How to Fix Wireless Display Install Failed Error in Windows?
By Puja Chatterjee on August 16, 2023The Wireless Display feature in Windows will allow you to expand your visual workspace and the functionality of your PC.
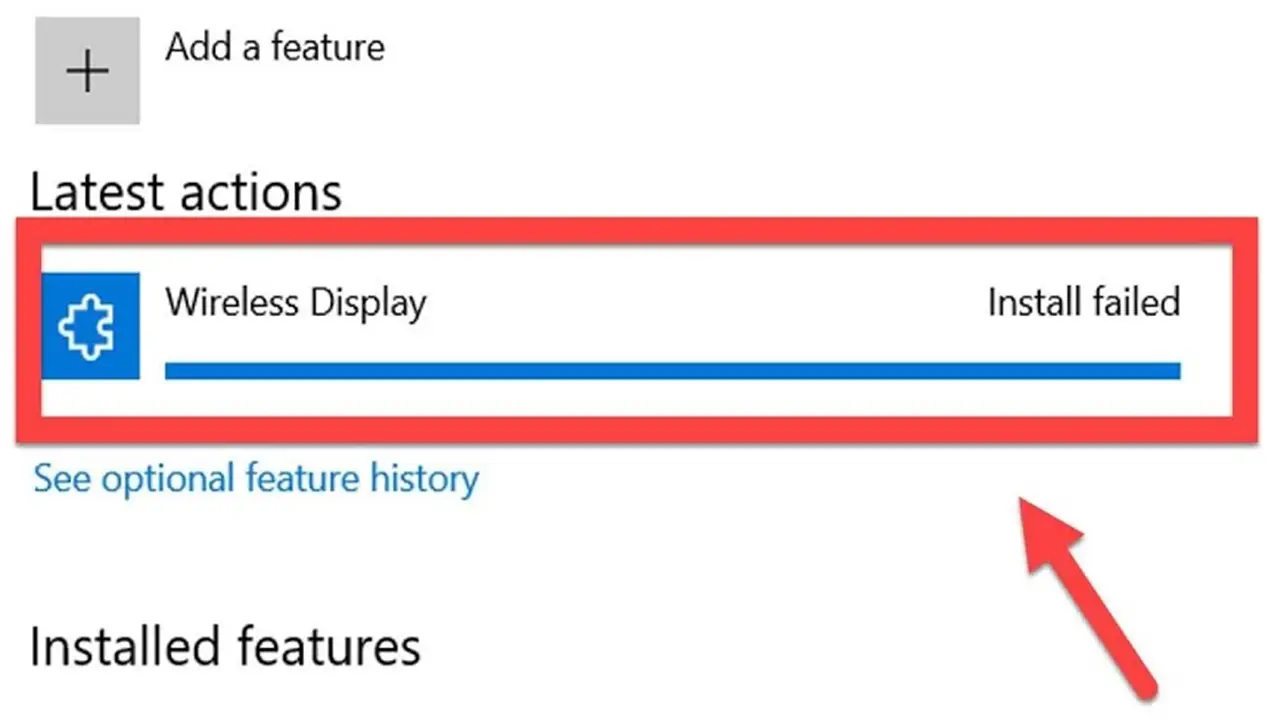
However, you may experience an error saying that wireless display could not be installed on your PC when you try to install it as you do for any other optional feature in Windows 10 or Windows 11.
You need not worry much when such an issue occurs because there are some easy solutions that might fix the problem quickly.
Read this article in its entirety to know more about the reasons for this issue to occur and the effective solutions.
KEY TAKEAWAYS
- A few basic checks of the internet connection, change of internet sources or frequency band may fix the issue of wireless display install failed error.
- Often resetting the wireless display adapter might fix the problem by removing any errors within the driver.
- You may run a specific DISM command in the Command Prompt to install the wireless display on your PC.
- Turning the metered connection for both Wi-Fi and Ethernet off might also resolve the error.
- Making changes in the registry is also another way that might help in rectifying the issue and install the wireless display.
Why Does Wireless Display Install Failed Error Occur in Windows?
The wireless display install failed error usually occurs when the internet connection is unstable or limited.
In addition to the above, there are also some other factors and generic corruptions and inconsistencies that might cause this issue, such as:
- Improper metered connection settings
- Conflicting antivirus software
- Corrupt cache update
- Issues with the wireless display adapter
Irrespective of the reason, the issue can annoy and frustrate you. So, you should resolve it as and when it happens.
Ways to Fix Wireless Display Install Failed Error in Windows
One of the most effective and common solutions to the wireless display install failure issue is turning off the metered connection for both Ethernet and Wi-Fi.
Read Also: 7 Ways to Fix Network Driver Issues
Assuming that you have restarted your computer and the problem still persists, you may try to resolve it by removing any antivirus software program that may be conflicting with the installation process.
However, before moving on to any of the fixes, there are a few basic checks you should make. Often these are ignored and it may result in several networking issues, including wireless display installation failed. So, check the following and fix them before moving on to the advanced solutions:
- Check that you are connected to the internet
- Use a different Internet source
- Reset the display adapter
- Change the wireless frequency band in your Pc settings
- Reinstall the graphics card driver
Often, switching to a different Domain Name System (DNS) server may resolve the issue.
All you have to do is:
Go to the Control Panel > Network and Internet > Network and Sharing Centre > Change adapter settings > Right-click on current network > Select Properties > Go to Networking tab > select Internet Protocol Version 4 (TCP/IPv4) > Click on Properties > Check Use the following DNS server addresses option > Set the Preferred DNS server to 8.8.8.8 > Set the Alternative DNS server to 8.8.4.4 > Click on OK to save the changes.
Now, if all of the above solutions could not resolve the issue, follow these advanced methods.
Method 1: Run a DISM Command in the Command Prompt
Running a specific Deployment Image Servicing and Management or DISM command in the Command Prompt can help fix a lot of issues which includes wireless display installation failed issues. This command is actually used to install the wireless display manually.
STEPS TO FOLLOW:
- Open the Command Prompt as an administrator. You can go to the search box > Type cmd > Right-click and select Run as administrator > Click on Yes in the User Account Control window when prompted.
- In the Command Prompt, type in the command DISM /Online /Add-Capability /CapabilityName:App.WirelessDisplay.Connect~~~~0.0.1.0 and hit the Enter key on your keyboard.
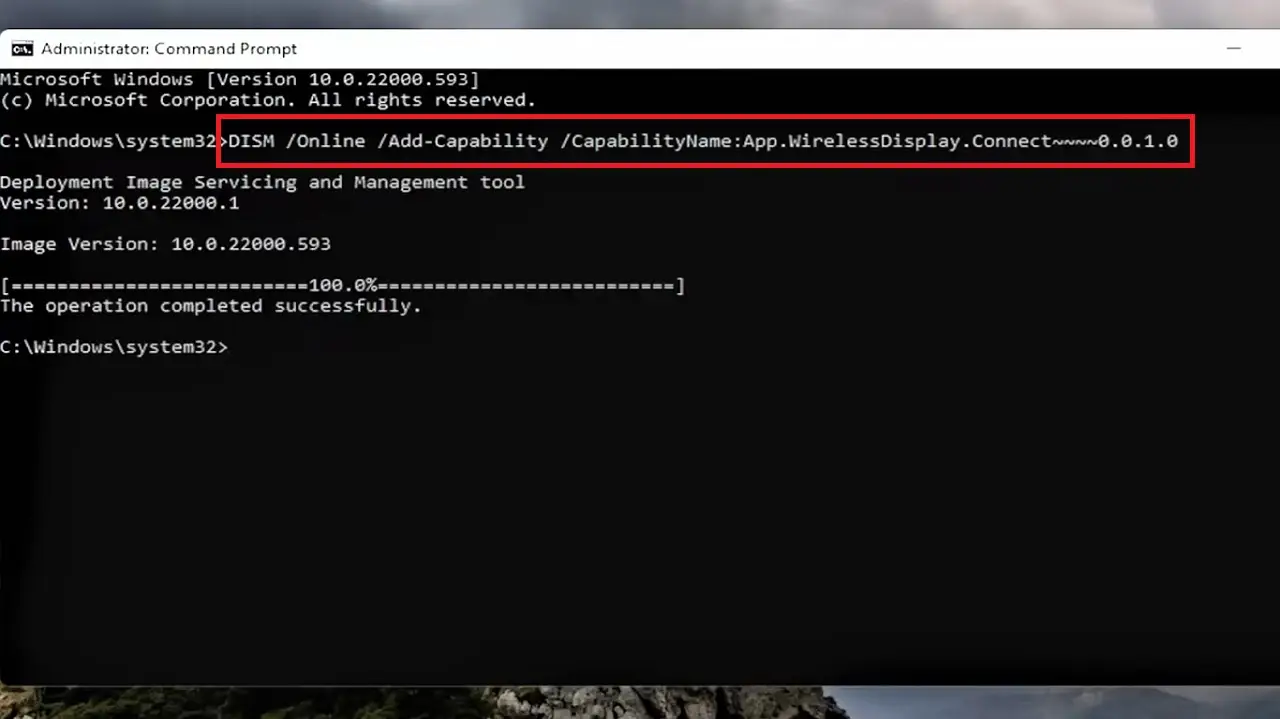
Wait for some time for the command to be executed fully. Once it is done, close the window and restart your computer system. Now, check if the wireless display installation problem is resolved or not. If it has not, then try the next method.
Read Also: Why is Your CPU Underperforming? (16 Reasons & Fixes)
Method 2: Turn Metered Connection Off
Often, the default setting of the metered connection can cause this issue. Making changes in it can fix the problem.
STEPS TO FOLLOW:
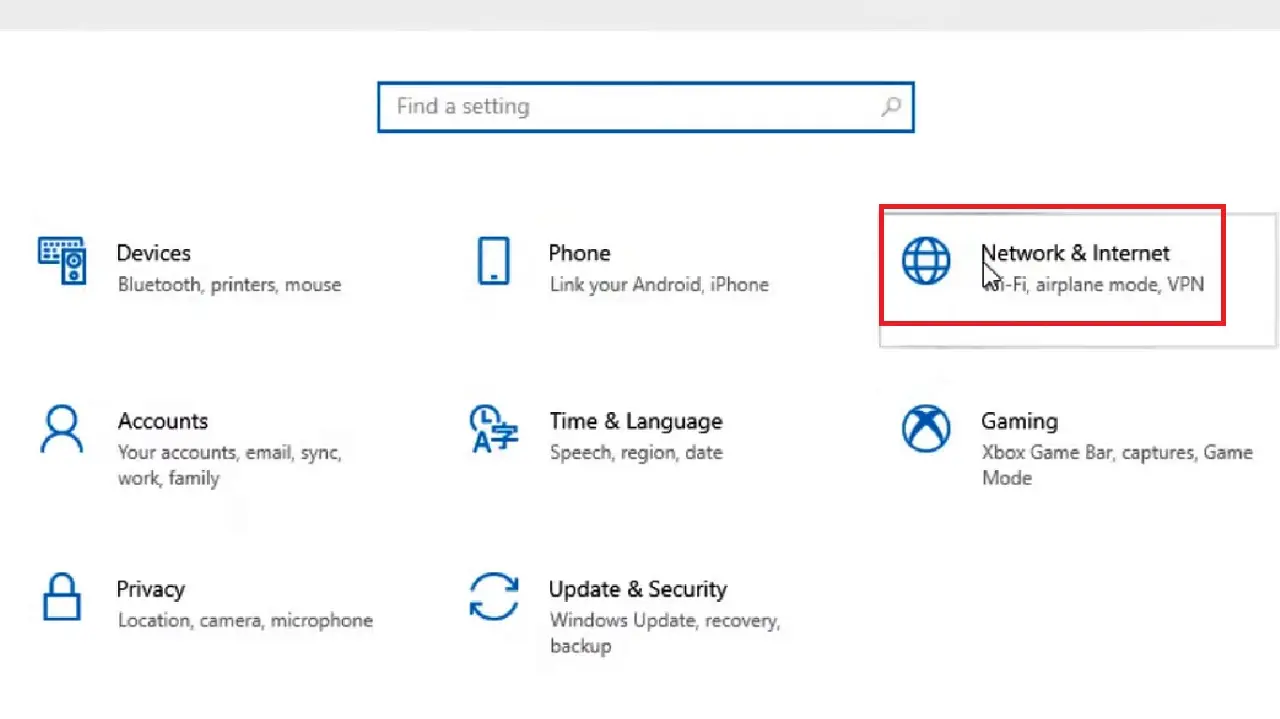
- Click on the Start Menu.
- Select Settings (the gear icon) from the options that appear.
- Go to Network & Internet.
- In the following Network & Internet windows and the default Status page that opens, look at the right side and choose Ethernet. (Ethernet0 in this case).
- Click on the Properties button under it.
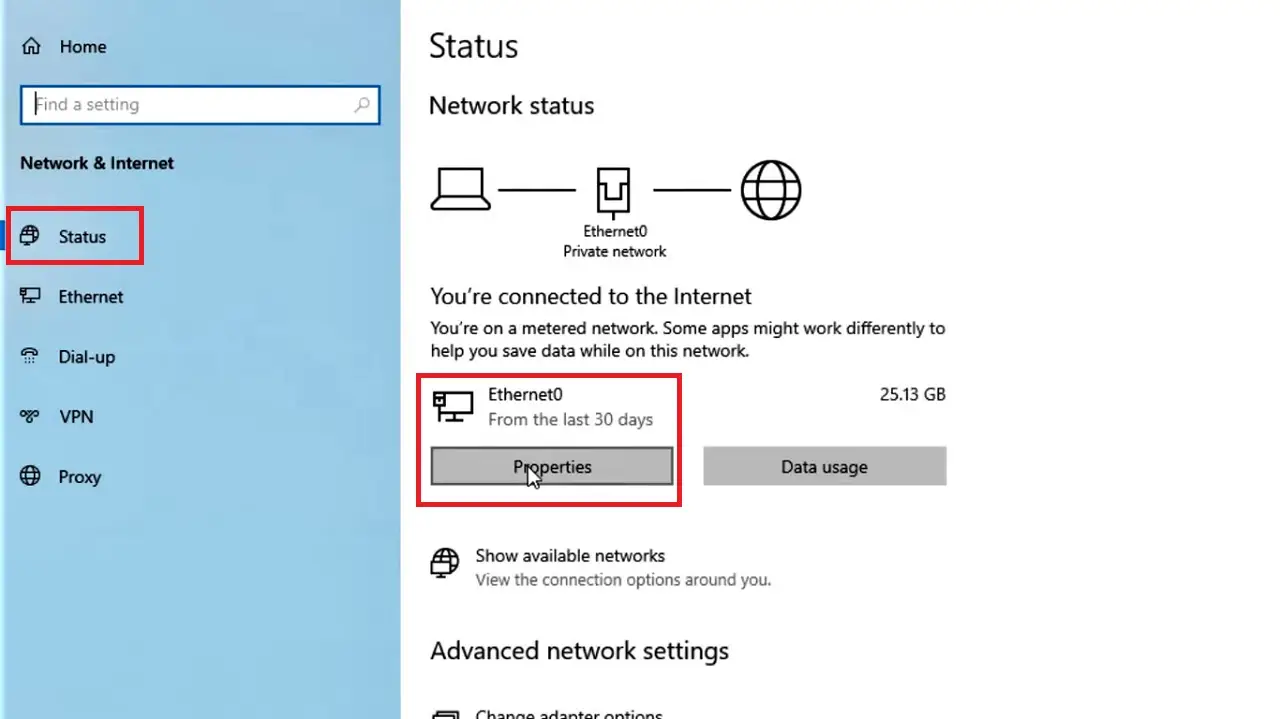
- In the following page under Network, drag the sliding switch under Set as metered connection in the Metered connection section to the left to switch it off.
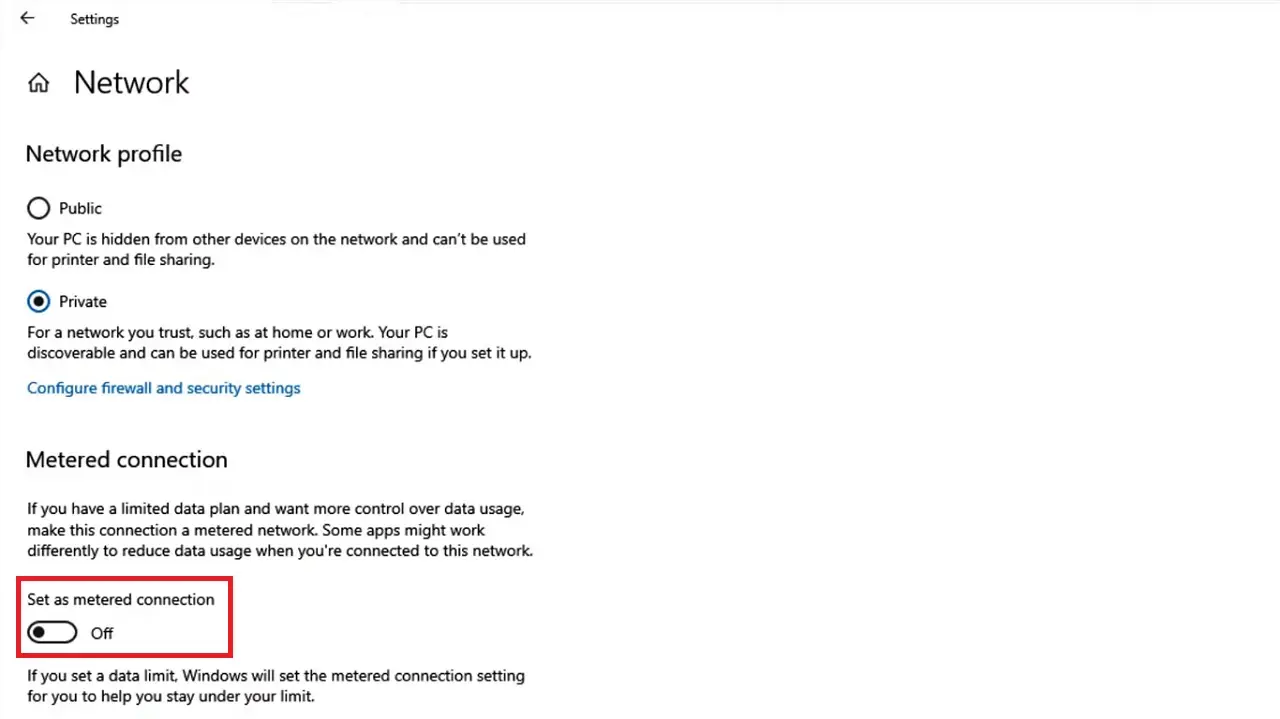
- Repeat the same process for Wi-Fi.
Check your system to see whether or not the issue is fixed and you can install the wireless display feature or not. If it still persists, move on to the next method.
Method 3: Make Changes in the Internet Properties
If you make some changes in the internet properties from the Control Panel it might resolve the issue of wireless display install failing issue.
STEPS TO FOLLOW:
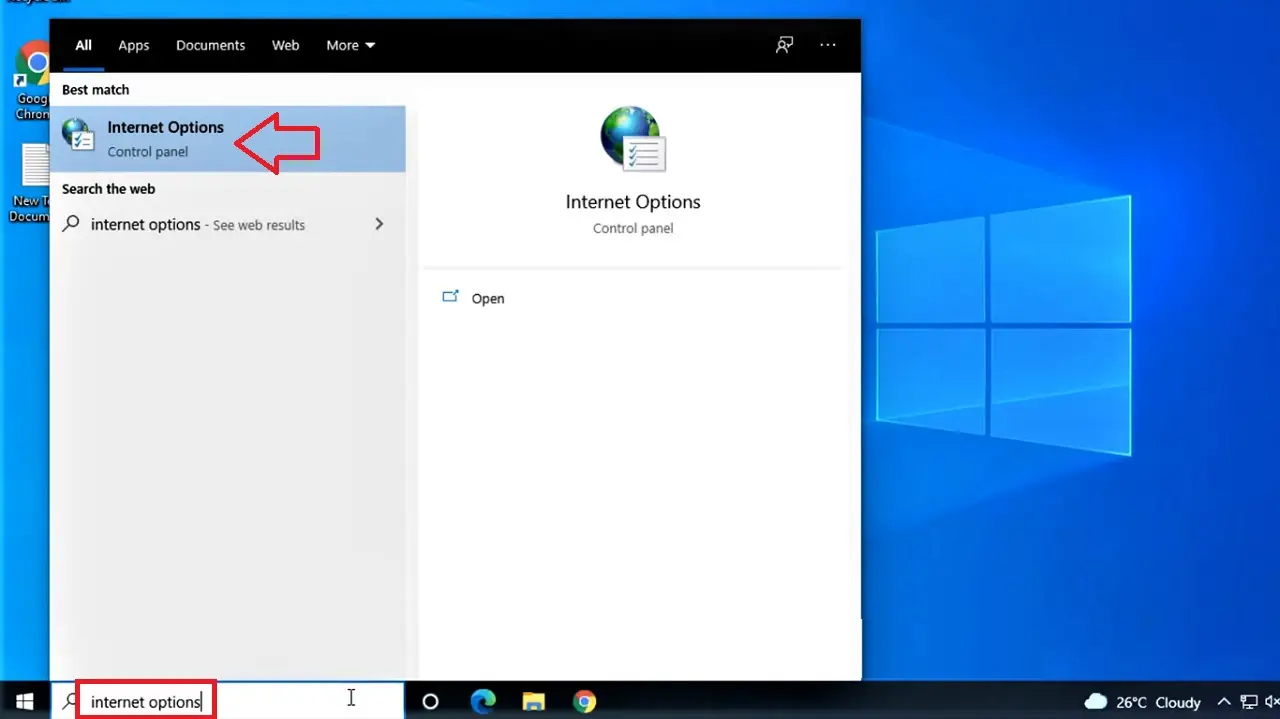
- Go to the search box as before.
- Type internet options and hit Enter.
- In the Internet properties window that appears, go to the Advanced tab.
- Scroll down the list in the box under Settings and check the small square box next to Use TLS 1.2.
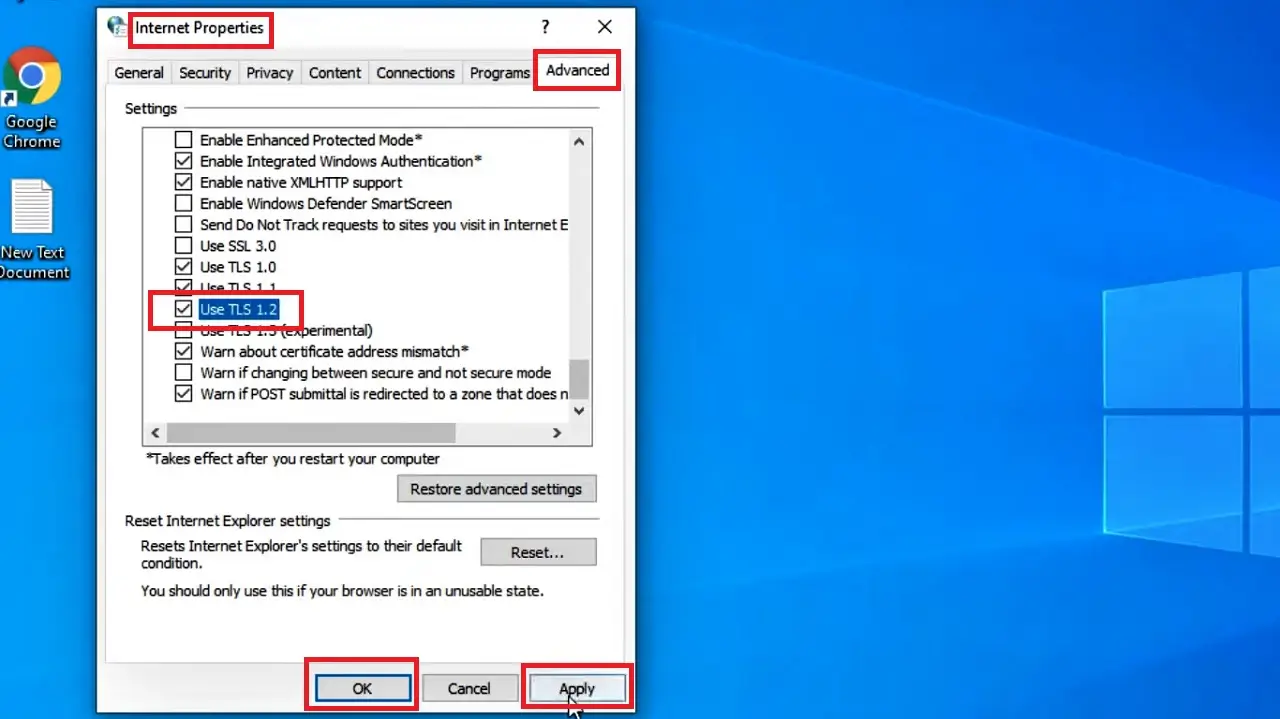
- Finally, click on the Apply button and then on the OK button to save the changes and close the window.
Restart your system and check if the issue is resolved or not. You may try the following method if it has not.
Method 4: Clear the System Cache
In most situations, clearing the system cache might help in resolving the issue of wireless display installation. This process will fix the issues within the cache that might be corrupted.
STEPS TO FOLLOW:
Open the Command Prompt as administrator as before.
Type in the following commands one by one and press the Enter key on your keyboard after each command is executed completely and successfully:
- net stop wuauserv
- net stop bits
- net stop cryptsvc
- rd /s /q c:WindowsSoftwareDistribution
- rd /s /q %temp%
- rd /s /q c:Windowstemp
- net start wuauserv
- sc config wuauserv start=auto
- net start bits
- sc config bits start=auto
- net start cryptsvc
- sc config cryptsvc start=auto
- exe
- DISM /Online /Cleanup-Image /RestoreHealth
Finally, type exit and hit Enter to close the Command Prompt window.
Now, restart your system and check whether or not you can install the wireless display successfully.
Method 5: Make Changes in the Windows Registry Key
It might be possible to install the wireless display after making changes in the registry keys.
Note: Making changes in the Windows Registry is crucial and may cause significant damage to the system and its operation. So, skip this step if you are not confident enough or know what you are doing exactly.
STEPS TO FOLLOW:
- Press the Windows and R keys together on your keyboard to open the Run dialog box.
- Type regedit in the box and hit Enter or click on the OK button below.
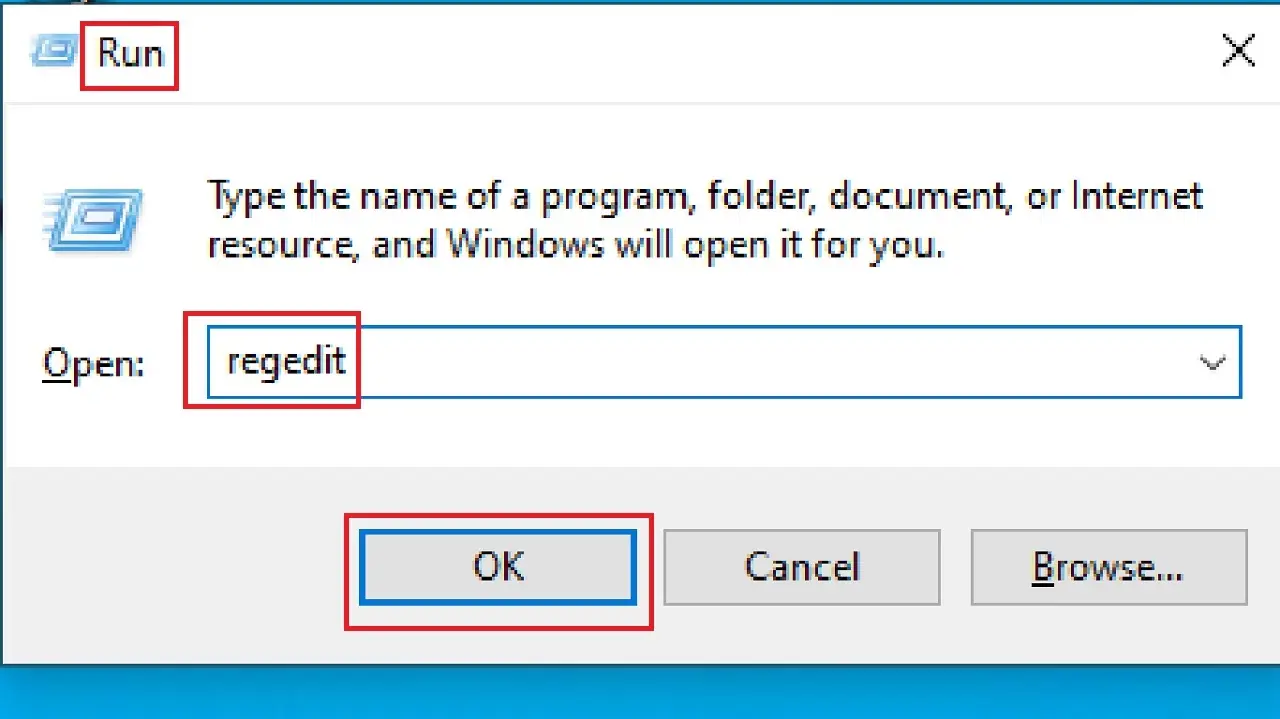
- Click on the Yes button on the UAC window for confirmation when it appears.
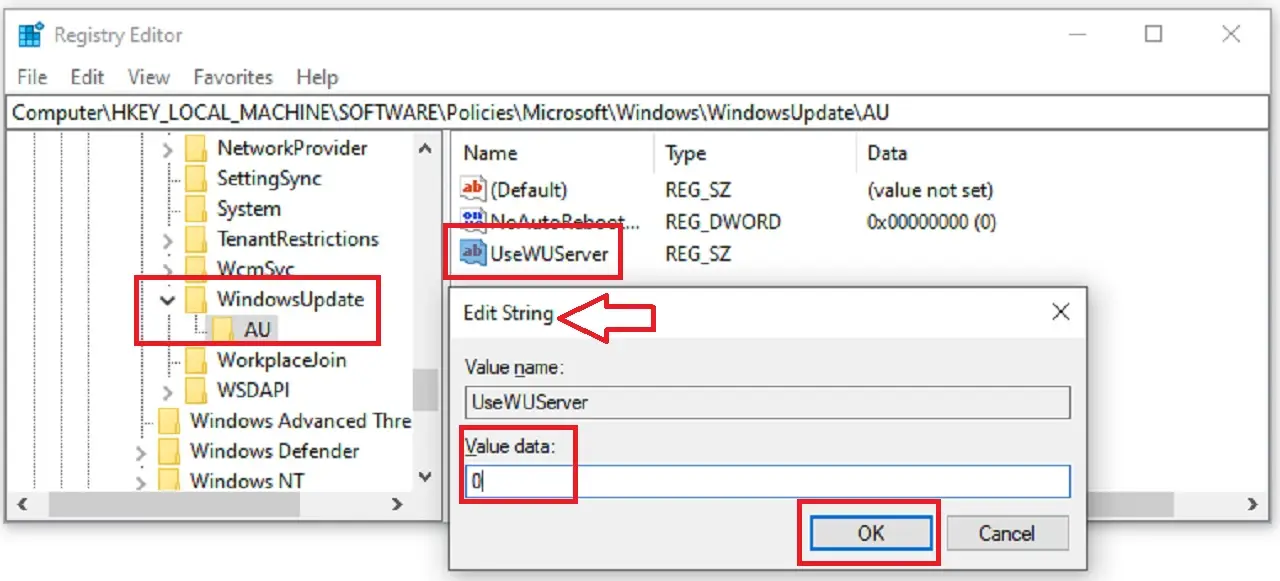
When the Registry Editor window opens, click on the small arrow next to each of these following folders located on the left pane one by one in the exact order mentioned to expand them:
- HKEY_LOCAL_MACHINE
- SOFTWARE
- Policies
- Microsoft
- Windows
- WindowsUpdate
- AU
Now, double-click on the AU folder then continue the following:
- Double-click on the UseWUServer REG file on the right side of the window to open it.
- In the Edit String window that opens, set the value to 0 in the box under Value data.
- Click on the OK button to save the changes and close the window.
Now, restart your computer system and then, when it starts, check whether or not you can install the wireless display now.
Conclusion
So, these are some of the ways to fix the wireless display install failed issue on your PC.
However, if none of the above solutions can rectify the error, there may be some other issues in your PC.
Consider contacting a professional service for assistance in that case.