4 Ways to Hide a Drive in Windows
By Dominic Chooper on July 10, 2023Usually, whichever drive is installed or connected to your PC, Windows will show them in File Explorer by default.
However, you may want to hide one particular drive or a few drives to keep them safe.
There are lots of ways in which you can hide your drive or its partition in Windows, whether it is an external drive or an internal drive.
If you are interested in hiding one of your drives on your computer, here are some easy ways to go about it.
KEY TAKEAWAYS
- You will need to hide the hard drive on your PC to protect it from prying by other users.
- You can use the Registry Editor Tool in Windows to hide your hard drive or hard drives.
- You can use the Disk Management feature as well for the same purpose.
- There are a few specific commands that you can run on the Command Prompt to hide the hard drive on your PC.
- Making some changes in the Local Group Policy will also allow hiding your hard drive.
Why Do You Hide a Drive in Windows?
Hiding a drive in Windows can serve various purposes depending on the specific needs of the user. Here are a few reasons why someone might choose to hide a drive:
Privacy and security: Hiding a drive can be a way to protect sensitive or confidential information from unauthorized access. By hiding a drive, its contents are not readily visible to other users who might have access to the computer.
Organization and decluttering: If you have multiple drives or partitions on your computer, hiding a drive can help keep things tidy and reduce visual clutter in file explorer. It can make it easier to focus on the drives that are actively used.
Prevent accidental modifications: Hiding a drive can help prevent accidental modifications or deletions of files on that particular drive. By making it less visible, it reduces the likelihood of unintentional actions that could lead to data loss or corruption.
Limiting user access: In shared computing environments, such as workplaces or public computers, hiding drives can be used to restrict access to certain areas of the system. For example, hiding the system drive (usually the C: drive) can prevent users from making changes to critical system files, reducing the risk of system instability or malware infections.
Read Also: What is Hard Drive RPM? Function & More
It’s important to note that hiding a drive does not provide foolproof security. It primarily prevents casual users from stumbling upon the hidden drive’s contents.
More sophisticated methods are necessary to ensure the confidentiality and integrity of sensitive data.
How to Hide a Drive in Windows?
The best way to hide your hard drive and/or its partition is to use BitLocker Drive Encryption feature to encrypt it or by enabling password protection.
There are a few other easy and quick ways to hide a hard drive or its partition, such as:
- By using the Disk Management feature
- By using the Command Prompt
- By using the Local Group Policy Editor feature
- By using the Windows Registry Editor
Of course, there are several third-party tools available which will also help you to hide your drive in the PC, but this article focuses especially on the features within a computer system that you may use for the same.
Method 1: Hiding Hard Drive by Using the Disk Management Feature
It is easy and quick to hide a hard drive or a partition from the Disk Management.
STEPS TO FOLLOW:
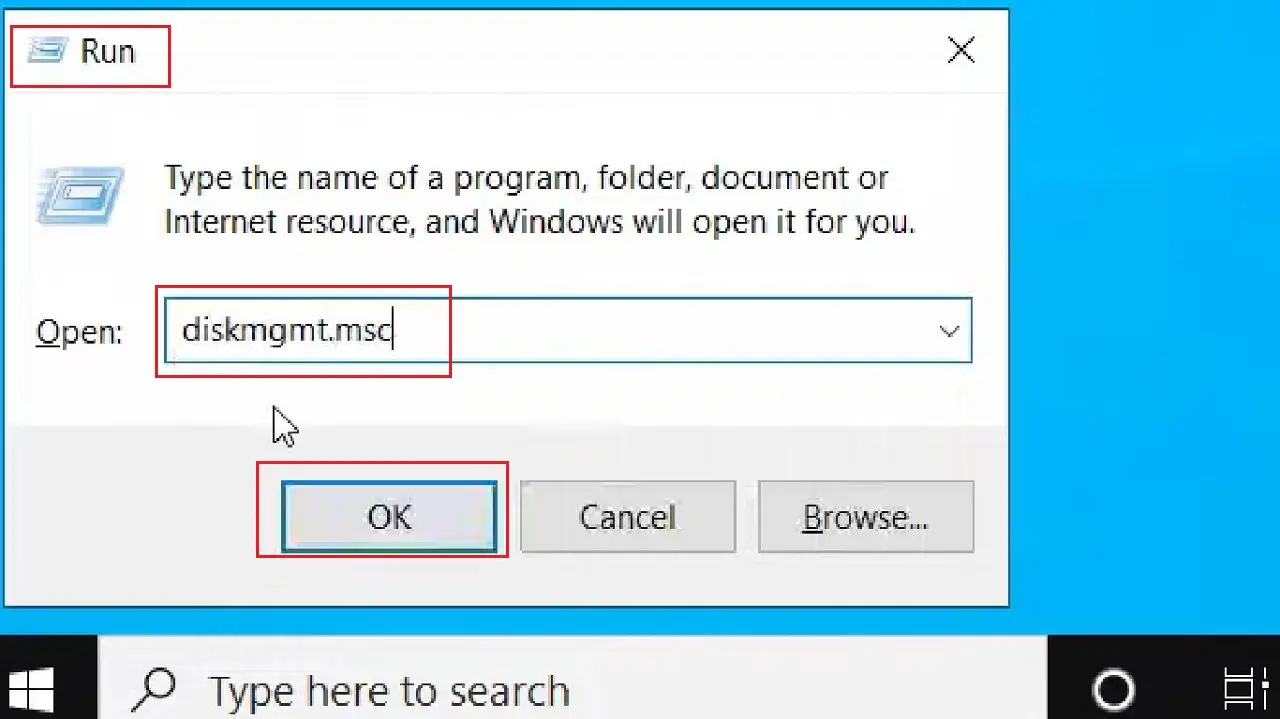
- Press the Windows and R keys on your keyboard together to open the Run dialog box.
- Type diskmgmt.msc in the search box.
- Click on the OK button below or hit Enter.
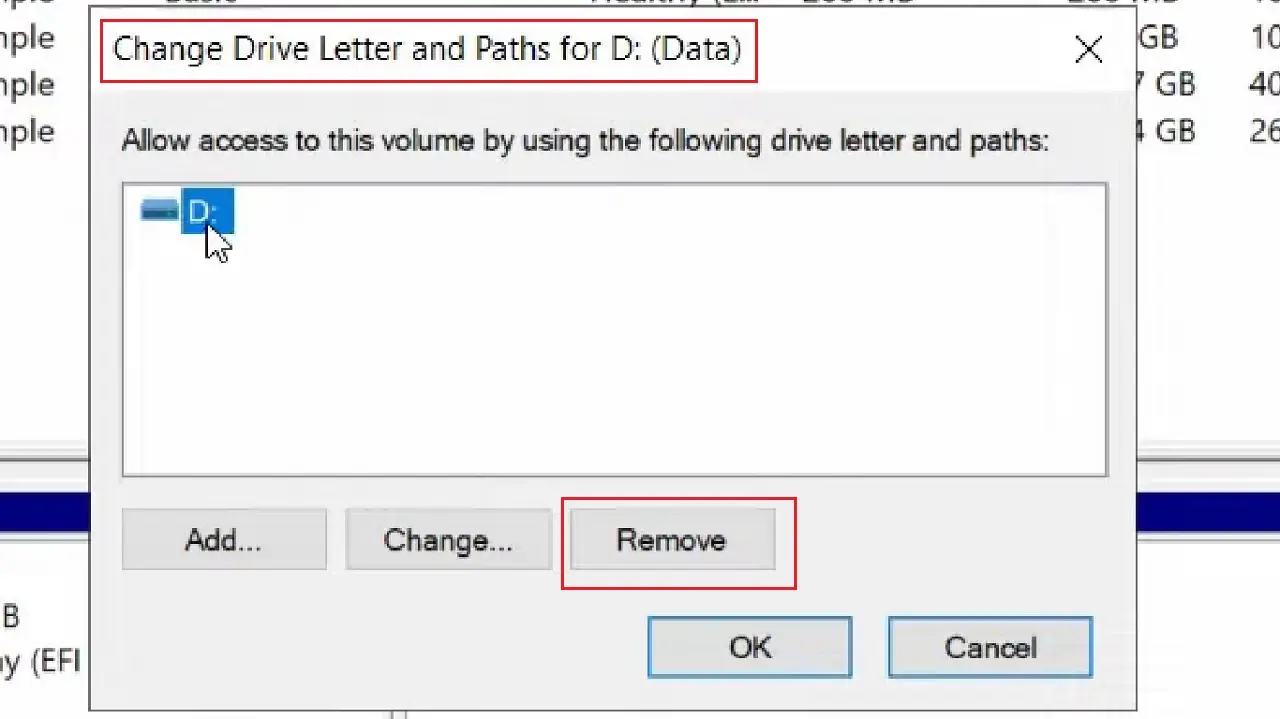
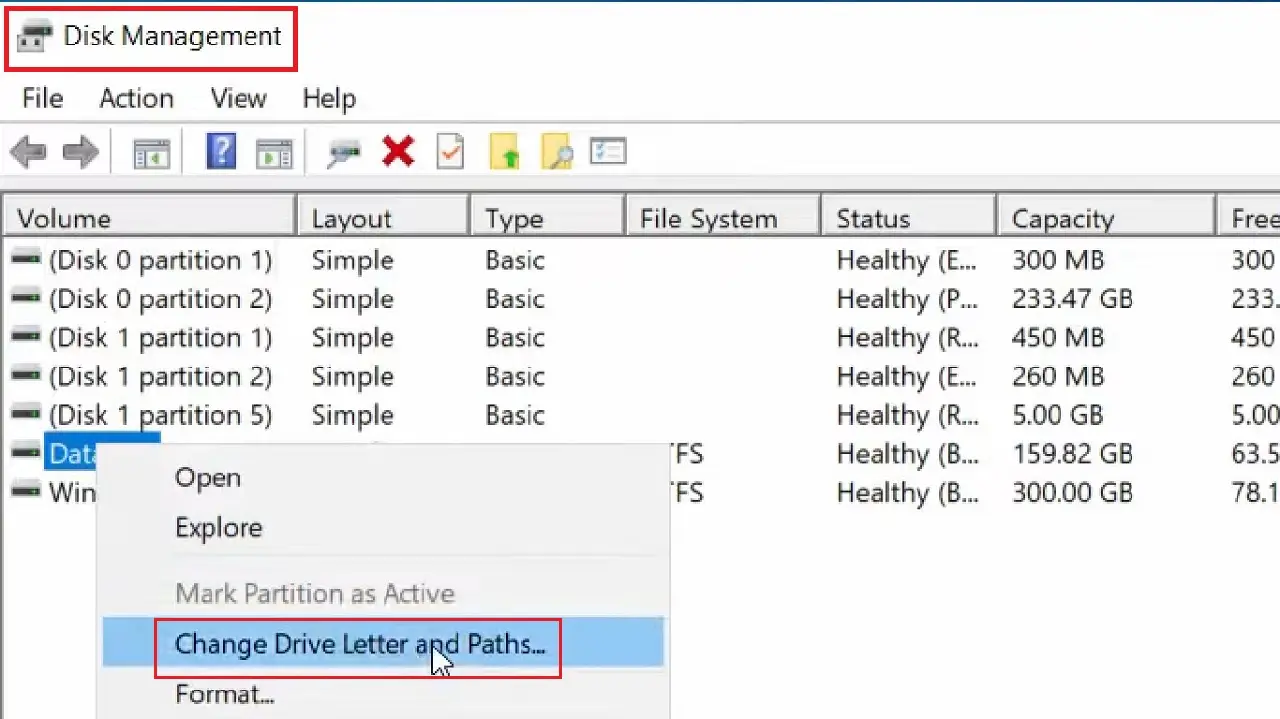
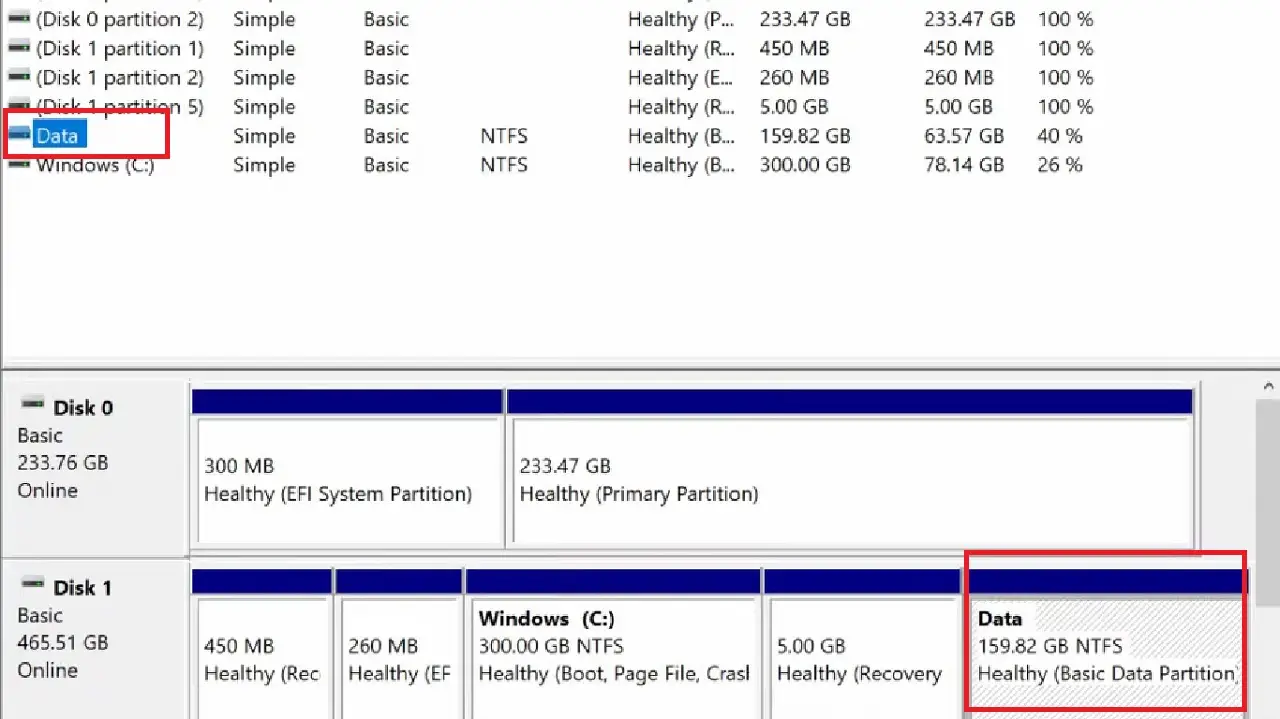
- Select what you want to hide from others from the Disk Management window that pops up. It is Data(D) in this case.
- Right-click on it.
- Select Change Drive Letter and Paths option from the drop-down window.
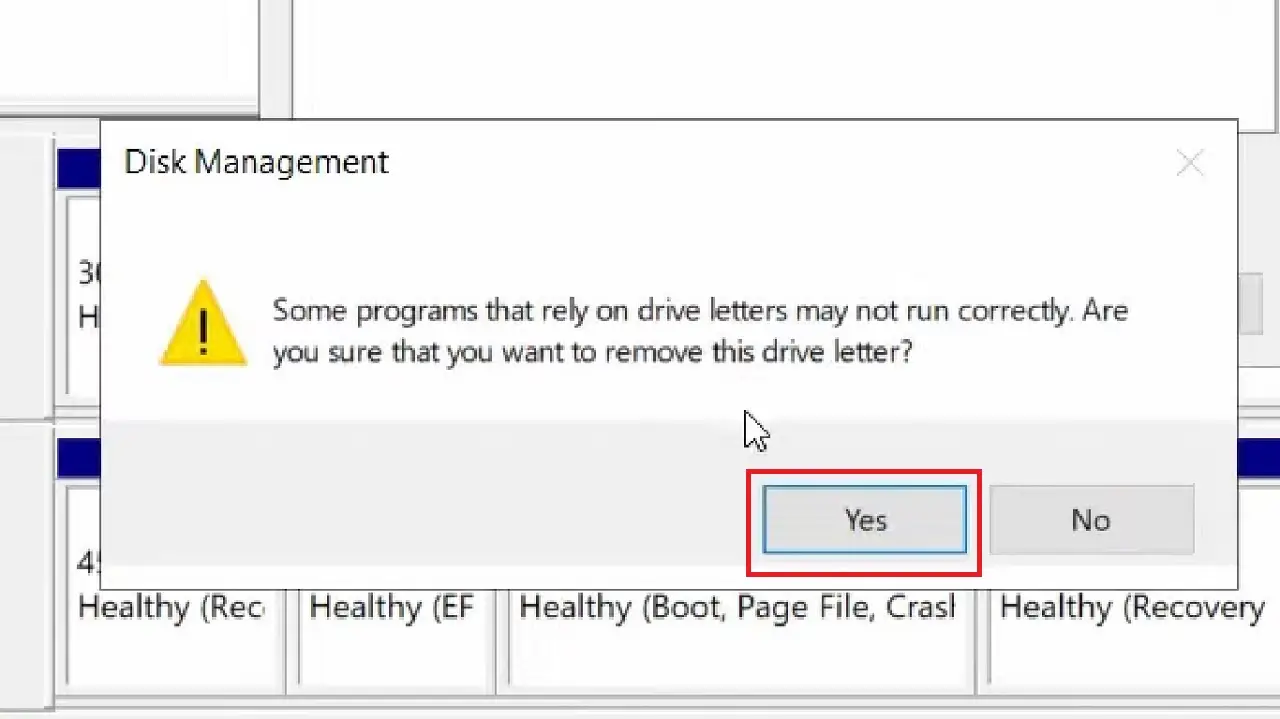
- Click on the Remove button in the Change Drive Letter and Paths for D: (Data) window that appears next.
- Click on the Yes button in the following warning window if you are sure that you want to continue.
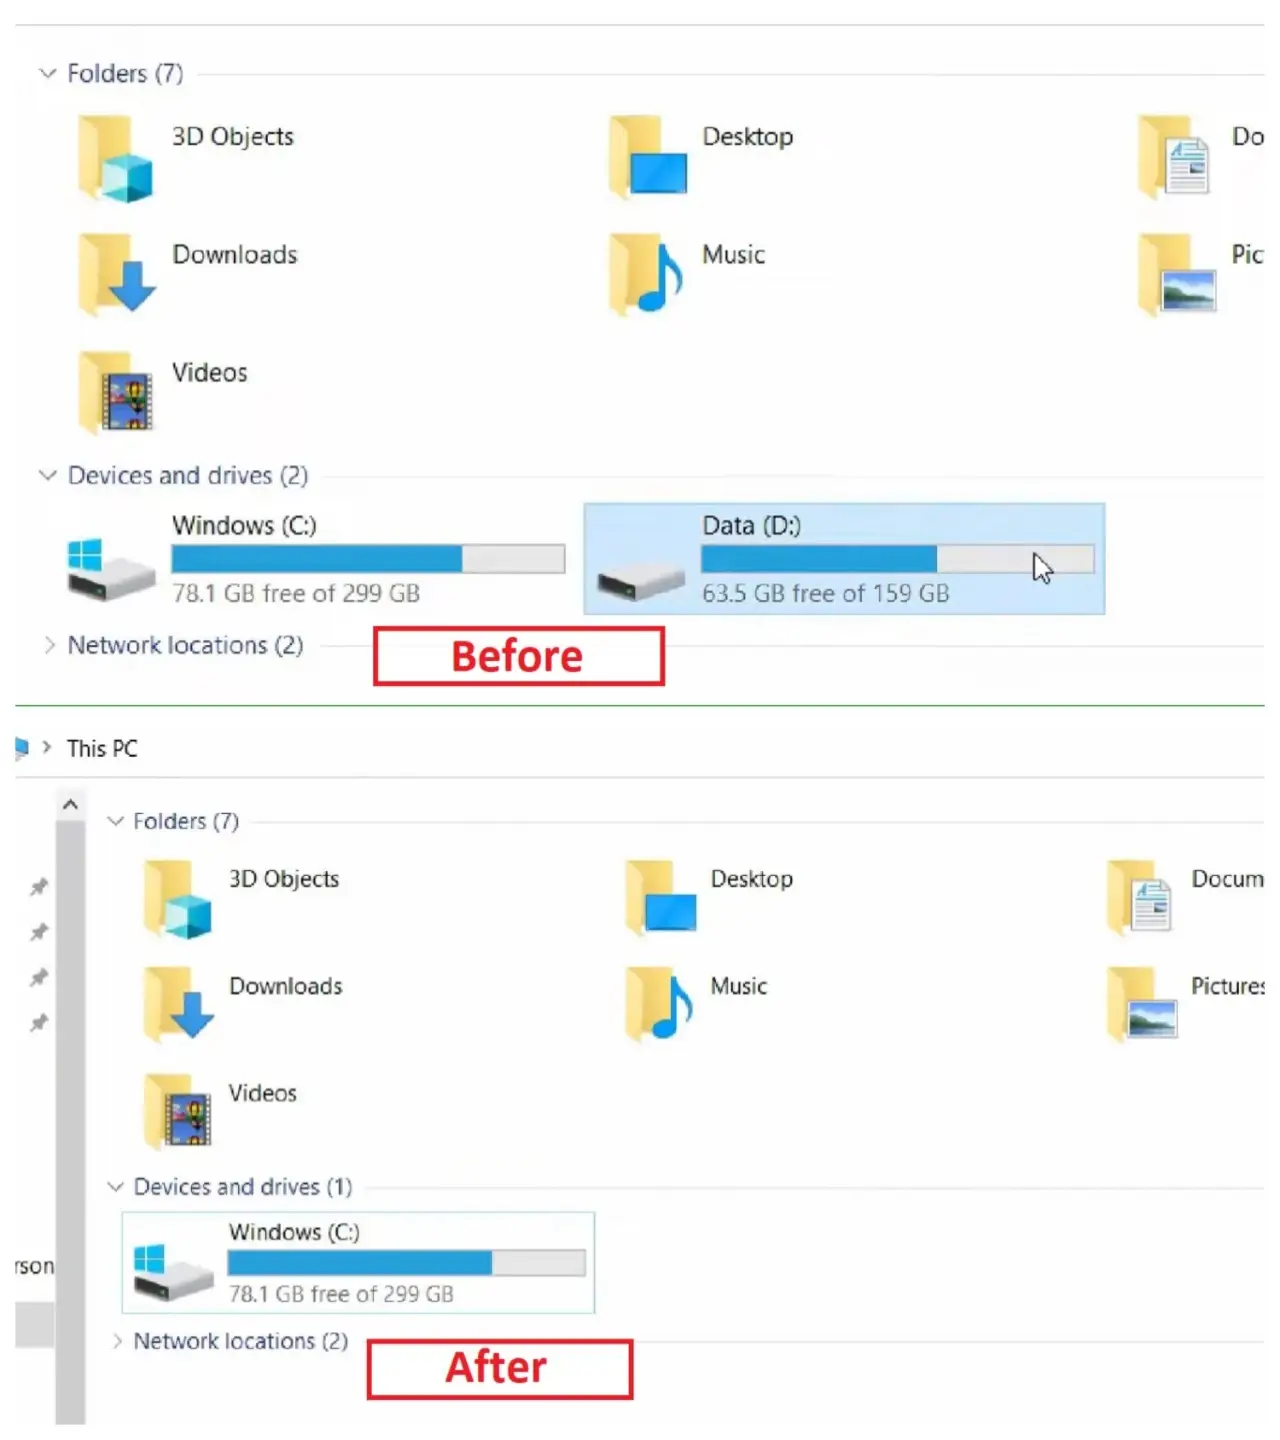
- The Drive D will now be hidden in the Disk Management. This means that the drive letter D will not be displayed anymore, as shown in the image below:
The drive will not be displayed in the File Explorer window as well, as shown in the image below:
If you want to unhide the drive at any point of time, follow the same process but instead of Remove, click on Add and then assign a letter. It can be the same letter (D) as before.
Refresh your PC and it will now show the hidden drive in the File Explorer window.
Method 2: Hiding a Hard Drive by Running Diskpart Command
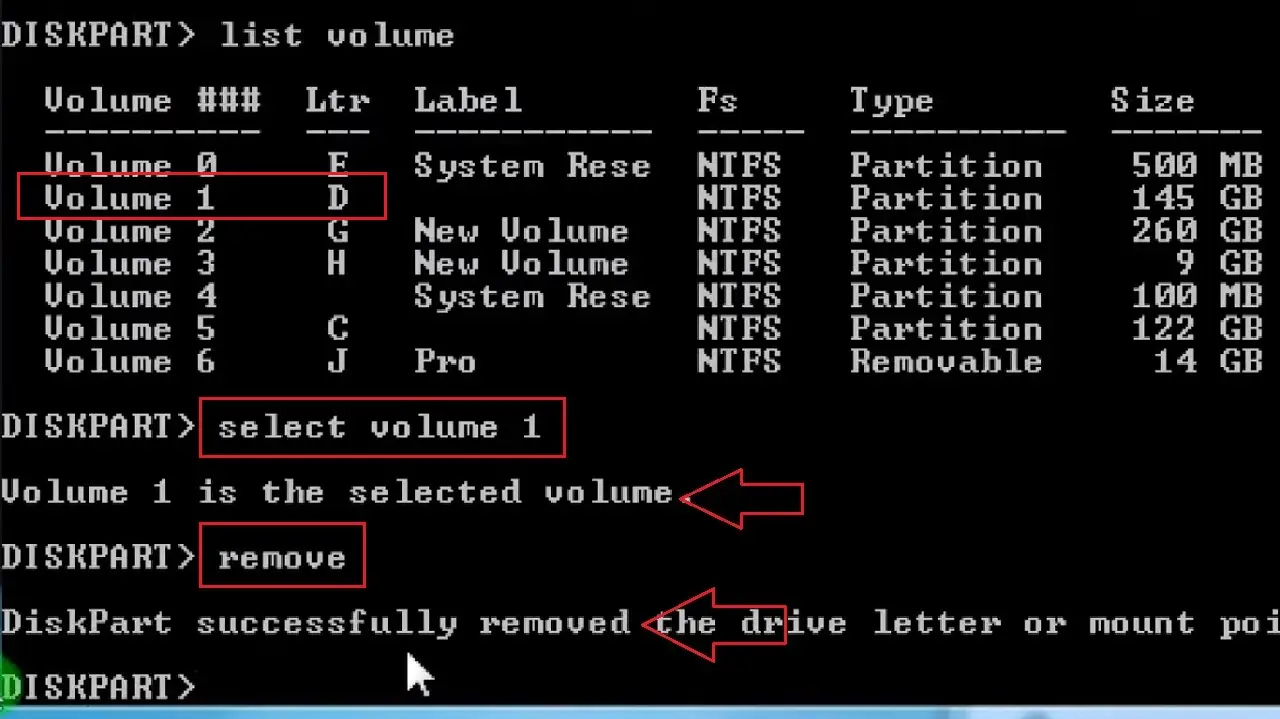
Another easy and quick way to hide your hard drive in Windows is by running the Diskpart command as an administrator in the Command Prompt.
STEPS TO FOLLOW:
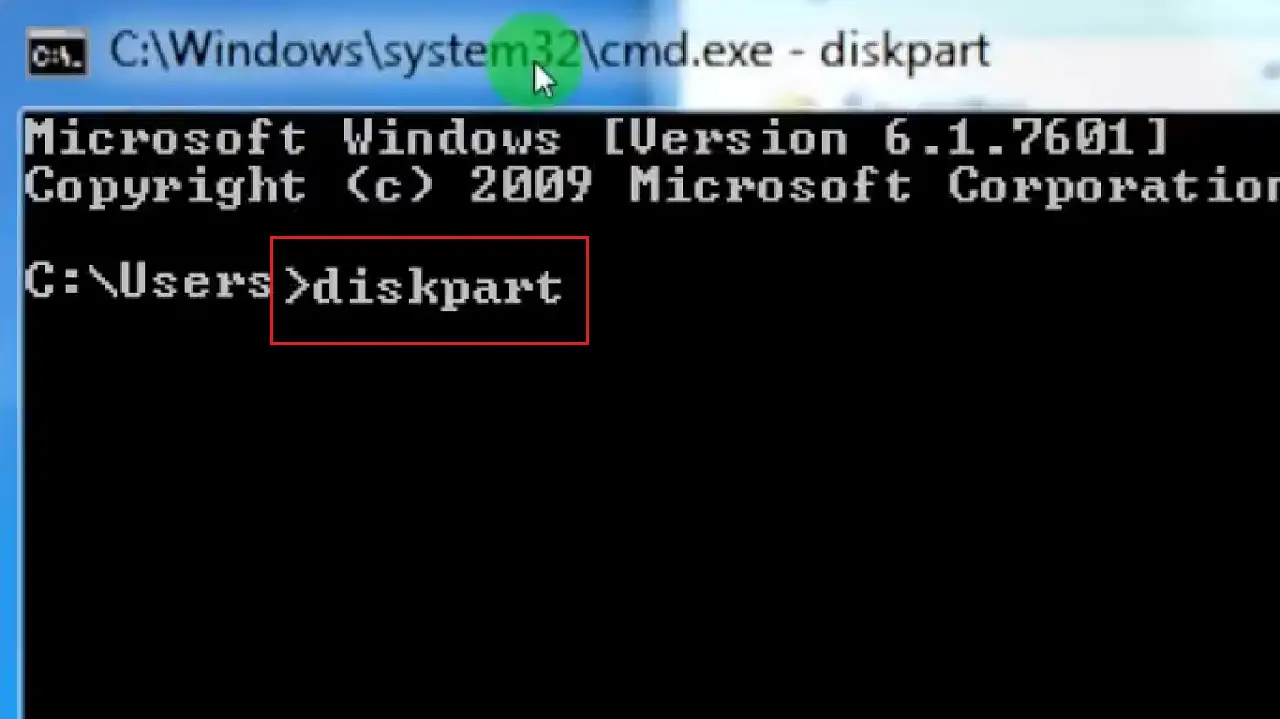
- Open Command Prompt as an administrator.
(For this go to the search box > type cmd > choose Run as administrator > click on it.)
- In the Command Prompt window, run the command diskpart and hit Enter on your keyboard.
Read Also: Enhanced Integrated Drive Electronics (EIDE) Explained
- Next, type the command list volume and hit Enter.
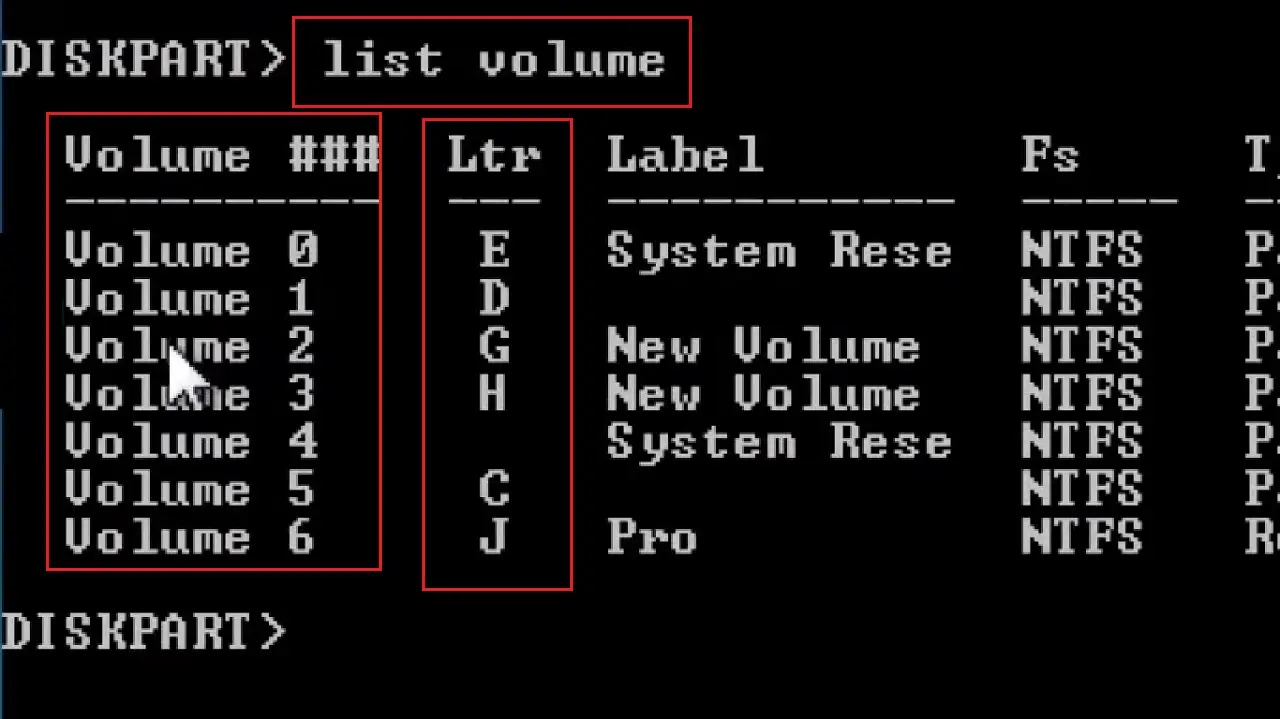
This will show all the drives on your system along with the drive letters assigned to each. When this letter is displayed it signifies that the drive is not hidden. So, you will need to remove this letter to hide your drive.
Assuming that you need to hide Drive D, which has the volume number 1 and the letter D assigned, follow these steps:
- You will need to type the command select volume 1.
- Hit the Enter button on your keyboard.
This will select the particular drive you want to hide.
- Next, type in the command remove and hit Enter.
You may also use the command remove letter D if you wish.
This will hide the drive from the “File Explorer” and “Disk Management” window.
If you want to unhide the drive, follow the same process but instead of ‘remove,’ type ‘assign’ as the second command. It will assign the same letter D to the drive and display it in the File Explorer window once again, unhiding it.
Method 3: Hiding Hard Drive By hanging Settings in Local Group Policy Editor
You can also use the Local Group Policy Editor to hide your drive from others.
STEPS TO FOLLOW:
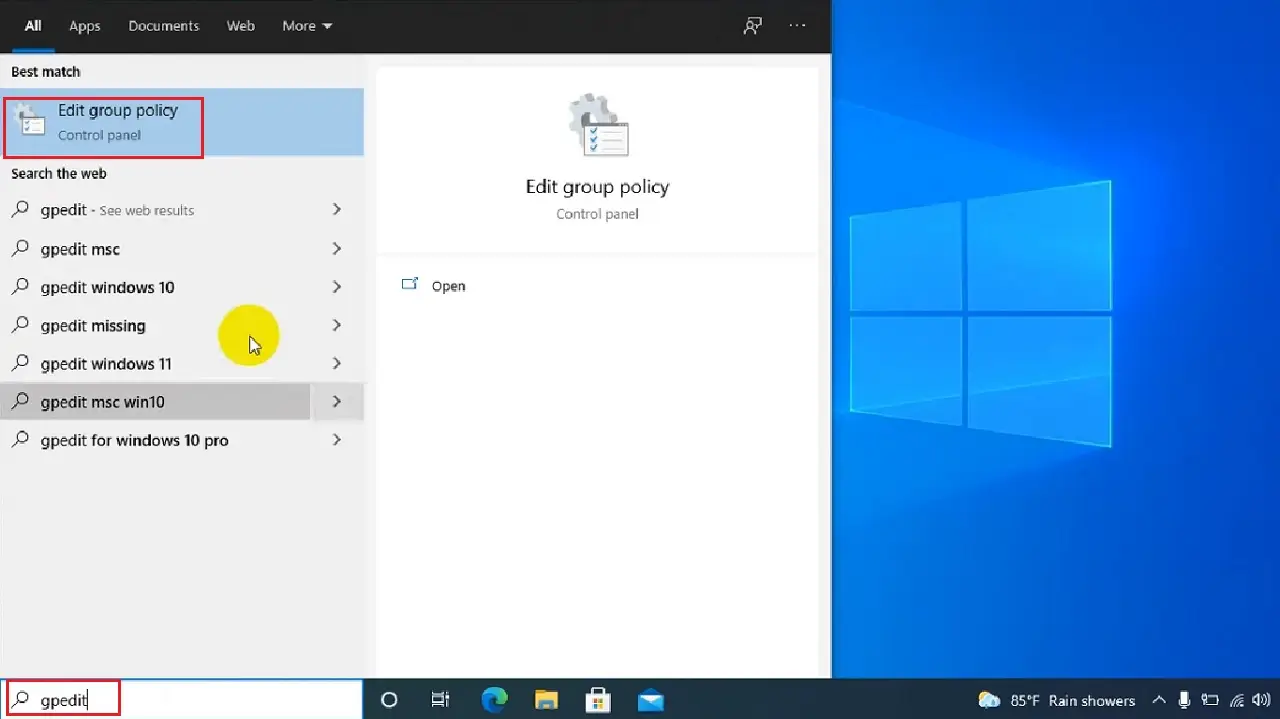
- Go to the search box next to the Start Menu.
- Type gpedit and click on Edit group policy.
- Select User Configuration in the left panel of the Local Group Policy Editor window that appears and click on the small arrow next to it to expand it.
- Expand Administrative Templates in the expanded list in the same way.
- Now expand Windows Components under it.
- Scroll down and look for File Explorer and click on it to open it.
- Scroll down on the right side of the window to find “Hide these specified drives in My Computer”.
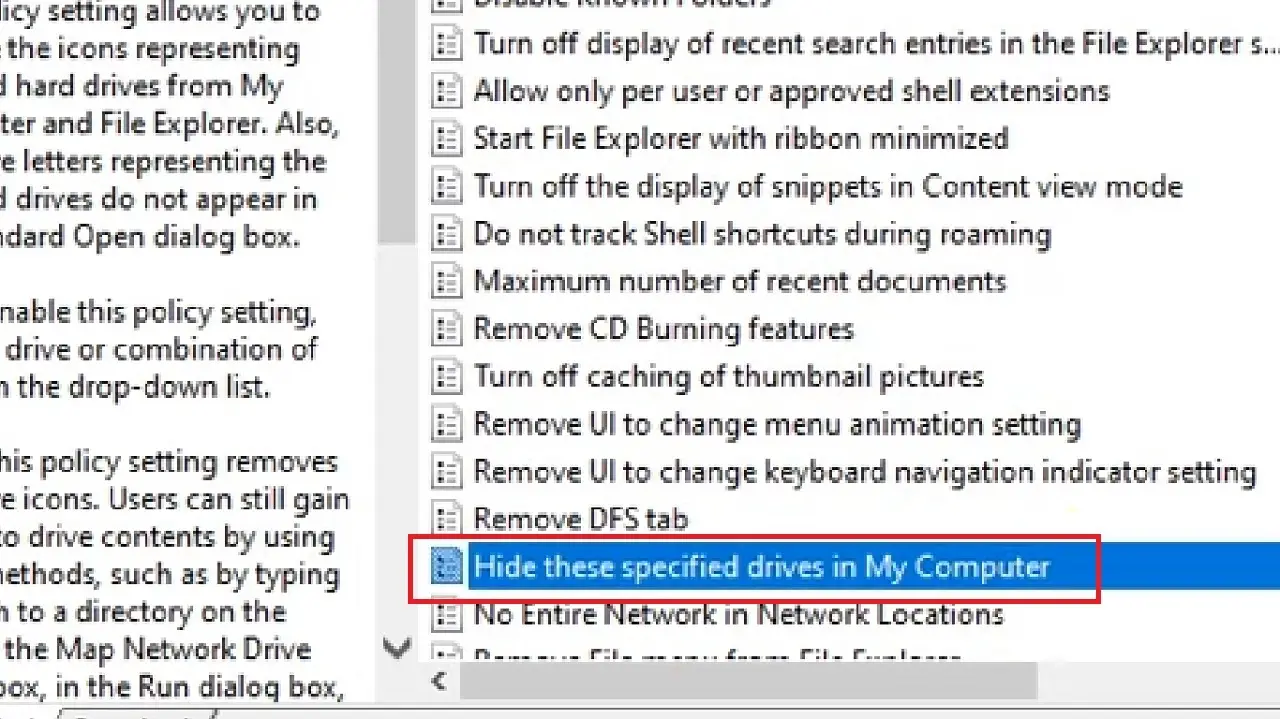
- Right-click on it.
- Select and click on Edit from the dropdown menu.

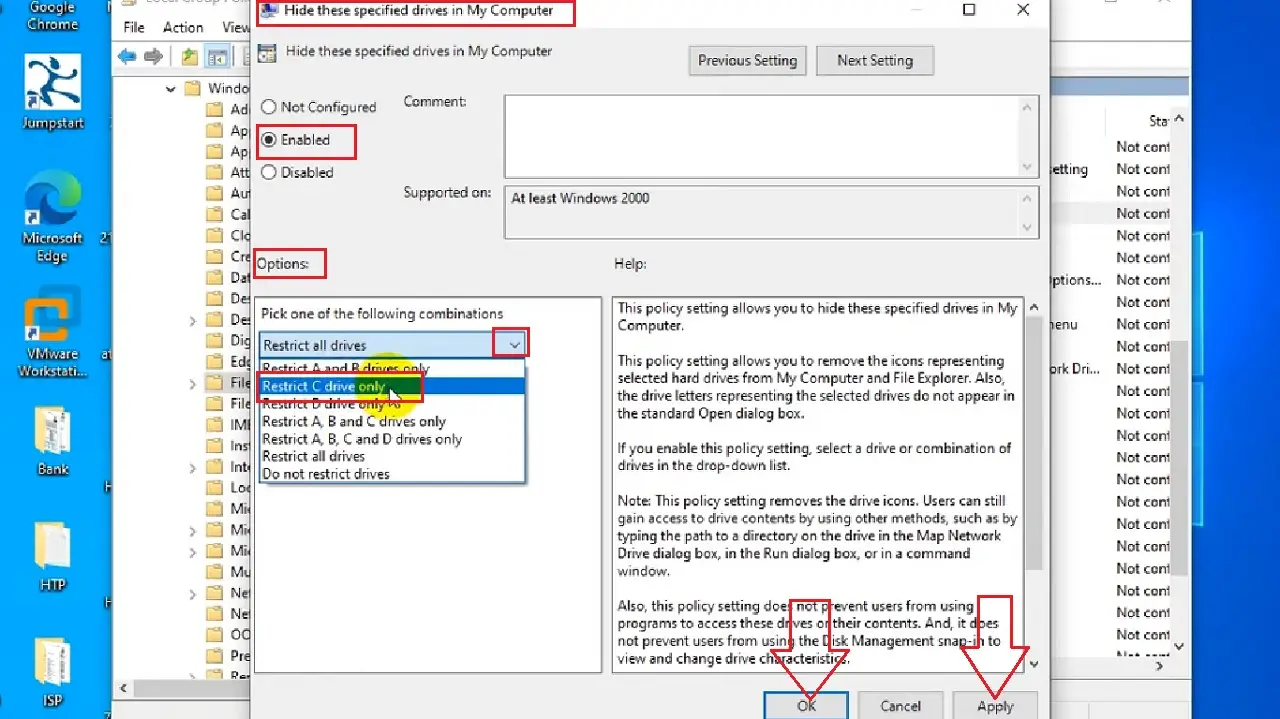
- Now, click on the small circle next to Enabled in the following Hide these specified drives in My Computer window.
- Go to the box below Options and click on the small downward arrow on its right to open a drop-down menu of all the drives in your computer’s File Explorer.
- Choose the particular drive you want to hide or restrict from the users from the options (Drive C in this example).
- Now click on the Apply button and then on the OK button to save the changes and exit.
Close the Local Group Policy Editor window. You will have to restart your computer for the changes to take effect.
After restarting your PC, go to This PC, and you will see that the Drive C, which was displayed before, is now hidden.
Method 4: Hiding All Drives from the Registry Editor Tool
Now, if you want to hide all the drives on your system together, you may use the Registry Editor tool. This tool will allow you to hide your drives if you want as well as unhide them together when you need it.
STEPS TO FOLLOW:
- Press the Windows and R keys on your keyboard together.
- This will open the Run dialog box.
- Type in regedit in the box and hit Enter.
When the Registry Editor window opens, expand the following folder in the exact order mentioned below by clicking on the small arrow key next to each:
- HKEY_CURRENT_USER
- SOFTWARE
- Microsoft
- Windows
- CurrentVersion
- Policies
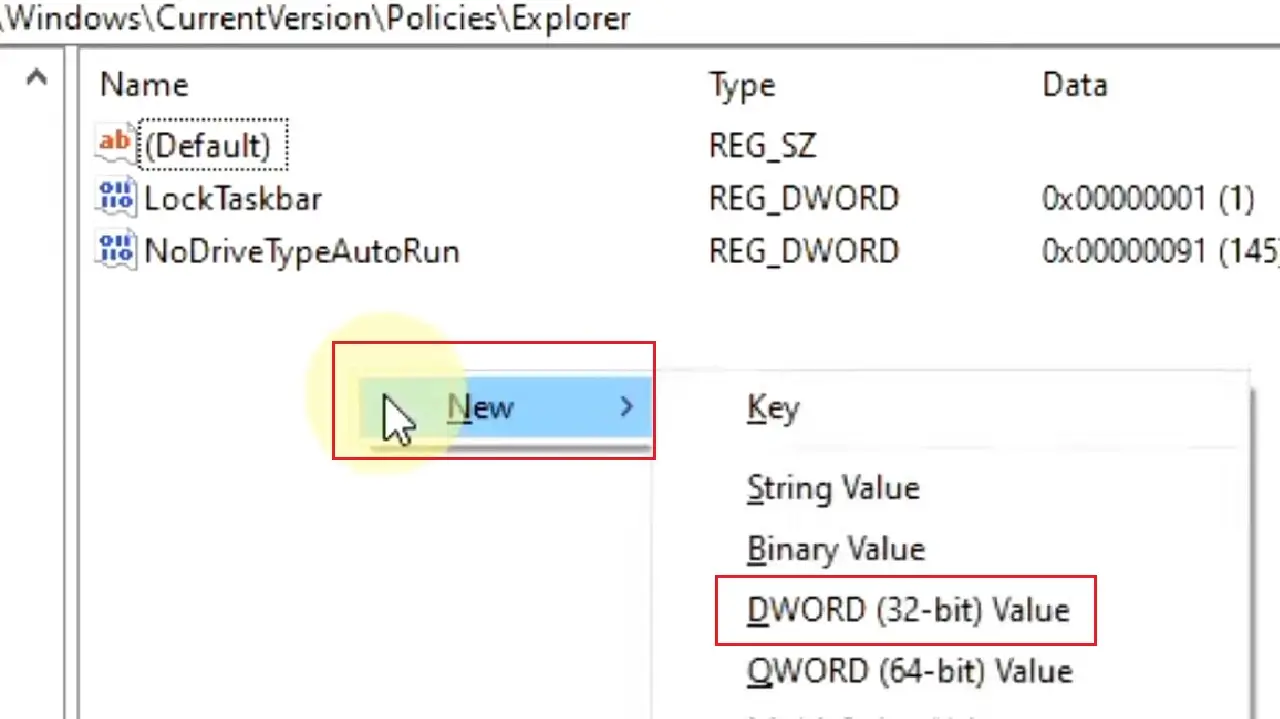
When you reach policies and expand it, you will get the Explorer folder. Click on it. You will need to create a new key on the right side of the window.
- Right-click on the blank space on the right side.
- Click on New.
- Then click on DWORD (32-bit) Value option from the drop-down menu.
- Name the New Value #1 as NoDrives.
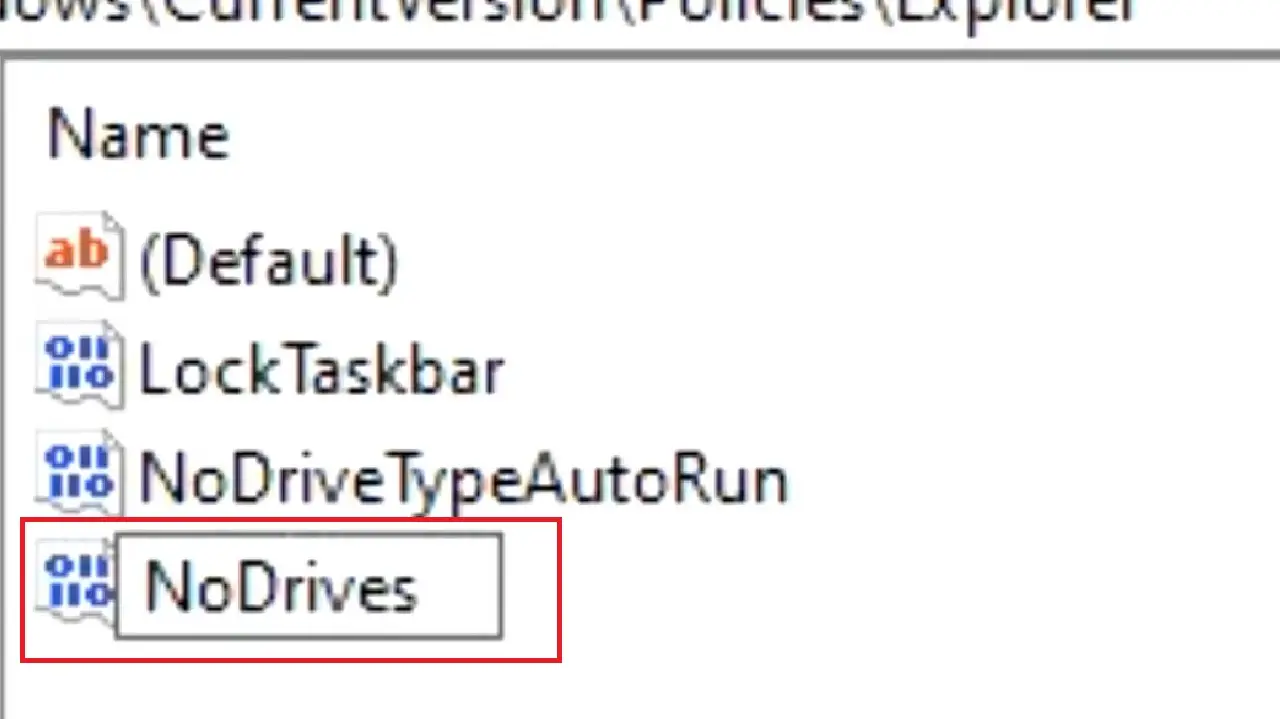
This is case sensitive and therefore make sure you type it just as shown with N and D in upper case and no space between the two words.
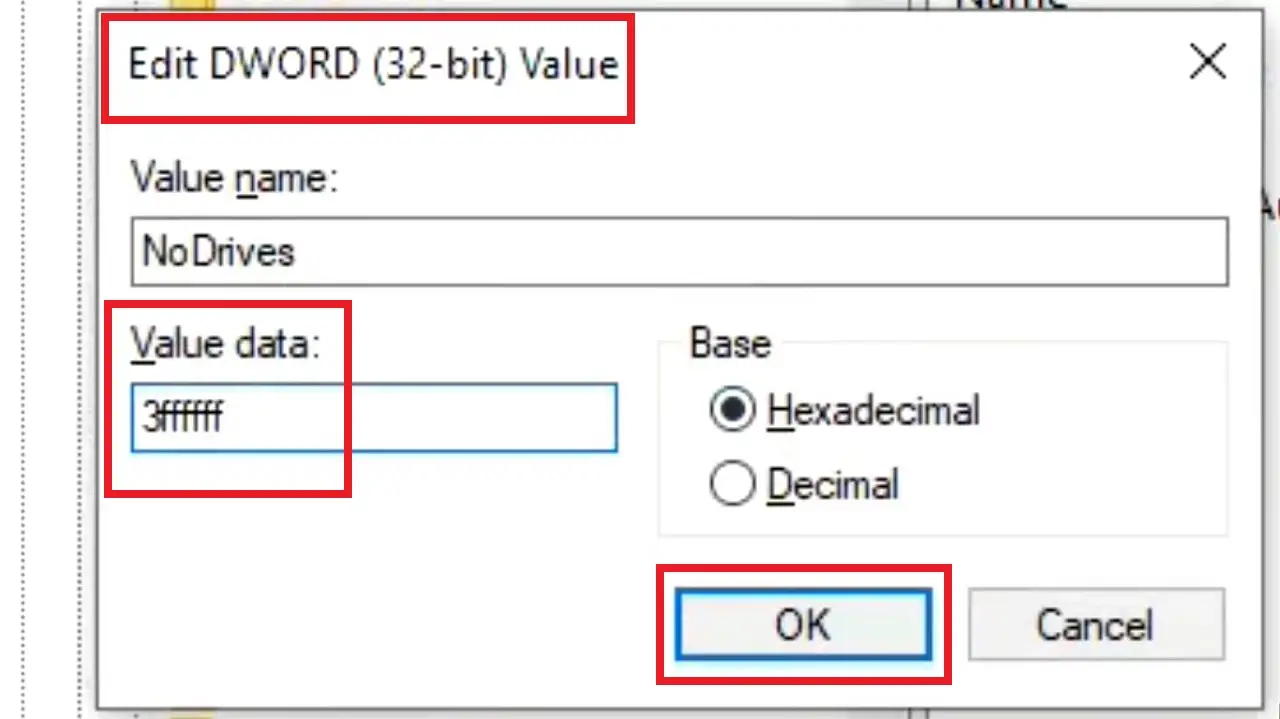
- Now, double-click on NoDrives.
This will open the Edit DWORD (32-bit) Value window.
- Change the Value Data with a new hexadecimal value.
- Set the value as 3ffffff. (That is, six times f after 3).
- Click on the OK button.
Now, close the Registry Editor window and restart your system. You will find that all the drives in the File Explorer are hidden.
If you want to unhide them at any point in the future, you will have to go to the Register Editor again and follow the same steps until you find NoDrives in the Explorer folder.
- Right-click on the key and click on the Delete option.
- Press the Yes button on the Confirm Value Delete window that appears.
Close the Registry Editor window and restart your system again. This will bring back all the drive together in the File Explorer window again.
Conclusion
As it is evident from the article, hiding an external or internal drive in a PC is not a difficult task, irrespective of the method you choose to follow.
If you follow the steps precisely, it will not take more than a couple of minutes to hide a drive.