How to Schedule Automatic Shutdown for Your PC?
By Dominic Chooper on May 04, 2023Shutting down a PC is very easy. However, if you want to make it simpler and save yourself from the hassle of shutting it down manually every night, or if you fear that you may forget to shut it down sometimes, do not worry.
You can schedule an automatic shutdown for your system. You will need to set up a few things first, and for that, you will need to follow a few specific steps.
This article will guide you through the process if you are not already aware of it.
KEY TAKEAWAYS
- The simplest possible way to schedule a shutdown for your PC is by using the Run command.
- Running a specific command mentioning the time in the Command Prompt will also set an automatic shutdown.
- The Task Scheduler app on Windows systems will also allow you to set a time to shut down your PC automatically.
- You can also create a shutdown shortcut on your desktop so that you can schedule and cancel it as and when required.
- The Mac systems, however, can be set to shut down automatically from System Preferences.
Why Do You Need to Automatically Shutdown a PC?
Shutting down your computer automatically is extremely helpful, especially when you are downloading a large file or a number of them or copying them from one drive to another, which will take a long time to complete.
A scheduled shutdown will ensure that the job gets completed and that the computer does not keep running unnecessarily after that, if you are away or asleep.
An automatic shutdown of your PC is also needed for:
- Saving electricity
- Clearing Random Access Memory (RAM)
It will also improve the performance of the PC indirectly since it will not have to run unnecessarily and therefore get time to cool down.
Ways to Automatic Shutdown a PC
The simple way to set an automatic shutdown for your PC is by running a command in the Command Prompt or in the Run dialog box.
However, you can also set it up in a roundabout way by using the Task Scheduler in Windows or by creating a desktop shortcut.
Method 1: From the Command Prompt
If you do not want to run into any complications, you may run a specific command in CMD to set an automatic shutdown for your PC.
STEPS TO FOLLOW:
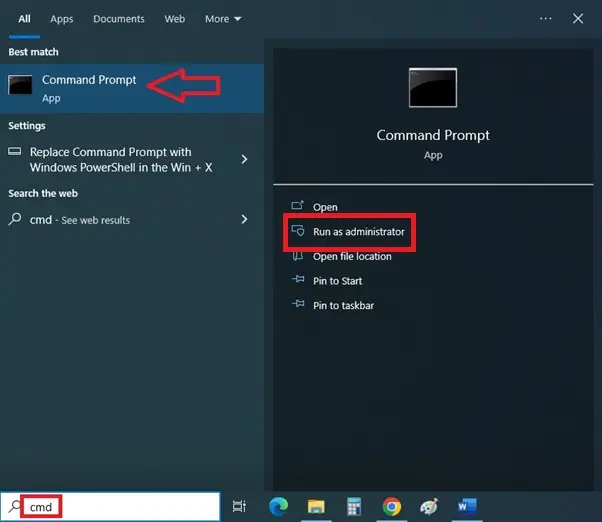
- Go to the Search box.
- Type cmd in the box.
- Press Enter.
- Select Run as administrator.
- In the prompt, type the command Shutdown -s -t 600, for example, if you want the system to shut down after ten minutes (600 seconds).
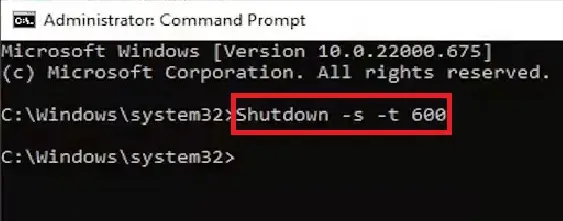
(Please note that the time, 600 or any other numerical, represents the time in seconds, which you may change according to your needs).
- Now, press Enter.
Read Also: Gaming Desktop & Regular: 8 Differences
You will get a Windows logon reminder stating the time when the system will shut down, along with the exact date and time.
- Finally, type exit to close the Command Prompt.
Points to remember:
Once the time is set, it cannot be changed and you cannot write another different command after writing a specific one for automatic shutdown.
If you want to change the shutdown schedule, you will have to cancel the existing command, restart the computer, and again write a fresh command.
In order to cancel or disable the set time for shutdown, enter the command shutdown -a.
Method 2: Using the Run Dialog Box
Almost in the same way, you can use the Run dialog box to set automatic shutdown for your computer.
STEPS TO FOLLOW:
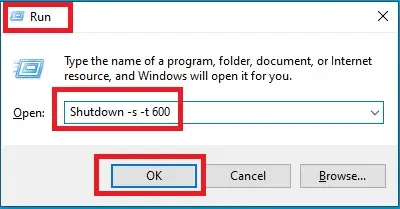
- Press the Windows and R keys on your keyboard together.
- In the Run box, type Shutdown -s -t 600, like in the above example. Alternatively, you can also use the command shutdown /s /t 600.
- Click on the OK button.
Once again, to cancel the scheduled shutdown, you should type in the command shutdown -a in the Run box.
Method 3: From the Task Scheduler
You will need to make some changes in the Task Scheduler to set the time to shut down your computer and trigger the process at the scheduled time automatically. This is a relatively longer and more complex method.
STEPS TO FOLLOW:
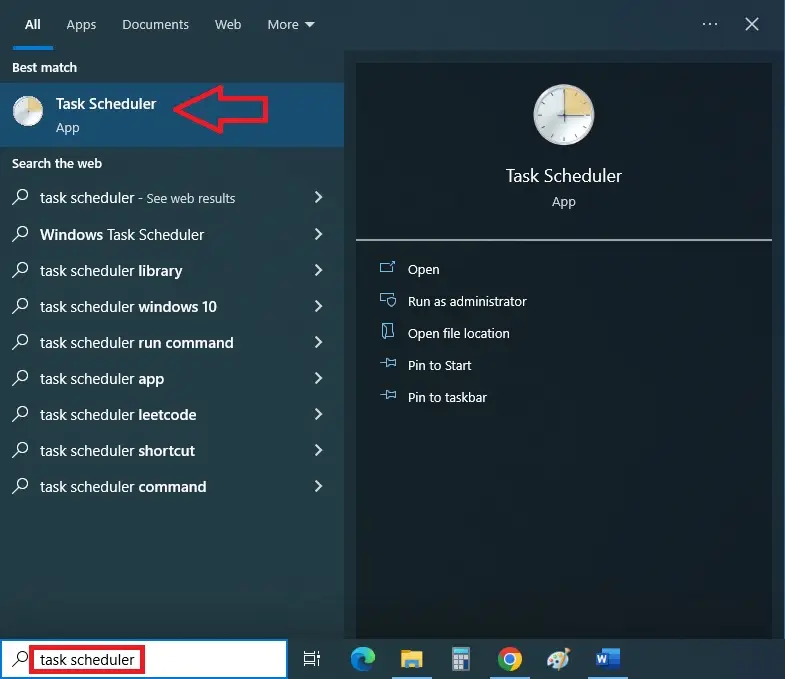
- Go to the Search box.
- Type task scheduler in the box.
- Press Enter.
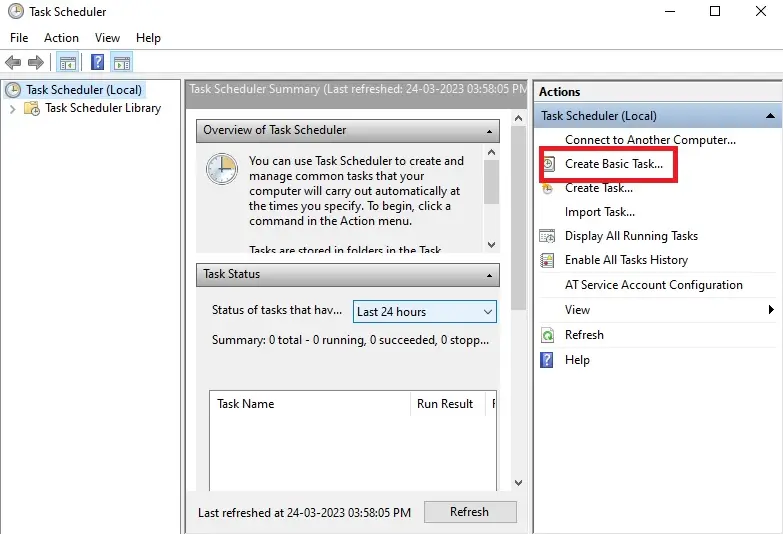
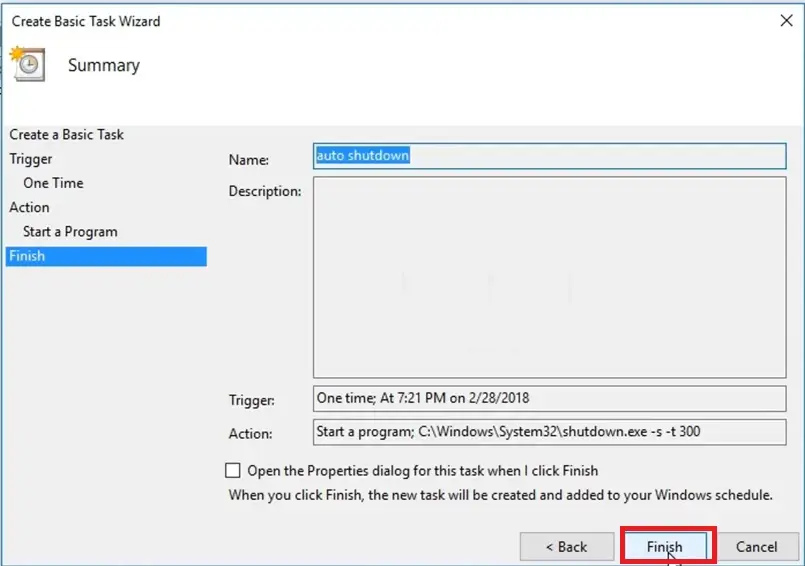
- Choose Create Basic Task from the right panel of the new window.
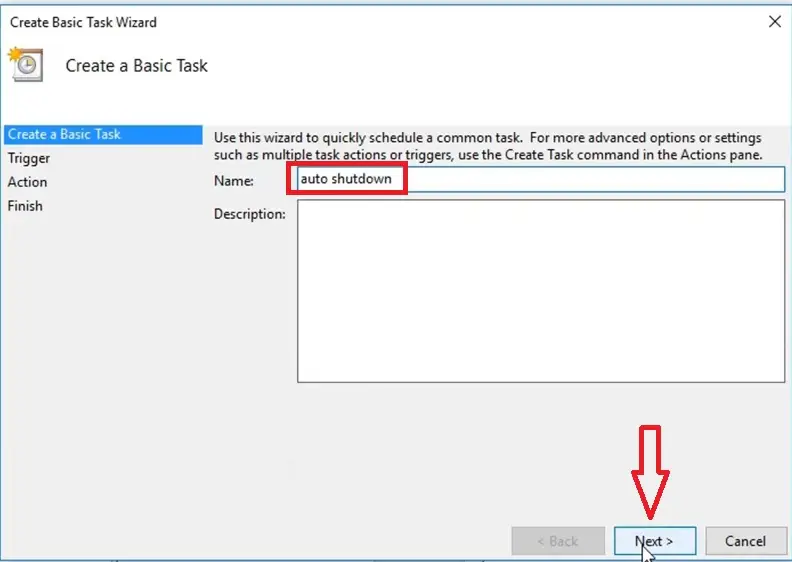
- In the next Create Basic Task Wizard that appears, type auto shutdown in the box next to Name.
- Click on the Next button.
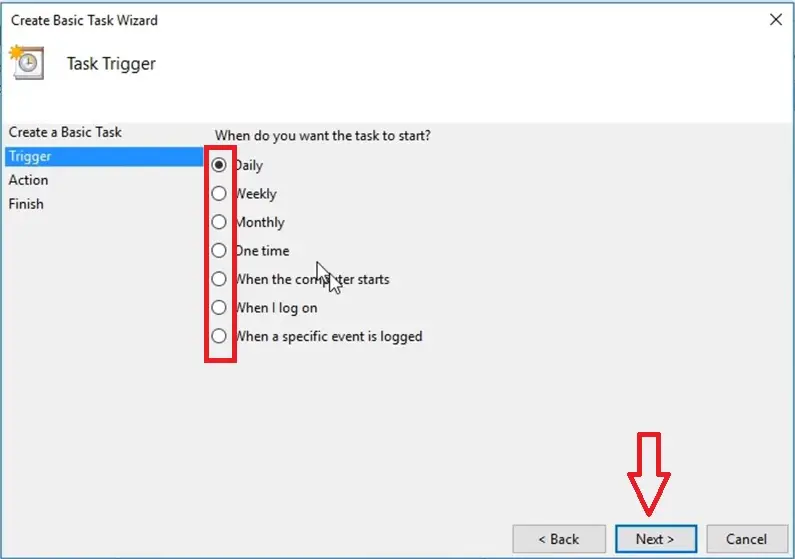
- Now, choose the Task Trigger or the time to start the task according to your wish.
- Click on Next.
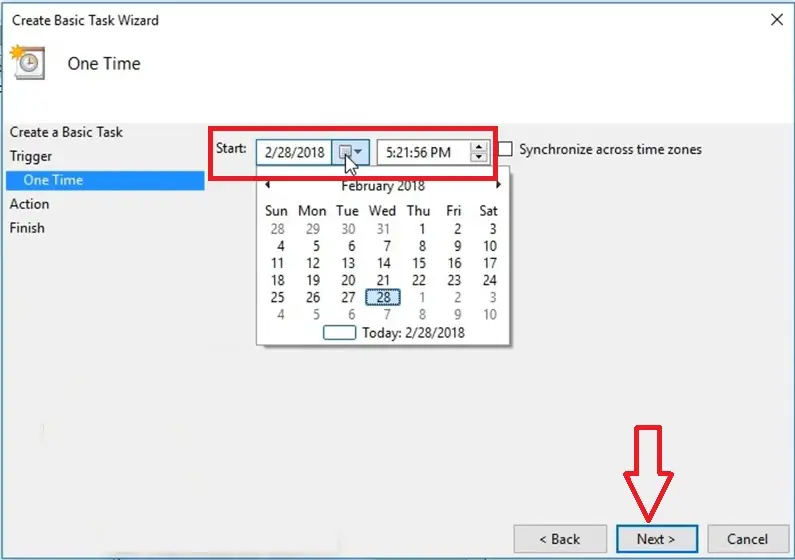
- Set the date and time for the auto shutdown of your PC in the two boxes next to Start.
- Click on the Next button.
- In the next window, if the circle next to ‘Start a program’ is checked, which it is by default, leave it as it is and click on the Next button.
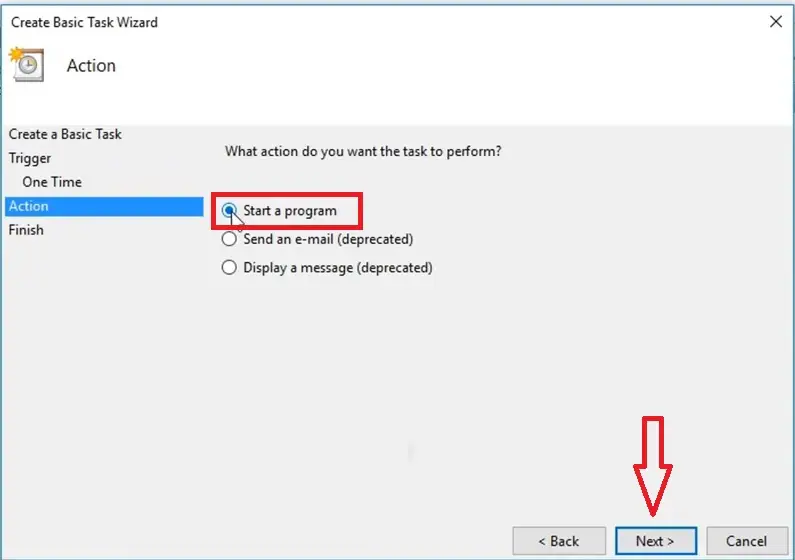
If it is not checked, then click on the small circle to enable it.
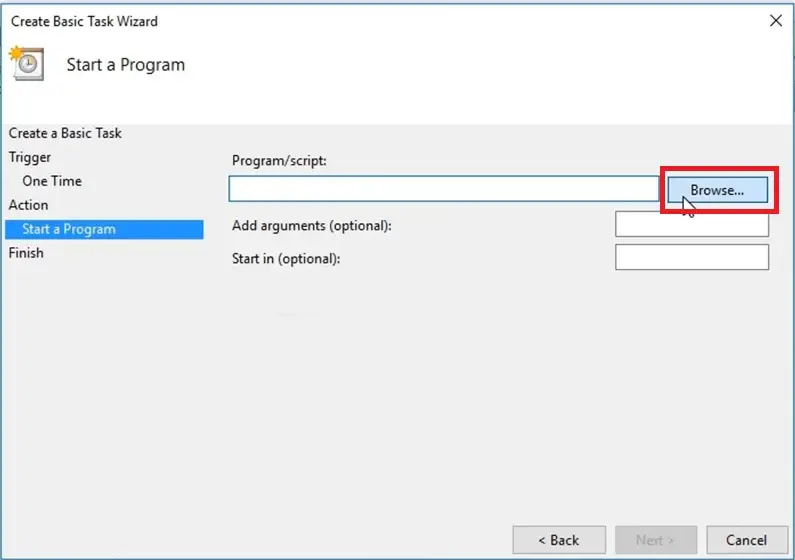
- Now, to open the shutdown script, in the next window, click on the Browse button next to the box under Program/script.
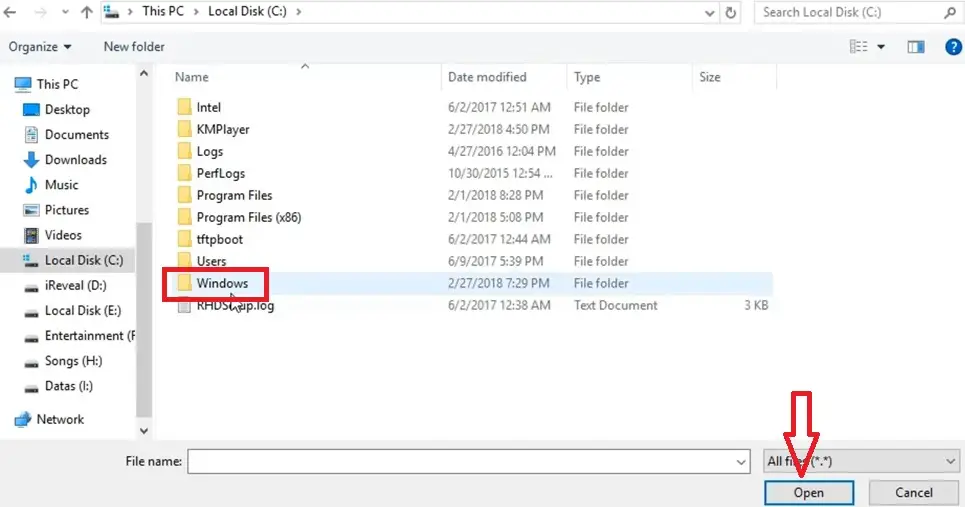
- From the This PC window, select Local Disk (C:) and click on Open.
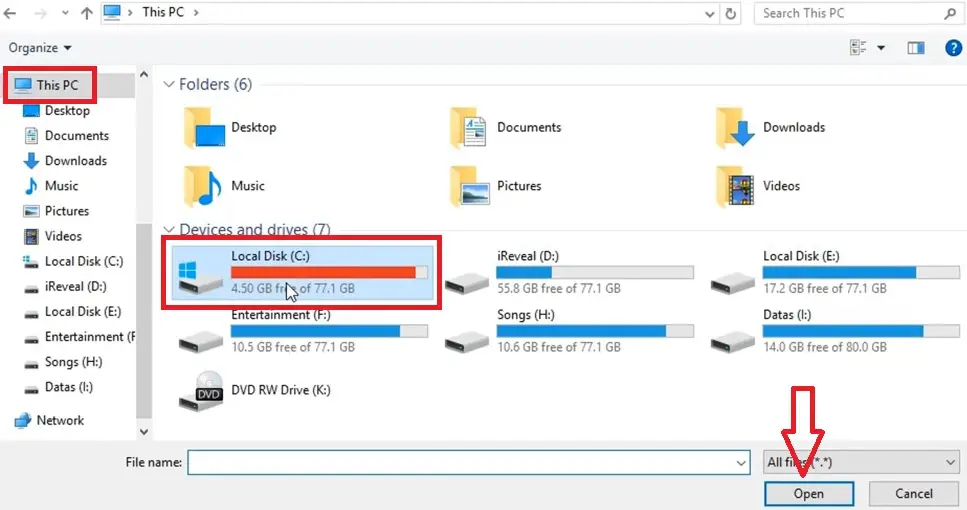
- Now select Windows and click on Open or double-click on the folder.
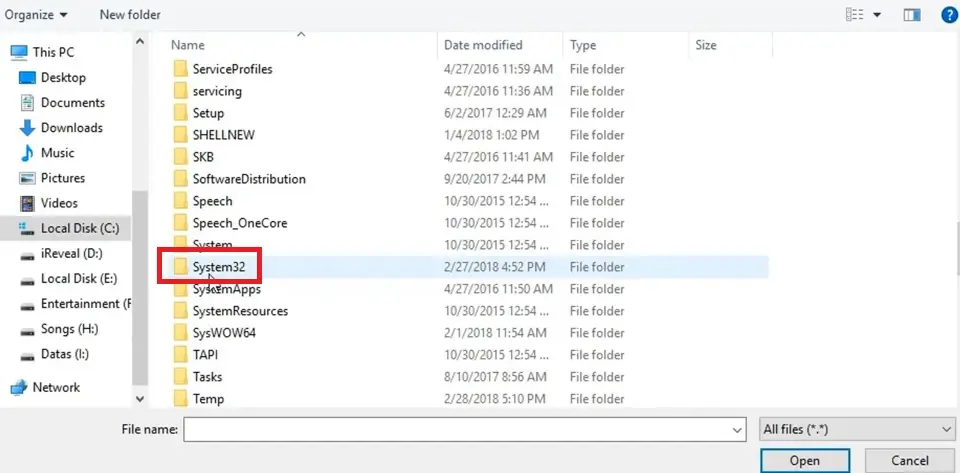
- Scroll down to select and open the System32 folder.
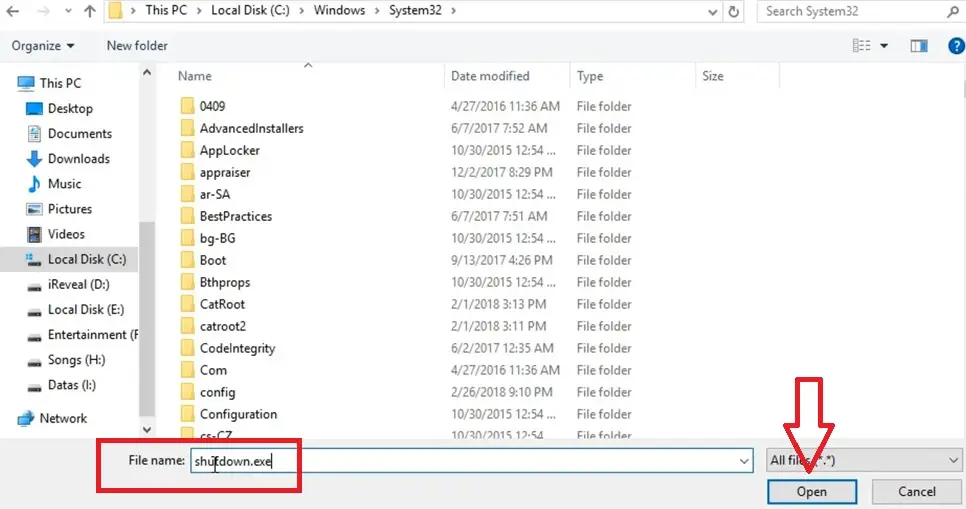
- In the box next to File name at the bottom, type shutdown.exe and click on the Open button.
- Now, to make the computer shutdown after a set time, for example 300 seconds, you will need to add arguments by typing -s -t 300 in the box next to Add arguments (optional).
- Click on the Next Button.
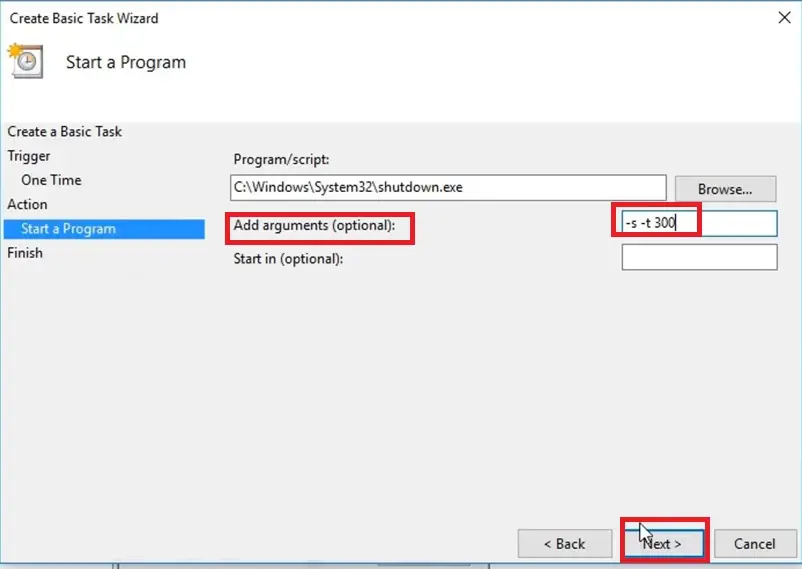
So, in the argument above, the computer will shut down after 5 minutes (300 seconds).
Once again, you can change it to anything according to your wish and the length of the delay time you want, but make sure to mention it only in seconds and not in minutes or hours.
You can even type -s -t 0, which will turn the computer off instantly.
However, the other alternatives to enter here as optional arguments are -s or /s.
- Finally, click on the Finish button after reviewing your settings.
Now that you are done scheduling a shutdown, your PC will be turned off automatically at the scheduled time.
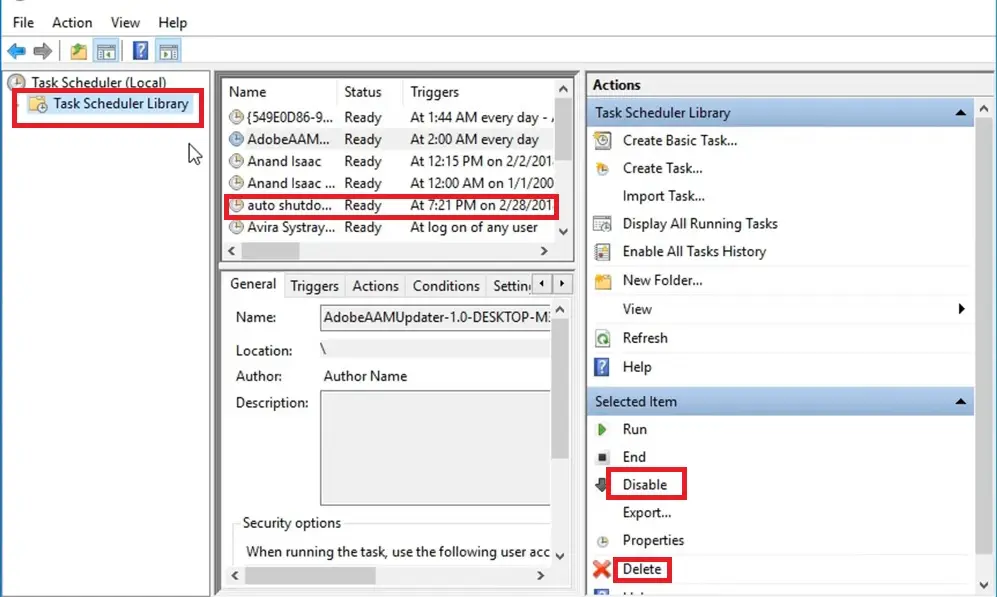
Well, this setting is not permanent. You can deactivate or delete the scheduled auto-shutdown process any time you want as well, just like in the above two methods. However, this can be done from the Task Scheduler Library.
You will simply have to choose the auto-shutdown settings from the Task Scheduler Library window, right-click on it, and click on the disable or delete option from the drop-down menu.
Alternatively, you can also select it and press the Delete or Disable option in the right pane of the window under Actions, as shown in the image below.
Method 4: Create a Shutdown Shortcut
If you do not want to create a shutdown schedule every day, you can even create a shutdown shortcut. Simply double-clicking on it will schedule a shutdown whenever it is necessary.
STEPS TO FOLLOW:
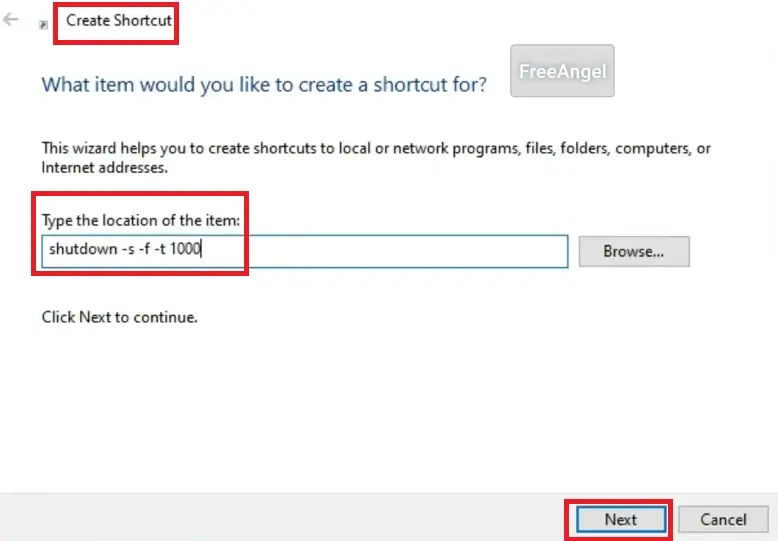
- Right-click on any blank space on the desktop, then click on New > Shortcut.
- In the Create Shortcut window that appears, type the location of the item.
For example, you can type shutdown -s -f -t 1000 if you want to shut your system down after about 16+ minutes.
- Click on the Next button.
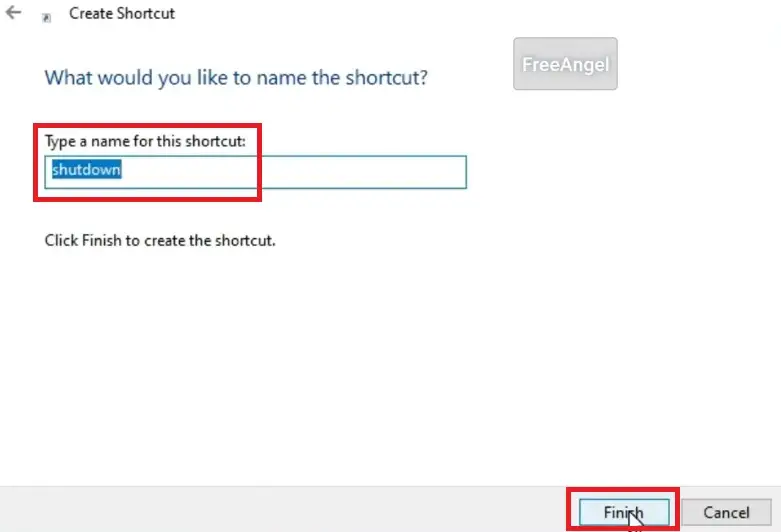
- Give the shortcut a name according to your wish.
- Click on the Finish button.
Now, create another shortcut in the same way for cancelling the shutdown schedule with the command shutdown -a. Also give it a name, cancel shutdown, for example.
When both shortcuts are created on your desktop, click on one to schedule the shutdown and the other to cancel it, according to your needs.
Expert tip:
You can change the icon of the created shortcuts according to those available in the list of icons on your system. You can access them by right-clicking on the shortcut, then clicking on Properties > Change Icon.
This way, you will not mix up the two shortcuts.
There is also another way to create a shutdown shortcut – by using Notepad. The steps to follow for this process are:
- Left-click on the Start menu.
- Scroll down to Windows Accessories.
- Select Notepad.
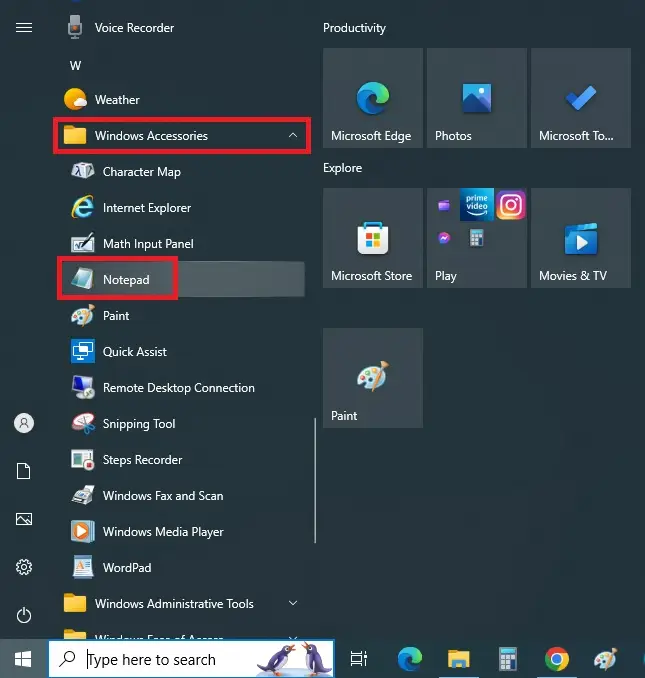
Alternatively, you can also access it by typing notepad in the search box and hitting Enter.
In Notepad, type in the command:
@echo off
shutdown.exe -s -t 60 -c for automatic shutdown.
The commands can be different according to the delay time you want or how exactly you want the alert message to be displayed.
Refer to the following two images as examples:
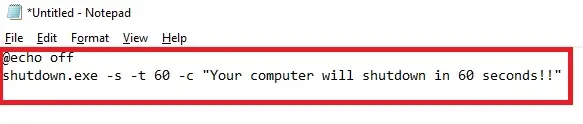
The computer will shut down after 60 seconds and also display the message as shown in the image above.
On the other hand, you may also try a relatively complex command for a more precise shutdown schedule, which would be:
Read Also: How to Open Control Panel? (21 Methods)
@echo off
:W
if %time%==22: 30:00.00 goto :X
goto :W
:X
shutdown.exe /s /f /t 60 /c
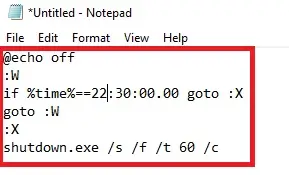
Based on the above command, the computer will check the time constantly, and just a minute before 10:30 pm, it will notify you that the system will shut down after a minute since it is mentioned as 60 in the command.
You can use any time or grace period of your choice, but make sure that the time is written in a 24-hour/military time format and the grace period is written in seconds.
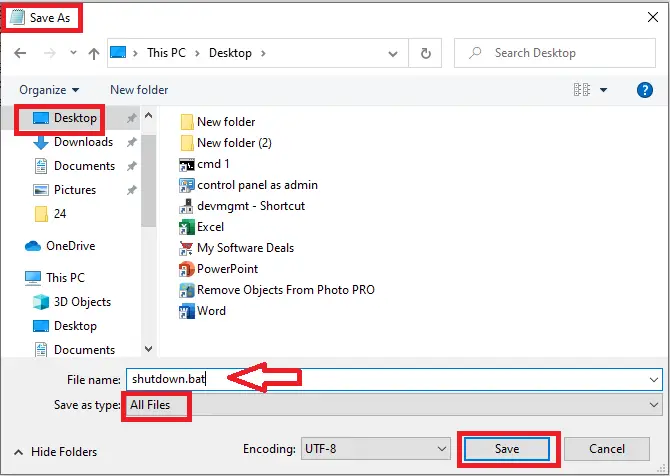
Once you have written the command, you must save the Notepad file in the .bat format.
- Click on the File tab.
- Click on Save As.
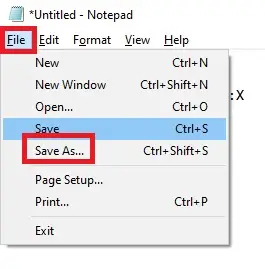
- In the new Save As window, select Desktop from the left panel.
- Select All Files in the box next to the ‘Save as type’ window.
- Type the file name in the box, such as shutdown.bat. You can give any name to it but do not forget the .bat extension.
When it is created, you will now simply need to double-click on it to schedule a shutdown.
For disabling it, you should type the same cancel command shutdown –a in the Run box, as mentioned before.
Setting Automatic Shutdown in Mac Systems
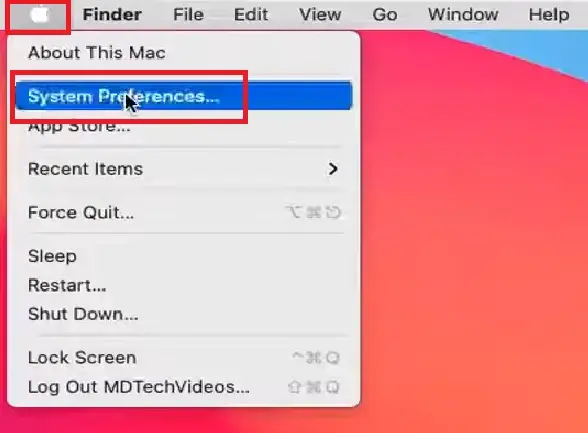
Are you using a Mac system and wondering whether or not you can schedule a shutdown? Well, surely you can do that via System Preferences.
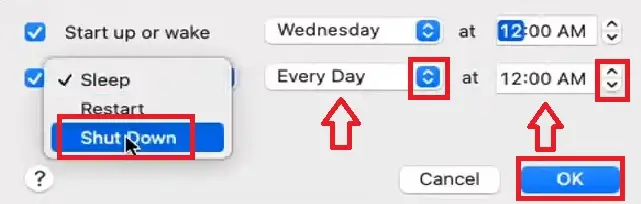
Method 5: Use Energy Saver in System Preferences
- Go to the Apple icon, which is usually located at the top left corner of your screen.
- Click on it.
- Select System Preferences from the drop-down menu.
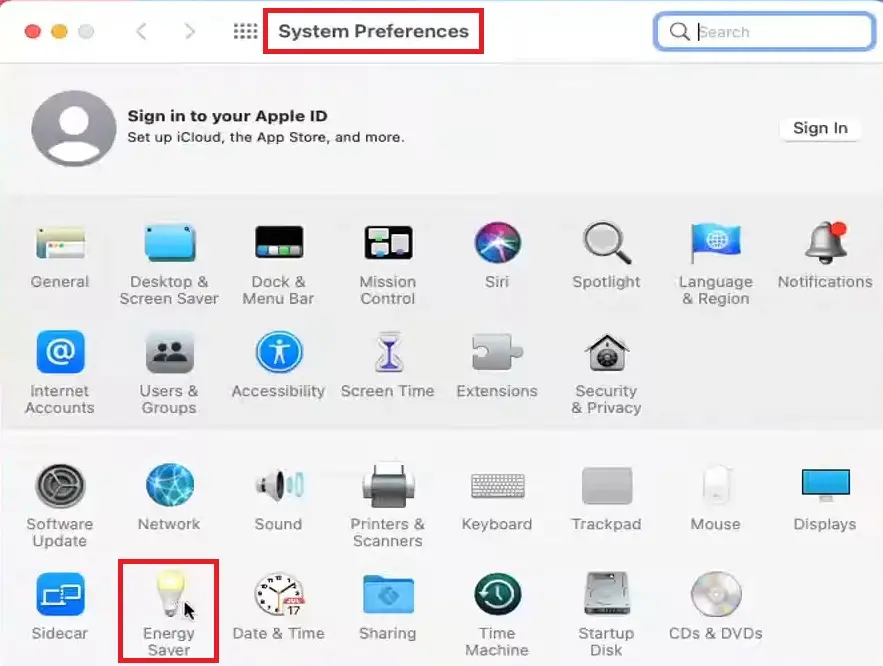
- Select Energy Saver from the System Preferences window.
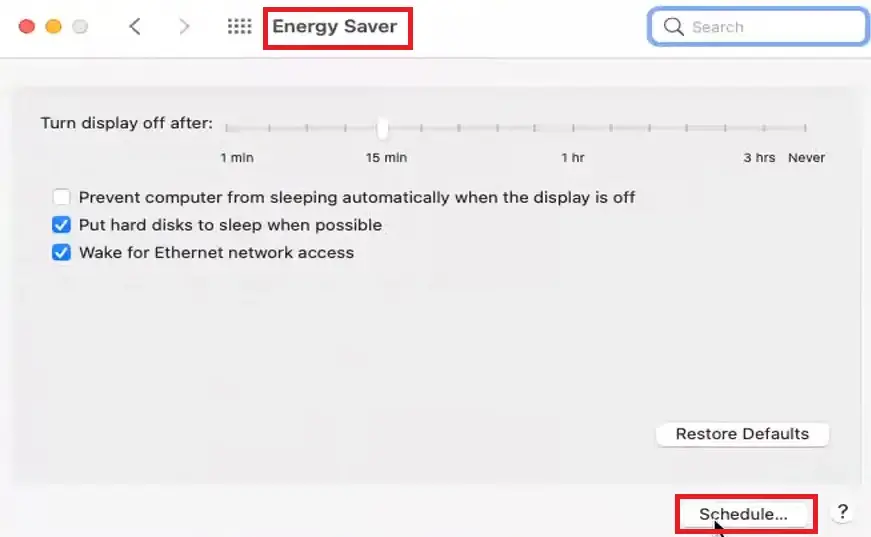
- Click on the Schedule button in the Energy Saver window.
- Now, in the new window, click on the small box next to the second row.
- Select Shut Down from the drop-down menu.
- Set the day by clicking the up/down arrow keys on the right side of the box.
- Set the time for shutdown in the same way, just beside the date.
- Click on the OK button to complete the process.
In order to cancel the scheduled task, follow the same process until you reach the above window and then uncheck the box next to Shut Down, or click on the Cancel button.
Conclusion
So, to summarize, it is not difficult at all to schedule a shutdown on your Windows or Mac computer.
You can also cancel the process at any time you prefer. Choose the method that you feel comfortable with and improve the performance as well as the life expectancy of your PC in the process.