
Ideally, there are three different types of network profiles you can use in Windows, namely, Private, Public, and Domain. The first two types can be used on any PC, but the domain profile can only be used by those devices that are linked to a domain.
If you want to switch to any of these three network profiles, there are a few specific methods to follow, which this article will walk you through.
In This Article
KEY TAKEAWAYS
- While using Ethernet, you can change the profile easily by toggling the on/off switch to select whether the PC should be discoverable by others.
- ‘Forgetting’ the Wi-Fi password and reconnecting will also allow selecting the same feature, which will change the network profile as well.
- Making changes in the value of the category of the network in the Registry Editor will switch the private network to public network, and vice versa.
- Different specific commands can be used in Windows PowerShell or the Command Prompt to change the network profile as desired.
- Changes in the network profile can also be made by accessing it through the Local Security Policy.
What is the Reason to Change the Network Profile?
You may need to change the network profile from public to private, especially when you need to share files or other devices, such as the printer, with other computer systems connected to the network.
This is because it will enable the network discovery feature.
You may also need to change the network profile according to the place you are working. For example, you should change it to public if you are in a public location such as an airport, library, or a coffee shop.
Changing the profile from private to public is also necessary to prevent other users from connecting to your network or to keep your data safe from hacking by making the best use of the different firewall restrictions imposed by Windows in this specific mode.
Ways to Change the Network Profile
You can change your network profile from private to public or from public to private by running a couple of specific commands in the Command Prompt or PowerShell.
Depending on the type of connectivity, Wi-Fi or Ethernet, you can also change it in other ways, such as by changing it from:
- Settings
- HomeGroup
- Local Security Policy
- Registry Editor
You can also change it by removing the password and connecting to the network again to set it to your desired network profile.
Here are some specific steps to follow to change the network profile on your PC.
Private or Public
You can change the network profile from private to public and vice versa, depending on the initial settings.
Method 1: Slide the On/Off Switch for Ethernet
If you are using an Ethernet connection for your network, you can change the profile type from public to private or the other way around with a click on the sliding switch.
STEPS TO FOLLOW:
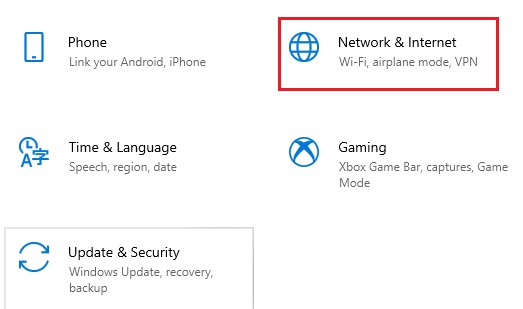
- Open Settings by pressing the Windows and I keys on your keyboard together.

- Select Network & Internet.
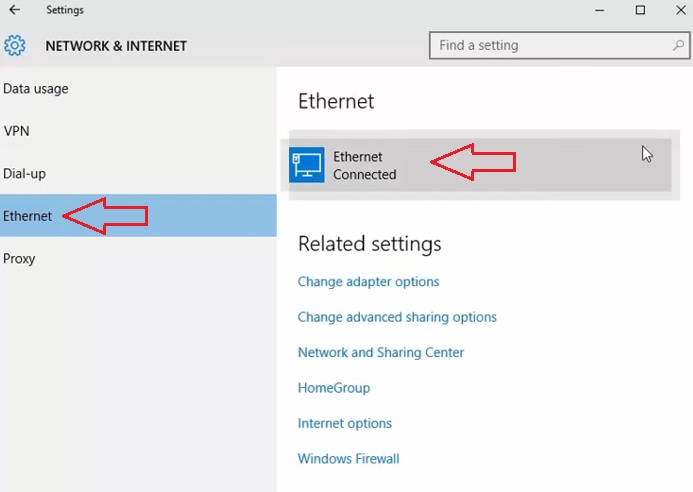
- Select Ethernet from the left panel of the window.
In the new window, you will see a sliding switch under Find devices and content.
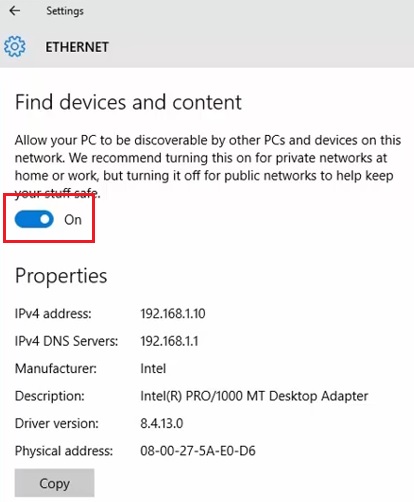
Simply slide it to On or Off, as the case may be, to change the network profile.
Method 2: From the Network and Internet Option under Settings for Wi-Fi
You may change the network profile very easily and quickly from private to public or vice versa from the Network and Internet option in Settings.
STEPS TO FOLLOW:
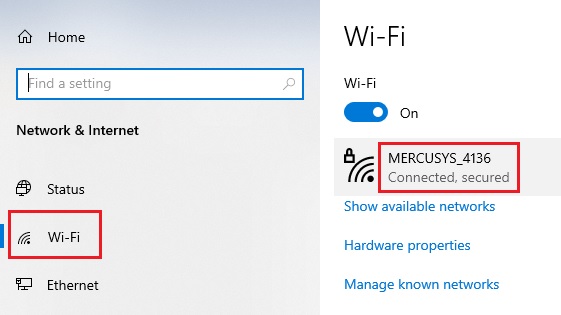
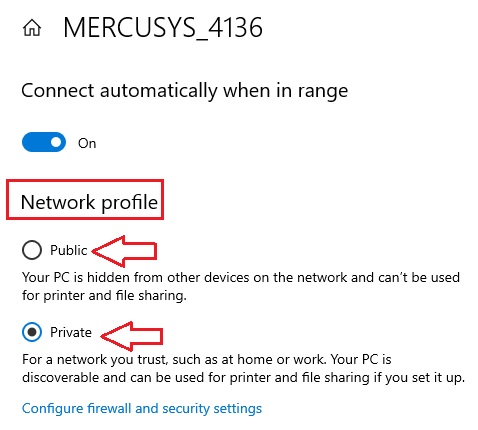
- Open Network & Internet as you did in Method 1, but choose Wi-Fi this time from the left panel.
- Then, click on the Wi-Fi you are connected to, MERCUSYS_4136 in this case, as shown on the right side of the window.
In the new window, click on the small circle next to either Public or Private, as the case may be, to change the Network profile.
Method 3: From the HomeGroup
If your network profile is set to public, for example, you can change it to private very easily and quickly from HomeGroup.
STEPS TO FOLLOW:
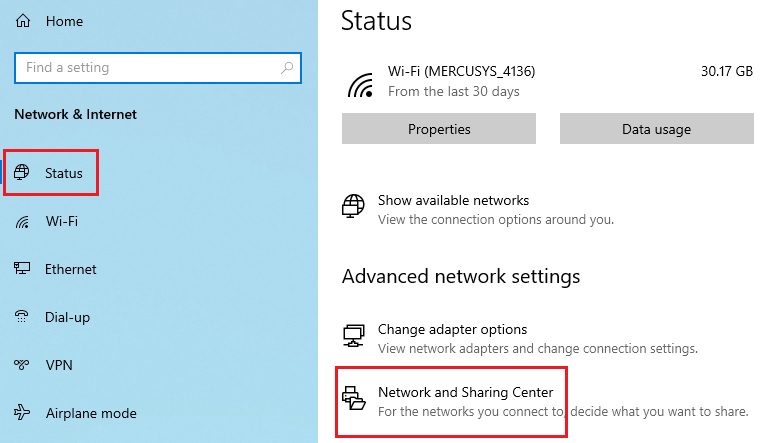
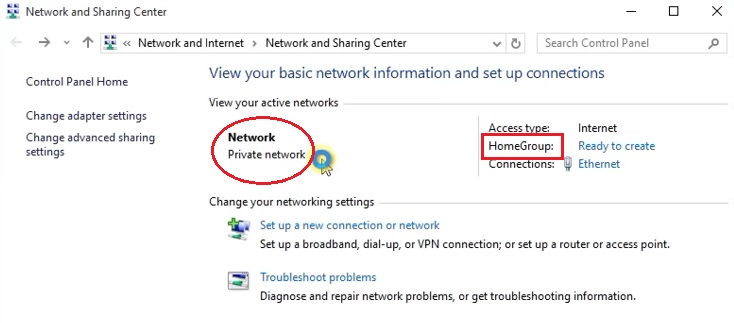
- Select and open Network & Internet as before.
- Choose Status from the left panel this time.
- Scroll down on the right side of the window to find and open the Network and Sharing Center.
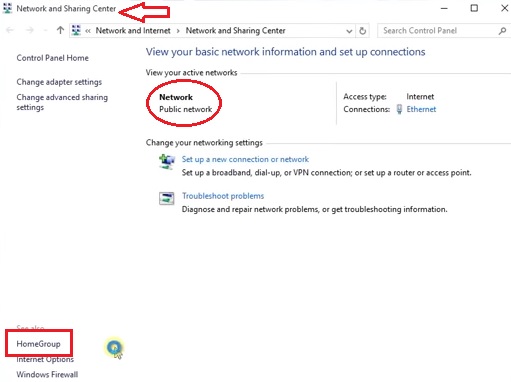
- Check which type of profile your network is set to in the following window. (Marked with a red circle in the image below.)
- Look for HomeGroup at the bottom on the left-hand side of the window.
- Click on it.
- Click on Change network location in the HomeGroup window.

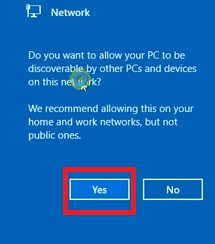
- Click on the Yes button when Windows asks you whether or not you want your PC to be discoverable by other PCs and devices on this network.
Now, go to the Network and Sharing Center window.
Compare the contents within the two circles in the first and last images of this method to see the change, marked with a red circle in both, and you will see that your network profile type has changed from Public network to Private network.
Method 4: By Removing the Password and Reconnecting
As a combination of the above two methods, you can also change the network profile by removing the password first and then connecting again.
STEPS TO FOLLOW:
- Go to Network & Internet from Settings as before and select Wi-Fi, if you are connected through Wi-Fi.
- Click on the Manage known networks option on the right side of the window.
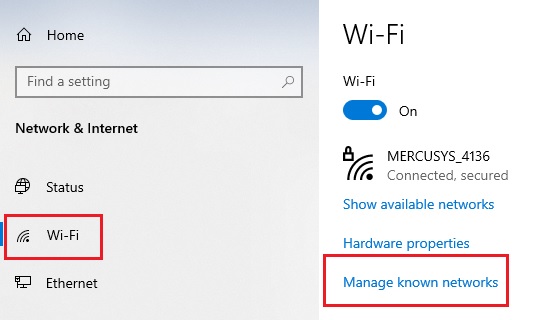
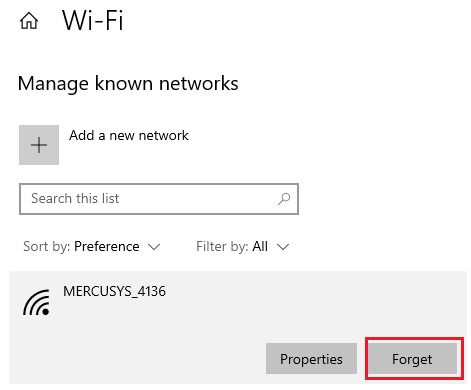
- Choose your network (MERCUSYS_4136) and click on it.
- Now click on Forget to remove the password.
- Then, go to the bottom-right corner of your screen and click on the Internet icon on the taskbar.
- Click on your network and enter the password again.
Once again, you will be asked whether or not you want your PC to be discoverable. Clicking on Yes will make it a private network, and if you click on No, the network profile will become public.
Method 5: Make Changes in the Local Security Policy
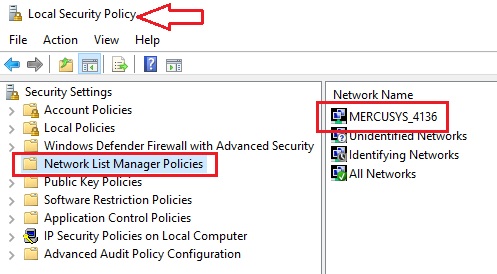
Another way to change the network profile of your PC is through the Local Security Policy. You can access it by using the Run command.
STEPS TO FOLLOW:
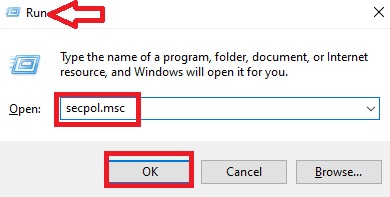
- Open the Run box by pressing the Windows and R keys on your keyboard together.
- Type secpol.msc in the box and hit Enter.
- Click on the Network List Manager Policies from the left side of the Local Security Policy window that appears.
- Choose your network, MERCUSYS_4136 in this case, on the right side of the window and double-click on it.
- In the new network properties window, go to the Network Location tab.
- Click on the small circle next to Private or Public, depending on what type you want to change your network profile to.
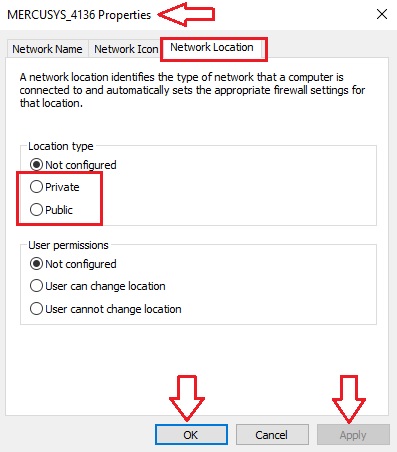
- Finally, click on the Apply button, and then click on the OK button.
Method 6: Running Specific Commands
You can run specific commands in either Command Prompt or PowerShell with administrative privileges to change your network profile.
STEPS TO FOLLOW:
- Go to the search box > Type cmd > Click Run as administrator > Hit Enter.
(Alternatively, you can press the Windows and X keys together and choose Windows PowerShell from the window that pops up.)
Now, first type in the command Get-NetConnectionProfile to check the type of profile your network is set to.
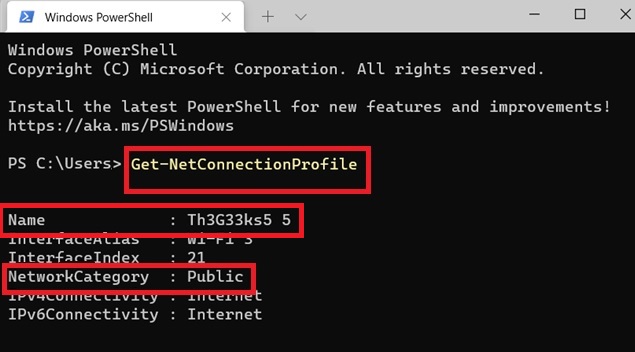
Once you know the network type, remember the name of the network exactly as it is displayed in the list. For example, it is Th3G33ks5 5 in the above list.
Now, since the network profile is public, you will need to change it to private. For that, type in the following command:
Set-NetConnectionProfile -Name “Th3G33ks5 5” -NetworkCategory Private
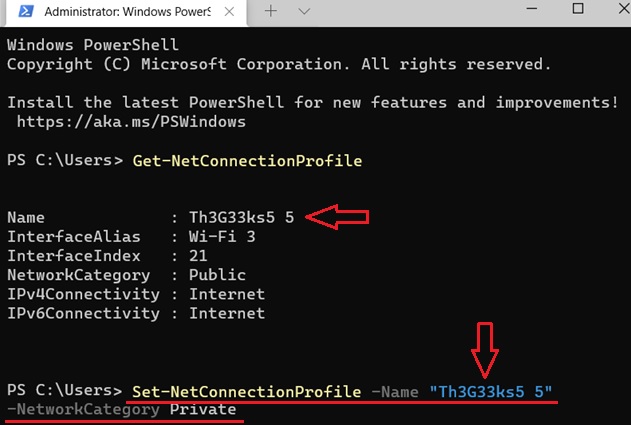
On the other hand, if the network profile was set to private, you could have changed it to public by running the following command:
Set-NetConnectionProfile -Name “Th3G33ks5 5” -NetworkCategory Public
The change will be made immediately, even though you will not get any message confirming it.
You may confirm it from the changed value in the network category by either running the earlier Get-NetConnectionProfile command or from the Network and Sharing Center window, as you did before.
Method 7: From the Registry Editor
Making some changes to the keys in the Registry Editor will change the network profile.
STEPS TO FOLLOW:
- Open the Run box as you did in Method 5.
- Type regedit this time and hit Enter.
Then, expand the following folders in the specified order in the Registry Editor window:
- HKEY_LOCAL_MACHINE
- SOFTWARE
- Microsoft
- Windows NT
- CurrentVersion
- NetworkList
- Profiles
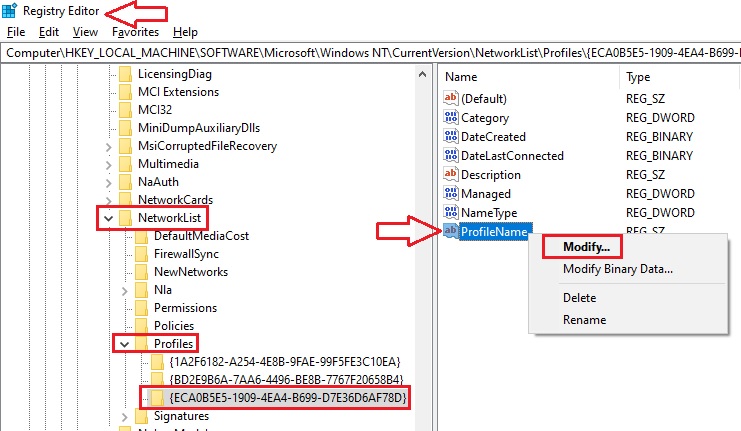
Once you reach there, look at the different profiles displayed under the folder.
(The number of profiles, however, may vary from one user to another.)
- Double-click on the particular network you are using or have used earlier and the profile in which you want to make changes.
- Look for ProfileName on the right side of the window.
- Right-click on it and select Modify.
- Change the value in the box under Value data in the Edit String window to change the name. You can change the name to anything you like.
- Click on the OK button.

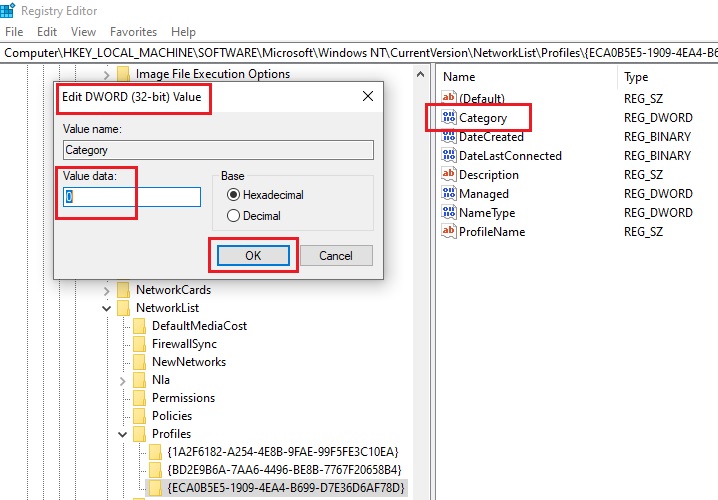
Also, changing the value of the Category of the same network will change the profile of your network.
- Right-click on Category.
- Select Modify.
- In the Edit DWORD (32-bit) Value window, if the value in the box under Value data is set to 0, it is public. Change it to 1 to make the network profile private.
(Change it from 1 to 0 if you want to switch from private to public network type.)
Finally, click on the OK button and close the Registry Editor window as well.
Now, restart your PC and then go to the Network and Sharing Center. When the window opens, you will see that the profile name of your network has changed.
Private to Domain
You can change the network profile from private to domain as well, almost in the same way as above.
Method 8: Change the Category Value
You will need to change the value of the Category of the network profile in the registry if you want to change to domain from private.
STEPS TO FOLLOW:
- Open the Profiles folder in the Windows Registry as above and select the network type that you want to change to domain.
- Double-click on the Category as above to open the Edit DWORD (32-bit) Value box and, this time, change the value to 2.
You can also change it by using specific commands.
Follow the same steps as you did in Method 6, but this time enter the command Set-NetConnectionProfile -Name “network name” -NetworkCategory DomainAuthenticated.
Conclusion
As you can understand by going through the methods described above in this post, making changes to the network profile is pretty simple.
You can follow any of the methods for it, though it is advised to set and leave your network connection type to Public since changing it may affect how Windows handles it.