
The Start menu is perhaps the most used and one of the most important features in your computer. Since you will need to use it every now and then, you may want to customize it so that it suits all of your needs.
Yes, the Windows 10 Start menu is customizable, but most users are not aware of it. If you too do not know the ways to modify it, in this article, you will learn about all those ways.
In This Article
KEY TAKEAWAYS
- You can change the size of the Start menu window by simply dragging the side or arrow at the corner outward and the top upward.
- The color of the menu can also be changed, along with the colors of the app icons in the tile container section.
- You may alter the number and type of apps to be displayed in the app menu container section in the middle of the menu as well as on its sides.
- The icons of the related or similar apps can be put into a folder or you can also create a group of apps to make the menu look more organized.
- You can even view the Start menu in full-screen mode and change the background to dark mode to make it easier on your eyes.
Why Do You Need to Customize the Windows Start Menu?
One primary reason to customize the Start menu is to add more convenience while using it and to make it more personal and functional.
For example, if you make the window larger and taller, you can accommodate more columns in it than the traditional default number. This will allow you to add more apps and access them without needing to do a lot of scrolling.
Apart from that, a lot of users simply personalize their Start menu to make it look better or different from the traditional outlay and appearance offered by Windows by default.
Quite a few users also customize the Start menu app to make it easier on their eyes, apart from having a better user experience.
Ways to Customize the Windows Start Menu
You can make the Start menu look wider and taller, provided you have the necessary space on both sides.
Press and drag the side of the menu or the arrow at the corner to make it wider, and drag the top border to make it taller according to your wish. You can even view the menu in full screen mode.
In addition to that, Windows offers a lot of options to customize your Start menu to make it look good.
For example, you can change the accent color of the Start menu and the other items in it or pin and unpin apps and arrange them according to your preference.
It also allows you to perform a lot of other actions. For example, when you right-click on a particular app, you can do the following:
- Change the position and size of the app icons.
- Pin the app icon to the taskbar.
- Rate and review the app in the store.
- Uninstall it if you do not need it any longer.
You may even turn off the live tile feature of the apps to display a static tile with no live content updates being displayed. You can turn the live tile on again by simply repeating the process.
Method 1: Select the Apps and Folders to Show or Hide
You may choose specific apps and folders to be displayed on the Start menu based on your liking and/or frequency of usage.
STEPS TO FOLLOW:
- Go to the Start menu > Settings.
- Select Personalization.

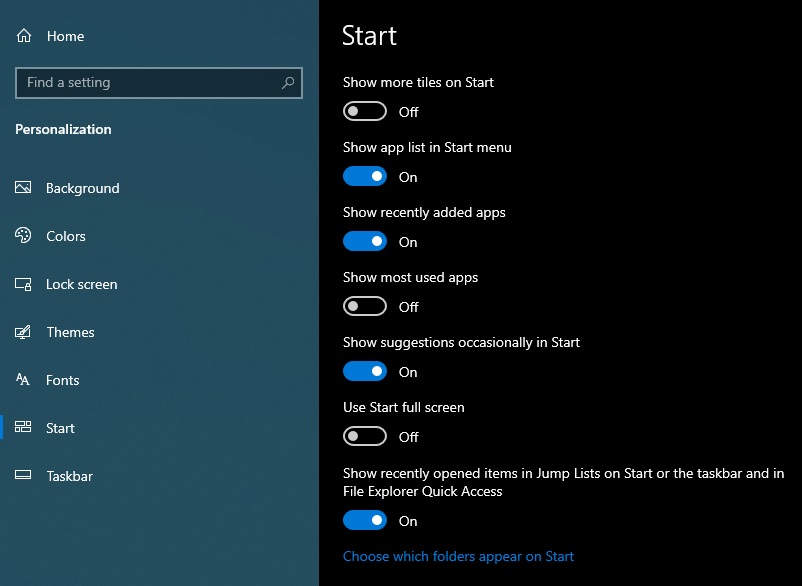
- Select Start from the left panel of the Personalization window.
- Slide the switch under each app to turn it on or off, depending on which one you want to show or hide.
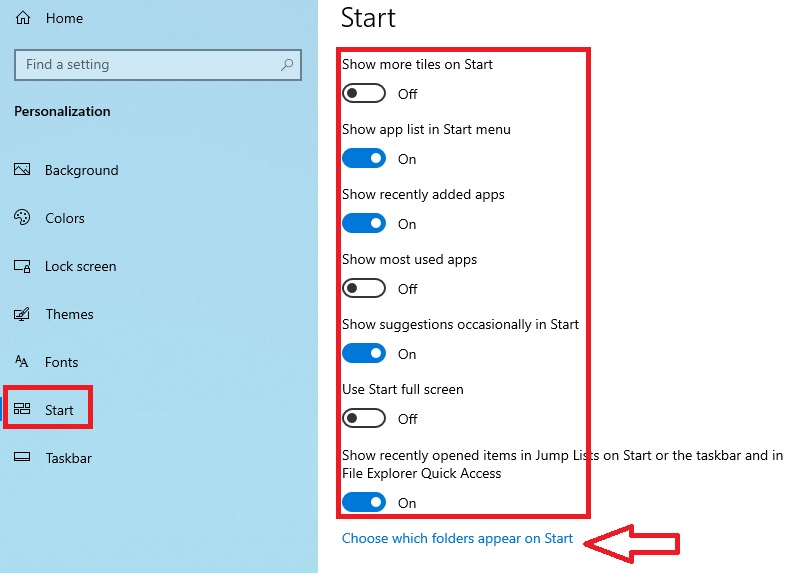
Now, if you want some specific folders to be displayed and hide the others, you can simply click on the ‘Choose which folders appear on Start’ option located below in the above window, as marked by the red arrow.
Then, follow the same routine as you did for the apps when the following window appears:

This will add the folders to the left side of the Start menu window.
Method 2: Select and Unpin the Apps You Do Not Use
You can even remove the apps from the Start menu that you do not use frequently by simply unpinning them. This will give it an uncluttered look.
STEPS TO FOLLOW:
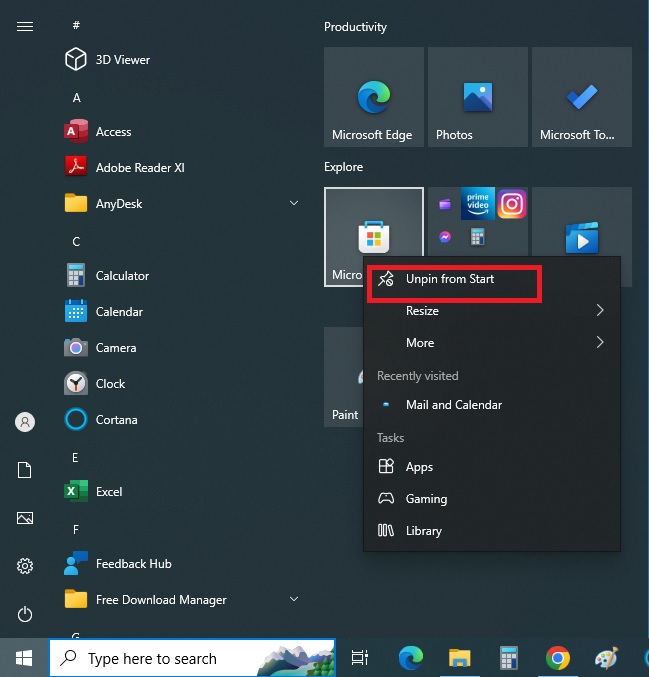
- Open the Start menu.
- Right-click on the app you want to remove.
- Click on Unpin from Start.
Note:
If you unpin any app icon from the Start menu, it is not deleted. It is simply removed. You can still access the unpinned app from the full list of apps on the left, which is the second section of the Start menu, also referred to as the menu container for all apps.
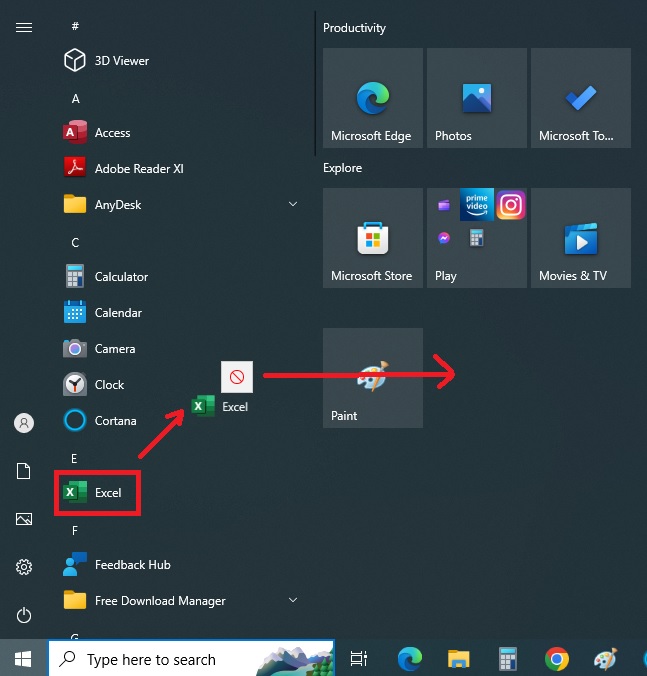
Now, if you want to add your favorite apps, Excel for example, in their place or in an empty space, simply click on the icons of the app on the left side of the window and drag it to the tiles section, as shown in the image below:
Method 3: Resize the Icons
If you do not want large icons or if you want to accommodate more apps in the tile section of the Start menu by making each icon smaller, you can even resize the icons and arrange them according to your preference.
STEPS TO FOLLOW:
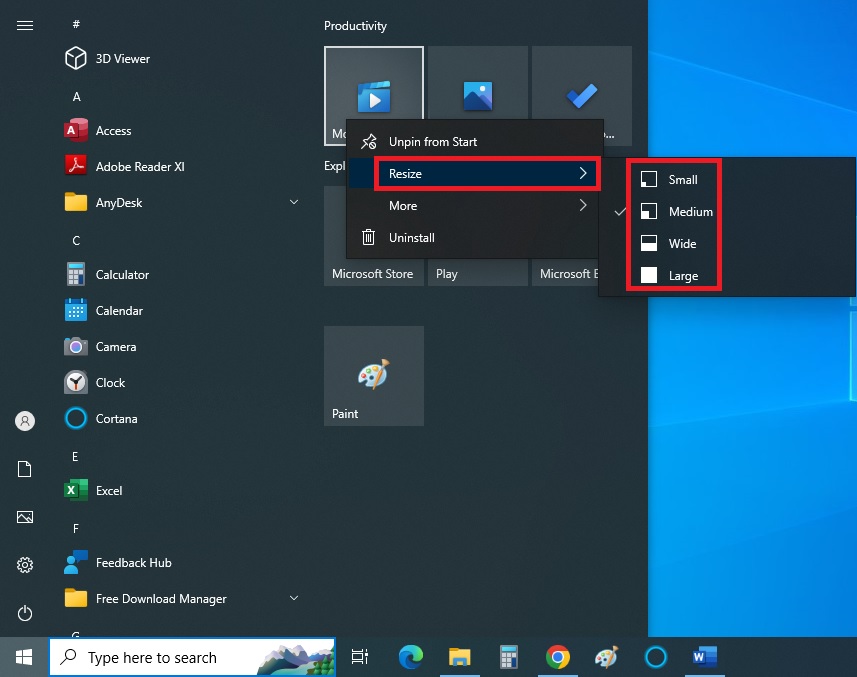
- Go to the Start menu and right-click on the app icon you want to resize.
- Click on the small arrow next to Resize to expand it.
- Choose one of the different options from those offered in the drop-down submenu.
Note:
If you choose ‘Small,’ the size of the app icon will be a quarter of the ‘Medium’ size. On the other hand, choosing ‘Wide’ will set it back to medium but the width will be doubled.
And lastly, if you choose ‘Large,’ the icon will be double the height and width both compared to the medium size.
Method 4: Arrange the Apps to Create a New Group
Once you are done resizing the icons, you can then arrange the apps as you wish by simply pressing and dragging them to the desired places and letting them go. The apps will drop into the right place.
If you want to keep things more organized, you can even create a new group by putting the tiles of the related apps together.
STEPS TO FOLLOW:
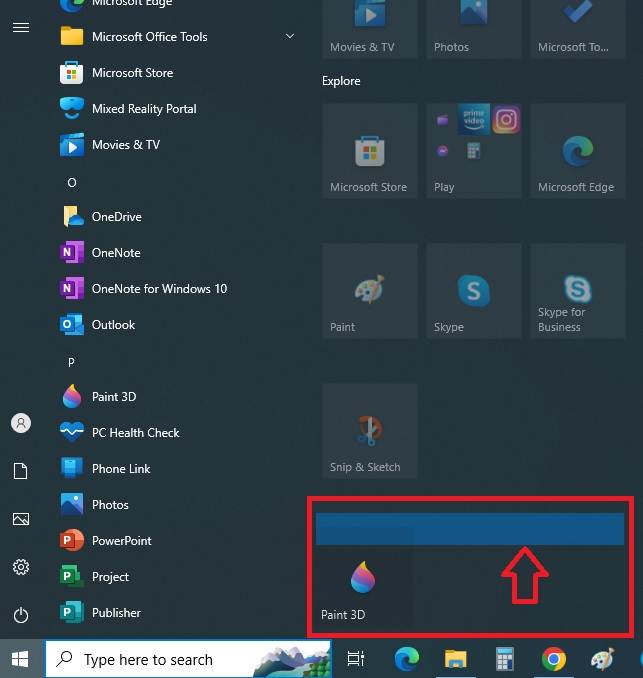
- Select an app, Xbox for example, and drag the tile to an empty space in the tile section.
- Let it go when you see a solid bar beside or above it, as indicated by the red arrow in the image.
- Now, once the group is created, simply select any other app that you want to add to the group and place it next to it.
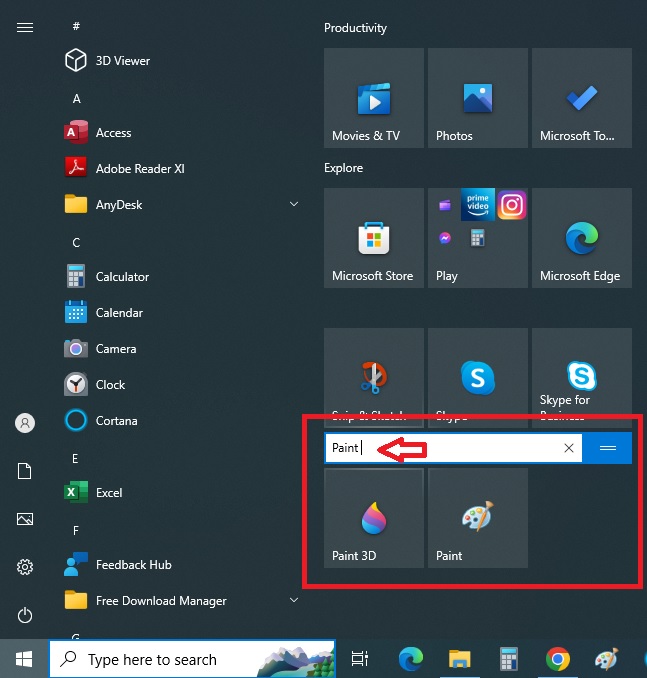
Finally, when all the apps are placed in the desired group that you created, you can also name the group as you want.
You may click or tap on the space just above the group and enter the name in the box indicated by the red arrow in the image below:
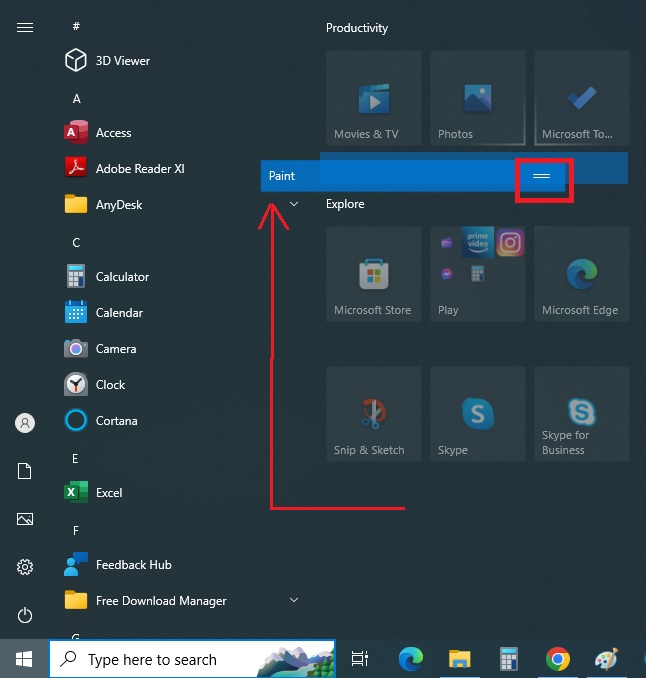
To move the group to another location, simply click and drag the sandwich icon or the double line, as shown in the image below by a red box, and release it where you want it to be.
Method 5: Place the Apps in a Folder
If you do not want to group the apps, there is even a better way to customize and organize your apps in the Start menu. You can put them all in a folder.
STEPS TO FOLLOW:
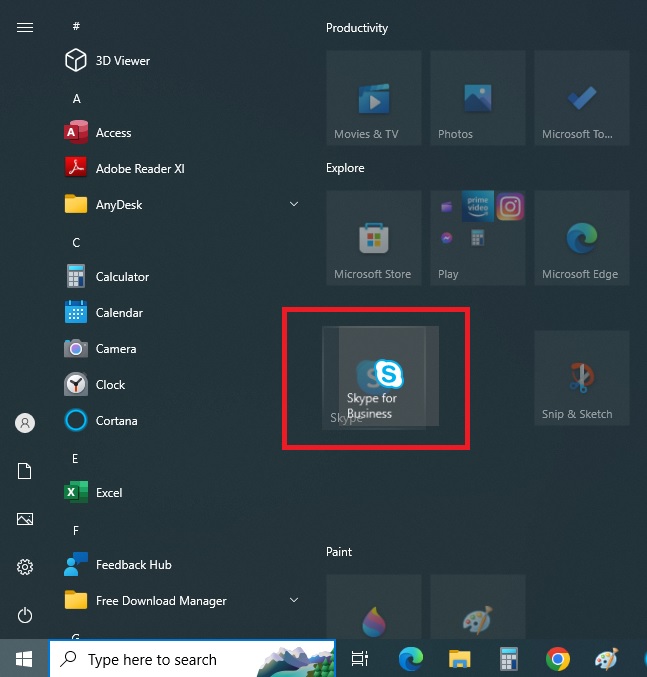
- Select the app icon you want to place in a folder with another.
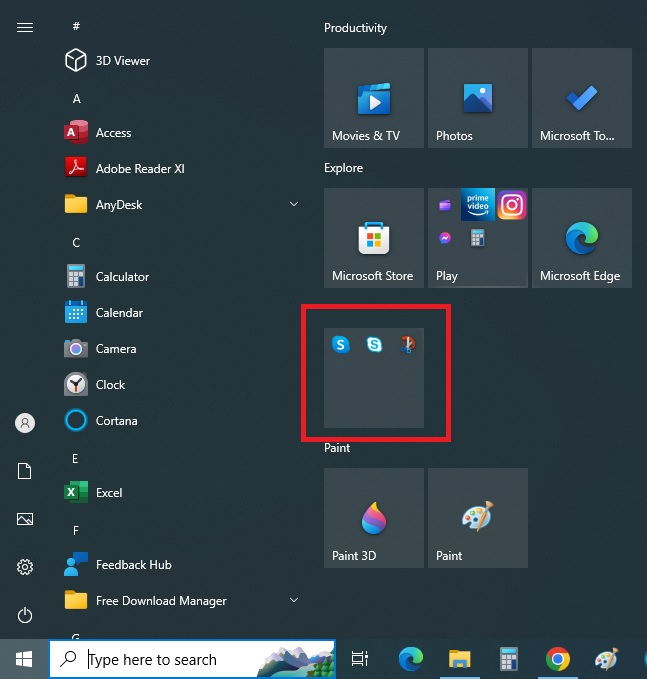
- Simply drag that app and let it go on top of the other. This will end it in the same folder, as shown below:
You can drag and drop as many apps as you want to put into the folder, which will finally look like the one marked with a red box in the image below:
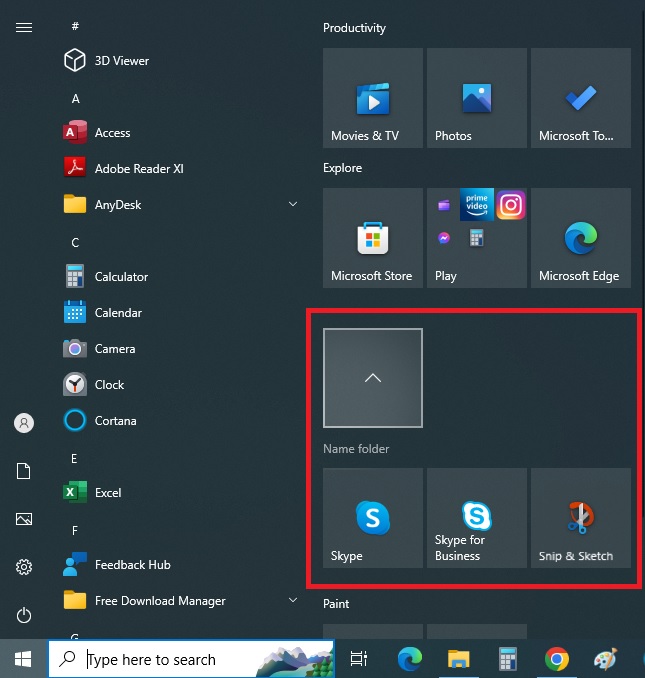
To open the folder, simply click on the tile as you would in the usual way for any tile. This will change the image of the tile. There will be a tile with an up arrow and the contents of the folder will be displayed below, as shown in the image below.
If you want to remove any app from the folder, all you have to do is simply drag it away from the folder and release it where you want it to be.
Method 6: Set the Menu to Full Screen
You can even set the Start menu to full screen if you wish. This will allow you to make the most of the screen space.
STEPS TO FOLLOW:
- Open the Start page as in Method 1.
- Slide the switch under ‘Use Start full screen’ to ON.

The Start menu, when clicked, will then look like this:
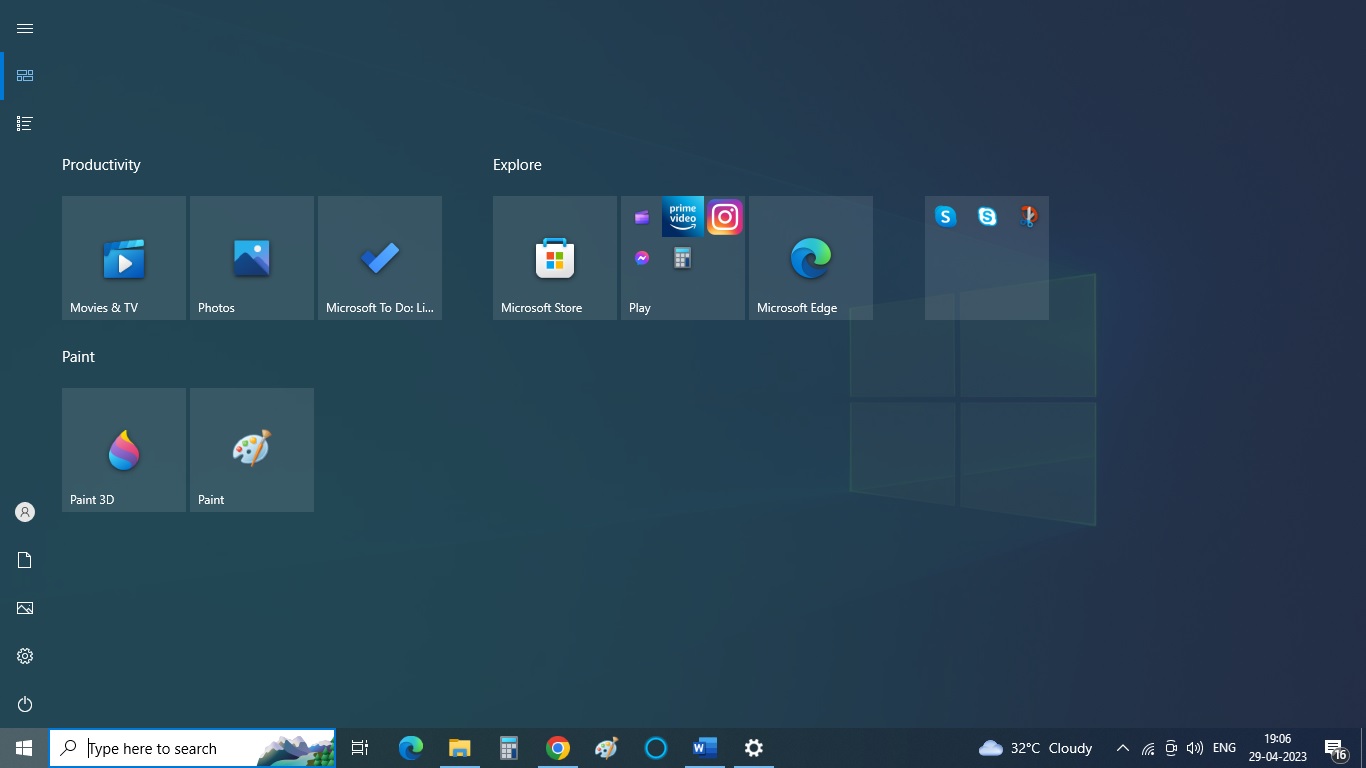
Note that in this window, you cannot see all the apps but just the pinned tiles. If you want to see all of the apps, you will need to click on the All apps icon located in the top-left corner of the screen.
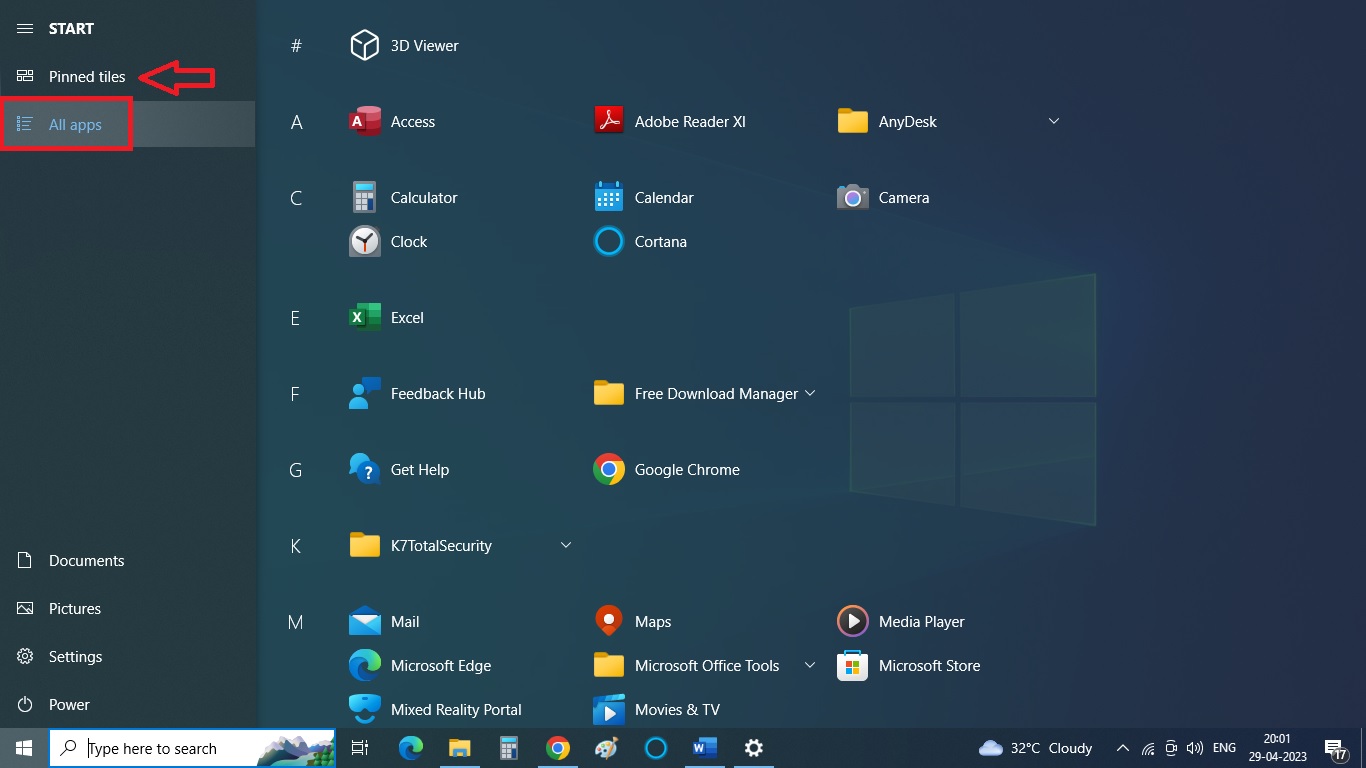
And, to go back to the pinned view, click on the Pinned tiles icon, which is indicated by the red arrow in the above image.
If you want to exit full screen, go back to the Start page and slide the switch back to OFF.
Method 7: Change the Accent Color of the Items and the Start Menu
If you want to make the Start menu look different from its traditional image, you can even change the accent color of the Start menu, which is used for the buttons, tiles, highlighted items, and others.
Usually, Windows chooses the accent color automatically from the background, but it also allows you to choose your favorite color from the grid or create a custom color from the palette.
STEPS TO FOLLOW:
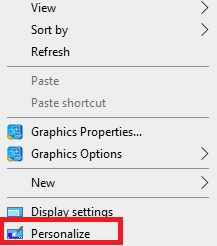
- Right-click on a blank space on the desktop and select Personalize from the drop-down menu of options.
- Choose Colors from the left panel of the Personalization page.
- On the right side of the window, click on the arrow in the box under ‘Choose your color.’
It may be selected as Custom by default but you can choose from Light or Dark as well. Click on the small down arrow in the right side of the box to find the options in a drop-down menu.
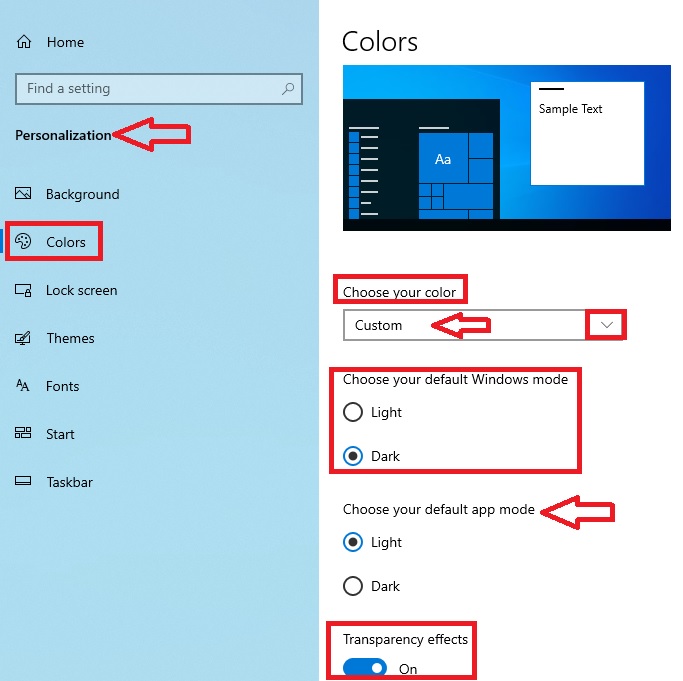
Just under it, as you can see in the above image, you can Choose your default Windows mode or app mode by clicking on the small circle next to Light and Dark.
There is also a slide switch under Transparency effect that you can set to ON if you want to see through the Start menu, taskbar and action center to the windows beneath.
Note:
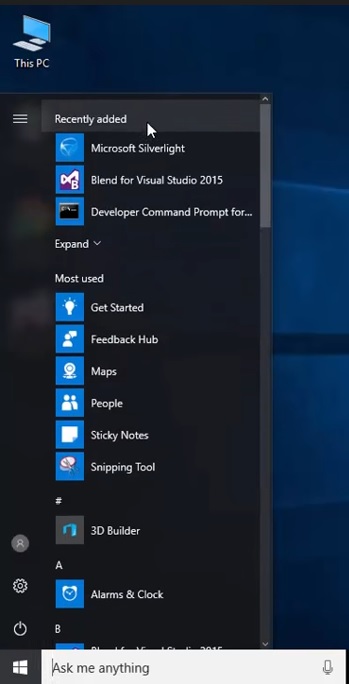
If you choose the dark app mode, the background will change to black, like this:
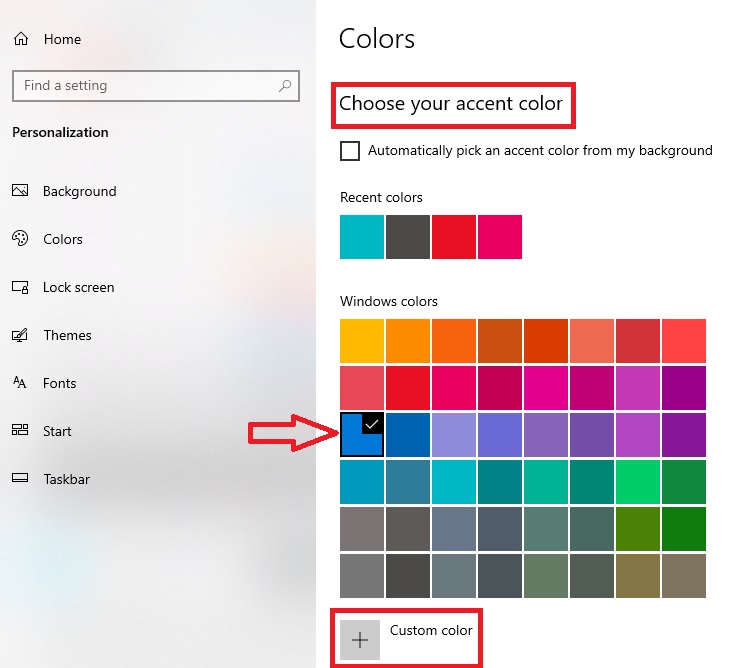
Now, to select the accent color you want, you can choose one from the grid.
If you want to create a new color, you can alternatively click on the Plus button next to Custom color button below the grid.
Click anywhere on the palette to Choose a custom accent color. You can even adjust the intensity of color by using the slider below the palette.
You can see how it will look from the Color preview and whether or not the color will make it difficult to read, when and if it is applied.
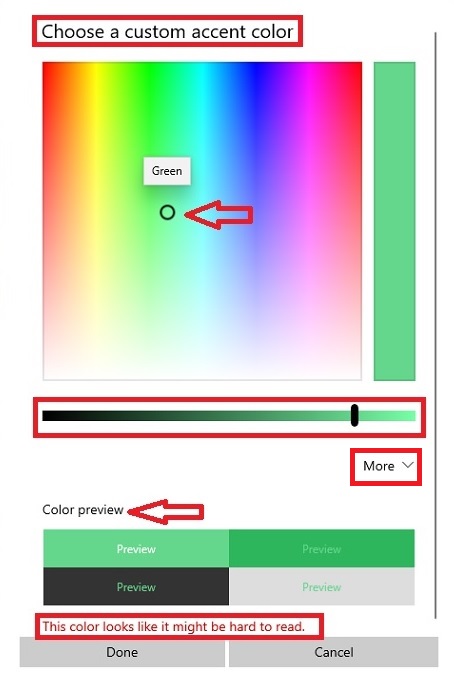
If you want to make some more adjustments, click on the small down arrow next to More, as shown in the image above by a red box.
It should change to Less with an up arrow, as shown in the image below, again by a red box. This will allow you to make changes in the RGB (Red, Green, Blue) value and Hue Saturation Value (HSV) scale.
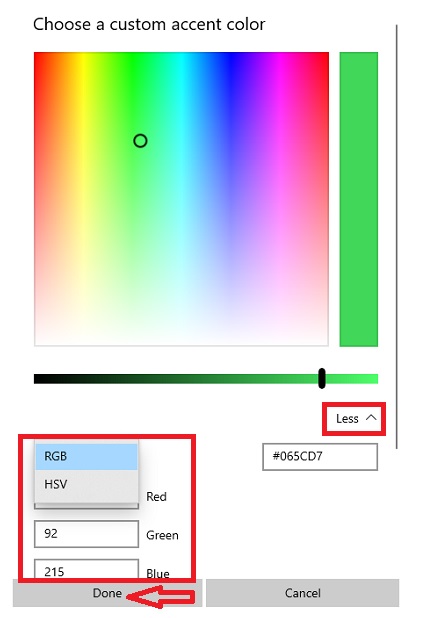
Finally, click on the Done button to make the changes.
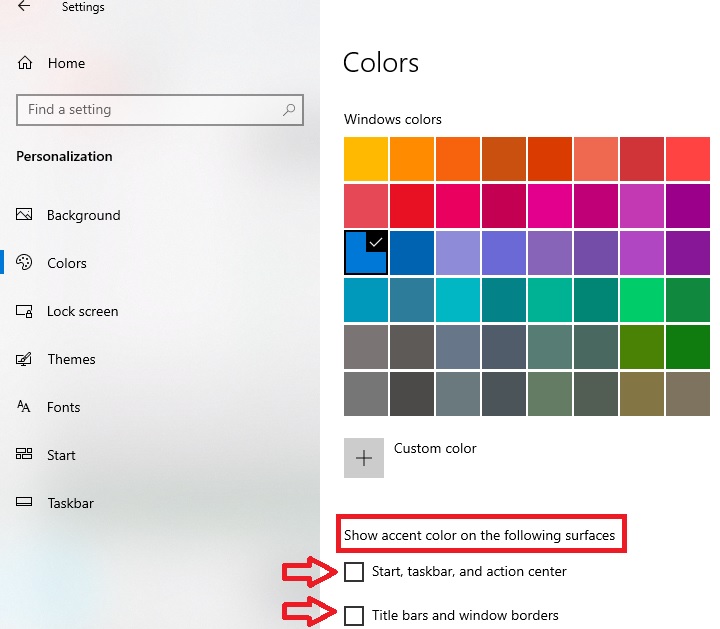
Now, whether you choose custom colors or Windows colors, you can choose where Windows should show the colors.
You can check the small square boxes under Show accent color on the following surfaces next to ‘Start, taskbar, and action center’ or ‘Title bars and window borders,’ as shown in the image below by two red arrows:
All these changes will be applied immediately. Simply close the window of the Settings app and take a look at your newly customized Start menu.
Method 8: Remove the Tile Container to Make it Classic Start Menu
You can even make the Start menu look like the old version without the tile container.
STEPS TO FOLLOW:
- Simply right-click on each and every app icon in the tile container and unpin it, like you did in Method 2.
- Drag the side of the menu, if you have to.
The menu will typically look like this:
Method 9: Change the Name of the Start Menu Tile
If you do not like the name given by default to the tile in the Start menu, you can also change it to your liking.
Note:
You may not be allowed to rename a few specific types of apps.
For example, assume that you want to change the name of the OneNote app to One Note, with a space in between the two words.
STEPS TO FOLLOW:
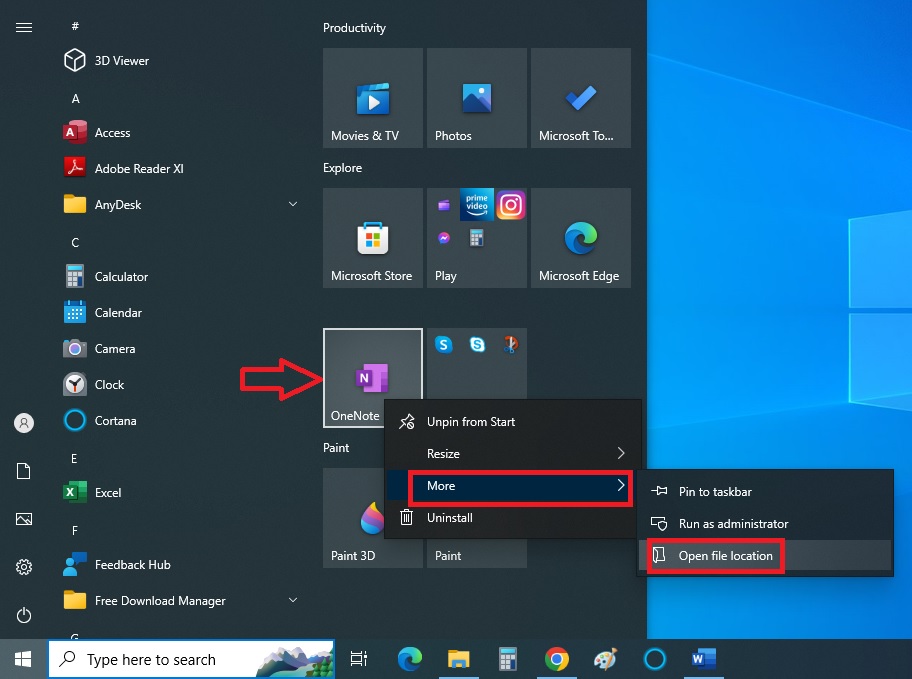
- Right-click on the particular tile on the Start menu that you want to rename, OneNote in this case.
- Click on the small arrow next to More in the drop-down menu.
- Go to and click on the Open file location option from the submenu that appears.
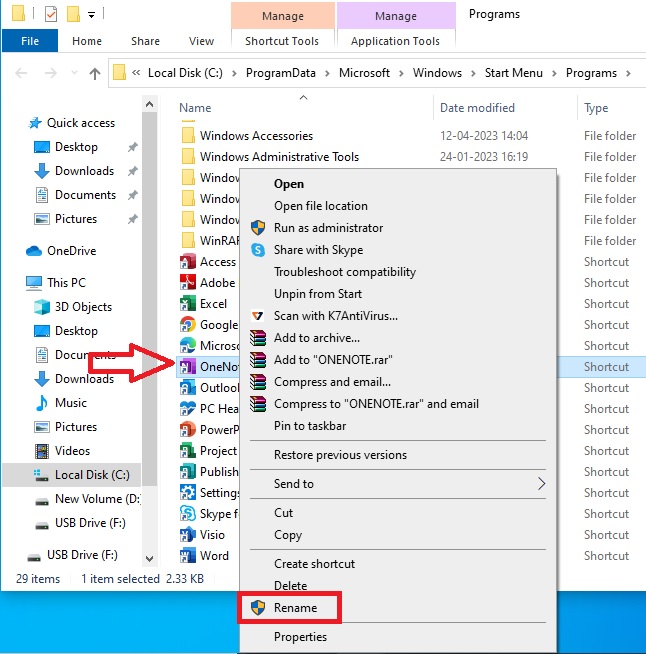
This will take you to the OneNote file in the Windows Explorer, directly.
- Right-click on the file.
- Select Rename from the menu.
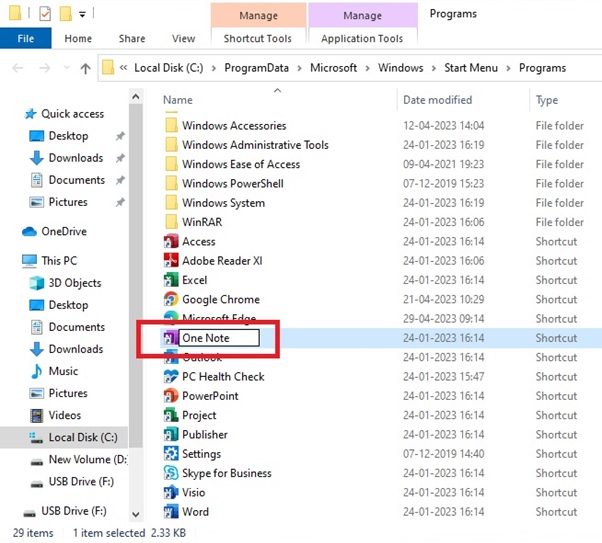
- Change the name of the file to One Note.
- Close the window.
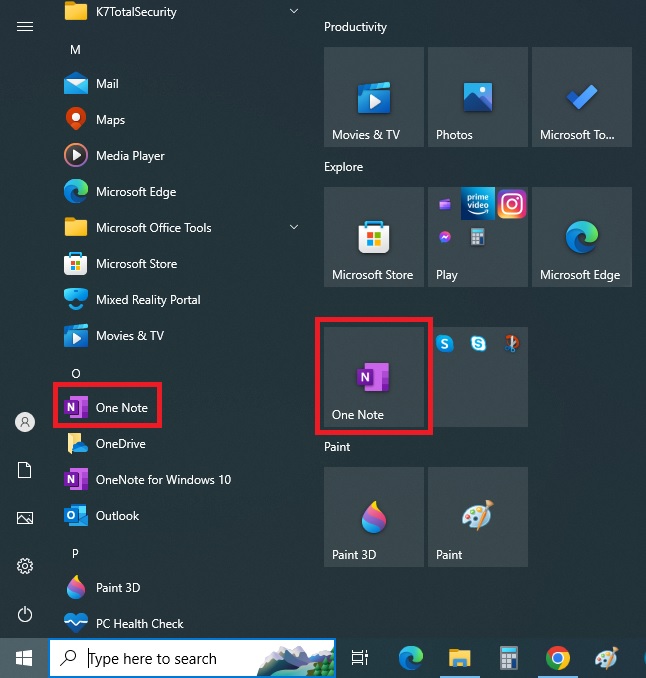
Open the Start menu again. You will find that the name has been changed, both in the tile container section as well as in the app menu section on the left of the Start menu, as shown in the image below:
Method 10: Change the Icon of the App
Almost in the same way as above, sometimes you can even change the name of the icon used for the apps in the Start menu, provided you are allowed to.
STEPS TO FOLLOW:
- Follow the first few steps as above to reach Windows Explorer and right-click on the file. (One Note, as in the above example).
- This time, select Properties.
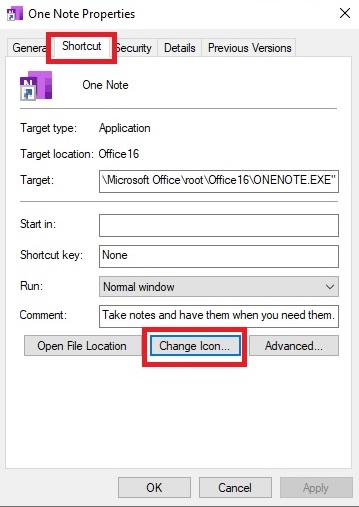
- Go to the Shortcut tab in the new One Note Properties window that appears.
- Look for the Change Icon button at the bottom in the middle and click on it.
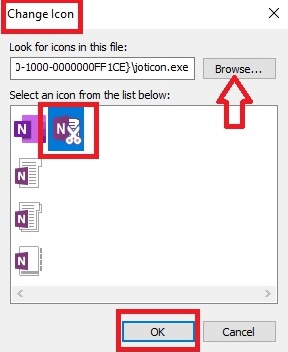
- Choose any available icon from the list of icons displayed in the Change Icon window.
Alternatively, you can also click on the Browse button next to the box under ‘Look for icons in this file’ to have more options to choose from any icon from the library on your computer.
- Click on the OK button.
Now, click on the Apply button, which was grayed out earlier in the One Note Properties window.
You may see a window pop up saying Access Denied because ‘You will need to provide administrator permission to change these settings.’
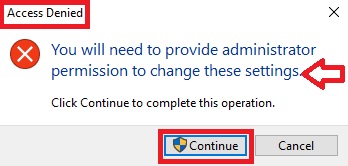
- Simply click on the Continue button.
- Then, click on the OK button in the One Note Properties window to close it and end the process.
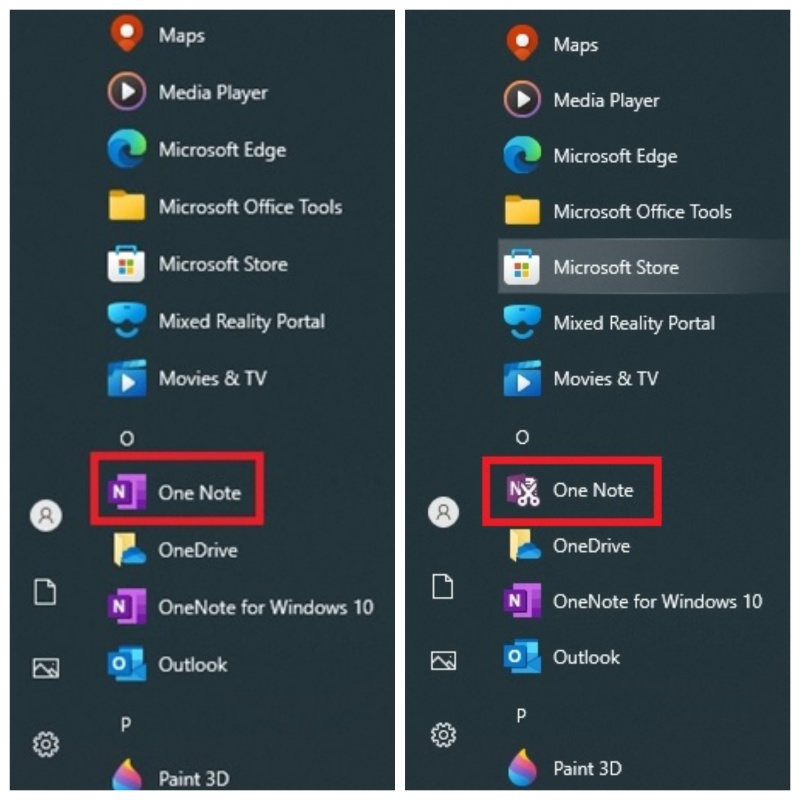
You can now see that it has changed the icon of One Note in the all-app section in the Start menu.
Conclusion
So, those are all the ways in which you can customize the Start menu on Windows 10.
You may apply any or all of them to make it look different from the default menu and even add to your convenience while using it, making it easier for you to access the apps as and when required while working on any project.