
You may want to or have to reset your PC sometimes for some reasons, but sometimes, even if you try your best, it may not reset. It may show error messages in different forms such as “There was a problem resetting your PC. No changes were made” and others.
However, this is a common issue with common reasons, and fortunately, it has some common and easy fixes.
Here are some easy solutions to try out when you see such a message and restore your computer system back to normal.
KEY TAKEAWAYS
- In an event when a PC cannot be reset, your computer system will either remain in the same state or get stuck in a reset loop.
- One of the simplest fixes to this issue is to run an SFC or System File Checker scan or to reboot your PC in Safe Mode and try again.
- Performing a clean install may also fix the problem as much as using a recovery drive would.
- One quick and easy fix for this issue is using the startup repair function by entering into the Windows Recovery Environment (winRE).
- Renaming the system and software registry by using the Command prompt may also rectify the problem sometimes.
In This Article
Why is Your PC Not Letting You Reset?
One of the most common reasons for a user not being able to reset a PC is the existence of corrupt system files, and especially when the key files are deleted or damaged.
Whether you are using Windows 7, 8, 10, or 11, you may encounter this error, and there are also a few other smaller reasons that may prevent the computer system from performing this specific operation. These are:
- The Windows 10 recovery image may be corrupted.
- The functionality of the system may be hindered due to malware and virus infections.
- A lack of continuous power supply or fluctuations may also affect the operation.
- Windows may not be activated sometimes, and that may also prevent a system reset operation.
- The DLL or Dynamic Link Library file may also be corrupted and cause the problem.
- When you have a damaged recovery partition, it may prevent the computer from performing the reset operation.
In addition to the above, there may be several other hardware and software problems within your computer system.
You can also know these internal reasons that may be resulting in such an issue by using specific commands such as dir c:\ /a:sh using the Command Prompt.
This will enable you to see the $SysReset folder on the root directory of the C: drive and open the file C:\$SysReset\Logs\Setupact.log to find the specific reason.
Now, once you know the specific reason for your PC being unable to reset, you can try one or a couple of the solutions mentioned in the next part of this article.
How to Fix a PC Not Able to Reset?
Since the most common reason for a PC not being able to be reset is corrupted files, one of the most common fixes for it is to run an SFC scan.
This will repair the files. Sometimes, clearing the Basic Input Output System or BIOS data and resetting it may also help resolve the problem.
In addition to that, some other common and easy fixes to the issue, depending on the cause, are:
- Performing a system restore. if there is a system restore point feature. will take the system back to the point before the issue occurred.
- Using different reliable software tools for resetting or creating a new Windows bootable USB drive may resolve the problem.
- Renaming software and the system registry using the Command Prompt and entering Windows Recovery Environment (WinRE) may also prove to be an effective solution.
- A fresh installation of Windows or refreshing Windows Defender may also help in rectifying the issue.
- When small, common issues result in such a situation, often performing startup repairs may prove to be a quick and effective fix.
All of these fixes are applicable to all Windows operating system versions.
No matter what, ensuring that you have a proper backup of all your important files is mandatory before you go ahead with any of the solutions mentioned below.
This is because such issues usually occur unexpectedly without giving any prior signals.
Now, read on for the complete list of solutions to a ‘problem in resetting your PC’ error.
Method 1: Using Different Commands
There may be issues with the hardware and software of the system that may be preventing the PC from performing a reset operation.
Therefore, in such situations, probably the best and smartest move is to use the built-in Command Prompt and enter different commands. This may help resolving the issue and also in knowing the specific reasons for the issue.
STEPS TO FIX:
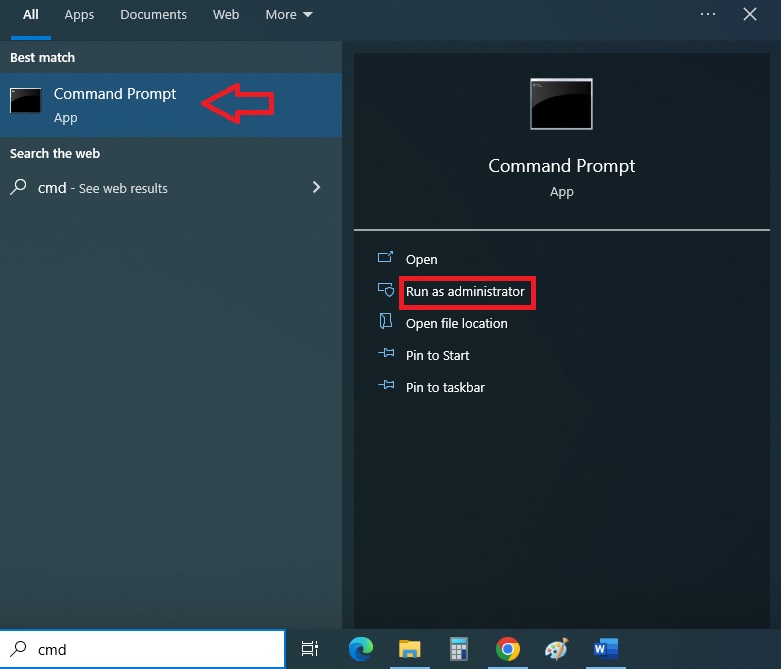
- Go to the Search bar.
- Type cmd in the box.
- Select Run as administrator.
- Press Enter to open Command Prompt.
- Type in the command sfc /scannow.
- Press Enter.
This will examine the system and report whether or not there are any integrity violations.
- If there is any, type in the command dism /online /cleanup-image /restorehealth.
- Press the Enter key.
- When done, type in exit.
- Press Enter.
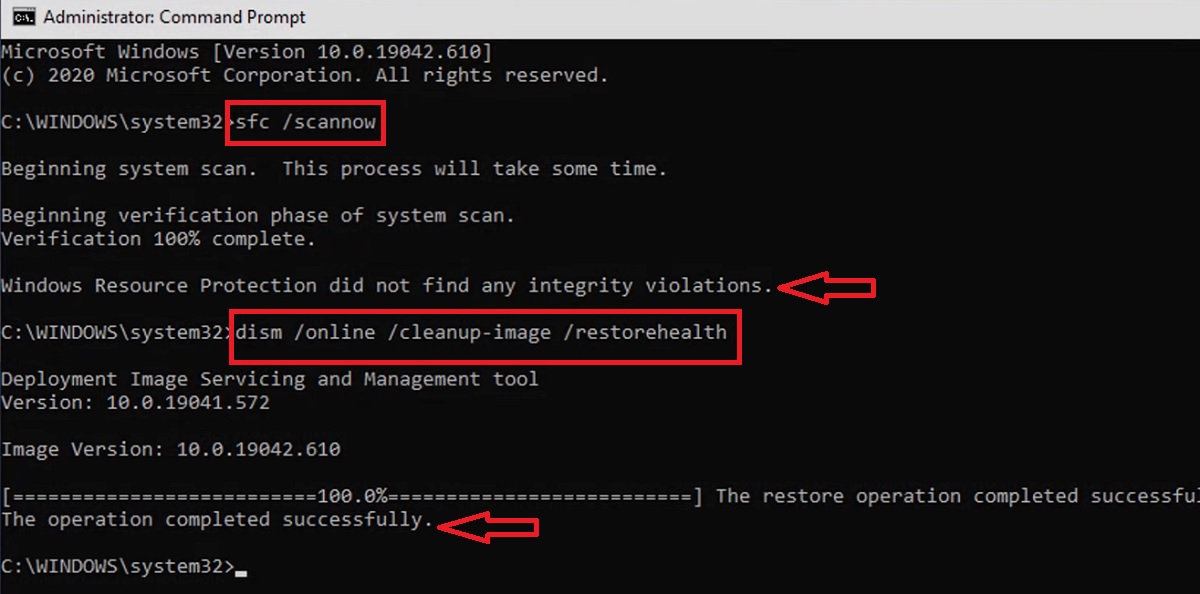
Restart your PC and try resetting it again. This may solve the issue.
If you still encounter the PC not being able to rest error, you may need to enter a few other commands on the command prompt. However, the entire approach this time will be different, as follows:
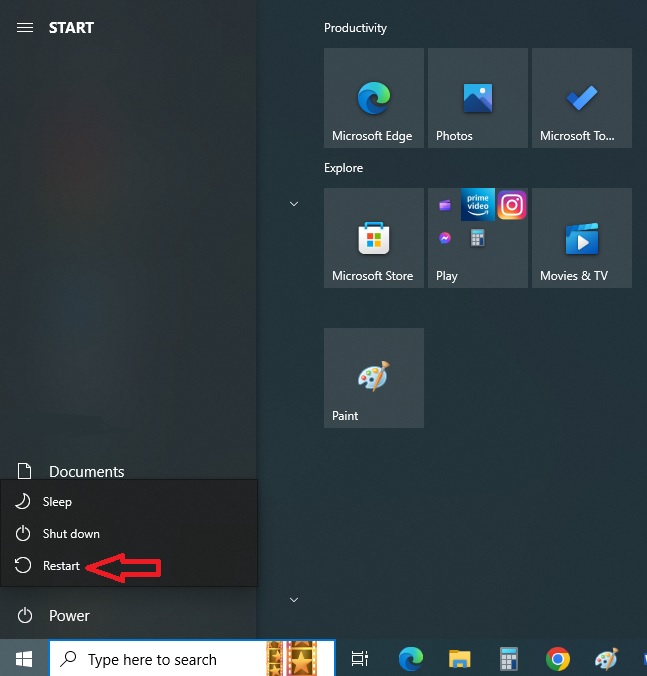
- Go to the Start menu and Restart the PC by holding the left Shift key down to go to this menu.
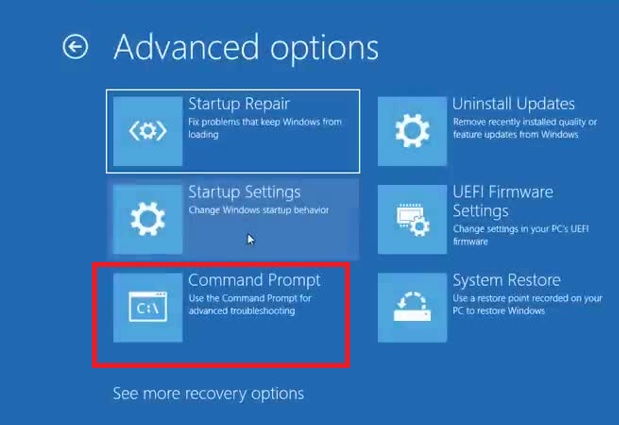
- On the new window, go to Troubleshoot.
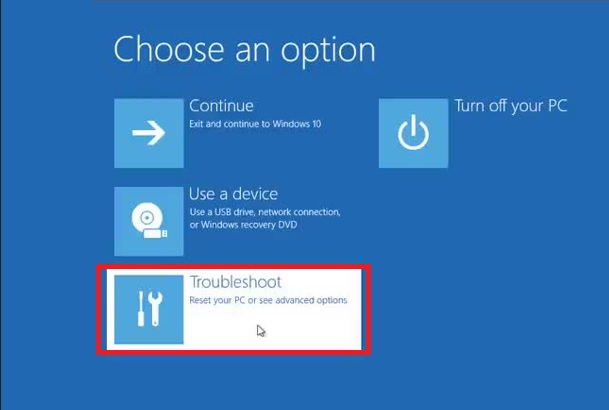
- Select Advanced options.

- Choose the Command Prompt option here.
Now, type in the following commands:
- cd %windir%\system32\config.
- del software.
- del system.
- ren system system.001.
- ren software software.001.
All of these above commands should be entered one at a time, pressing the Enter key after each.
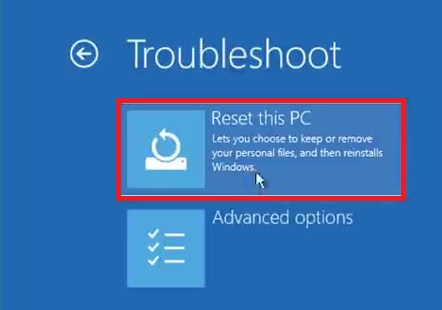
Once the system has done running the necessary checks, go back to the Troubleshoot window and:
- Select Reset this PC option.
- If you are allowed, select the Keep my Files option.
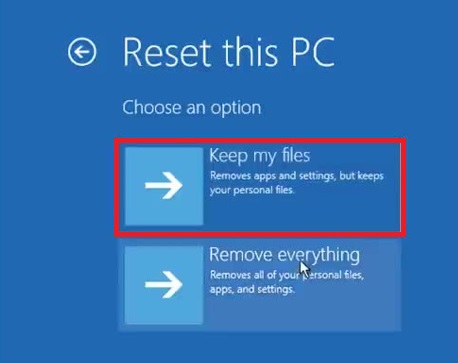
- Then choose one from Local reinstall or Cloud download.
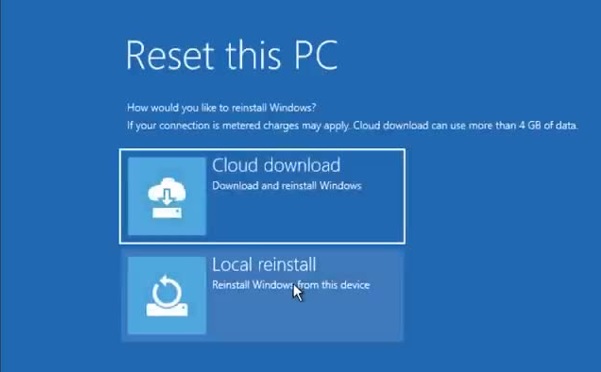
When the system is ready, follow the on-screen instructions to get the issue resolved.
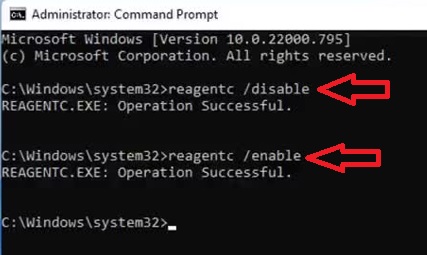
Now, if that does not work, go to the command prompt by typing cmd in the Search box.
- Then, type a new command reacgentc /disable in the Command Prompt and Press Enter.
- When done, type in the command reacgentc /enable and Press Enter. This will restore and reset the PC.
Method 2: System Restore
If you still have issues, then there may be some issues with your computer system itself, and it therefore, should be restored. This is a good option for those PCs that come with the System Restore feature enabled.
STEPS TO FIX:
- Go to Troubleshoot and then on the Advanced options menu as above.
- From the new window, select the System Restore option, if the option is available.
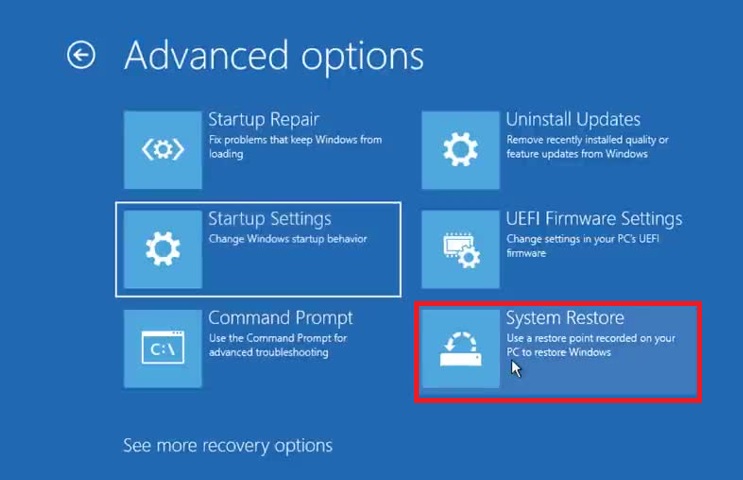
- Click on the Next button on the Restore system files and settings page to start the process.
You can also restore the system in a different way.
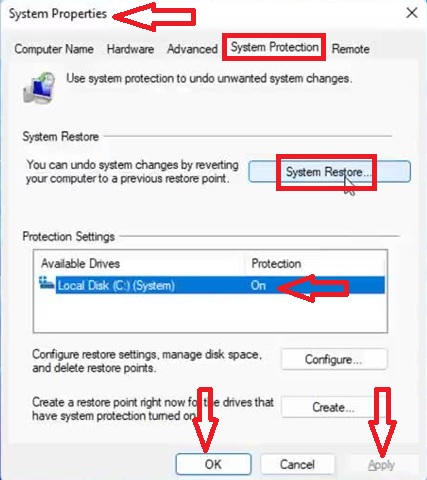
- Go to the Search bar.
- Type sysdm.cpl
- Click on the OK button.
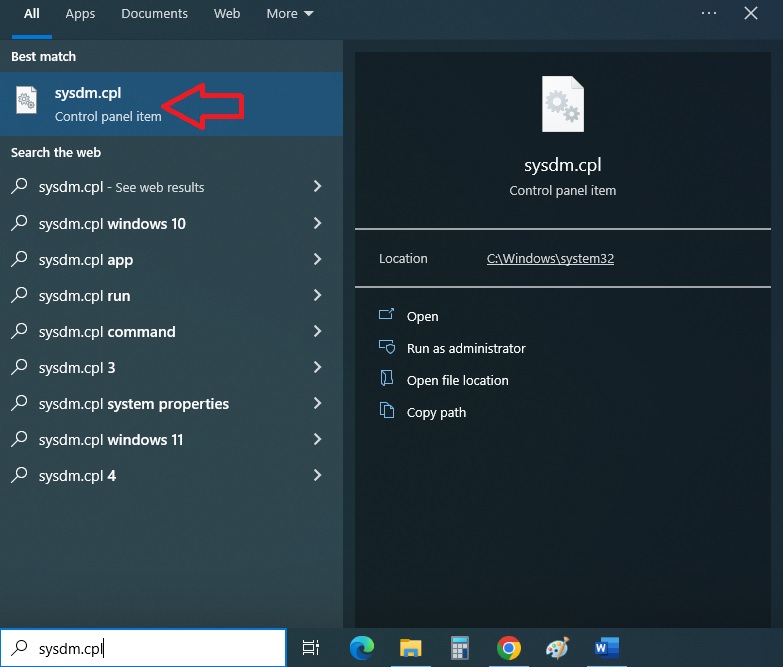
- This will open up the System Properties window.
- Go to the System Protection tab in the window.
- Click on the System Restore button if you see that it is not enabled.
- Click on the apply button and then click on the OK button.
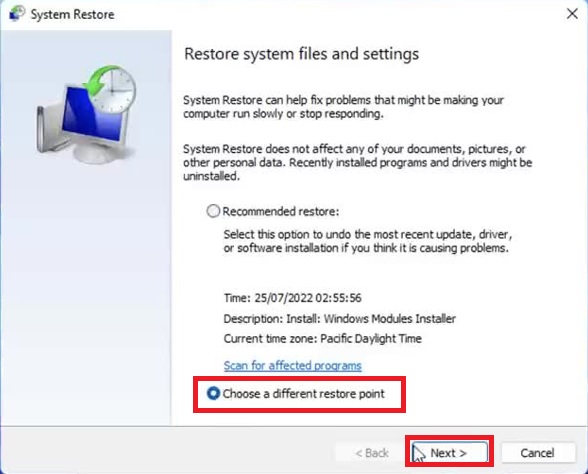
- In the new window, click on the circle beside ‘Choose a different restore point.’
- Click on the Next button.
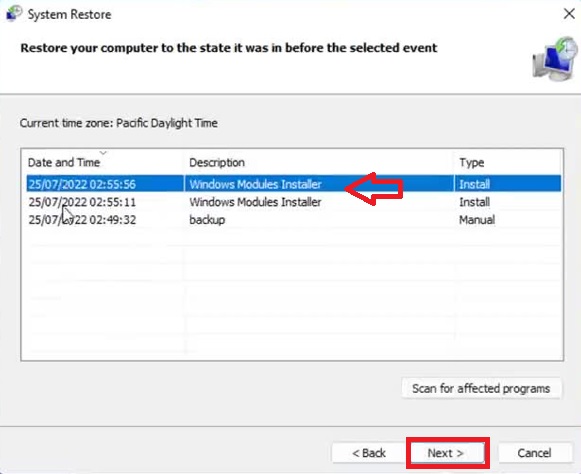
- Choose the state you want your system to restore to a state before the problem started from the next window.
- Click on the Next button.
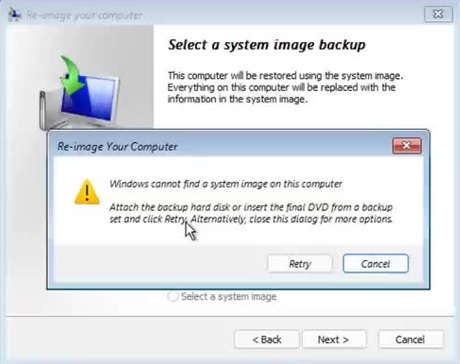
Method 3: System Image Recovery
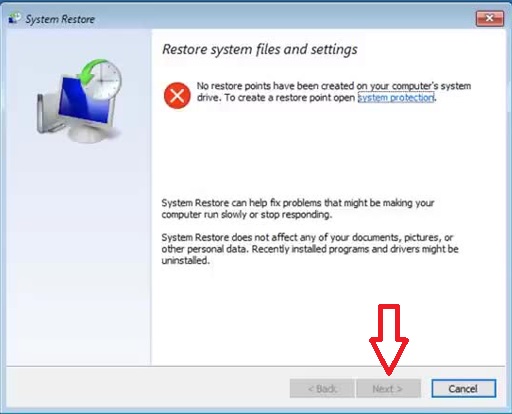
If running a system restore function is not possible on your PC, you can use the system image recovery option to resolve the issue with resetting your computer.
STEPS TO FIX:
- Go to Troubleshoot and advanced options like before.
- Click on System Image Recovery.
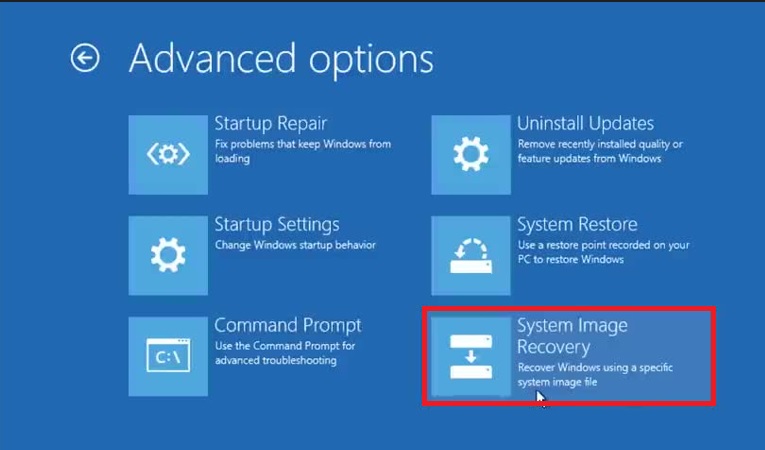
- Click on the Next button.
However, you will need to have a system image backup on your system. Otherwise, you will get an error message like this on top of the window:
Method 4: Using RegBack
The files in the RegBack folder can also help in resolving the issue. For that, you will need to copy all the files in this folder to another location.
STEPS TO FIX:
- Restart the PC.
- Go to the Command Prompt.
- Look in the C or D Drive for Windows file by typing c: or d:
- Press Enter each time.
- Assuming that it is in the Drive D, type in the next command dir.
- Press Enter.
- When you see the Windows file in there, type in the command cd \windows\system32\config.
- Press Enter.
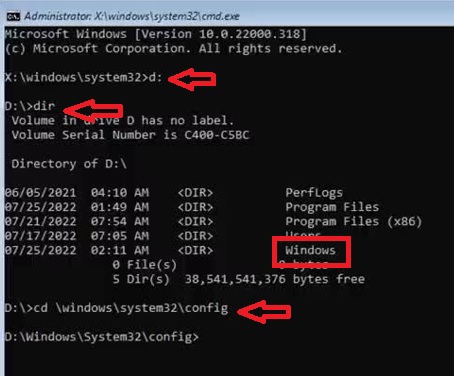
On the next prompt, type in the command dir once again and press Enter to see the files with their values.
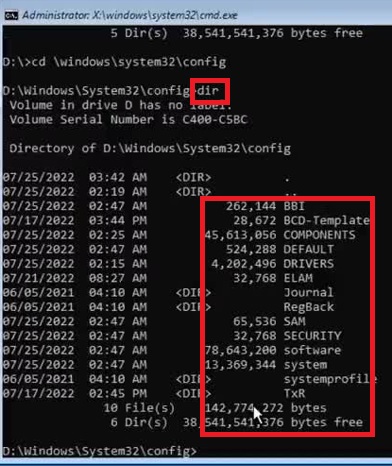
- Now, to copy these files, type in MD Backup.
- Press Enter.
- Type in copy *.* backup.
- When you see that the files have been copied, you will need to change the directory to RegBack using the command CD RegBack and press Enter.
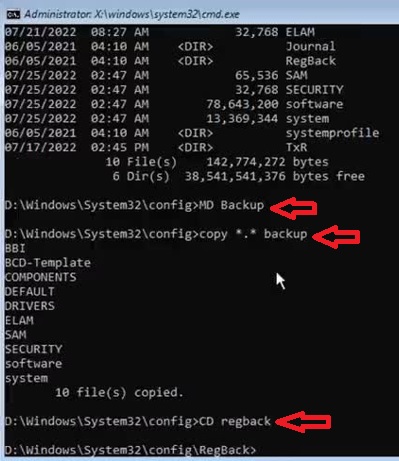
Finally, enter the following commands and press Enter every time:
- copy *.* ..
- all
- exit
The issue with resetting the PC will be resolved.
If it does not, then restart your PC and open the Command Prompt from the Advanced options in Troubleshoot as before.
- On the prompt, type in the command wmic logicaldisk get deviceid, volumename, description.
- Press Enter.
- Now type sfc /scannow /offbootdir=d: \ /offwindir=d: \Windows.
- Press Enter.
This will take some time. Once it is done, type in exit.

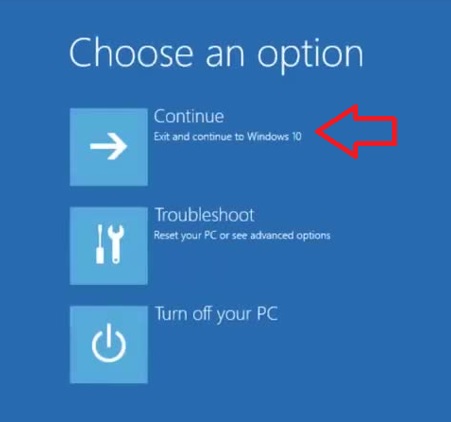
Now, click on Continue and now reset your PC.
Method 5: Using Installation Media
There may be issues with Windows in the first place that may be creating the problem. Using the Windows media tool for it will fix the issue and will prove to be reasonable.
However, make sure that you have this tool downloaded on a USB drive and follow these steps, and it should be the same as your Windows edition.
STEPS TO FIX:
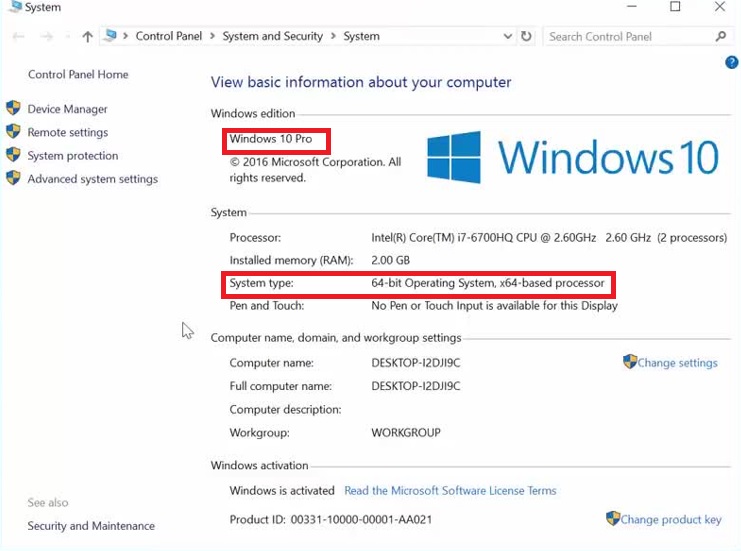
- Go to the Control Panel.
- Click on System and Security.
- Click on System to know the Windows version and architecture.
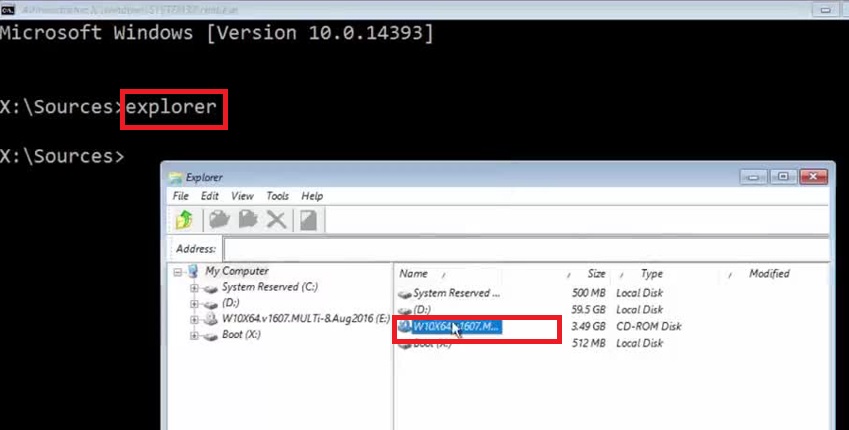
- Now, boot from the USB and select Command Prompt from the Advanced options in Troubleshoot.
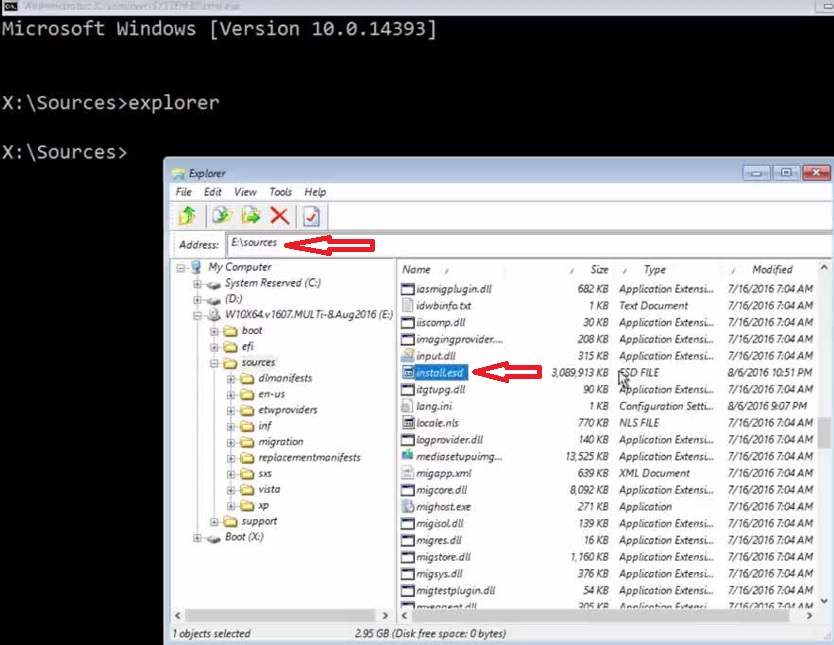
- Type in explorer.
- On the new window, navigate to the Windows Installation Media as you saved.
- Open the Sources folder.
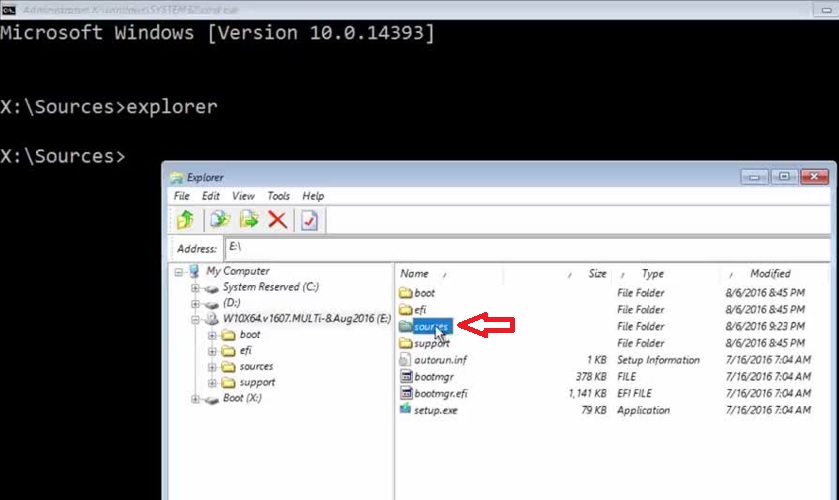
- Look for Install.esd and copy the path from above.
- Close the window.
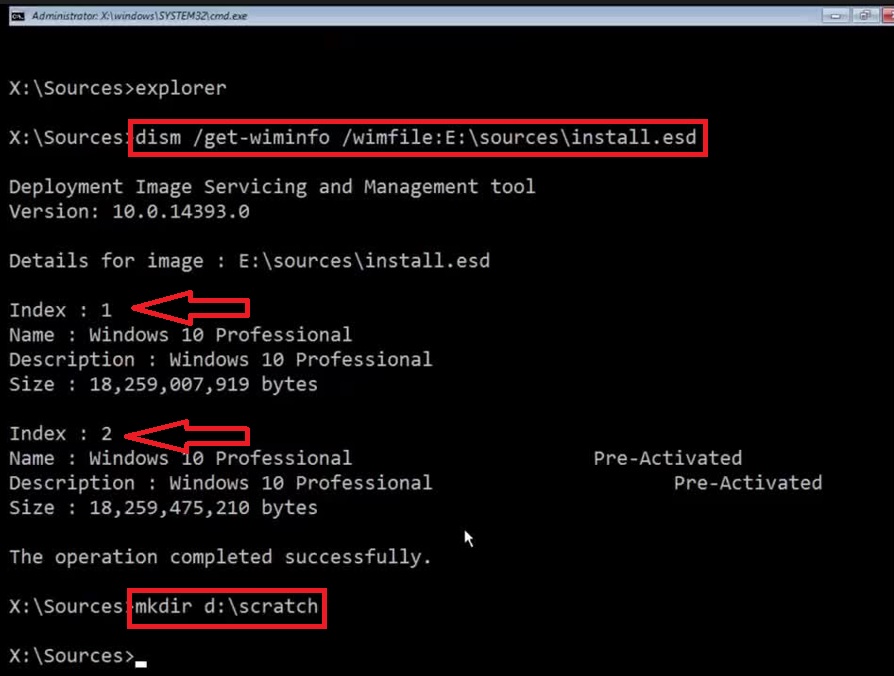
- Go to the Command Prompt.
- Type in dism /get-wiminfo / wimfile: E: \sources\instal.esd.
This will show the number of editions existing in the specific system image.
- Now, make a directory by typing in the command mkdir d: \scratch.
- Type in the command dism /image: d: \ /cleanup-image /restorehealth /source:esd:E: \sources\install.esd:2 /scratchdir:d:\scratch /limitaccess
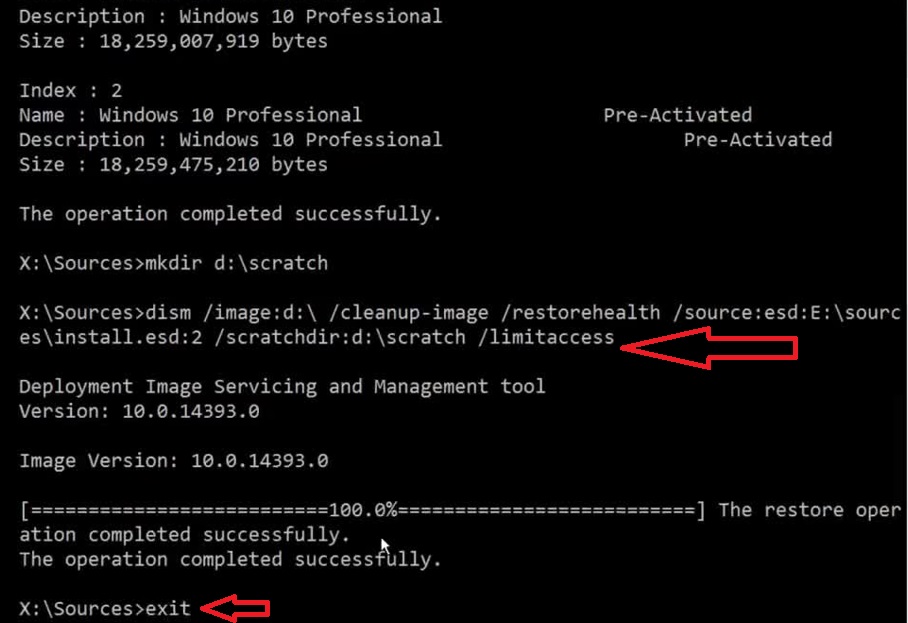
This will take some time, and when it is finished, type exit, click on Continue to reset your PC.
Method 6: Refreshing Windows Using Windows Defender
The Windows Defender tool is very useful to remove viruses and malware and refresh Windows. Therefore, using this tool may resolve the PC not resetting issue.
However, make sure that you have taken a proper backup of your personal files because these may get deleted in the process.
STEPS TO FIX:
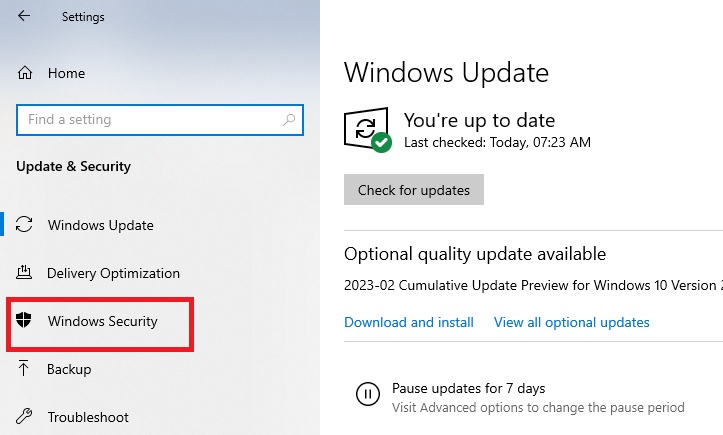
- Press Windows and I keys on your keyboard together to open the Settings app. (Alternatively, you can go from the Start menu and by clicking on the gear icon).
- Click on Update & Security.
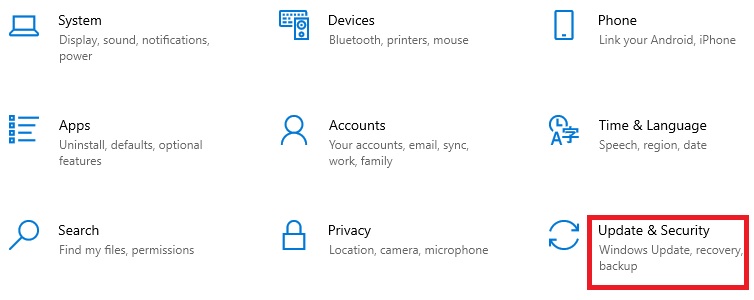
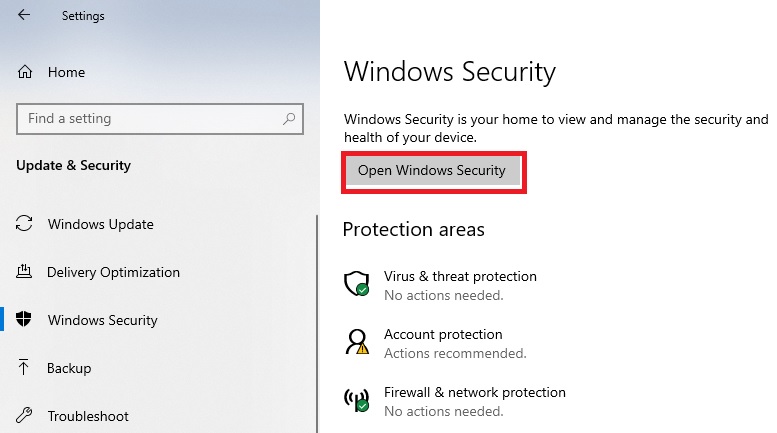
- From the left panel in the new window, select Windows Security. (This may be labeled as Windows Defender in older versions).
- Click on the Open Windows Security button or the Open Windows Defender Security Center option, as the case may be.
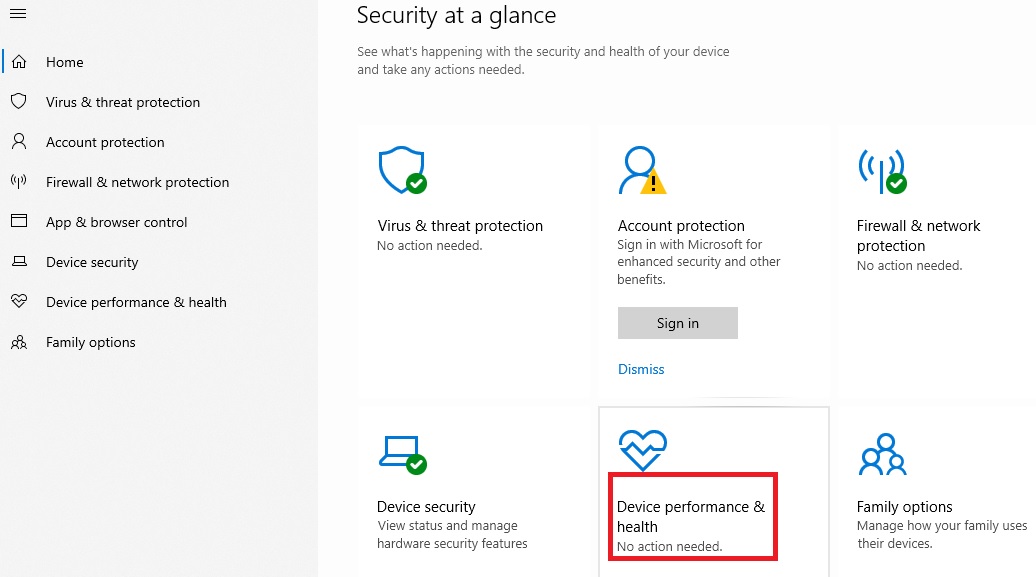
- Go down and look for Device performance & health option.
- Go to the Fresh start section.
- Click on the Additional Information option.
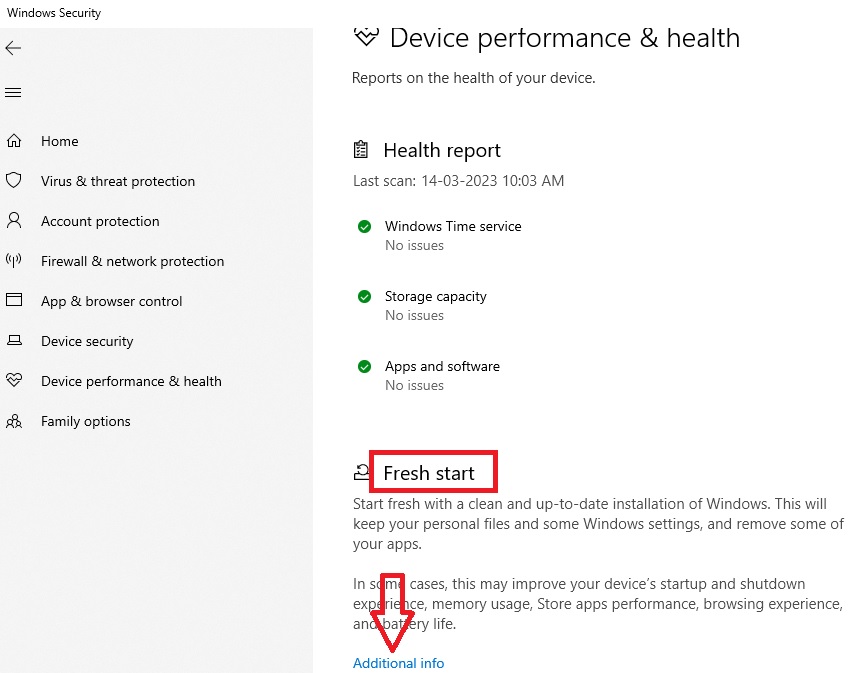
- Click on Get Started.
- Follow the on-screen instructions.
This will refresh Windows. Once your system is refreshed, try resetting your system once again.
Steps to Fix a PC Not Able to Reset from BIOS
Sometimes, you may not be able to rest your PC from the BIOS. This may happen if the settings in the BIOS do not allow performing such an operation. Here are a couple of BIOS-specific fixes.
Method 7: Resetting the BIOS
When the BIOS setting does not allow resetting your PC, changing the settings of the BIOS in the first place is therefore essential. This is because the default BIOS settings are often sufficient to make a computer system run effectively.
This is a multi-way process which involves clearing the BIOS data first and then resetting it. Since the steps to reset the BIOS may be different from one make and model of a computer system to another, one of these processes would be able to do the job.
STEPS TO FIX:
To clear the BIOS data on your PC, you can try any of the following methods:
- Switch your PC off.
- Restart it and press the specific key on your keyboard that will take you to the BIOS setup. (This may vary from one manufacturer to another PC manufacturer).
- Look for the key for Setup Defaults or Default Values or anything similar to it. This will also vary from one manufacturer to another).
- Press that specific key.
- Go to Yes by using the arrow keys on your keyboard.
- Press Enter to confirm that you want the BIOS setting to be reset to its original value.
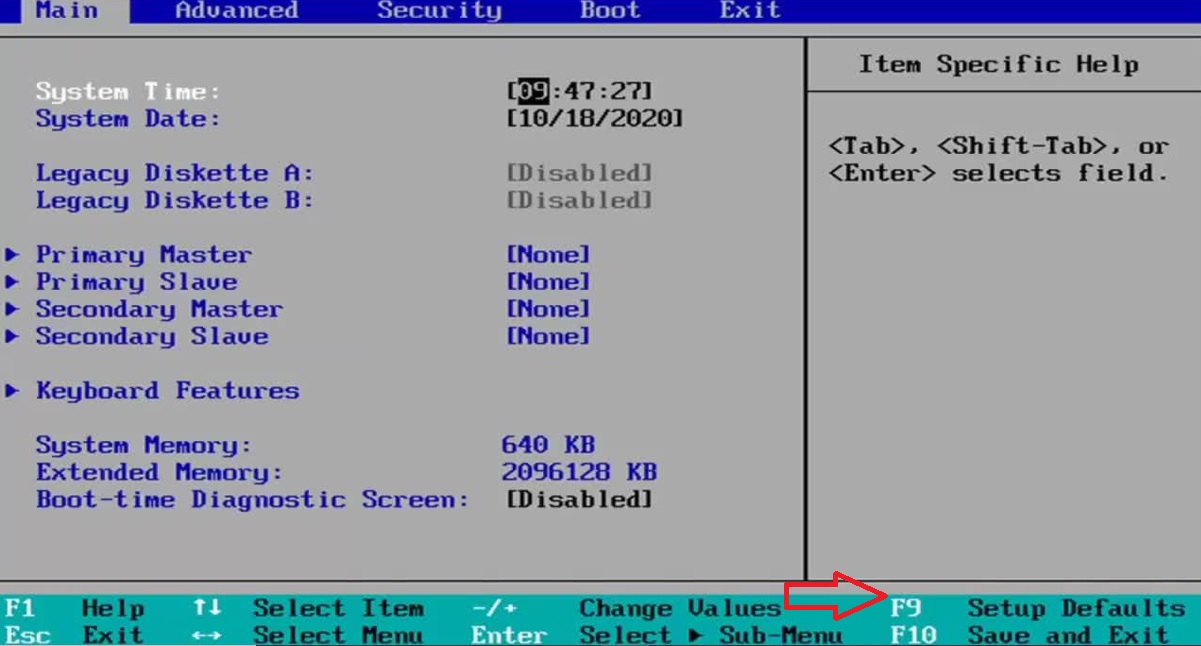
- Go to the Exit page.
- Click on Exit Saving Changes.
- Press Yes.

- Reboot the PC.
Now launch the BIOS configuration again to check whether or not the values have been changed. This should resolve the issue.
Method 8: Clearing CMOS
Another way to clear BIOS data is by clearing the CMOS using a jumper on the motherboard.
STEPS TO FIX:
- Make sure your computer is powered off.
- Also unplug the power cord.
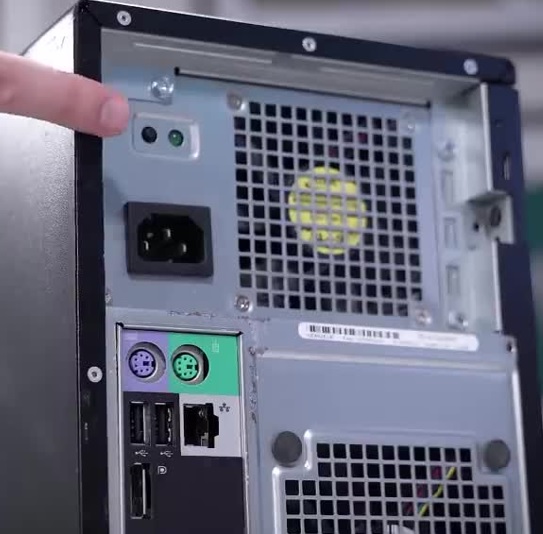
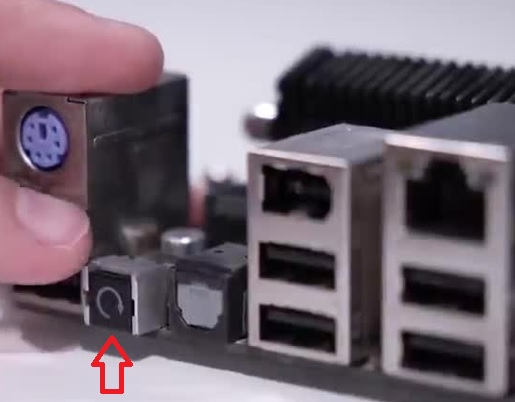
- Look at the I/O shield at the back for any switch marked CMOS clear, or a refresh sign of a circled arrow or anything similar. Press it if you find one.
- If you do not find any such switch, you should remove the cover of the computer case.
- Press the power button at the front of the CPU case to drain residual static electricity.
- You may also ground yourself by touching any metallic object.
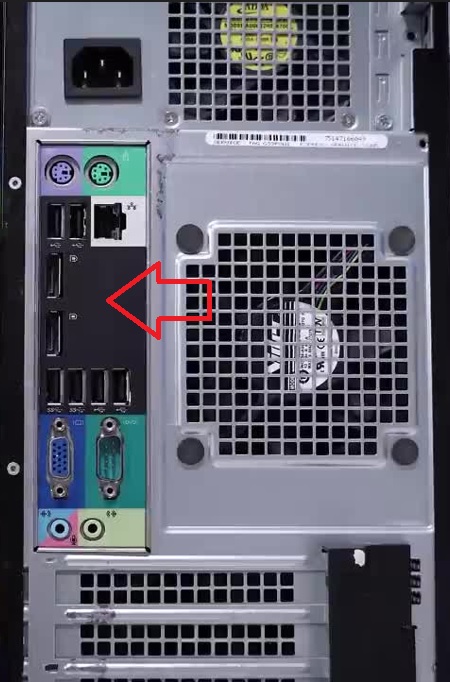
- Remove the motherboard for easy access and operation.
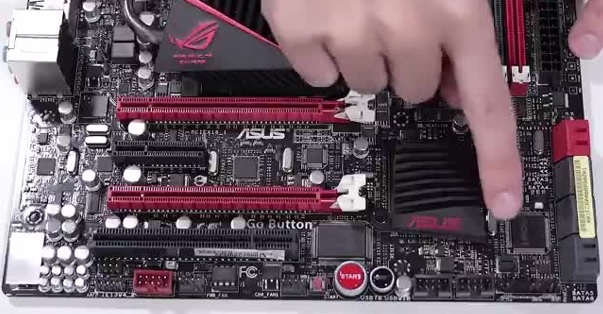
- Here you may see the CMOS clear button on the side.
- Push it and hold it down for about 3 seconds.
- Look for the jumper on the motherboard, usually located near the silver, round battery and labeled CLR_CMOS, CCMOS or anything similar. (Refer to the manufacturer’s manual for the diagram, if needed).
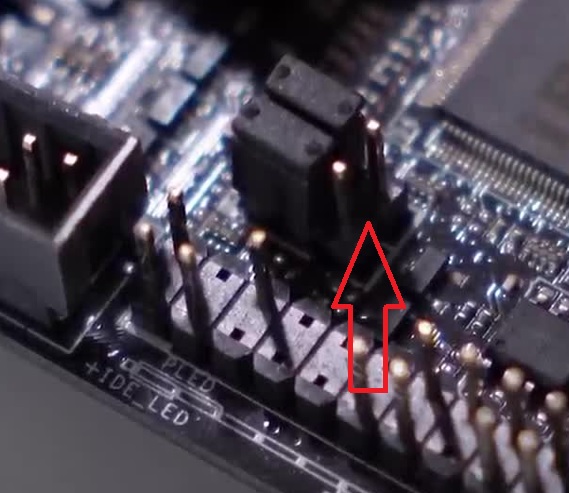
- Jump the pins by using a magnetic screwdriver and holding it for about 10/20 seconds across the two pins. (You may use a physical jumper if your motherboard is an older model).

If you remove the Complementary Metal Oxide Semiconductor or CMOS battery, and replace it back after some time, it will also do the job.
- Look for the silver-colored round battery on the motherboard. (Refer to the manual to know where exactly it is located).
- Press the clip to release the battery and remove it from its holder.
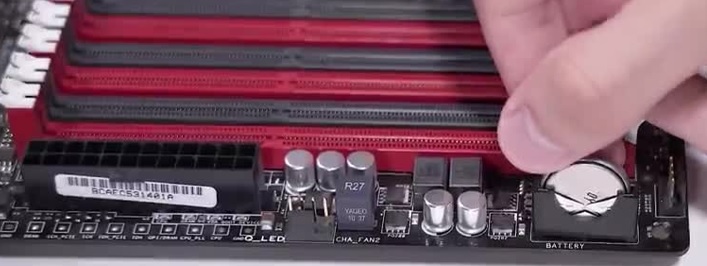
- Keep it aside safely.
- Let the computer sit idle for quite some time, longer the better.
- Replace the battery in its holder.
- Replace the cover.
- Reconnect the power cord.
- Switch your computer on.
Now, to resolve the issue, go to the BIOS and change the settings to its default, factory settings, or fallback values.
Conclusion
So, that is all about the different solutions to a Windows reset failed error.
Now that you know both the reasons for this issue and its proven fixes, you can choose one or a couple of them according to the situation and the cause.
You will find that restoring your PC back to normal is not as difficult as you thought.