In the Control Panel, there may be some icons that you want to remove, especially those that are invalid, duplicate, or non-functioning. You may uninstall it directly, but sometimes the icons may still remain.
Therefore, proper methods should be followed to remove them. If you are not aware of them, this is an article that will tell you the exact processes to follow. So, read on.
In This Article
KEY TAKEAWAYS
- The CPL file for the item should be removed or deleted in order to remove the icon from the Control Panel properly.
- Some changes in the keys and paths in the registry may also be needed to remove an item from the panel.
- You can also remove duplicate and invalid icons from the Control Panel by creating a desktop shortcut and then deleting it from the System32 folder.
- Individual apps that may or may not be showing in the Control Panel can also be deleted by the Uninstall a program feature in particular.
- Items in the panel may also be removed by using the Local Group Policy Editor.
Why Do You Need to Remove Icons from the Control Panel?
The most significant reason to remove the icons from the Control Panel is to set it up just right so that it helps while changing settings for Windows.
You will also need to remove the invalid and non-functional icons from the Control Panel because these are mainly the results of an incomplete and improper uninstallation of a software program.
Some other minor, though not entirely insignificant, reasons to remove the non-functioning icons from the Control Panel are:
- It helps with the working.
- It makes it look better.
- It helps performing maintenance tasks much more easily.
- It saves time and the hassle of scrolling through useless icons.
Ways to Remove Icons from the Control Panel in Windows
![]()
Typically, the Control Panel applets and their icons are stored in the System32 folder under Windows. These files normally have a .cpl extension. If only you remove this file, the icon will be kept from appearing in the Control Panel.
In most cases, to remove an icon from the Control Panel, you will need to look in the NameSpace location in the registry and delete it from there.
Here are a few proven methods to remove icons from the Control Panel. Most of the solutions described below will work well in removing unwanted icons from the panel, even if it is third-party software.
Points to remember:
However, please keep in mind that a few specific programs, especially the native items of Windows, such as the Device Manager and others, cannot be removed easily.
For these specific items, you will need to use the Group Policy, get into the registry and make changes in the values and paths of the keys, or take ownership of the file in the first place.
Most importantly, such removals should be made very carefully so that you do not remove any crucial or necessary item from the Control Panel.
Method 1: Removing Duplicate Icons by Creating Shortcuts
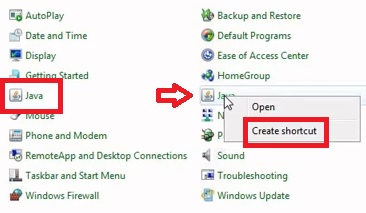
There may be duplicate icons (say, Java, for example) in the Control Panel, which, needless to say, is useless. You can remove it from the panel by creating a shortcut on the desktop and then deleting it.
STEPS TO FOLLOW:
- Open the Control Panel by typing it in the search box and hitting the Enter button.
- Right-click one of the two icons.
- Select the Create shortcut option.
- Go to the desktop.
- Right-click on the newly created shortcut.
- Select Properties.
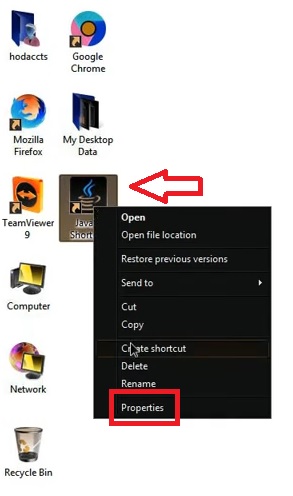
- Under the Shortcut tab in the new window, you will find the Change Icon button.
- Click on it.
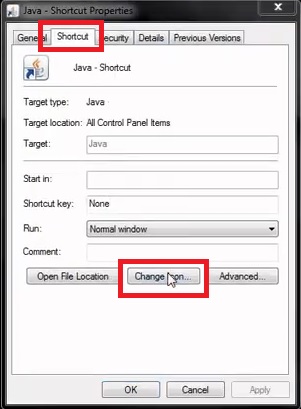
In the next window, you will see the path name of the CPL file in the System32 folder.
- Select just the filename part from the Change Icon window, as highlighted in the image below.
- Right-click and select Copy.

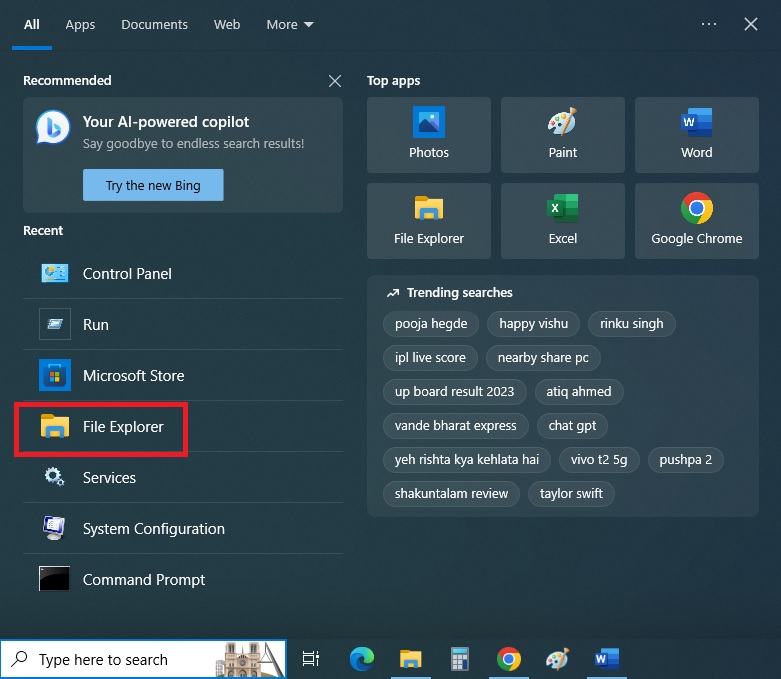
- Open File Explorer from the search box.
- Open This PC and go to Drive C.

- Select the Windows folder.
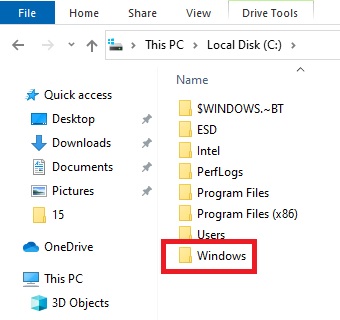
- Then scroll down in the next window to find System32 folder.
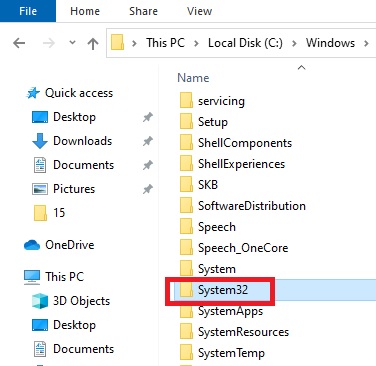
- Click on the folder.
- Go to the search bar at the top right corner of the window.
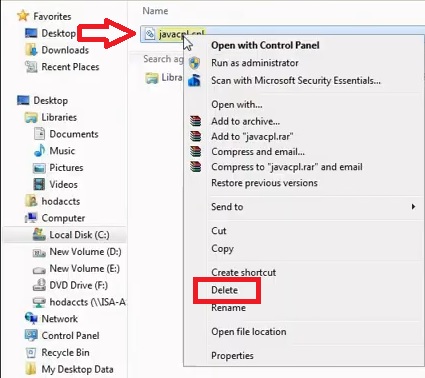
- Paste the file name you have copied.

- When the file opens, right-click on it.
- Press Delete.
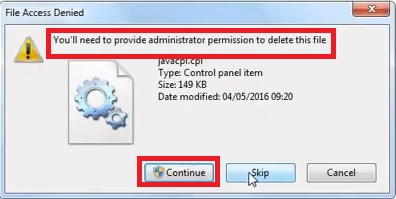
- Click on the Yes button in the Delete File confirmation window.
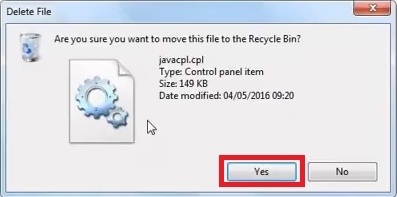
- Access may be denied since ‘You’ll need to provide administrator permission to delete this file.’
- Click on the Continue button.
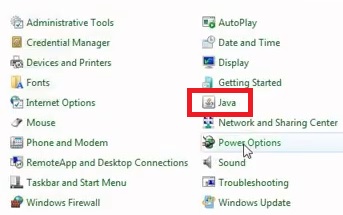
After you have deleted the icon, refresh the screen, restart your computer, and go to the Control Panel to check whether or not the duplicate icon is removed from there.
Ideally, it should be removed, and there should be only one Java icon displayed in the Control Panel, as shown in the image below:
Expert tip:
However, before you hit Delete, you will need to make sure that you did not delete the valid Java icon.
In order to check that, follow the same steps as above to open the Change Icon window. Check the path and make sure it is different.
Method 2: Removing from the Registry
You can remove the Control Panel icons by making some specific tweaks in the Windows registry.
This process, however, involves two parts. The first one is to find the .cpl file, and the second part, which itself has three different approaches, involves removing the Control Panel applet.
STEPS TO FOLLOW:
For the first part, follow the steps of Method 1 until you reach the Change Icon window and see the CPL file name.
First approach of the second part:
You can remove the icon from Policies. For this, simply follow these steps:
- Press the Windows and R keys of your keyboard together to open the Run dialog box.
- Type regedit in the box.
- Press Enter or click on the OK button.

- Click on Yes in the UAC or User Account Control window when it appears.
Now, once the Registry Editor opens, either double-click or left-click on the small arrow next to these following key folders to expand them in the exact order listed below:
- HKEY_CURRENT_USER
- Software
- Microsoft
- Windows
- CurrentVersion
- Policies
Once you are there, look for the Explorer key under it. However, it may not always be there. If it is not there, create a new key by right-clicking on Policies and name it Explorer.
- Select this existing or newly created Explorer key.
- Click on the blank space on the right side of the window and select DWORD (32-bit) Value from the New submenu.
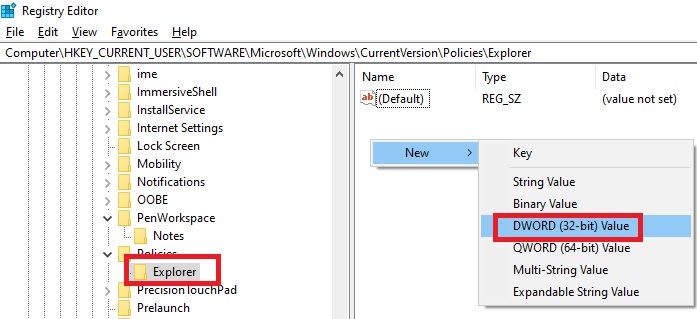
- Name it DisallowCpl.
- Right-click on it.
- Select Modify from the drop-down submenu.
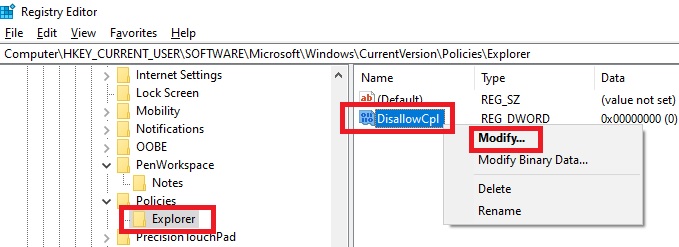
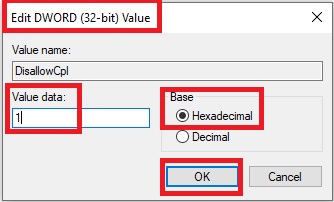
- Set its Value data to 1 when the Edit DWORD (32-bit) Value window appears.
- Click on the small circle beside Hexadecimal under Base.
- Click on the OK button.
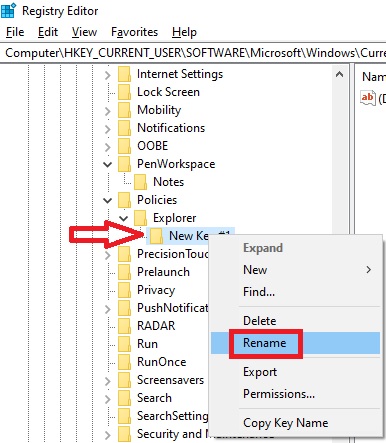
- Now right-click on Explorer to create a new key under it.
- Right-click on it and Rename it DisallowCpl.
- Select it.
- On the right side of the window, follow the same process as above to create a new String Value from the New submenu.

- Give it the name 1.
- Right-click on it and select Modify as before.
- Set the Value data of it using the name of the Control Panel applet you want to remove, say, AutoPlay.

The final representation will be something like this:
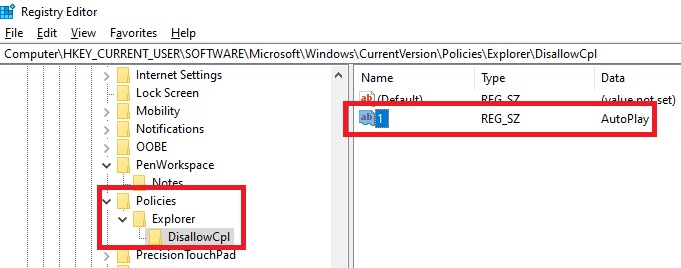
(Here, you can simply type the label of the applet you see in the Control Panel. There is no need to .cpl file name in this case.)
You can create as many String values as you want in this case, as the number of Control Panel applets you want to remove. Just name them 2, 3, 4, and so on, and set their values according to the specific applet label.
Second approach:
This is the converse of the first approach, where you instruct Windows to display only the necessary applets and remove or hide the others from the Control Panel.
All the steps to follow in this case are the same as in the second process with the only difference being that you should create the new DWORD value for the Explorer key as RestrictCpl.
The image below represents clearly what the final result will be, assuming that the AutoPlay applet is to be removed from the Control Panel:
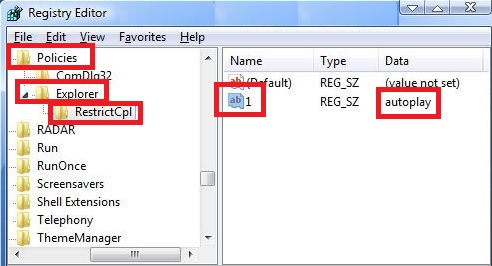
As in the above approach, you can create as many String values as you want in this case as well.
Third approach:
Apart from the above two methods, you can also follow an alternative approach to removing the icon from the Control Panel key folder.
Open the key folders in this exact order:
- HKEY_LOCAL_MACHINE
- SOFTWARE
- Microsoft
- Windows
- CurrentVersion
- Control Panel
When you have reached this far, these are the next steps to follow, which are similar to the steps of the first approach with just the difference in the nomenclature:
- Right-click on the Control Panel.
- Under this key, create a new key with a different name, say, ‘don’t load.’
- Go to the right-side pane of the window.
- Click on a blank space there.
- From New, select String value to create a new one.
- Give it the name of the .cpl file you want to remove from the Control Panel.
- Set its value to ‘no.’
This will remove the icon from the Control Panel. If you want to have it back, follow the same steps, and in the last step simply set the value to ‘Yes.’
Method 3: Via Group Policy
You may also use the Group Policy feature to remove the icons from the Control Panel.
STEPS TO FOLLOW:
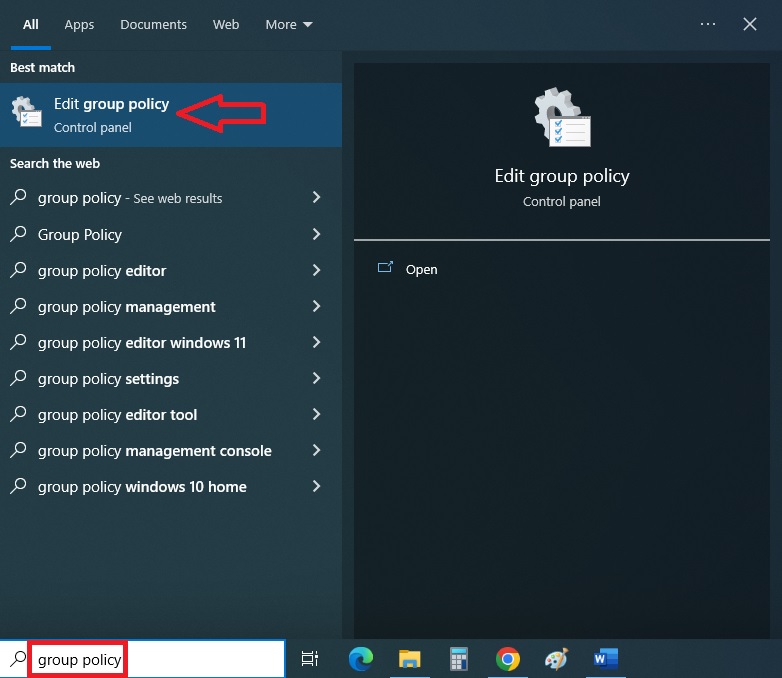
- Go to the Search box.
- Type in group policy.
- Hit Enter.
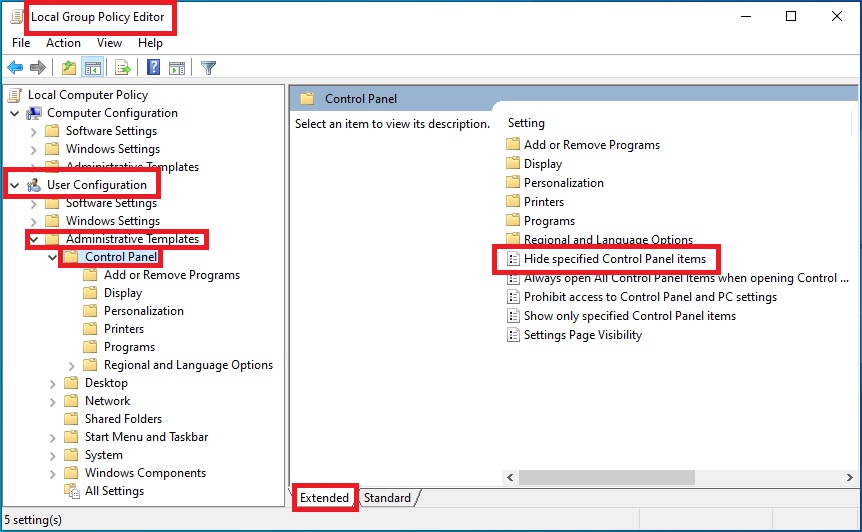
- Look for the Administrative Template folder under the expanded User Configuration section in the left panel of the Local Group Policy Editor window.
- Choose the Control Panel folder and click on it.
- On the right side of the window, double-click on Hide specified Control Panel items in the Extended page.
- In the new window, click on the small circle next to Enabled.
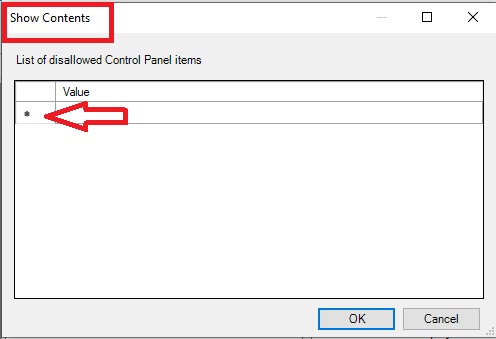
- Click on the Show button under Options.

- Now, click on the small asterisk mark in the Show Contents window under Value in the box below the List of disallowed Control Panel items.
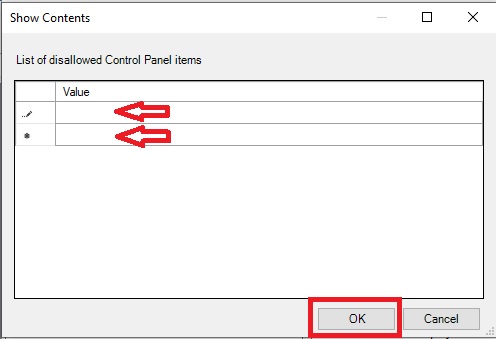
- In the first box, type in the name of the file that you do not want to be displayed in the Control Panel.
- In the next box, which will usually appear automatically when you start typing in the first box, enter the name of the value you do not want to be shown.
- Click on the OK button to end the process.
This will remove the icons that you specified above from the Control Panel.
Method 4: Using the Uninstall Programs Feature
Now, there may be a few specific apps that may or may not show up in the list of programs, and you want to remove them from the Control Panel.
In this case, you will need to dig deeper and do much more than the simplest way of right-clicking on the app and clicking on the Uninstall option.
STEPS TO FOLLOW:
If the specific app or program that you want to remove from the Control Panel is visible in the list, these are the steps to follow:
- Open the Control Panel by typing it in the Run box.
- Click on Uninstall programs under Programs.
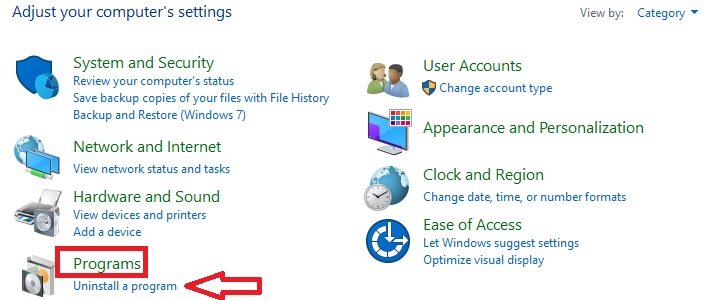
- In the new Uninstall or change a program window, right-click on a specific program you want to remove.
- Click on Uninstall.

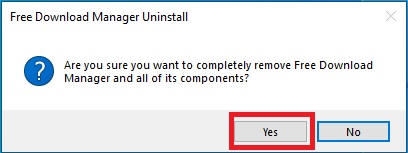
- It will ask for confirmation. Click on the Yes button if you are sure.
Sometimes additional questions, such as the reason for your wanting to delete the program or whether or not the data files should be deleted, may also be asked before deleting the program.
Now, if the program is not visible in the list, you will need to remove or uninstall it using the uninstall feature built into the app itself.
For example, if the Free Download Manager is not showing in the Control Panel’s programs list, then the specific steps to follow are:
- Typing the name in the search box.
- Choosing Open file location option.
- Hitting Enter.
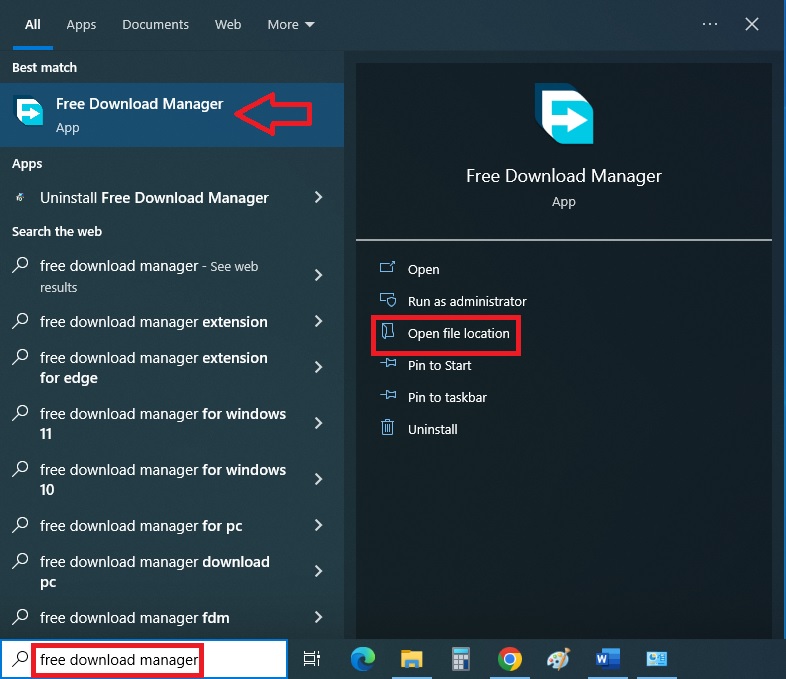
The system will find the file and open it in a new window.
- Simply double-click on the Uninstall Free Download Manager option.
- Click on the Yes button in the confirmation window.

This will remove the program.
In order to make sure that it is also removed from the Control Panel, you will first need to check whether it is there, and then delete it.
For that, you will need to go back to the Registry Editor once again as before and expand the following folders in this exact order:
- HKEY_LOCAL_MACHINE
- SOFTWARE
- Microsoft
- Windows
- CurrentVersion
- Uninstall
Depending on what apps and programs you are using and have installed on your PC, the list may be longer since each of them will be displayed under this expanded version of Uninstall.
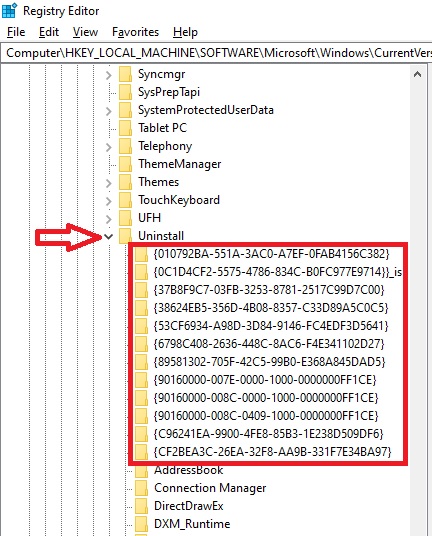
You will have to click on each of these keys individually and find out which one matches with the app or program that you have uninstalled.
To be doubly sure that it is the same app and not any other crucial app, check the DisplayName in the right side of the window.
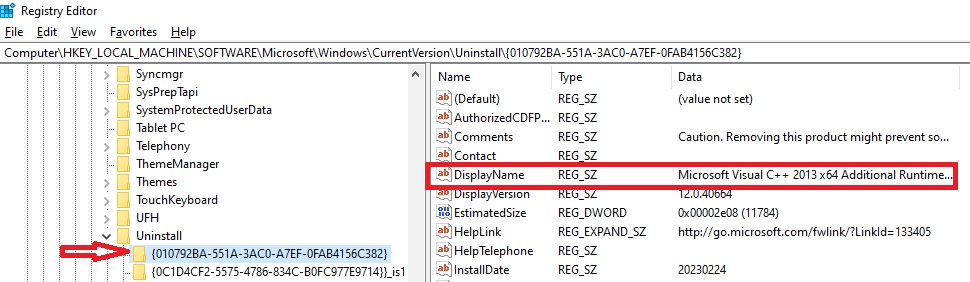
If it matches, right-click on the app and simply click on the Delete option.
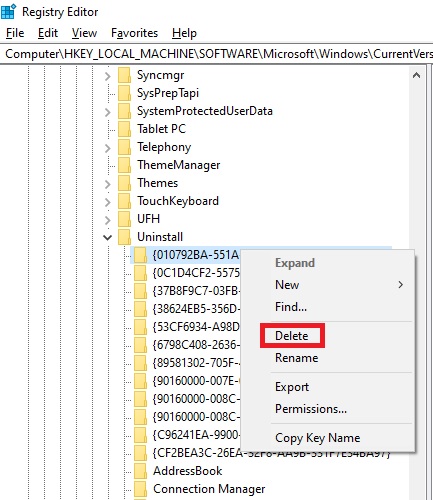
Now, it will be successfully removed from the Control Panel.
Conclusion
Removing an invalid or non-functional icon from the Control Panel is not at all a tough job. It is only that you should know what you are doing and do it very carefully.
Thanks to this article, both of these requirements are satisfied, since you are knowledgeable about the methods as well as the distinct steps to follow.