
A VPN (Virtual Private Network) may not connect at times, which may be quite frustrating for a user. However, you need not bear with it or change your service provider as the only solution to fix it.
Through this article, you will learn about some possible and practical fixes to this issue, some of which are pretty easy to perform. So, keep reading and get started with fixing the VPN not connecting issues yourself.
In This Article
KEY TAKEAWAYS
- Restarting the entire system along with the router may resolve the issue of the VPN not connecting.
- Uninstalling and reinstalling different network adapters and even the VPN client may sometimes allow the VPN to connect as usual.
- Sometimes the system and the VPN app may need updating, besides changing the VPN servers, to ensure a VPN connection is established.
- If you create a desktop shortcut and then choose a new connection, the issue with the VPN hindering it from connecting may be resolved.
- You may also try turning the proxy server and the Xbox Live Networking Service off in an attempt to rectify the VPN not connecting problem.
Why Does a VPN Fail to Connect?
Virtual Private Network may fail to connect mostly due to the issues with the network, or more precisely, with the internet source. There may also be some network restrictions imposed in your workplace or even at the country level.
Also, if you use multiple VPNs, connecting to one while the other is active may not allow you to establish a connection.
Some other reasons for the VPN not connecting include, but are not limited to:
- Outdated version of the app or VPN client software
- Interfering apps, firewalls, and antivirus software
- Unsuccessful domain name resolution
- Blocked ports
- Faulty router
- Overloaded VPN server
- Issues with the server of the VPN itself, such as being down for maintenance
- Using the wrong login credentials and VPN protocol
The list can be pretty long, and there are quite a few fixes to try out to get things back to normal.
Ways to Fix the Virtual Private Network Not Connecting Issue
Assuming that your network connections and other credentials are correct, you can fix the VPN not connecting or working issue by connecting to a different network hotspot or Wi-Fi if there is an issue with a specific network.
Updating the app may also resolve the issue if it is old, just like toggling the settings or completely disabling the firewall settings of antivirus and conflicting apps would.
If local or countrywide restrictions are the cause for it, switch protocols for traffic obfuscation from Settings and choose OpenVPN.
Then connect to the obfuscated servers if it does not start automatically, as may be the case with a few specific types of VPNs.
Some other simple and quick fixes to this issue are:
- Restarting your router and checking its settings
- Checking for any specific parental restrictions on the device
- Uninstalling and reinstalling the VPN app altogether from Programs and Features in the Control Panel
- Checking that the browser is up-to-date
- Changing the connection port
- Contacting customer support
Now, take a look at the different steps to follow for different solutions to try to fix the VPN not connecting issue.
Method 1: Remove a Few WAN Miniport Items from the Device Manager
The WAN Miniport (IP), WAN Miniport (IPv6), and WAN Miniport (PPTP) may specifically cause some issues, and therefore the VPN may not connect. So, remove them.
STEPS TO FIX:
- Press Windows + X keys > Select Device Manager.
- Click on the small arrow next to Network adapters to expand it.
- Select WAN Miniport (PPTP).
- Right-click on it.
- Select Uninstall from the drop-down menu.
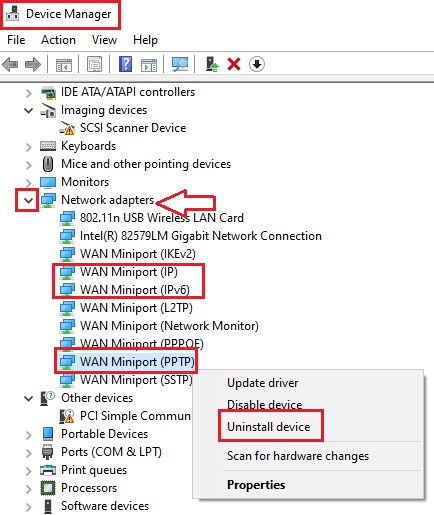
Repeat the same process to remove WAN Miniport (IP) and WAN Miniport (IPv6), marked by a red box in the image above.
Complete the process by:
- Going to the Action tab on the top-left of the Device Manager window.
- Clicking on it and then clicking on the ‘Scan for hardware changes’ option.
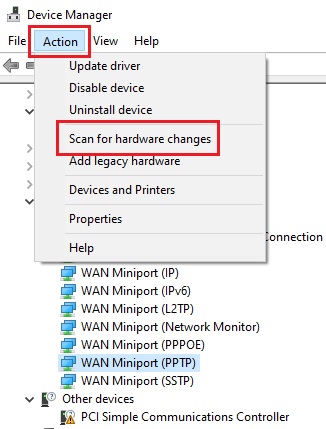
Try to connect to your VPN now.
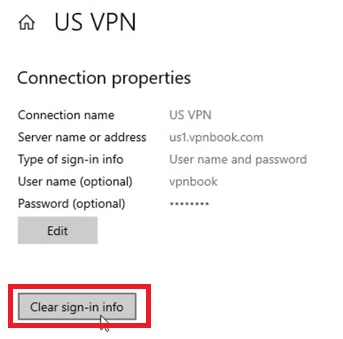
If the above process fails to connect the VPN, then there may be some problems with the other network drivers as well. You will then have to uninstall all of them.
However, you must start by clearing the sign-in information.
- Click on the Advanced options button next to the Connect button.

- Now click on the Clear sign-in info button.
Now, open Device Manager and expand the Network Adapters as before.
This time, uninstall all WAN Miniport items. You may or may not uninstall the one with Network Monitor written within brackets.
Everything is shown in the image below for better understanding:
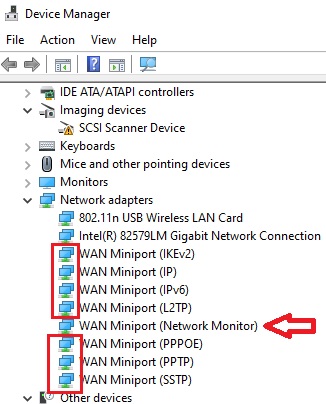
Now, let the system Scan for hardware changes again, as before. This will reinstall the uninstalled drivers and allow you to connect to your VPN.
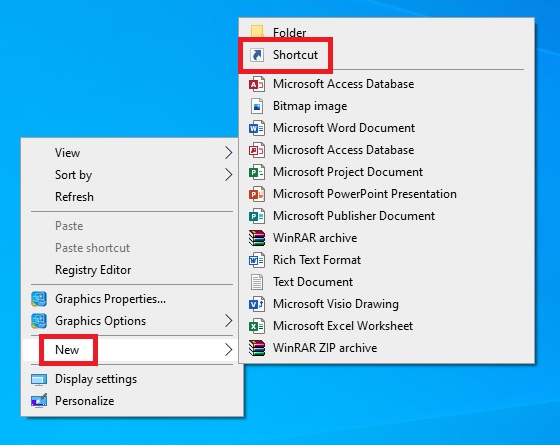
Method 2: Create a Desktop Shortcut
If the above method could not fix the issue, try to solve it by creating a desktop shortcut for the Rasphone executable file.
STEPS TO FIX:
- Right-click on a blank space on the desktop.
- Select and click on New from the menu.
- Select Shortcut from the submenu.
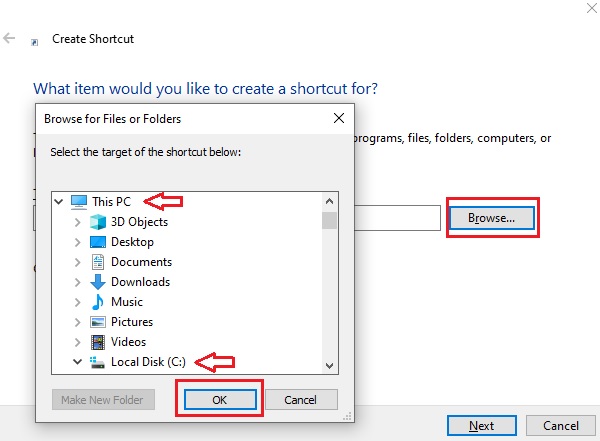
In the new Create Shortcut window, click on the Browse button.
Then, navigate through the following one by one:
- This PC
- Local Disk (C:)
- Windows
- System32
- Rasphone.exe
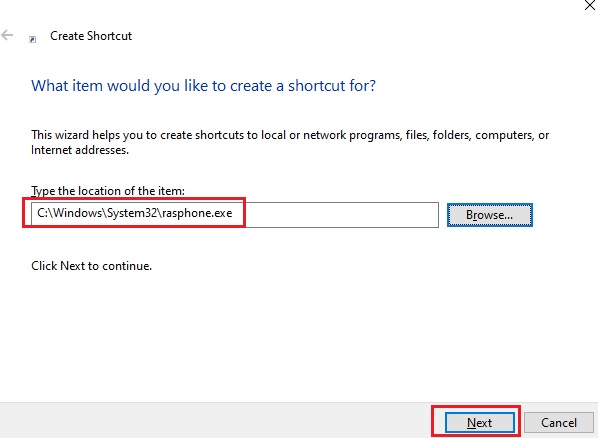
Then, click on the OK button to close the window.
- Click on the Next button.
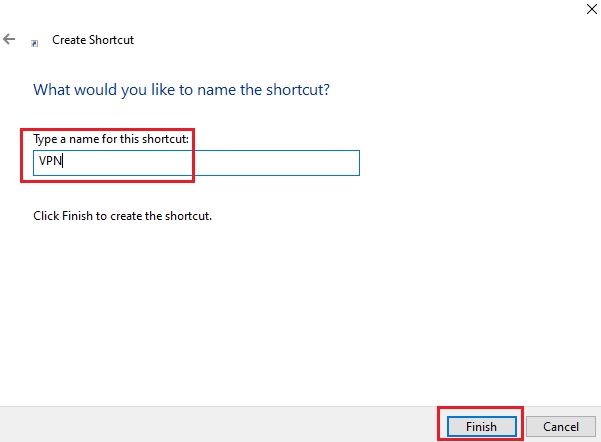
- Now, type a name for the Shortcut, VPN, for example. This is not mandatory though.
- Finally, click on the Finish button.
When you double-click on the desktop icon, you will get a message as follows:
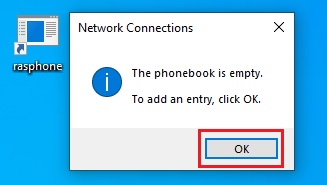
- Click on the OK button.
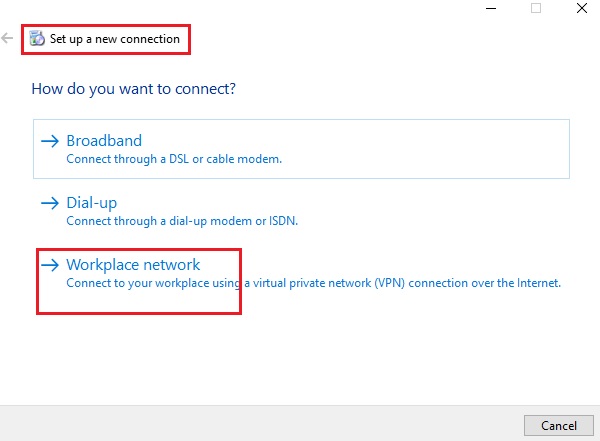
You will then have to Set up a new connection.
- Click on Workplace network.
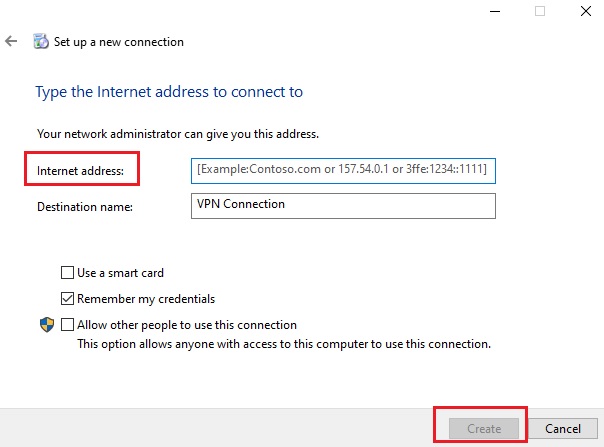
- In the following window, furnish the VPN credentials.
- Now, click on the Create button.
- Finally, Choose a network connection.

Now try connecting your VPN.
Method 3: Uncheck Internet Protocol Version 6 (TCP/IPv6)
Sometimes, specific types of Transmission Control Protocol/Internet Protocol (TCP/IP) may prevent the VPN from connecting, such as Internet Protocol Version 6 (TCP/IPv6). Uncheck it to resolve the issue.
STEPS TO FIX:
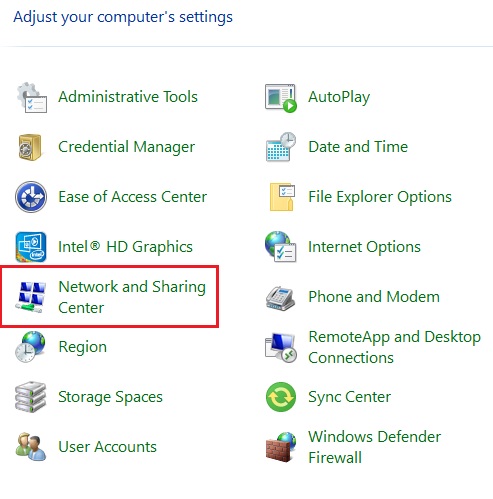
- Go to Search > Type control panel > hit Enter.
- Click on the arrow next to Category to View by Large icons.
- Go to the Network and Sharing Center.
- Click on the link for whatever connection is selected under Internet type.
- Click on the Properties button.
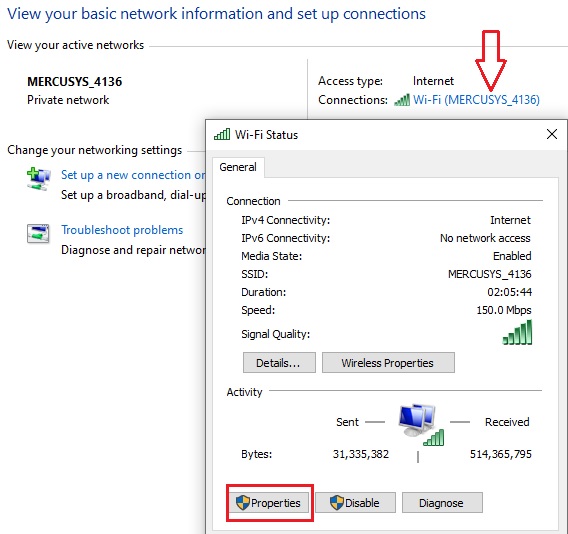
- Select Internet Protocol Version 6 (TCP/IPv6) from the properties window.
- Uncheck the small box next to it on the left side.
- Then, click on the OK button.
Close all windows and restart your system. This should resolve the issue.
If it does not, then you will need to reset the network from Settings as well in the following way:
Press the Windows and I keys > Network & Settings > Advanced network settings > Reset Now.
Restart your computer, and this will solve the issue, and your VPN will connect now.
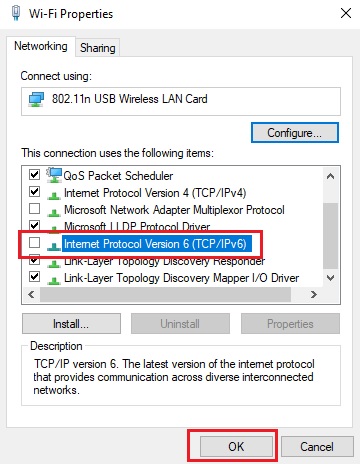
Method 4: Disallow VPN over Metered Networks and Roaming
Most of the time, simply toggling the switches to disable VPN while roaming and over metered connections may resolve the issue.
STEPS TO FIX:
- Go to Settings > Network & Internet > VPN.
- Under Advanced Options, set both sliding switches under Allow VPN over metered networks and Allow VPN while roaming to off.
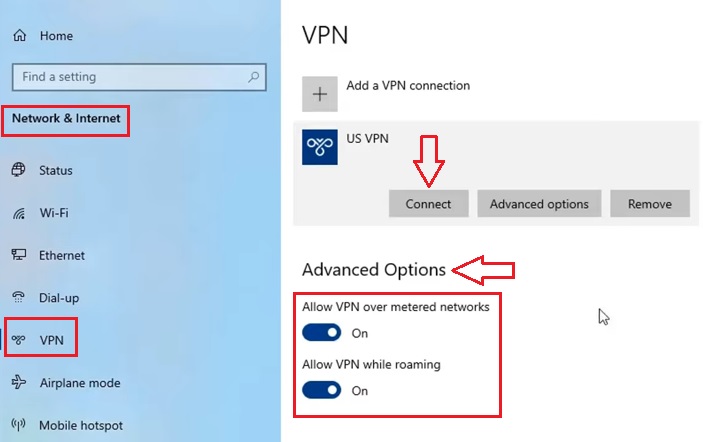
- Try to connect to your VPN again by clicking on the Connect button above.
If it still does not connect and shows an error, provide the sign-in credentials afresh in the Windows Security window with the two switches turned off, as shown in the image below:
- Click on the OK button to connect.
If it connects this time, you can switch on the two switches under Advanced Options if you want.
Method 5: Fix the Domain Name
Sometimes the domain name resolution may prevent the VPN from connecting if it is unsuccessful. You will need to change the DNS settings to fix the issue.
STEPS TO FIX:
- Open the Run box by pressing the Windows and R keys together.
- Type ncpa.cpl in the box.
- Hit Enter or press the OK button.
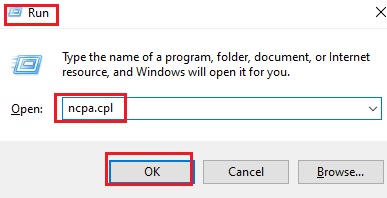
- Right-click on Wi-Fi in the Network Connections window.
(If you are using an Ethernet connection, you can right-click on it.)
- Click on Properties in the drop-down menu.
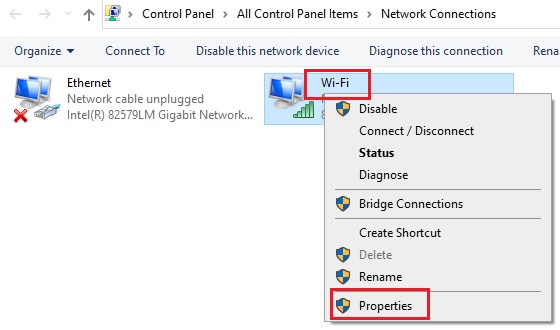
- Select Internet Protocol Version 4 (TCP/IPv4) in the Wi-Fi properties window.
- Then, click on the Properties button.

- In the new Internet Protocol Version 4 (TCP/IPv4) Properties window, make sure that the circle next to Obtain DNS server address automatically is checked.

- Click on the OK button and close all the windows.
Now, restart your computer and check whether the issue has been resolved.
Method 6: Disable the VPN Client
If the above method could not resolve the issue, then you may have to disable the VPN client as well.
STEPS TO FIX:
- Go to Settings > Network & Internet > VPN as before.
- Click on the arrow key next to the Connect button.
- Click on the Remove button.
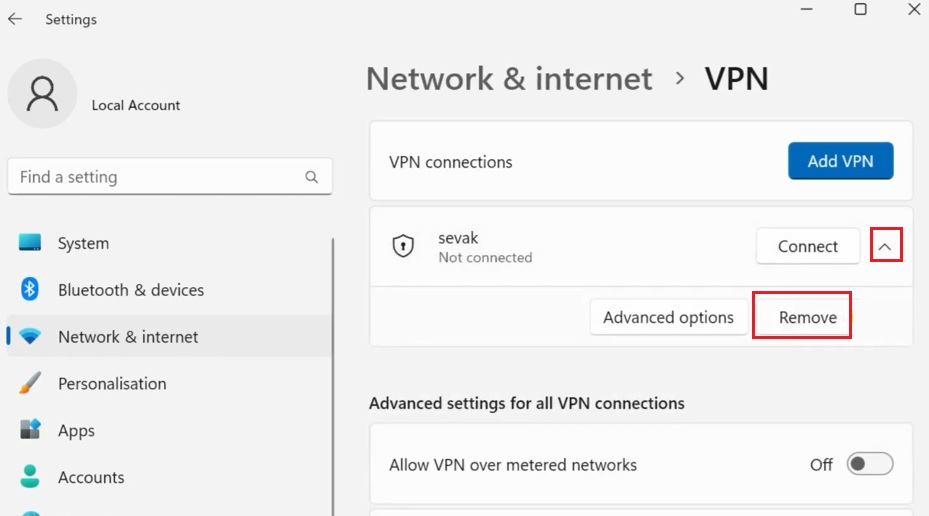
- Click on Confirm in the confirmation window when it appears.

Now, set it up again and try connecting to it. This time, you should be able to connect.
Method 7: Turn the Proxy Server Off
If you are still facing the issue with VPN not connecting, you may try turning off the proxy server.
STEPS TO FIX:
- Go to Settings > Network & Internet > Proxy.
- If the switch below Use a proxy server under Manual proxy setup is on, turn it off by dragging the sliding switch.
- Click on the Save button and exit.
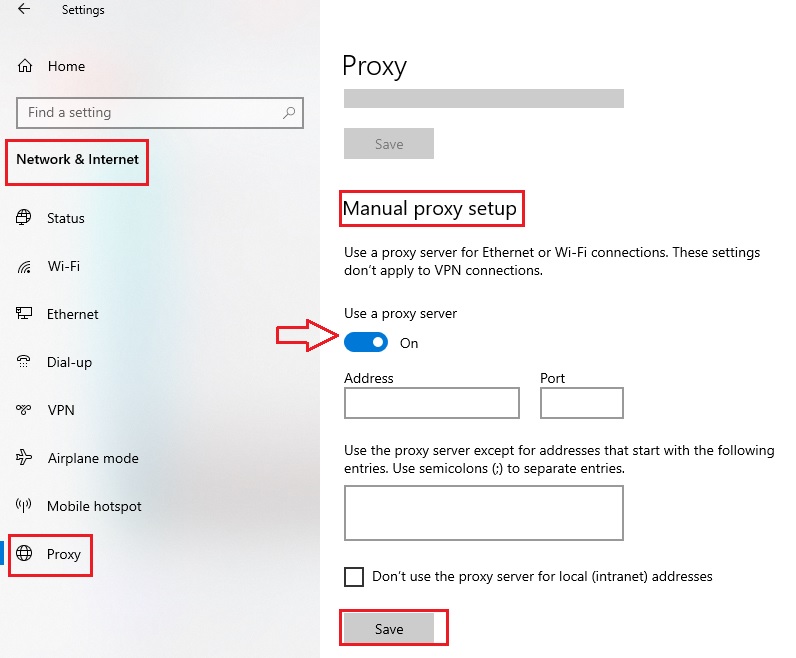
- Close the window.
After making all these changes, you should restart your computer. Now, when it turns on, check whether the VPN not connecting issue has been resolved.
Method 8: Disable the Xbox Live Networking Service
If the Xbox Live Networking Service is running, the VPN will not work or connect because Microsoft uses multicast which cannot be used over a Virtual Private Network service. So, disable this service.
STEPS TO FIX:
- Press the Windows and S keys on your keyboard at the same time.
- Type services in the search box.
- Hit Enter.
- In the Services window, scroll all the way down until you find Xbox Live Networking Service.
- If you see it is Running, right-click on it and click on Stop in the drop-down menu.
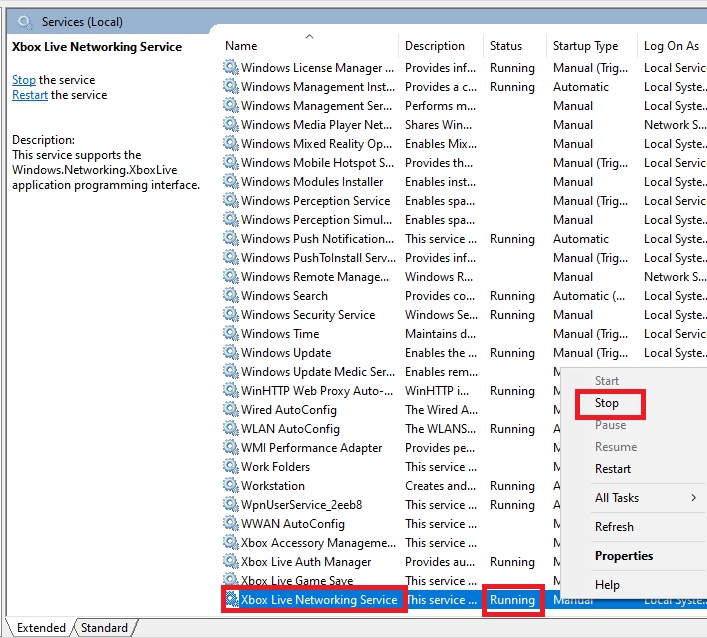
It will now show nothing under the Status column. Now, try to connect your VPN, which should connect this time.
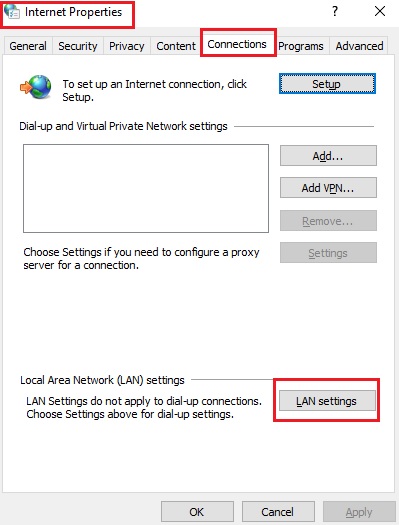
Method 9: Make Changes in the LAN Settings
If you are facing problems with VPN connections on a remote computer especially, you should check the LAN settings and make some changes there.
STEPS TO FIX:
- Go to the Control Panel, in the same way as you did in Method 3.
- Select Internet Options this time.
- When the Internet Properties page opens, go to the Connections tab.
- Click on LAN settings at the bottom of this window.
This will take you to the Local Area Network (LAN) Settings window.
- Uncheck the small square box under Proxy server and next to ‘Use a proxy server for your LAN.’
- Check the box next to Automatically detect settings under Automatic configuration.
- Then, click on the OK button.
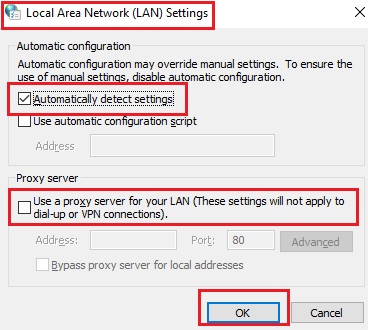
Now, connect and check whether the issue with your VPN has been solved.
Method 10: Fix Issues with the Router
If none of the above methods can resolve the issue, there may be some problems with the router that are preventing your VPN from working together and getting connected. Setting it up again may resolve the issue, provided you know the IP of the login page of your router.
(As an example, assume that you are using a TP-Link router.)
STEPS TO FIX:
- Go to the search box next to the start menu, type cmd in the box, and open the Command Prompt by hitting Enter.
(You may open it as an administrator or in ordinary mode.)
- Then, type in the command ipconfig.
In the return result, you will get all the relevant information about your router, along with the IP to login, marked by a red arrow in the image below:

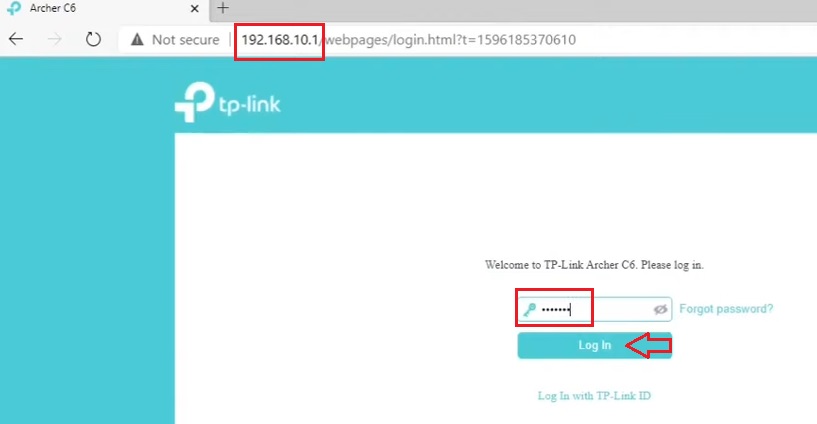
- Now, open your browser and type in the IP address in the address bar, and hit Enter.
- Type in the password, which is admin in most cases.
- Click on the Log In button.
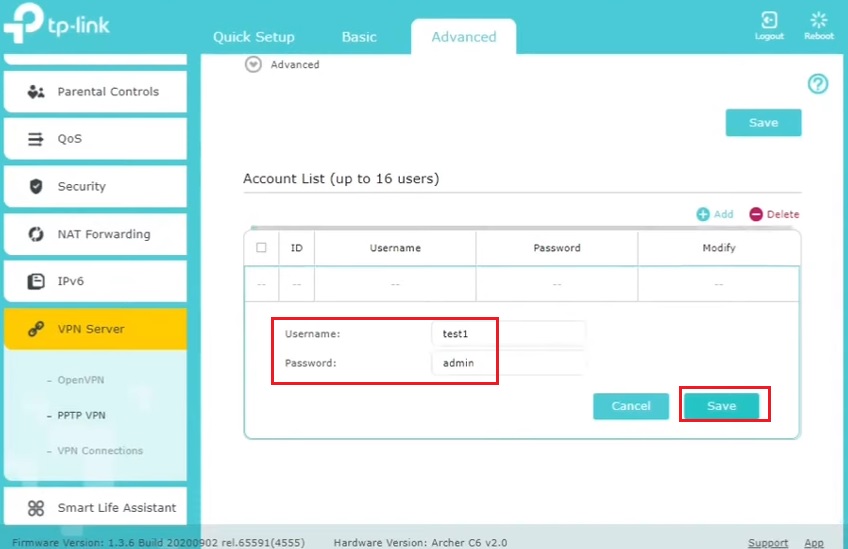
- In the new window, go to the Advanced tab.
- Select VPN Server from the left panel.
- When it expands, choose PPTP VPN, because most of the devices come with this VPN built in them.
- Check the box next to Enable VPN Server at the top.
- Finally, click on the Save button.

- You will be prompted to set a new username and password. Set it as you wish.
(Here it is set as test1 and admin, respectively.)
- Click on the Save button again.
- Now, go to the Network & Internet option and select VPN as you did in Method 4.
- Click on the Plus sign or Add a VPN connection at the top, on the right side of the window.
In the new window, furnish all the details to set up a new VPN connection for your router in the following way:
- Click on the down arrow in the box under VPN provider and select Windows (built-in).
- Put test1 as the Connection name.
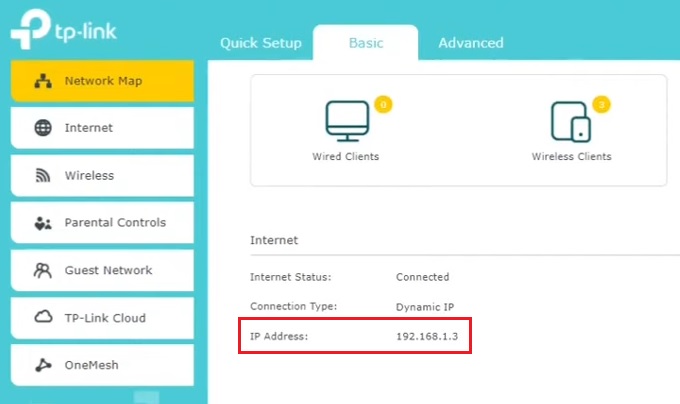
- Type in the WAN IP address of the router in the box under Server name or address.
You will get this address on the Basic page of the TP-Link login page, as shown in the image below:
- Now, click on the down arrow in the box under VPN type and select Point to Point Tunneling Protocol (PPTP) from the options displayed in the drop-down menu.
- Similarly, select User name and password in the box under Type of sign-in info.
- You may type in the User name test1 in the next box.
- Type the password in the last box.
When you have completed providing all the necessary details, it will look like this:
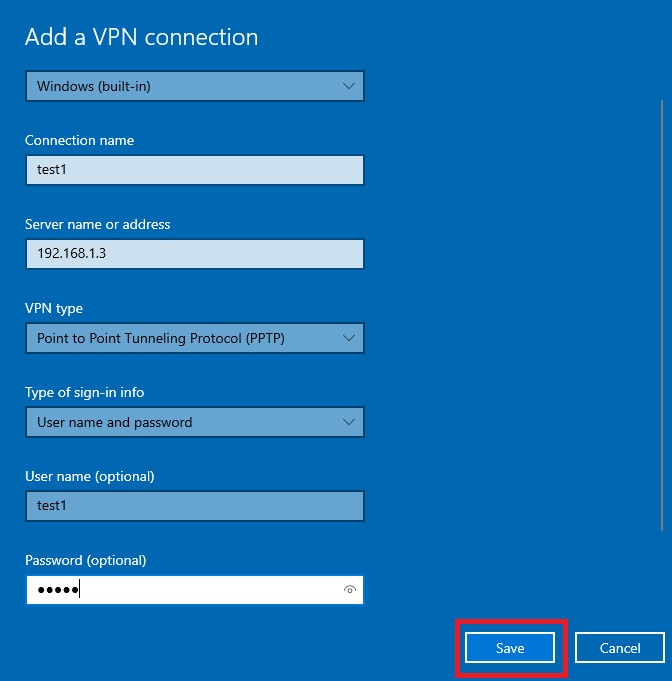
- Finally, click on the Save button.
Your setup will be complete with a new VPN added.
You can even check the new connection from the Command Prompt as well by typing ipconfig once again. It will show the new PPP connection – test1, as shown in the image below:
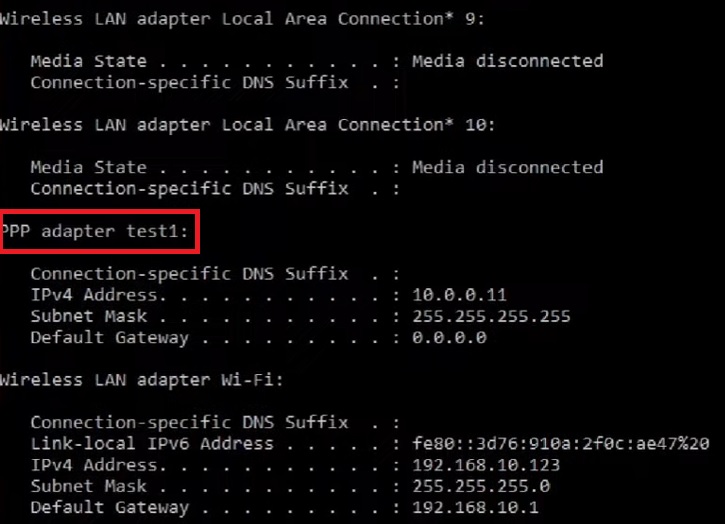
You may now connect using this new connection and have the problem of the VPN not connecting solved.
If it still does not work, then your router may have the VPN passthrough settings disabled by default. In that case, it will not be able to make VPN connections outbound.
Note:
The passthrough feature may not be available on all router models.
If your router has this feature and it is disabled, you will have to enable this setting.
- On the router login page, click on NAT Forwarding under the Advanced tab.
- Go to ALG.
Check the boxes next to anything that has the word Pass-through, as shown in the image below:
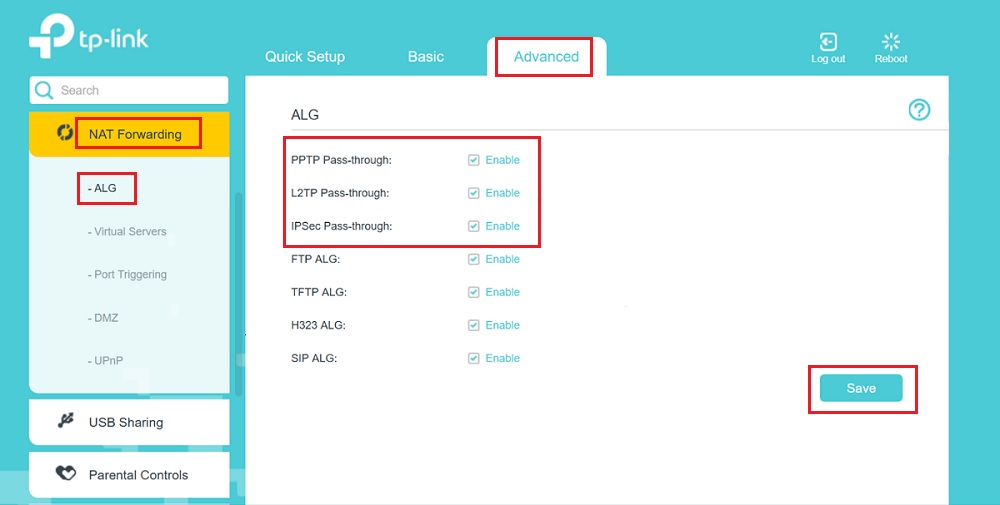
This should resolve the issue, and your VPN will now connect just the way it should.
Conclusion
To summarize in simple words, there are quite a few reasons for a VPN failing to connect and an equal number of fixes to this issue.
While most of the time it will be resolved by simply troubleshooting, you may also try the other possible fixes mentioned in this post before you call or change your VPN service provider.