
You will need to format an external hard drive to use it with the operating system of your PC, whether it is Windows or a Mac system.
Regardless of the system you are using, the process is pretty straightforward and can be completed by using the inbuilt features on your computer system.
Here in this article, you will learn about a couple of quick and easy steps.
In This Article
KEY TAKEAWAYS
- You will need to format your external hard drive to make it compatible with the operating system of your PC.
- An external drive can be formatted quickly from the Windows File Explorer.
- The Disk Management feature in Windows also allows formatting such a drive.
- The format command run in the Command prompt will format the hard drive connected externally quite quickly as well.
- You can use the Utilities feature to format the external hard drive in a Mac computer system.
Why Do You Format an External Hard Drive?
You will need to format an external drive to make the drive work with the operating system of your PC. This is because different file systems process data by using different file systems.
Ideally, you will need to format the external hard drive to make it compatible with the file system installed on your computer.
Other reasons to format an external hard drive are:
- If it is a secondhand drive
- If you want to switch between the operating systems
- If you want to fix any non-physical and unknown errors on the hard drive
- If you want to create partitions in the drive
Here are a few methods to follow for formatting your external hard drive.
Ways to Format an External Hard Drive
You can format an external hard drive after connecting it to your PC very quickly from the Windows File Explorer.
If you want, you can also format it by running the format command in the Command Prompt, or from the Disk Management feature.
If you are using a Mac system, you can format the external drive from the Utilities features under Application.
Here are the specific steps to follow.
In Windows
Method 1: Format from File Explorer
The easiest of all ways to format an external hard drive on your PC is from the Windows Explorer.
STEPS TO FOLLOW:
- Connect your external hard drive to the PC.
- Wait for the Windows Explorer to open.
(You may also click on the This PC icon).
- Right-click on the external drive. (Drive D, for example).
- Select ‘Format’ from the drop-down menu.
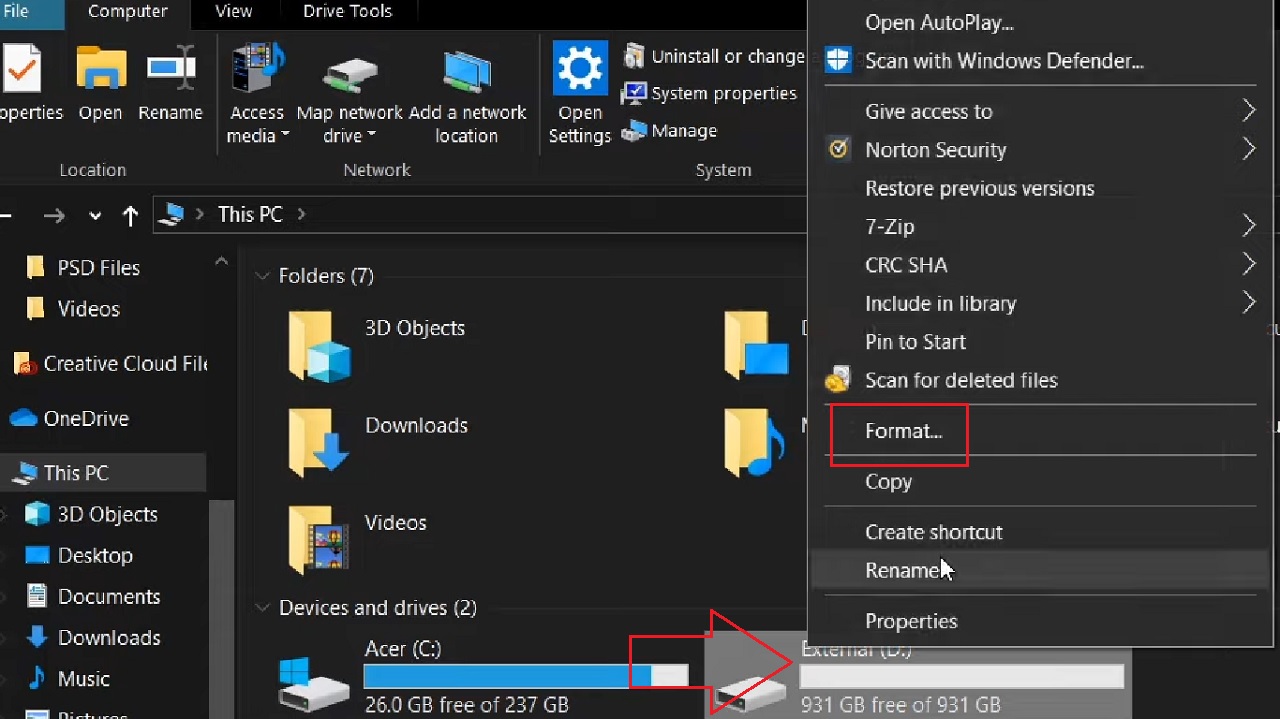
- In the following Format External (D:) window, choose the right file system by clicking on the small arrow on the right side of the box under ‘File system.’
- Give your drive a name (External, in this case) in the box under ‘Volume label.’ This is optional. You may or may not give it a name.
- Click on the small square box next to Quick Format under ‘Format options.’
- Click on the Start button.
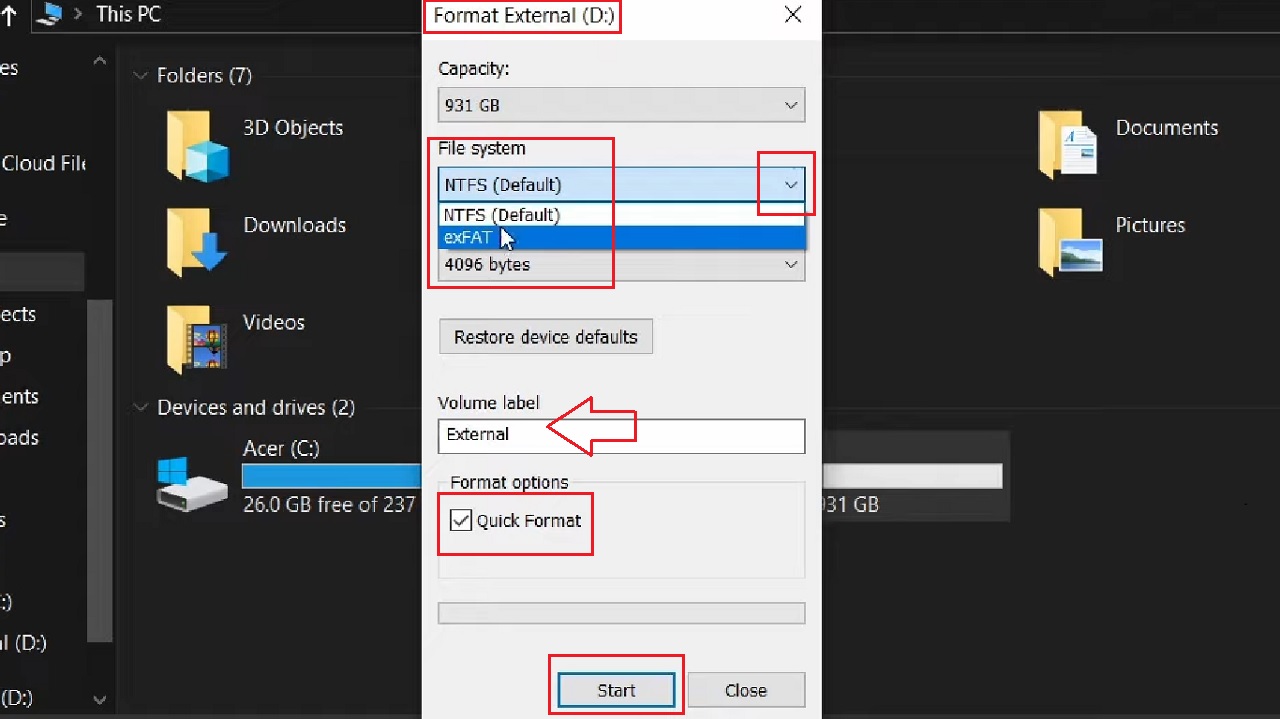
- Click on the OK button to start the formatting process in the following confirmation window, if it appears.
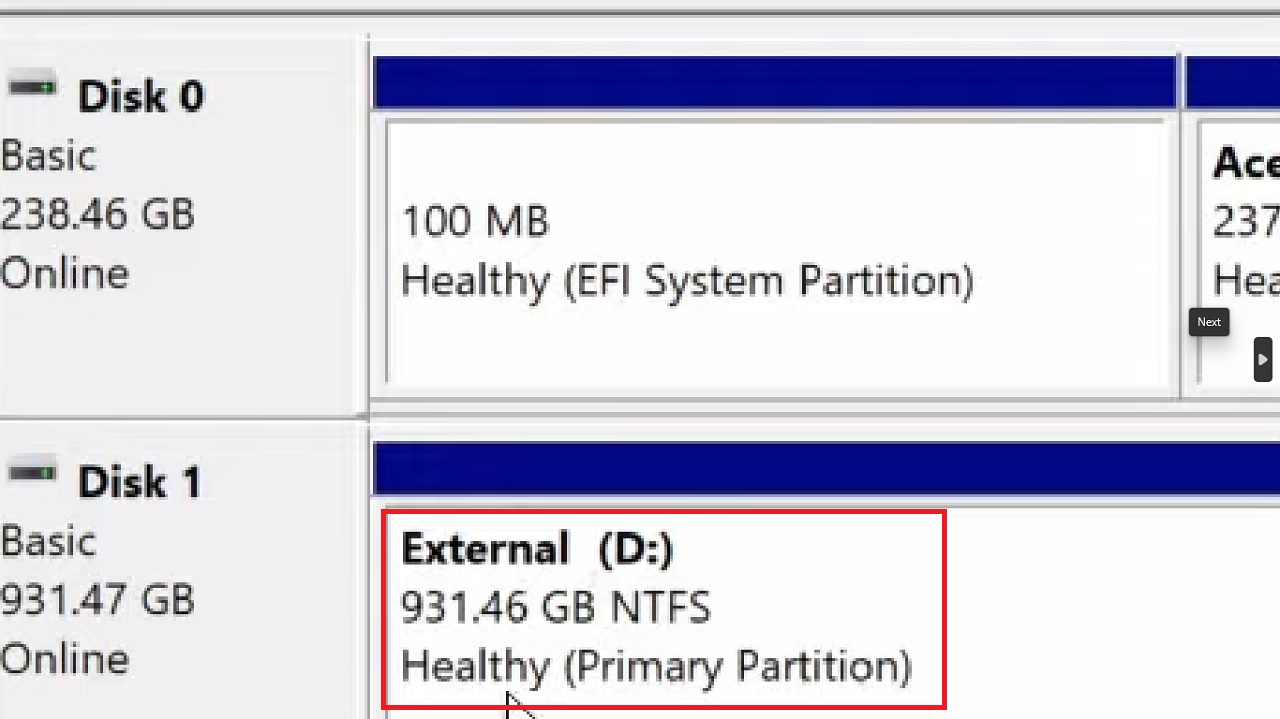
After formatting, the drive will open automatically in Windows Explorer.
If you want to check it, you can go to the Disk Management by choosing the option from the window that appears after right-clicking on the Start Menu. It will be marked as Healthy (Primary Partition) as shown in the image below:
Method 2: From the Command Prompt
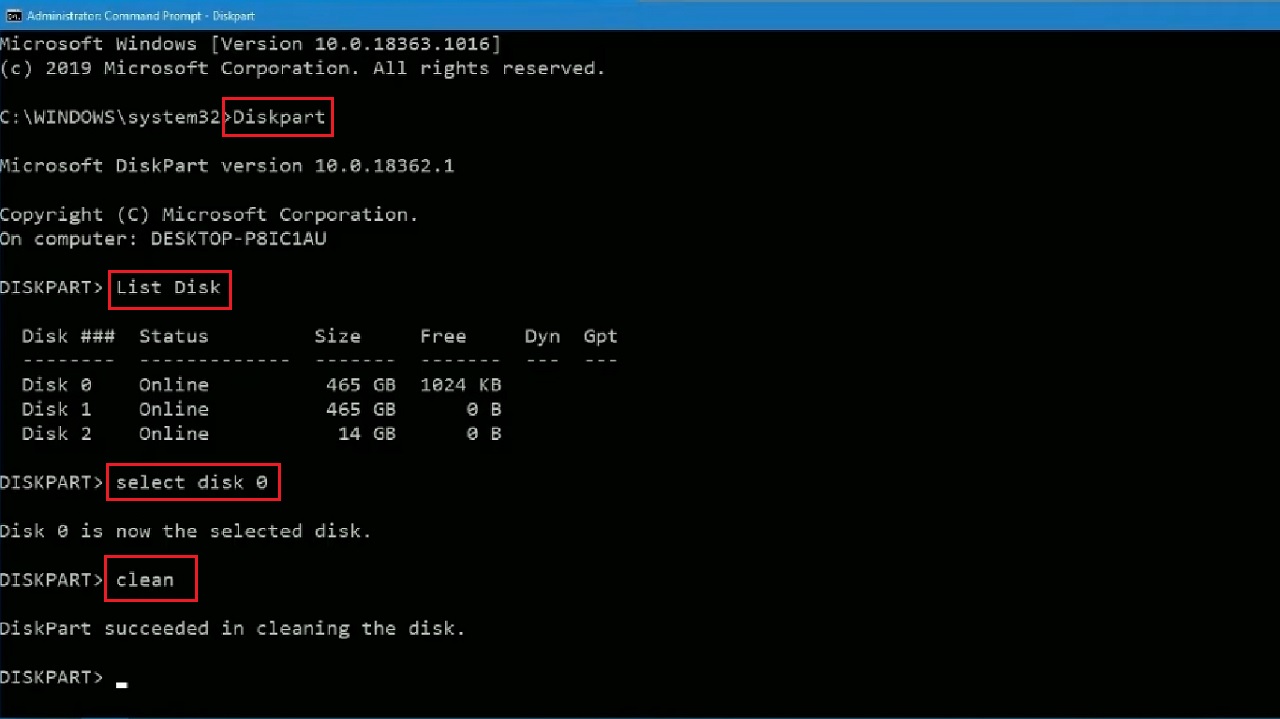
You can use the Command Prompt to format your external hard drive. However, for that you will need to run a few specific commands, such as diskpart, before in order to clean the drive and then create partitions for better formatting.
Assume, you want to format Disk 0.
STEPS TO FOLLOW:
- Press the Windows and S keys on your keyboard together.
- Type cmd and choose Run as administrator.
- Hit Enter.
Type the following command in the Command Prompt window, hitting Enter every time after each command is executed properly:
- Diskpart
- List Disk
- select disk 0
- clean
When the disk is cleaned, you will then need to run the following command in the Command Prompt:
- create partition primary and hit Enter.
This will create a primary partition
Now, to complete the process, you will need to type in the format command along with the file system you want it to be formatted in. For example, to format an external drive in the NTFS format, the command to type is:
- format fs=ntfs
When you hit Enter, the formatting process will be initiated. It will take some time. When the drive is formatted fully, finally, type exit to close the Command Prompt.
Method 3: From the Disk Management Feature
You can format your external hard drive directly from the Disk Management feature in Windows.
STEPS TO FOLLOW:
- Right-click on the Start Menu as before and open Disk Management.
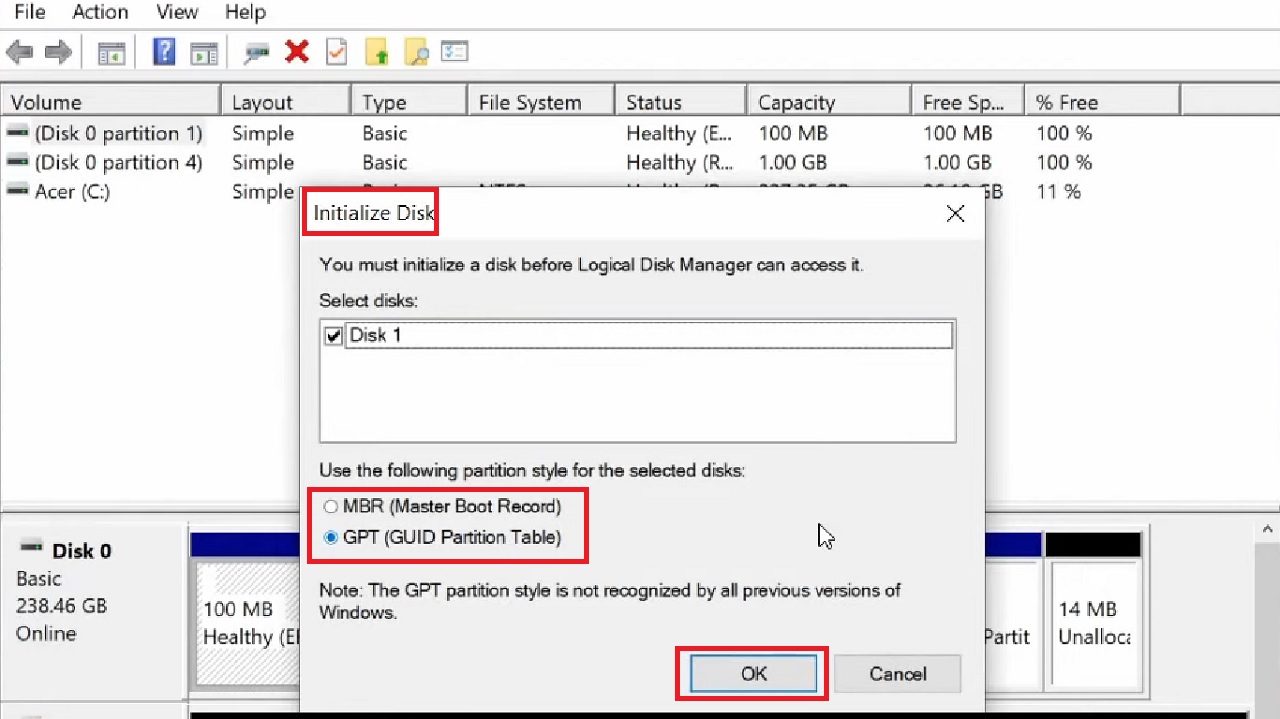
- Select the Drive you want to format, marked Disk 1 in this example.
- To Initialize Disk, choose MBR (Master Boot Record) if the drive capacity is 1 GB or GPT (GUID Partition Table) if it is more, as it is in this example.
- Click on the OK button.
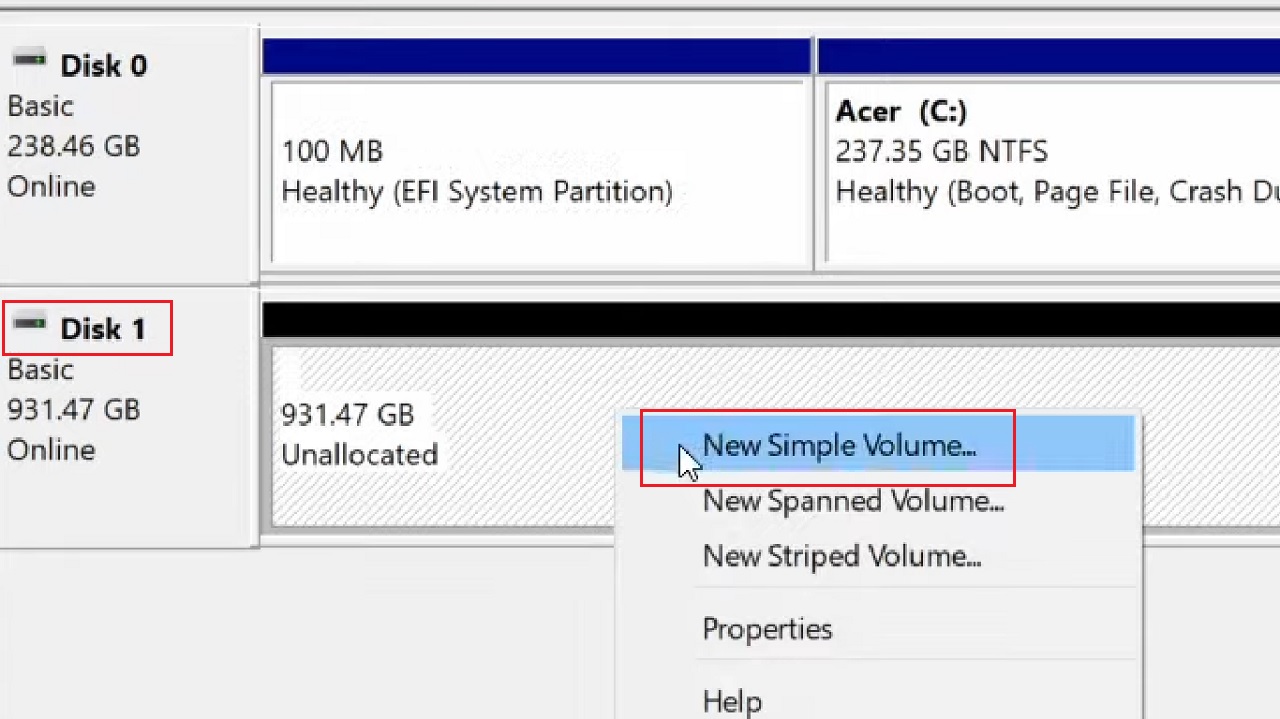
- Next, right-click on Disk 1.
- Select New Simple Volume.
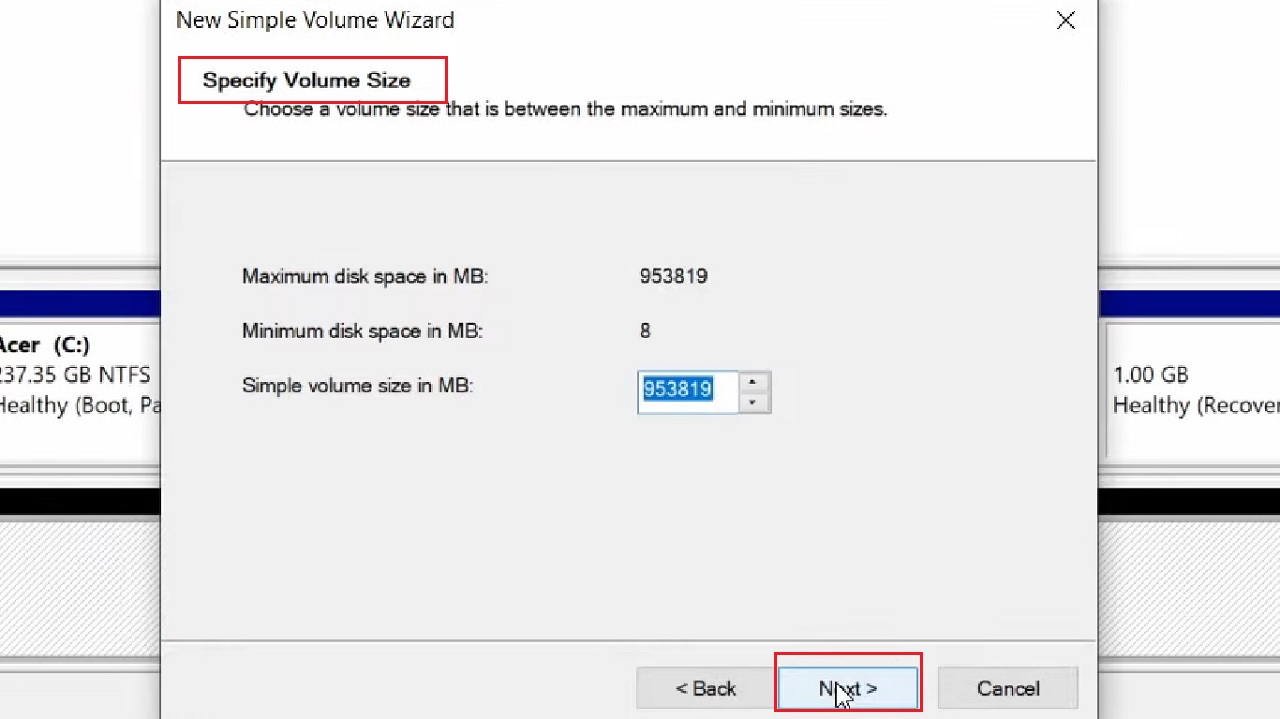
- This will open the New Simple Volume Wizard window. Click on the Next button.

- In the following window which asks you to Specify Volume Size, you need not change anything. Simply click on the Next button below to continue.
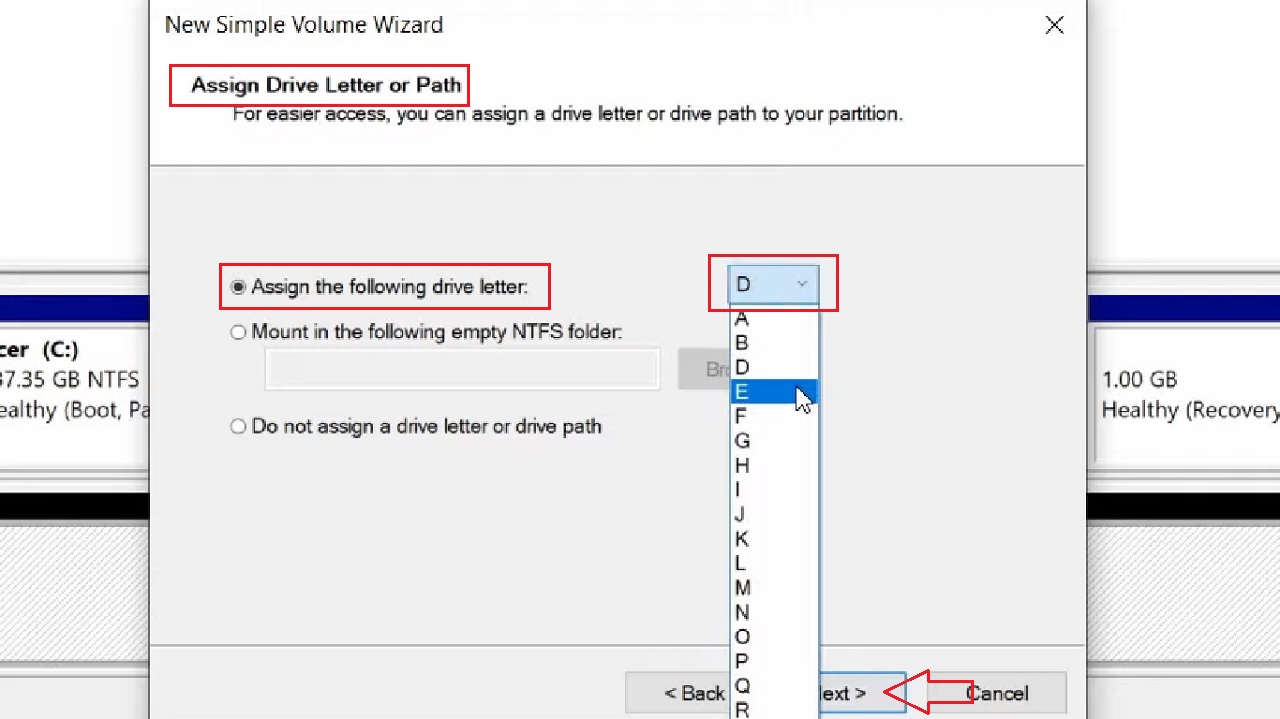
- In the following window which asks you to Assign Drive Letter or Path, click on the small circular button next to Assign the following drive letter.
- Click on the small arrow in the box on the right side of it.
- Select a drive letter, D for example. You can choose any letter from the drop-down options.
- Click on the Next button below, which is partially hidden in the image and is marked by a red arrow.
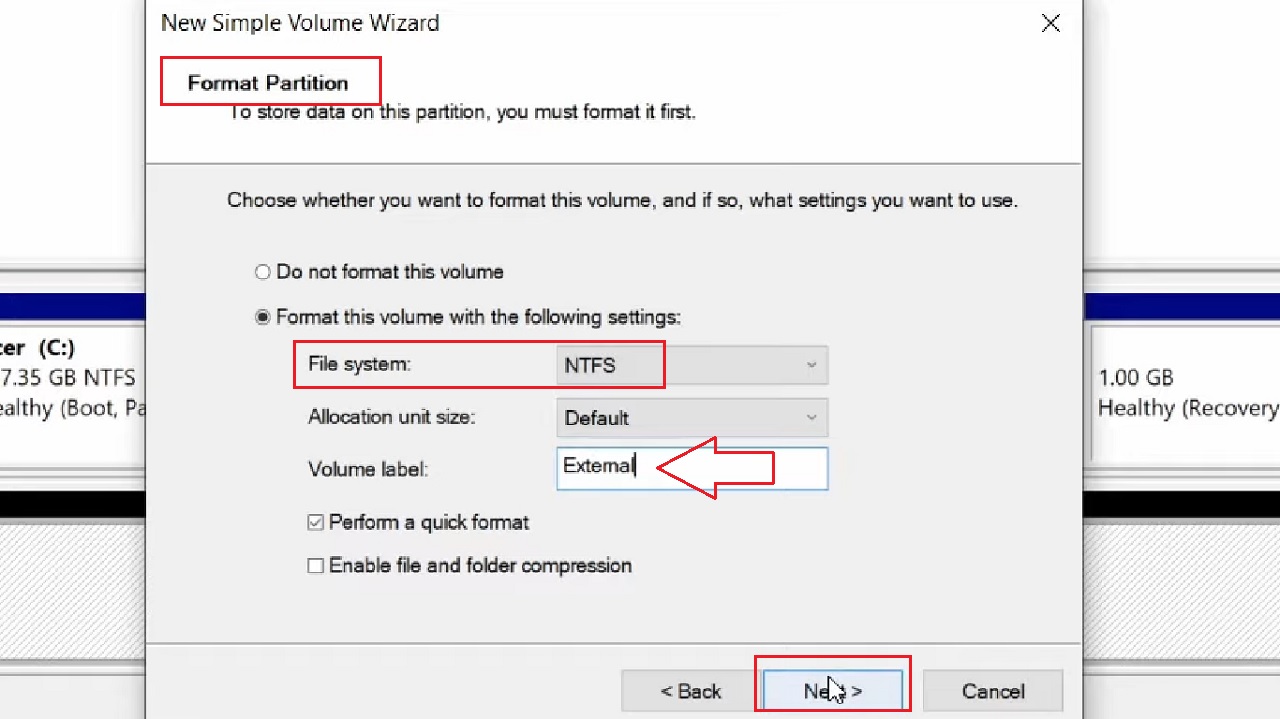
- In the following window, to Format Partition, choose the NTFS file system from the drop-down option you get after clicking on the small down arrow on the right side of the box next to the File system.
If it is selected already, as it is in this case, leave it like that.
- Name the hard drive in the box next to Volume label, if you want.
- Click on the Next button below.
- Finally, click on the Finish button in the New Simple Volume Wizard window.
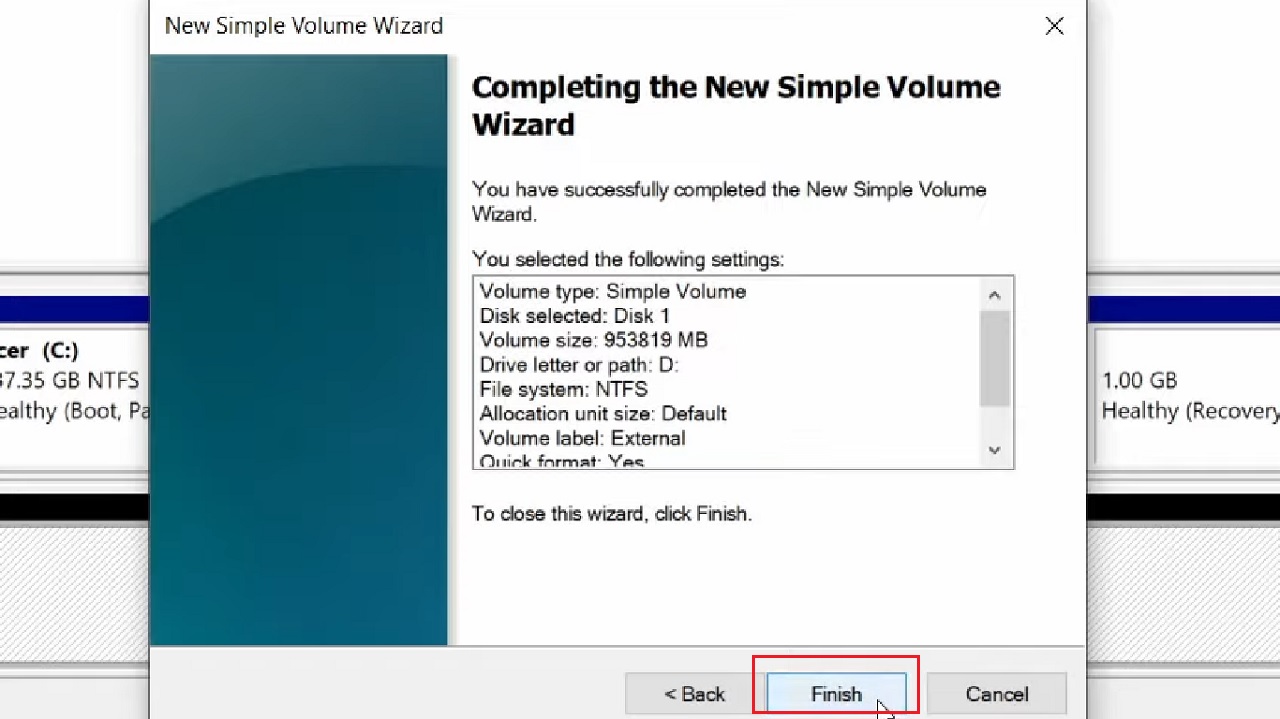
This will start the formatting process. Close all windows when it is complete.
In Mac Systems
If you are using a Mac computer, you can also format an external hard drive.
Method 4: From the Utilities Feature
You can use the Utilities feature in Mac to format an external hard drive.
STEPS TO FOLLOW:
- Connect the external hard drive.
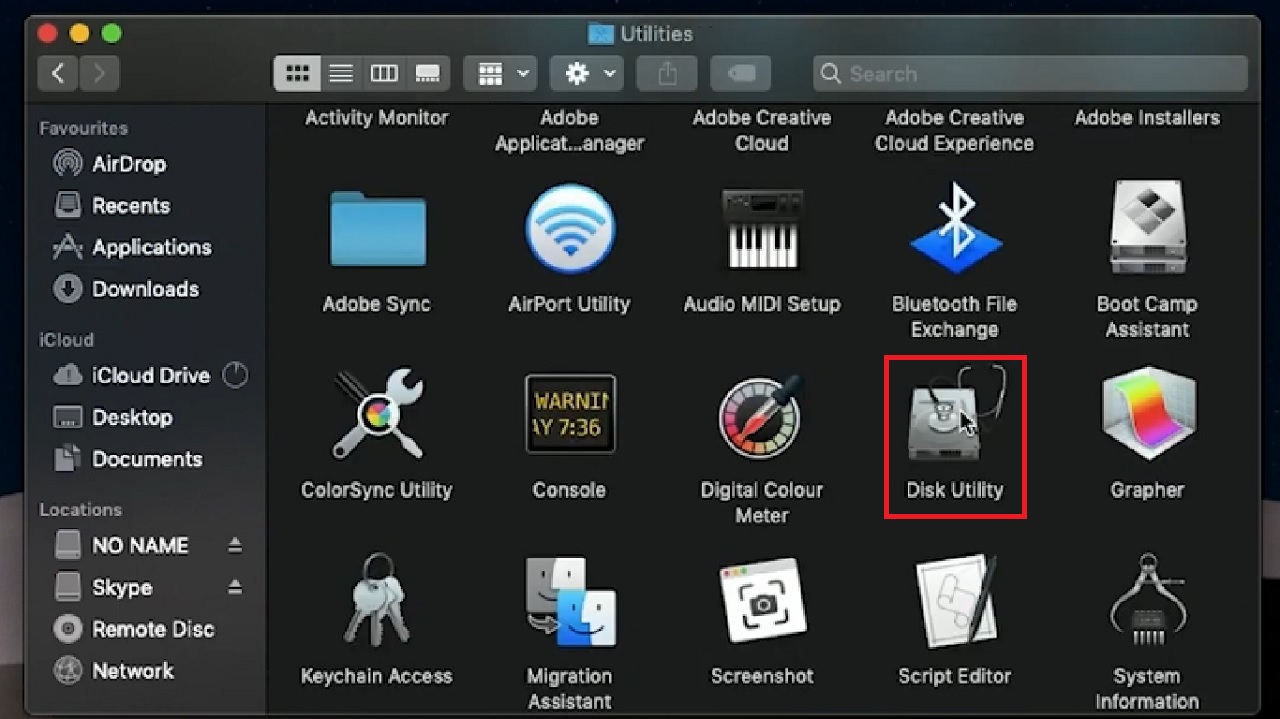
- Open Finder.
- Go to Applications on the left side of the window.
- Click on Utilities.

- Select Disk Utility and double-click on it.
- Select the external hard drive showing in the left side of the Disk Utility window that appears next. The one with NO NAME here.
- Click on the Erase tab at the top.
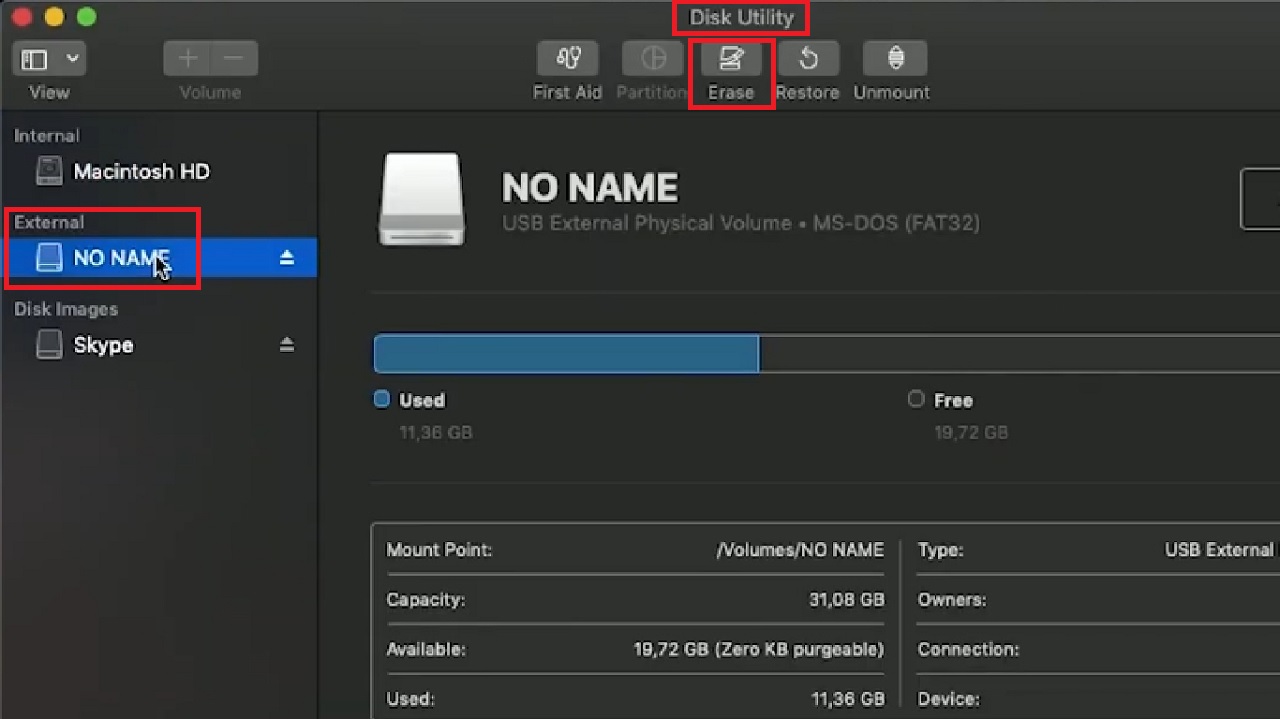
- Give the external hard drive a name.
- Select the file system from the drop-down menu that appears after clicking on the arrows on the right of the box next to Format.
- Click on the Erase button.
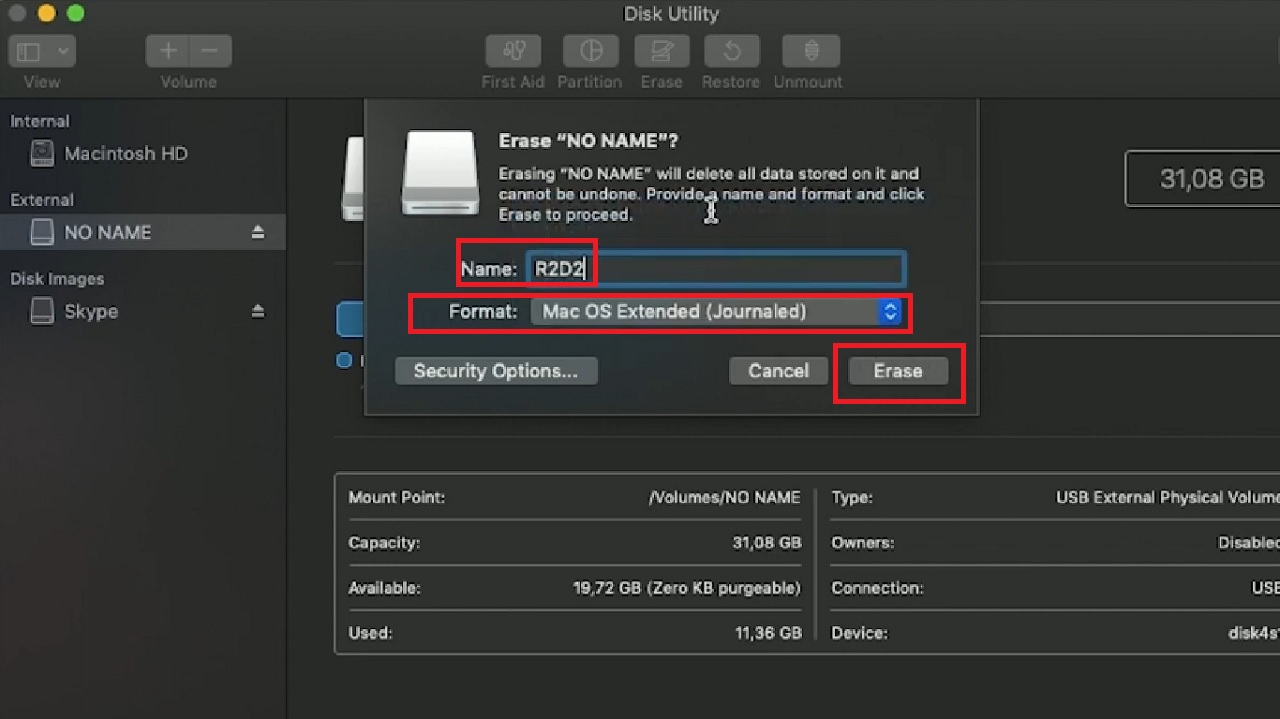
This will start formatting the external hard drive as shown in the image below:
When the process is complete, close the window.
Conclusion
Formatting an external hard drive is very easy. But you must keep in mind that it will remove all that you stored on the drive.
So, make sure you have created a proper backup of the data. Also, ensure you select the right disk to format.