
In this age, you must be very cautious while using your computer system and keep it well protected from any sort of vulnerabilities.
This not only applies to the PC as the whole, but to all other devices connected to it. One such device is your external hard drive.
If this device is not protected with a strong password, it will be the primary target of the cyber attackers.
The ways in which you can password protect an external hard drive are not many. If you do not know about them, continue reading this article.
In This Article
KEY TAKEAWAYS
- Turning the BitLocker Drive Encryption feature on is a good way to protect your external drive with a password.
- In a Mac computer system, you can ensure your external hard drive is well-protected with a password by using the Disk Utility feature.
- You can also use one of the many reliable third-party software tools to encrypt your external hard drive and protect it with a strong password.
Why Do You Password Protect an External Hard Drive?
As it is with passwords, one of the most significant reasons to protect an external hard drive with a password is to prevent unauthorized access and data theft, should it fall into the wrong hands.
It is also the best to ensure security of your device from cyberattacks.
Ways to Password Protect an External Hard Drive
Apart from using a reliable third-party software tool, you may turn on the BitLocker Drive Encryption feature in your Windows PC to protect your external drive with a secure password.
If you are using a Mac computer, you can use the Disk Utility feature to create a password to prevent unauthorized access to the external drive.
These are the specific steps to follow.
In Windows System
Method 1: Use BitLocker Drive Encryption Feature
One common way to protect an external hard drive using a password is by using the BitLocker Drive Encryption feature in your Windows computer.
STEPS TO FOLLOW:
- Connect the external hard drive to your PC. Assume that it is Drive D, as in this example.
- Right-click on the drive volume.
- Select Turn on BitLocker from the options that pops up.
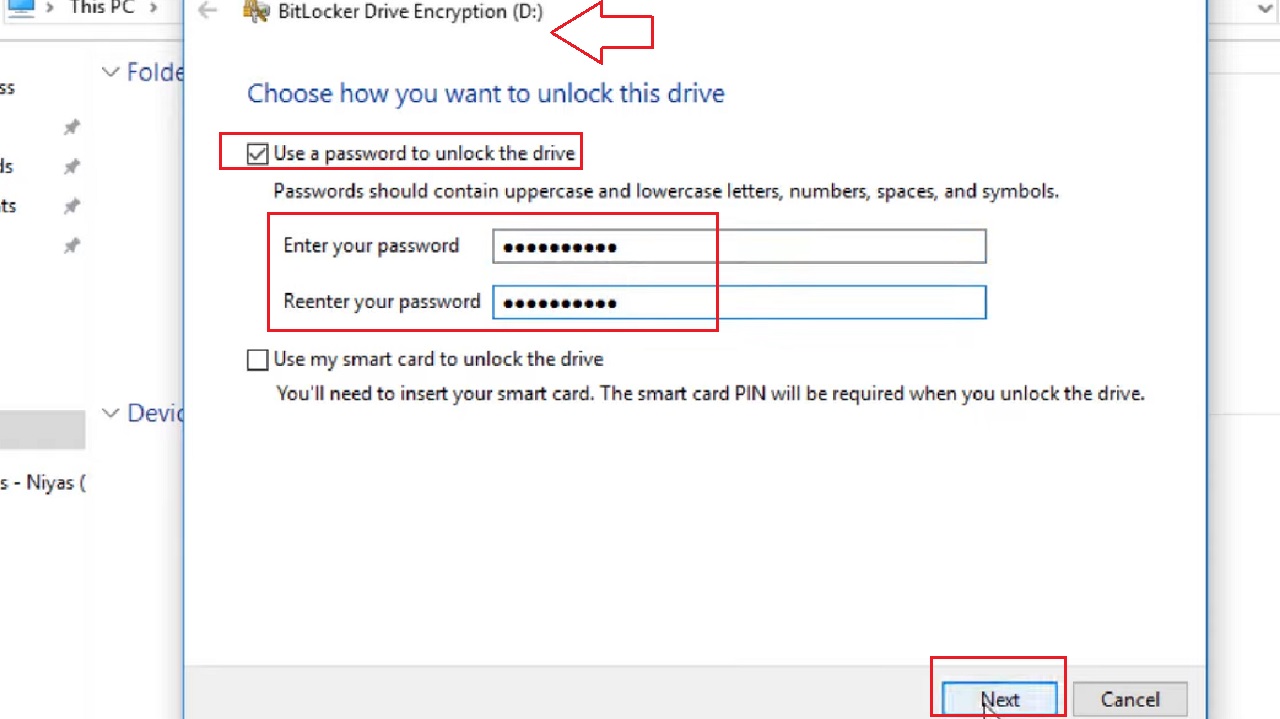
- In the following BitLocker Drive Encryption (D:) window, click on the small square box next to “Use a password to unlock the drive.”
- Enter and re-enter a password in the relevant fields as shown in the image below and then click on the Next button.
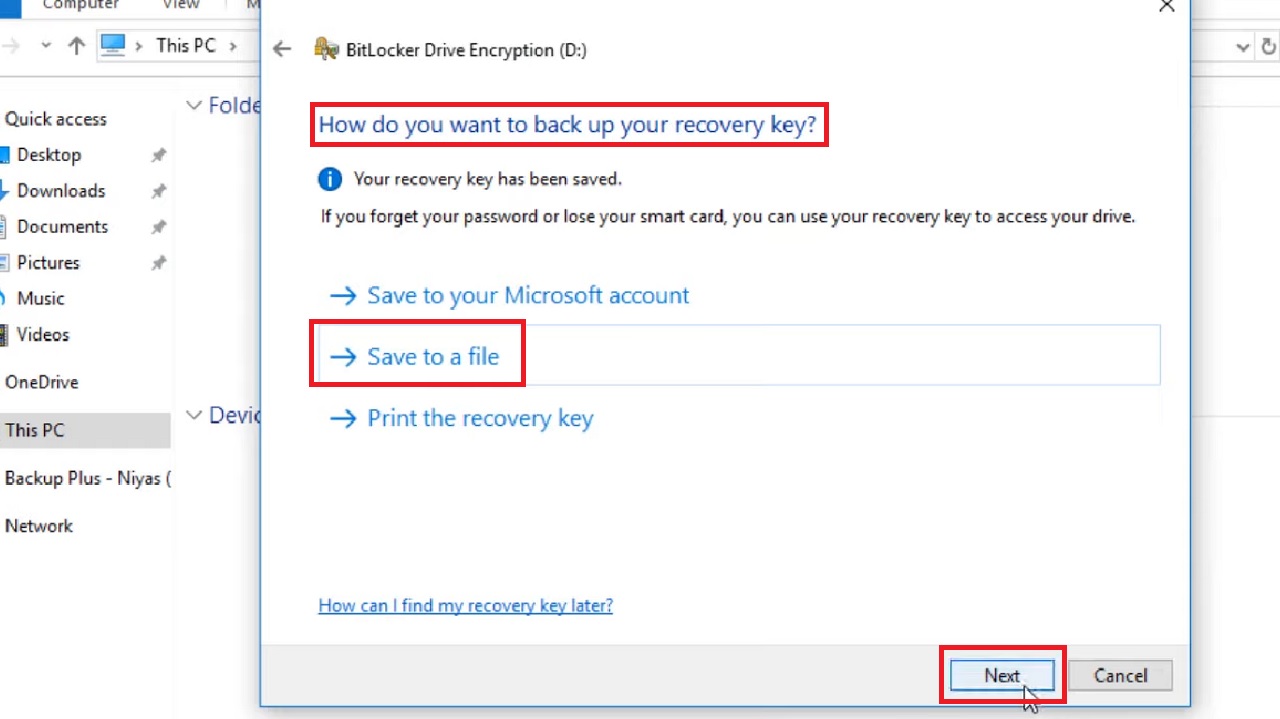
- Choose one of the options you prefer in the following window where you are asked ‘How do you want to back up your recovery key?’ (For example, Save to a file).
- Click on the Next button.
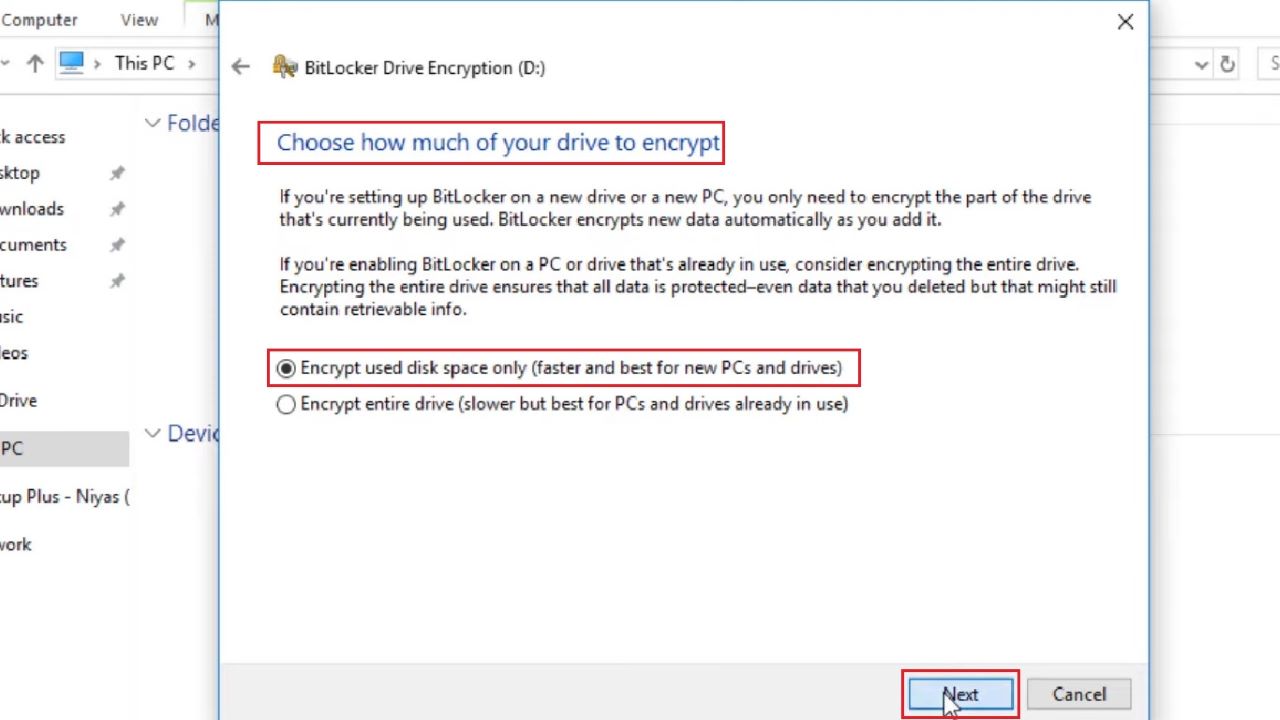
- You may or may not change anything in the following window asking you to ‘Choose how much of your drive to encrypt’ and simply click on the Next button. However, here the small circular button next to the option ‘Encrypt used disk space only (faster and best for new PCs and drives)’ is checked.
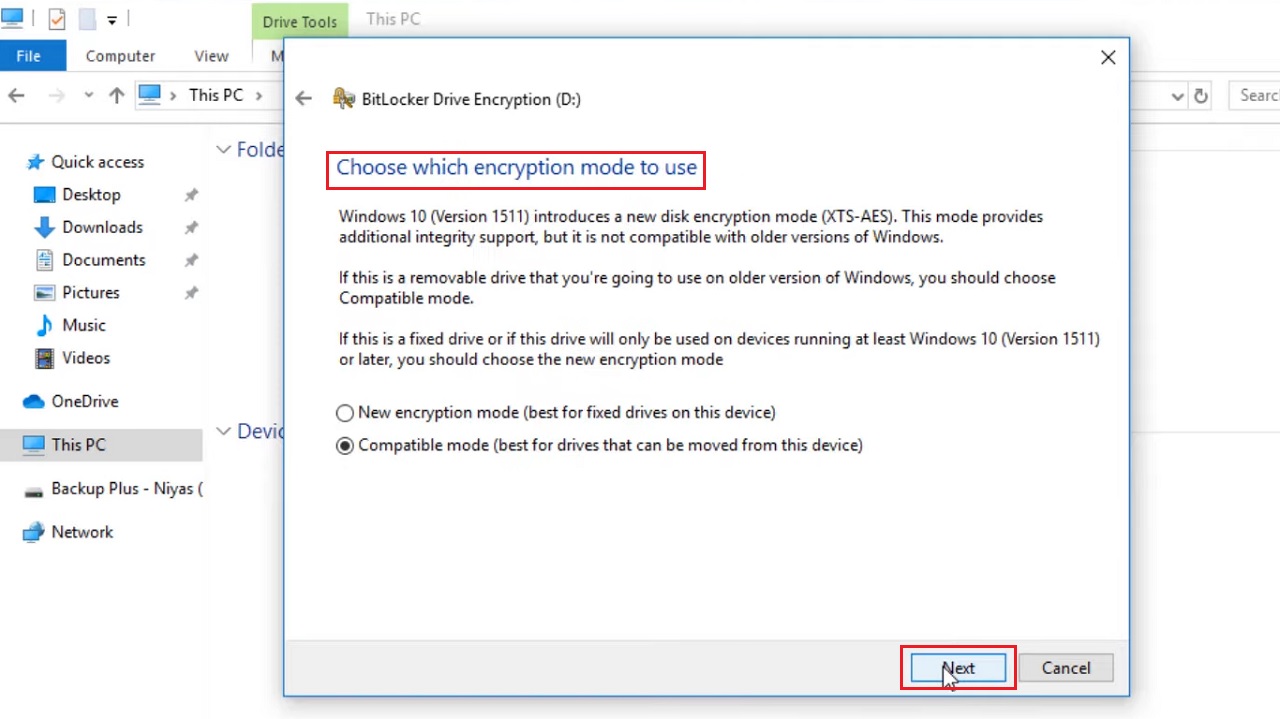
- Also, simply click on the Next button when the following window asking you to ‘Choose which encryption mode to use’ appears.
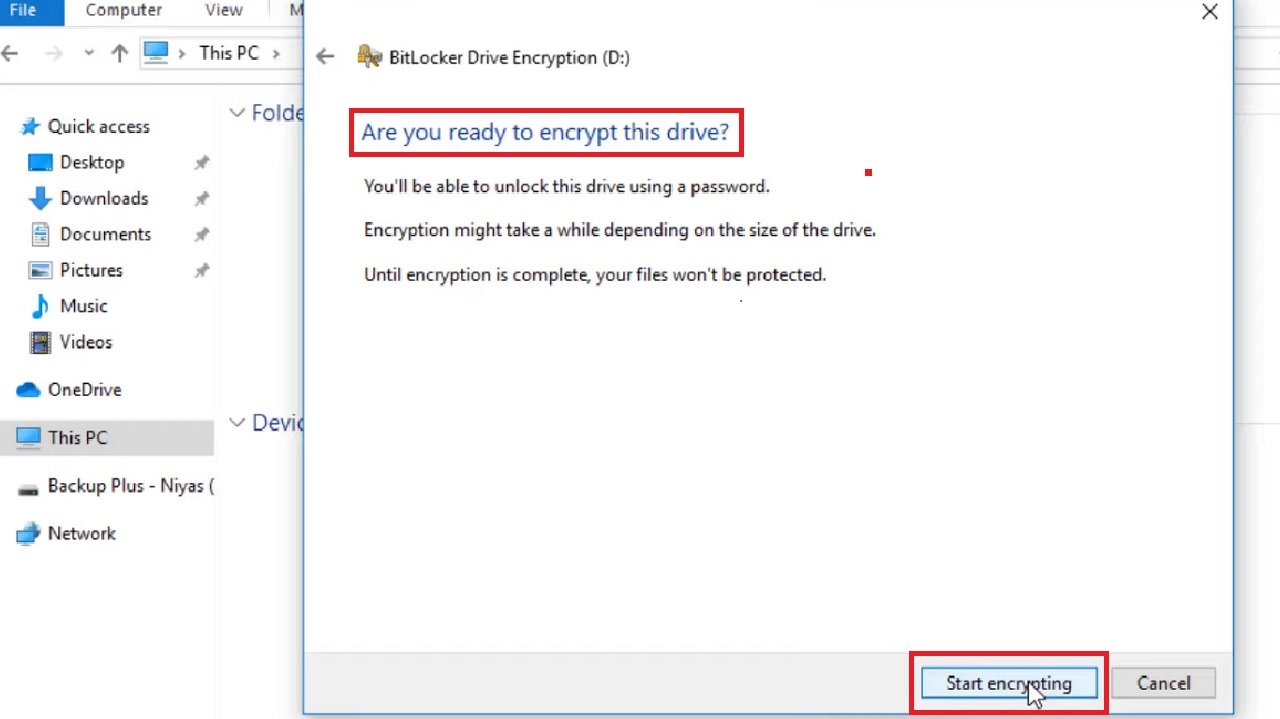
- Finally, click on the Start encrypting button in the final window that asks you “Are you ready to encrypt this drive?”
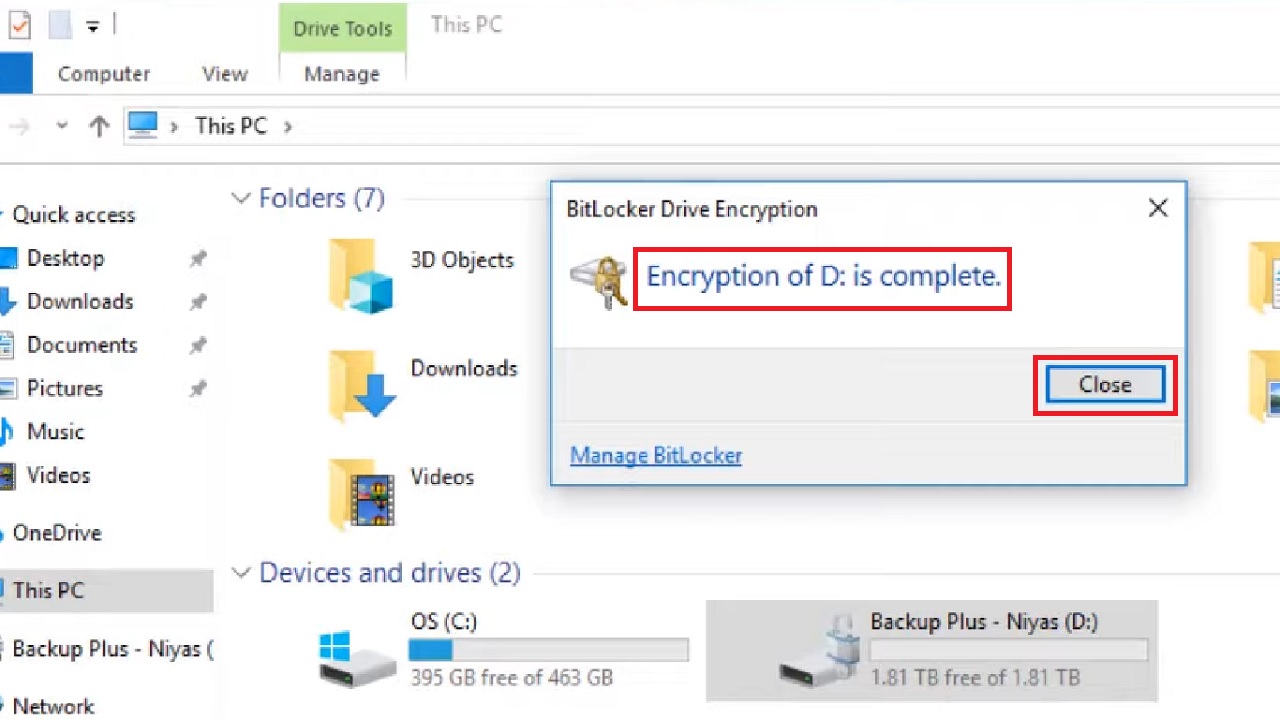
The process will be initiated and may take a couple of minutes depending on the size of the external drive and the data stored in it. Therefore, be patient and wait until the process is complete.
When it is done, click the Close button when you see the window saying ‘Encryption of D: is complete’ as shown in the image below:
In Mac Computer Systems
If you are using a Mac computer system, you can also protect your external hard drive with a password by using the Disk Utility feature.
Method 2: From the Disk Utility Feature
The Disk Utility feature in Mac computers is very helpful. You can use it to protect your external hard drive with a password as well.
STEPS TO FOLLOW:
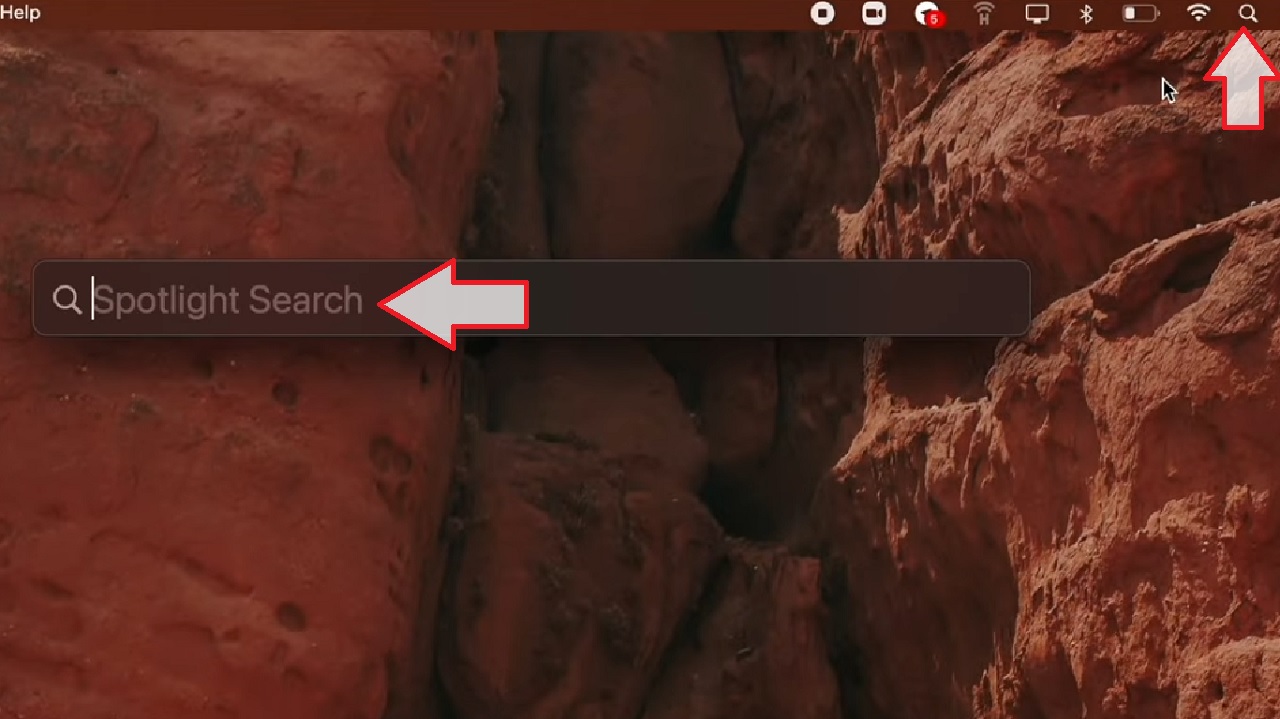
- Click on the small magnifying glass icon at the top-right corner of the screen to open Spotlight Search.
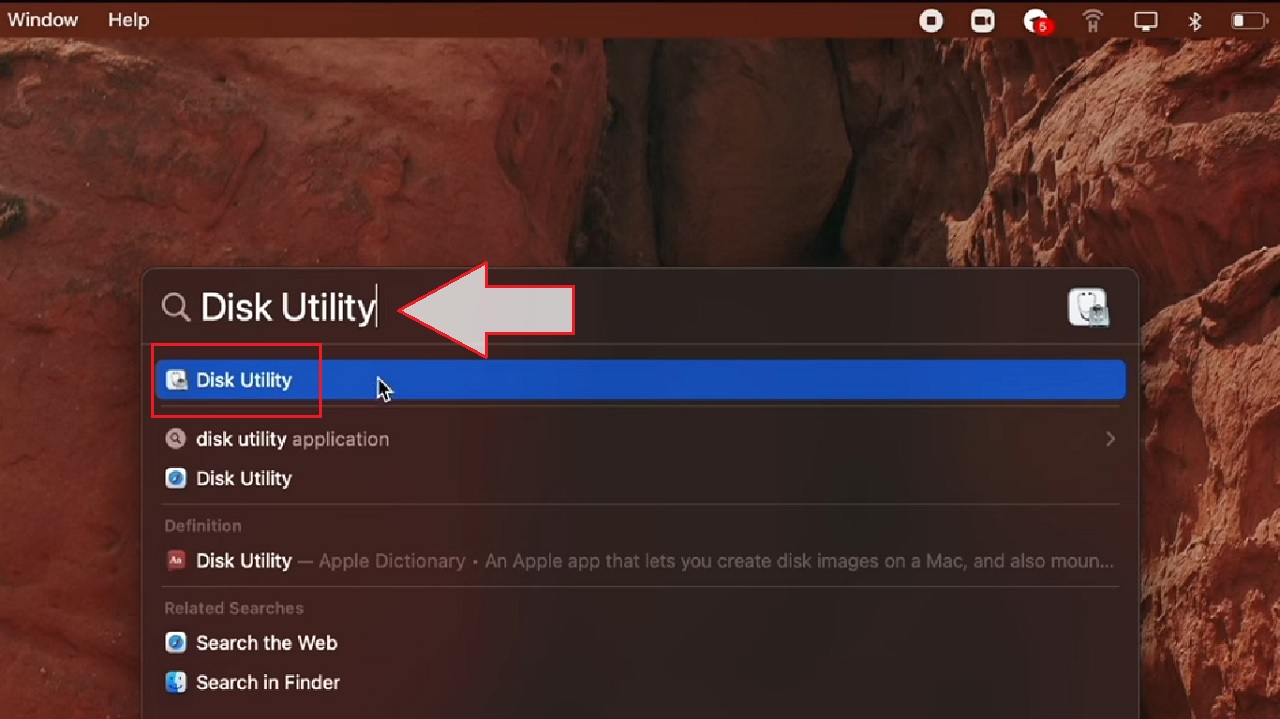
- Type Disk Utility in the search box.
- From the drop-down menu, select and click on the Disk Utility option.
- In the Disk Utility window, click on the small downward arrow icon.
- Select Show All Devices from the drop-down options.
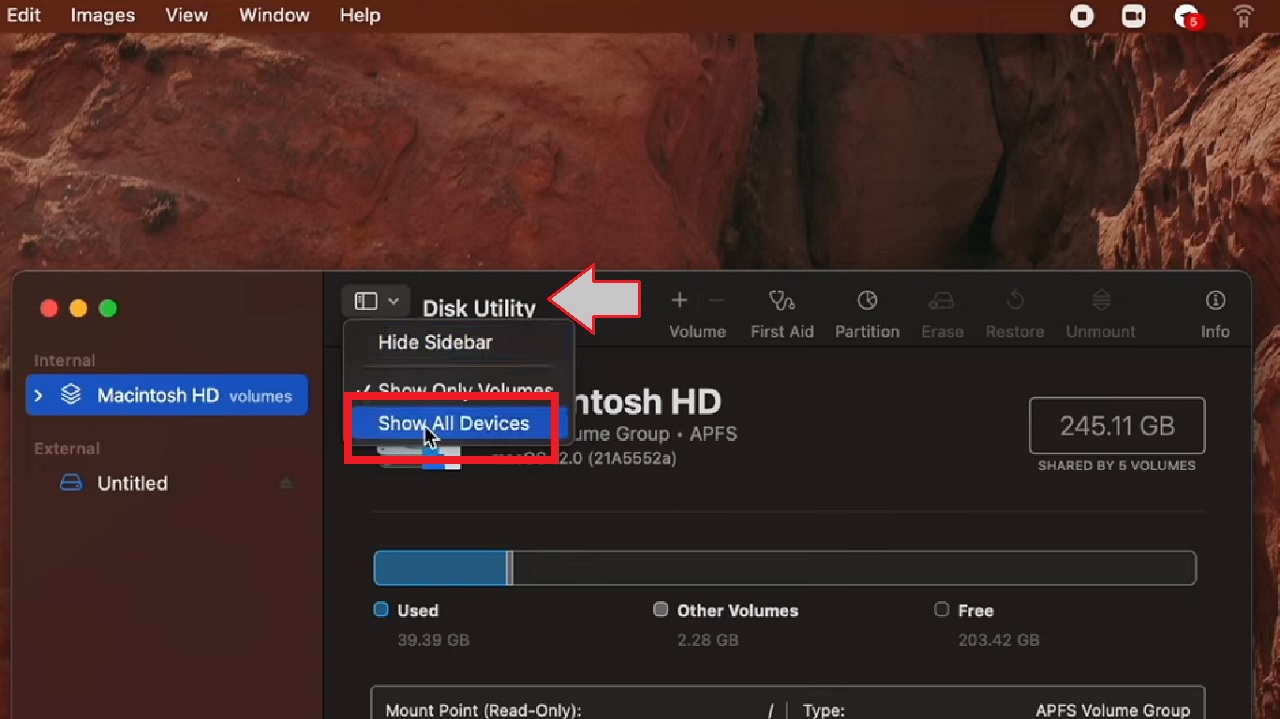
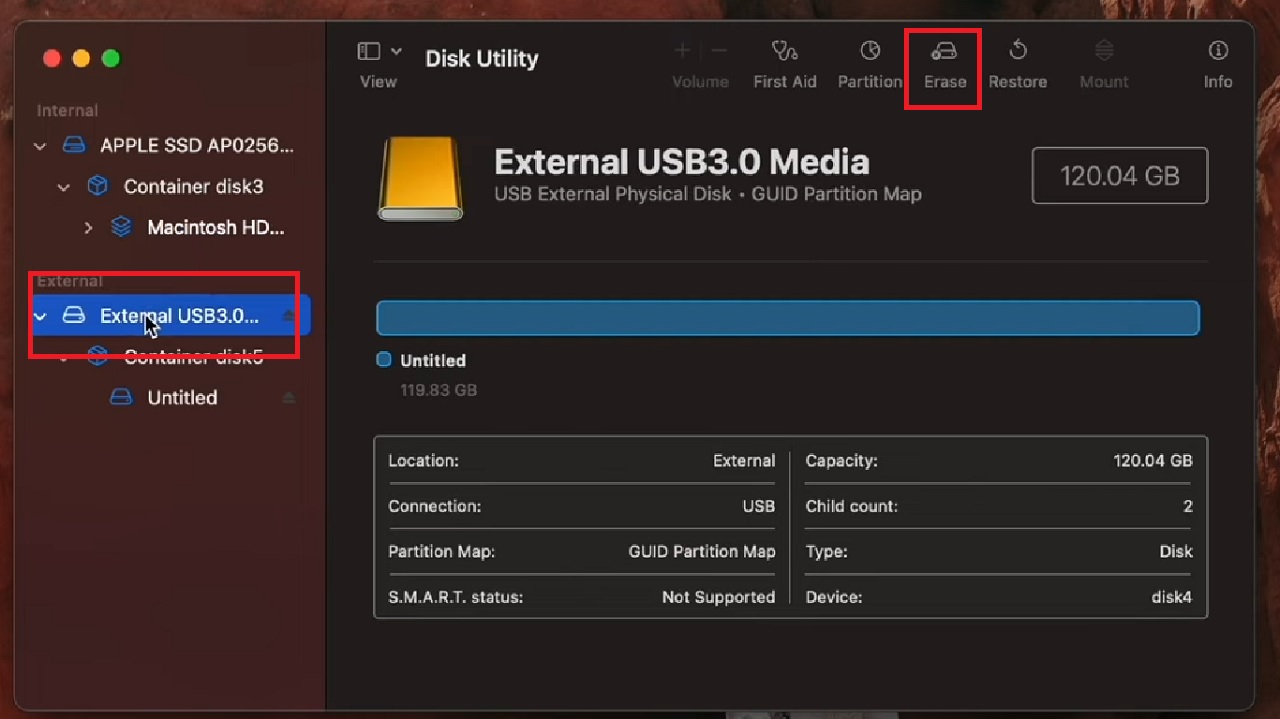
- Select the external drive (External USB3.0 Media in this case) from the left panel of the following window.
- Then click on the Erase button at the top.
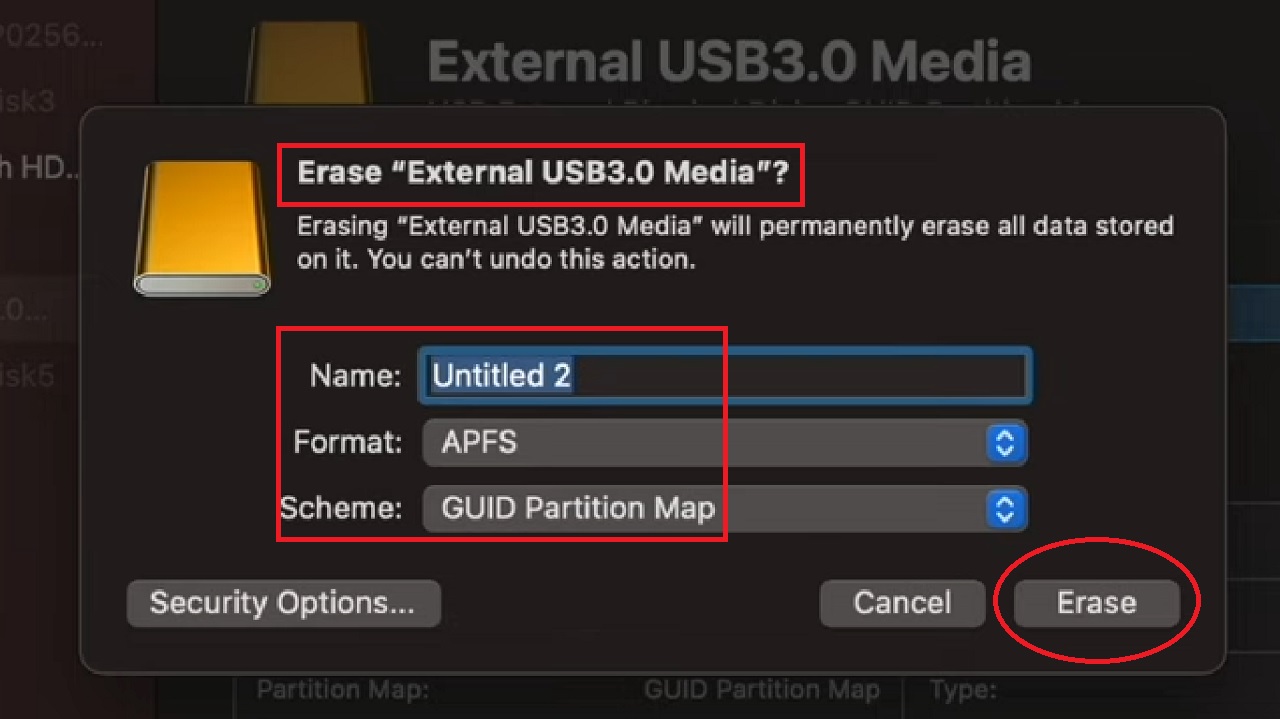
- This will open a new window which will ask whether or not you want to Erase “External USB3.0 Media”?
- Choose a name for the drive, the format type, and the scheme.
- In the next window, type in the password you want to give to your external hard drive.
- Verify it and also give a Password hint, just in case.
- Click on the Choose button below.

- Click the Erase button, marked with a red circle in the previous image, on the previous window.
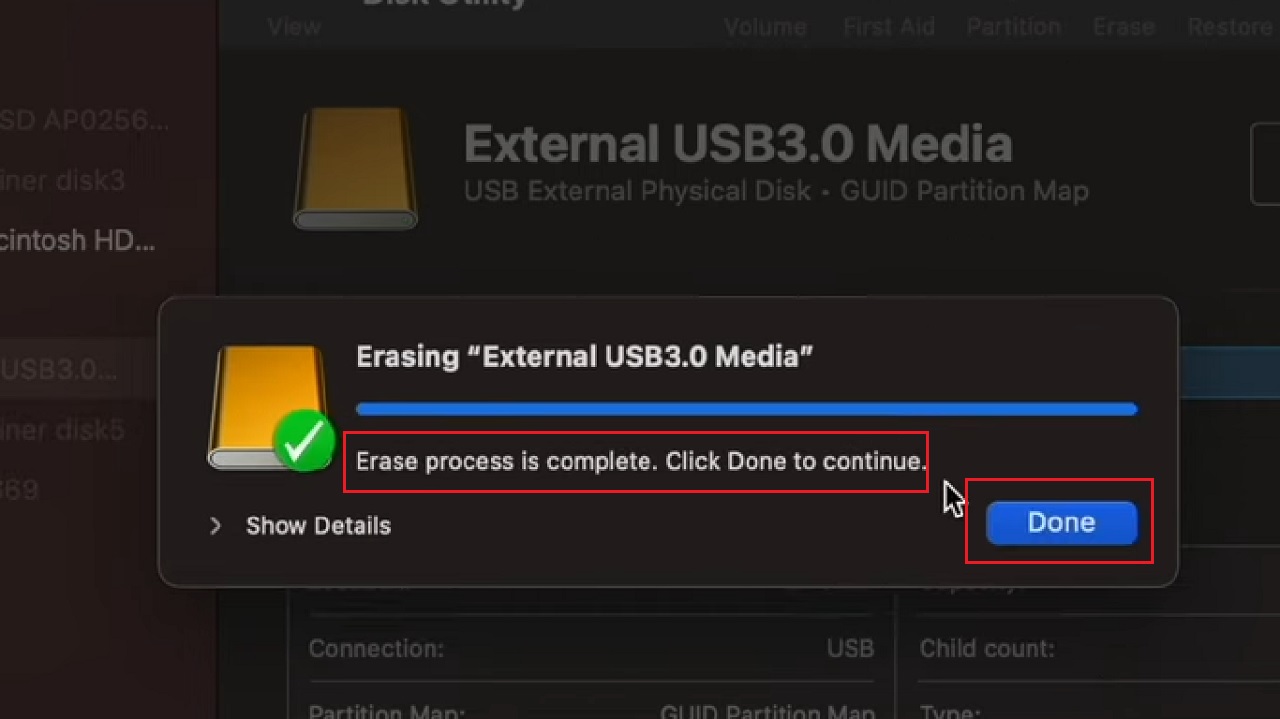
- This will take some time, and when the process is complete, click the Done button in the final window that says Erase process is complete. Click Done to continue.
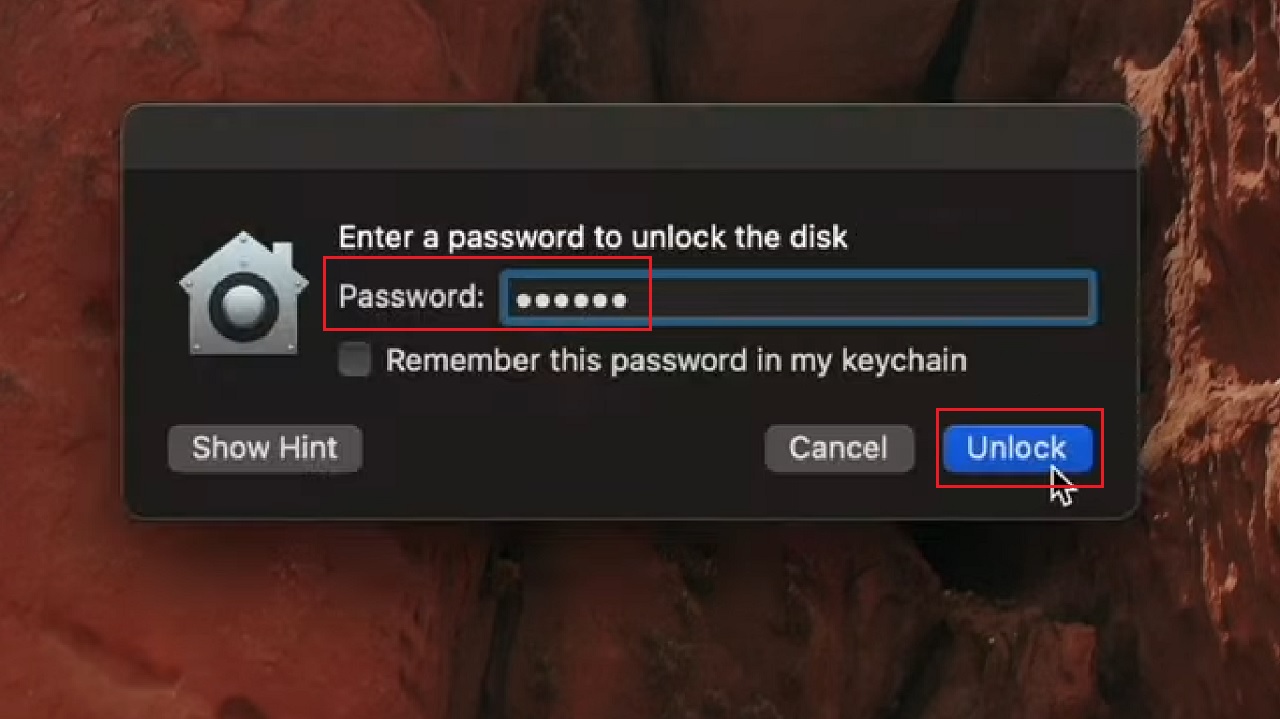
Now, the drive will be password protected. Every time you insert your external drive to your Mac computer from now on, it will ask for a specific password you set before allowing access.
- Enter the password and click on the Unlock button, as shown in the image below:
Conclusion
So, these are the two ways in which you can protect your external hard drive with a password.
If you are not sure about the reliability and do not want to use any third-party software tool, use them based on the computer system you use.