
When you use multiple hard drives, it is the volume label or volume name of the hard drive that helps identify and differentiate each one.
You can change this label to make it more descriptive or to reflect its contents. And the process is quite easy.
If you are unfamiliar with the process, follow this comprehensive guide to change or customize the label of your hard drive.
In This Article
KEY TAKEAWAYS
- The easiest way to change the volume label of a hard drive is from the File Explorer.
- Using the Disk Management Feature in Windows is an effective way to change the name and letter of the hard drive in a PC.
- Specific commands in the Command Prompt and Windows PowerShell will also allow you to change the drive letter and name.
- If you are using a Windows 11 computer, you can change the volume name of your hard drive from the Settings App.
- Using the Registry Editor will also allow changing the volume name and letter and even add icons to customize the hard drive.
Why Do You Need to Change the Volume Label of a Hard Drive?
The need to change the volume label of hard drives may vary, but one of the most significant reasons is that it helps in easy identification and differentiation among multiple drives and facilitates better organization with more consistency.
Other significant benefits or reasons for changing the volume label of a hard drive include:
Customization: You can customize the label of your hard drive and make it more meaningful by giving it a personal touch through its content or function. You will not have to rely only on the drive letter to identify it, especially during repurposing or rebranding.
Intuitive system: With a changed or different volume label, you will have a more intuitive system where the hard drives can be quickly recognized and used when connected and disconnect them very easily and quickly when you are done.
Software compatibility: There may be some apps or software that may need a particular volume label to function. Changing the volume label will fulfill such requirements and ensure compatibility.
In short, when you change the volume label of the hard drive, it will offer a superior user experience by ensuring better management of the storage devices.
How to Change Volume Label of a Hard Drive?
Any user with administrative privileges can change the volume label of the hard drive and its partitions from the File Explorer itself.
In addition to that, you can also change the name and letter assigned to a hard drive in the following ways:
- By using the Command Prompt
- By using Windows PowerShell
- By using the Disk Management feature
- By using WinRAR
Here are the simple steps to follow for each method.
Additionally, if you are a Windows 11 user, you can change the volume label and letter by using the Windows Registry Editor or the Settings app.
Method 1: Changing the Volume Label from Disk Management
You can change the volume label as well as the letter assigned to the hard drive very easily and quickly from the built-in Disk Management utility in Windows.
For example, assume that you want to change the volume name and letter of Drive G, shown as New Volume G (G:) here.
Ensure that the operating system or any other vital programs are not stored on it before changing the name, as doing so may cause performance issues.
STEPS TO FOLLOW:
- Right-click on the Start Menu.
- Go to and click on Disk Management from the list of options that pops up.
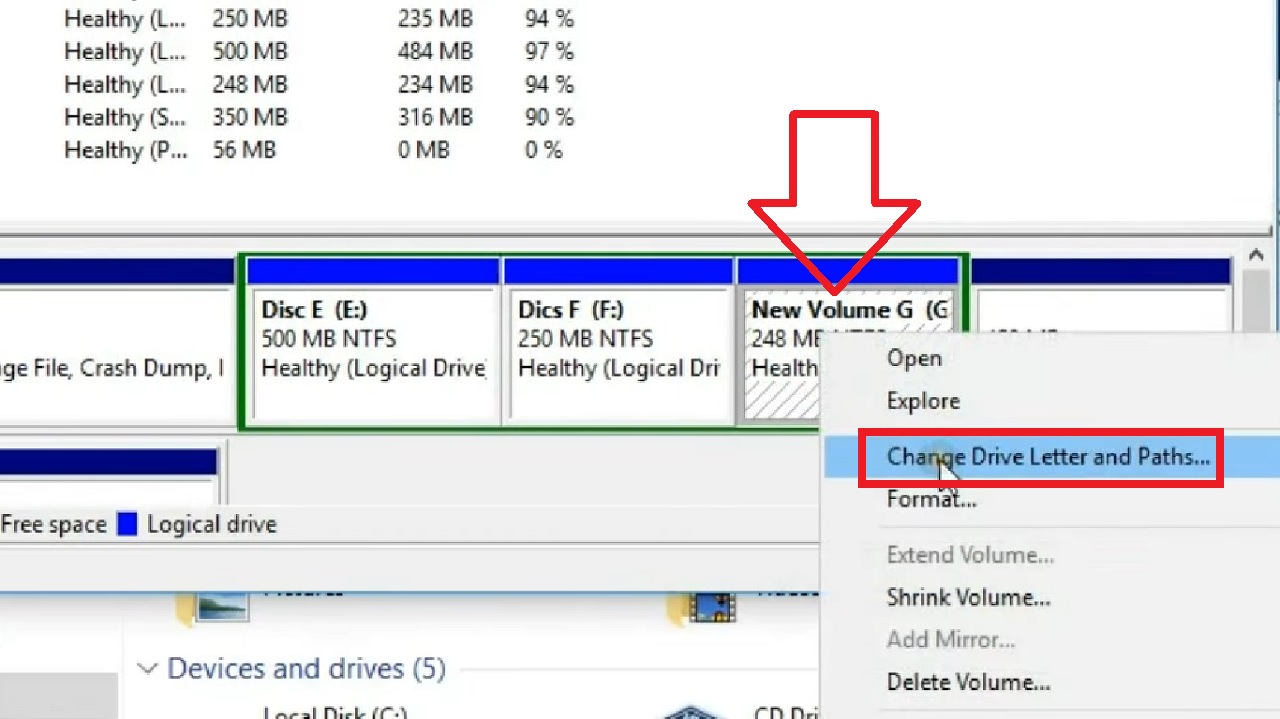
- In the Disk Management window, right-click on New Volume G (G:).
- Select “Change Drive Letter and Paths” from the options in the drop-down menu.
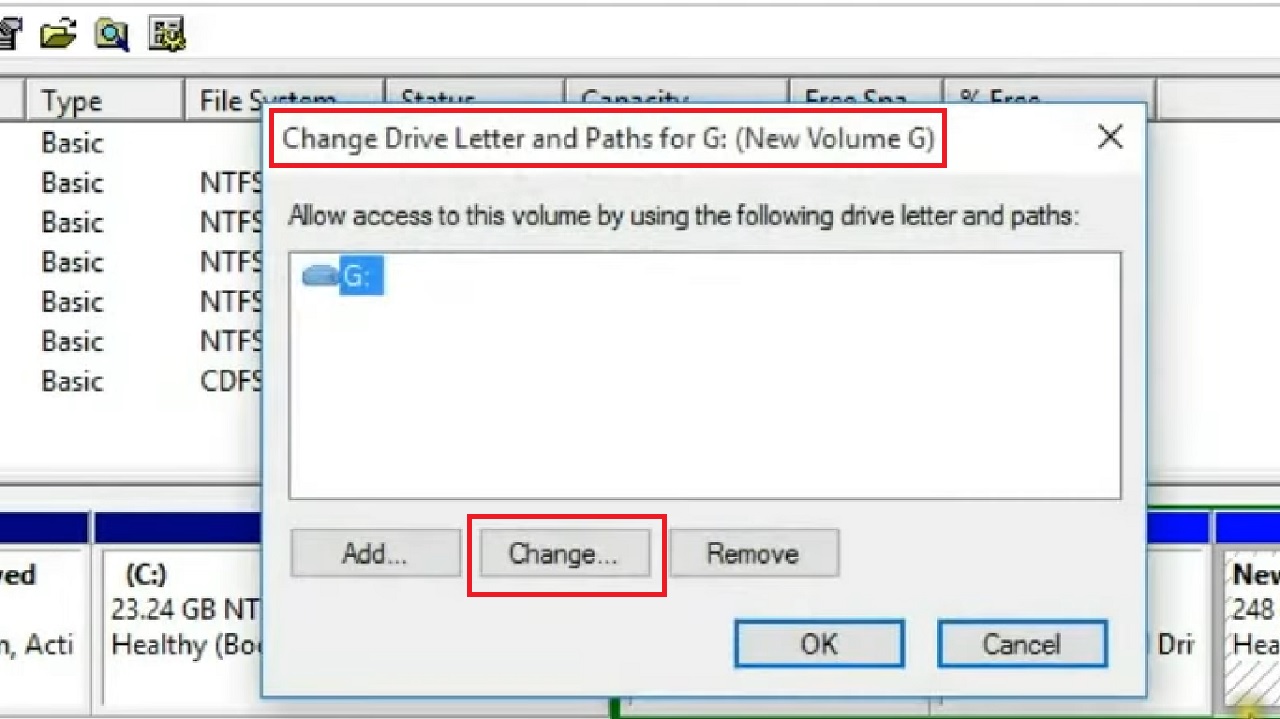
- In the new Change Drive letter and Paths for G: (New Volume G) window, click on the Change button.
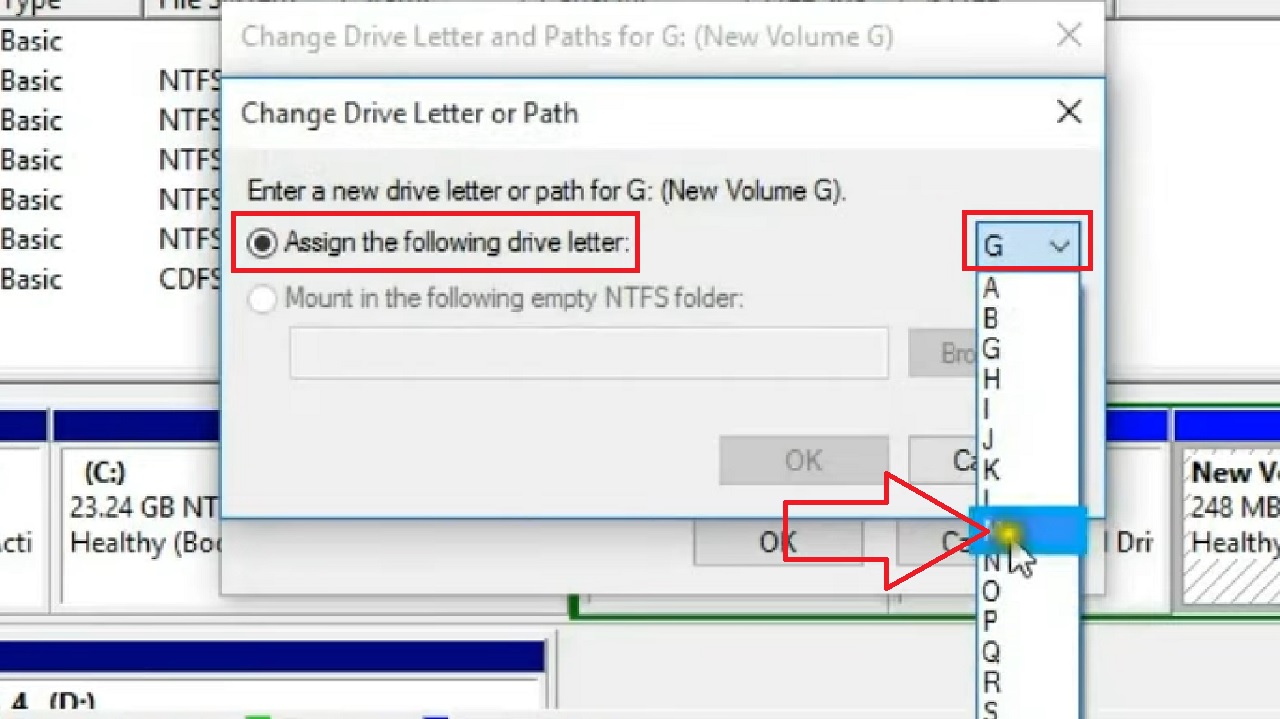
- In the following window, click on the small circle next to “Assign the following drive letter:”
- Now, click on the small arrow in the small box showing G.
- Select a new letter of your choice from the drop-down options. Suppose, you choose the letter M. Click on it.
- Then click on the OK button below. (Not shown in the image).
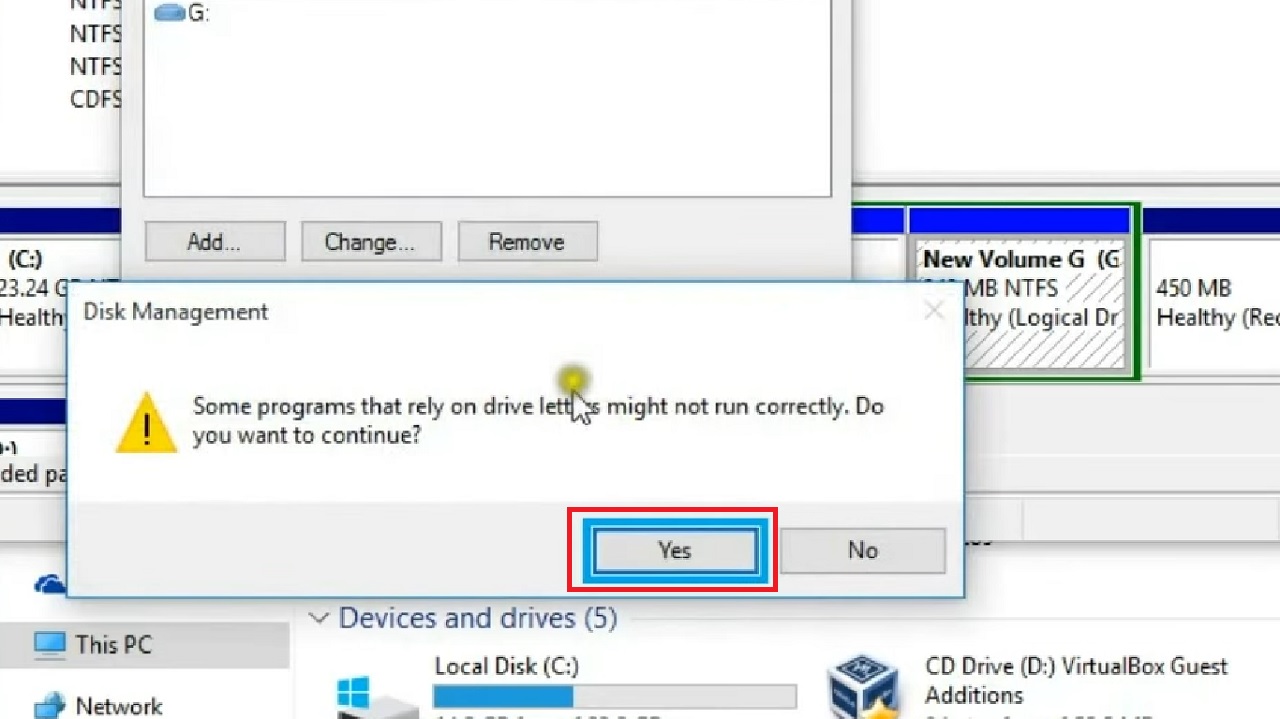
- You will get a message box asking you ‘Do you want to continue?’
- Click on the Yes button.
You will see that the letter assigned to the hard drive has changed from G to M, as shown in the image below:
Now, to change the volume name, follow these steps:
- Right-click on New Volume G (M:)
- Select Properties from the options in the menu.
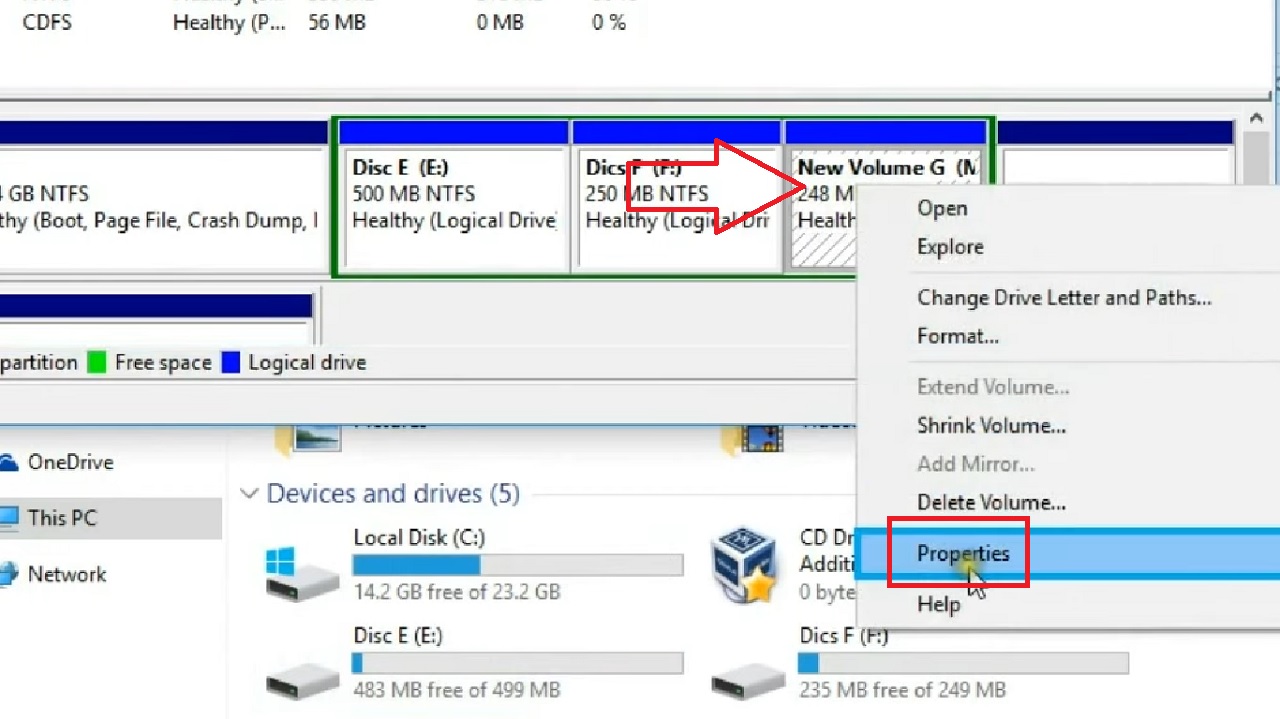
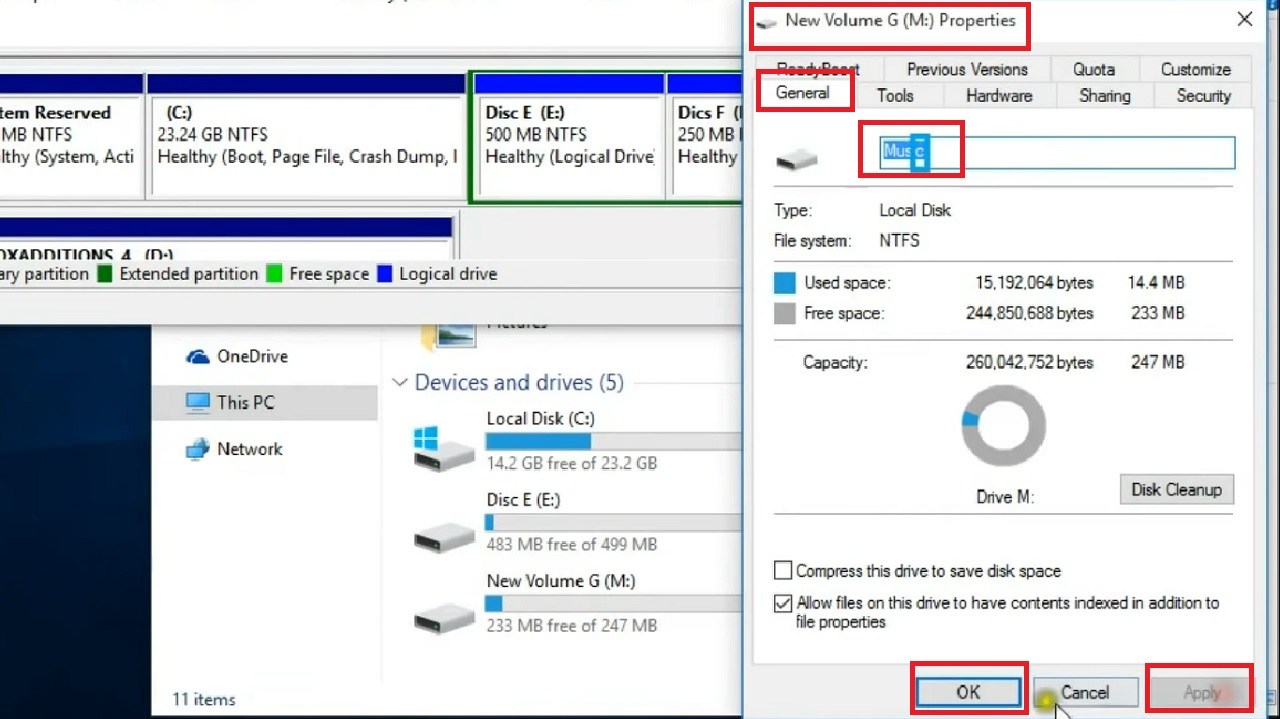
- Under the General tab in the New Volume G (M:) Properties window, change the name to Music in the box.
- Click on the Apply button and then on the OK button.
- You will see that the volume name of the New Volume G is now changed to Music (M:).
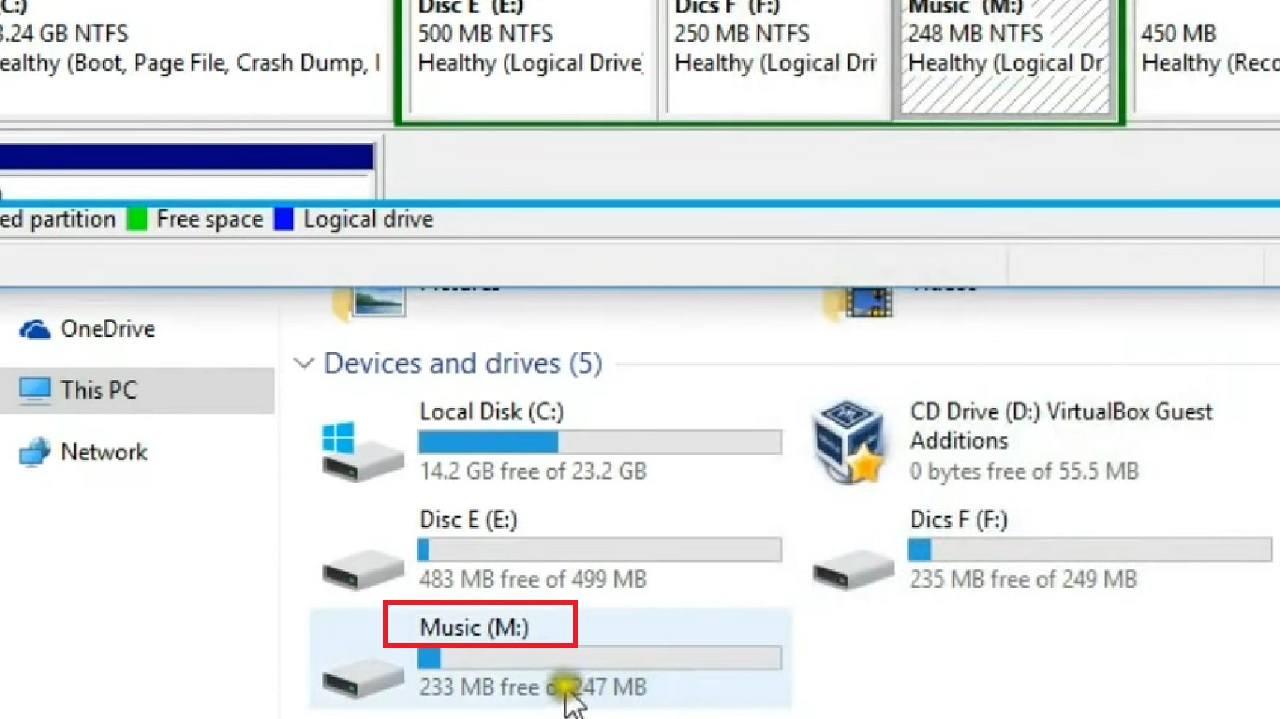
This way you can change the volume name and letter of as many drives you want and have on your computer.
Method 2: Changing the Volume Label of Hard Drive from the File Explorer
You can also change the name of the hard drive from Windows File Explorer. Usually, there are two ways you can do that, provided you have the administrator permission for it.
STEPS TO FOLLOW:
- Press the Windows and E keys on your keyboard together to open File Explorer.
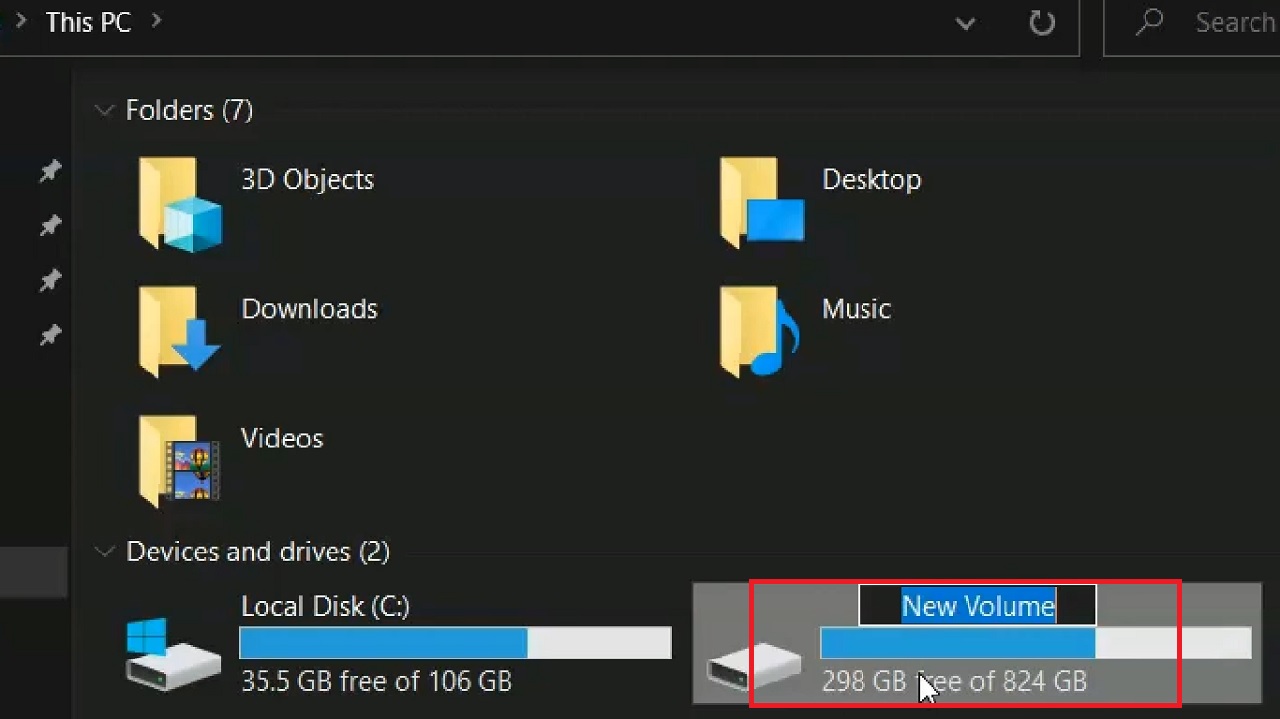
- Select This PC from the left panel of the window.
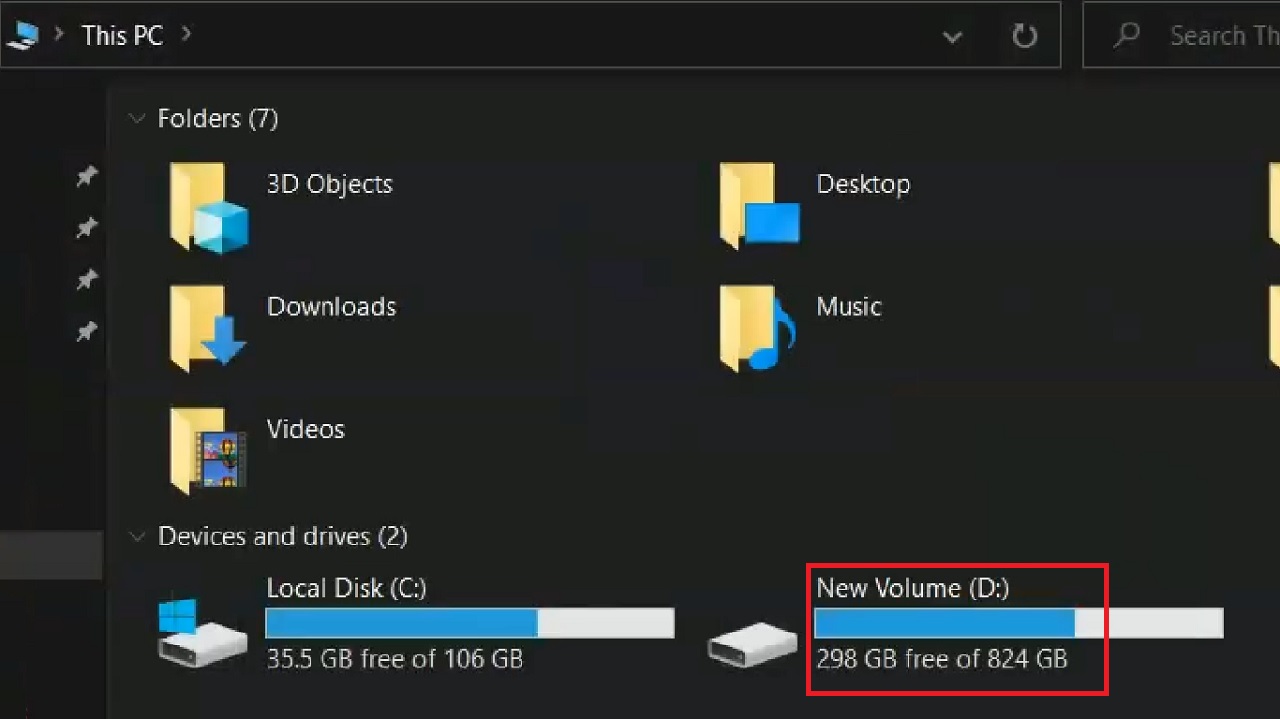
- To change the volume label of the New Volume (D:), as shown in the above image by a red box, first click on it once to select the drive.
- Now press the F2 button on your keyboard.
- Name the drive as you want in the box as shown in the image below:
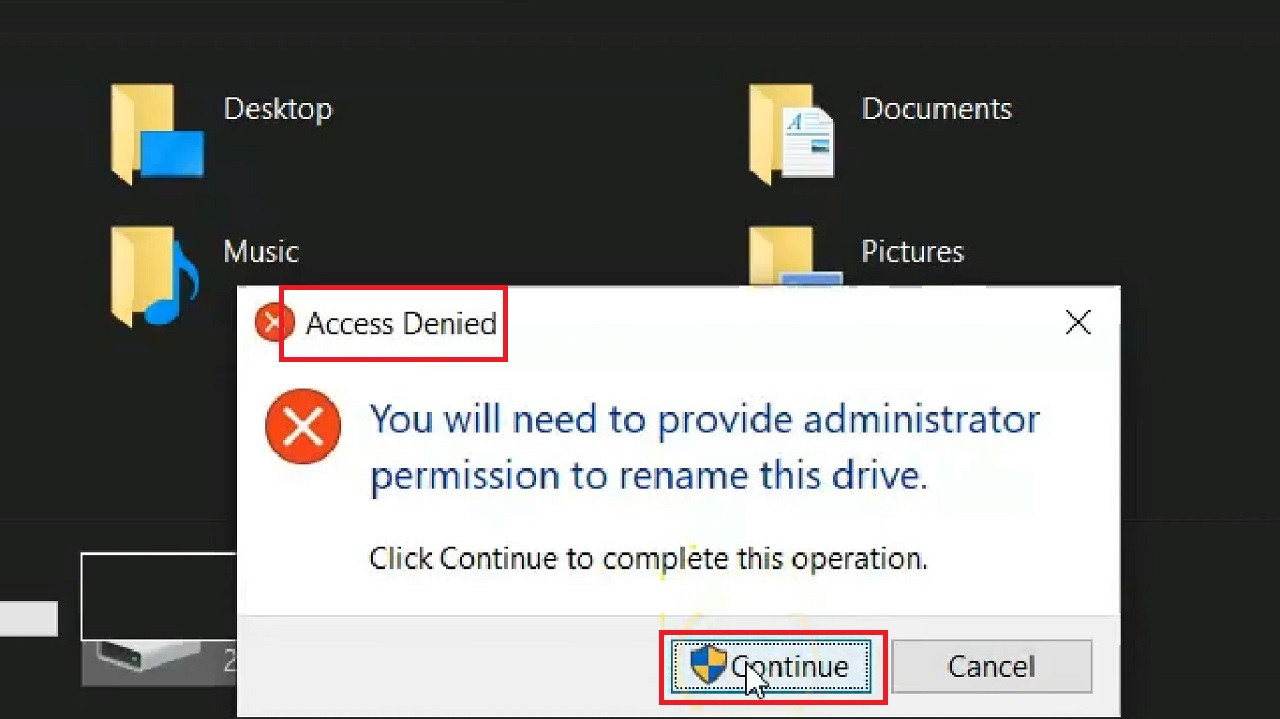
You will see an Access Denied message as shown below because you will need to provide administrator permission to rename the drive.
- Click on the Continue button to complete the operation.
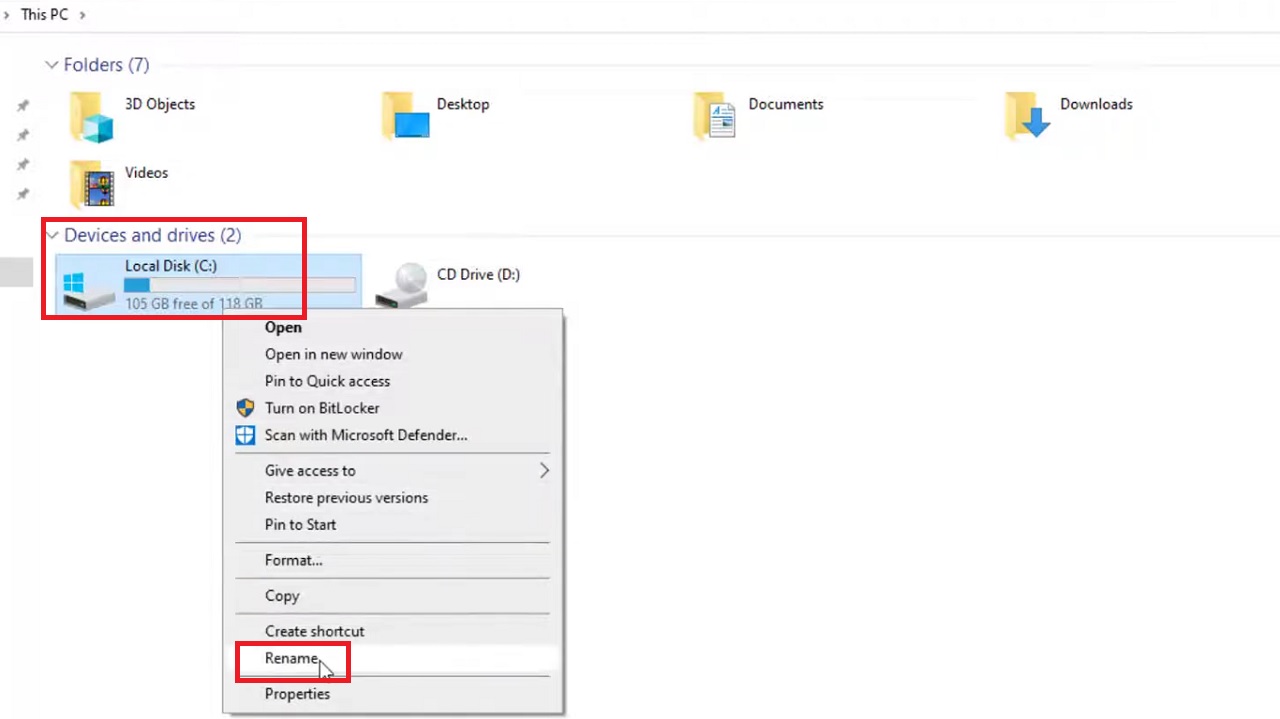
You can also rename the hard drive in a different way. For example, if you want to rename the Local Disk (C:), right-click on it and then select Rename from the drop-down menu.
- Rename the drive.
Again, click on the Yes button in the Access Denied window to complete the process.
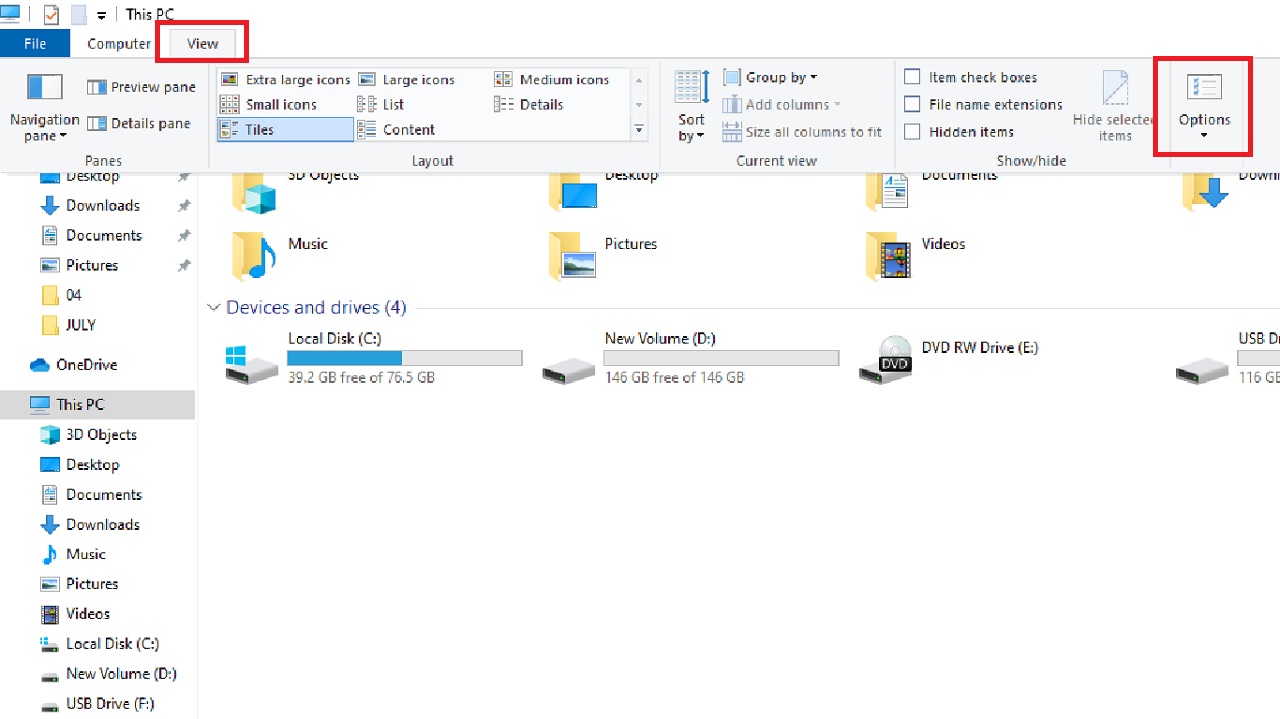
Now, if you want to remove the drive letter assigned to these drives and display their names only, you can do it by following these steps:
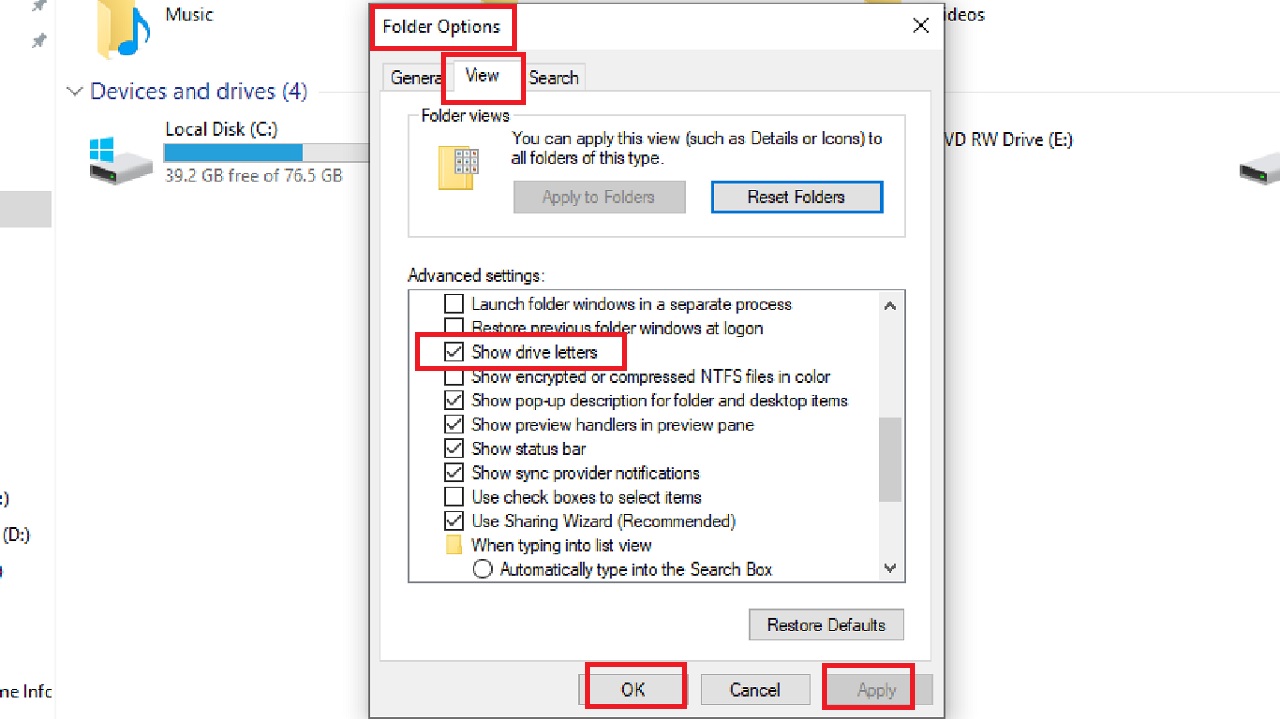
- Go to the View Menu at the top of the This PC window.
- Select Options at the far-right and click on it.
- This will open the Folder Options window.
- In this window, go to the View tab.
- Scroll down to find Show drive letters in the box under Advanced settings:
- Uncheck the small square box next to it.
- Click on the Apply button and then on the OK button to apply the changes.
This will hide the drive letters.
Method 3: Changing Volume of Hard Drive Using the Command Prompt
Running a few particular commands in the Command Prompt will also change the volume name and letter of a hard drive.
STEPS TO FOLLOW:
For example, suppose you want to change Drive D to Drive G.
- Type cmd in the search box next to the Start Menu.
- Choose Run as administrator and hit Enter.
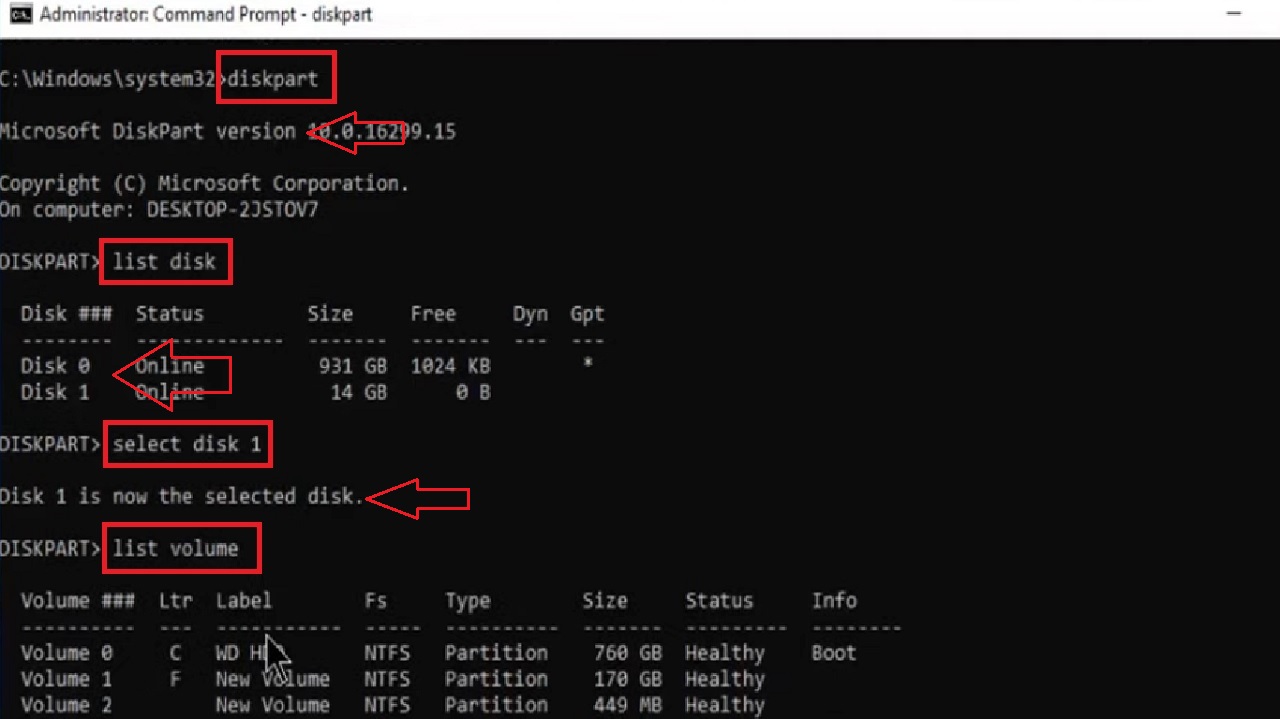
In the Command Prompt window, type the following command:
- diskpart (This will create the Microsoft Diskpart version).
- list disk (This will create the list of disks on the PC).
- select disk 1 (This will select Disk 1 to change the letter).
- list volume (This will display the volume of the hard drives).
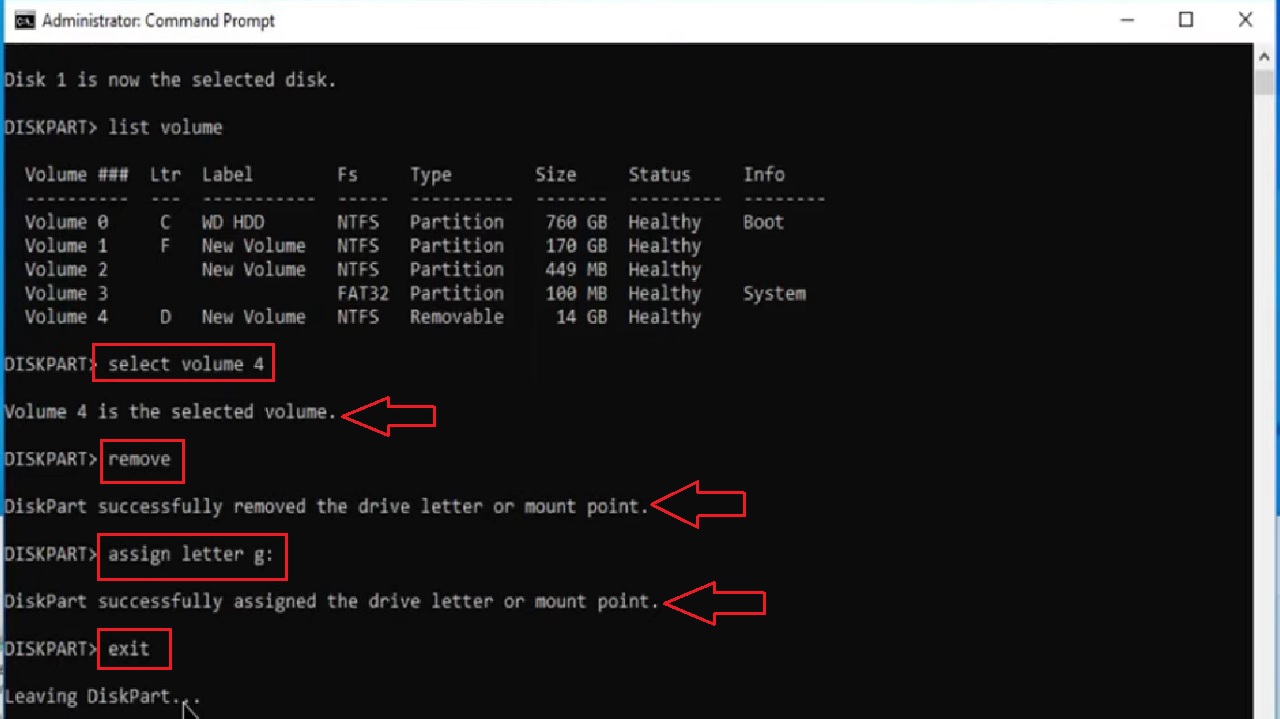
Now, type the rest of the commands:
- select volume 4 (This will select the volume 4).
- Remove (This will remove the mount point or drive letter).
- assign letter g: (This will assign the new drive letter G to the hard drive).
- exit (This will complete the process).
Note: The numbers 1 and 4, and the letter g are just for examples. You may replace them with the numbers or letters you want on your hard drive.
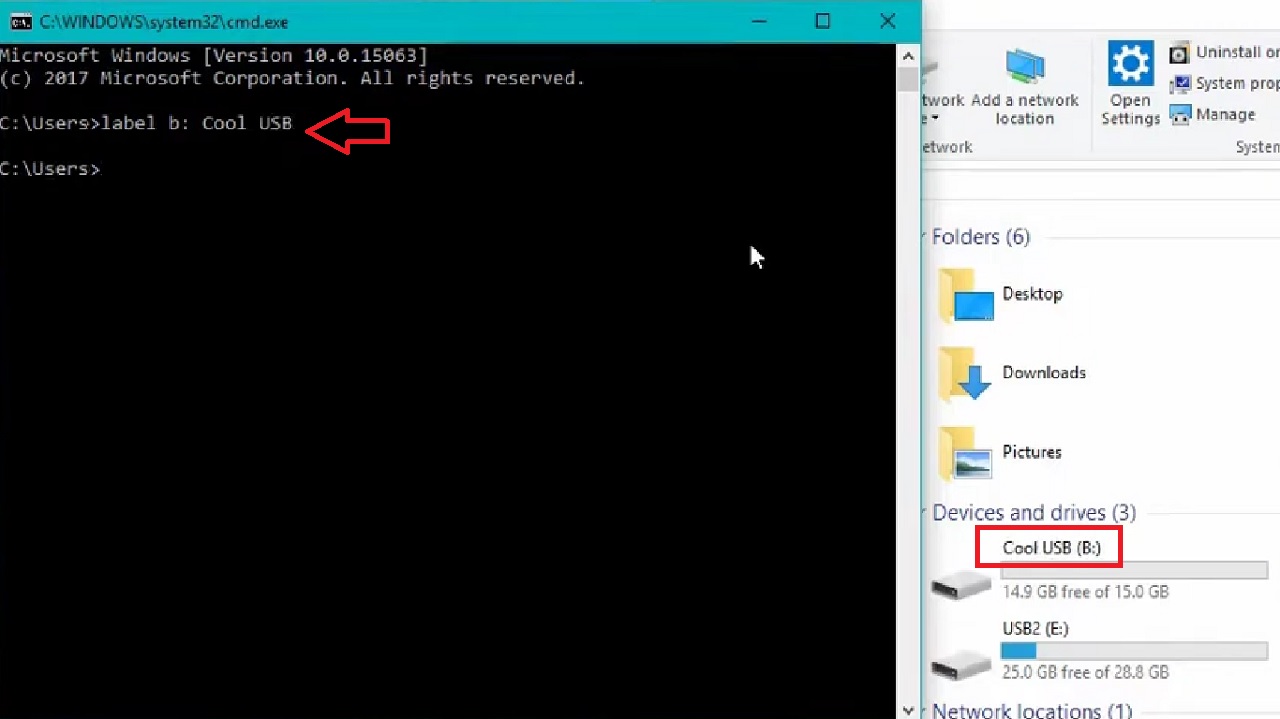
Now, if you want to change the volume label of the hard drive using the Command Prompt, you will simply have to use the ‘Label’ command.
For example, suppose the hard drive is named Beetle USB (B:) and you want to change it to Cool USB, type the command label b: Cool USB, as shown in the image below:
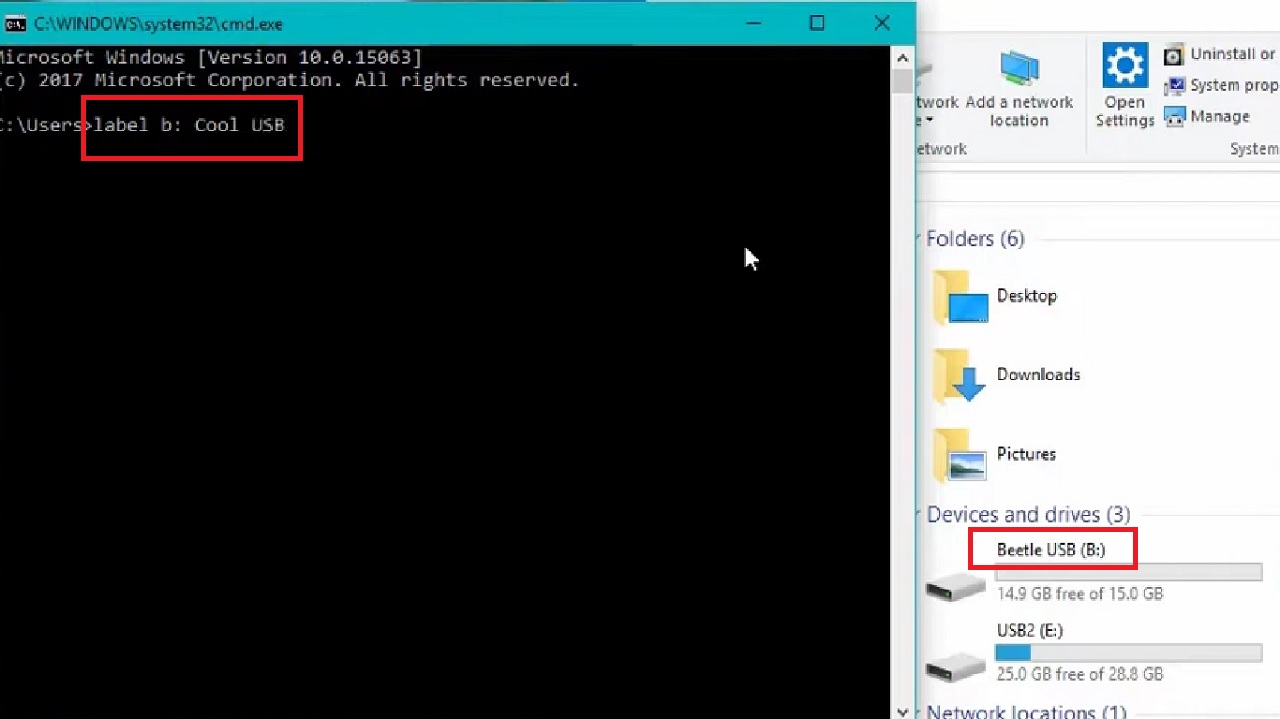
When you hit Enter, it will change the volume name of the hard drive as shown below:
You can even use quotes while naming the hard drive. For example, if you want to name your Drive C to THIS OS, with or without quotes, you can use the commands label c: “THIS OS” or label c: THIS OS, as shown in the image below:
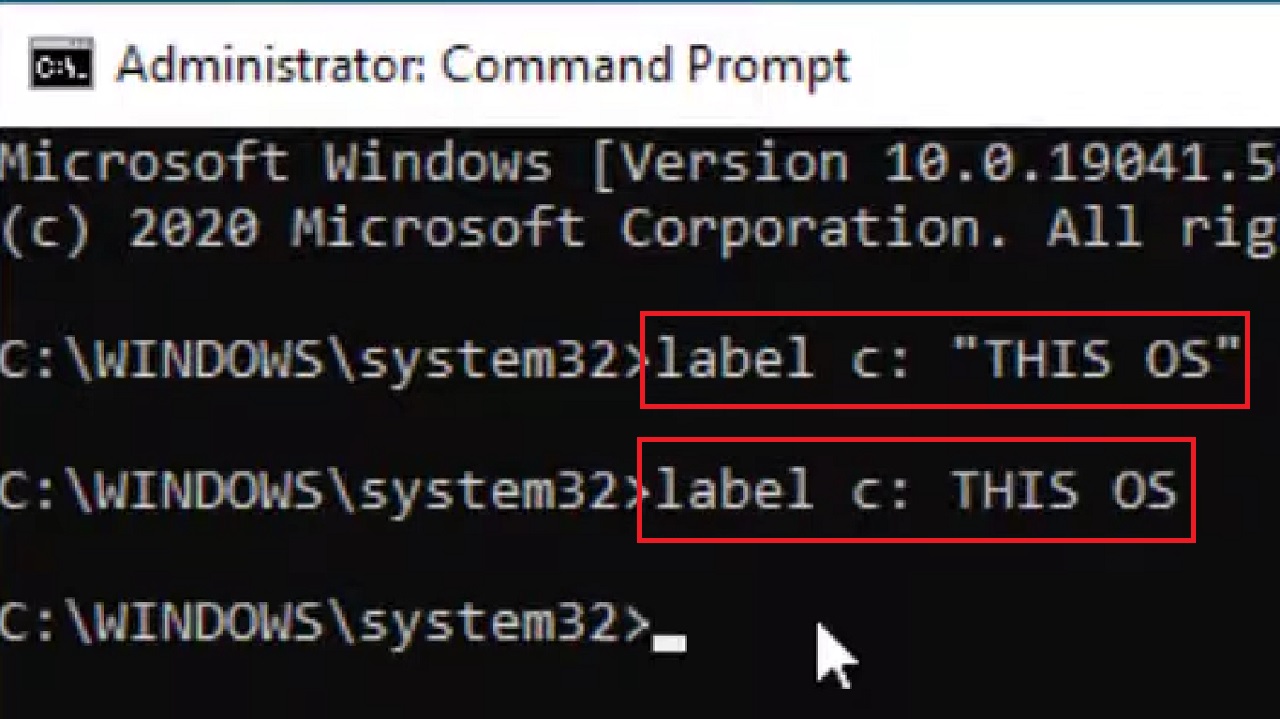
Finally, type exit to complete the process.
Method 4: Change Volume name from Windows PowerShell
In a similar way to using the Command Prompt, you can also use Windows PowerShell to change the volume name of your hard drive.
STEPS TO FOLLOW:
- Right-click on the Start Menu.
- Select Windows PowerShell (Admin) from the options that pop up.
- Click on the Yes button in the User Account Control window when prompted.
- In the PowerShell window, type in the command Set-Volume -DriveLetter C -NewFileSystemLabel “NT Windows” as shown in the image below, and hit Enter.
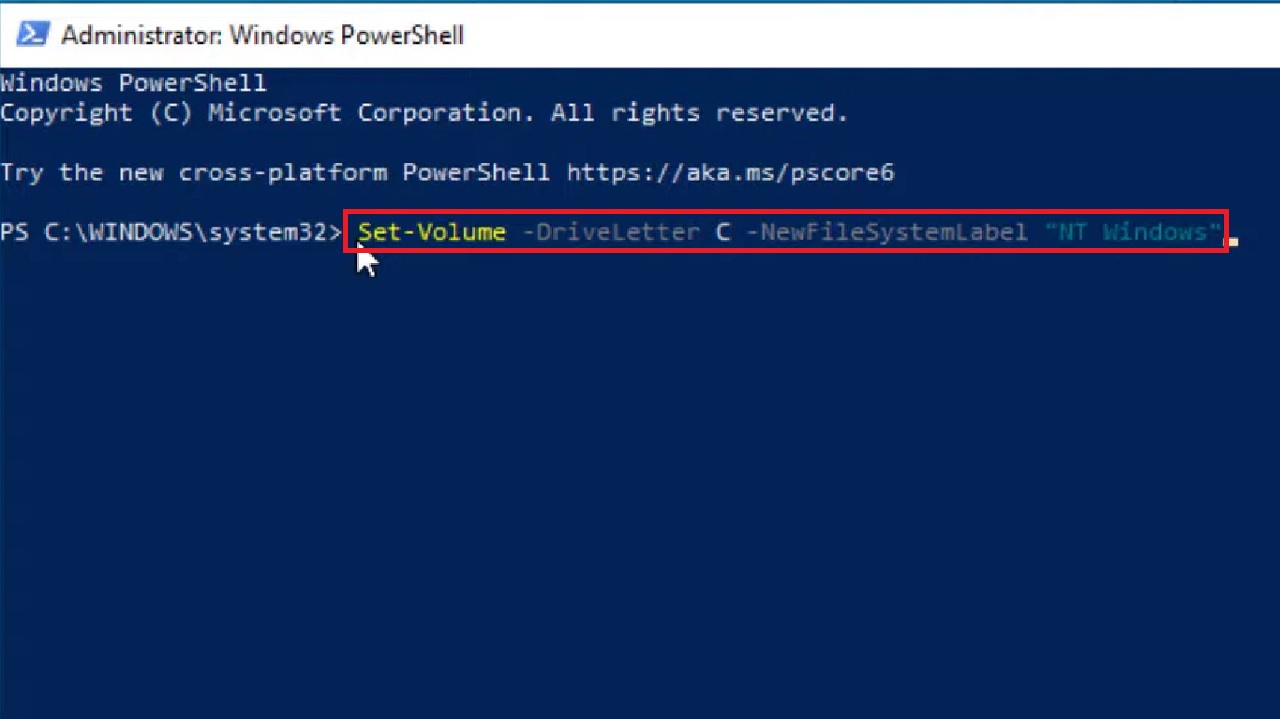
The drive will now be displayed as ‘NT Windows’.
Method 5: Changing Volume Label using WinRAR
Suppose you are using a removable drive and want to rename it. However, it may show that it is unrenamable. In such a situation you can use the WinRAR feature to successfully change the volume name.
STEPS TO FOLLOW:
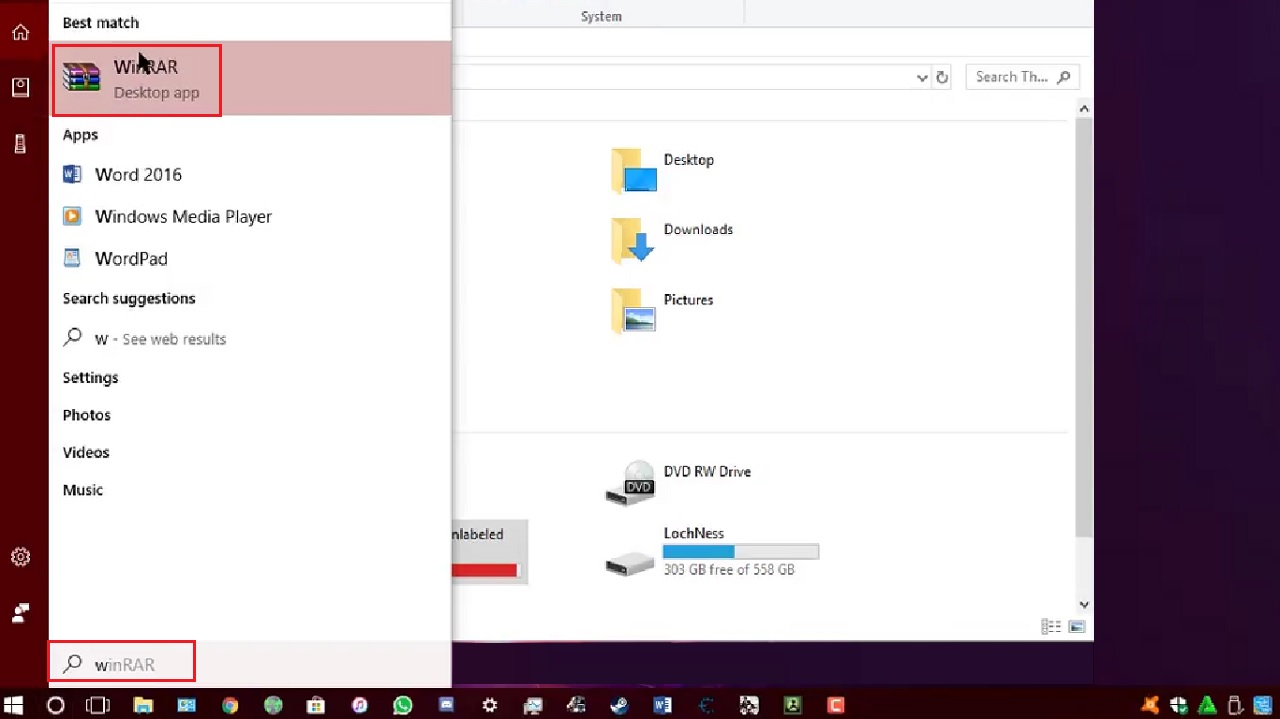
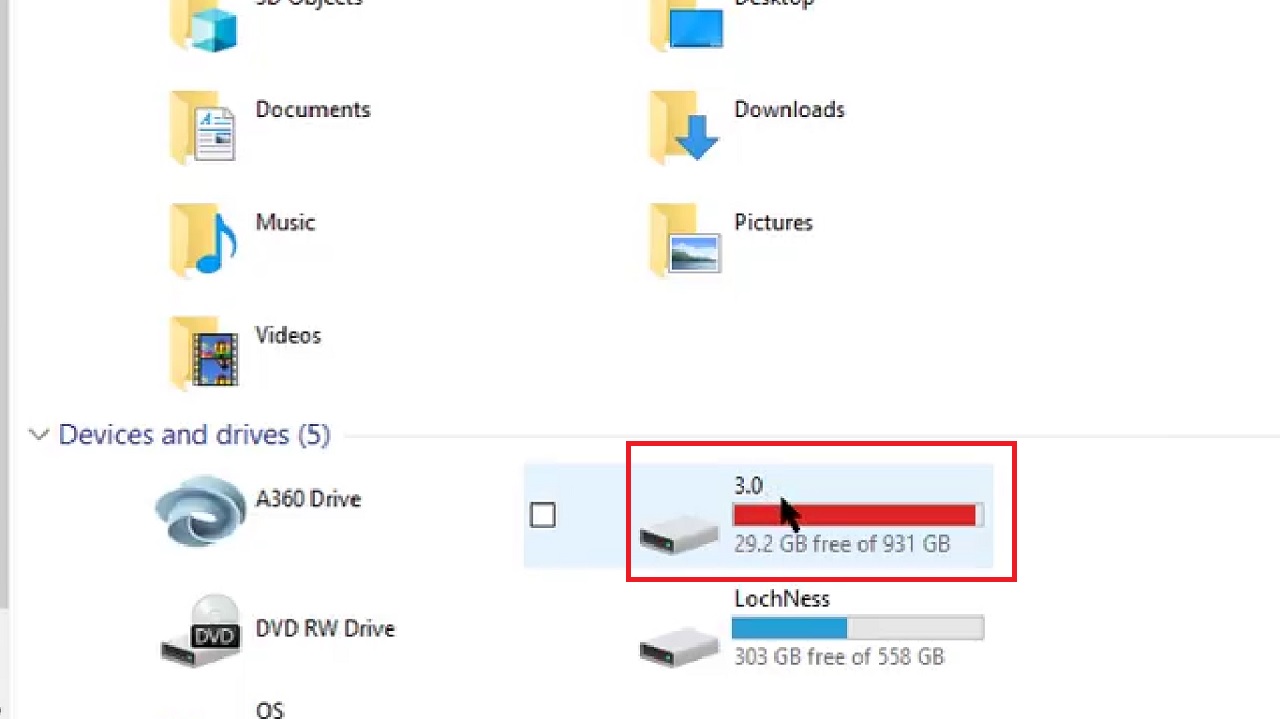
Suppose you want to change the name of the drive to 3.0, but when you attempt to rename it, it does not change and shows as ‘Unlabeled,’ as shown in the image below:

- To resolve this issue, go to the search box and type WinRAR and click on the Best match.
In the address bar in the following window, you will need to type the drive letter of the drive that you cannot rename.
- To find the drive letter, go to This PC > Click on the drive> Click on the address bar.
- Right-click on it to Copy it.
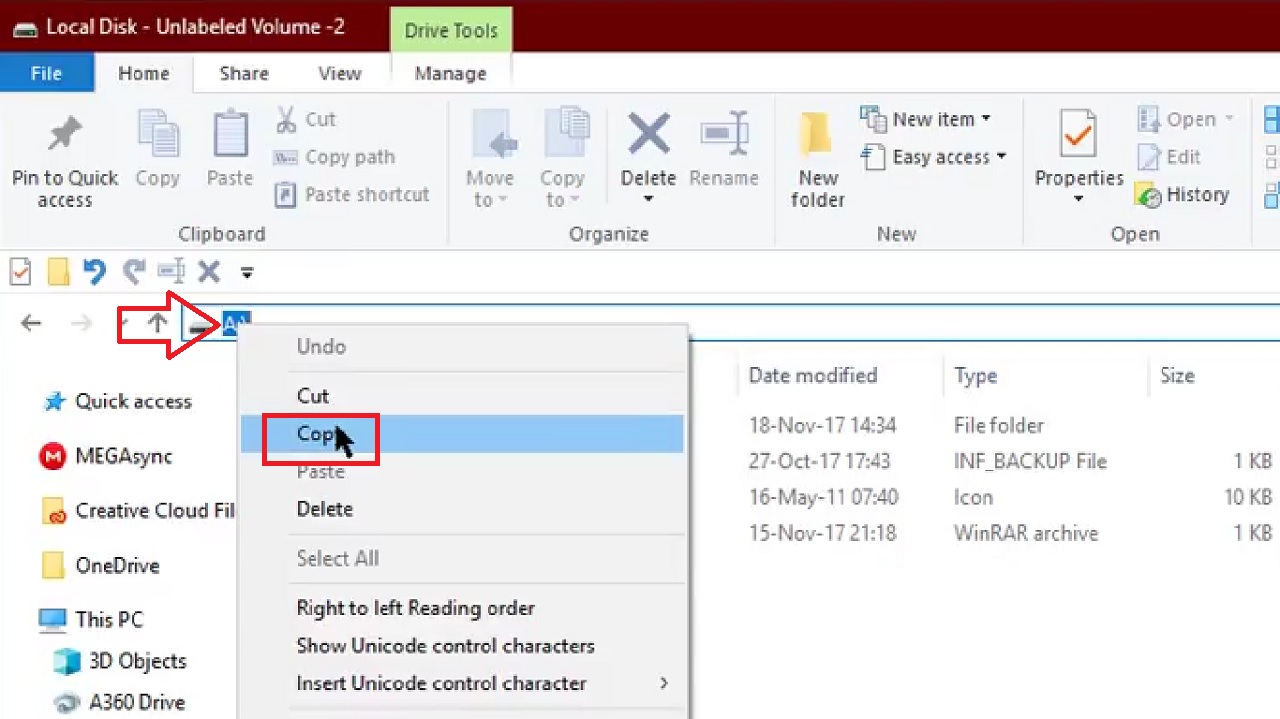
- Right-click on the address bar of WinRAR to Paste it.
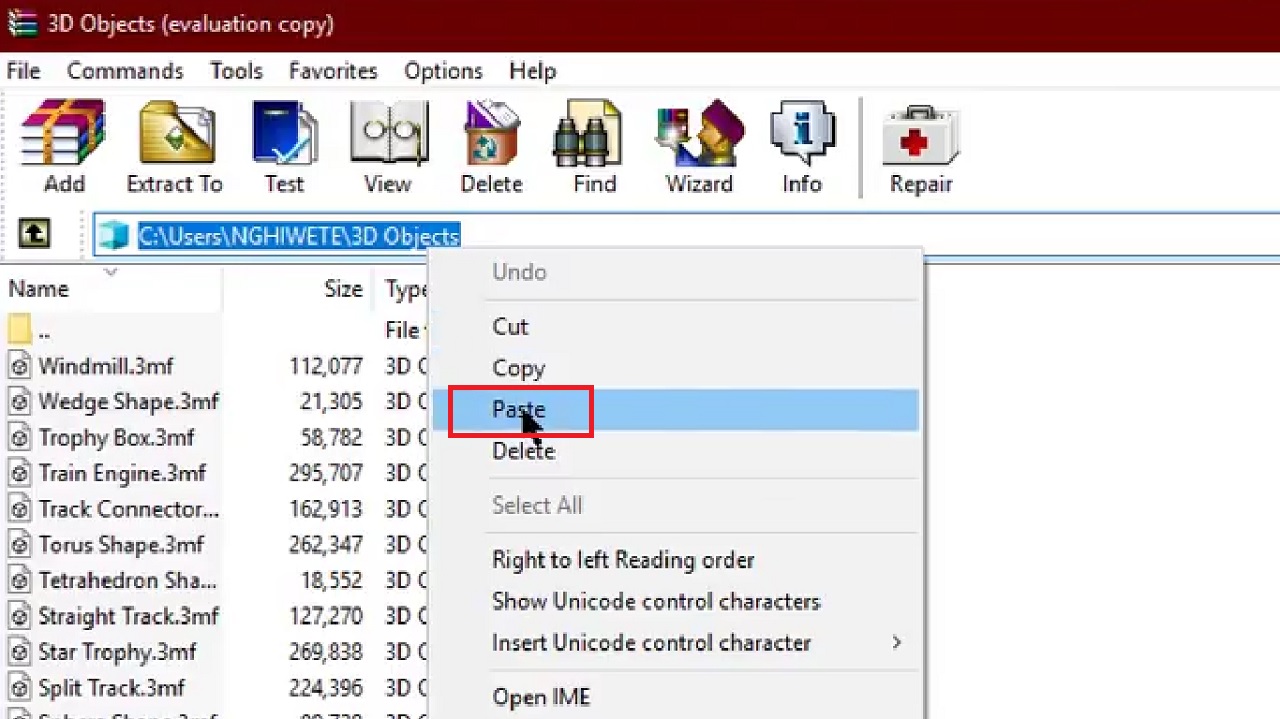
- Hit Enter.
- Right-click on the autorun.inf file.
- Click on the Delete files options from the drop-down menu.
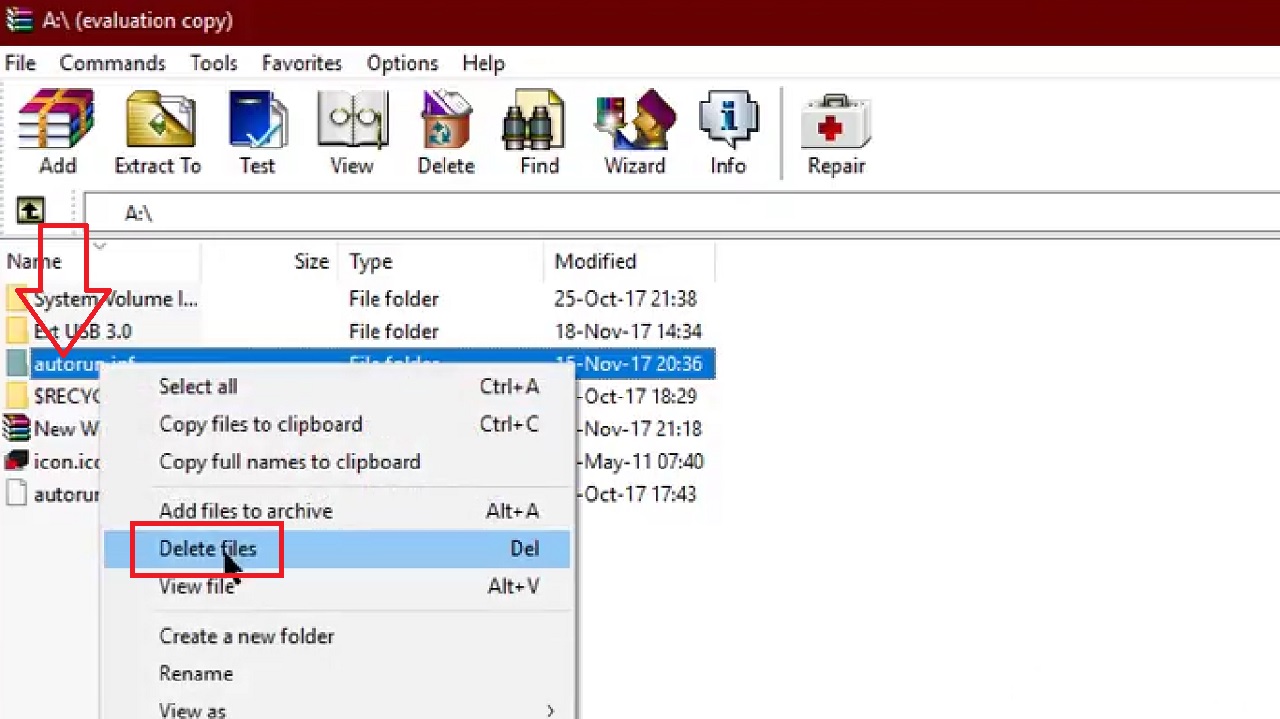
- Close the WinRAR window.
- Now, go back to This PC.
- Rename the Local Disk to 3.0.
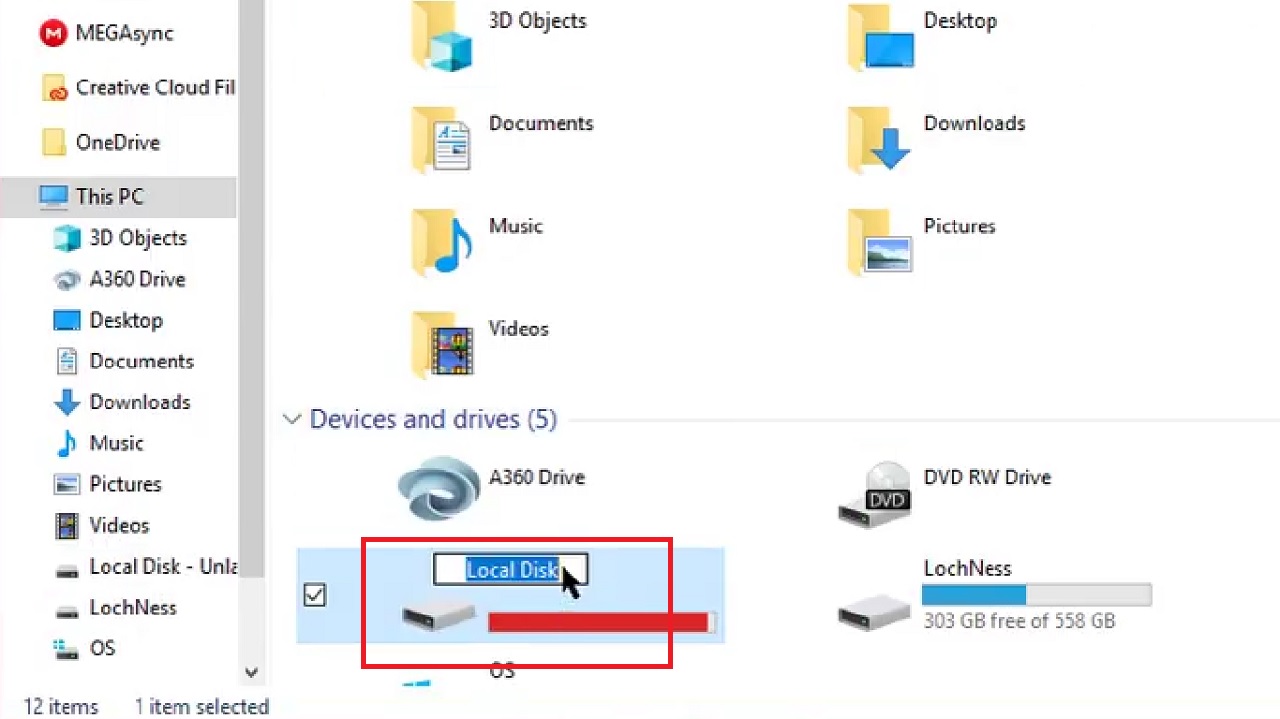
- Right-click on a blank space on the window and click on Refresh.
- Eject the device safely and then reinsert it to your PC.
It will now be displayed as 3.0 as shown in the image below:
So, finally, the name of the drive has been successfully changed.
In Windows 11:
If you are using a Windows 11 system, then you can even change the name of your hard drive using the Settings app.
Method 6: Changing Volume Label from the Windows Settings App
There is a Disks & volumes section in the Settings app that allows you to perform quite a few tasks related to storage. You can use this feature to change the volume label, the drive letter or even format the drive.
STEPS TO FOLLOW:
- Press the Windows and I keys on your keyboard together to open the Settings app.
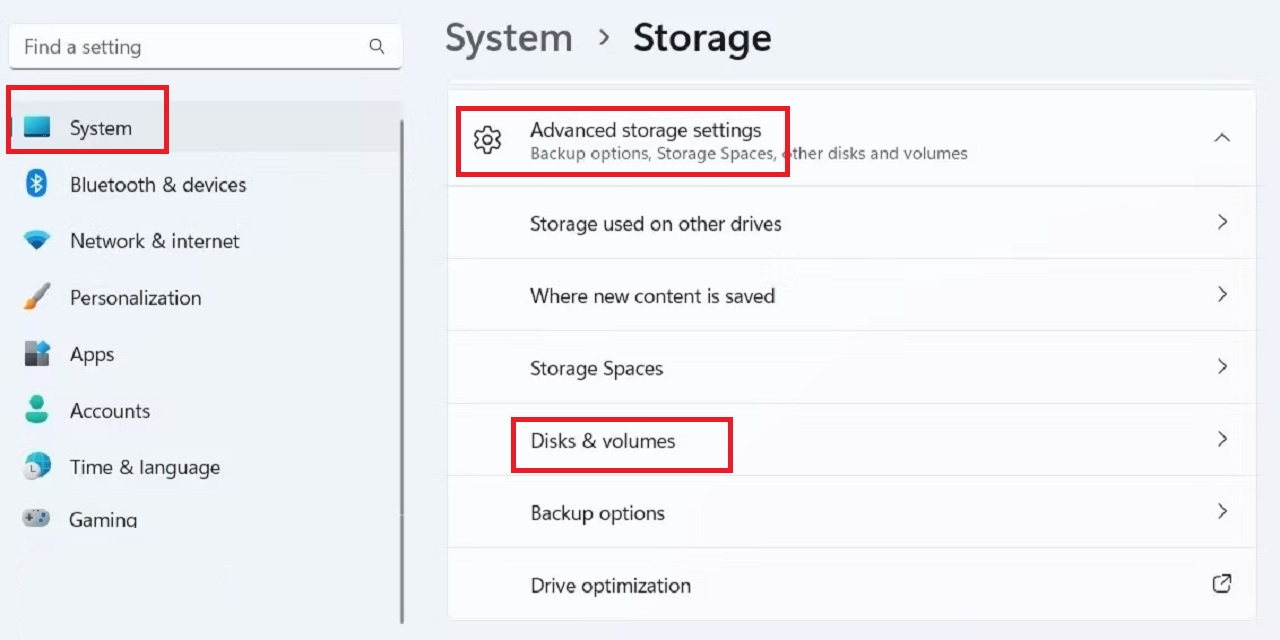
- Go to the System tab.
- Choose Storage.
- Look for Advanced storage settings on the right side of the window.
- Expand it.
- Select and click on Disks & volumes.
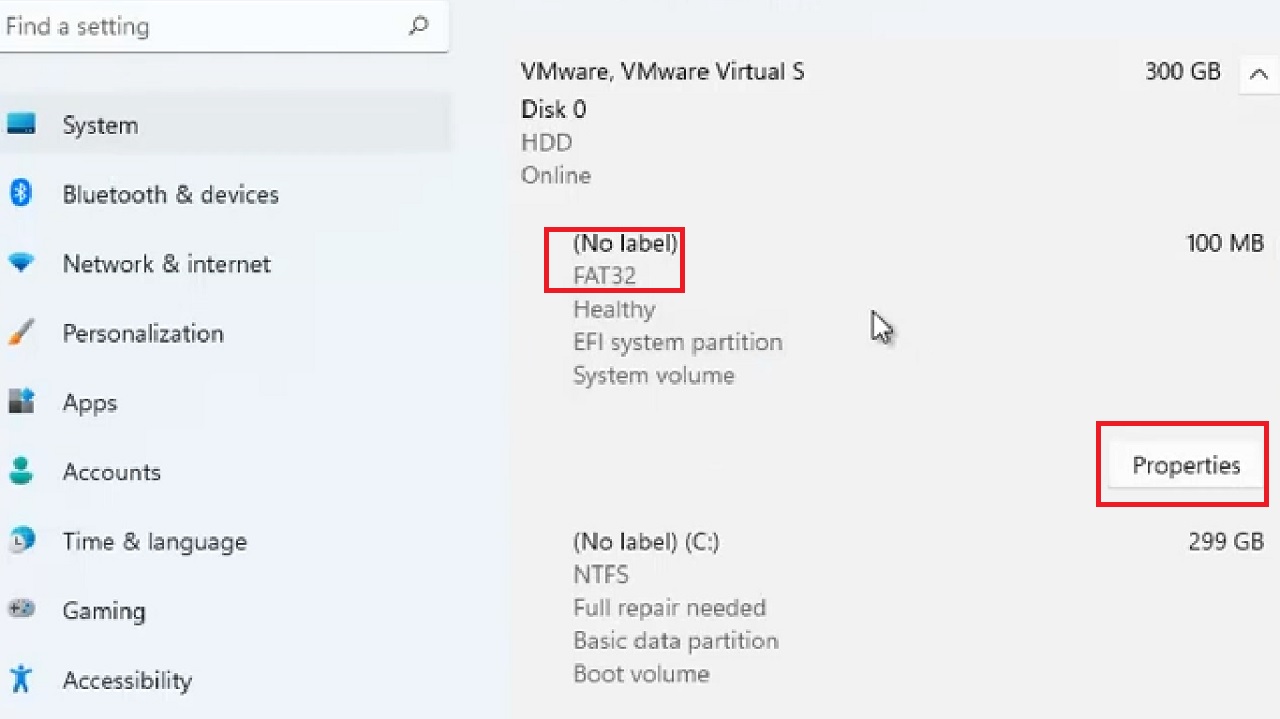
- Go to the drive you want to rename.
- Select Properties.
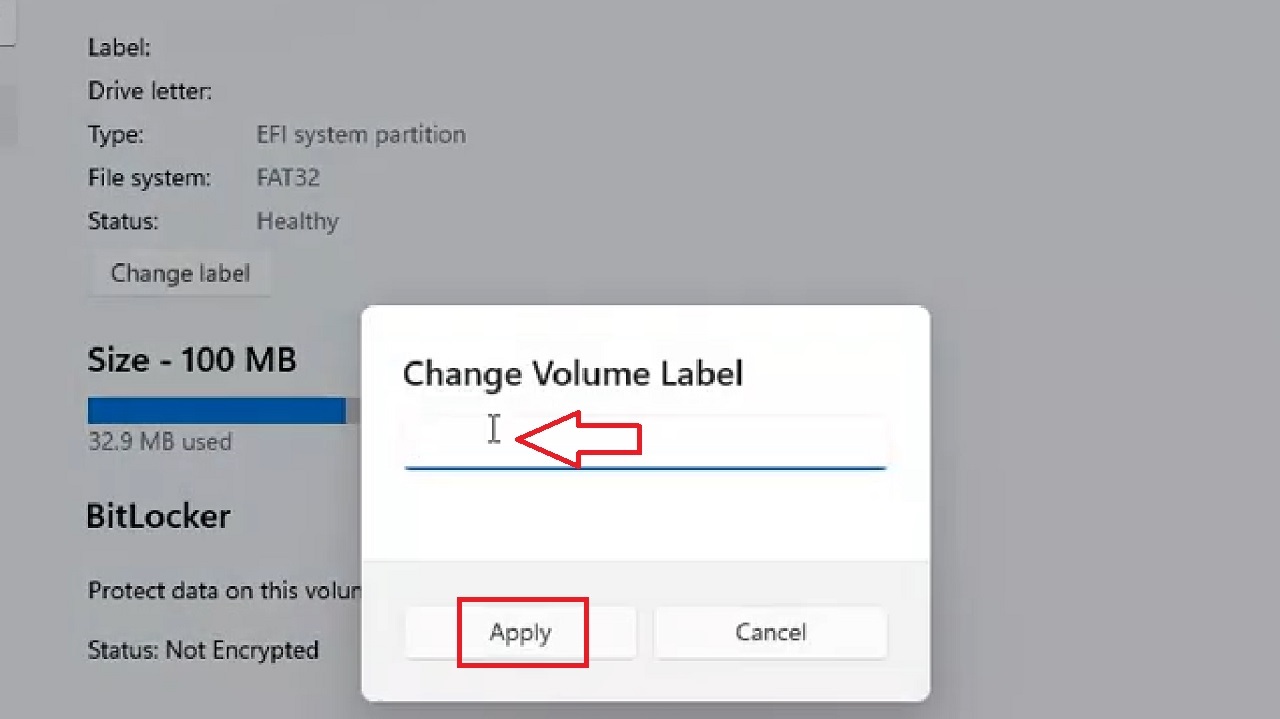
- Click on the Change label button.
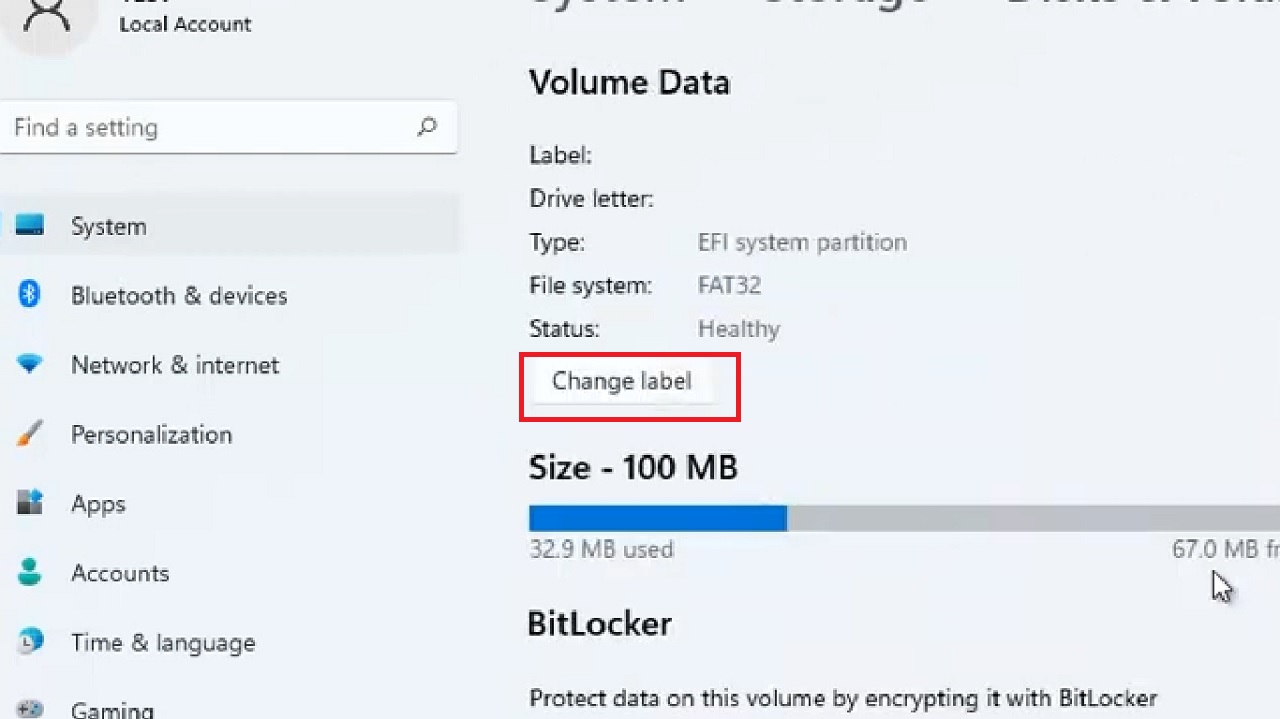
- Enter the name you want for the drive in the Change Volume Label window in the area marked with a red arrow in the image below.
- Then, click on the Apply button.
The name of the hard drive has been successfully changed.
Method 7: Changing the Volume Label from the Registry Editor
If you are a power user and are comfortable using the Registry Editor in Windows, you can use it to change the volume name of your drive.
STEPS TO FOLLOW:
- Press the Windows and R keys together to open the Run dialog box.
- Type regedit in the text box.
- Hit enter or click on the OK button.
- If you see the User Account Control (UAC) prompt, click on the Yes button on it.
When the Registry Editor window opens, expand the following folders in the left pane in the exact order:
- HKEY_LOCAL_MACHINE
- SOFTWARE
- Microsoft
- Windows
- CurrentVersion
- Explorer
Now, look for a folder named DriveIcons under the Explorer key.
(If you cannot find it, right-click on Explorer > Choose New > Select Key > Name it DriveIcons).
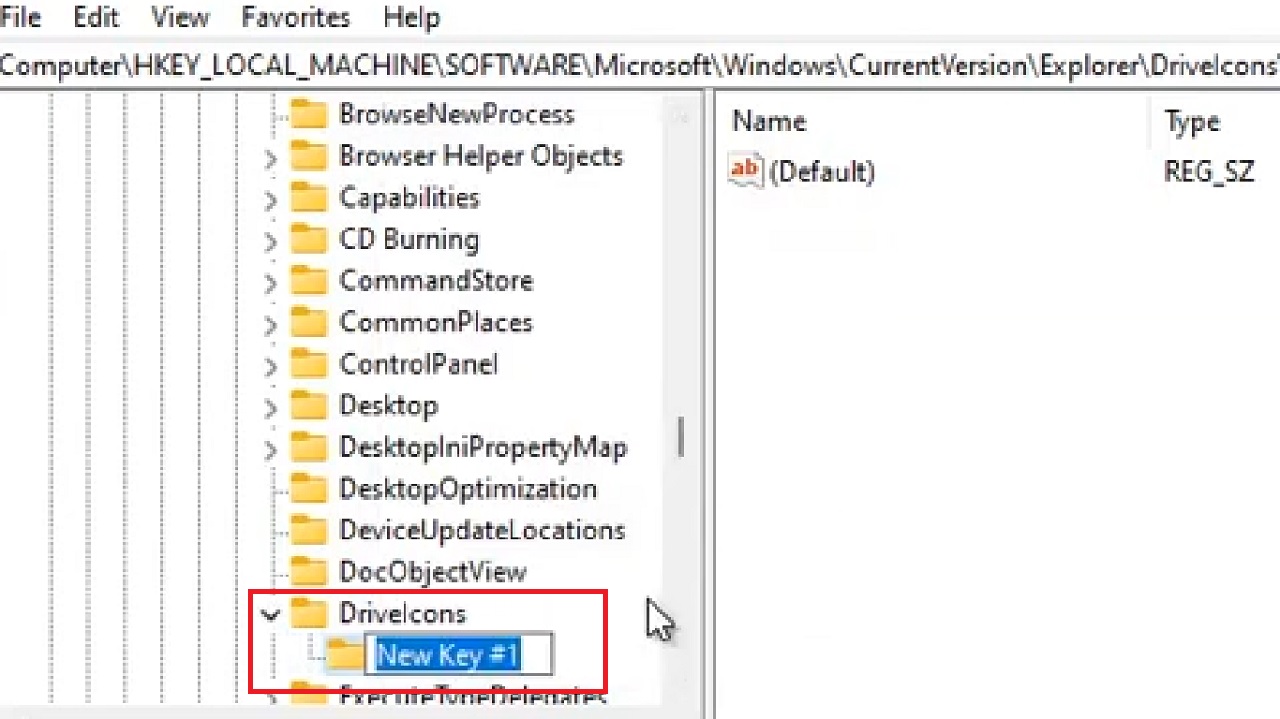
- Right-click on it.
- Select New.
- Choose Key.
- To rename this key, put the Drive letter you want to rename. For example, name it as E if you want to rename Drive E.
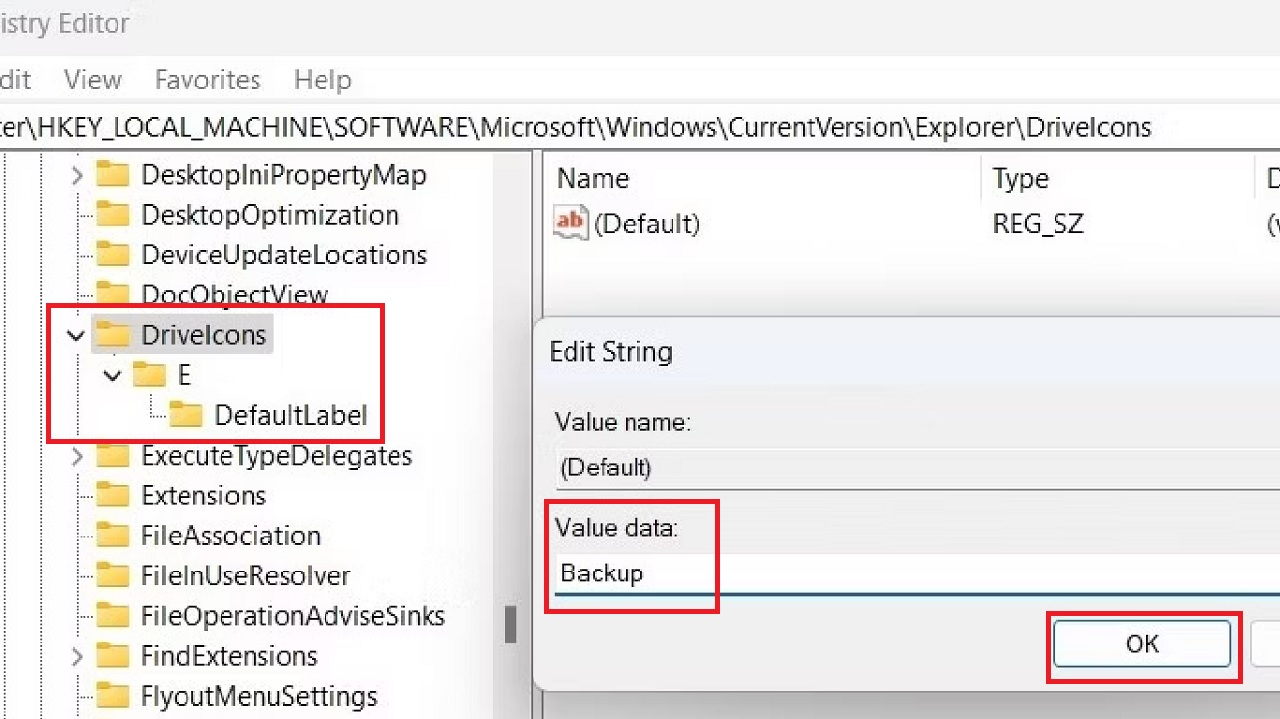
- Create another new key in the same way under it.
- Name this key as DefaultLabel.
- Select the DefaultLabel key.
- Double-click on the Default value in the right side of the window.
- Go to the Value data field.
- Enter the drive name.
- Click on the OK button.
- Close the Registry Editor window.
- Restart your PC.
You will find that the name of the drive has been changed to the name you provided.
Using Registry Editor in Windows, you can even add an icon to your hard drive to make it look more personalized.
Once you have completed the above steps, you can go to the drive on your PC where you have some icons stored and want to add to your new hard drive.
- Select an icon.
- Right-click on it while pressing the SHIFT key.
- Click on Copy as path.
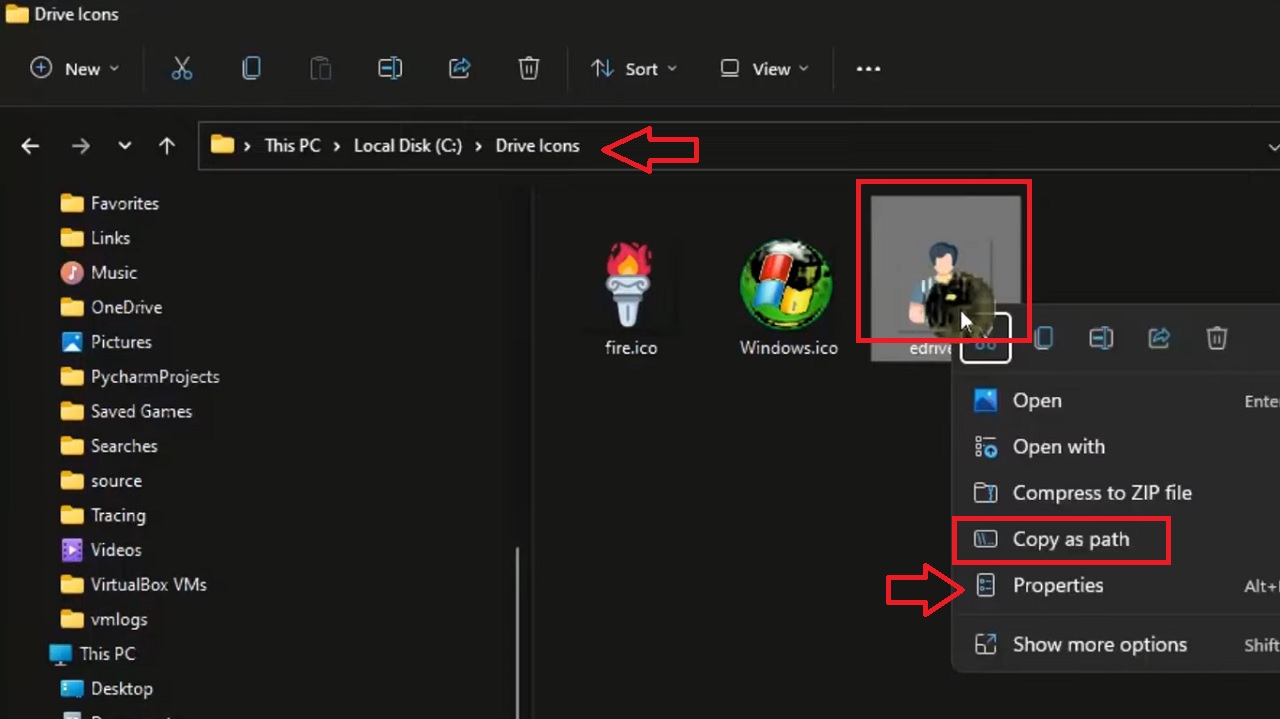
If you cannot find the Copy as path option, go to the address bar (shown by the red arrow) and copy the path from there. You may also right-click on the icon, select Properties (indicated by a red arrow in the image above) and get the path from there.
- Go back to the Registry Editor window where you left it.
- Double-click on the Default value in the right side of the window.
- Go to the Value data field.
- Paste the path.
- Click on the OK button.
Now you will have your customized hard drive with the name, drive letter, and even an icon of your choice.
Conclusion
Giving a name to your hard drive or changing it is a simple process.
You can even change the drive letter and customize it, as explained in this article.
Go ahead and try any one of them to organize your storage in a more efficient manner.