
You should change the username and password of your Wi-Fi to protect it from hackers and other threats.
It is very easy to make such changes, but unfortunately most users do not bother to modify them, and end up facing different problems.
If you want to avoid it but do not know how to make these changes, you are reading the right article. Continue reading.
In This Article
KEY TAKEAWAYS
- You can change the name and password of your Wi-Fi from the router’s configuration page.
- Logging into the web page of the router and changing the username and password from there is another useful way.
- The Windows Registry Editor can also help in changing the username and password, just as it helps in solving several other issues.
- You may use the Local Security Policy feature if you need to enhance the protection of your Wi-Fi by changing its username and password.
- In specific conditions when the router page may not allow making such changes, resetting the router can do the trick.
What Are the Reasons to Change Wi-Fi Name and Password?
The security aspect of your Wi-Fi will be enhanced significantly when you change the default name and password of your router.
This will prevent unwanted users and hackers getting access to your system and cause all sorts of problems.
In short, it is an effective measure by any individual to contribute in their way in preventing cyberthreats and cybercrimes.
How to Change Wi-Fi Name and Password?
The most common way to change the name and password of Wi-Fi is through the configuration page of your router.
You may also do the same from:
- A web browser
- The Registry Editor
- The Local Security Policy
Resetting the router will also help in changing the name and password of your Wi-Fi connection.
In Windows Computers
Here are the methods and steps to follow to change Wi-Fi name and password in Windows computer systems.
Method 1: Change it from the Configuration Page
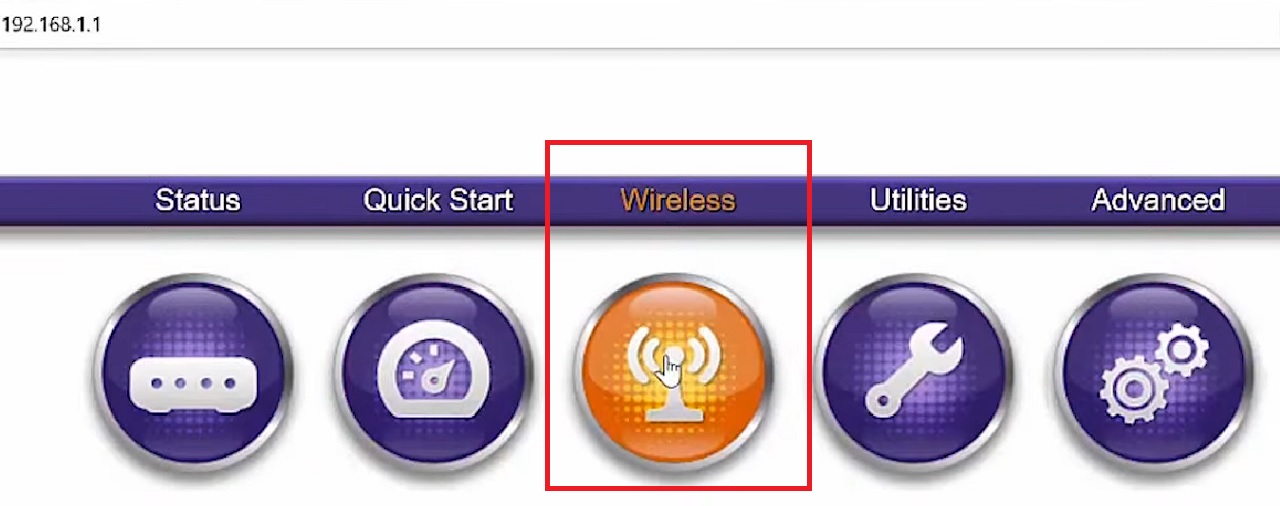
To change the name and password of your router, you will need to access the configuration page of your router.
Note: The interface may differ depending on the type or model of the router. However, the basic process is almost the same.
STEPS TO FOLLOW:
- Open the browser on your PC.
- Type in the default IP address of the router in the URL bar.
(The IP address is usually 192.168.1.1 or 192.168.0.1). However, check it out at the side or on the bottom of the router.
- Log into the router using the User Name and Password, which is usually ‘admin’ in both cases.

- Go to the Wireless option.
- Look for the SSID Setup under Wireless and change the name in the relevant box next to Rename SSID.
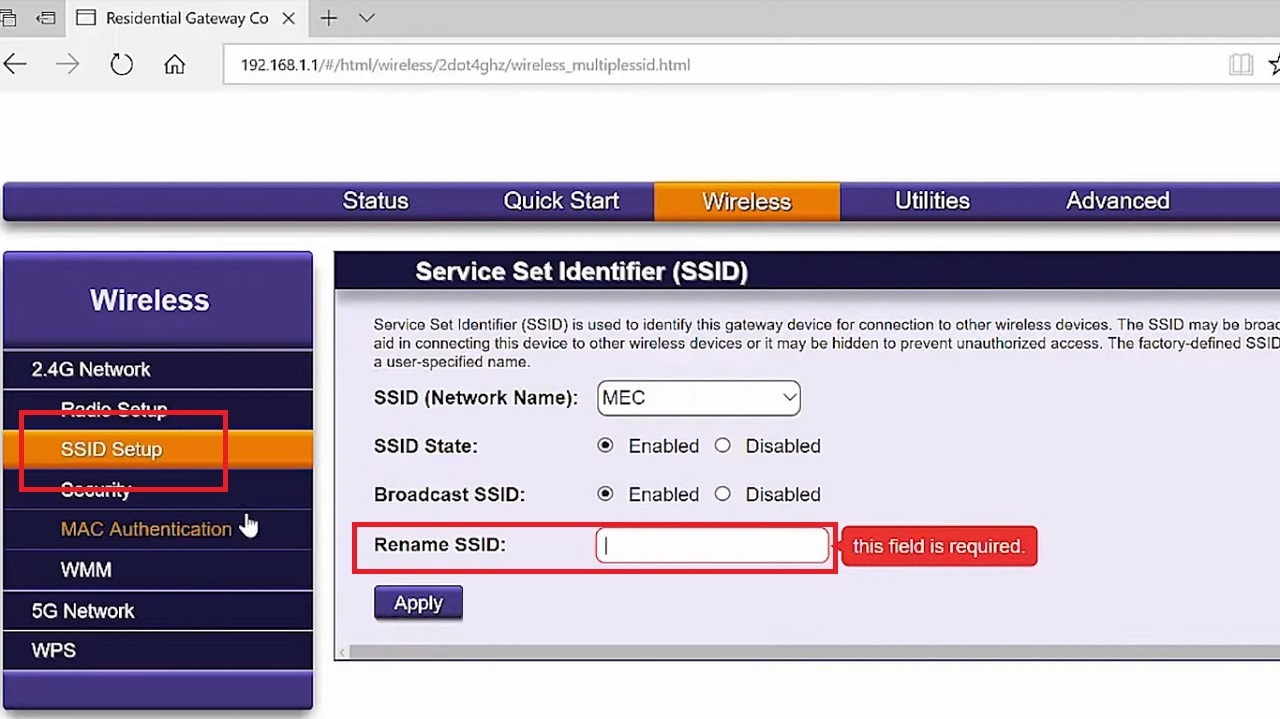
- Then, go to the Security section under it.
- Click on the small radio button next to Use Custom Security Key.
- Enter the password you want your router to have now in the relevant box.
- Then, click on the Apply button.
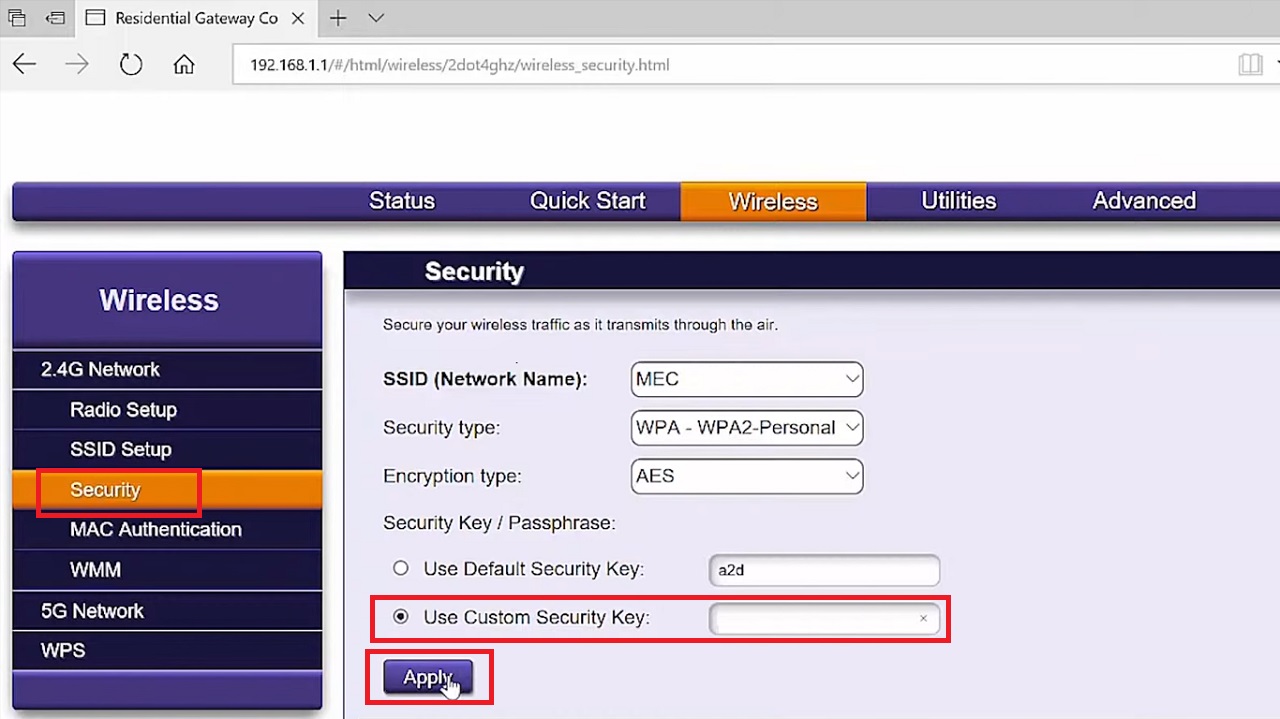
The device connected to the network may be disconnected. If that happens, reconnect it with the new password.
Method 2: Change from the Profiles Folder in the Windows Registry
The Profiles folder in the Windows Registry Editor lists all network connections. Selecting your specific network from there and changing its name and password is another way to go ahead.
STEPS TO FOLLOW:
- Press the Windows and R keys together on your keyboard to open the Run dialog box.
- Type regedit in the box and click on the OK button.
- Click on the OK button in the User Account Control window when it appears.
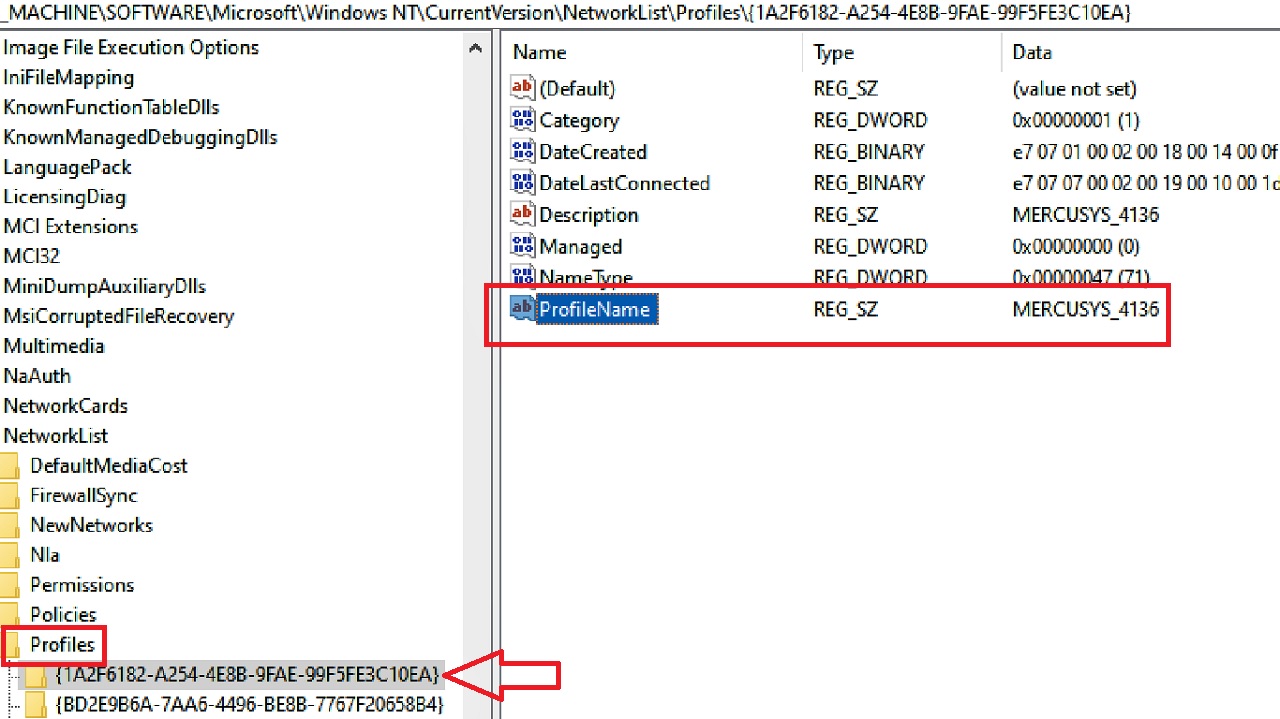
In the Windows Registry Editor, expand the following folders on the left panel in the exact order by clicking on the small arrow next to each:
- HKEY_LOCAL_MACHINE
- SOFTWARE
- Microsoft
- Windows NT
- CurrentVersion
- NetworkList
- Profiles
Select this folder and double-click on it to see all the network connections listed under it.
- Select each one of them until you find the name of your router under the Data column on the right side of the window. (MERCUSYS _4136 in this case).
- Look for the ProfileName key string.
- Double-click on it.
You may also right-click on it and select Modify from the drop-down options.
- In the Edit String window, type in a new name in the box under Value data.
- Click on the OK button to save the change.
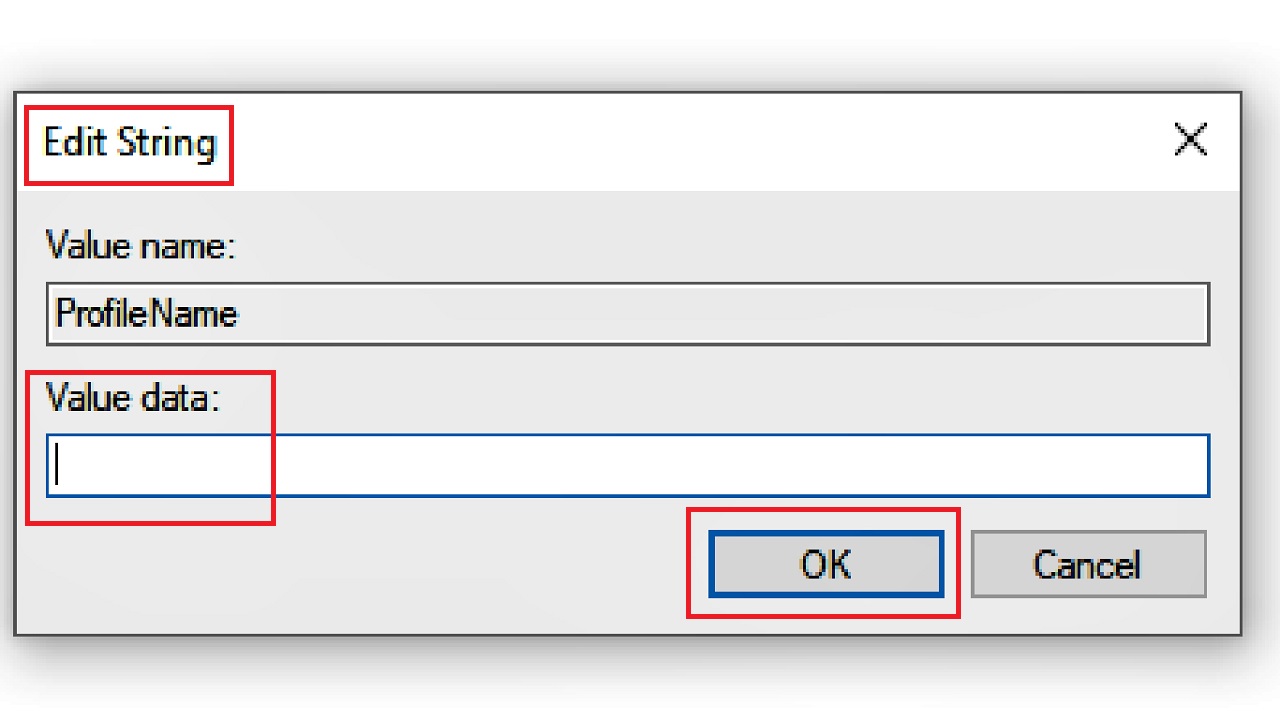
This will change the name of your Wi-Fi network.
Method 3: Via Local Security Policy
If your version of Windows operating system has the Local Security Policy utility, you can use it to change the name of your network as well.
STEPS TO FOLLOW:
- Go to the search box next to the Start Menu.
- Type secpol.msc in the box and hit Enter.
- In the Local Security Policy window, select Network List Manager Policies from the left pane.
- Double-click on the network.
- Select Properties.
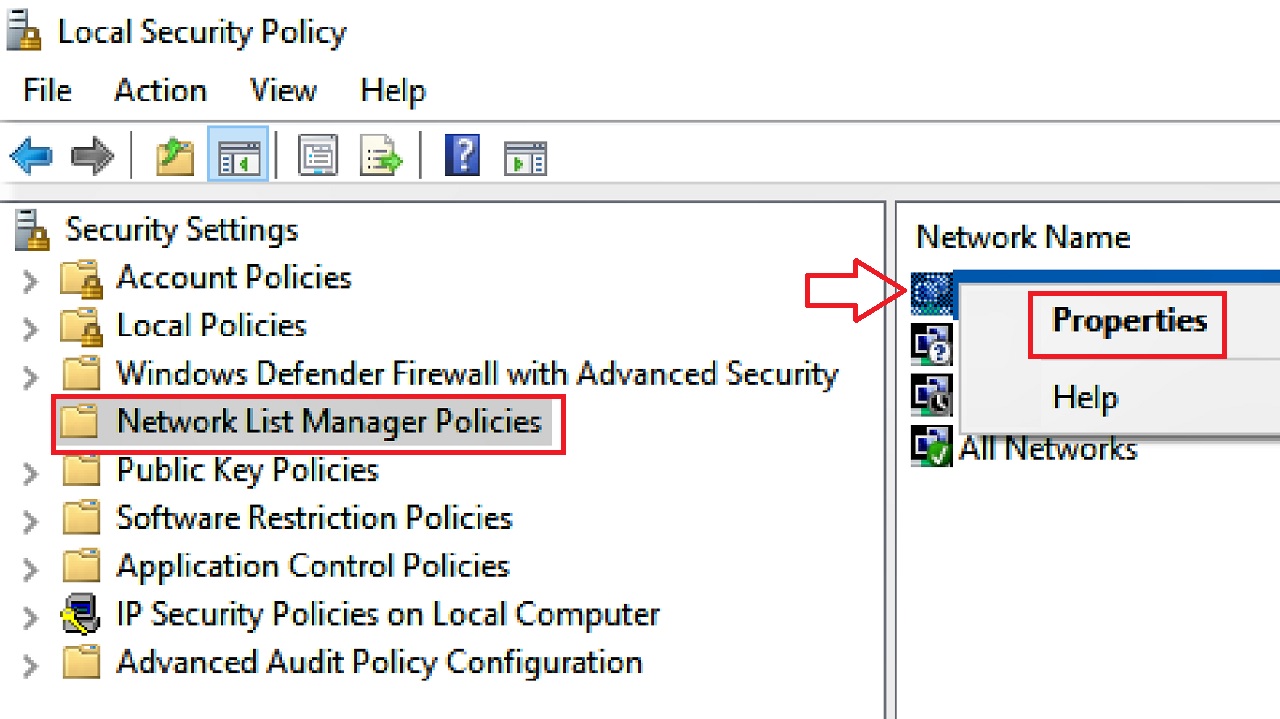
You may also double-click on the network to open the Network Properties window.
- In the new Properties window, go to the Network Name tab.
- Click on the small circular button next to Name to select it.
- Add the new name for your network in the box under it.
- Click on the Apply button and then on the OK button to confirm and exit.
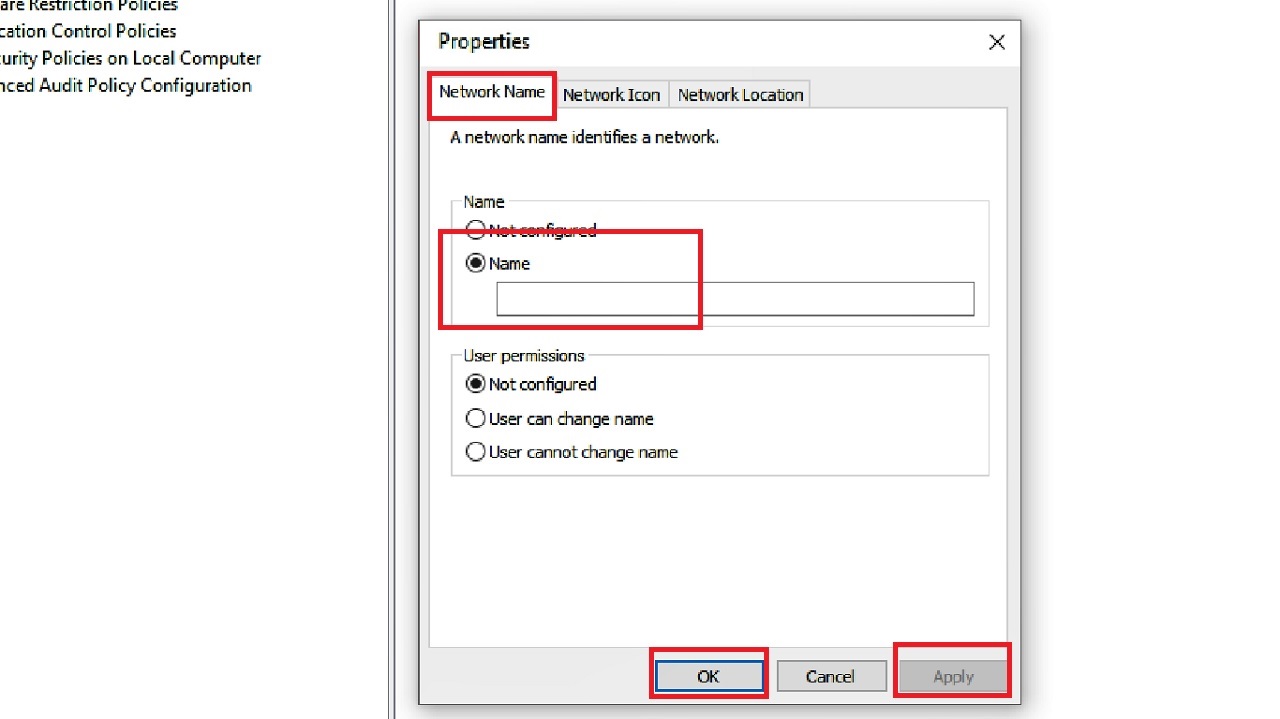
This will change the name of your Wi-Fi.
Method 4: Reset and Reconfigure the Router
Sometimes, depending on the type of router in question, the configuration page may not allow making any changes in the username and password of your Wi-Fi network.
In that case, you should reset your router to its factory settings. However, follow this method as a last resort, when all of the above methods have failed.
This will reset the username and password back to its original state, as displayed on the label at the back of the device.
Thereafter, you can set a new username and password to your Wi-Fi network by reconfiguring it, whether it is a Windows or a Mac system.
STEPS TO FOLLOW:
- Disconnect the router.
- Remove all cables from its back.
- At the back of the router, look for the small Reset button.
- Use a thin and pointed object to press it.
- Hold it for about 30 seconds.
- Release it when you see the power indicator blinking.
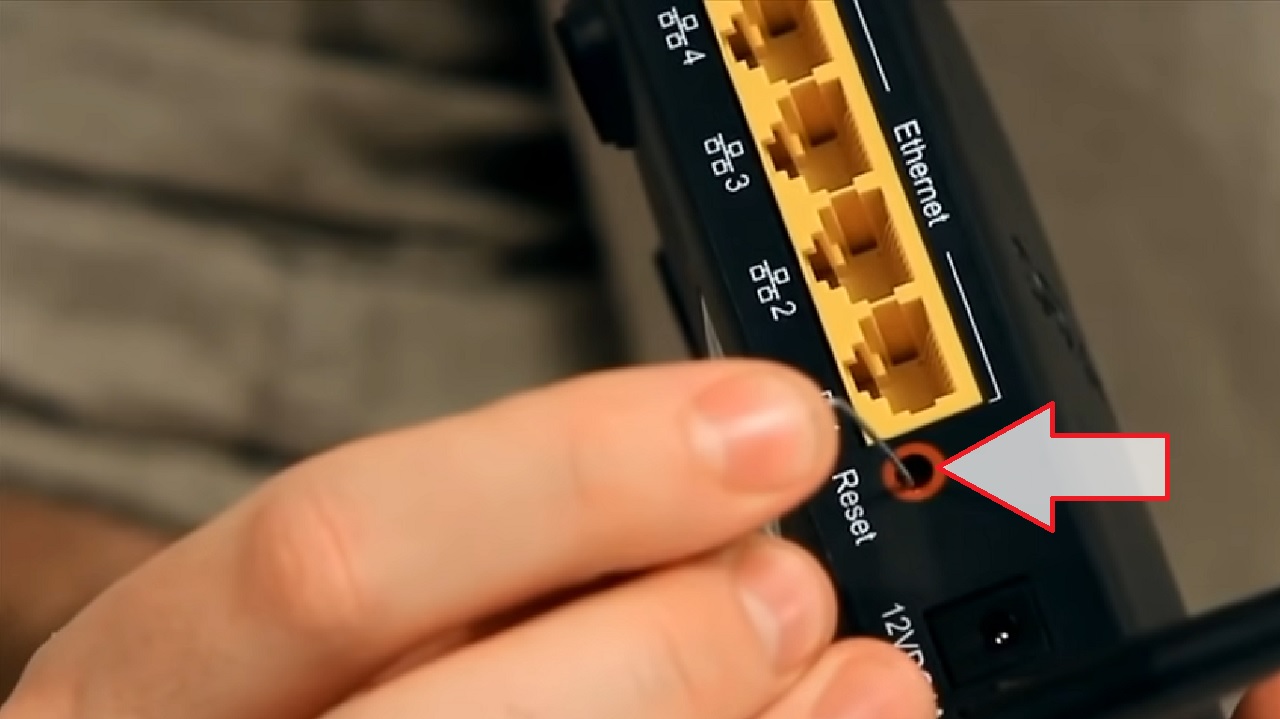
The router will turn off and reset. Wait for the process to complete. Now connect all cables back.
You can now change the username and password from the Wi-Fi Settings by following these steps to reconfigure it: (Assume you are using a TP-Link router).
- Open your browser.
- Type in the router manufacturer name in the URL and hit Enter.
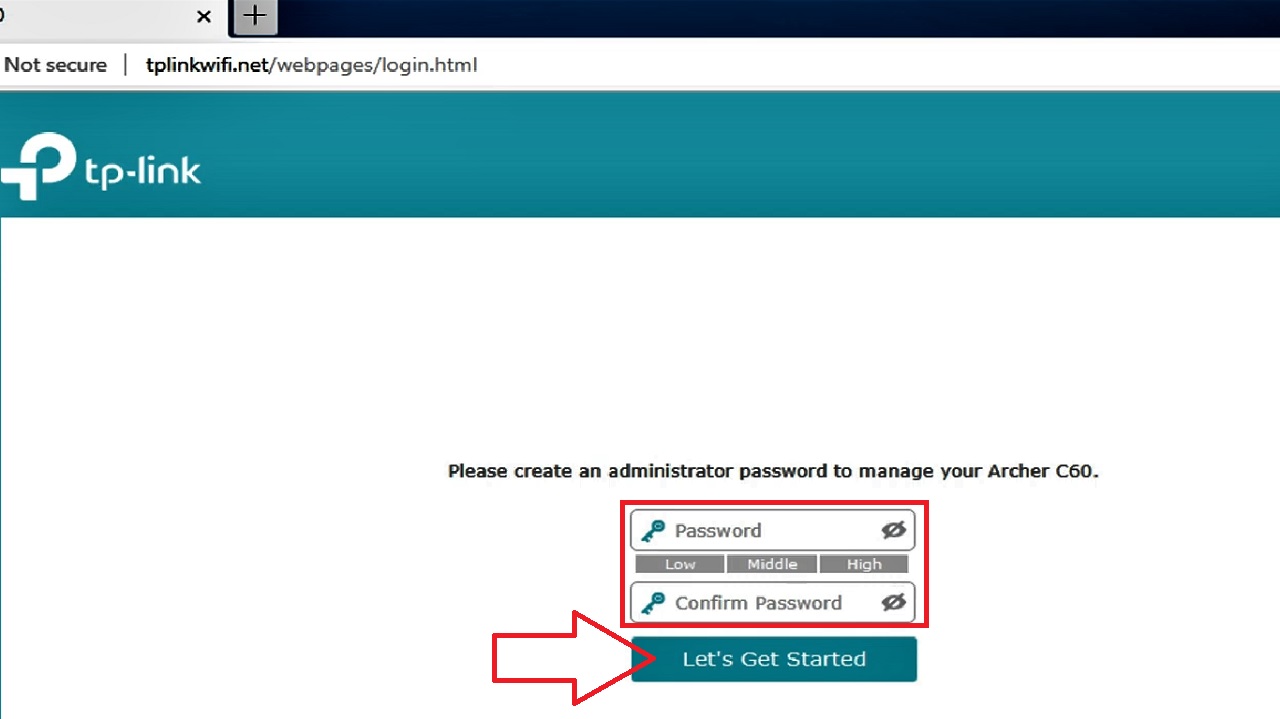
- You will now be asked to create an administrator password. Type in a password of your choice in both the fields.
- Click on the Let’s Get Started button.
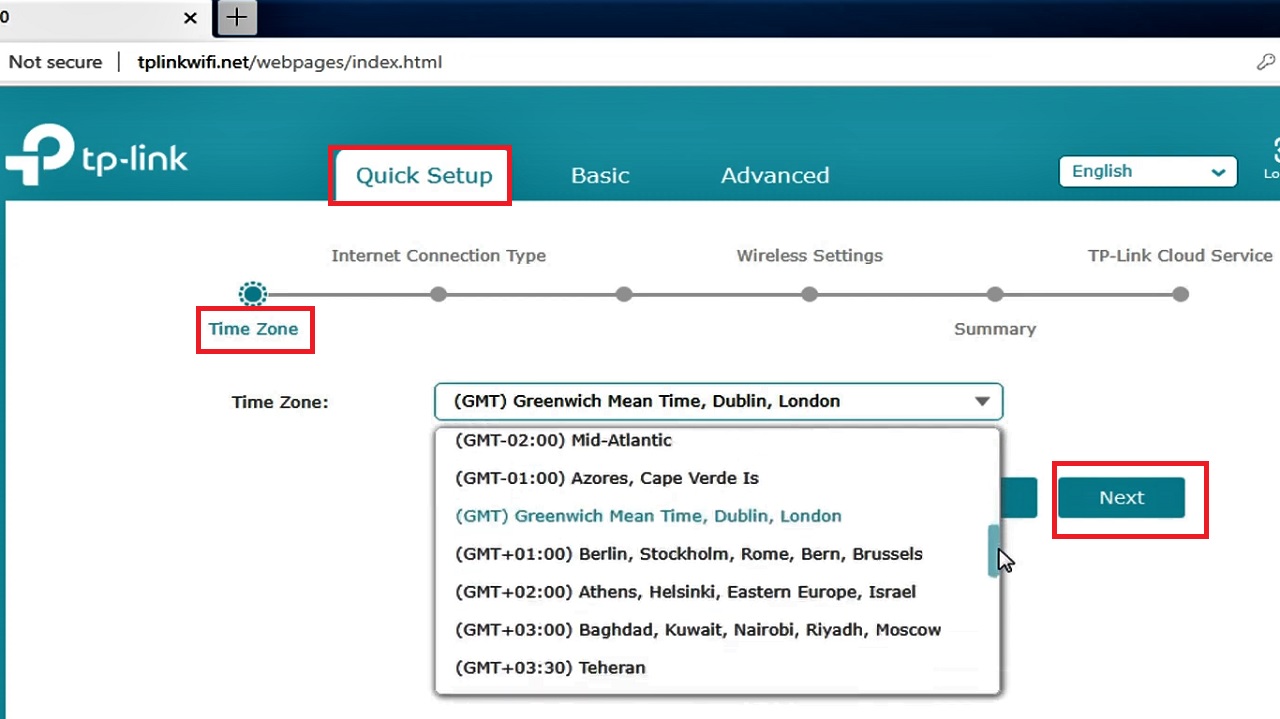
- In the following Quick Setup page, select the Time Zone.
- Click on the Next button.
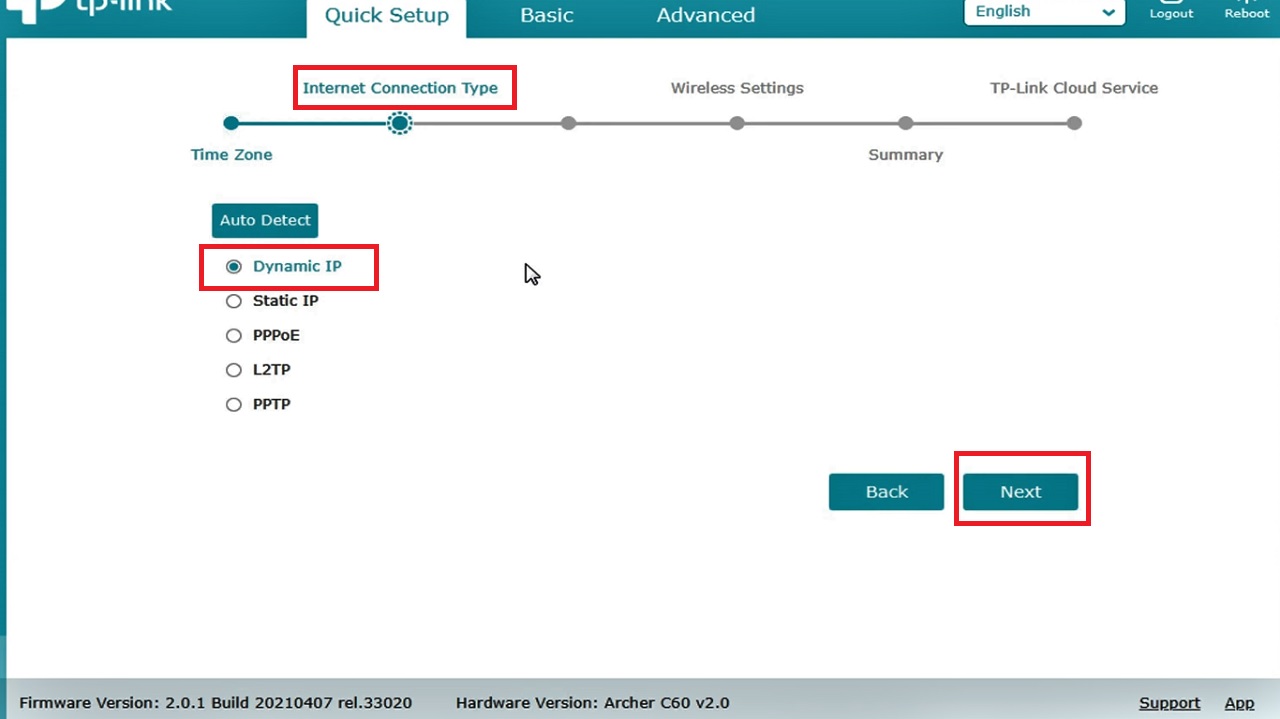
- Choose the Internet Connection Type in the following page. Usually, it is Dynamic IP. Check yours from your ISP.
- Click on the Next button to proceed.
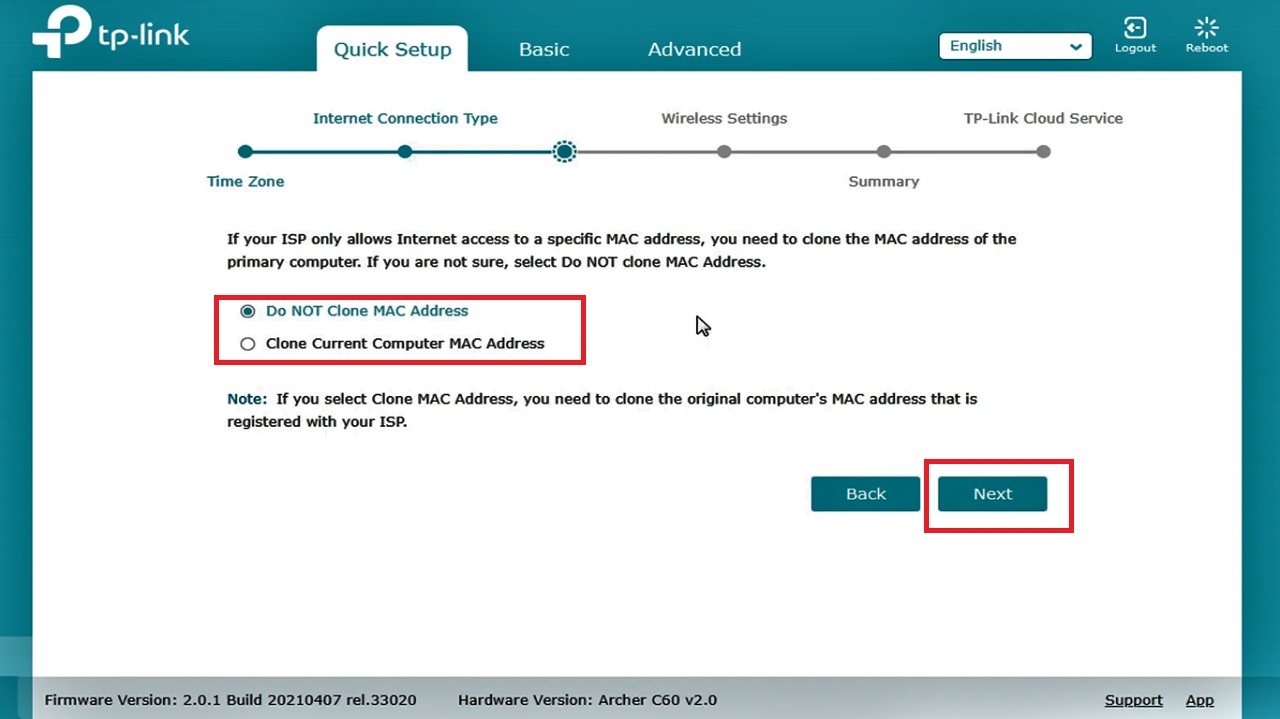
- In the following window, you will be asked whether you want MAC cloning. You can choose DO NOT Clone MAC Address or Clone Current Computer MAC Address by checking the small radio button next to each.
- Click on the Next button.
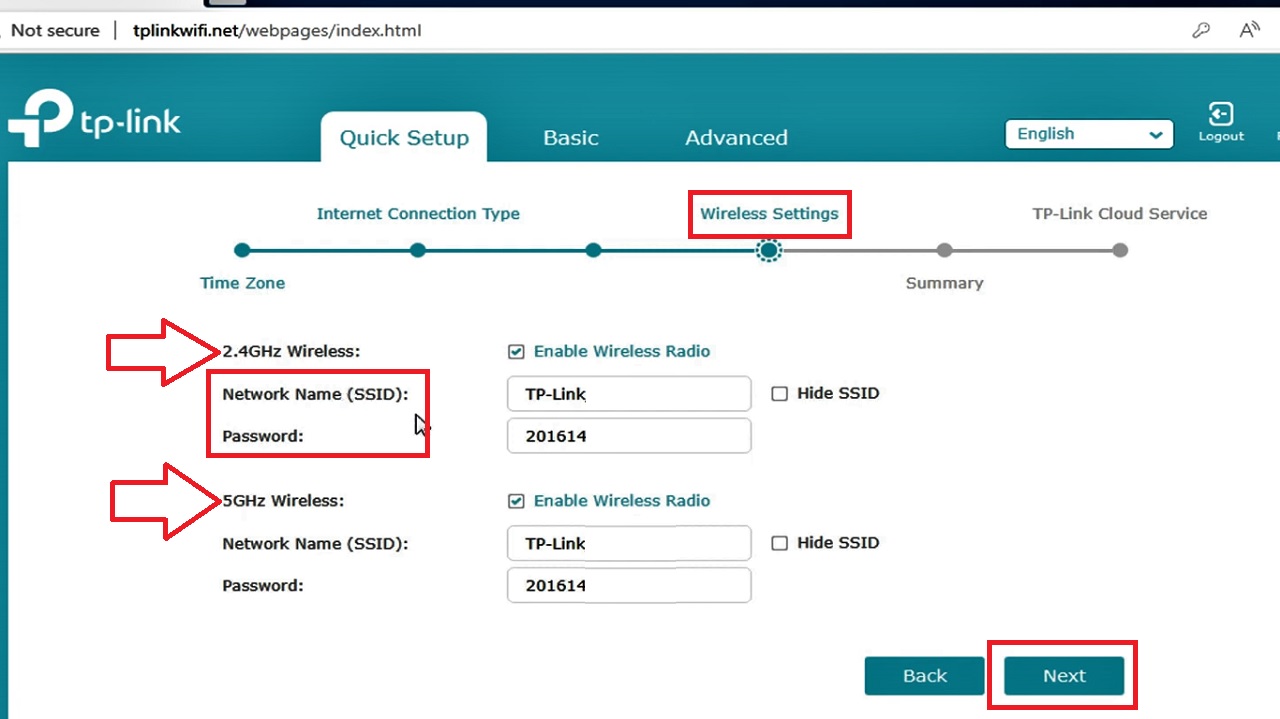
- In the following Wireless Settings page, change the Network Name (SSID) and Password of both the network types.
- Click on the Next button.
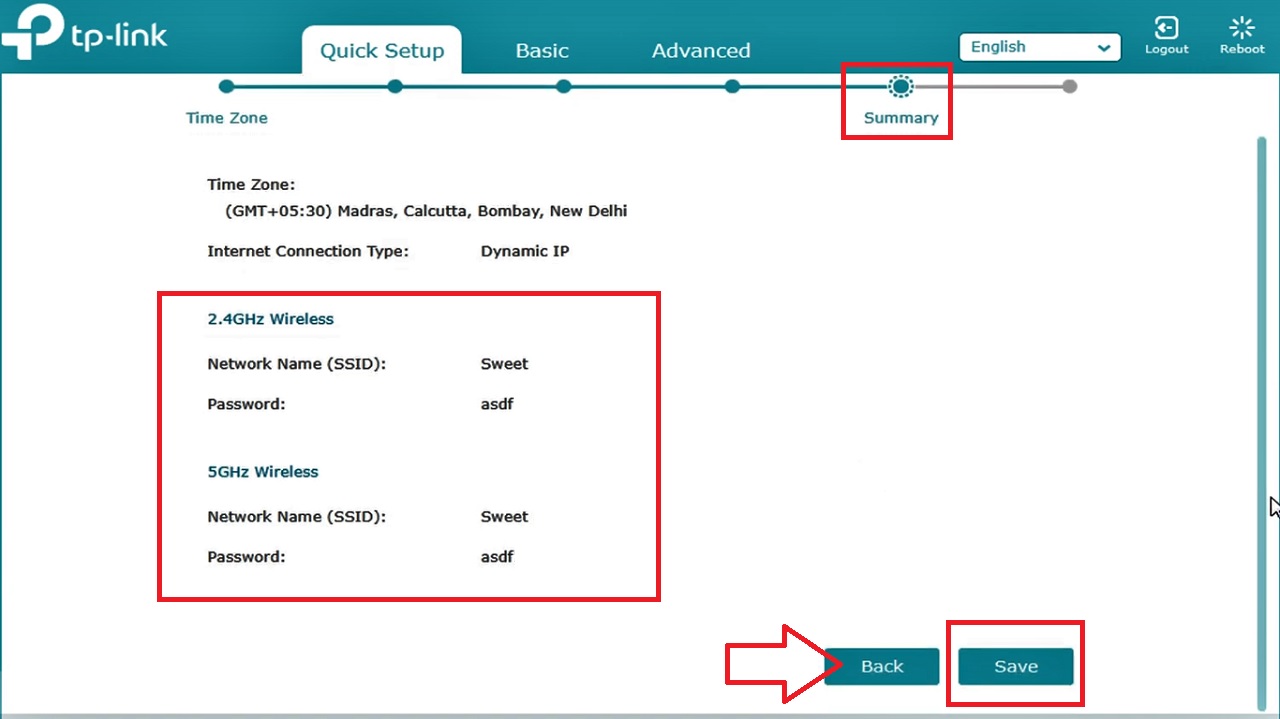
In the following Summary page, check the changes. If they are correct, click on the Next button. Otherwise, click on the Back button next to it, marked by a red arrow, and rectify the changes. Then click on the Next button.
The names and passwords for both frequencies can be the same or different. It is up to your discretion.
The configuration of the router will be completed within a couple of minutes.
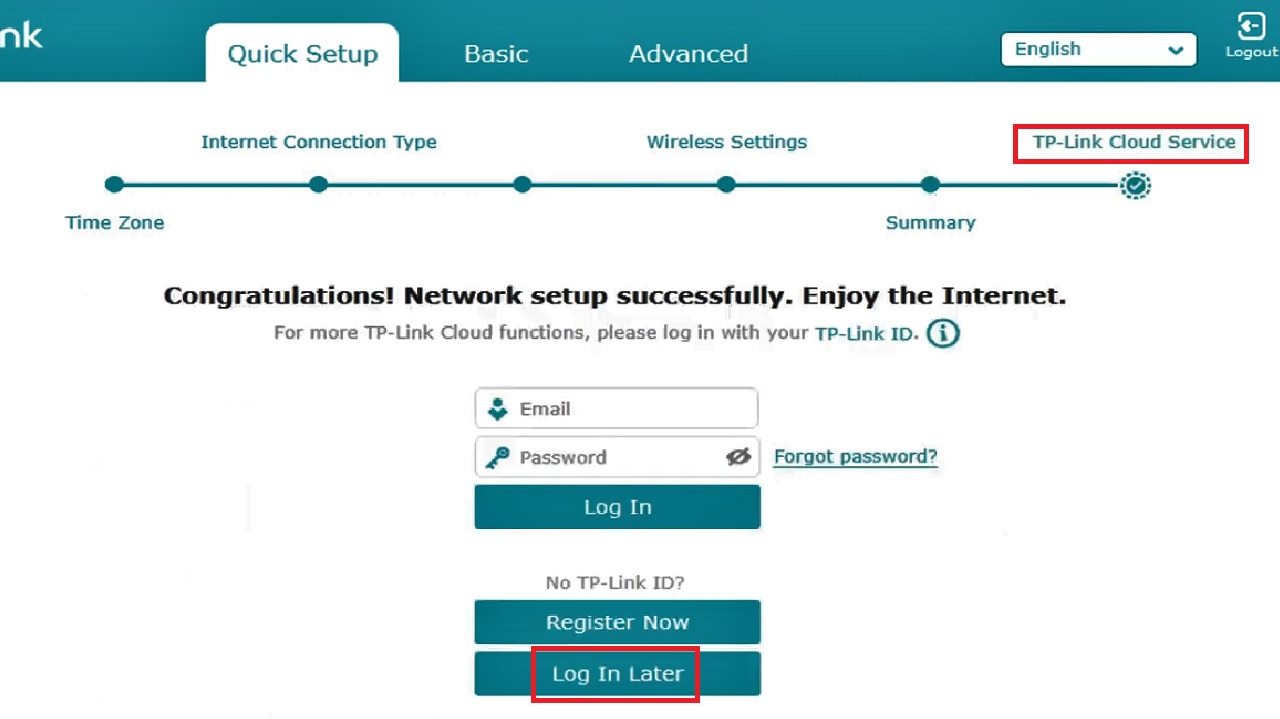
If you are asked to login for TP-Link Cloud functions in the TP-Link Cloud Service page, you may skip this step by clicking on the Log In Later option because it has nothing to do with the configuration process of the router.
- Finally, click on the Finish button to end the Quick Setup process.
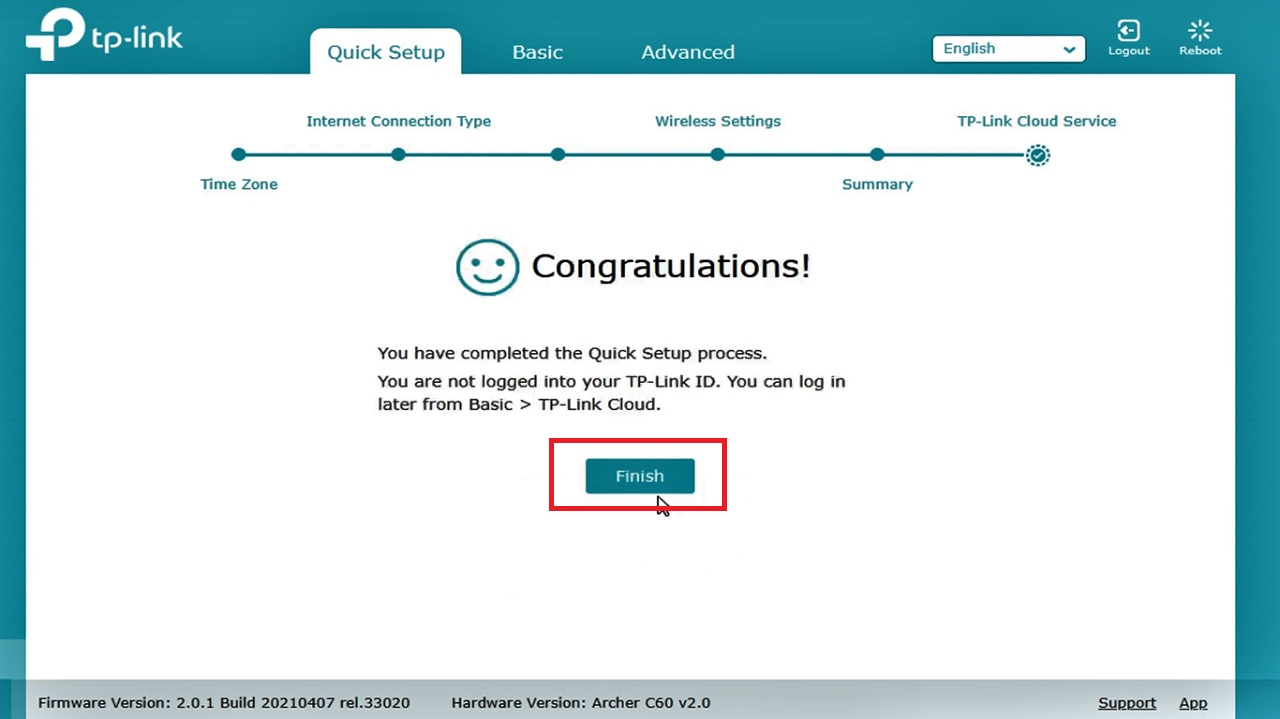
Connect to your network and check whether the name and password have changed.
In Mac Systems
You can also change the username and password of your Wi-Fi network or router even if you are using a Mac computer system almost in the similar way.
Method 5: From the Admin Interface
It is the same process to follow as in Windows computers to change the name of a Wi-Fi router. However, there is a little difference as described below.
STEPS TO FOLLOW:
- Open Safari from the bar below.
- Type in the IP address of your router.

- Type in the username and password of your router.
- Click on the Login button.
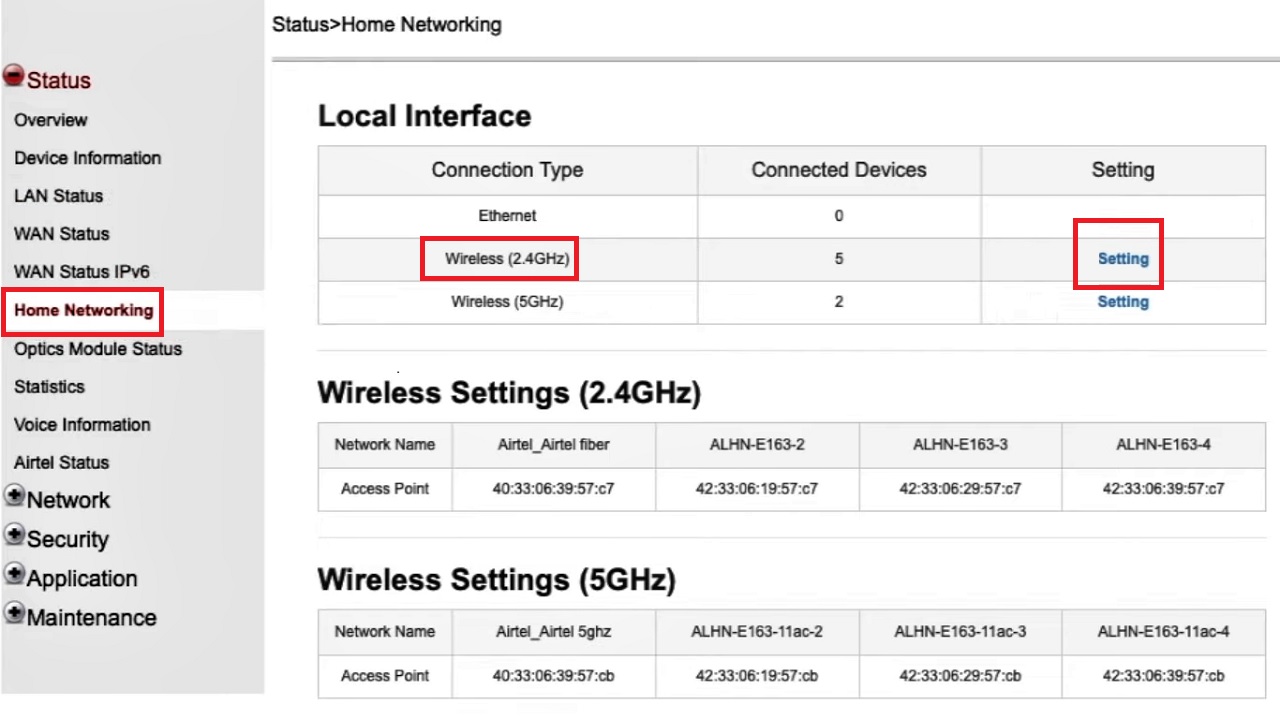
- Select Home Networking from the left pane in the window that appears.
- Choose your wireless band type.
- Click on the Setting button at the right side.
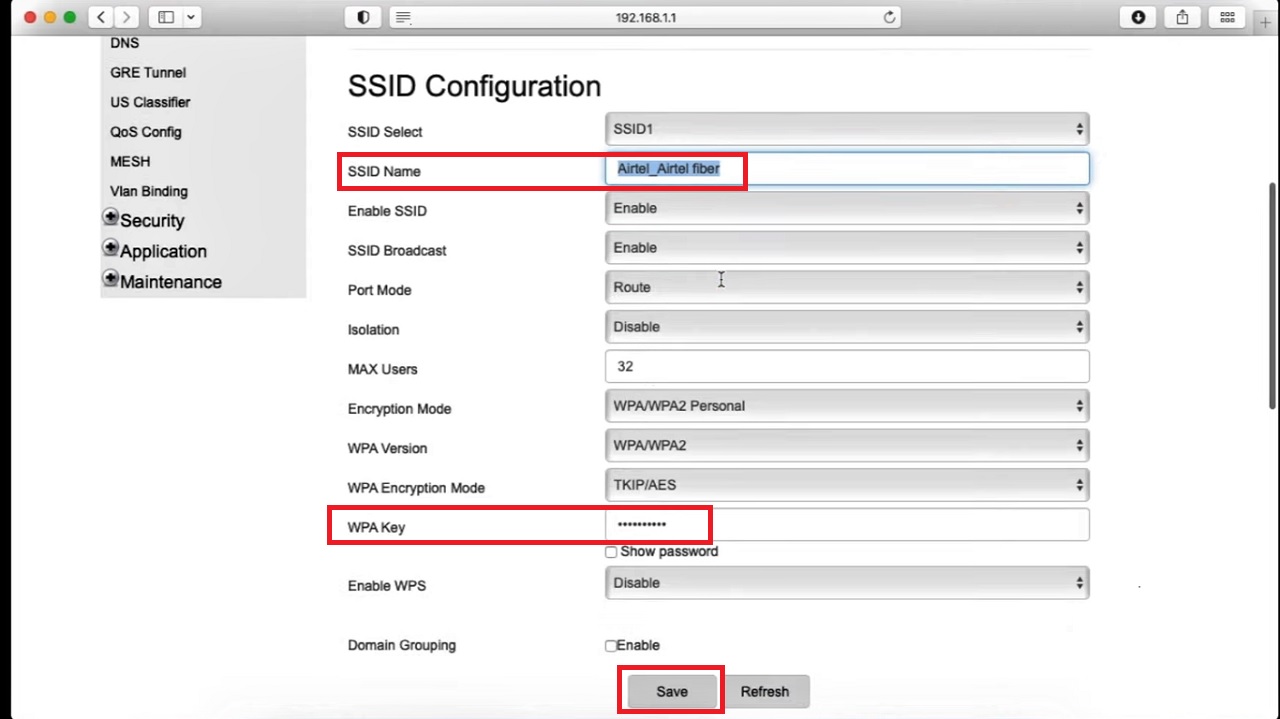
- In the following window, change the SSID Name and the password (WPA Key) in the relevant boxes.
- Do the same for the other wireless band type.
- Click on the Save button.
Finally, logout from the page.
Conclusion
Changing the name and password of your router is not at all different.
Now that you know the methods you will find it even easier to change them and enhance the security of your Wi-Fi network, whether you are using a Windows computer or a Mac system.