
The Wi-Fi signal in and around your house may drop due to several reasons including physical barriers, unauthorized use of resources, hardware issues and others.
It reduces the speed of the internet to cause a lot of inconvenience and annoyance to you as a user.
However, there is nothing to worry about. There are both simple and complex solutions available to increase the signal strength for a seamless and steady internet experience.
In This Article
KEY TAKEAWAYS
- The Wi-Fi signal strength can be increased significantly by a fresh reboot to the router by resetting it.
- Removing physical barriers from the path or relocating the router to a more open space can enhance the strength of your Wi-Fi signal pointedly.
- Disconnect all secondary devices connected to your Wi-Fi router and leave the primary ones to have a much better signal strength.
- You may need to set the Fat Channel Intolerant and Roaming Aggressiveness Wi-Fi properties correctly to improve the signal strength.
- Disable the Allow the computer to turn off this device to save power’ feature from the power management for a greater signal strength.
Why Do You Need to Boost Wi-Fi Signal Strength?
The most obvious reason to boost your Wi-Fi signal strength is to get a much better projection of signals and seamless internet access.
Apart from that, you will also need it for:
- Increasing the downloading and uploading speed while using the internet
- Making your system work faster
How to Boost Wi-Fi Signal Strength?
One most common and easy ways to boost your Wi-Fi signal strength is to reset your router for a fresh reboot or restart your router.
In addition, you may also try to relocate the router to a more open space so that it gets more room for projection. So, remove barriers and physical obstructions such as doors, walls, and microwave ovens.
Running ipconfig /flushdns, netsh winsock reset catalog, and netsh int ip reset commands in the Command Prompt as administrator may also increase the signal strength.
Some other proven ways to increase the signal strength of your Wi-Fi with varied impacts include:
- Reducing the number of devices connected to your router at the same time
- Using an extender in case the router is located at a distance from your system
- Using an Ethernet cable
- Setting Wi-Fi properties correctly
- Making changes in the power management
- Updating router firmware and driver
- Changing the Wi-Fi channels
- Running network adapter troubleshooter
- Checking wireless card and slot
- Disabling Bluetooth adapter
- Changing MTU value
If you have the required knowledge and expertise, you can even create an improvised router antenna to use outdoors to increase the Wi-Fi signal strength.
Here are the ways to go about each of the complex processes to improve the signal strength of your Wi-Fi network.
Note: All of these solutions will have varied impacts on the signal strength, either directly or indirectly.
Method 1: Check and Set Specific Wi-Fi Properties Correctly
There are a few specific Wi-Fi properties that you need to check and set correctly from Network Connections.
STEPS TO FOLLOW:
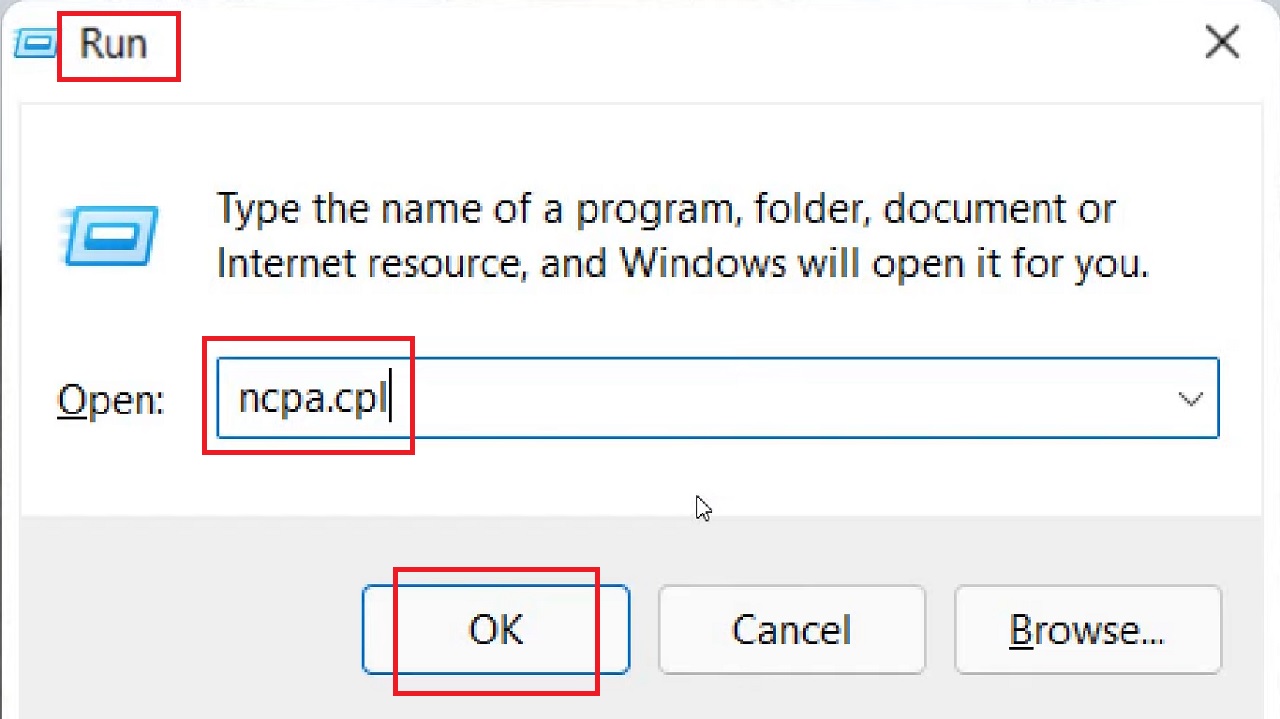
- Press the Windows and R keys on your keyboard together to open the Run dialog box.
- Type ncpa.cpl in the box and press the OK key or hit the Enter key.
- In the Network Connections window that opens, select and right-click on Wi-Fi.
- Select Properties from the drop-down options.
- Click on the Configure button in the following Wi-Fi Properties window under the Networking tab.
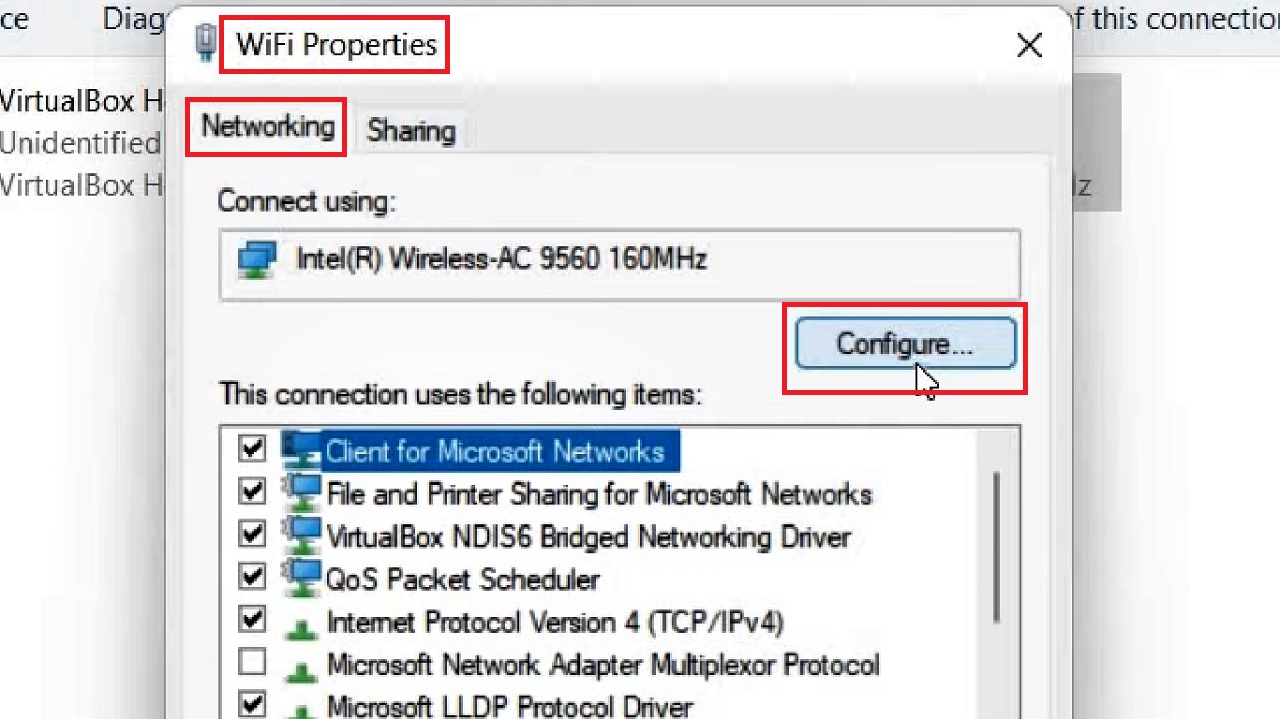
- Go to the Advanced tab in the following window.
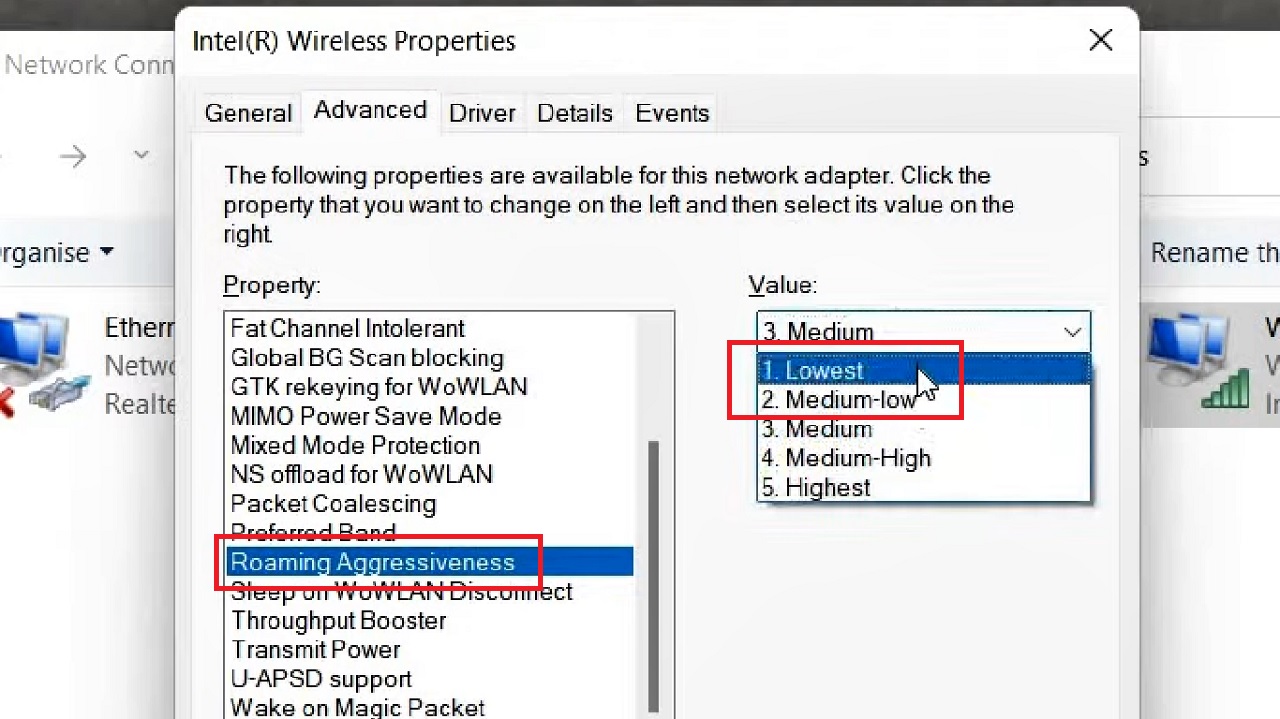
- Look for Fat Channel Intolerant in the list in the box under Property.
- Click on the small arrow at the right-end of the box under Value.
- Select Enabled from the drop-down options.
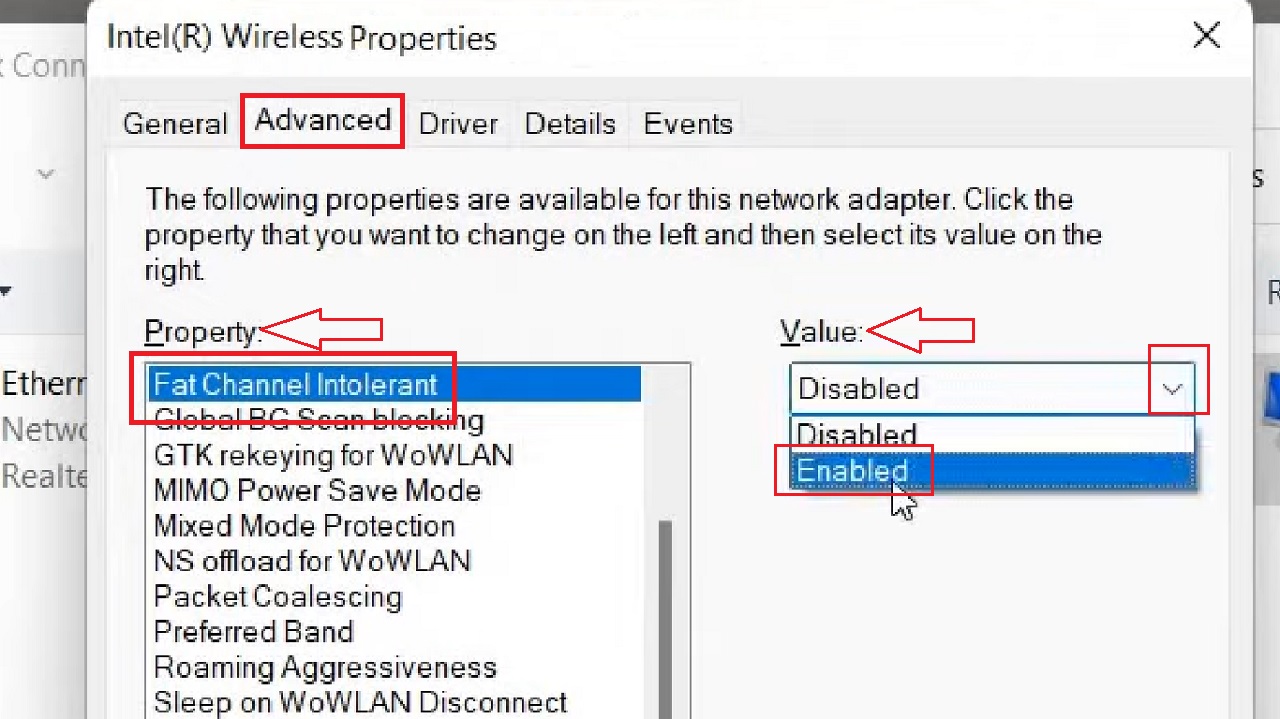
- Now look for Roaming Aggressiveness in the same box.
- In the Value box, set it to Lowest or Medium-low, because lower the value, the better will be your Wi-Fi performance.
Also, change the following properties:
- Transmit Power property to Highest
- BSS Mode or Brand Preference to 802.11a for 5 GHz connection and to 802.11g or 802.11b for 2.4 GHz connection
- Roam Tendency to Aggressive
- Antenna Diversity to Auto
Now, click on the OK button and close all the windows, and check the speed and strength of your internet. It should be significantly better now.
If that did not help increase the signal strength and speed significantly, then follow the next step additionally.
Method 2: Make Changes in the Power Management
The default settings of the power management feature of your Wi-Fi may also hinder the strength and speed of the network. So, make the necessary changes in the settings.
STEPS TO FOLLOW:
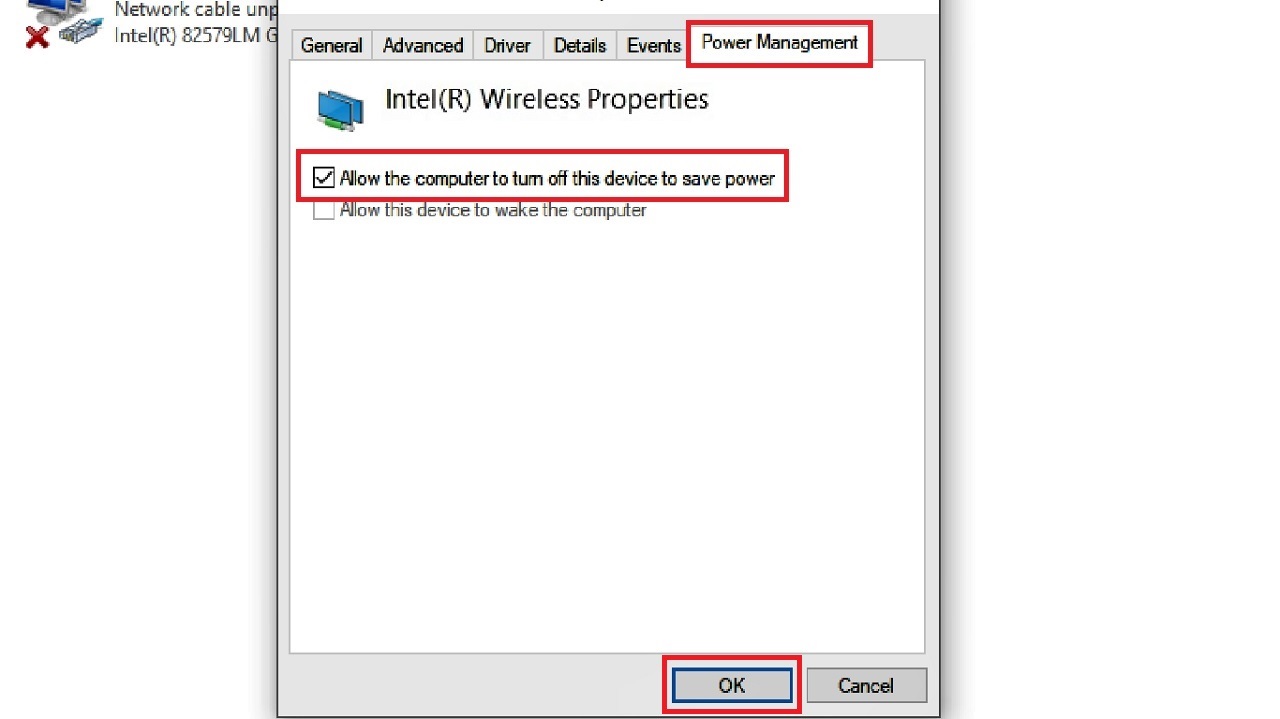
- Go to the Network Connections > Properties > Configure as before.
- Now, from there, go to the Power Management tab at the top on the right side of the following window.
- Click on the small square box next to ‘Allow the computer to turn off this device to save power’ to uncheck this option, which will be check marked by default.
- Finally, click on the OK button.
This will reconnect the Wi-Fi, and probably would increase its speed and strength of the signal as well. If it failed to do so, then go to the next solution.
Method 3: Check and Update the Router Firmware
Sometimes, the firmware of your Wi-Fi router may be outdated, enough to reduce the signal strength and speed of the internet. It is wise to check it and update it if necessary.
Note: You can do it directly from the specific app of your Wi-Fi router. However, not all Wi-Fi routers will have such an app. In that case, you will need to go to the web portal of your particular router brand and login as an administrator to get the necessary updates.
STEPS TO FOLLOW:
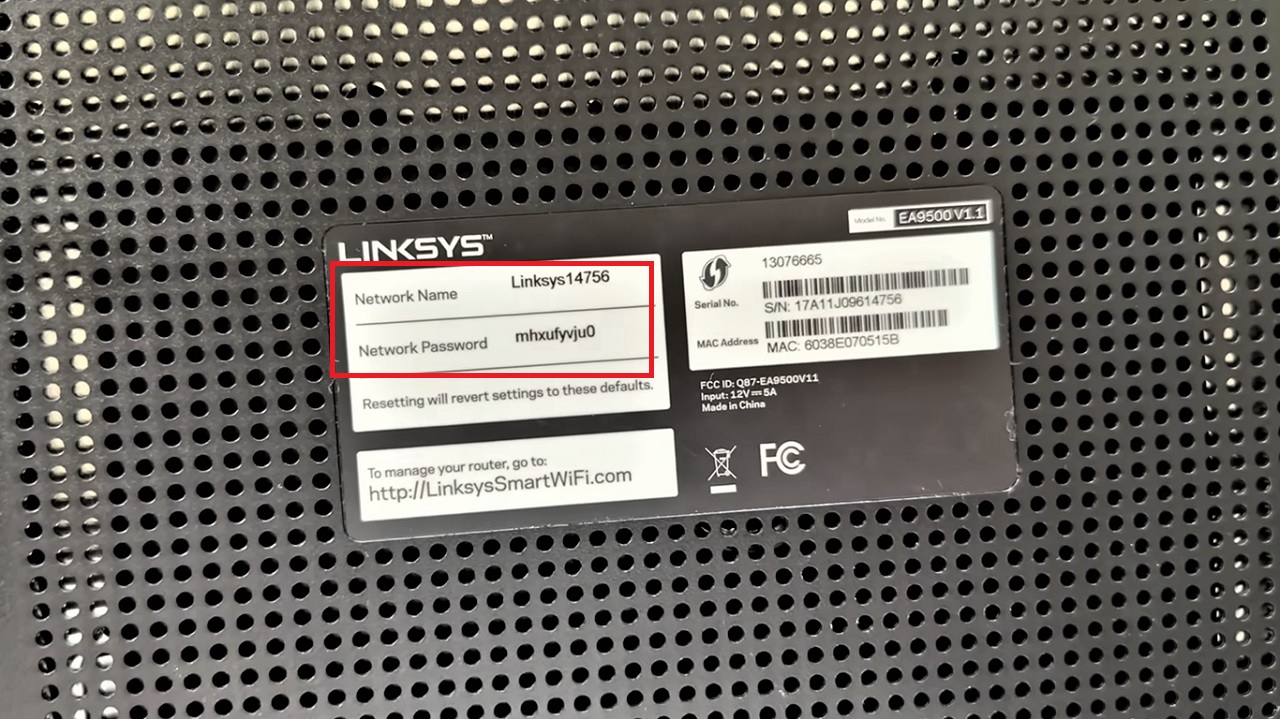
- Look at the back or side of your router device to find the username and password to login in to the web portal of your particular router manufacturer.
- Open Google Chrome.
- Type in the IP address, which is usually 192.168.1.1 or 192.168.0.1, in the address bar and hit the Enter key on your keyboard. This will open the login page of your router (MERCUSYS in this case).

- Type in the password to login this will open the homepage of your router manufacturer.
- Go to the Update page and check for updates available there.
- Click on the Update button and follow the on-screen instructions.

Once your router is up-to-date, you will see a notable increase in the Wi-Fi signal strength and internet speed.
Method 4: Change the Wi-Fi Channels
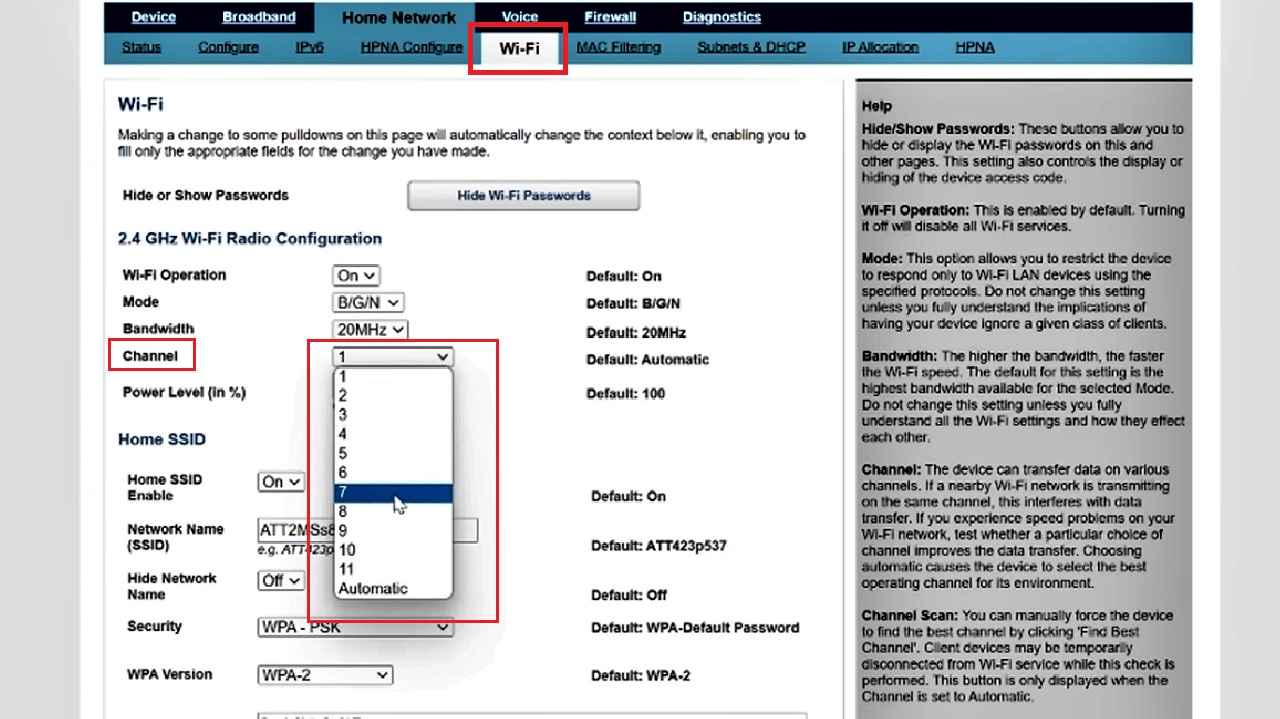
Wi-Fi channels refer to the frequencies that your Wi-Fi router uses to transfer data and there are about 11 different such channels.
If you live in a densely populated area where a lot of Wi-Fi routers are in use and are using the same channel. It will cause congestion and weak Wi-Fi signals.
So, change your channel to avoid interference and improve the performance and signal strength of your Wi-Fi router.
Note: The Wi-Fi portal interface may vary depending on the router manufacturer.
STEPS TO FOLLOW:
- Go to your router’s interface through the web portal as before
- Login using the username and password, which is usually ‘admin’ for both, if you have not changed it.
- Click on Wi-Fi in the following window.
- Go to the Channel option.
- Click on the small arrow on the right-end of the box.
- Choose a different channel than what is set by default from the list of options.
- Change on the Save button below (not shown in the image) to apply the changes.
Now, perform a speed test to find whether or not there is any improvement in the signal strength and upload and download speed along with.
Note: There may be a few specific types of routers that will come with an Auto option as well, as it is in this case. If you set your router to Automatic, it will choose the best channel frequency automatically for higher signal strength and optimal performance.
Method 5: Find and Block Unwanted or Unknown Devices
Once again, if you live in a densely populated area, there is a higher probability of others intruding your Wi-Fi network and using the resources for which you are paying for. This will reduce the signal strength and speed significantly.
Identify and remove them from your network to improve signal strength.
Expert tip: It is recommended that you use a unique username and a very strong password of at least 8 characters comprising upper- and lower-case letters, symbols and numbers rather than the default ones that can be guessed easily. This will prevent easy access to your network by the outsiders.
STEPS TO FOLLOW:
If you have the dedicated app in your router:
- Log into your Wi-Fi router.
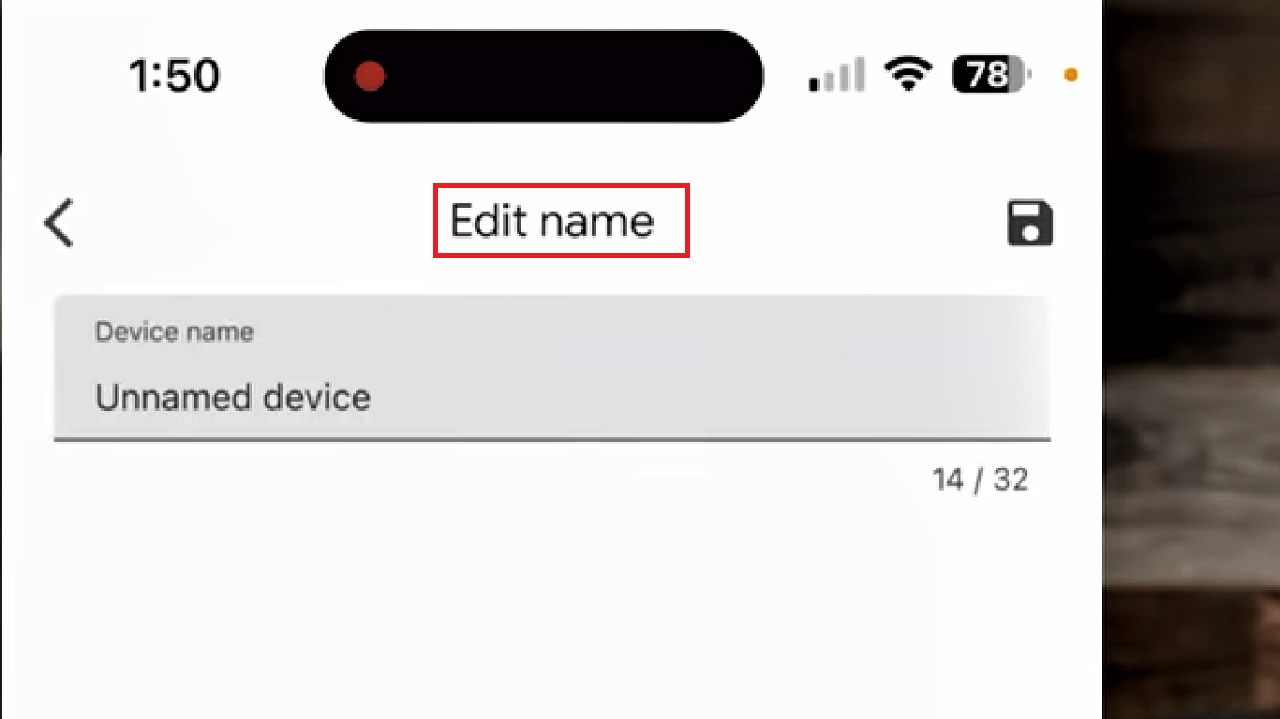
- Check the devices that are currently connected to your network that you recognize and use but do not have a proper Device name and appear as Unnamed devices.
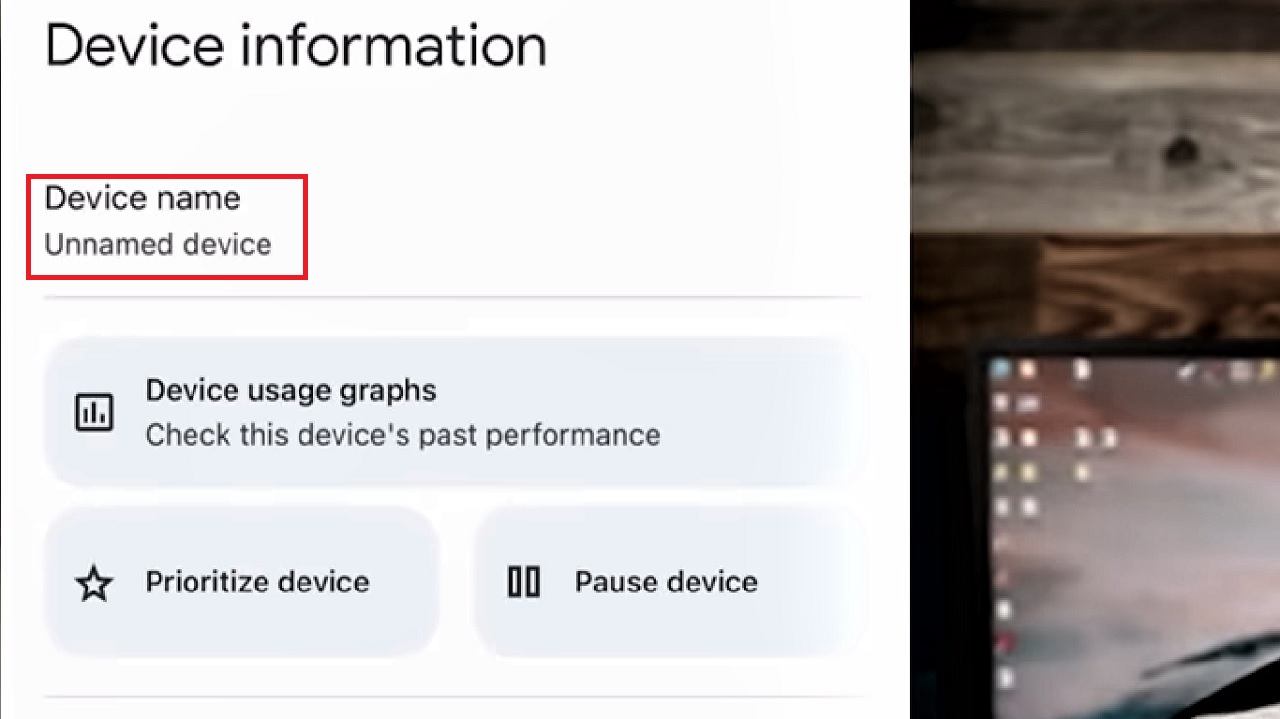
- Customize their names by tapping on each and giving a new name using the Edit name option.
If you do not have the dedicated app in your router:
- Open Google Chrome as before and long into your router, TP-Link in this case.
- Select Wireless from the left pane of the window.
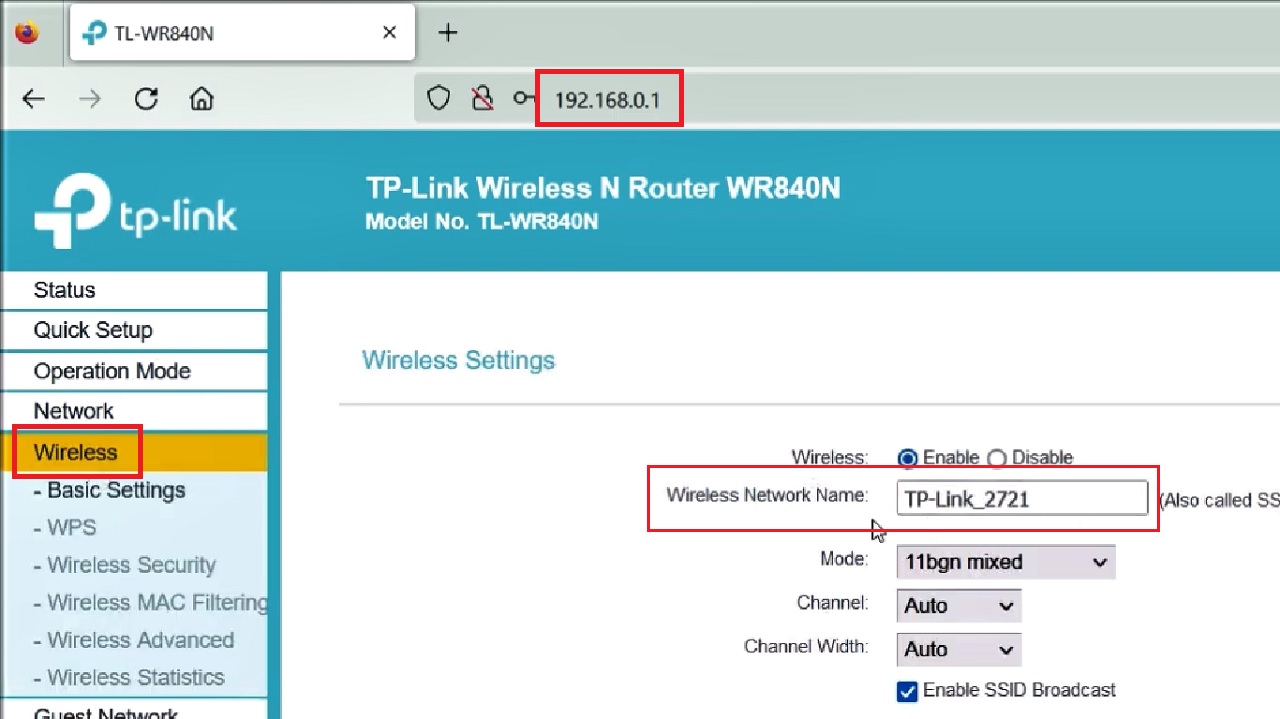
- Go to the Wireless Network Name on the right side of the window.
- In place of the default router name (TP-Link_2721 in this case), type in your preferred name for your router.
Also find other devices connected to your router from DHCP Clients / Devices / Connected Devices / Wireless Clients.
- Click on each of the connected devices that appears in the list and you know and recognize.
- Click on the Edit or Change Hostname option next to the device.
- Give the device a new name of your choice.
- Click on the Save button (not shown in the image) to apply the changes.
Now that you know what the devices are known to you and you do not mind them using your network, it is left for the other unknown devices to be removed.
You can remove them by disabling the WPS feature, Enabling WPA2 protocol, and in different ways to prevent them from stealing your Wi-Fi.
Method 6: Set up a Wired Backhaul
Setting up a wired backhaul or a wired connection instead of wireless will significantly increase the strength of your Wi-Fi network.
This is especially helpful if you have a mesh Wi-Fi system where there is a single point connecting to the modem and then to other satellites out in your home. It will be easy for the Wi-Fi to overcome the physical barriers such as walls, furniture and others.
STEPS TO FOLLOW:
- Get a good Ethernet cable.
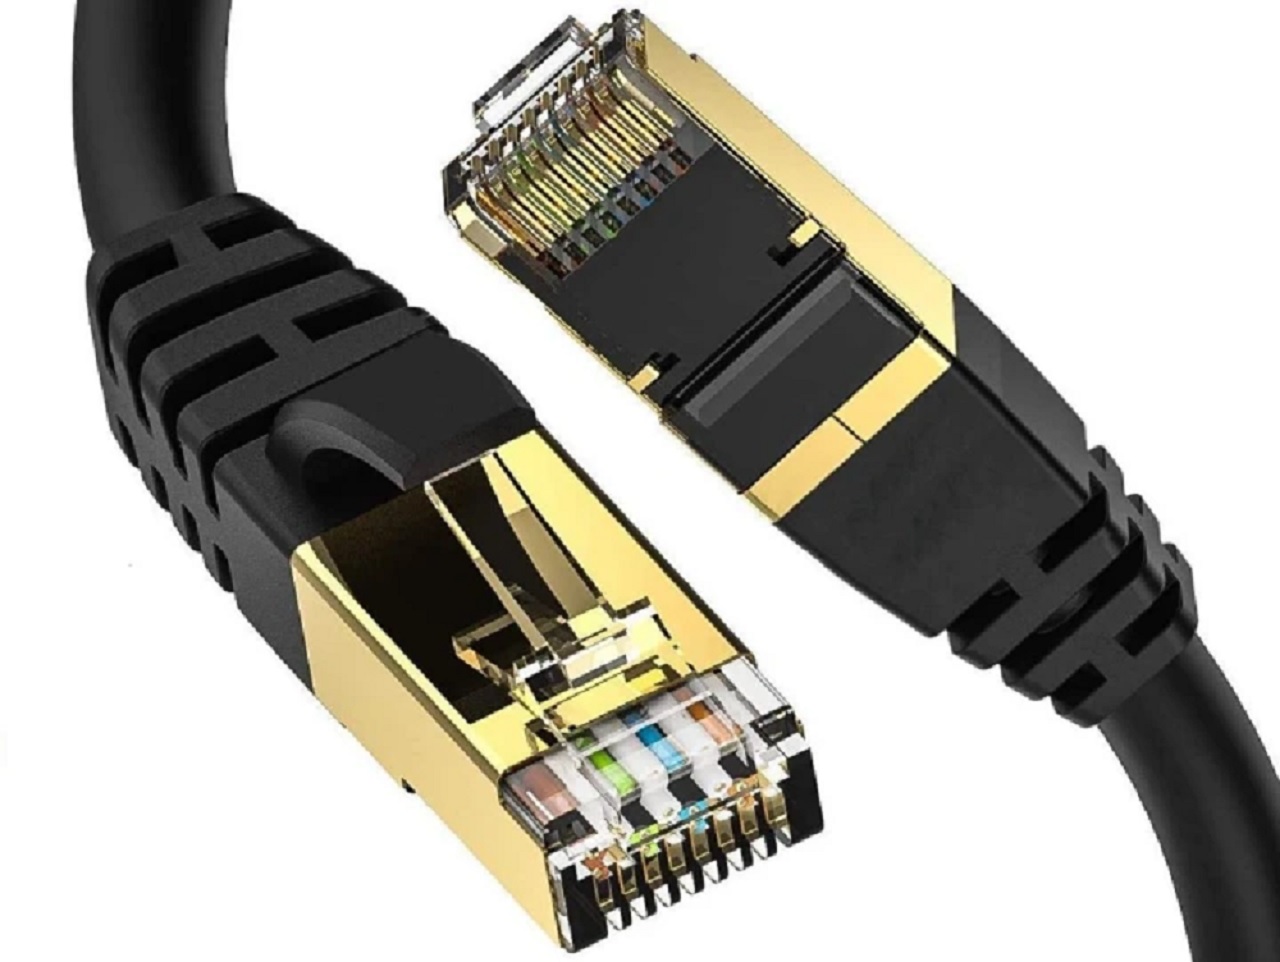
- Plug one end into the router.
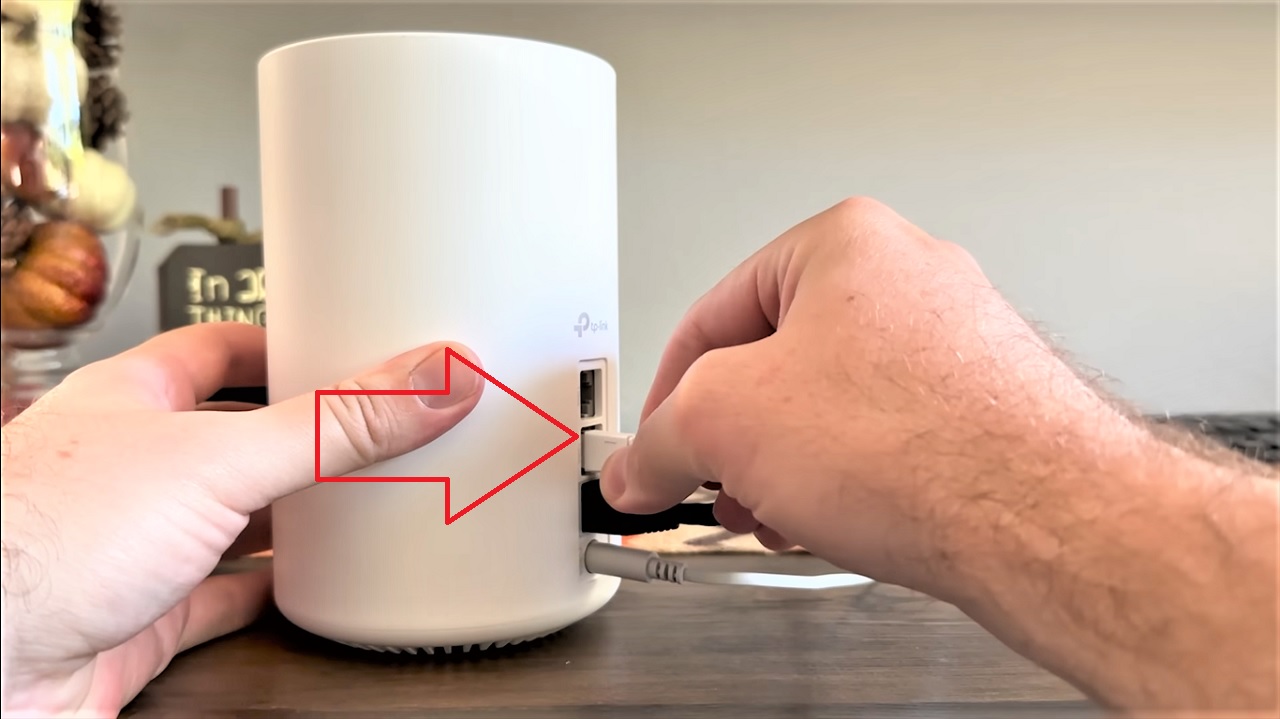
- Plug the other end to the device.
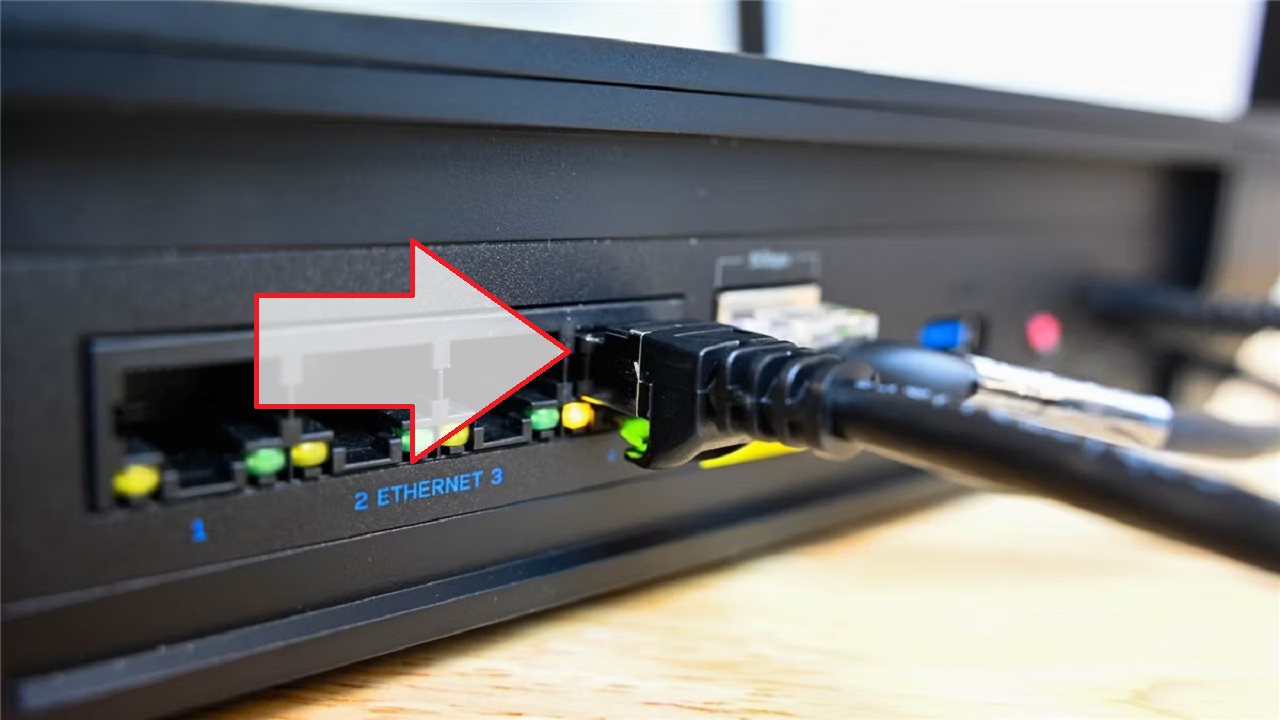
You will likely experience a much stronger Wi-Fi signal and an approximately fivefold increase in internet speed.
Method 7: Change the Maximum Transmission Unit (MTU) Value
Changing the Maximum Transmission Unit value of the Wi-Fi adapter will enable it to send large data sizes, thereby improving the signal.
STEPS TO FOLLOW:
- Open the Run dialog box as in Method 1 and type cmd in it, and hit the CTRL + SHIFT + ENTER keys together on your keyboard to open the Command Prompt as an administrator.
- Type the following command netsh interface ipv4 show subinterfaces and press the Enter key on the keyboard.
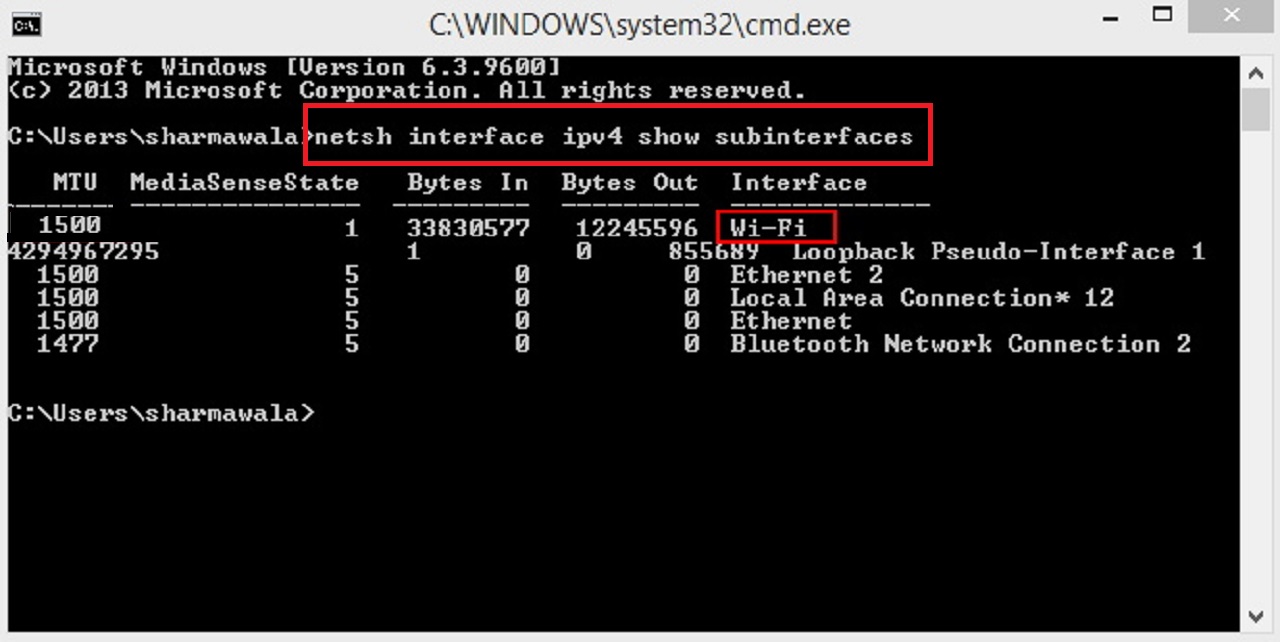
This will display the name of your Wi-Fi adapter either as Wi-Fi or as Wireless Network Connection.
Now, type the command netsh interface ipv4 set subinterface “Wi-Fi” mtu=1400 store=persistent to change the MTU value. Replace the “Wi-Fi” with the name of your router.

Type exit and close the Command Prompt. Restart your computer and see the difference in signal strength.
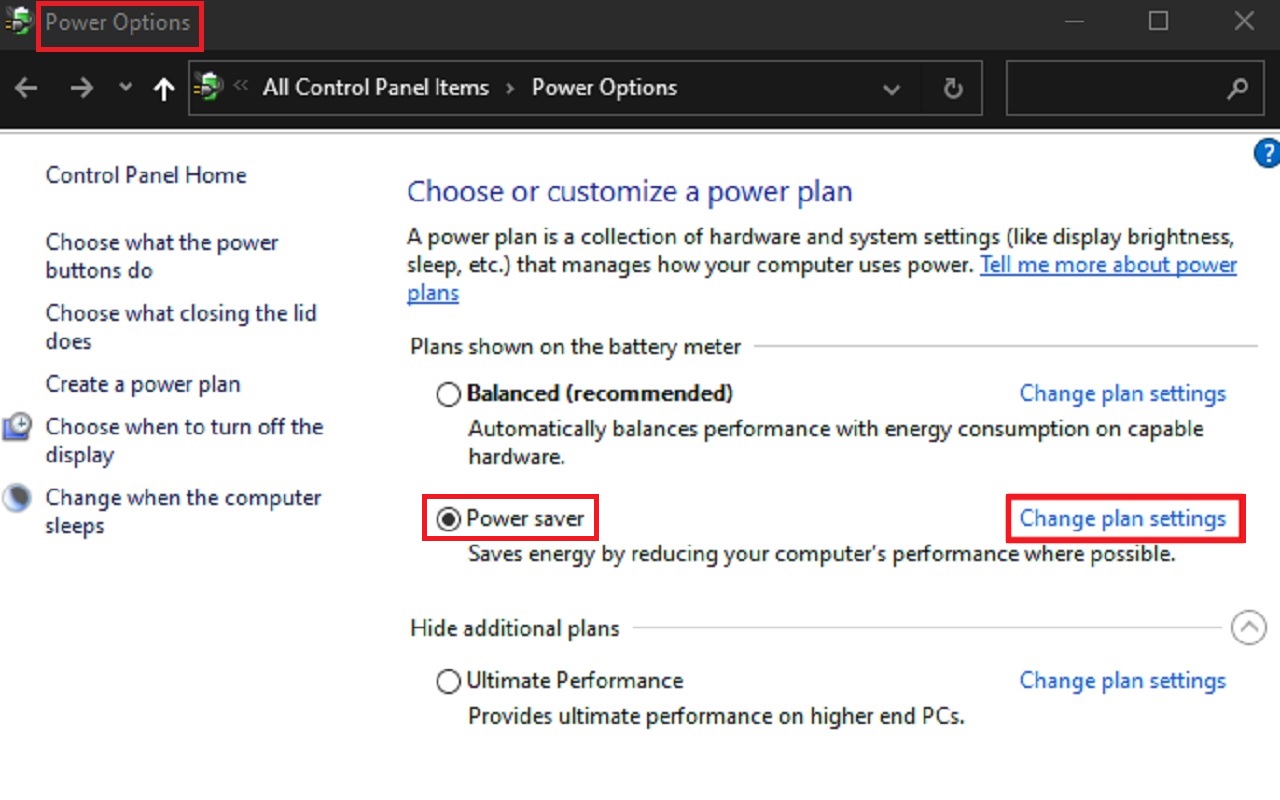
Method 8: Change Power Options
At times, adjusting the power options can maximize both Wi-Fi signal strength and performance.
STEPS TO FOLLOW:
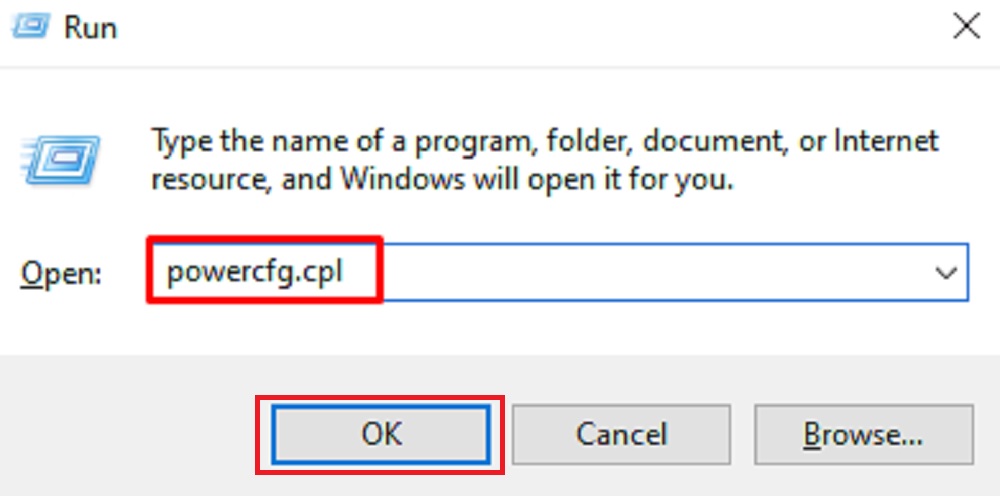
- Open Run > Type powercfg.cpl > Press OK.
- In the Power Options window, click on the radio button next to Power saver and click on Change plan settings.
- Click on Change advanced power settings in the following Edit Plan Settings window.
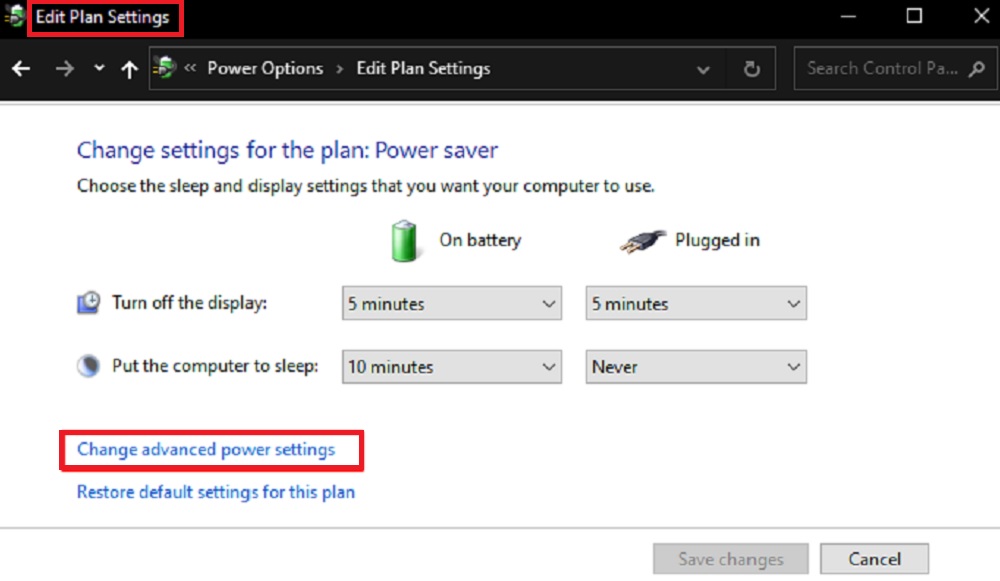
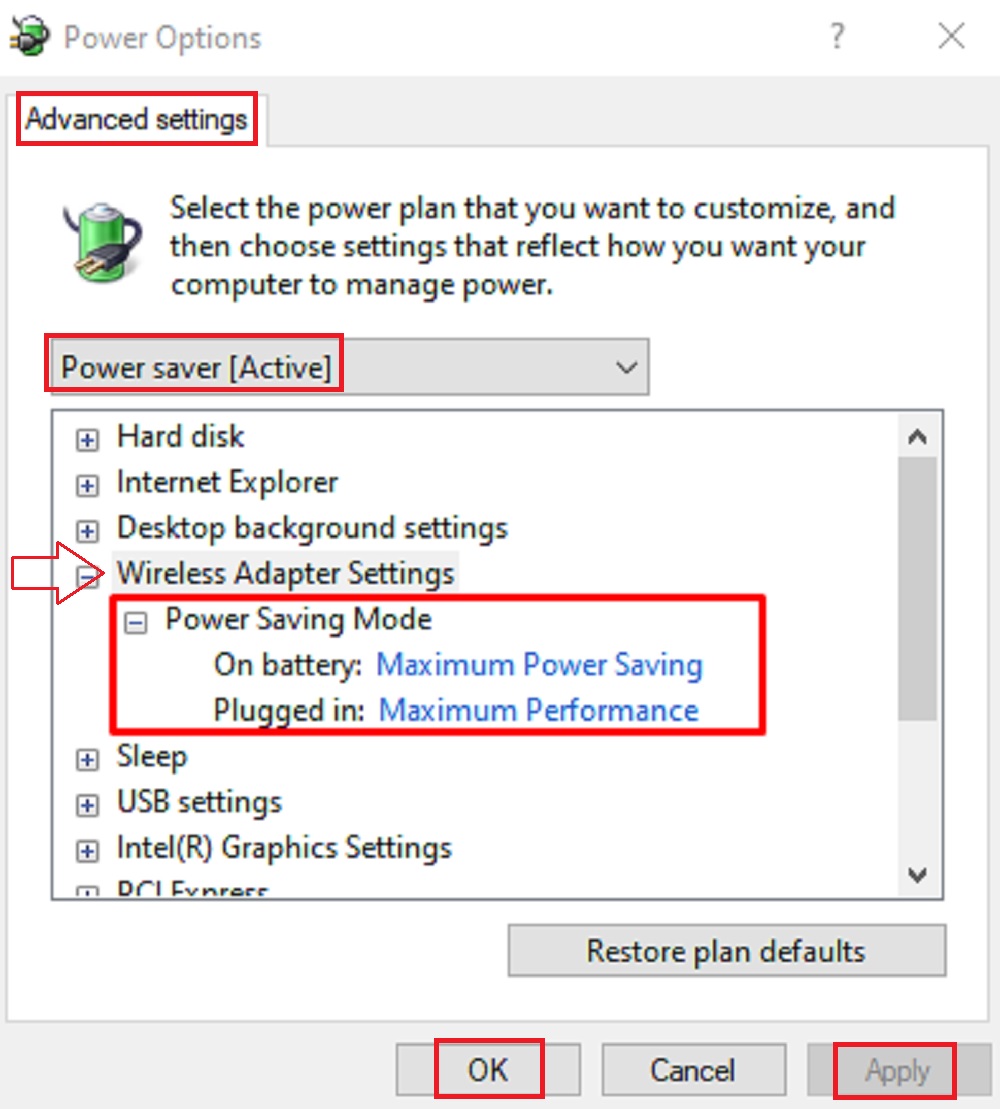
- Scroll down the list in the box under Power saver [Active] in the Advanced settings tab to find Wireless Adapter Settings and click on the Plus button to expand it.
- Similarly, expand Power Saving Mode under it.
- Set Maximum Power Saving mode for On battery and Maximum Performance for Plugged in.
- Click on the Apply and OK button to apply the changes and exit.
Check the increase in the Wi-Fi signal strength and speed.
Method 9: Create and Set an Outdoor Router Antenna
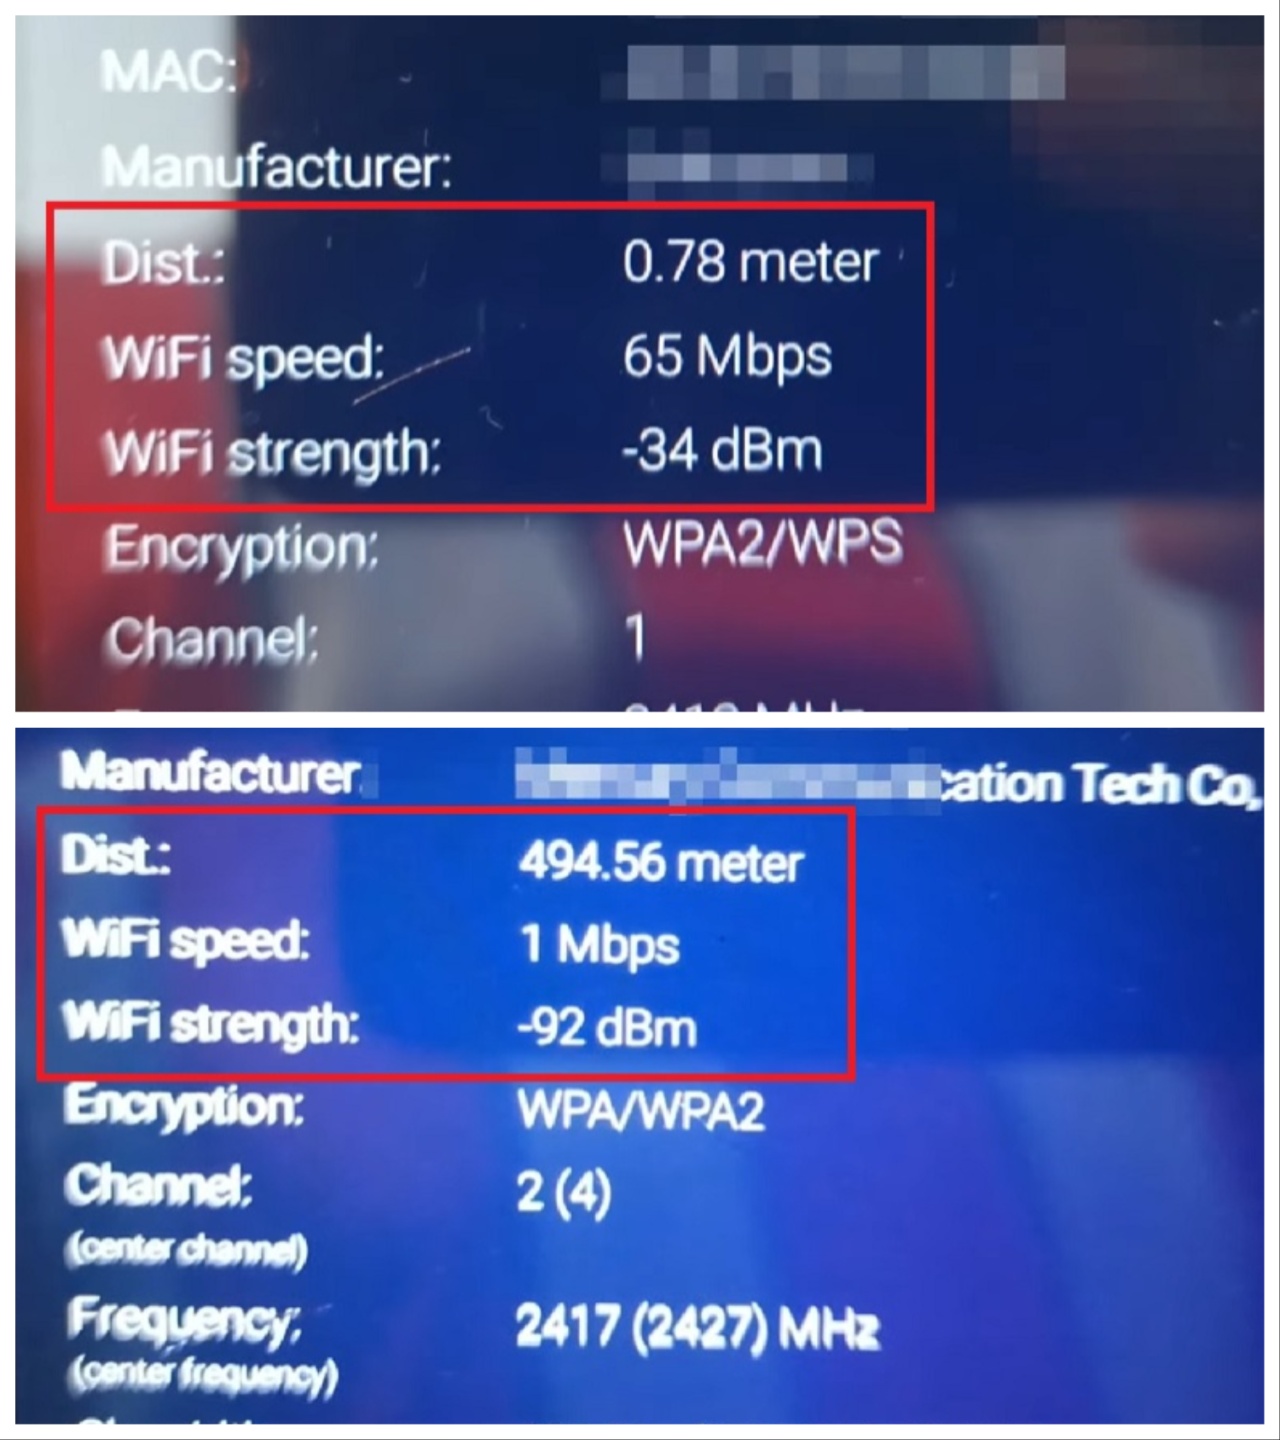
You can create an outdoor antenna for your Wi-Fi router by disabling one of its built-in antennas, resulting in a noticeable increase in signal strength regardless of distance and internet speed.
You will need a few plastic caps, 1/2-inch plastic pipes, plastic sockets, long cable, F Connector chassis sockets, tape, soldering iron, and a tall pole to fix the antenna.
Note: This is a complex process and needs hardware knowledge and technical expertise. If you do not know what you are doing, do not risk yourself.
STEPS TO FOLLOW:
- Find an old router antenna.

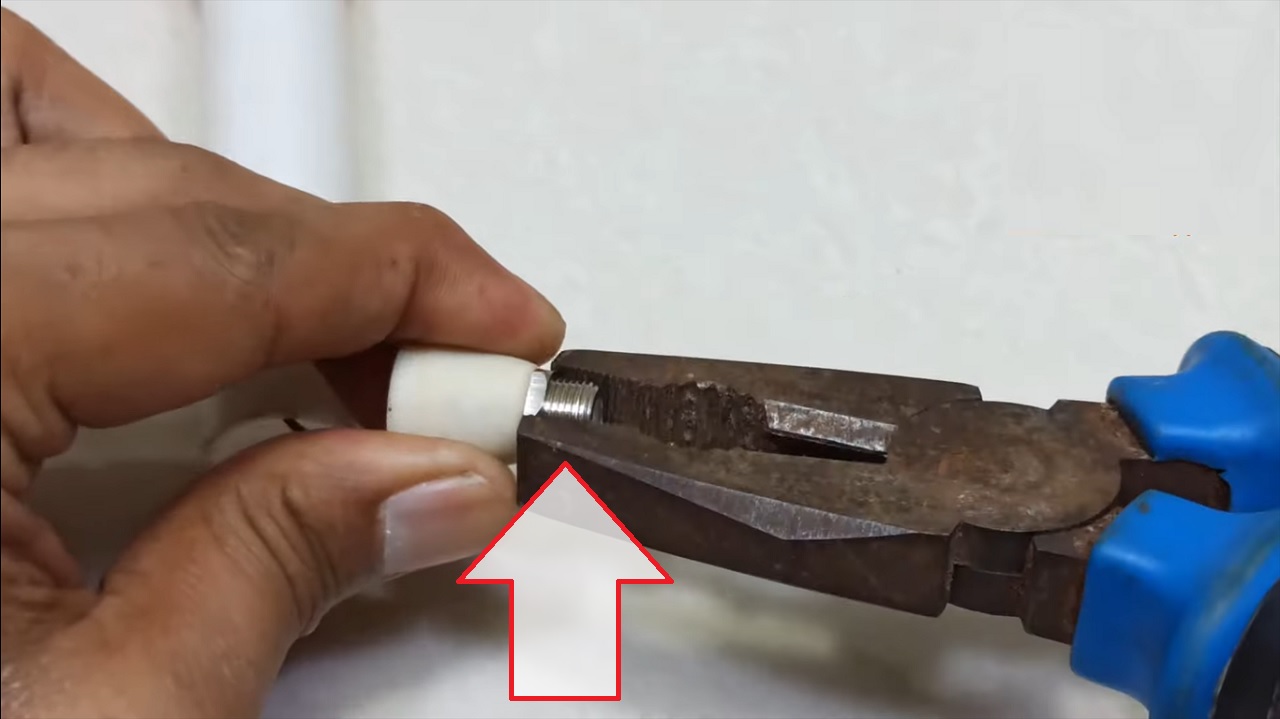
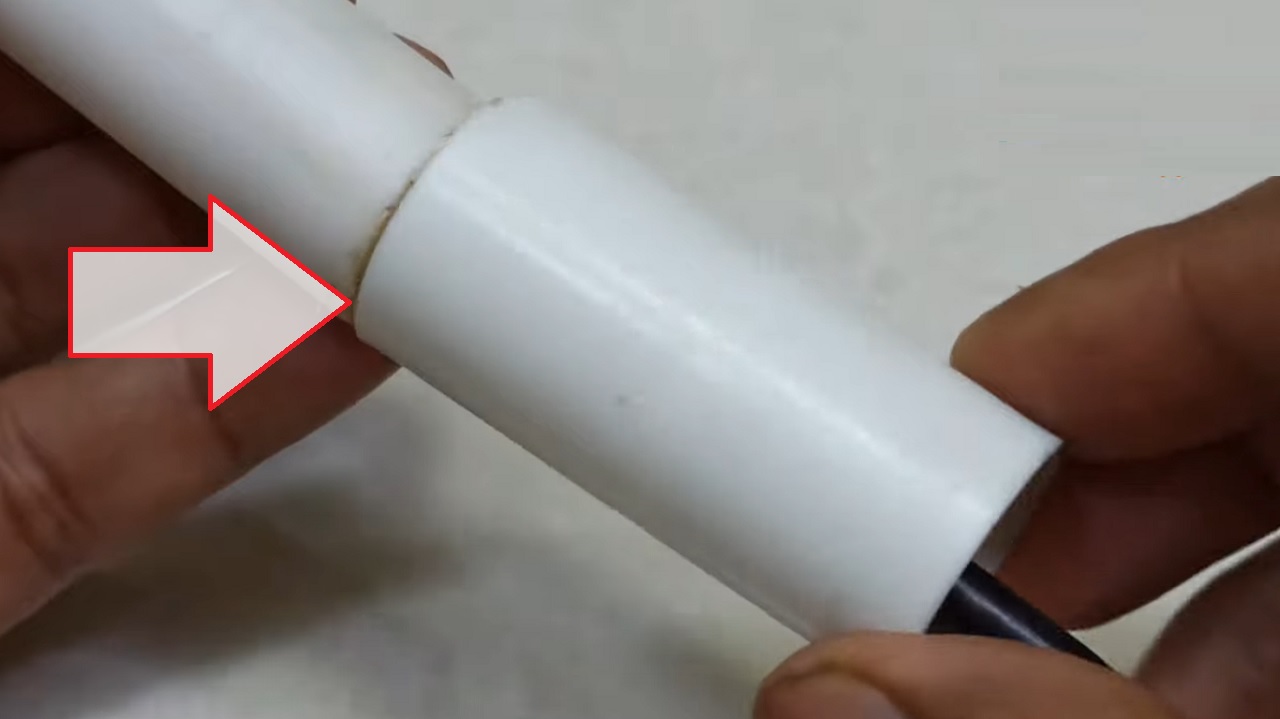
- Make a hole in a plastic cap using your soldering iron.
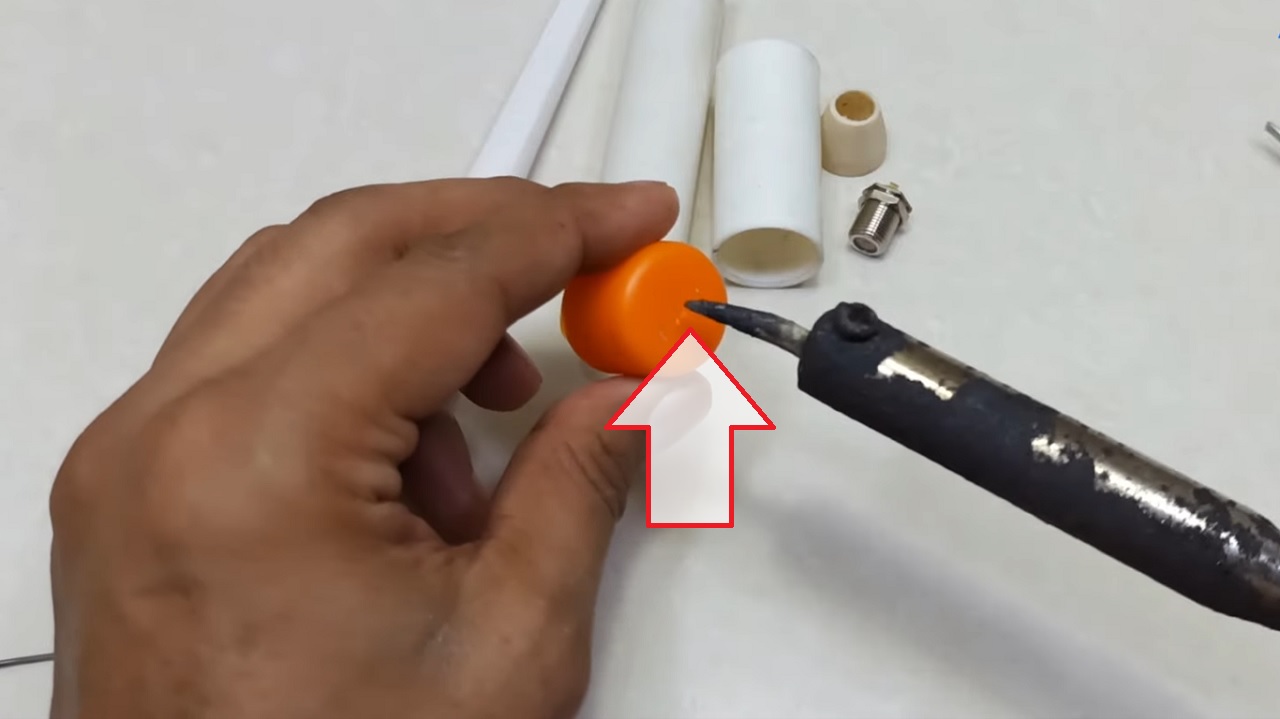
- Insert the cap on the old router antenna.
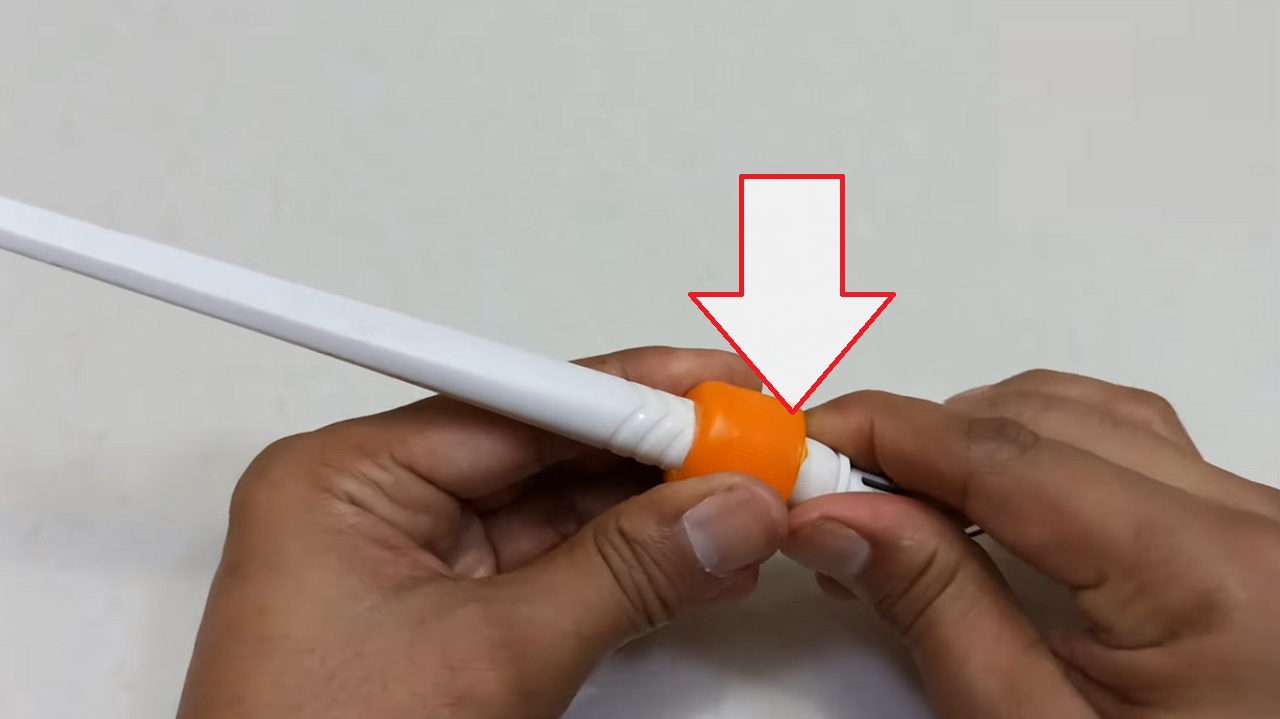
- Fix it with a glue gun nicely.
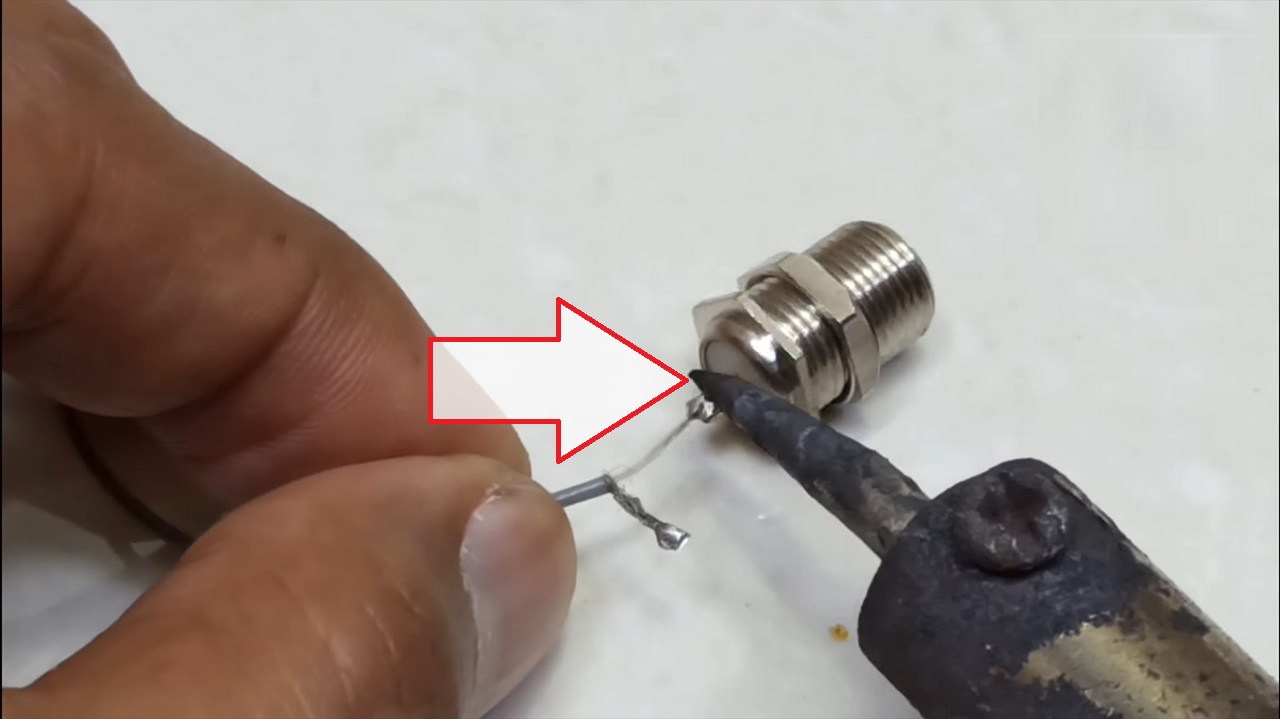
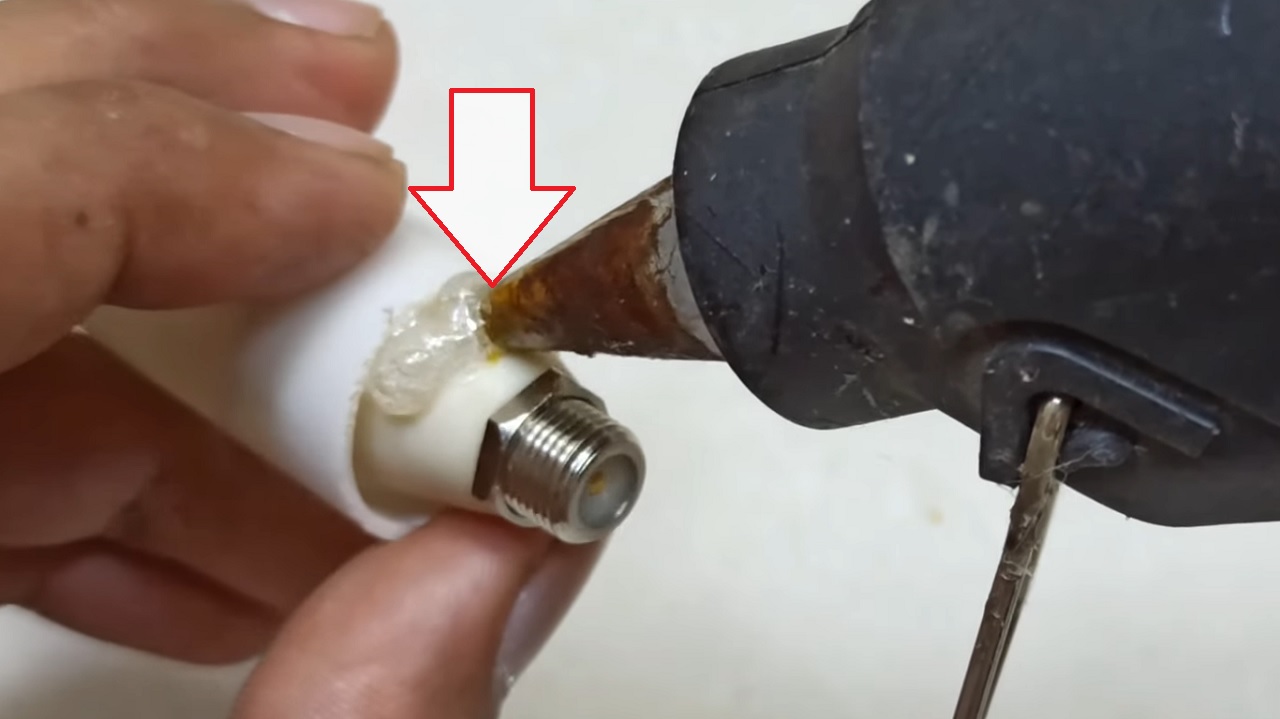
- Fix the wire of the antenna on the F Connector chassis socket.
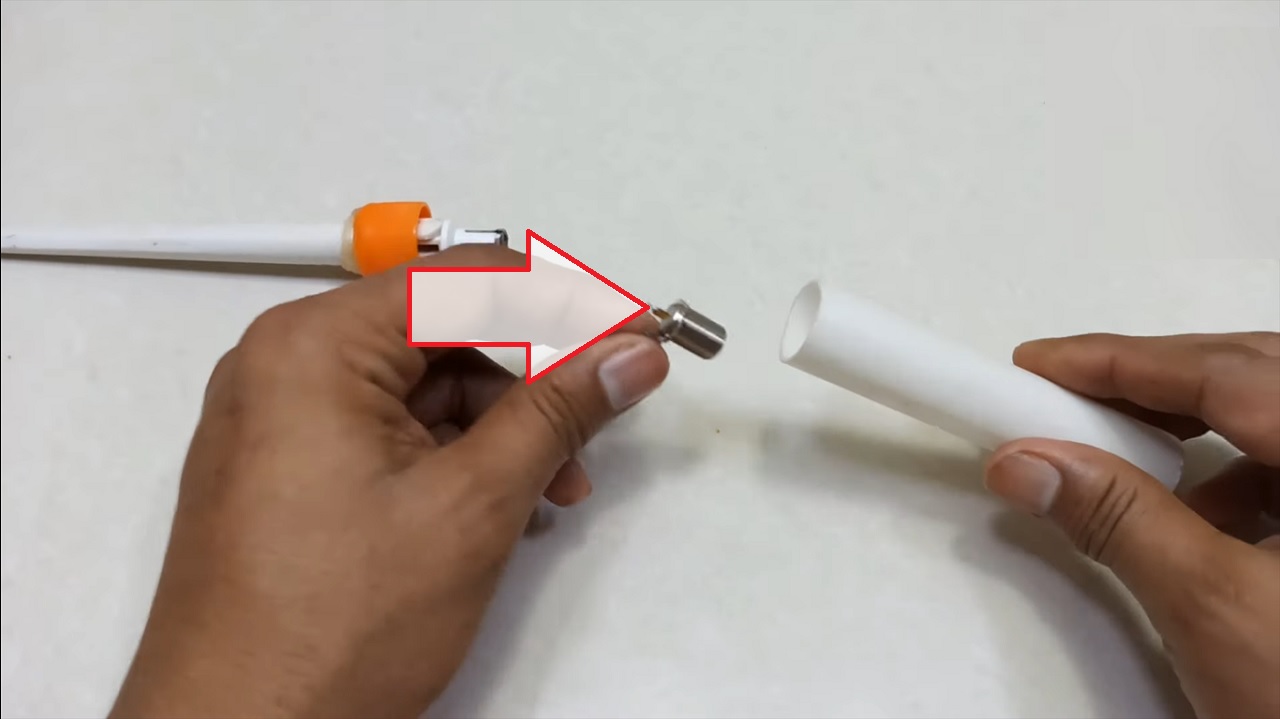
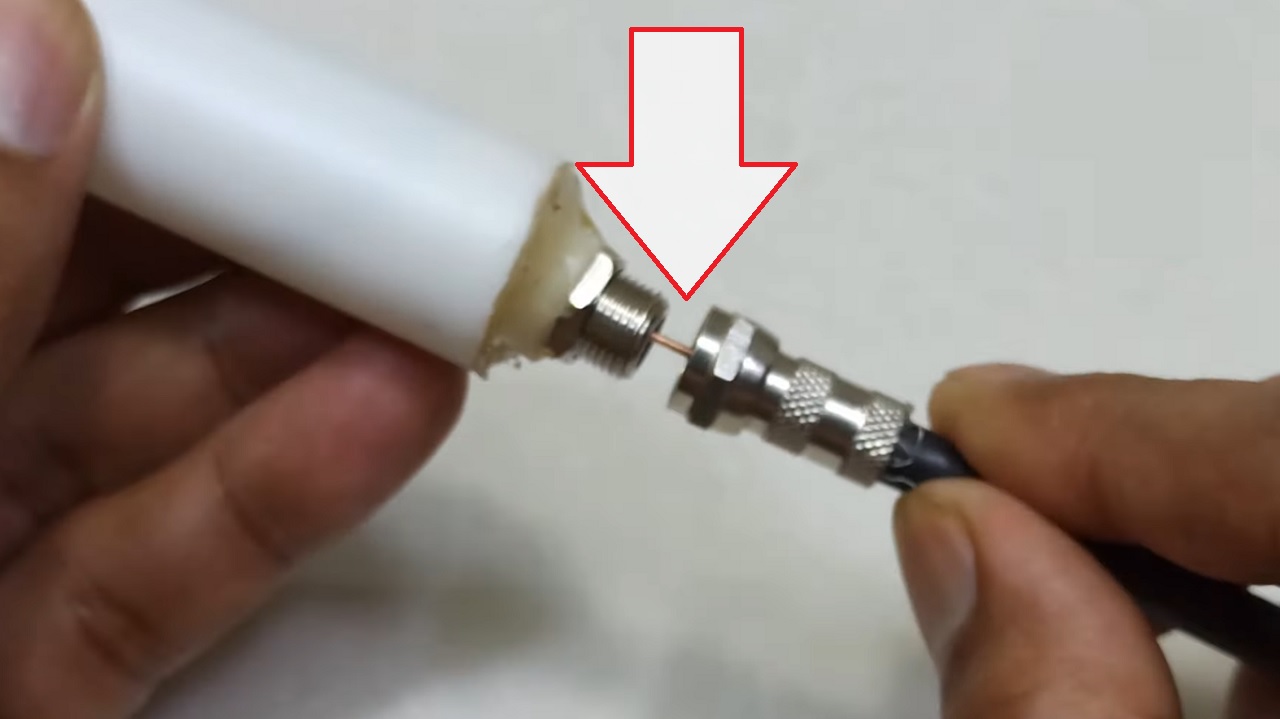
- Insert the connector through the plastic pipe and fix the pipe to the plastic cap connected to the router antenna.
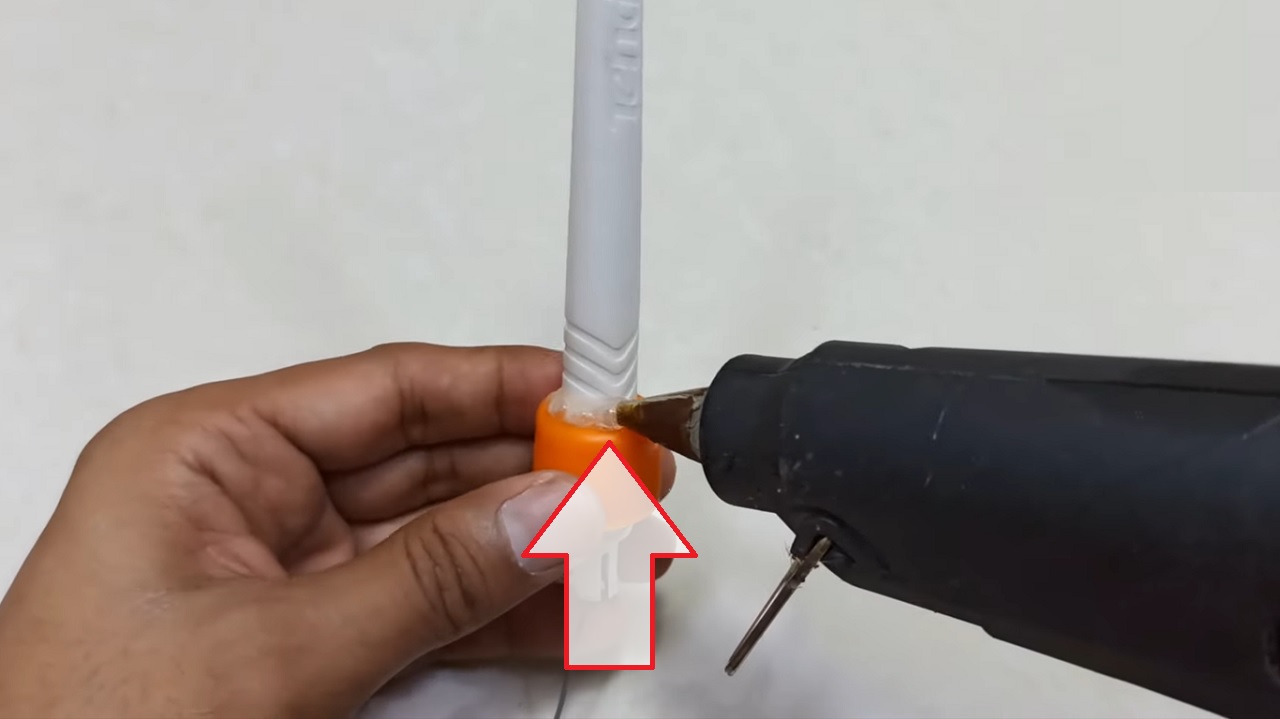
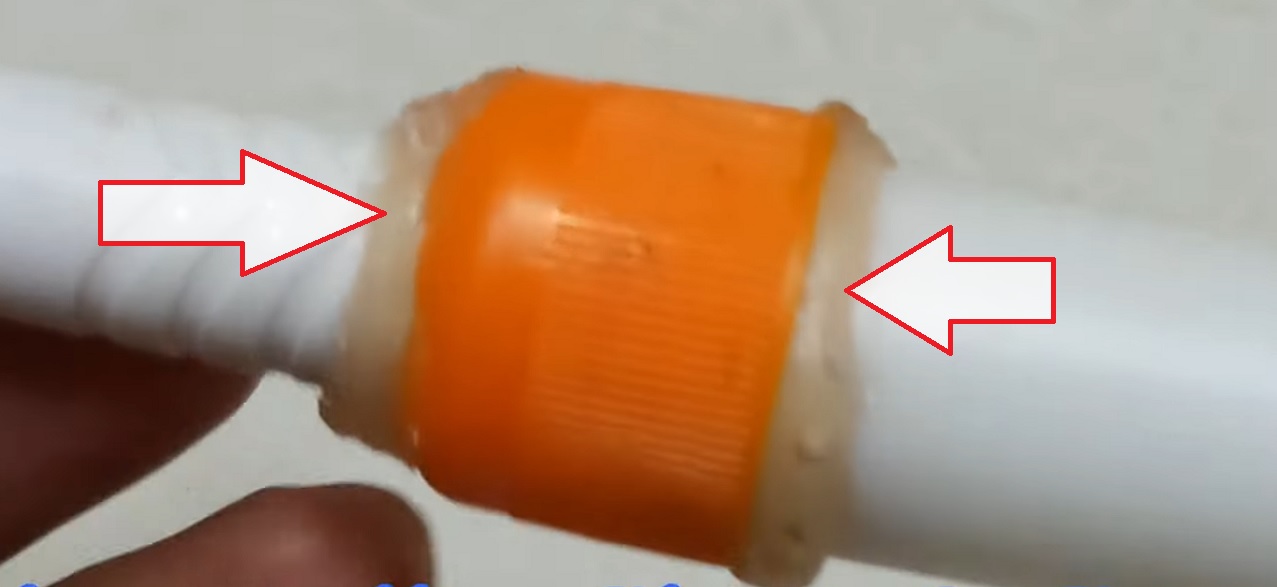
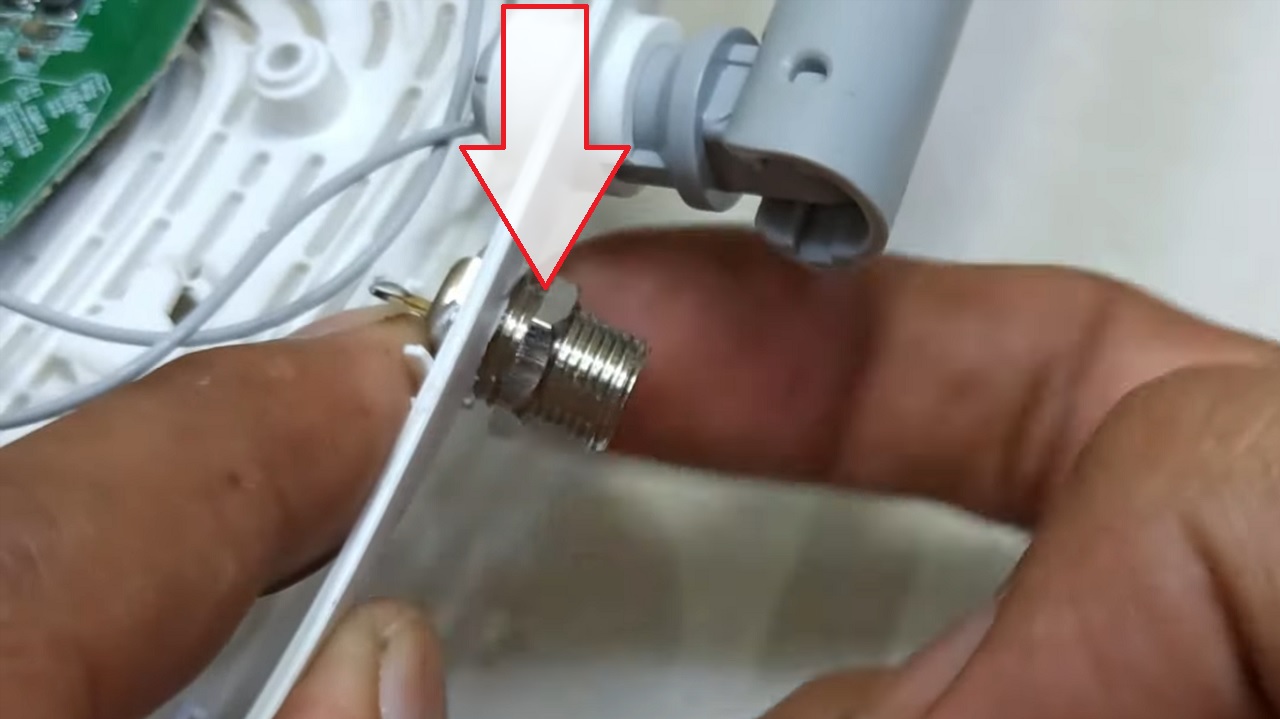
- Fix the connector to another small plastic cap and tighten the nut with the help of a plier.
- Use glue gun again for a snug fit of the cap with the connector.
- Fix the both ends of the cap on the plastic pipe to the router antenna with glue.
- Use a tape for additional fixing.
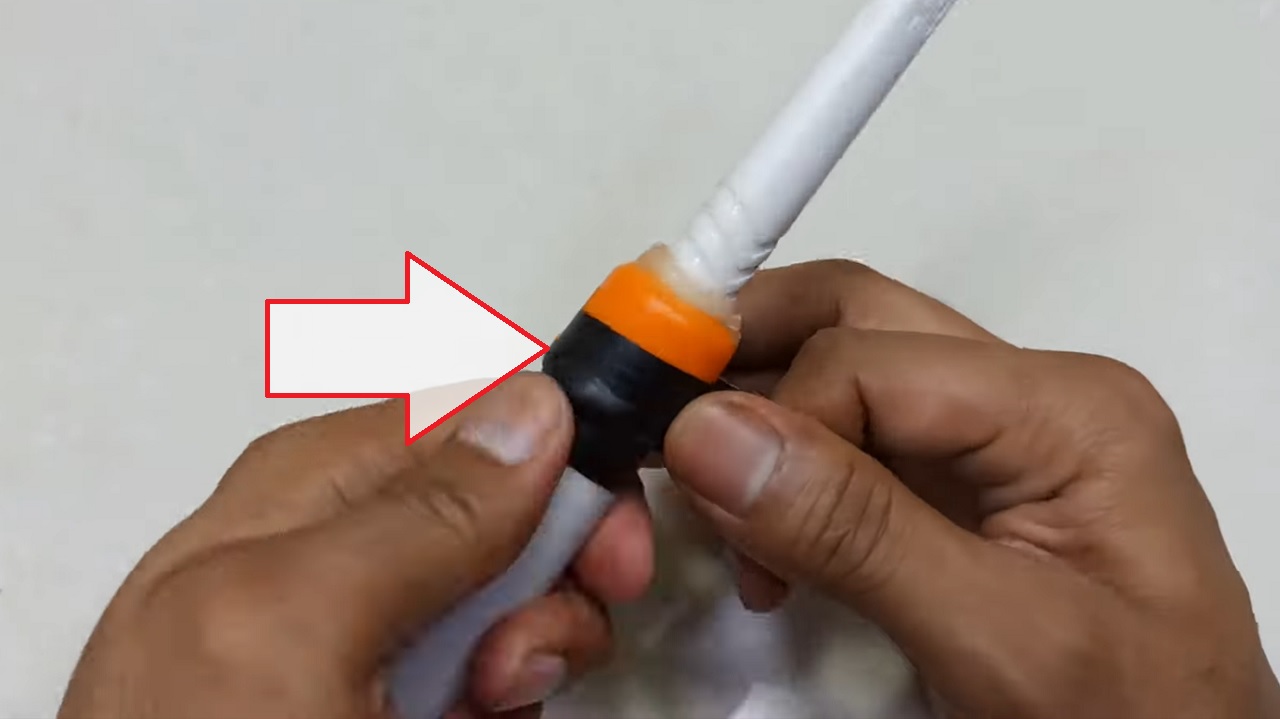
- Insert the plastic pipe socket.
- Now, open the router.
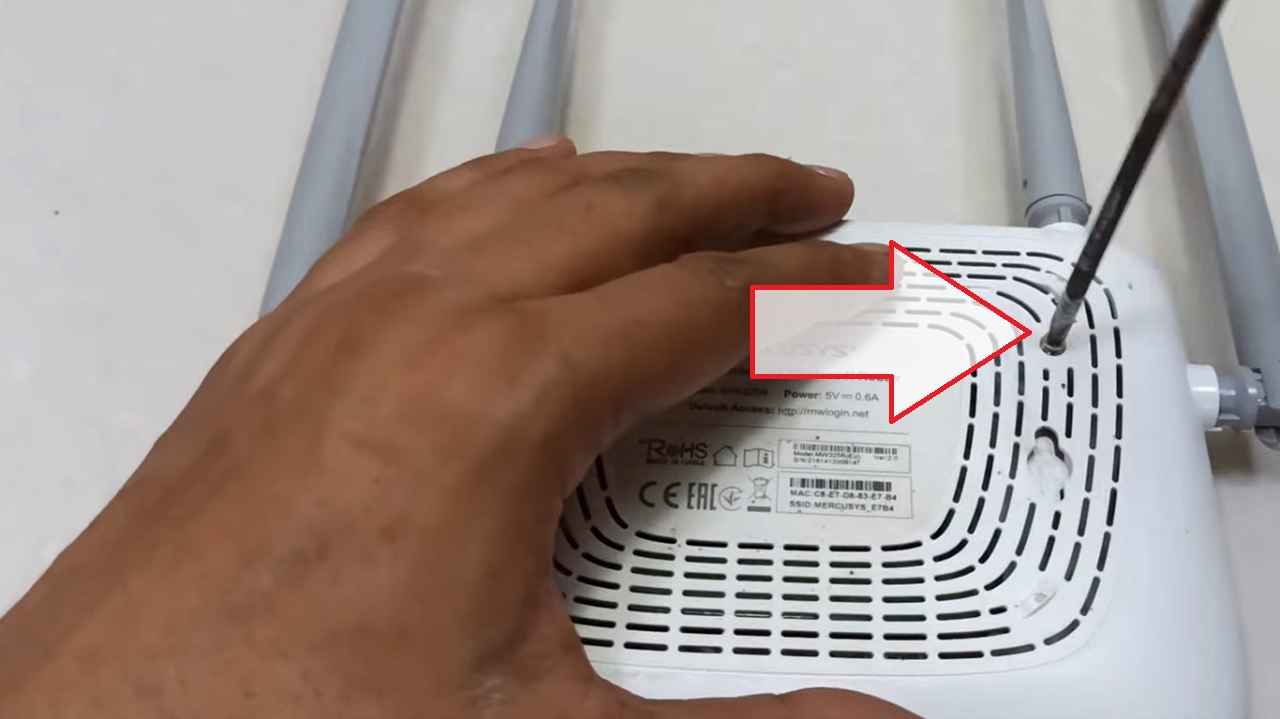
- Make a hole at the side of the router case.
- Insert another F Connector socket.
- Fix the nut on the other side properly.
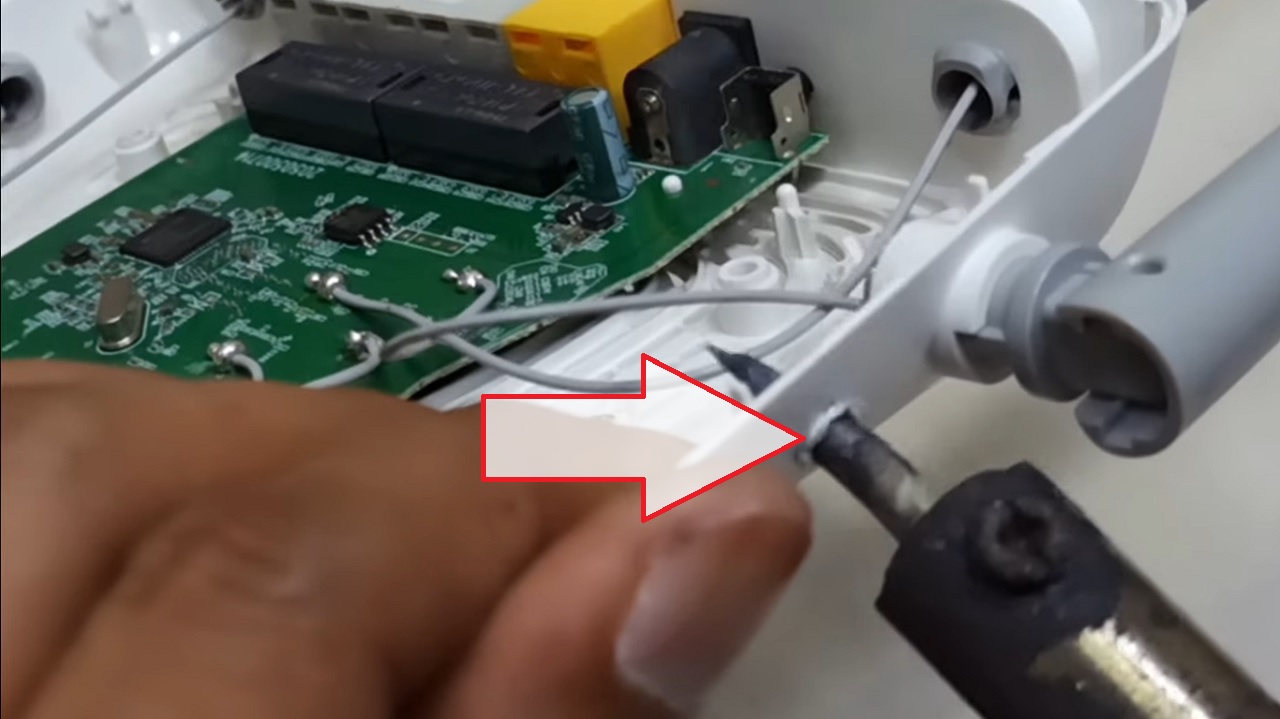
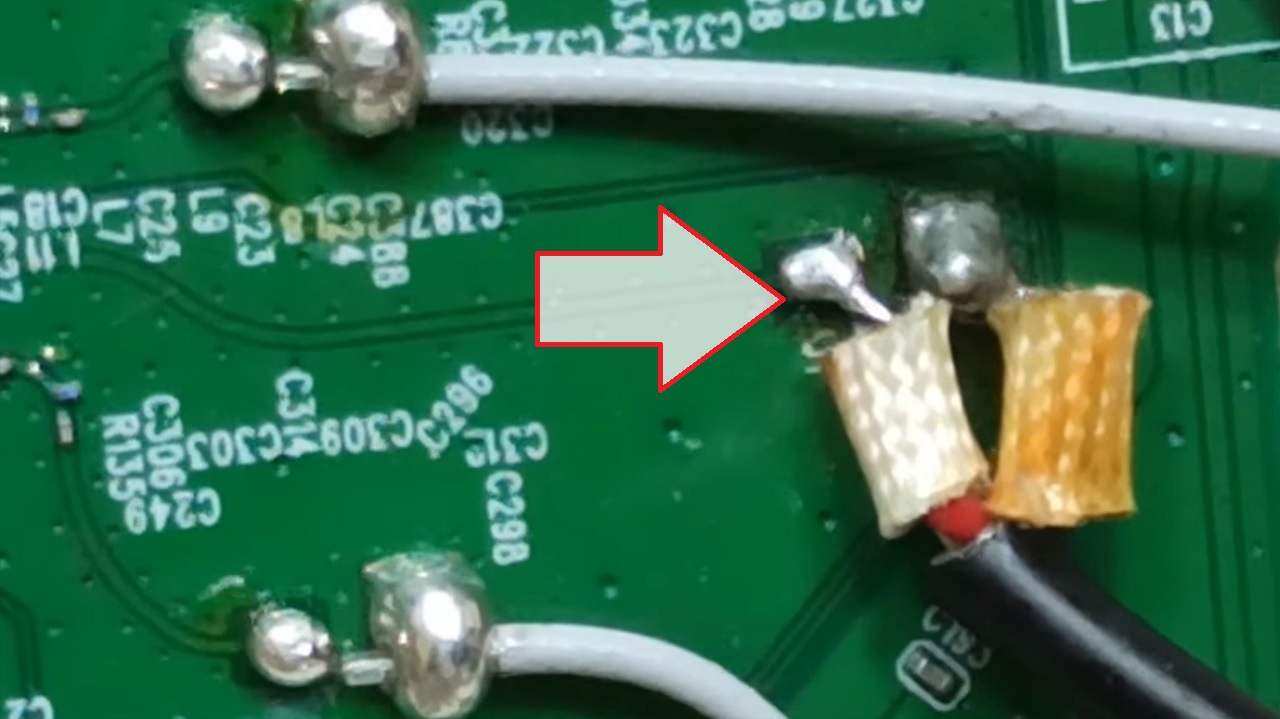
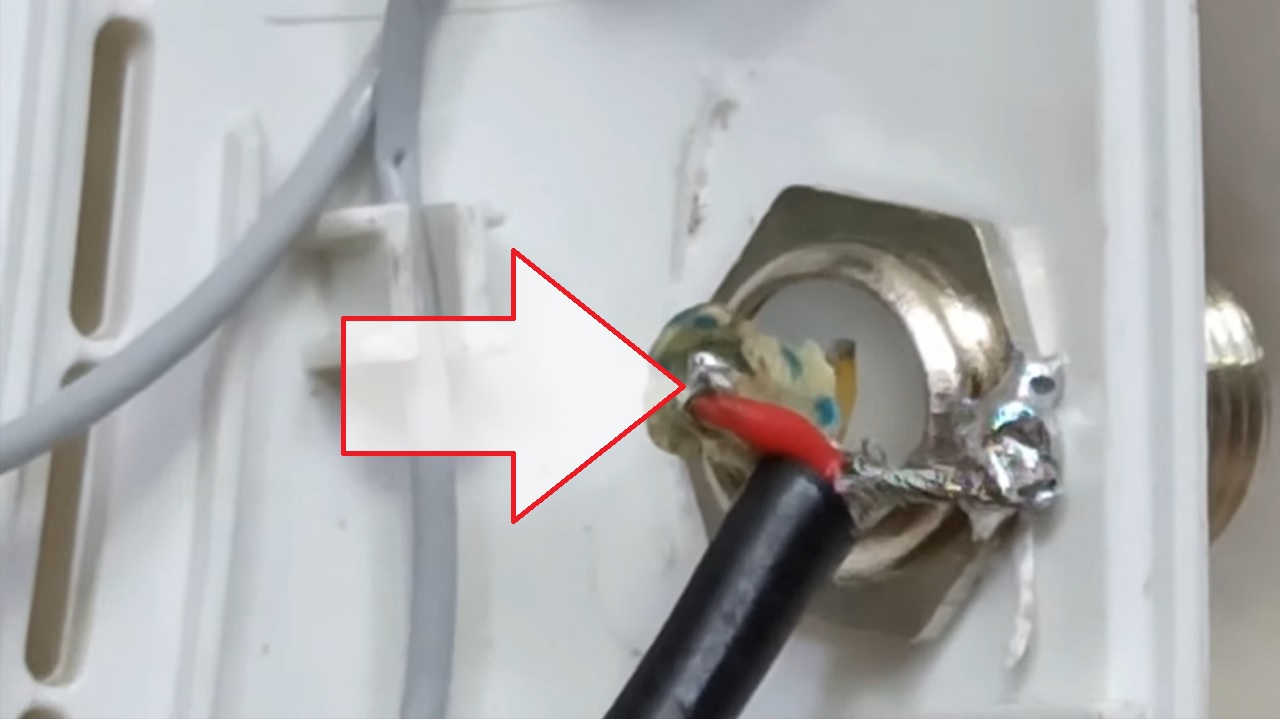
- Remove (unsolder) the connection of one router antenna from the Printed Circuit Board (PCB).
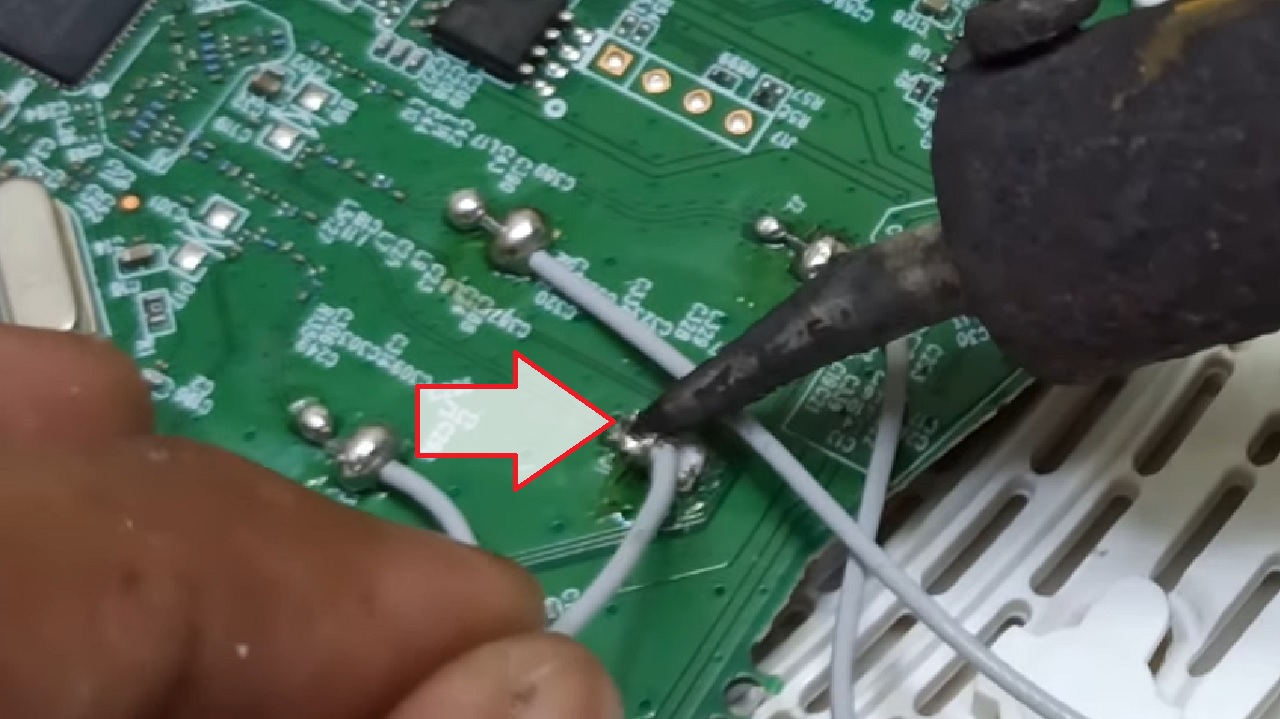
- Take a new wire to connect.
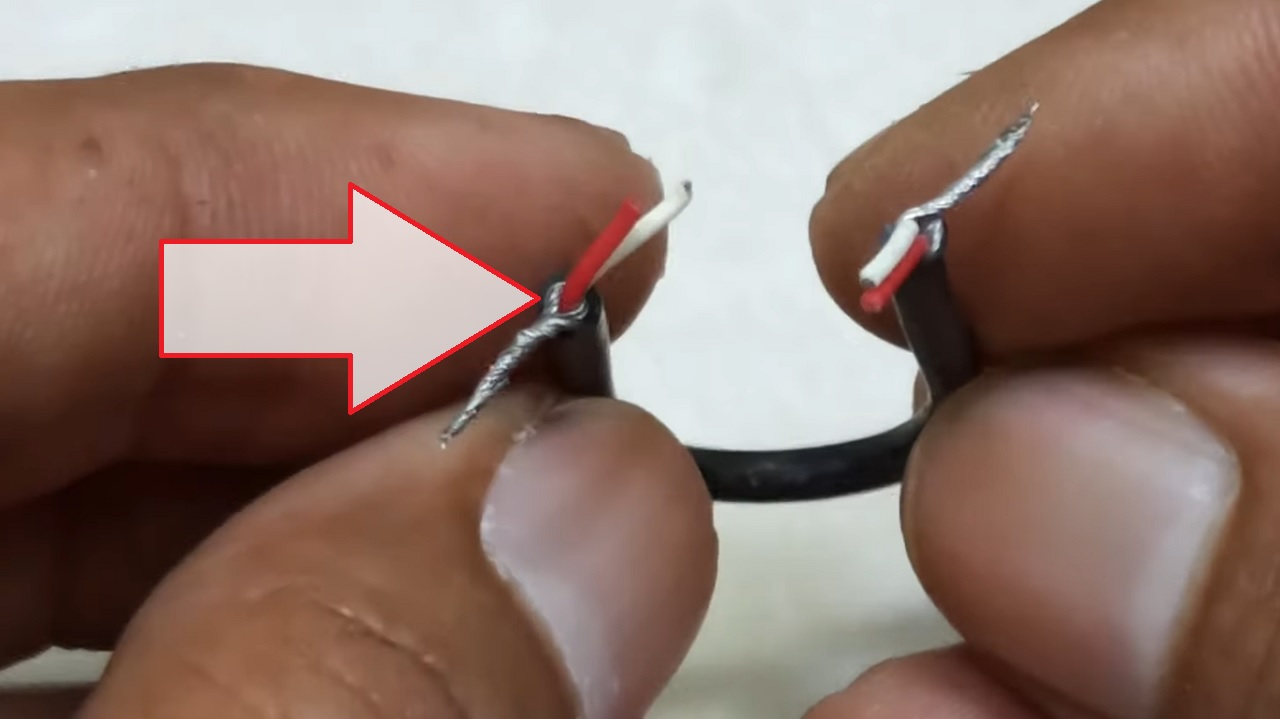
- Fix one end of the wire on the PCB.
- Fix the other end of the wire to the F Connector socket on the router case.
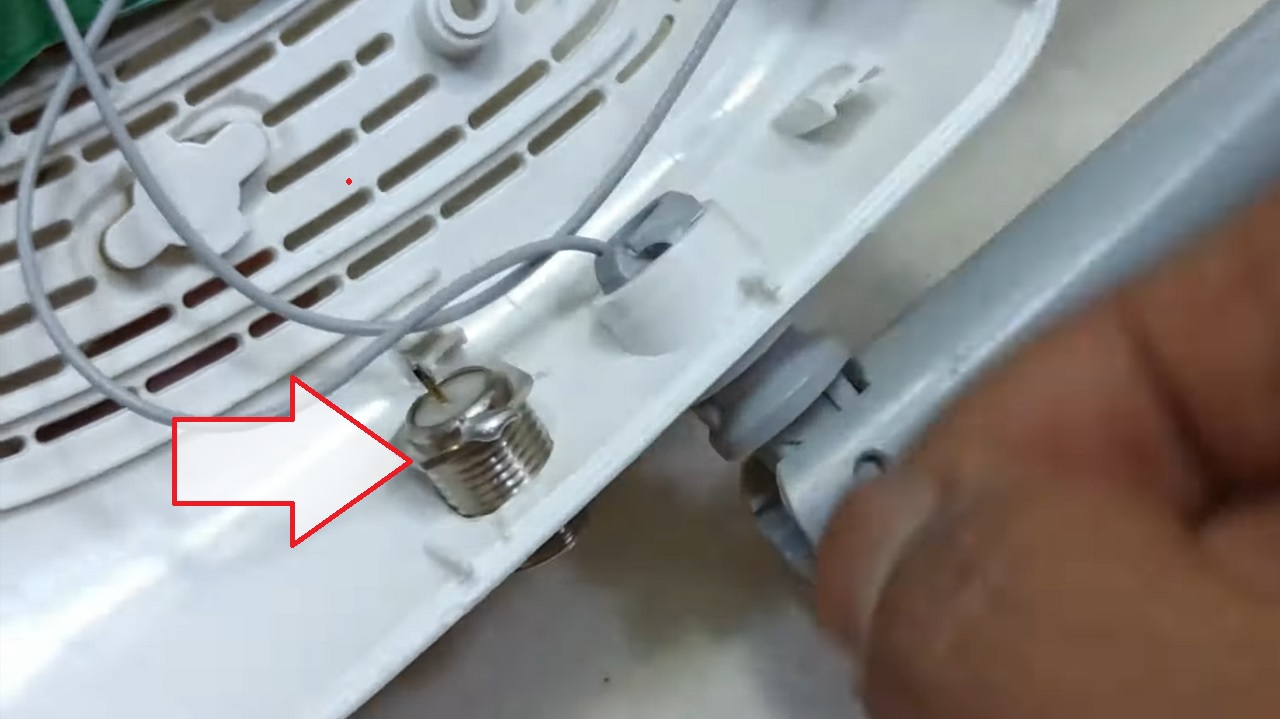
- Close the router case.
- Fix one end of the cable to the new connector on the router case.
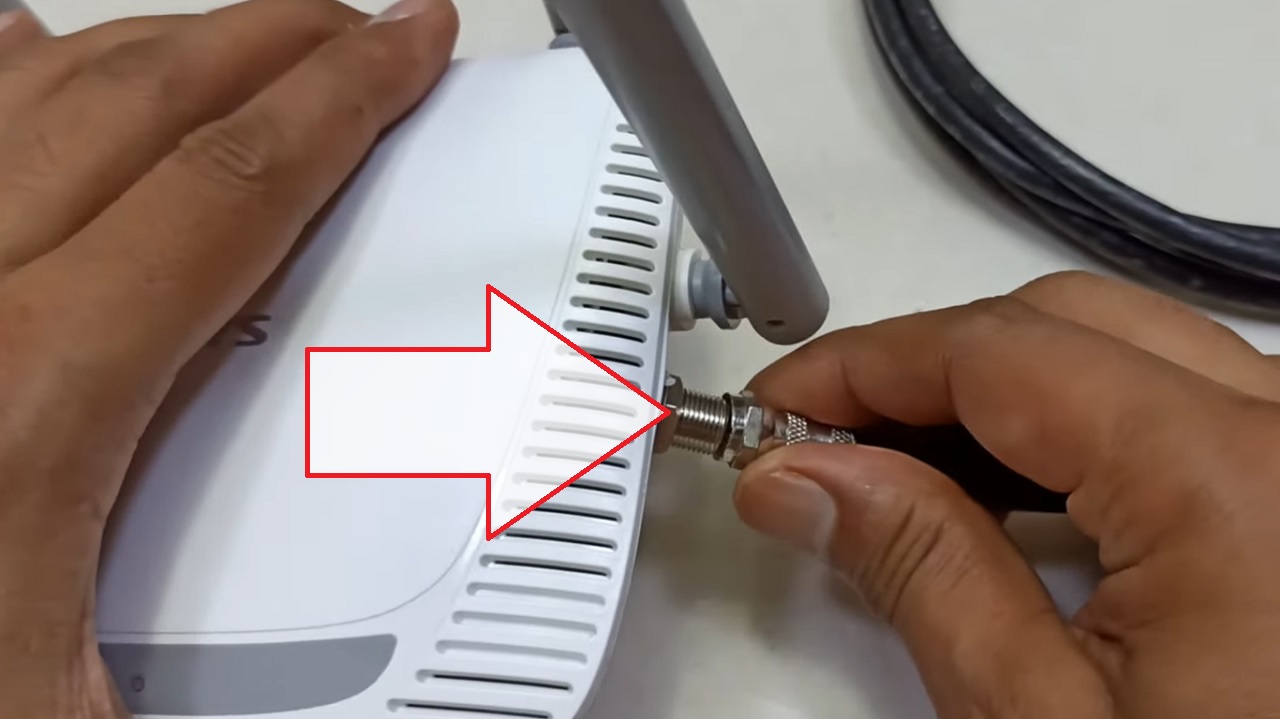
- Connect the other end of the cable to the newly made router antenna.
- Now, go outside and fix the newly made antenna on a pole in a suitable location.

When you connect your improvised router, see the difference in signal strength and performance.
Conclusion
These are the simple yet effective fixes, along with a few complex ones.
Though the impact for each may vary and may not affect signal strength directly, it will certainly improve the speed and performance of your Wi-Fi network.