
One of the most important components of a computer is the hard drive, where you store all data, files and programs.
With constant usage, a hard drive degrades, and its life may become shorter if you do not take proper precautions beforehand.
Here are some easy methods to follow to extend the life of a hard drive and also help it perform the way it should be.
In This Article
KEY TAKEAWAYS
- Simple troubleshooting, performing virus and malware scan can fix common errors in the hard disk and extend its life and performance levels.
- Maintaining the hard drive properly by keeping your system free from dust, high temperature, and not using the hard drive when not needed or in extreme conditions also help extend its life.
- Performing a check disk scan can detect issues within the hard disk and fix most of them, which will eventually add to its life and performance.
- You may perform disk defragmentation periodically by using the built-in feature in Windows. It will arrange the stored data properly to enhance the performance and life of the hard drive.
- Preventing the hard disk from spinning unnecessarily or putting it to sleep mode when not in use will also increase its life.
Why is It Necessary to Extend the Life of a Hard Drive?
You will need the hard drive to store necessary files and software programs to use as and when required. Extending its life will ensure that you have the storage ready and working always.
Extending the lifespan of the hard drive will also ensure that it performs well and you do not have to spend on replacing your drive with a new one every couple of years.
Ways to Extend the Life of a Hard Drive
Apart from using third-party tools, you can extend the life of your hard drive by performing disk defragmentation process periodically. Also, it is good to monitor its performance regularly.
In addition to the above, running a Check Disk scan will also help in extending the lifespan of the hard drive because the process will not only check the issues in the drive but will also fix most of the errors in it.
There are lots of checks and processes to maintain a hard drive, which may look trivial apparently but play a significant role in extending the life of the drive.
Some of these easy yet effective ways that may help prolong the life of your hard drive directly or indirectly are:
- Using it only when you need it to load or save files, otherwise using an external drive or the cloud
- Keeping your system as well as the hard drive cool, dry, and dust-free
- Not keeping it on power all the time
- Not moving or switching the computer off when the drive is working
- Disinfecting it from viruses and malware by performing regular scans by using a good antivirus software
- Ensuring that it does not experience any physical shock
- Removing all unnecessary and duplicate files from the drive
- Limiting reading and writing data on the hard drive
- Using good quality surge protectors to prevent damage due to sudden power surge
- Using good quality Uninterrupted Power Supply (UPS) unit to prevent sudden system shutdown and damage to the hard drive
- Using the HDD sleep mode
- Grounding the power supply properly to prevent damage to the hard drive due to static shock
For external hard drives, always use good and branded cables with it. Also, make sure that you eject it ‘safely’ after use.
Store the drive properly in sealed plastic in a cool and dry place and also protect it from shocks, molds, and other elements that can cause damage to it.
In addition to the above, there are other ways as well to extend the life of the hard drive such as putting it to sleep mode when not in use.
The less the disk on the hard drive spins, the more will be its life. Therefore, preventing it from spinning unnecessarily will also help significantly to extend the life of your hard drive.
Some of the methods that will prevent the drive from spinning continuously and unnecessarily are:
- Turning off the Windows Search Indexing feature
- Setting the paging file option
- Making changes in the value data in the Registry Editor
- Disabling the SysMain and Windows Media Player Network Sharing services
Here are all those methods clearly explained for you.
Method 1: Perform Disk Defragment
Defragging your hard drive periodically will arrange the data in a contiguous manner. This will make the drive work less to find relevant data when it is needed and therefore increase its lifespan.
STEPS TO FOLLOW:
- Open the Control Panel by typing it in the quick search box next to the Start menu and hitting Enter.
- Go to System and Security in the Control Panel window.

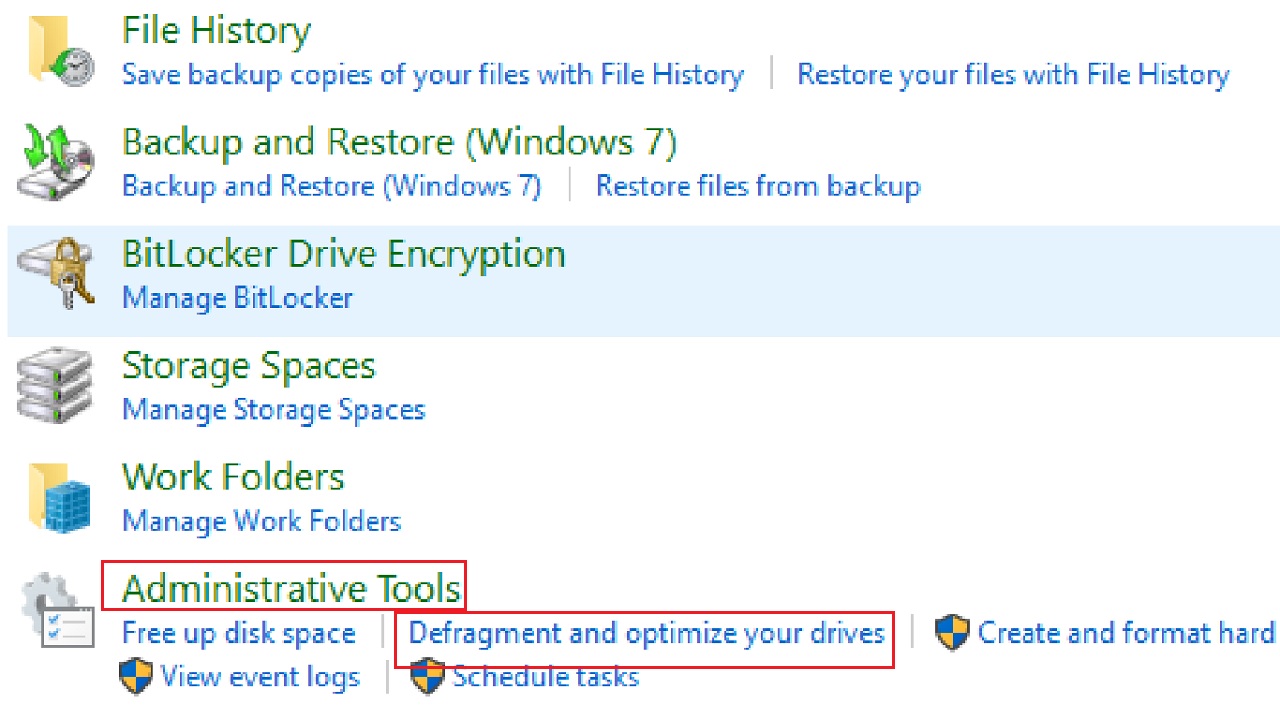
- Select Administrative Tools section in the next.
- Look for the Defragment and optimize your drives option under it.
- Click on it to open it.
(Alternatively, you can open File Explorer > Right-click on the desired drive volume > Go to the Properties option > Select the Tools tab > Click on the Optimize button).
- Choose the particular drive.
- Click on the Analyze button.
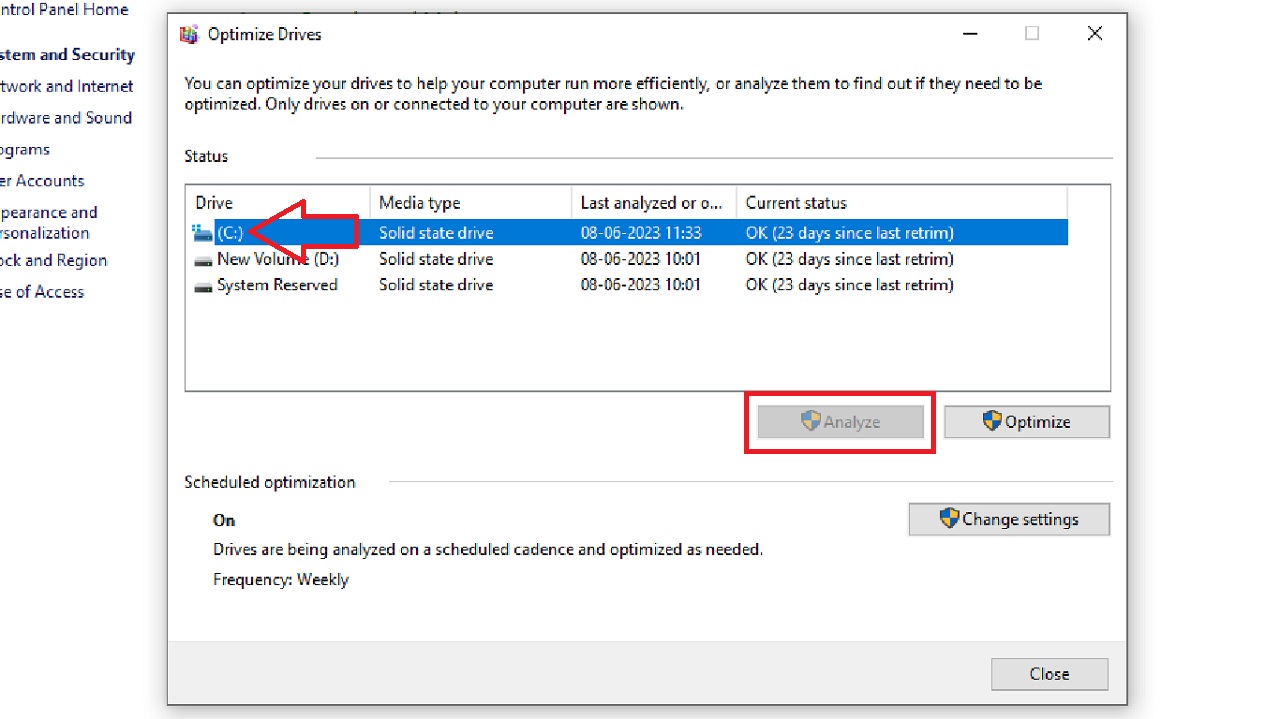
When the analysis process is complete, you will get a report stating whether you need to defrag your hard drive. Check the percentage of fragmented files.

If it is needed, that is, if the disk is fragmented by 20% of its space or more, click on the Optimize button next to the Analyze button, marked in the image above by a red circle.
Method 2: Running the Check Disk Scan
This process will detect the issues and fix most of them. It will eventually increase the lifespan of your SSD.
STEPS TO FOLLOW:
- Press the Windows and S keys on your keyboard together.
- In the search box, type command prompt or cmd.
- Right-click on the Command Prompt option.
- Choose Run as administrator.
- Press the Yes button on the User Account Control window.
In the Command Prompt, type the command chkdsk X: /r /f and hit Enter.
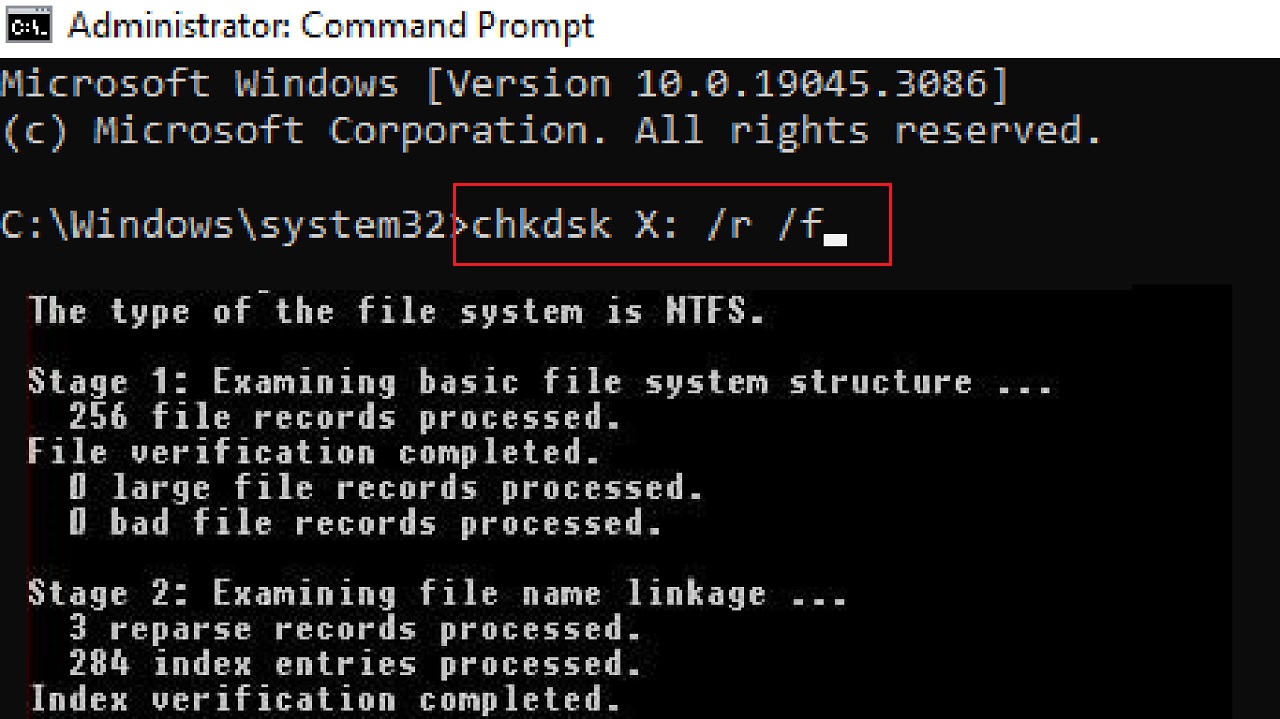
(Here, X is just for example. You must replace this letter with the drive letter you want to extend the life of.)
This will start the scanning process, and a return result with the error reports, if any, will be displayed as shown in the image above.
If it is found after scanning that your drive has some logical errors or bad sectors in it, it will fix those errors and restart the system.
It may also ask you whether or not you want to schedule a disk check the next time you restart the computer. Use your discretion.
Method 3: Put the Hard Drive in Sleep Mode
You can put your hard drive into sleep mode when it is not in use so that it does not spin unnecessarily and is subject to wear and tear. This will also extend the life of the drive eventually.
STEPS TO FOLLOW:
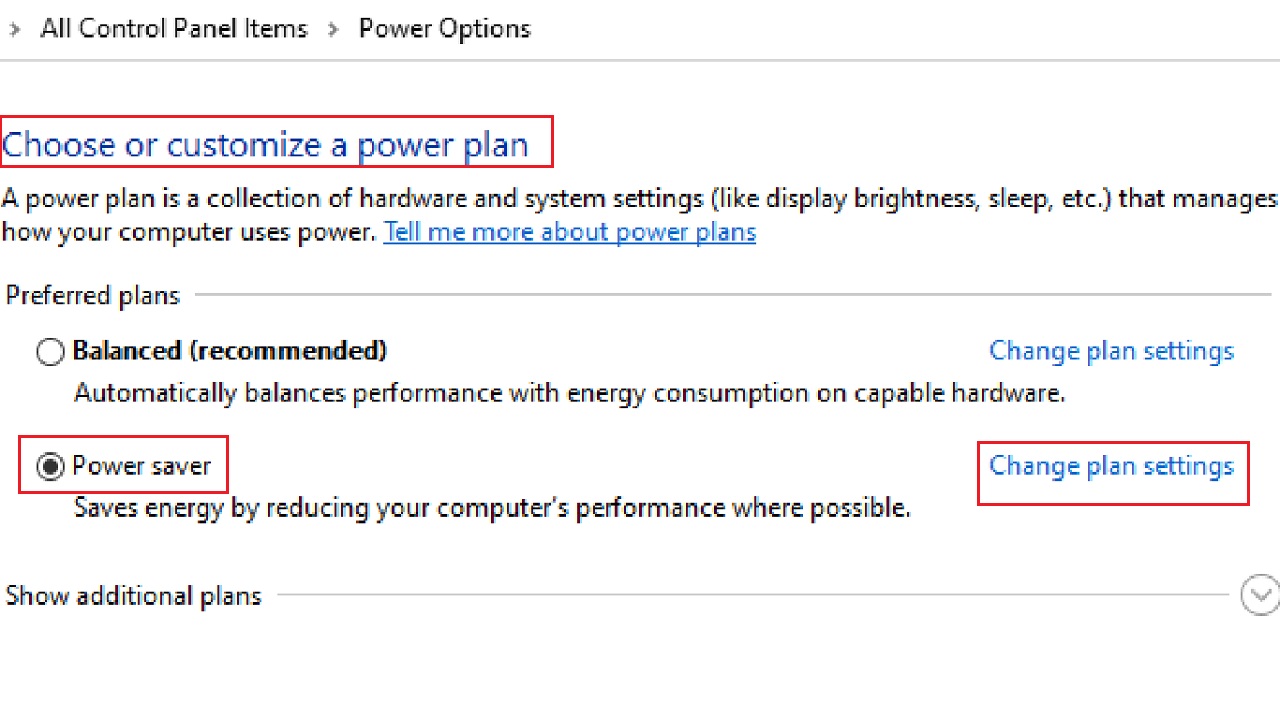
- Go to Control Panel > Choose Large icon in the View by box > Choose Power Options.
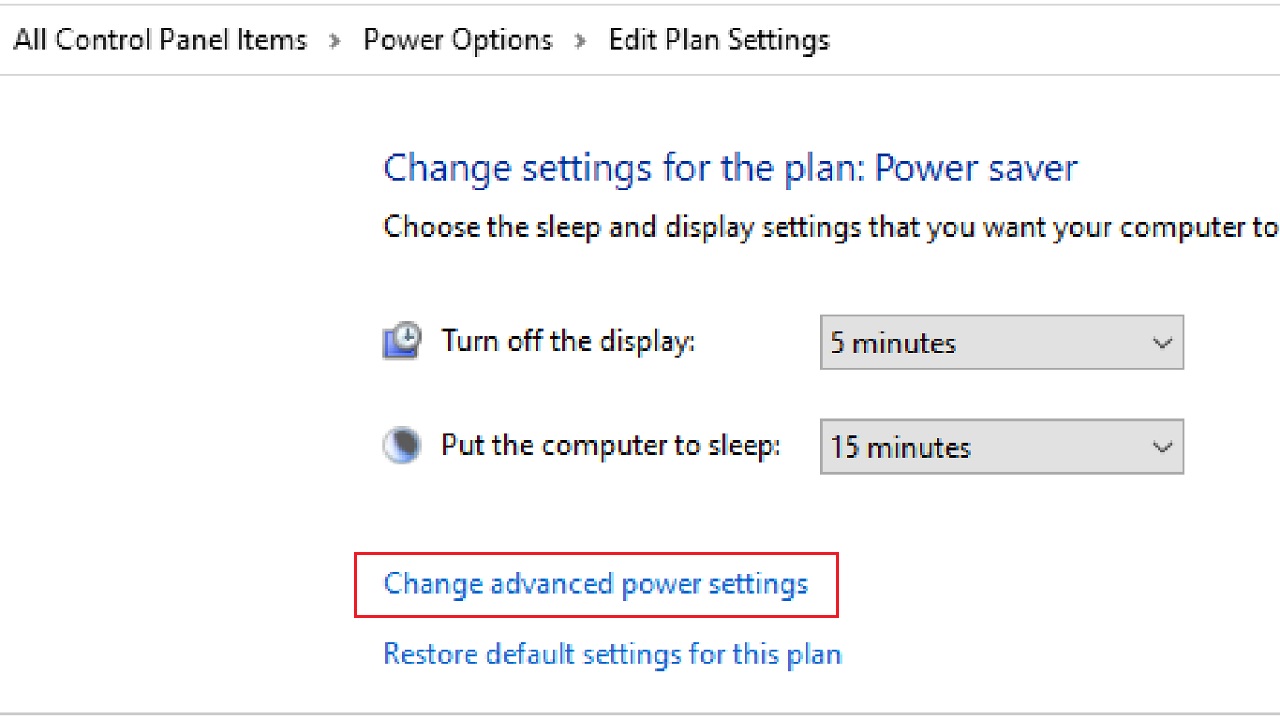
- Click on the small circle next to Power saver and click on Change plan settings in the Choose or customize a power plan window that pops up.
- Click on Change advanced power settings in the following window.
- In the following window under Advanced settings, click on the small plus button next to Hard disk.
- Do the same for the ‘Turn off hard disk after.’
- Click on the arrow buttons next to the boxes On battery and Plugged in (Minutes) to set the time to the lowest number.
- Click on the Apply button and then on the OK button to save the changed settings and exit.
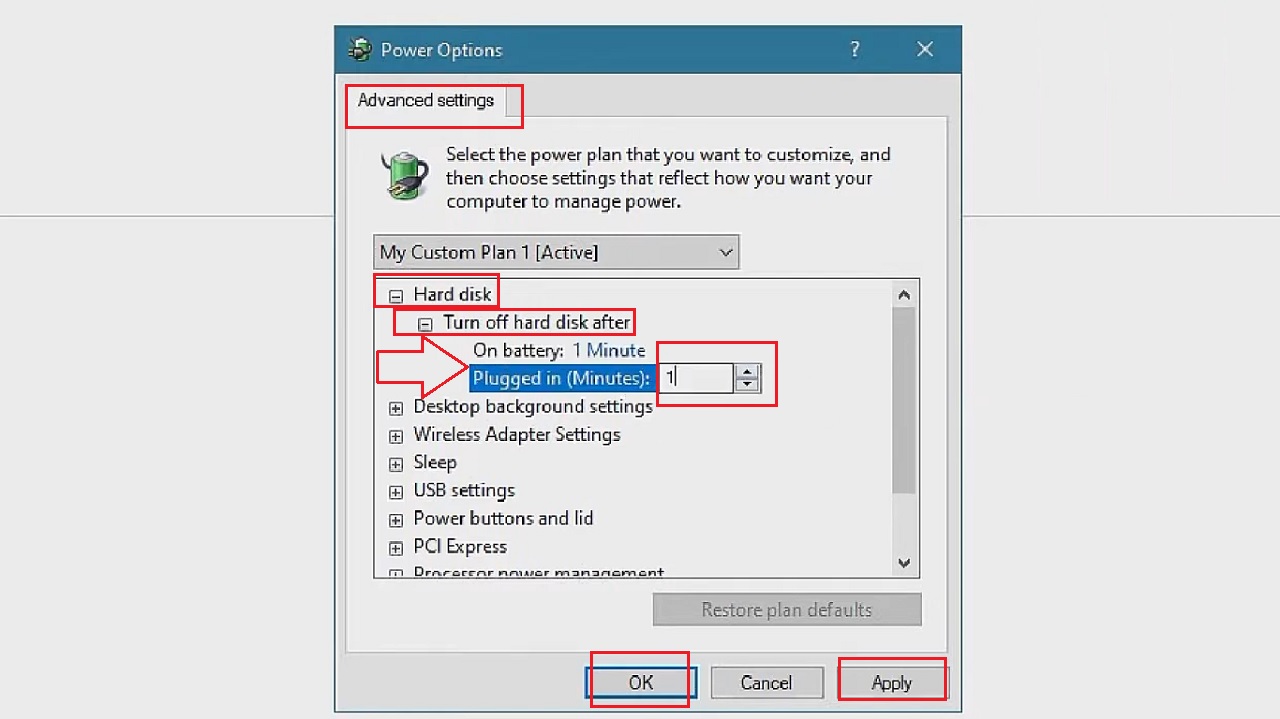
This will ensure that the hard drive will stop spinning or go to sleep if it is not in use for the number of minutes you specified.
Method 4: Change Firefox Settings
If you are using Firefox, some minor changes in the configuration of it will also reduce the workload of the hard drive needing it to write less data and therefore enhance its life.
STEPS TO FOLLOW:
- Open Firefox.
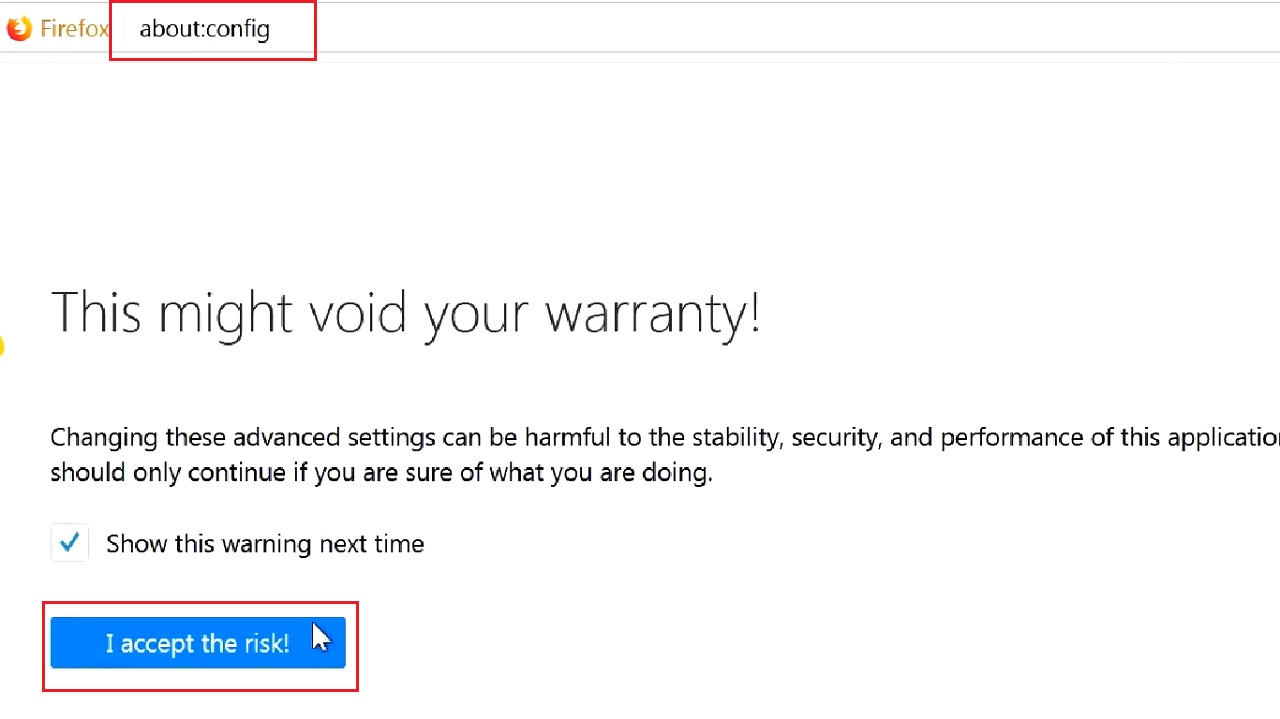
- Type about:config.
- Click on I accept the risk button.
- Type brower.sessionstore.interval in the new search window.
- Click on it.
- It will open the Enter integer value window with the default value. (15000 here means 15 seconds).
- Change it to a higher value.
- Click on the OK button.
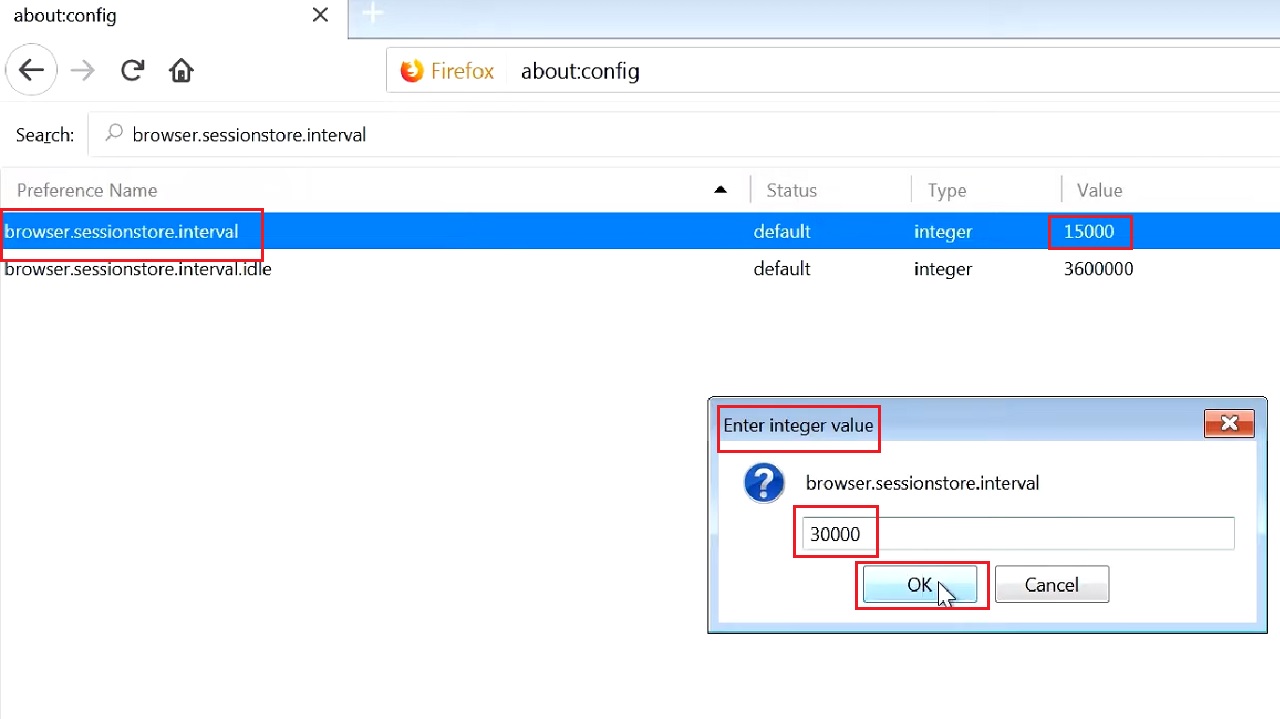
This will mean less writes to the hard drive, therefore enhancing its life.
Method 5: Set BIOS to AHCI Mode
If you set the Basic Input Output System (BIOS) into Advanced Host Controller Interface (AHCI) mode instead of Integrated Drive Electronics (IDE) mode because it will limit the performance of the drive.
STEPS TO FOLLOW:
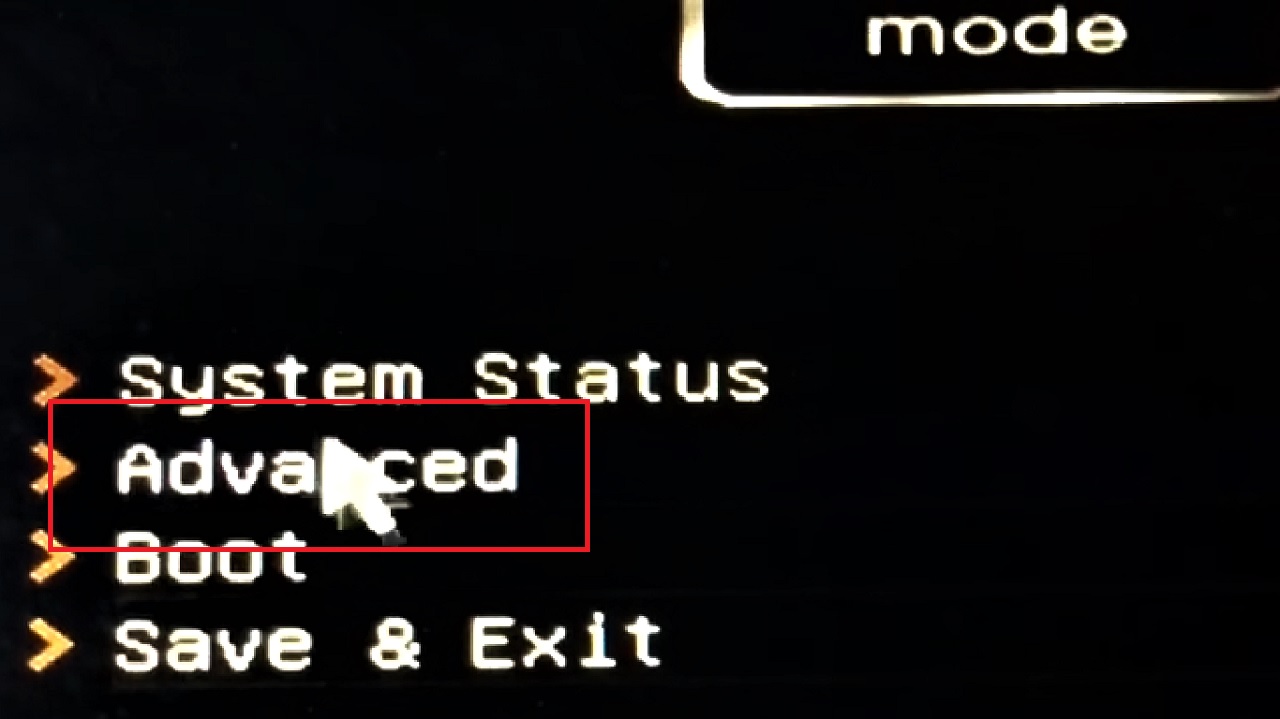
- Go to the BIOS settings by pressing the desired key (F9, F12 or any other) according to your system configuration.
- Select Advanced and hit Enter.
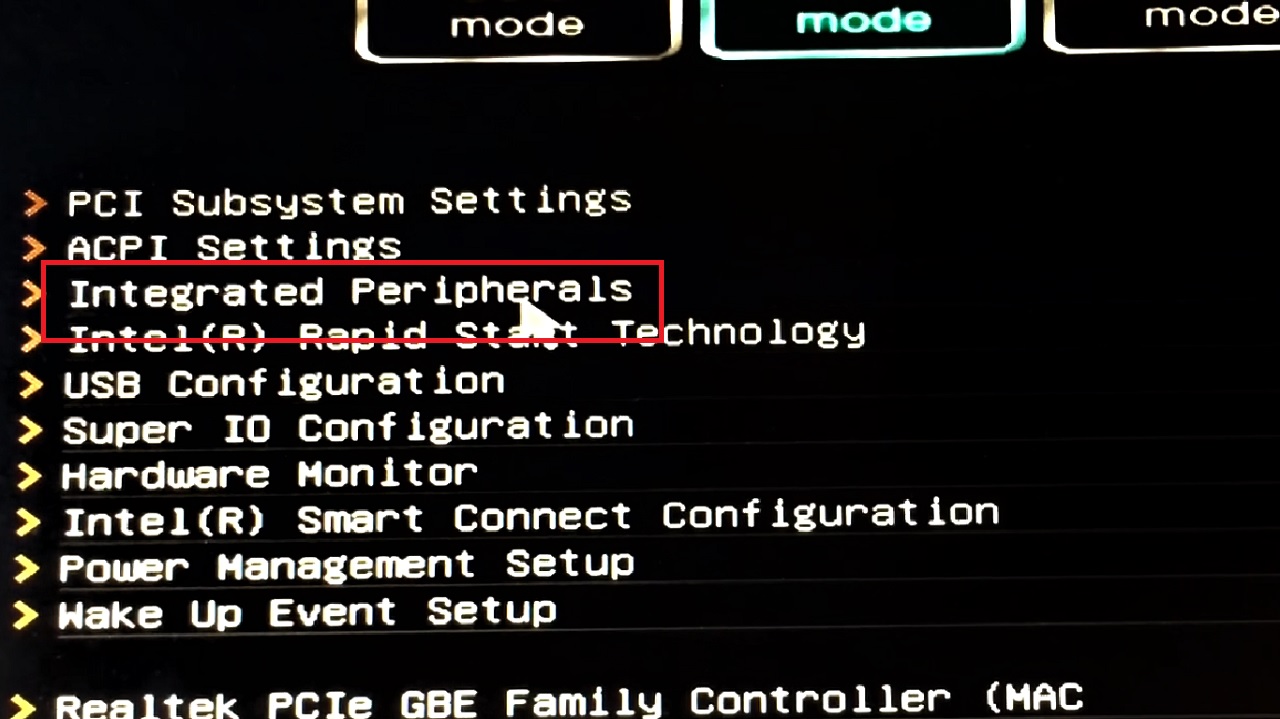
- Then, select Integrated Peripherals in the following window and hit Enter.
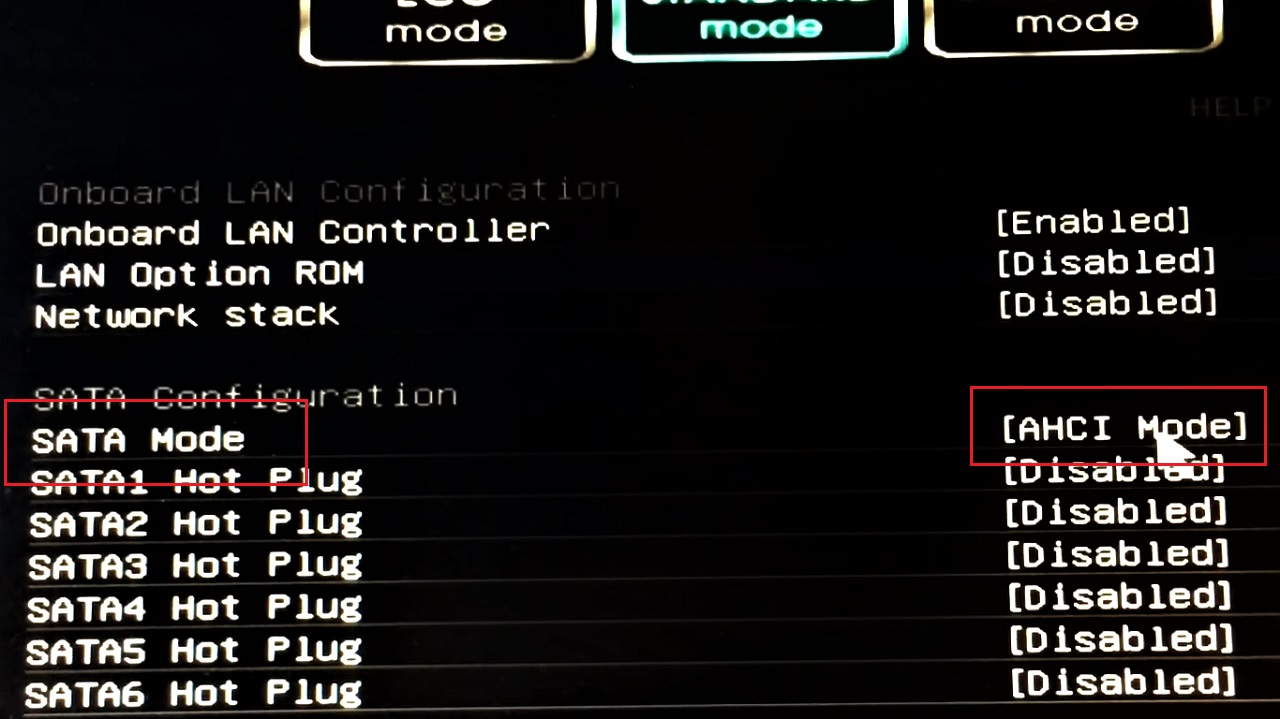
- In the next window, select SATA Mode and click on the bracket alongside to change the mode from IDE to AHCI, if it is not set already.
At this point, you must remember that IDE mode is the standard setting after Windows is installed. Therefore, your system may experience some issues when you change it to AHCI mode.
To prevent these issues, you must make the changes either before installing Windows afresh or boot in the IDE mode and apply the Registry Fix AHCI Mode: https://support.microsoft.com/en-us/topic/error-message-occurs-after-you-change-the-sata-mode-of-the-boot-drive-0e3ab9b8-99aa-c2b3-1f27-dc9eaf58a14b link.
Method 6: Turn Off Windows Search Indexing
It is good to disable Windows Search Indexing feature, especially for the hard drives, to prevent them from spinning and searching and indexing the files continuously.
This will, in turn, not let the hard drive kick off when you do not want it to, thereby preventing wear and tear.
STEPS TO FOLLOW:
- Press the Windows and E keys on your keyboard together to open File Explorer.
- Go to This PC.
- Choose the drive you want to turn off the search indexing feature of.
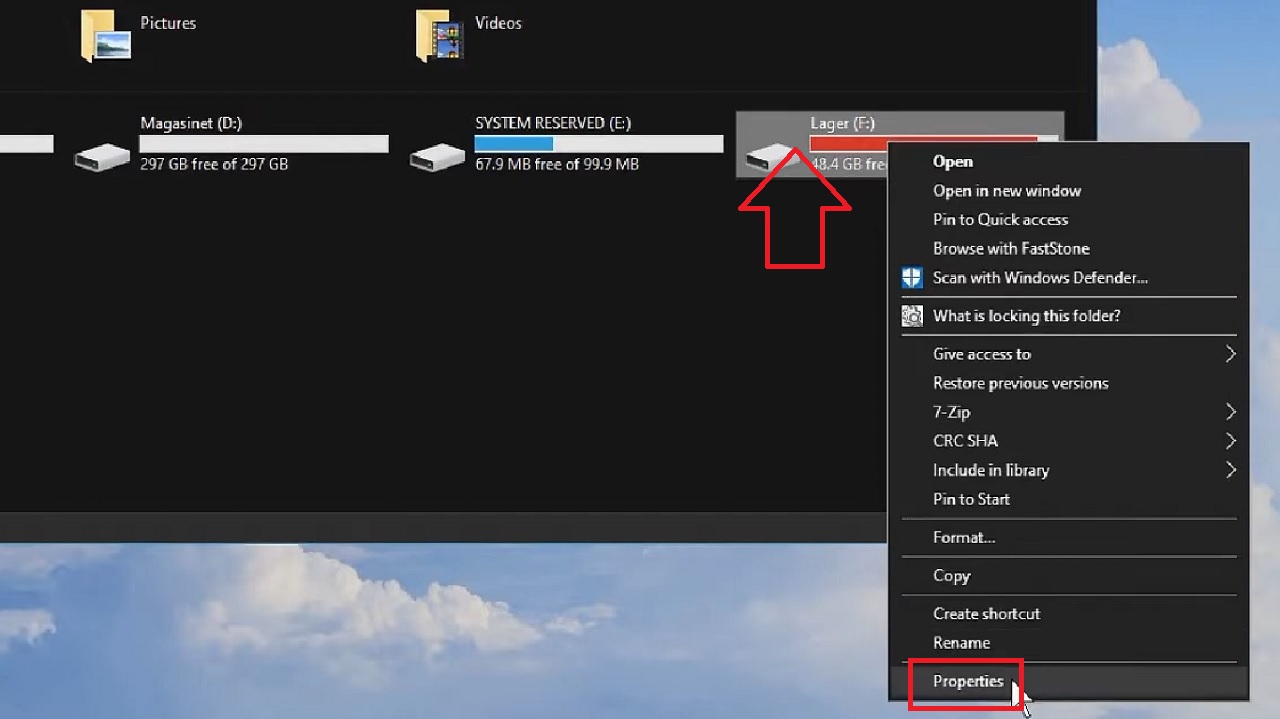
- Right-click on it.
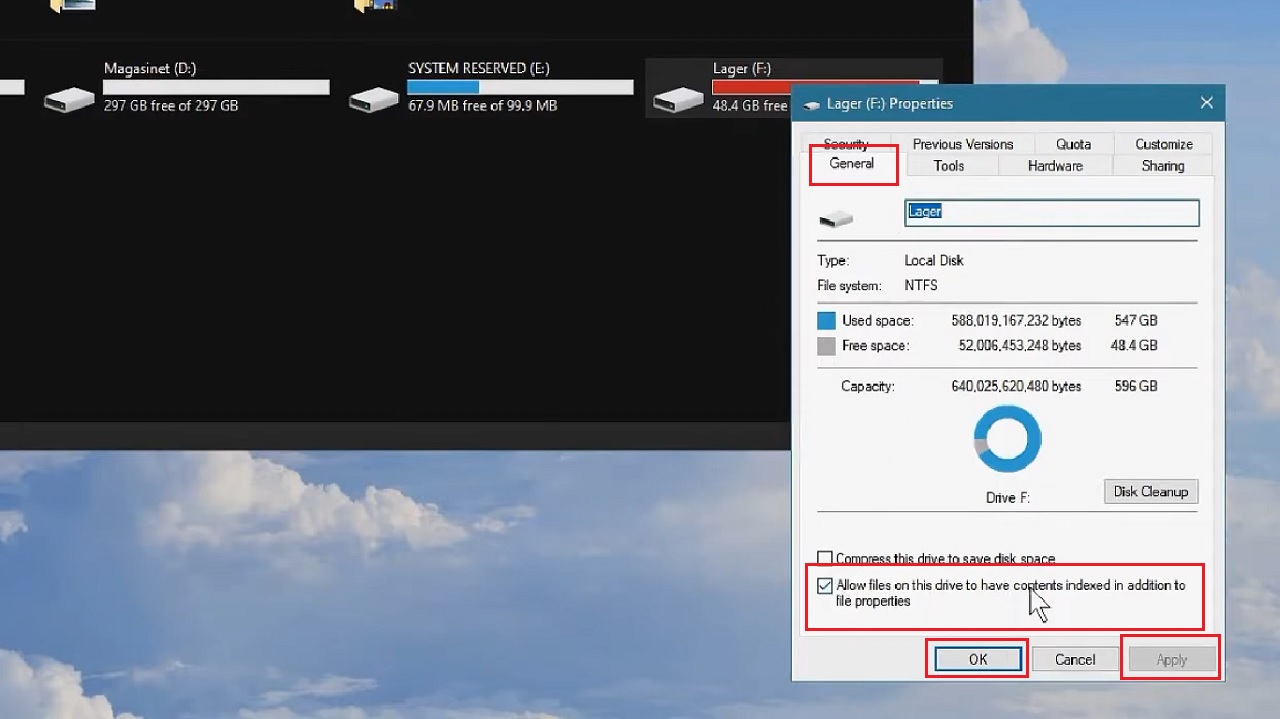
- Choose Properties from the drop-down menu.
- Under the General tab, down below you will find Allow files on this drive to have contents indexed in addition to file properties.
- Uncheck the small square box next to it.
- Click on the Apply button and then on the OK button.
- Click on the OK button in the Confirm Attribute Changes window.
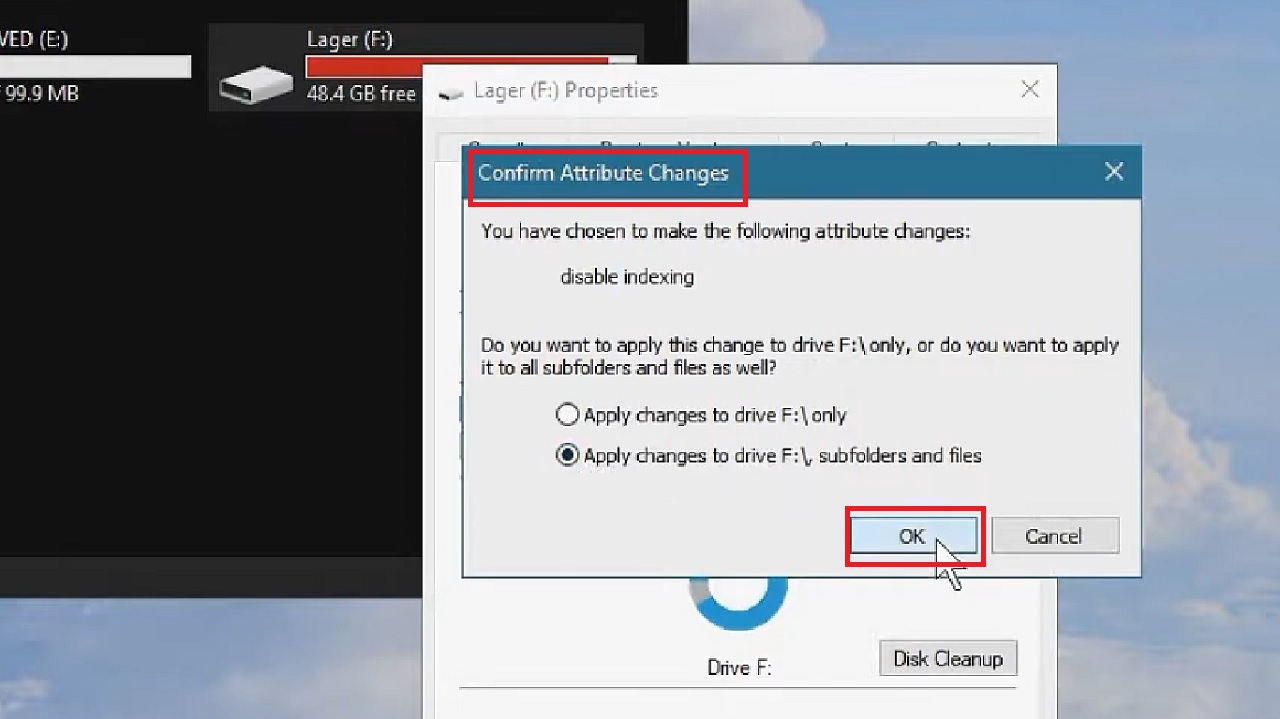
- When the process is complete, click on the OK button to close the previous window.
Repeat the same process if you want to turn off the indexing feature on other drives.
Now, the Windows Search Indexing features will be disabled.
Method 7: Set the Paging File of the Disk
If the paging file is ON in one of the disks that spin up quite often, then you will need to move that drive to the main disk. This is a good way to enhance the life of the hard drive.
STEPS TO FOLLOW:
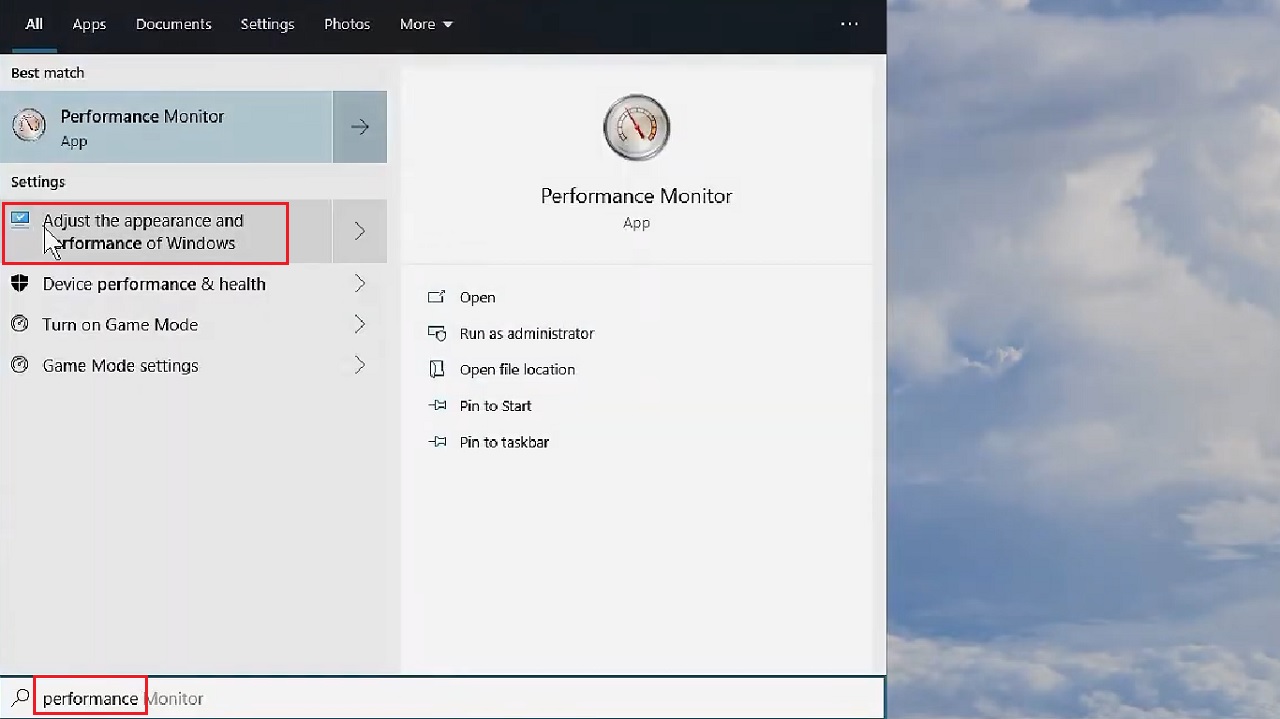
- Go to the search box.
- Type performance and hit Enter.
- Select Adjust the appearance and performance on Windows option from the results.
- In the Performance Options window that appears, go to the Advanced tab.
- Click on the Change button under the Virtual memory section.

- In the Virtual Memory window that appears next, check that the small square box next to Automatically manage paging file size of all drives is checked.
- Check that the desired drive does not have a paging file. (It will be mentioned None under the Paging File Size (MB) column, as shown in the figure.
- If it is not, select the drive, check the small circle next to No paging file, and click on the Set button.
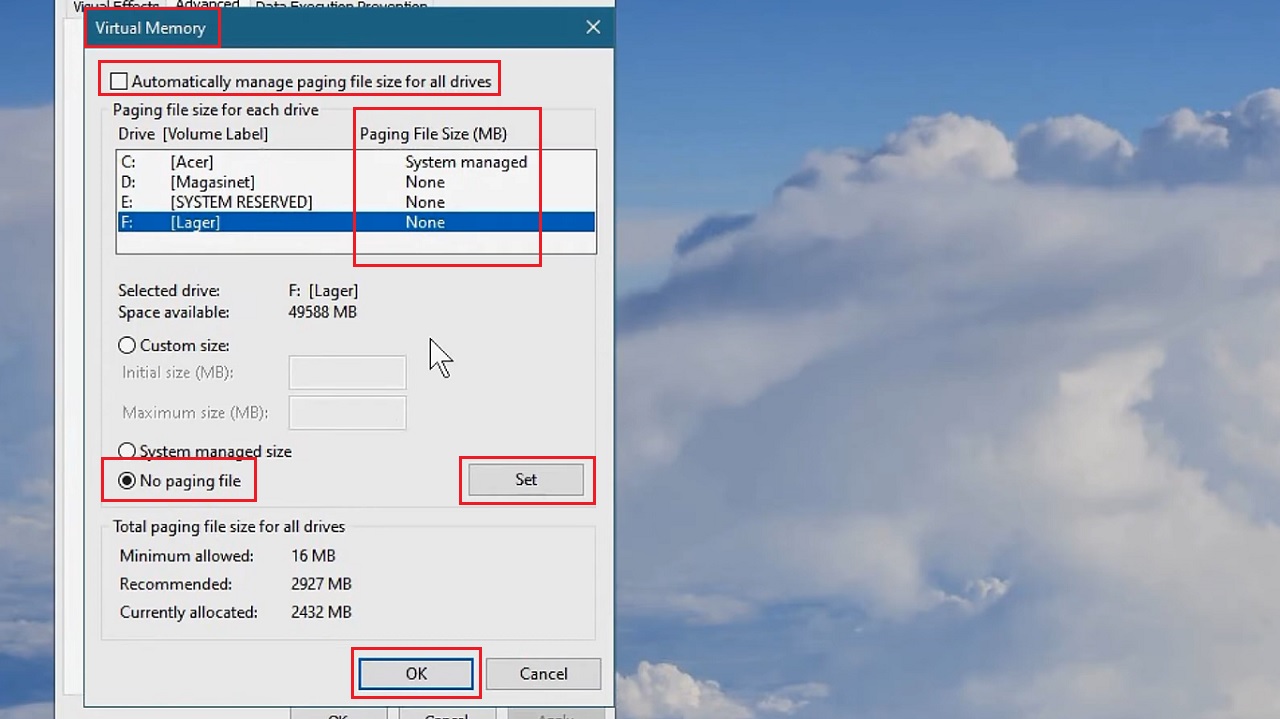
Remember, the main disk, Drive C: in this case, should always be set to System managed.
- Click on the OK button.
- Click on the Apply button and then on the OK button in the previous window to save the changes made and exit.
This completes the setup process.
Method 8: Make Changes in the Registry Editor
Windows usually come with a SMART feature to check whether or not your hard drive disk is full. If it is full, it will tell you.
The problem with this feature is that it will spin the disk unnecessarily and lower its life due to higher wear and tear probabilities. Disable this feature from the Registry Editor if you check it manually on a regular basis.
STEPS TO FOLLOW:
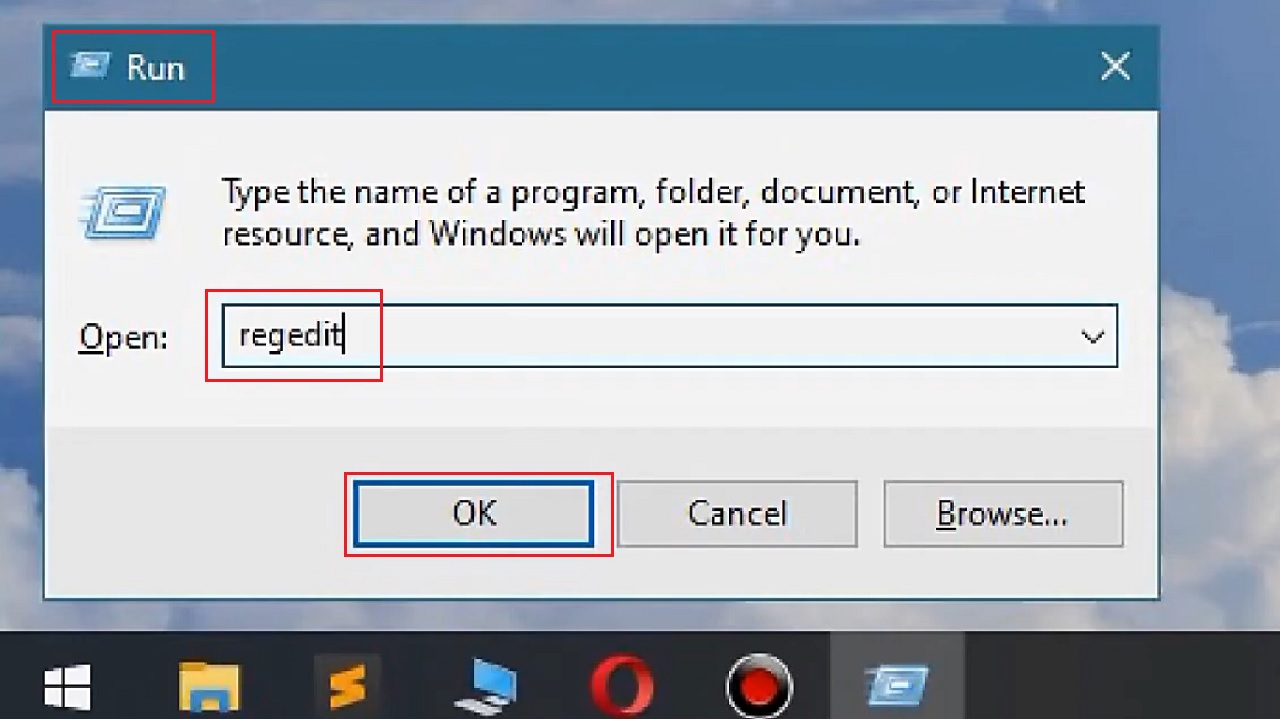
- Press the Windows and R keys together on your keyboard to launch the Run dialog box.
- Type regedit and hit Enter or click on the OK button.
In the Registry Editor window, click on the following folders in the specified order:
- HKEY_CURRENT_USER
- Software
- Microsoft
- Windows
- CurrentVersion
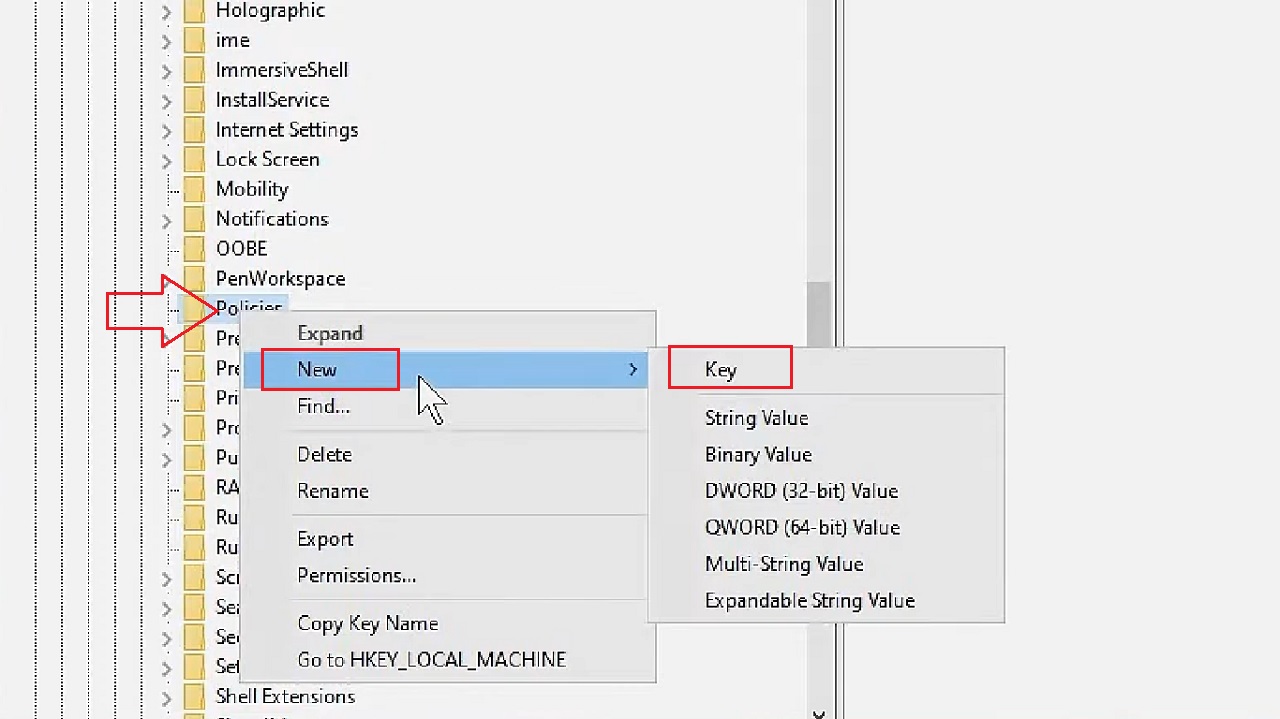
- Policies
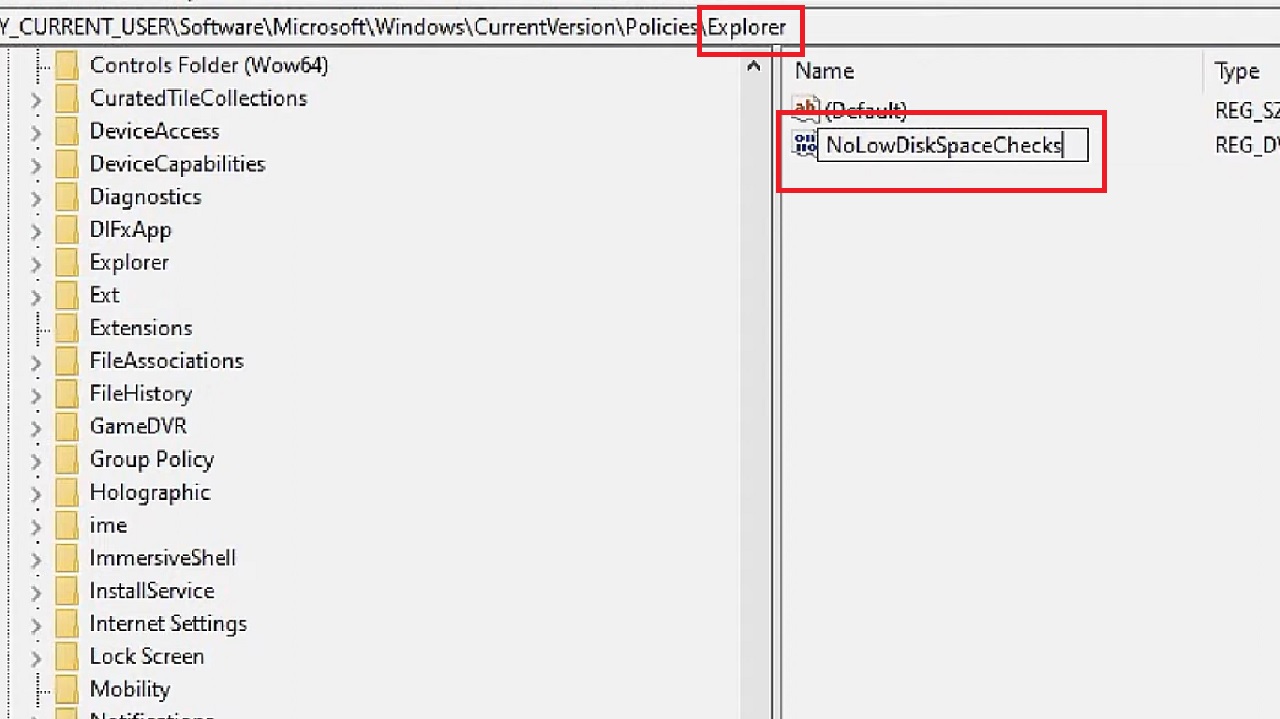
When you reach policies right-click on the folder to create a New Key.
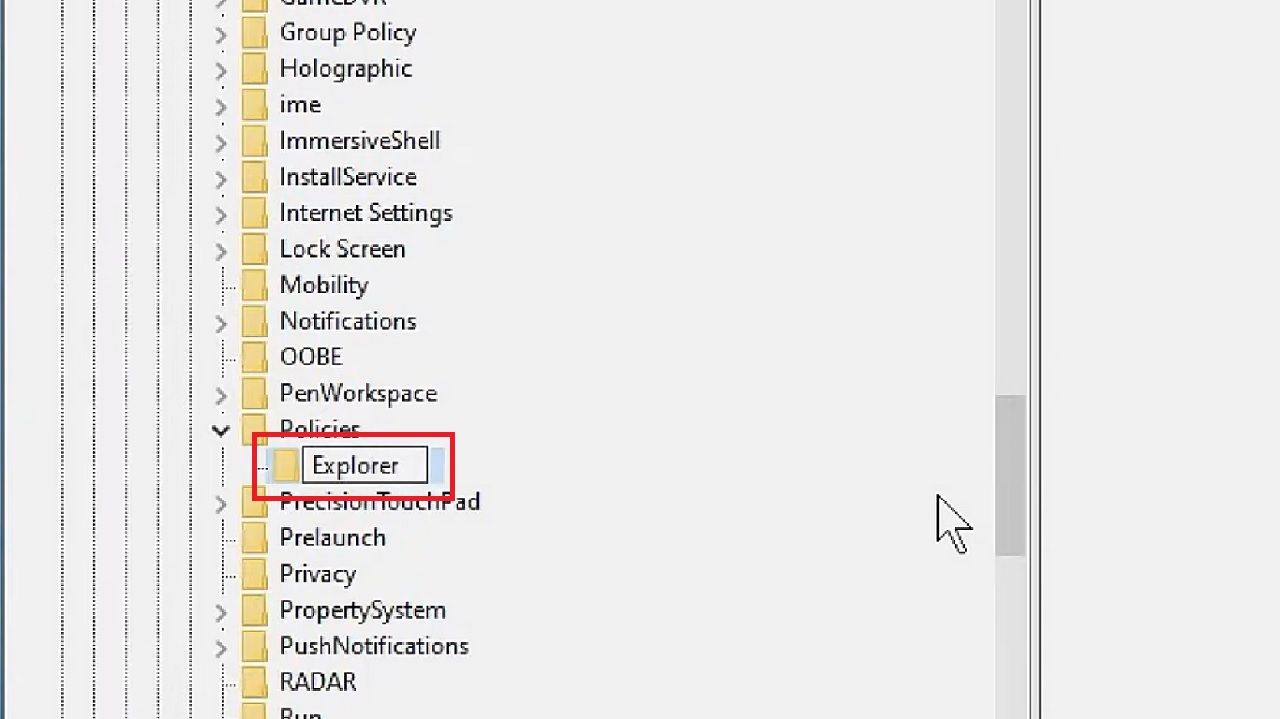
- Click on New and then on the Key option from the dropdown menu and submenu.
- Name it Explorer and hit Enter.
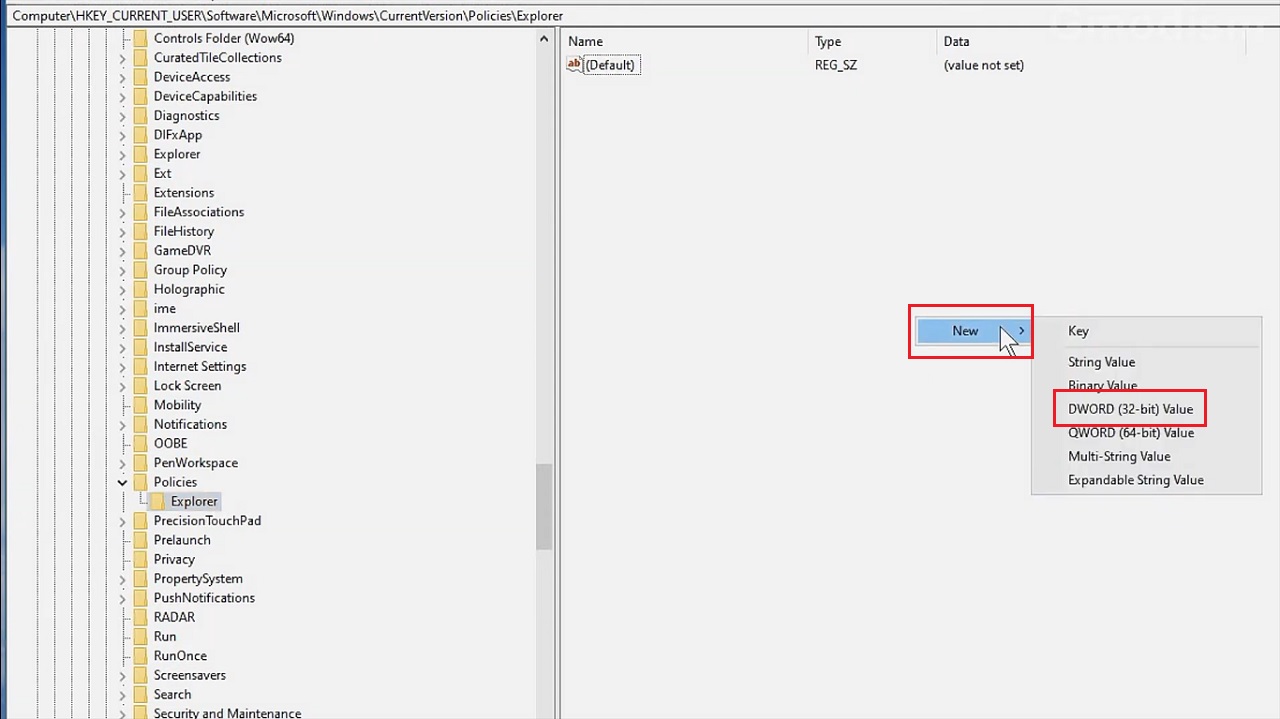
Now you will have to create a new value data inside this new folder by right-clicking on a blank space in the right-side window.
- Select New and then DWORD (32-bit) Value from the options in the dropdown menu.
- Name this value in the Explorer folder as NoLowDiskSpaceChecks.
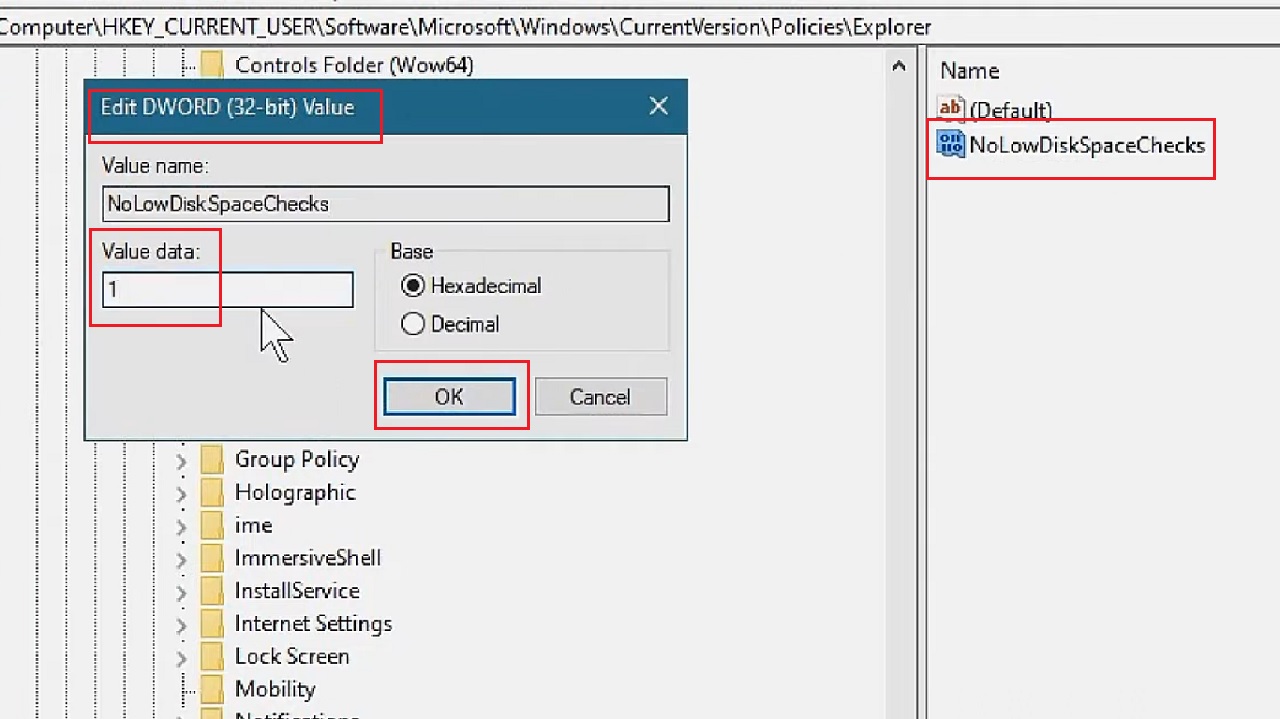
- Click on it to open the Edit DWORD (32-bit) Value window.
- Change the Value data to 1.
- Click on the OK button.
Close the Registry Editor window.
Methos 9: Disable SysMain from Services
Disabling the SysMain service from the Services window will also prevent spinning of the hard drive unnecessarily and extend its life.
STEPS TO FOLLOW:
- Open the Run dialog box again as before and type services.msc and hit Enter.
- Look for the SysMain service in the Services window that pops up.
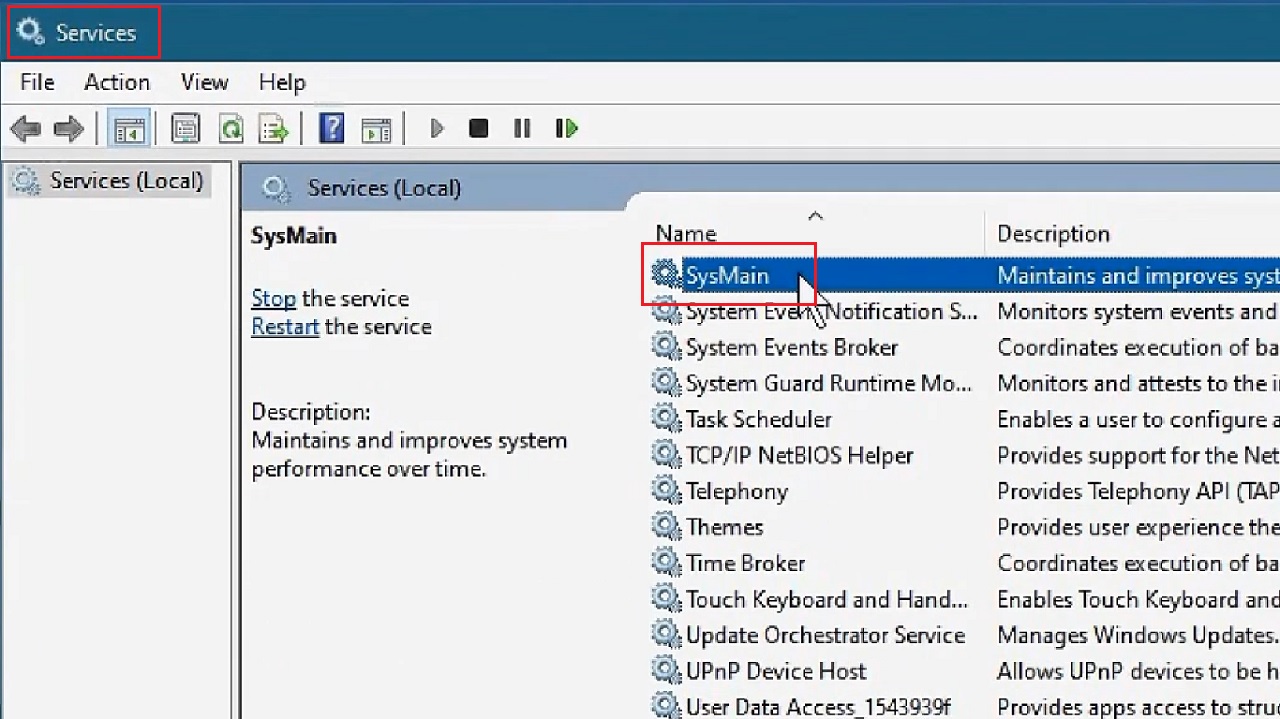
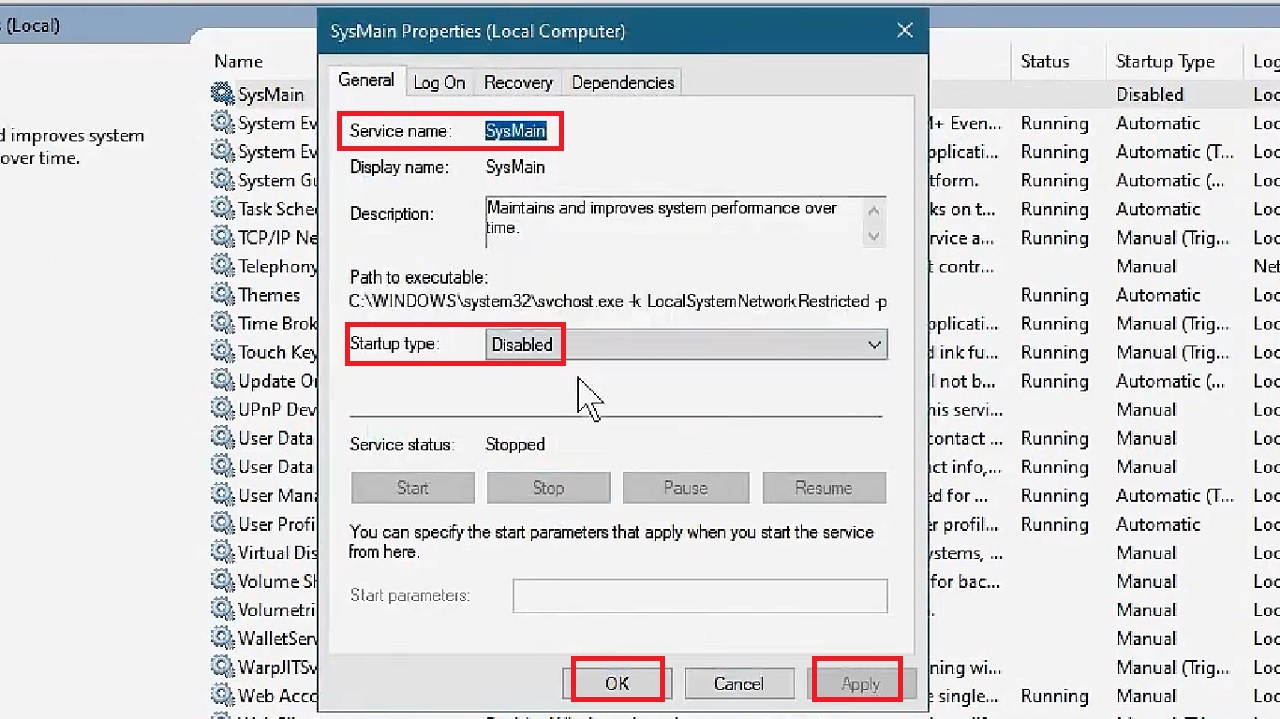
- Double-click on it to open the SysMain Properties (Local Computer) window.
- Change the Startup type to disabled from Automatic by clicking on the small arrow in the box and selecting Disabled. (You can also do the same by simply clicking on the Stop button.)
- Click on the OK button.
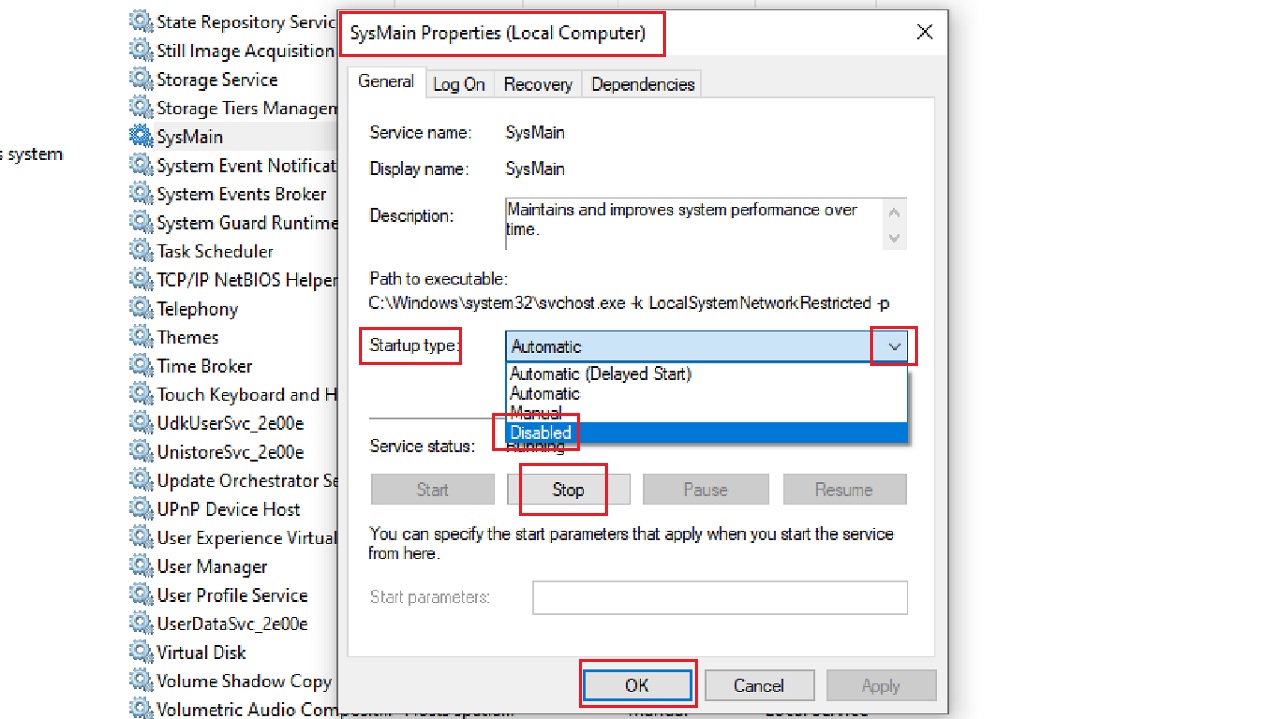
- Click on the Apply button and then on the OK button in the next window which shows that the SysMain service had been Disabled to save the changes and exit.
You may also disable the Windows Media Player Network Sharing Service in the same way for better results.
(You can also turn this service off from the settings in the Control panel or from within the Windows Media Player.)
Conclusion
Now that you know about the ways to check and maintain your hard drive, follow them and expect your hard drive to last for its lifetime, usually ranging between 3 and 5 years, in good health condition.