
It is easy to move the games stored on your computer system from one drive to another by using the Command Prompt.
There are also several other ways to accomplish this. If you are not aware of these methods, fortunately you are in the right place.
In this article, you will find all those methods that will allow you to move the games across any platform, as well as the files of any other software program.
In This Article
KEY TAKEAWAYS
- Moving a PC game from the default Drive C to another drive is necessary to move it quickly and free up the space.
- Running a few specific commands in the Command Prompt will move the game or any other file from one drive to another very quickly.
- You may use the Windows Settings feature as well to move your game by simply selecting the destination location.
- You can also use the settings of the games in a particular platform that you want to move from one drive to another.
Why to Move a PC Game to Another Hard Drive?
Usually, most of the programs, games, and files that you download are stored in Drive C: by default.
Therefore, most users move the game file from Drive C: to any other drive because they do not want one particular drive to be full and run out of space.
Another significant reason to move a PC game from one drive to another is to save the hassles of reinstalling the game file all over again from scratch. Moving it directly from one drive to another expedites and simplifies the process.
A few other reasons to move your PC game file to another drive are:
- The primary drive may be old and cannot function at a speed as it used to do before. Freeing up disk space will optimize the performance of the drive and the games as well.
- Users may want to move the game files from one drive to separate data, personal files, and games for better protection and prevent these files from getting deleted or modified accidentally while working on game data.
- You will also need to move your PC game to another folder if you want to format that drive but want to retain the game and not have to download it all over again after formatting the drive. This way you can save a lot of time.
How to Move a PC Game to Another Hard Drive?
Whether it is for moving a PC game or a software program, the process to follow is basically the same. You can use specific commands in the Command Prompt and move the files. This is probably the easiest way.
Using Settings in Windows will also allow you to move the game from one location to another.
Usually, you will need to move games from one drive to another on Steam or any other platform. As for the platforms in particular, there may be a slight difference in the process depending on the game you want to move on a specific platform.
Remember, you may move your PC game from one drive to another drive within the computer system itself or from a Hard Disk Drive (HDD) to a Solid-State Drive (SSD).
Here are all the methods and steps explained for you in detail, using examples of the most commonly played games on different platforms.
Method 1: Using the Command Prompt
This is the easiest of all ways to move your PC game from one drive to another, as well as other software programs. The commands will actually create a symbolic link for both the source and destination folder.
STEPS TO FOLLOW:
- Go to the search box next to the Start menu.
- Type cmd in the box and hit Enter.
When the Command Prompt window opens, type in the following command and hit Enter:
- robocopy “source” “destination” /sec /move /e
This command will copy all the security permissions from the source drive to the destination drive.
Once it is done, type in the next command and hit Enter:
- mklink “source” “destination” /j
This command will create a symbolic link to the source folder with the destination folder so that the file can be opened and run from the new destination drive.
However, in this method the crucial aspects are the source and destination paths of the folder containing the game or software program file.
While the destination path can be of any drive that you wish to move the game or software program file, the source path is essentially either of the Program Files or of the Program Files x86 folder usually located in the Drive C:
Method 2: From Windows Settings
Games from Microsoft App Store can be moved from one drive to another easily from the Windows Settings.
STEPS TO FOLLOW:
- Click on the Start button and select Settings. (The gear icon).
- Click on Apps in the Settings window.
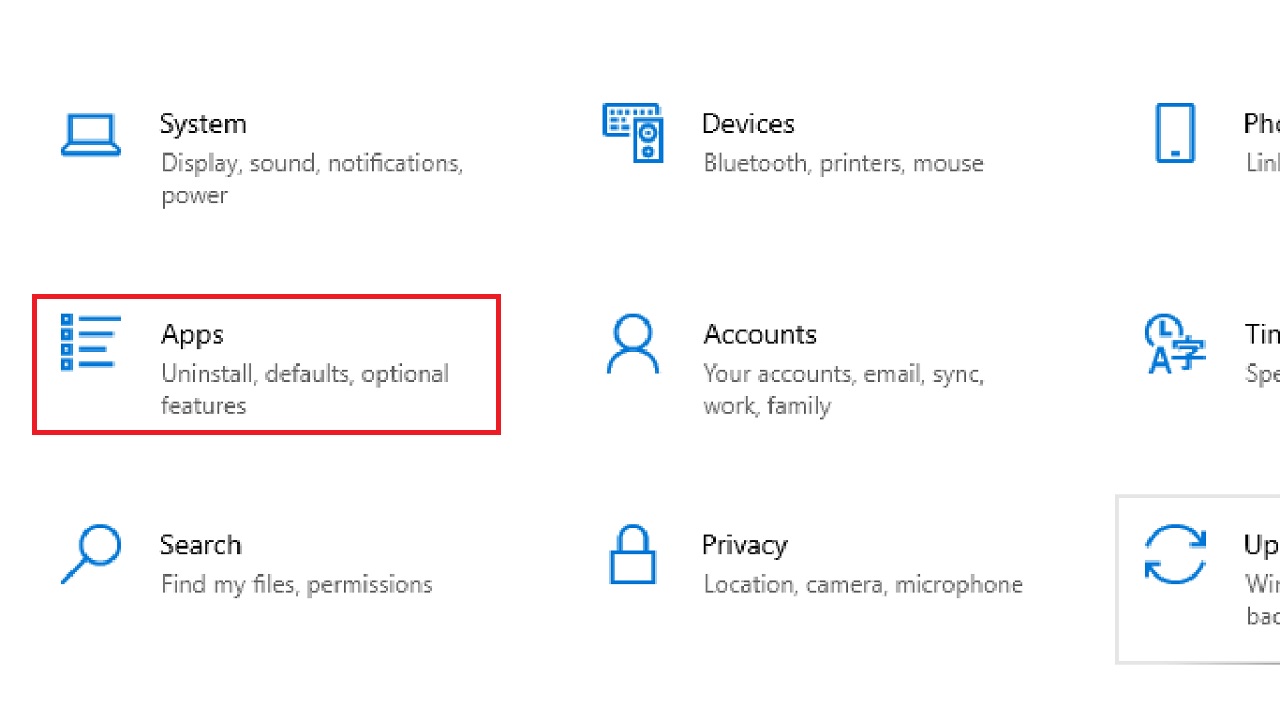
- Select Apps and Features from the new window. (It may be selected by default).
- Find the games that you downloaded from the Microsoft App store and now want to move from the current location.
- Click on it.
- Select the drive (Drive E for example) you want the game to move to from the options you get after clicking on the small downward arrow in the box.
- Select Move.
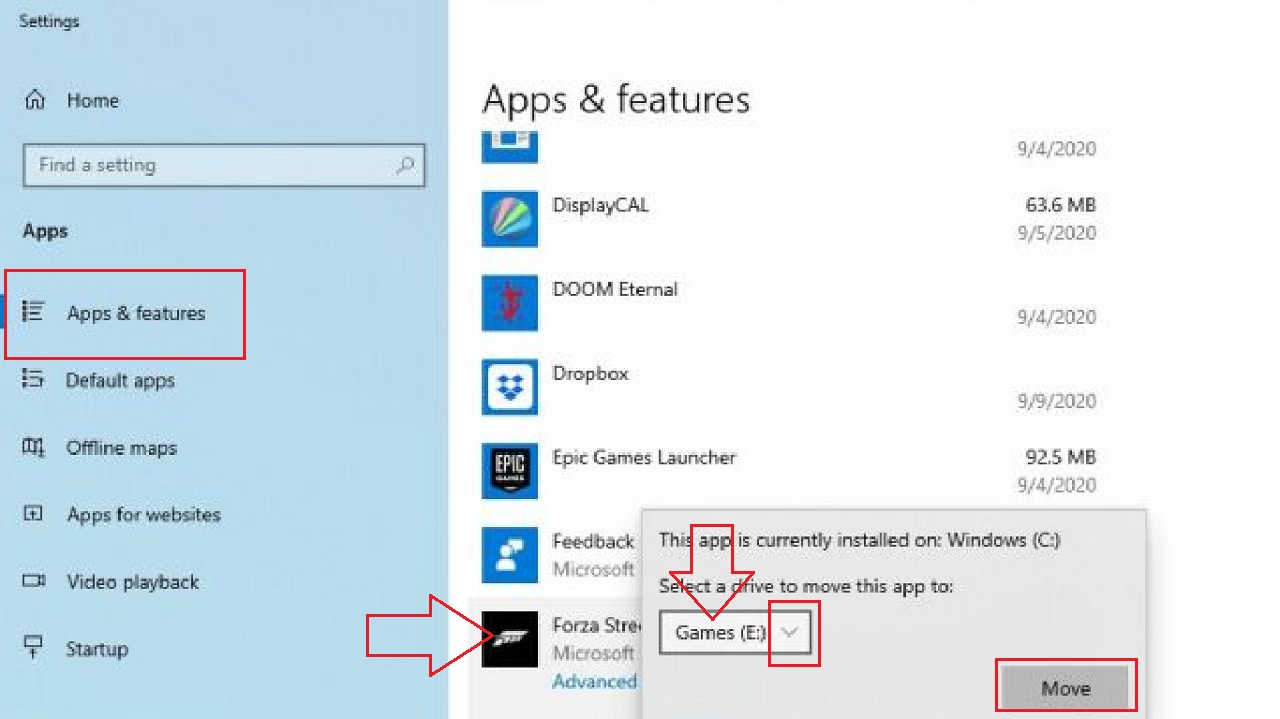
The game will now be moved to Drive E from Drive C:
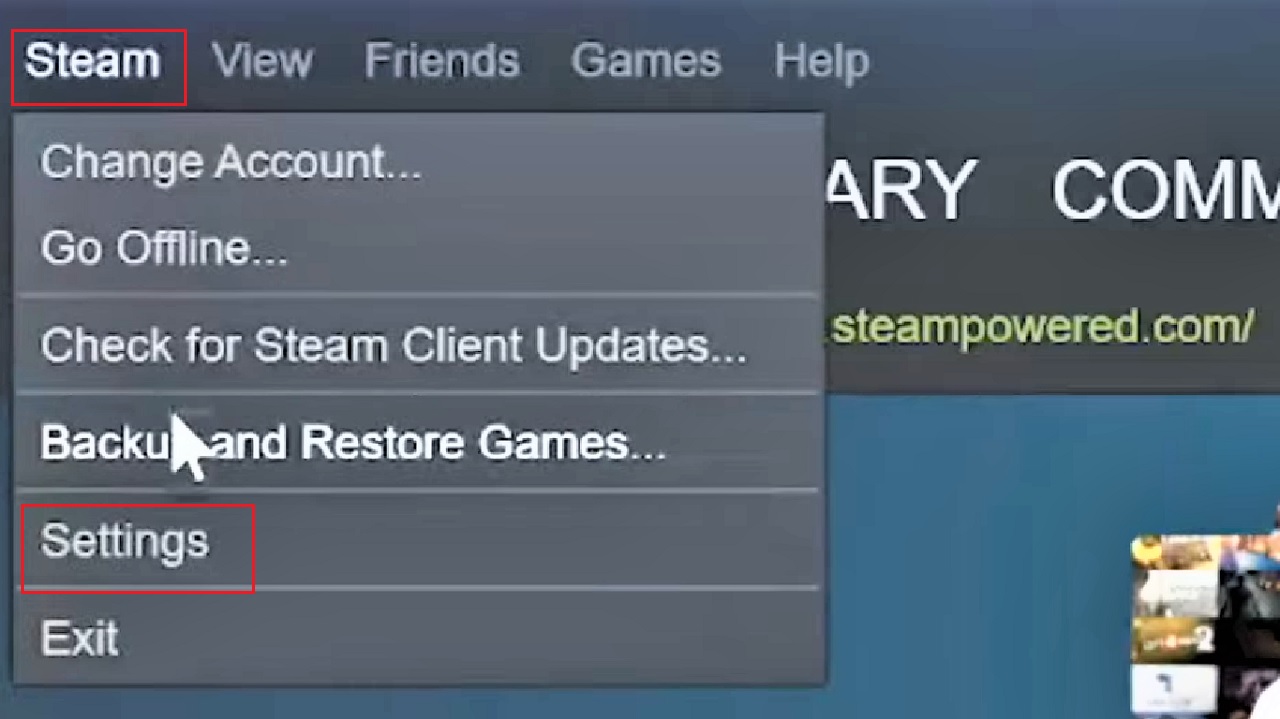
Method 3: Moving Steam Games from Settings
If you want to move any of the Steam games from one drive to another, you can do it from Settings when you open the Steam launcher.
STEPS TO FOLLOW:
- Go to Steam on the upper-left corner.
- Select Settings from the drop-down menu.
- Click on Downloads in the new window that pops up.
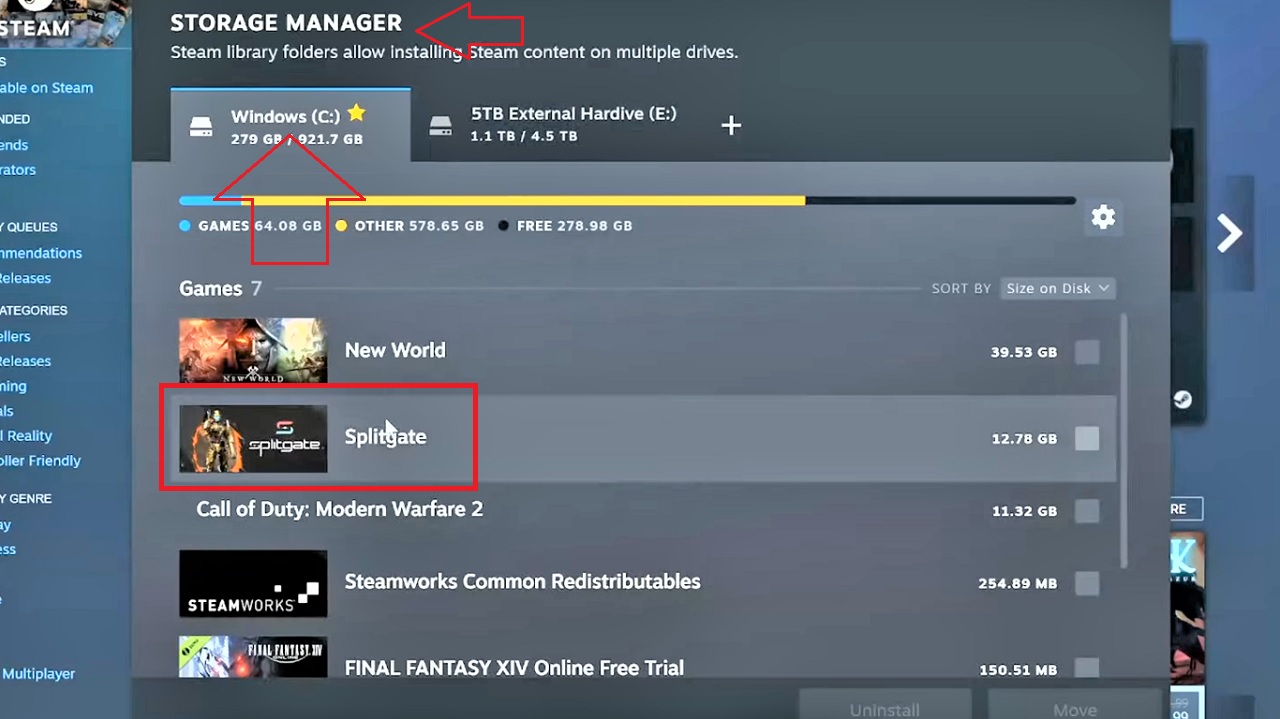
- Look for STEAM LIBRARY FOLDERS on the right side of the window at the top.
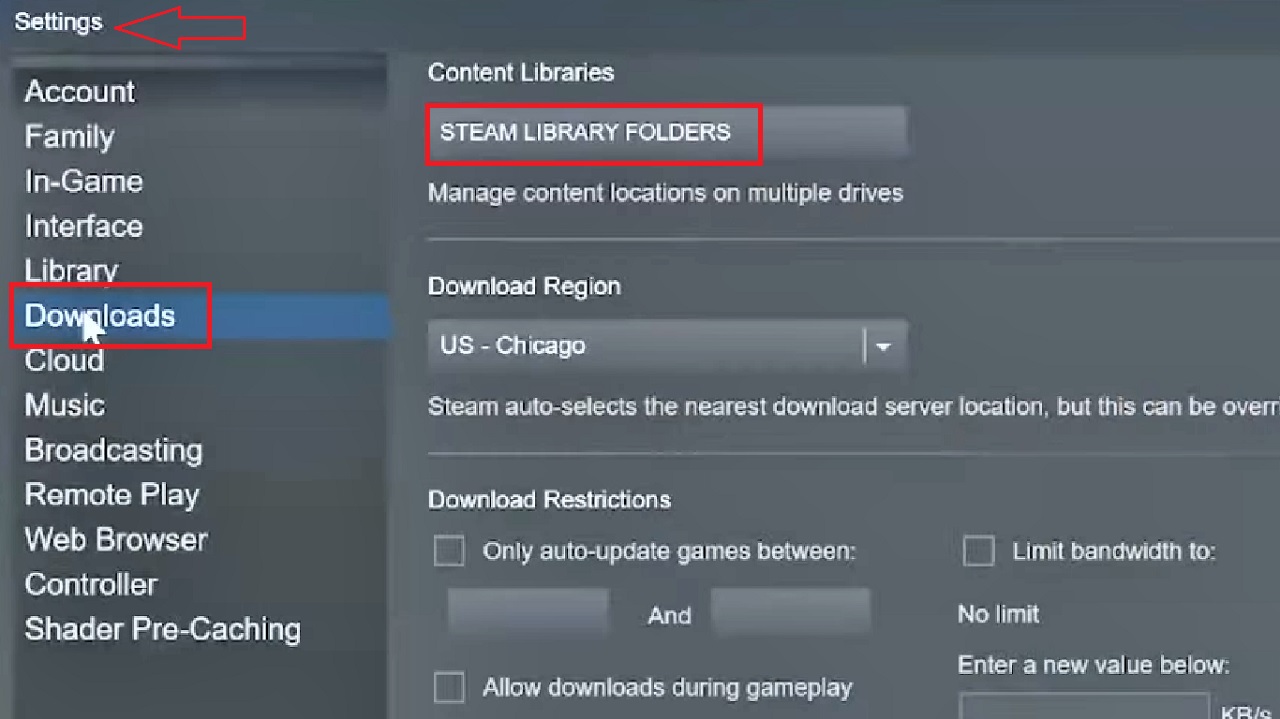
- A new STORAGE MANAGER window will appear with the available drives indicated, as shown in the image below:
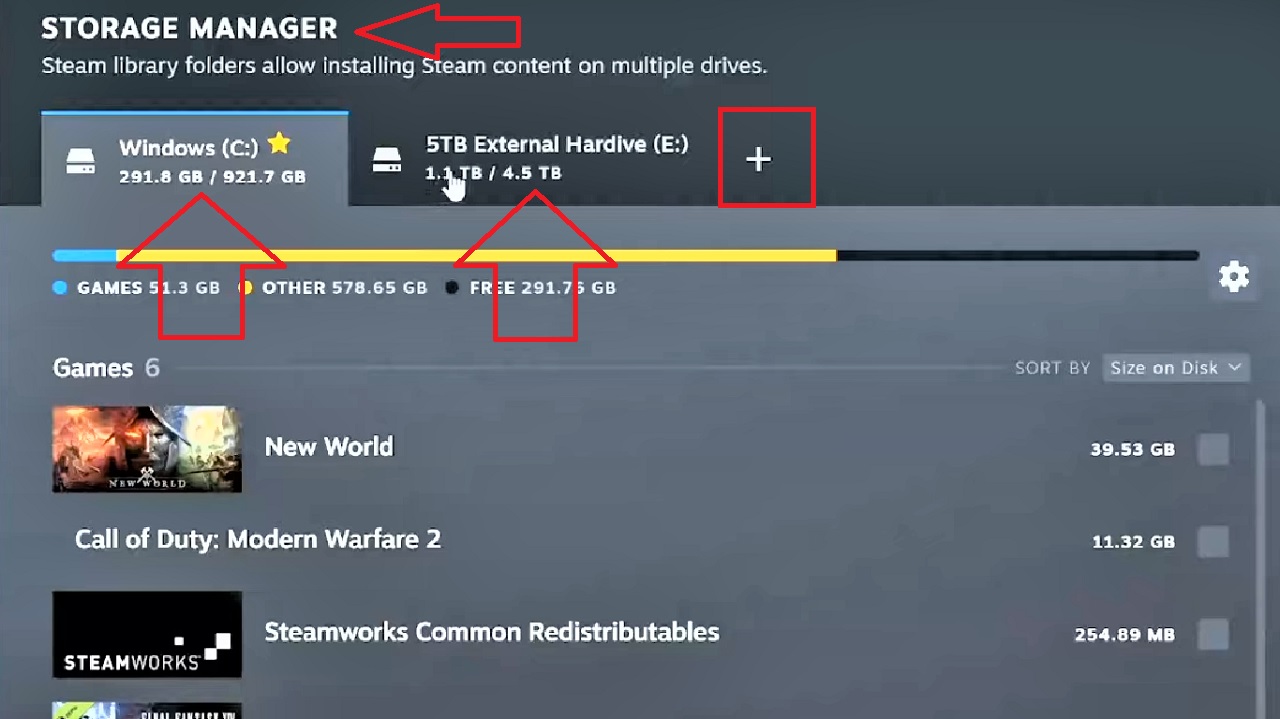
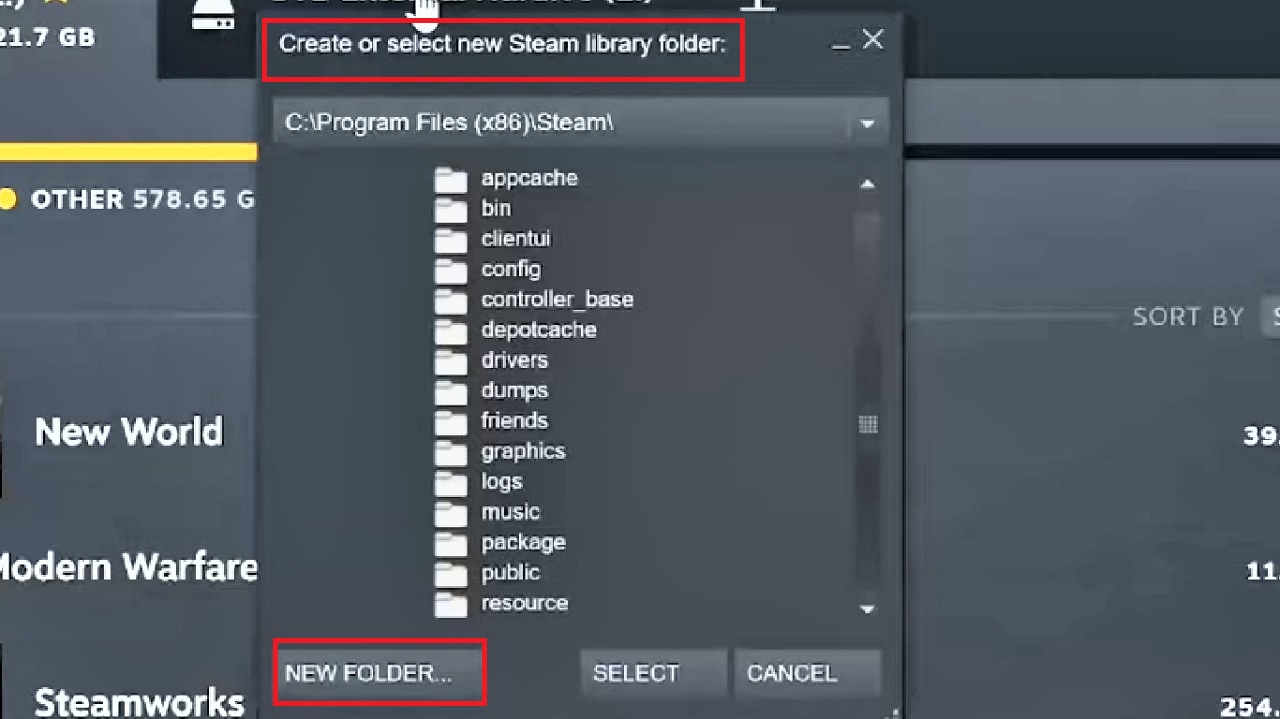
- Click on the Plus Button, indicated by a red box in the image above.
- Choose the hard drive where you want to make a new folder up from the following window that says Create or select new Steam library folder:
- Click on the NEW FOLDER button at the bottom on the left side of the window.
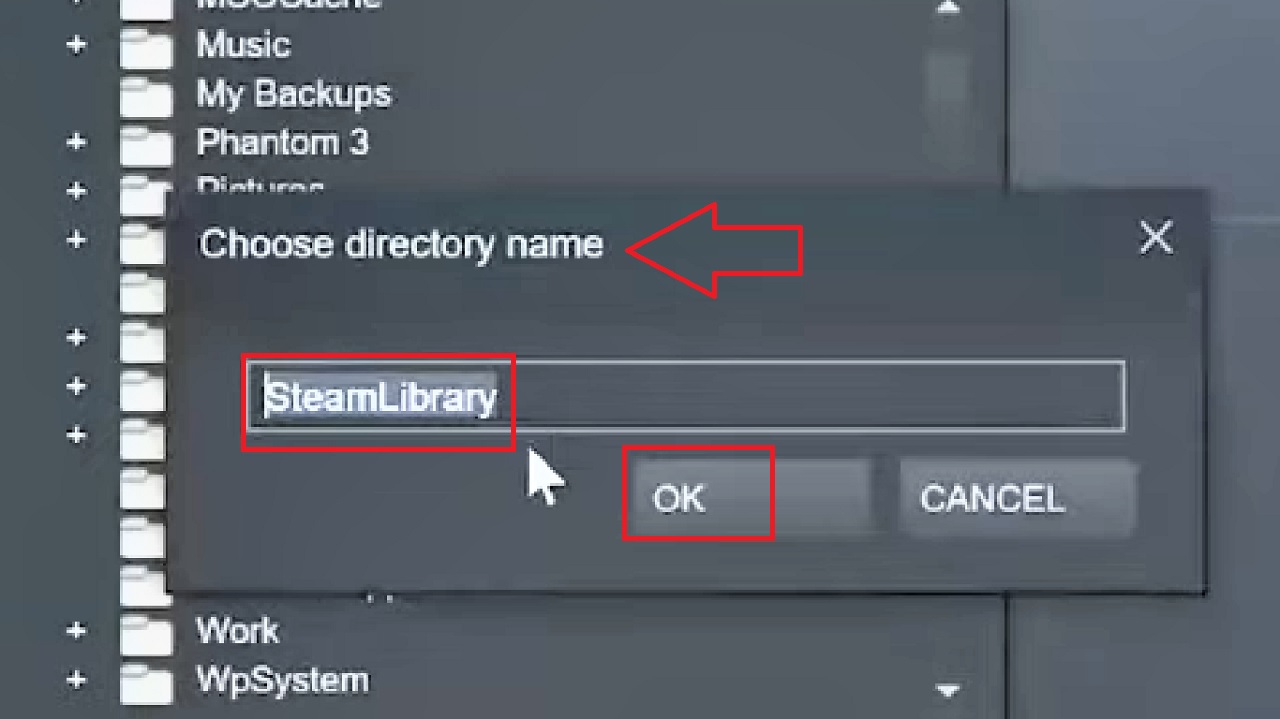
- Give the folder a name according to your choice in the following Choose directory name window. (SteamLibrary in this case.)
- Click on the OK button.
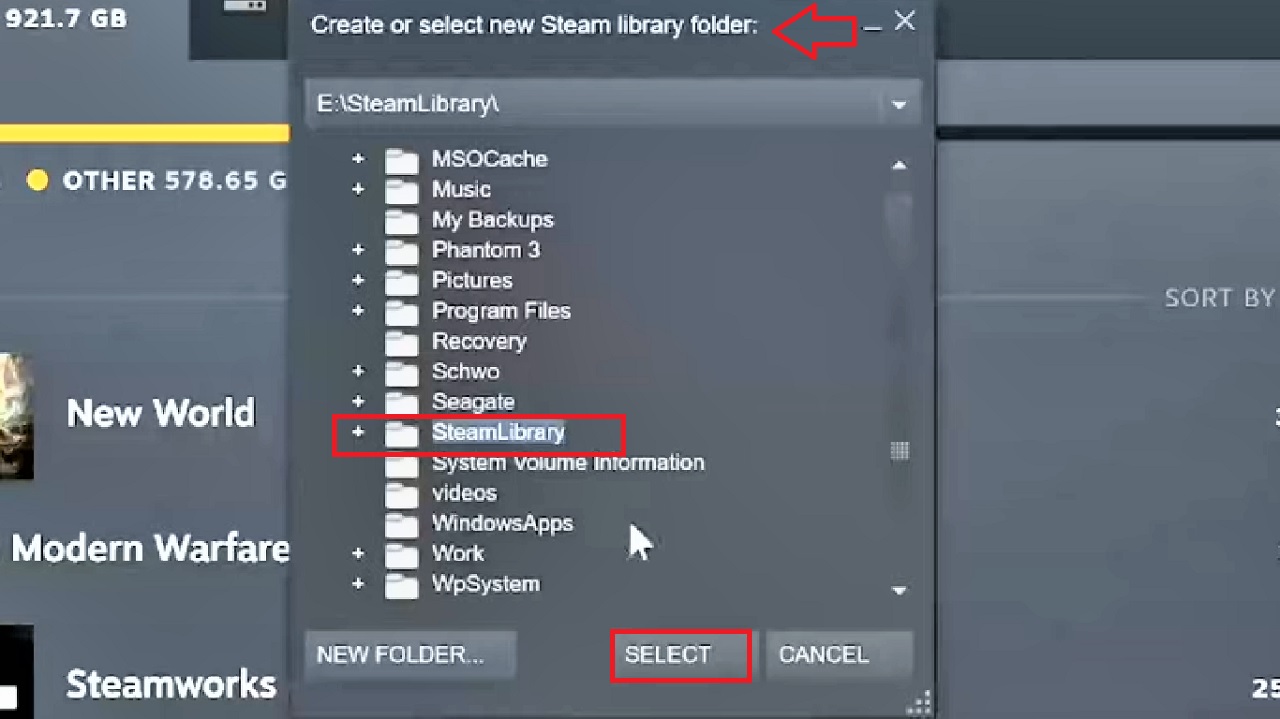
You can see the folder indicated in the new drive location in the Create or select new Steam library folder.
- Click on the SELECT button to select the folder.
- Now, choose the particular game (Splitgate in this case) from the STORAGE MANAGER that you want to move to the new drive.
- Click on the Move button below.
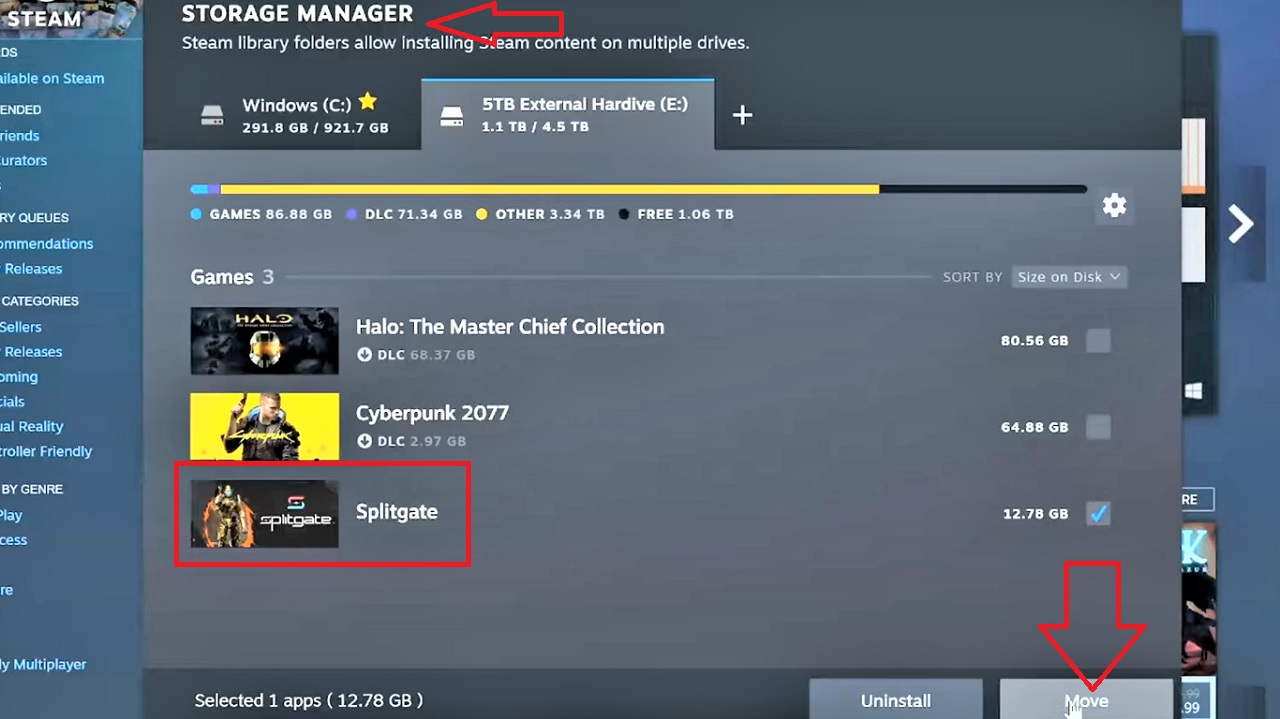
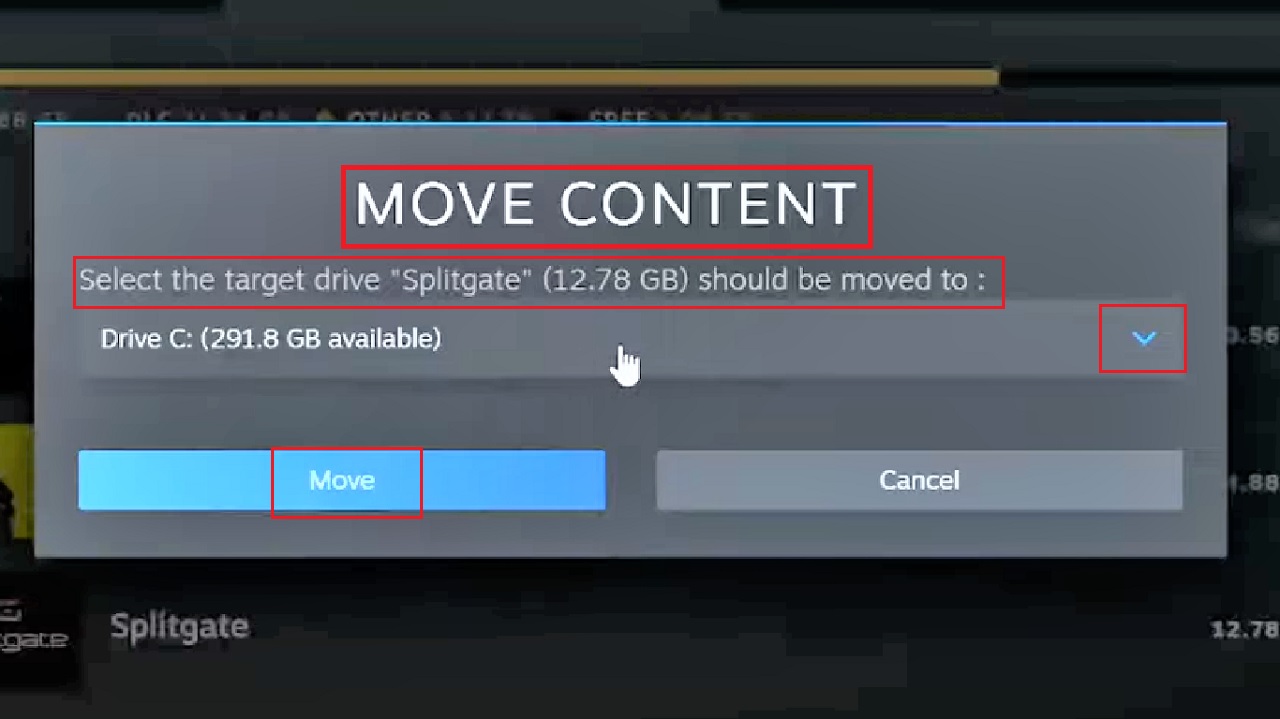
- Select the drive you want to move it to by clicking on the small downward arrow at the right side of the box under Select the target drive “Splitgate” (12.78 GB) should be moved to: in the MOVE CONTENT window that appears next.
- Click on the Move button for confirmation.
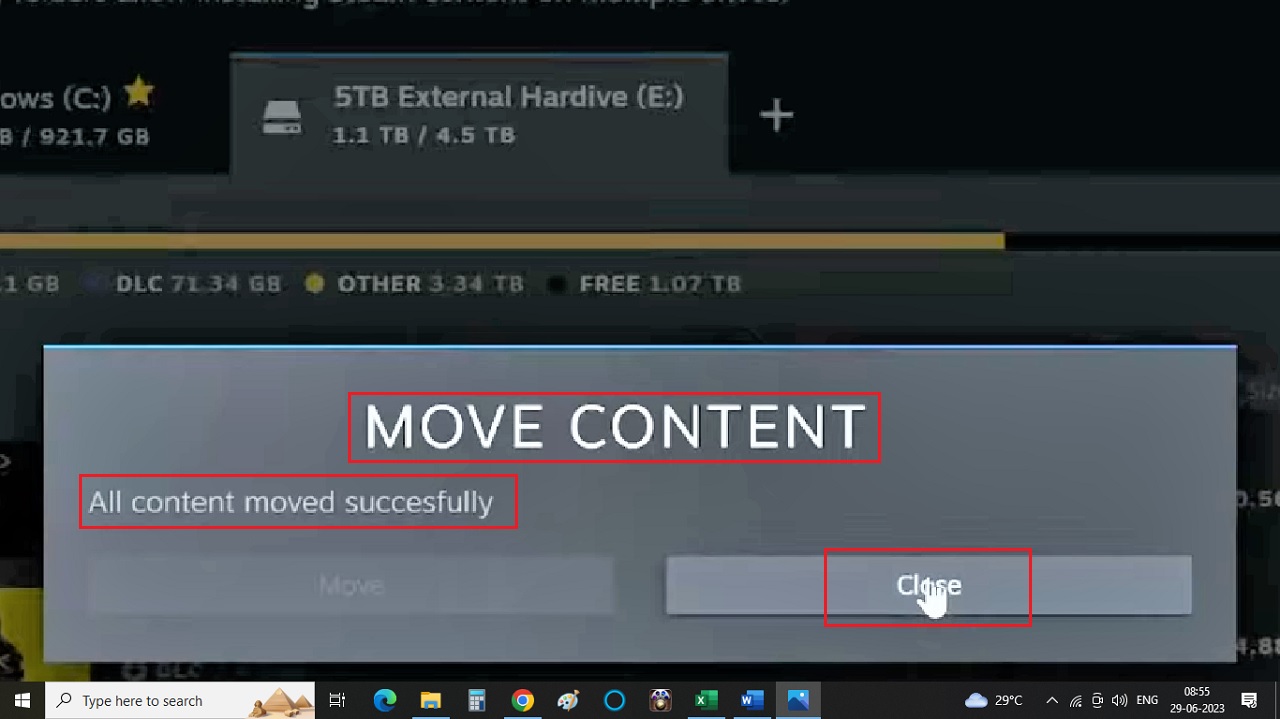
If a pop-up window appears asking for confirmation, click on the Yes button.
This will move the game file from the source to the destination drive. It will take some time, which will vary according to the size of the game file.
When the process is complete, and the MOVE CONTENT window now says that All content moved successfully, Close the window.
Now you can see that the place where the Splitgate game file was located in the in Drive: E is empty, as shown in the image below:
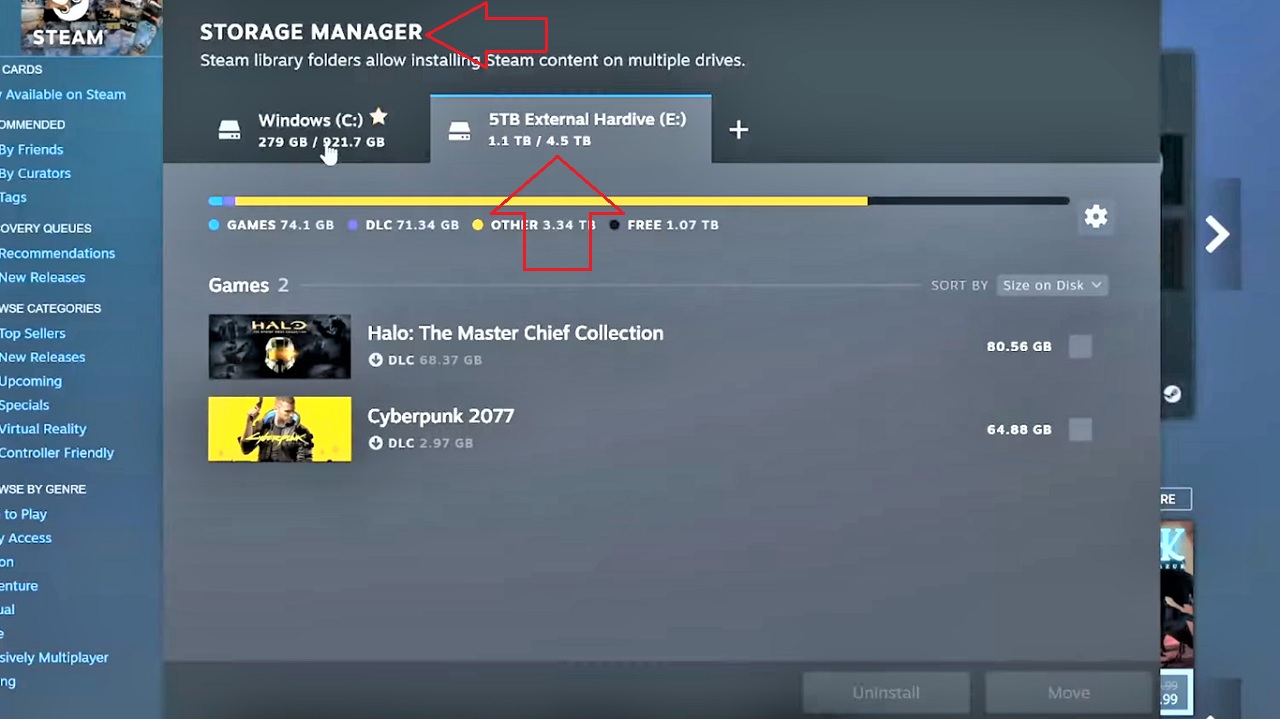
It is now moved to Drive: C, indicated by a red box in the image below:
You have therefore moved your PC game successfully from Drive E: to Drive C: now from Steam Settings.
Method 4: Directly from the Source Folder of Steam Platform
You can also transfer your PC game or games from one drive to any drive across all platforms very easily directly from the source folder. The process to follow for different types of games may be a bit different. So, follow the steps very carefully.
Make sure that you have created a proper backup of your files beforehand.
STEPS TO FOLLOW:
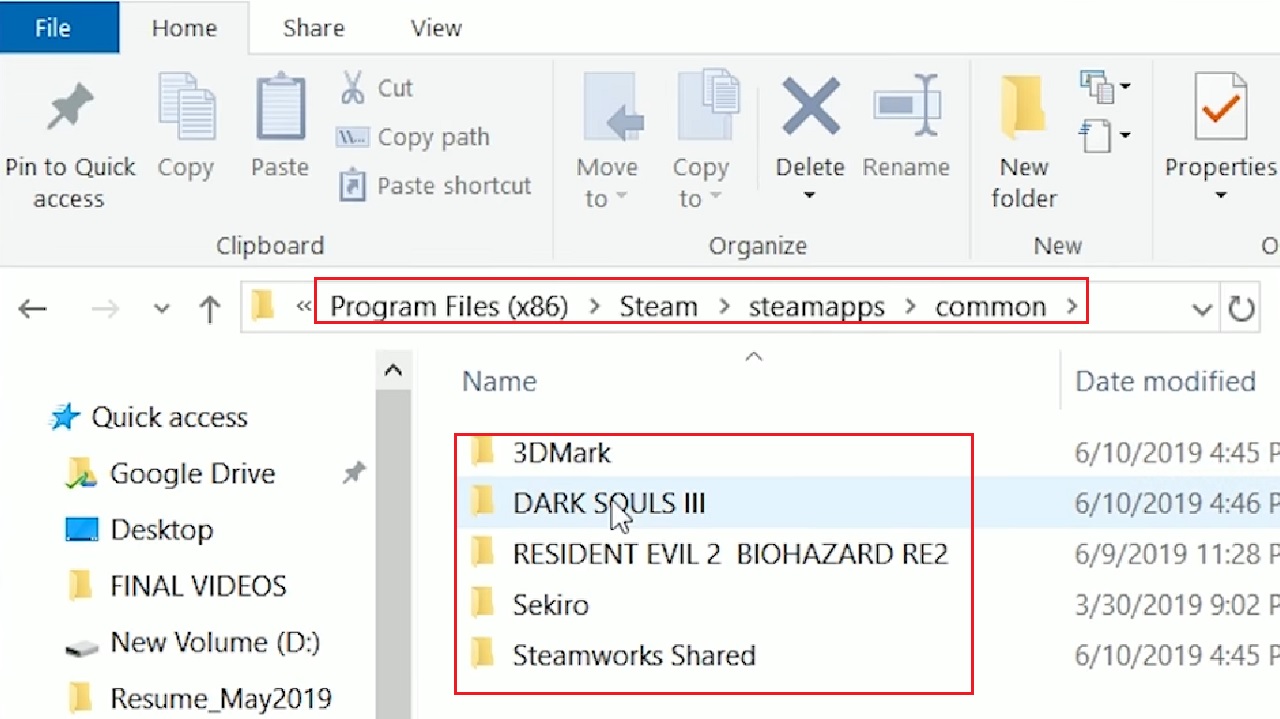
For Steam, suppose you want to move the game DARK SOULSTM III. The steps to follow are:
- Open File Explorer > Choose Drive: C > Program Files (x86) folder > Steam > Steamapps > Common.
You will see all your games stored here, as shown in the image below:
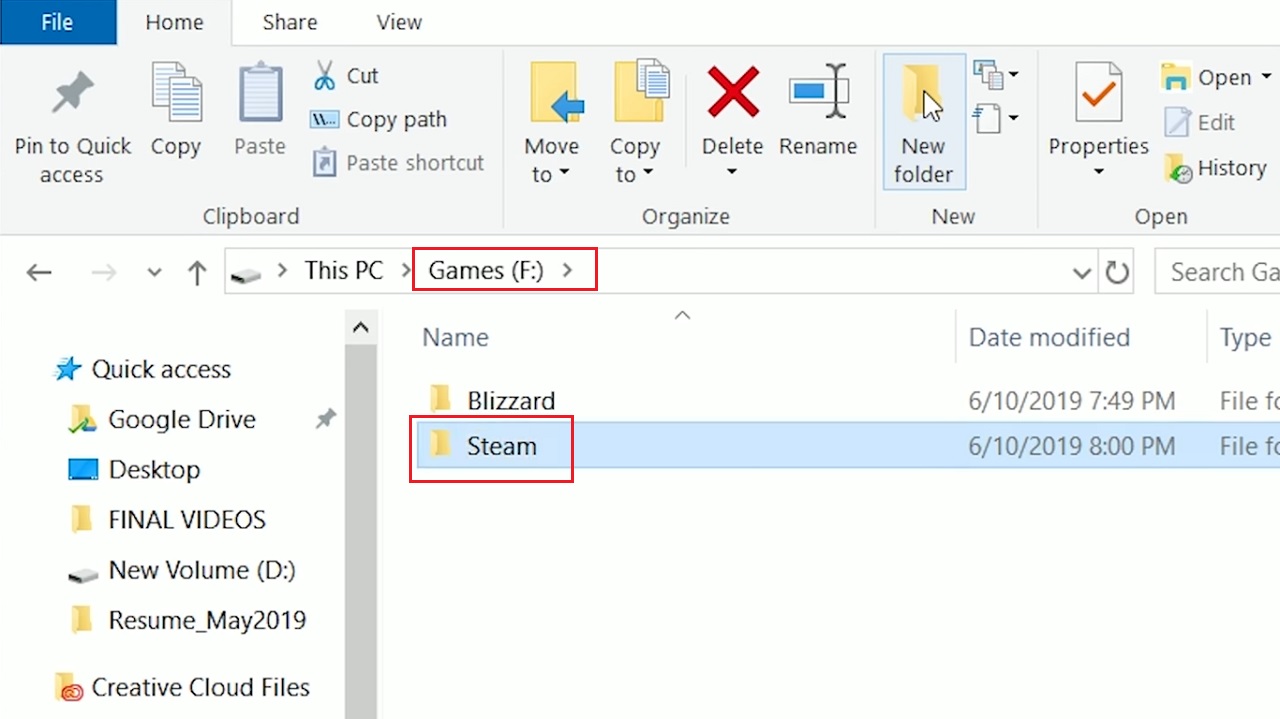
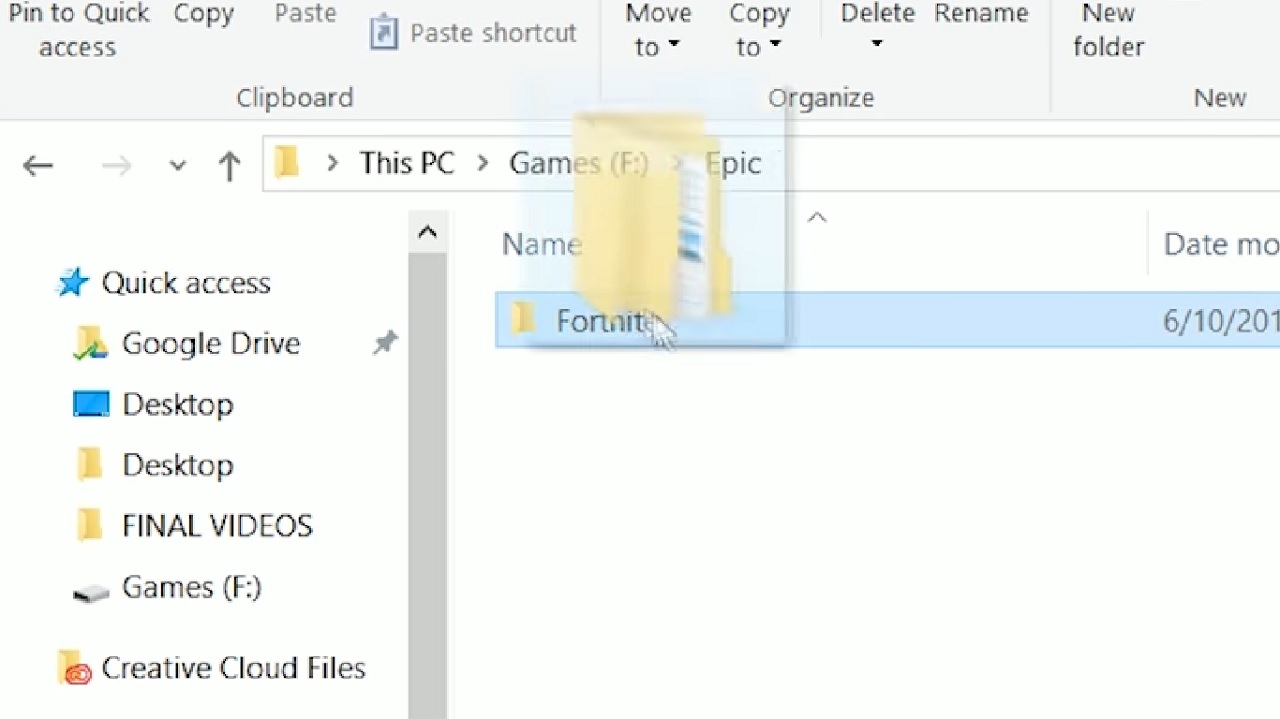
- Now, create a new folder in the destination hard drive, Games (F:) in this case, and name it Steam, for example, as shown in the image below:
- Click on the particular game folder you want to move from the old hard drive and drag and drop it into the new folder that you have just created, as shown in the image below:
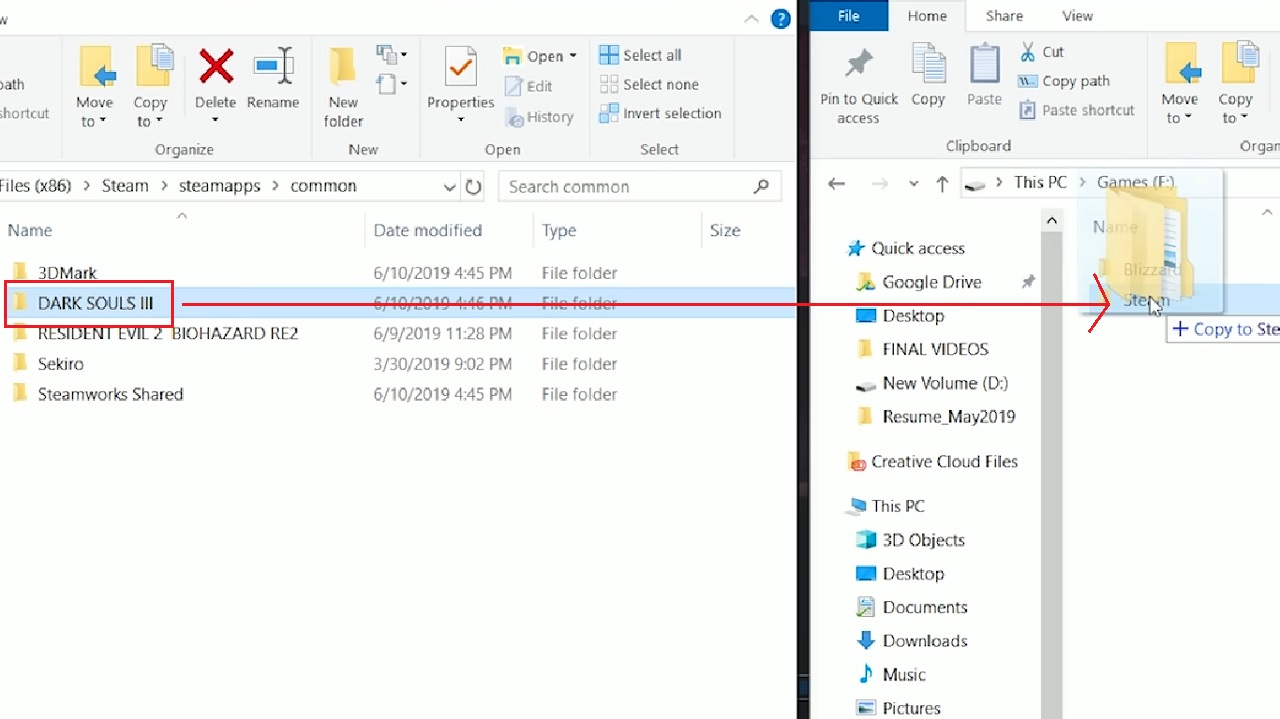
You are done moving the DARK SOULSTM III game file from the old hard drive to a new location.
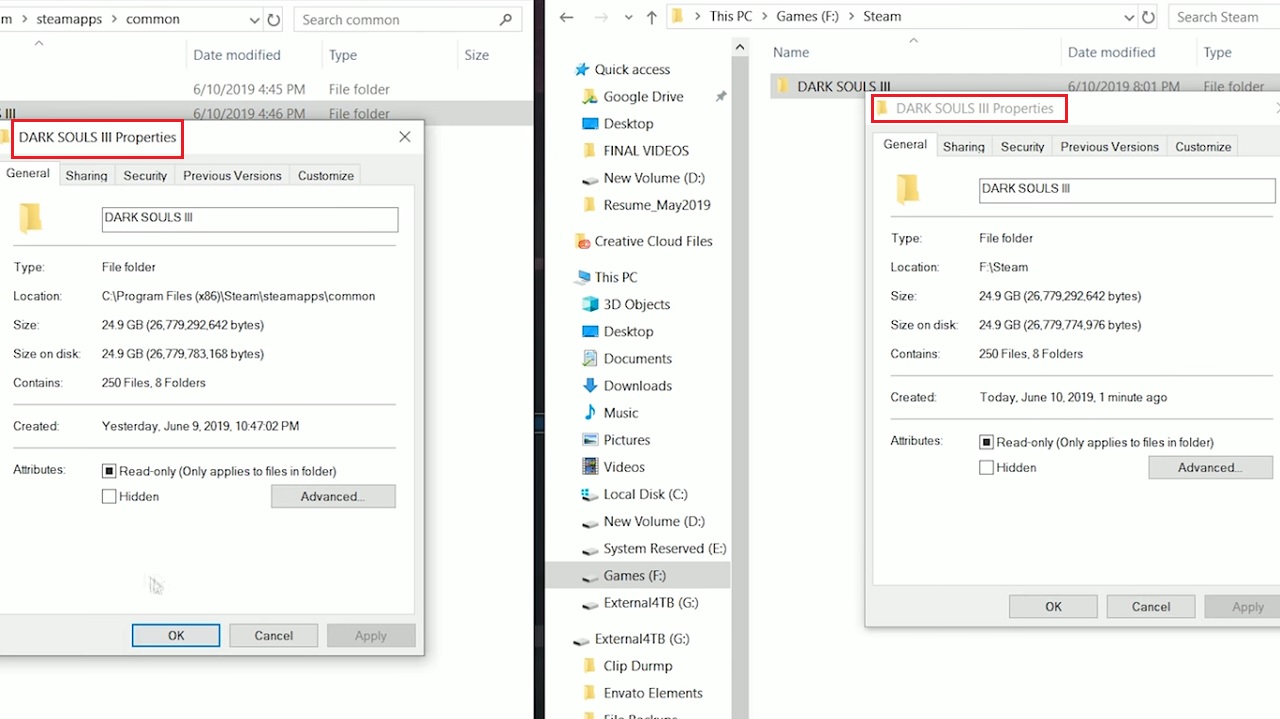
In order to check the files size and make sure that everything is there, right-click on the game folder in the new drive and select Properties from the dropdown menu.
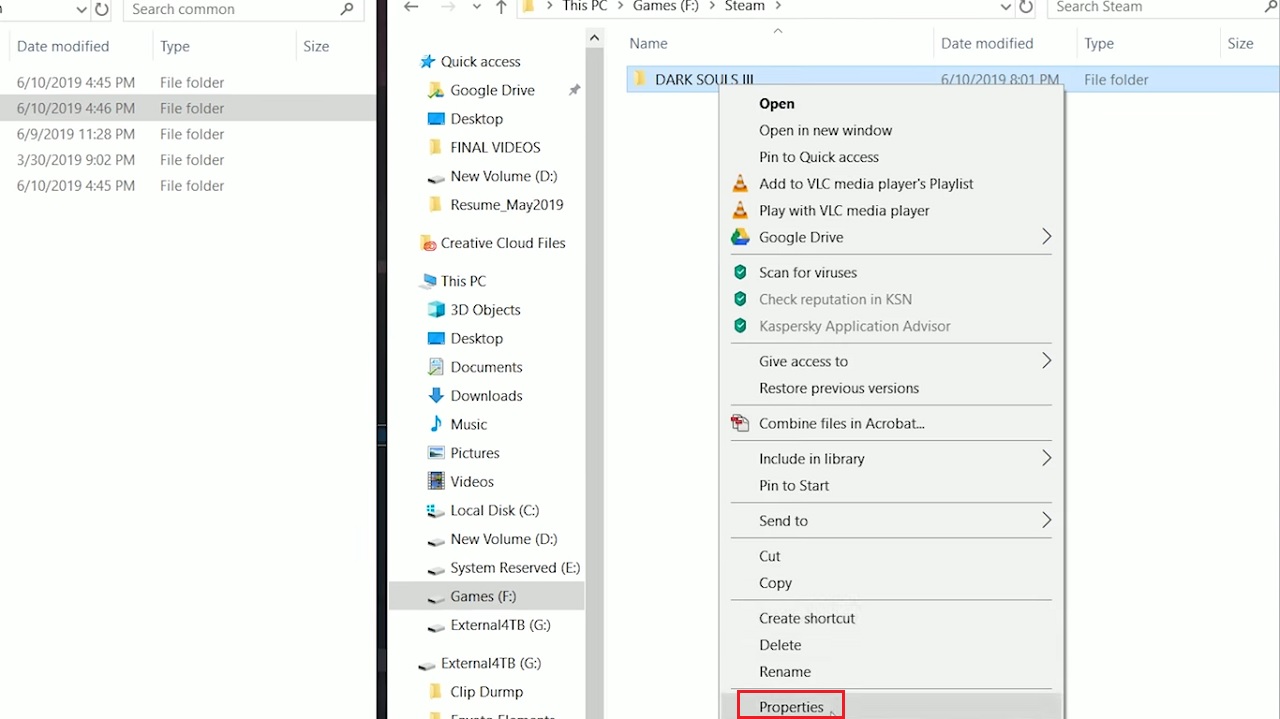
- Do the same for the folder in the old drive and tally the information details on the two Property windows, as shown in the image below:
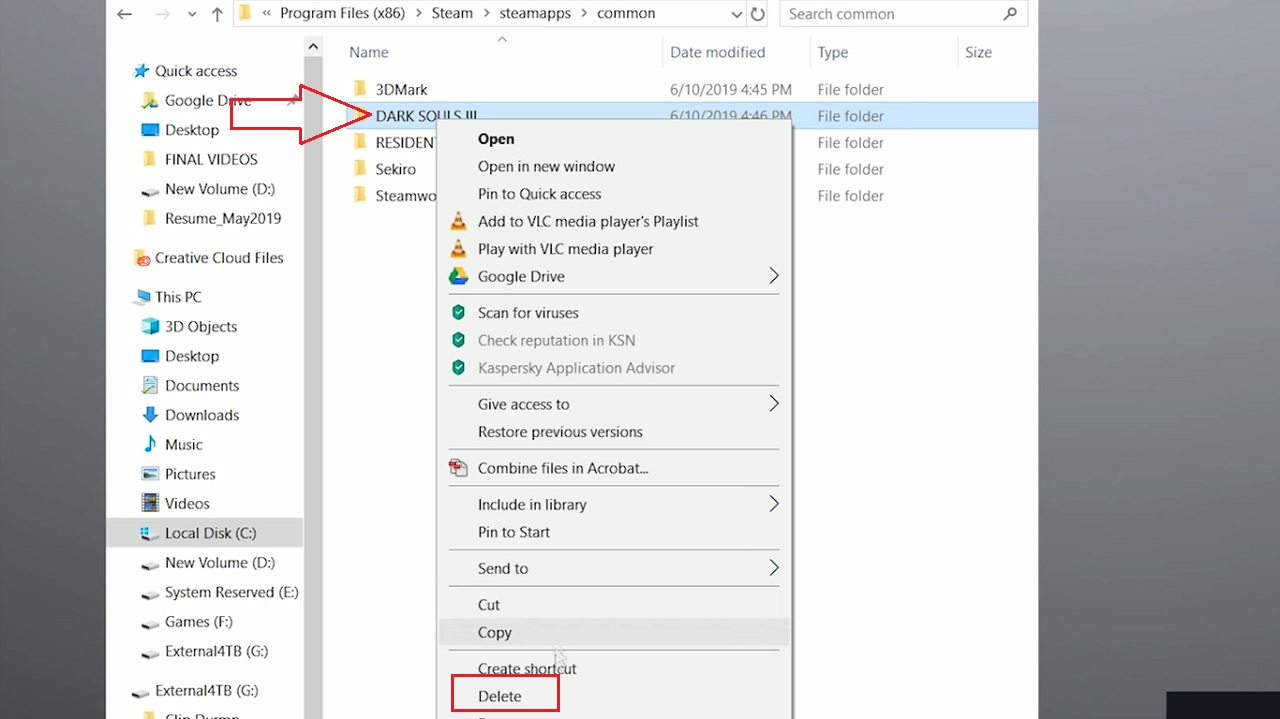
- Now that you are sure that you have the file in the new location, delete the file in the old drive that you have just copied in the new hard drive by right-clicking on it and clicking on Delete from the options in the dropdown menu.
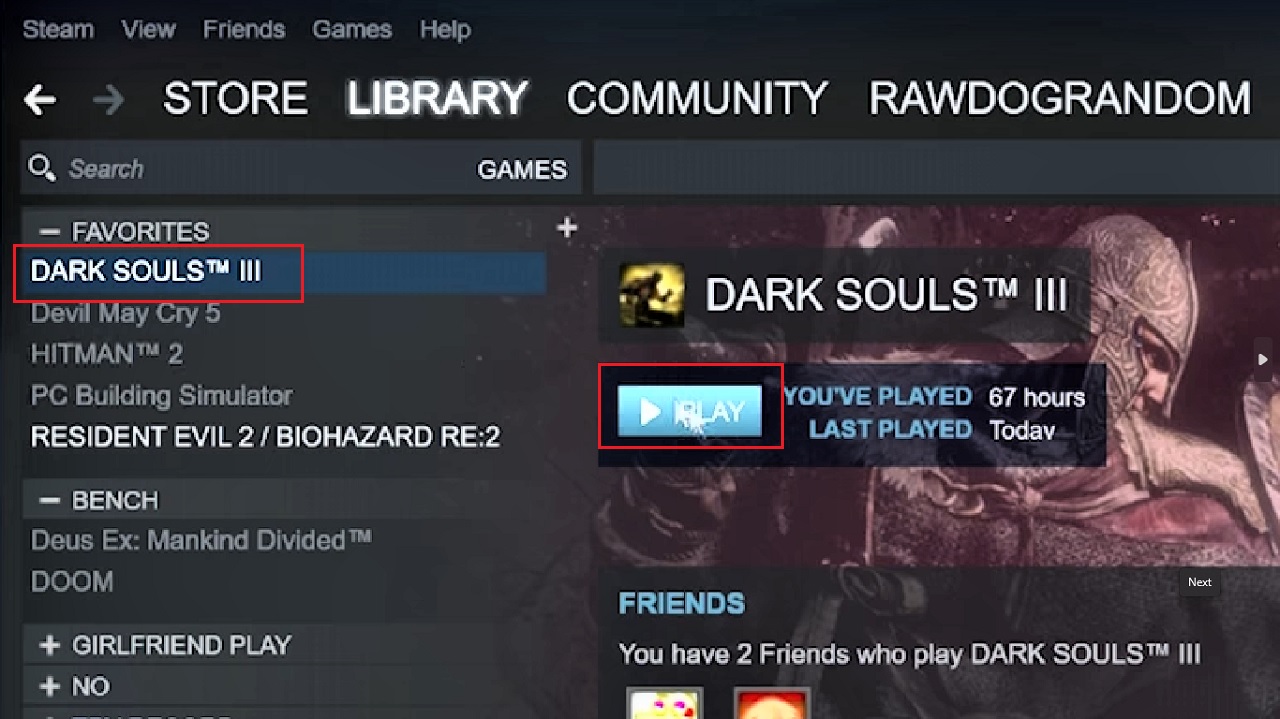
- Also, check whether it is running on Steam from the old hard drive by clicking on the Play button.
- If you get a Steam – Error message box for missing executable as follows, it indicates that it is not running or cannot be found.
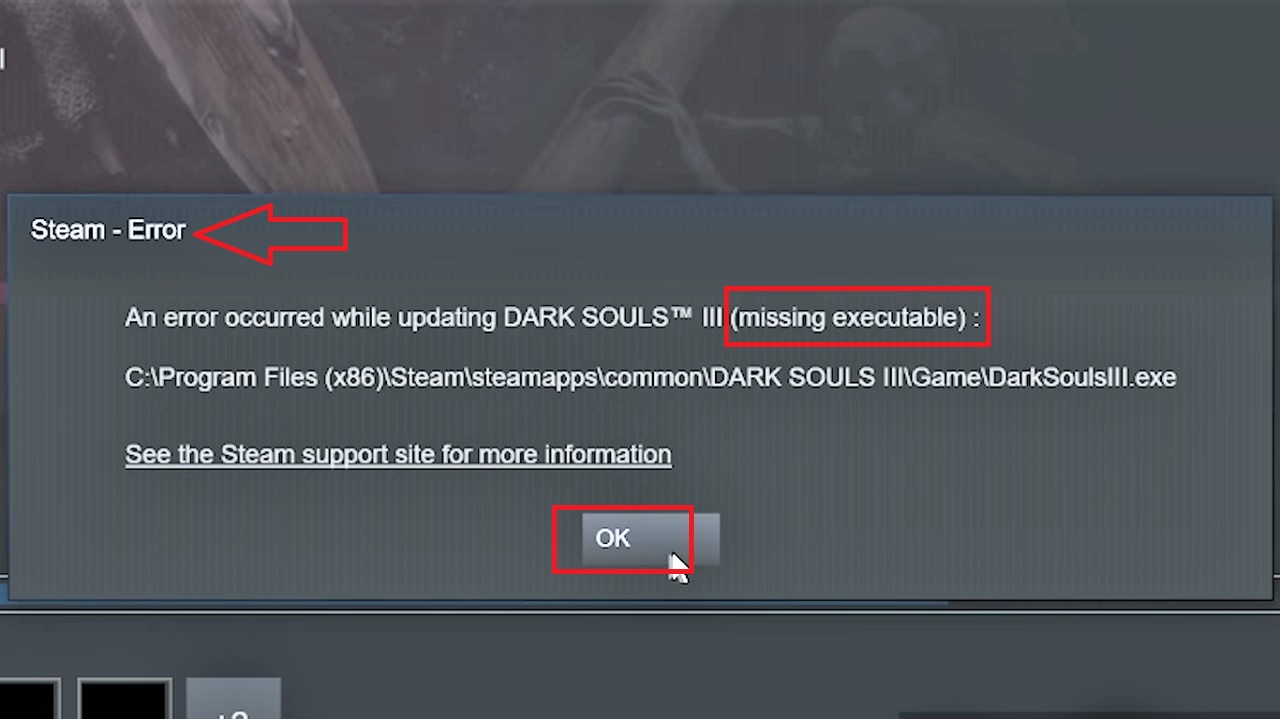
- Click on the OK button to close the above error message window.
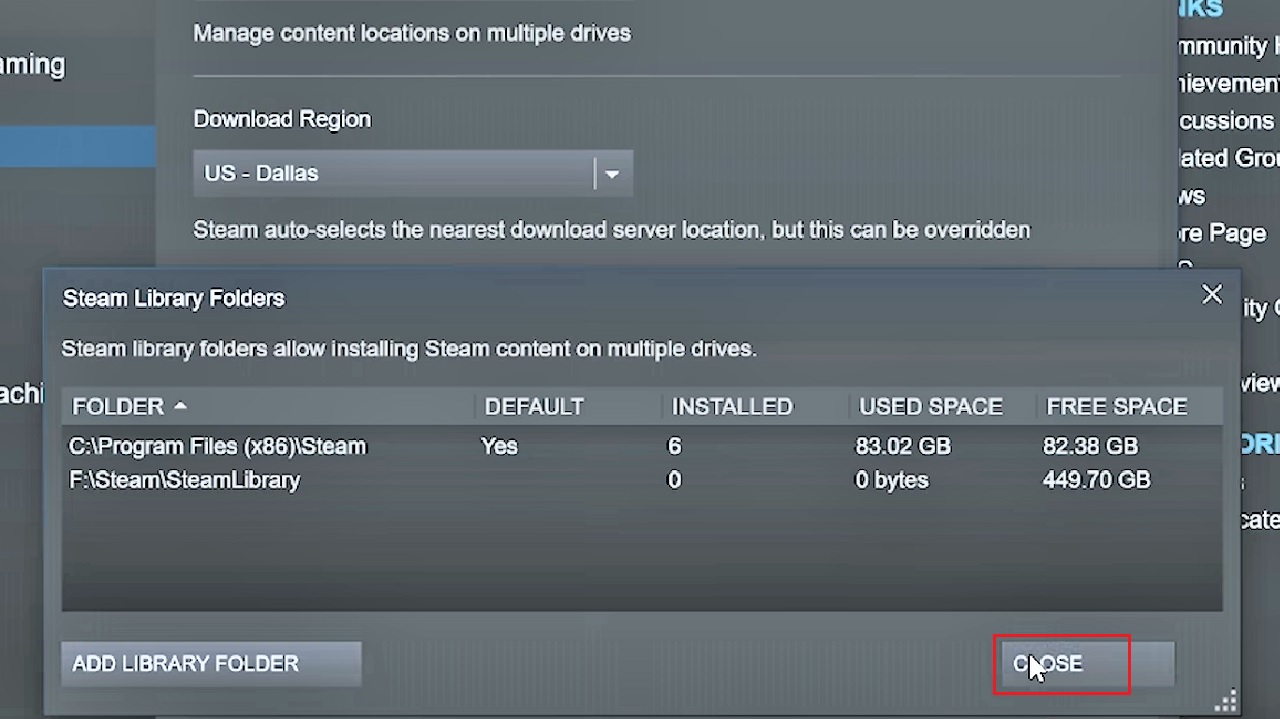
- To make it work, like you did in Method 1, Go to Steam > Settings > Downloads > STEAM LIBRARY FOLDERS > ADD LIBRARY FOLDER > Select the target drive and folder > Select Steam > Click on NEW FOLDER > Click on OK.
- Steam will make a new folder for itself. When it is done, as shown in the image below, Close it out.
- Press RESTART STEAM in the new Steam – Restart required window.
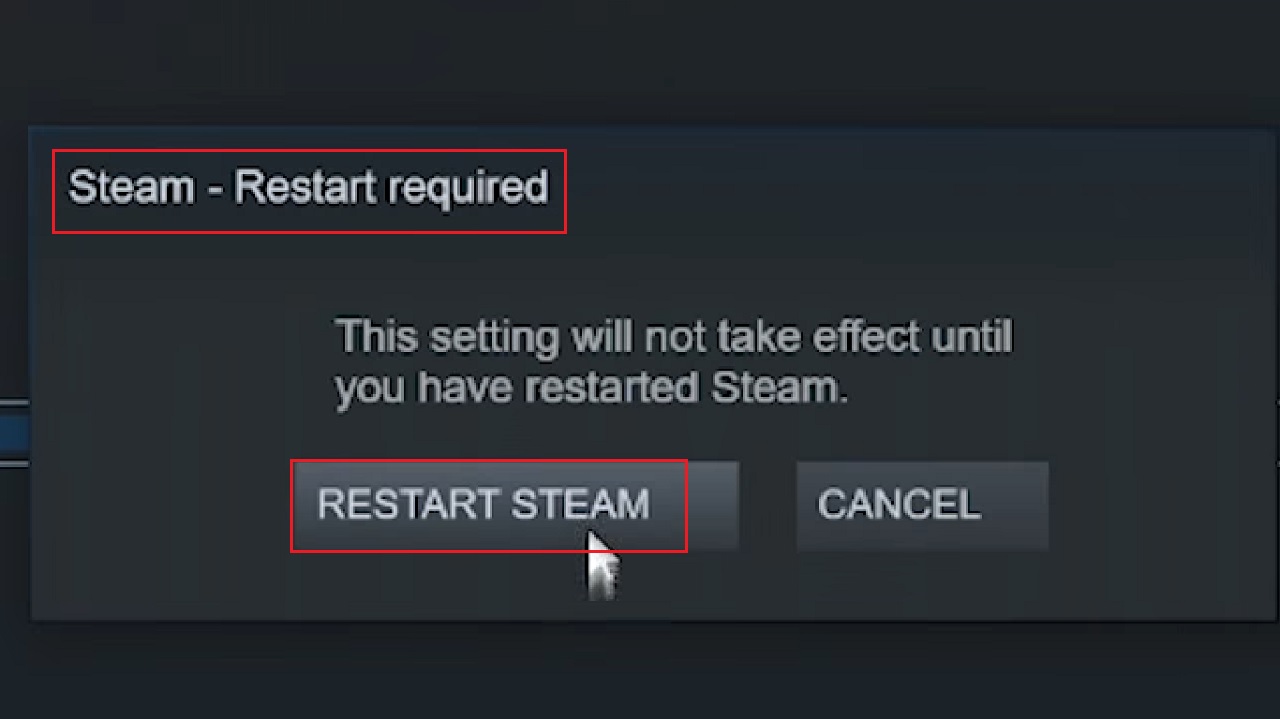
This will start downloading the game.
- Click on the Pause button at the top-right corner of the window to stop the downloading process.
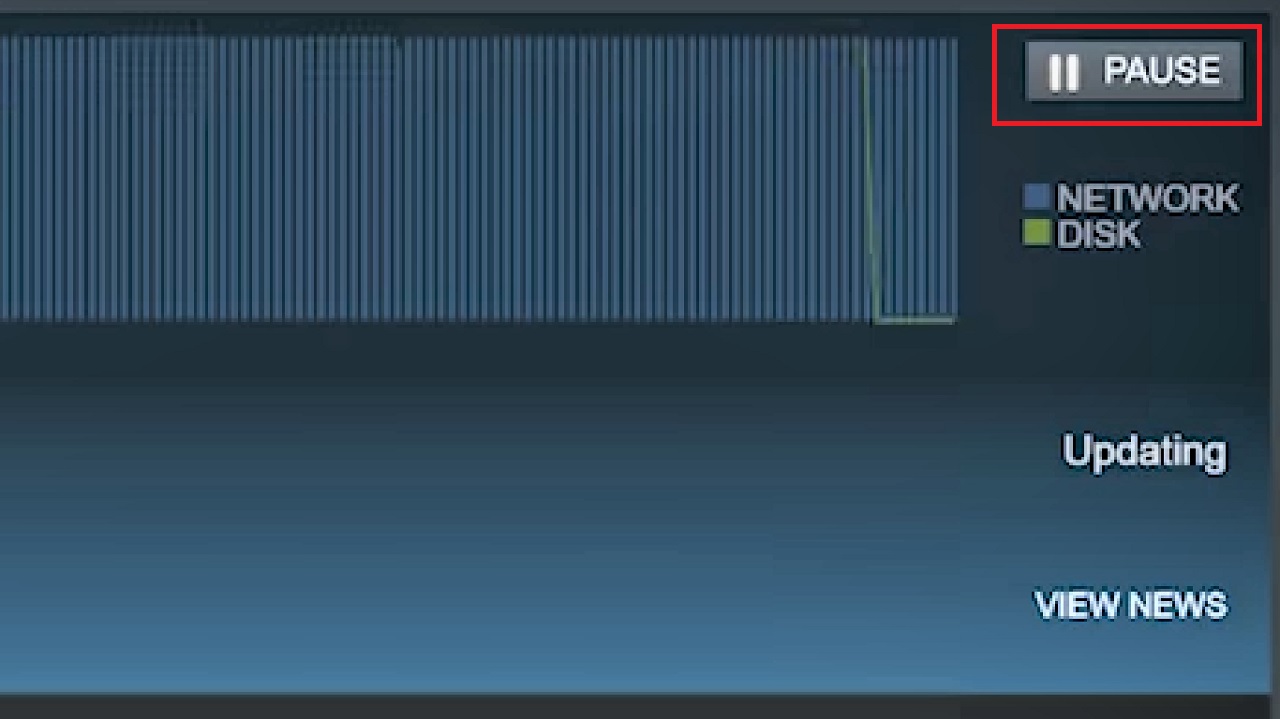
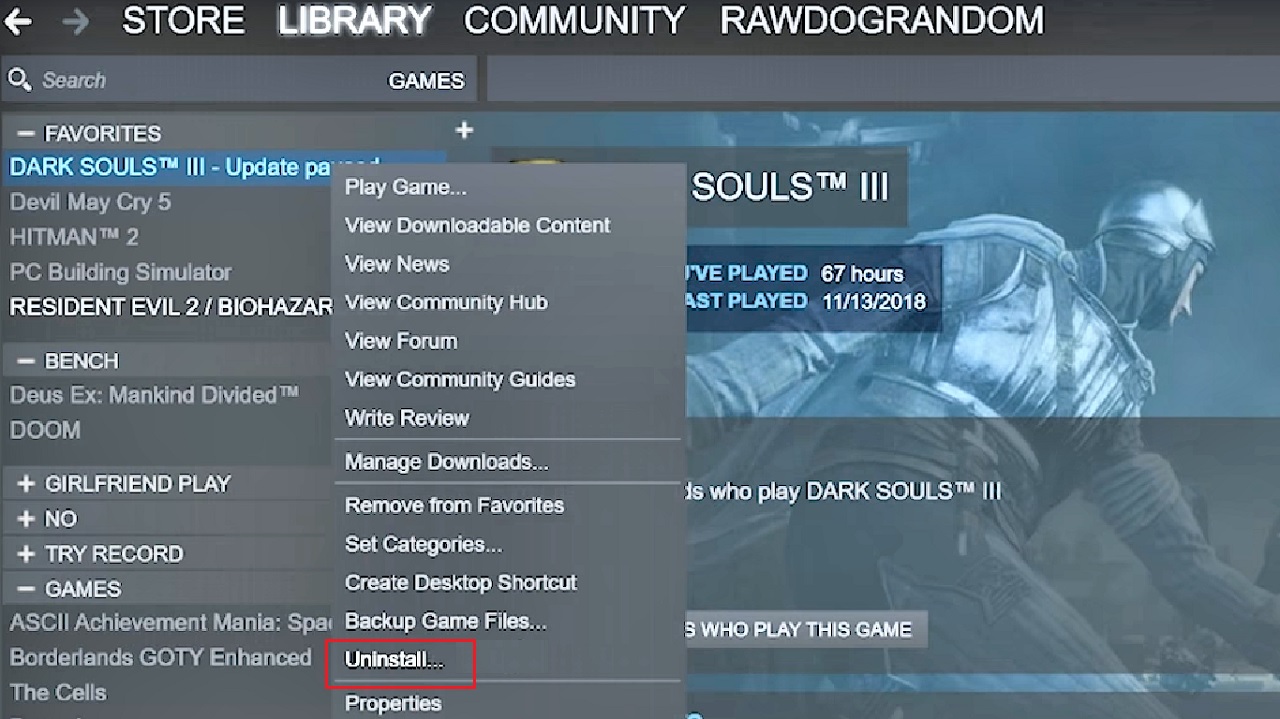
- Click on Uninstall.
- Next, move the game folder to common simply by dragging it from one folder to another sequentially.
Now you must install the game.
- Click on the game folder to open it.
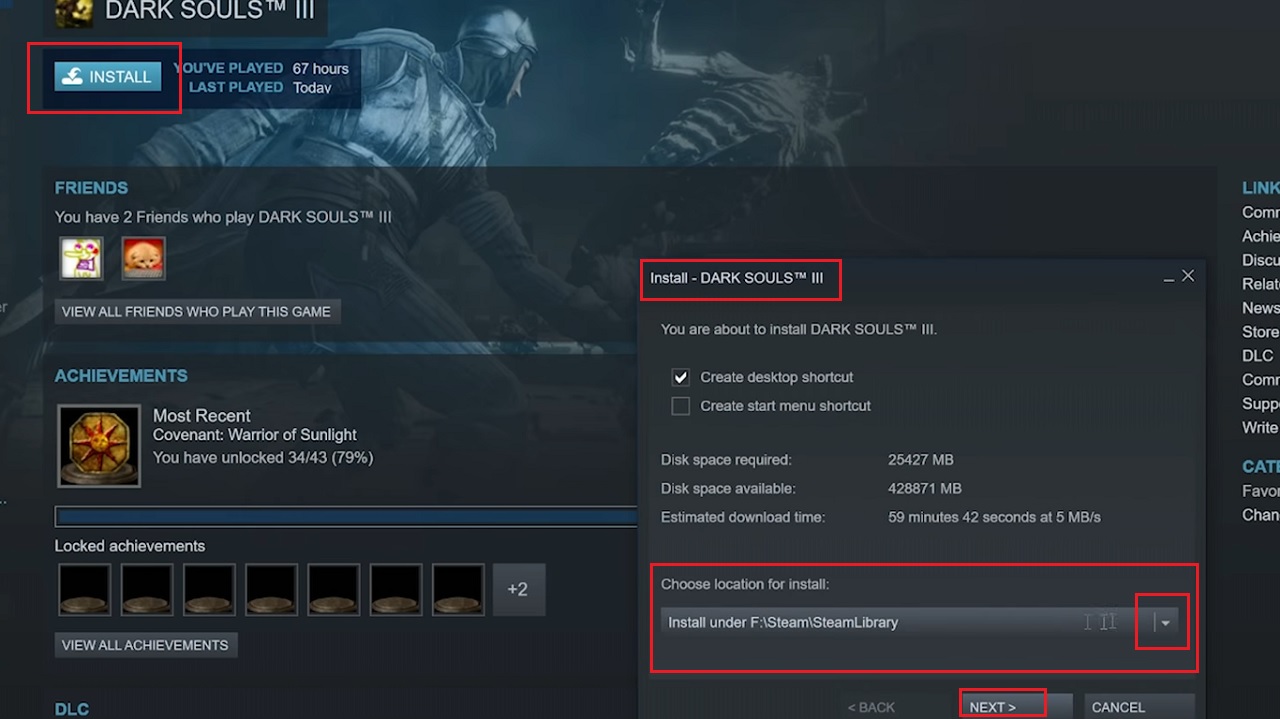
- From the new window click on the Install option.
- In the Install – DARK SOULSTM III window, choose the folder you have just created as the location for installing the game.
- Click on the Next button.
The installation process will now start, and when it is completed and updated, you can open the game from the new location and start playing.
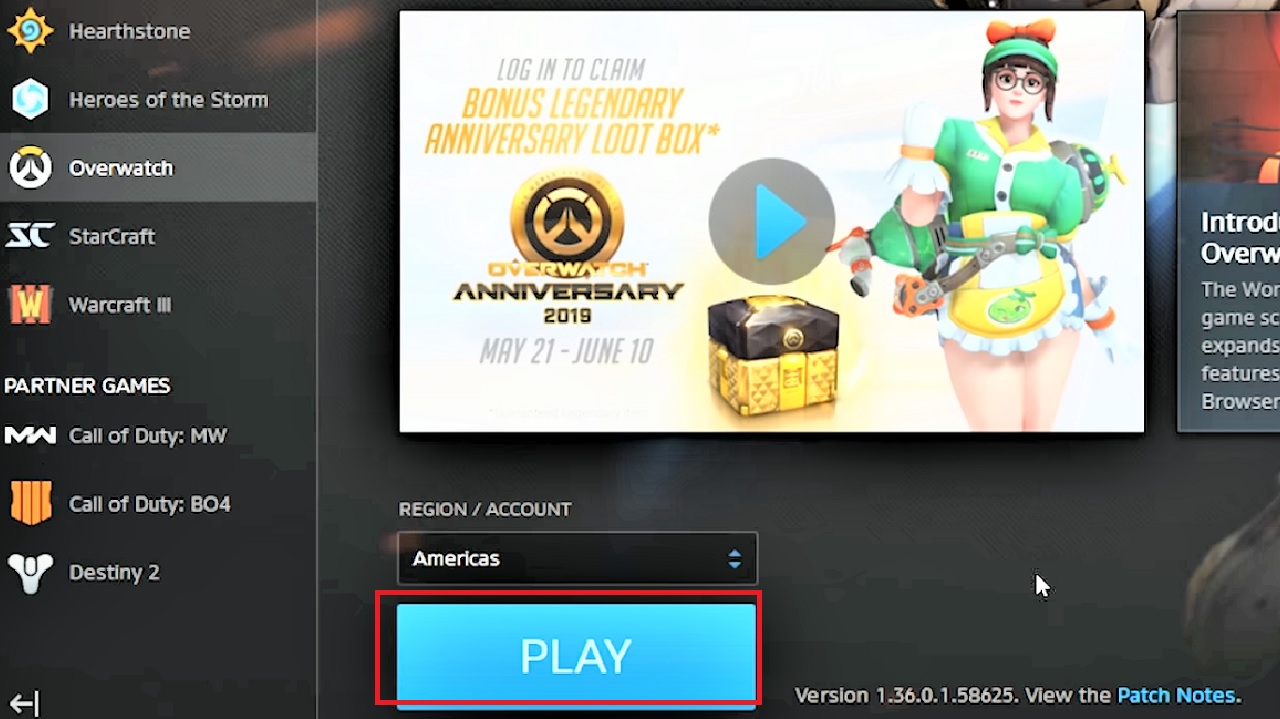
Method 5: Moving Games of the Blizzard Platform
The process to move a game on the Blizzard platform is relatively easy. For example, assume that you are moving the game Overwatch from one drive to another.
STEPS TO FOLLOW:
- Follow the same process as above to create a folder on the destination hard drive but name the new folder Blizzard.
- Drag and drop the game from the old drive to the new, and you are almost done.
- Delete the game from the old drive and open the game from the new folder in the new drive.
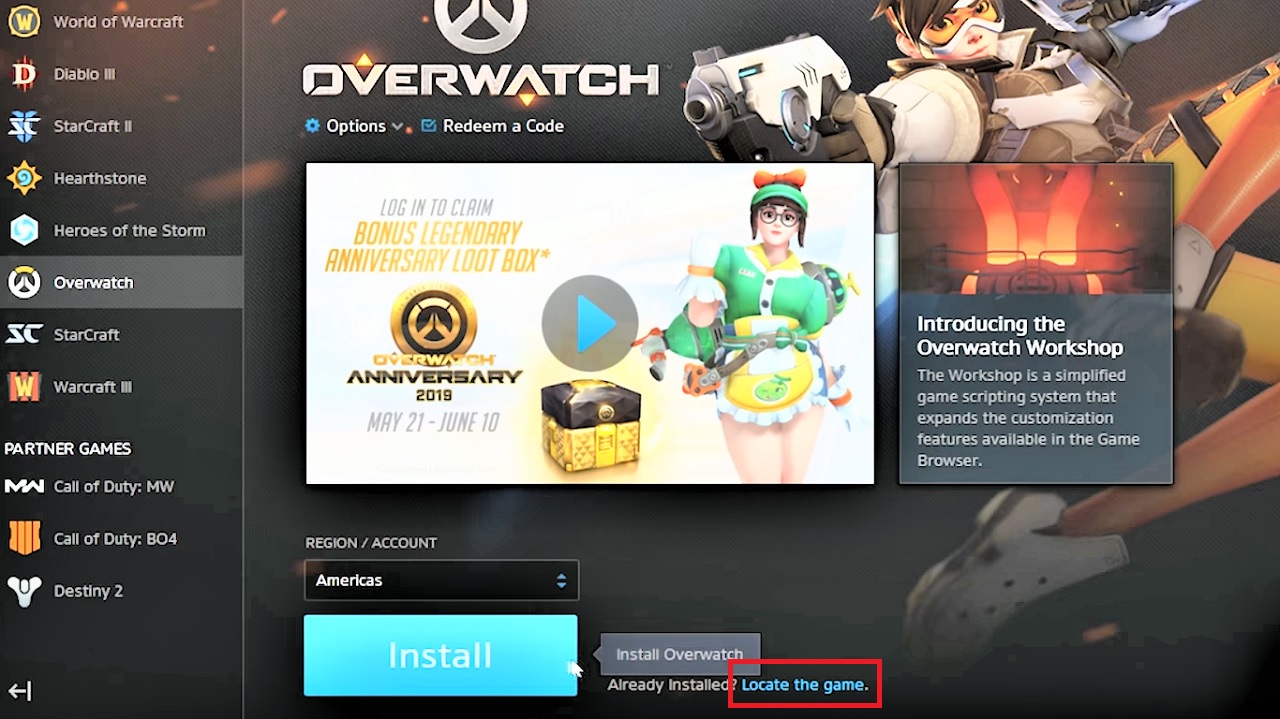
- Locate the Game from in the new folder by clicking on the option next to Install in blue.
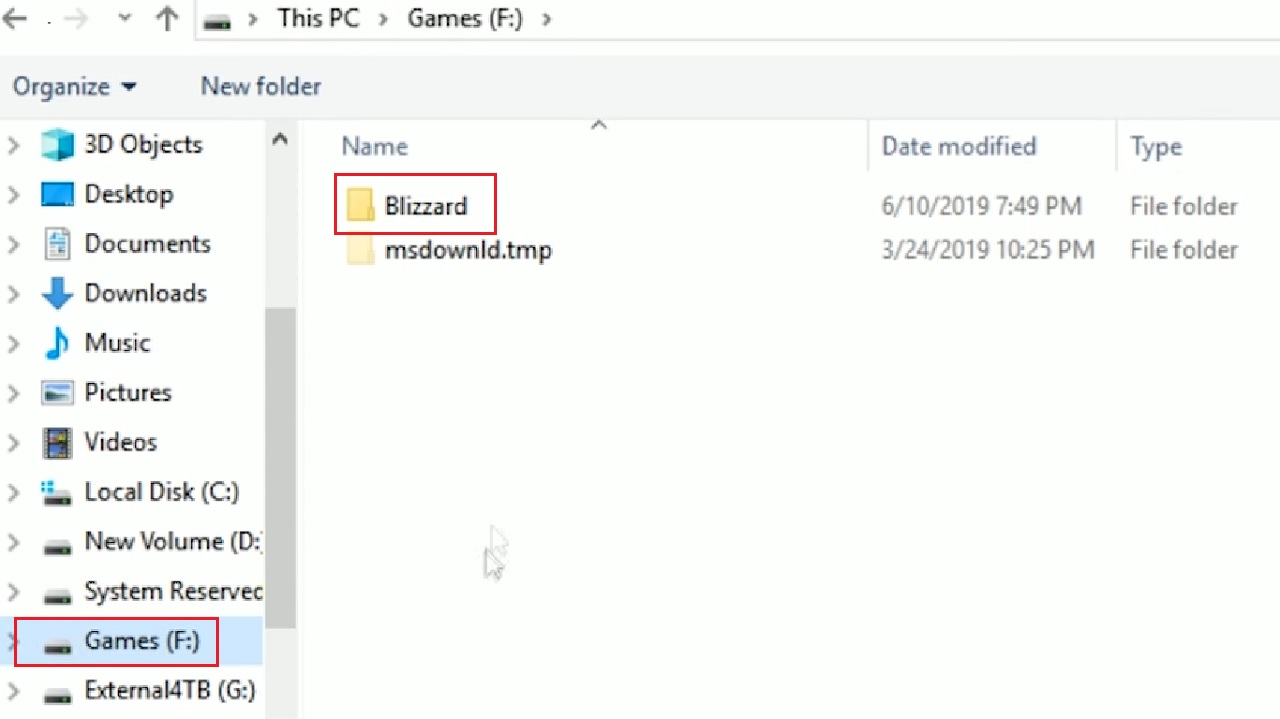
- In the File Explorer window, click on the desired hard drive on the left panel, F in this case.
- Click on the Blizzard folder you created.
- Click on the game, Overwatch in the following window, and open it.
- Click on the Select Folder button.

- Click on the Play button and start playing the game.
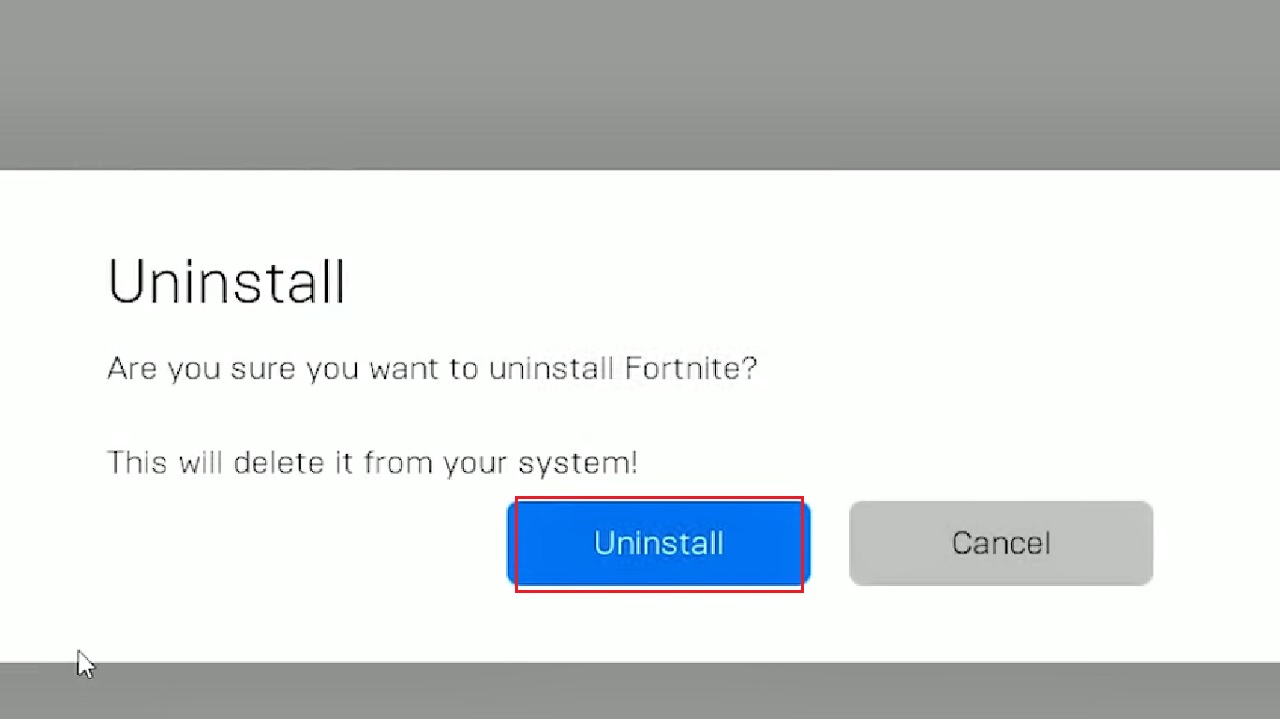
Method 6: Moving Games of the Epic Games Platform
Suppose you want to move the game Fortnite on the Epic Games platform, then this is the way.
STEPS TO FOLLOW:
The steps are the same as in Method 4 to create a folder named Epic, copying the game file, and deleting the old folder from the source drive.
- Now, go back to the Epic game store.
- Click on the Settings button on the game.

- In the new window, click on Uninstall.
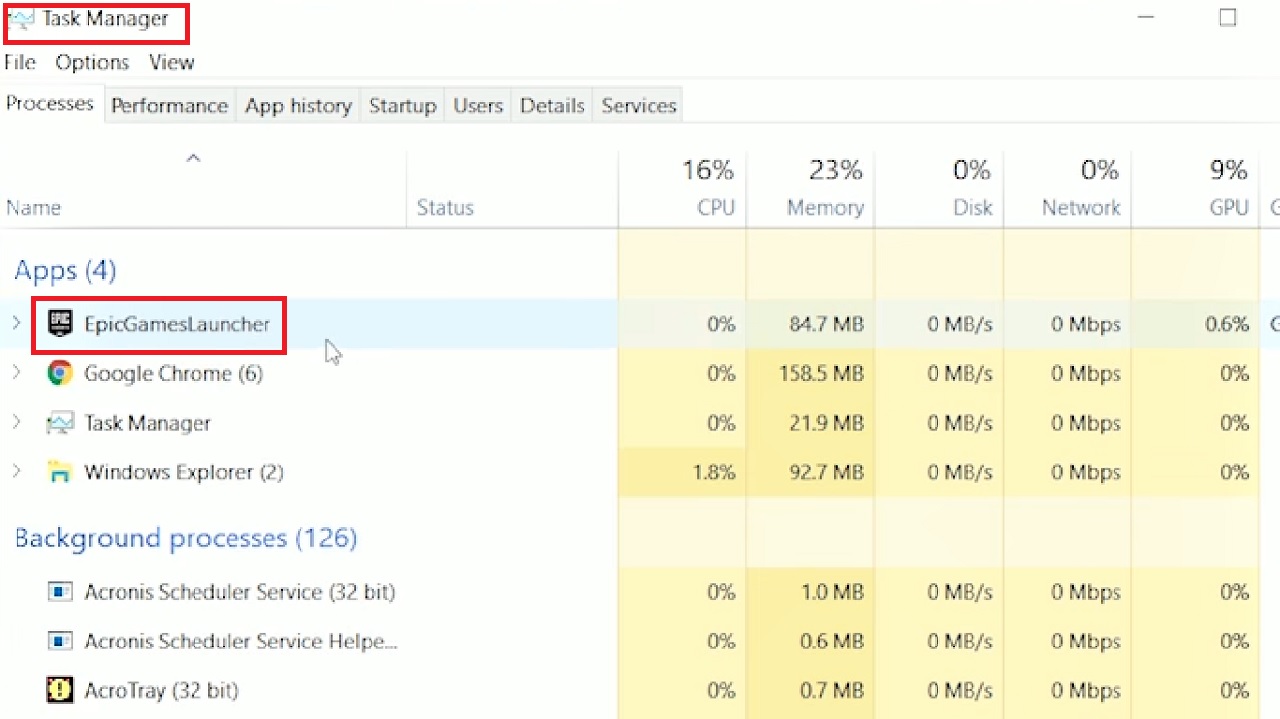
- Now press CTRL + ALT + DEL keys altogether on your keyboard to bring up the Task Manager.
- Select the game.
- Click on the End task button at the bottom right side (not showing in the image).
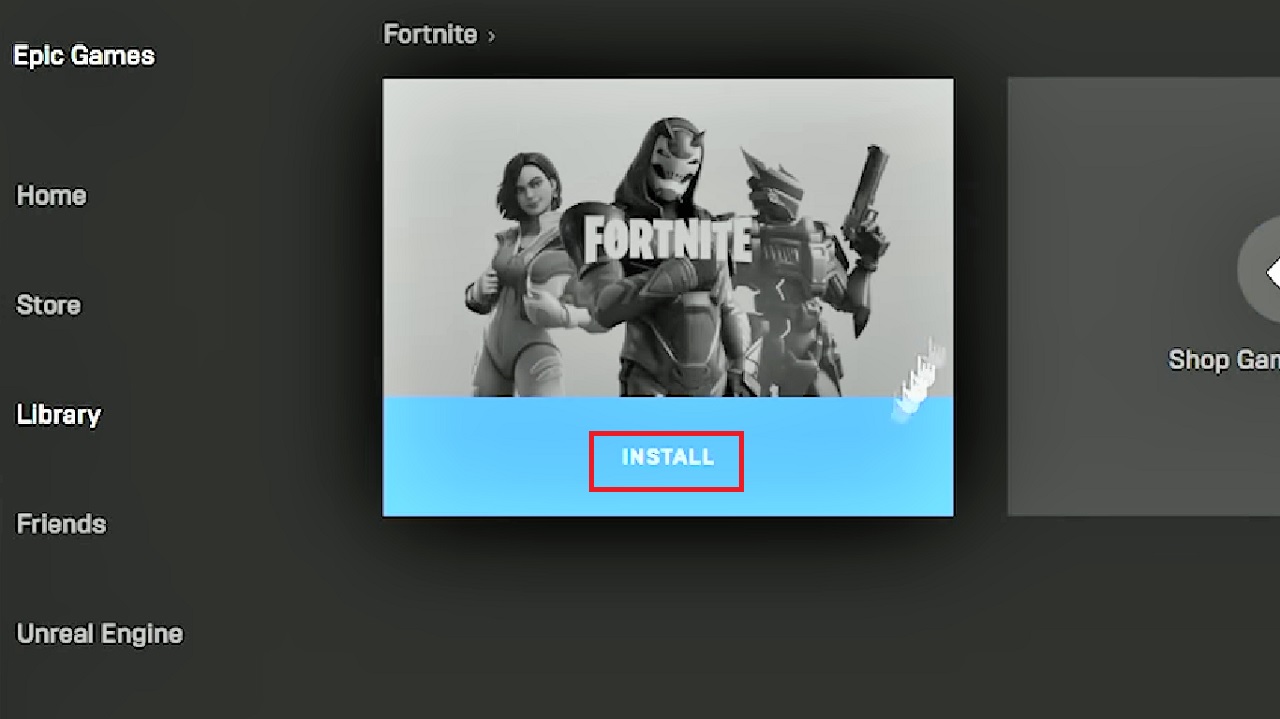
- Now, open the backup Epic game store.
- Go to the library.
- Click on the Install button to install the game.
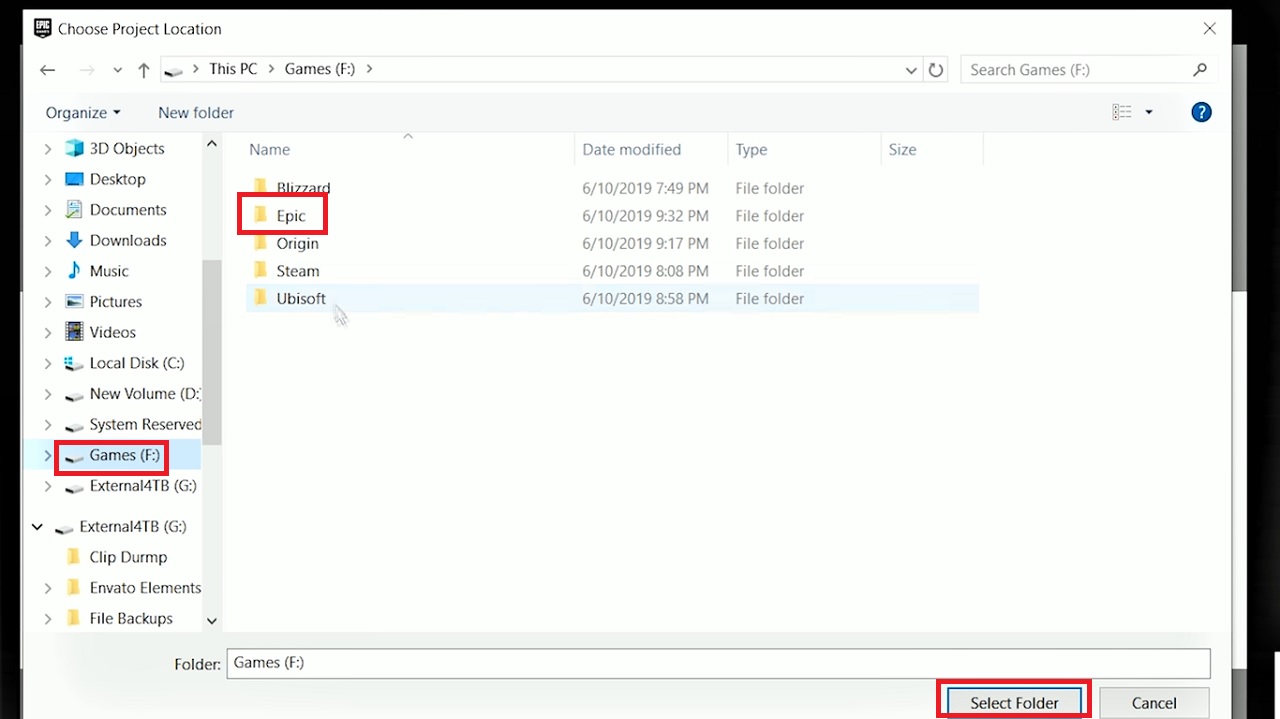
- In the following Choose install location window, click on the Browse button to choose the new folder location (F in this case).
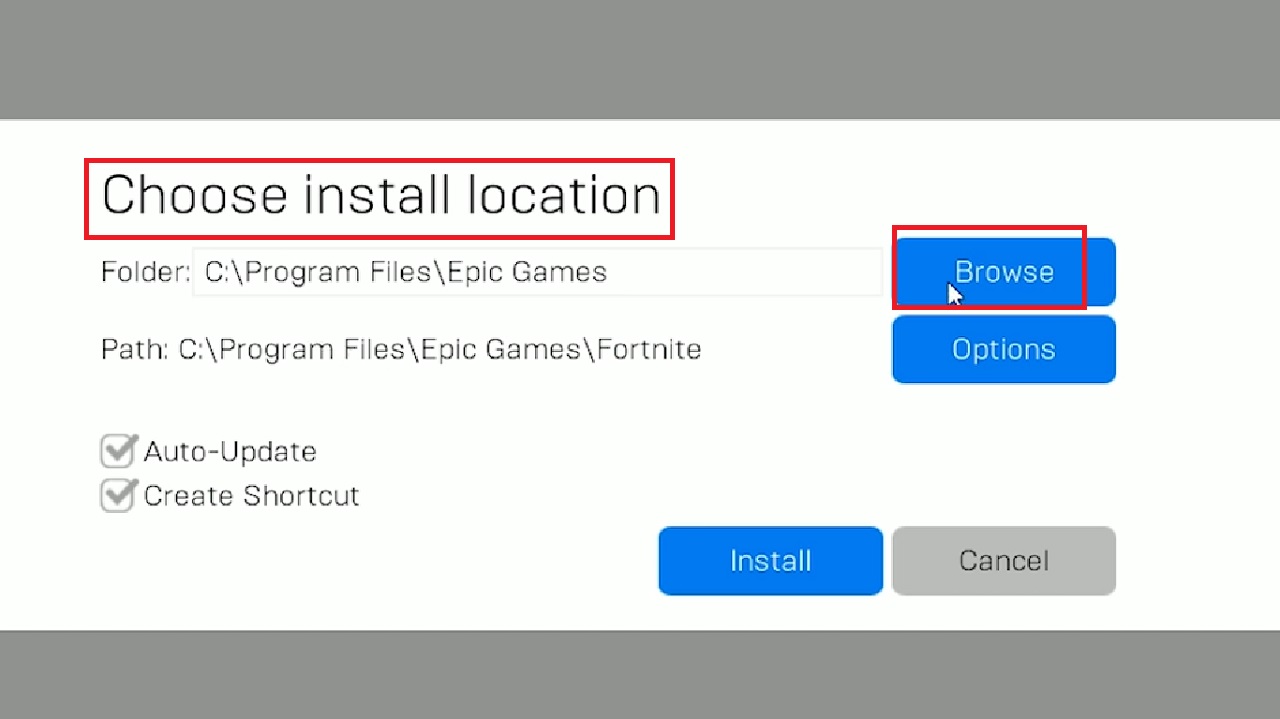
- Choose the Epic folder from the drive F.
- Press Select Folder or double-click on it.
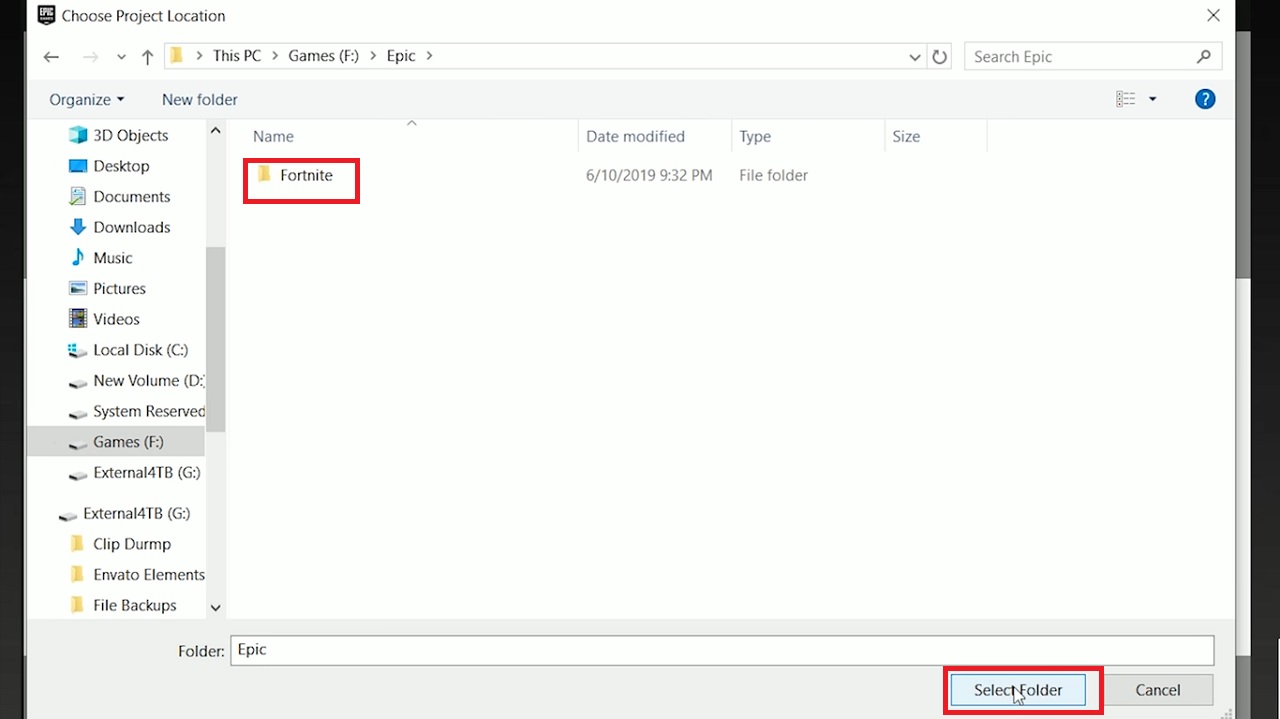
- Choose the game Fortnite.
- Click on Select Folder.
It might say that the Directory must be empty. In order to fix this, click on the Cancel button.
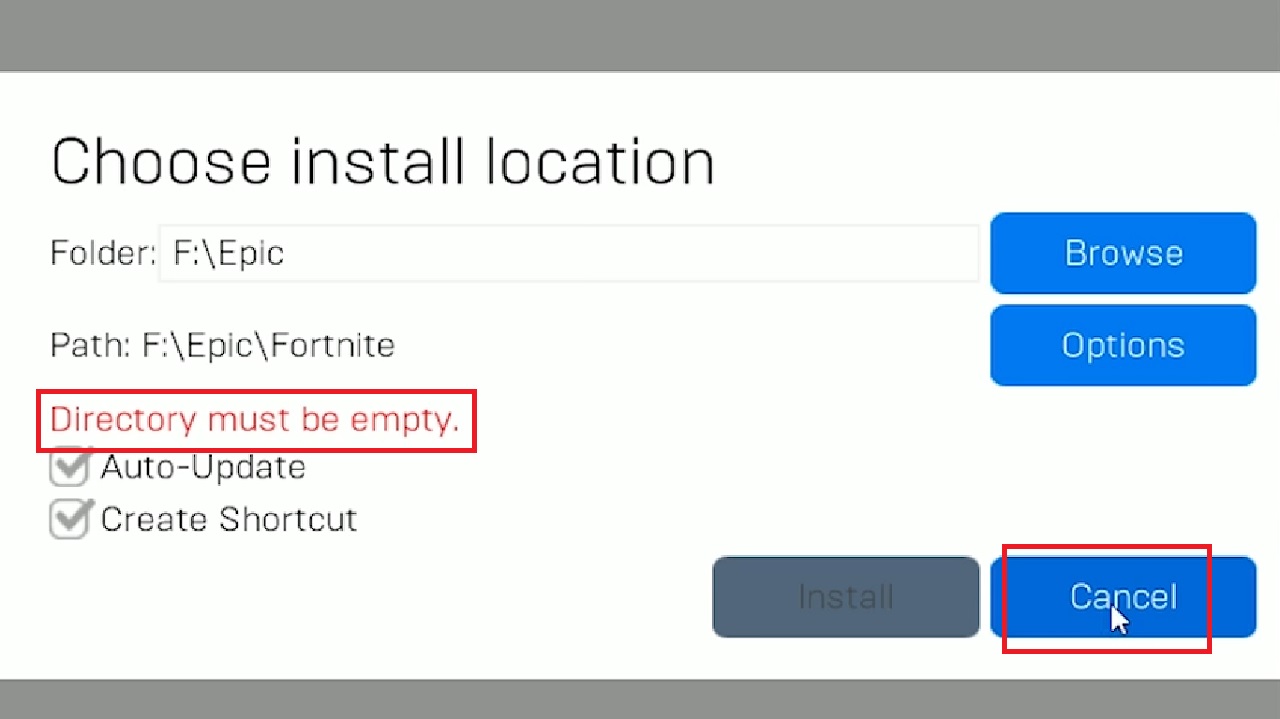
- Drag the Fortnite games folder and put it in the main folder of F Temporarily.
- Go back to the Epic game store > Press Install > Click on Browse > Click on the Epic folder > Press Install.
- Pause the process in the middle of it and open the Epic folder once again and the Fortnite folder.
- Now drag the folder from the old drive to the new drive with all the contents inside it.
- Then, go back to the Epic game store and click on Resume.
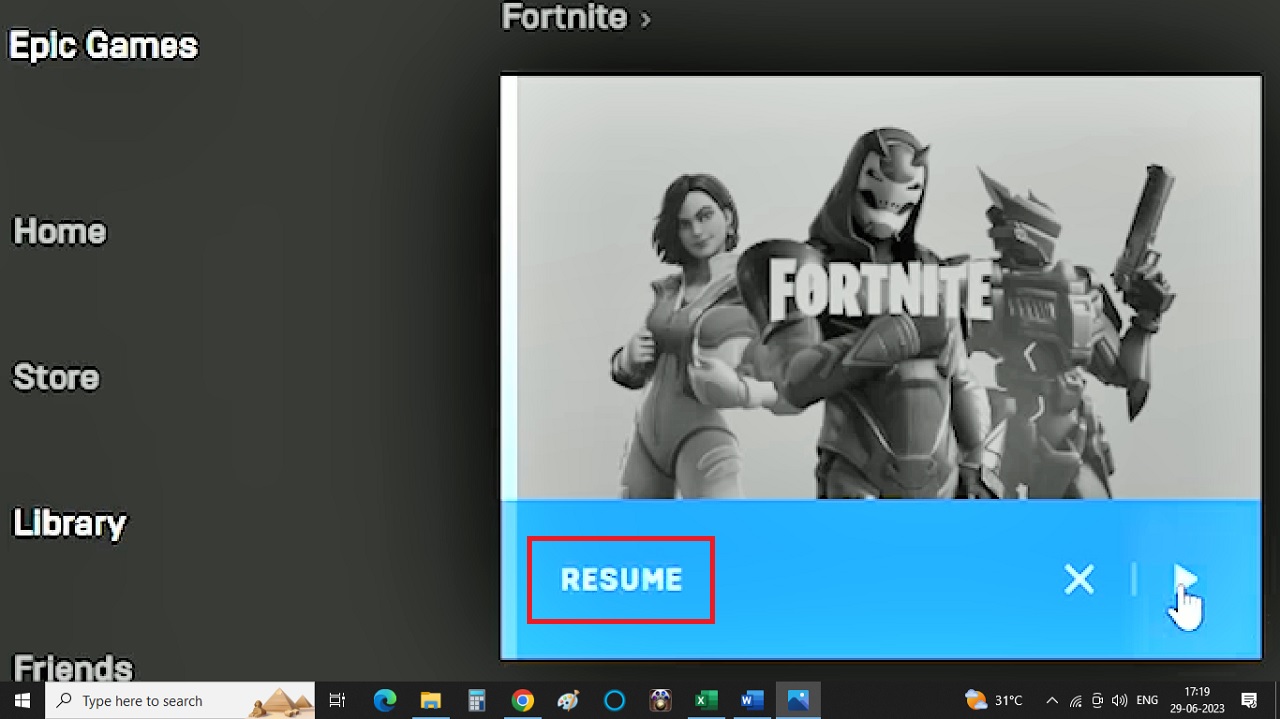
It will now download successfully and you will be able to play the game, opening it from the new location.
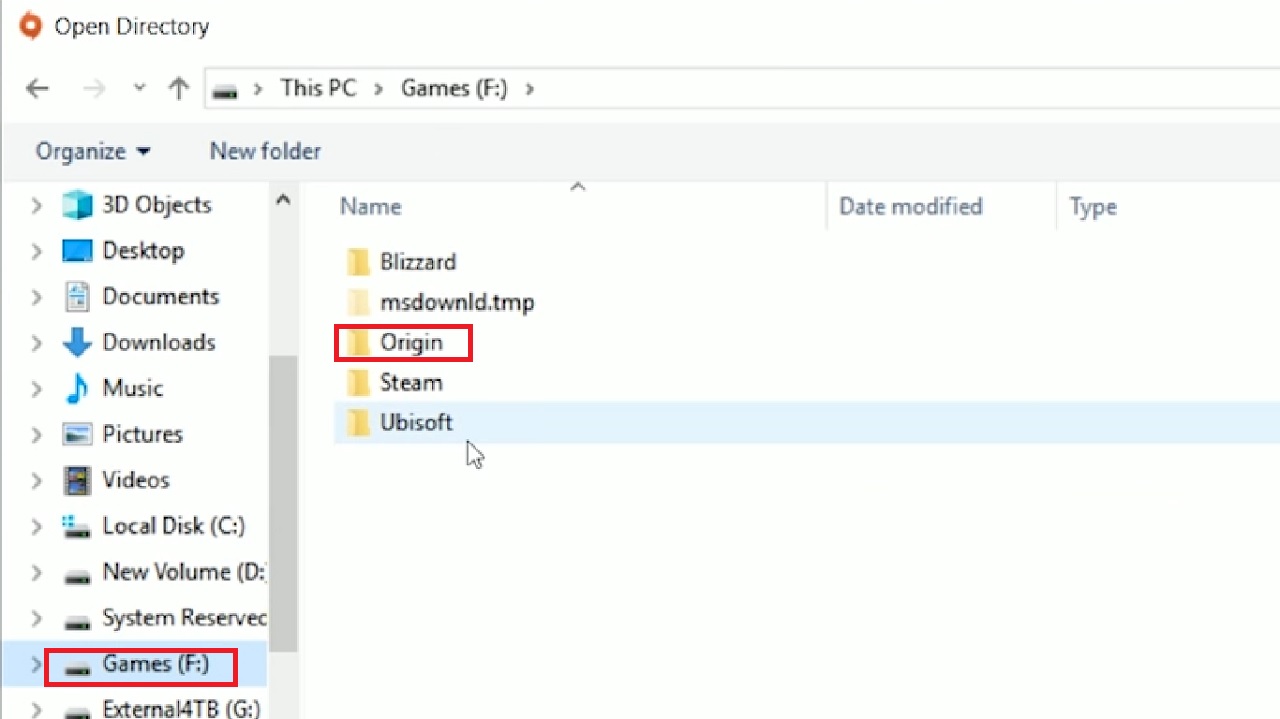
Method 7: Moving Games of the Origin Platform
You may also move games like Apex on the Origin platform from one drive t another in this way.
STEPS TO FOLLOW:
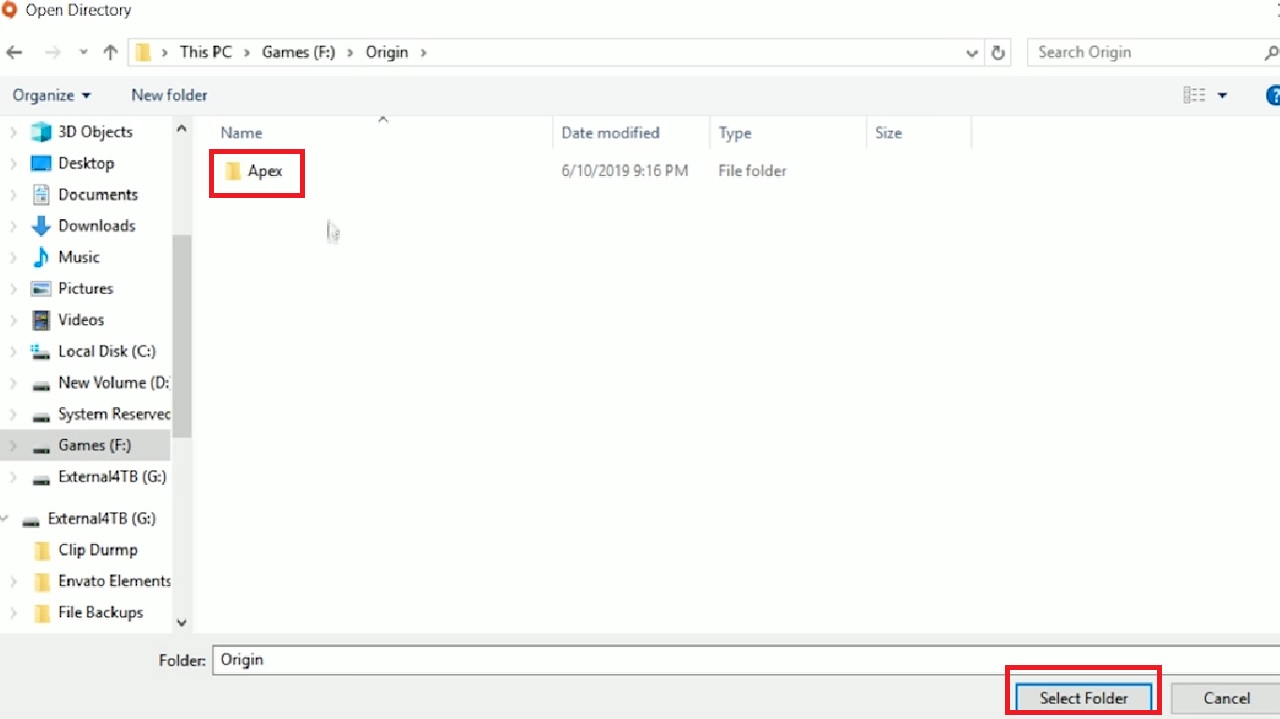
You will have to follow the same initial steps to create the Apex folder and then continue with the following steps:
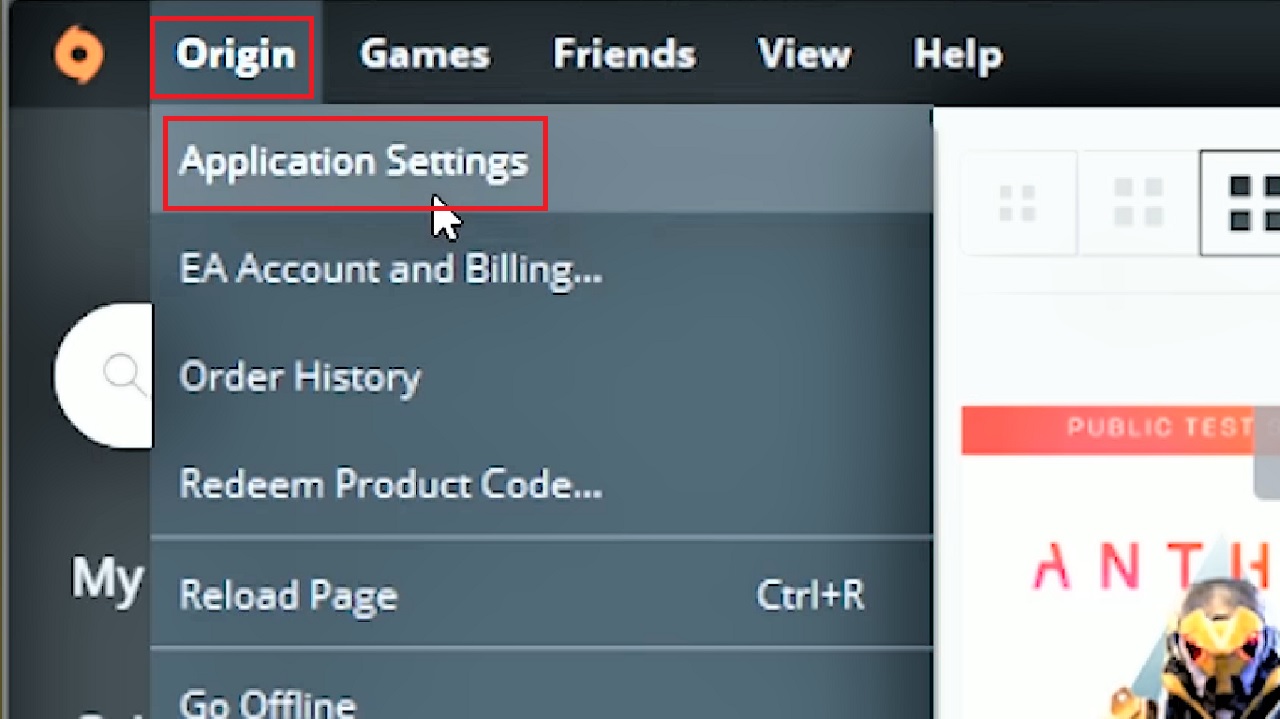
- Go to the Origin Launcher.
- Click on Origin.
- Select Application Settings.
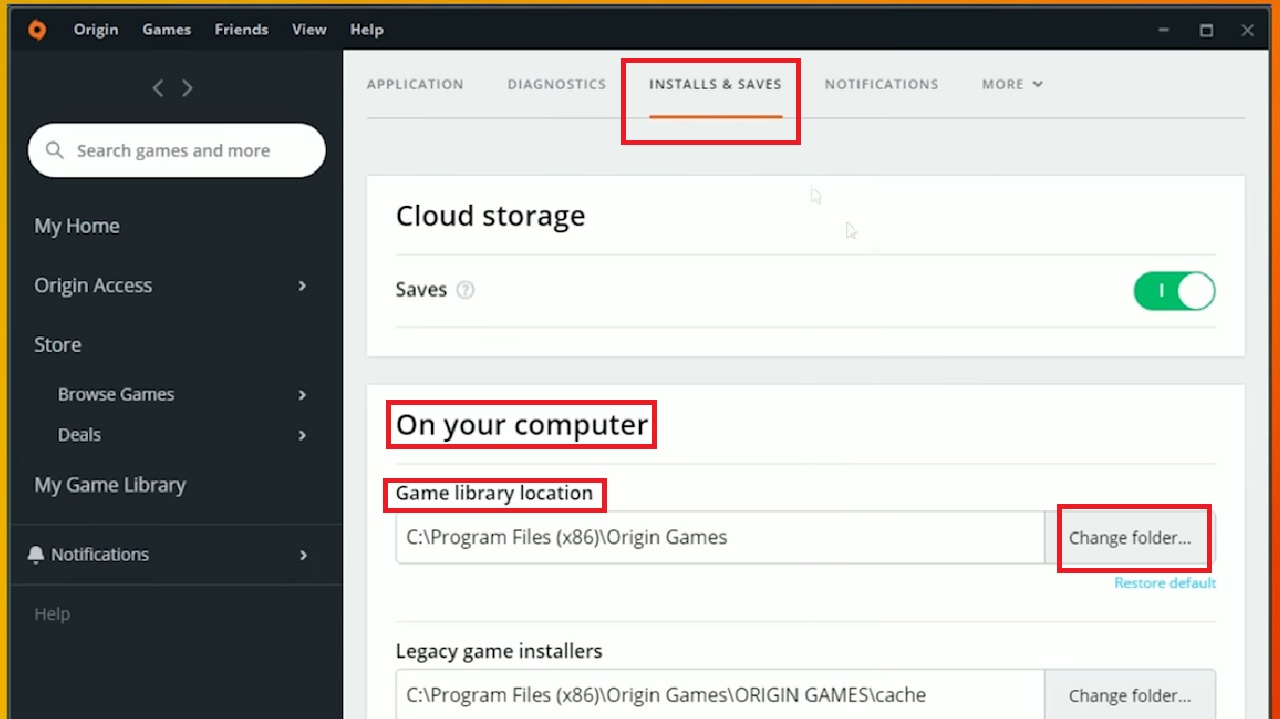
- In the new window, go to the INSTALLS & SAVES tab.
- Then click on the Change folder button in the Game library location section under ‘On your computer’ in the window.
- Choose the desired hard drive and the Origin folder you created. (Once again, it is Drive F.)
- Choose the Apex game folder and click on the Select Folder button below.
- When the prompt saying Your settings have changed appears, click on the Close button.

- Go to the My Game Library on the left panel.
- Select Apex.
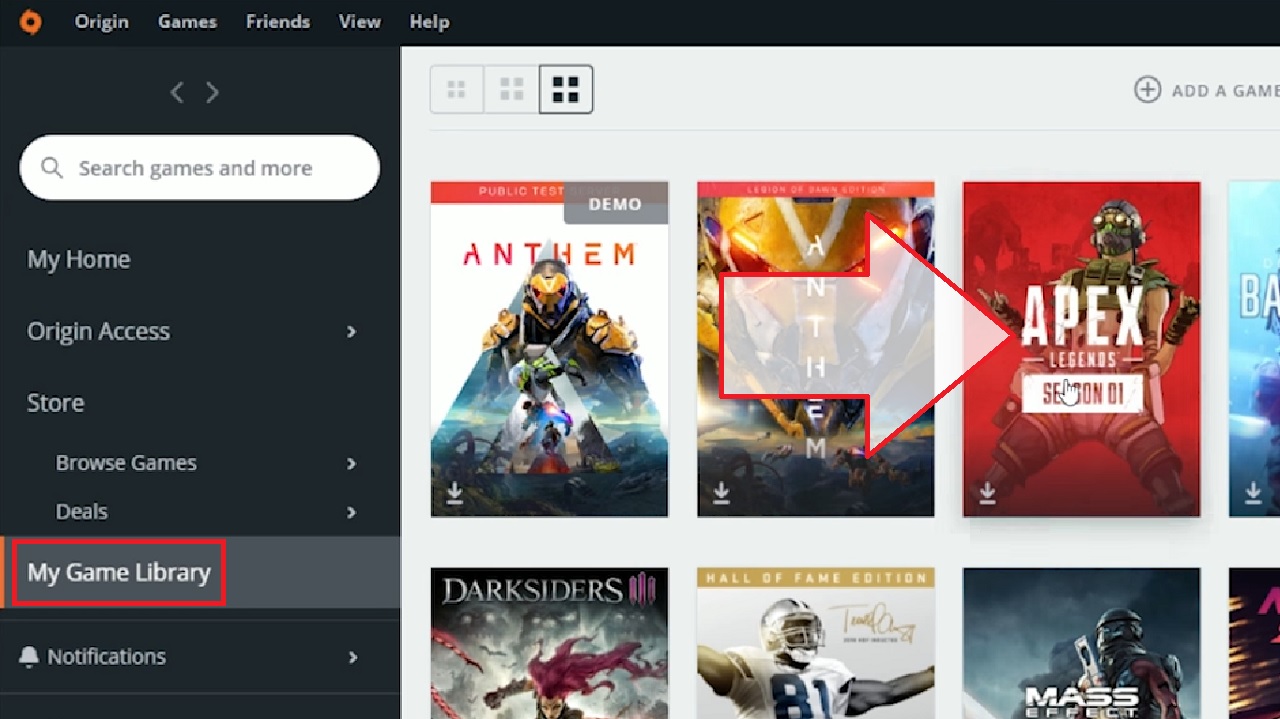
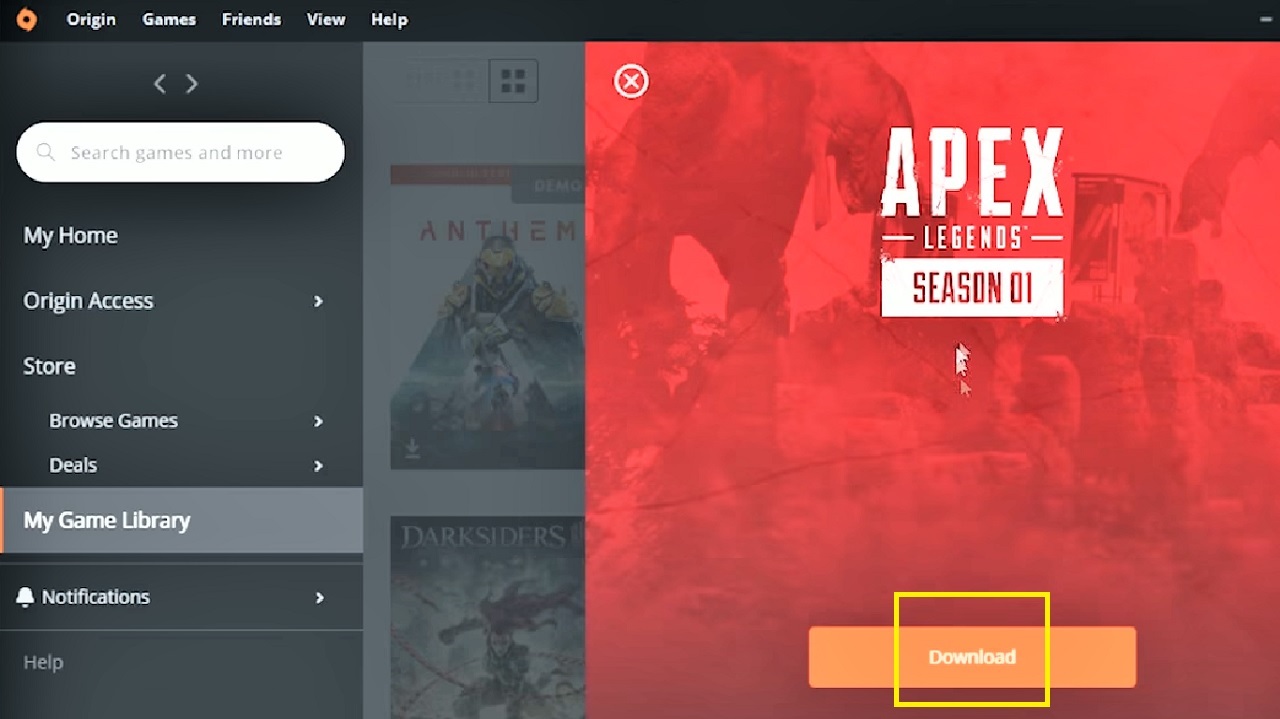
- Click on the Download button in the next window that pops up.
- Click on the Accept button after you Choose your language from the options offered when you click on the small downward arrow in the box under ‘The language you select will determine what language is used in Apex Legends.’

- Press on the Next button in the new Download window that pops up after making sure that the INSTALL LOCATION is that of the new hard drive.
If the drive location is not current, click on the Change Location button to set the right location and then click on the Next button below.
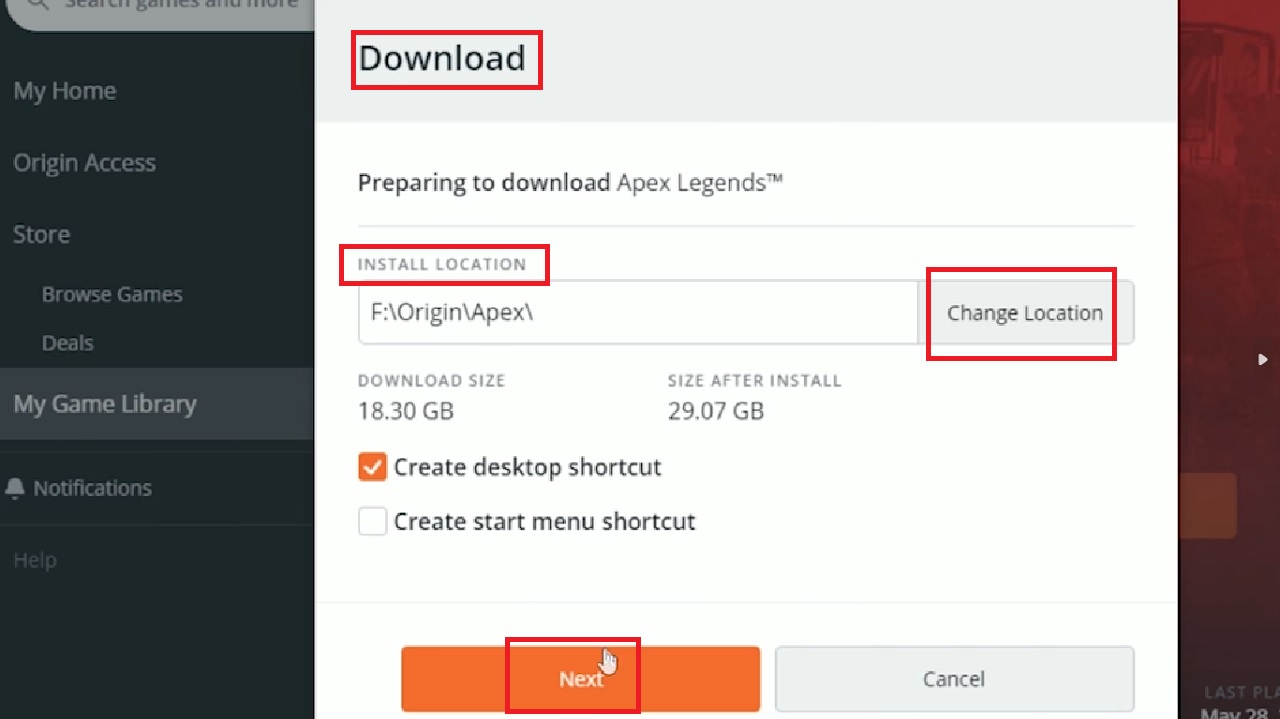
It will take some time to download and move the file to the drive before you can play the game.
Method 8: Moving Games of the Ubisoft Platform
Games like Far Cry 5 and The Division 2 in the Ubisoft platform may also be moved quite easily. In this example, consider you are moving The Division 2 game folder.
STEPS TO FOLLOW:
Like all other platforms, follow the initial steps till you rename the new folder Ubisoft in the new drive, copy the game and delete the old game from the old drive.
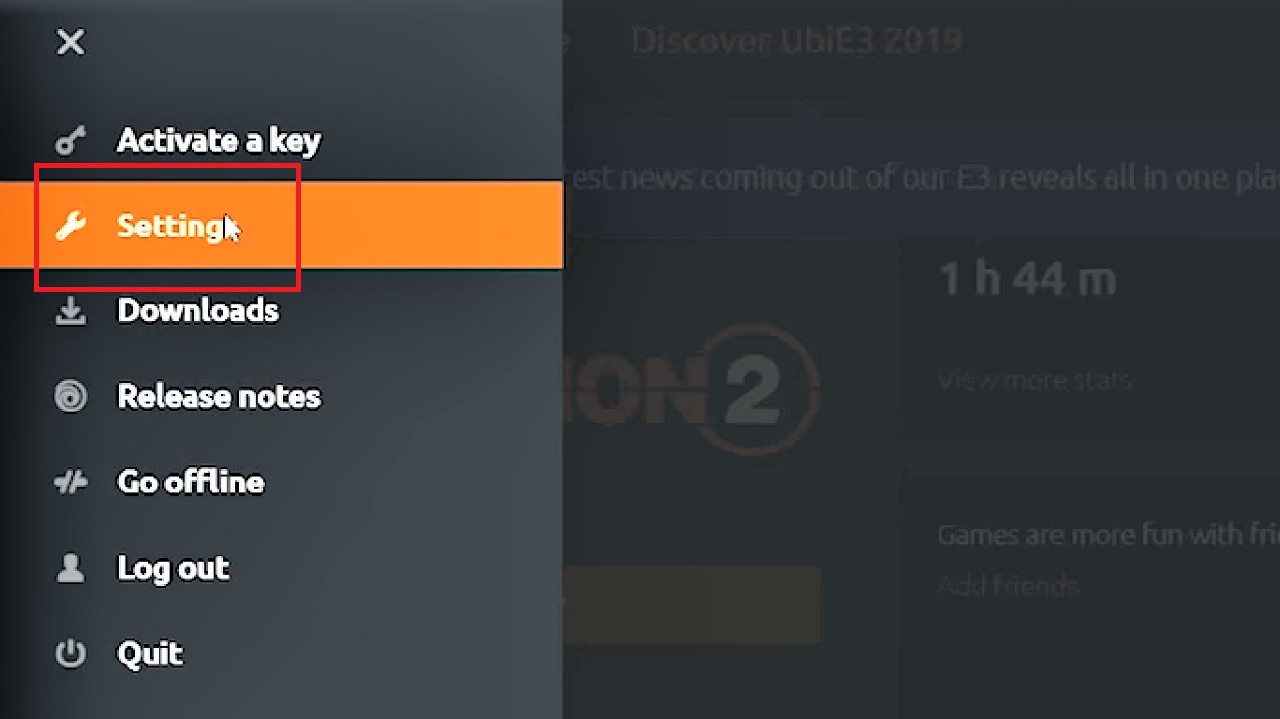
- Open the play launcher and look for the three little horizontal lines on the top-left corner of the window.
- Click on it.

- Select Settings from the drop-down menu.
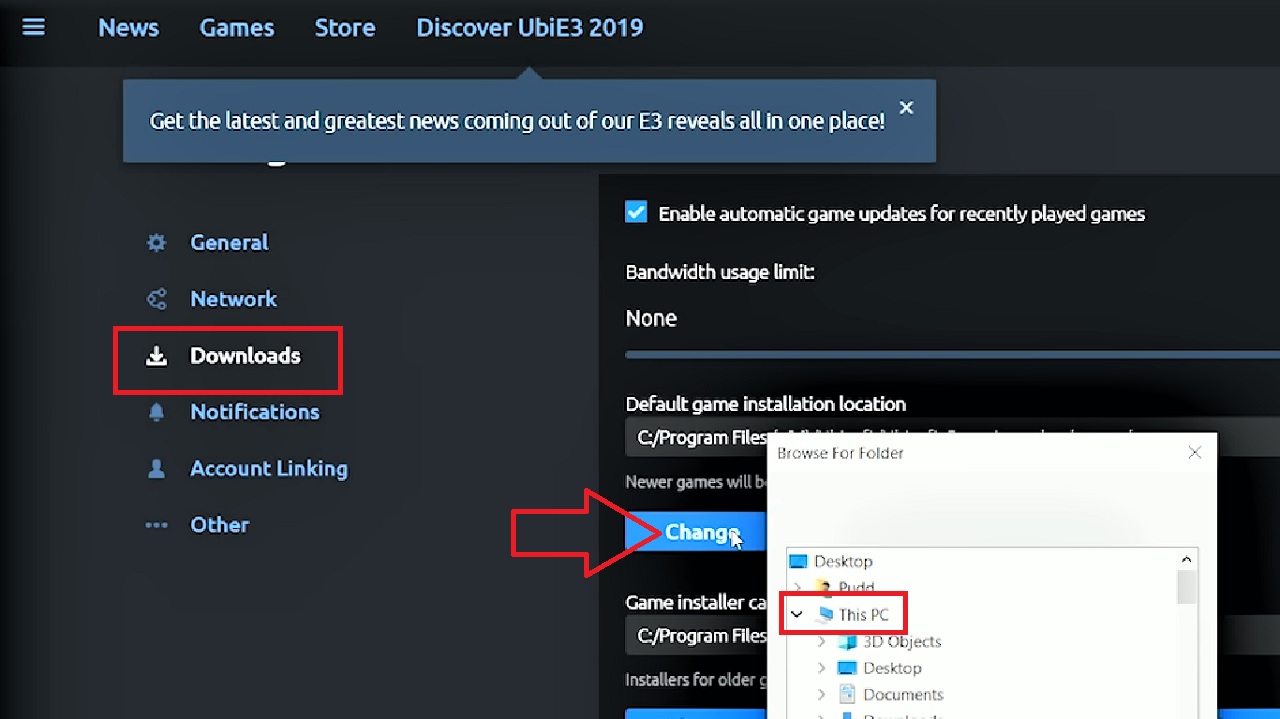
- Click on Downloads in the left panel of the following window that appears.
- Click on the Change button under Default game installation location on the right side of the window.
- From the options that appear, select This PC.
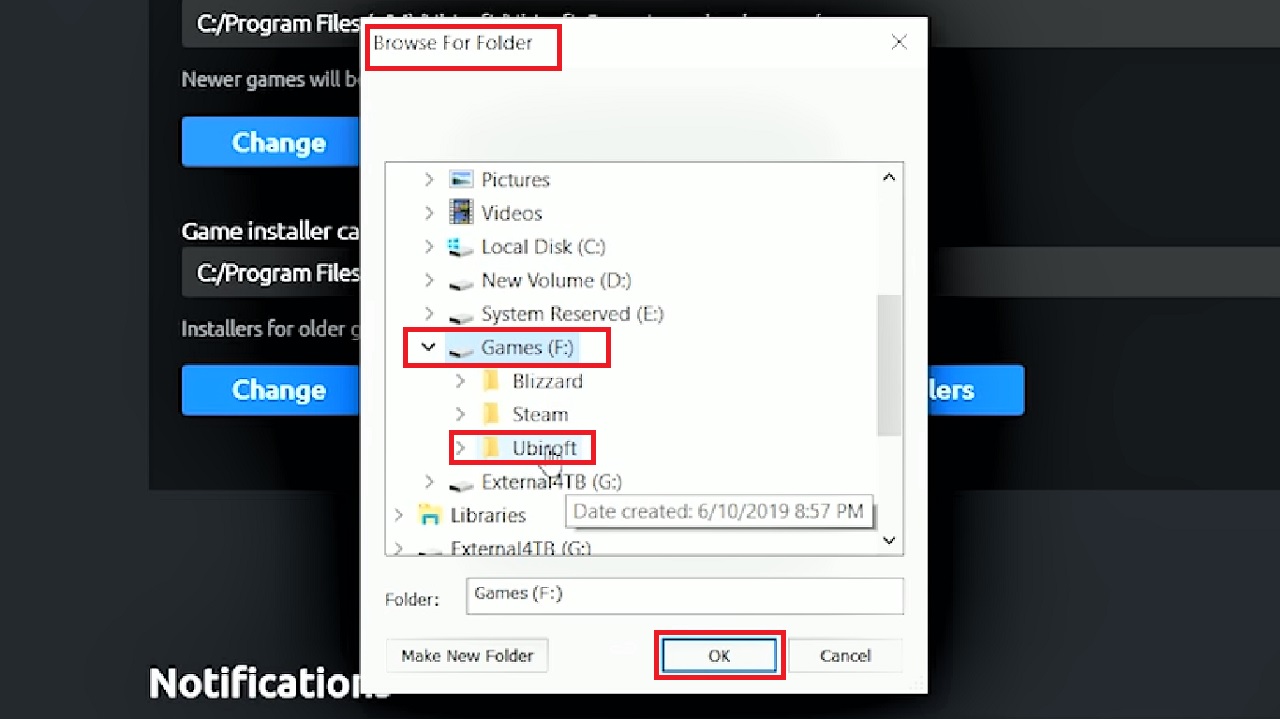
- In the following Browse For Folder window, scroll down and press the little arrow beside the new hard drive, Drive F in this case as well.
- Select the Ubisoft folder.
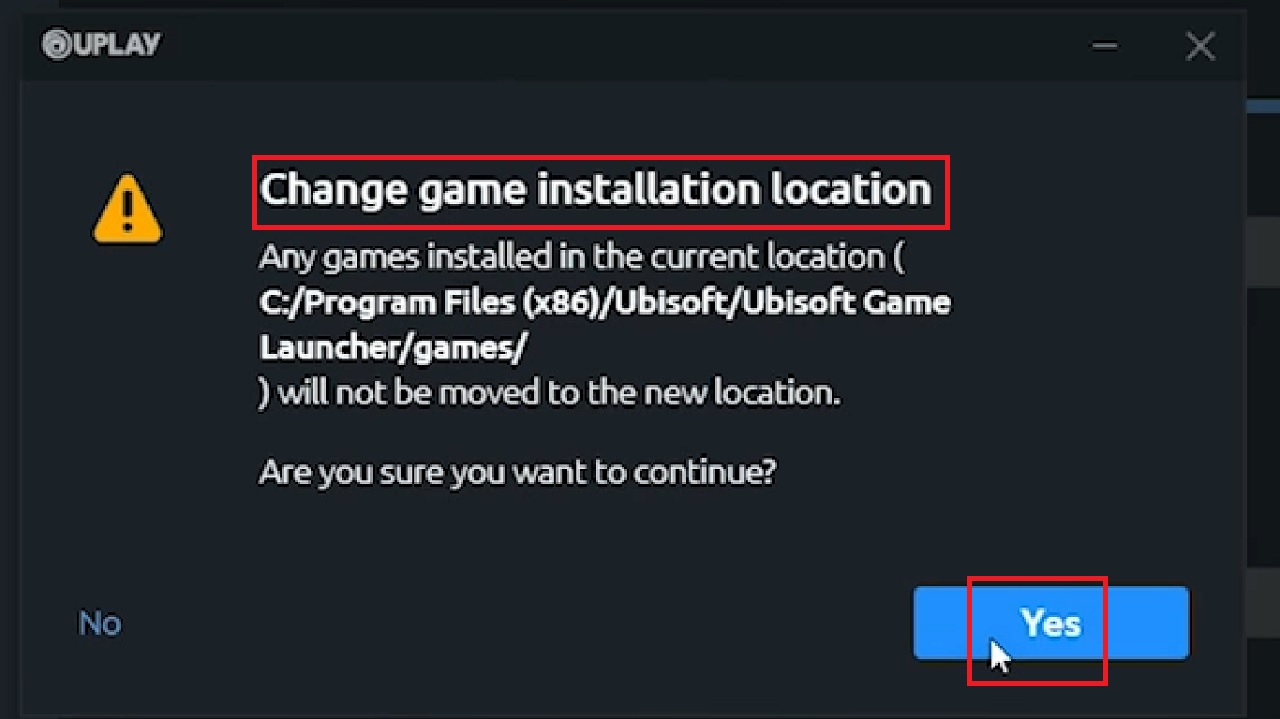
- Click on the OK button.
- Press on the Yes button to confirm that you want to Change game installation location.
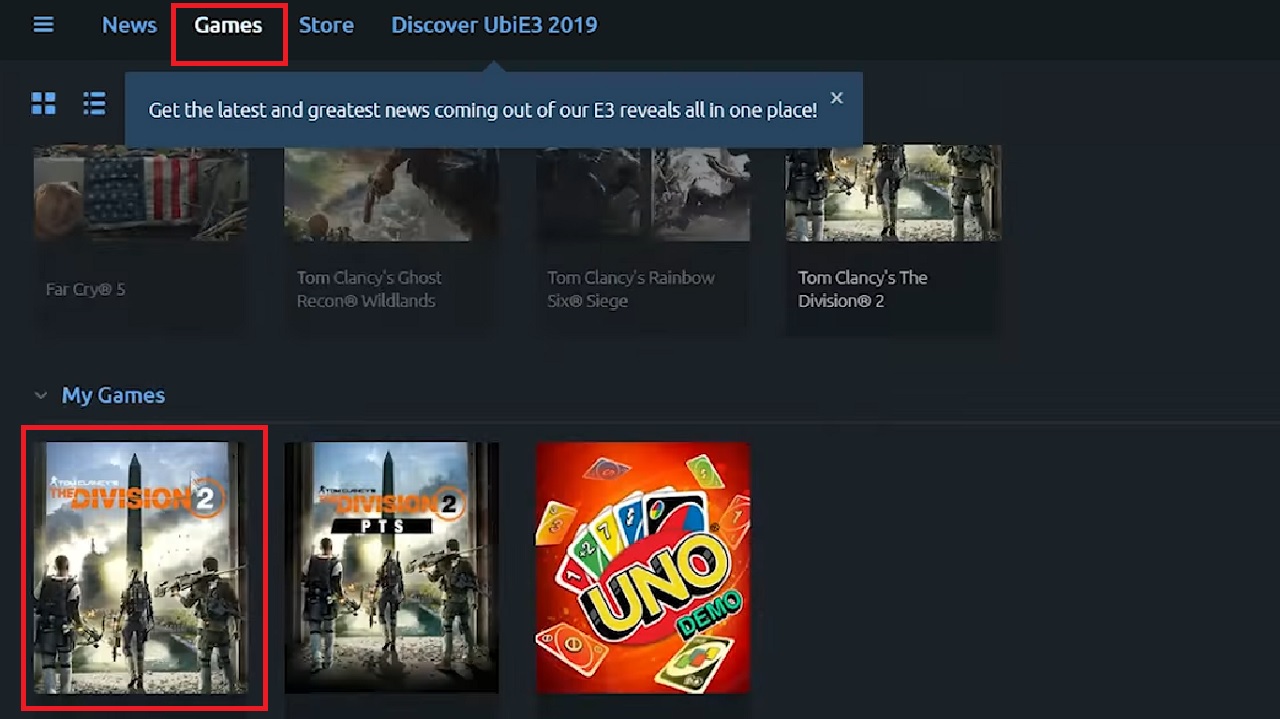
- Go back to the Games tab at the top of the window.
- Select the game.
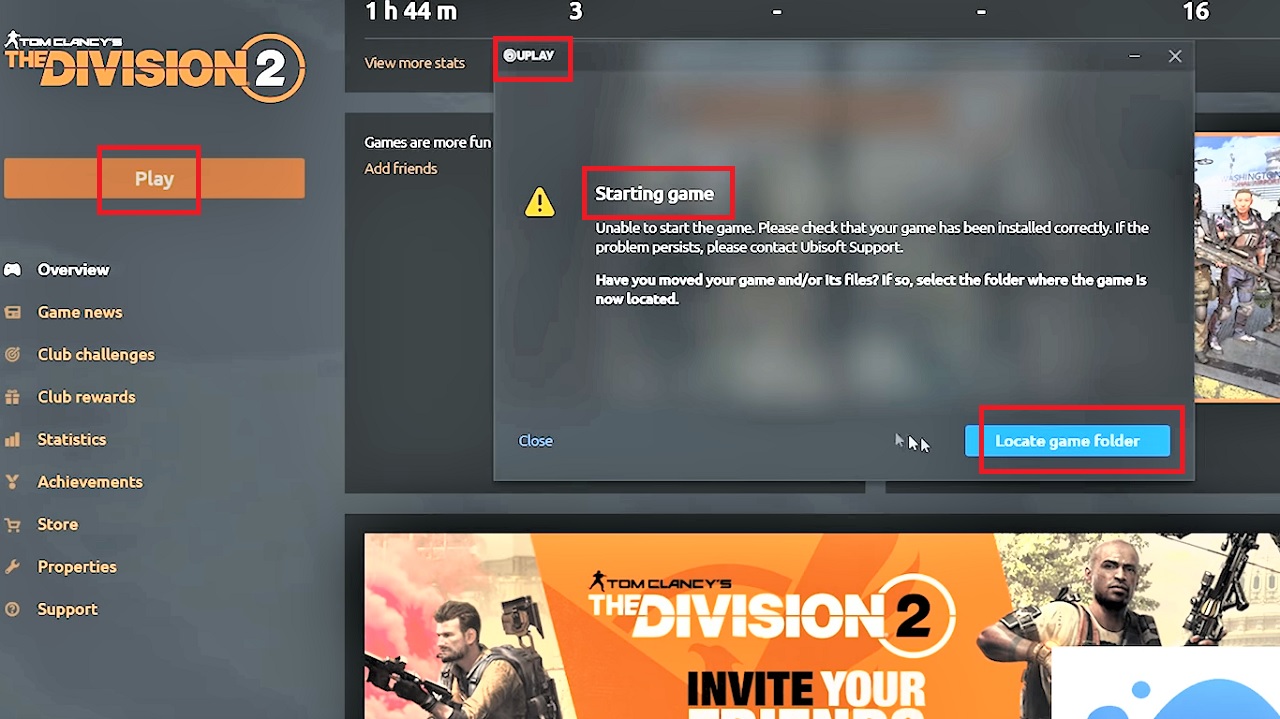
- Press the Play button. You will not be able to play because you will first have to Locate game folder. Click on this button under Starting game in the UPLAY window.
- From the new window, Go to This PC > The game drive > Ubisoft folder > Click OK.
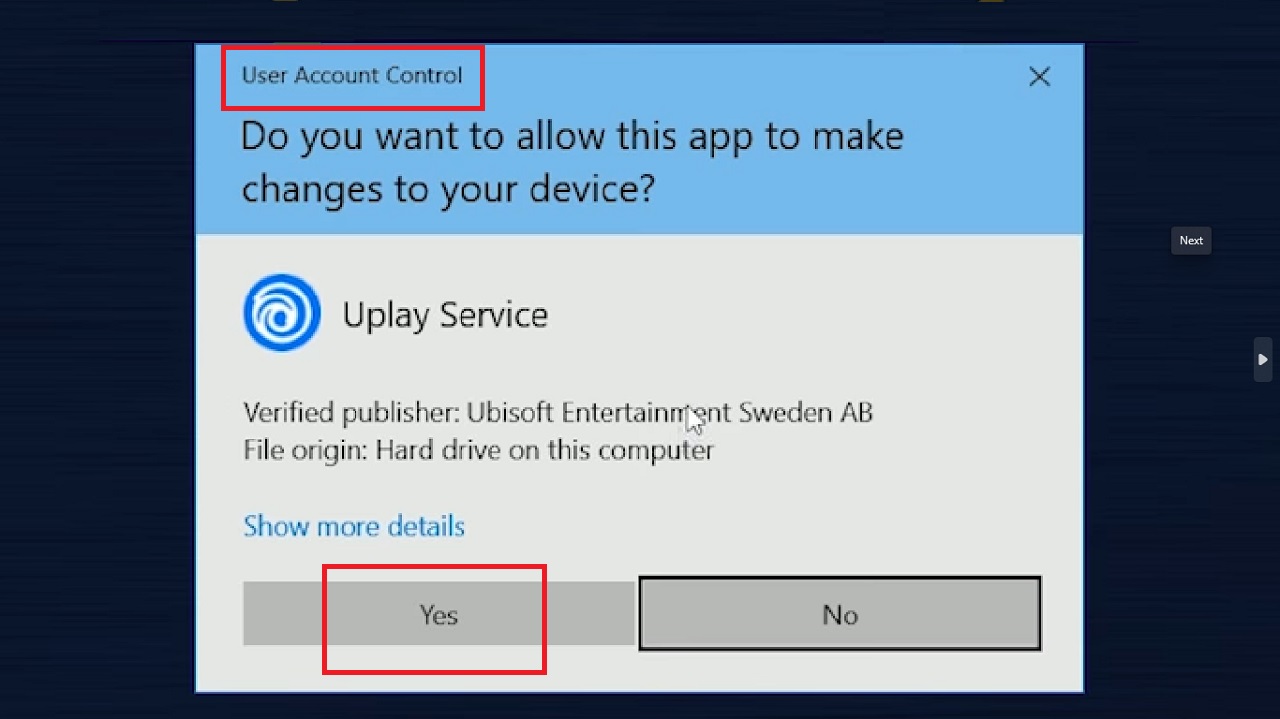
- Click on the Yes button on the User Account Control window that pops up.
This will start locating the game folder automatically.
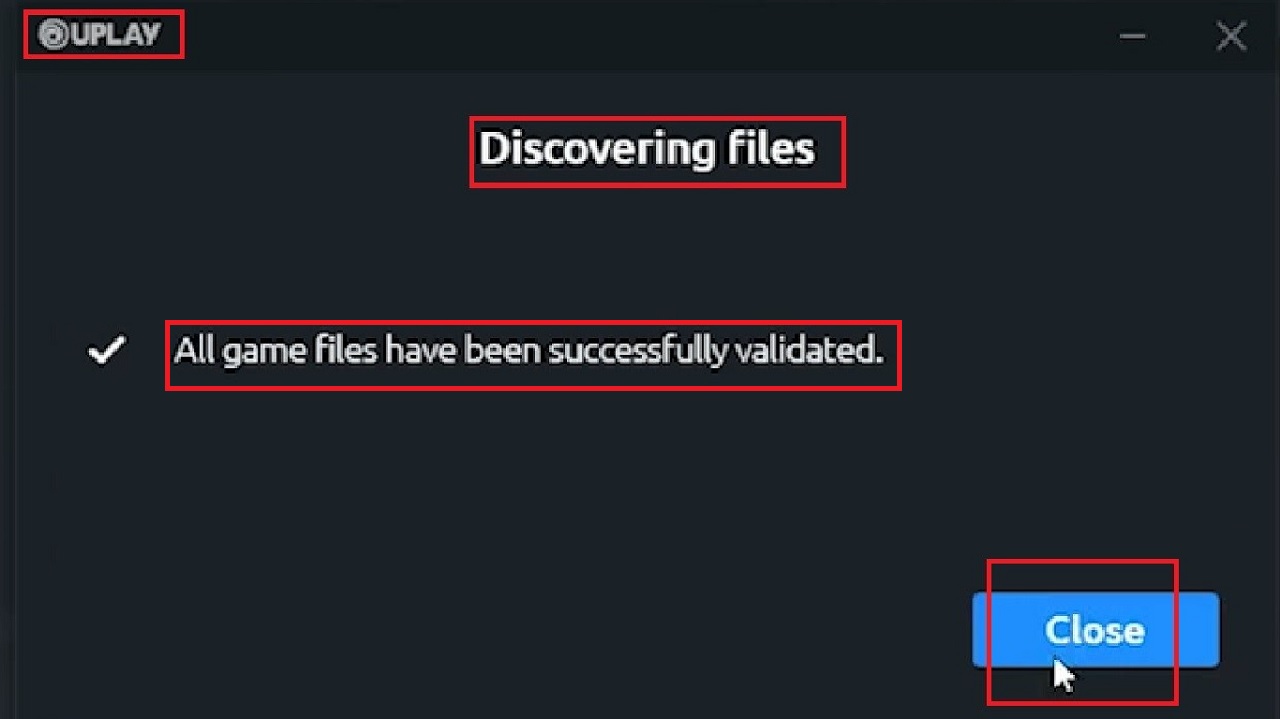
When the process is complete, click on the Close button when the Discovering Files status is displayed in the UPLAY window stating that All game files have been successfully validated.
This will move the game to the other hard drive and you will be able to launch it from there and start playing.
Conclusion
Moving the games downloaded and stored on your PC is not a difficult process.
As you can see, all you need to know is the right process for each particular game you want to move and follow them precisely.