
You can boost any system from a network if you have a boot server. Simply select the right kind of boot strategy from the boot task menu of the configuration assistant and set the network configuration strategy accordingly.
You may also use other methods such as DHCP or Dynamic Host Configuration Protocol, and RARP or Reverse Address Resolution Protocol to boot from a network.
In This Article
KEY TAKEAWAYS
- You can boot a standalone system that is unable to boot from the local drive from a network temporarily by using a PXE network boot directly without requiring an installation CD or a configuration assistant.
- Booting from the network is ideally done in a few specific ways that include starting up the remote-boot PC and the BIOS configuration or a specific hotkey instructing the system to boot on the network.
- It also involves IP address discovery based on the DHCP request that knows the target and has a group of dynamic addresses that can be distributed freely. Other parameters are also given for the boot process.
- OS distribution server discovery is also used in PXE-based booting. It delivers the target PC the exact network boot program which responds to the first server replying and downloading data with MTFTP.
- Server connection and configuration of the OS is another way to boot from the network by transferring files via the multicast or unicast protocol. This process involves repairing or installing a new OS.
Why Do You Need to Boot from the Network?
You will need to boot from the network when you want to manage the hard drive storage of your computer in a centralized manner.
A few other significant benefits of booting from a network are:
- Reduce capital expense
- Lower maintenance cost
- Install unattended systems
In addition to the above, network boot is also helpful for cluster computing with systems or nodes that do not have any local drive in them. It also helps in creating a platform for executing the script-driven installation of the operating systems on the target computer.
How to Boot from a Network?
Ideally, you will need to set the network configuration strategy appropriately in order to boot from a network.
Though the default strategy followed is the RARP, you may also use a DHCP boot server for the same to avail of the PXE network boot.
Some other useful ways to boot a system from the network are:
- Using a specific installation CD or a configuration assistant boot diskette
- Using the BIOS configuration program of the system or the network adapter or PXE network boot
- Reinstalling the operating system
- Sharing a drive or a folder
All these processes need to follow a few specific steps in parts or in a single process as mentioned below. It is naturally a long process.
For beginners, it can appear to be a bit complex, and therefore extreme caution must be taken to avoid any errors that may affect the functionality of the system adversely.
Method: Creating New Partition Volume and a Network Path
This is a long process and mainly comprises several parts. It mainly involves using the PXE or Pre-Boot Execution Environment. This single method includes every step mentioned above.
The first part involves creating a new partition volume on your computer and then using relevant software for the actual booting process in the following steps.
STEPS TO FOLLOW:
- Open This PC or My Computer.
- Right-click on This PC on the left pane and select Manage.
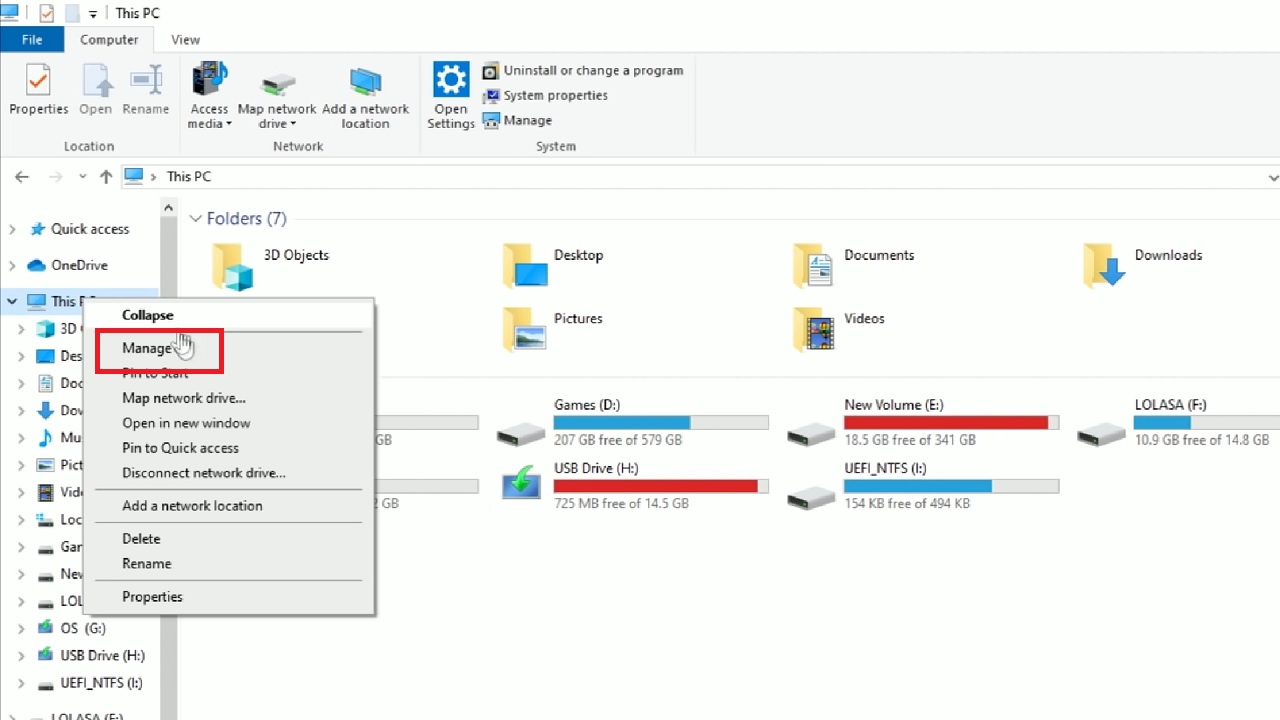
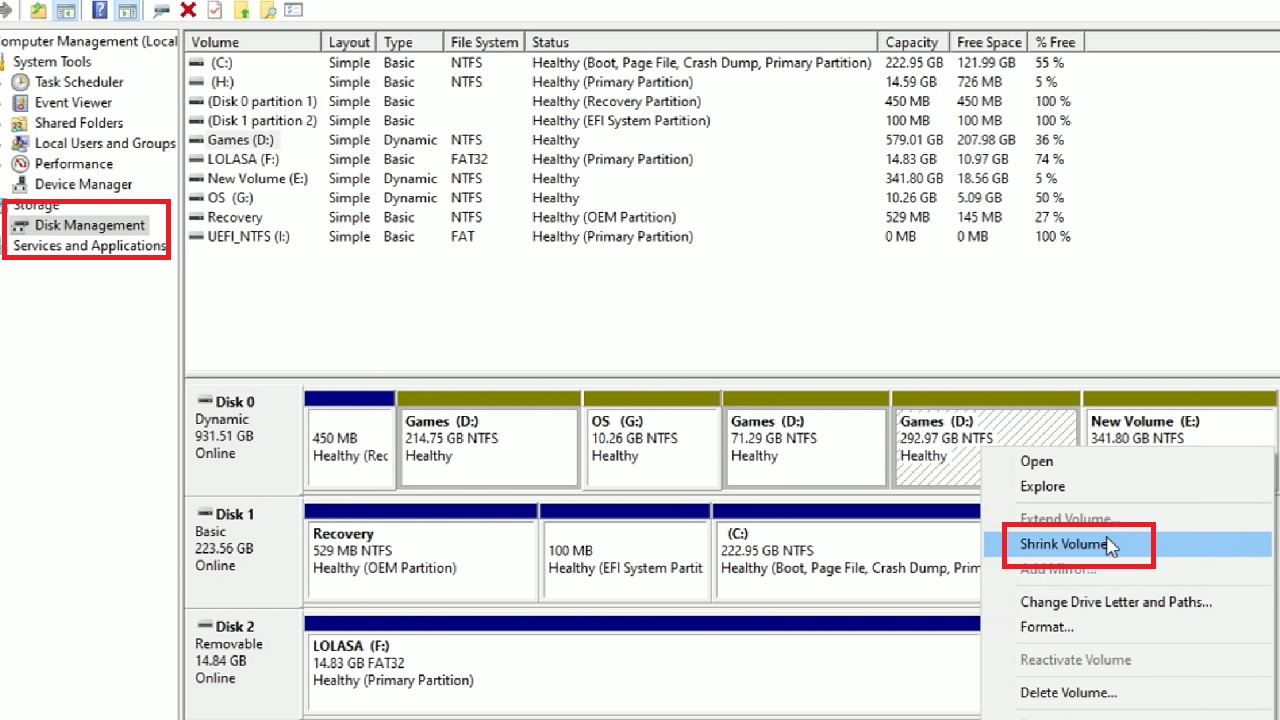
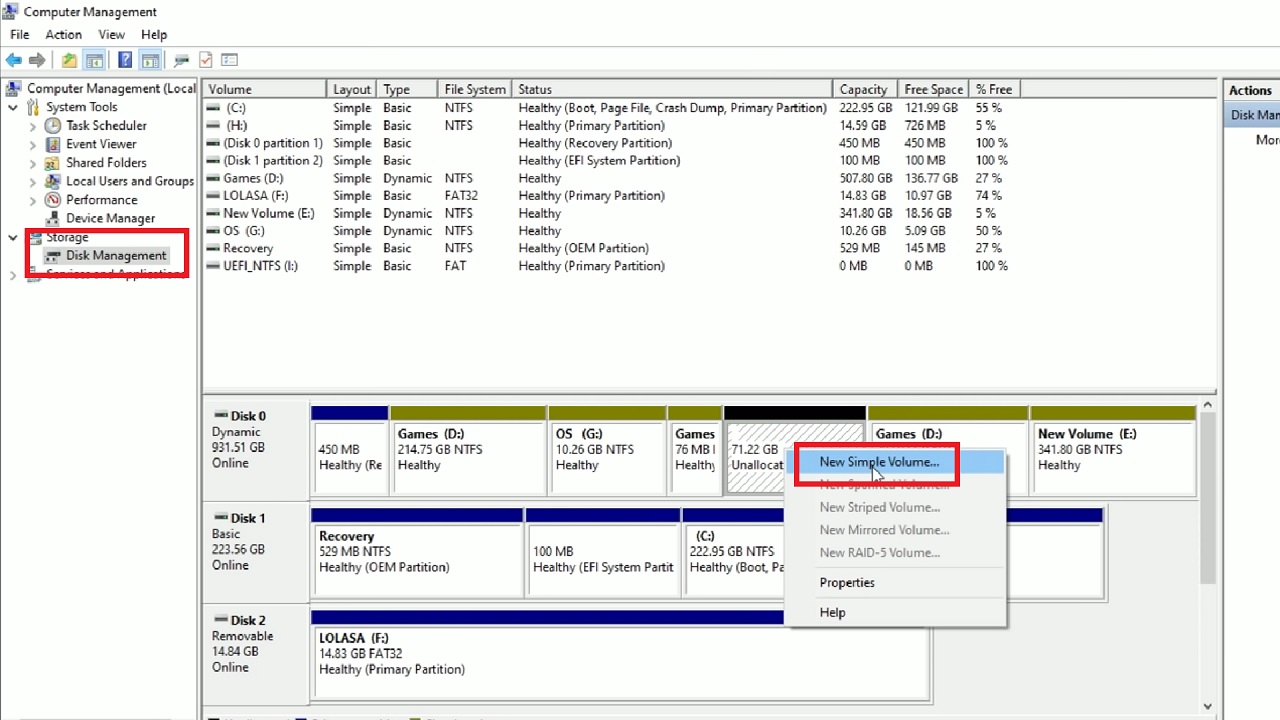
- Go to and click on the Disk Management tab on the left pane of the Computer Management window.
- Select a drive and right-click on it.
- Select Shrink Volume.
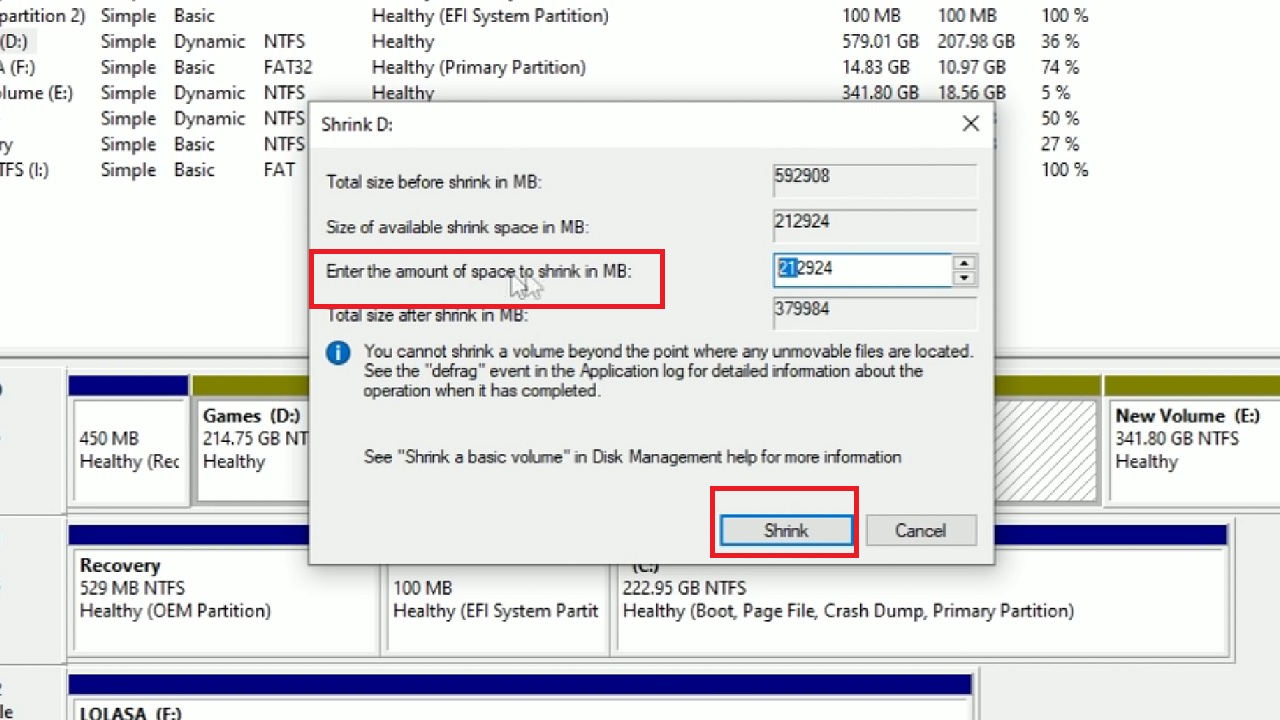
- In the new window, Enter the amount of space to shrink in MB in the relevant box.
- Click on the Shrink button below.
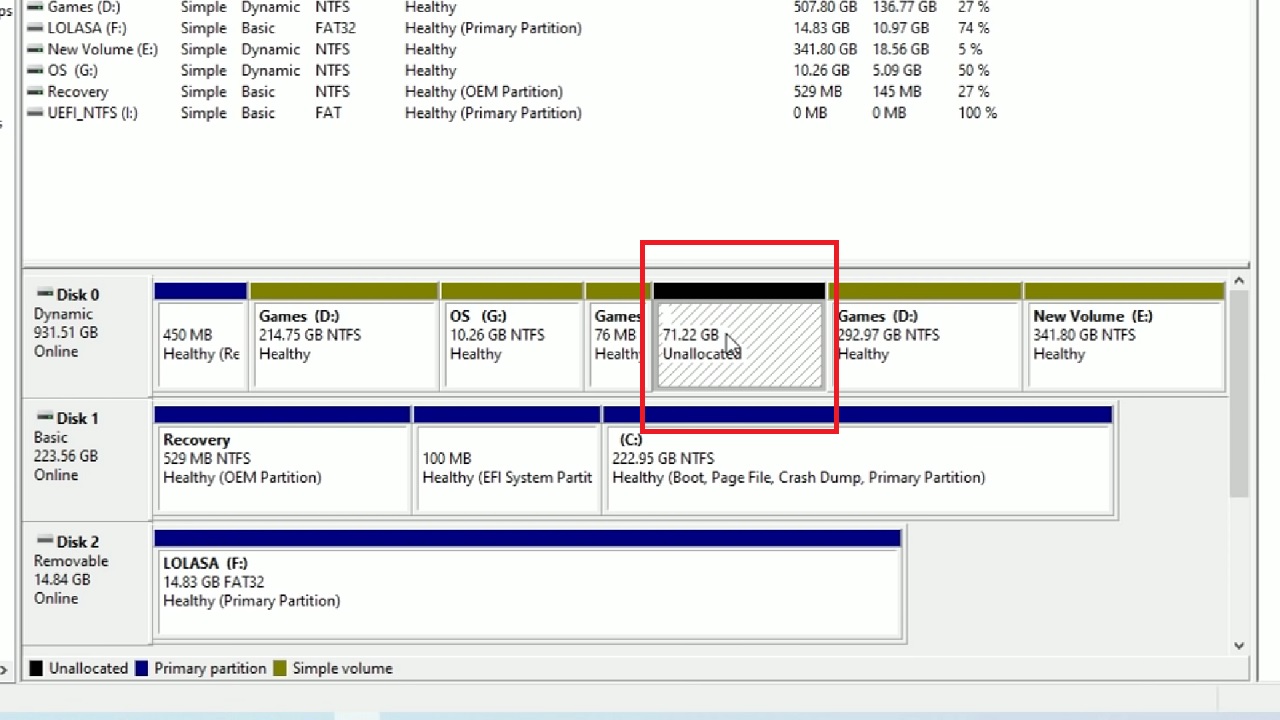
- This will create an Unallocated partition as shown below:
- Right-click on the newly created partition.
- Click on New Simple Volume from the list of options in the drop-down window.
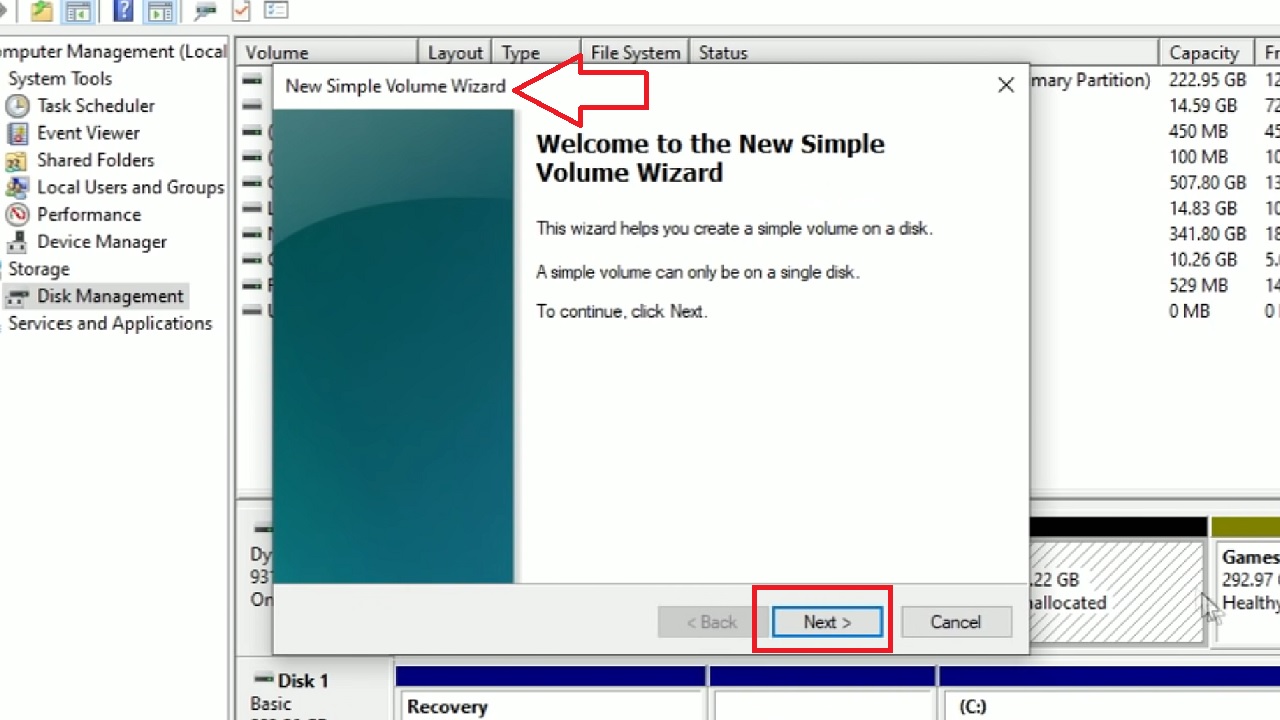
- This will open the New Simple Volume wizard.
- Click on the Next button.
- Continue clicking on the Next buttons in the following windows.
- Then finally click on the Finish button in the New Simple Volume wizard.
This will create a new blank partition which you can see in My Computer as shown below:
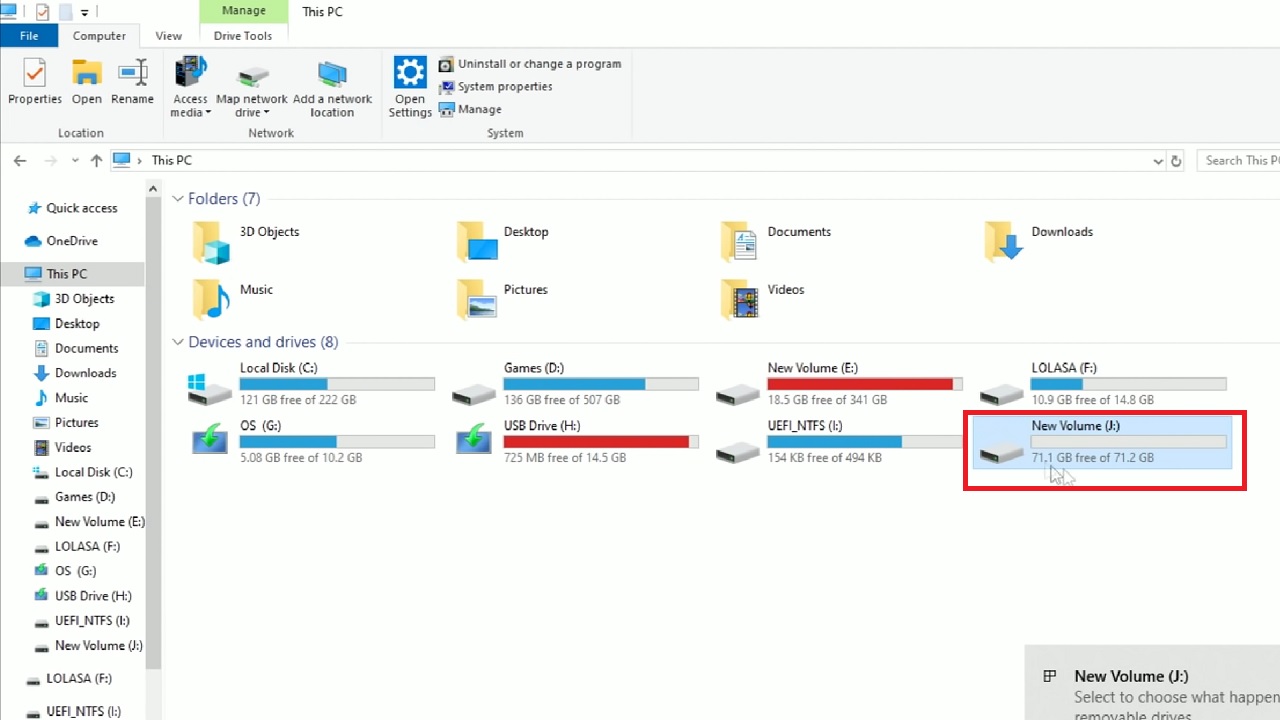
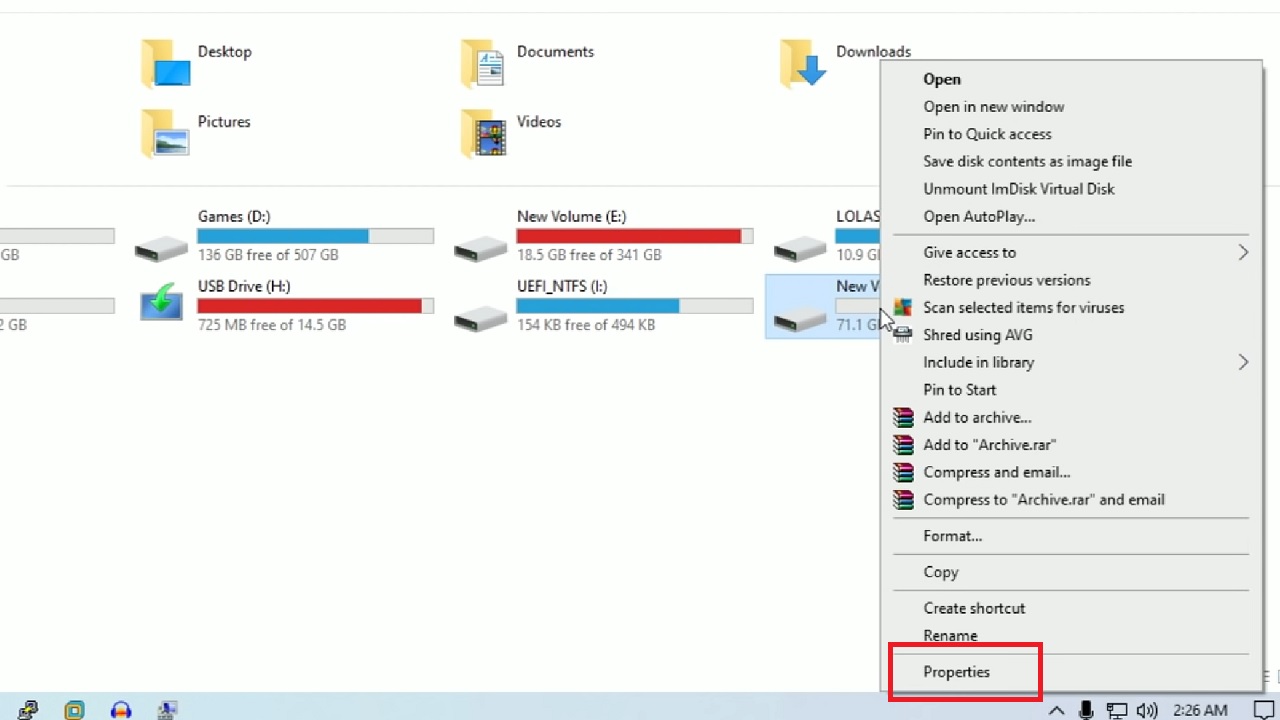
- Now right-click on that partition.
- Select Properties from the drop-down submenu.
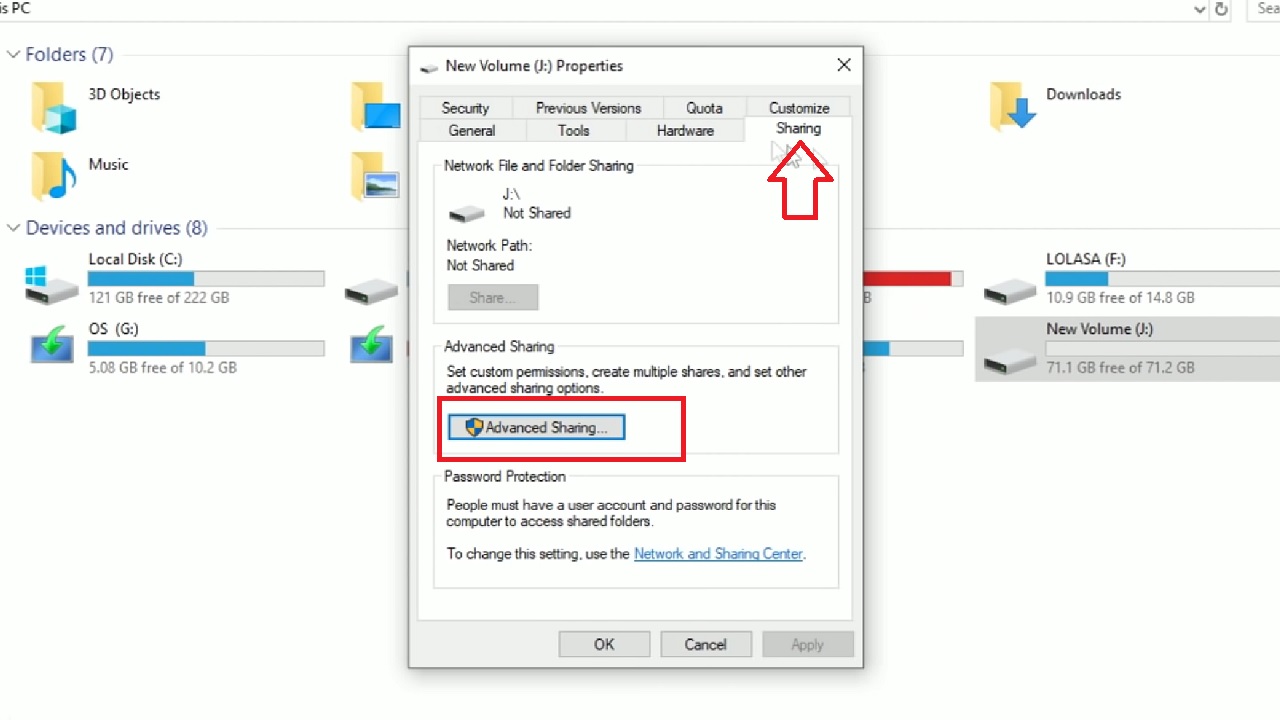
- Go to the Sharing tab in the Properties window and click on it.
- Then click on the Advanced Sharing button below.
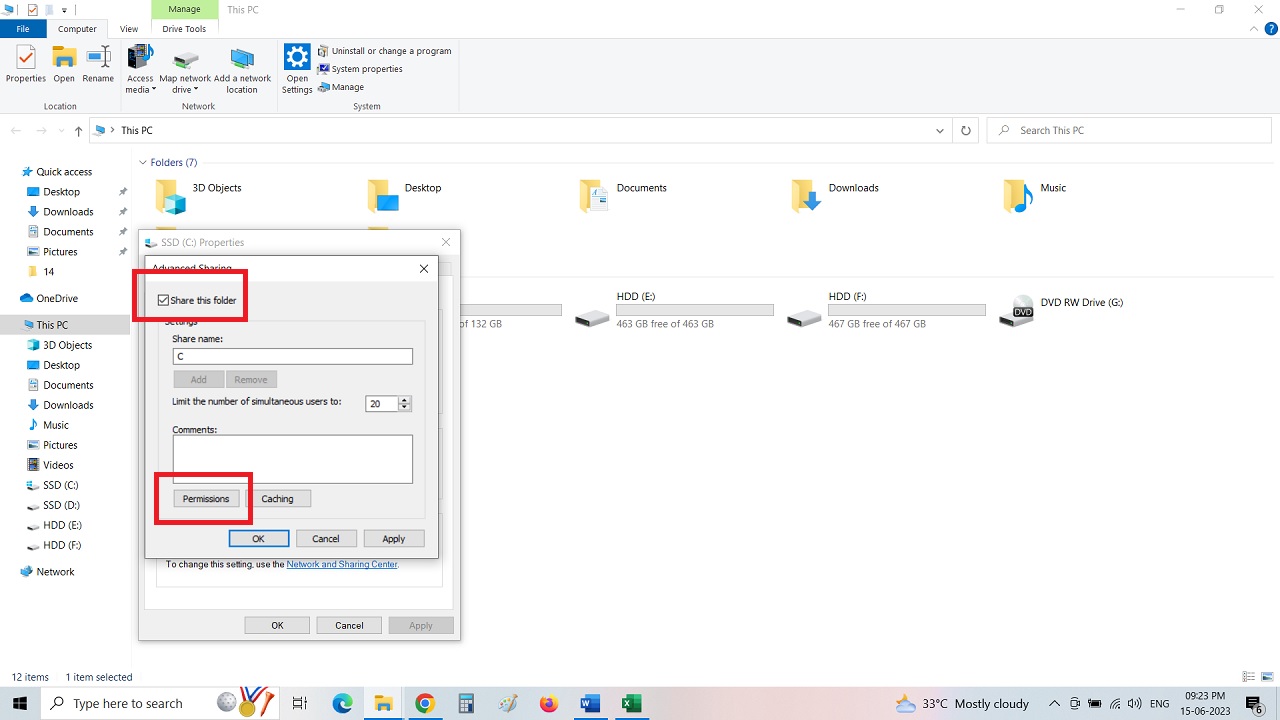
- Click on the small square box beside Share this folder in the Advance Sharing window.
- Click on the Permission button below.
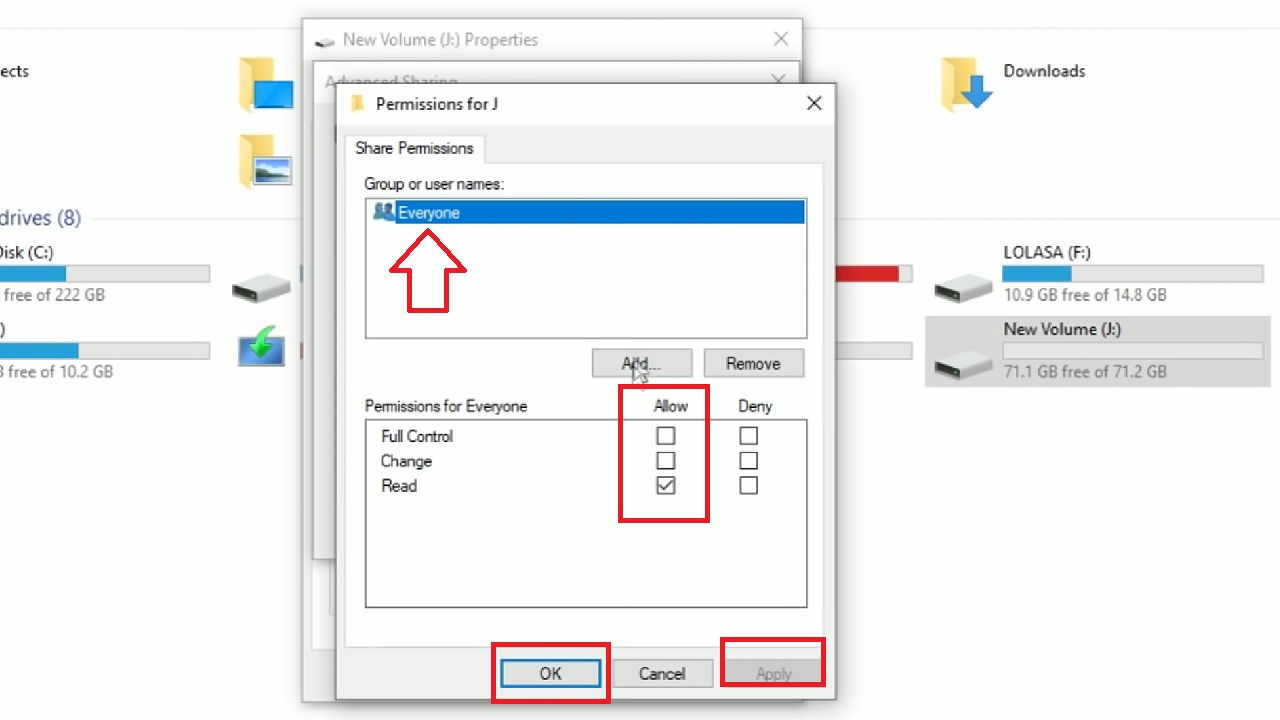
- Select Everyone, which is usually selected by default, in the following window.
- Check all the boxes under Allow as well.
- Then click on the Apply and OK buttons.
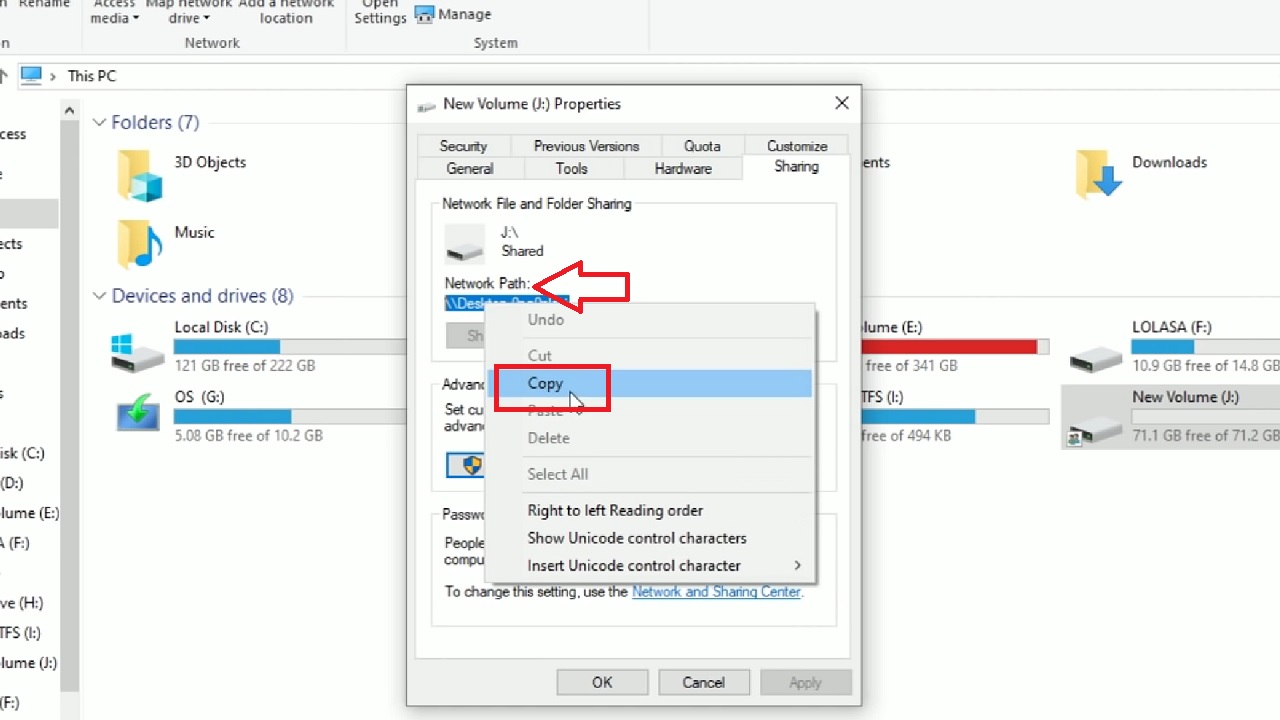
- Close all the windows except the New Volume Properties window.
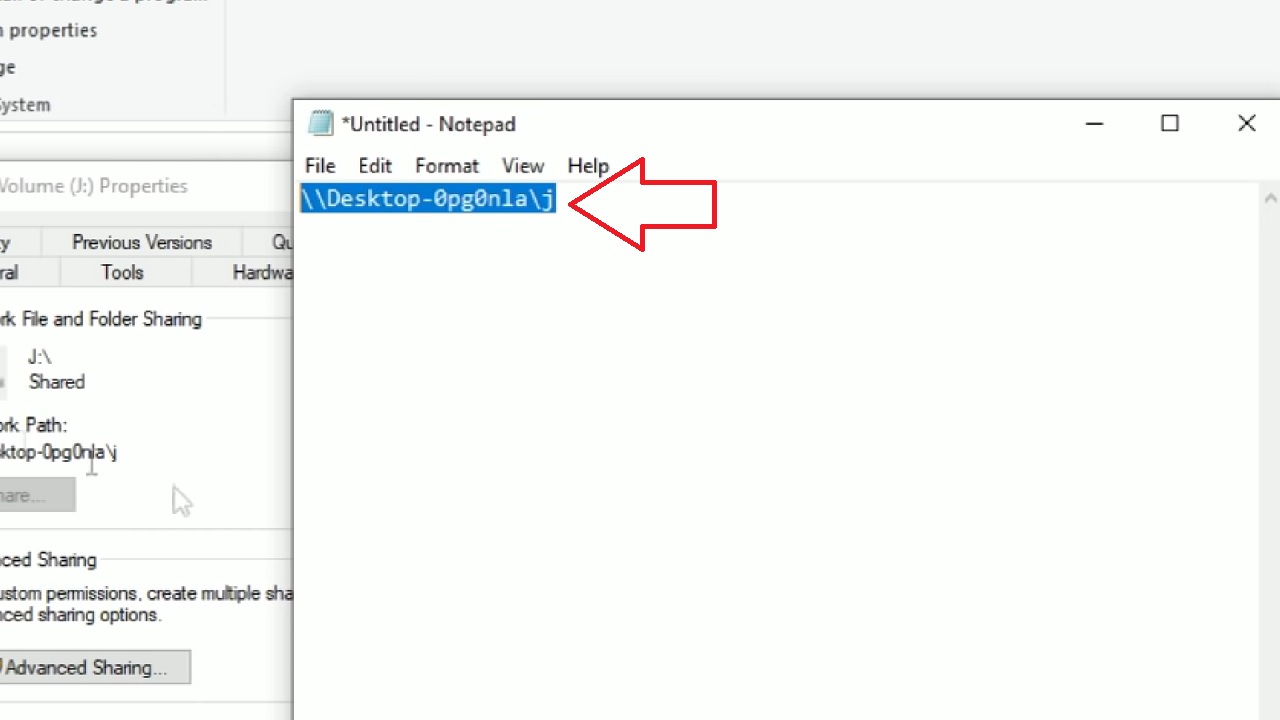
- Here, right-click on the Network Path to Copy it.
- Open Run from the start menu.
- Type Notepad.
- Hit Enter.
- Paste the network path on it.
The next part of the process involves using relevant software for booting from the network, AIO Boot, for example. (This is just an example and is not a promotion. It is your discretion which software you will use).
Download the boot software and copy it to the new partition. Also, download a Windows ISO file and copy it to the same drive.
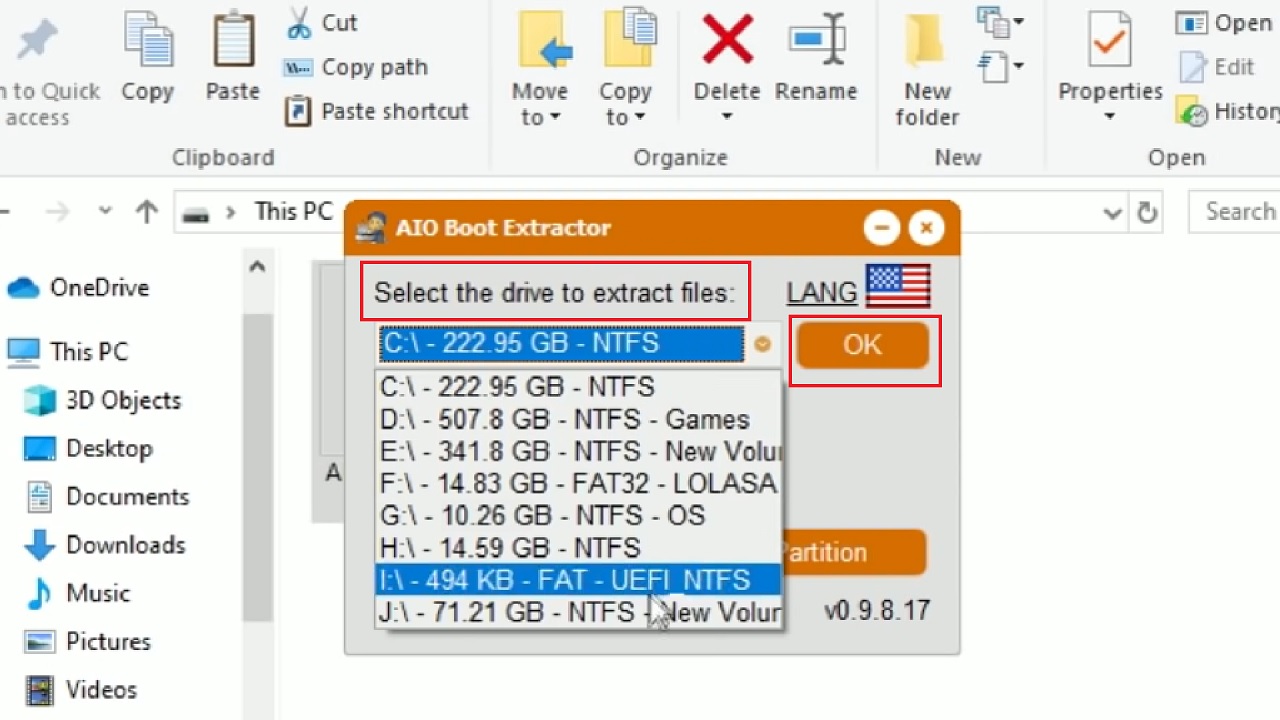
- Now, open the boot software and check the small box beside Use Hard Disk Drive.
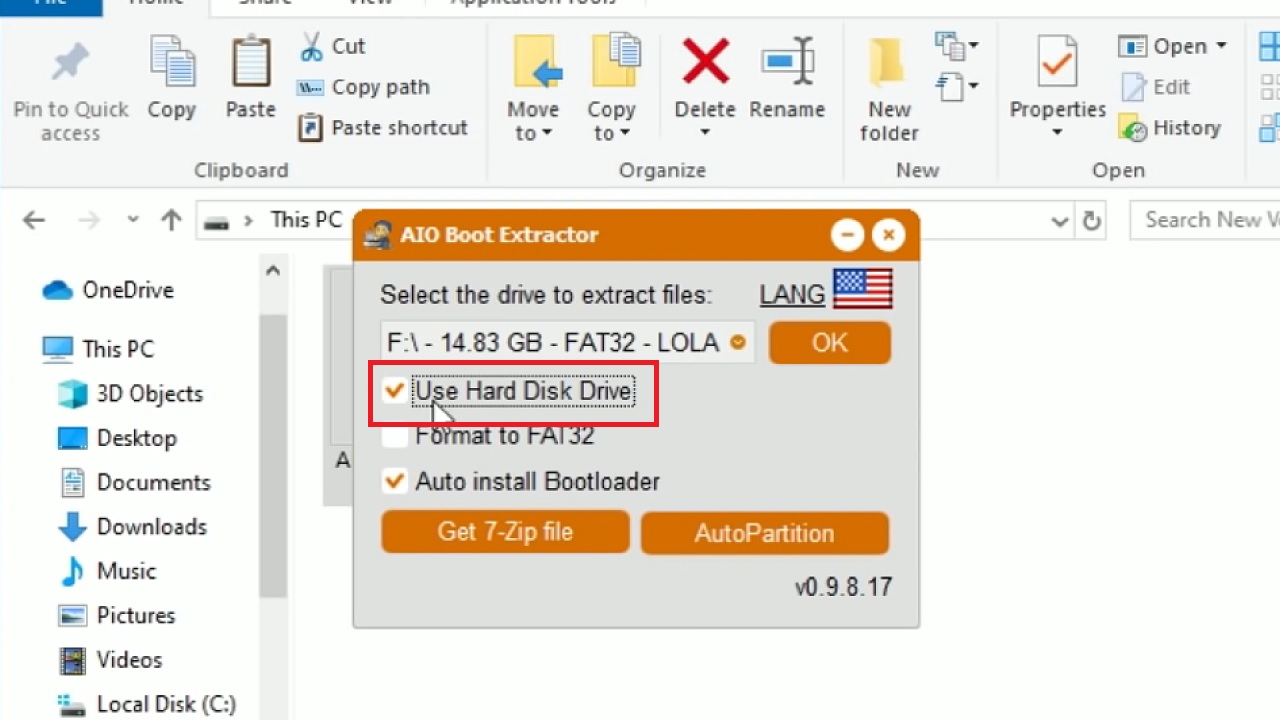
- Then select the correct drive from the options available in the dropdown menu in the ‘Select the drive to extract files’ box.
- Click on the OK button next to it.
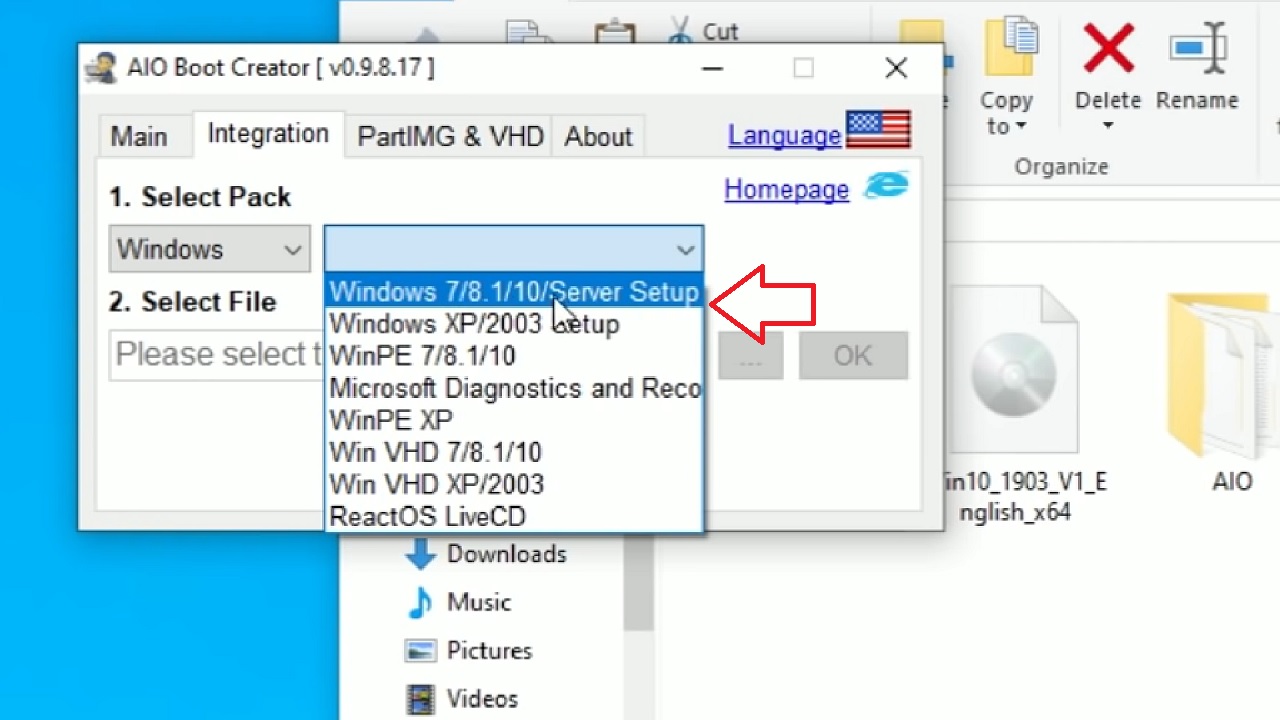
- This will take some time. When the process is complete, click on the Integration tab in the AIO Boot Creator window.
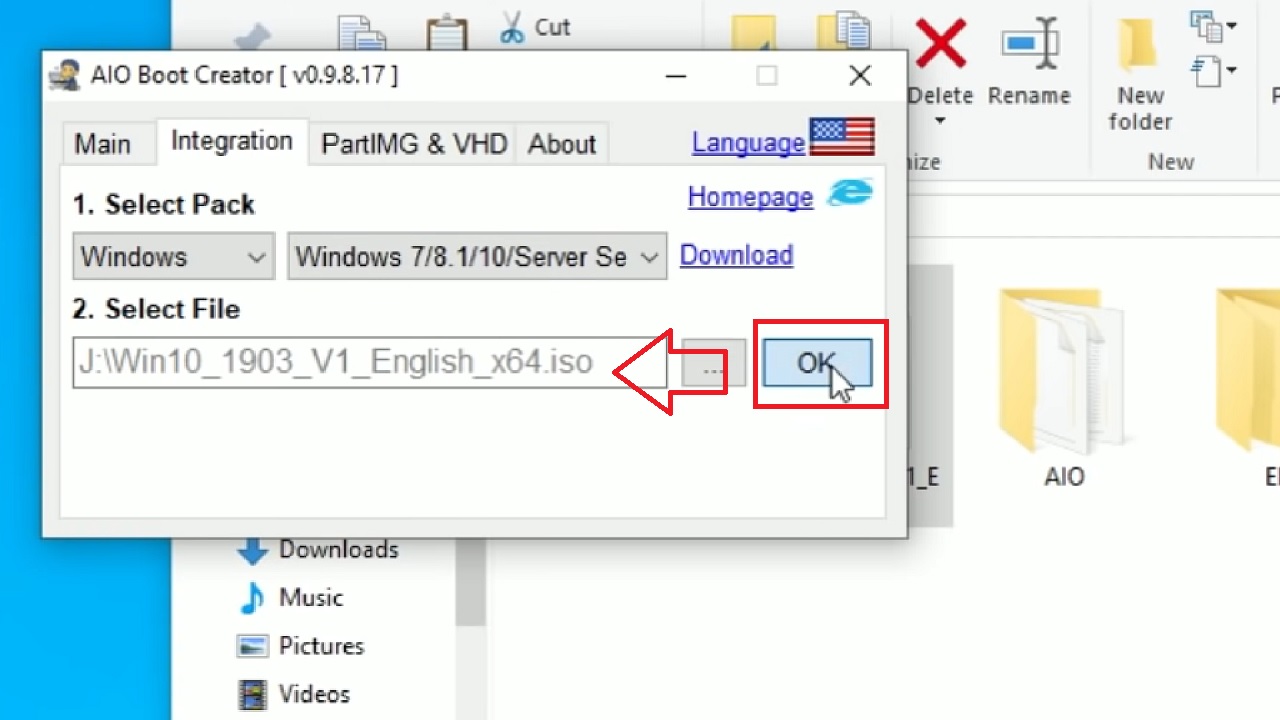
- Select the operating system you want to install from the options you get after clicking on the Select Pack box.

- Select the version of the operating system from the options offered in the box beside it.
- Now, select the ISO file from the drive.
- Then, click on the OK button.
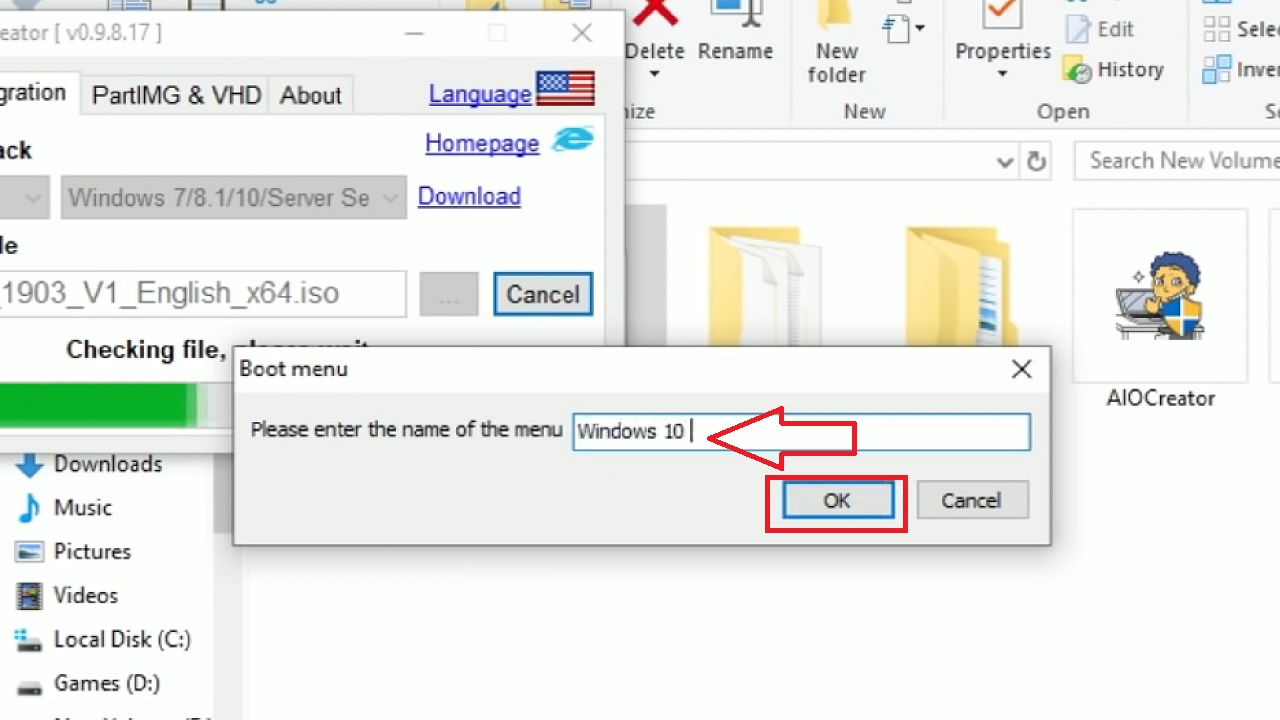
- While the process continues, you can give a name to the menu in the Boot Menu window.
- Click on the OK button.
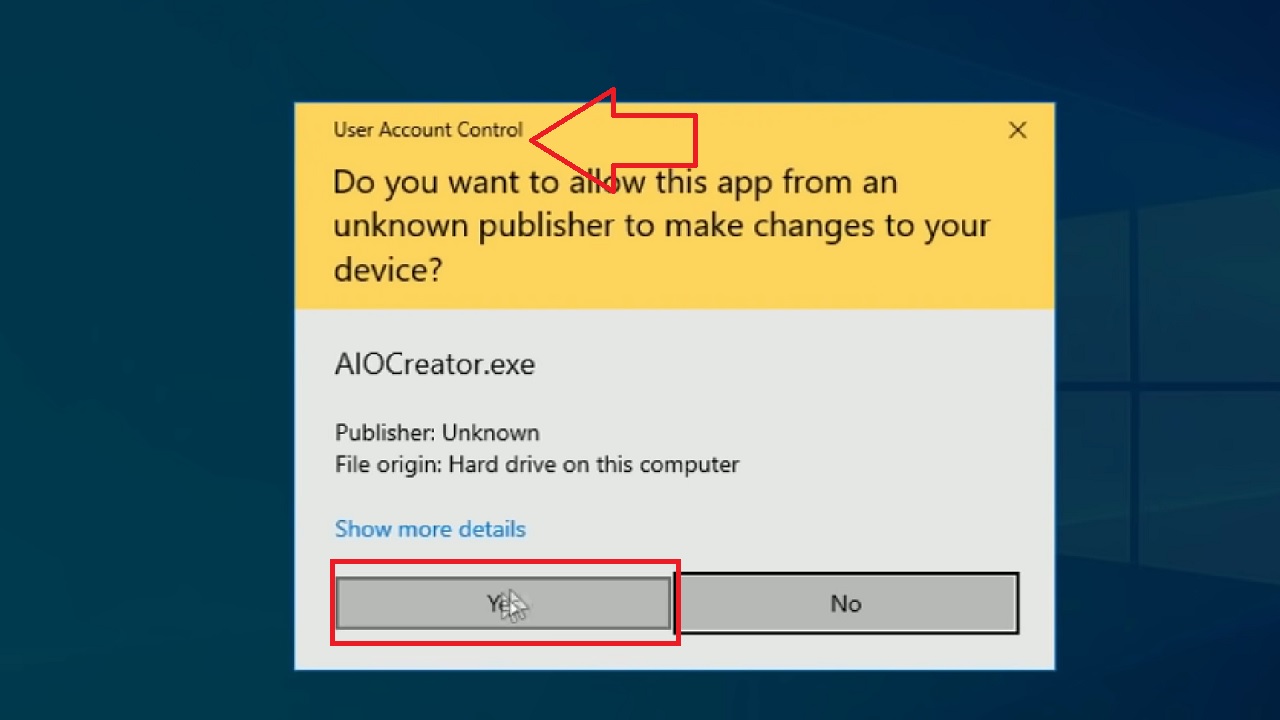
- The process will take some time and when it is complete, close all windows and click on the AIOCreator logo in the drive.

- Click on Yes in the User Access Control window.
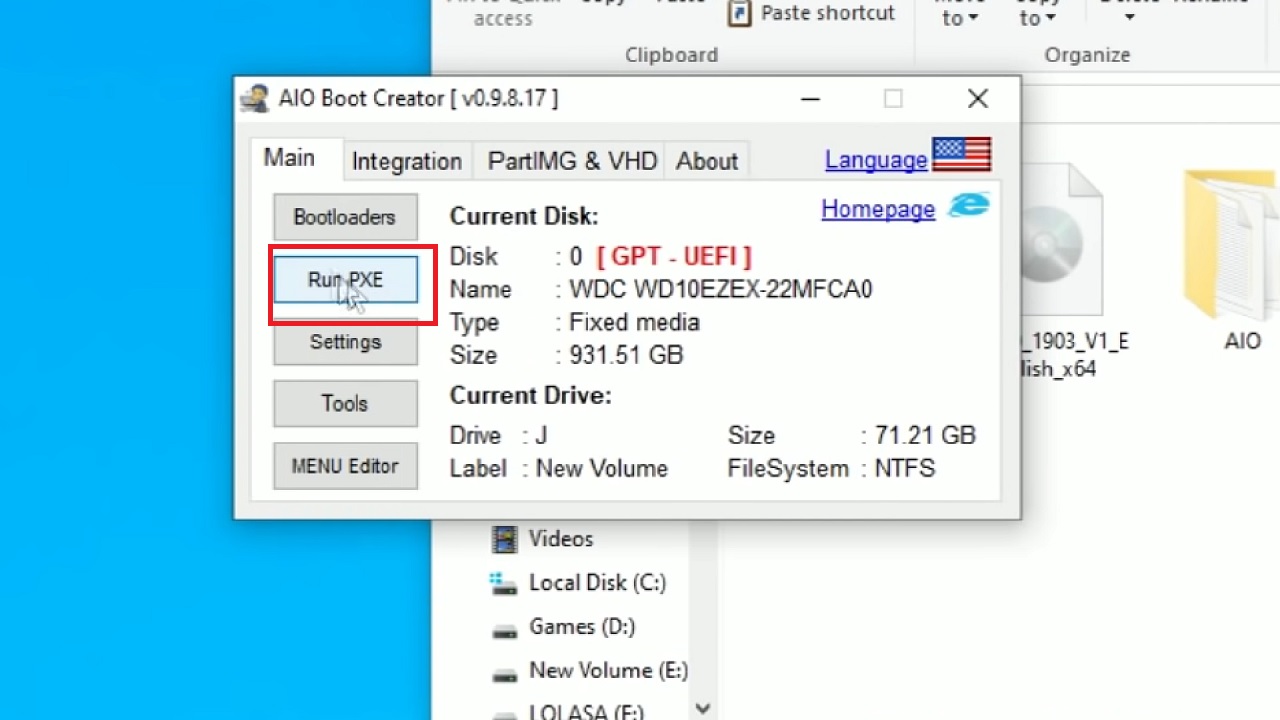
- Now, click on the Run PXE tab in the following window.
Meanwhile, go back to My Computer > right-click on the volume > Go to Properties > click on Sharing > Click on Network and Sharing Center.
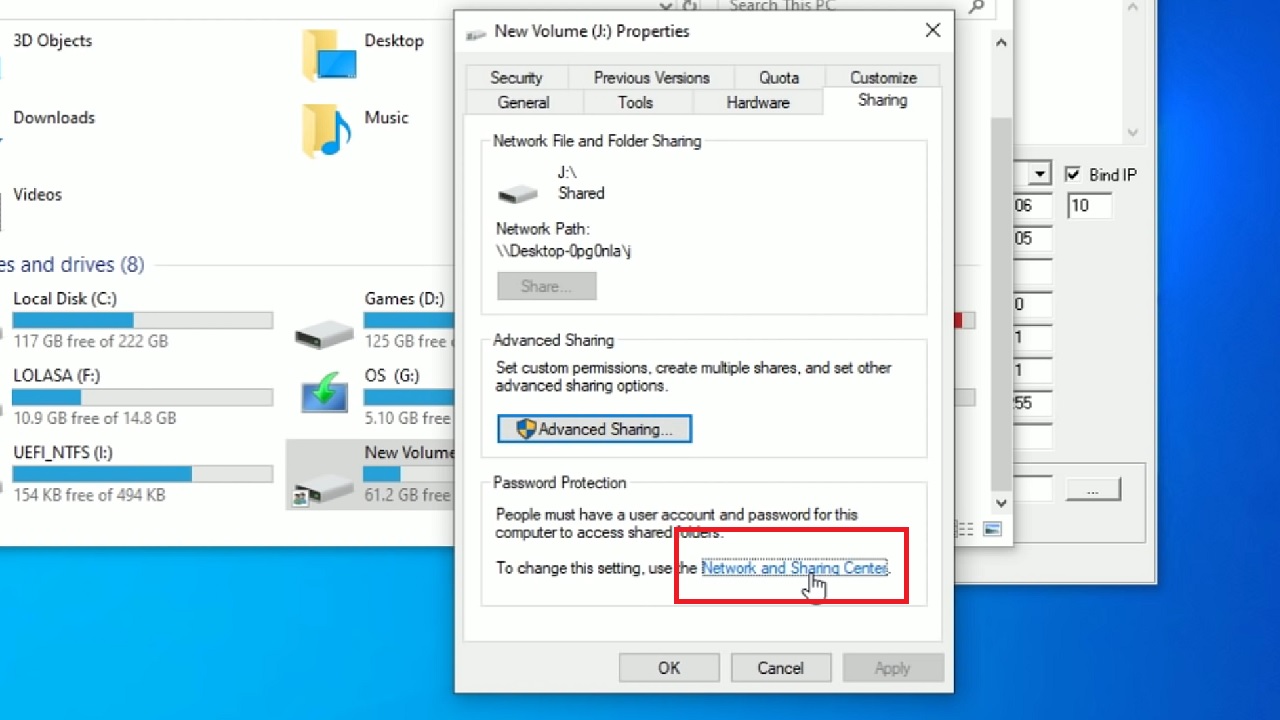
Alternatively, you can also open this window from the Control Panel from Start > Typing control in the search box > hitting enter > Network and Internet > Network and Sharing Center > Change advanced sharing settings.
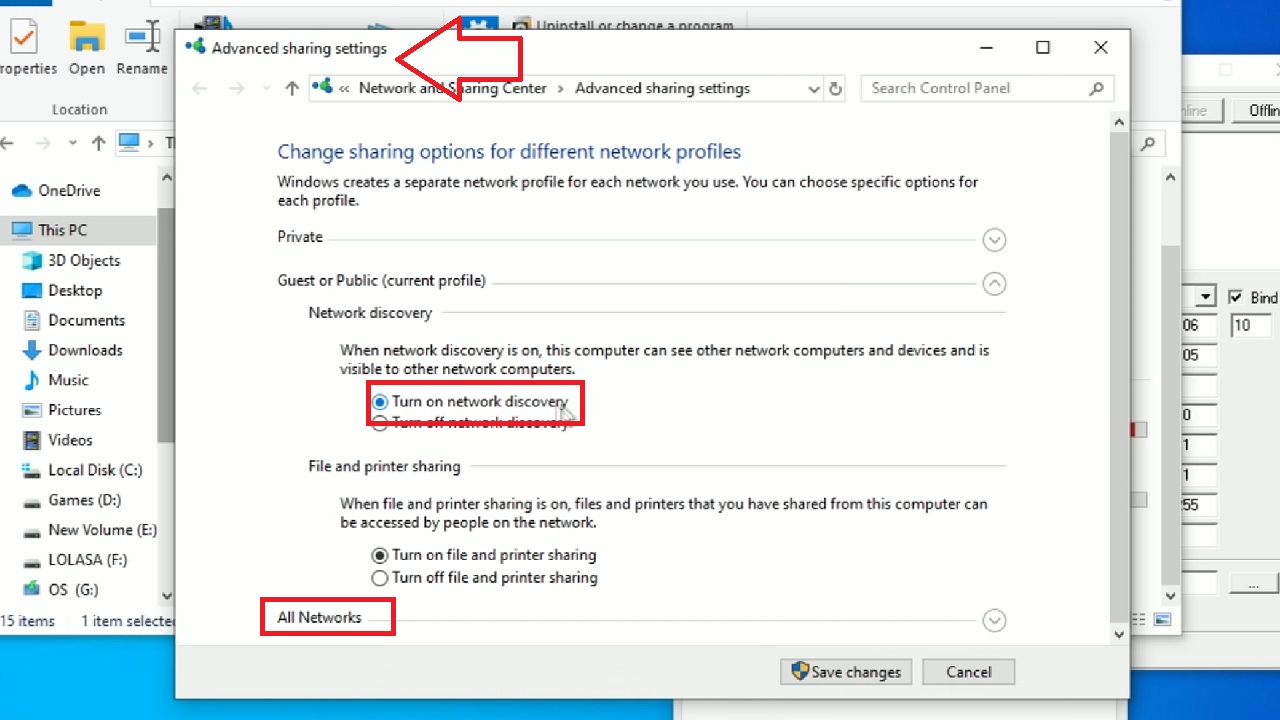
- In the Advanced sharing settings window, click on the circle next to Turn on network discovery under Guest or Public (current profile).
- Click on All Networks.
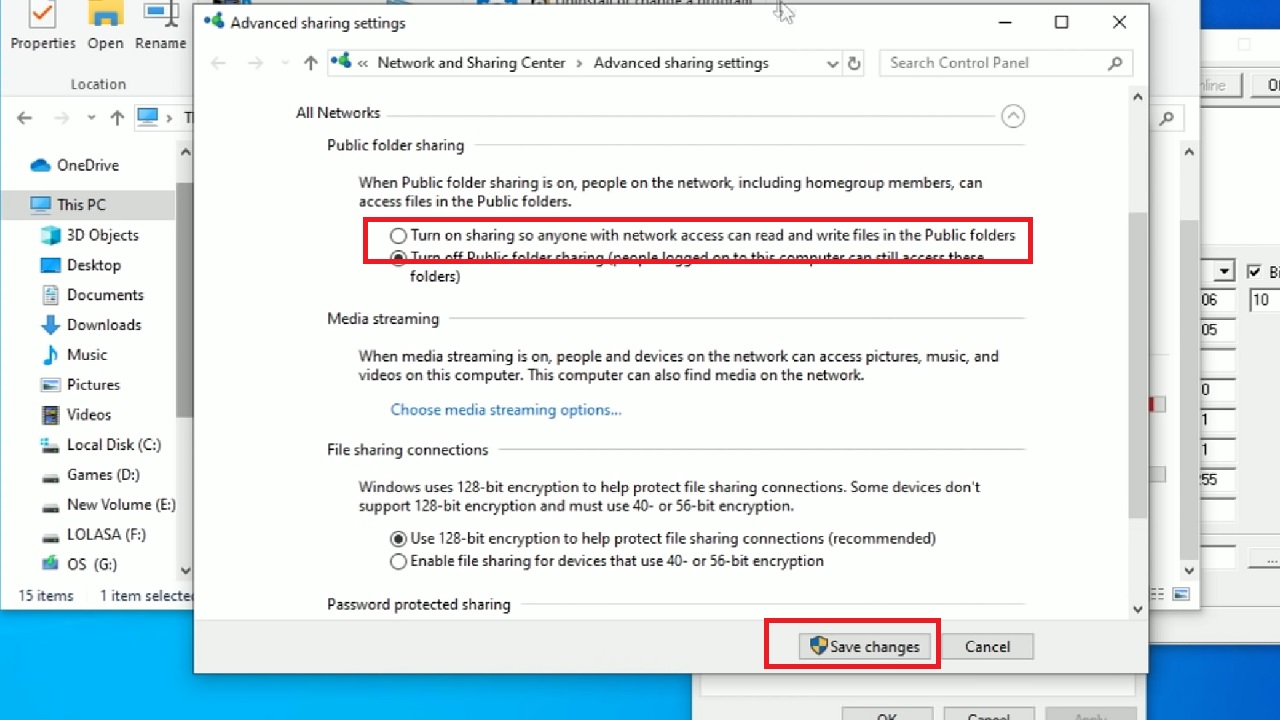
- Click on the small circle under Public folder sharing next to ‘Turn on sharing so anyone with network access can read and write files in the Public folders.’
- Click on Save Changes.
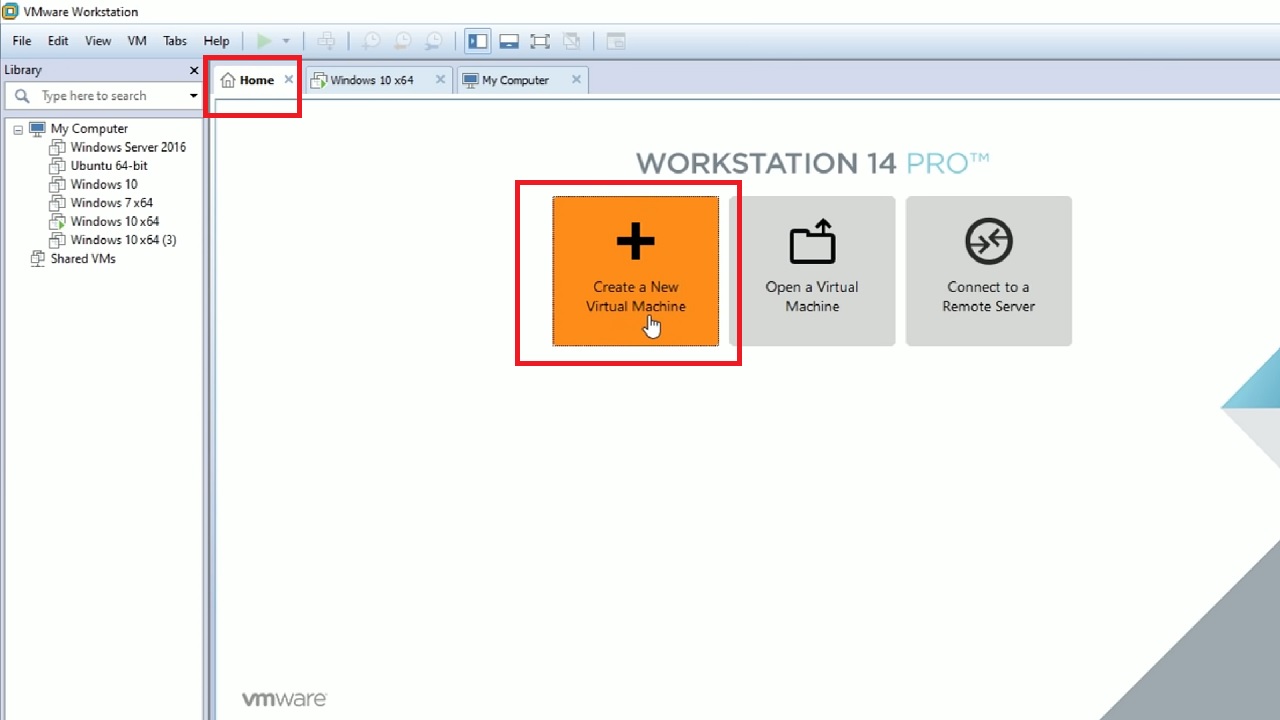
Now, boot your virtual machine from the network. Assuming that you are using VMWare, these are the steps to follow:
- Click on home.
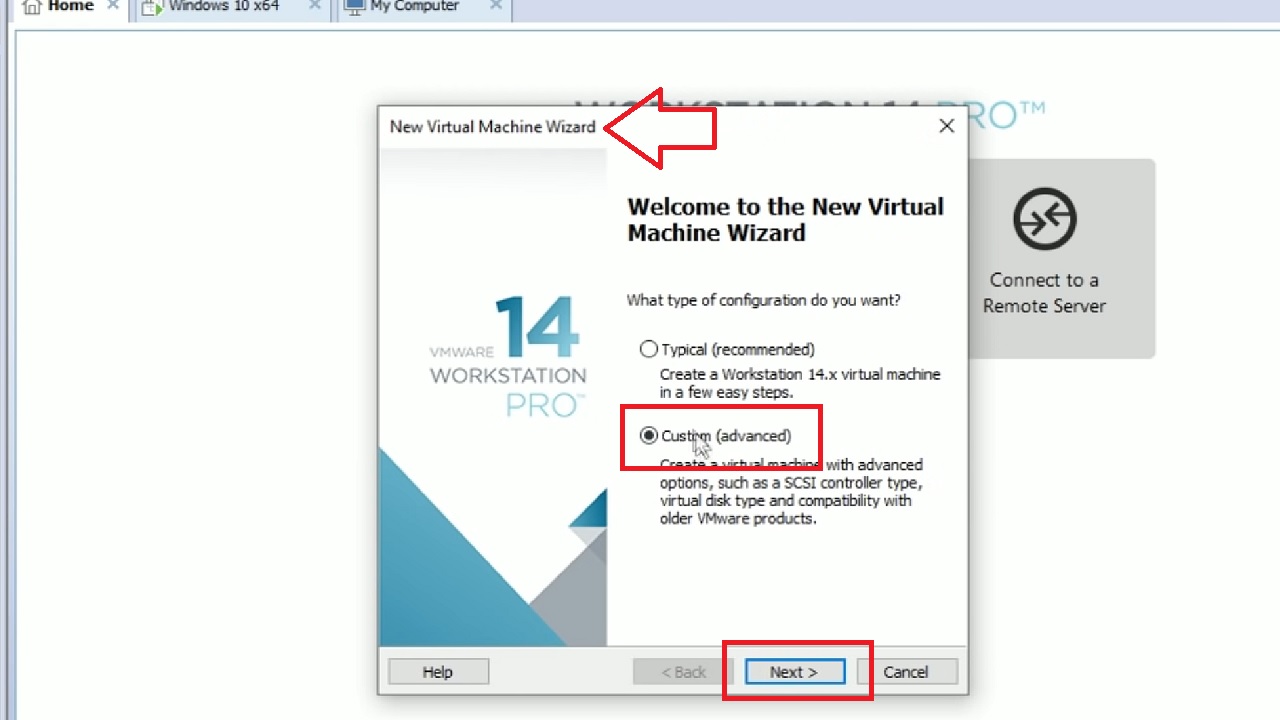
- Click on Create a New Virtual Machine.
- Click on the Next button on the New Virtual Machine Wizard window after selecting Custom.
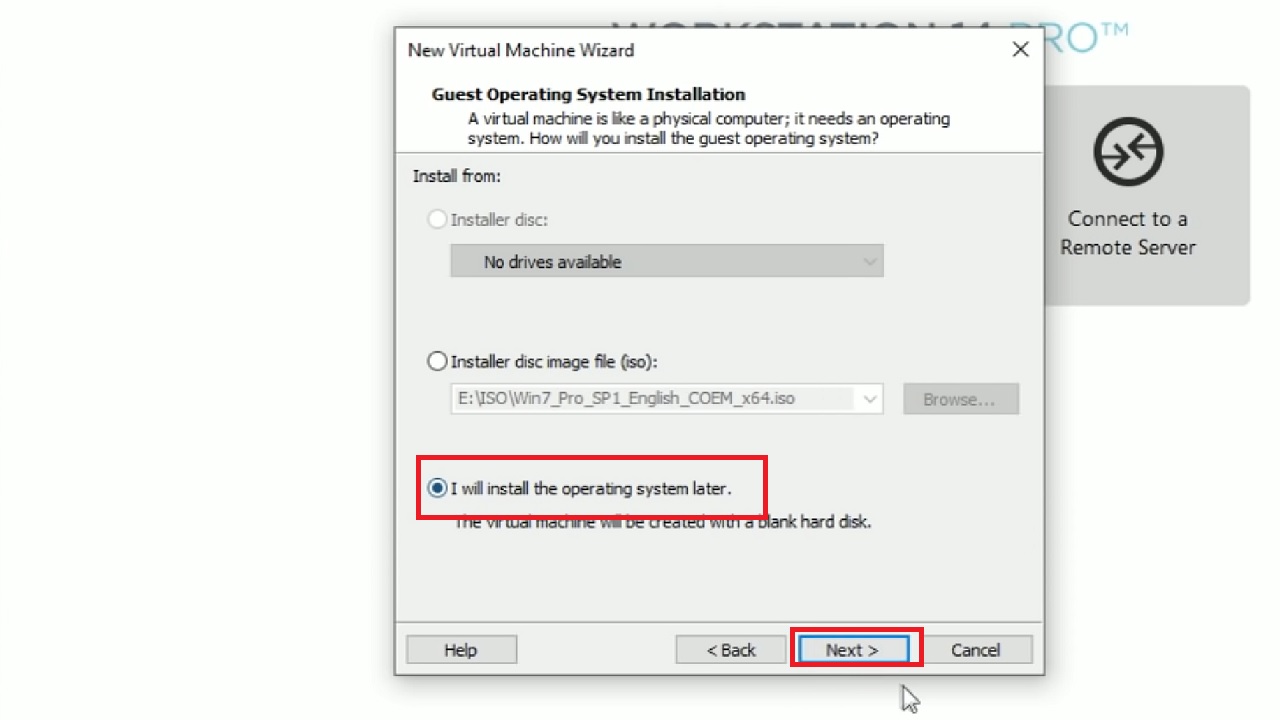
- Click on Next twice and then check the circle next to ‘I will install the operating system later.’
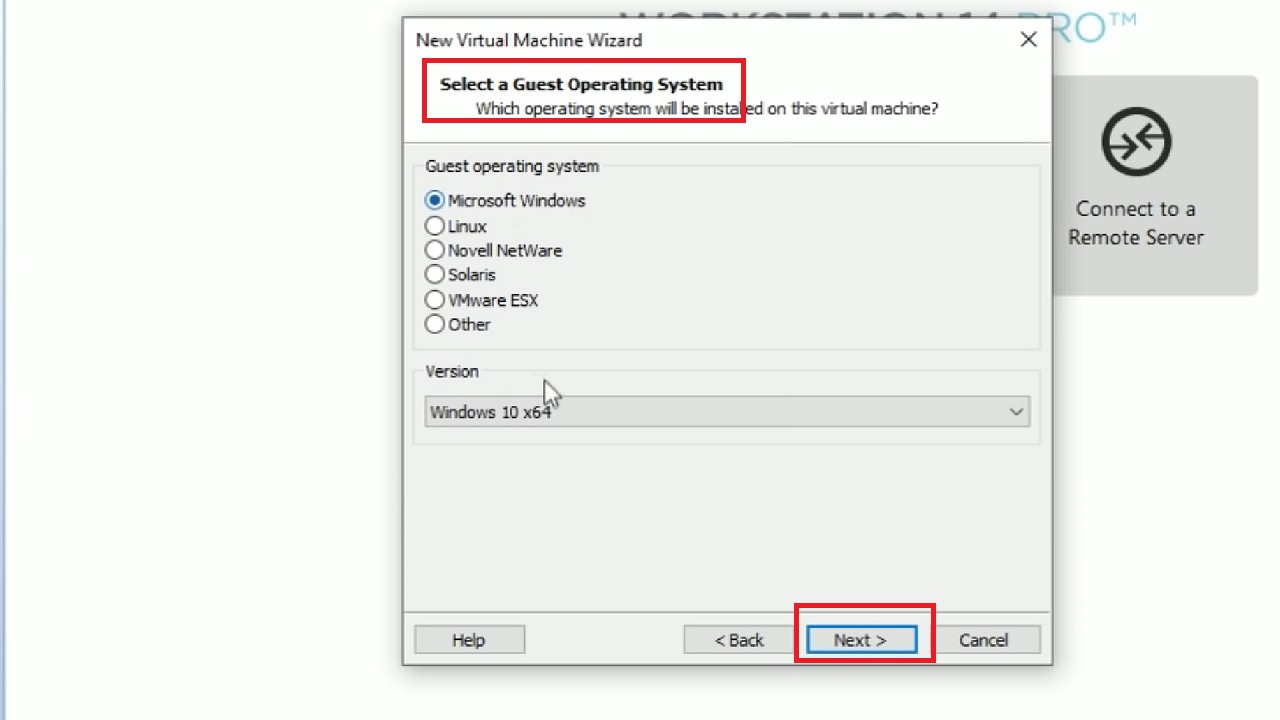
- Select a Guest Operating System from the next window.
- Click on the Next button.
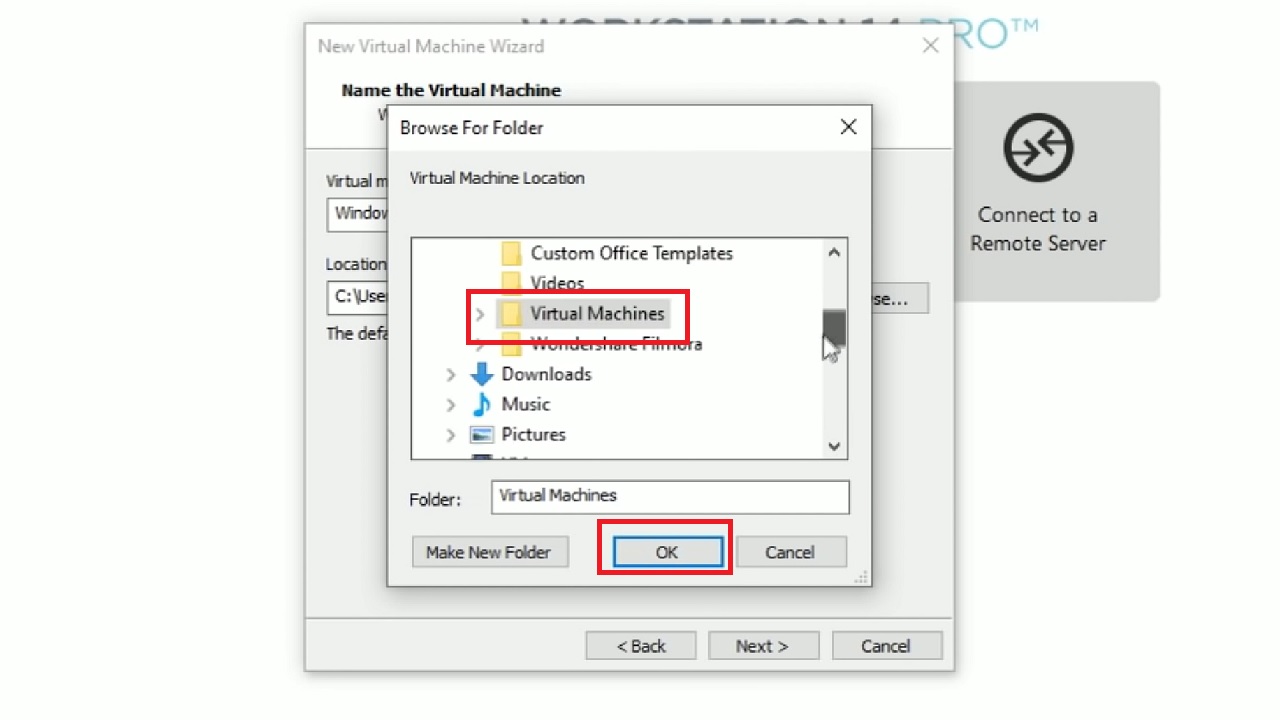
- Click on the Browse button in the following window.
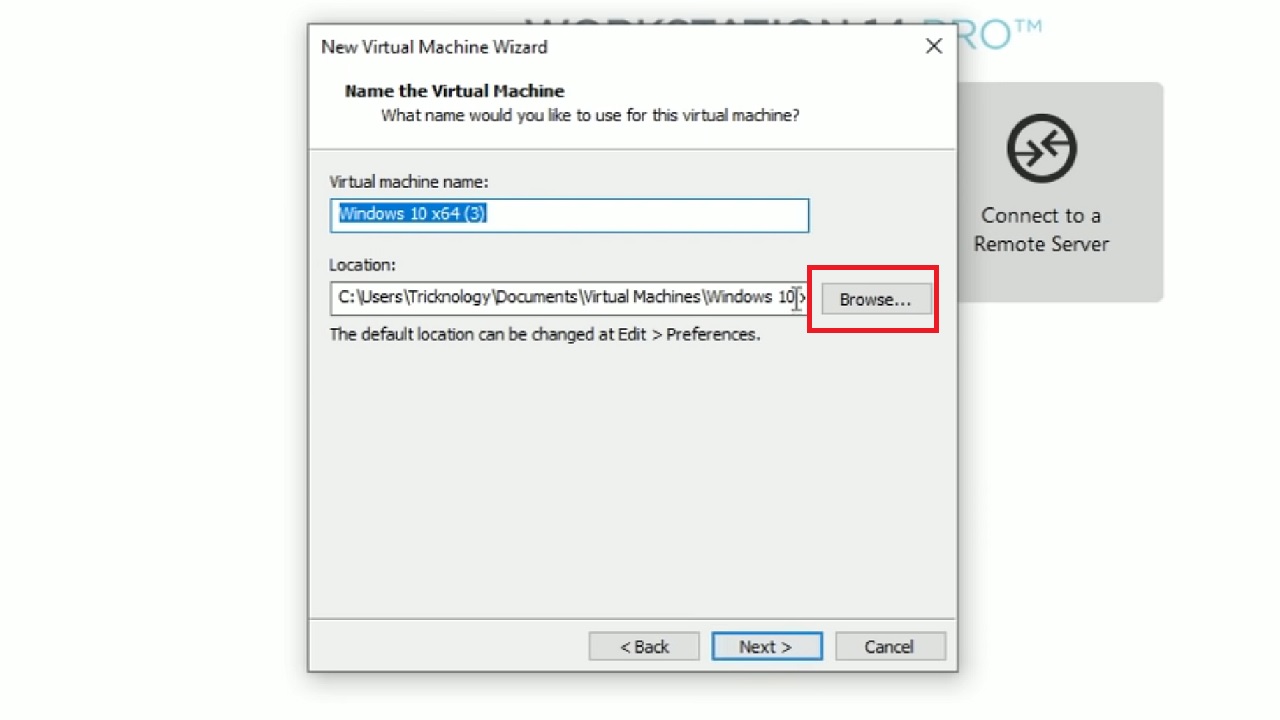
- Select the location.
- Click on the OK button.
Then continue clicking on the Next button in the following windows until you find the Finish button. Click on it to end the process.
- Then you will have to click on the Edit virtual machine settings option in the following window.

- Select Network Adapter from the following window.
- Check the small circle next to ‘Bridged: Connected directly to the physical network.’
- Click on the OK button.

Open the virtual machine now and you will see that it is receiving the MAC address.
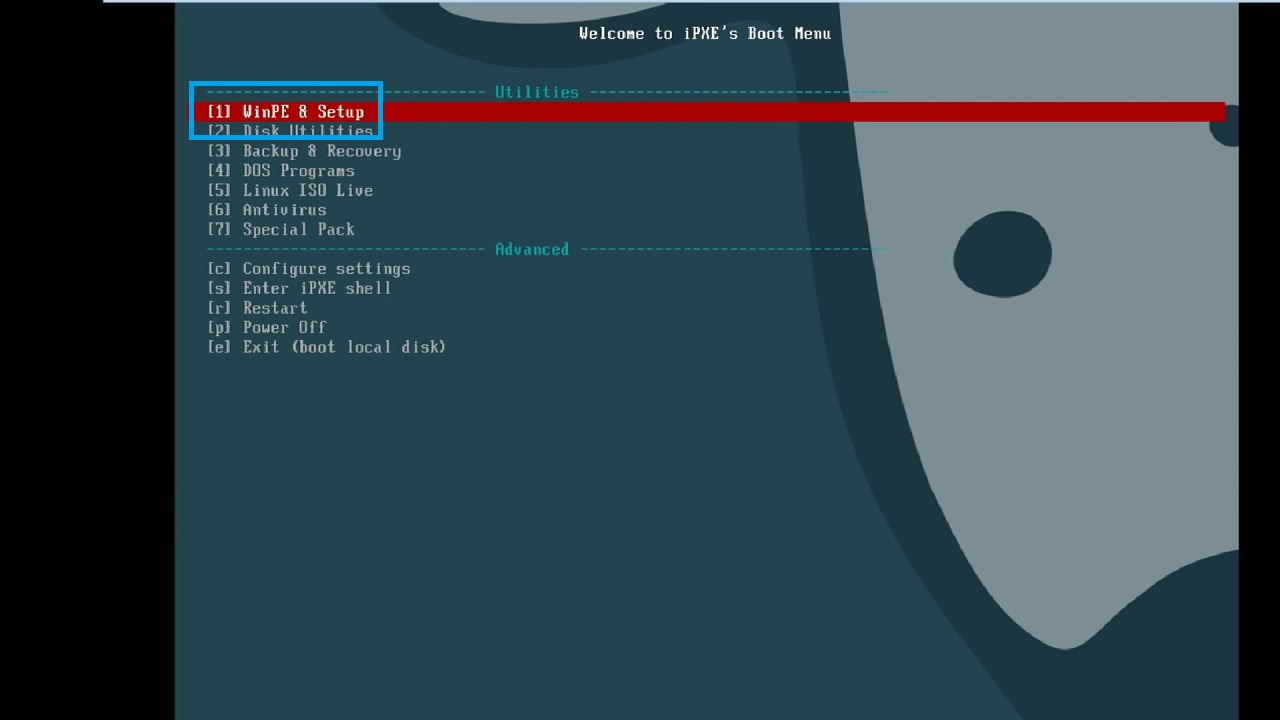
- A new window will open at this stage where you will have to select the WinPE & Setup option, usually located at the top.
- Hit Enter.
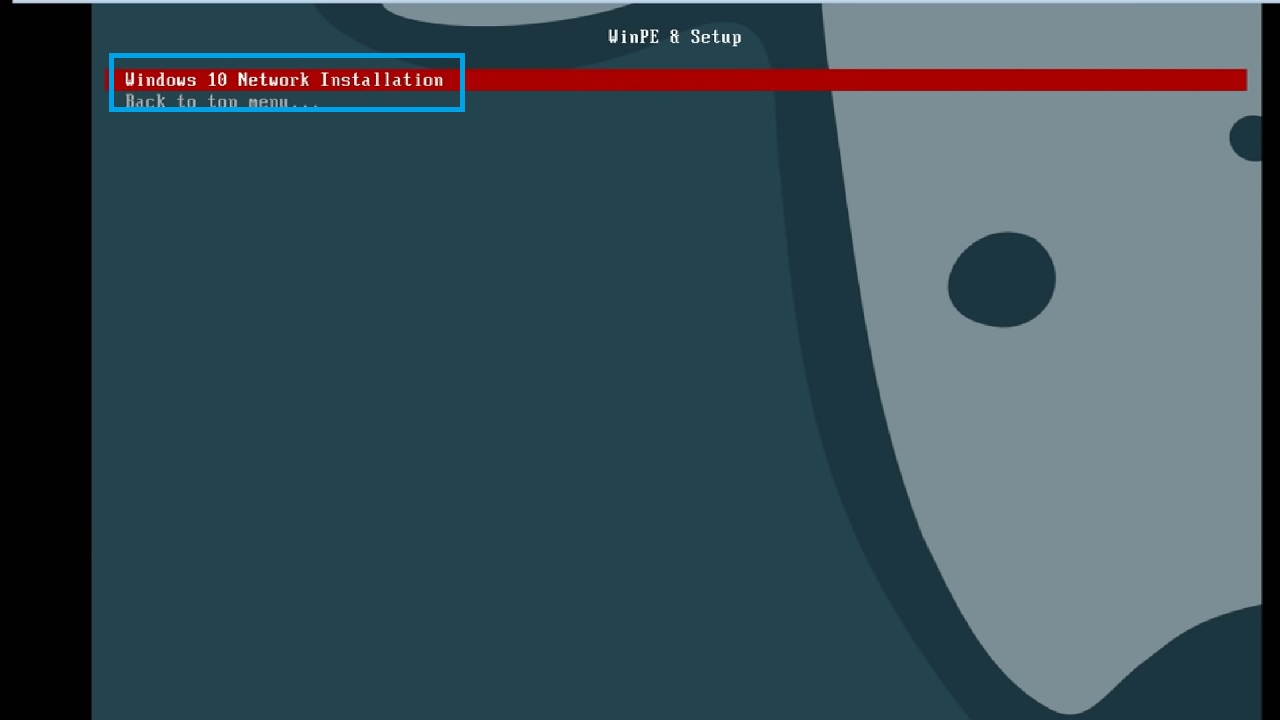
- Select Windows 10 Network Installation or the name that you set up before during AIO boot.
- Hit Enter.
- Wait till you see a Network Path window.
- Type the network path you wrote down on the notepad before.
- Click on the OK button.

- Type the username in the new Command Prompt window. (You will get it in the Accounts section in Settings.)
- Press Enter.
- Now type in the Password. (It will not show in the CMD window).
- Hit Enter.
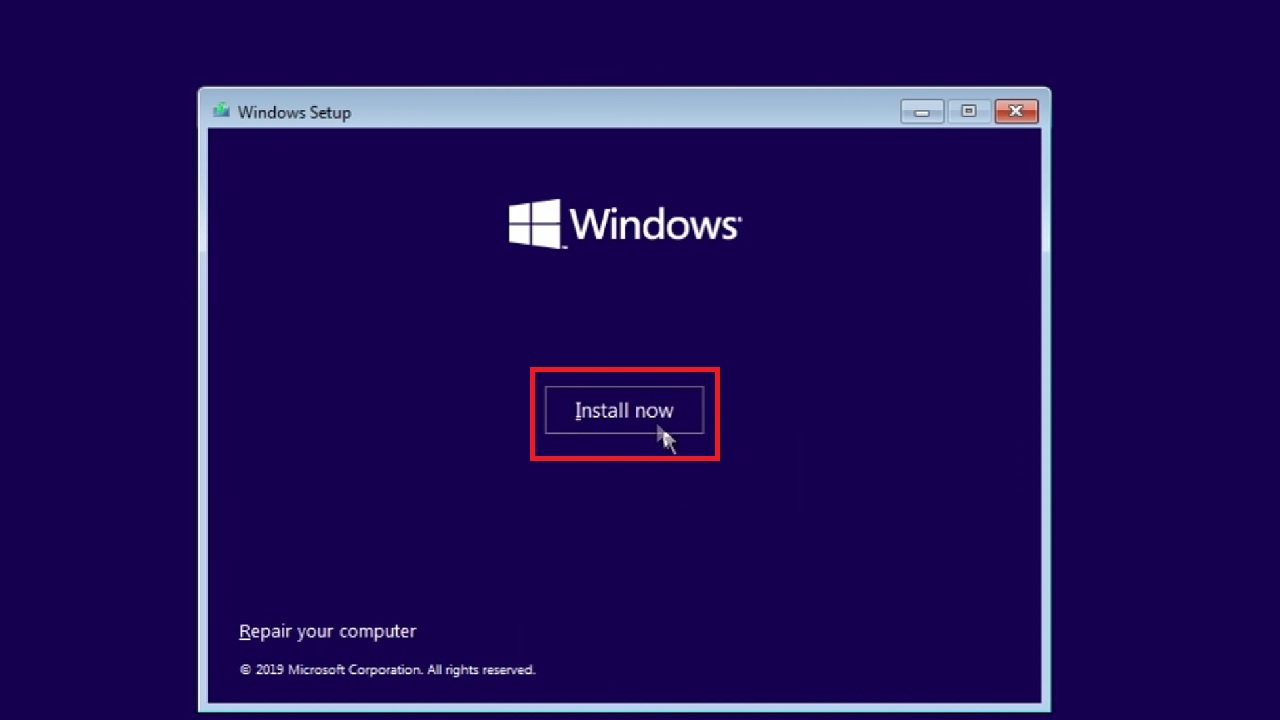
- Click the Next button in the following Windows Setup window.

- Click on Install Now in the successive window.
Follow the instructions on the screen and click on the Next buttons, accept the terms and conditions as instructed to install the new OS and boot your system from a network.
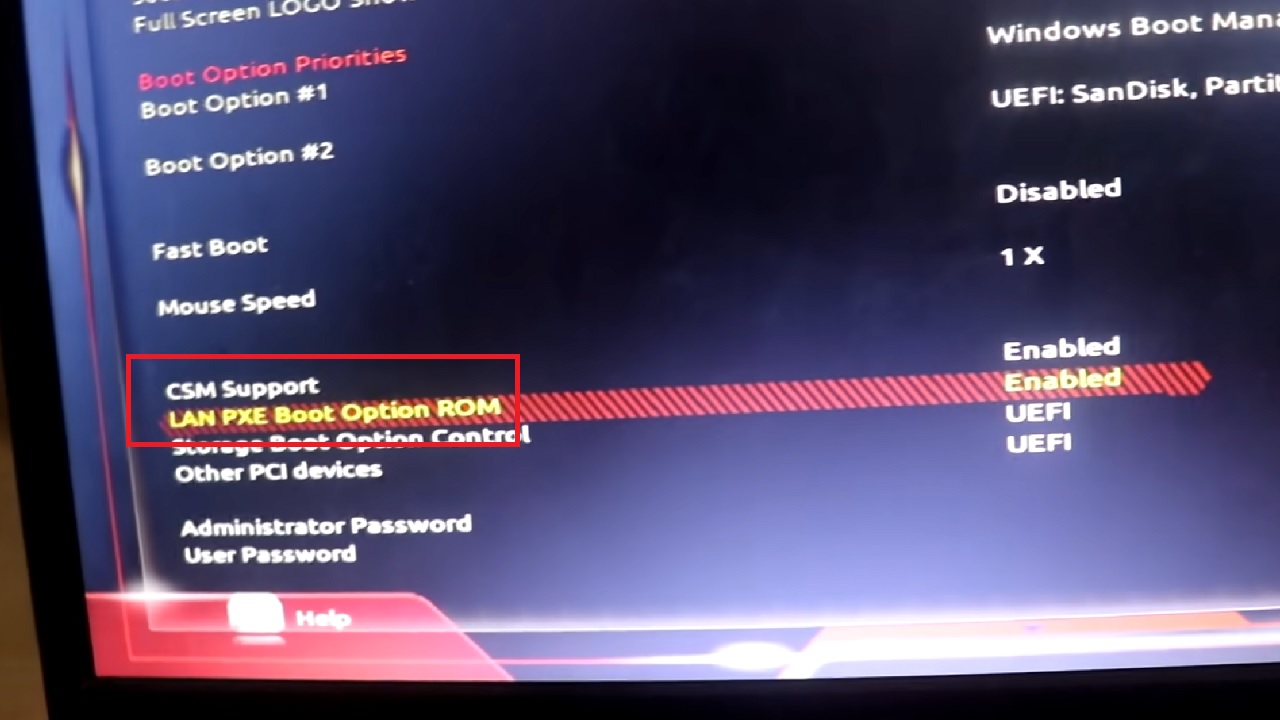
Finally, set up the BIOS in the target computer and enable the CSM Support and the LAN PXE Option ROM, save and exit BIOS.
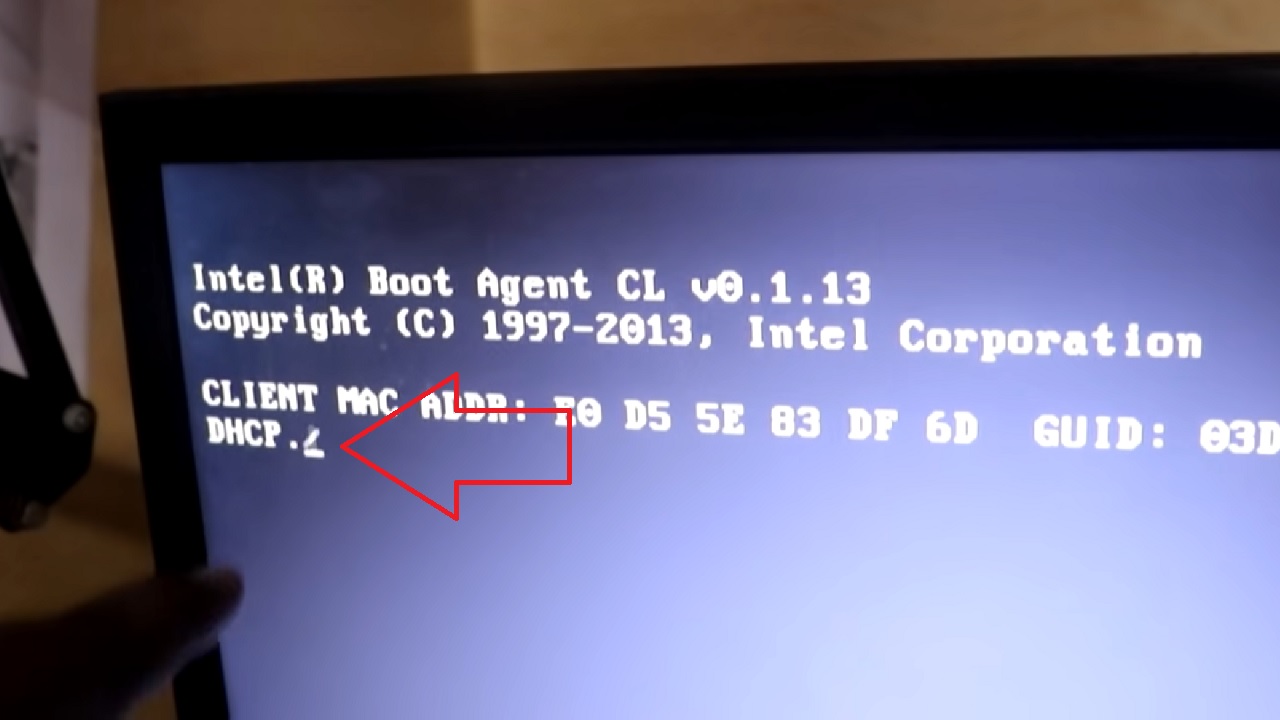
Restart the computer, go to the boot menu by pressing the F 12 key, or other according to your system, and select the specific network LAN card.
The system will now show DHCP suggesting that it is connecting to the network.
Once it does, follow the same steps to install the operating system on this PC as before.
Conclusion
Booting a system from a network is not easy, especially if it does not have a local drive, as you can see from the single, long process mentioned above.