
Computers connected to a network can share data, files, and folders remotely, provided that the network path is distinct and detectable. However, at times you may face errors such as “Network path name was not found,’
In this article, you will find all these fixes discussed and described so that you can choose one or many of them to rectify the error in no time.
In This Article
KEY TAKEAWAYS
- Make the TCP/IP NetBIOS Helper automatic if it is set to manual to resolve the issue of the network path not being found.
- Go to the Registry Editor and delete the Hardware ID and Store folders under the MS Licensing folder.
- You can rectify the issue by changing the Network security LAN Manager authentication level under the Local Security Policy.
- Disable all features related to SMB or Server Message Block from Programs and Features.
- Making changes to the Windows credentials or adding a new credential from the Control Panel may rectify the problem.
Why is the Network Path Not Found?
Just as it is in most cases, an outdated operating system and drivers on a PC may cause a lot of issues, and not finding the network path is one of them.
The Windows Defender Firewall protection may also be interfering and preventing the network path from being found.
Here are some other proven reasons for a network path not being detected by a PC:
- There may be issues with network services such as Transmission Control Protocol/Internet Protocol (TCP/IP) NetBIOS Helper and others.
- The Hardware and Store keys in the Registry Editor may be conflicting just as the third-party antivirus program.
- The settings in the Network security LAN Manager authentication level may be incorrect and need adjusting.
- Sometimes, if the name of the computer you want to connect to is too long, it may cause such an error.
- If there are issues in the Server Message Block, it will not function properly and prevent the network from being detected.
- If no Windows credential is set or removed, it might be the reason the network path stays undetected.
- The computer you are trying to access may be down or inaccessible at the moment, or file sharing may be disabled.
Just as the causes of a network path not being found are many, so are its fixes. This is a common issue most users face while connecting to a remote computer. However, there is not much to worry about because there are some effective fixes for this error.
10 Ways to Fix the Network Path Not Found Error
Most issues related to networks can be fixed quickly by resetting the TCP and IP. This usually refers to setting the Domain Name System and the IP protocols to their default settings.
Some other simpler methods to resolve this specific issue are:
- Turning off the Windows Defender Firewall protection
- Running a few specific commands in the Command Prompt
- Disabling the antivirus program or Windows Defender temporarily
- Renaming the computer to make it short, if it is too long
- Disabling the IPv6 protocol
- Updating Windows as well as the adapters of all drivers installed on your PC
If these simpler fixes cannot resolve the issue, then here are some more complicated ones to try out, such as:
- You may make some tweaks in the network services to ensure your network path is found, such as turning the TCP/IP NetBIOS Helper feature to automatic.
- Deleting the hardware ID and store keys from the registry may also resolve the issue.
- Some minor changes in the Local Security Policy will also solve the problem.
- Disabling the SMB feature from the Control Panel often rectifies the issue of an undetected network path.
- Adding a new Windows credential to your system so that the network path can be detected.
If you are interested in knowing the specific steps to follow for each specific method to fix the network not found issue, continue reading.
Method 1: Make Changes in Network Services
Sometimes a simple change in the settings in the TCP/IP NetBIOS Helper may resolve the issue of the network path not being found. If it is set to manual, change it to automatic and then run it.
STEPS TO FIX:
- Go to the search box, type services and open it.
- In the new window, scroll down to find TCP/IP NetBIOS Helper.
- Right-click on it.
- Select Properties.
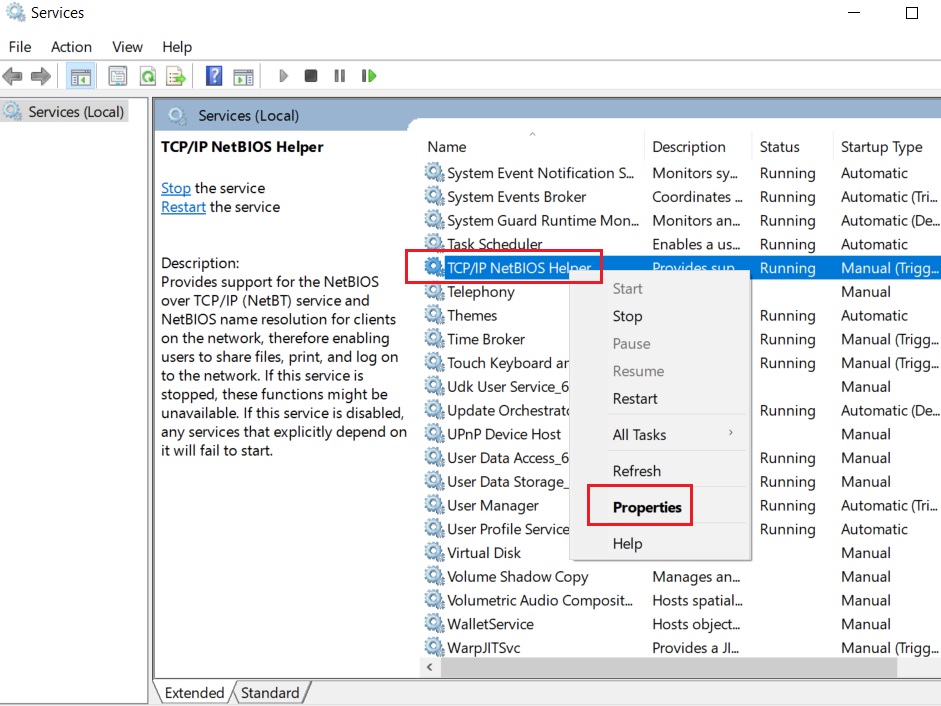
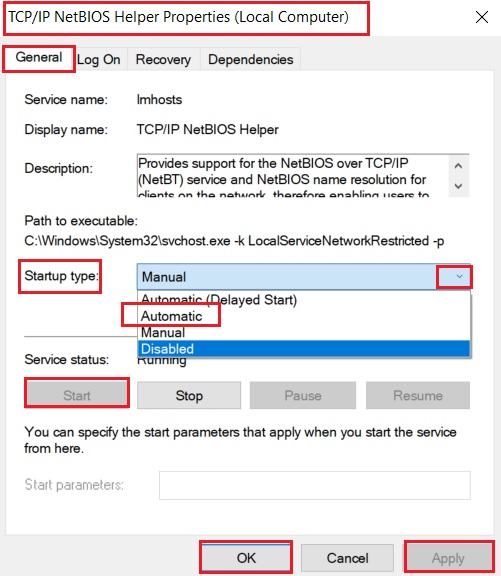
- In the General tab of the TCP/IP NetBIOS Helper Properties window, click on Stop if it is set to manual and running.
- Now, click on the small arrow in the box next to Startup type.
- Select Automatic from the drop-down menu of options.
- Click on the Start button.
- Click on the Apply button, and then click on the OK button.
Following the same steps, you will need to start the following services as well by changing the Startup type to Automatic for all:
- Function Discovery Provider Host
- Function Discovery Resource Publication
- SSDP Discovery
- UPnP Device Host
Check whether or not the issue has been resolved. If the problem persists, try the next method.
Method 2: Make Changes in the Registry Editor
A few specific changes made in the Registry Editor may help your system find the network path.
STEPS TO FIX:
- Go to the search box next to the Start menu.
- Type registry editor in the box.
- Hit Enter.
- Click on the Yes button on the User Account Control window for confirmation when it appears.
Now, when the Registry Editor window opens, click on the small arrows next to the following folders in the left panel in the exact order to expand them:
- HKEY_LOCAL_MACHINE
- SOFTWARE
- Microsoft
- MSLicensing
When you reach there, you will typically find two specific folders under it, such as HardwareID and Store.
- Right-click on HardwareID.
- Select Delete from the drop-down menu.
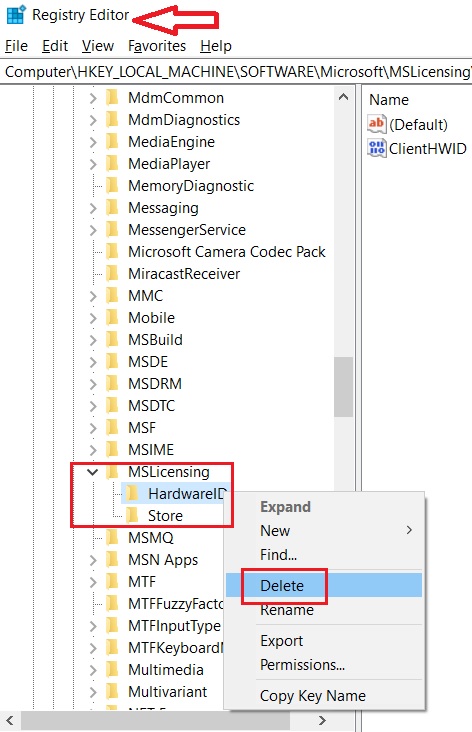
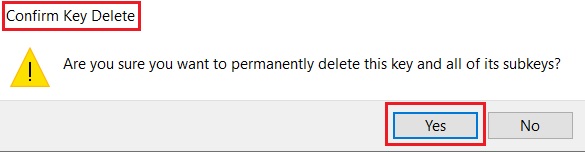
- Click on Yes on the Confirm Key Delete window.
Repeat the above process for the other file and delete it as well.
When you are done deleting these two folders, restart your system and check whether or not the issue has been fixed.
Now, close all of the expanded folders and then expand the following folders in the exact order:
- HKEY_LOCAL_MACHINE
- SYSTEM
- CurrentControlSet
- Services
- LanmanWorkstation
- Parameters
Double-click on the Parameters folder and then select the AllowInsecureGuestAuth file from the right side of the window.
If it is not there already, you will have to create one first in the following way:
- Right-click on a blank space on the right side of the window.
- Click on New.
- Select DWORD (32-bit) Value.
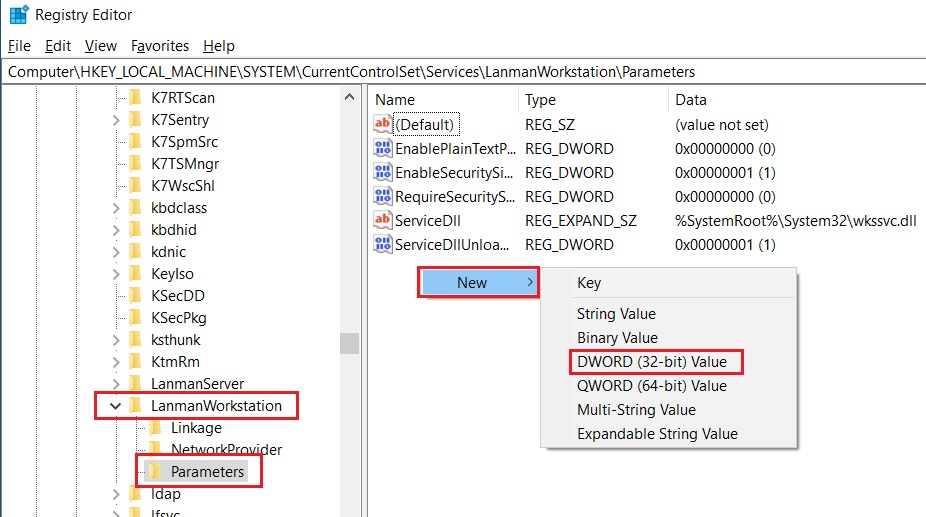
- Name the new key AllowInsecureGuestAuth.
- Right-click on it.
- Select Modify from the drop-down menu.
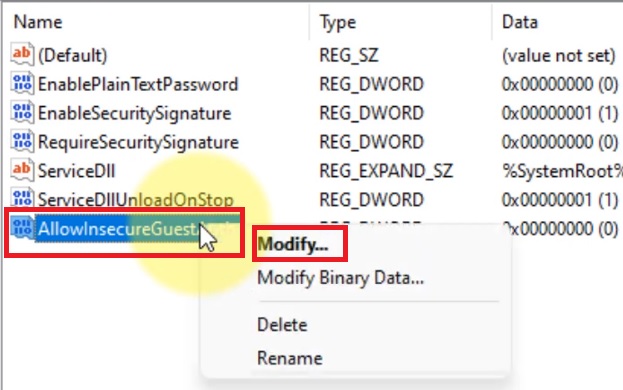
- In the Edit DWORD (32-bit) Value window, change the Value data from 0 to 1.
- Click on the OK button.

Now, restart your computer and check if the issue has been fixed.
Method 3: Make Adjustments to the Local Security Policy
You may need to make some changes in the Local Security Policy if the above two methods cannot rectify the issue of the network path not being found.
STEPS TO FIX:
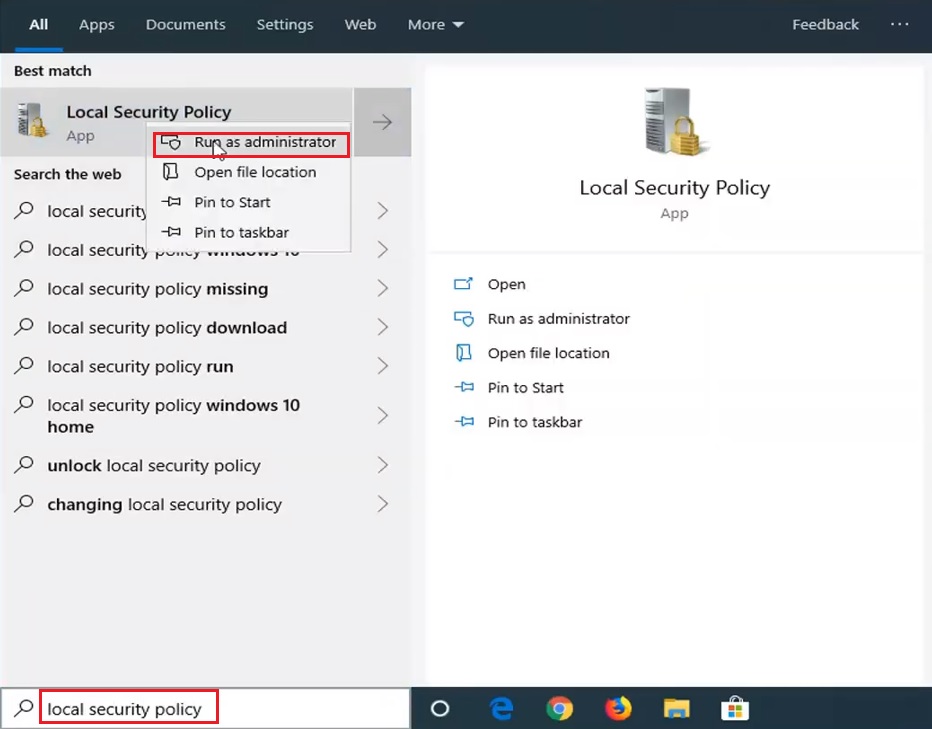
- Go to search > Type local security policy > Right-click on the best match > Select Run as administrator > Hit Enter.
- In the new window, click on the small arrow next to the Local Policies folder to expand it.
- Select Security Options and click on it once.
- Scroll down the list of options in the right window to find out the Network security LAN Manager authentication level.
- Double-click on that.

From the following window, select ‘Send LM & NTLM – use NTLMv2 session security if negotiated.’
Click on the Apply button, and then click on the OK button.
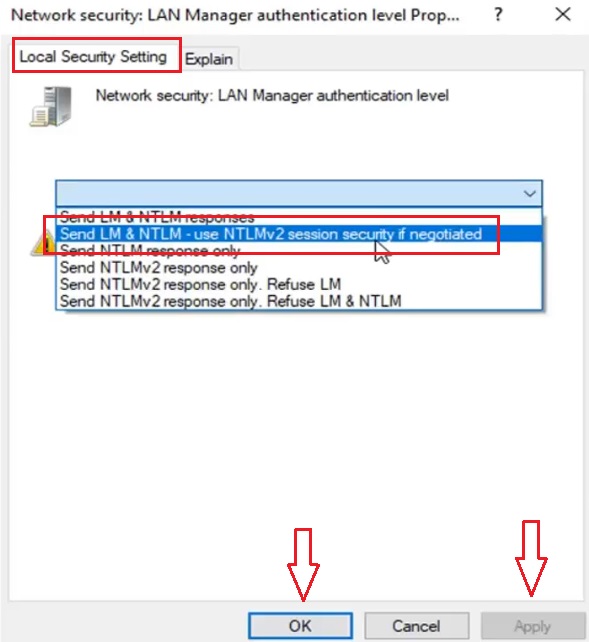
Finally, restart your computer and that should rectify the problem.
Method 4: Make Changes in the Windows Credentials
The credentials of Windows may not be set on your system and that might also cause the issue. You can add one to fix the problem.
STEPS TO FIX:
- Go to the Control Panel from the search box.
- Change it to Large icons in the View by box.
- Click on Credential Manager.
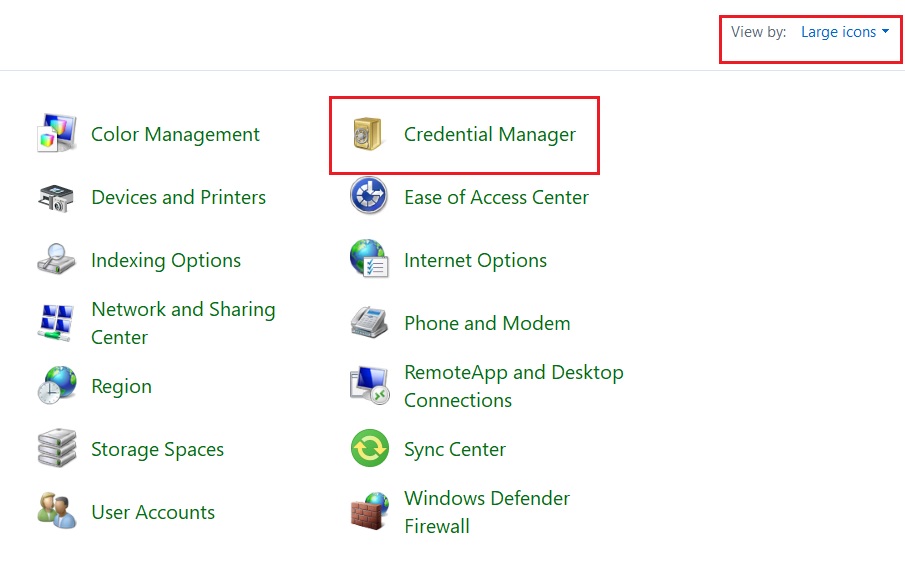
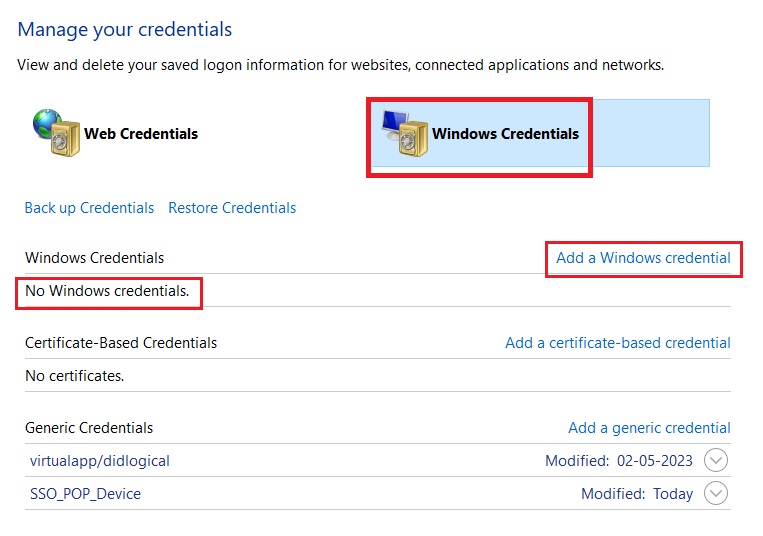
- Select Windows Credentials from the Credential Manager window.
- If you see that it says ‘No Windows credentials,’ click on Add a Windows Credential on the right side.
- Type the address of the website or network location and your credentials correctly in the relevant boxes in the following window, as indicated by the red arrows in the image below:
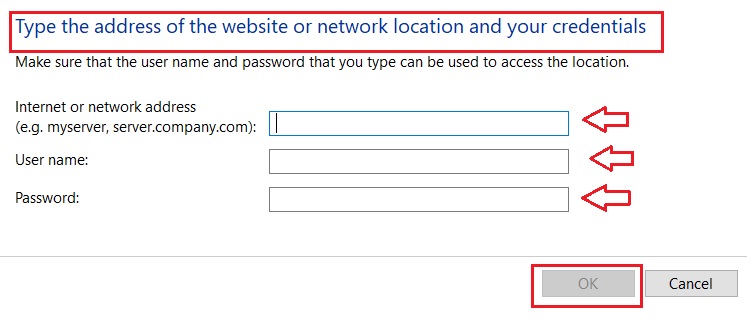
- Finally, click on the OK button.
Method 5: Turn On the SMB 1.0 Feature
There may be issues with the Server Message Block (SMB) feature in Windows that are preventing the network path from being found. Check it and turn them on to resolve the issue.
STEPS TO FIX:
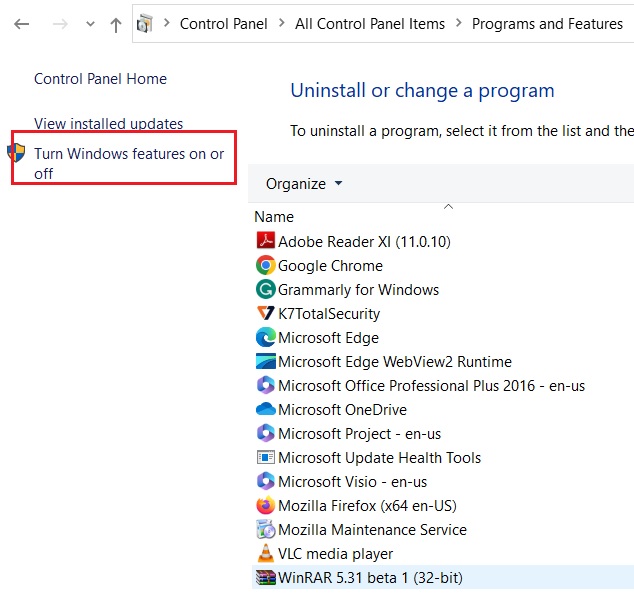
- Go to the Control Panel again and select Large icons.
- Select Programs and Features.
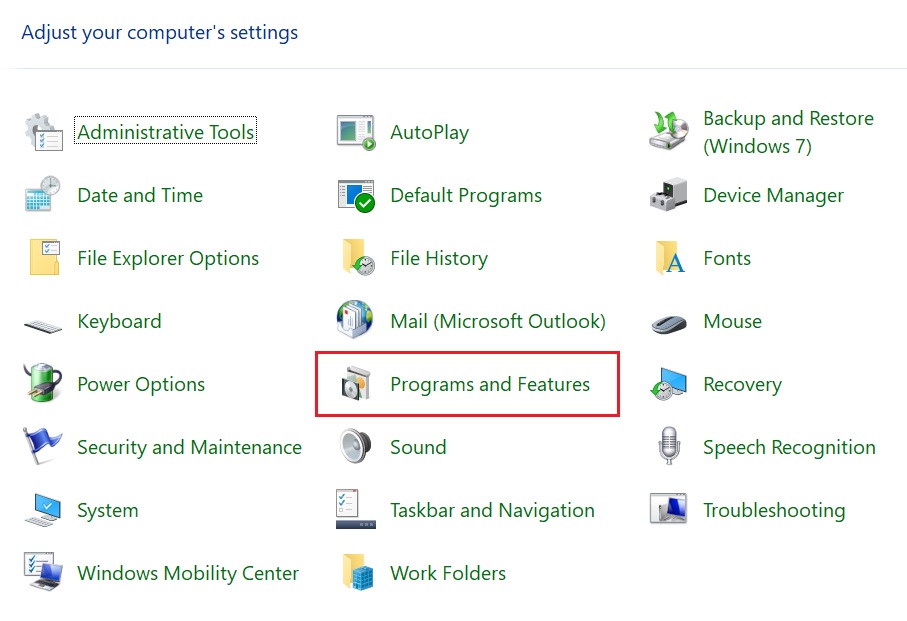
- Now click on Turn Windows features on or off from the left side of the following window.
 (Alternatively, you can also go to the search box, type windows features and hit Enter.)
In the Turn Windows features on or off window, scroll down to find SMB 1.0/CIFS File Sharing Support.
- Click on the plus button next to it to expand it.
- Click on all of the small square boxes under it to select all of them.
- Click on the OK button.

When Windows has completed searching for the necessary files and making the changes, click on the Close button on the window.
Now, restart your computer and check whether the network path can be found. If it is still not found, make some changes in the Local Group Policy, if that feature is available in your version of Windows, to try and solve the problem.
- Press the Windows and R keys together to open the Run dialog box.
- Type gpedit.msc in it.
- Hit Enter or click on OK.
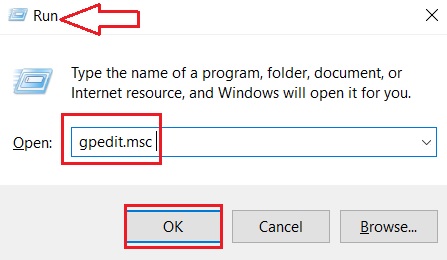
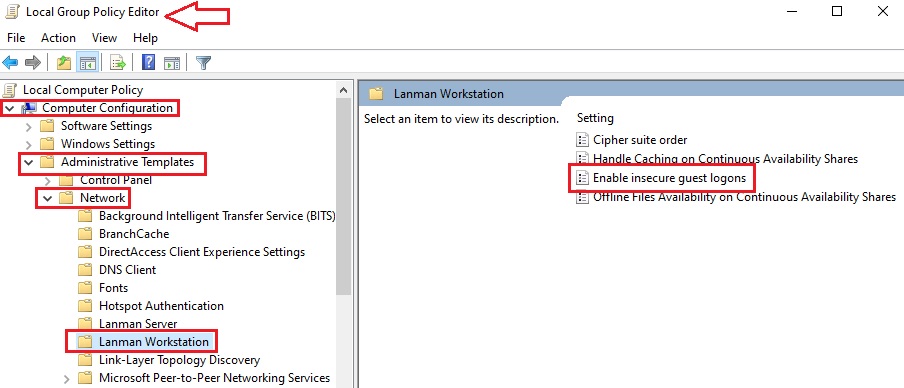
This will take you to the Local Group Policy Editor window.
From the left panel of this window, click on the following folders under Local Computer Policy:
- Computer configuration
- Administrative Templates
- Network
- Lanman Workstation
Now, double-click on the file Enable insecure guest logons on the right side of the window.
- Click on the small circle next to Enabled in the Enable insecure guest logons window.
- Click on the Apply button and then on the OK button.
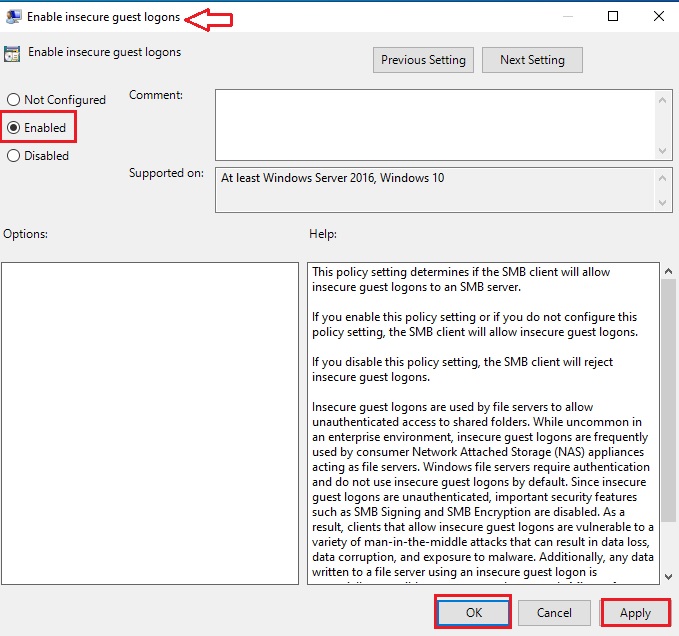
Now, when you restart your system, the problem of the network path not being found may be resolved.
Method 6: Enable NetBIOS over TCP/IP
You will need to make changes in the Advanced TCP/IP settings as well to enable the NetBIOS feature over TCP/IP and rectify the problem.
STEPS TO FIX:
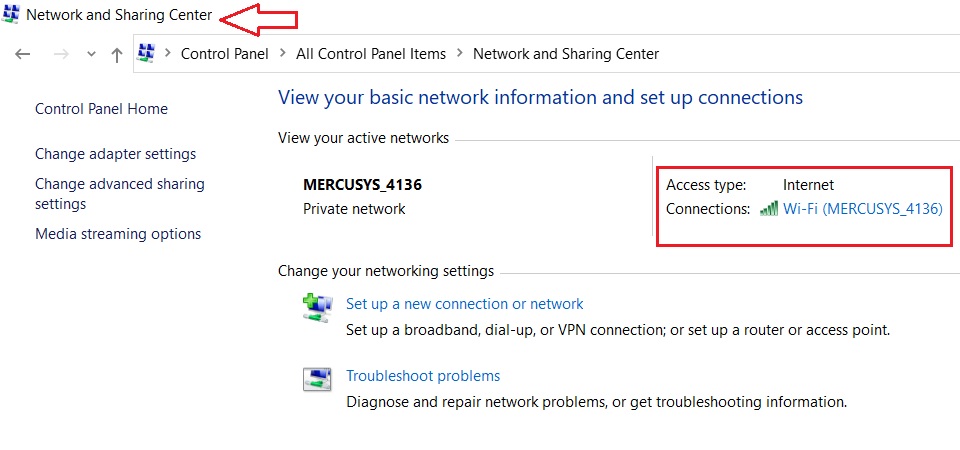
- Open the Control Panel again and select Network and Sharing Center this time.
- Click on whatever network you are connected to and it is displayed in the Network and Sharing Center window.
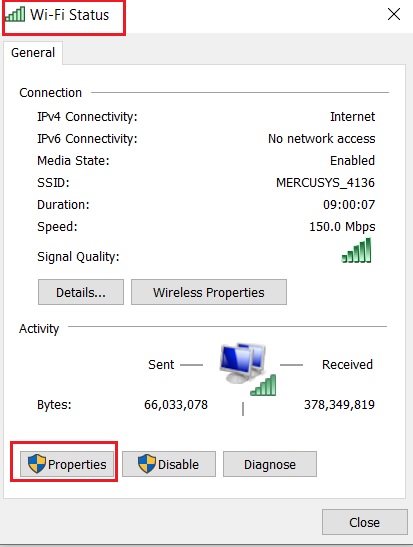
- Click on Properties in the following Wi-Fi Status window.
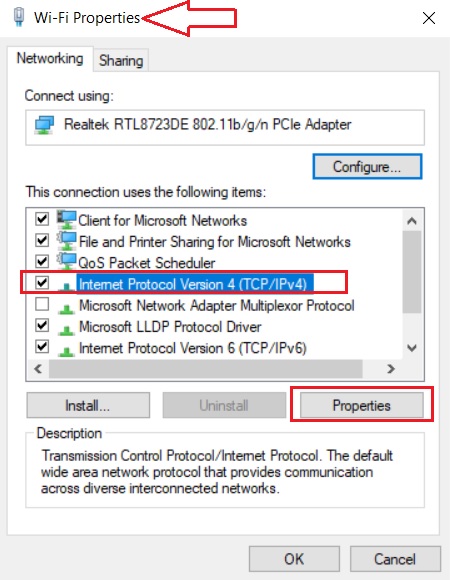
- In the next Wi-Fi Properties window, check the small box next to Internet Protocol Version 4 (TCP/IPv4).
- Click on Properties.
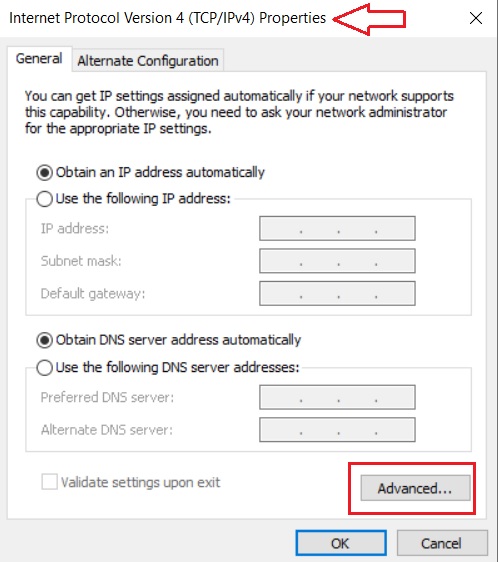
- Click on the Advanced button at the bottom of the next Internet Protocol Version 4 (TCP/IPv4) Properties window.
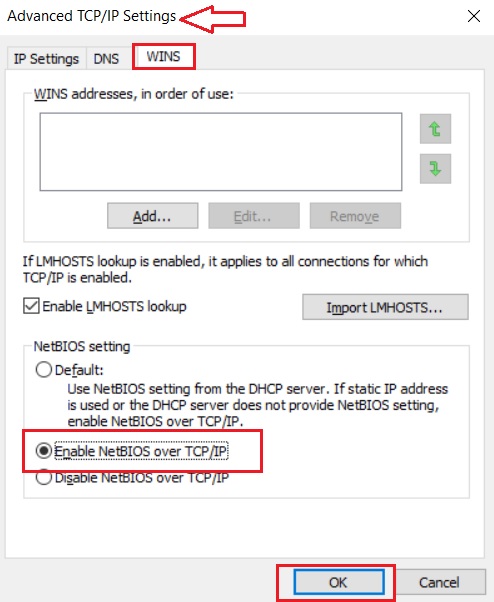
- Click on the WINS tab in the following Advanced TCP/IP Settings window.
- Click on the small circle next to Enable NetBIOS over TCP/IP.
- Click on the OK button.
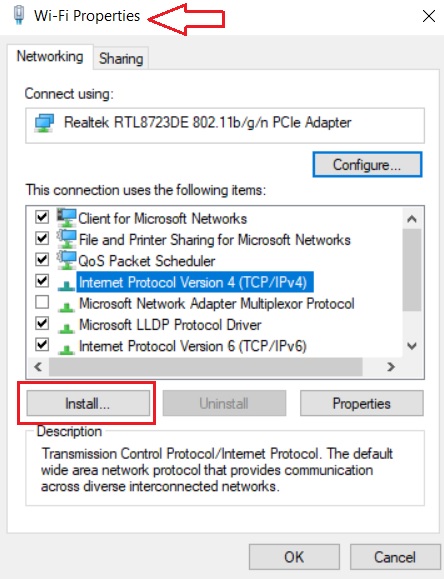
Close all the windows that are open and check whether the issue has been resolved. If not, then you will additionally need to install a new and reliable multicast protocol.
- For this, go back to the Wi-Fi Properties window.
- Click on the Install button.
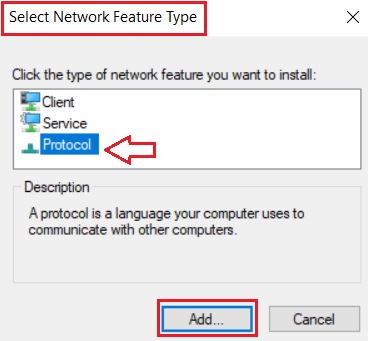
- Select Protocol in the Select Network Feature Type window.
- Click on the Add button.
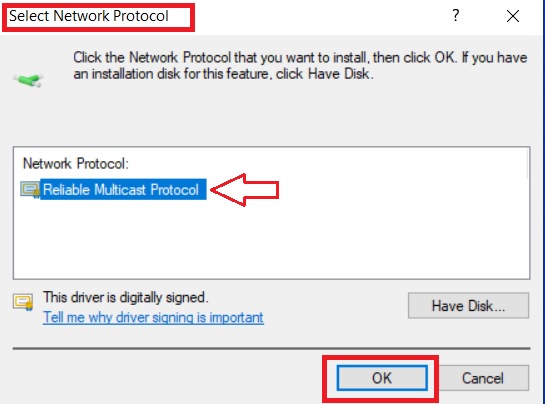
- Select Network Protocol.
- Click on the OK button.
This will probably resolve the issue. If your network path is still not found, you may move on to the next method in an attempt to fix it.
Method 7: Turn Off Windows Firewall Protection
Sometimes, the Windows Defender Firewall feature may cause this issue. It is better to turn it off, even if you are not sure about it.
STEPS TO FIX:
- Go to the search box and type windows firewall.
- Click on Windows Defender Firewall.
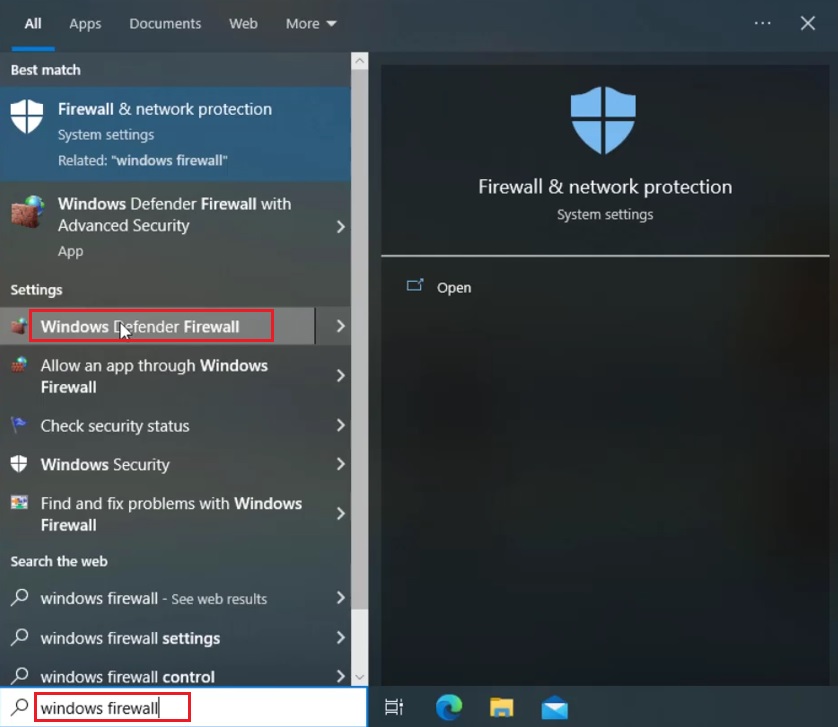
- In the new window, click on Turn Windows Defender Firewall on or off on the left side.
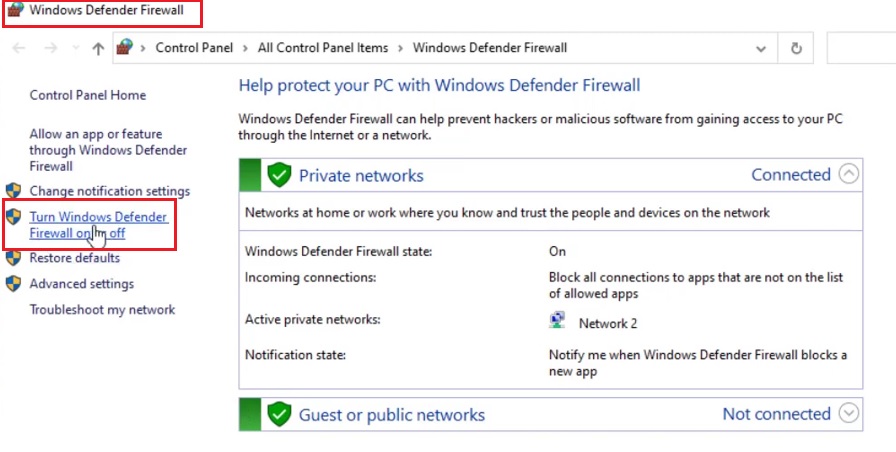
Click on both the small circles next to Turn off Windows Defender firewall (not recommended).
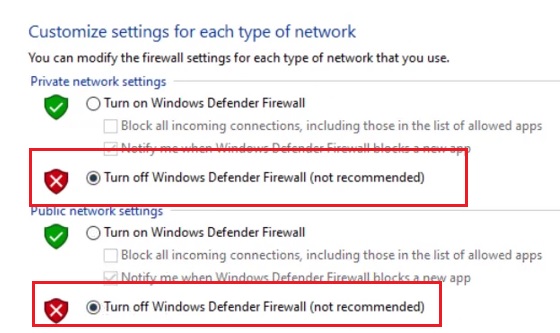
Close the window and find out whether your network path is being found this time.
Method 8: Run a Few Commands
If the problems still persist, run the following commands.
STEPS TO FIX:
Open the Command Prompt by typing cmd in the search box and hitting Enter. Make sure you run it as an administrator.
Run the following commands, one by one, and press Enter every time:
- ipconfig /release
- ipconfig /flushdns
- ipconfig /renew
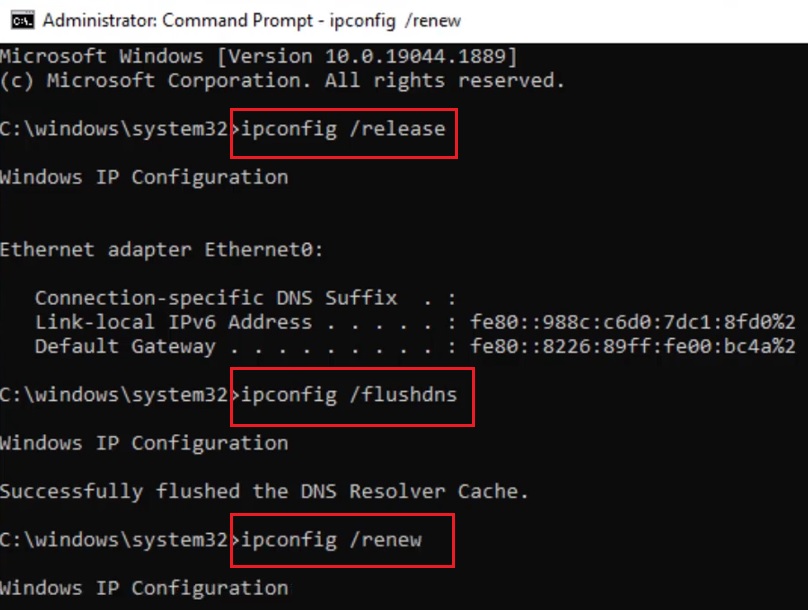
All the information about your network connection will be displayed as a return result of the ipconfig /renew command, as shown in the image below:
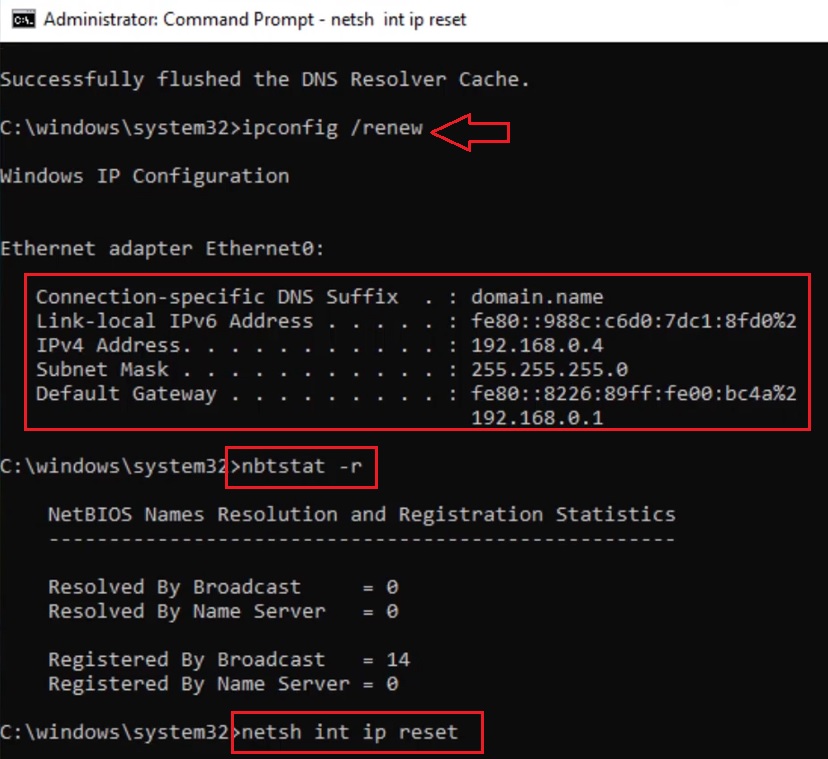
Now, run the following commands one after the other as well, as shown in the image above:
- nbtstat -r
- netsh int ip reset
Finally, when the command is executed successfully, type exit, and then restart your computer.
Method 9: Turn on the Advanced Sharing Settings Feature
Files and network paths may not be found if the sharing feature is disabled in Windows. So, turn these features on to resolve the issue.
STEPS TO FIX:
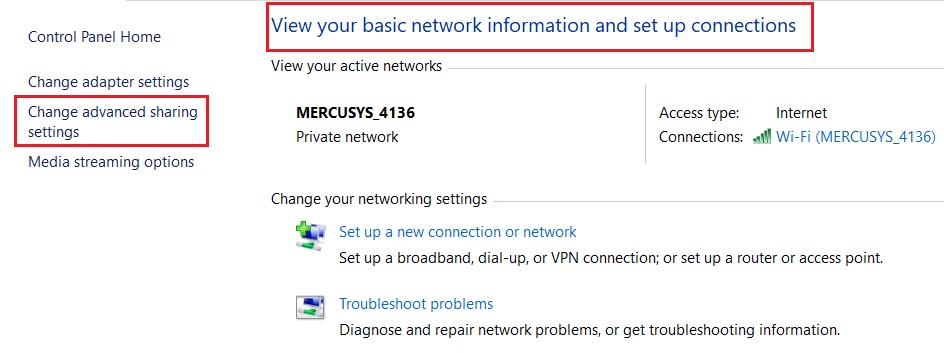
- Go to the Control Panel and Network and Sharing Center as before.
- Click on the Change advanced sharing setting option on the left panel of the window.
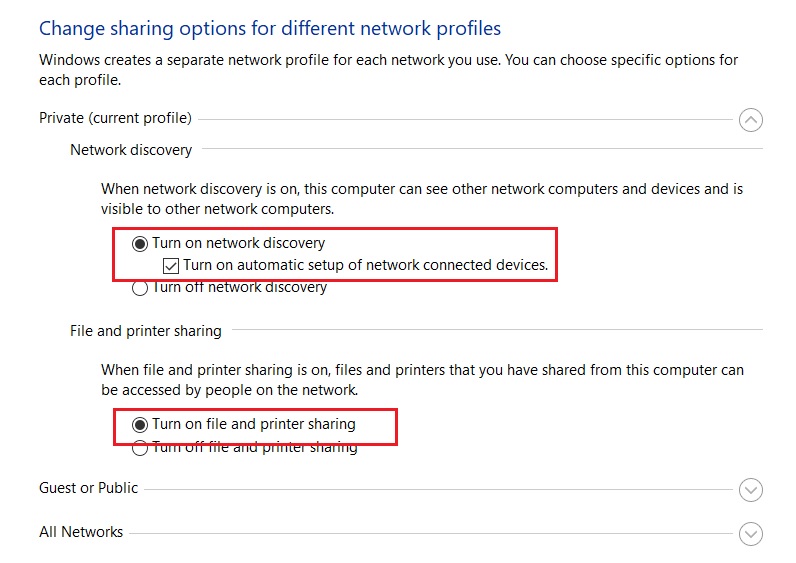
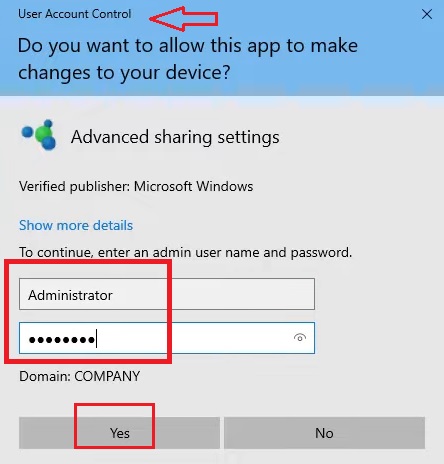
In the new window, check the circles next to Turn on network discovery and Turn on file and printer sharing.
- Save the changes.
- You may now be asked to enter the admin username and password in the User Account Control window.
Now, close all the windows and try again. This time, the problem should be resolved.
If you find that the problem still persists, try changing a couple of other things in the Guest or Public and All Networks as well.
- Go back to the Change advanced sharing settings window.
- Click on the arrow at the far right to expand Guest of Public.
- Check the circles next to Turn on network discovery and Turn on file and printer sharing.
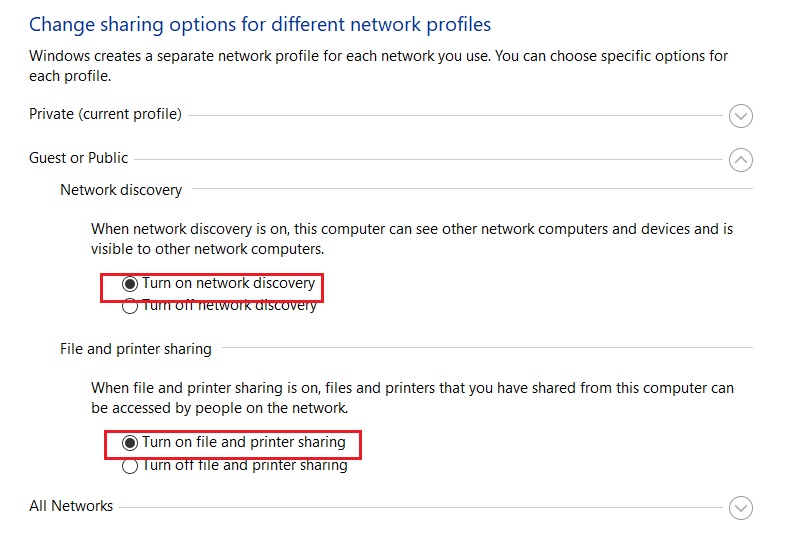
- Save the changes you have made and close the expansion.
- Next, click on the arrow to expand the All Networks option.
Here, check all the circles as shown in the image below:
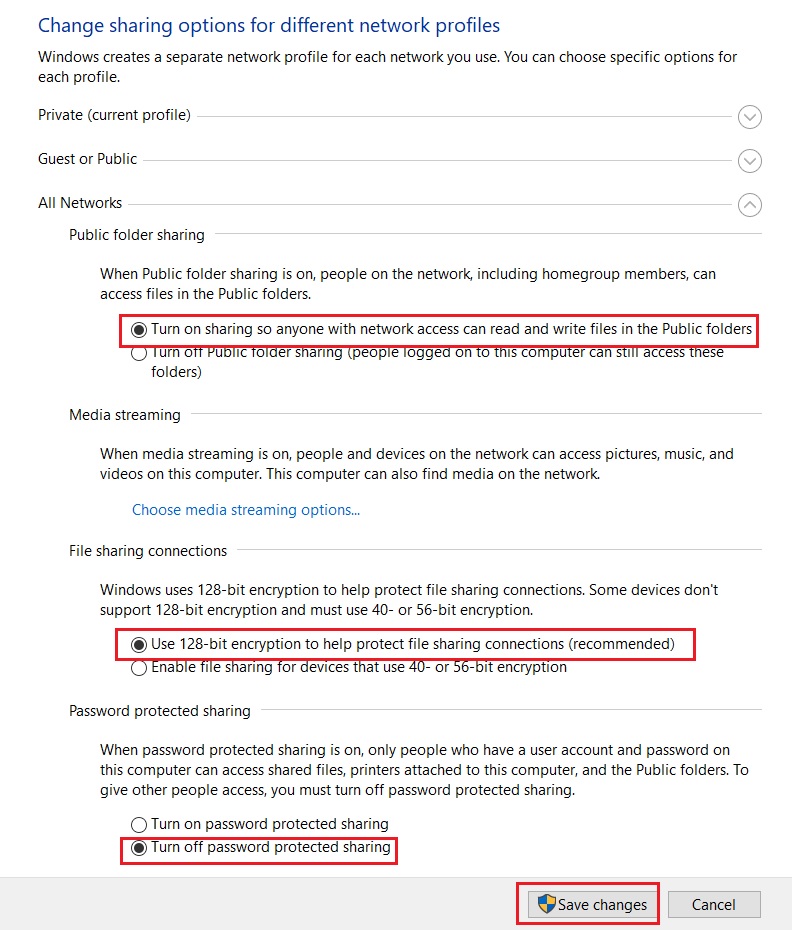
Finally, click on Save changes to complete the process.
Additionally, you may also check whether sharing is allowed or whether the pathname is correct or not. If it is not, you should change it first in the following way:
- Go to This PC from the File Explorer.
- Select the drive, such as SSD C for example.
- Right-click on it and select Properties.
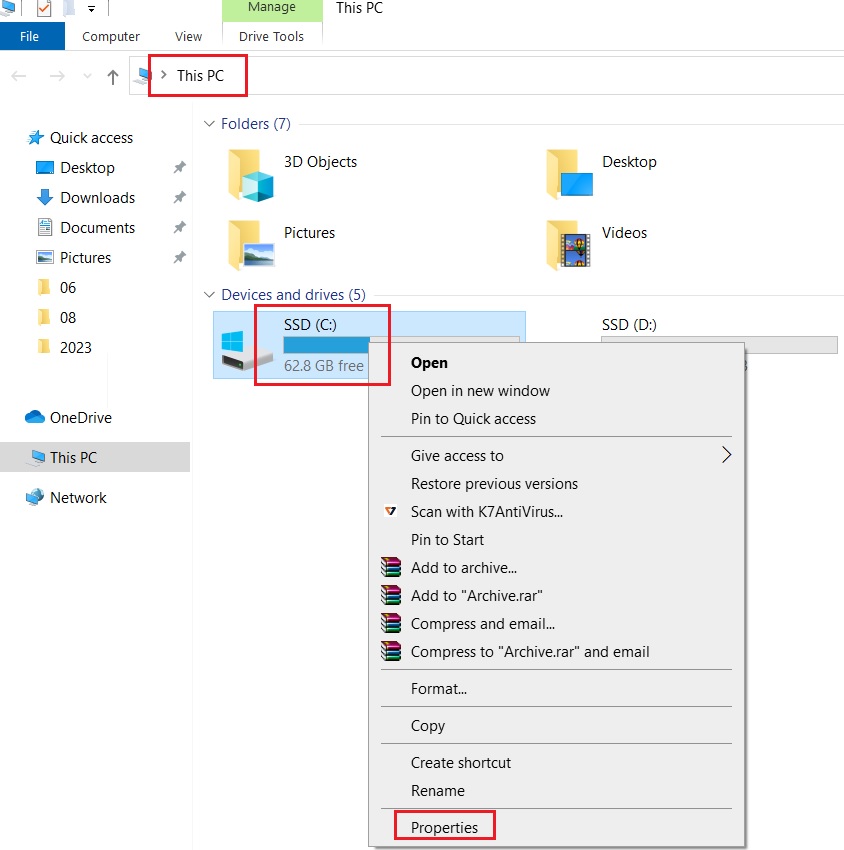
- Go to the Sharing tab in the SSD (C:) Properties window.
- Check the Network Path.
- Click on the Advanced Sharing button if the network path is not shared.
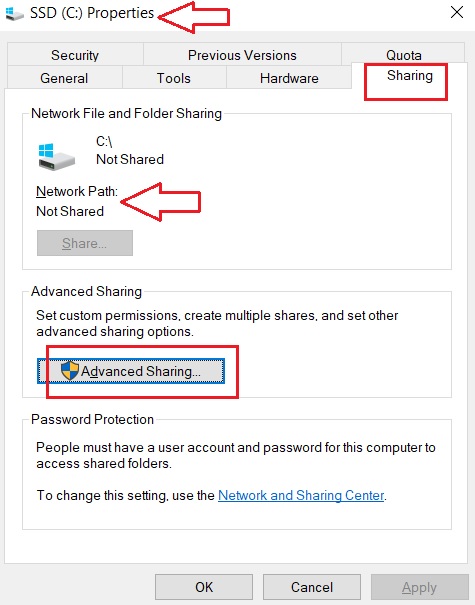
- Click on the box next to Share this folder in the Advanced Sharing window.
- Click on the Apply button and then on the OK button to save the changes.
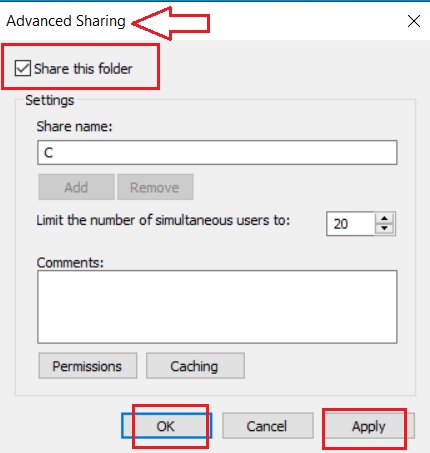
This should make the network path detectable and even the files and folders can be shared.
Method 10: Use the IP Address to Connect
You can also connect to a remote computer within the network by using a specific IP address. You will need to use the Command Prompt once again for this.
STEPS TO FIX:
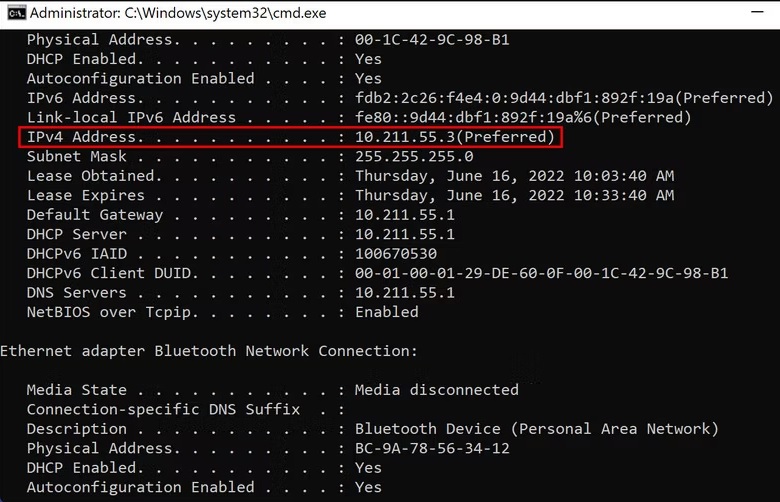
- Open the Command Prompt as an administrator as before and type the command – ipconfig /all.
- Hit Enter.
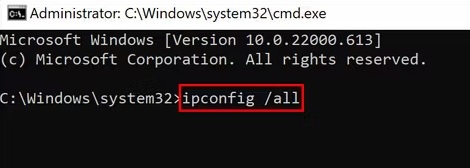
- From the results, check the IPv4 Address.
- Open the Run dialog box by pressing the Windows and R keys together.
- Type the IPv4 address in the box, as shown in the image below as an example:
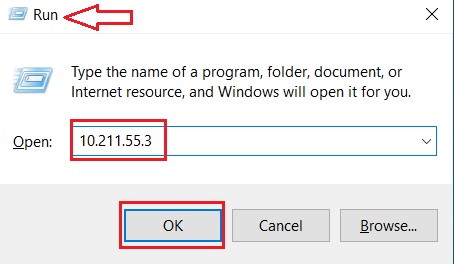
Finally, click on the OK button. You should now be able to connect to the remote computer.
Conclusion
So, with these many methods to fix the ‘network not found’ issue, you should not worry about even an iota when you face such an error.
Start with the simpler solutions to it and then move on to the more complex ones, one by one.
You will surely be able to make your PC functional again without needing to call a pro.