
It can be really annoying when you connect your headphone and mic set to your computer to listen to your favorite music or watch a movie and the PC fails to detect it.
However, this is a common issue, and it does not always end up with repairing or replacing the pair of headphones.
If you know the reason for the issue, there are a few easy and quick fixes to this problem. In this article, you will find all those fixes, all in one place, to put your headphones back into normal working condition. So, continue reading.
KEY TAKEAWAYS
- The most obvious fix for a headphone not being detected by a PC is changing it if there are broken or damaged cables or other components.
- Outdated and corrupted drivers will also hinder the normal functioning of the headphones and therefore will need to be updated or reinstalled.
- Often, the output device may be selected incorrectly, and therefore, selecting the right one or disabling a few may resolve the issue.
- Changing the USB port may also fix the issue because a particular port may be loose or faulty.
- There may be dust accumulated on the port if it is not used for a long time. Cleaning it may resolve the issue as well.
In This Article
Why Does a PC Not Recognize Headphones?
A PC may not detect a headphone due to several reasons, including a faulty headphone cable or connector. There can also be issues with the earbuds due to damage, wear or breakage.
In addition to the above, the headphones may also not be detected by the computer due to:
- Improper connections
- Faulty or loose ports
- Improper sound settings
- Improper selection of the desired output device
- The sound card driver may be outdated or corrupted and may need updating
- Malware attack
- Malfunctioning switches or scroll on a headphone
- Accumulation of dust on the ports
How to Fix a PC Not Detecting Headphones?
Typically, there are a host of solutions that can fix the issue of a headphone not being detected by the computer. However, all these solutions generally fall under two broad categories, namely, hardware and software fixes, depending on the cause.
However, before getting into the relatively complex set of solutions to fix the issue of your headphones being undetectable by the PC, try the basic ones first.
This involves physically checking the headphones, the cables, and the ports, and even trying them on a different device.
Once you are satisfied with your checks and know that your headphone set is all good, you may try these specific solutions.
Method 1: General Troubleshoot
Sometimes, simple issues with the headphones and their settings may prevent a PC from detecting them. Therefore, it is better to start with simple troubleshooting.
STEPS TO FIX:
- Go to the Start menu.
- Click on the gear icon to open Settings.
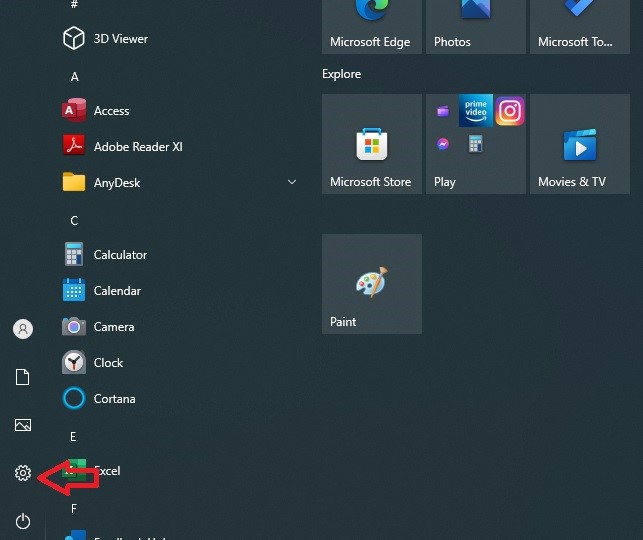
- Click on System.
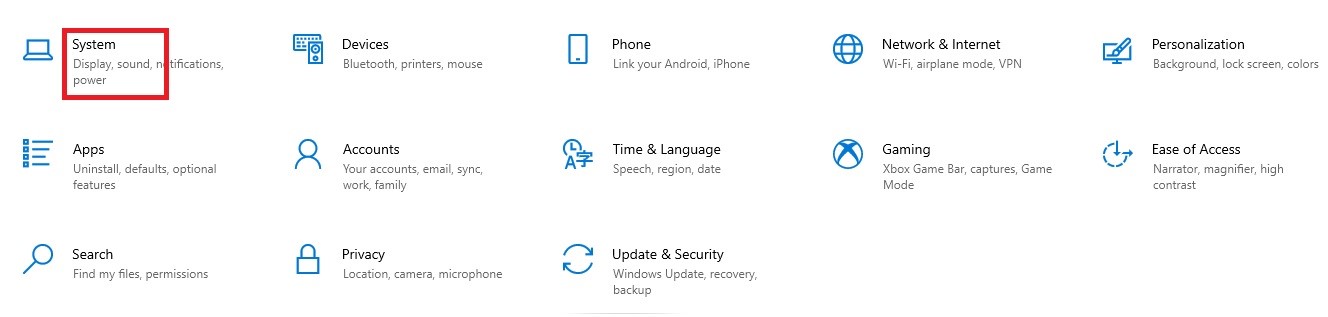
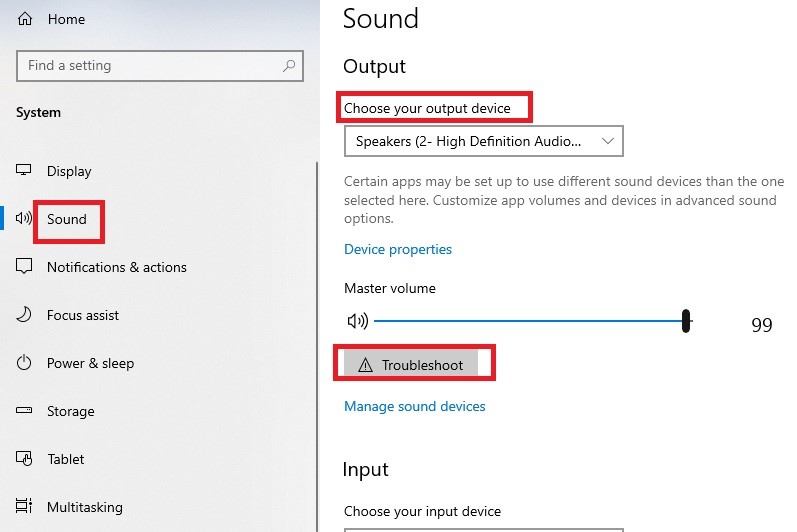
- Click on Sound.
- Select the audio device.
- Click on Troubleshoot.
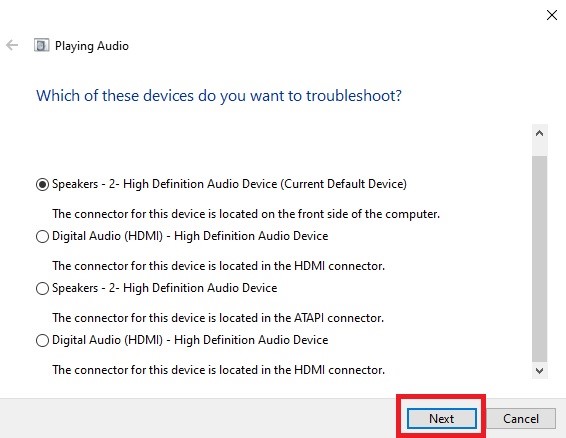
- Wait until it finishes Detecting problems and the window disappears.
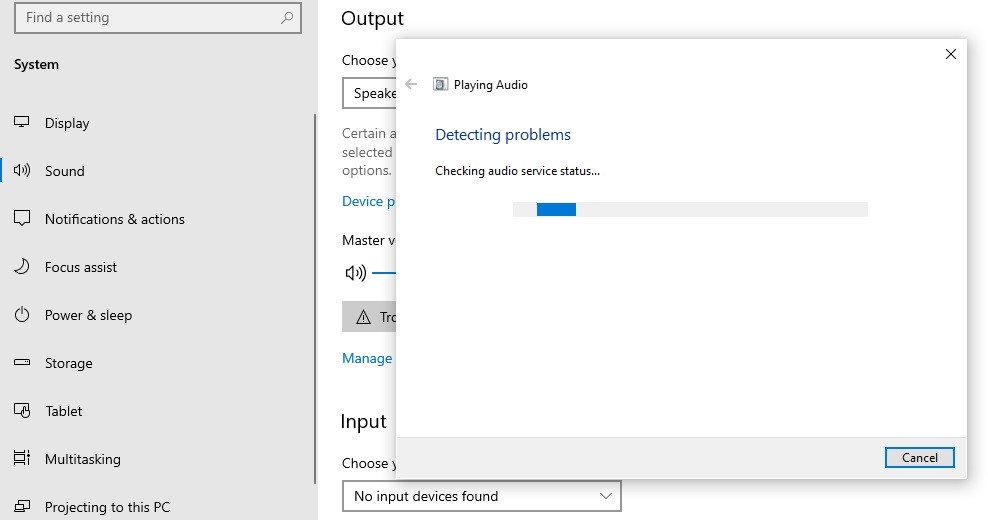
- Select the right option for headphones or speakers from the next Playing Audio window.
- Click on the Next button.
Wait for the audio to be repaired which will resolve the issue.
Method 2: Update the Driver
Often, the installed driver on your PC may be corrupted or outdated, preventing the headphones from being detected.
Therefore, it is better to update the drivers installed on your PC.
STEPS TO FIX:
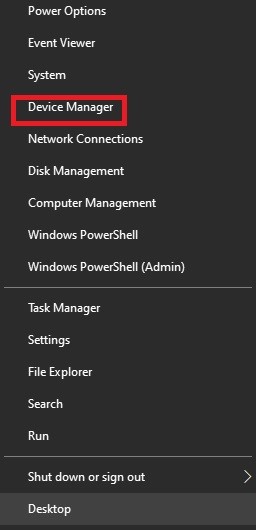
- Right-click on the Start menu.
- Go to Device Manager.
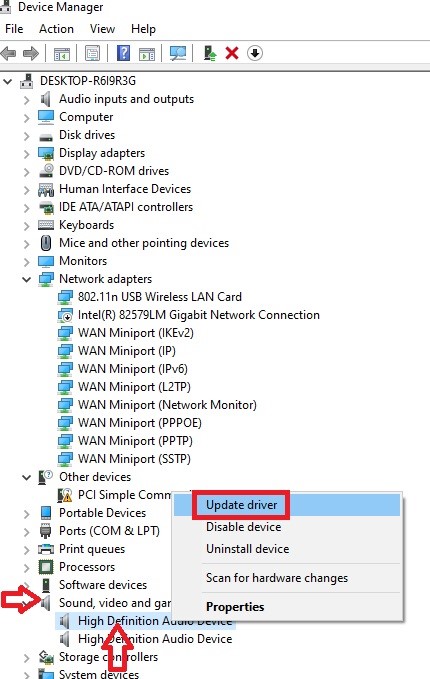
- Right-click on the audio device.
- Select Update driver.
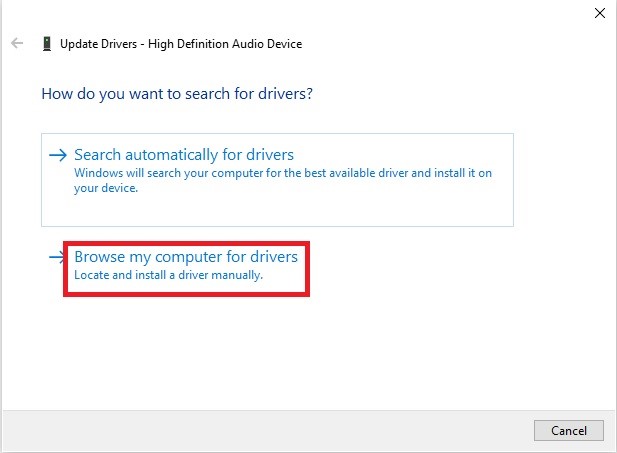
- Select the ‘Browse my computer for drivers’ option.
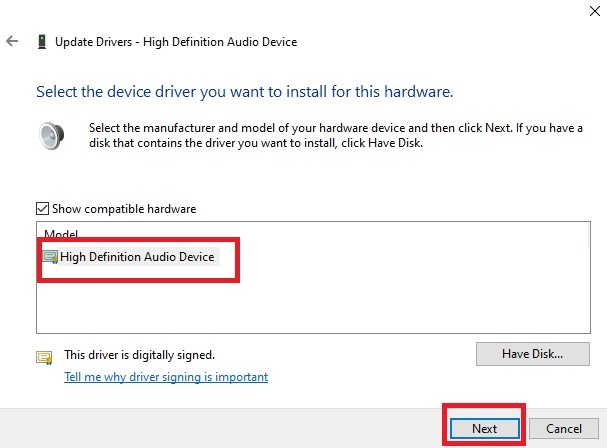
- Select ‘Let me pick from a list of available drivers on my computer.’

- Select High-Definition Audio Device.
- Click on the Next button.
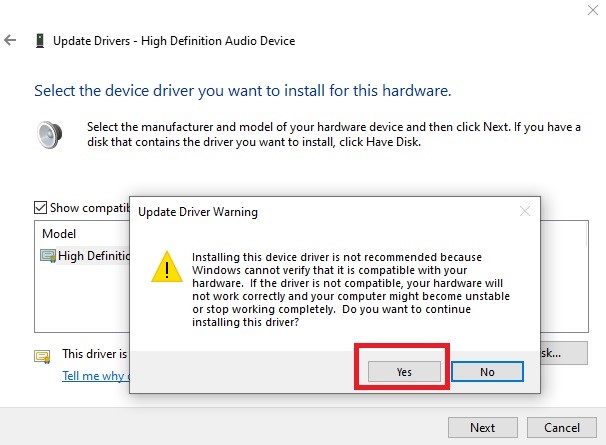
- Click on the Yes button on the Update Driver Warning window that appears on top of it.
- Click on the Close button when Windows has successfully updated your drivers.
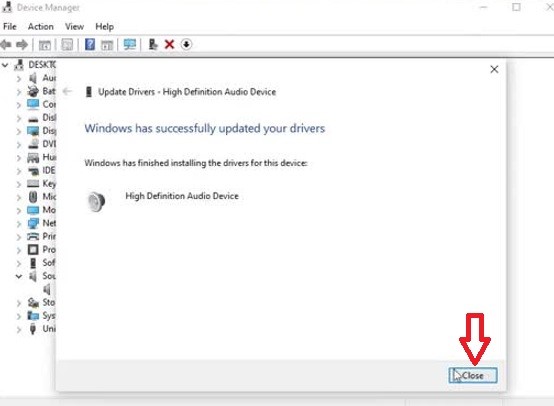
- Restart your system.
You may find the issue resolved.
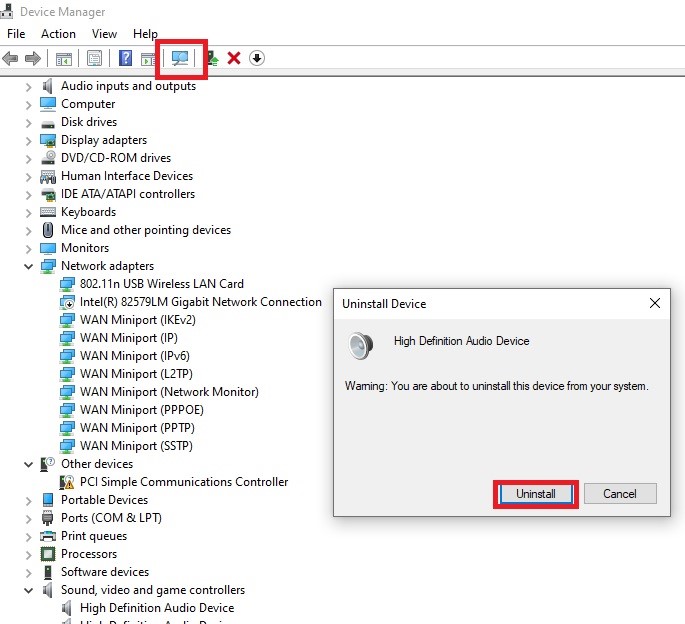
Method 3: Uninstall Device
If the above method did not work, the device itself may be the cause of the issue. It is good to uninstall the device and reinstall it again to fix the problem.
STEPS TO FIX:
- Open Device Manager and select the audio device as above.
- Select and click on Uninstall device.
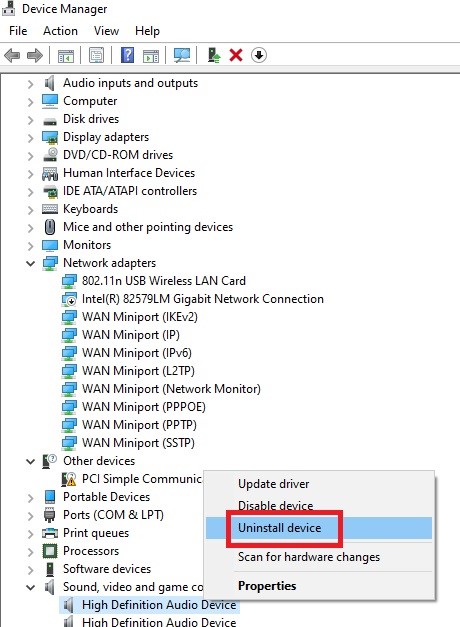
- Go to the Scan for hardware changes button at the top in the toolbar of the window.
- Select the audio device.
- Right-click on it.
- Select Uninstall.
Sometimes, you may see a window like this:
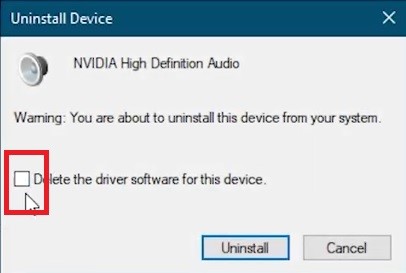
If you see it, make sure that you uncheck the Delete the driver software of this device option. If you do not then it will uninstall the primary sound driver software.
When it is done uninstalling, reinstall it back. You must then restart your PC. This will resolve the issue.
Method 4: Change the Bitrate
Sometimes the quality of sound or the bitrate may prevent the PC from detecting a headphone set. Therefore, change it.
STEPS TO FIX:
- Go to Sound from System and Settings as you did in Method 1.
- Click on the Sound Control Panel on the right side.
- Select the audio device.
- Right-click on it.
- Select Properties.

- Select the Advanced tab.
- Change the bitrate to CVD or CD quality and continue testing until you hear sound.
- Click on Apply and then on the OK button.

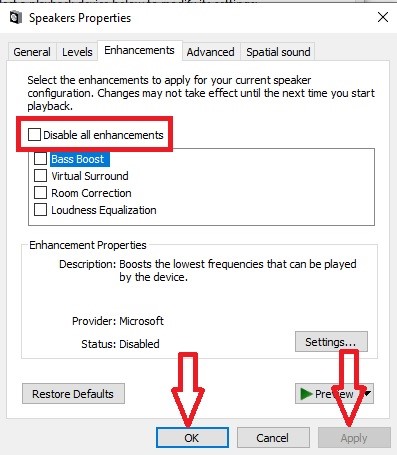
Method 5: Disable All Enhancements
There may be too many enhancements enabled in your PC. This can also create some issues with detecting the headphones by the system. In order to fix this issue, disable them.
STEPS TO FIX:
- Go to the Start menu.
- Type Control Panel in the Search bar.
- Open Control Panel.
- Select Hardware and Sound.
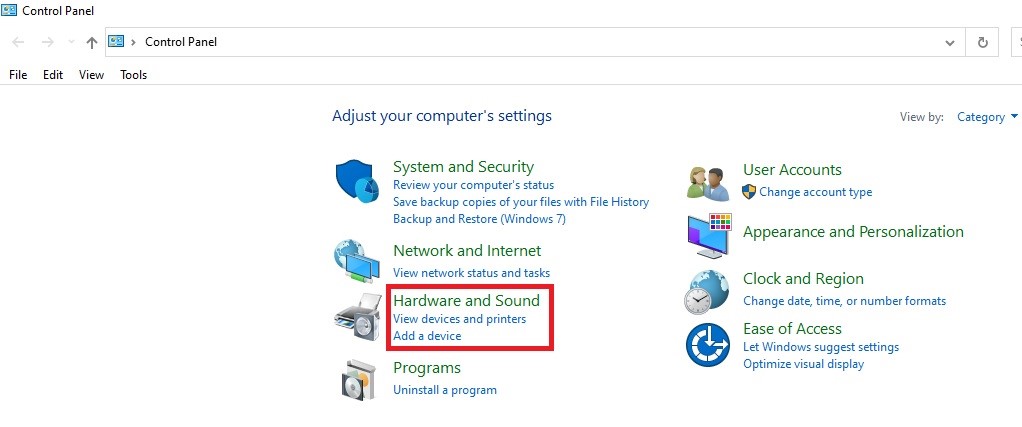
- Click on Sound.
- Select the audio device.
- Right-click on it.
- Select Properties.
- Go to the Enhancements tab.
- Check Disable all enhancements.
- Press Apply and then on the OK button.
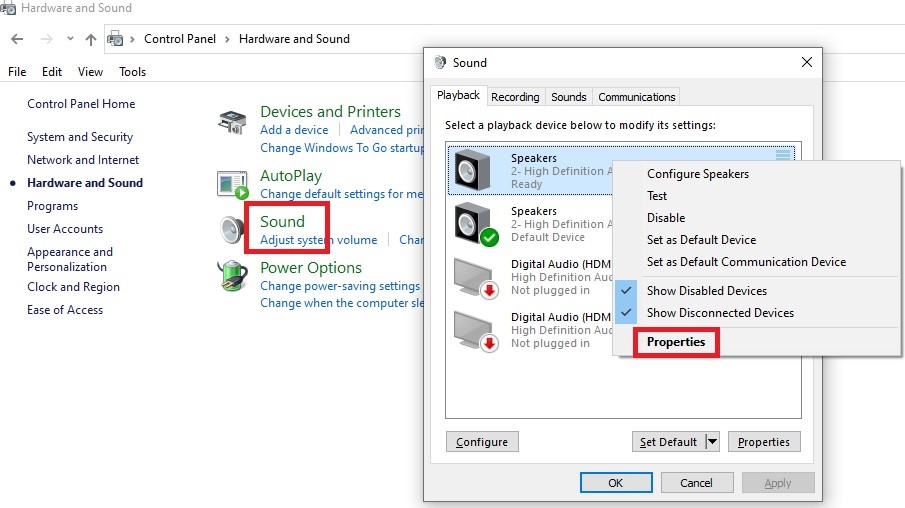
Method 6: Set the Default Device
The PC may not detect a headphone if it is not set as the default device. You should set it in these easy steps.
STEPS TO FIX:
- Go to the right-hand bottom corner of the Taskbar.
- Right-click on the volume icon.
- Click on Open Sound settings.
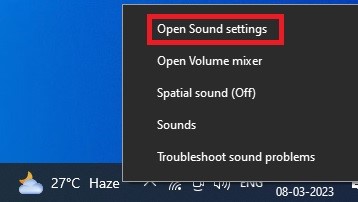
- Click on Manage sound devices.
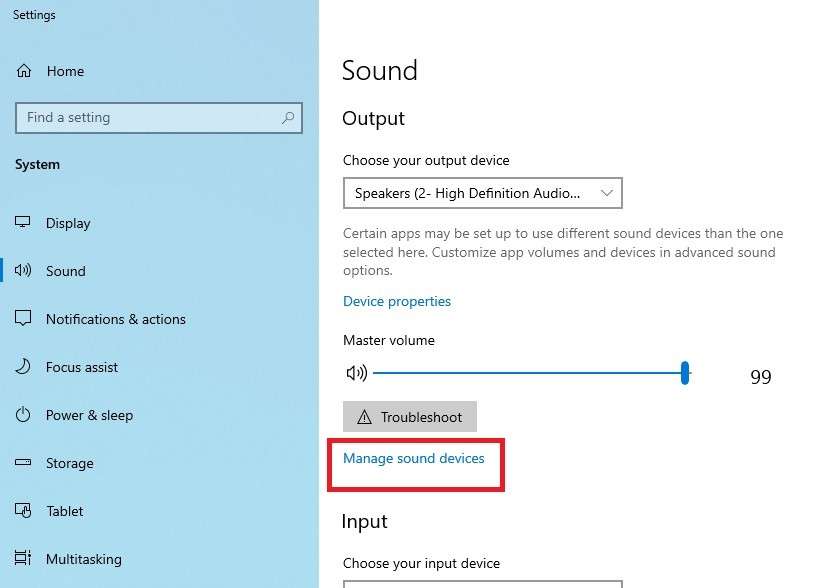
- Check the disabled list of Output devices on the next window.
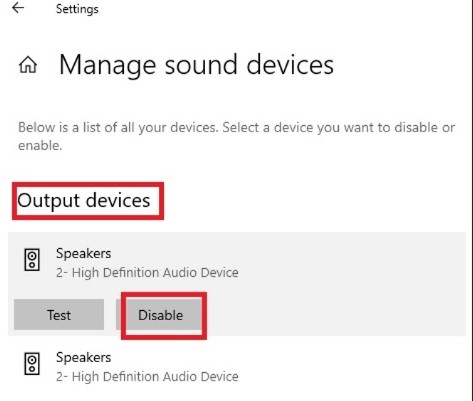
See whether or not the headphones mentioned under this list are disabled. If it is so, enable it. In the above case, it is enabled and therefore left unchanged. Do the same for the other output device/devices under it.
This will make your headphones the default output device.
Method 7: Uninstall Problematic IDT Audio Device
There are several instances where the Interdigital transducer or Interdigitated Transducer (IDT) audio device creates problems with the sound drivers and thereby prevents the PC from detecting the headphones.
Therefore, it is best to uninstall them in the following ways.
STEPS TO FIX:
- Go to the Control Panel as before.
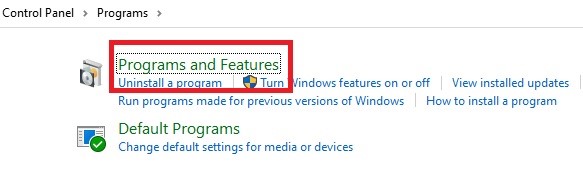
- Click on Programs.
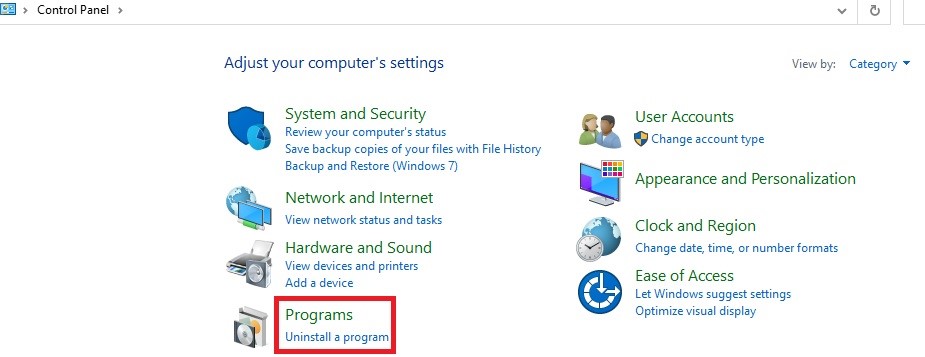
- On the new window click on Programs and Features.
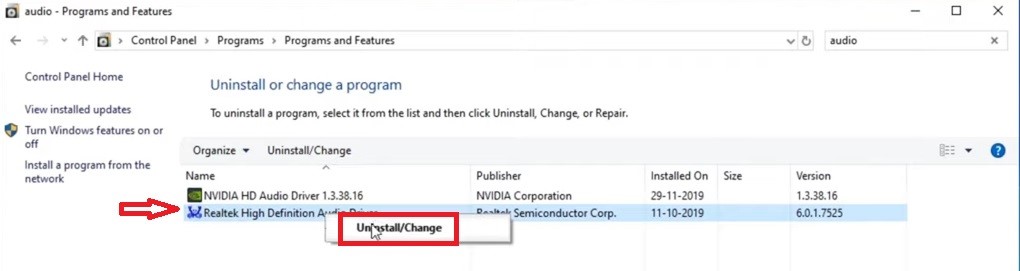
- Look at the list of applications installed on your PC.
- Search for the IDT audio driver from there.
- Select it.
- Click on Uninstall/Change.
- Restart your computer.
It will be removed. and the problem will be solved. You can check your headphones to find out.
Method 8: Windows Update
Your Windows operating system may need some updating not only to detect your headphones connected to the PC but for all its other functions as well.
Most of the time, an outdated version of Windows can cause a variety of issues. Therefore, update it.
STEPS TO FIX:
- Go to the Search bar beside the Start menu.
- Type in updates.
- Press Enter.
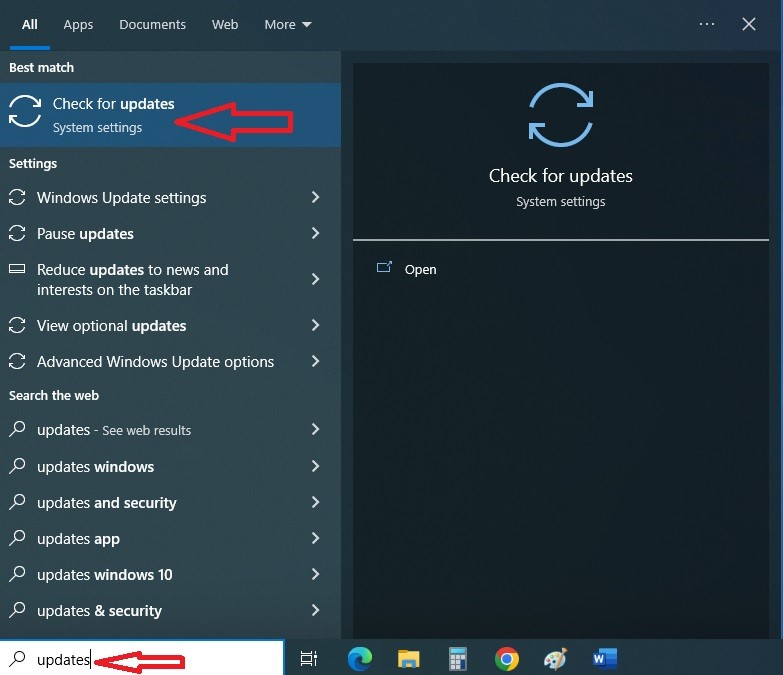
- Click on Check for updates.
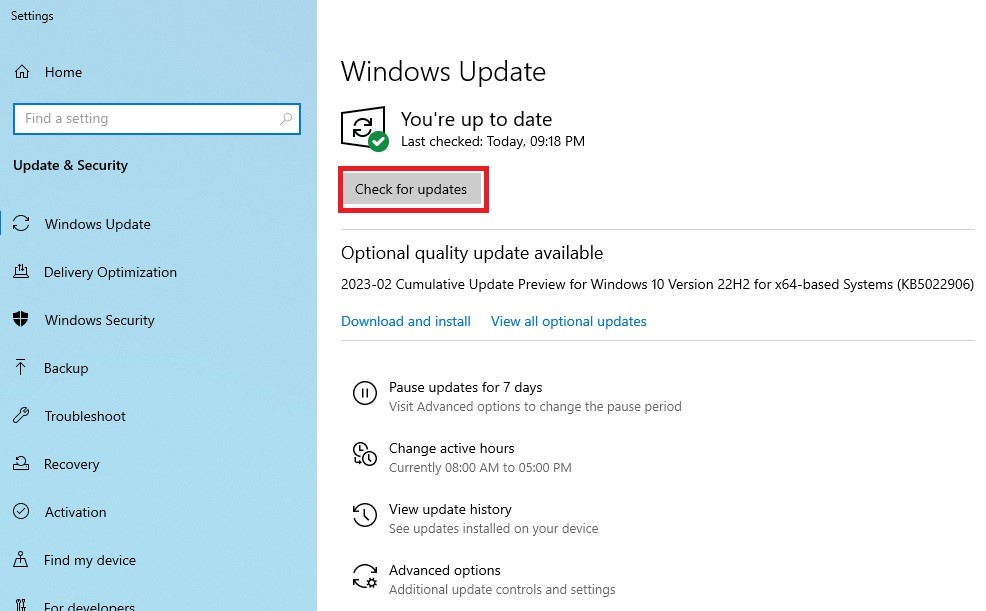
- Click on the button Windows Update on the left side panel.
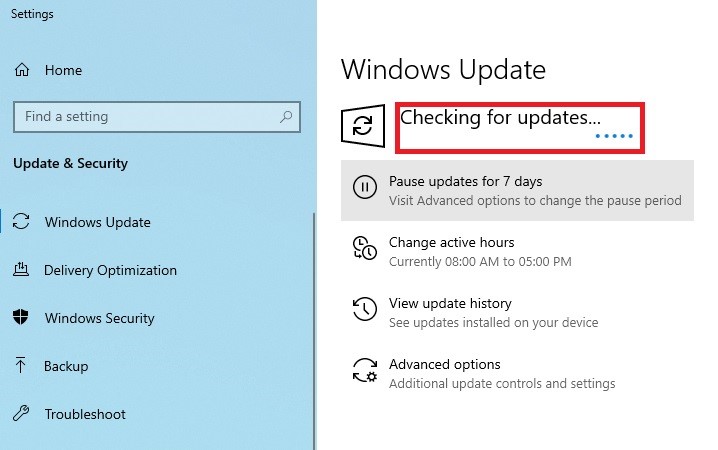
Windows will check for the latest updates and inform you when it has finished updating. This simple yet essential step will also resolve the issue of your headphones not being detected by your PC.
Method 9: Setting the Exclusive Mode
More often, a wrong setting or selection of the exclusive mode may create such an issue. So, it is better to resolve the problem in hand by setting the exclusive mode correctly.
STEPS TO FIX:
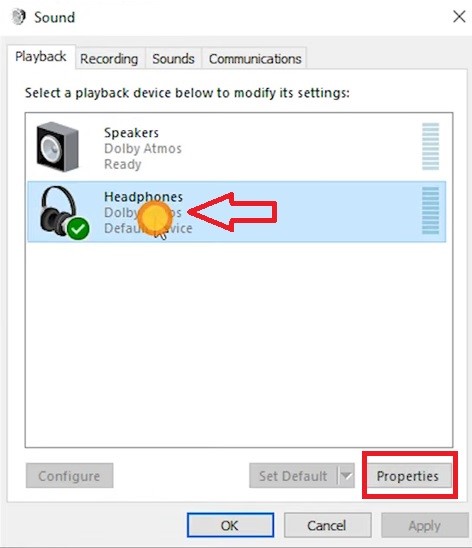
- Go to the Control Panel and Sound as before.
- Select Headphone option.
- Click on the Properties button.
- On the new window go to the Advanced tab.
- Uncheck all boxes under Exclusive Mode.
- Click on Apply and then on the OK button.
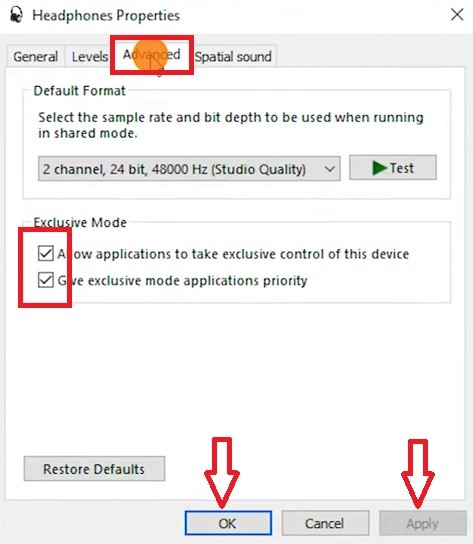
Finally, disconnect and reconnect your headphones. This should solve the issue.
Steps to Fix a PC Not Detecting Headphones Mic
There may be times when your PC would not detect the microphone. In such situations, you will need to make some adjustments to your system settings.
Method 10: Switching the Microphone On
A microphone will not be detected by a computer system if it is not switched on. Therefore, make sure it is switched on.
STEPS TO FIX:
- Click on the Start menu.
- Go to Settings.
- Click on Privacy.
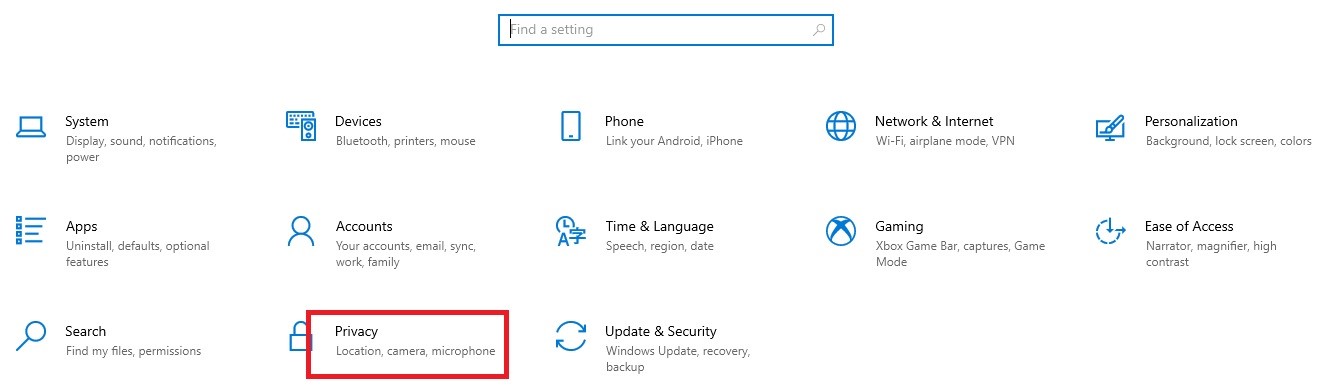
- Select the Microphone option from the left panel.
- Make sure that the ‘Allow access to the microphone on this device’ is enabled. If it is not, you should change it.
- Slide the switch under ‘Let apps use your microphone’ to On.
- Close all windows.
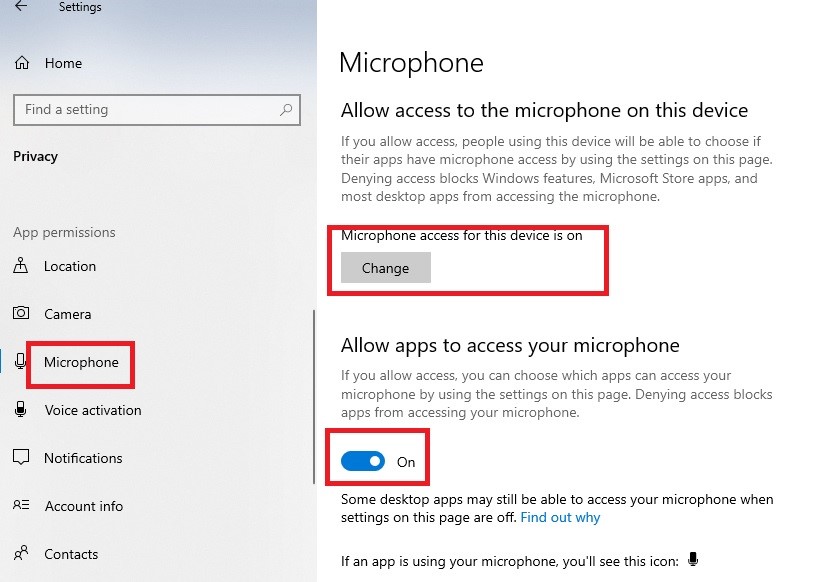
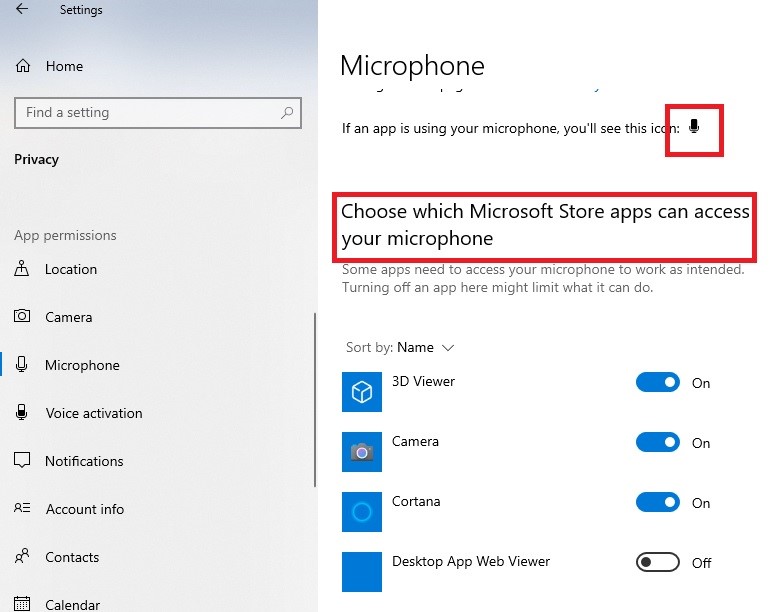
This should resolve the issue and you will see the microphone icon when an app uses the microphone. You may also ‘Choose which Microsoft Store apps can access your microphone’ according to your wish.
Method 11: Tweak HD Audio Manager
The audio manager installed on your PC may not be working properly and hence your microphone may not be detected by the computer system. Make changes to it in order to resolve the issue.
STEPS TO FIX:
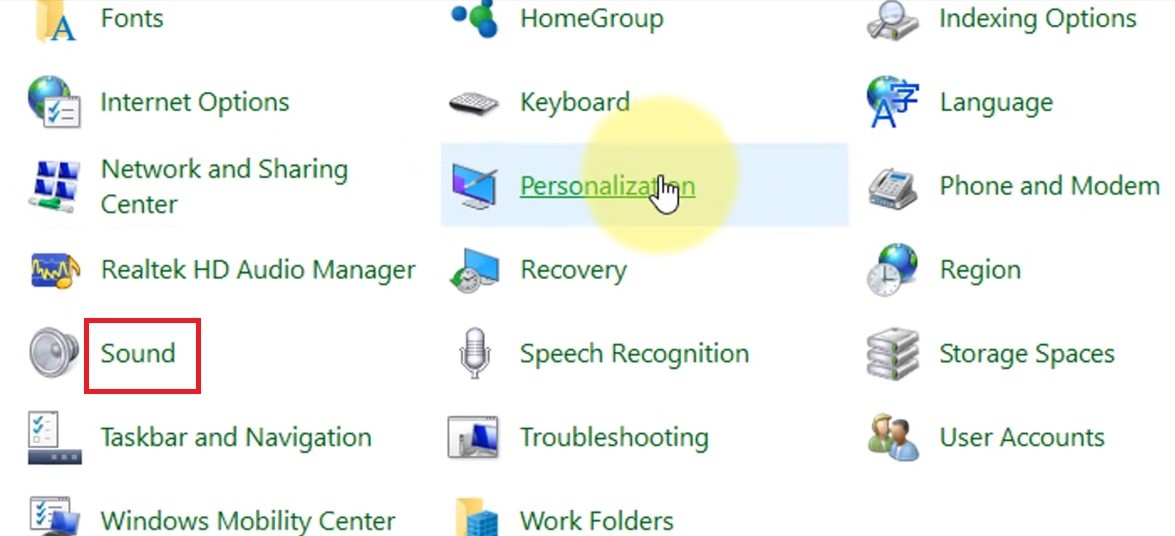
- Go to the Control Panel.
- Go to the Category part in the top right corner.
- Click on the Large icons button to open All Control Panel Items.

- Select HD Audio Manager.
- Click on it.
- Click on Microphone in the new window.
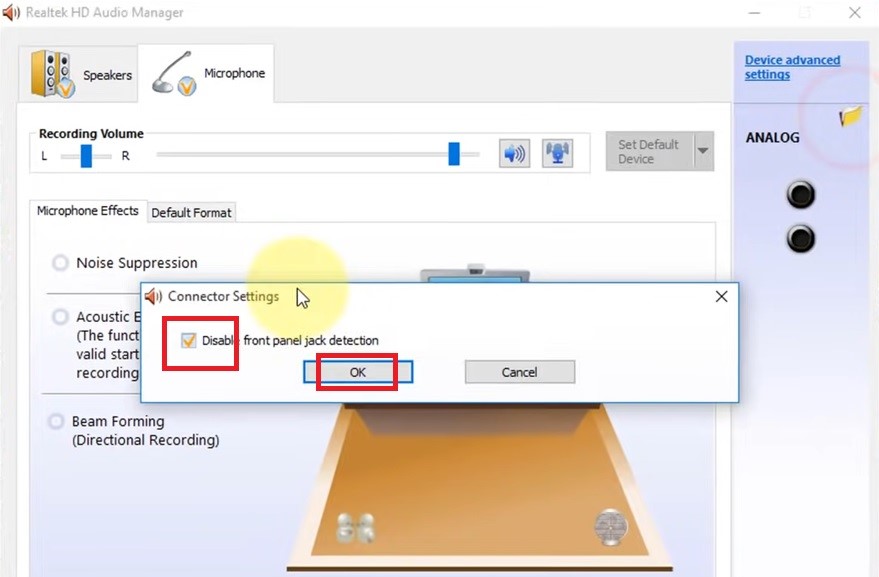
- Click on the Folder icon in the top right corner.
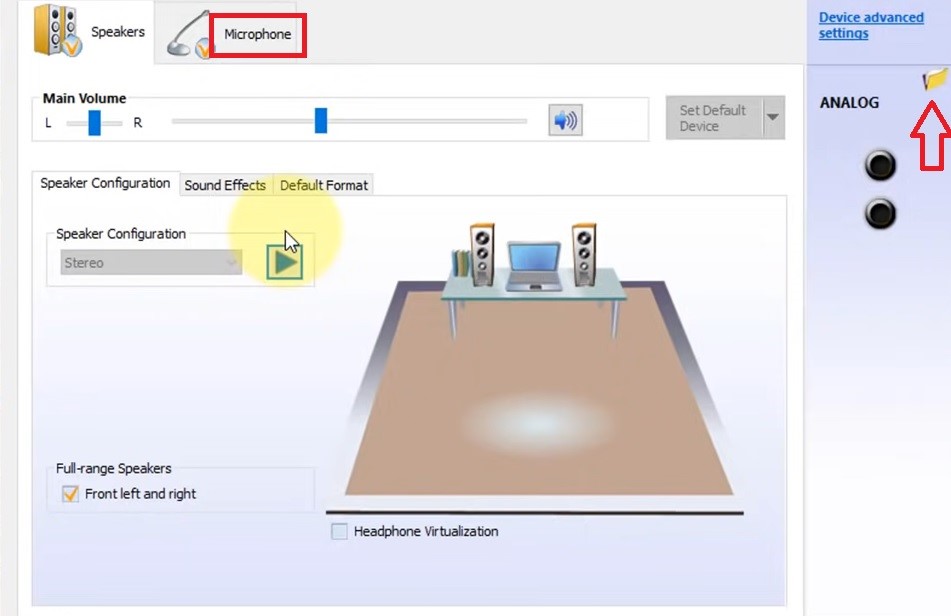
- Uncheck the box beside ‘Disable front panel jack detection’ on the Connector Settings window.
- Click on the OK button.
- Click again on the OK button in the previous window.
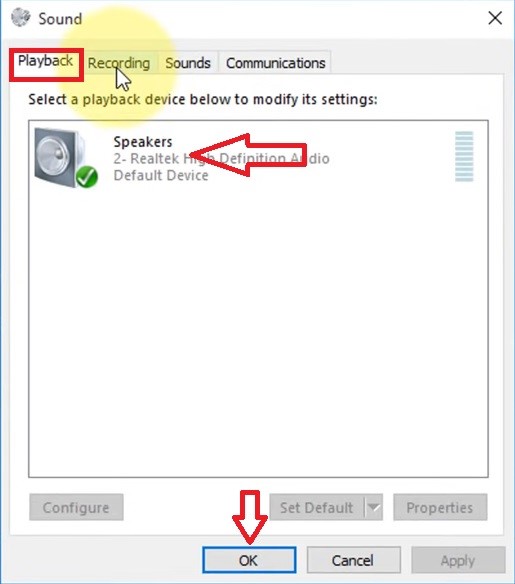
- Now go to the Sound option on the Control Panel.
- Go to the Playback tab.
- Double-click on Speakers or select it and click on the OK button to open the Speakers Properties window.
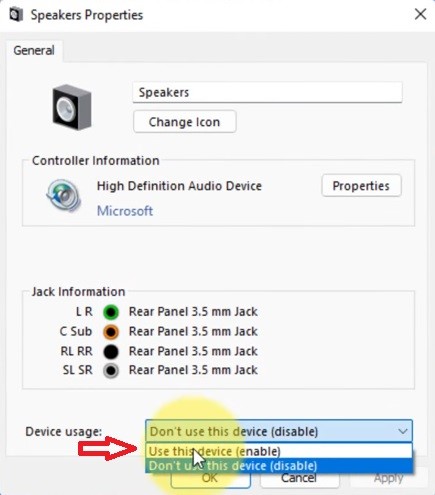
- Go to the General tab on the new window.
- Look down to the Device usage part.
- If you see that it is written ‘Don’t use this device (disable)’ change it to ‘Use this device (enable)’.
- Click on Apply and then on the OK button.
- Now go to the Levels tab.
- Check that the sound levels for all are set to the maximum.
- Check that all enhancements are disabled, or disable it as mentioned in Method 5.
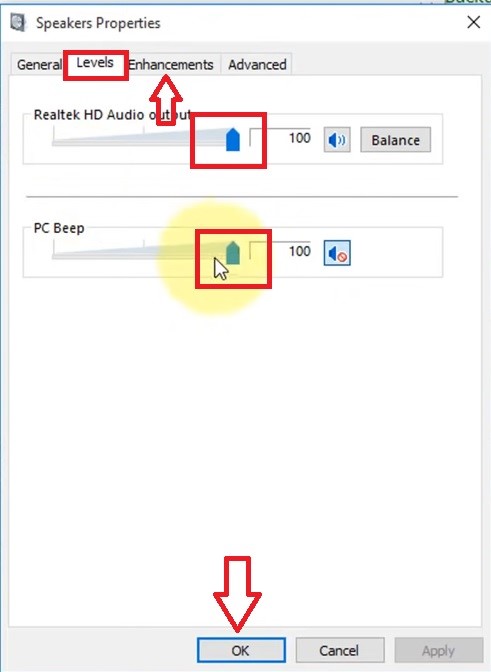
- Click on the OK button on both windows.
When done, restart your PC, and it should solve the issue.
Method 12: Check the Jack
Now, if the above solution did not work, there may be an issue with the jack and you may need to rectify it.
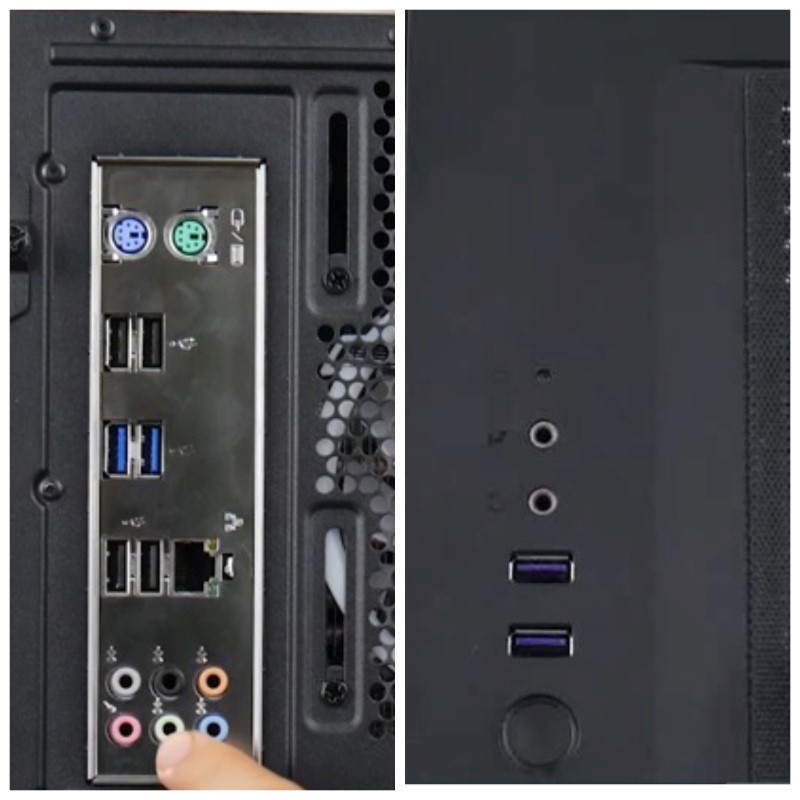
Did you know that a 3.5 mm jack comes in two forms, namely, 3-pin and 4-pin? Obviously, if you use a 3-pin jack, your PC will not detect the mic but the sound may be fine.
So, choose a 4-pin 3.5 mm TRRS or Tip Ring Ring Sleeve audio jack instead of a 3-pin TRS or Tip Ring Sleeve audio jack.
STEPS TO FIX:
First, check the jack to find out which type of jack you are using.
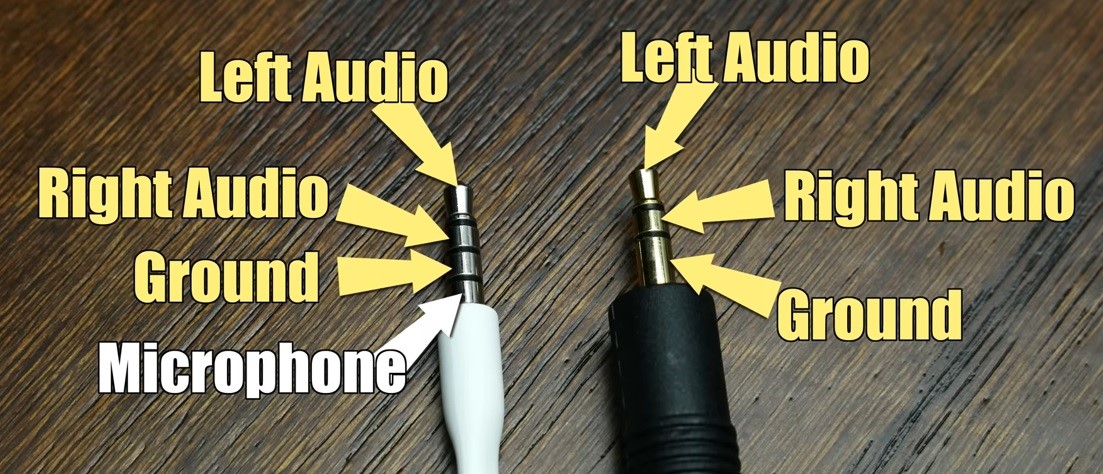
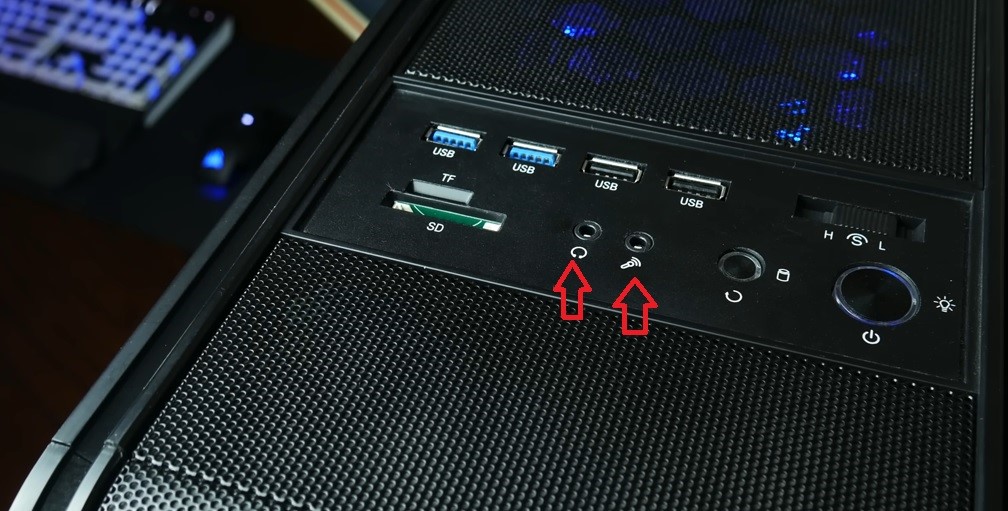
Now, look at the front panel audio connectors for the mic and headphones, which look just the same but have different markings for the headphone and the mic.
If you connect a 3.5 mm 4-pin audio jack in the headset slot, you will hear sound, but the mic will not work.
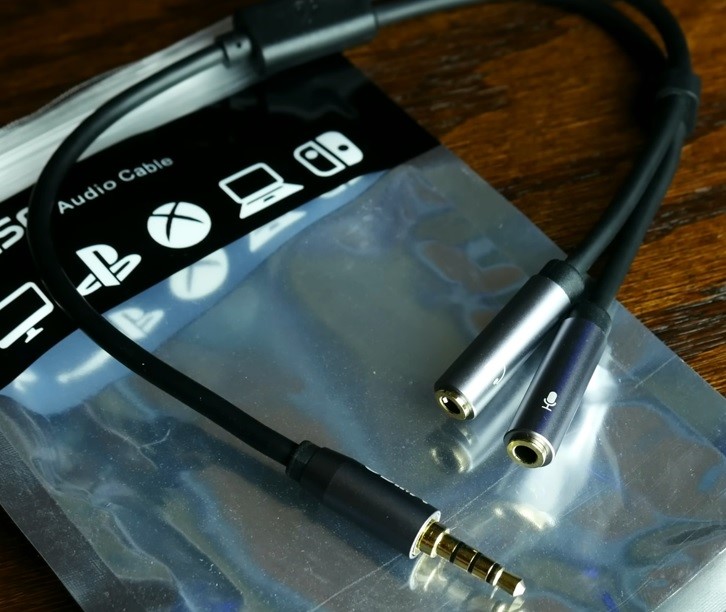
In that case, you will need to use a special type of cable that comes with a splitter and two different connectors marked for the mic and headset.

Now, simply plug in the connectors into the right slots according to the marks and it will resolve the issue.
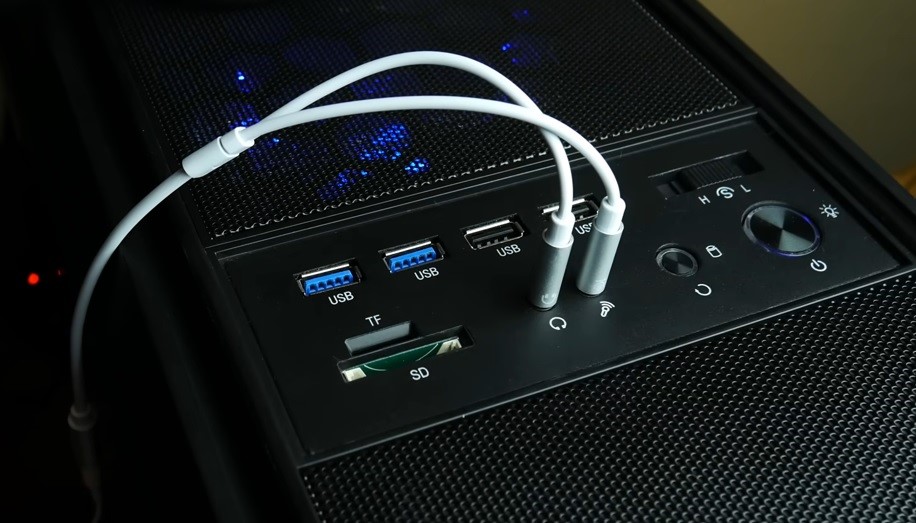
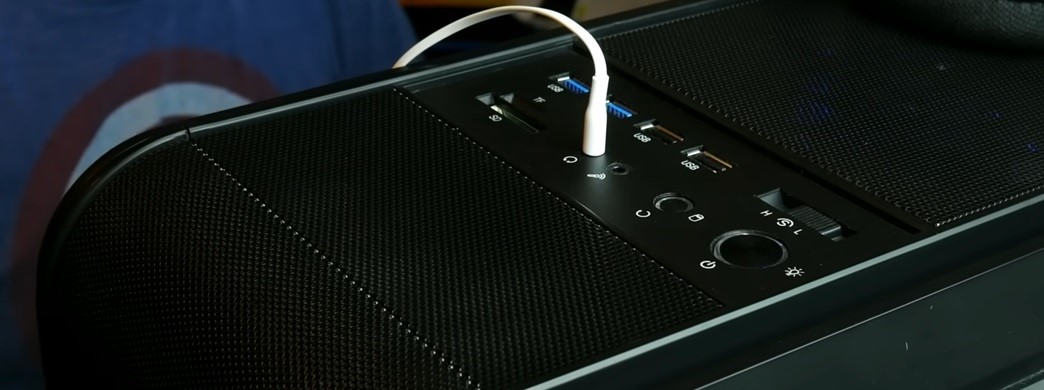
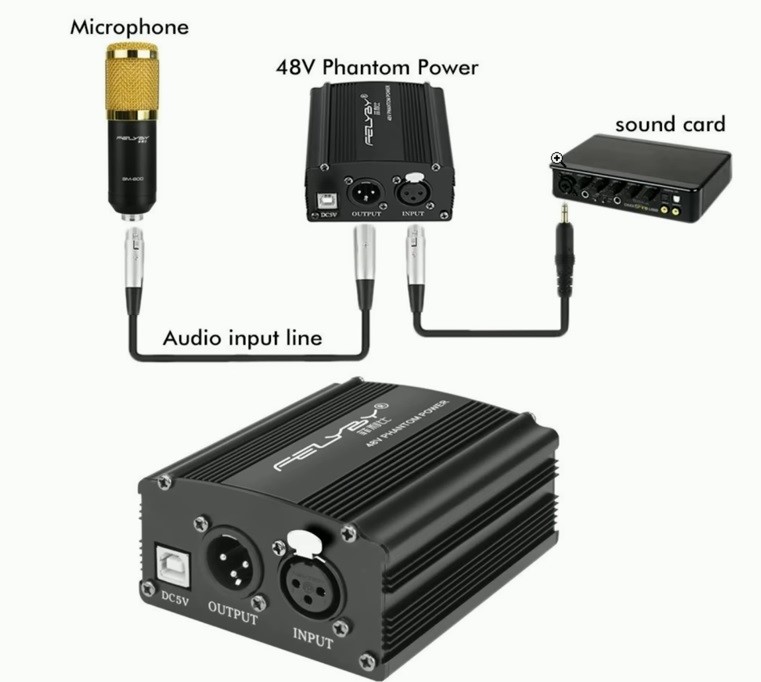
In some rare cases, users may use a separate microphone with their PCs like this:

Typically, this type of mic may need a separate type of connectivity and arrangement like this:
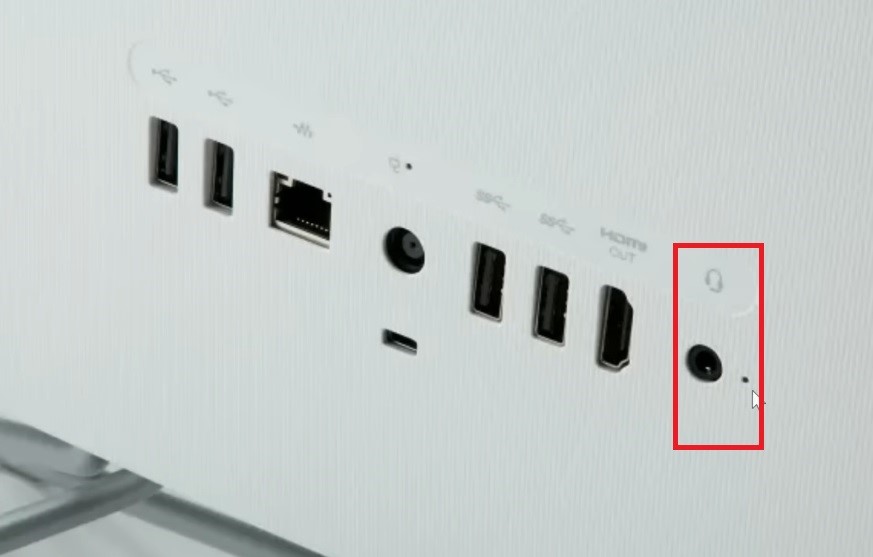
If you have a new PC, such as a new All-in-One computer system, it will typically come with a single 4-pin TRRS 3.5 mm jack as shown below:
So, if you use a 3-pin connection, the mic will not work. Therefore, you will need a different jack for the adapter to recognize the microphone. You will need to use a 3-pin to 4-pin adapter like this one.
Method 13: Uninstall Audio Inputs and Outputs
The ‘Audio inputs and output’ setting may be incorrect and therefore, your microphone may not be detected.
In that case, it is better to try updating it, and if the mic still does not work then uninstall it to resolve the issue.
STEPS TO FIX:
- Go to the Device Manager as before.
- Look for Audio inputs and outputs, usually located at the top.
- Click on it to expand it.
- Select Microphone (High Definition Audio Device).
- Right-click on it.
- Click on Update Drive first, following the same steps as in method 2.
- Check whether the issue is fixed. If not, select Uninstall device.
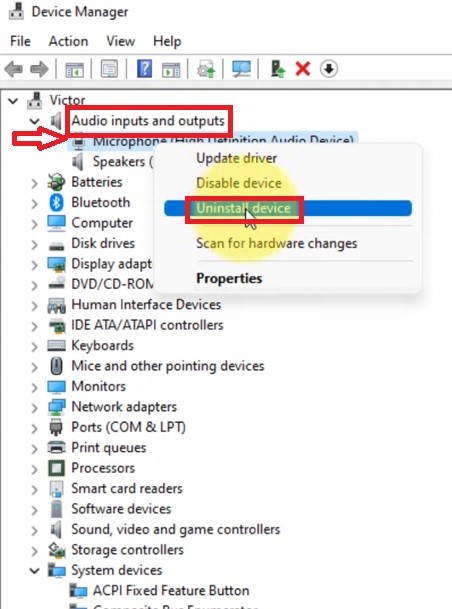
- Click on Uninstall when the warning box appears.
- Now, click on the Action button in the Device Manager window.
- Click on Scan for hardware changes.
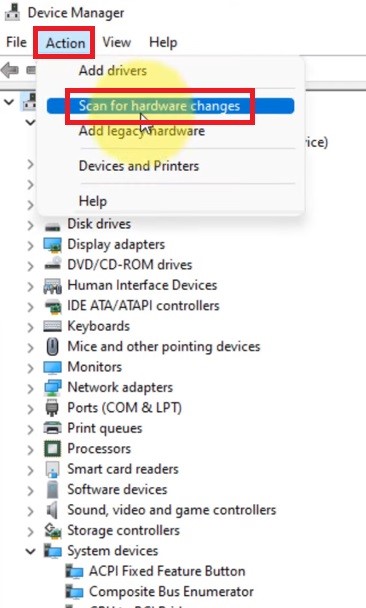
Restart your PC and see whether or not the issue is resolved.
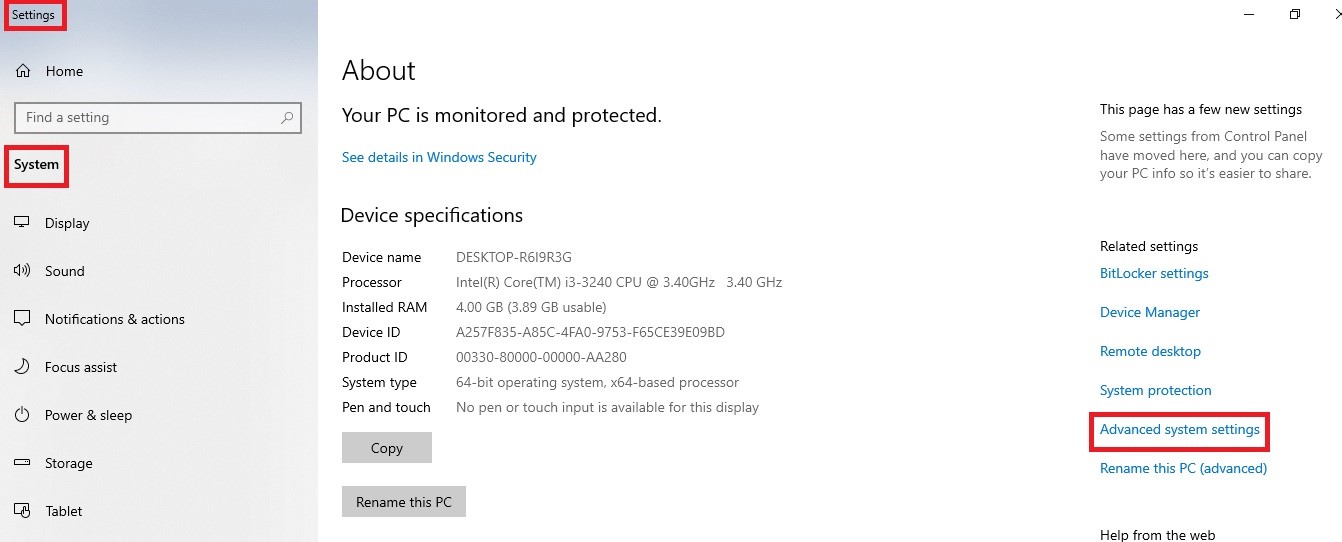
Method 14: Adjusting Device Installation Settings
Sometimes, automatic downloads of manufacturers’ apps and custom icons may also cause such an issue.
So, it is better to disable this feature, which is usually enabled by default.
STEPS TO FIX:
- Go to System from Settings.
- Click on Advanced system settings at the right side of the window.
- Go to the Hardware tab on the next window.
- Click on Device Installation Settings.
- Click on the OK button.
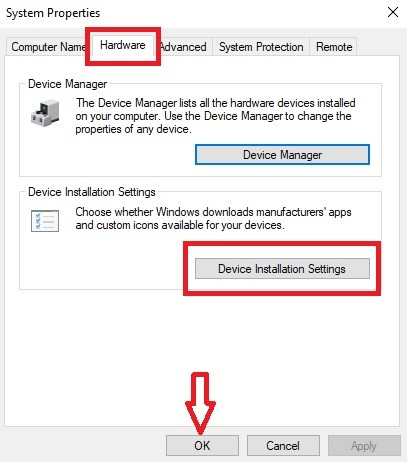
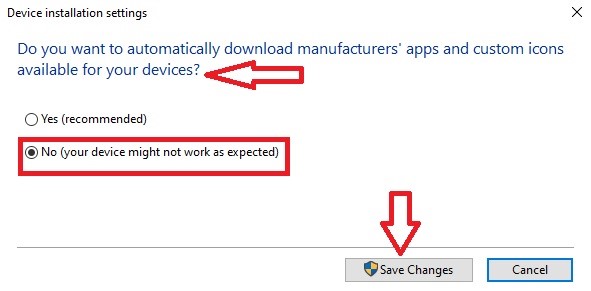
- On the new window saying ‘Do you want to automatically download manufacturers’ apps and custom icons available on your devices?’ click on the circle beside No (your device might not work as expected).
- Click on Save Changes.
Close all windows and your issue will be resolved.
Method 15: User Policy Update
There are several instances when an outdated user policy has hindered the PC from recognizing the microphone in a headphone.
Needless to say, you will need to update the policy.
STEPS TO FIX:
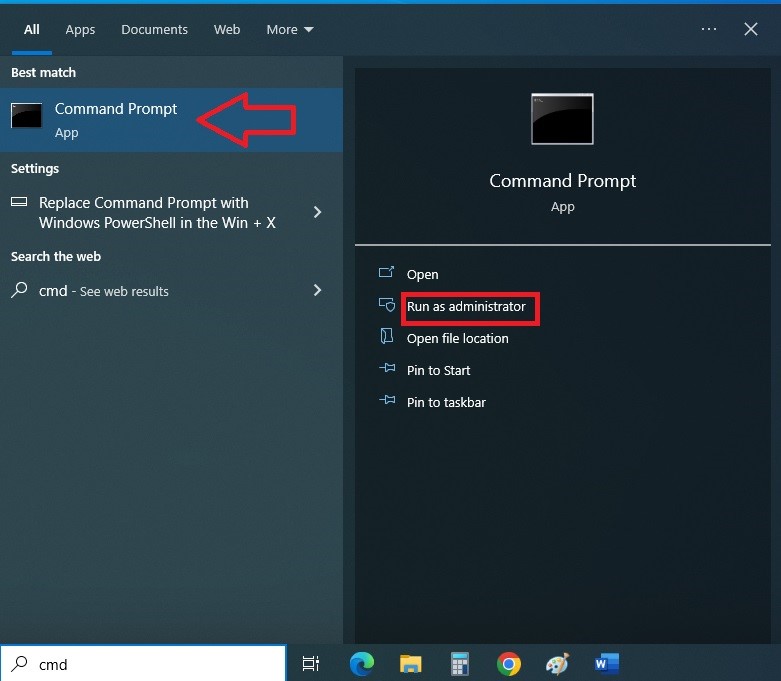
- Go to the Search bar.
- Type cmd in the box.
- Click on Command Prompt to open it.
- Select Run as administrator.
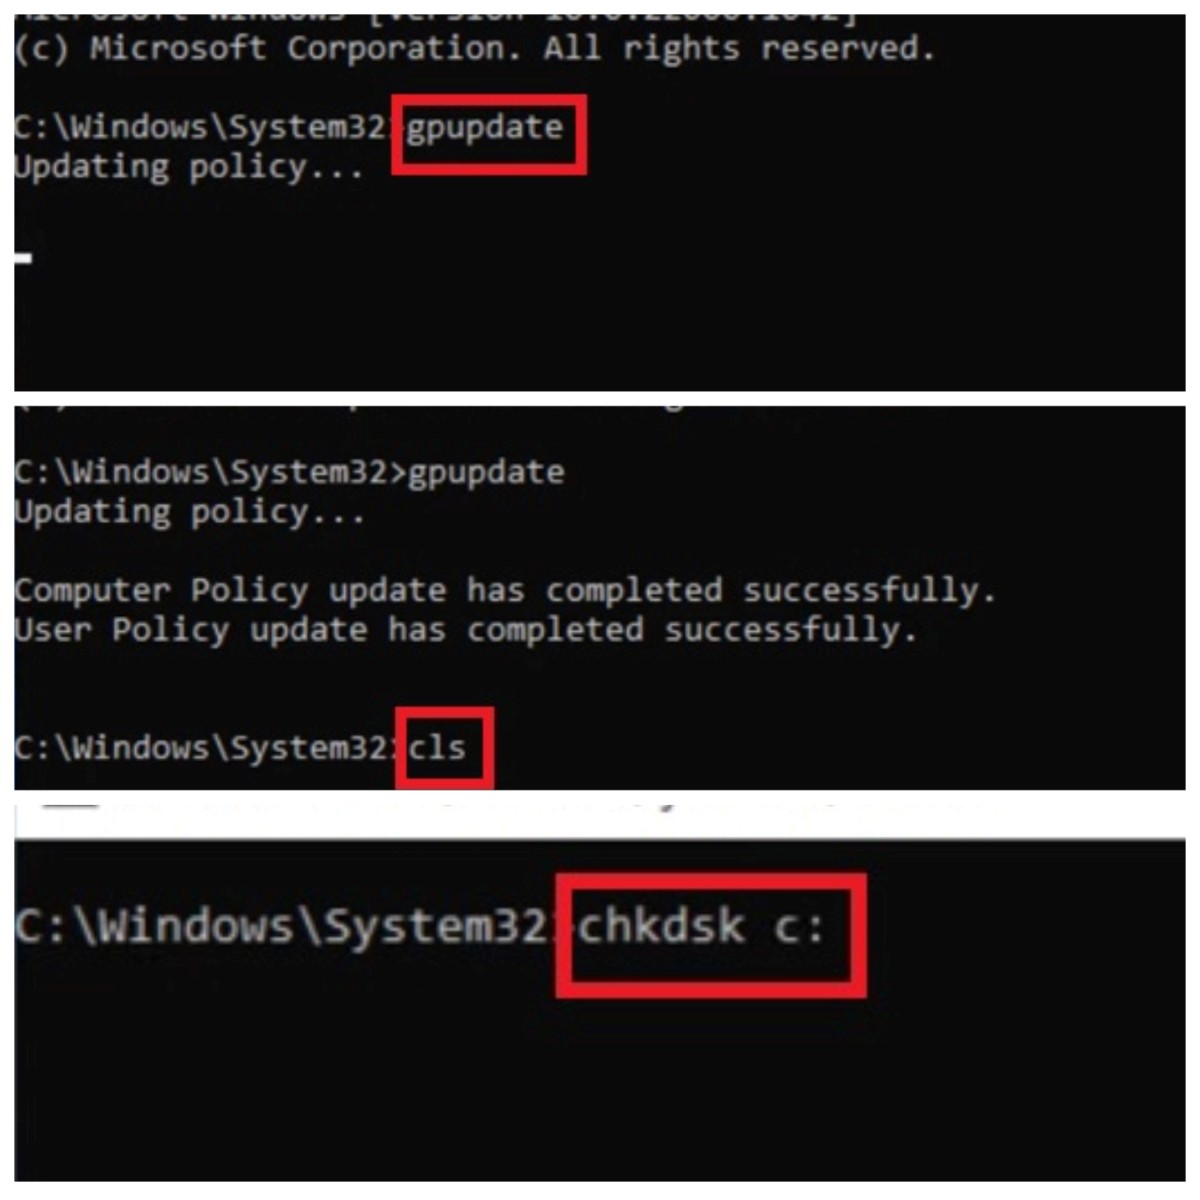
- Type in gpupdate beside the prompt
- Press Enter
- When it is done updating, type cls
- Now type chkdsk c:
- Press Enter.
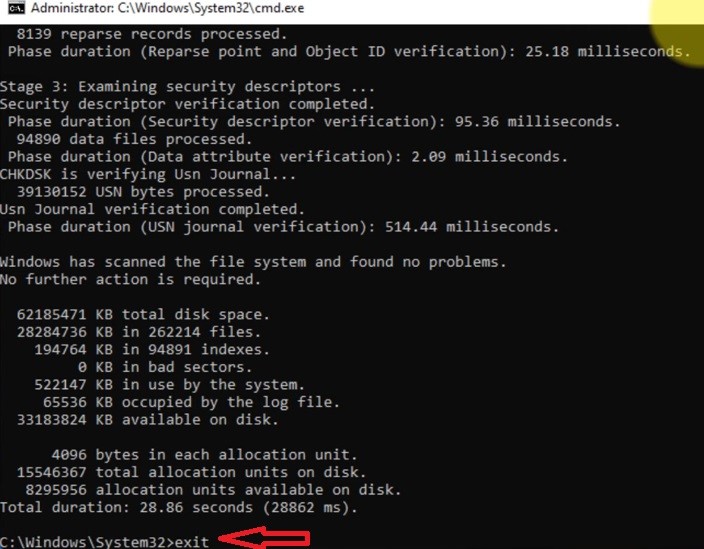
Finally, when it is done checking, type exit to close command prompt. This should fix the problem.
Steps to Fix a PC Not Detecting Headphones Jack
The PC may sometimes not detect the headphone set due to a faulty port where you have inserted the jack. Fixing this issue is quite simple.
Method 16: Check the Audio Source
First up, the audio source may not be correct and that may be the cause of your headphones not being detected.
Assuming that your jack is not damaged and it has the right number of pins, and the volume is not muted, it may not work sometimes because the slots on the PC may be faulty.
So, changing and trying a different slot and source may resolve the issue.
STEPS TO FIX:
- Click on the audio icon at the bottom right side corner of your screen.
- Check the different sources, if any.
- Try each of them one by one.
- Now, remove the jack from the slot at the back and plug it in at the front, or vice versa.
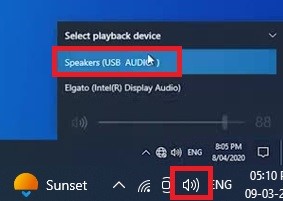
If you are using an activated Universal Serial Bus connection, make sure that the Speakers (USB AUDIO) source is chosen correctly.
Steps to Fix a PC Not Detecting Headphones Via Bluetooth
There may be times when your computer system will not be able to detect the headsets that are connected or paired via Bluetooth. You should fix it and there are quite a few ways to do it.
Method 17: Turn Bluetooth On
First of all, you will need to make sure that the Bluetooth headset is powered on and the Bluetooth option on the PC is also on.
STEPS TO FIX:
- Go to the settings option.
- Click on Devices.
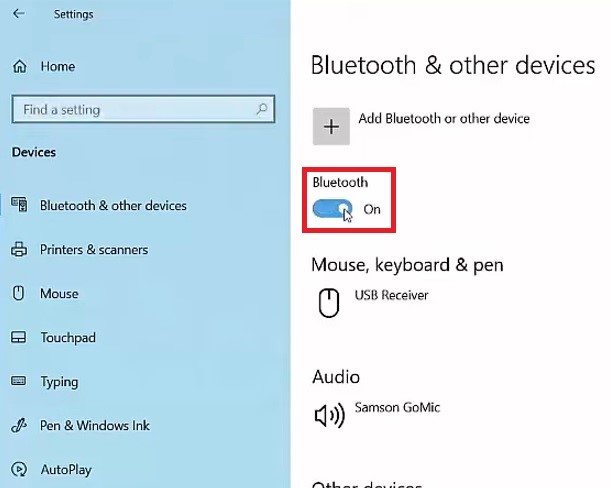
- Select Bluetooth and other devices from the left panel.
- Slide the button below Bluetooth to On if it is Off.
Method 18: Add a Device
Often, users forget to connect or add their Bluetooth headphones with the PC, and therefore it cannot detect the device.
Therefore, make sure that you have added your headphones correctly.
STEPS TO FIX:
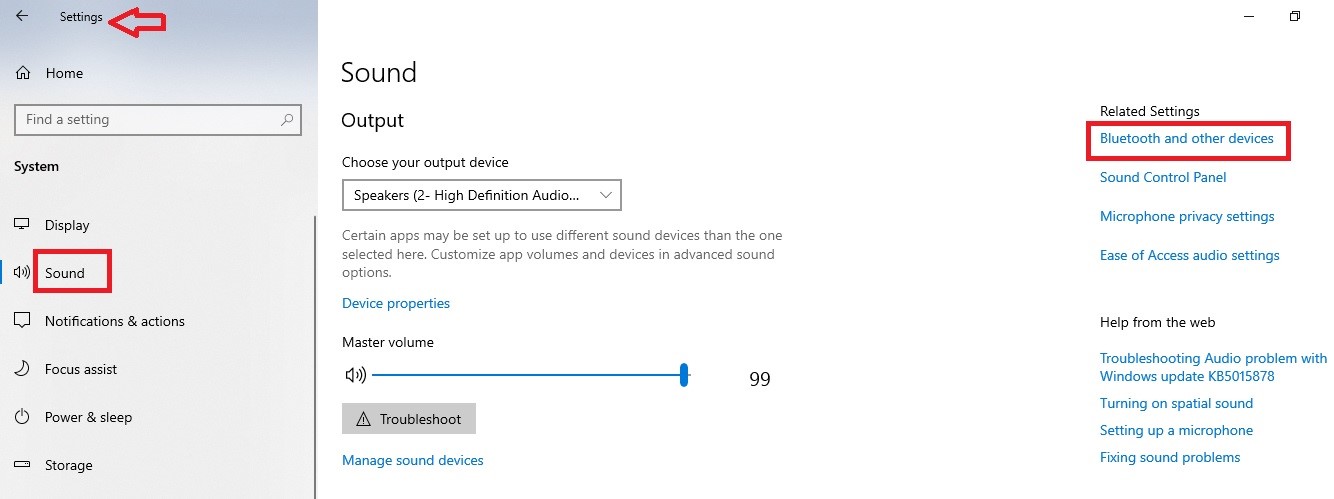
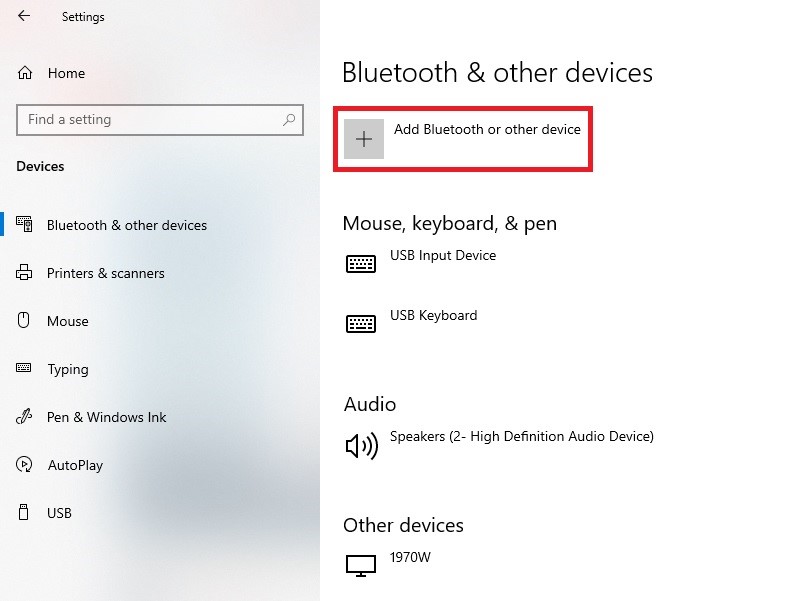
- Go to Sound from Settings as before.
- Click on Bluetooth and other devices on the right side.
- On the new window, click on the ‘+’ sign to add a Bluetooth or other device.
- Click on the Bluetooth option at the top.
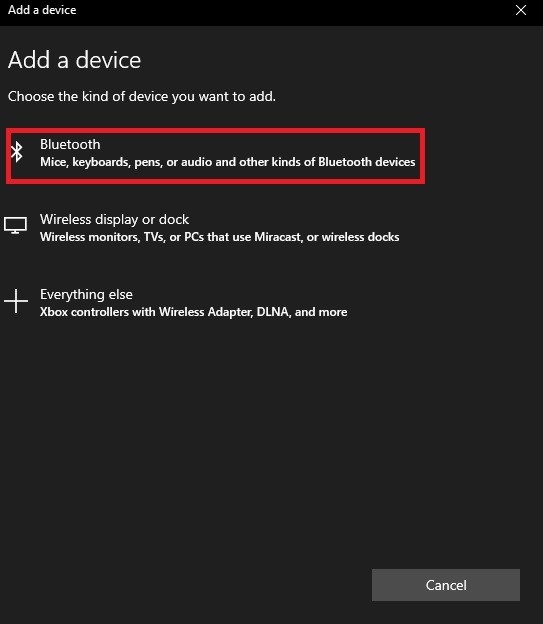
- On the new window, click on the device you want to connect via Bluetooth.
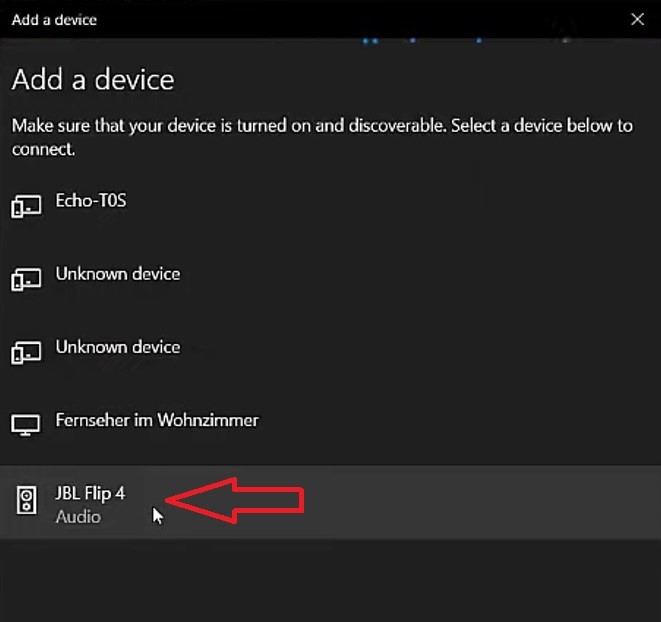
The system will do the rest to connect and pair your headphones to the computer system to resolve the issue.
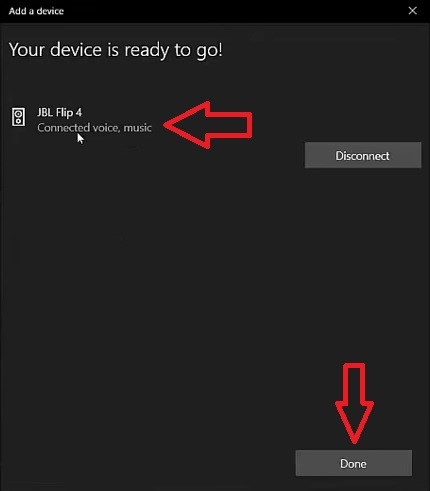
You can now see your headphones under the Audio section of the earlier Bluetooth and other devices window.
Method 19: Run the Troubleshooter for Bluetooth
Sometimes, there may be internal issues with the settings and other aspects of your PC which may prevent the normal functioning of the Bluetooth feature, even when it is on.
Running the troubleshooter is one of the easiest fixes to this issue.
STEPS TO FIX:
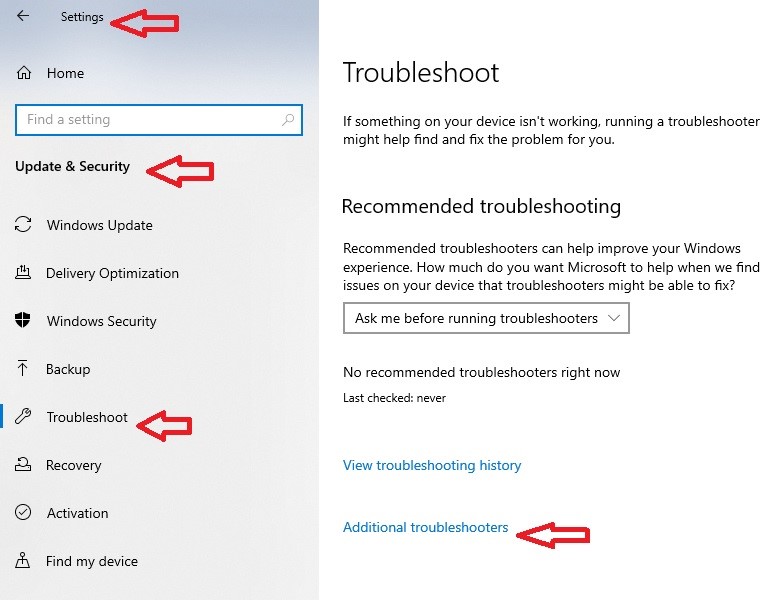
- Press Windows and I keys together to enter Settings.
- Go to Update and Security.
- Select Troubleshoot.
- Click on Additional troubleshooters option.
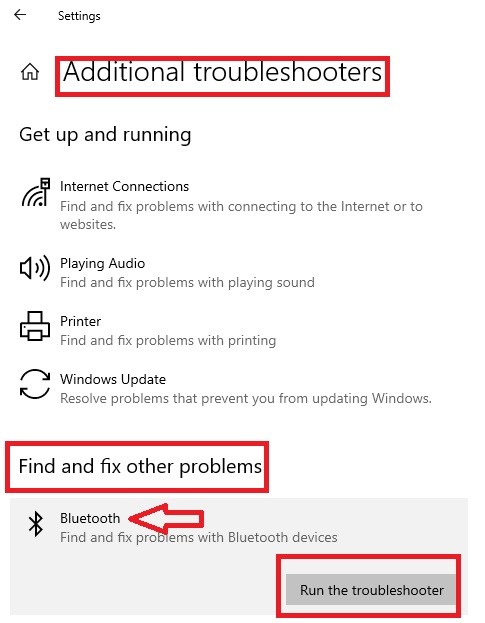
- Go down to Find and fix other problems.
- Click on Bluetooth.
- Click on Run the troubleshooter.
Now, restart your PC and the issue should be resolved.
Method 20: Update the Bluetooth Driver
The Bluetooth driver may not be able to detect the BT headset and therefore may need updating sometimes to resolve the issue.
STEPS TO FIX:
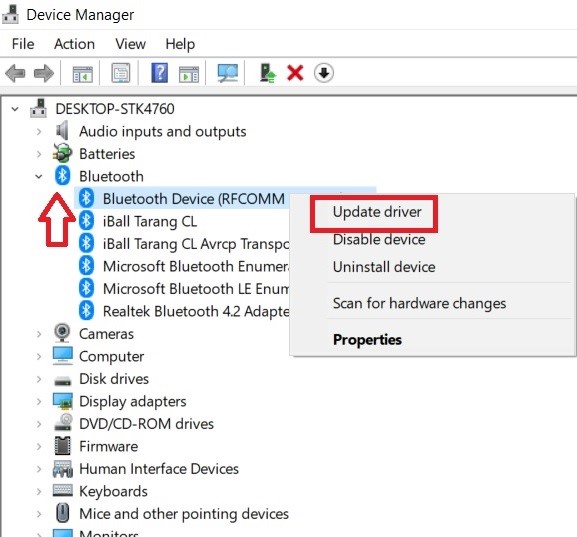
- Open Device Manager.
- Look for Bluetooth.
- Click on it to expand it.
- Right click on the driver.
- Click on the Update driver option.
- There will be two options in the new window.
- Try ‘Search automatically for drivers’ first.
- You may even try ‘Browse my computer for drivers’.
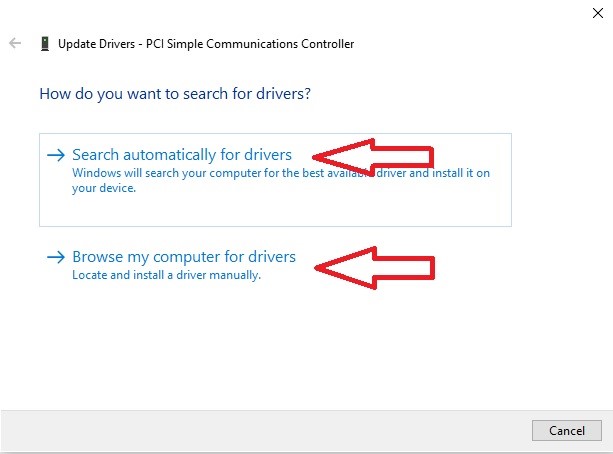
Once both are done and you close the windows, it may fix the problem.
Method 21: Change the Bluetooth Support Service Startup Type
Windows offers a lot of services but all may not be needed or configured just the way you want. In this case, the Bluetooth support service may cause some issues with detecting your BT headphones.
Therefore, you will need to reset it properly.
STEPS TO FIX:
- Go to the Search bar beside the Start menu.
- Type Services.
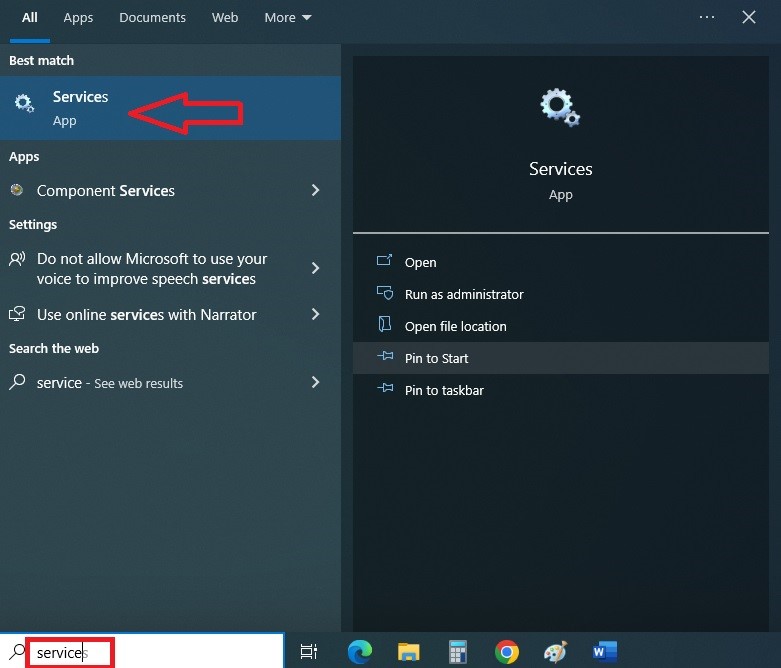
- Open the Services app.
- Look for Bluetooth Support Service.
- Click on it.
- On the new window, change the default Manual setting to Automatic.
- Click on apply and then click on the OK button.
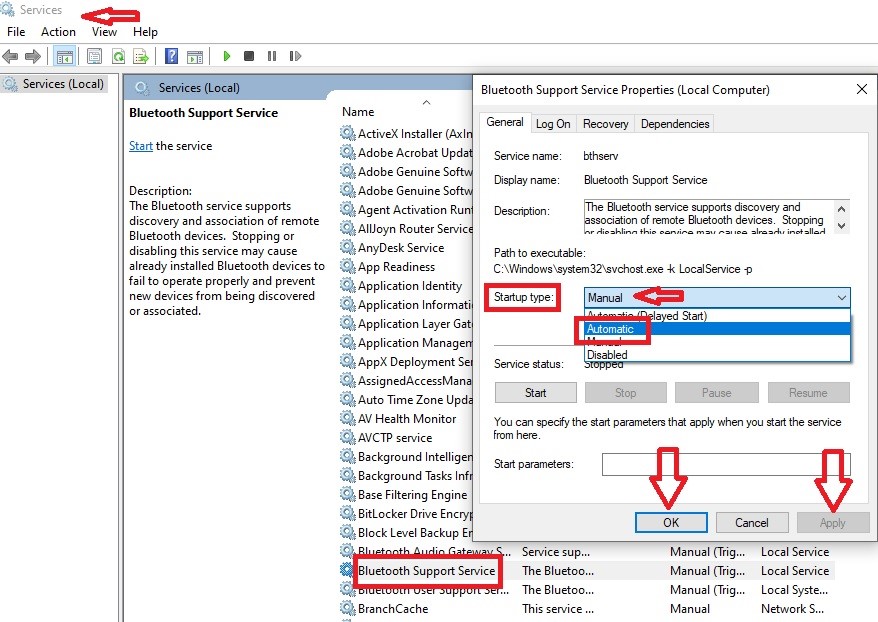
Finally, restart your PC and your problem should be solved.
Method 22: Fix Hardware Issues
There may be some issues in the hardware that are unknown to you but may cause this problem of the Bluetooth headset not being detected by the PC.
You should therefore try to fix them by following these easy steps.
STEPS TO FIX:
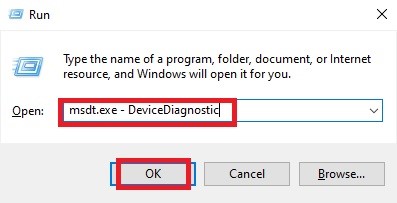
- Go to the Search bar at the bottom left corner of your screen.
- Type Run.
- Press Enter to open the Run box.

- Type in msdt.exe – DeviceDiagnostic.
- Press Enter or click on the OK button.
Alternatively:
- Go to the Control Panel.
- Select all Control Panel Items.
- Select Troubleshooting.
- Select Bluetooth.
- Click on the Next button on the windows that pop up.
- Now click on ‘Hardware and Devices’ from the different troubleshooting packs.
- Click on the Next button on the windows that pop up.
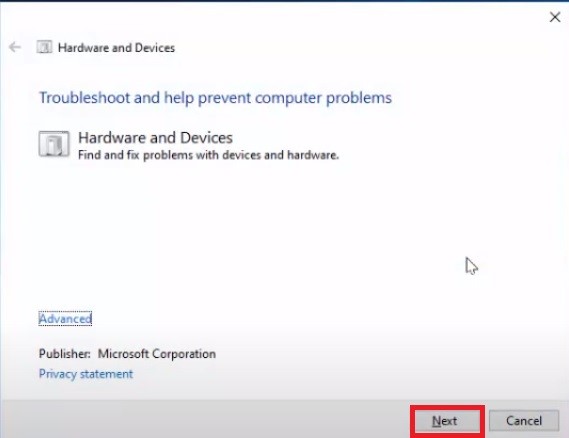
- Follow the on-screen instructions.
When the process is complete, restart the PC and see whether the problem is resolved or not.
Method 23: Troubleshoot Bluetooth
There may be problems with the Bluetooth itself that may be preventing your headphones from being detected by the PC.
Updating and reapplying it is one feasible fix.
STEPS TO FIX:
- Go to the control panel as you did in Method 2 of fixing the issue with the microphone.
- Select all items.
- Click on Troubleshoot in the left panel.
- Click on Hardware and Sound.
- In the new window, click on the Bluetooth category.
- Click on the Next button on the window that pops up.
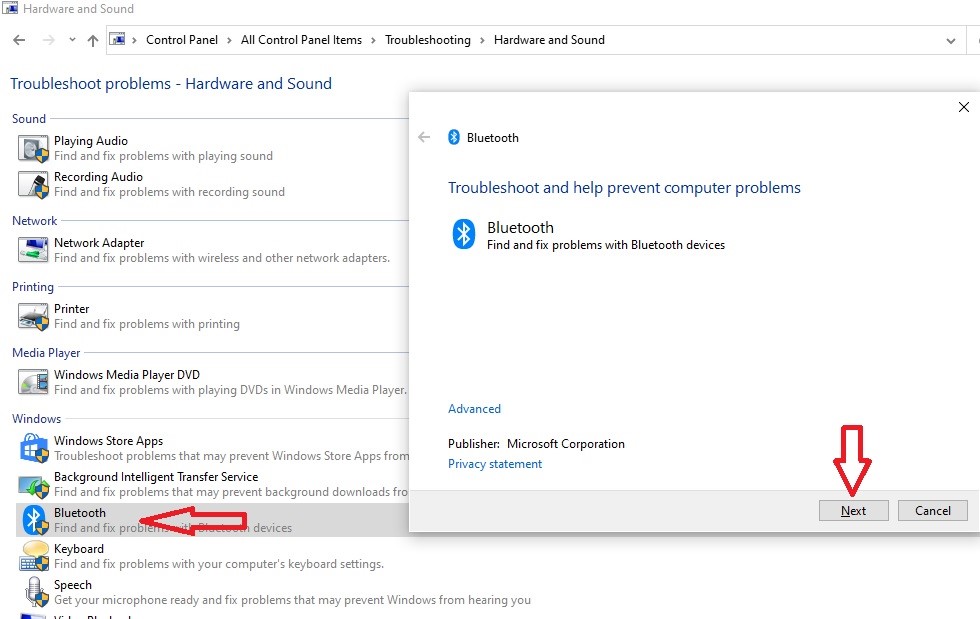
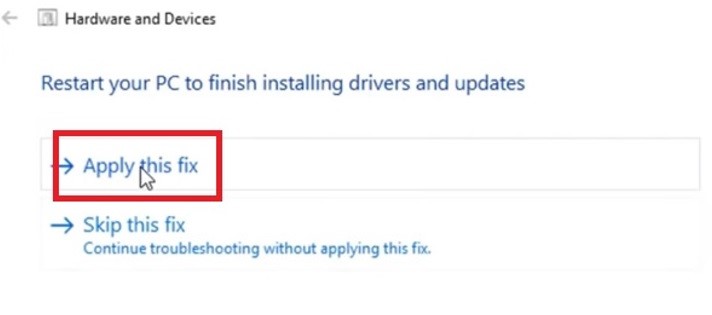
- When the system completes detecting the problems and fixing them, you will need to select Apply this fix to finish the process.
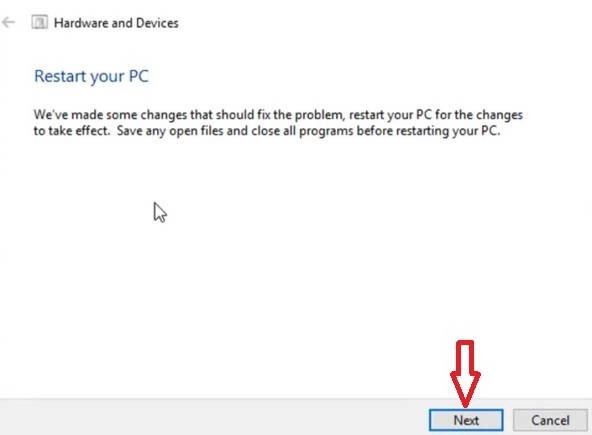
- Click on the Next button on the ‘Restart your PC’ window that pops up.
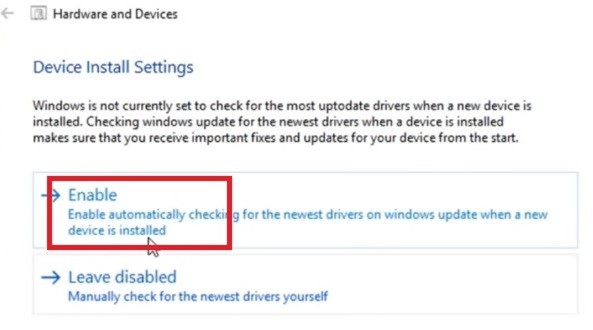
- In the next Device Install Settings window, click on Enable to detect additional problems.
- Click on the Close button in the Troubleshooting has completed window.
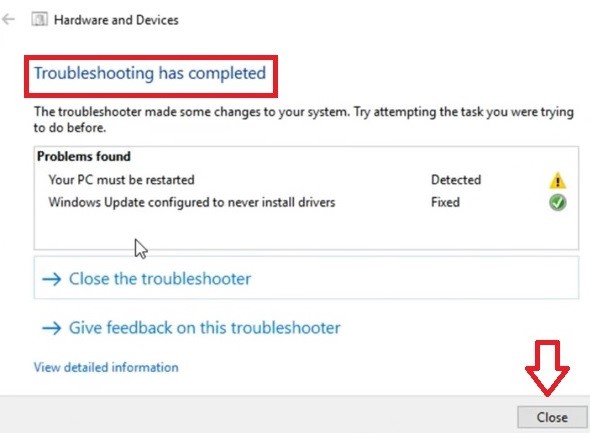
Close all windows and let the system restart, which will resolve the issue.
Conclusion
So, now you know that there are lots of reasons for why a headphone may not be detected by the PC.
Assuming that the device is not faulty and needs repair, you can try any or a combination of the above methods, depending on the cause and the situation, to get your headphones to start working normally again.