
When you use Wi-Fi connection on your PC, you may run into different types of issues, it getting disconnected after sleep mode being one of them.
In such a situation, you will not have automatic Wi-Fi network connectivity, though connections are available.
It is quite frustrating and will affect your user experience. However, this issue is quite common and not fatal.
It can be fixed easily with some quick and easy methods. In this article, you will come to know about them.
In This Article
KEY TAKEAWAYS
- The Wi-Fi disconnecting after sleep mode issue can be resolved by updating network driver and Windows, and removing conflicting third-party antivirus programs.
- Disabling Ethernet and Bluetooth devices may also fix the issue just as restarting the system or router would.
- Another easy way to keep the Wi-Fi from disconnecting is to check and fix issues in the internet connections by running the troubleshooter.
- Performing a system restore will take back your PC to a time when the issue did not occur. So, you can try this method to resolve the issue as well.
- Making changes in the power settings and management may also prevent your Wi-Fi from disconnecting after sleep mode.
Why Does Wi-Fi Disconnect after Sleep Mode?
One of the most significant reasons for Wi-Fi to get disconnected after sleep mode or hibernation state is that the router may be faulty and want you to create a new SSID for connecting to the network on your PC.
Another significant reason is that the Wi-Fi adaptor may be at fault or incompatible with the operating system and need to be updated, uninstalled and reinstalled.
A few other probable reasons for this issue to occur are:
- Recent upgrade of Windows
- Wi-Fi adapter getting corrupted during upgrade
- The Wi-Fi switch is Off
- The Airplane mode is On
Whatever is the reason, there are quite a few easy and relatively complex solutions to this specific issue.
Ways to Fix Wi-Fi Disconnects after Sleep Mode
Some of the easiest and quickest solutions to the Wi-Fi disconnects after sleep mode issue are restarting your PC, updating Windows, and disabling antivirus temporarily.
A few other ways to resolve the issue are:
Update network driver: Go to Device Manager from Start Menu > Click and expand Network adapters > Select your connected network adapter > Click Update driver > Click Search automatically for drivers.
Uninstall and install device: Right-click on the Start Menu > Go to Device Manager > Click and expand Network adapters > Select your connected network adapter > Click Uninstall device > Click Uninstall in the next window > Restart computer system.
Run Internet Connections troubleshooter: Type troubleshoot in Windows search > Hit Enter > Select Additional troubleshooters or Other troubleshooters > Look for Internet Connections section > Click on it > Click on Run the troubleshooter > Apply the fixes > Restart the system.
You may also run the command msdt.exe -id NetworkDiagnosticsNetworkAdapter in the Command Prompt and follow the on-screen instructions.
Perform a system restore: Press Windows + S keys > Type system restore > Select Create a restore point > Click on System Restore in the System Properties window > Click Next > Choose a restore point > Click Next > Follow the on-screen instructions to complete the process.
If these solutions cannot resolve the issue, you may try these advanced fixes explained in detail for you.
Method 1: Make Changes in the Power Settings
The Wi-Fi disconnecting after sleep mode or hibernation state can be resolved by making a few changes in the power settings of your PC.
STEPS TO FOLLOW:
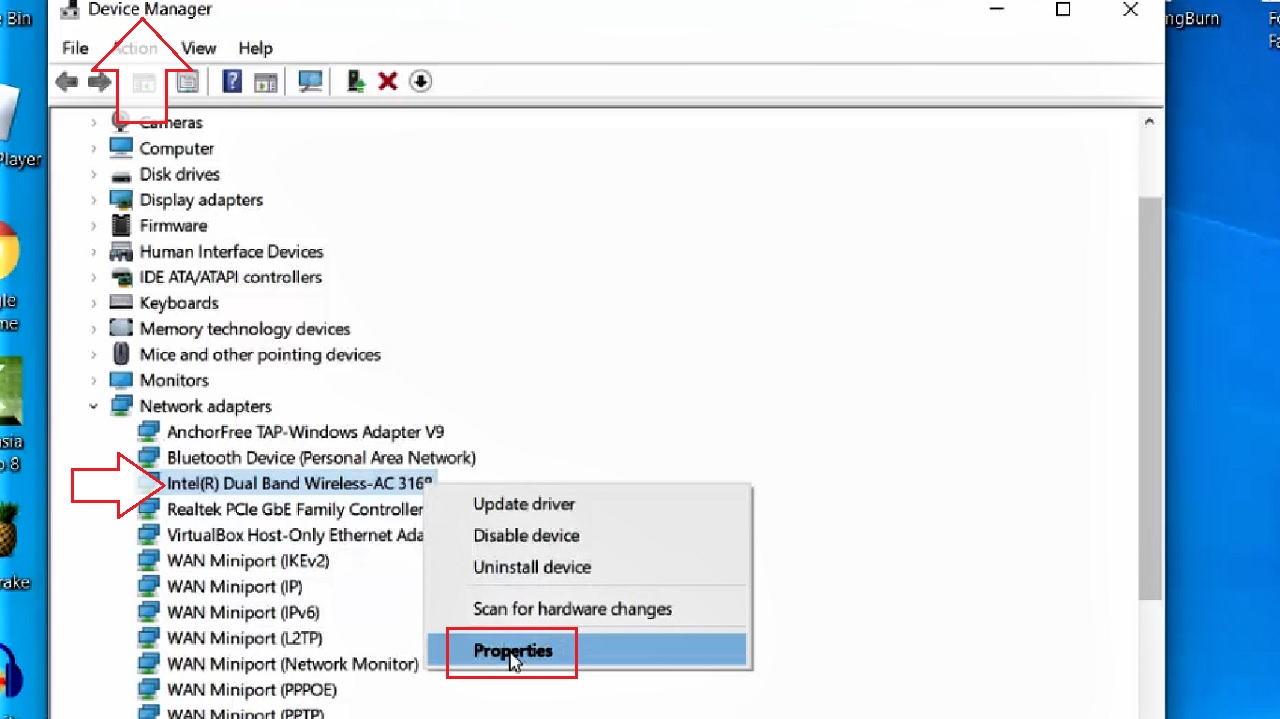
- Go to the search box next to the Start Menu > Type device manager > Hit Enter on your keyboard.
- In the Device Manager window, click on the small arrow next to Network adapters to expand it.
- Select your network adapter.
- Right-click on it.
- Select Properties from the drop-down context menu.
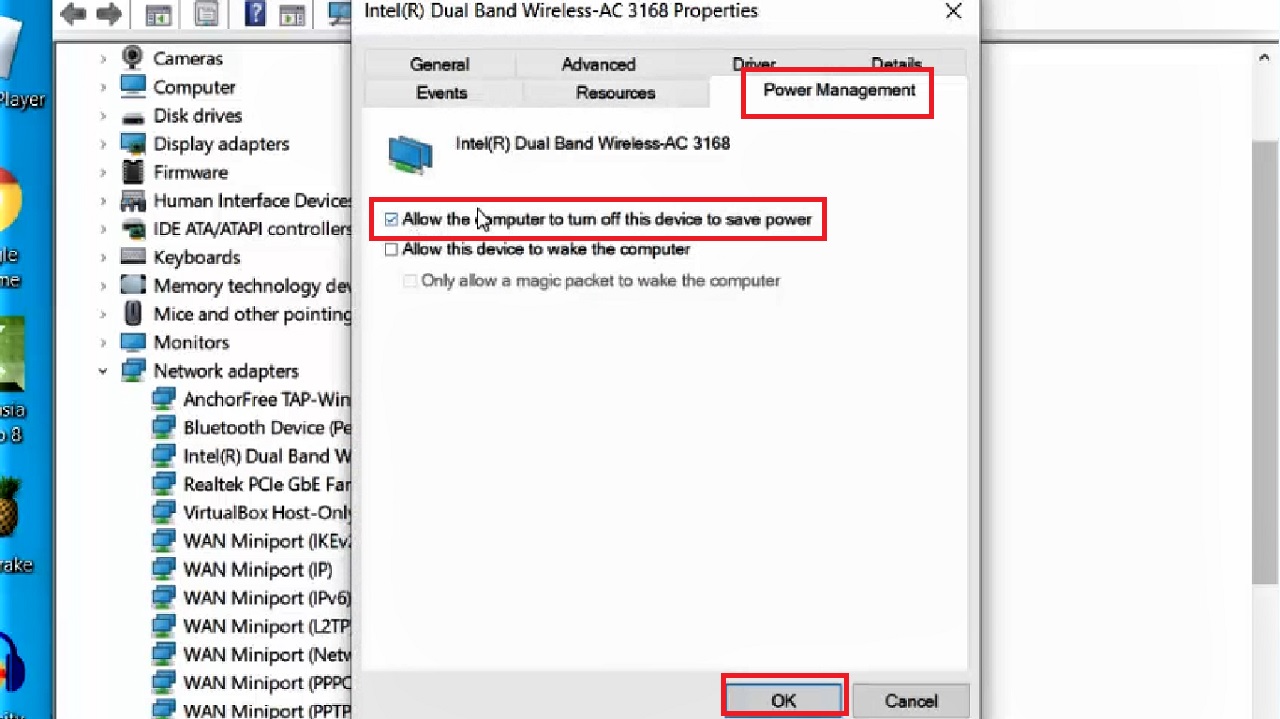
- Go to the Power Management tab.
- Click on the small box next to ‘Allow the computer to turn off this device to save power’ option to uncheck it.
- Click on the OK button below.
Also, do the same for Microsoft Hosted Network Virtual Adapter by following the same steps.
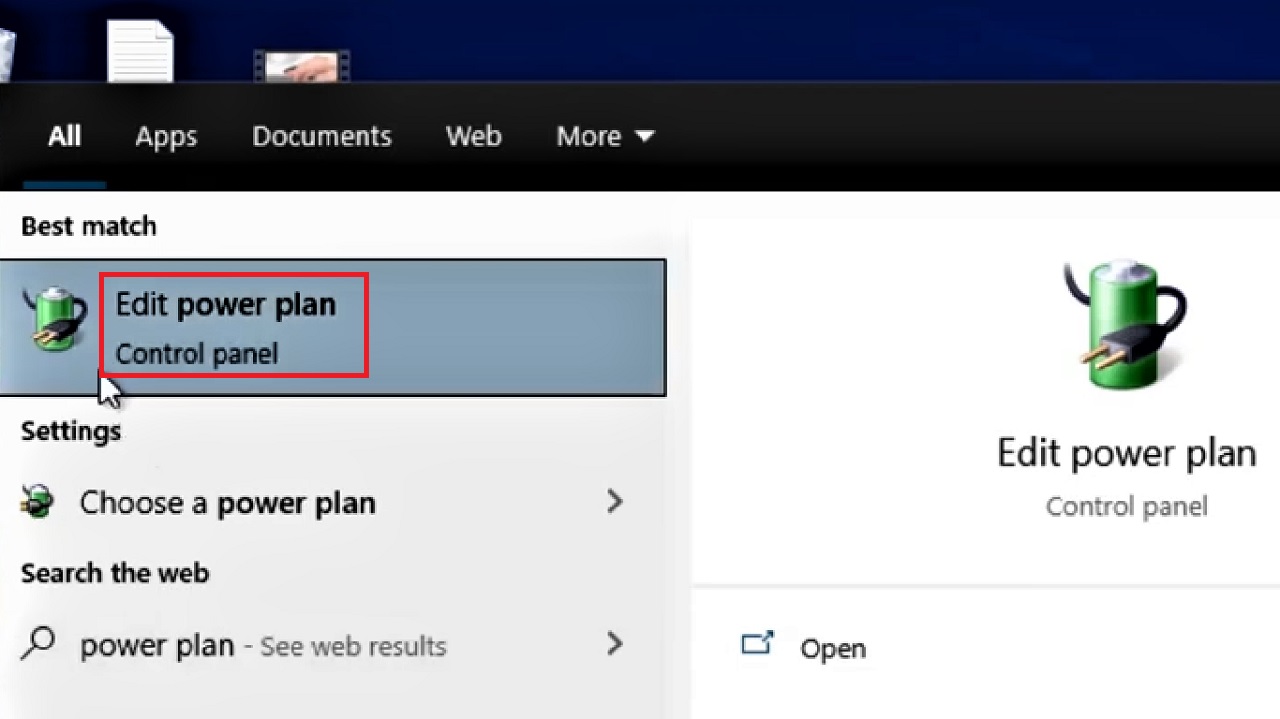
- Now, go to the search box again and type power options.
- Click on Edit power plan.
- In the following Edit Plan Settings window, click on Change advanced power settings.
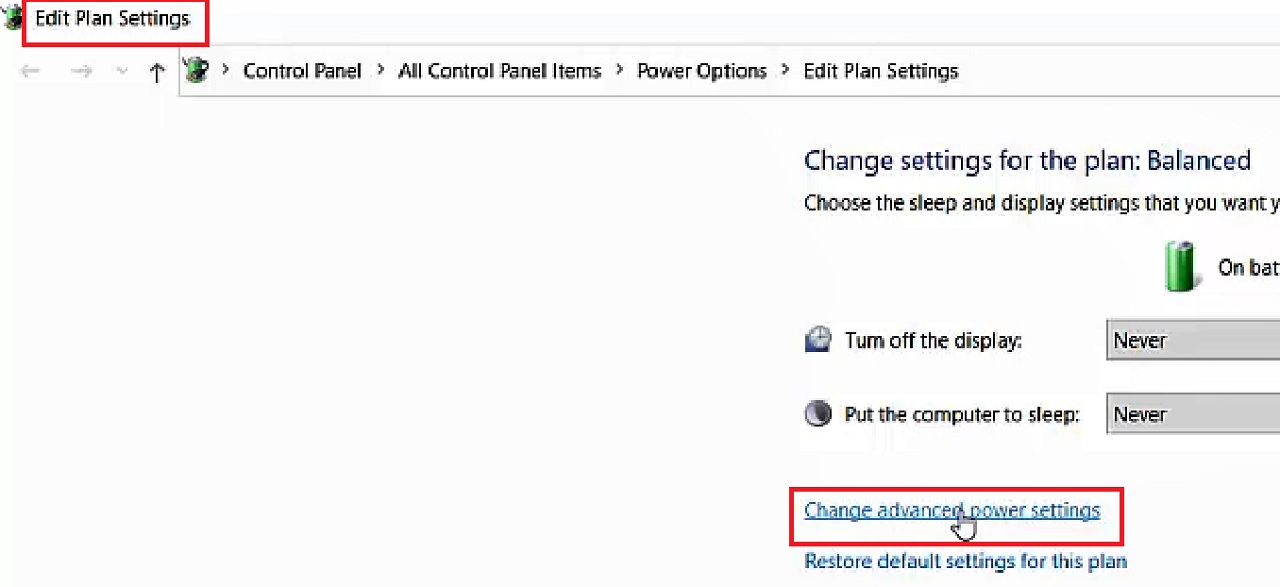
- In the following Power Options window, look for Wireless Adapter Settings in the list in the box under Balanced [Active].
- Click on the plus sign next to it.
- Also, click on the plus sign next to Power Saving Mode from the expansion under it.
- Click on the small arrow on the right side of the box next to ‘On battery’.
- Choose Maximum Power Saving option from the drop-down context menu.
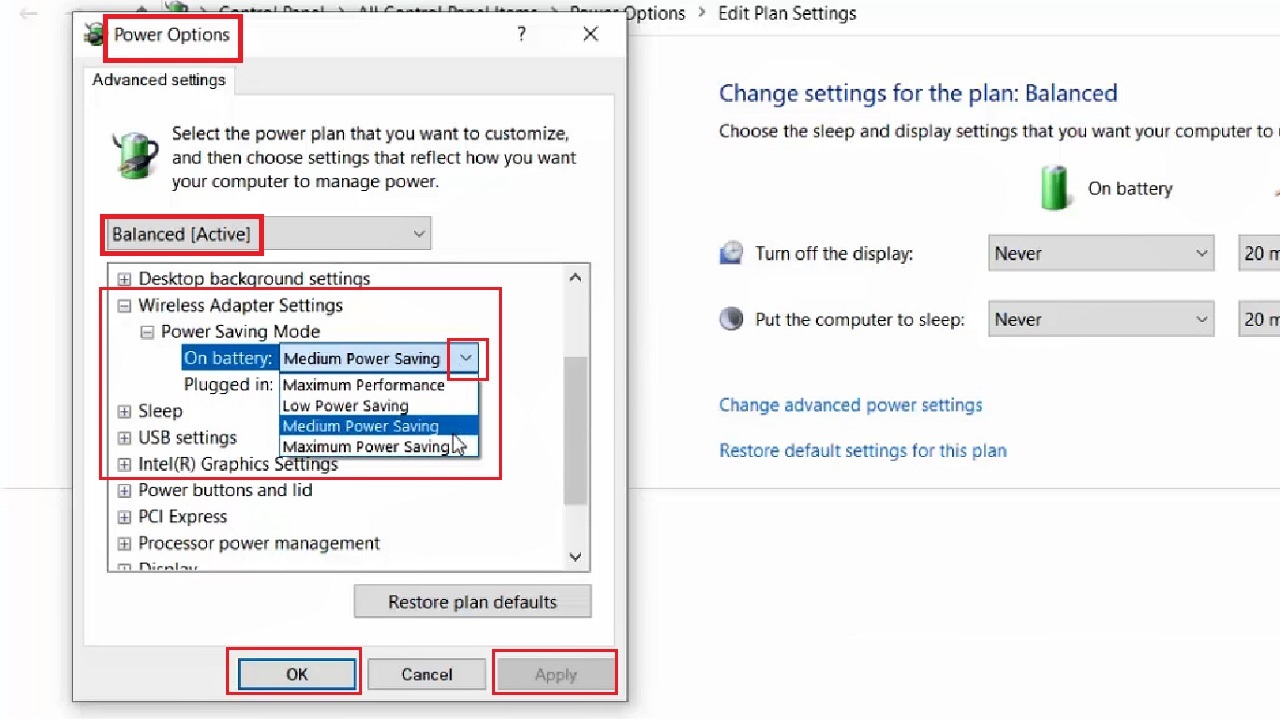
- Repeat the same steps to change and set the power saving mode in the box next to ‘Plugged in’ as well.
- Finally, click on the Apply button first and then on the OK button.
Close all the widows and restart your PC. This should resolve the issue.
Method 2: Disable and Enable Wi-Fi Connection
You may try fixing the issue of Wi-Fi disconnecting after sleep by disabling the adapter and then enabling it after a few seconds.
STEPS TO FOLLOW:
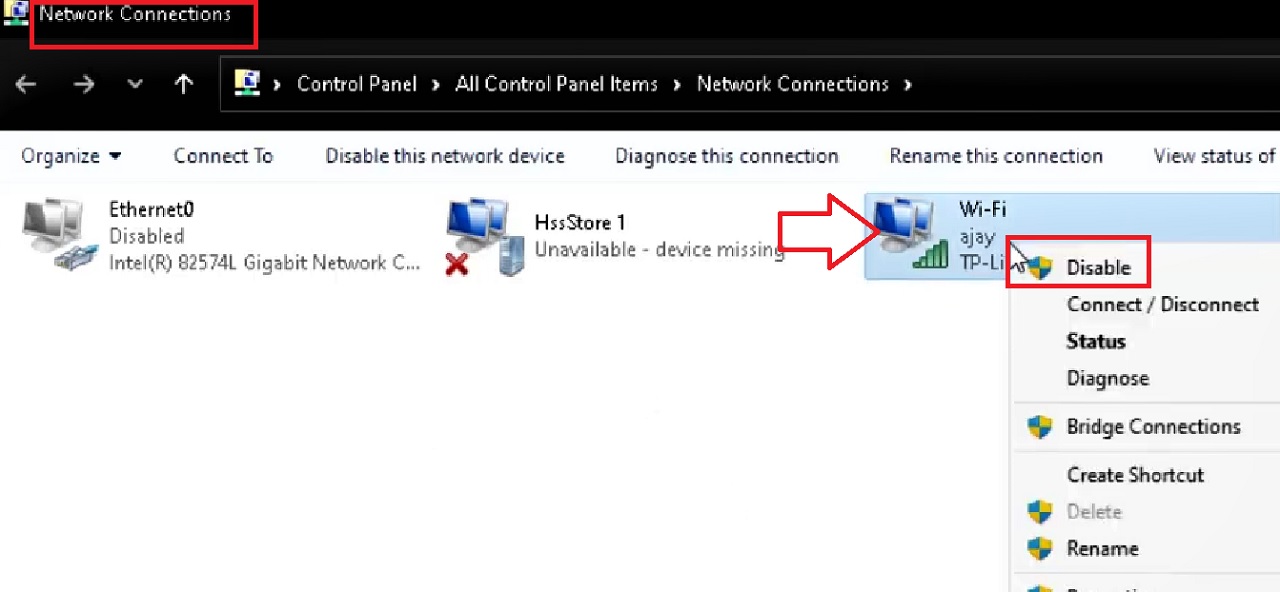
- Go to the search box > Type ncpa.cpl > Hit the Enter key.
- Right-click on the Wi-Fi adapter.
- Select Disable.
- Right-click again on the Wi-Fi adapter after some time.
- This time, select Enable.
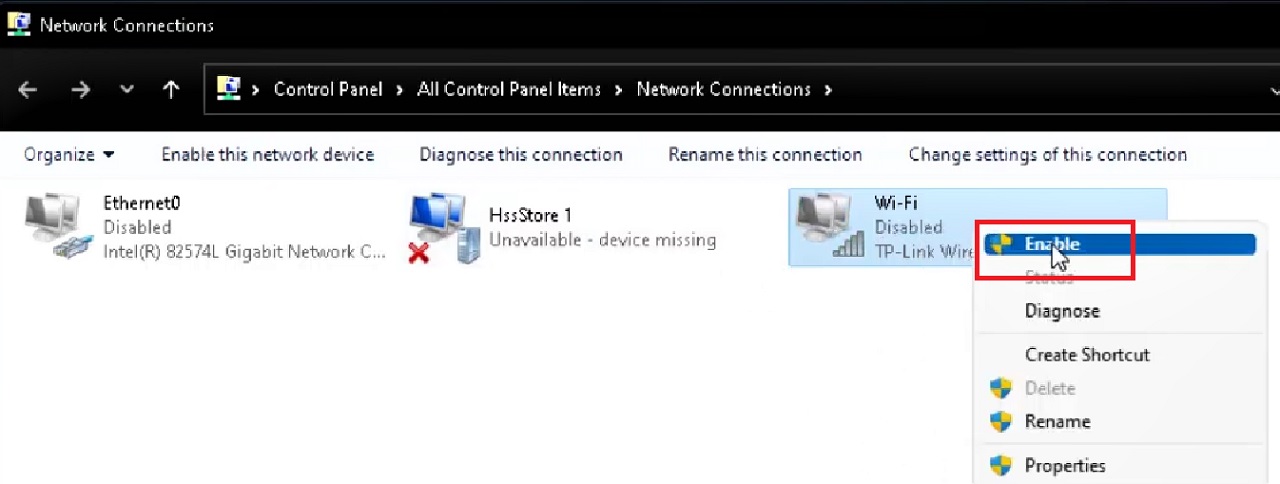
It will take some time. Wait until the system completes enabling the Wi-Fi.
After and you see the completion message, close the window, restart the system and check whether or not the issue is resolved.
Method 3: Enable Networking Connectivity in Standby
If you enable the networking connectivity in standby option, it will often resolve the issue of Wi-Fi getting disconnected after sleep mode or hibernation status.
STEPS TO FOLLOW:
- Go to Edit power plan as you did before for the second part of Method 1 and click on Change advanced power settings in the following Edit Plan Settings window.
- In the following Power Options window, look for Networking connectivity in Standby option in the list in the box under Balanced [Active].
- Click on the small arrow at the right side of the box.
- Select Enable from the drop-down context menu.
- Click on the Apply button.
- Click on the OK button.

However, sometimes, the Networking connectivity in Standby option may not be present in the list. In that case, you will need to follow these steps, to bring it up:
- Go to the search box > Type cmd > Right-click on the Command Prompt icon > Choose Run as administrator > Click on the Yes button in the User Account control window.
- In the Command Prompt, type in the command powercfg -attributes F15576E8-98B7-4186-B944-EAFA664402D9 -ATTRIB_HIDE and hit the Enter key on your keyboard.
- Go back to the Power Options window again. You will see the option.
Now follow the steps mentioned above, to complete the process.
Close all windows and restart your system to check whether or not the issue is resolved.
Method 4: Rollback Network Adapter Driver
Since the issue is mainly in the network adapter, sometimes if you rollback the driver it may resolve the problem.
STEPS TO FOLLOW:
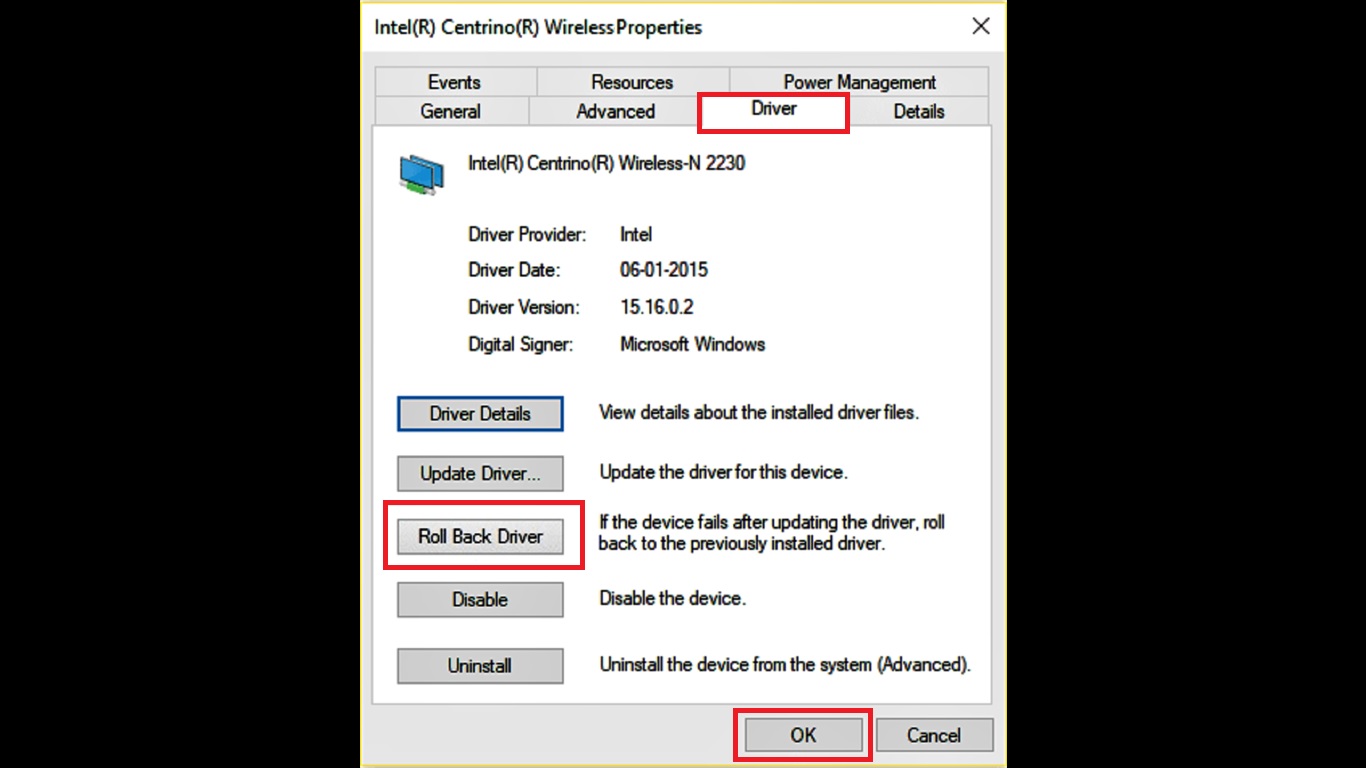
- Open Device Manager and go to Properties of your wireless adapter as you did in Method 1.
- Go to the Driver tab.
- Click on Roll Back Driver.
- Click on the OK button to start the process.
After the rollback process is complete, reboot your computer and check whether the issue is resolved. If it still persists, move to the next method.
Method 5: Load Default Settings and Enable Wi-Fi in BIOS
A few changes made in the Basic Input Output System (BIOS) to load the default configuration can also resolve the issue.
STEPS TO FOLLOW:
- Switch off your PC and turn it on by pressing F2, DEL or F12 (depending on the manufacturer) simultaneously to enter into the BIOS setup.
- Look for Load Setup Defaults, Reset to Default, Load Factory Defaults, Clear BIOS Settings, or something similar in the Exit page. (The appearance of the interface may vary).
- Use the arrow keys on your keyboard to select it.
- Press Enter.
- Confirm the operation.
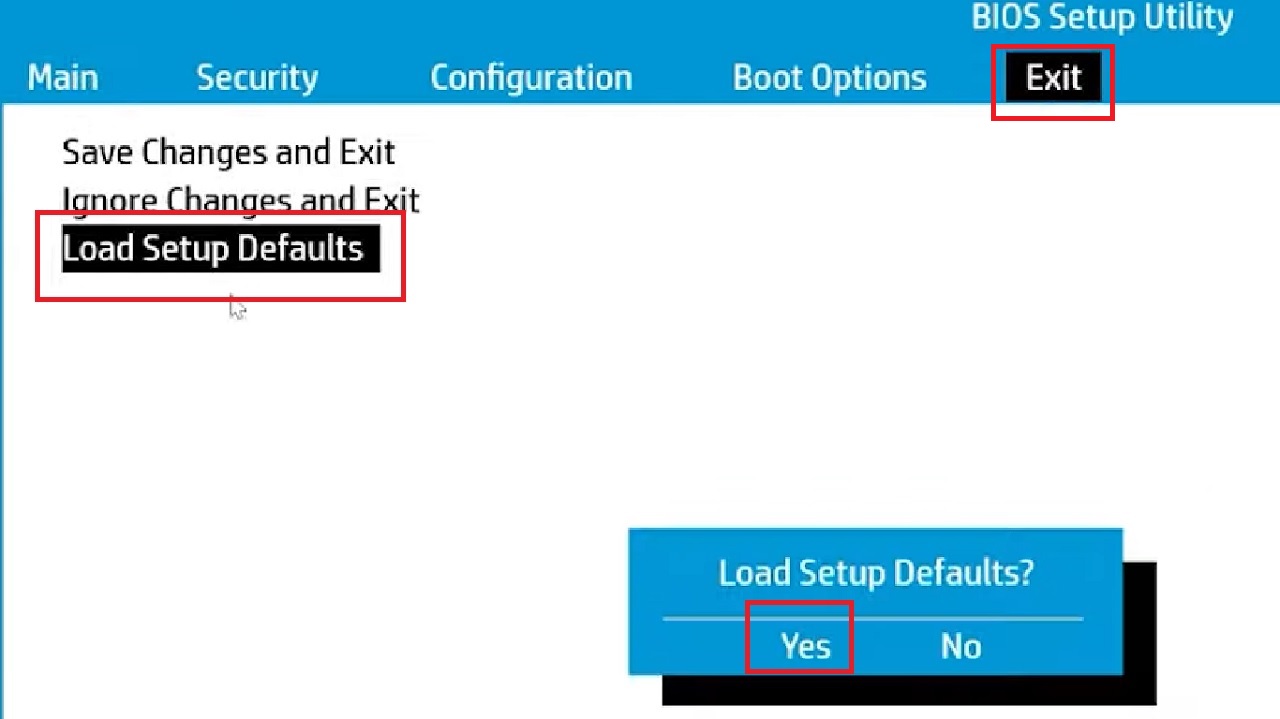
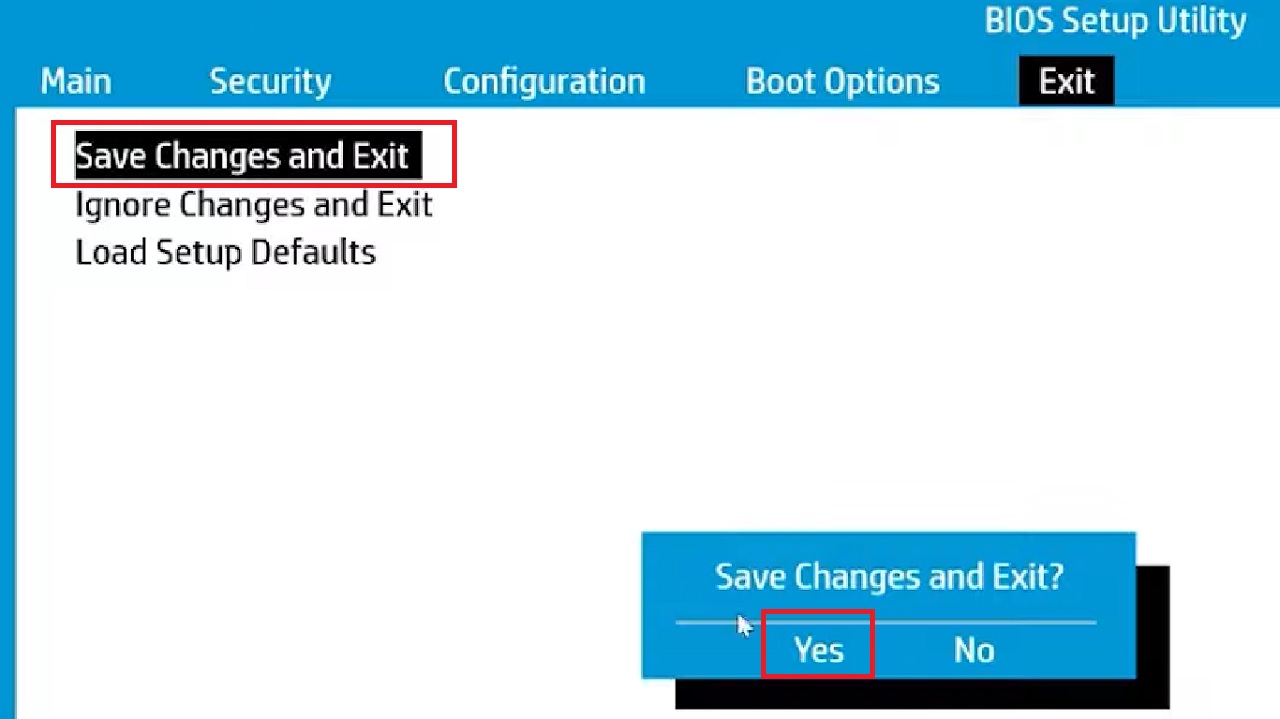
- Save Changes and Exit BIOS.
It will now be configured in its default settings. Try to log in to your PC with the password.
Now, go back to BIOS, now set as default, and then enable the wireless adapter from the Configuration page.
Additionally, go to the Control Panel. If you find Windows Mobility Center, click on Turn the wireless adapter On/Off.
This should help you fix the Wi-Fi disconnects after sleep mode issue easily.
Method 6: Create a Shortcut for a Workaround
You can fix the issue as and when it arises by creating a shortcut and pinning it to the taskbar to use it as a workaround.
STEPS TO FOLLOW:
- Right click on the Start Menu.
- Select Windows PowerShell (Admin).
- Type in the command Get-NetAdapter and hit the Enter key on your keyboard.
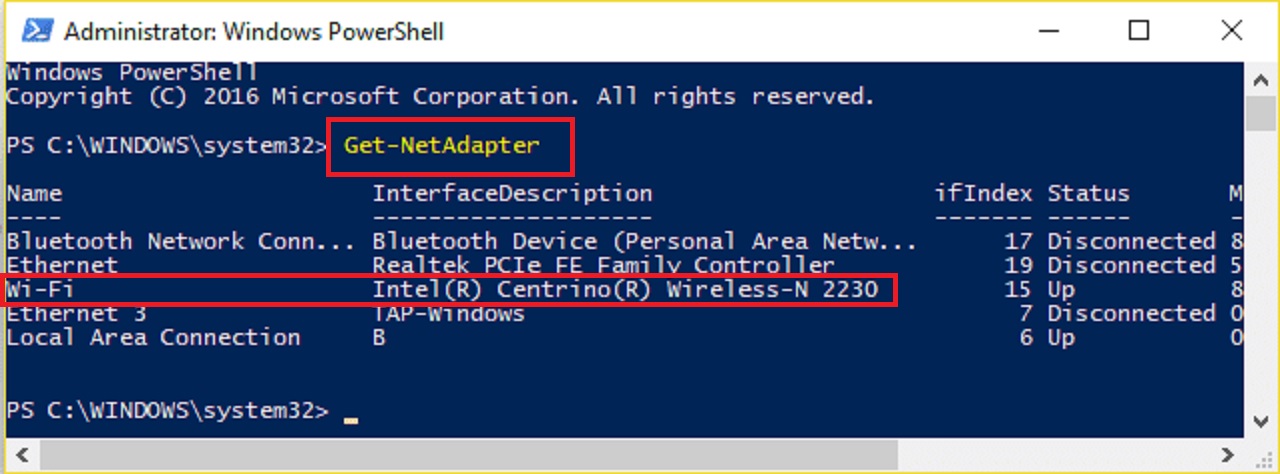
Note the value under InterfaceDescription next to the Wi-Fi, Intel(R) Centrino(R) Wireless-N 2230 here, for example. (Check the name of your wireless adapter).
- Now close the PowerShell window.
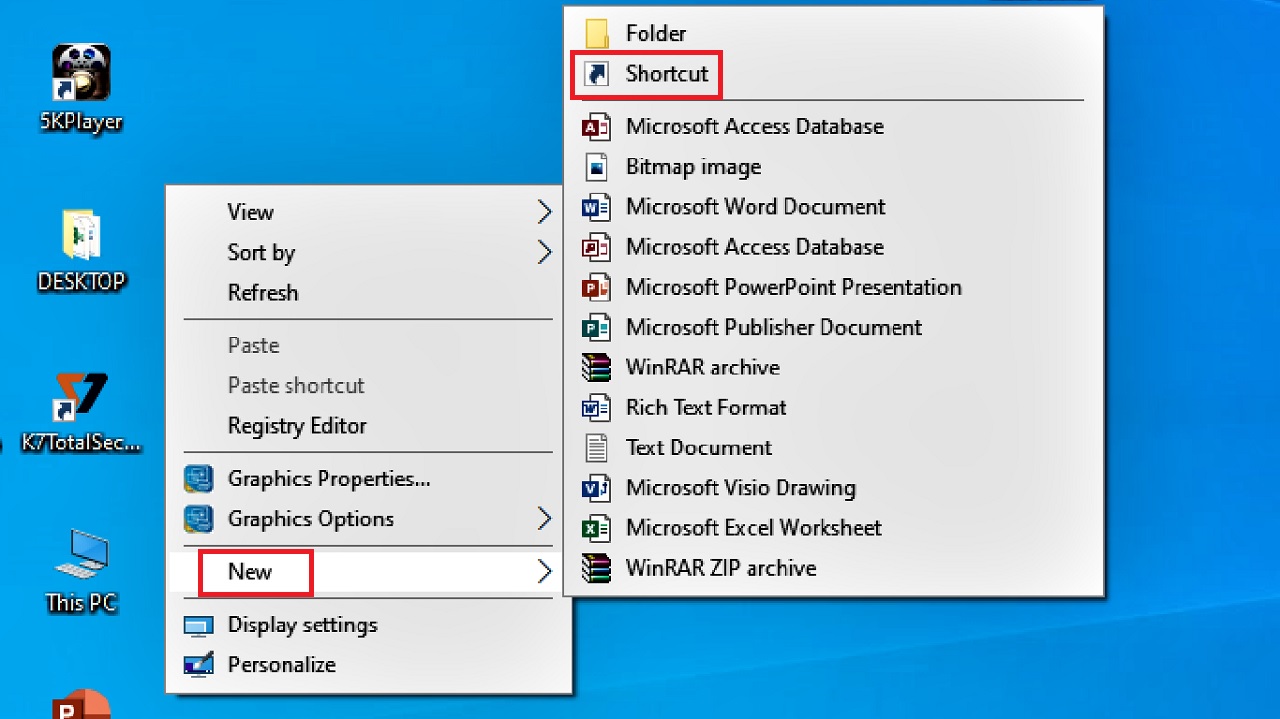
- Right-click in an empty area on the desktop.
- Select New from the drop-down context menu.
- Select Shortcut from the submenu.
- Go to the ‘Type the location of the item’ field.
- Type the command powershell.exe restart-netadapter -InterfaceDescription ‘Intel(R) Centrino(R) Wireless-N 2230’ -Confirm:$false.
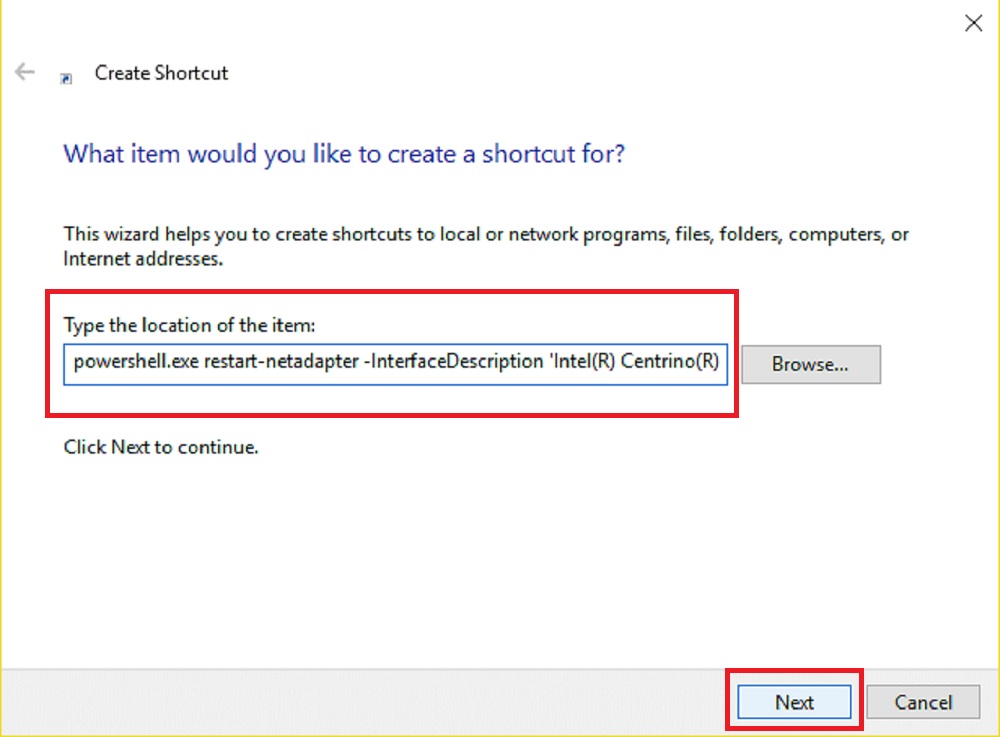
Note: Substitute ‘Intel(R) Centrino(R) Wireless-N 2230’ with the name of your wireless adapter.
- Click on the Next button to continue.
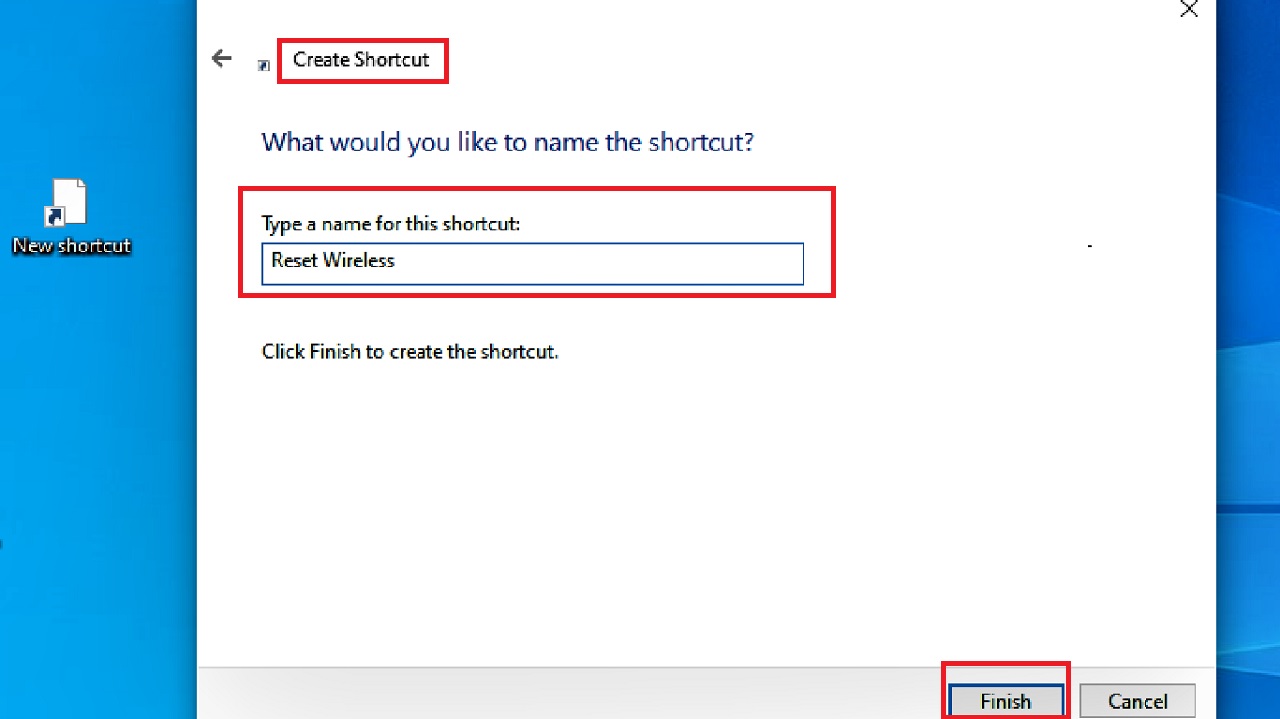
- Give a name to the shortcut, Reset Wireless, for example, in the following Create Shortcut window in the box under ‘Type a name for this shortcut’.
- Click on Finish to end the process.
- Now right-click on the shortcut you just created.
- Select Properties in the Reset Wireless Properties window.
- Go to the Shortcut tab.
- Select Advanced.
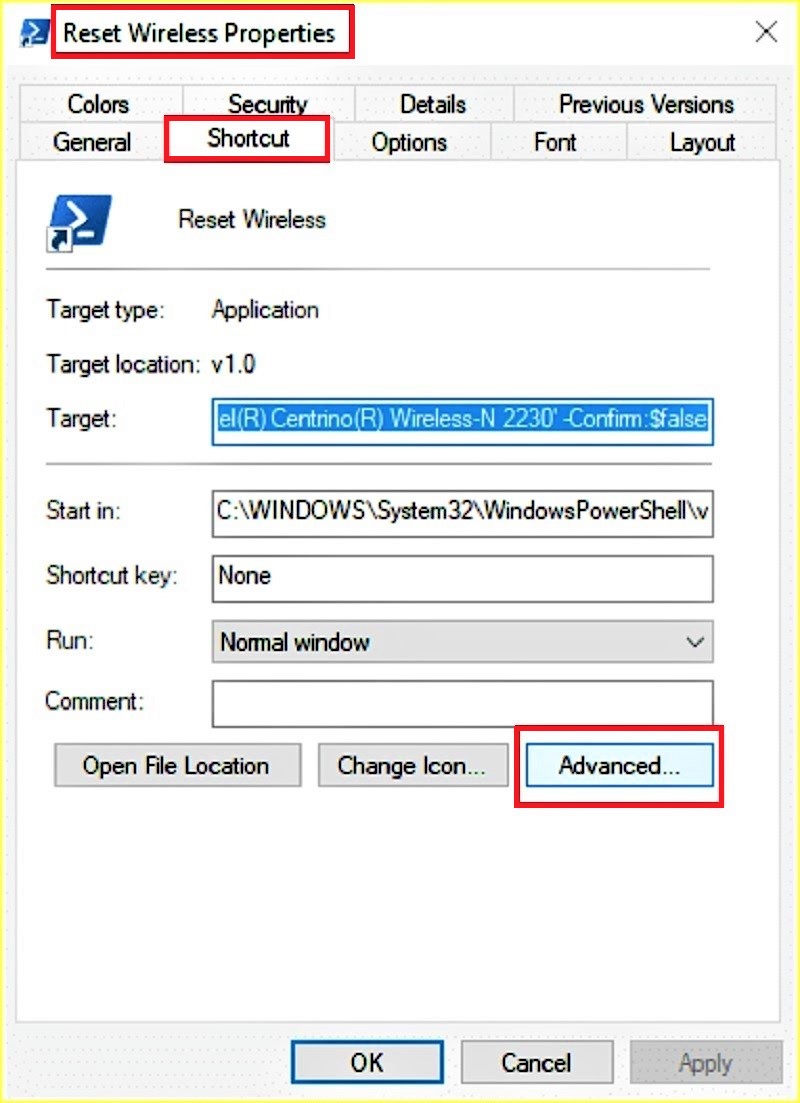
- Click on the small square box next to ‘Run as administrator’ in the Advanced Properties window.
- Click on the OK button.

- Click on the Apply button and then on the OK button in the previous Reset Wireless Properties window to close it.
- Now, right-click on the shortcut on the desktop.
- Select Pin to Start or Pin to taskbar.
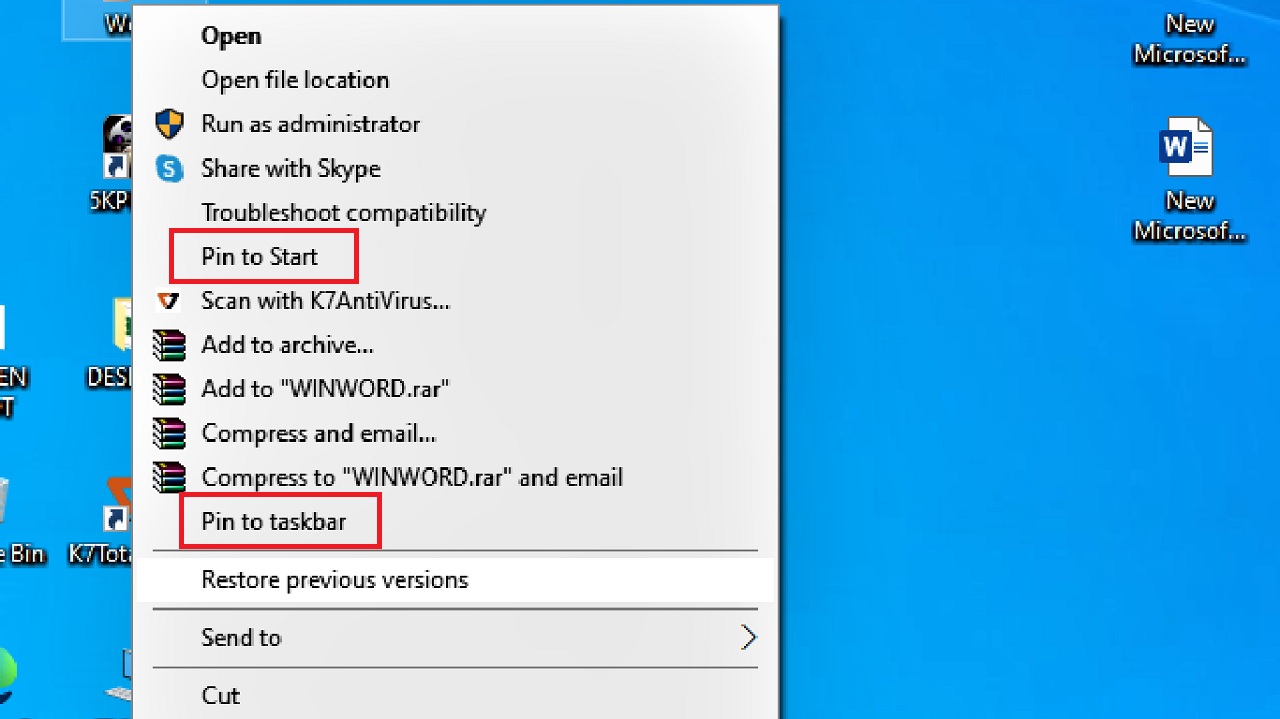
This will allow you to double click on the pinned shortcut as soon as the issue arises, from taskbar or Start Menu, to fix it.
Method 7: Disable Bluetooth Service from the Task Manager
Sometimes, a few specific Bluetooth services, such as Broadcom Bluetooth, and connected devices may cause such an issue. Disabling them will resolve the problem.
STEPS TO FOLLOW:
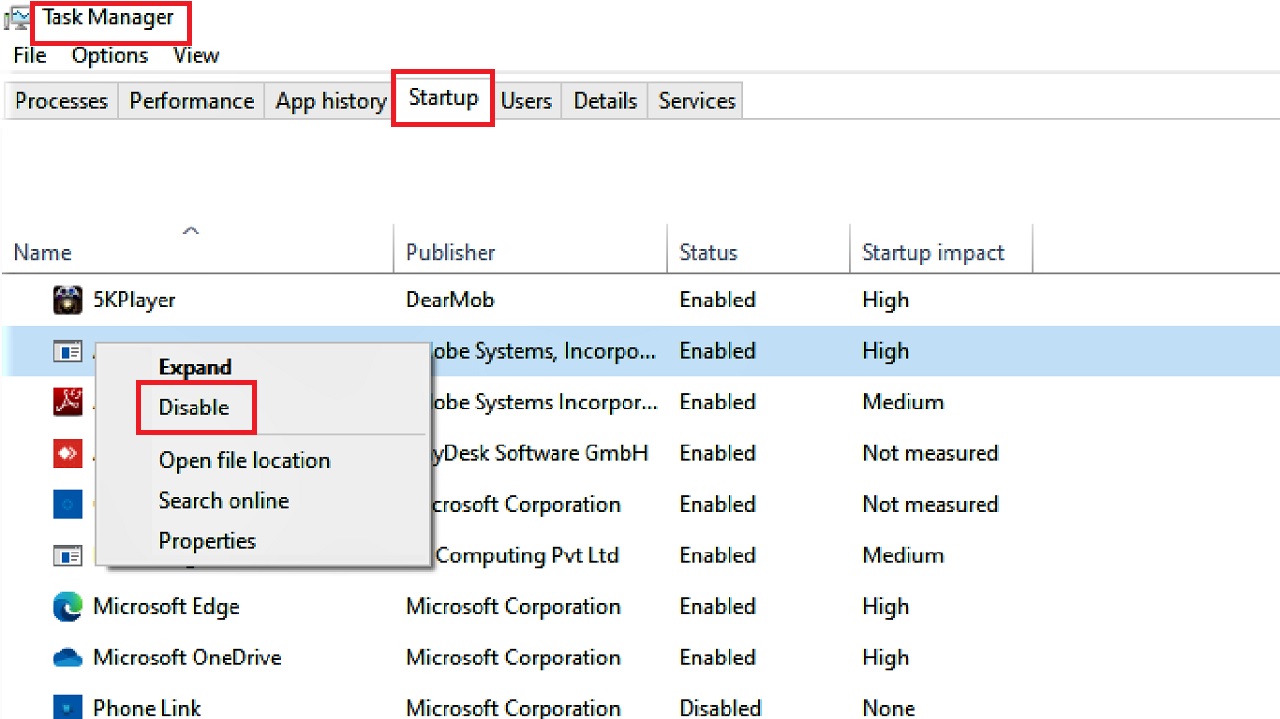
- Press the CTRL + SHIFT + ESC keys on your keyboard together to open the Task Manager.
- Go to the Startup tab.
- Find a Bluetooth service.
- Right-click on it.
- Select Disable.
Close the Task Manager window and check whether the issue is resolved.
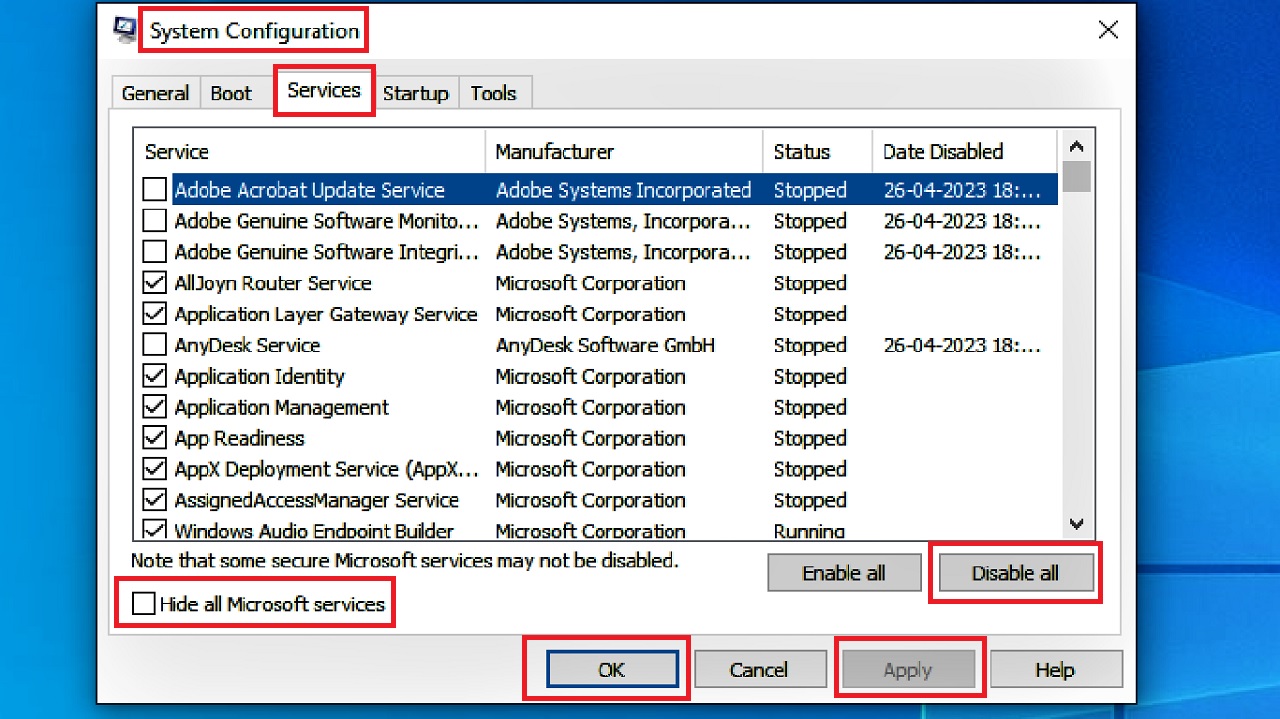
Alternatively, if you cannot find such services or devices in the Startup tab, you can also hide them from the Services page in the following way:
- Press Windows and R keys > Type msconfig and hit Enter > Go to the Services tab > click on Hide all Microsoft services > Click on Disable all > Appy > OK.
You may also locate Bluetooth services separately in the System Configuration window and disable them.
Method 8: Restart WLAN AutoConfig Service
You may need to restart the WLAN AutoConfig, even if it is running, to resolve the issue of Wi-Fi getting disconnected after sleep mode.
STEPS TO FOLLOW:
- Go to the search box next to the Start Menu.
- Type service and hit Enter on your keyboard.
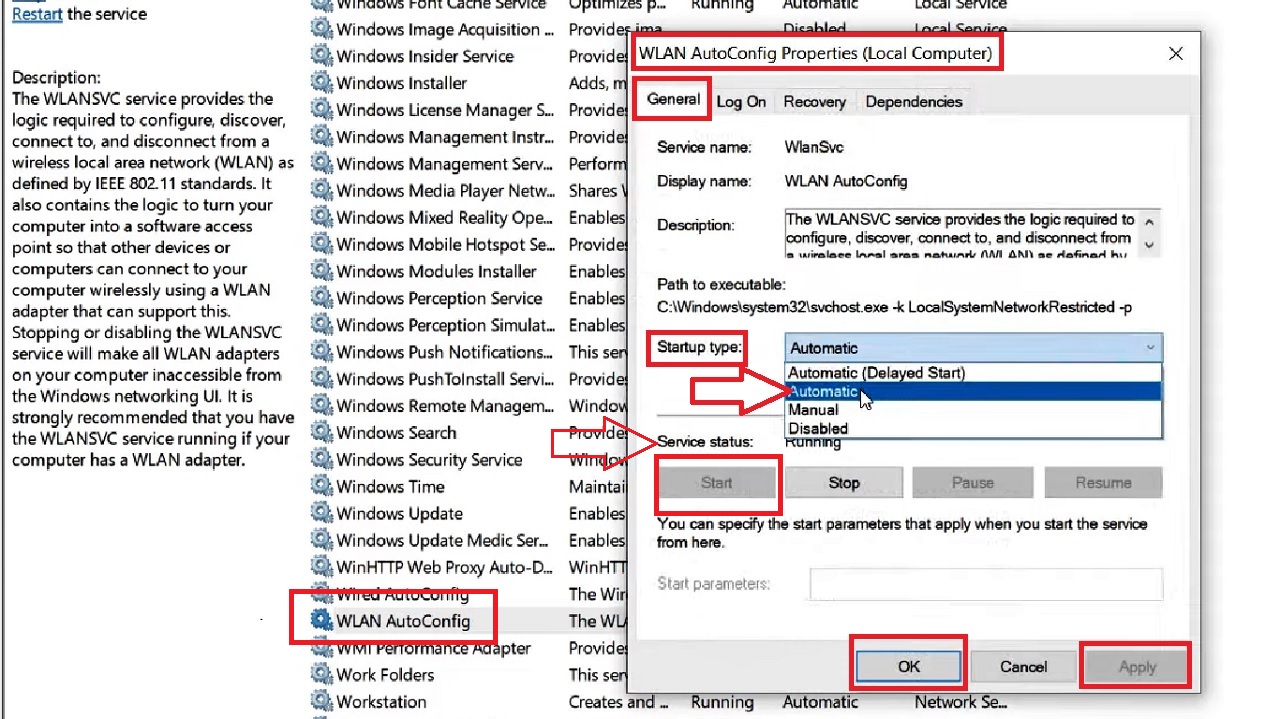
- In the Services manager window, look for WLAN AutoConfig.
- Double-click on it.
- Set the Startup type to Automatic by choosing the option from the drop-down menu you get after clicking on the small arrow at the right side of the box.
- Click on the Start button.
- Click on the Apply button and then on the OK button.
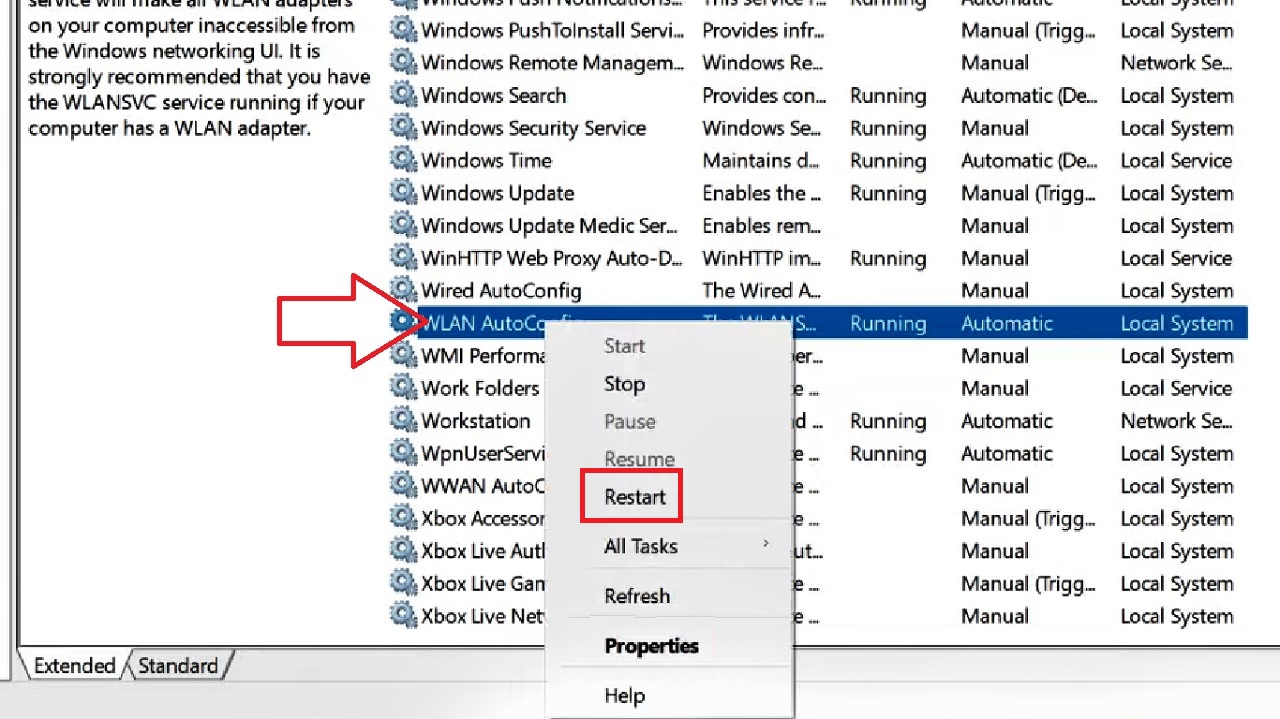
- If the service is already running, as it is in this case, right-click on the WLAN AutoConfig service and click on Restart from the drop-down menu.
At this point, you may get an error message saying ‘Windows could not start the WLAN AutoConfig service on Local Computer.’ This is because the svchost.exe process of WlanSvc keeps running.
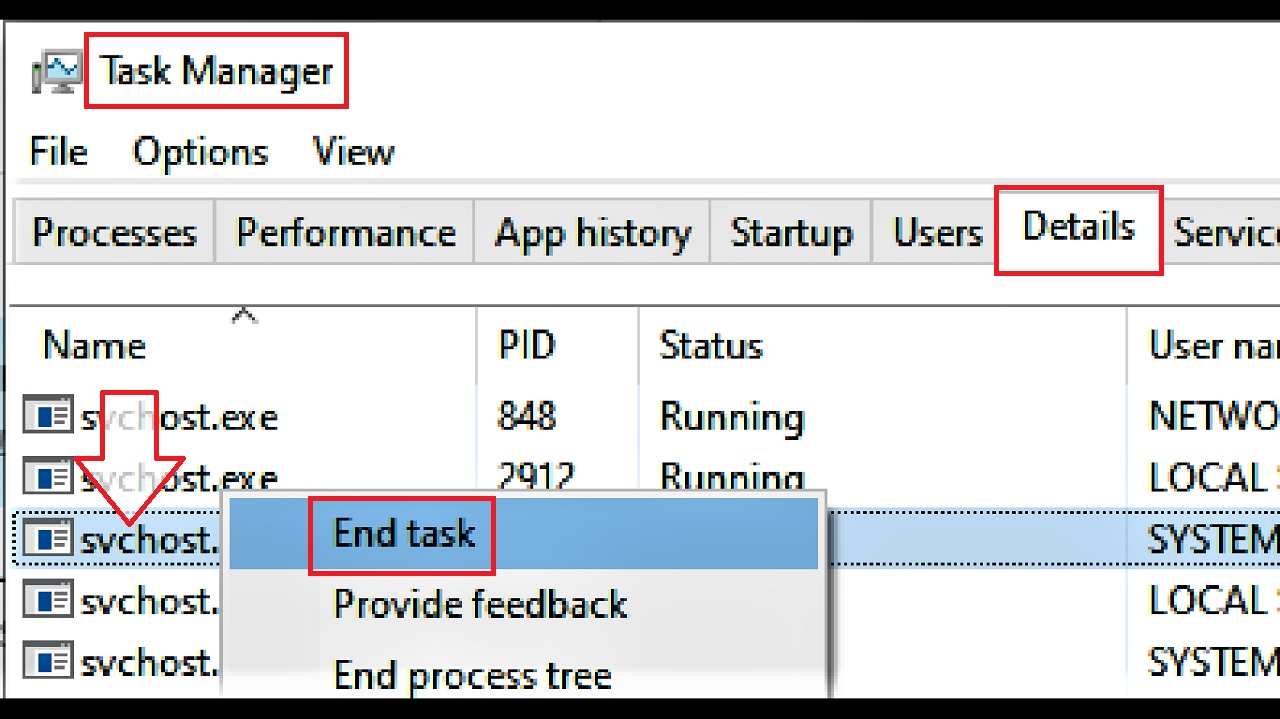
- To kill this process, open Task Manager as before.
- Find svchost.exe in the Details tab.
- Right-click on it.
- Click on End Task from the drop-down context menu to end the process.
Now you can start the WlanSvc service from the service management console.
Alternatively, you may also use PowerShell as administrator, and run the command Start-Service -Name WlanSvc -PassThru.
However, in that case, you may also need to create a bat file by following the steps given below:
- Open PowerShell as administrator as before.
Type the commands and hit the Enter key after each:
- $WLANProc = Get-CimInstance Win32_Process | Where-Object {$_.CommandLine -eq “c:\windows\system32\svchost.exe -k LocalSystemNetworkRestricted -p”}
- Stop-Process -Id $WLANProc.ProcessId -Force
- Start-Service WlanSvc
This will restart the WLAN AutoConfig service.
Next, you will need to restart the Wi-Fi adapter by running the following command:
- restart-netadapter -InterfaceDescription ‘your_wireless_adapter_name’ -Confirm:$false
Note: Replace ‘your_wireless_adapter_name’ with the actual name of your wireless adapter. If you do not know the name, run an additional command in the PowerShell before, which is Get-NetConnectionProfile and Hit Enter.
- Now save the file with the .ps extension.
- Run the program after sleep mode or hibernation state on your PC.
This should resolve the issue.
Method 9: Run PowerShell Commands to set Network Profile and TCP/IP
Assuming that you know your network name, setting the network profile and Transmission Control Protocol/Internet Protocol (TCP/IP) will also resolve the issue sometimes.
STEPS TO FOLLOW:
- Open PowerShell as admin.
- Type in the command Set-NetConnectionProfile -Name “Name” -NetworkCategory Private and hit the Enter key.
(In the place of ‘Name’ in the command, make sure you type the actual name of your network).
This will change the network profile to private. Close the PowerShell window to check whether the issue is resolved.
If it still persists, run these following commands one by one in the Command Prompt as administrator, hitting the Enter key every time, to reset the TCP/IP:
- netsh winsock reset
- netsh int ip reset
- ipconfig /release
- ipconfig /renew
- ipconfig /flushdns
When all these commands are executed successfully, close the window and recheck whether the issue has been resolved.
Method 10: Uninstall Latest Security Updates from the Control Panel
Sometimes, there may be a few security updates that you may have installed recently that may cause this issue of Wi-Fi disconnecting after sleep mode.
Uninstalling them from the Control Panel may resolve the issue.
STEPS TO FOLLOW:
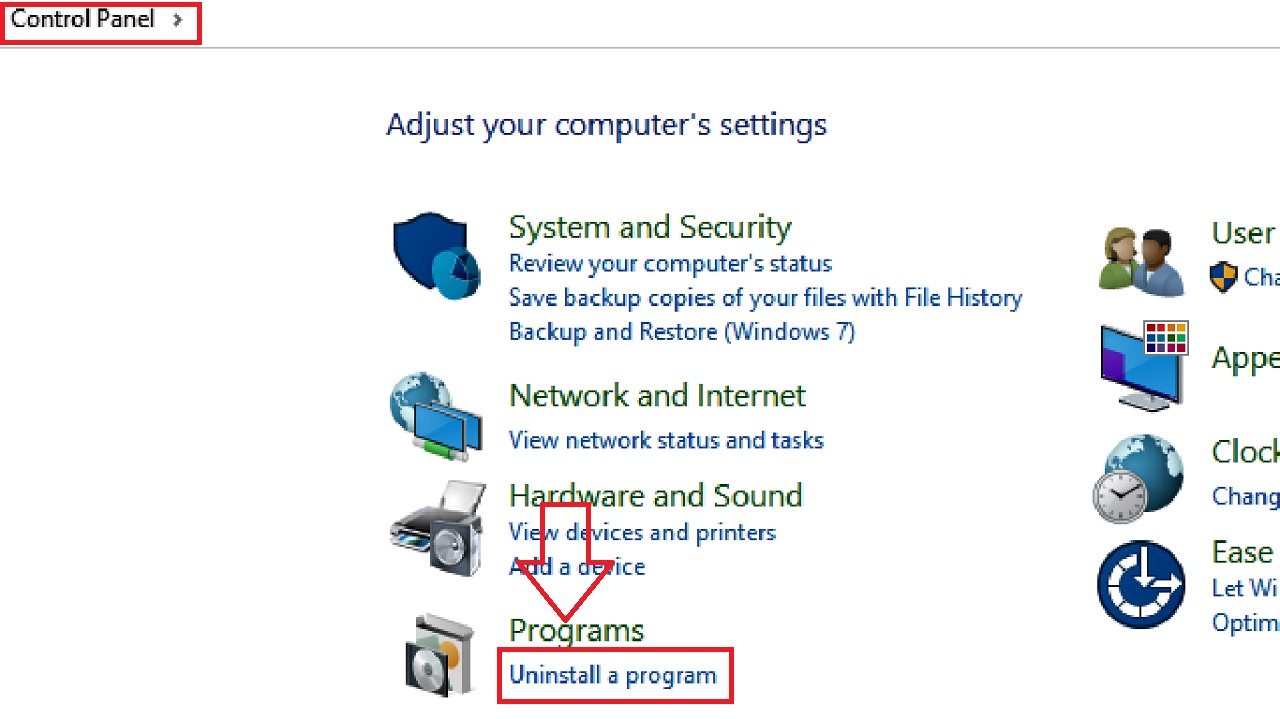
- Type Control Panel in the Windows search box and press Enter > Select Uninstall a program under Programs.
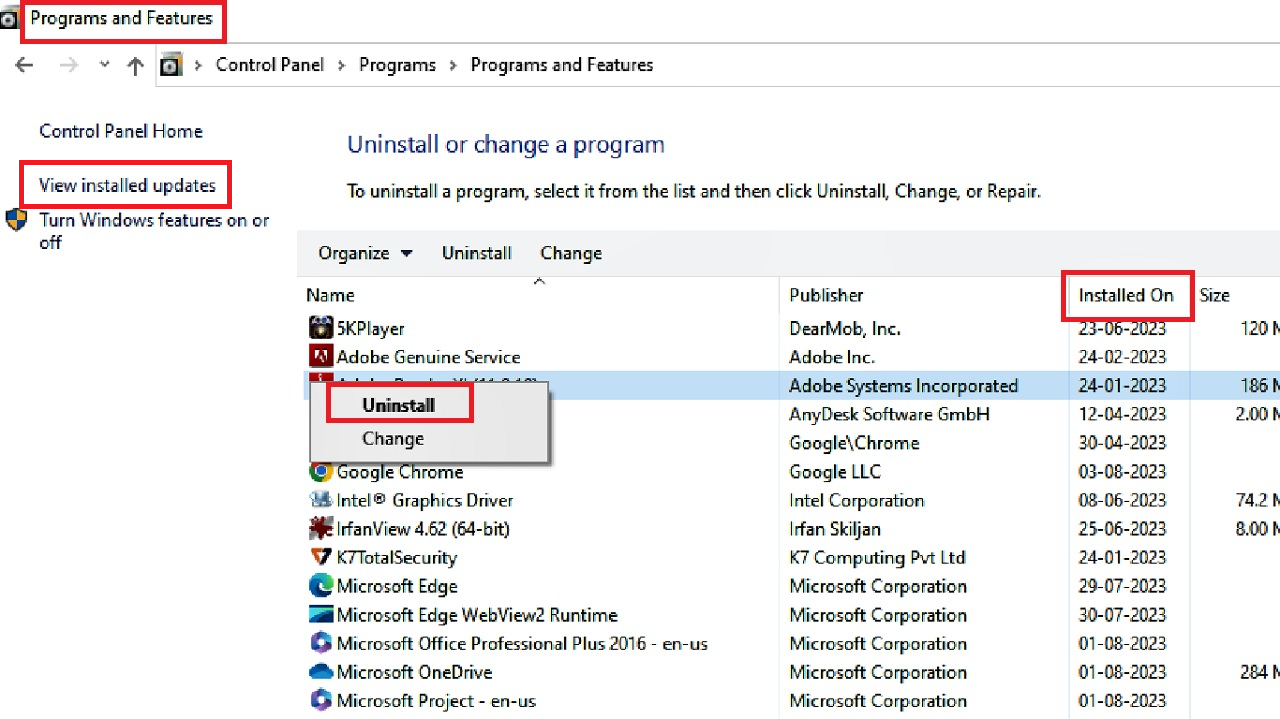
- Select View installed updates from the left pane of the Programs and Features window.
- Find the latest update (You may sort them by date under the Installed On column).
- Right-click on it.
- Select Uninstall.
- Follow the on-screen instructions.
When the process is complete, restart your PC.
In this workaround, you may also need to pause the updating process, temporarily in this way:
- Press the Windows and I keys on your keyboard together to open Settings > Choose Update & Security > Windows Update > Pause updates for 7 days (for example).
(In Windows 11, you will find this option under More options).
Method 11: Disable the Fast Startup Feature
The Fast Startup feature often causes a lot of issues in the normal functioning of a PC, and disconnecting Wi-Fi after sleep mode is one. Disable it to resolve the issue.
STEPS TO FOLLOW:
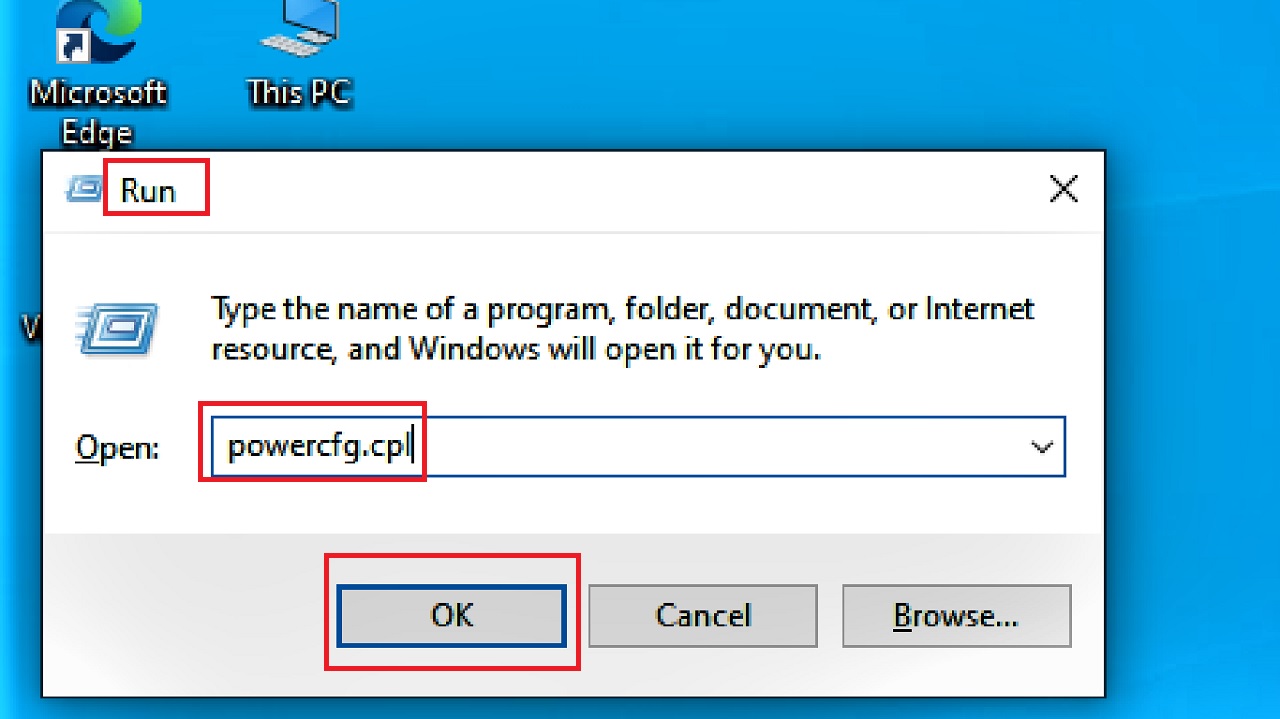
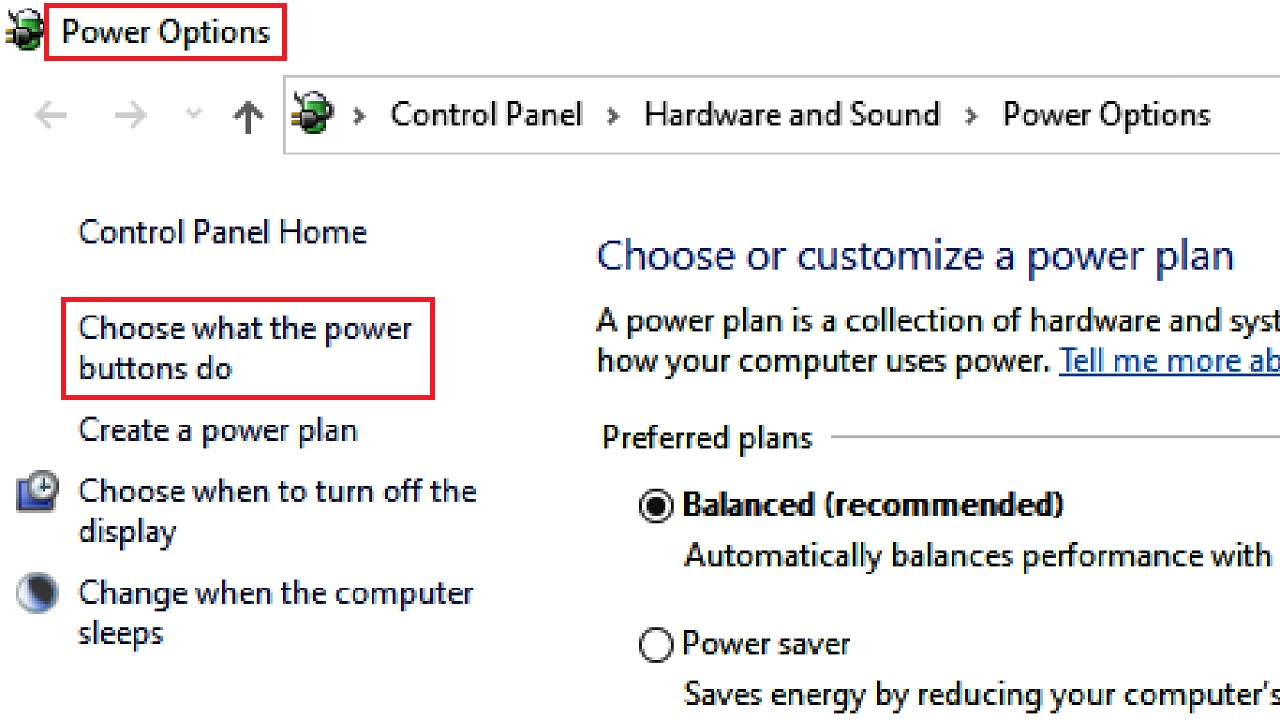
- Press the Windows and R keys on your keyboard to open the Run dialog box.
- Type powercfg.cpl in the box next to Open and click on the OK button.
- Select Choose what the power buttons do from the left pane of the following Power Options Window.
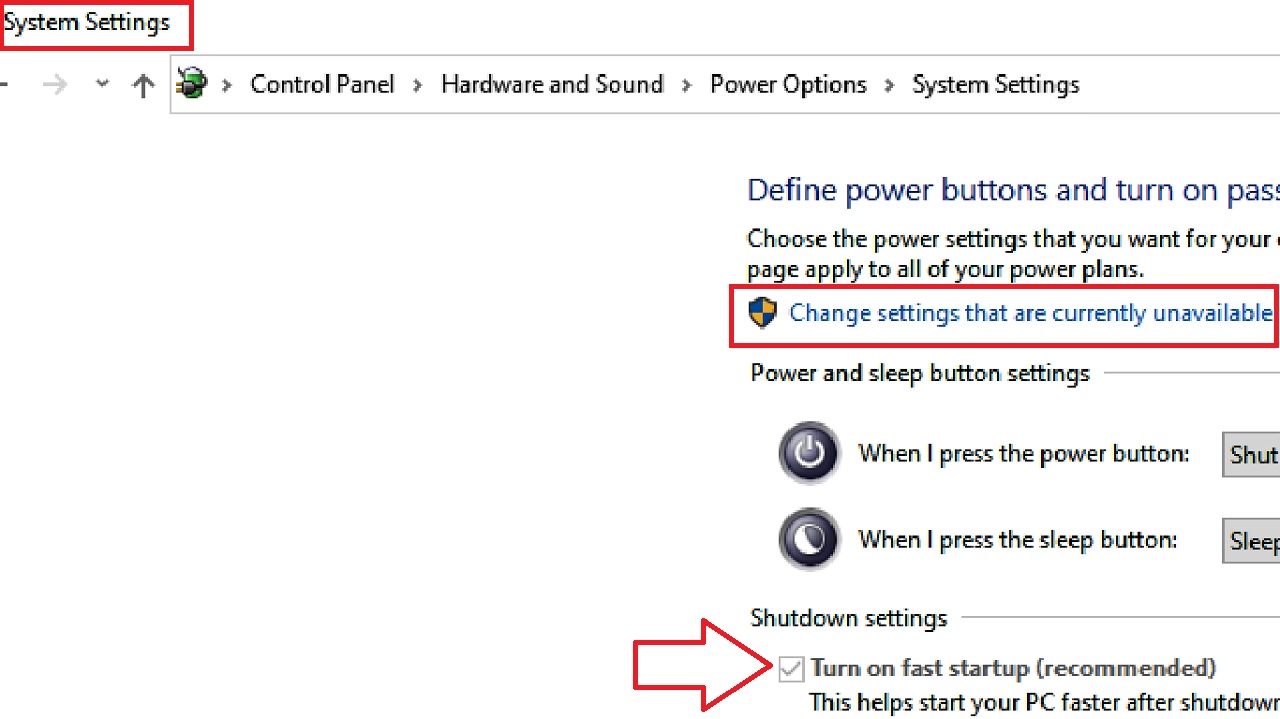
- In the System Settings window, you will see that the box next to Turn on fast startup (recommended) will be ticked and gray, as shown in the image below.
- To change it, click on Change settings that are currently unavailable.
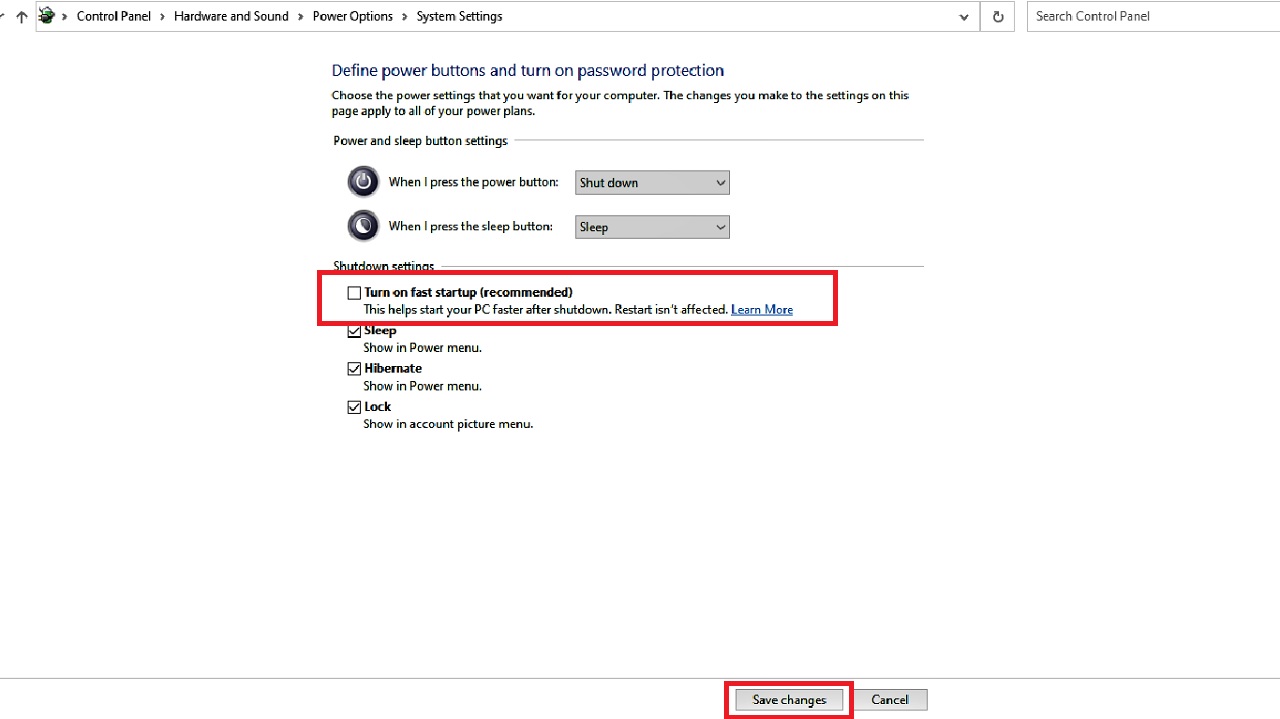
- Now, uncheck the box next to Turn on fast startup (recommended) to disable it in the following window.
- Click on Save changes.
Now check whether the issue is resolved.
Method 12: Make Changes in Sleep Settings from the Local Group Policy Editor
You may make some changes to enable a few options in the Sleep Settings in the Local Group Policy Editor console to resolve the issue.
STEPS TO FOLLOW:
- Open the Run box as before.
- Type gpedit.msc and hit the Enter key on your keyboard.
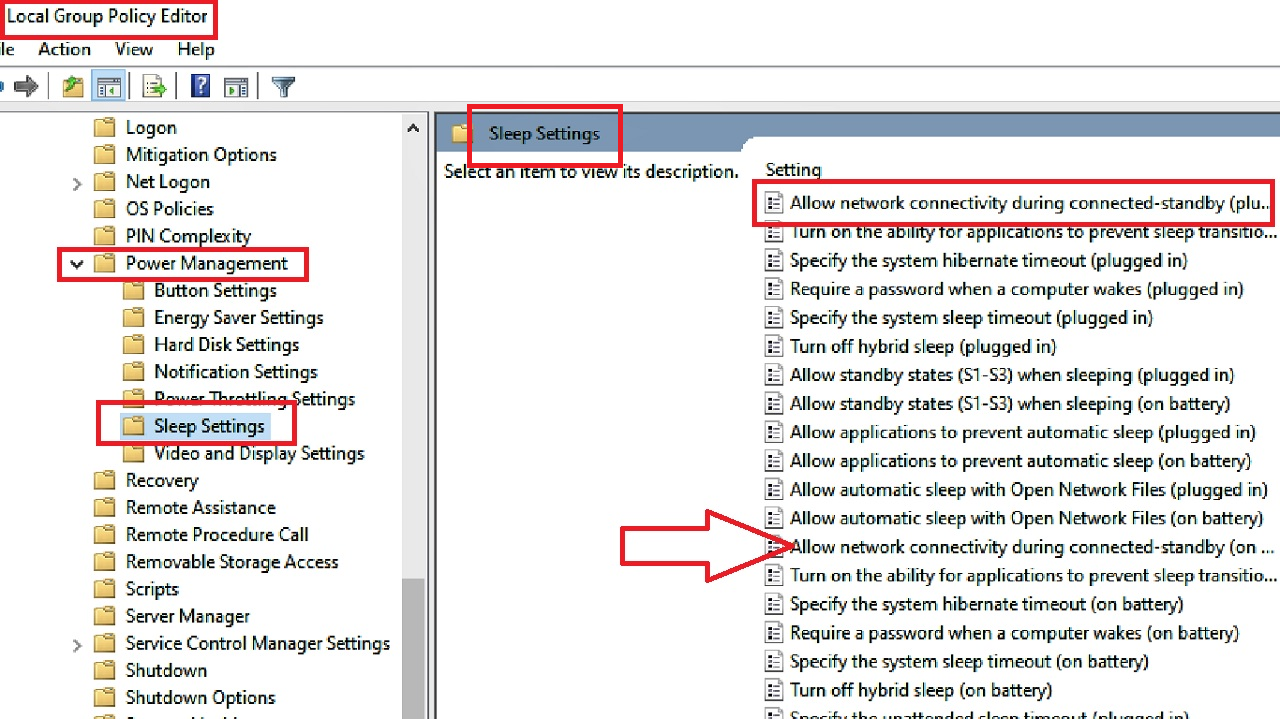
In the Local Group Policy Editor console, select the following folders from the left pane:
- Computer Configuration
- Administrative Templates
- System
- Power Management
- Sleep Settings
On the right side of the Sleep Settings section, select ‘Allow network connectivity during connected-standby (plugged in)’ and double-click on it.
- Click on the small circle next to Enabled in the following window.
- Click on the Apply button and then on the OK button to save the changes.
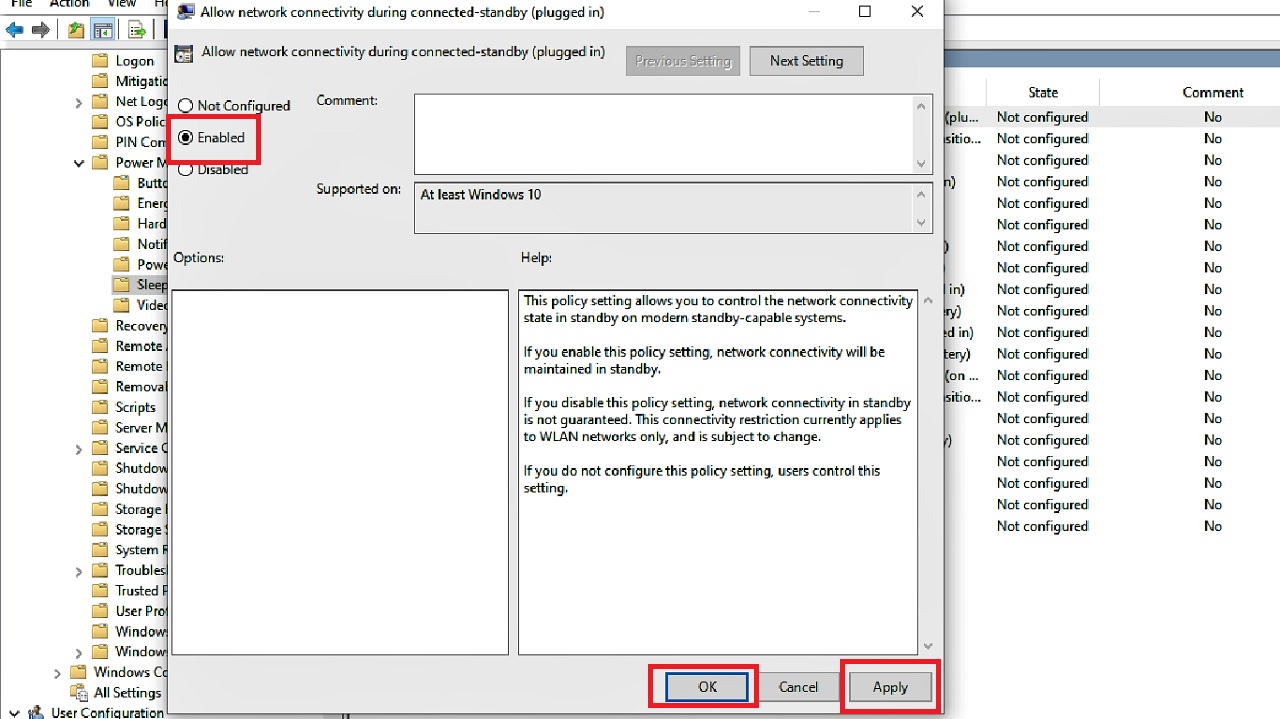
Repeat the same process to enable ‘Allow network connectivity during connected-standby (on battery)’ marked by a red arrow in the previous image.
This will enable the system to maintain an active and steady network connection even in hibernation state or sleep mode.
Method 13: Uncheck IPv6 Protocol from the Network and Sharing Center
If there is any issue in the IPv6 protocol, it may cause this issue. Disable it from the Network and Sharing Center.
STEPS TO FOLLOW:
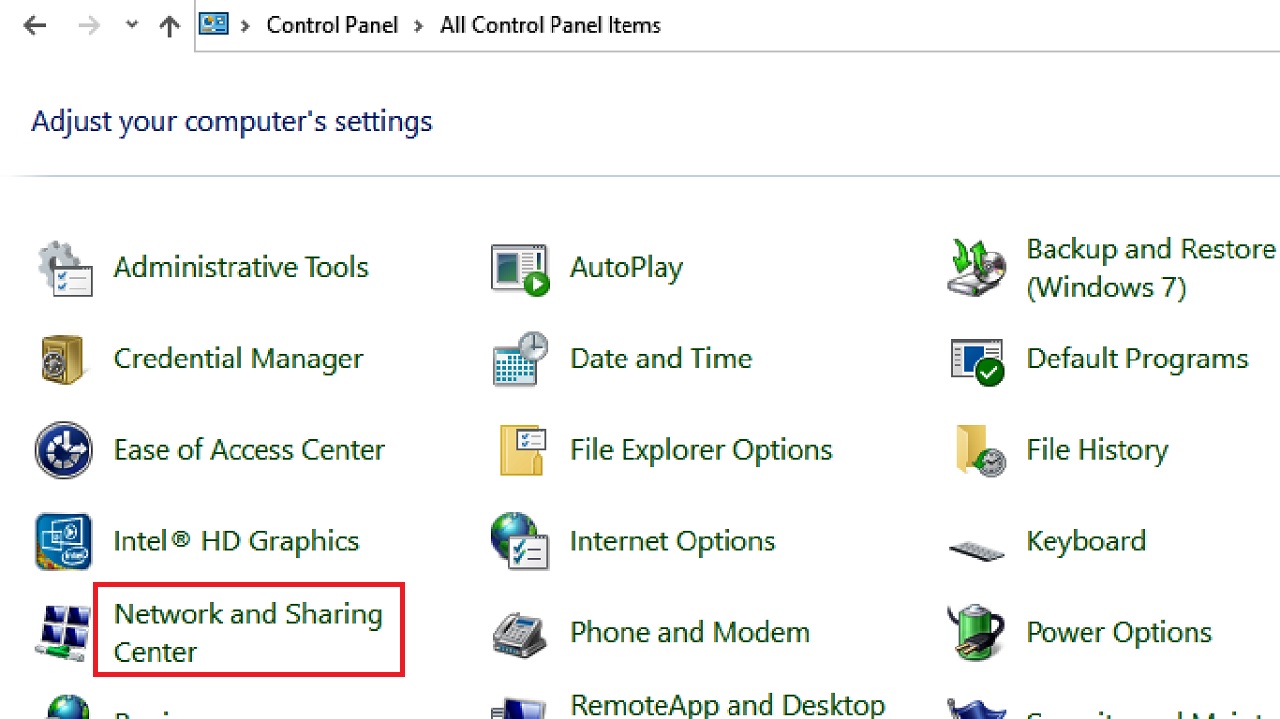
- Open the Control Panel as before in Large icons.
- Select Network and Sharing Center.
- Click on Change adapter settings in the left pane of the Network and Sharing Center window.

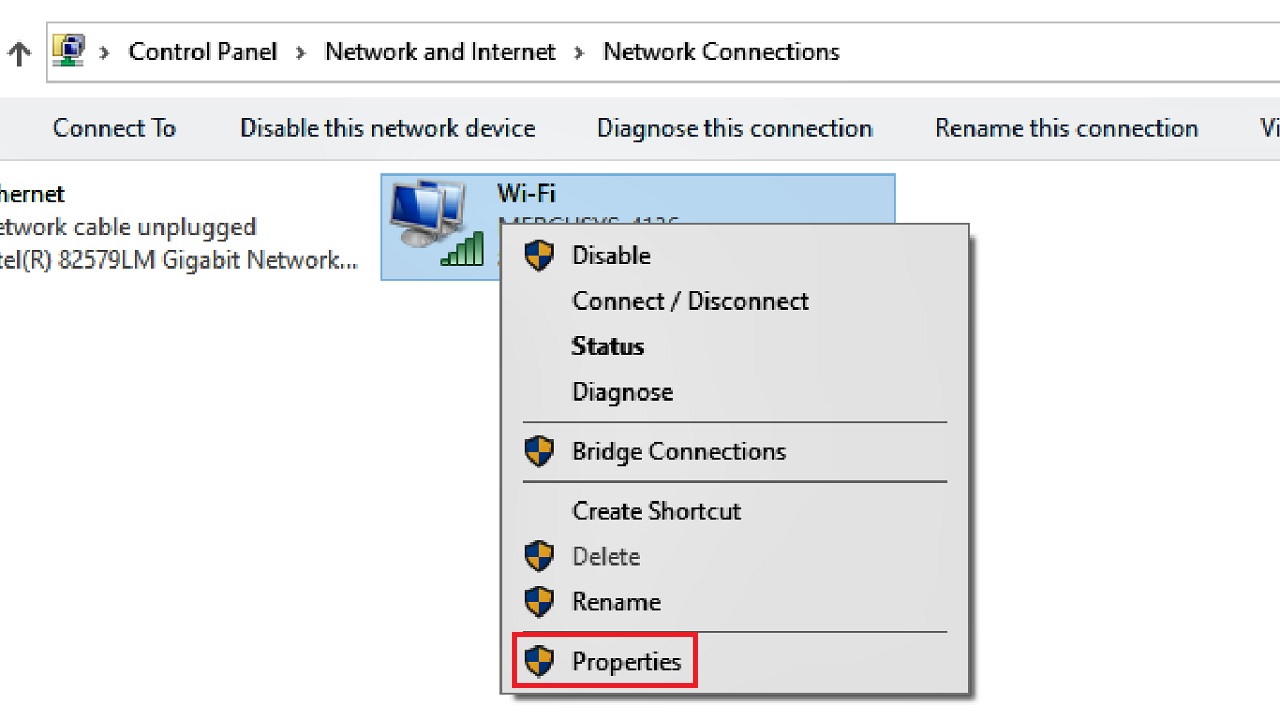
- Right-click on your network connection.
- Select Properties from the drop-down context menu.
- Uncheck the small square box next to Internet Protocol Version 6 (TCP/IPv6) in the box under ‘This connection uses the following items’ in the Wi-Fi Properties window under the Networking tab.
- Click on the OK button to save changes.
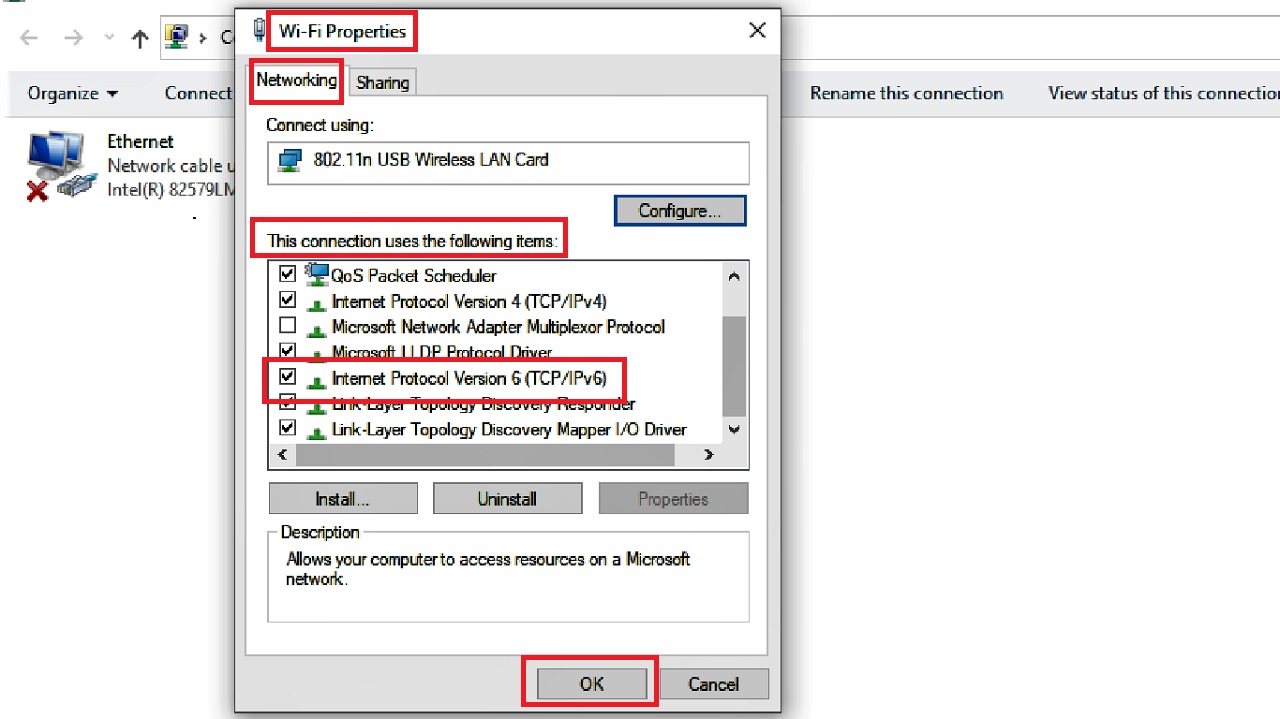
Now check whether the issue is resolved or not.
Method 14: Perform a Network Reset
Often resetting the Wi-Fi adapter or performing a network reset may resolve the issue.
STEPS TO FOLLOW:
- Press the Windows and I keys together to open Settings.
- Go to Network & Internet.
- Look for Network reset on the right side of the Status page.
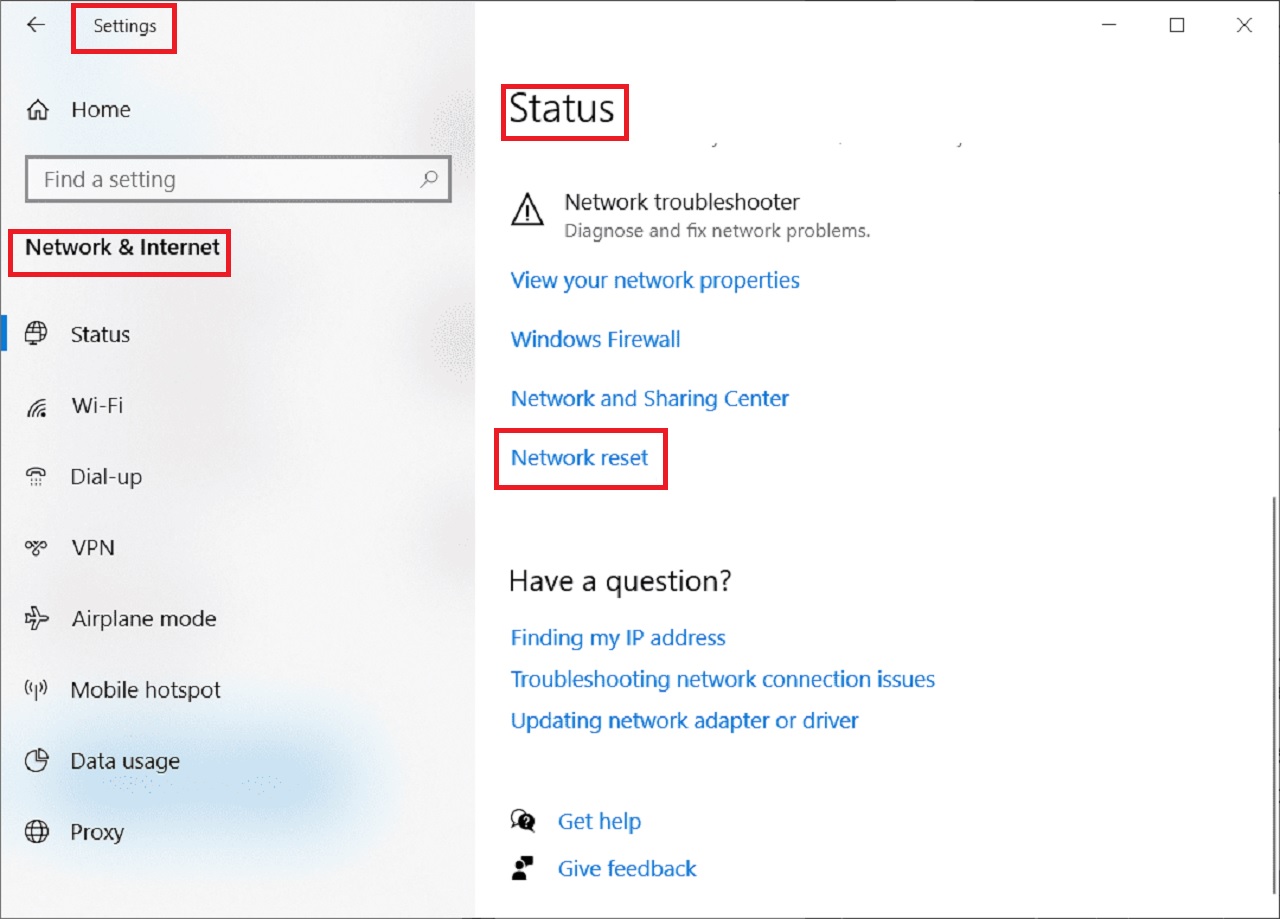
- Click on it.
- Confirm the action by clicking on Reset now on the next screen.
Restart your computer and check whether the issue is resolved.
Method 15: Allow Auto Connect and Change Network Profile
You may enable the auto-connect mode if it is disabled and also change the network profile to Private from Public, if needed.
STEPS TO FOLLOW:
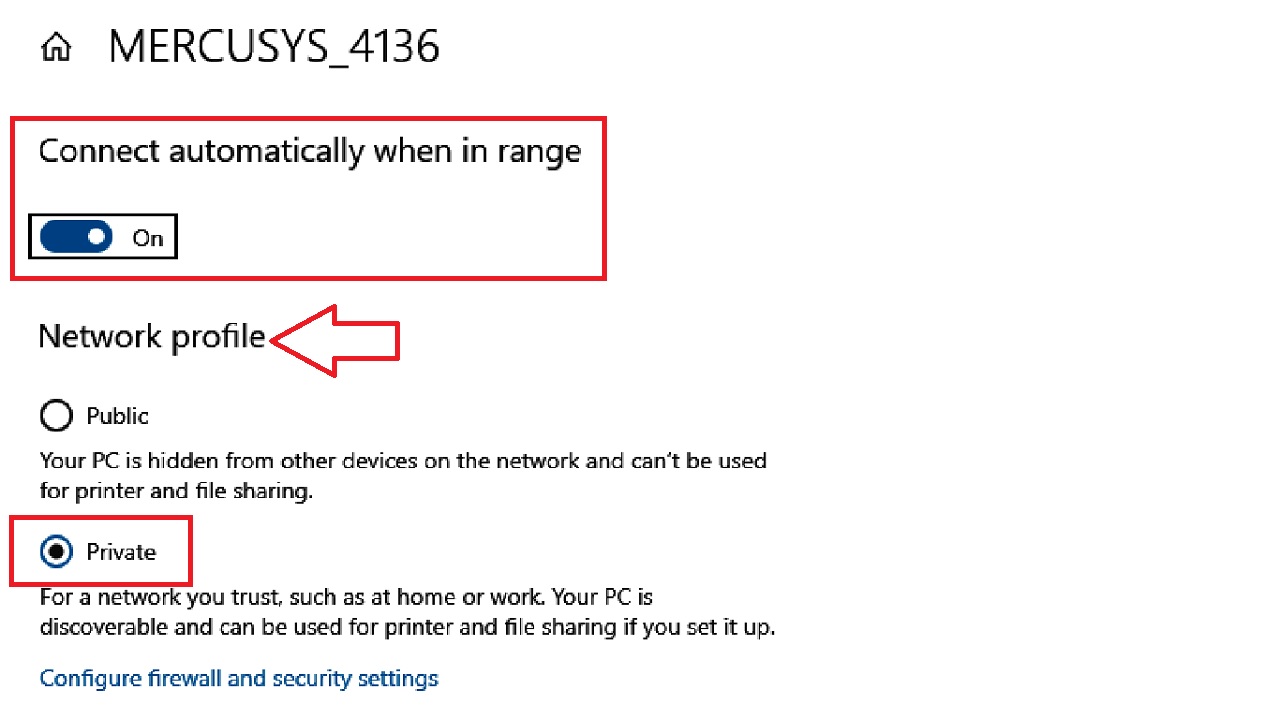
- Click on the Wi-Fi icon in the taskbar.
- Click on your Wi-Fi connection.
- Click on Properties.

- In the Settings window, drag the sliding switch under Connect automatically when in range to On.
- Also click on the small circular button next to Private under Network Profile.
If this method cannot resolve the issue, try the following.
Method 16: Delete Previous Network Profiles from Registry
You may also try deleting previous network profiles and then change the current one. You will need to use the Registry Editor for this.
STEPS TO FOLLOW:
- Go to the search box > Type regedit and hit enter.
In the Windows Registry Editor window, click on the small arrow next to each of the following folders and expand them in the exact order as mentioned below:
- HKEY_LOCAL_MACHINE
- SOFTWARE
- Microsoft
- Windows NT
- CurrentVersion
- NetworkList
- Profiles
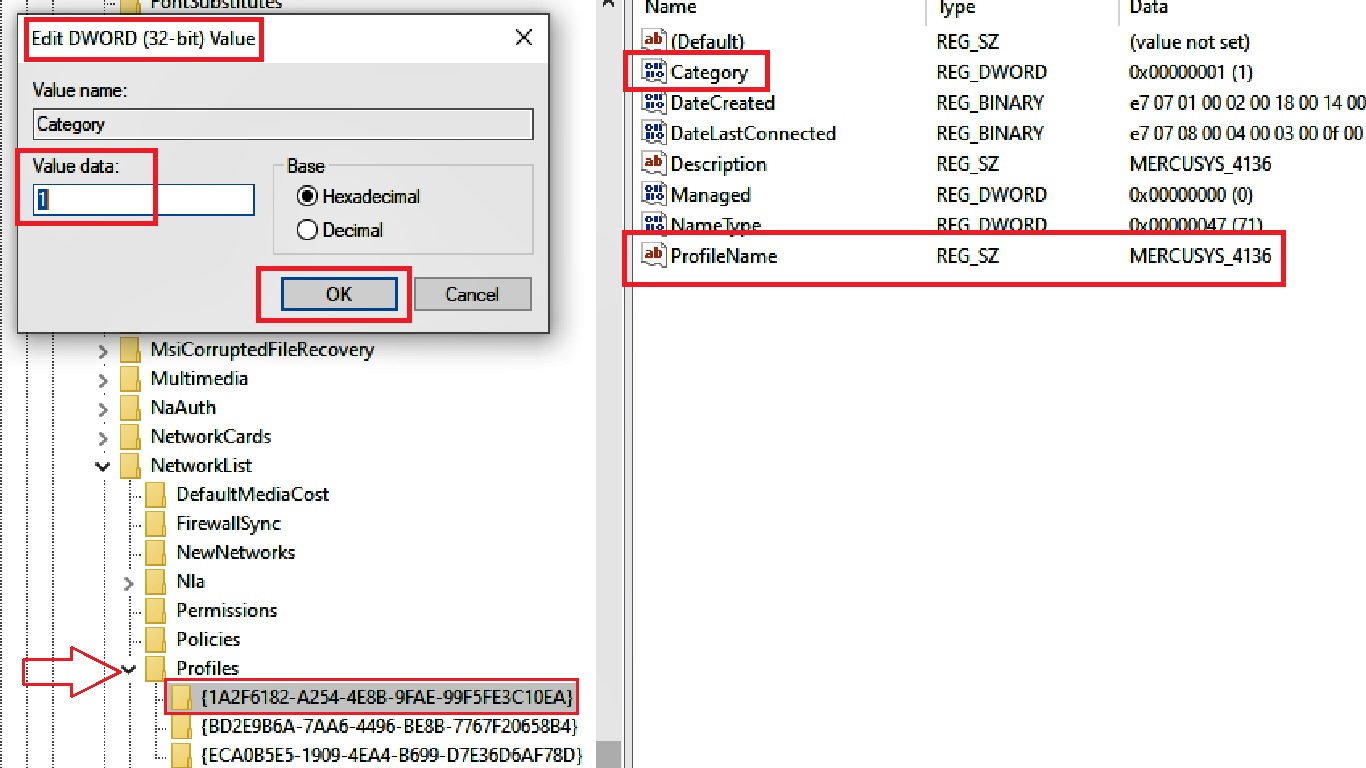
Under Profiles, you will see one or more folders. Click on each of them, check the name under the Data field alongside the ProfileName on the right side for your current wireless network name (MERCUSYS_4136 in this case).
- Double-click on Category.
- Set the Value to 1 to change it to Private in the Edit DWORD (32-bit) Value window.
- Click on the OK button.
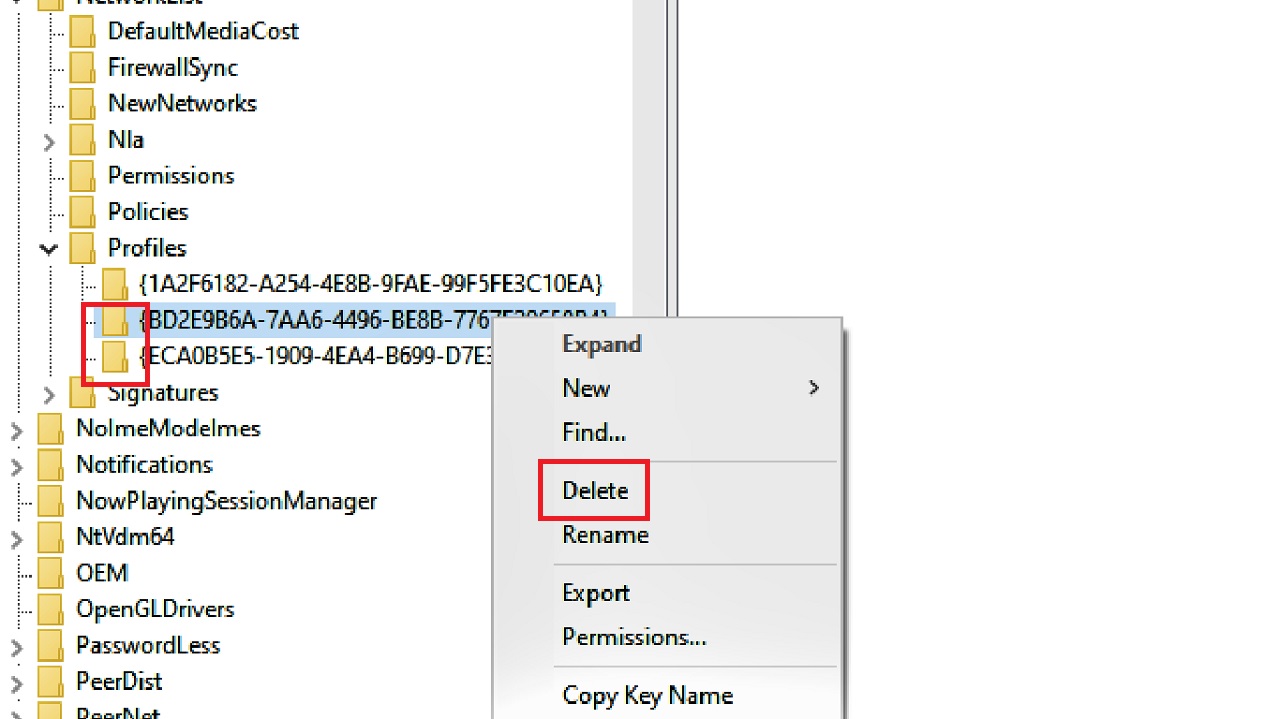
- Now, right-click on the other folders under Profiles one by one.
- Choose Delete from the drop-down options.
Once done, close the window, reboot your PC, and check.
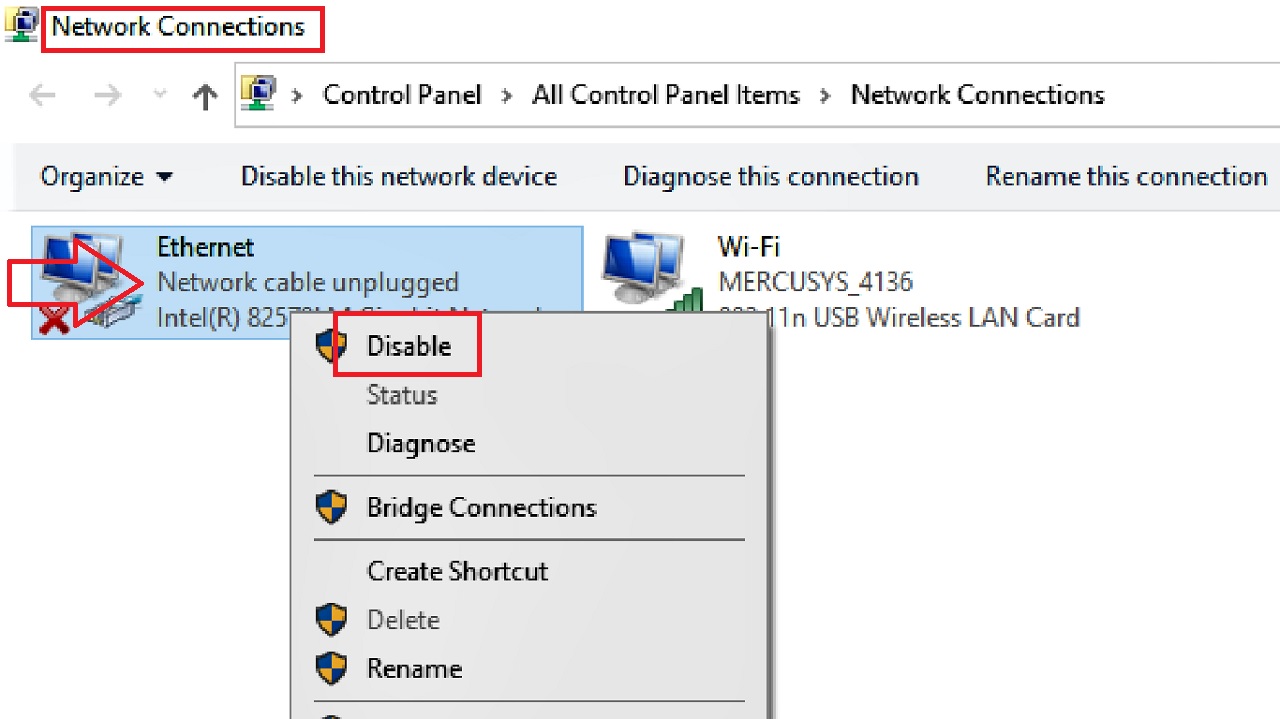
Method 17: Disable Ethernet from Network Connections
Often, keeping Ethernet and Wi-Fi connections running at the same time may cause this issue. Disable Ethernet to restore normal functionality.
STEPS TO FOLLOW:
- Type ncpa.cpl in the run box and open Network Connections as you did in Method 2.
- Right-click on Ethernet.
- Select Disable from the drop-down context menu.
Method 18: Disable Require Sign-in Feature
Sometimes, this specific Wi-Fi sign-in setting may cause this problem. If your system has the Require sign-in feature, disable it to fix the issue.
STEPS TO FOLLOW:
- Click on the Start Menu.
- Select settings or the gear icon.
- Go to the Accounts section.
- Click on Sign-in options from the left pane of the window.
- Look for the Require sign-in section on the right side.
- Click on the small arrow in the box under it.
- Select Never from the drop-down context menu.
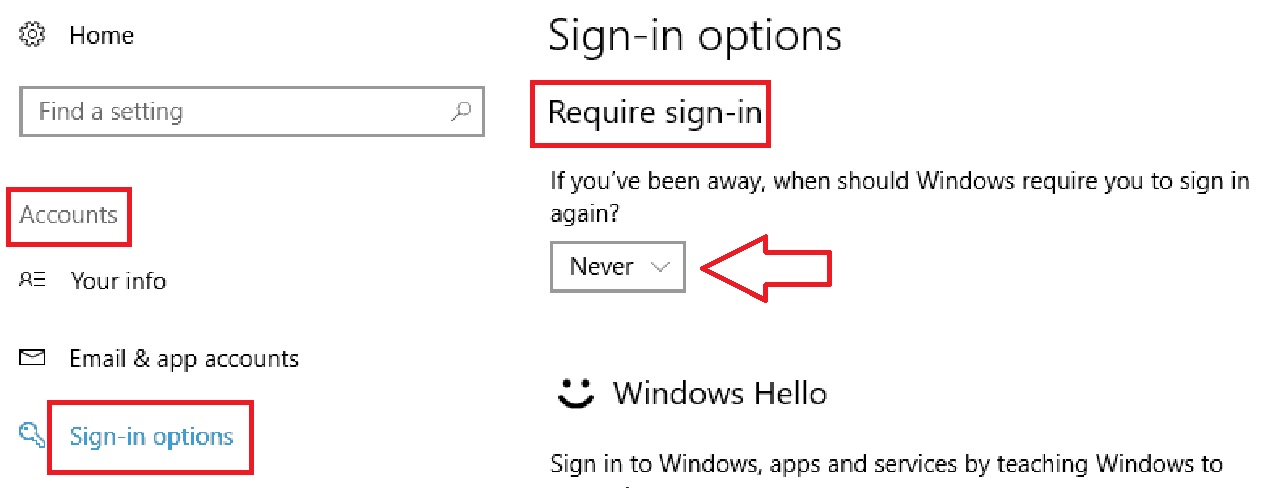
Note: This may however lead to some security concerns. So, be aware of what you are doing.
Conclusion
So, there are lots of solutions to the Wi-Fi getting disconnected after sleep mode. Try one or a few of these fixes and enjoy surfing the internet.