
Ethernet connections usually are consistent and can work with little or no interruptions. Moreover, it is less vulnerable to cyberattacks. So, a lot of users use Ethernet connections to access the internet.
However, just like any other kind of internet connection, it may fail all of a sudden or drop due to several reasons, while your Wi-Fi connection may work just fine.
Ethernet not working while Wi-Fi is working is a typical issue that you may experience like most Windows users. It is quite easy to fix this issue nonetheless.
If you want to know about them, read on.
In This Article
KEY TAKEAWAYS
- The issue of Wi-Fi working but Ethernet is not can be easily fixed by running network adapter troubleshooting most of the time.
- If any third-party antivirus program or the Windows firewall is causing this issue, it can be resolved by turning them off temporarily.
- Reinstalling or updating the drivers and resetting the network or the router may also make the Ethernet work properly along with the Wi-Fi.
- Network and MAC addresses may be configured improperly and cause this issue. Resetting them can restore normalcy in the Ethernet operation.
- Outdated drivers and Windows may also cause this issue which can be fixed by updating them.
Why is Wi-Fi Working but Ethernet is Not?
There can be several reasons for the Ethernet connection not working while Wi-Fi works properly. One of the most significant reasons is a damaged Ethernet cable.
In addition to that, the issue may also be the result of any of the following:
- Issues in the network adapter
- Issues with the router
- Firewall or antivirus program conflicting with normal operation
- Ethernet adapter is disabled or is unidentified
- Network drivers are outdated
- IP address needs to be renewed
- Inconsistent internet connection
- Cached network data
- Damaged Ethernet port in your system
- Network adapter is non-functional and needs a reset
- Corrupted DNS cache
- Outdated Windows
- Malware or virus infection
- Issues in the Internet Protocol Version 6 or IPv6
- Improperly configured MAC address
- Improperly loaded Ethernet driver files
So, the reasons are quite varied and many, as you can see. However, the fixes to this issue are quite simple, as explained in the following section.
Ways to Fix Wi-Fi Working but Ethernet is Not
The most obvious thing to do to fix the issue of Wi-Fi working but Ethernet is not working is to change the Ethernet cable with a new one.
You may also check the Ethernet port in your system if it is loose or faulty and change the port if necessary.
You may also resolve the issue by some other ways, such as:
Running the network adapter troubleshooter: Go to Start > Select Settings > System > Troubleshoot > Other troubleshooters > Network Adapter > Run the troubleshooter.
Performing a network reset: Go to Settings > Network & Internet > Status > Network Reset > Click on Reset now button.
Reset the router: Look for the small Reset button at the back of your router > Press it for about 10 seconds using a paperclip till you see the power LED blinking > Reconnect and check.
Some other useful fixes to the issue are:
- Restarting your PC
- Restarting your router
- Turning off firewall or any conflicting third-party antivirus program
- Reinstalling or updating the drivers
- Changing the network address
- Enabling Ethernet adapter
- Updating Windows
Go through a few of the relatively complex solutions explained below, if the simple fixes cannot put your Ethernet back to its normal functioning.
Method 1: Change the MAC Address
You can change the MAC address or the physical address of your network from the Device Manager to resolve the issue of Wi-Fi working but Ethernet is not.
STEPS TO FOLLOW:
- Press the Windows and R keys on your keyboard together to open the Run dialog box.
- Type cmd.exe in the box and press CTRL + SHIFT + ENTER.
- Click on the Yes button in the User Account Control window to open the elevated Command Prompt.
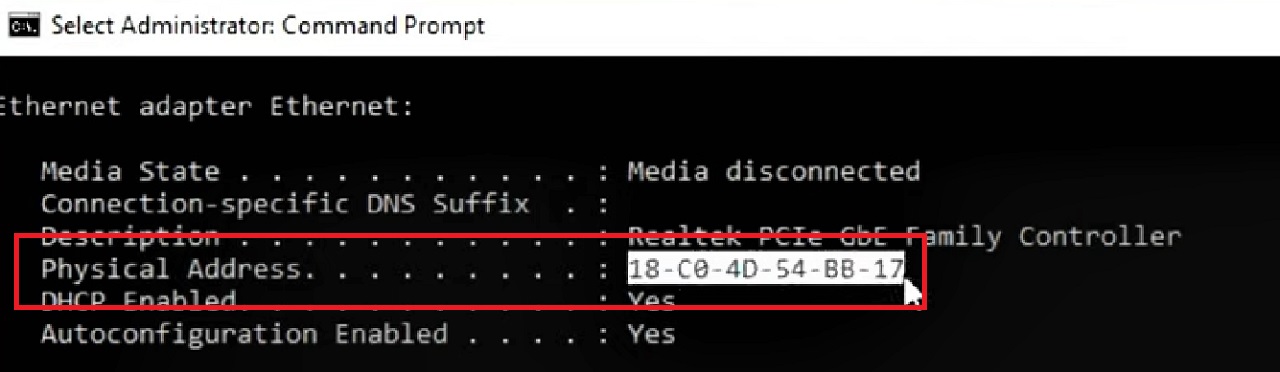
- When the Command Prompt opens, type ipconfig /all and hit the Enter key on your keyboard.

- Note the Physical Address, which is the MAC address.
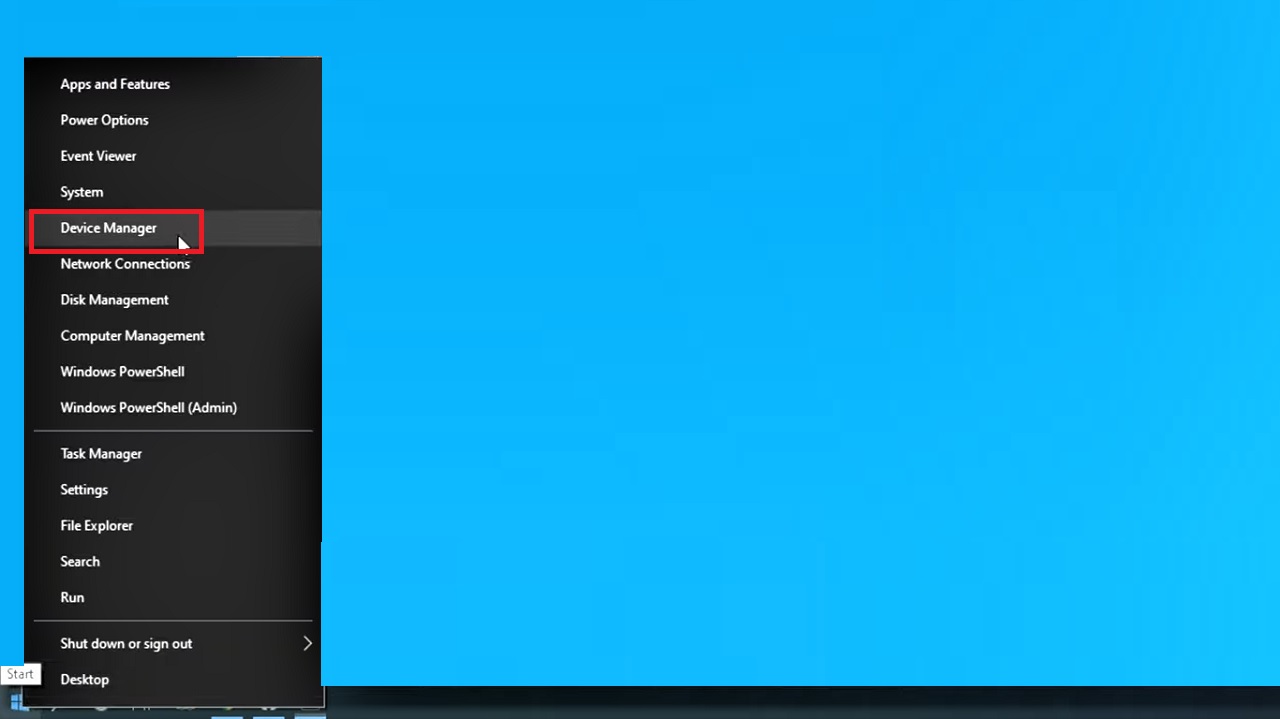
- Now, right-click on the Start Menu.
- Select Device Manager from the options.
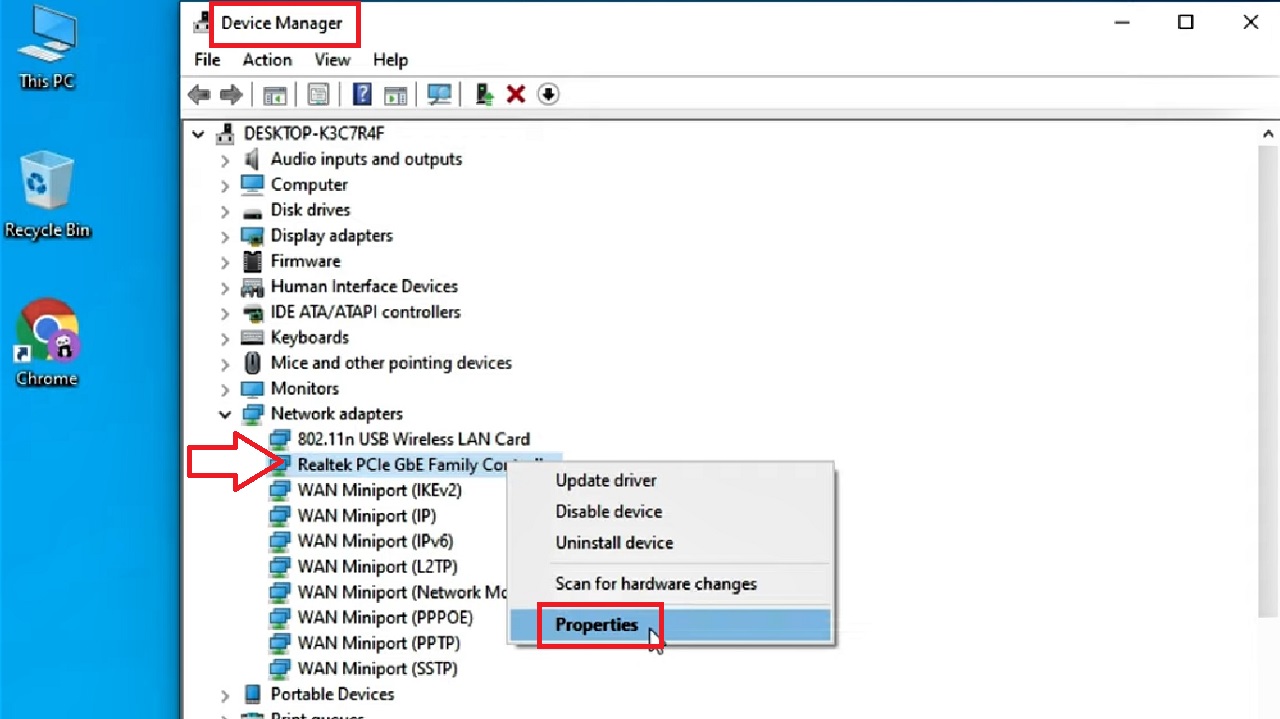
- Click on the small arrow next to Network adapters in the Device Manager window to expand it.
- Choose your LAN Card driver.
- Right-click on it.
- Select Properties from the drop-down options.
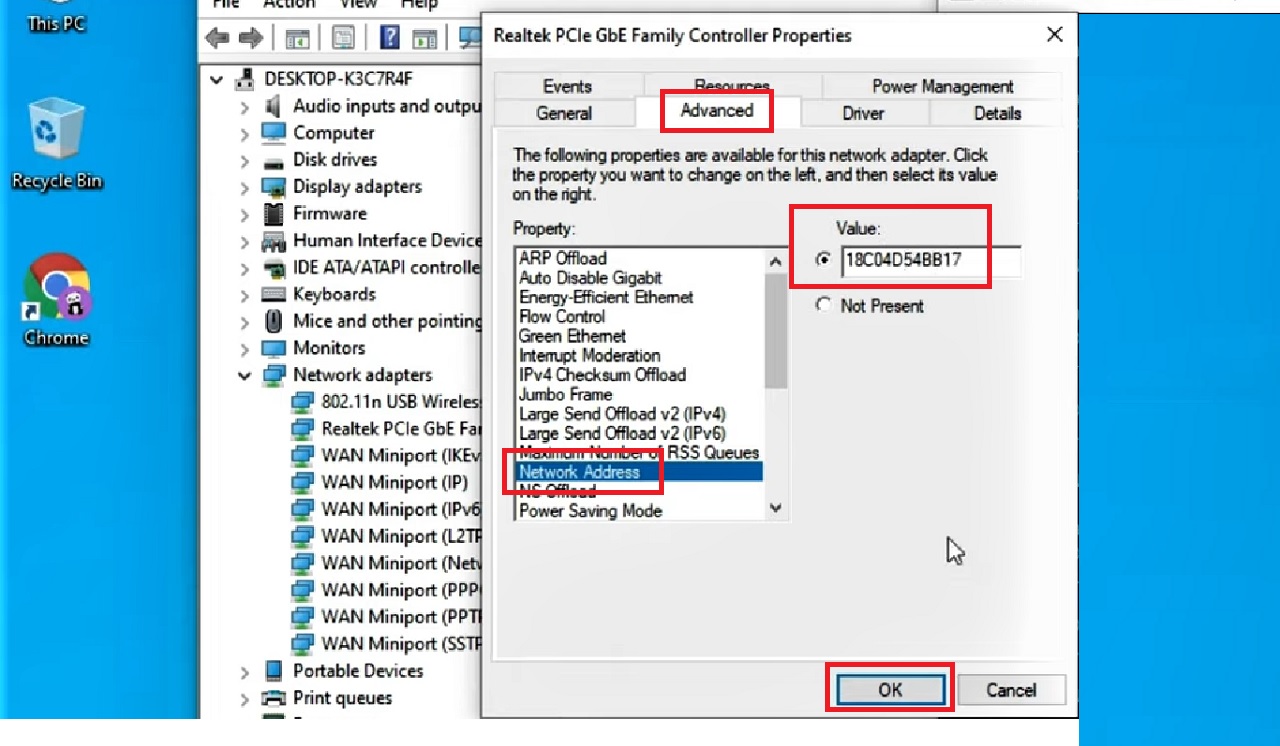
- Go to the Advanced tab in the following window.
- Choose Network Address from the list in the box under Property.
- Check the small circular button next to the box under Value.
- Type in the value of the physical address noted from the Command Prompt above in the box under Value, 18C04D54BB17 in this case.
- Click on the OK button.
Close all windows and then check whether Ethernet is working or not. If it is still not working, move to the next method.
Method 2: Reinstall Drivers
You can reinstall the generic drivers of the network which can resolve the issue most of the time.
STEPS TO FOLLOW:
- Repeat the same steps as above to go to your LAN Card driver in the Device Manager > Right-click > Select Uninstall device > Click on Uninstall in the following window.
- Now, go to the Action tab at the top.
- Select Scan for hardware changes.
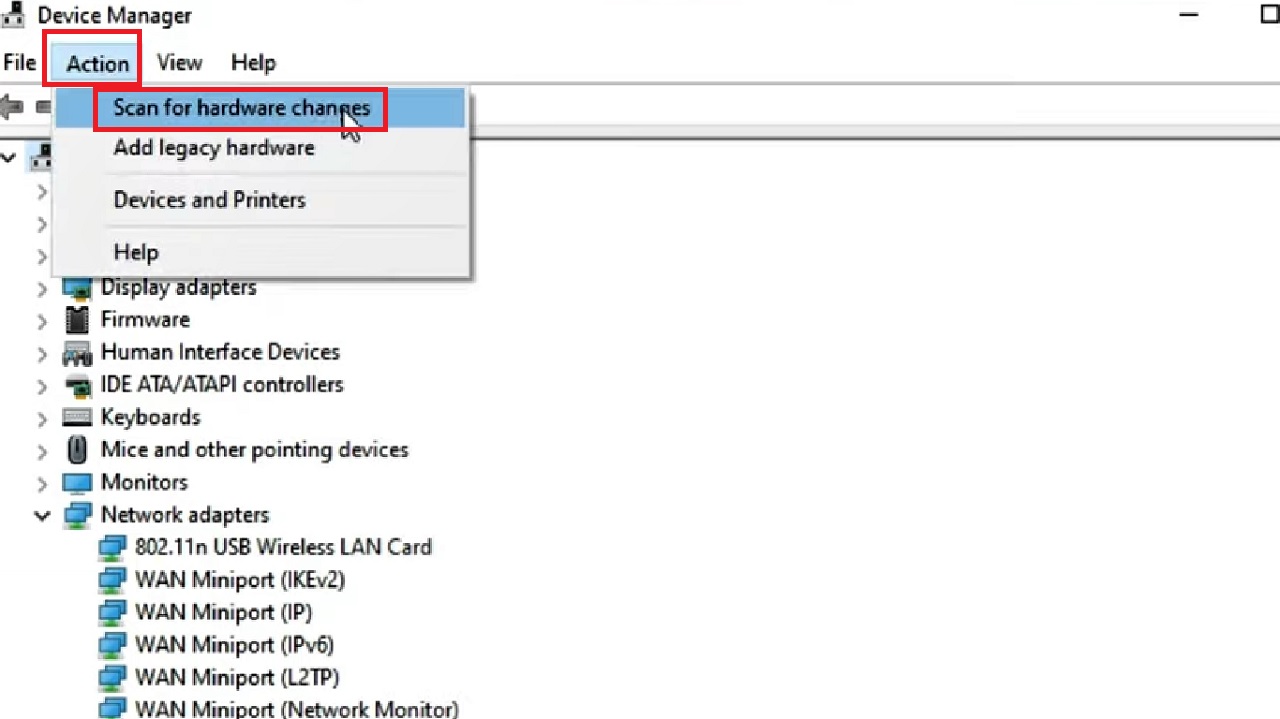
Close the Device Manager and check whether the issue is resolved or not. If it has not, then move to the next method.
Method 3: Update Network Card Driver
Updating the outdated network card driver will also resolve the issue very easily.
STEPS TO FOLLOW:
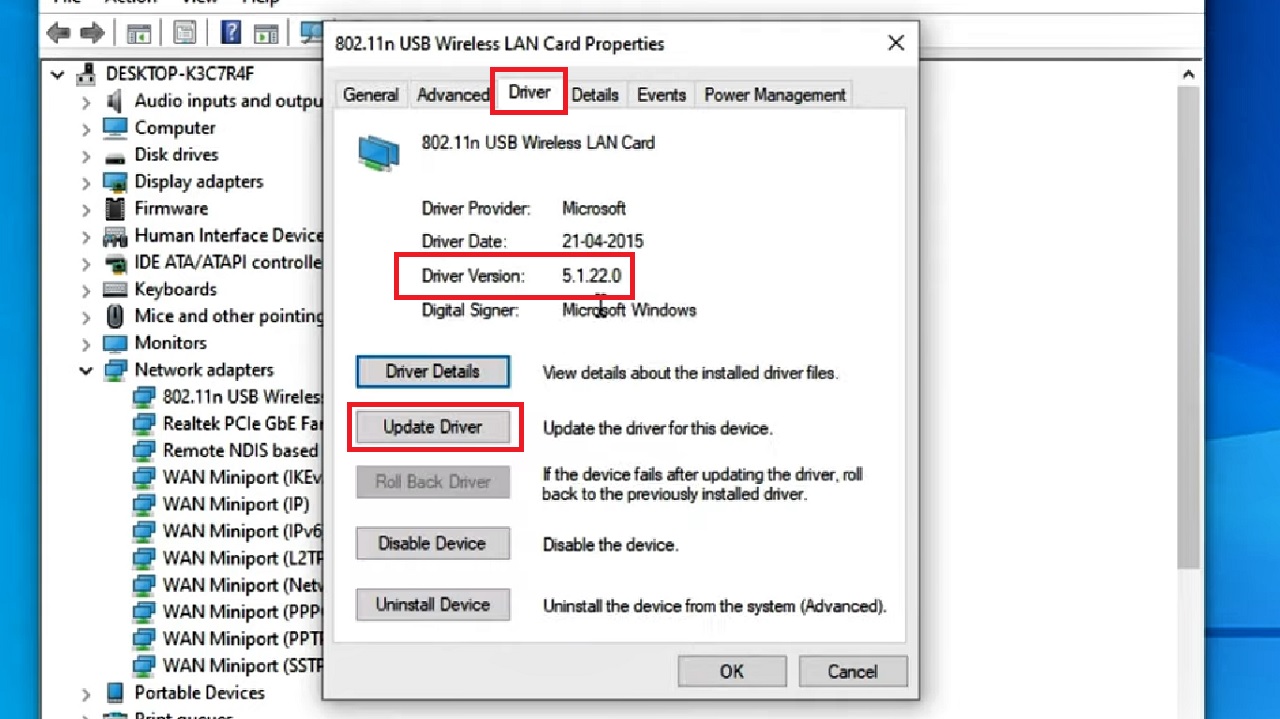
- Open Device Manager as before and double-click on your network adapter.
- Go to the Driver tab in the following window.
- Check the Driver version.
- In a different window, go to Google and download a later version of the driver than that from the manufacturer’s site.
- Now, Click on the Update Driver button.
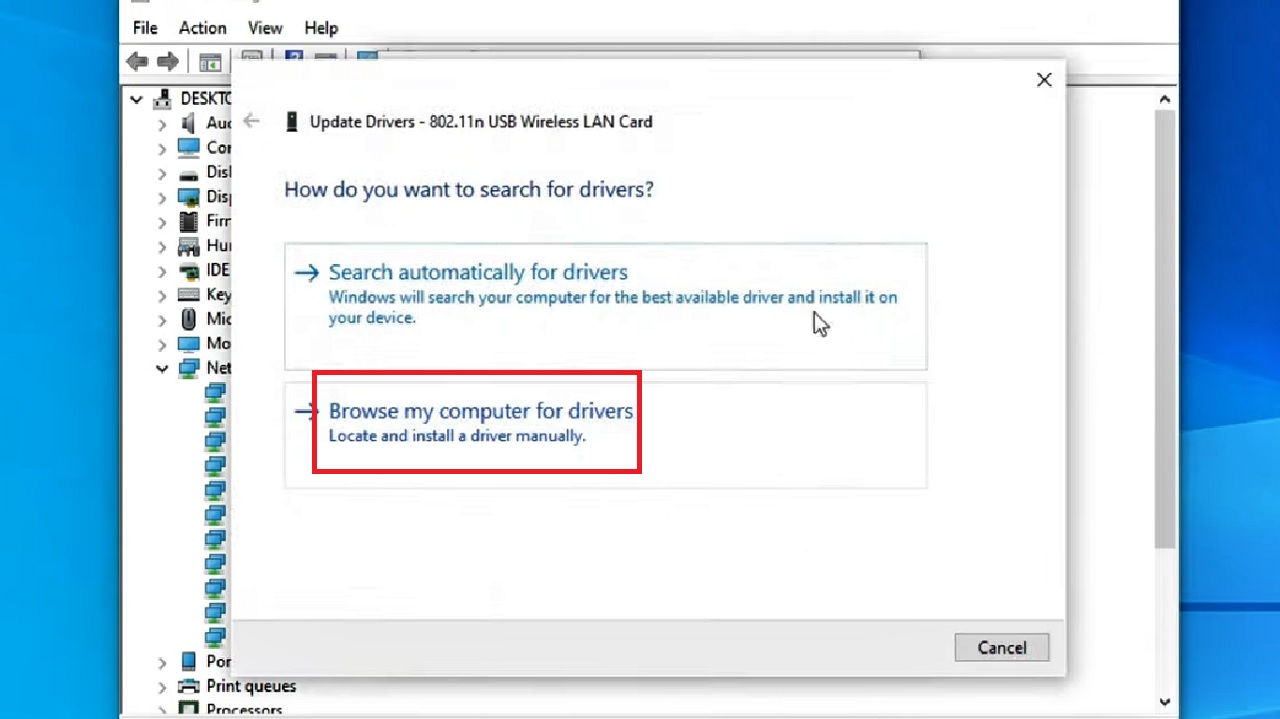
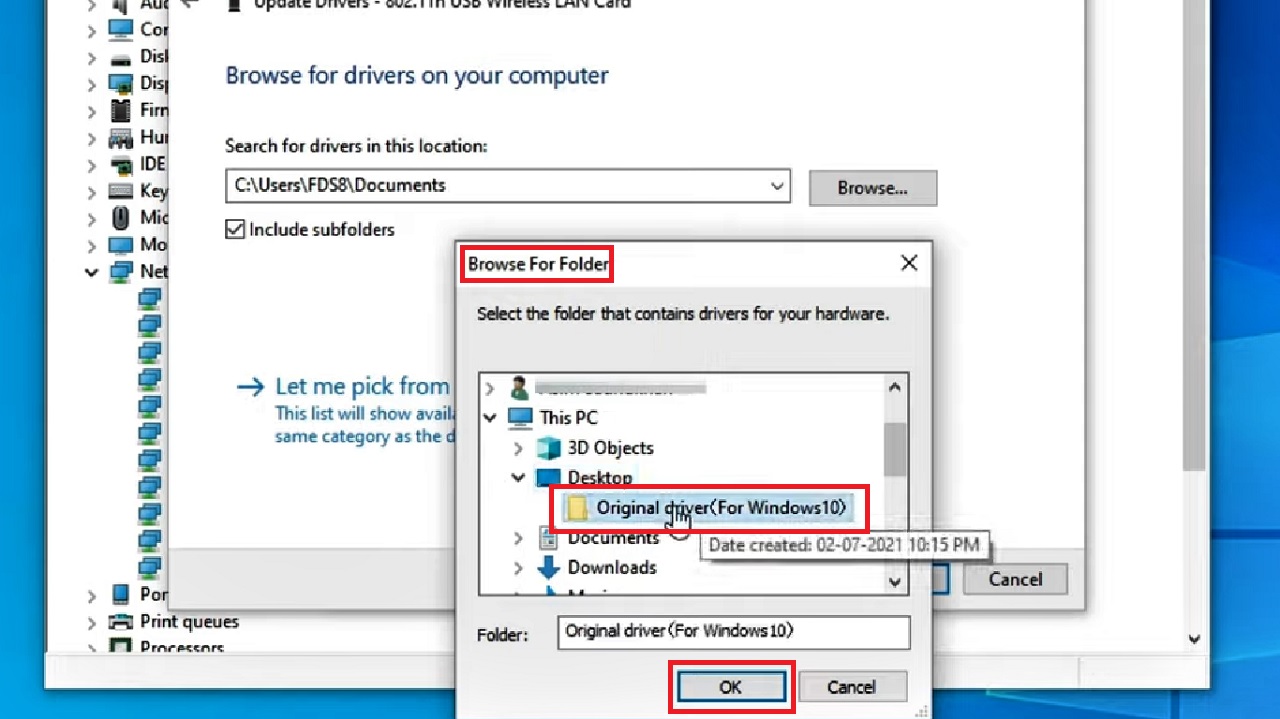
- Select Browse my computer for drivers in the following window.
- Click on the Browse button next to the box under Search for drivers in this location in the following window.
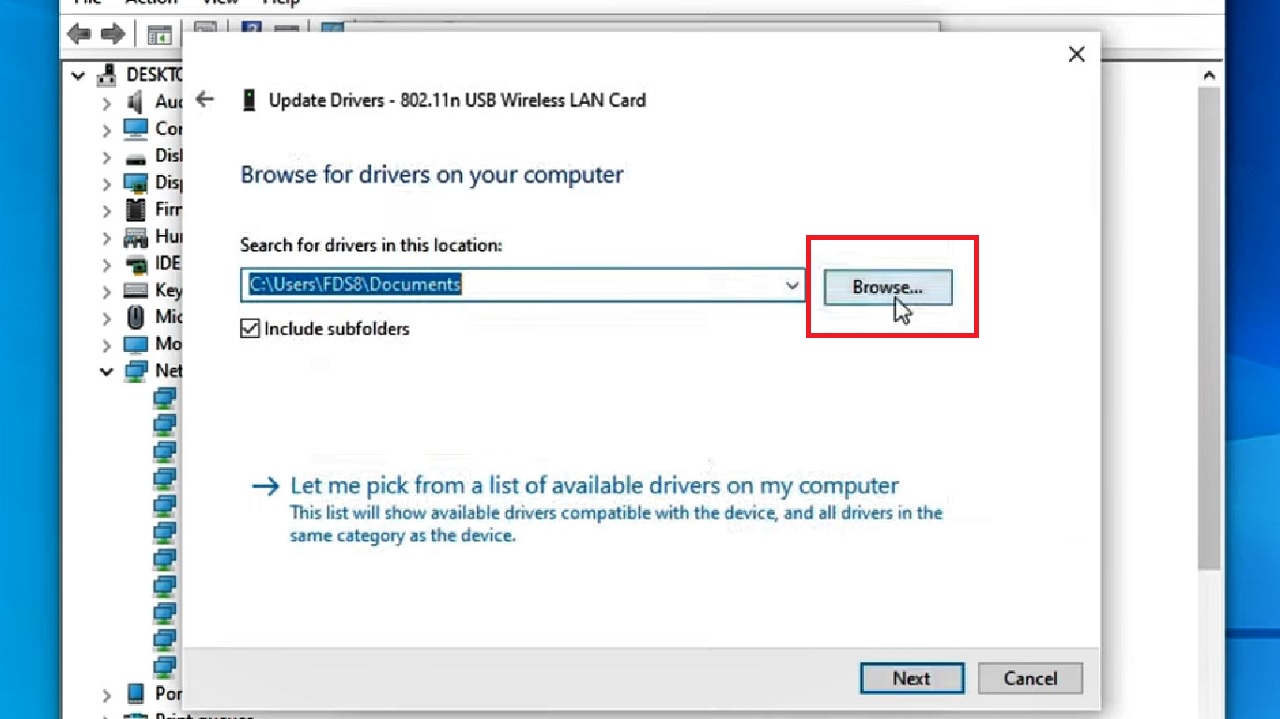
- Browse For Folder and find the driver that you have just downloaded.
- Click on it to select it.
- Click on the OK button.
- Click on the Next button in the previous window.
- Close all windows.
Now restart your computer and check whether Ethernet is working or not.
Method 4: Temporarily Turn off Firewall or Third-Party Antivirus Program
Often, the issue of Wi-Fi working but Ethernet is not can be resolved by turning off Firewall or any conflicting third-party antivirus program temporarily.
STEPS TO FOLLOW:
- Go to the Windows search bar next to the Start Menu.
- Type windows security and hit the Enter key.
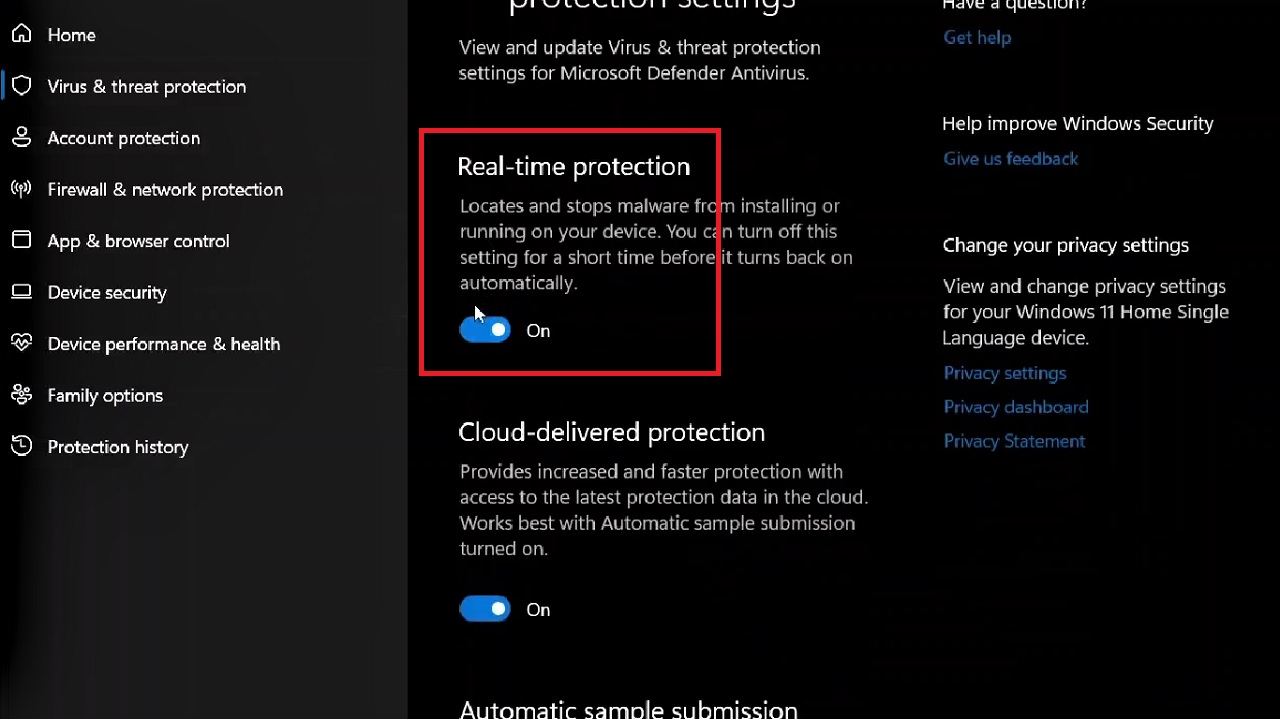
- In the following window, go to Virus & threat protection in the left pane.
- Click on Manage settings on the right side of the window.

- Turn off Real-time protection by dragging the sliding switch to the left.
Check whether things are restored or not.
Method 5: Enable Ethernet Adapter
Often the Ethernet adapter is not enabled which is why it does not work while the Wi-Fi does. Checking and enabling it will resolve the issue.
STEPS TO FOLLOW:
- Press the Windows and R keys together on your keyboard to open the Run dialog box.
- Type ncpa.cpl in the box and click on the OK button.
- In the Network Connections window, right click on Ethernet.
- Choose Enable from the drop-down option if you find it in place of Disable, as it is in this image.
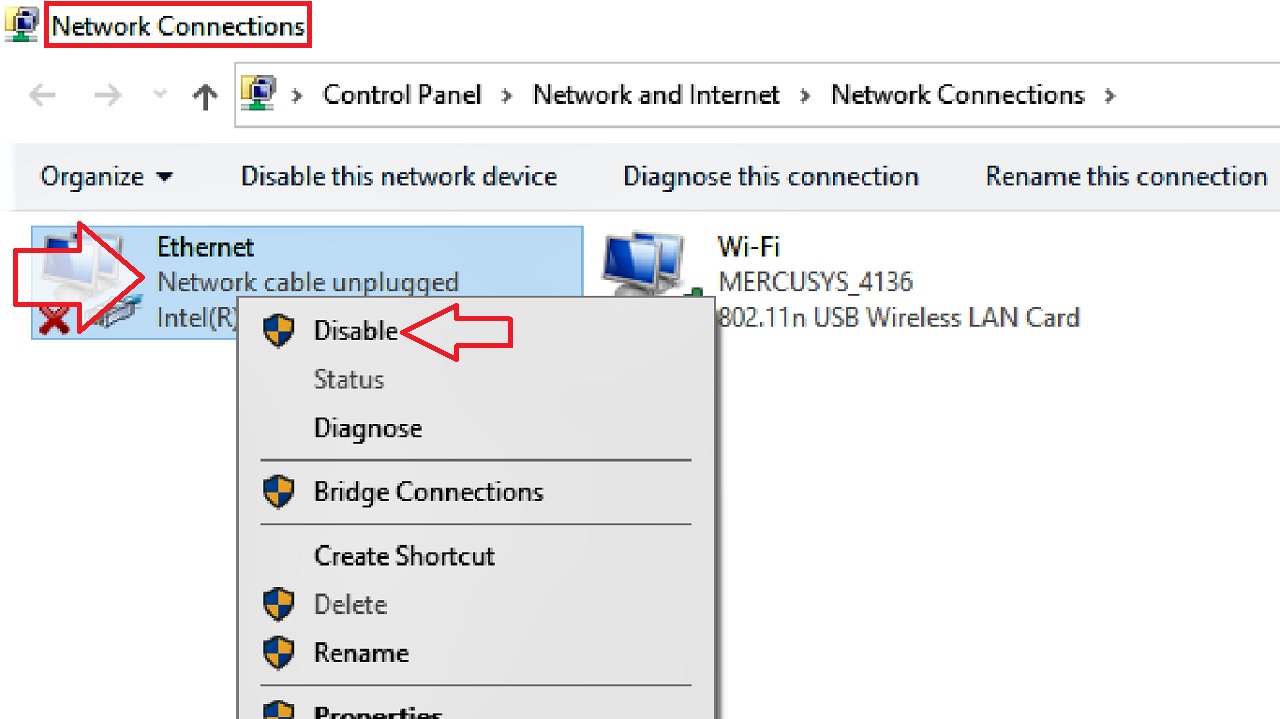
Now, check whether your Ethernet connection is working just as fine as your Wi-Fi connection.
Method 6: Release and Renew the IP Address
The Ethernet may work again just like your Wi-Fi if you release and renew the IP address.
STEPS TO FOLLOW:
- Open the Command Prompt as an administrator as before.
Type in the following commands one after another and hit Enter after each command is executed completely:
- ipconfig /release
- ipconfig /renew
Once these commands are executed, you may also type the following command lines and press Enter after each:
- ipconfig /flushdns
- nbtstat -r
- netsh int ip reset
- netsh winsock reset
- netsh winsock reset catalog
- netsh int Ipv4 reset reset.log
When all these commands are executed successfully, type exit and press Enter.
Finally, reboot your PC so that the changes take effect and check whether it has solved the problem or not.
Method 7: Flush Residual Power
Sometimes, the residual power in your system may cause this issue and prevent the USB ports from detecting the router or cable. In that case, you will have to drain it out.
STEPS TO FOLLOW:
- Shut down your PC.
- Remove all cables of the devices connected to it from all the ports, including your router and Ethernet cable.
- Remove the power cable.
- Press and hold down the power button for 30 seconds.
- Reconnect all devices to the PC.
- Power it on.
Now connect your Wi-Fi and Ethernet to see whether they both are working or not.
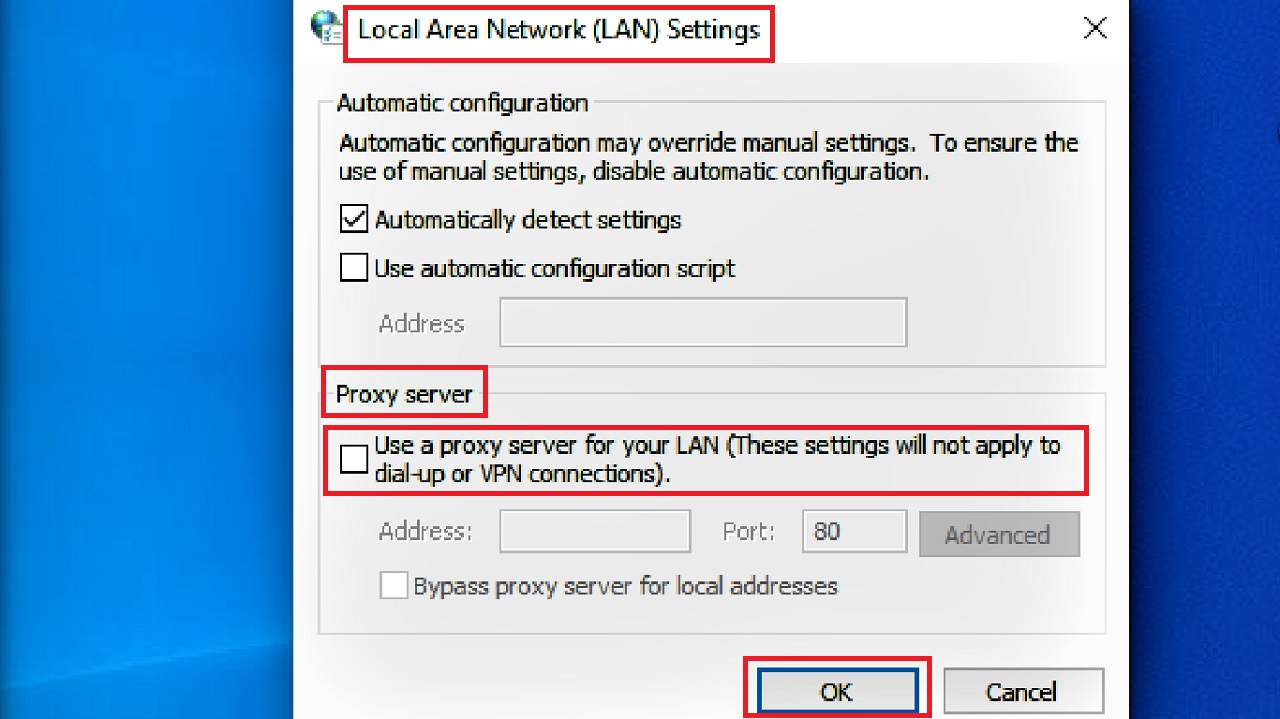
Method 8: Change Proxy Setting of Local Area Network
If you are using a LAN connection on your PC, the Ethernet may not work properly while the Wi-Fi would. So, make the necessary changes in such LAN proxy settings.
STEPS TO FOLLOW:
- Open the Run dialog box as before.
- Type inetcpl.cpl in the box and hit the Enter key.
- Go to the Connections tab in the following Internet Properties window.
- Click on the LAN settings button below.
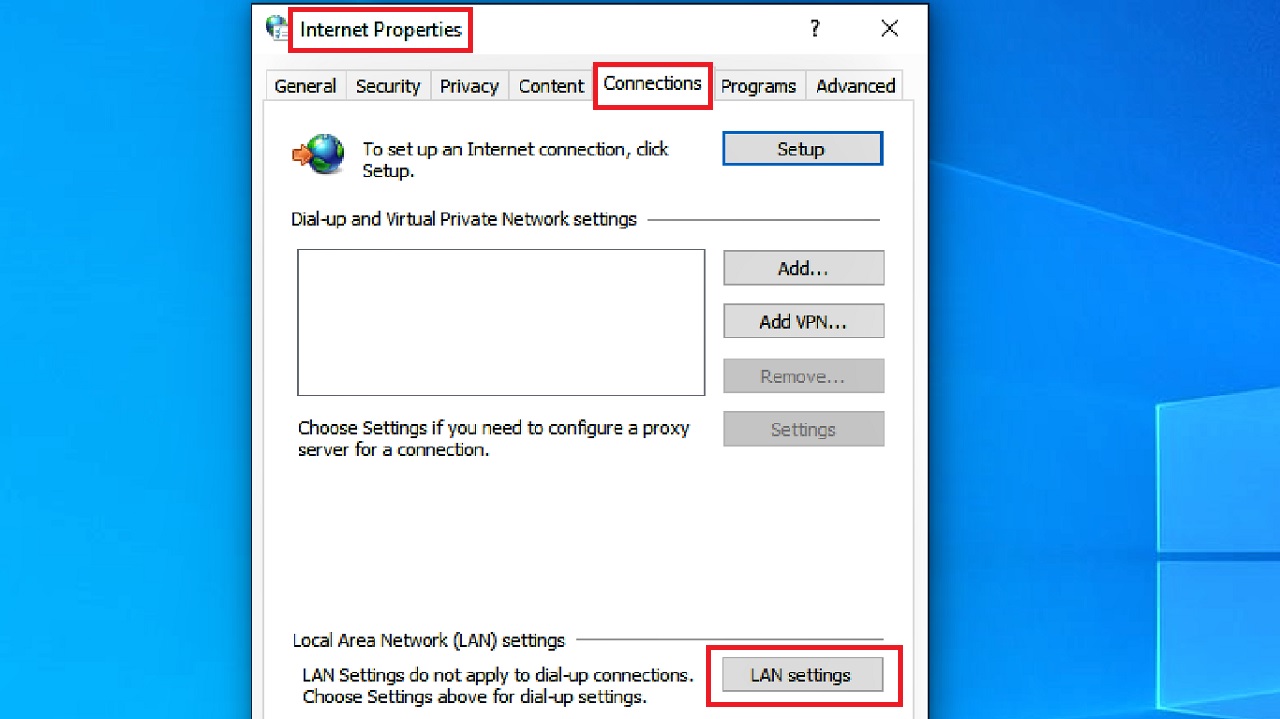
- Uncheck the box next to Use a proxy server for your LAN (These settings will not apply to dial-up or VPN connections) under Proxy server to disable it.
- Click on the OK button to save the changes.
Now check whether the issue is resolved.
Method 9: Disable Internet Protocol Version 6
If the Internet Protocol Version 6 or IPv6 is disabled, your PC will use IPv4 which is a more dependable protocol for both Wi-Fi and Ethernet connections.
STEPS TO FOLLOW:
- Go to the Network Connections window by typing ncpa.cpl in the Run box as you did in Method 5.
- In the Network Connections window, right-click on the Ethernet network adapter and choose Properties from the drop-down context menu.
- Click on the Yes button when and if the User Account Control (UAC) window appears.
- On the following Ethernet Properties window, go to the Networking tab.
- Find Internet Protocol Version 6 (TCP / IPv6) in the list in the box.
- Click on the small square box next to it to uncheck or disable it.
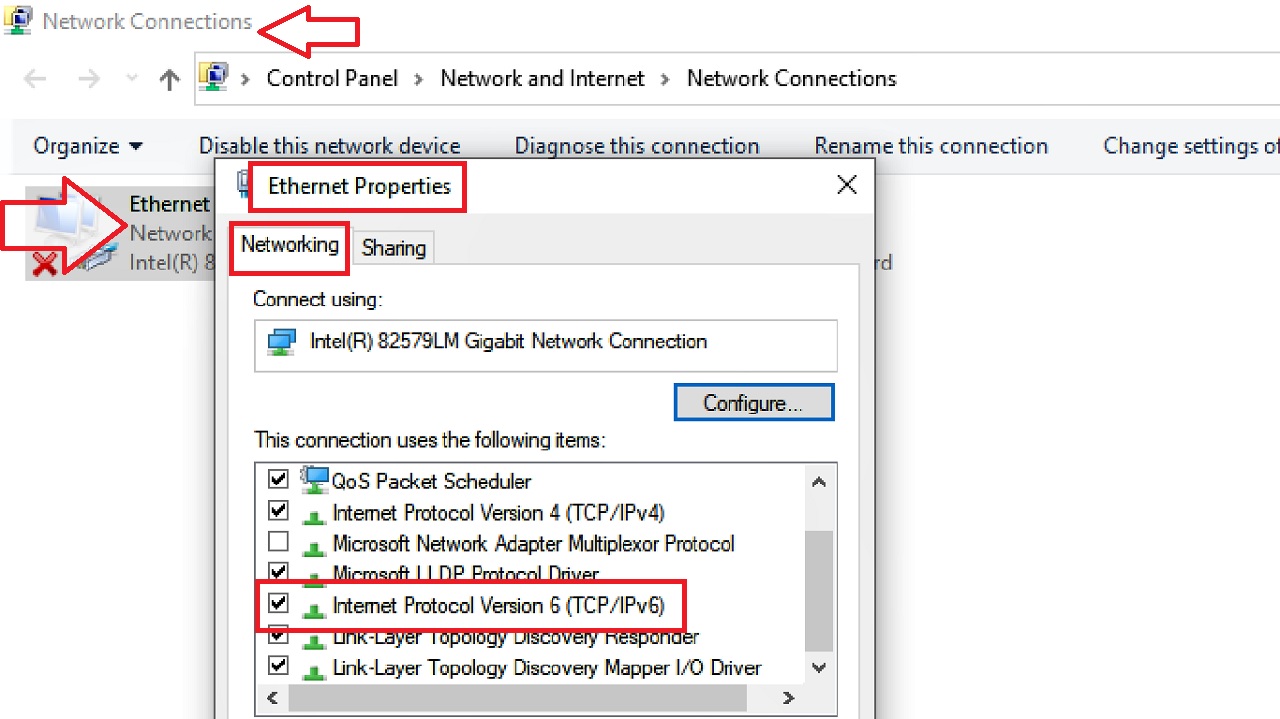
- Click on the OK button below (not shown in the image) to save the change and exit.
Repeat the same process to disable the IPv6 protocol for your Wi-Fi connection as well.
Finally, restart your computer and check whether the issue has been resolved or not.
Conclusion
So, it can be summarized that your Ethernet may stop working due to several reasons while your Wi-Fi may not.
There are quite a few solutions to resolve this issue, some of which are most basic while a few of them are comparatively complex.