
The DNS Probe Finished No Internet Error refers to issues in the network or browser. It is quite common and there are a few basic solutions to resolve this error as and when it happens.
The error can appear and disappear on its own but when it occurs it can be really frustrating for any user while trying to use the internet.
You can fix this issue in both Windows and Mac Computers by following a few simple steps. Read on to know more.
In This Article
KEY TAKEAWAYS
- Right at the outset, you can simply restart your system and the router to resolve the issue of DNS Probe Finished No Internet.
- You may also try disabling the Windows firewall or the VPN as a temporary fix to the problem.
- Running a few specific commands in the Command Prompt will reset the network configuration and may bring things back to normal.
- Changing the DNS server or switching from one DNS to another has often proved effective in resolving this particular issue.
- Clearing the browser cache data and disabling the proxy servers are two other common and easy ways to rectify this error.
What Causes the DNS Probe Finished No Internet Error?
Usually, ‘DNS Probe Finished No Internet’ error occurs due to improper firewall settings and internet connection which may block access.
This issue can also happen in both Windows and Mac computers due to bad configurations and errors in Domain Name System (DNS) for different reasons such as:
- Minor software issues
- Presence of cookies
- Loss of internet connection
- Using a new router
- The DNS client service is disabled
- Using a VPN or Virtual Private Network
- A cache full of browsing data and
- The server of the DNS itself.
In such situations, the device will not be able to match the site requested on the server and therefore will not be able to process the request.
However, the good news is that this issue is common and is not fatal. It can be resolved easily by following some easy steps.
How to Fix DNS Probe Finished No Internet Error?
To fix the issue of ‘DNS Probe Finished No Internet’ error, you can start by the basic checks, such as checking your internet connection, your router, and restarting the device and your system.
Sometimes, simply switching the DNS server or restarting the DNS Client service can also help in rectifying the error.
You may also uninstall a few particular programs that are used for filtering websites and try to resolve the error.
Some other solutions worth trying to resolve the ‘DNS Probe Finished No Internet’ error are:
Update network driver: Go to Device Manager by right-clicking on the Start Menu > Network Adapter > Expand it > Right-click on your network adapter > Select Update driver > Select Browse my computer for driver software > Click on Browse and select the driver location > Click on Next > Click on Next again in the following window > Close all windows when driver is updated.
Run Internet Connections troubleshooter: Press the Windows and I keys on your keyboard together to open Settings > Go to Update & Security > Select Troubleshoot > Additional troubleshooters > Internet Connections > Click on Run the troubleshooter.
Network reset: Open Settings > Go to Network & Internet > Network Reset > click on the Reset now button > Press Yes > Restart your computer > Reconnect to the internet following the on-screen instructions.
Router reset: Look for the small Reset button at the back of the router > Press it with a sharp object and hold for about 10 seconds > Release it when the Power LED starts blinking.
Disable VPN: In Windows, go to the Start Menu > Settings > Network and Internet > VPN > Select the VPN > Click on Disconnect.
If you are using macOS, go to System Preferences > Network > VPN connection > Click on Disconnect.
Disable the Windows firewall: Go to the Start Menu > Settings > Windows Security > Select Firewall & network protection > Select your network > Turn off Microsoft Defender Firewall. You must turn off the firewalls for Domain, Private and Public networks.
Note: This should however be a temporary fix because it is risky to keep the protection off for a long time leading to security threats.
Now, here are the steps to follow to rectify the issue of ‘DNS Probe Finished No Internet.’
Method 1: Run a Few Commands in the Command Prompt
You may resolve the issue of ‘DNS Probe Finished No Internet’ error on your PC by running a few specific commands in the Command Prompt to flush DNS and reset the settings.
STEPS TO FOLLOW:
- Go to the search box next to the Start Menu > Type cmd > Right-click on it > Left-click on Run as administrator.
- If you see the User Account Control Window, click on the Yes button.
- In the Command Prompt window, first type in the command ipconfig /release and hit the Enter key on the keyboard.
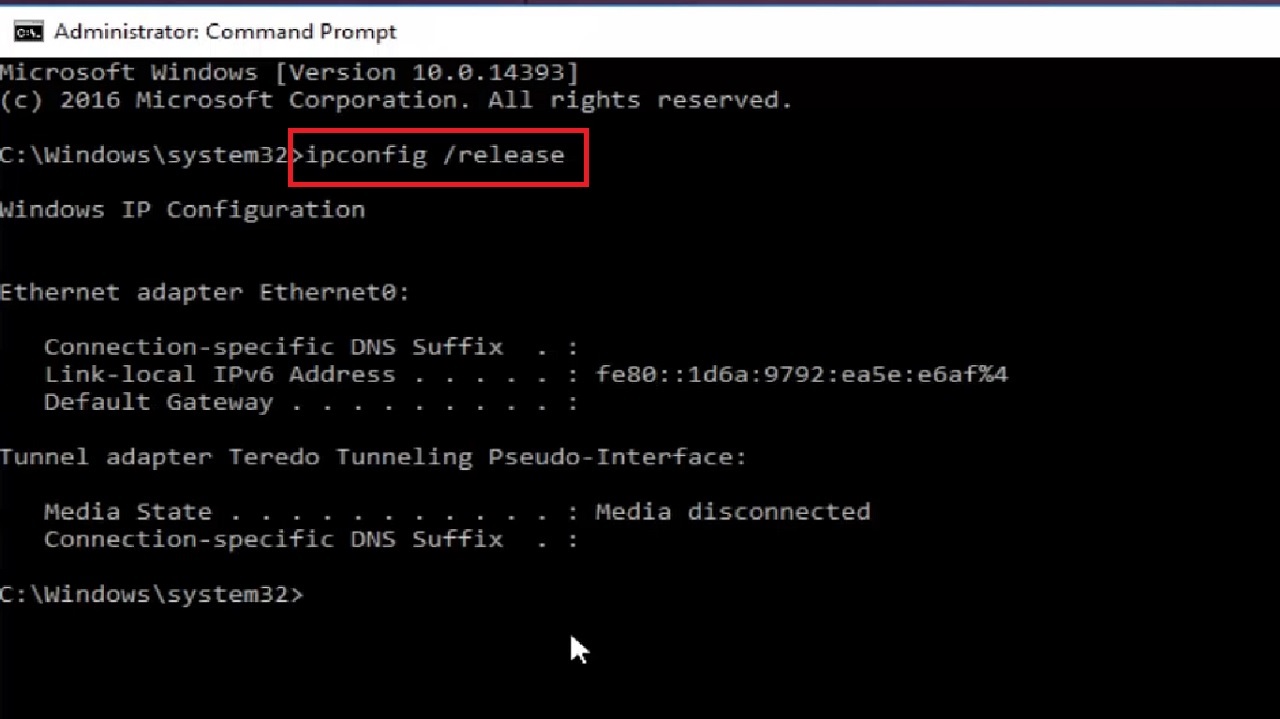
When this command is finished running, type in the following commands one by one and press Enter:
- ipconfig /all
- ipconfig /flushdns
- ipconfig /renew
- netsh int ip set dns
- netsh winsock reset
When all these commands are executed successfully, close the Command Prompt window by typing exit and hitting Enter.
Now you will have to restart your computer so that the resetting is completed. This should resolve the issue, but in case you still experience the same problem, move on to the next method.
Method 2: Change the Adapter Setting from the Network and Sharing Center
Changing the adapter settings and the DNS server may often resolve the issue of ‘DNS Probe Finished No Internet’ error, both in Windows and Mac computer systems.
STEPS TO FOLLOW:
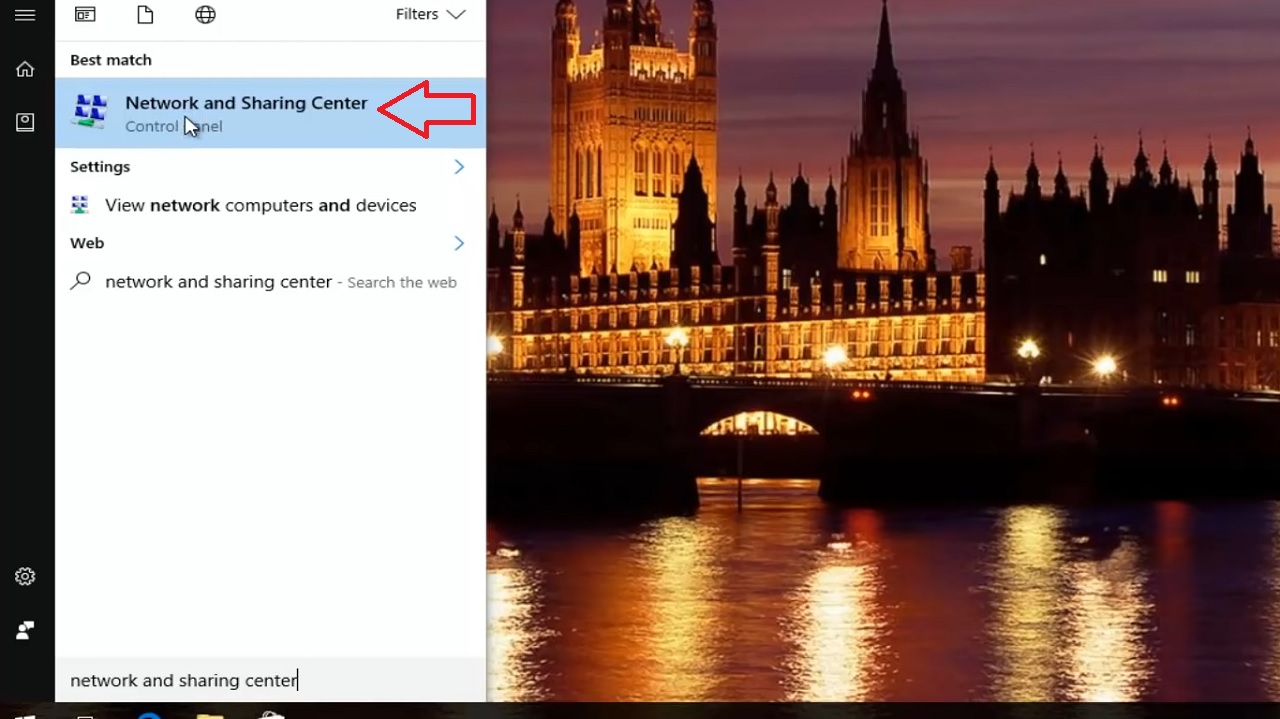
- In Windows systems, open the Network and Sharing Center by typing it in the quick search box and hitting the Enter key on your keyboard.
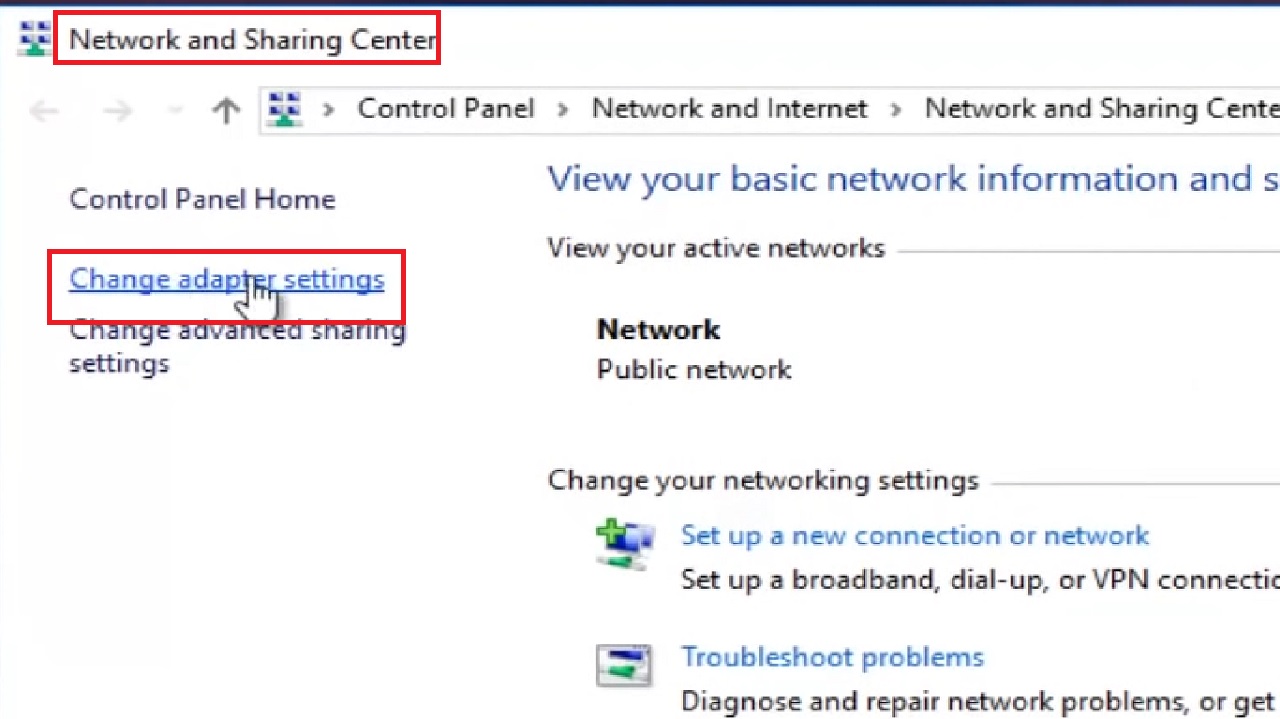
- In the Network and Sharing Center window select Change adapter settings from the left pane.
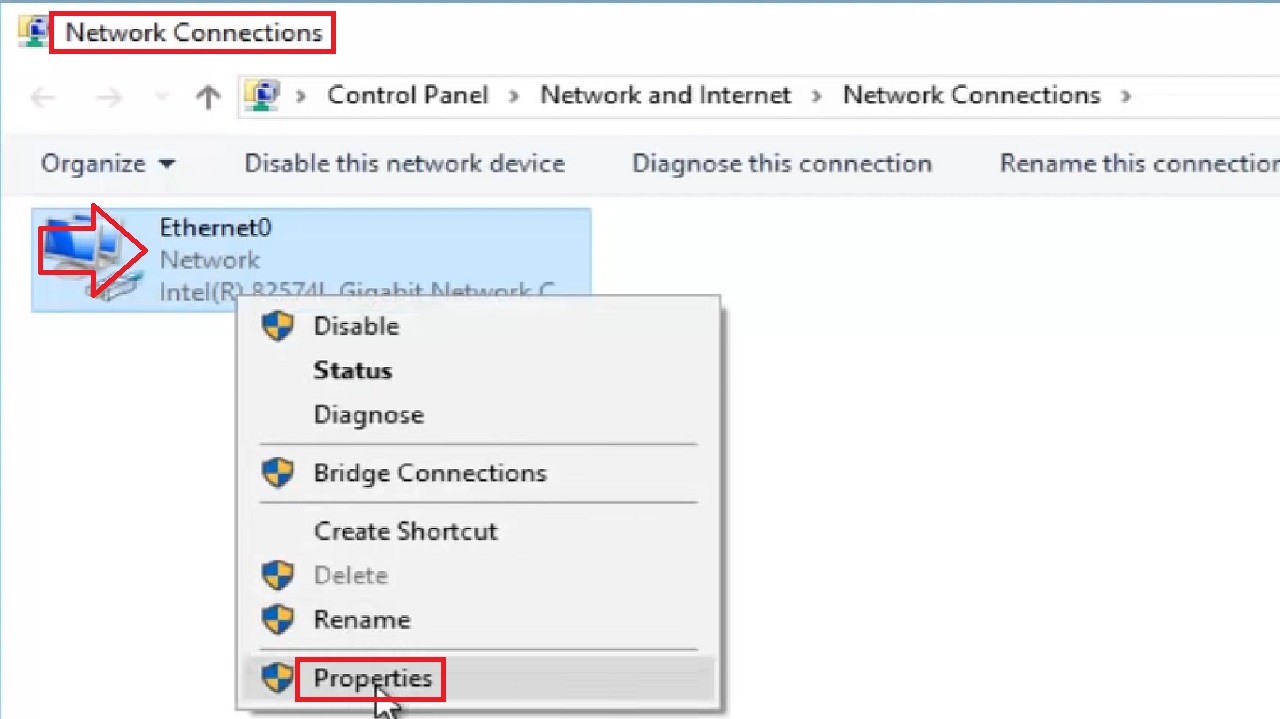
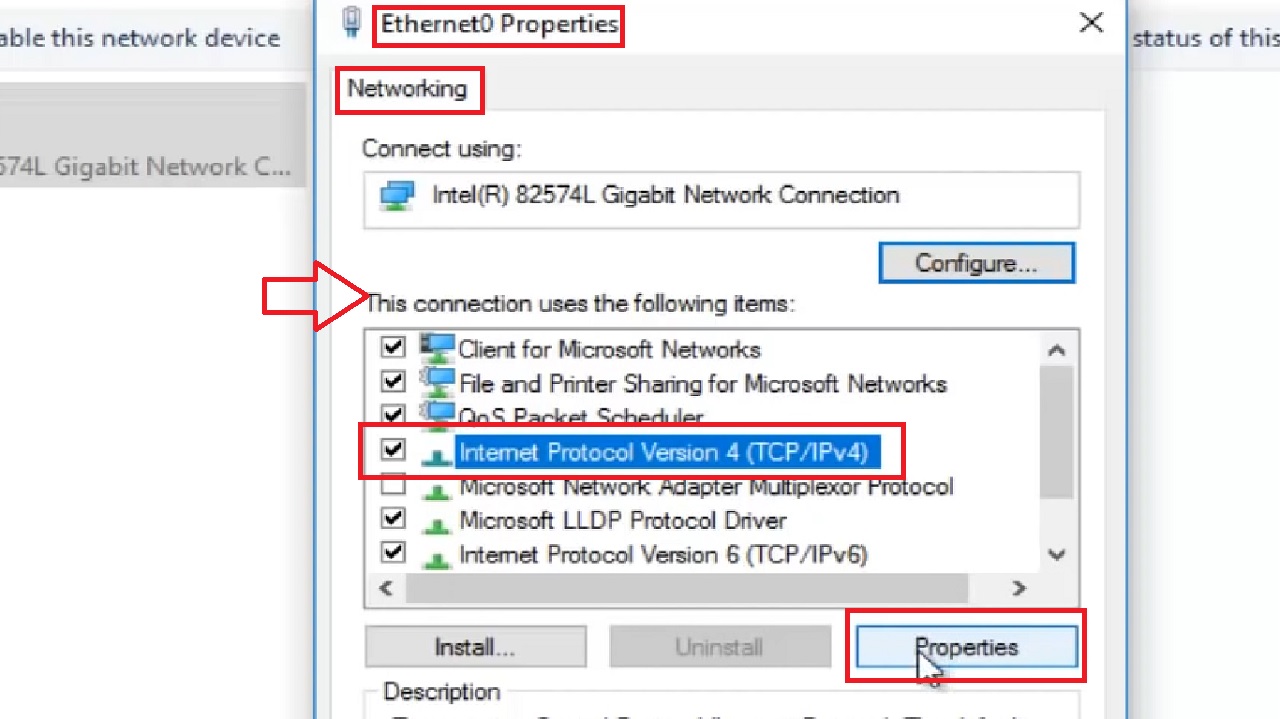
- Right-click on your primary internet connection in the following Network Connections window. (Ethernet0 in this case).
- Click on the Properties option from the drop-down context menu.
- In the Ethernet0 Properties window, click on Internet Protocol Version 4 (TCP/IPv4) from the list in the box under ‘This connection uses the following items’ in the Networking tab.
- Click on the Properties button.
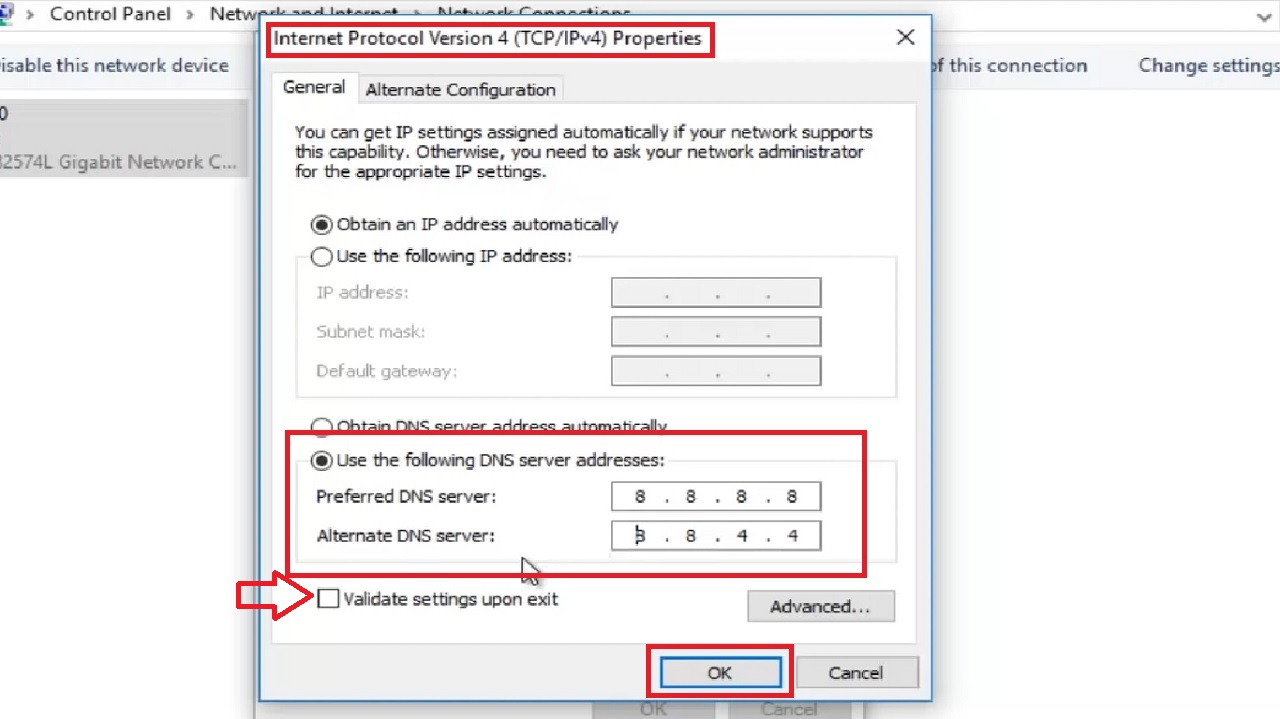
- Click on the small radio button next to ‘Use the following DNS server addresses’ to select it in the Internet Protocol Version 4 (TCP/IPv4) Properties window.
- Type 8.8.8.8 in the relevant field next to the Preferred DNS server.
- Type 8.8.4.4 in the relevant field next to the Alternate DNS server.
- Click on the small square box next to ‘Validate settings upon exit.’
- Click on the OK button and close the window.
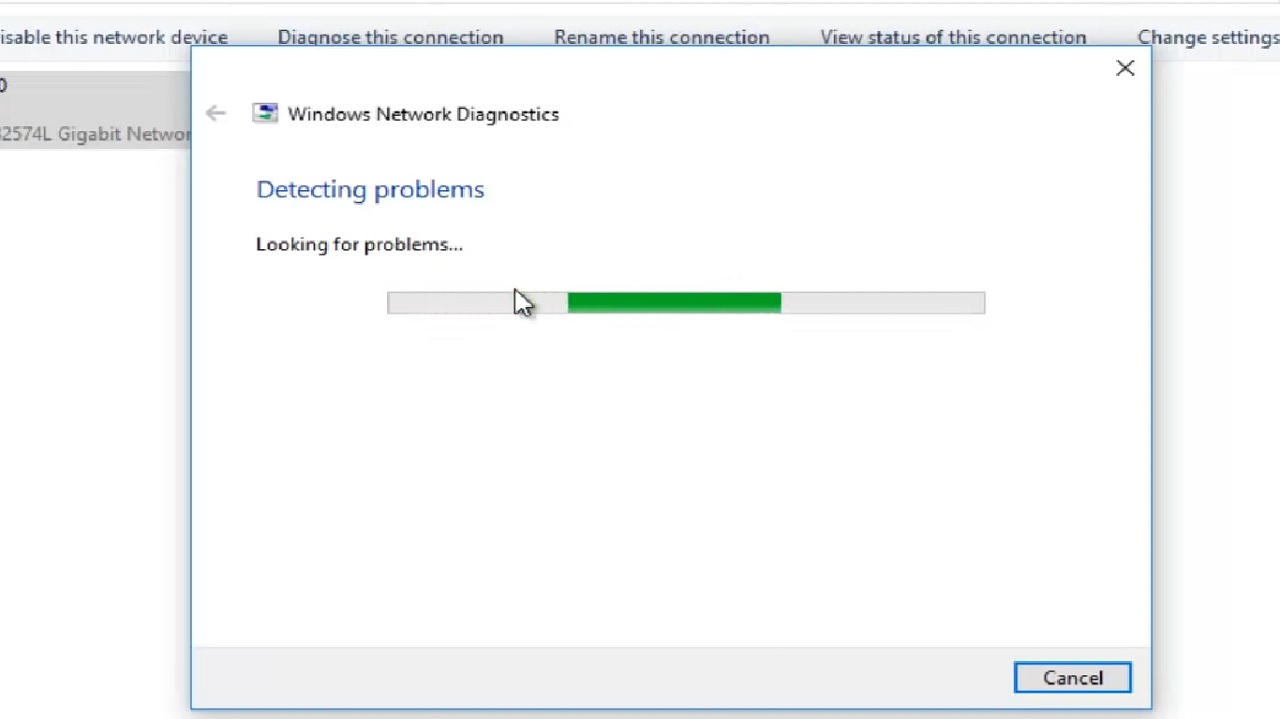
- This should initiate the troubleshooting process, as shown in the image below, which may take some time:
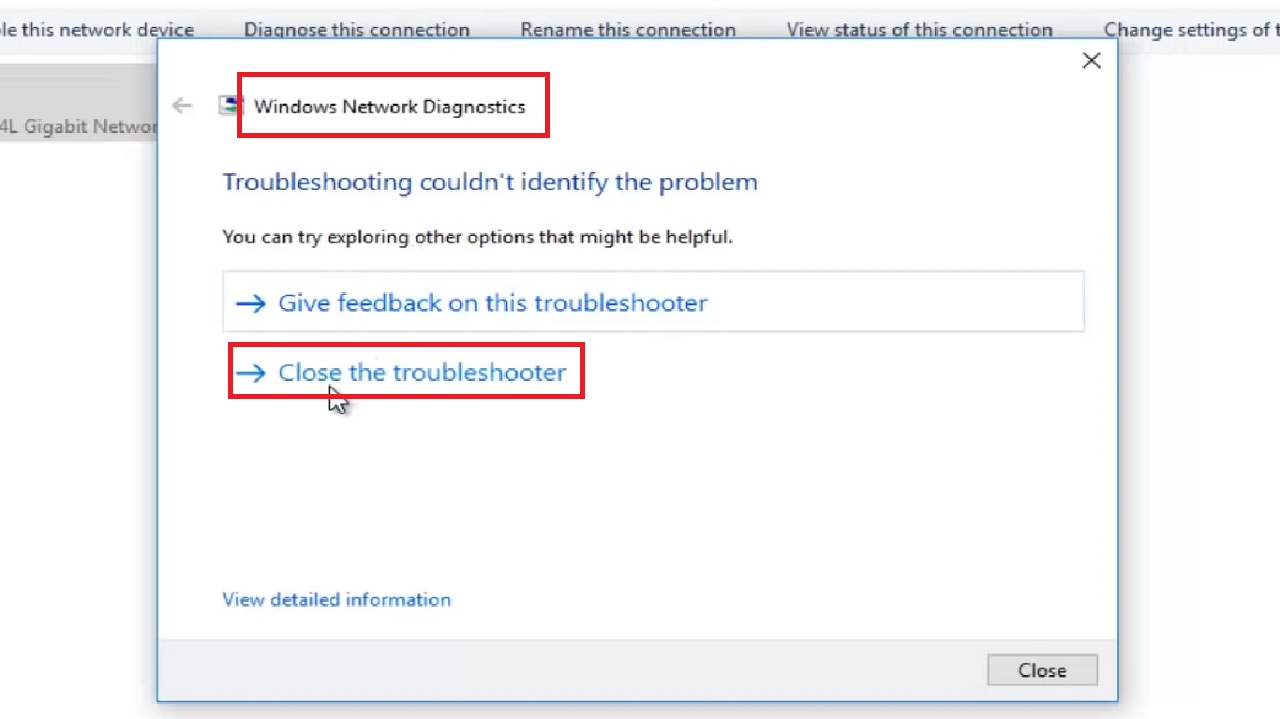
- When it is completed and the following window says ‘Troubleshooting couldn’t identify the problem,’ click on the Close the troubleshooter option in the Windows Network Diagnostics window.
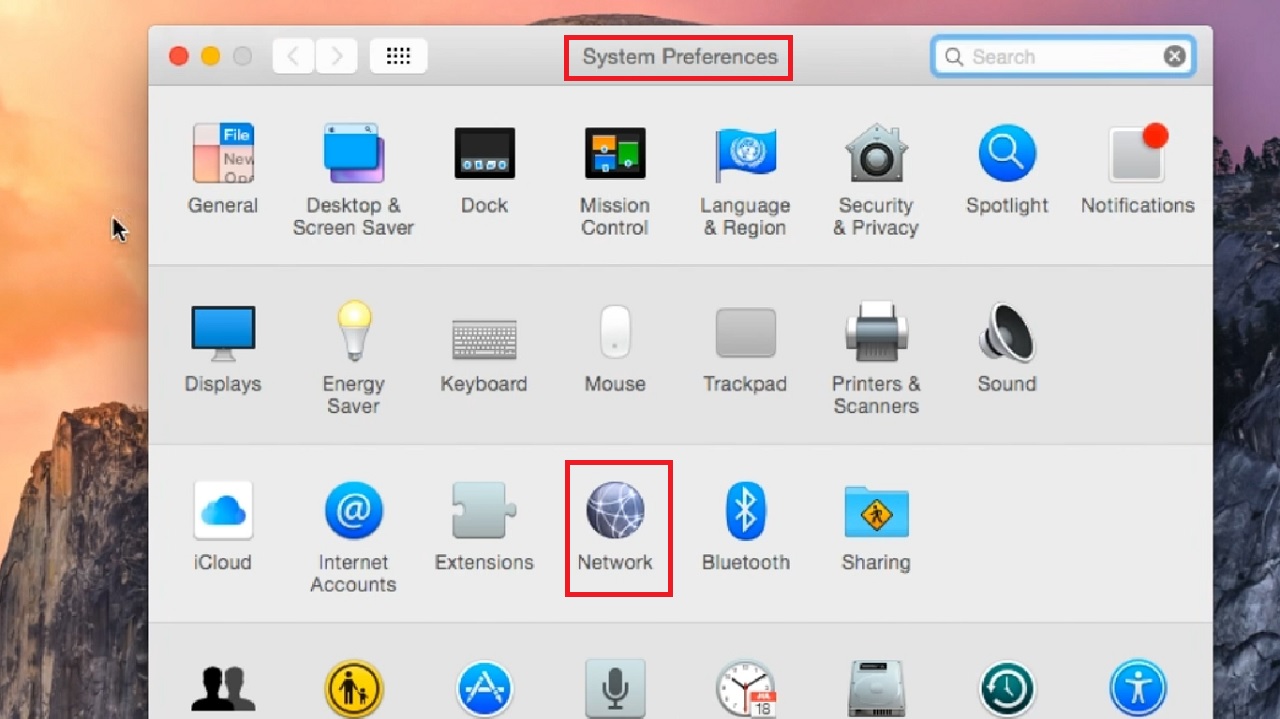
On the other hand, if you are using a Mac computer, follow these steps:
- Click on the Apple icon on the top-left corner of your screen.
- Select System Preferences from the drop-down context menu.

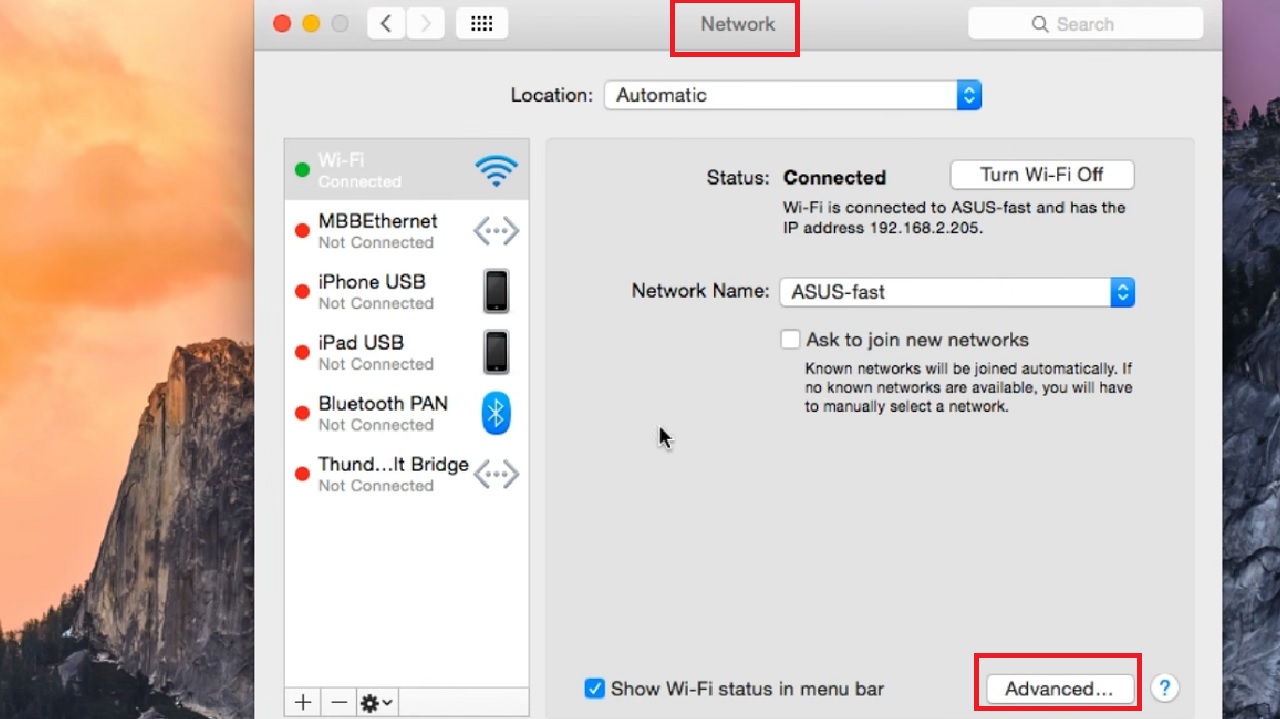
- Click on the Network icon in the System Preferences window that appears.
- Click on the Advanced button in the Network window.
- Click on the DNS tab in the following window.
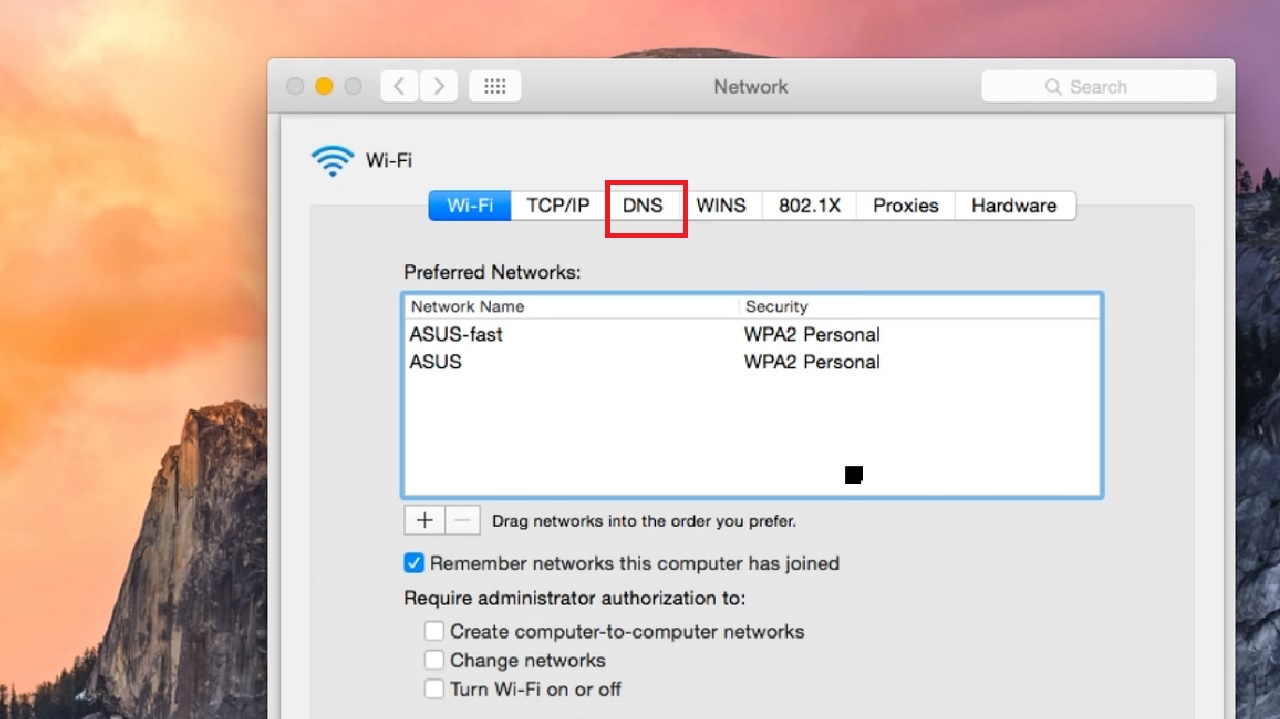
- Click on the Plus button below the DNS Servers box next to IPv4 or IPv6 addresses.

- Type in the DNS server address 8.8.8.8.
- Click on the Plus button again and type 8.8.4.4 this time.
- Click on the OK button below.
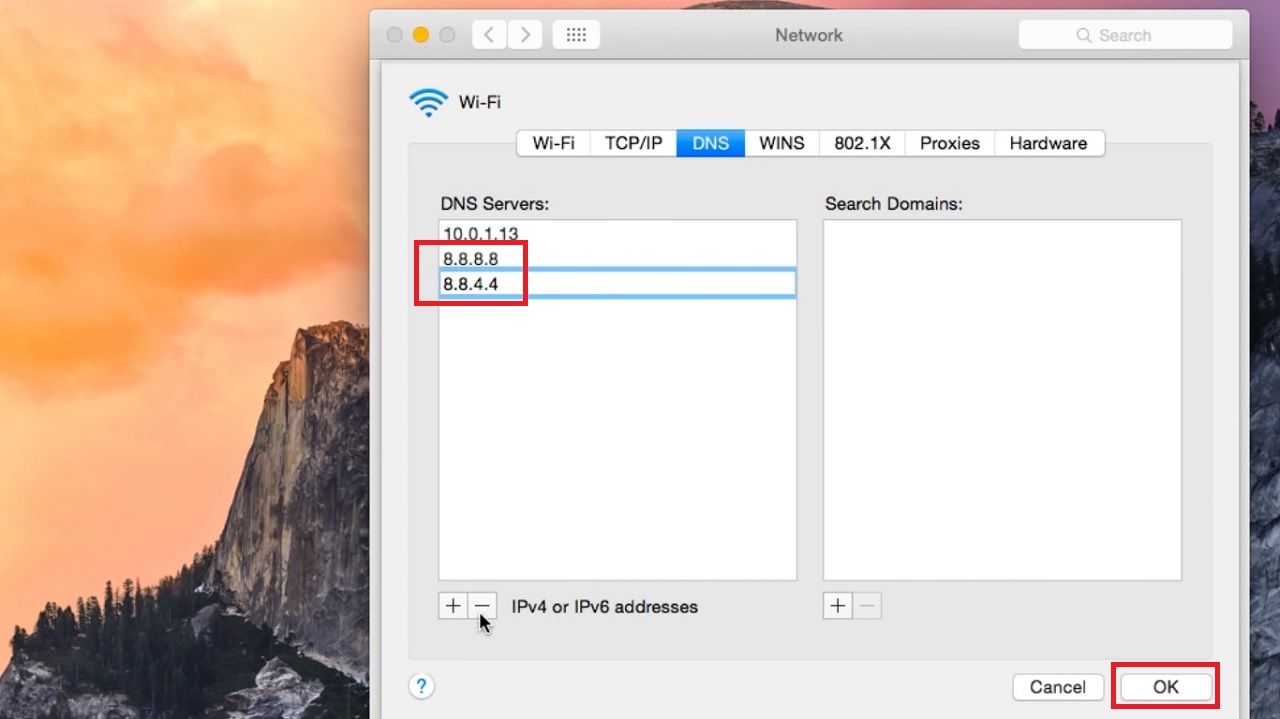
- Click on the Apply button in the previous window.
Now, close all windows and try your internet connection and it should run fine this time. However, if it still does not run properly, try the next method.
Method 3: Clear Browser Host Cache or Browsing Data
The cache of your browser may be full and cause this error as well. In that case clearing the host cache or browsing data may be helpful.
Whether you are using Google Chrome or Microsoft Edge, the process is pretty much the same.
STEPS TO FOLLOW:
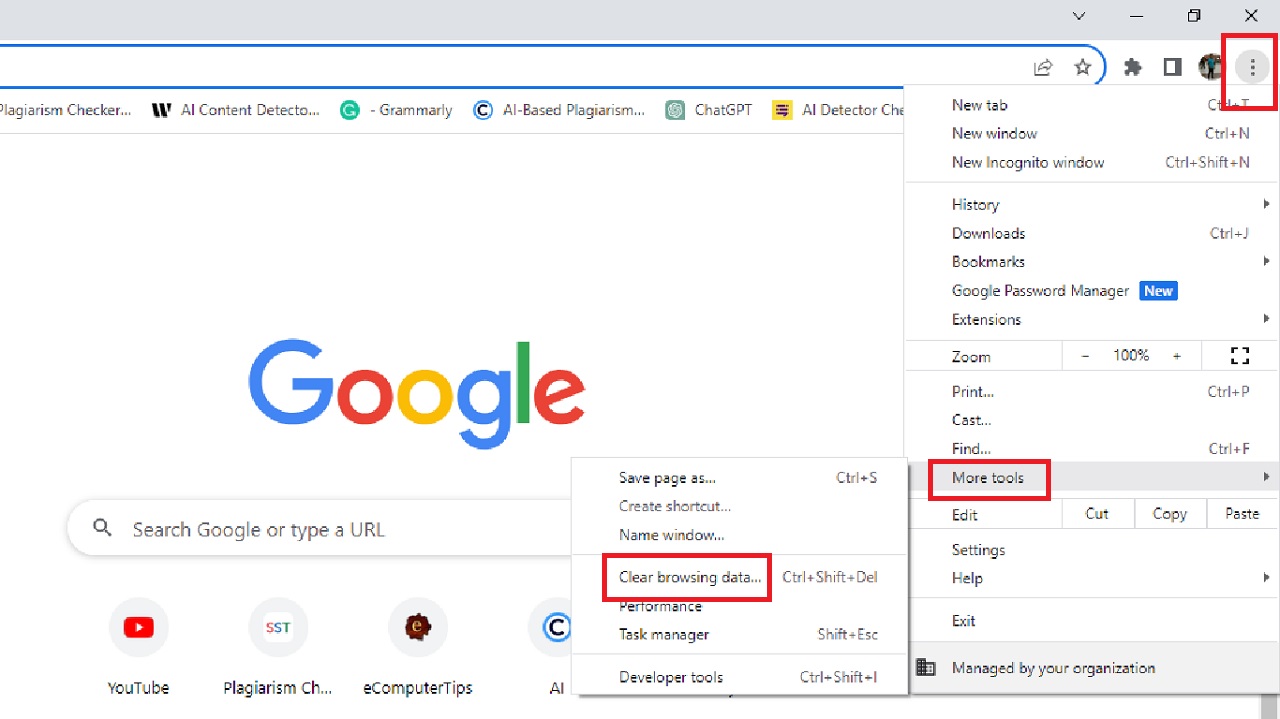
- To proceed with Google Chrome, open the browser.
- Click on the three small vertical dots on the top-right corner on the home page.
- Go to More tools from the drop-down context menu.
- Click on Clear browsing data from the drop-down submenu.
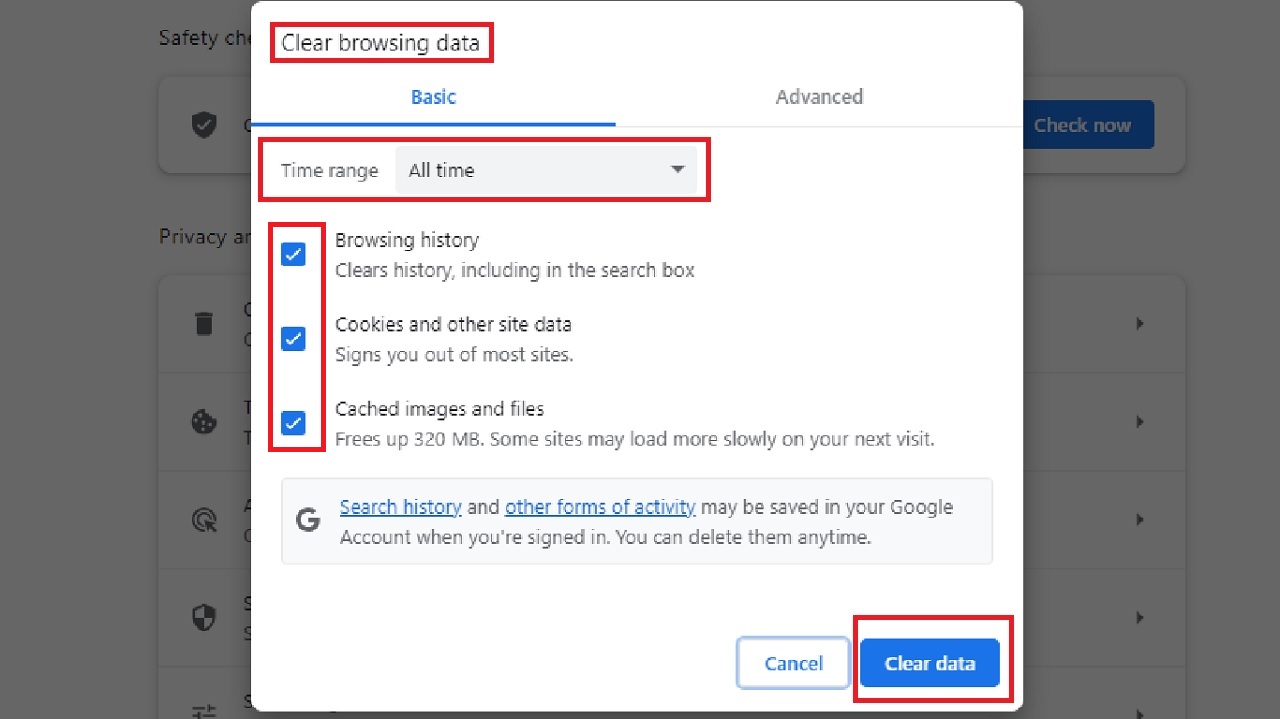
- In the Clear browsing data window, choose the time range from the drop-down options that you get after clicking on the small arrow on the right side of the field.
- Select the data you want to delete.
- Click on the Clear data button.
Alternatively, you can open Google Chrome > Type chrome://net-internals/#dns in the address bar > Hit Enter > Click Clear host cache button next to Host resolver cache.
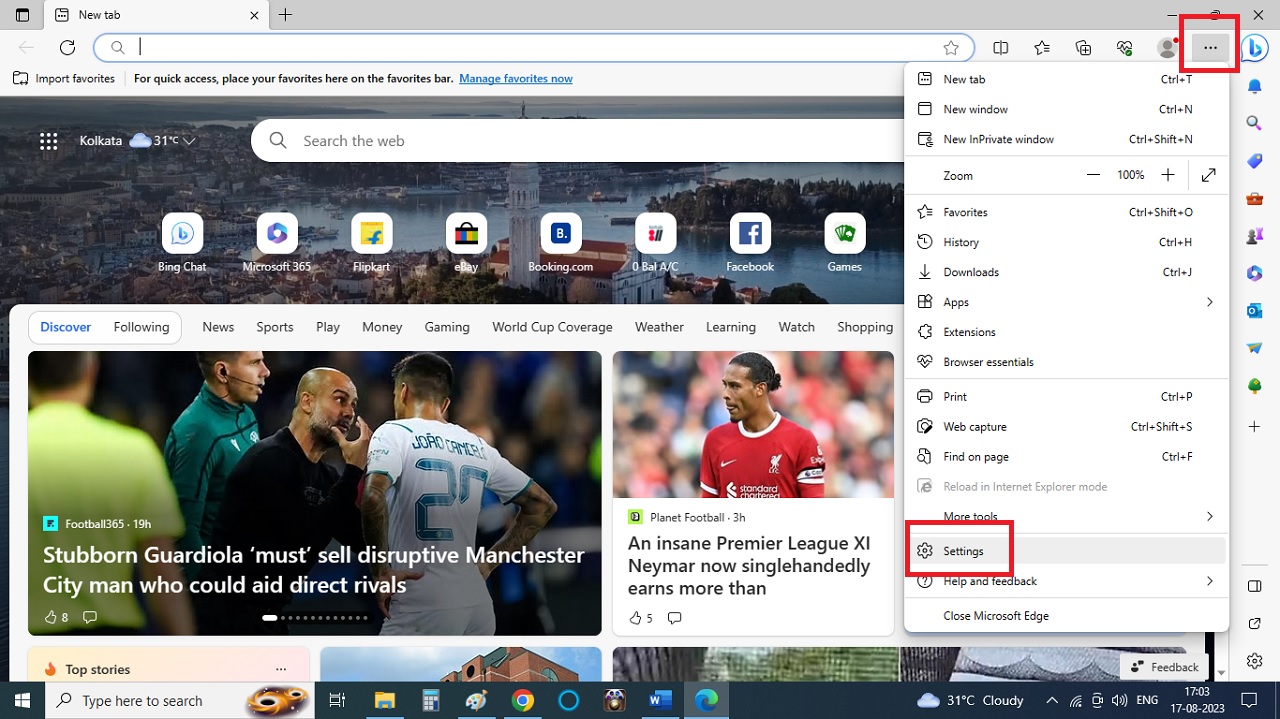
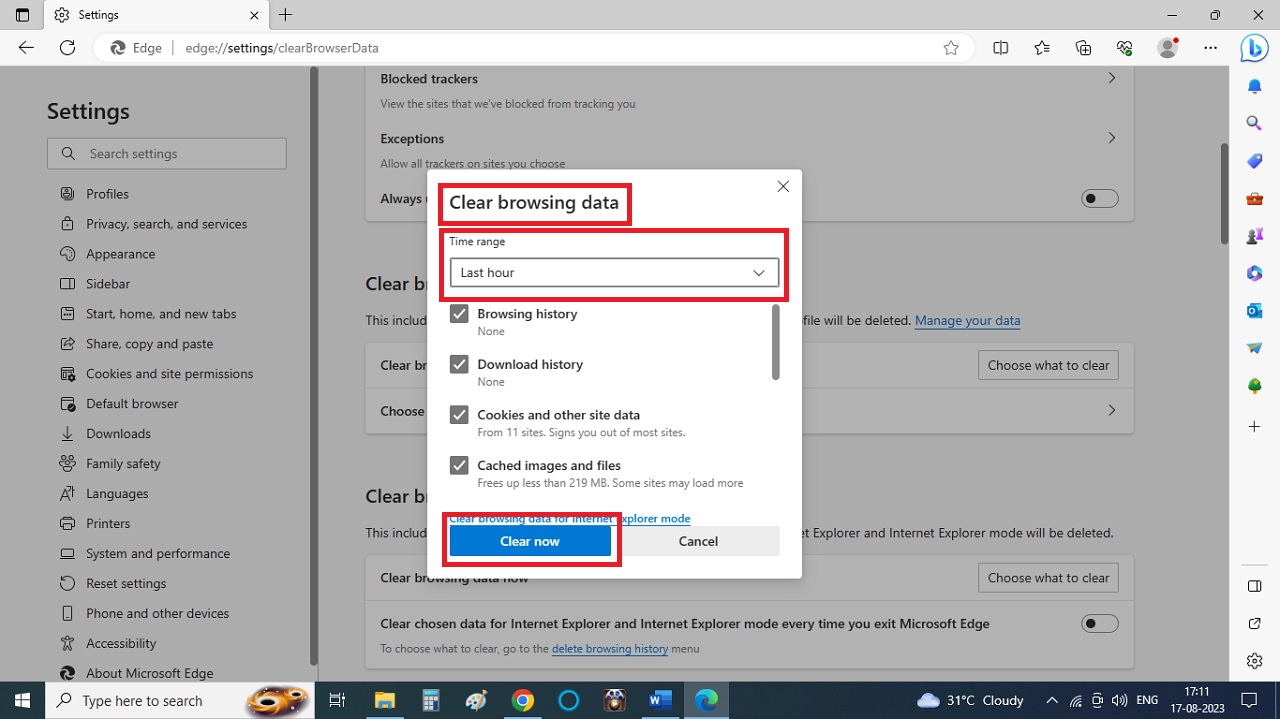
If you use Microsoft Edge, then here are the specific steps to follow:
- Open the browser.
- Click on the three horizontal dots at the top-right corner of the screen.
- Select Settings from the Drop-down menu.
- Click on the Privacy, search, and services option on the left panel in the following Settings window.
- Scroll down to find Choose what you clear option on the right side of the window.
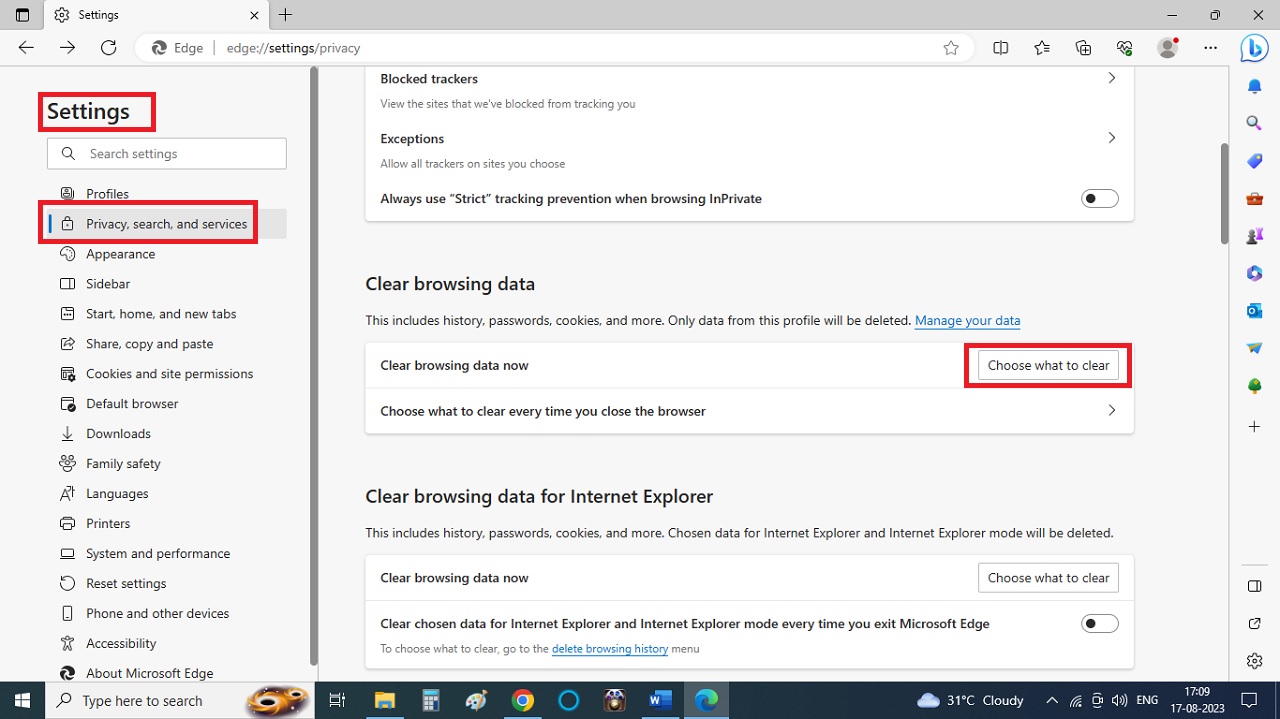
- In the following Clear browsing data window, select the Time range.
- Now, click on the Clear now button.
Finally, close the window and try using the browser again after reconnecting. If that did not resolve the issue, you may try the next solution.
Method 4: Change the Settings to Disable Proxy Servers
Often, disabling the proxy servers that may be causing some issues with the connectivity may help rectify the issue of ‘DNS Probe Finished No Internet.’
STEPS TO FOLLOW:
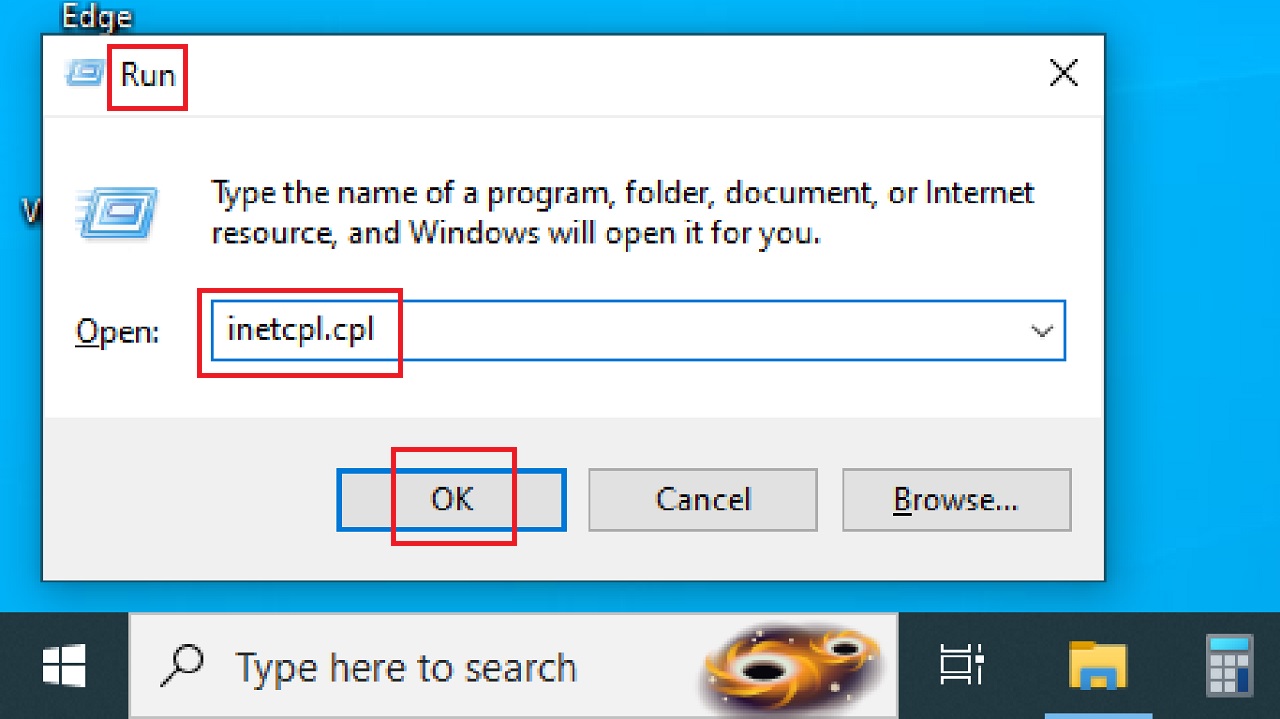
- Press the Windows and R keys together on your keyboard to open the Run dialog box.
- In the box, type inetcpl.cpl.
- Click on the OK button.
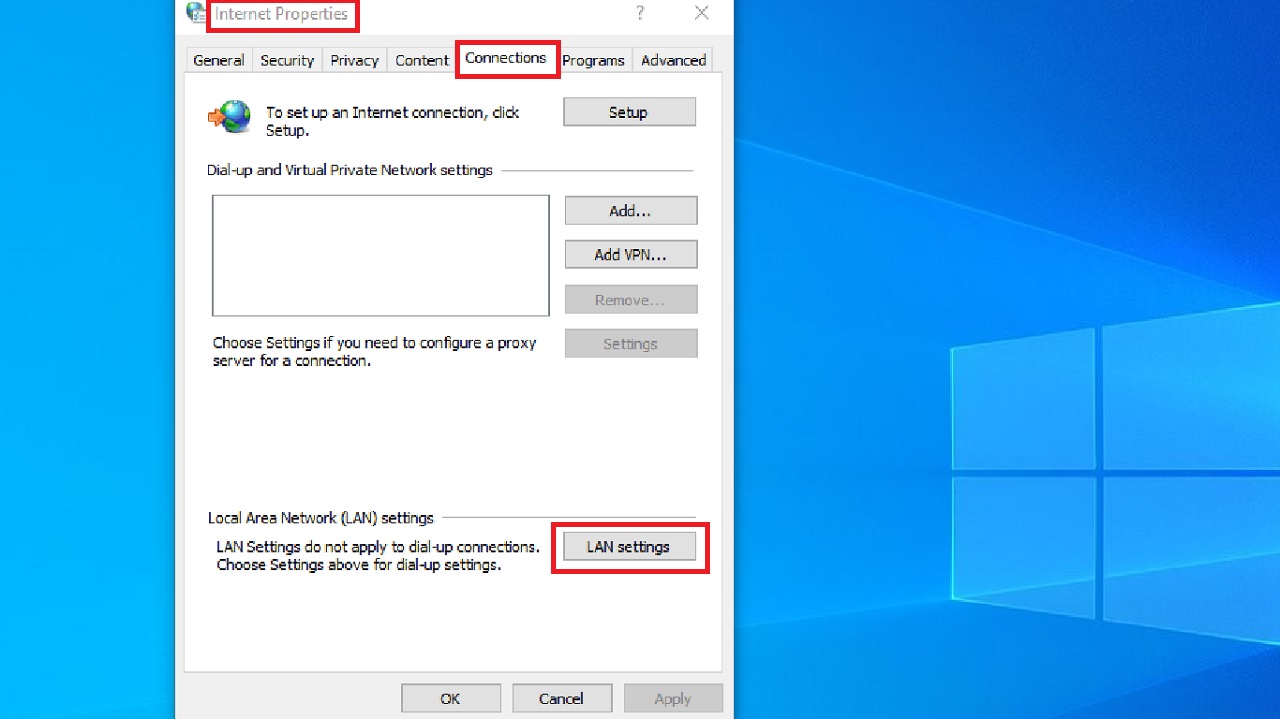
- In the following Internet Properties window, go to the Connections tab.
- Then click on the LAN Settings button below.
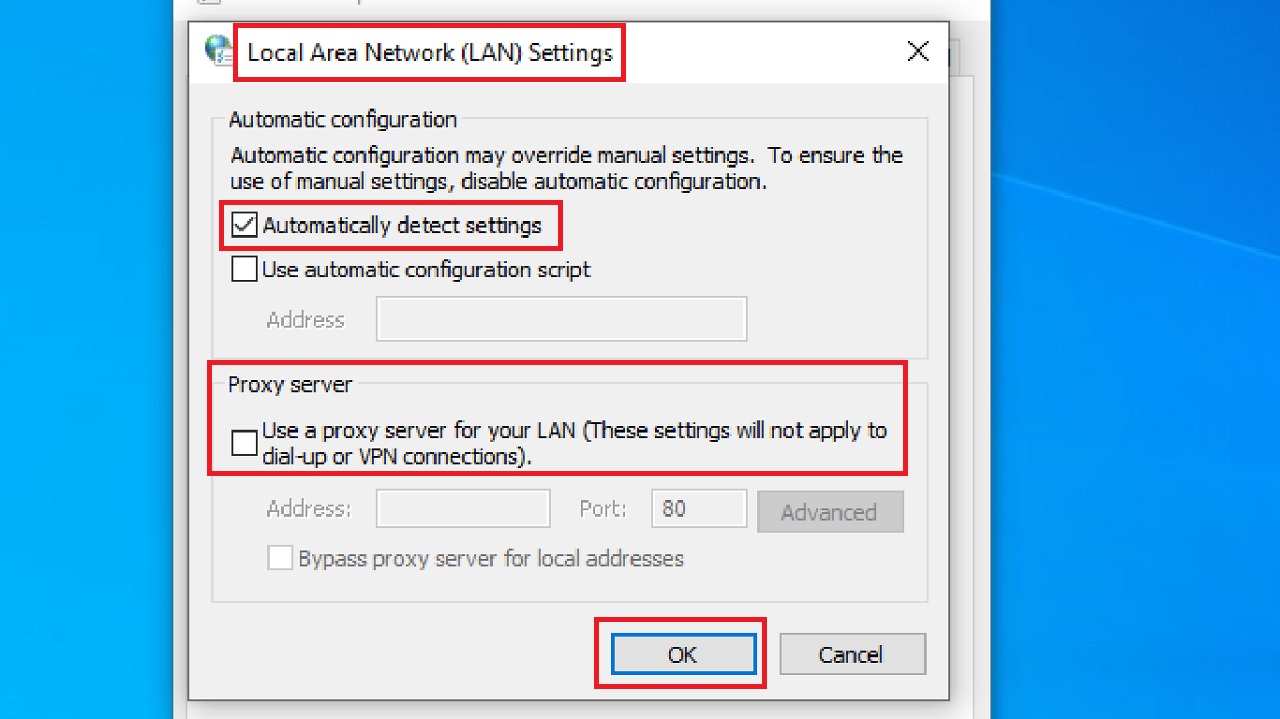
- On the next Local Area Network (LAN) Settings window, uncheck the small square box next to Use a Proxy server for your LAN (These settings will not apply to dial-up or VPN connections) option under ‘Proxy Server’ section.
- Make sure that the box next to Automatically detect settings option above is checked.
- Click on OK to save the settings on your computer.
Now try connecting again. This time the problem should be fixed.
Method 5: Restart DNS Client Service
Information about the DNS configuration is usually held by the DNS Client. This service often starts DNS lookups. If this service is stopped, restarting it may sometimes resolve the ‘DNS Probe Finished No Internet’ issue.
STEPS TO FOLLOW:
- Open the run dialog box as before.
- Type msconfig and press Enter or click on the OK button.
- In the System Configuration window that appears, go to the Services tab.
- Look for DNS Client in the list.
- Uncheck the small box next to it.
- Click on the Apply button and then click on the OK button to save the change.
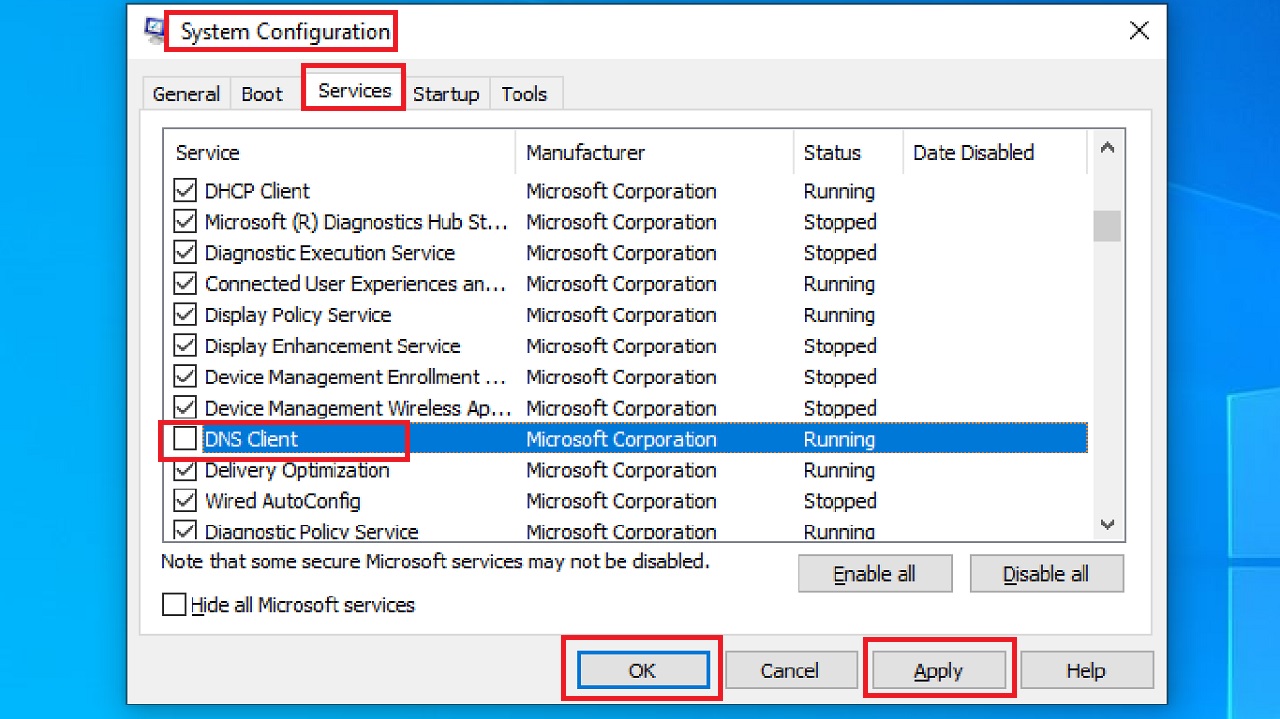
- Restart your computer.
- When it restarts, go to the System Configuration window again.
- This time check the box next to DNS Client service.
- Click on Apply and then on OK.
This might resolve the issue.
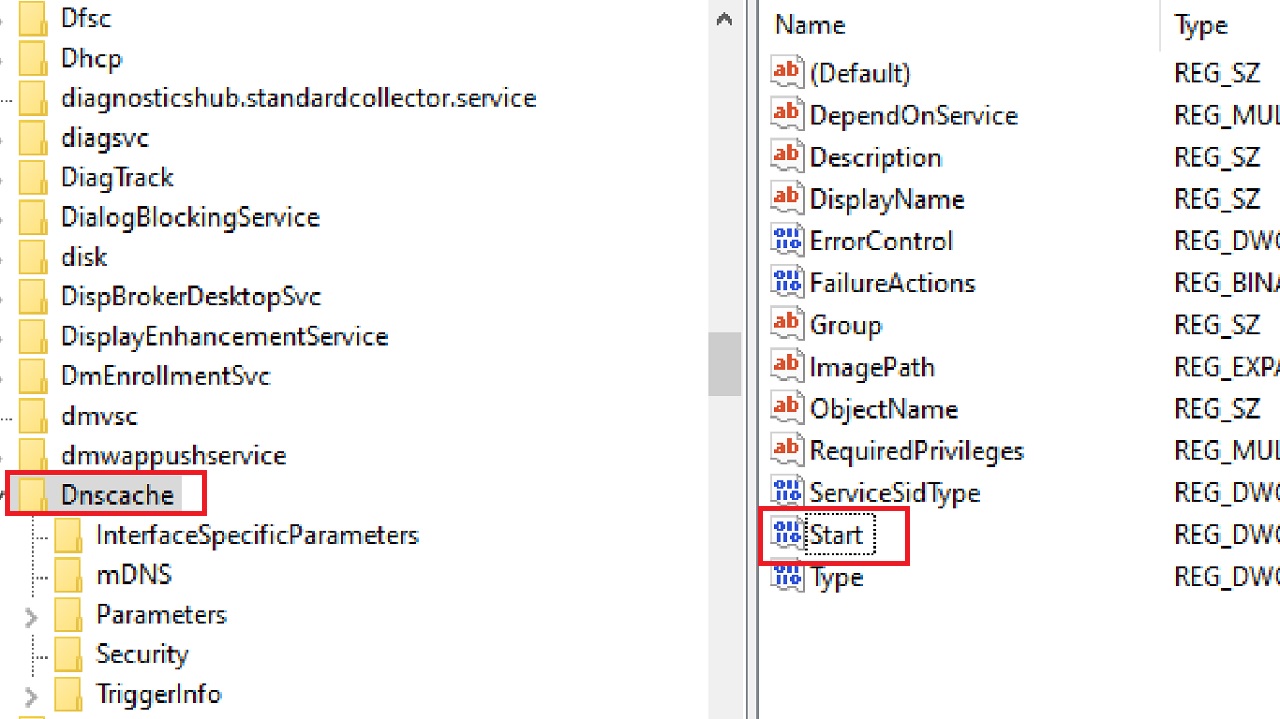
Alternatively, there is a roundabout way to follow this method using the Windows Registry.
Note: This method should be followed only if you are confident and know what you are doing. This is because changing the values in the Windows Registry erroneously may sometimes cause irrecoverable damage to the system and its operation.
Also, make sure that you create proper backup before moving on with the method.
Now, if you wish to continue, these are the steps to follow:
- Open Run.
- Type regedit.
- Hit Enter.
When the Windows Registry window opens, click on the small arrow keys next to each of the following folders to expand them in the exact order as mentioned below:
- HKEY_LOCAL_MACHINE
- SYSTEM
- CurrentControlSet
- Services
- Dnscache
Once you reach here, look at the right side of the window.
- Find Start and double-click on it.
- Set the value to 4 in the field under Value Data in the following Edit DWORD (32-bit) Value window. This will disable the service.
- Click on the OK button to save the change and close the window.
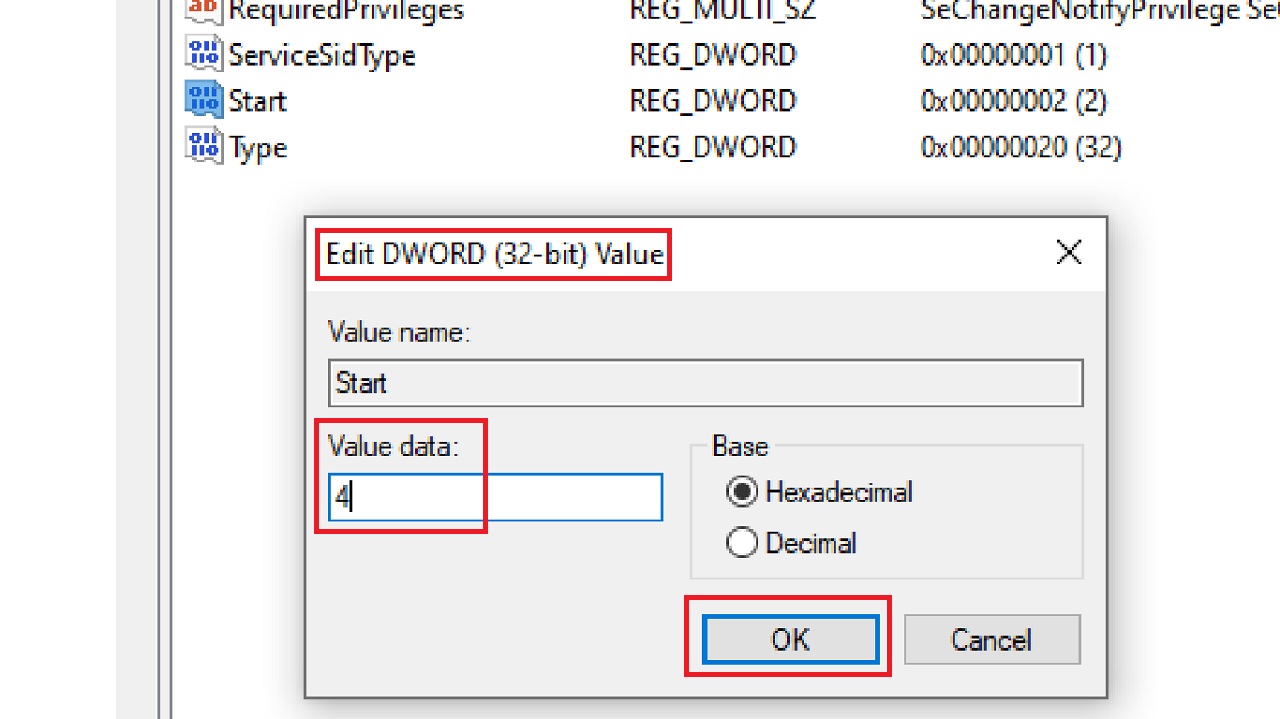
- Restart your PC.
- After it restarts, follow the same initial steps and now change the value to 2.
- Restart the computer again.
After it restarts, check whether or not the issue is resolved.
Note: The different values of the Value data have different purposes. For example, the value 1 usually sets it to delayed automatic, 2 sets it to automatic, 3 triggers the manual startup function, and 4 sets it to disabled.
Conclusion
That is all you need to do to resolve the ‘DNS Probe Finished No Internet’ error on your PC.
So, henceforth, when you see this error, whether it is due to the browser or the router, simply try one or a couple of these solutions to fix the issue and enjoy surfing the internet.