
You may have to use an external hard drive or flash drive to store or transfer files to and from your computer system. It is a very convenient and helpful way to do your job, provided it functions properly in the first place.
There may be times when the hard drive you plugged in will work properly but you may not be able to eject it safely after completion of your job.
Do not worry because this is nothing fatal and can be resolved easily by following a few quick methods that are explained in this article.
In This Article
KEY TAKEAWAYS
- Using the Task Manager to end the task is a useful way to resolve the issue of an external hard drive not ejecting properly.
- You can eject the external hard drive from your PC by using the Disk Management utility.
- A few specific commands run on the Command Prompt may also help in ejecting an external hard drive.
- Restarting Windows Explorer from the Task Manager is another way to resolve this issue.
- You may also try uninstalling the USB drive from the Device Manager in Windows.
Why Can’t You Eject External Hard Drive?
When you find that you cannot eject your external hard drive from your PC, the most common reason for it to happen is that the system may still be accessing the files or folders stored in the drive.
This may be due to copying a file from the drive to the PC.
Sometimes there may be some processes or programs still running in the background. If you do not close them, you will not be able to remove the external drive safely.
Another significant reason for this kind of issue occurs is the USB drives that may be malfunctioning or corrupted.
The good news is that there are lots of easy methods in which you can resolve this issue, as you will see if you continue reading this article.
Ways to Fix Cannot Eject External Hard Drive Issue
One of the most obvious yet ignored solutions to the issue of an external hard drive not ejecting is to restart the computer after making sure that there are no programs running in the background or any file open.
If that does not resolve the issue, you can use the Task Manager to end the task for you.
In Windows Computer System
Method 1: Use the Task Manager to End Task
The Task Manager can help you in a lot of ways in resolving minor issues very quickly, and in this case, you can use it as well.
STEPS TO FOLLOW:
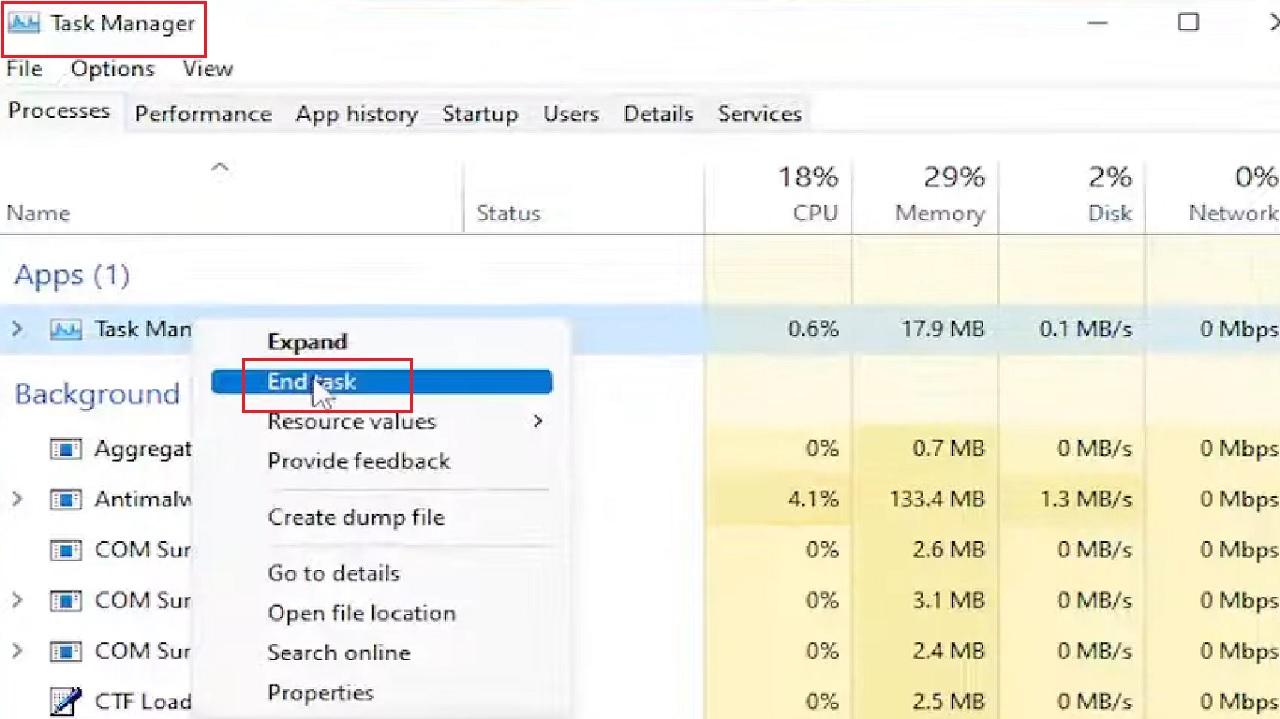
- Go to the taskbar > Right-click on it > Select Task Manager.
- Under the Processes tab in the Task Manager window, if you see your flash drive under Apps, right-click on it.
- Select End task.
This should resolve the issue.
Method 2: Use the Command Prompt
Another useful feature is the Command Prompt that may resolve a lot of issues including an external drive not ejecting properly.
STEPS TO FOLLOW:
- Go to the search box > Type cmd > Choose Run as administrator > hit Enter.
- In the Command Prompt, type in the command RunDll32.exe shell32.dll,Control_RunDLL hotplug.dll and hit Enter.
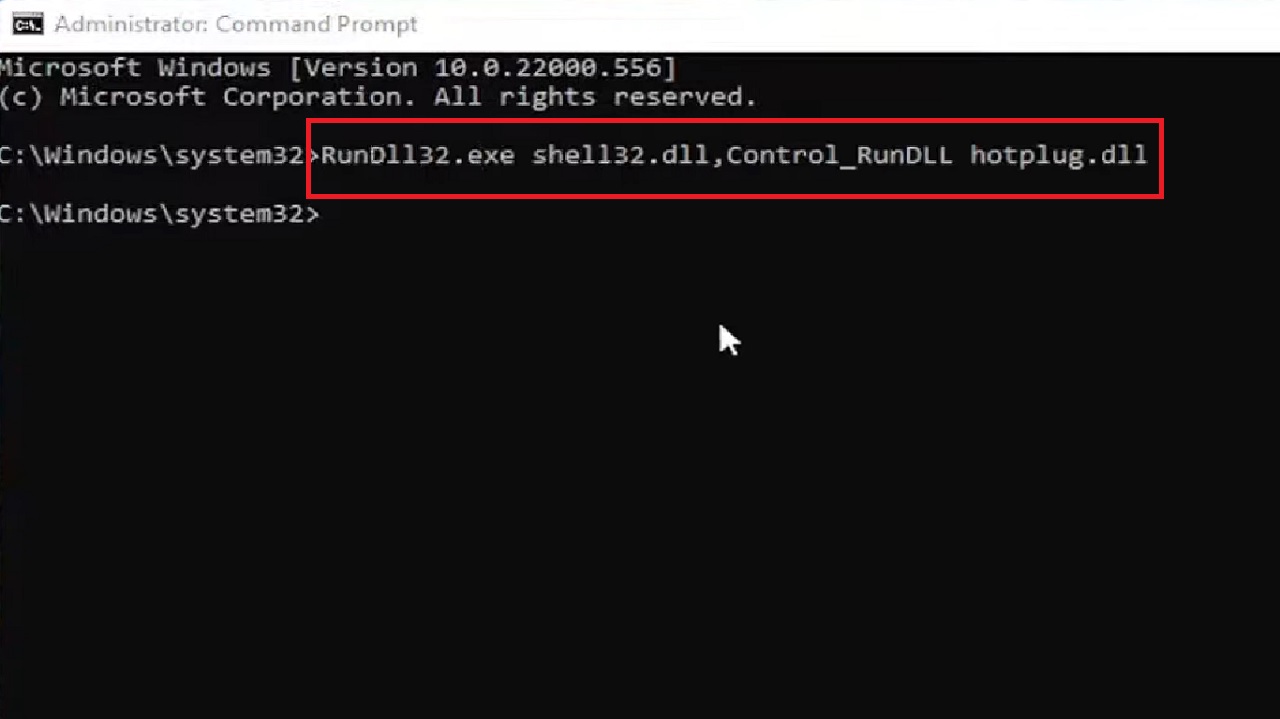
This will open a new Safely Remove Hardware window.
- Select your drive.
- Click on the Stop button.
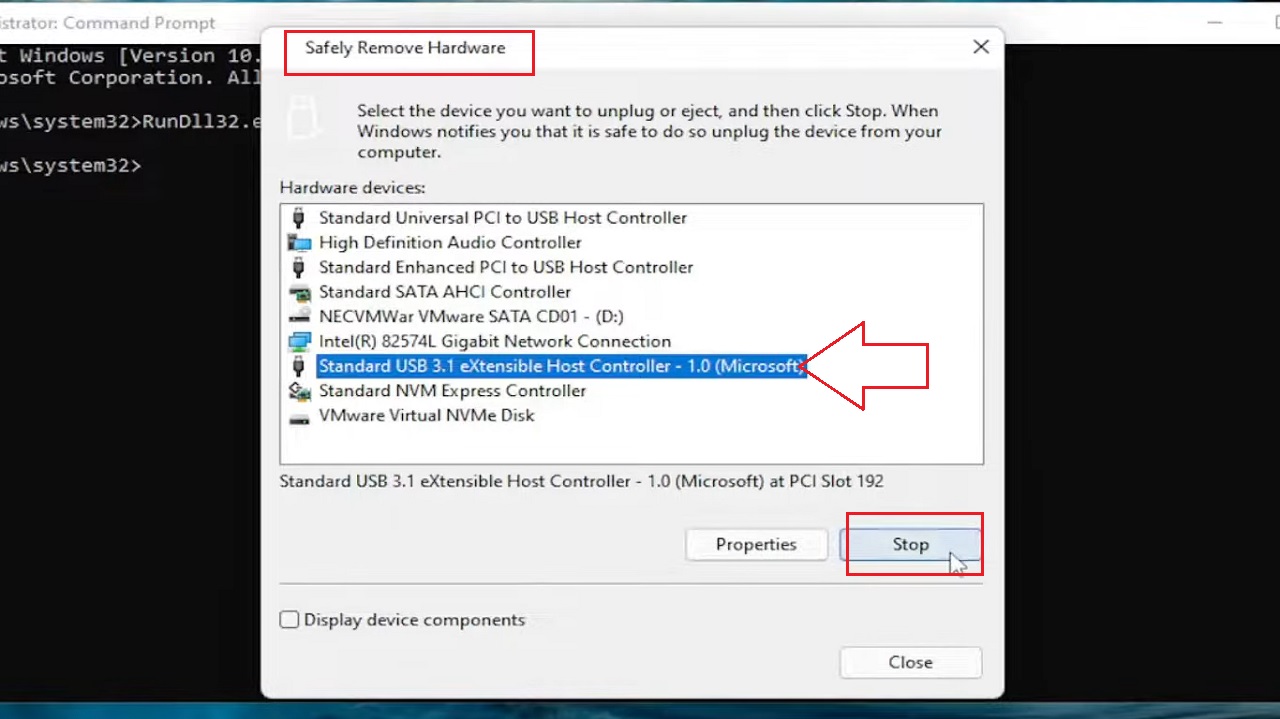
Windows will inform you when it is safe to remove the hardware. When it does, unplug your external hard drive.
Method 3: From Disk Management Utility
External hard drives that cannot be ejected safely at the first go can be ejected by going offline from online from the Disk Management utility.
STEPS TO FOLLOW:
- Right-click on the This PC icon on your desktop.
- Click on Manage from the options in the dropdown menu.
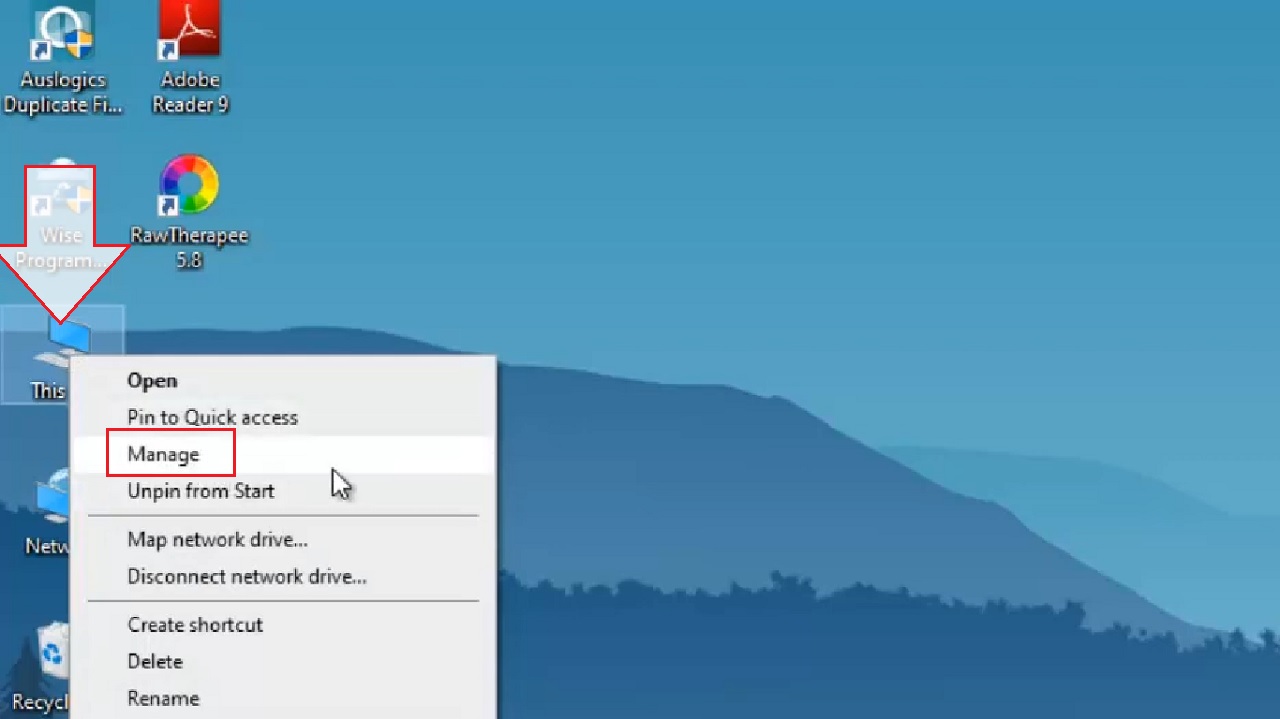
- Select Disk Management from the left panel of the Computer Management window that appears.
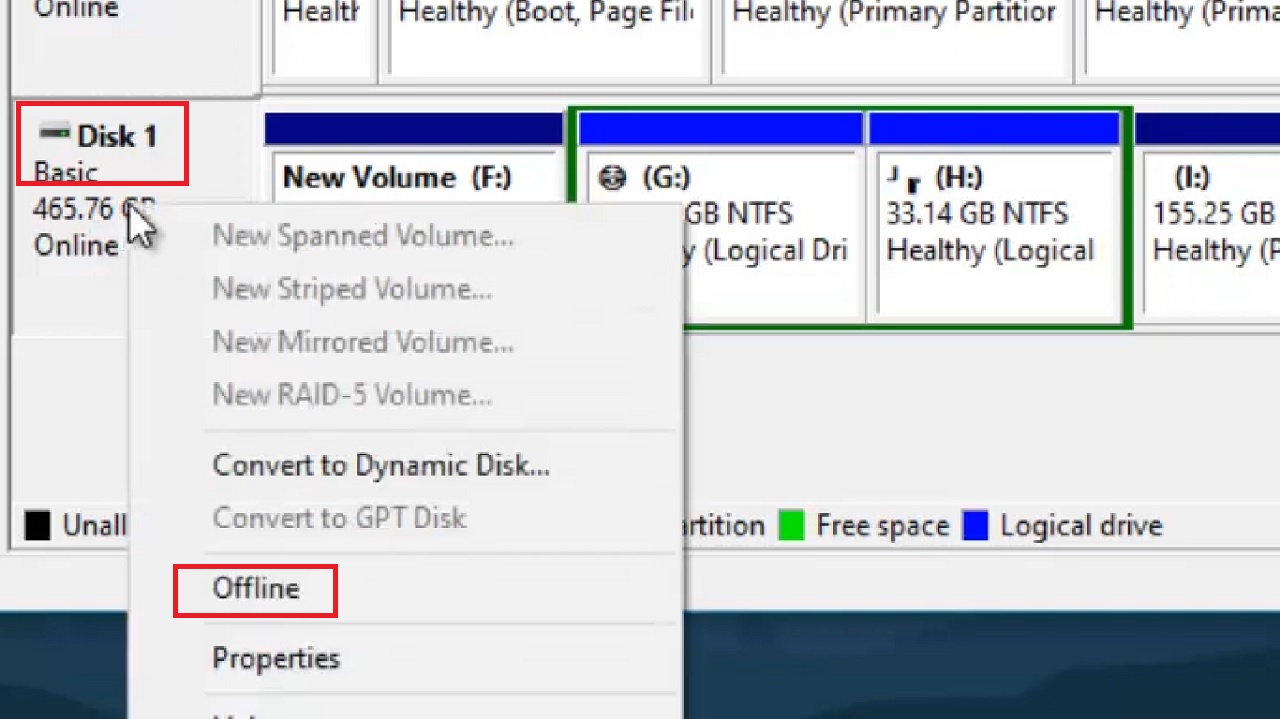
- Right-click on the external drive. (Here, it is Disk 1.)
- Click on the Offline option from the list in the dropdown menu.
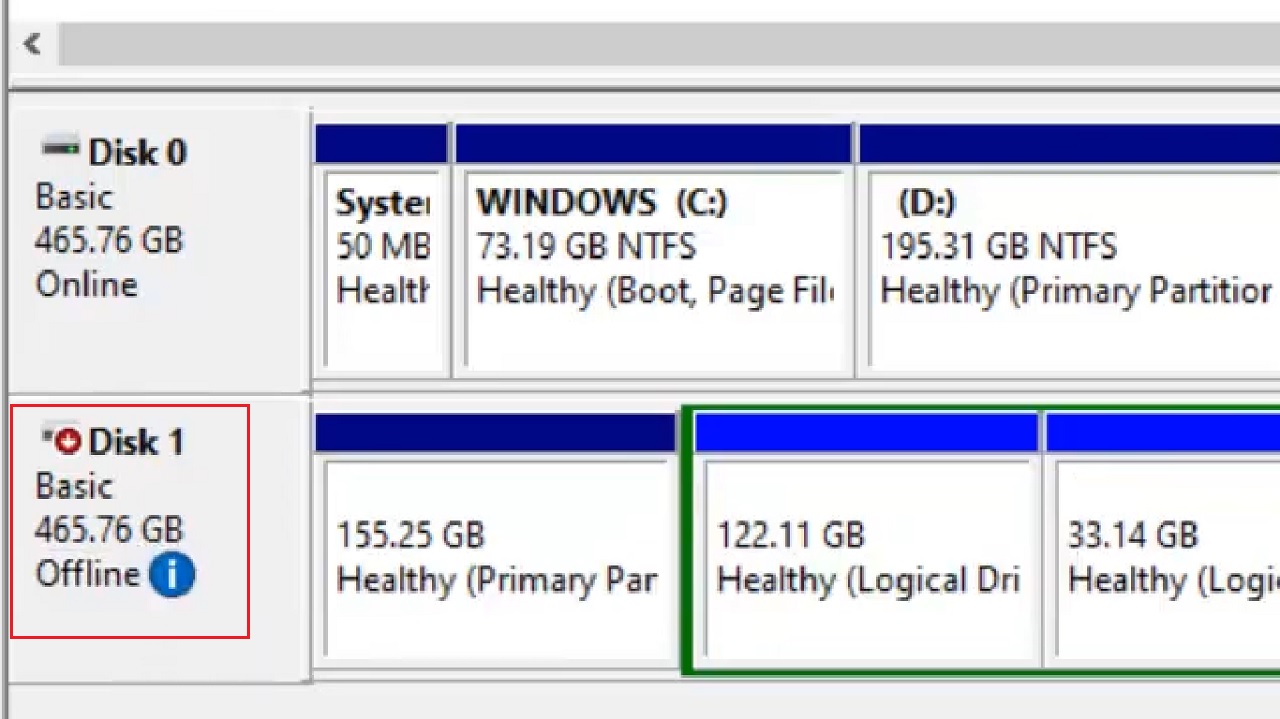
It will take a few seconds to indicate that the disk is now offline as shown in the image below:
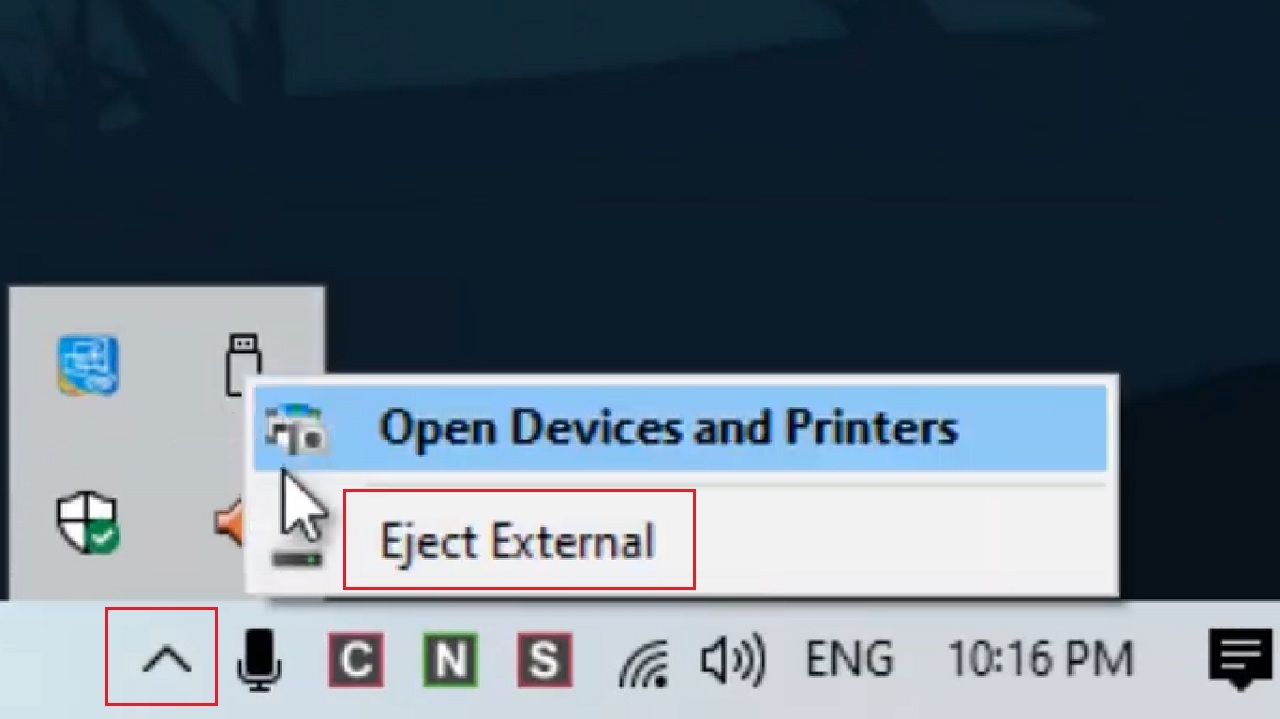
- Go to the up arrow on the right side of the taskbar and click on it.
- Right-click on the drive icon.
- Click on Eject External.
You will get the Safe To Remove Hardware message that you can now eject your external hard drive safely. As shown below:
Now, sometimes, when you plug in the external hard drive again, it may not work or show in the File Explorer. This is because it is still set to Offline.
You will simply have to repeat the process and change it back to online in order to use your external hard drive.
Method 4: Restart Windows Explorer from Task Manager
It the above methods did not resolve the issue, then you can use the Task manager in a different way this time.
STEPS TO FOLLOW:
- Open the Task Manager by pressing CTRL + SHIFT + ESC keys on your keyboard together.
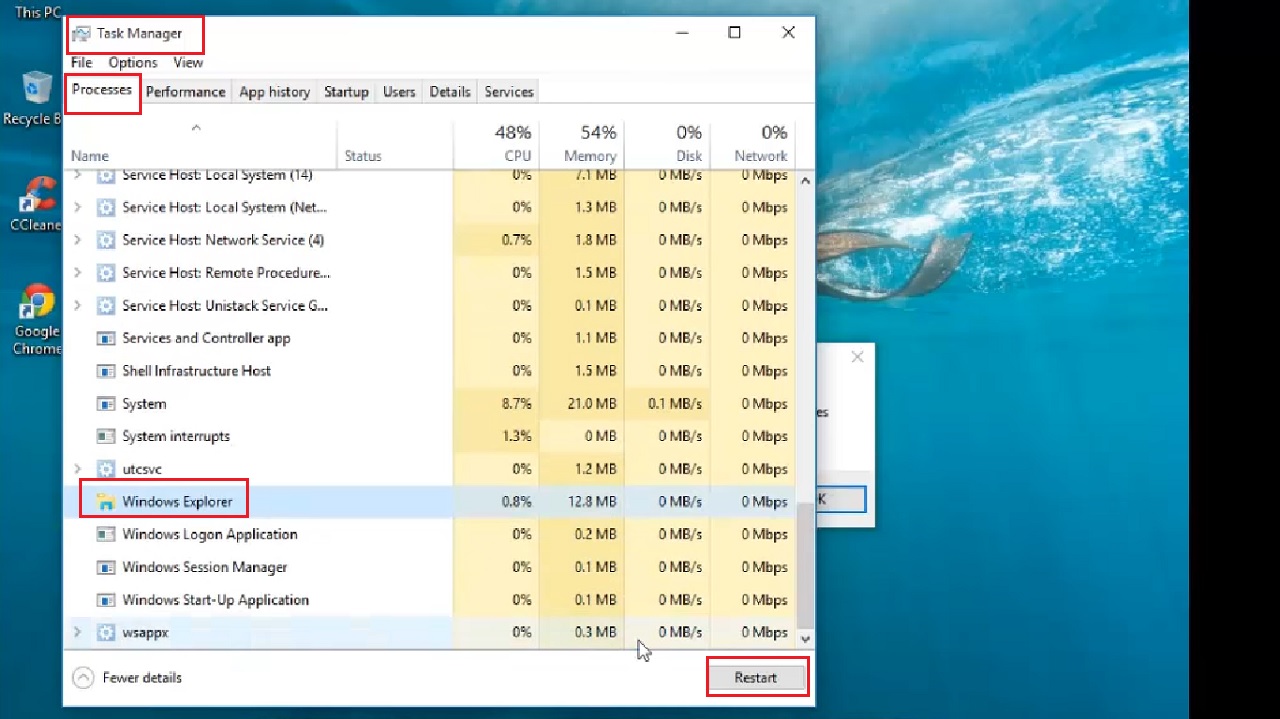
- Under the Processes tab, look for Windows Explorer.
- Click on it once to select it.
- Click on the Restart button below.
Now try to eject your external hard drive and you will see the Safe To Remove Hardware message. Remove the drive.
Method 5: Uninstall from the Device Manager
You can also remove your external hard drive safely after uninstalling it from the Device Manager.
STEPS TO FOLLOW:
- Right click on the Start menu and click on the Device Manager option from the list.
- Select USB Mass Storage Device from the Device Manager window.
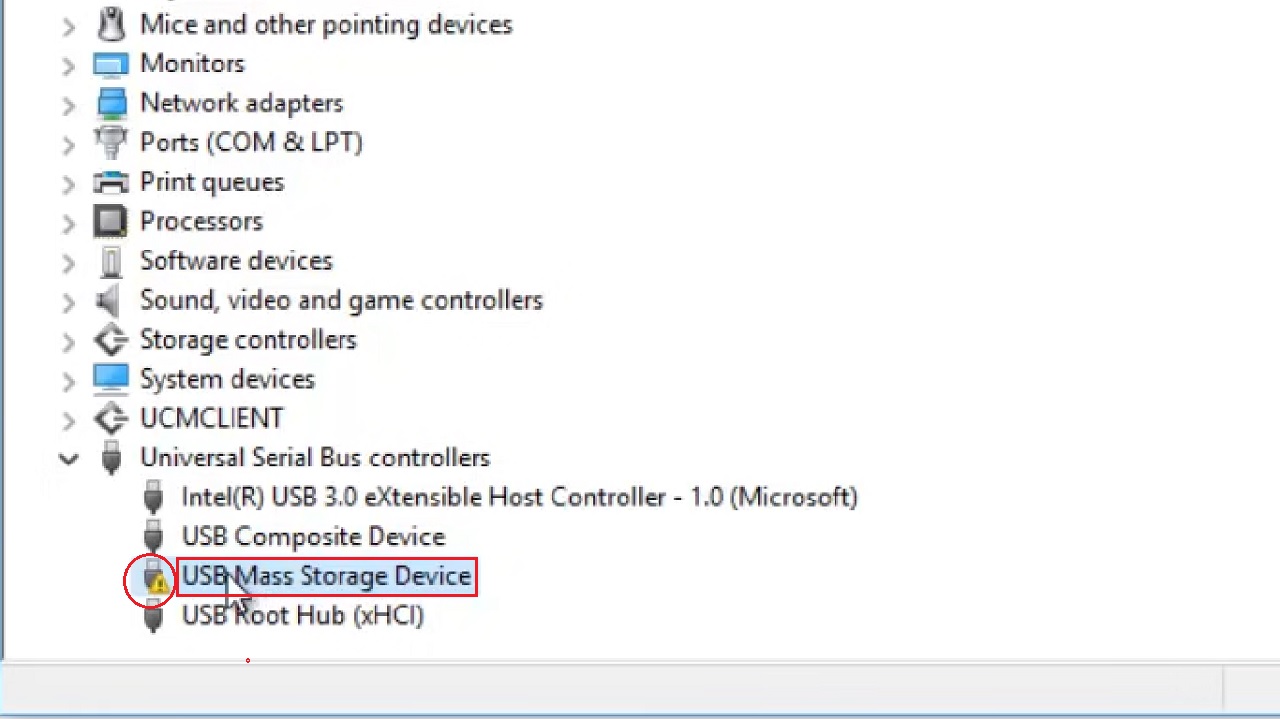
You will see a yellow triangle with an exclamation mark, (indicated by a red circle in the image above), which indicates your external mass storage device is not working properly.
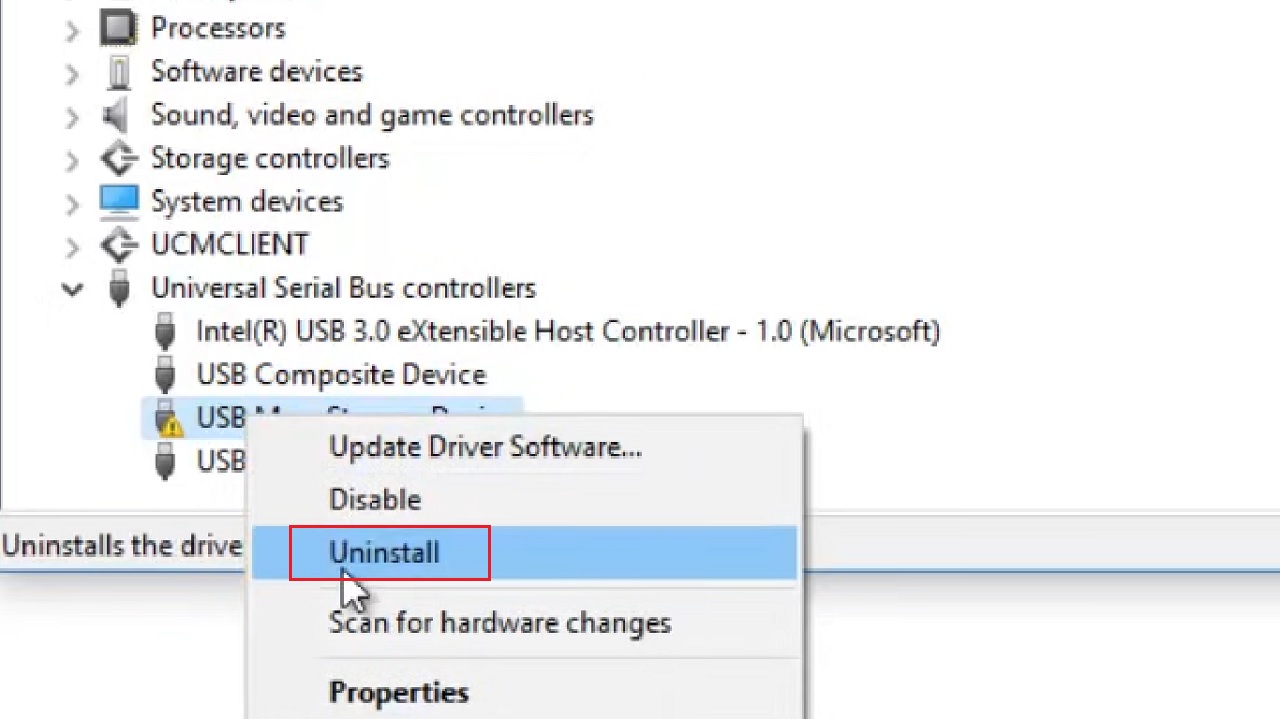
- Right-click on it.
- Select Uninstall.
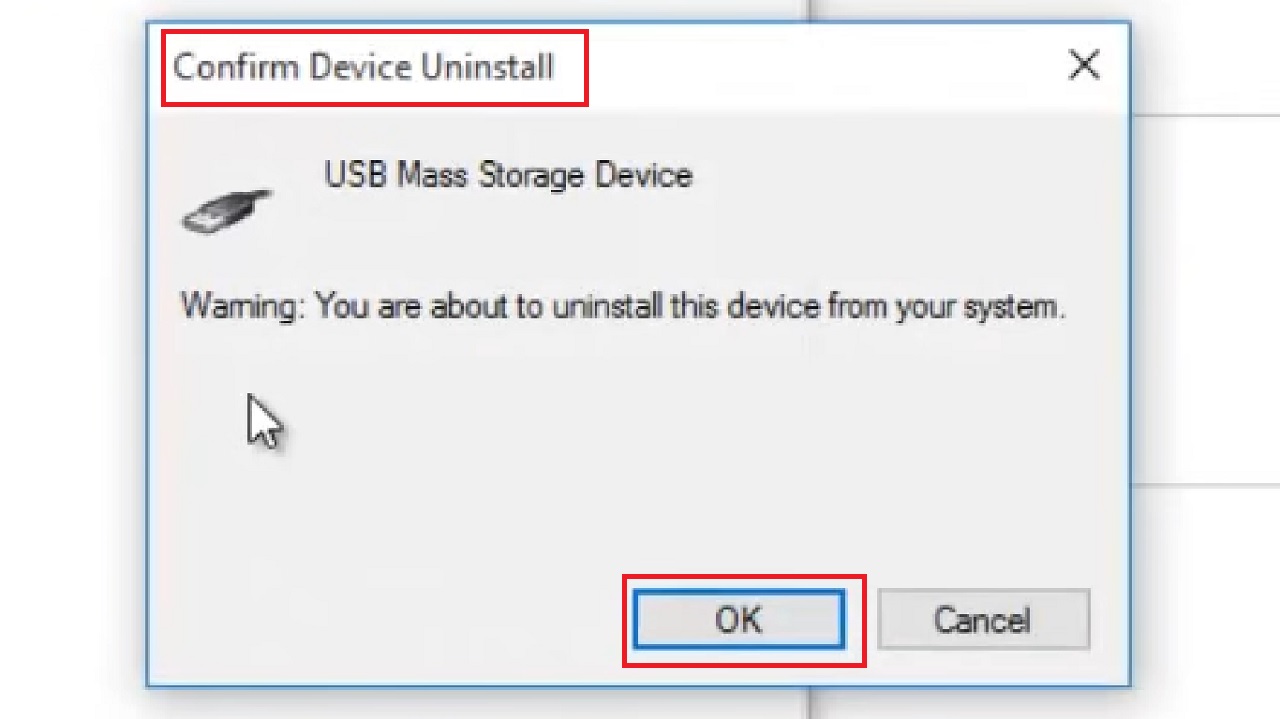
- Click on the OK button in the Confirm Device Uninstall window that appears.
- Restart your PC.
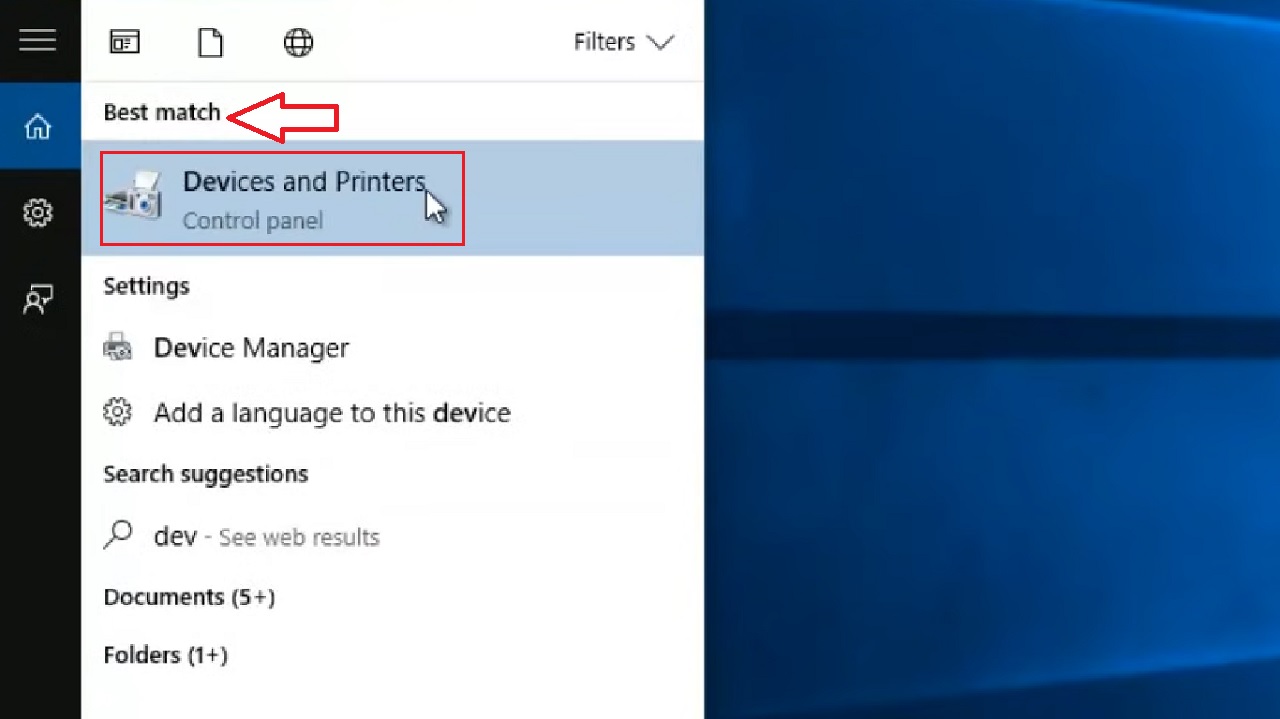
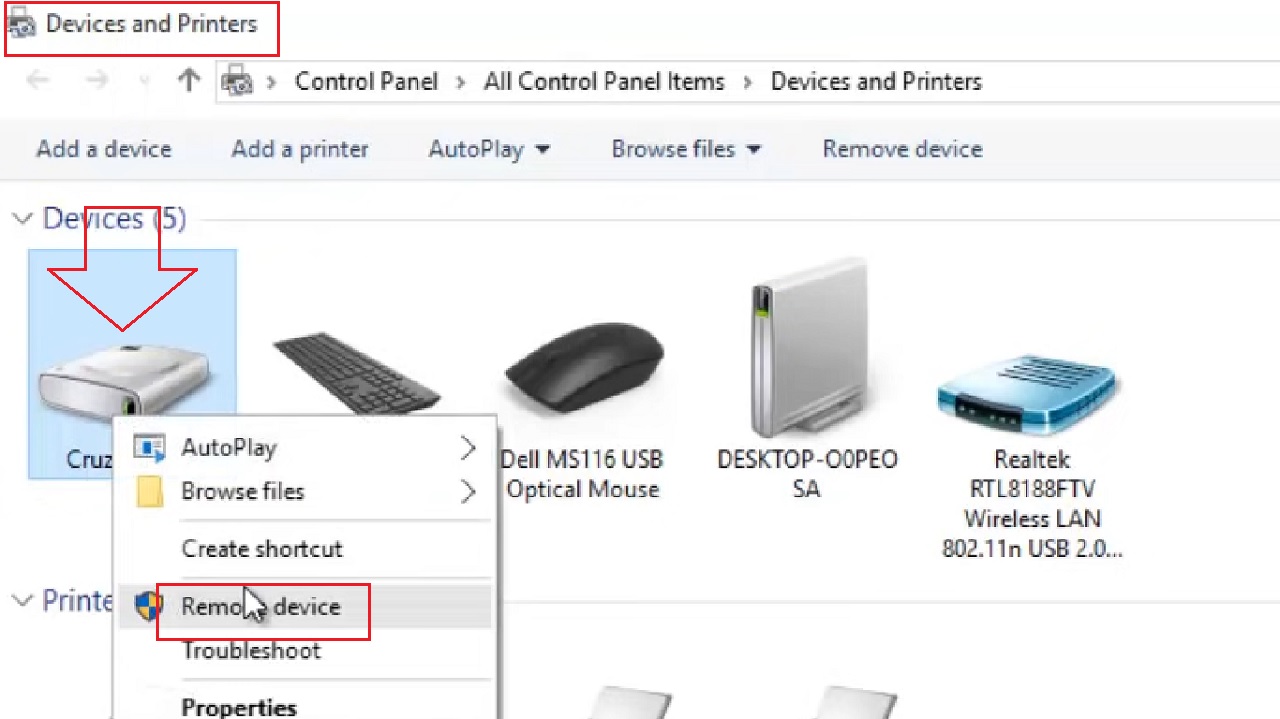
- When the system restarts, go to the search box.
- Type devices and printers and click on the Best match.
- Select your external hard drive from the Devices and Printers window.
- Right-click on it.
- Click on the Remove device option.
- Click on the Yes button on the Remove Device window asking Are you sure you want to remove this device for confirmation.
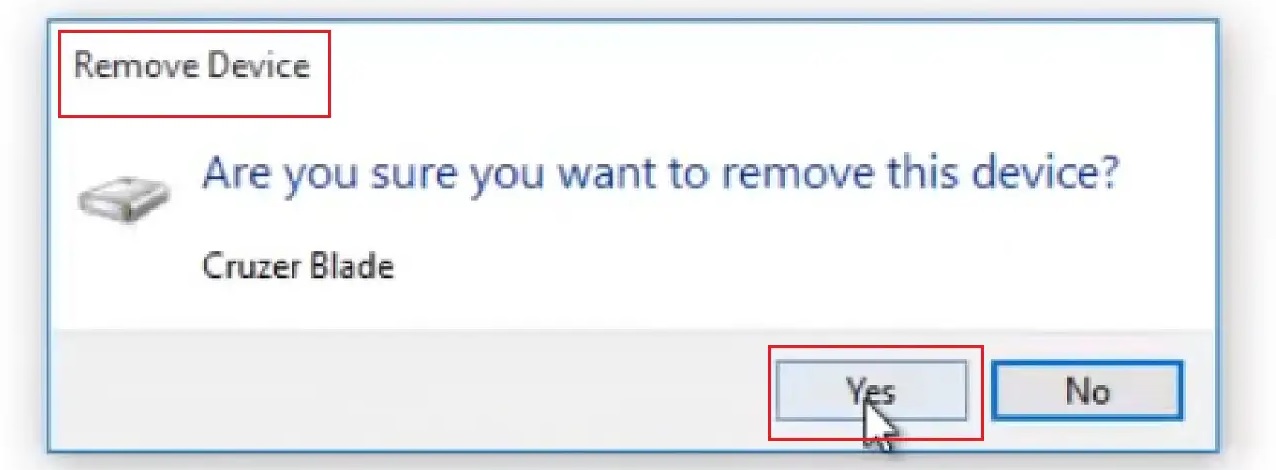
You can now unplug your external hard drive safely from your PC.
Alternatively, you may also eject your drive directly from the System tray on the right-side of the taskbar and click on the flash drive icon as you did in Method 3.
However, sometimes the drivers of the USB may have some problem and not let you remove the external hard drive safely even after you followed the above process correctly.
In such a situation, it is easy to resolve the issue by updating the USB drivers from the Device Manager that is creating the problem. (The one with an exclamation mark in a yellow triangle.)
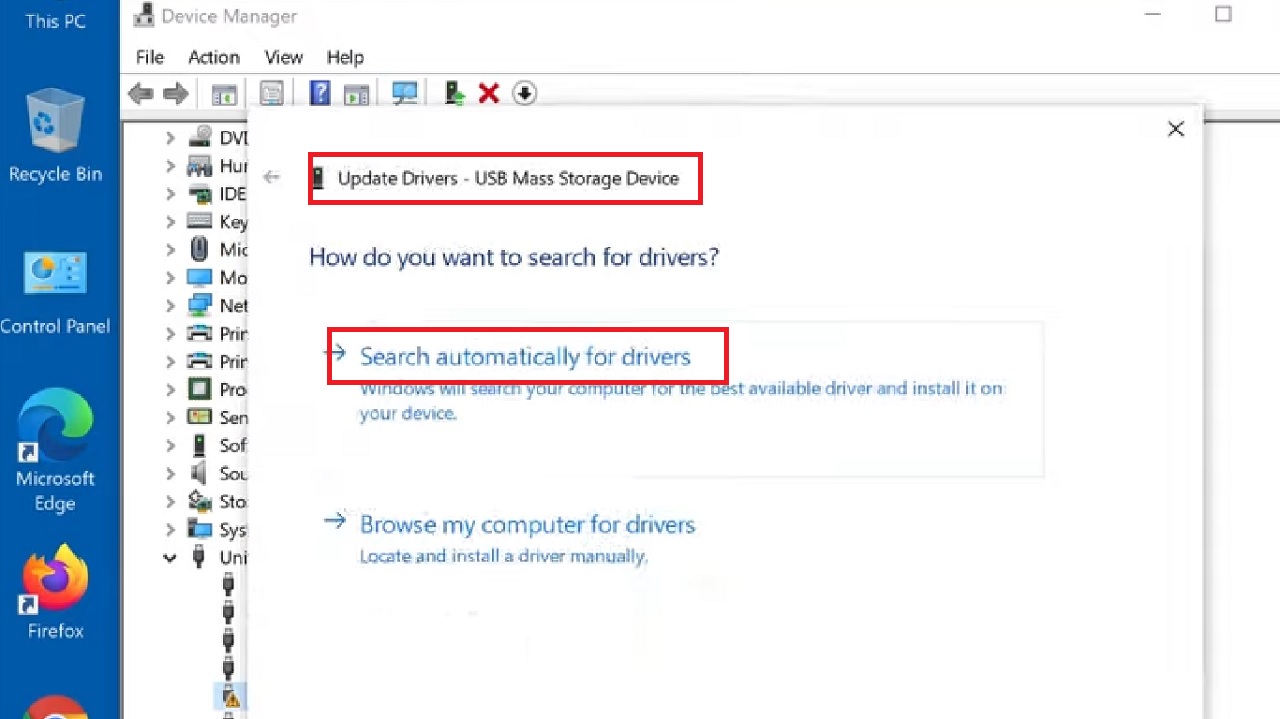
- Select and right-click on the specific Universal Serial Bus and click on Update Driver Software from the option.
- In the following Update Drivers – USB Mass Storage Device window, select Search automatically for drivers to specify how exactly you want to search for the drivers.
Let the process be complete. Click on the Close button when the following window confirms that The best drivers for your device are already installed.
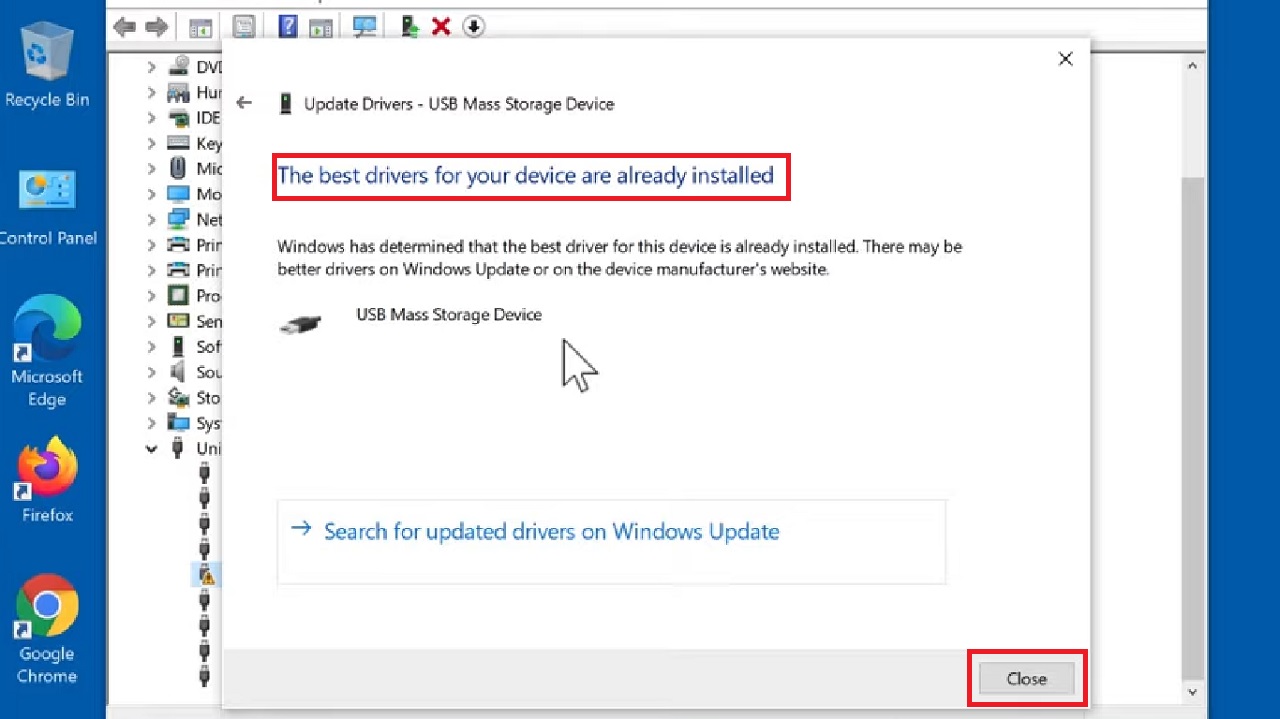
You will now be able to eject your external drive. Finally, restart your PC.
Method 6: From the Command Prompt
You can run the Windows Hardware and Devices Troubleshooter to resolve this issue and eject your external hard drive safely.
STEPS TO FOLLOW:
- Open the Run dialog box by pressing the Windows and R keys together on your keyboard.
- Type in cmd in the box.
- Press all the three SHIFT + CTRL + ENTER keys together on your keyboard to open the elevated Command Prompt.
- When the command Prompt opens, type in the command msdt.exe -id devicediagnostic and hit Enter.
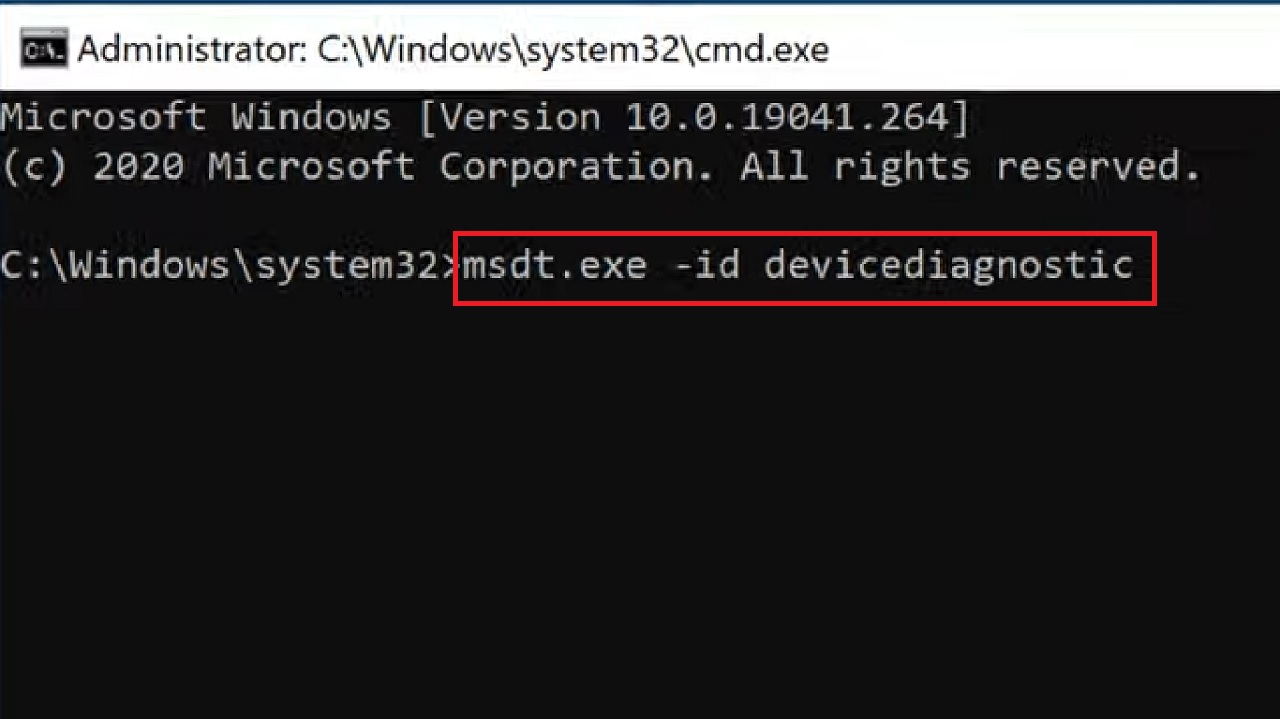
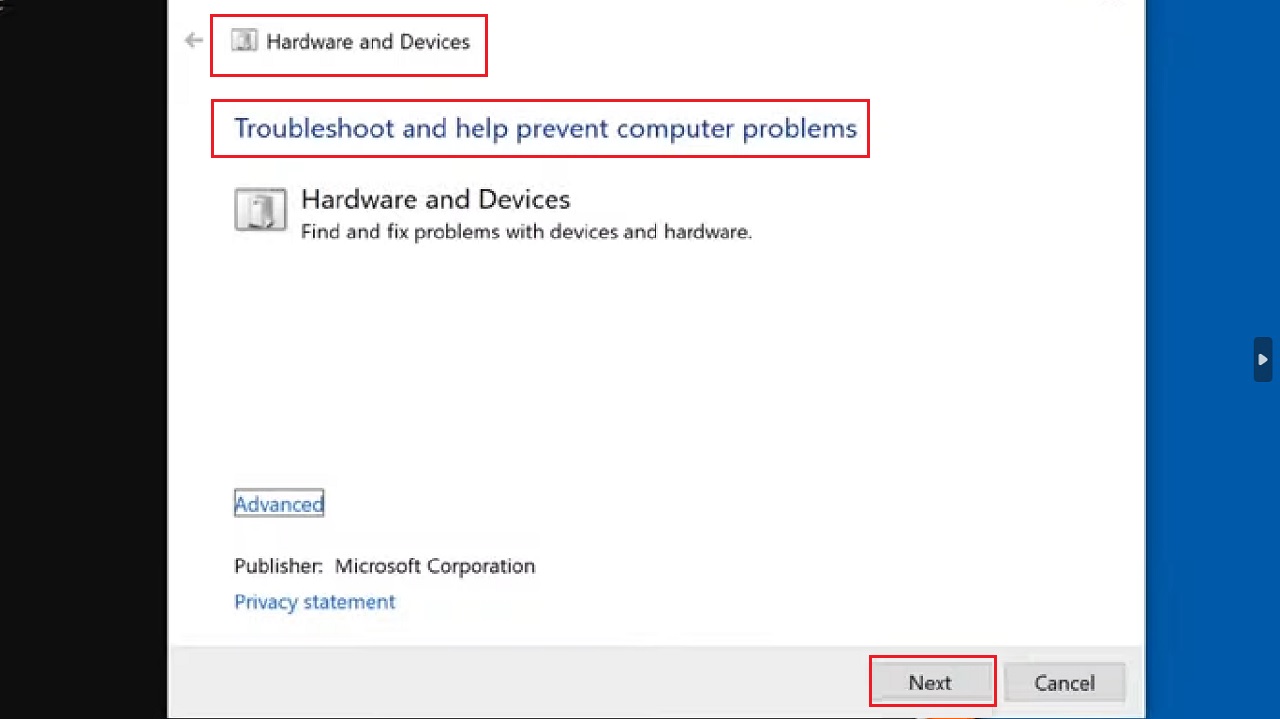
This will open the Hardware and Devices window.
- To Troubleshoot and help prevent computer problems, click on the Next button on this window.
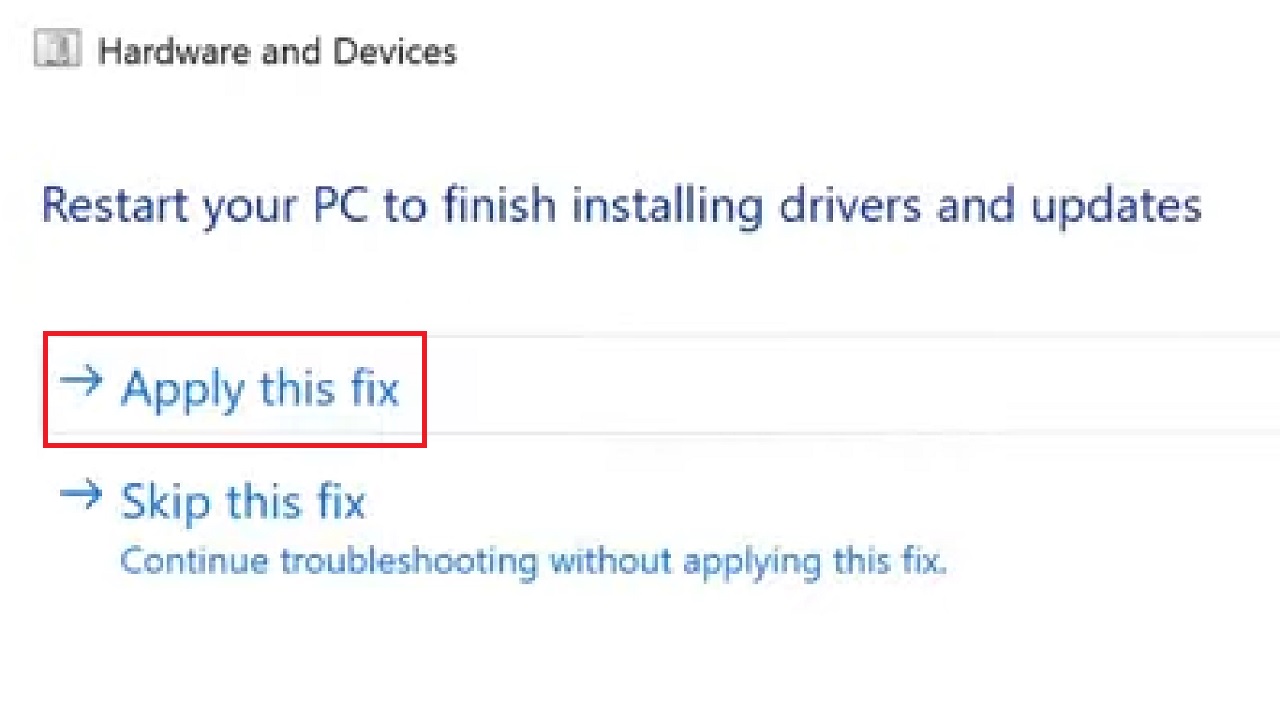
- Wait till the troubleshooter detects the issue.
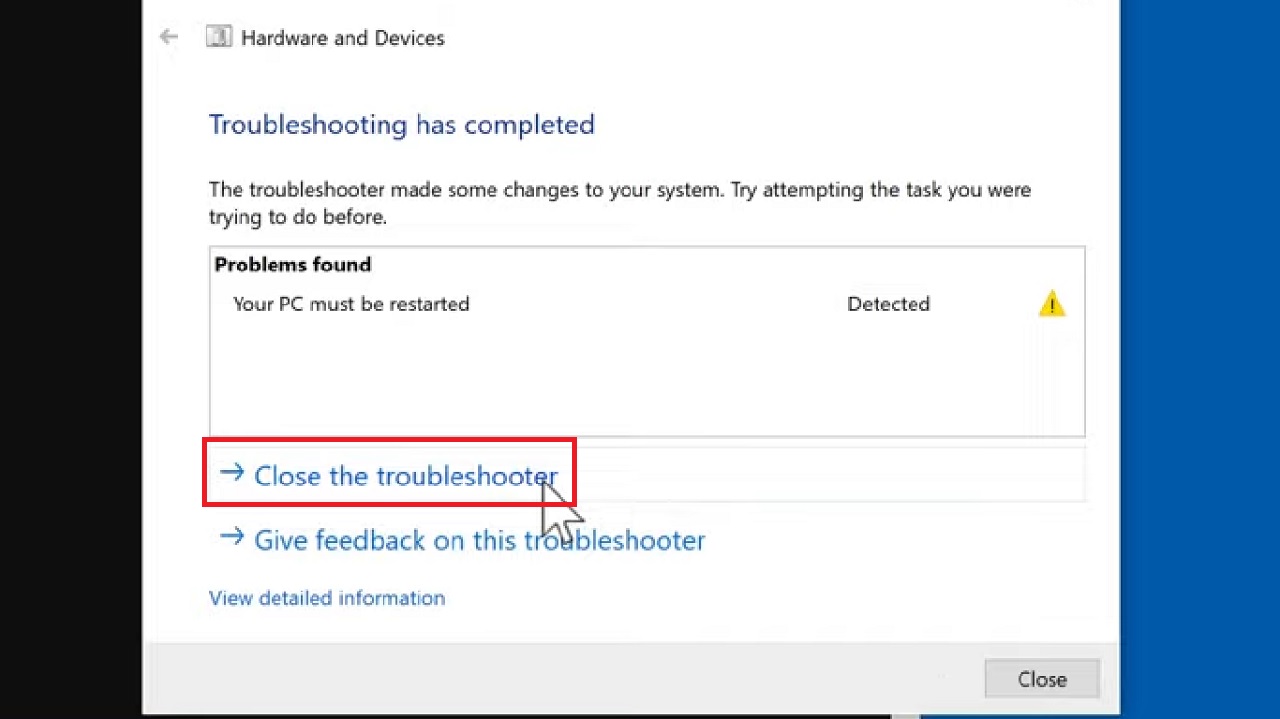
- When it is done detecting, it will click on Apply this fix option in the following window when it appears.
- Then click on the Next in the following window to Restart your PC.
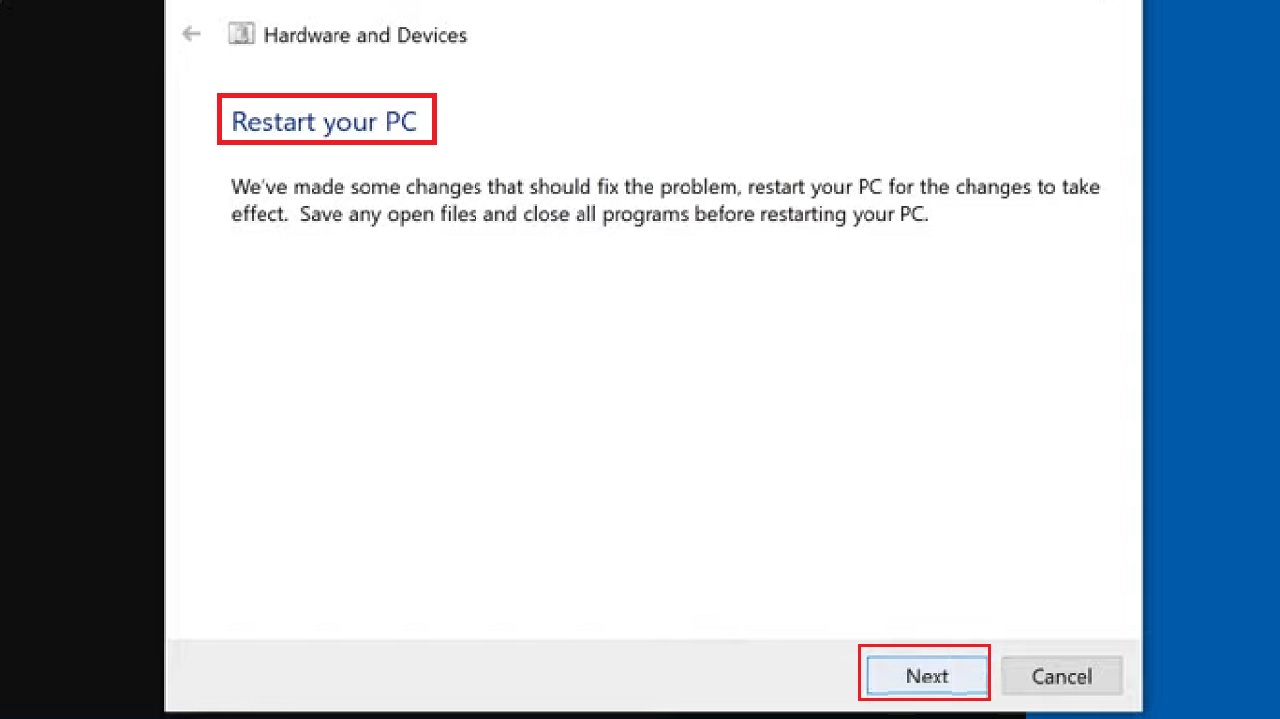
- Then, Close the Troubleshooter window.
Now, close the Command Prompt window and restart your PC.
Method 7: Check and Change the Hard Drive Policy
Check the hard drive policy because sometimes changing it may resolve the issue and allow you to remove the external hard drive safely.
STEPS TO FOLLOW:
- Press the Windows and X keys on your keyboard together.
- Select Device Manager.
- Click on the arrow next to Disk Drives to expand this section.
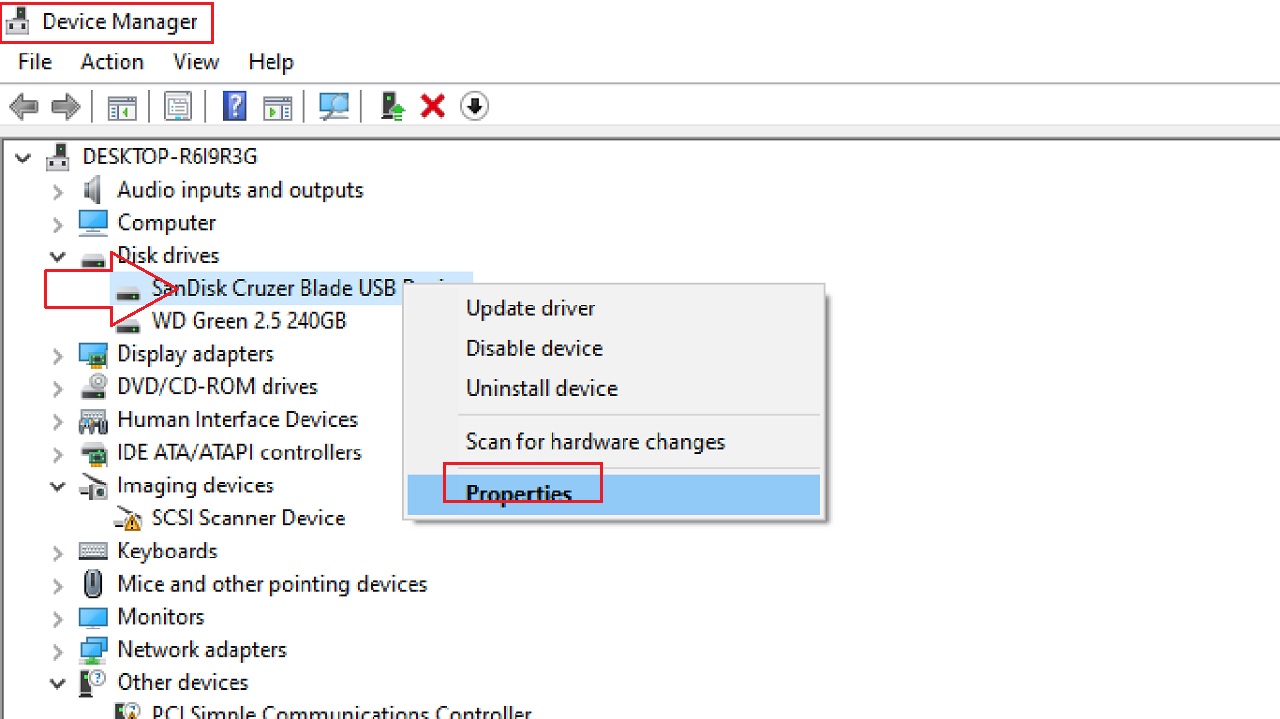
- Find the particular drive you want to eject. (Sandisk Cruzer Blade USB Device in this case.)
- Right-click on the drive.
- Select Properties from the drop-down options.
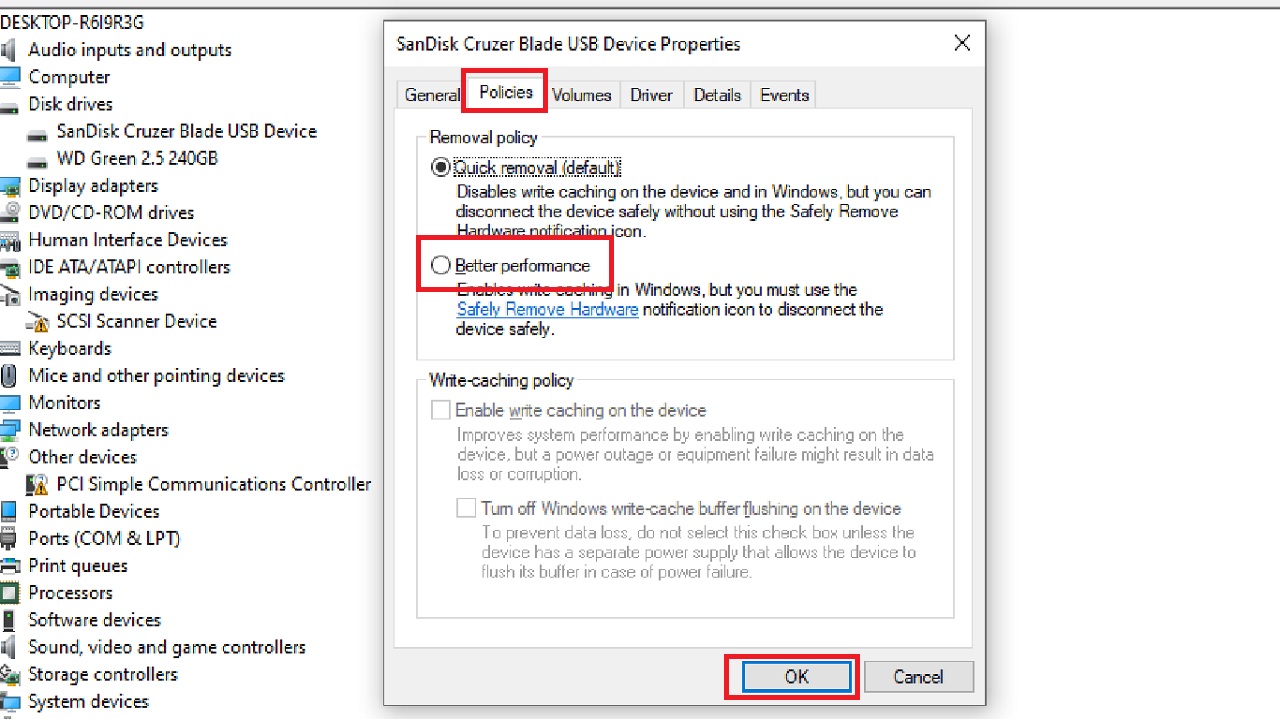
- Go to the Policies tab in the Properties window.
- Check the small circle next to Better Performance.
- Click on the OK button to save the changes and exit.
Now restart your computer. This will resolve the issue.
In Mac Computer System
You may also face the same issue if you use a Mac computer system. In that case, you will need to follow these specific steps to remove the external hard drive safely from your system.
However, right at the outset, you must make sure that the trash is empty. This is one of the most common solutions to issues like this.
Method 8: Try Again or Force Eject
You may give it another try or force eject your external drive as a quick and effective solution to the issue most of the time.
STEPS TO FOLLOW:
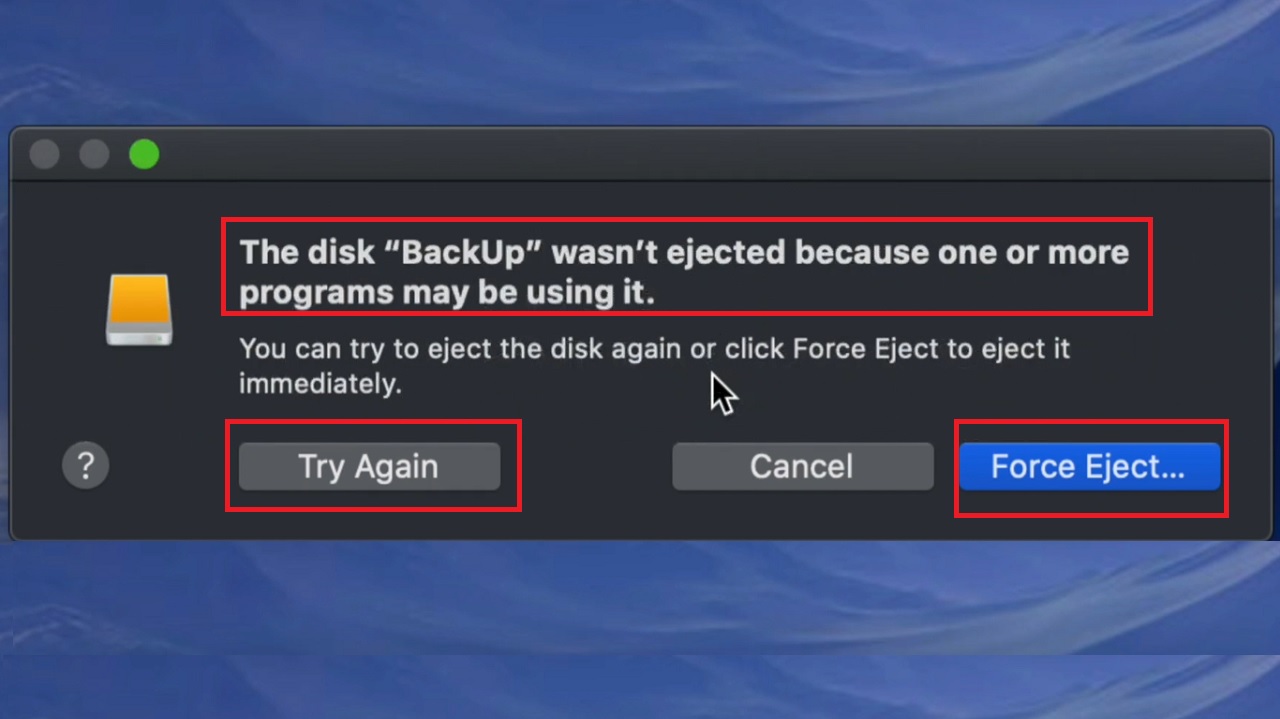
Click on the Try Again button on the left side or Force Eject button on the right side of the message window that says ‘The disk “Backup” wasn’t ejected because one or more programs may be using it’ as shown in the image below:
If this does not resolve the issue, try these following solutions.
Method 9: Close Other Apps
There may be some other apps that you do not know but are getting in the way. Therefore, you will need to close them.
STEPS TO FOLLOW:
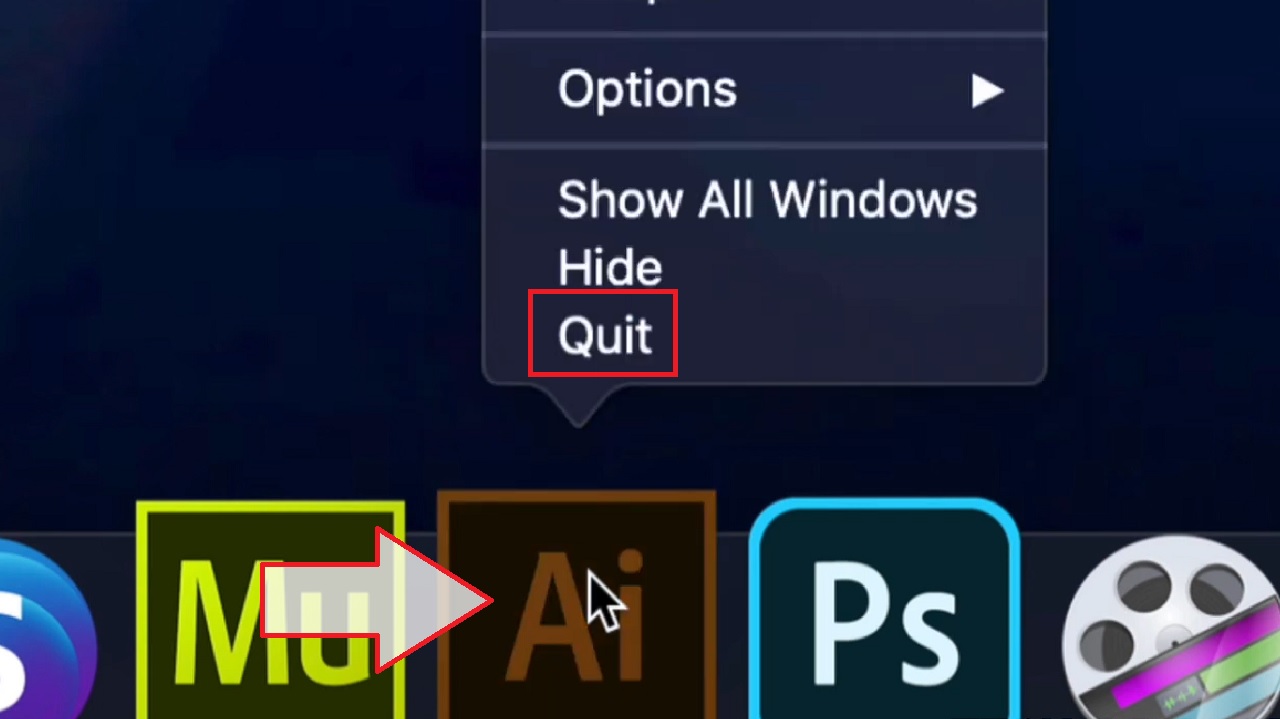
- Select and right-click on the Adobe Illustrator icon at the bottom of your screen.
- Click on the Quit option from the list that pops up.
Now try to eject your external hard drive.
Method 10: Relaunch Finder
More often than not, relaunching Finder may resolve the issue.
STEPS TO FOLLOW:
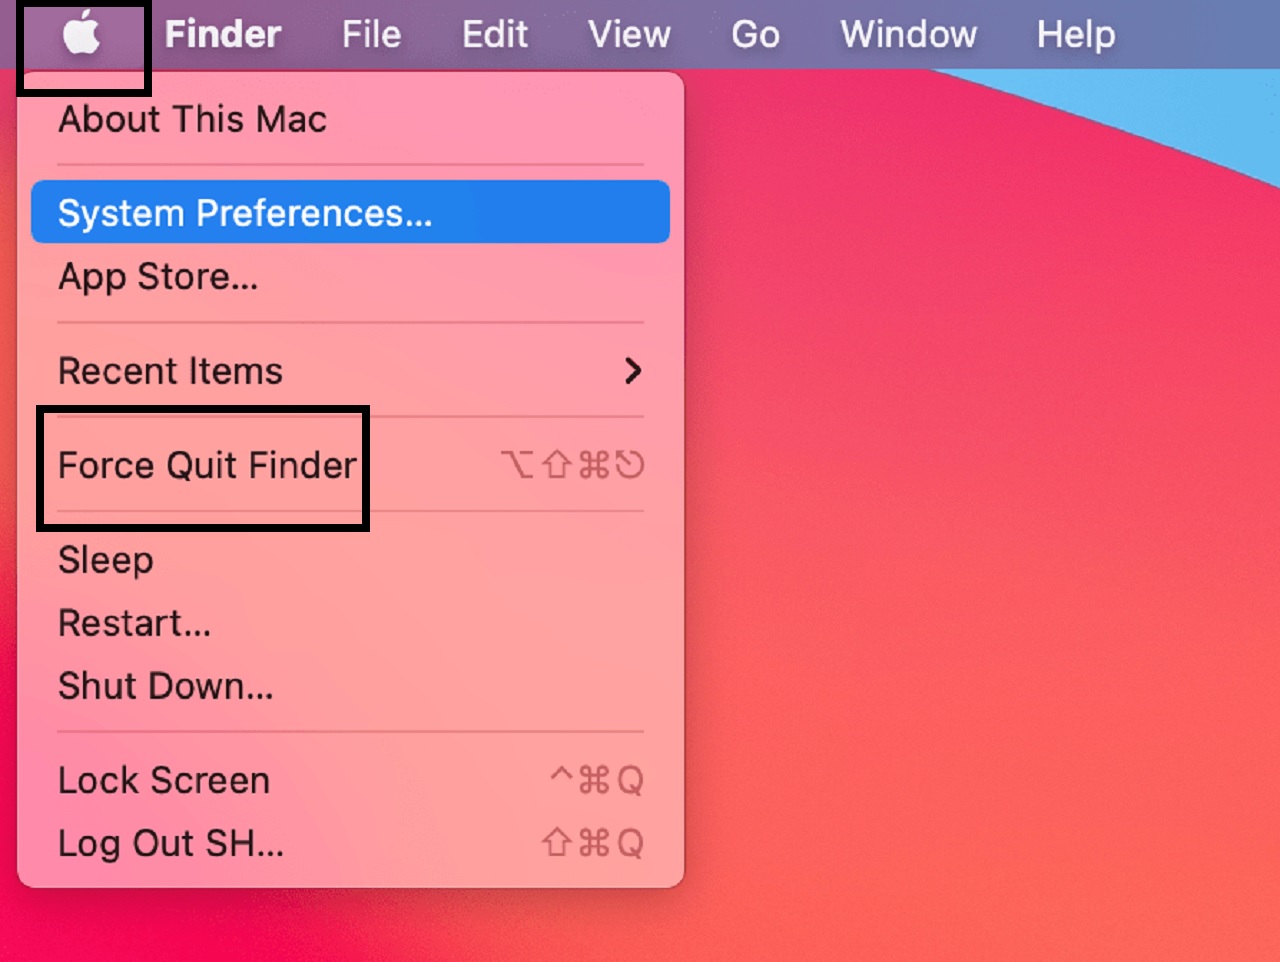
- Go to the Apple icon on the top-left corner of your screen.
- Click on it.
- Select Force Quit from the options available in the drop-down menu.
- Select Finder and click on the Relaunch button below in the next Force Quit Applications window.
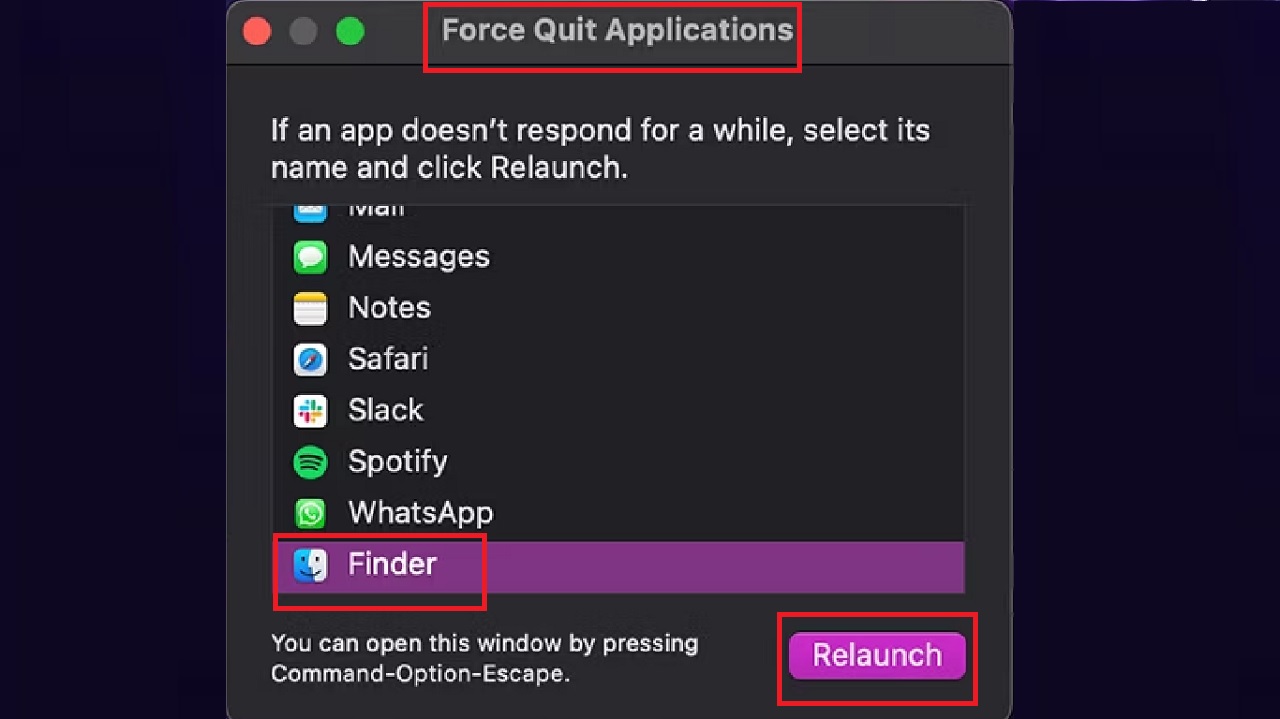
- In the following Force Quit Applications confirmation window, click on the Relaunch button.
Close the window and try ejecting the external hard drive now. It should work.
Method 11: Use the Terminal
You may run a few specific commands in the Mac Terminal to eject the external hard drive.
STEPS TO FOLLOW:
- Open Terminal.
- Type the command diskutil list external in the Terminal window.
- Hit Return.
This will give you the list of the external drives mounted in the system along with the number of each of the drives.
- Now type the command diskutil eject disk[NUMBER] and hit Return.
Replace [NUMBER] with the number of the particular external drive you are having a problem to eject. This will eject the drive.
Method 12: Use Disk Utility to Run First Aid
If the external drive plugged into your system is corrupted, it will not eject. You will need to run Disk Utility to run First Aid to remove it.
STEPS TO FOLLOW:
- Open the Disk Utility app from the bar at the top of the screen.
- Select the external drive you want to eject from the left side of the Disk Utility window.
- Click on the First Aid button.
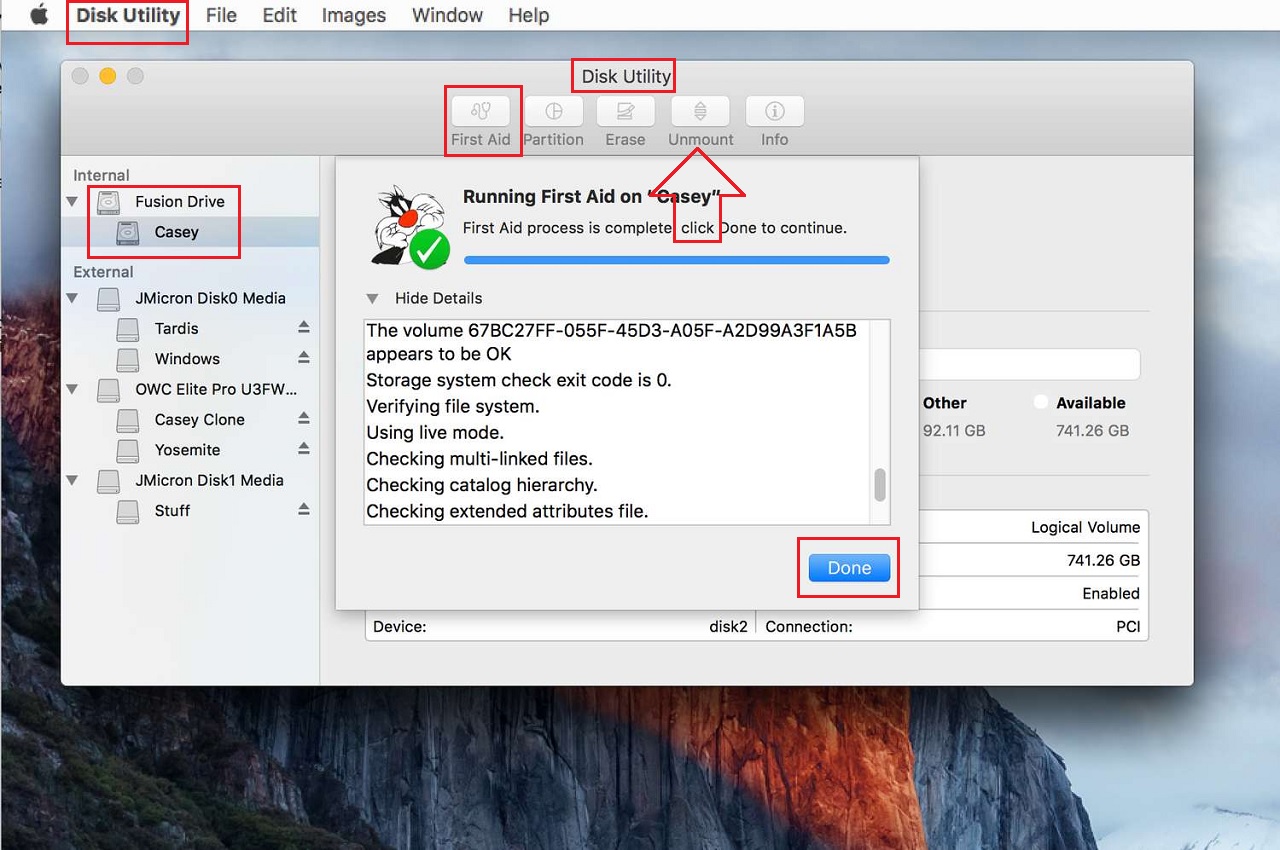
- Click on the Run button in the next window that pops up.
First Aid will repair the issues and when the process is complete, click on the Done button.
You may eject the external hard drive from your computer by clicking on the Eject/Unmount button in the Disk Utility.
Conclusion
You may face different issues with your external hard drive and not being able to eject it safely is one of them.
However, now you know that there is nothing to stress about it. Use any of the methods explained above to fix it.