
You will need to wipe a hard drive when you upgrade to a Solid-State Drive or want to get rid of a damaged hard drive. There are also several other reasons behind it.
The process is simple and can be completed in a few easy steps, as explained in this article. Read on.
In This Article
KEY TAKEAWAYS
- Running ‘clean all’ command in the Command Prompt will wipe a hard drive clean.
- You can also perform a secure wipe on the hard drive to wipe it clean by using the Command Prompt.
- A hard drive can be wiped clean from the Settings option on Windows as well.
- Resetting your computer will remove all programs and data stored on the hard drive and give it a fresh start.
- The disk management feature of Windows will also help you wipe the data stored in the hard drive.
Why Do You Need to Wipe Hard Drive?
You will need to wipe a hard drive when you want to sell off or give away your used drive to anyone. This will ensure that no personal or any data gets into the hands of the person.
You may also need to clean your used hard drive when you want to donate it or hand it over to a charity so that it appears like it is brand new.
With relation to the above aspect, here are some other specific but allied reasons to wipe clean the hard drive:
- Simply deleting or formatting a hard drive may not always wipe it clean.
- The process will also ensure that you comply with the data protection laws and other governmental regulations related to data leakage.
- It will prevent others from stealing data and information and therefore prevent identity theft.
- For a business it helps in protecting the identity of the business as well as its customers.
- It will also enable you to set your PC eventually to the factory settings.
Most importantly, if you clean your hard drive and then use it yourself, it will enhance the performance of the processor and your PC on the whole.
How to Wipe a Hard Drive?
The most common and perhaps the easiest way to wipe a hard drive clean and delete all data and information from it is to run a few specific commands on the Command Prompt.
Apart from that, there are also a few other easy ways to wipe data from the hard drive of your computer. These are:
- You can use the Settings in Windows to clean your hard drive.
- You may reset your computer system to wipe your hard drive clean.
- You can also use the disk management feature to clean the hard drive.
Here is what you will need to do to go ahead with each of these methods.
Method 1: From the Command Prompt
You can run the ‘clean all’ command in the Command Prompt to wipe all data stored in a hard drive.
STEPS TO FOLLOW:
- Go to the quick search box and type cmd. Choose Run as administrator and hit Enter.
- When the Command Prompt opens, launch diskpart by typing diskpart and hitting Enter.
- When diskpart launches, type list disk and hit Enter.
- When the information about the disks is displayed, select the disk you want to wipe clean. (For example, you select disk 1, type in select disk 1 and hit Enter.)
- Now type the final command clean all and hit Enter.
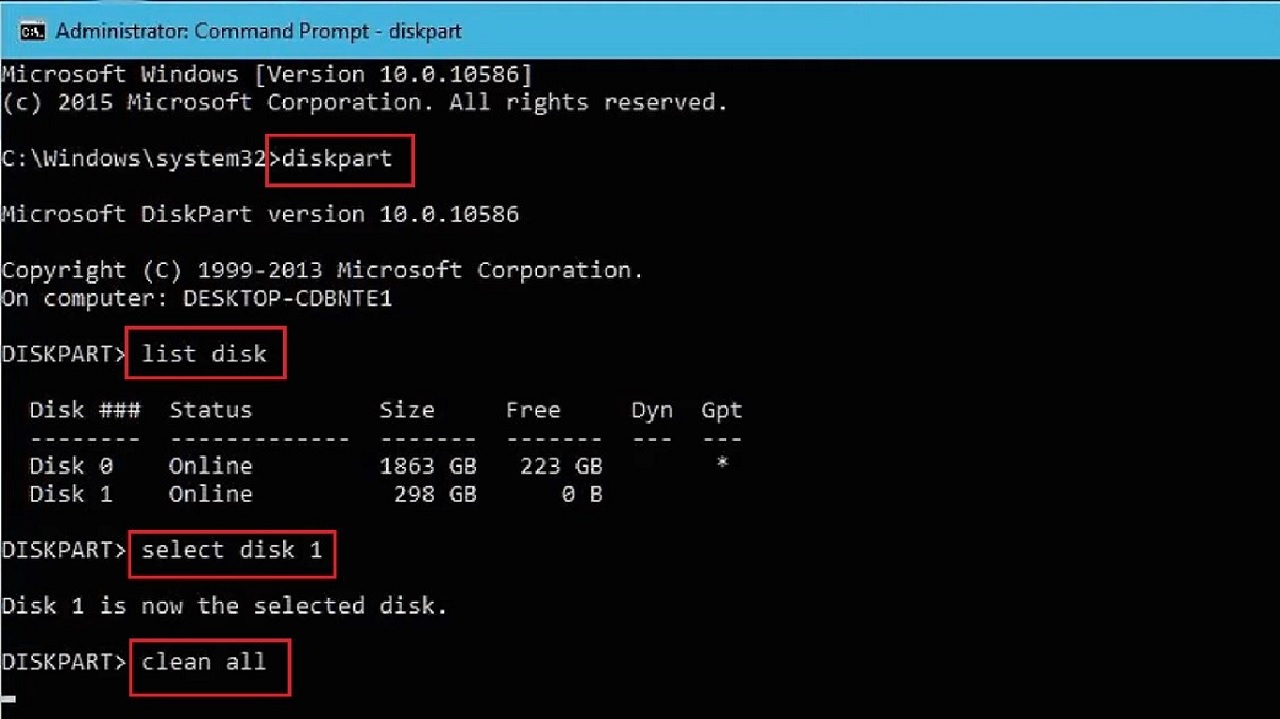
It will take some time. Wait for the process to complete. When it is done, your disk will be wiped clean.
- Finally type exit to close the Command Prompt.
Method 2: Perform a Secure Wipe
If you want you can also perform a secure wipe on your hard drive by using the Command Prompt to wipe it clean.
For example, assume that you want to clean drive F.
STEPS TO FOLLOW:
- Open the Command Prompt as before.
- Type format F: /p:3.
(This will format the F drive and P3 will instruct the computer to pass random data over the hard drive three times.)
- Hit Enter.
- Type Untitled against Enter current volume label for Drive F:
- Type Y (case does not matter) when you see the warning message telling the computer that you want to proceed with the action anyway.
- Hit Enter.
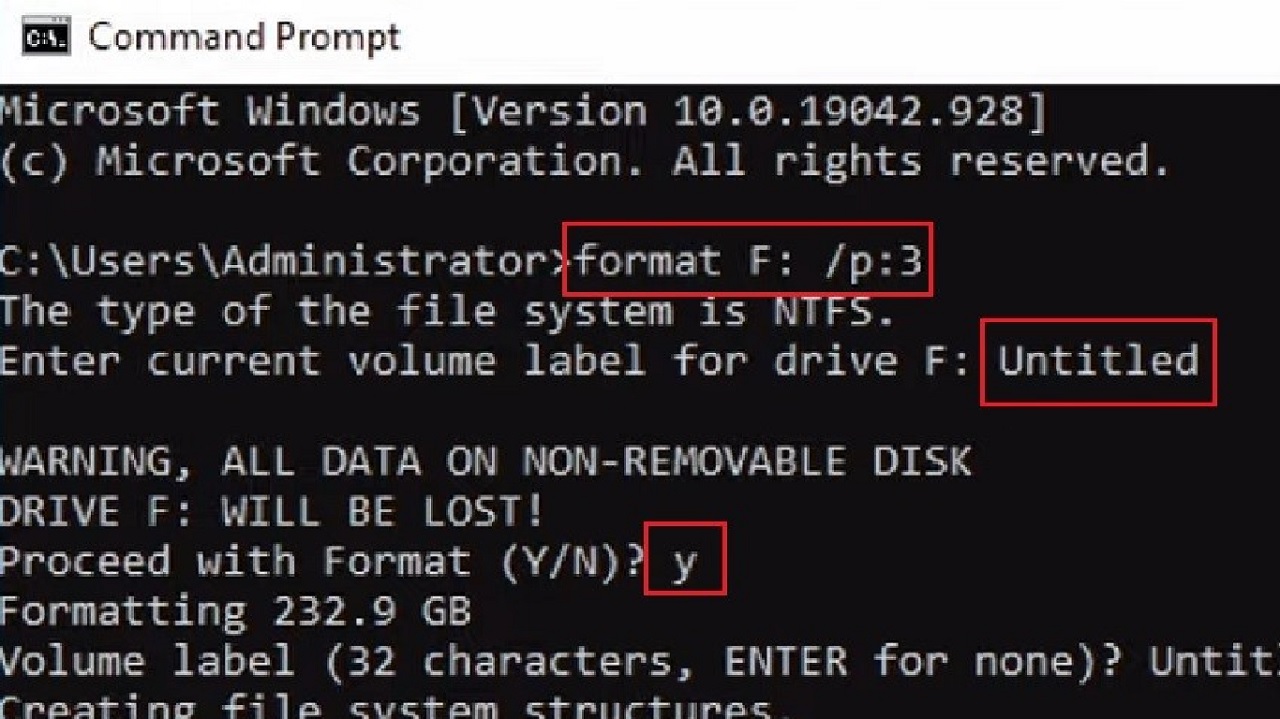
The secure wiping process will be initiated. It will take a long time to complete.
When it is complete, you will be asked once again to give a volume name within the specified number of characters. If you do not wish to give any name, simply press Enter on your keyboard.
In this case it is given the same label – Untitled.
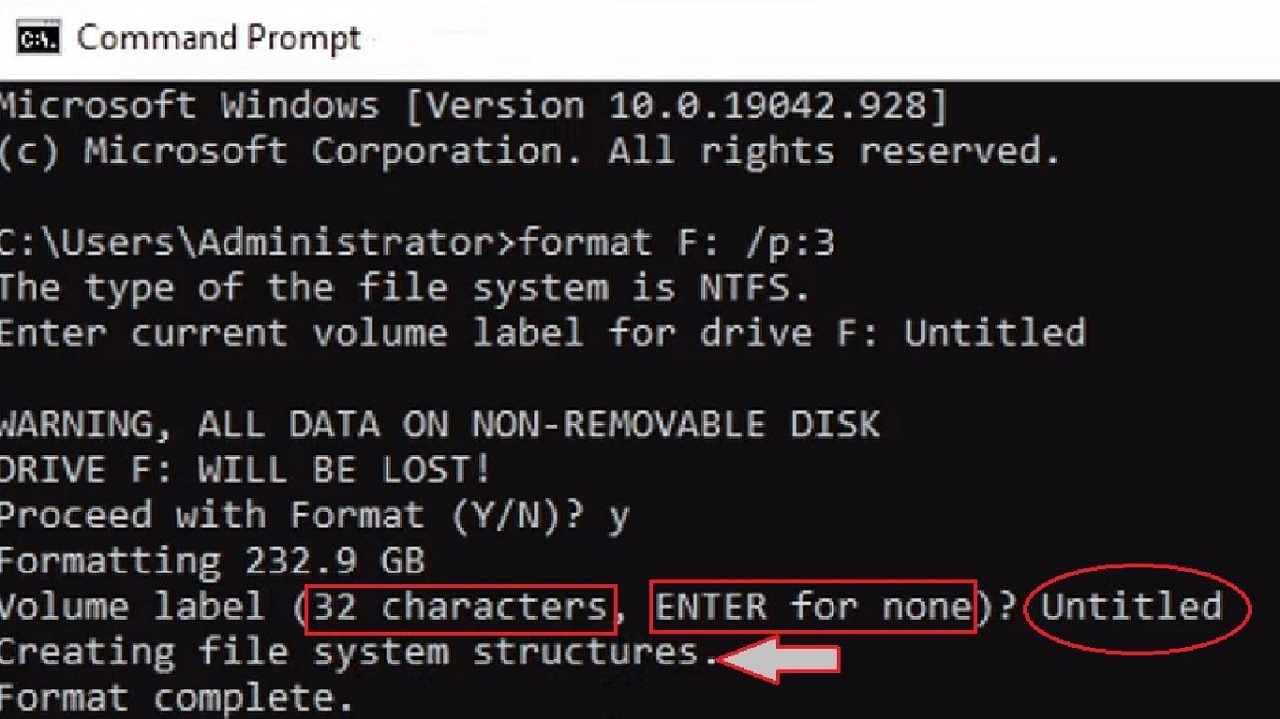
When you hit the Enter key, the computer will initiate creating the file system structures. When it is completed successfully, you can close the Command Prompt.
Method 3: From the Windows Settings
Windows offer some easy options to wipe a hard drive clean with its inbuilt feature, Settings. You can use it for this purpose.
STEPS TO FOLLOW:
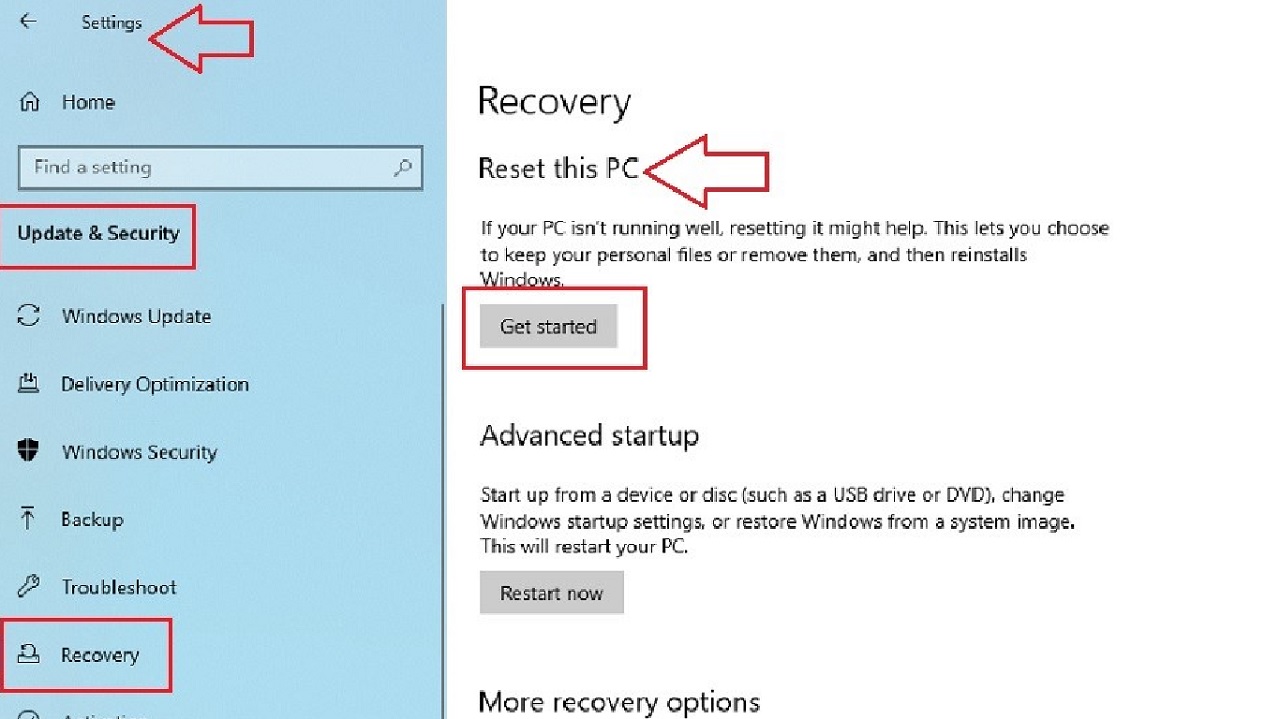
- Press the Windows and I keys together on your keyboard to open Settings.
- Go to Update & Security.
- Select Recovery from the left panel.
- Click on Get started under Reset this PC.
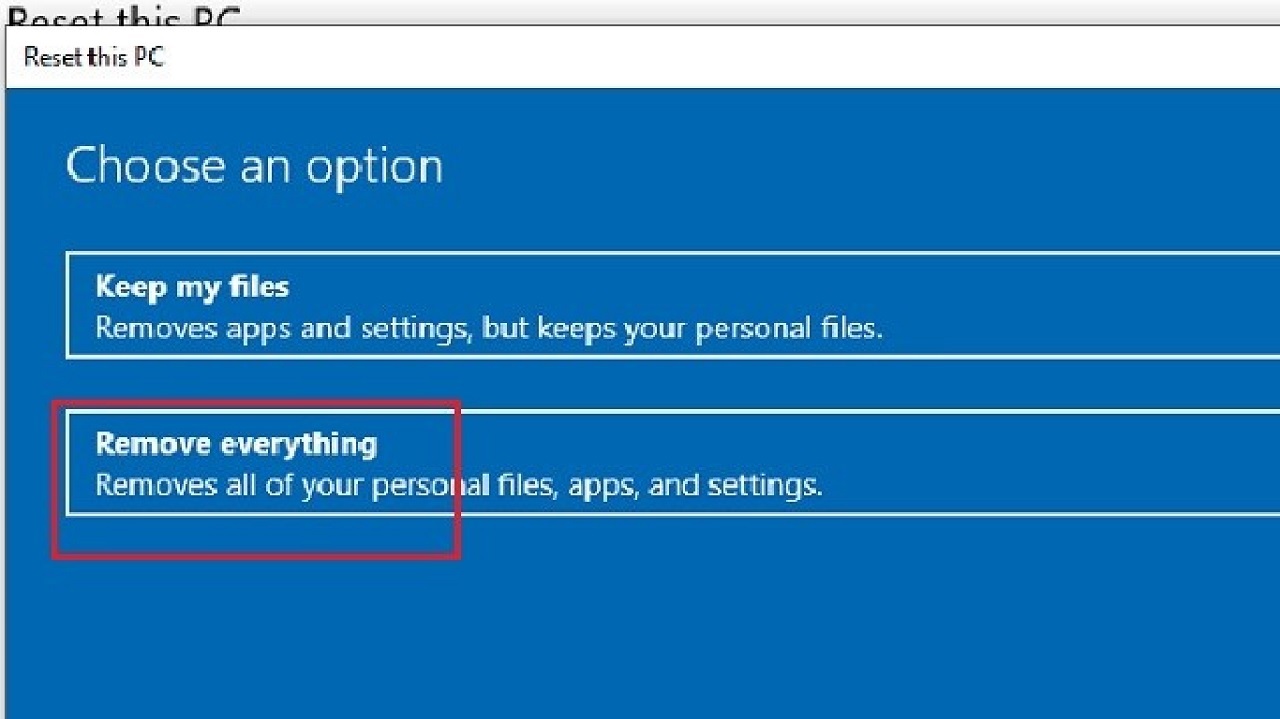
- Choose Remove everything from the available options in the following window that pops up because you want to wipe the hard drive clean.
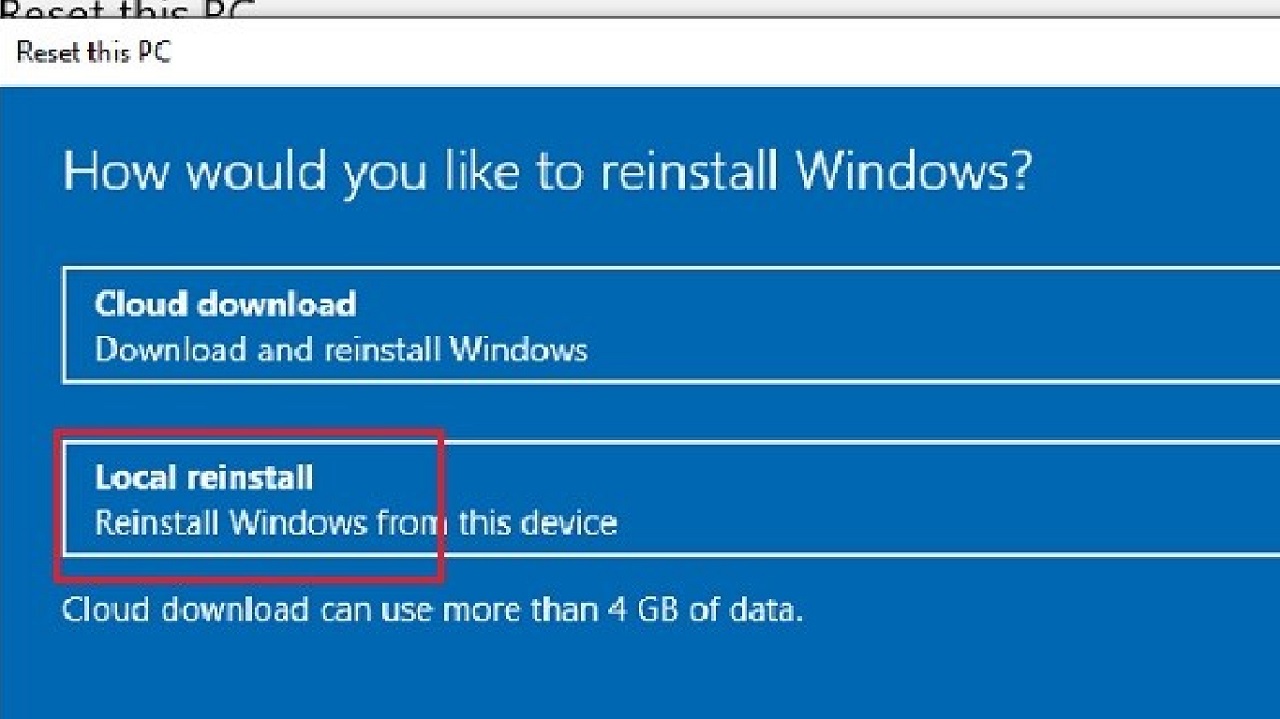
- Choose Local reinstall when you are asked ‘How would you like to reinstall Windows?’ in the next window.
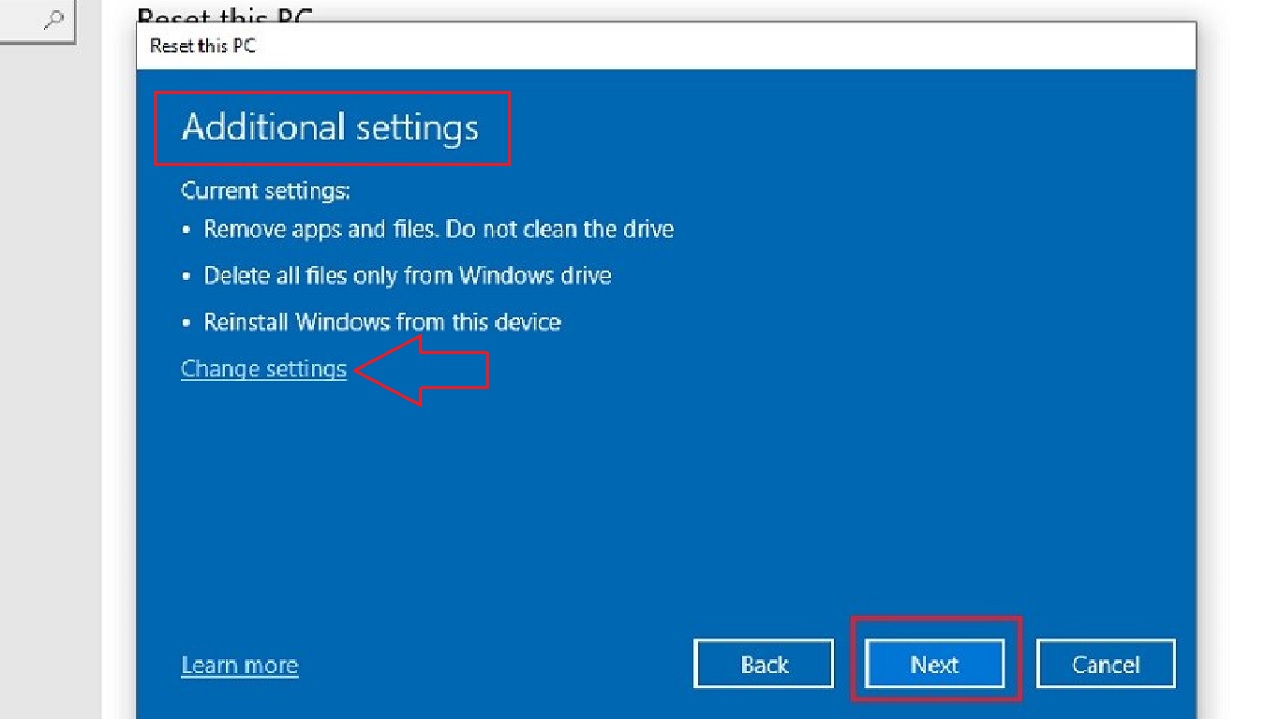
- Click on the Next button in the Additional settings window that pops up. You may also choose Change settings if you want to.
- Additionally, if you see another window, select ‘Remove files and clean the hard drive’ option from the available ones there depending on the settings.
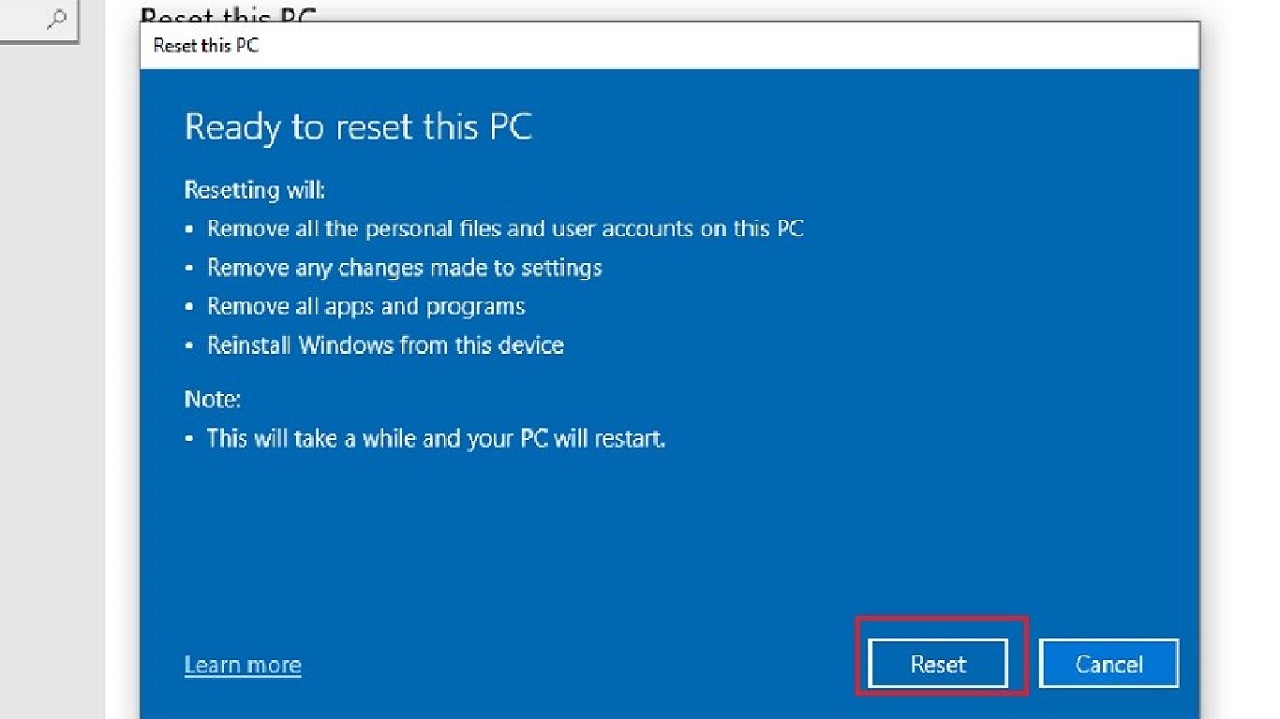
- Click on the Reset button from the ‘Ready to reset this PC’ window that pops up.
- Click on the Yes button on the confirmation window when and if it appears.
This will take some time and when it is complete the PC will restart.
Note: Depending on Windows version and settings, you may not need to follow each and every step mentioned above.
Method 4: Using the Disk Management Tool
You may use the Disk Management tool in Windows to clean a hard drive that is not formatted for it.
However, you will need to use an external hard drive for it and also need to log in as an administrator first and then go ahead with the process.
STEPS TO FOLLOW:
- Connect the external drive to the computer using a USB port.
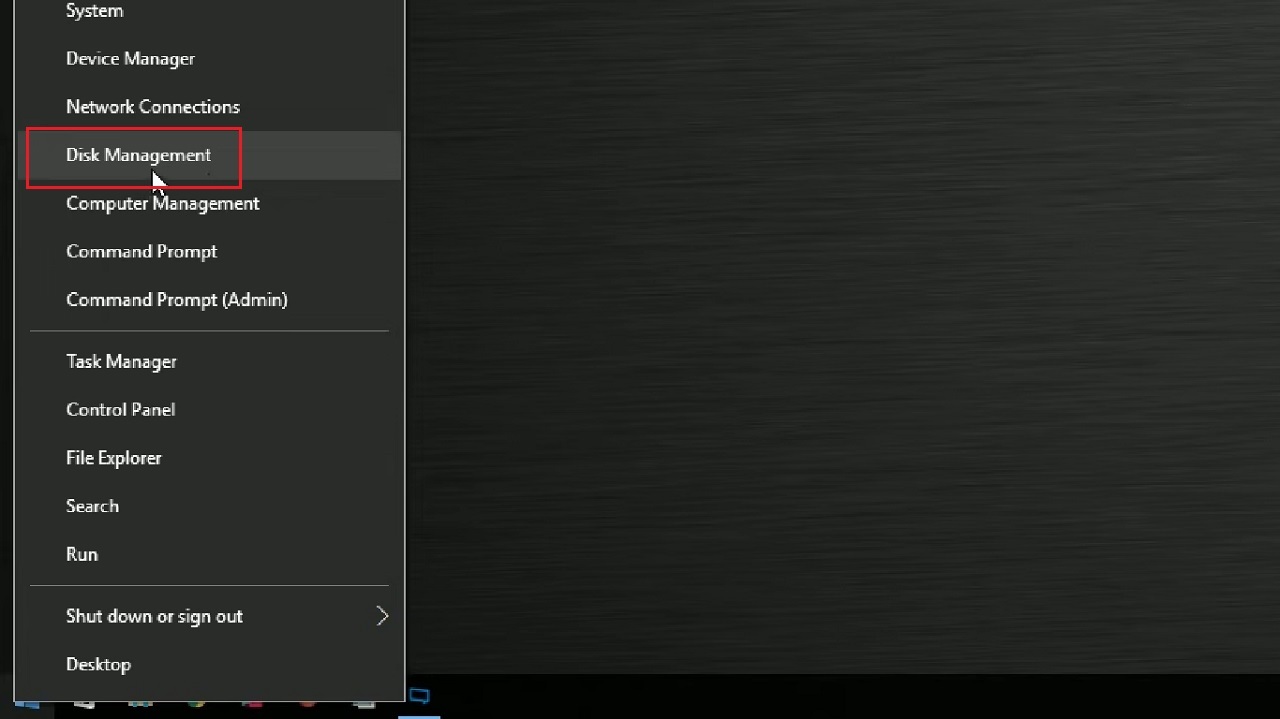
- Press the Windows key and the X key on your keyboard together and select Disk Management from the options that pops up.
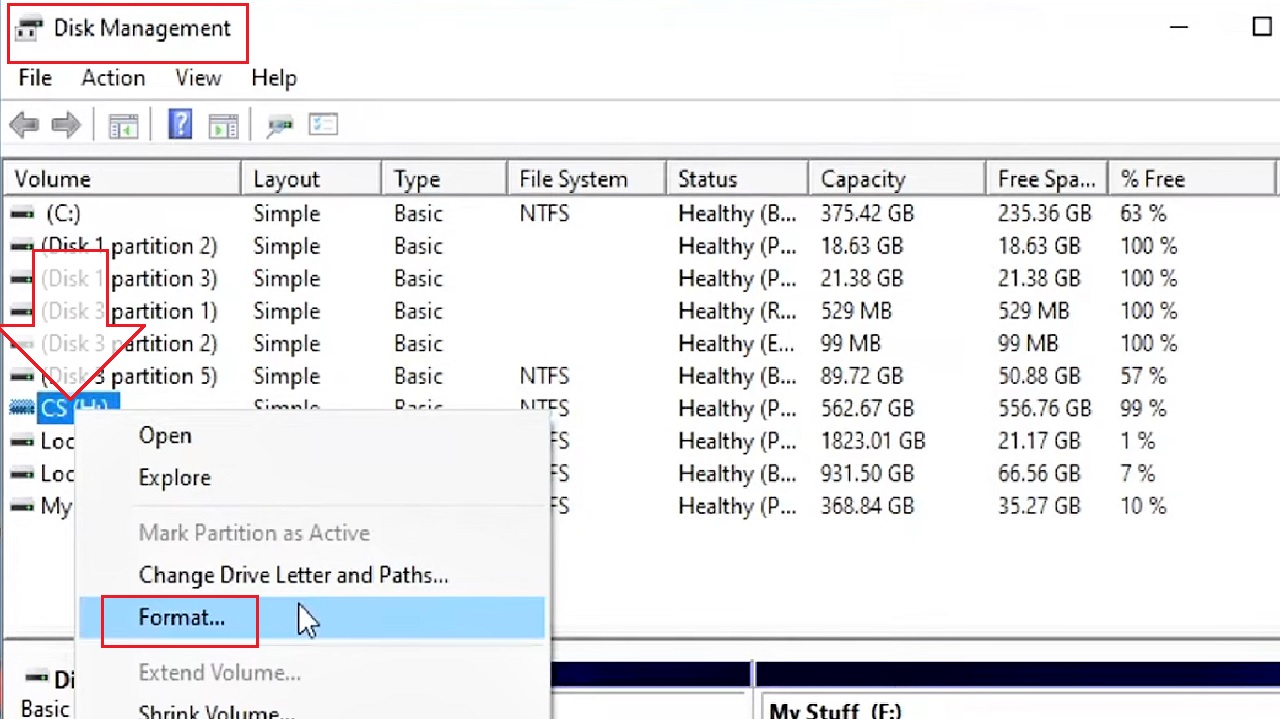
- From the Disk Management window, select the drive you want to wipe data from. (Drive: H, for example).
- Right-click on it.
- Choose the Format.
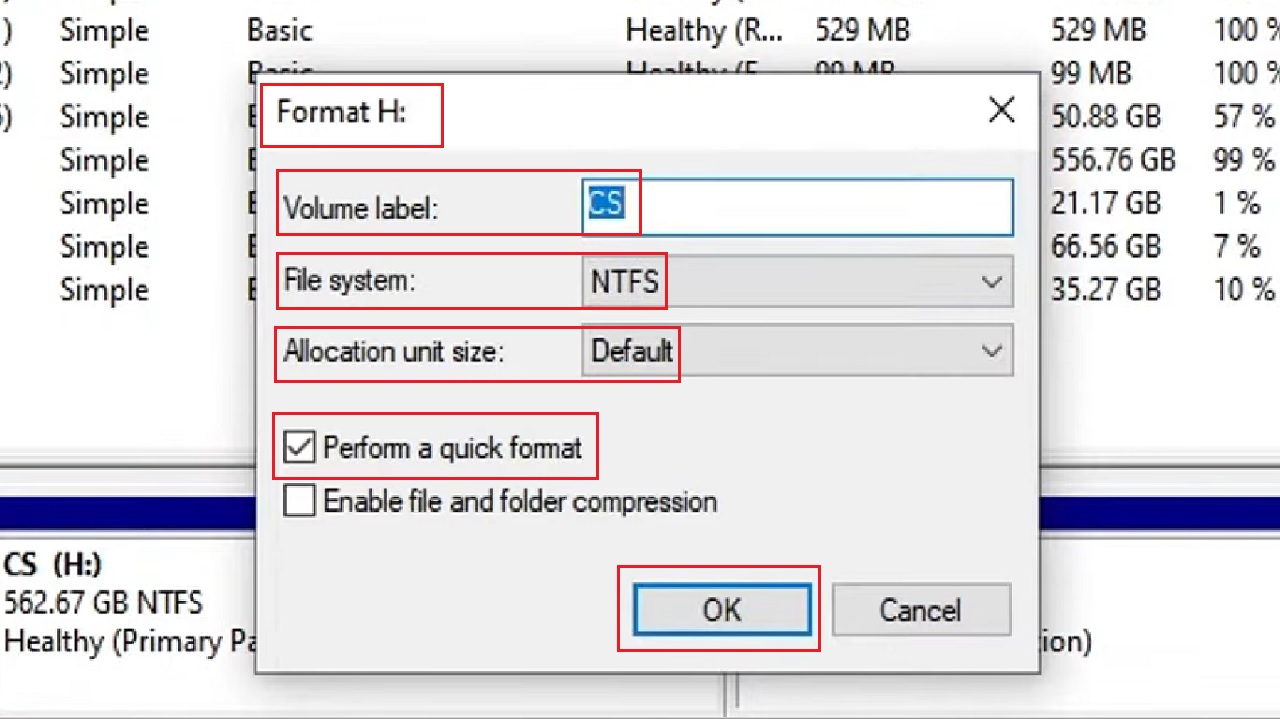
- Then in the new Format H: window that pops up, choose a volume label, which will be the name of the hard drive. (CS in this case.)
- Also choose the new File system and the Allocation unit size. (Keep it as NTFS and Default if it is set like that already.)
You can choose Perform a quick format by checking the small square box next to it. Otherwise, you may leave it unchecked if you want a longer and more secure formatting of your hard drive.
- Click on the OK button.
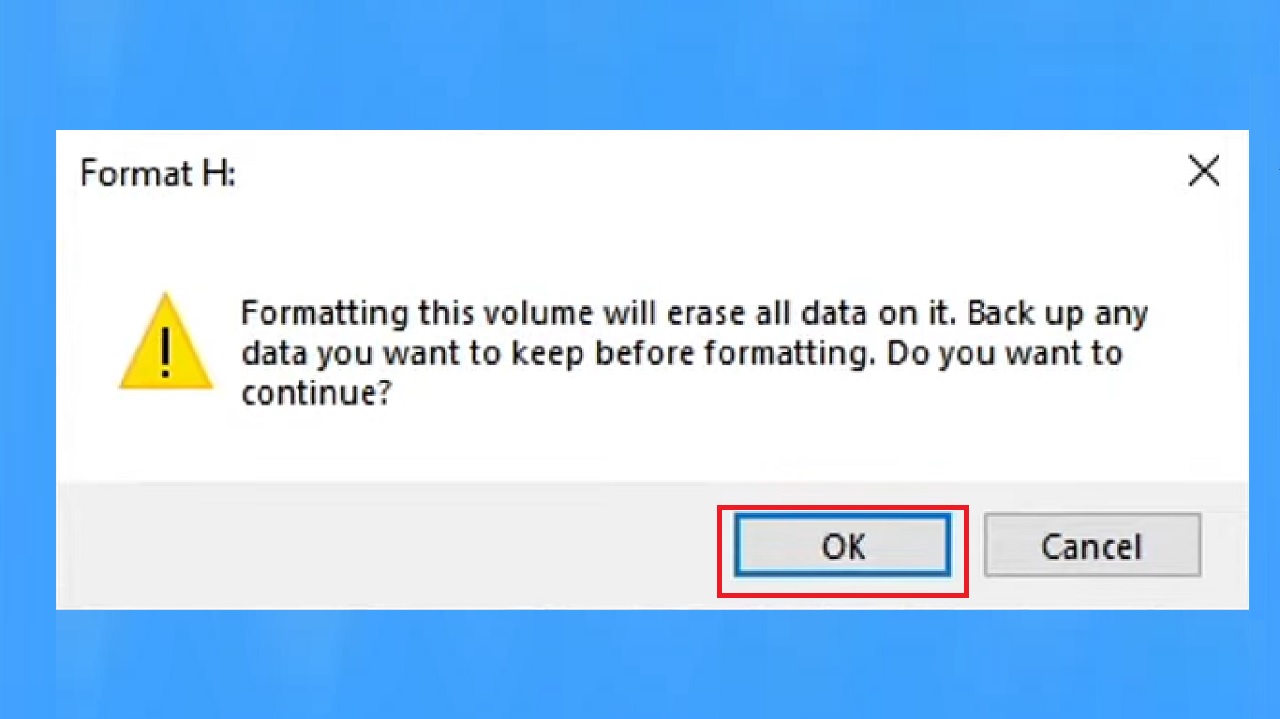
- Click on the OK button in the warning window that pops up to Format H.
Once the formatting of the hard drive starts, it will show Formatting under the Status column. When it is complete, it will show Healthy under the Status column and 100% under the % Free column.
However, sometimes, you may not be allowed to format and wide your hard drive clean. In such situations, you will need to initialize the hard drive first in the following way:
- Open Disk Management as before.
- From the new Initialize Disk window, if your drive is smaller than 2 TB, select MBR (Master Boot Record) by clicking on the radio button next to it. If the drive is larger than 2 TB, switch to GPT (GUID Partition Table).
- Click on the OK button below.

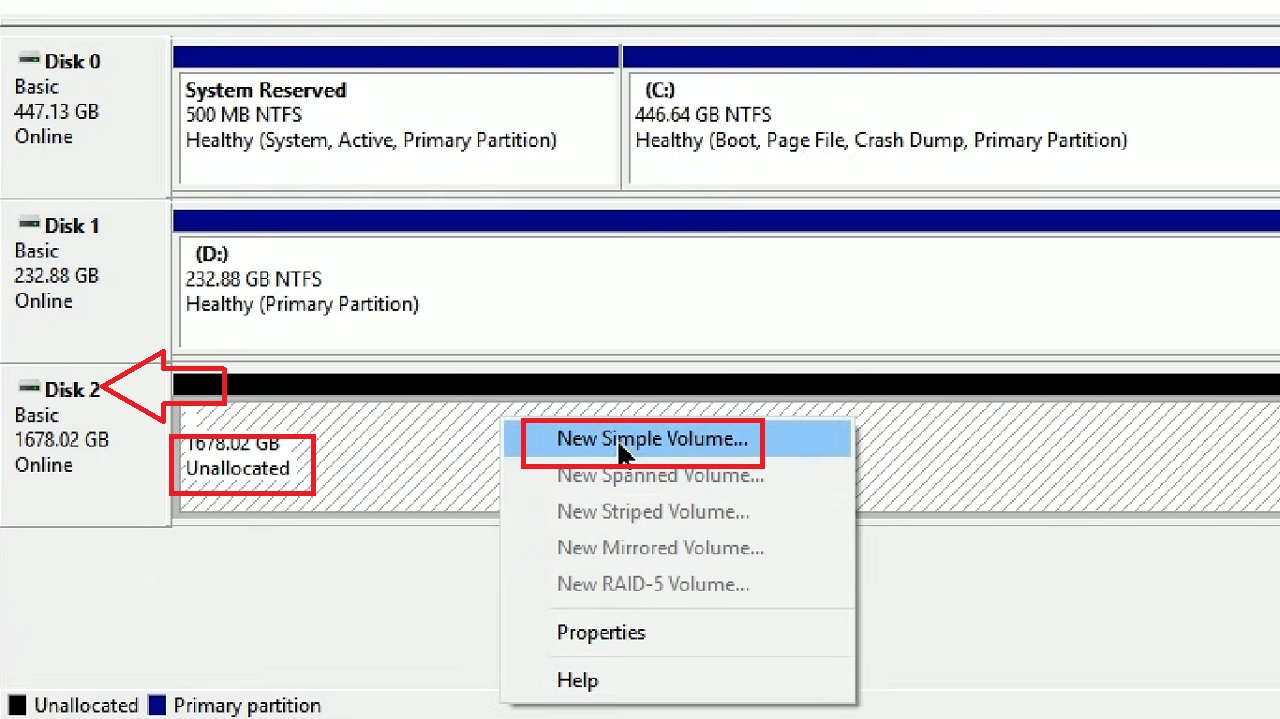
- Select and right-click on the drive marked Unallocated.
- Select New Simple Volume from the list of options in the dropdown menu.
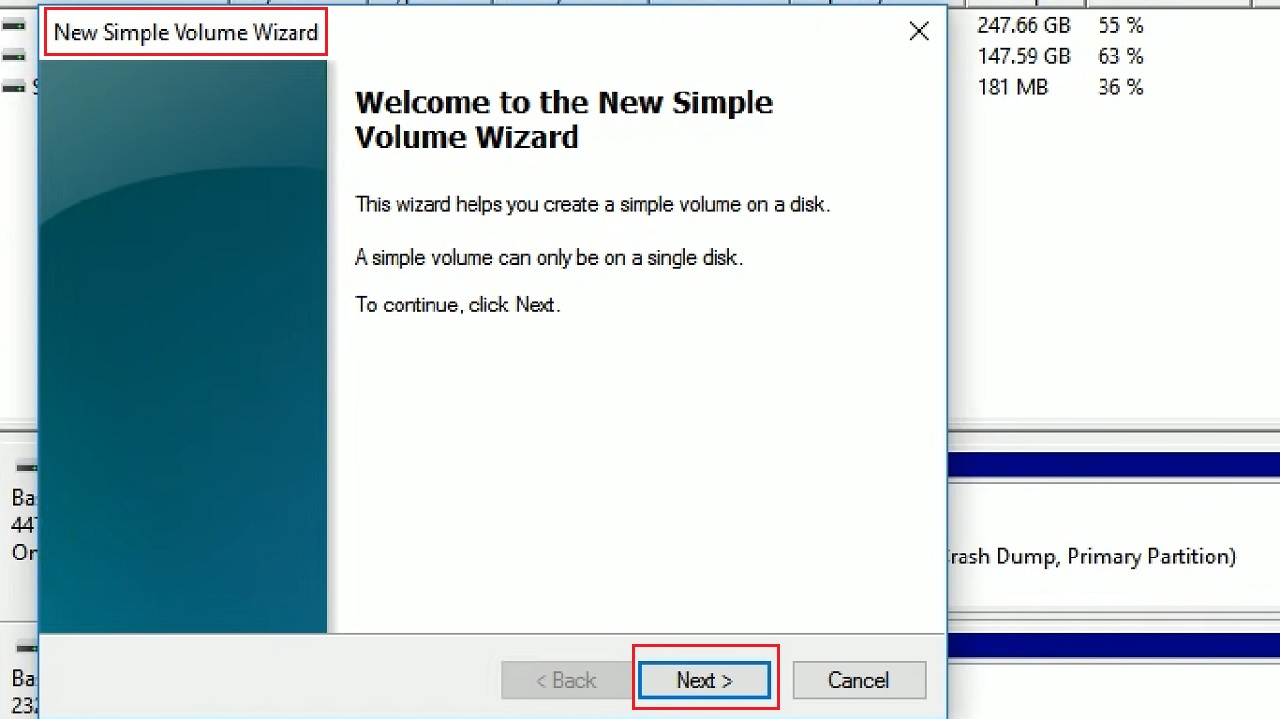
- Click on the Next button on the New Simple Volume Wizard window.
- Click on the Next button on the following window straightaway to leave everything as default.
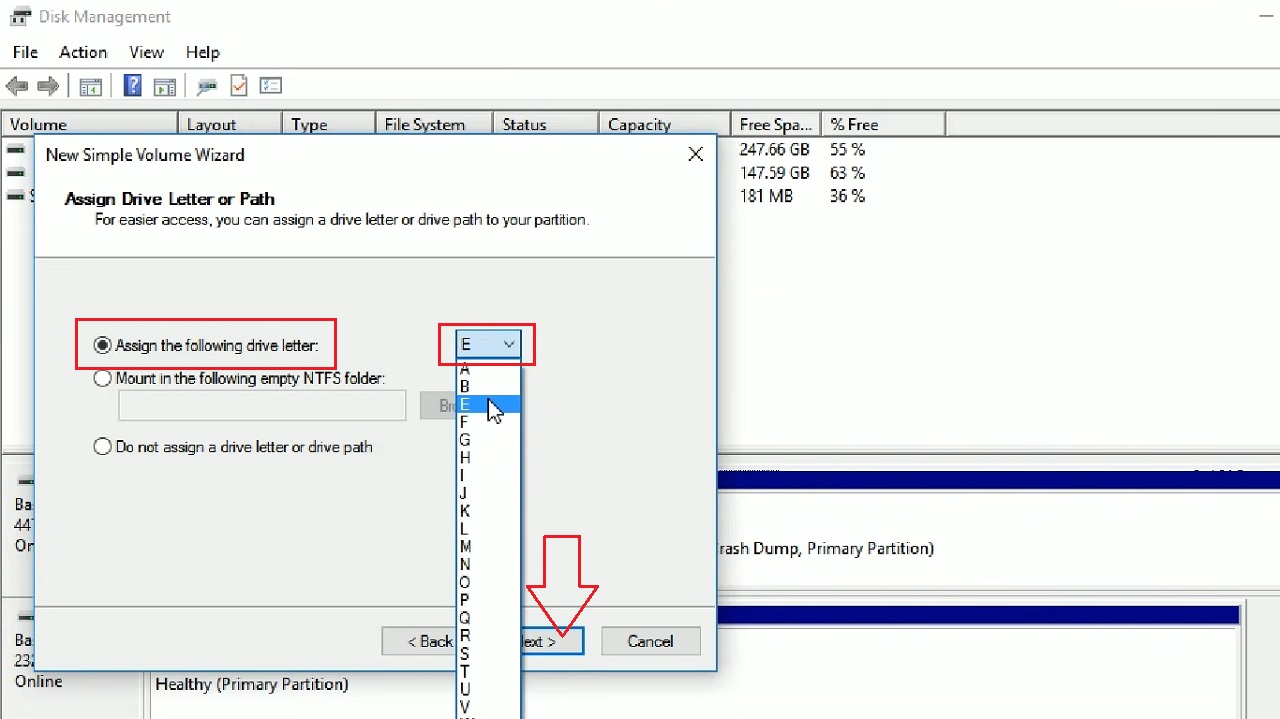
- In the following window you can select a Drive letter from the dropdown list of options you get after clicking on the small arrow in the box next to Assign the following drive letter section, or leave it as selected.
- Click on the Next button below in the Assign Drive Letter or Path window.
- Then, follow the steps to format the drive as mentioned before.
- Click on the Finish button on the New Simple Volume Wizard window.
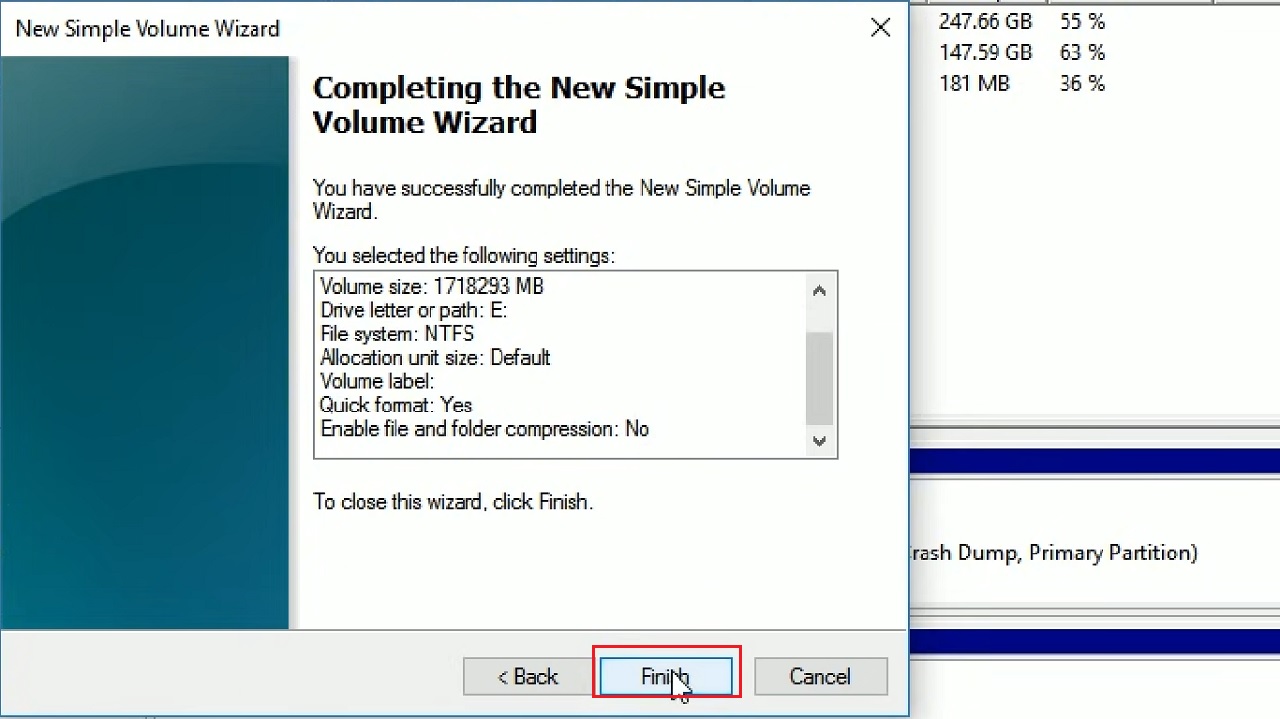
- Click on the Format disk button in the following window.
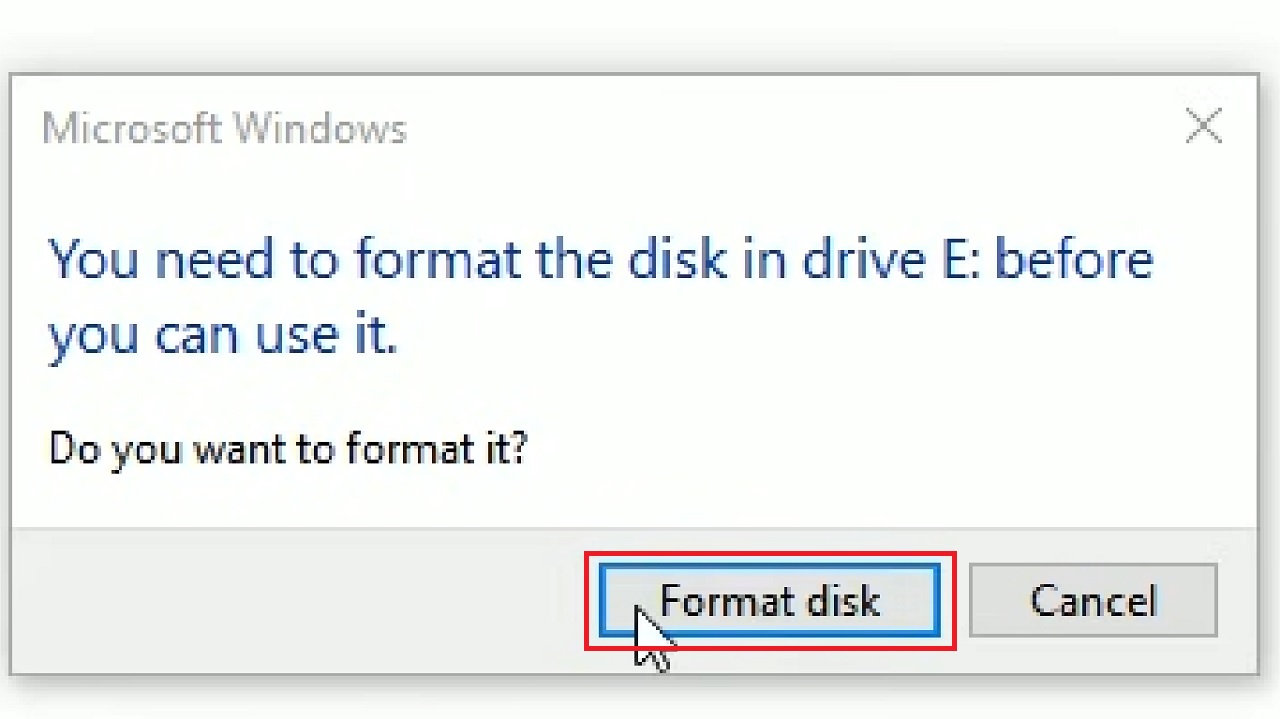
This will complete the formatting process after initializing the hard drive and it will now show in the File Explorer.
Conclusion
Erasing data from a hard drive and wiping it clean before handing it over to the buyer or to a charity is a good, safe, and sure way to protect your data.
And, as it is shown in this article, it is quite a simple process as well.