
In a computer network, every IP address should be unique. Otherwise, you will face some complications such as Windows has detected IP address conflict error.
When you experience this error, it will disrupt communications between the specific hosts and other devices. It will also result in loss of network connectivity.
Such a situation can be quite frustrating for the users but luckily there are some quick and easy solutions for this error.
If you ever face this issue, use any of the methods explained in this article apart from the quick checks and troubleshooting to be done initially.
In This Article
KEY TAKEAWAYS
- One of the most common and easy fixes to the Windows has detected IP address conflict issue is to restart the router and try again to connect.
- More often than not, disabling and re-enabling the network adapter from the Network Connections may rectify the error.
- Using the Command Prompt to release and renew the IP address may also fix the issue and allow the network to be connected.
- In some cases, disabling the Internet Protocol Version 6 and removing the static IP to use an automatic IP in its place may also resolve the issue.
- Resetting all network configurations after creating a restore point is also a proven solution in many instances of Windows detecting and IP address conflict error.
What are the Reasons for IP Address Conflicts in Windows?
The most common reason for Windows have detected IP conflict error is that the two IPs in your system, dynamic and public, are conflicting with each other.
It usually happens when the admin of the network of the devices configures the static IP address manually and conflicts with the IP address of the device.
This error may also happen when there is another computer in your network that has the same IP address as your computer and they both are conflicting.
Also, when you use dual network adapters, Wi-Fi and Ethernet, you may experience this error.
When you turn on a device from sleep mode again, it may connect to a network with a device that has the same IP address as yours, and thereby cause the issue.
There are also some other instances when this issue may occur, such as:
- There is an issue in the DHCP server
- Improper network configurations
- The Internet Protocol Version 6 IPv6 may be enabled
When the Dynamic Host Configuration Protocol or DHCP network management tool assigns the same IP address automatically as the IP address that you set manually, it can result in such an error.
No matter what, you can easily resolve this issue and for that you do not need to have exceptional technical knowledge.
How to Fix Windows Has Detected IP Address Conflict Error?
In order to resolve the issue of Windows having detected an IP address conflict on your PC, you should start with the basic checks which includes checking for loose connections of Ethernet cable if you are using one, by unplugging and plugging the cable again.
Some other easy ways to try to resolve the issue are as follows:
- You may also restart your system or router by pressing the power button off, waiting for five minutes and turning it on again. You may also login to 192.168.0.1, 192.168.1.1, or 192.168.11.1 to visit the administrator management page and the Management section to click on Reboot for the same.
- You may even try disconnecting the other devices from the network and try again.
- If IPv6 is enabled in your system, you may even check by disabling it.
- You may try to reset all the network configurations.
- If the issue is caused due to using two network adapters, it can be resolved by disabling or uninstalling one when you switch to the other.
- If any other external device is connected to the same IP address as the device and is causing the issue, you can resolve it by resetting the network settings or by assigning an entirely different IP address.
You may also try these following solutions in addition before moving on to the relatively complex solutions.
Troubleshooting: Sometimes, simple troubleshooting may help in resolving the issue of Windows having detected an IP address conflict. This would fix any internal issues existing with the network connection.
Go to the search box > Type troubleshoot > Hit the Enter key on your keyboard > Click on Internet Connections > Click on Run the troubleshooter > Select the Troubleshoot my connection to the Internet option from the following window > Close the troubleshooter window > Restart the computer.
Router reset: Resetting the router back to factory settings may sometimes rectify the issue as well. You may switch it off, unplug it from the wall socket, wait for 30 seconds, plug it back again and turn it on.
If that does not solve the issue, look for a small Reset button at the back of the router > Press it with a paperclip or a sharp object and hold for about 10/20 seconds until the power indicator starts blinking.
Note: It is never advised that a beginner configures the settings of the router with little knowledge on their own. It will not only interrupt network connectivity, but it may also cause some severe issues to the home network.
Reenable network adapter: Go to the Control Panel > Network and Internet > Network and Sharing Center > Change Adapter Settings > Right-click on the current adapter > Click on Disable > Again right-click on the adapter > Click on Enable.
If the above simple methods fail to resolve the issue, here are the steps to follow for trying the more advanced solutions.
Please be informed that these solutions are not written on stone and results may vary depending on the situation. However, these solutions are still worth a try.
Method 1: Flush DNS and Reset using the Command Prompt
The most common fix to the issue of Windows having detected an IP address conflict is to run a few commands in the Command Prompt to flush DNS. If that does not resolve the issue, you can then flush the DNS Resolver cache and reset your system.
STEPS TO FOLLOW:
- Go to the search box next to the Start Menu.
- Type in cmd in the box.
- Right-click on the best match and select Run as administrator from the drop-down context menu.
- If you receive a User Account Control prompt, click on the Yes button.
Now, in the Command Prompt window, type the following commands one after the other and press the Enter key on your keyboard after the successful completion of the commands:
- ipconfig /flushdns
- ipconfig /release
- ipconfig /renew
- ipconfig /all
Close the Command Prompt Window, restart your computer and check whether or not the error is rectified.
If that did not resolve the issue, you can try running these two commands one after the other as before:
- ipconfig /flushdns
- netsh winsock reset
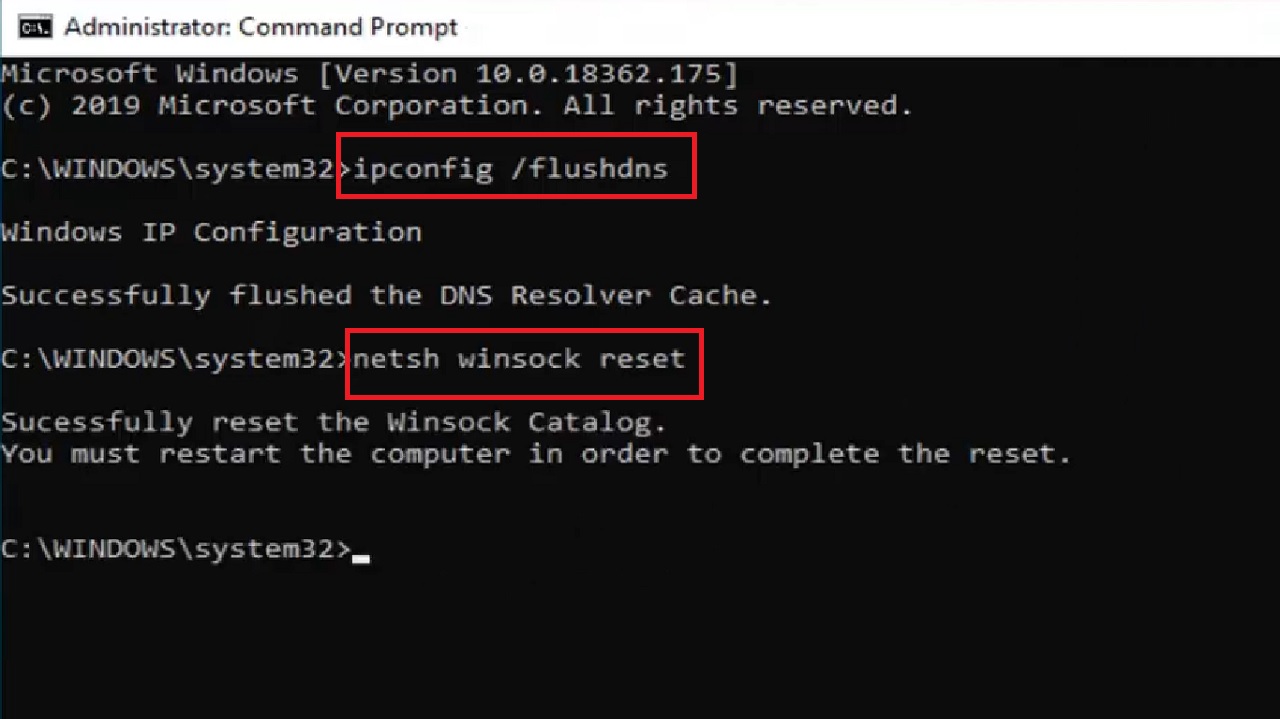
This should successfully flush your DNS Resolver Cache and reset.
When the process is complete, type exit in the Command Prompt window and close it.
Now, restart your computer and hopefully your problem will be resolved. If it still persists, move on to the next method.
Method 2: Make Changes in the Internet Protocol Version from the Control Panel
Most of the time, just like in several other network issues, making some small changes in the Internet Protocol (IP) version from the Control Panel can resolve the issue of Windows having detected an IP address conflict.
STEPS TO FOLLOW:
- Go to the search box again and type control panel in it.
- Hit Enter.
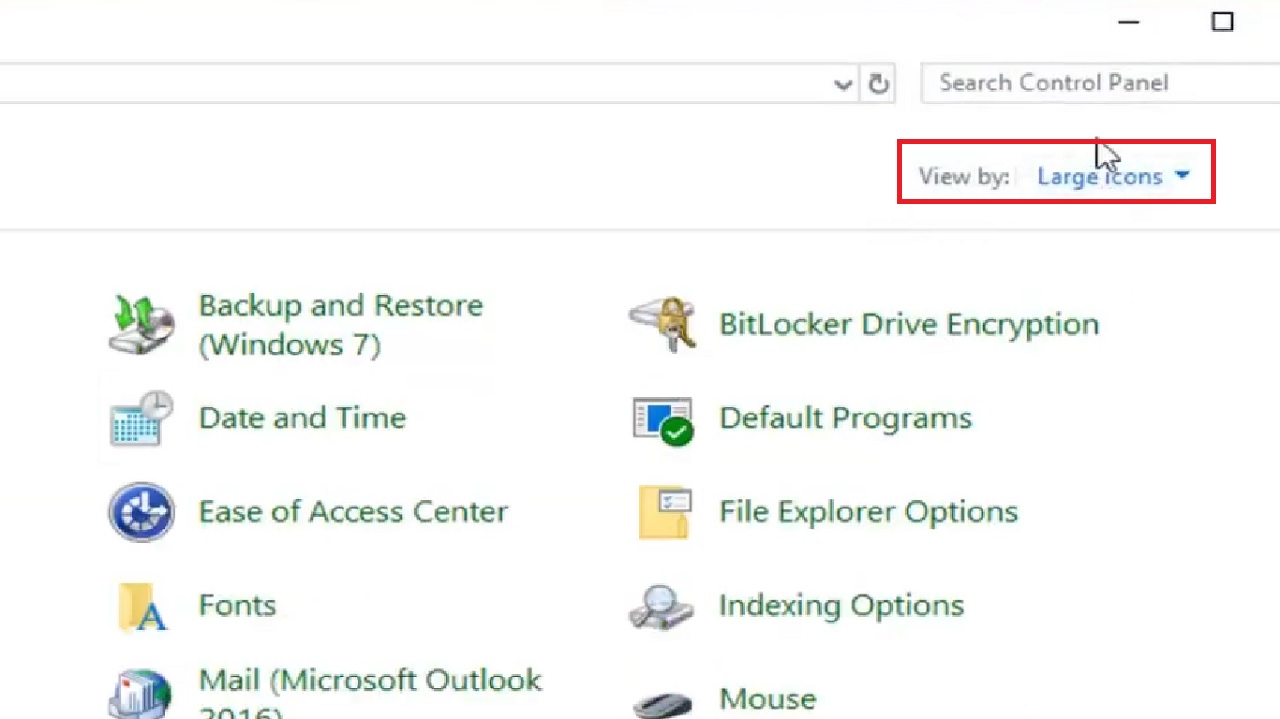
- Select Large icons in the View by box on the top-right corner of the Control Panel window when it appears and choose the option by clicking on the small blue arrow in the box.
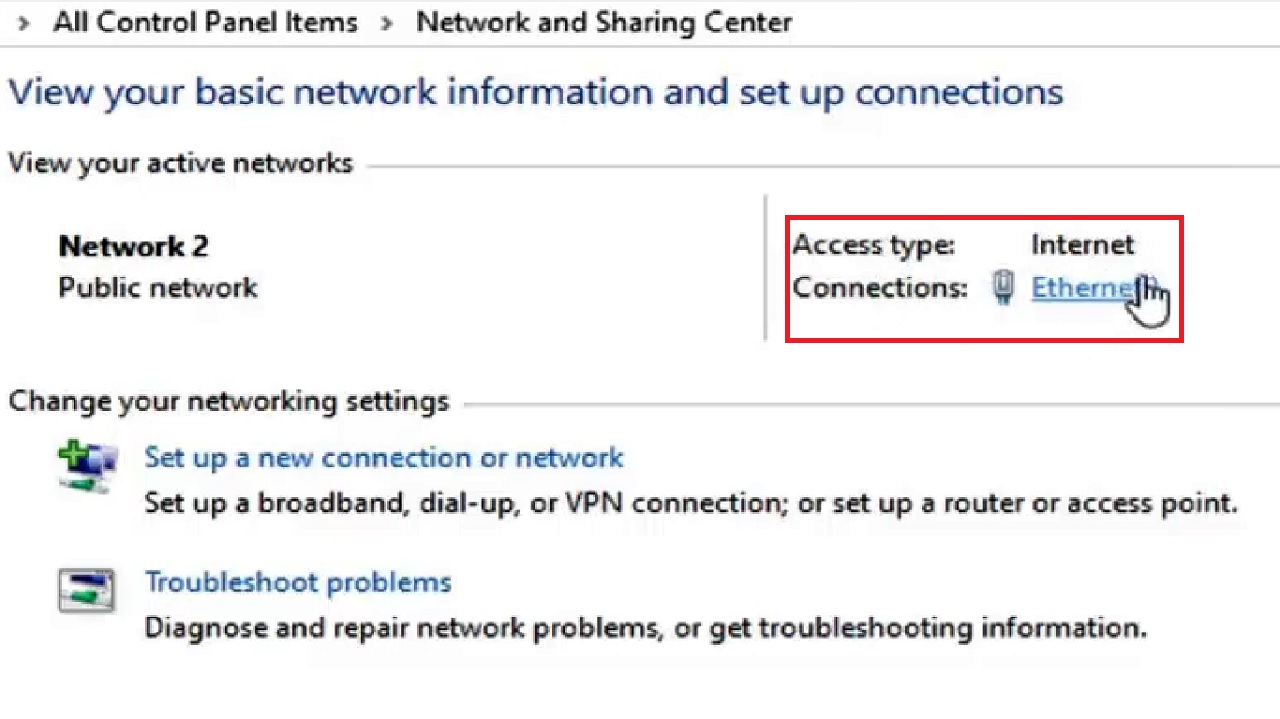
- Select the Network and Sharing Center option.

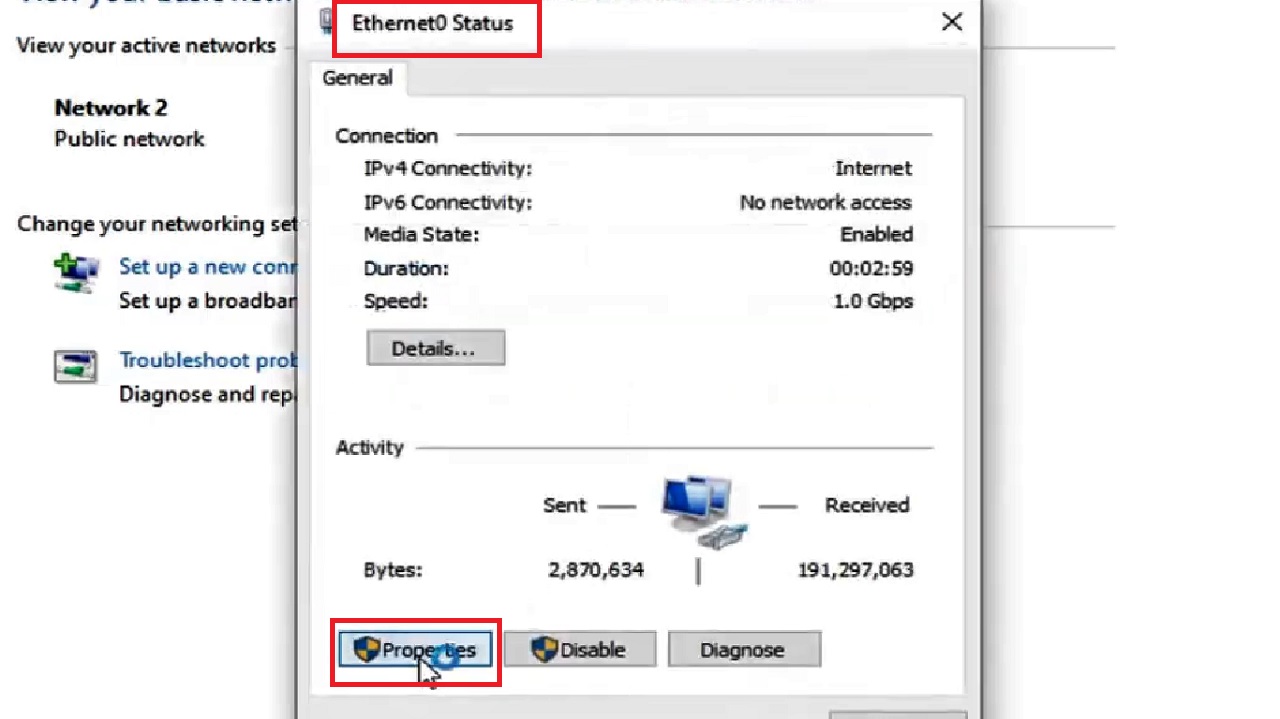
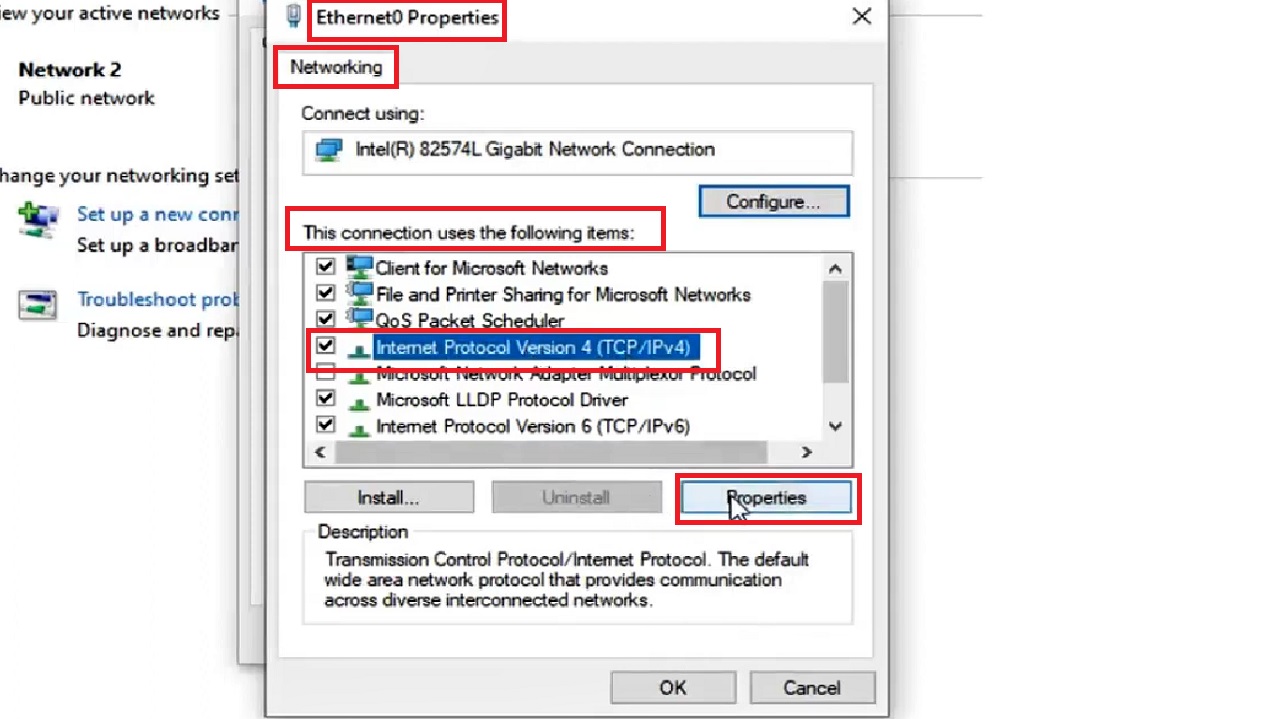
- On the right side of the Network and Sharing Center window, click on the hyperlink in blue next to Connection underneath Access type, irrespective of what it is showing. (In this case, it is Ethernet0. In your case it can be Wi-Fi).
- Select the Properties button below the Ethernet0 Status window.
- In the following Ethernet0 Properties window in the Networking tab, check the small square box next to Internet Protocol Version 4 (TCP/IPv4) from the list in the box under ‘This connection uses the following items.’
- Click on the Properties button.
- In the following Internet Protocol Version 4 (TCP/IPv4) Properties window, click on the small radio buttons next to ‘Obtain an IP address automatically’ and ‘Obtain a DNS server address automatically’ both, if they are not selected already.
- Click on the OK button.
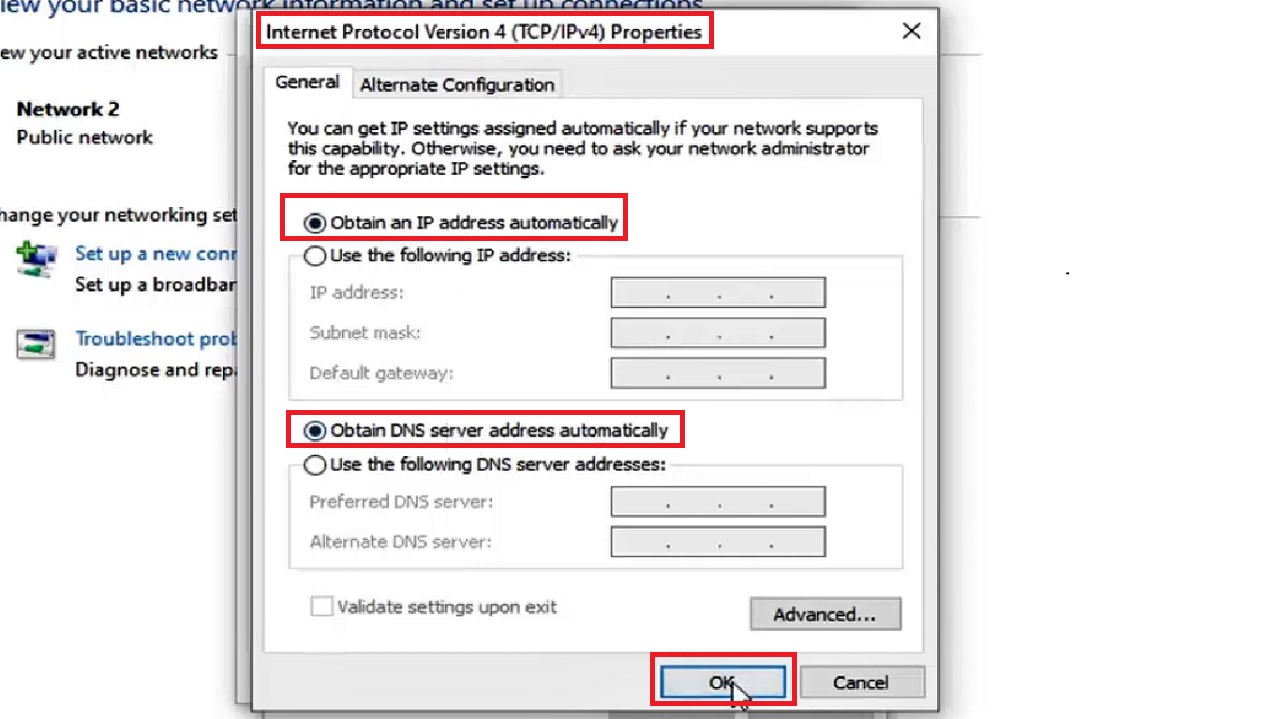
If you see that the Internet Protocol version 6 (TCP/IPv6) is enabled, you might as well uncheck the box next to it to disable it.
Now, restart your computer and hopefully, the problem will be resolved. If it is not, then you might try to resolve it by following the next method.
Method 3: Reinstall and Update the Network Driver
You may reinstall and update the network driver on your PC to resolve the Windows has detected IP address conflict error.
STEPS TO FOLLOW:
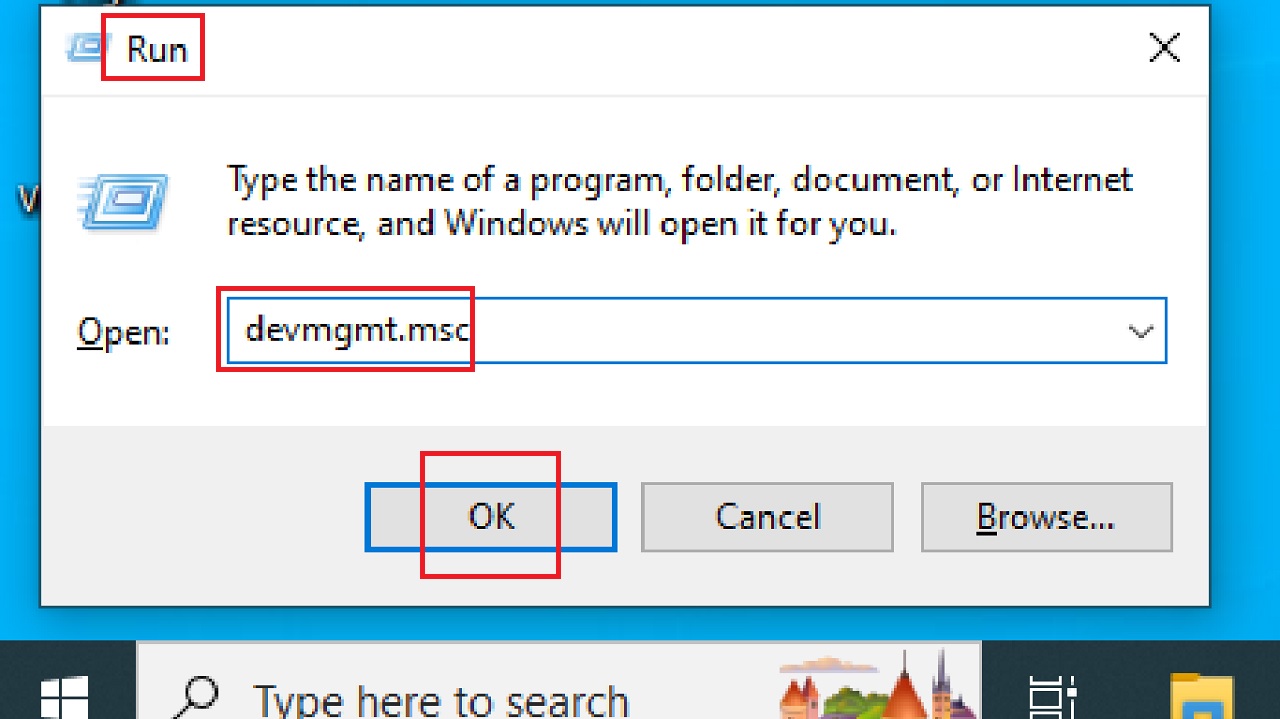
- Press Windows + R keys at the same time on your keyboard to launch the Run program.
- Type devmgmt.msc in the box and click on the OK button below.
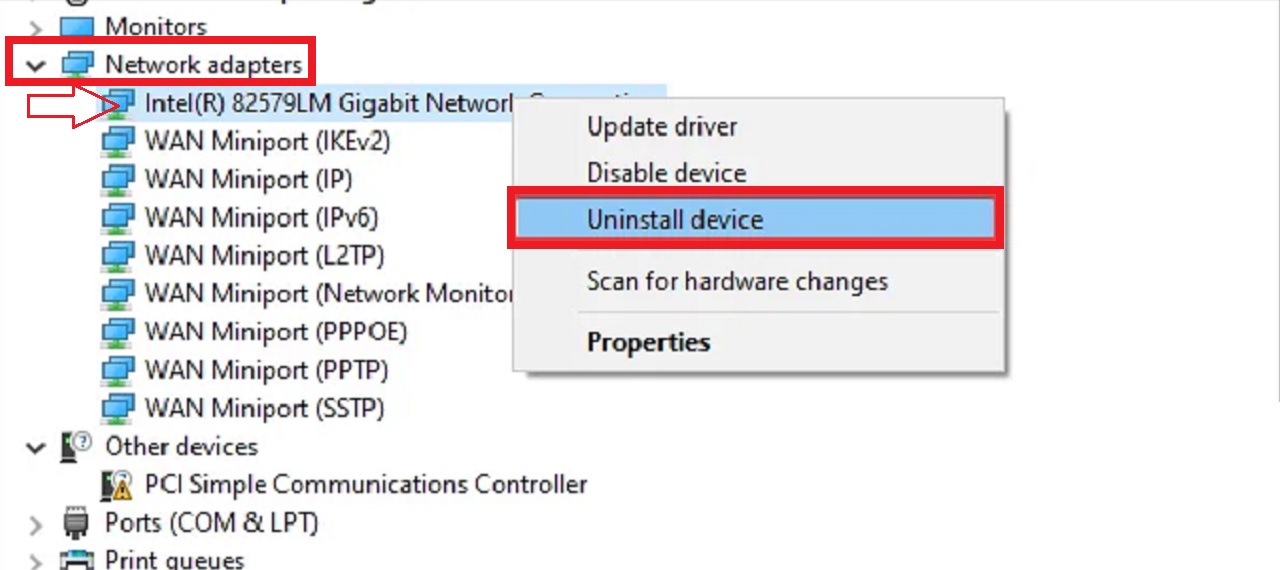
- In the Device Manager that appears, click on the small arrow next to the Network adapters to expand it.
- Right-click on your current network adapter.
- Click on the Uninstall device option from the drop-down context menu.
- Now, restart your computer so that Windows can reinstall the driver.
You may also update the network driver in the same way additionally for resolving the error.
Finally, check whether the issue has been resolved. If you still experience the error, follow the next method.
Method 4: Create a Restore Point and Reset All Network Configurations
In most cases, the Windows has detected an IP address conflict error can be resolved by resetting the network configuration.
Note: Following this method will remove all your network configurations such as proxy settings, DNS settings, virtual adapter assigned by the VPN, and network adapter.
So, it is recommended that you create a backup of your network adapter since you will not be able to download the network drivers if you use a custom network adapter.
Therefore, for this method it is better to create a restore point first and then go ahead with the solution.
This will help you to reset the network settings if anything goes wrong during the process and restore all the files and drivers in the future.
STEPS TO FOLLOW:
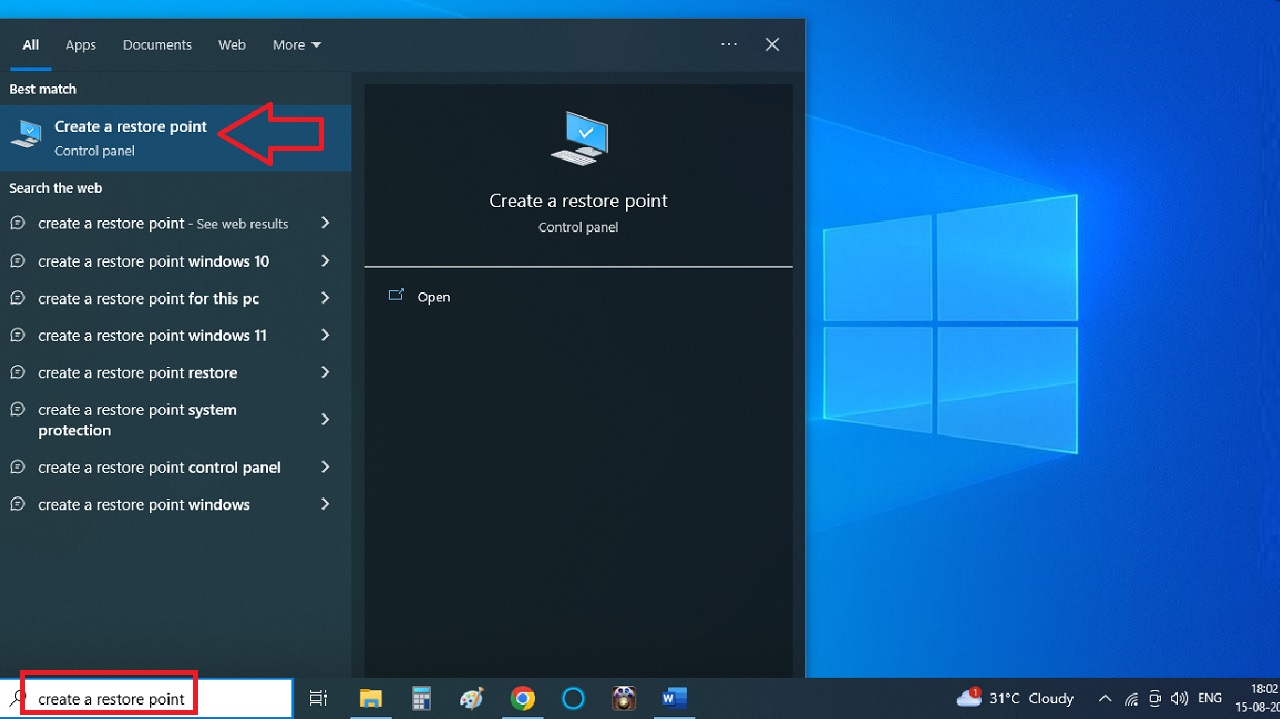
- To create a restore point, go to the quick search box next to the Start Menu.
- Type create a restore point in the box.
- Hit Enter.
- In the System Properties window under the System Protection tab, select the hard disk, preferably where Windows is installed.
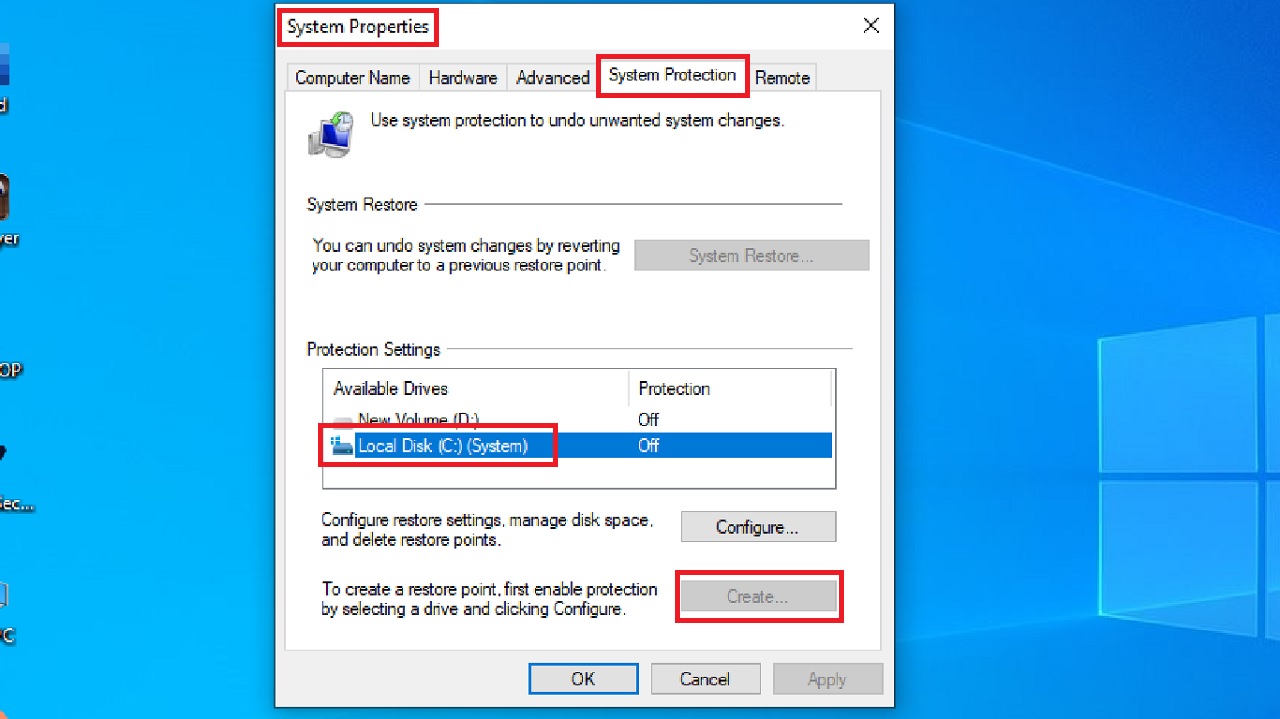
- Click on Create. Note that it is grayed here because the system protection is turned off.
- In the following System Protection window, type the name of the restore point in the relevant field. It can be any name of your choice.
- Click on the OK button.
This might take some time, so wait for the process to complete.
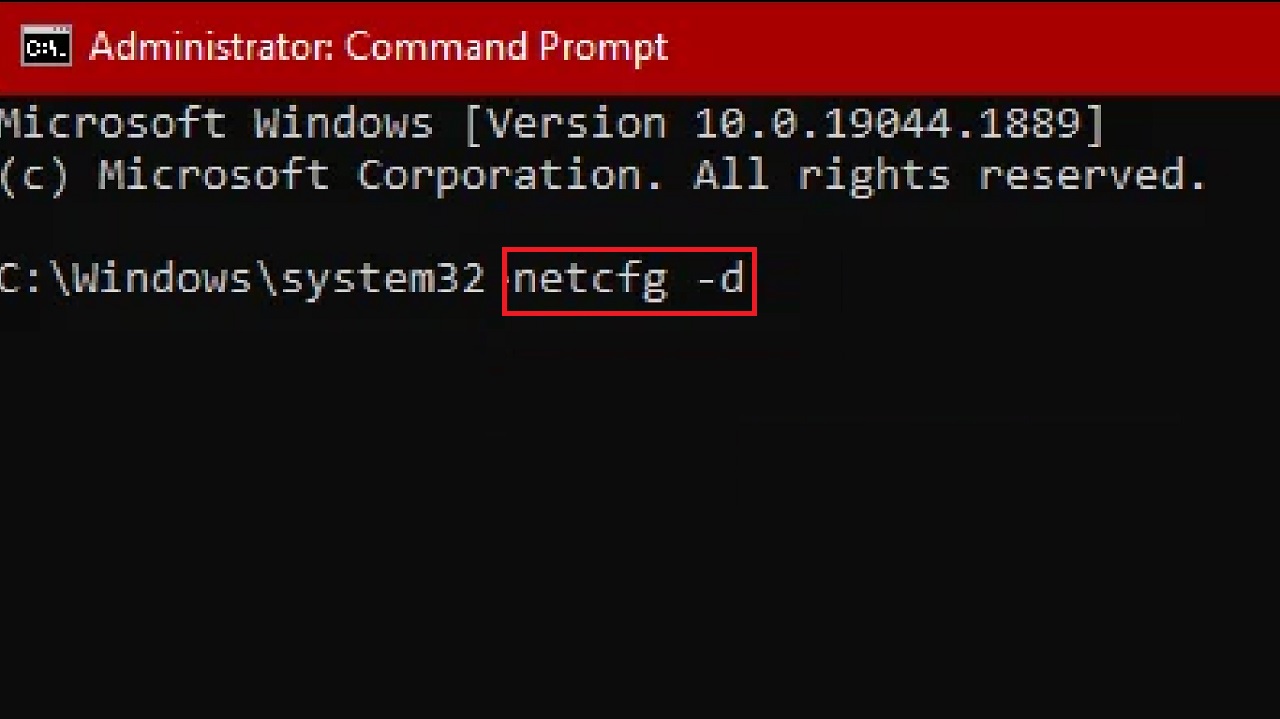
- Now, reset the network configuration by opening the Command Prompt window as before and typing netcfg -d and hitting the Enter button on your keyboard.
When the process is complete, restart your computer system and connect with the Wi-Fi network to check whether or not the Windows has detected an IP address conflict error is fixed.
Conclusion
So, these are the solutions that you can try to fix if Windows has detected an IP address conflict error.
If none of the methods suggested in this article could resolve the issue, you should contact your Internet Service Provider for assistance.