
It is quite frustrating when you encounter a message “Let’s Connect You to a Network” while sifting through different websites in the digital landscape. This may affect your productivity as well as your user experience.
In such situations, when you will not be able to access the online resources as desired, you need not fret. Here is an article that will tell you about the strategic approaches to rectify this issue.
Offering a wide range of effective solutions to fix this problem, this guide will put you and your system on the right track.
In This Article
KEY TAKEAWAYS
- You may start resolving the “Let’s Connect You to a Network” issue by checking the network connection and cable ensuring they are secure and functional.
- You may also restart the router or power cycle the modem by unplugging it, waiting for some time, and plugging it back in to check if it is fixed or not.
- Running the network troubleshooter tool built-in the operating system may also help a great deal in identifying and fixing it automatically like other network-related issues.
- You may reset the network settings of your PC to default in order to rectify the incorrect configuration that may be causing the issue.
- Updating the network drivers is also a common fix for most network related issues including “Let’s Connect You to a Network.”
What are the Reasons Behind Let’s Connect You to a Network Error?
Typically, an improper connection or loose cable can cause the “Let’s Connect You to a Network” issue. There may also be some technical or hardware glitches in the router or modem causing the issue.
In addition, each of the following factors might contribute to this annoying error:
- Issues with the network connectivity caused due to unstable or weak Wi-Fi signal
- Issues with the network configurations due to incorrect IP address or conflicts between the IP addresses set in the network
- Issues with the DNS server due to no response and incorrect settings
- Issues with the network adapter due to corrupted or outdated network drivers or even a disabled network adapter
- Hardware issues with the network card
- Software issues such as updated operating system and other third-party program conflicts
- Firewall or antivirus blocking the access to and communication with the network
- Issues with the network profile due to incorrect settings and conflicts due to inconsistency
- Errors in password and authentication due to incorrect typing
- Failure in network service due to malfunction or crashing
- Corrupted network stack, once again due to corrupted network configuration settings or damaged files in the operating system related to networking
- Confusions caused by several active network adapters
- Bugs in the operating system or malware and virus infection in the PC affecting the connectivity
- Exhausted IP addresses in the DHCP pool or limited network resources
- System hardware issues such as damaged ports of the PC or malfunctioning components of the router
So, a myriad of causes can stem the “Let’s Connect You to a Network” error from hardware to software issues.
To fix it, you will need to follow a methodical approach to diagnose and follow the right steps to restore seamless network connectivity.
How to Fix Let’s Connect You to a Network Error?
You may start fixing the issue of “Let’s Connect You to a Network” by performing some basic checks on the network cables and connections.
If that is proper and there is nothing loose, you may then restart your PC and the router by unplugging and plugging it back again after some time.
If these did not rectify the issue, you can also try the following quick fixes:
- Running the network troubleshooter tool
- Resetting the network settings of your PC
- Disabling and re-enabling the network adapter
- Stopping and restarting the services related to network connectivity
- Updating the network drivers from the Device Manager or the manufacturer’s website
- Stopping Network Connection Flow process, if available
- Enabling and disabling the airplane mode
- Forgetting the current network
You can also try these methods:
A network reset: Open Settings > Go to Network & Internet > Network Reset > click on the Reset now button > Press Yes > Restart your computer > Reconnect to the internet following the on-screen instructions.
Disable/Enable Network Interface Card: Press Windows and R keys together on your keyboard > Type ncpa.cpl > Hit Enter > Right-click on your active Wi-Fi network> Choose Disable > Right-click again > Choose Enable > Restart the PC.
Disable IPv6: Type control panel in the search box next to the Start Menu > Hit Enter > Select current network > Go to Properties > Internet Protocol Version 6 (TCP/IPv6) under Networking tab > Uncheck the box > Reboot the PC.
Note: Remember, each of the solutions mentioned above and below to fix the “Let’s Connect You to a Network” problem may not be applicable on each and every PC. It will largely depend on the PC setup, which can be unique.
However, these are usually general solutions that may work in almost any given situation. Still, you are advised to try a combination of these fixes so that you can find the right one that will work for your particular case.
Method 1: Forget Current Network
Sometimes, when you forget the current network and connect to it again, the “Let’s Connect You to a Network” error may be resolved.
STEPS TO FOLLOW:
- Go to the Start Menu.
- Click on it.
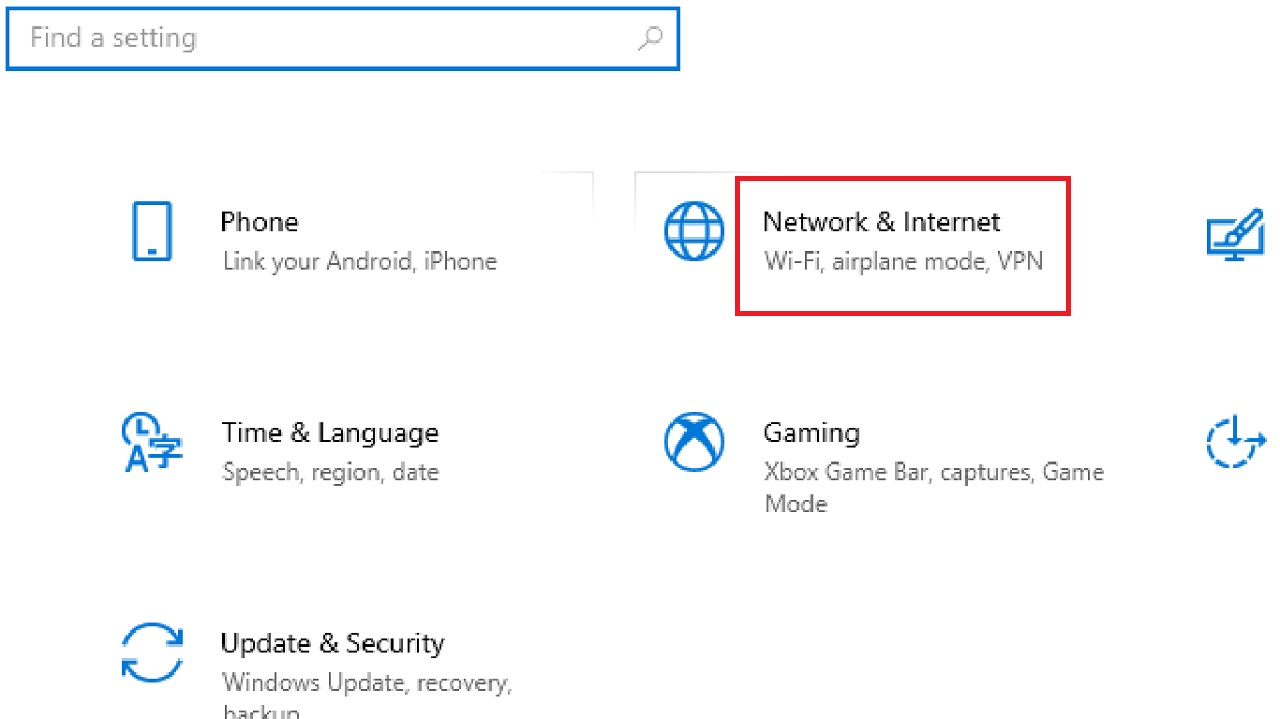
- Select Settings or the gear icon.
- Select Network & Internet in the following window.
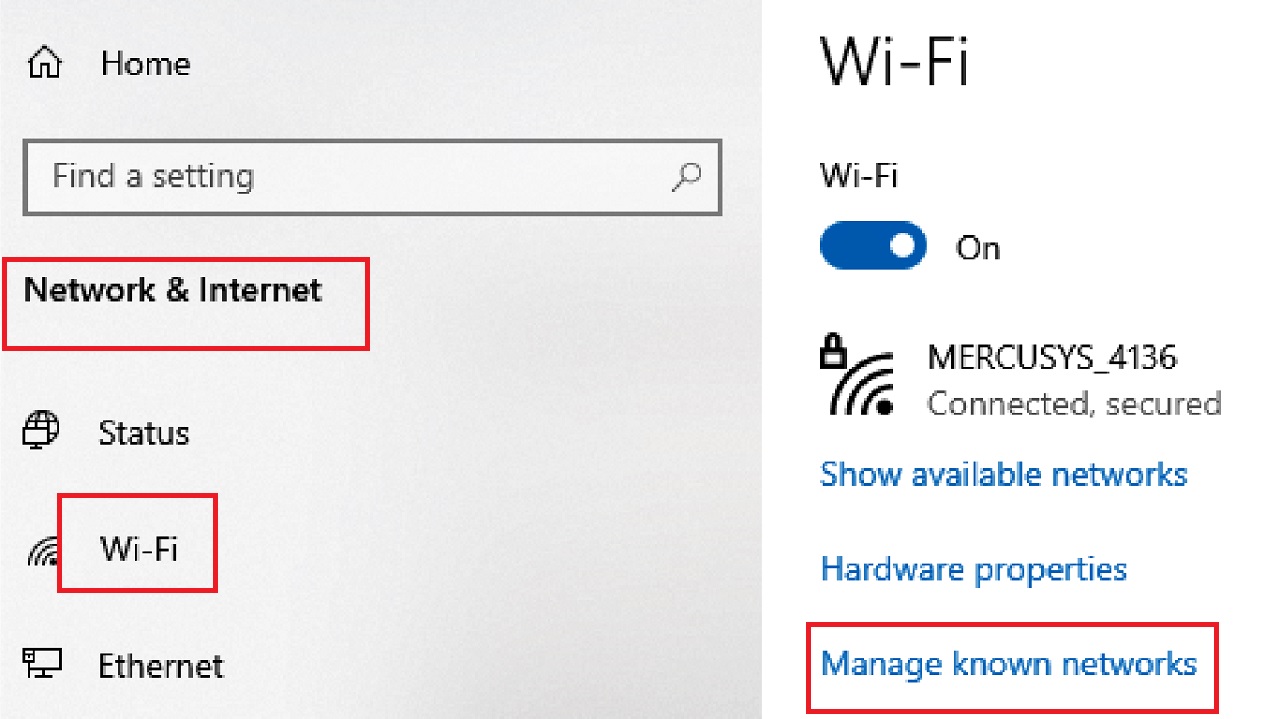
- Select Wi-Fi from the left panel of the following Network & Internet window.
- Click on Manage known networks in the right side of the window.
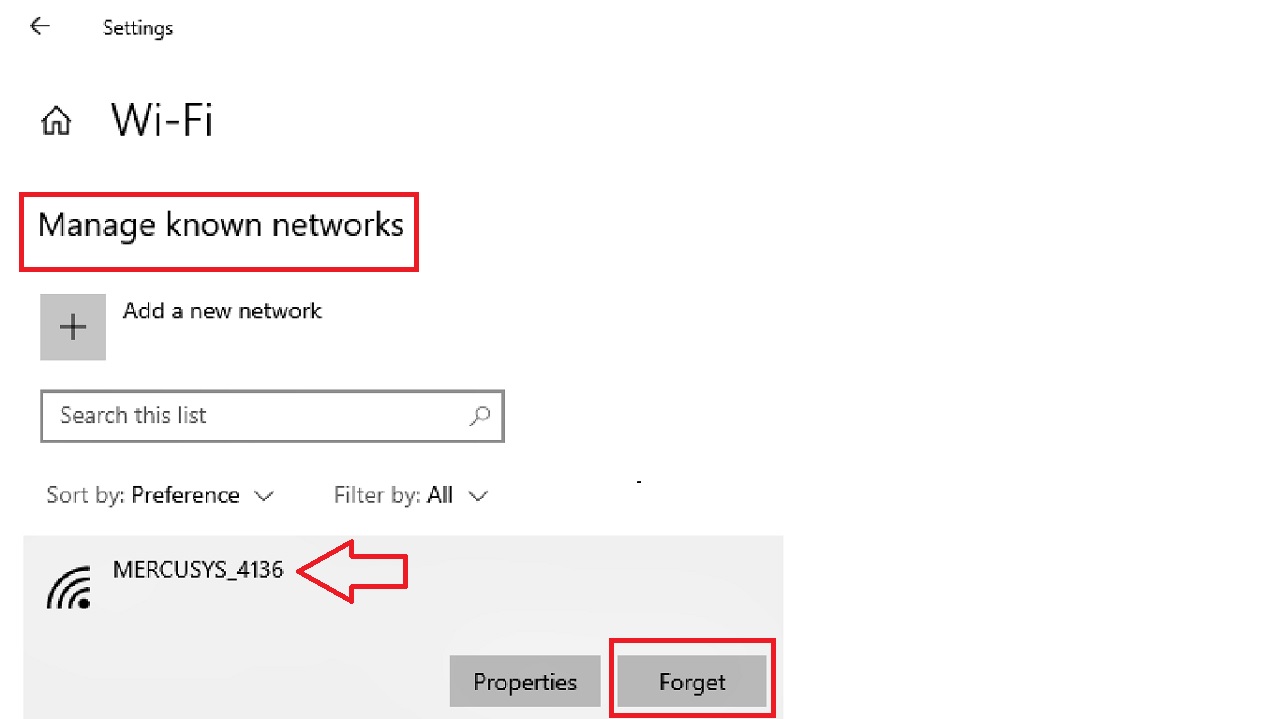
- Select and click the network you want to delete, MERCUSYS_4136, for example.
- Click on the Forget button.
Now, restart your device after forgetting the current network. After it restarts, connect to the network again by clicking on the network icon on the taskbar and typing the password when prompted.
Your issue should be resolved now because the process will now have a fresh connection to the network free from any corrupted or incorrect configuration that might have been causing the issue.
Note: This solution might not be applicable in all cases. However, it is worth a try. If it cannot solve the problem, try the next method.
Method 2: Run Network Adapter Troubleshooter
The built-in troubleshooter in Windows can rectify a lot of networking issues, including the “Let’s connect you to a network” issue.
STEPS TO FOLLOW:
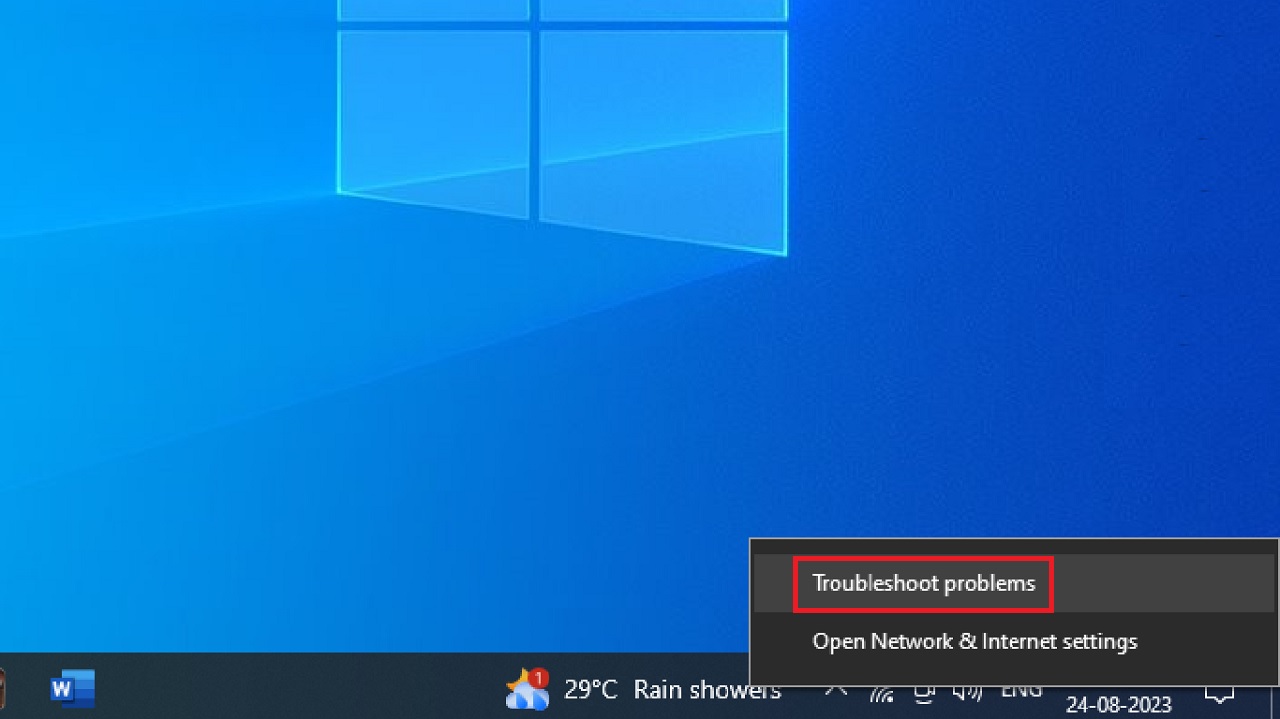
- Right-click on the network icon on the taskbar on the bottom-right corner of your screen.
- Click on Troubleshoot problems.
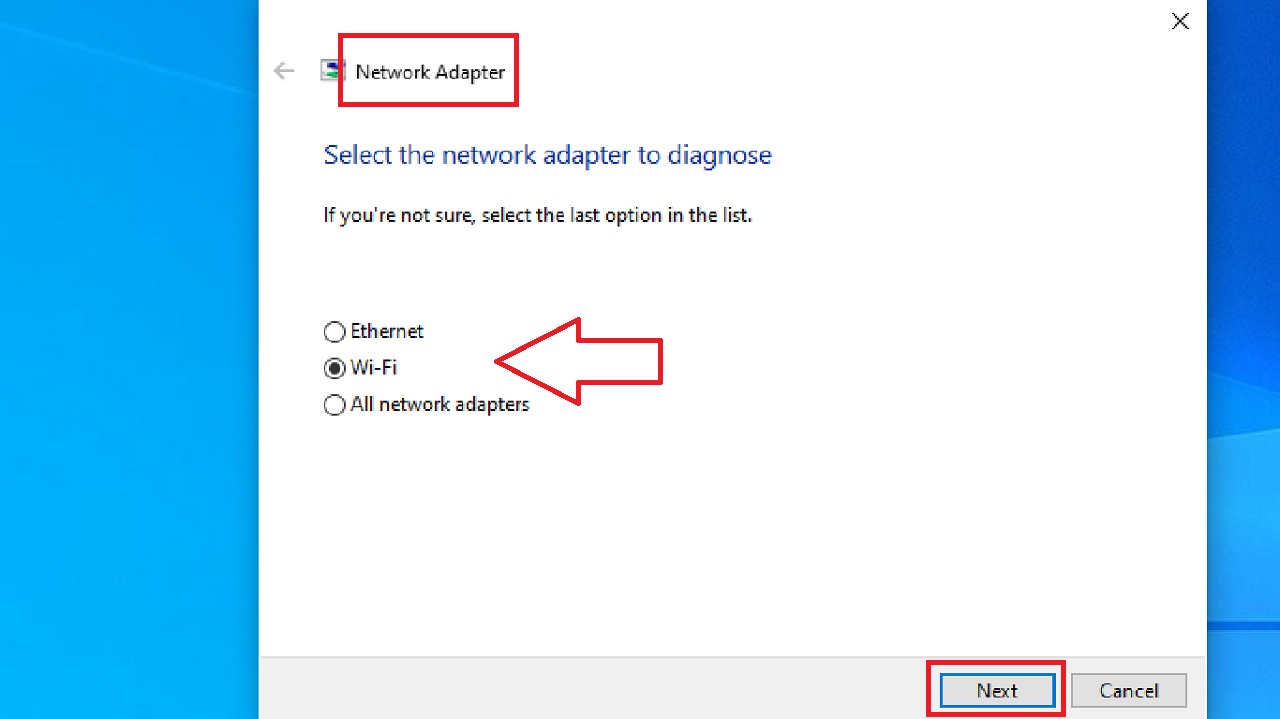
- In the following Network Adapter window, select Wi-Fi. If you are not sure, you can choose All network adapters.
- Click on the Next button.
Follow the on-screen instructions as Windows attempts to identify and fix the issues with the network connection.
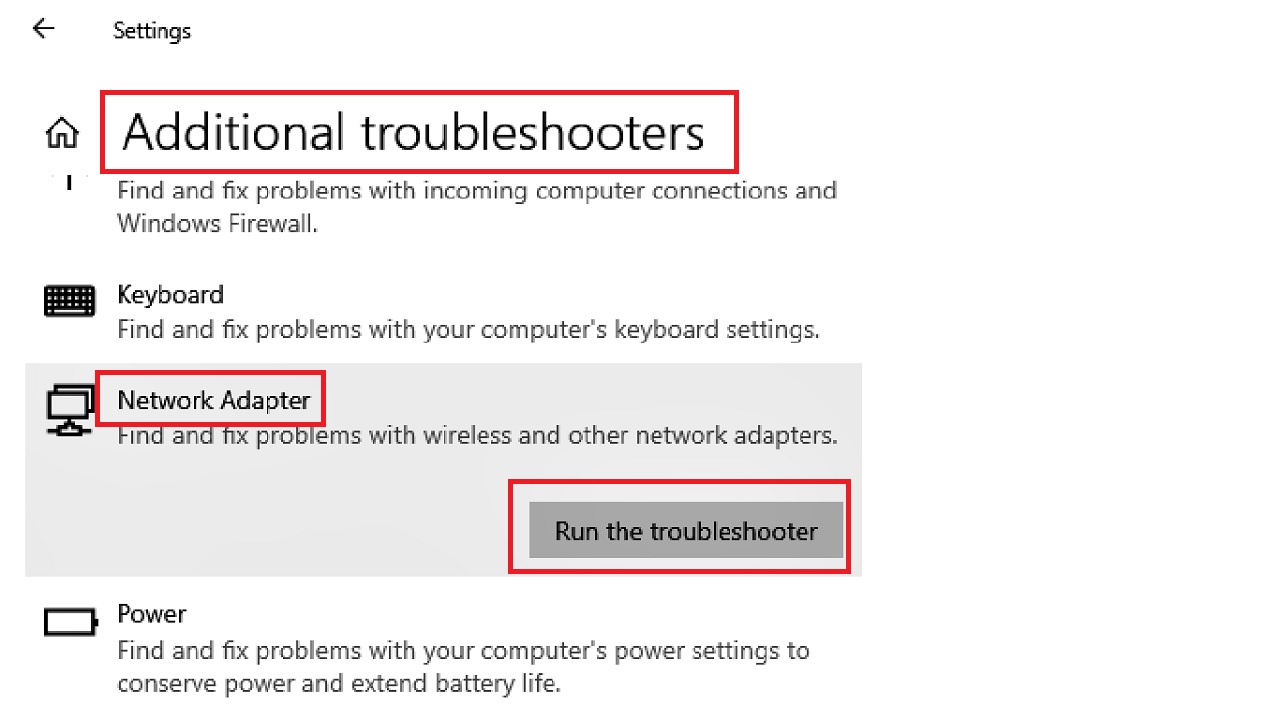
- Alternatively, you can go to Start Menu > Settings > Update & Security> Troubleshoot > Additional troubleshooters on the right.
- Now look for Network Adapter in the following window under Additional troubleshooters.
- Click on it.
- Click on Run the troubleshooter.
When the process is complete, check whether the issue is resolved. If you still face the problem, explore the following solution.
Method 3: Stop the Network Connection Flow Process
If the above method did not work, you may also try solving the “Let’s Connect You to a Network” issue by stopping the network connection flow process. Typically, this will reset the networking components.
Note: This process is to be followed especially if a temporary issue in the network connection setup is causing improper connectivity.
Also, this process is applicable subject to availability of Network Connection Flow process. Therefore, this solution might not work in all situations or if the issue is related to hardware or is more complex.
STEPS TO FOLLOW:
- Remove all the peripherals connected to your PC.
- Plug the keyboard into one of the USB ports of your computer.
- Press the Windows and R keys together.
- Type cmd.
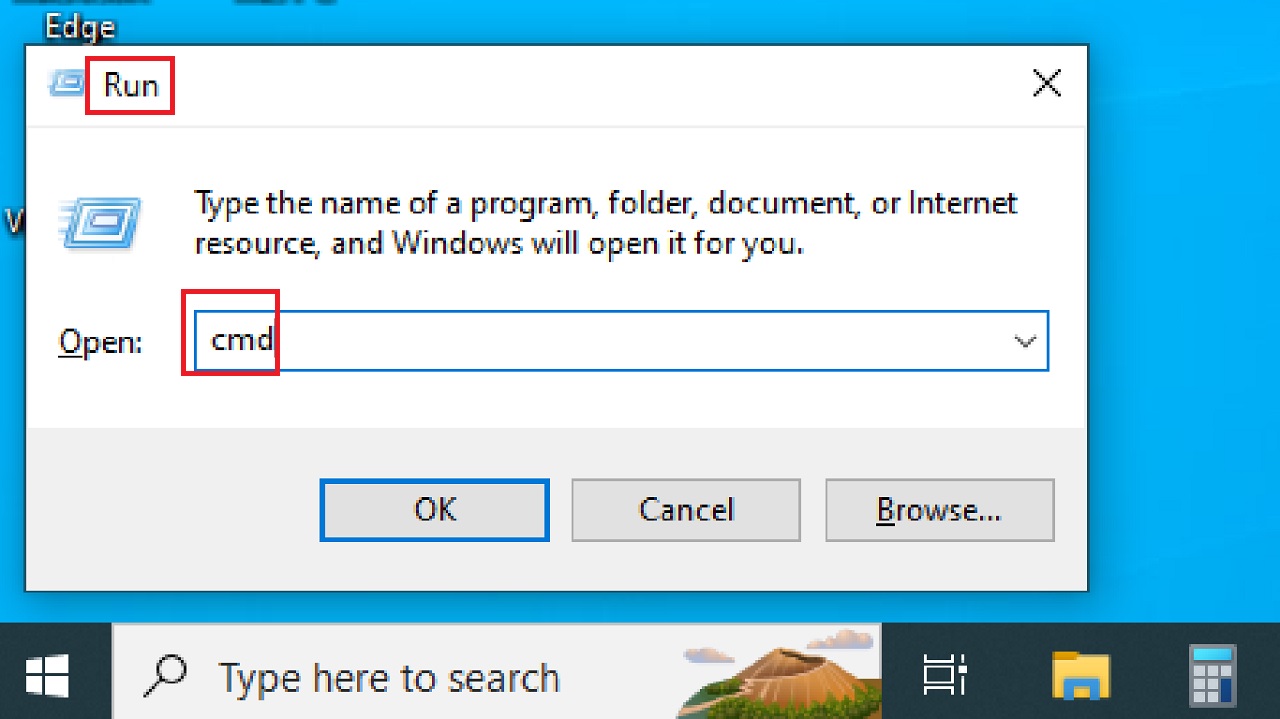
- Press Enter to open the Command Prompt window.
- Type taskmgr in the Command Prompt.
- Hit Enter.
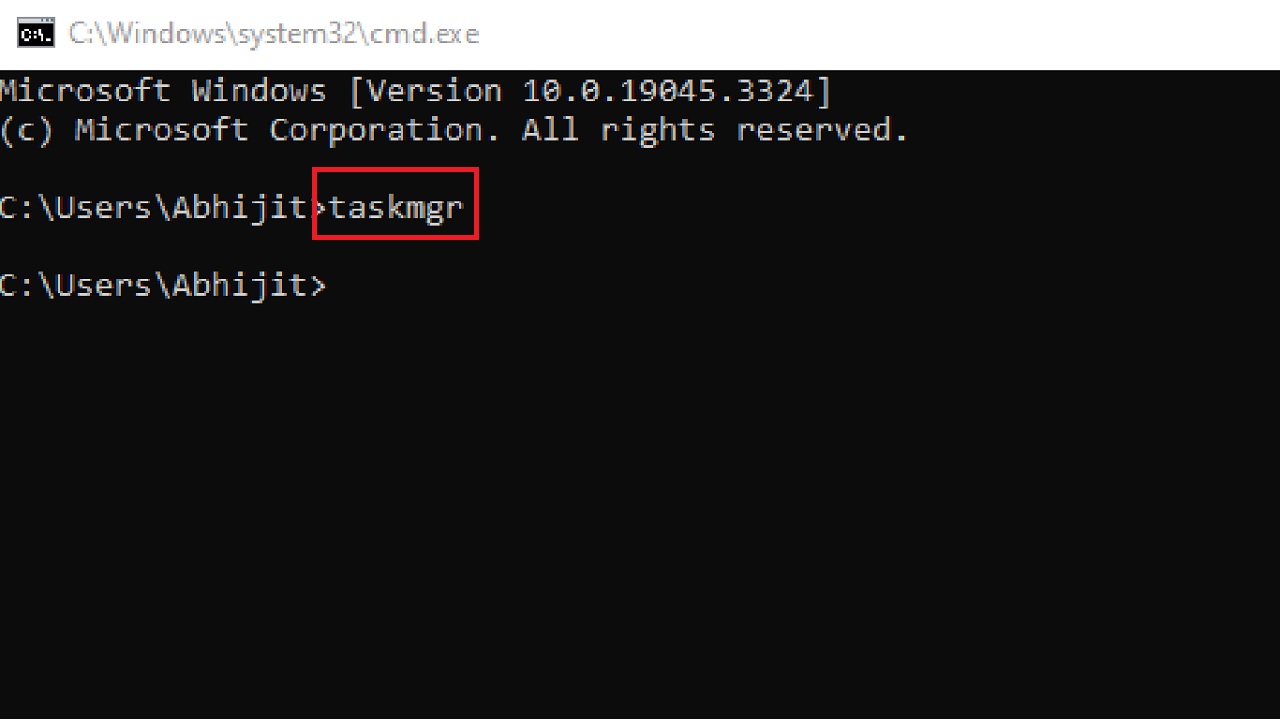
- Click on the Processes tab in the Task Manager window, if it does not open by default.
- Scroll down to locate the Network Connection Flow process, if available.
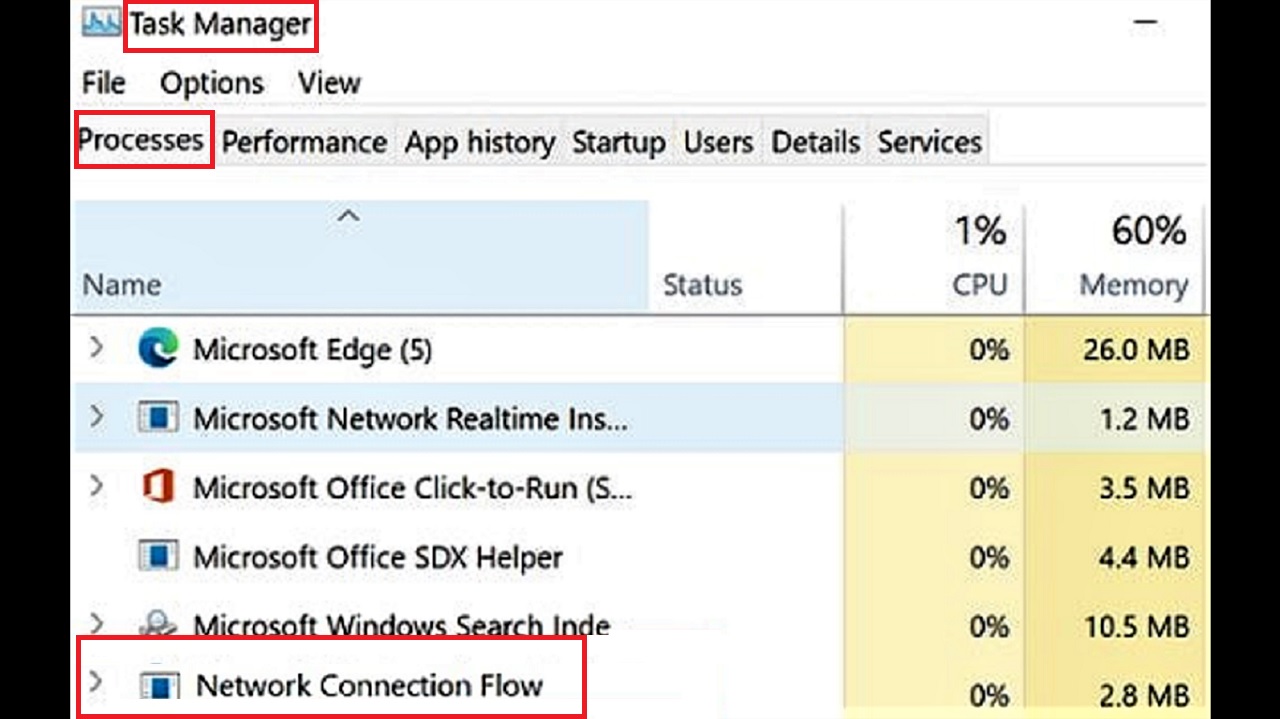
- Right-click on it.
- Select End task.
Additionally, you may have to create a new local account when and if prompted. Follow the in-screen instructions for it.
Alternatively, you may also do it by using a simple command in the Command Prompt – taskkill /F /IM oobenetworkconnectionflow.exe.
Now, check whether the issue is resolved or not. If the error still persists, try the next troubleshooting step.
Method 4: Enable and Disable Airplane Mode
In some specific situations, enabling and disabling the airplane mode in your settings may resolve the “Let’s Connect You to a Network” error because this feature disables all wireless communications including cellular and Wi-Fi connections.
When you enable this mode again, it will reset the network connection settings and solve the issue.
STEPS TO FOLLOW:
- Click on the Wi-Fi icon on the lower right-hand side on your screen on the taskbar.
- Go to and click on the Airplane mode option. This will enable it and disconnect all connections.
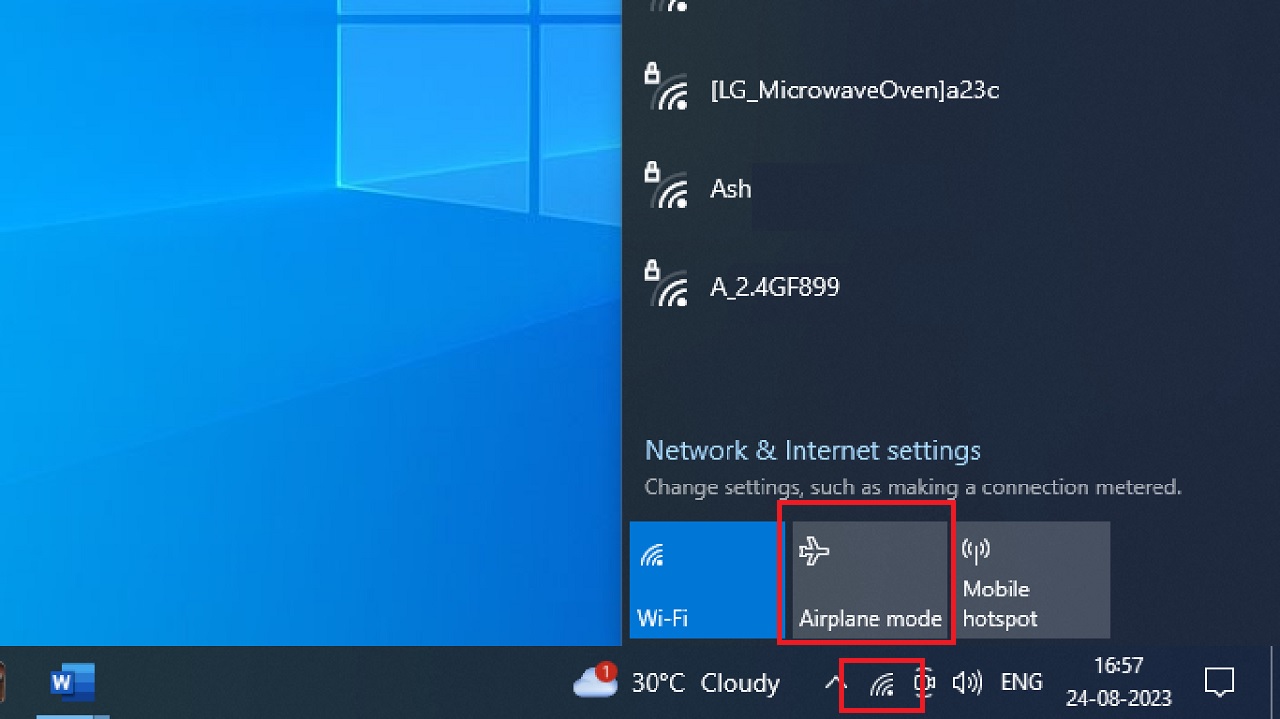
- Wait for some time and then click on the icon again to reestablish network connection.
Note: Though this solution is a potential fix to this issue, the impact and result cannot be guaranteed as it would be for mobile devices such as tablets and smartphones. Still, it is worth a try.
If it does not resolve the issue, try the next method.
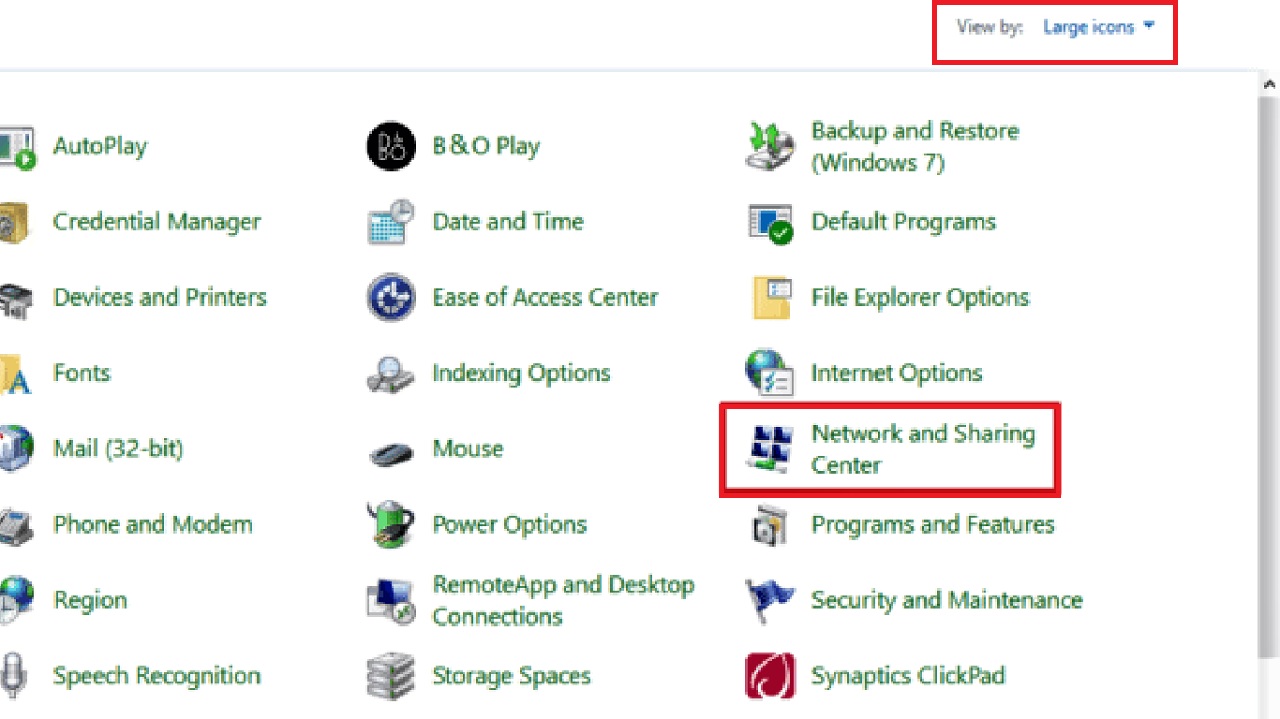
Method 5: Set Up Network Connection Manually
Ideally, when you set up the network connection manually, it will fix almost every network issue, including “Let’s Connect You to a Network,” depending on the nature of the issue. So, it is worth trying.
STEPS TO FOLLOW:
- Press the Windows key.
- Type control panel in the search box.
- Click on Open on the right side or hit Enter.
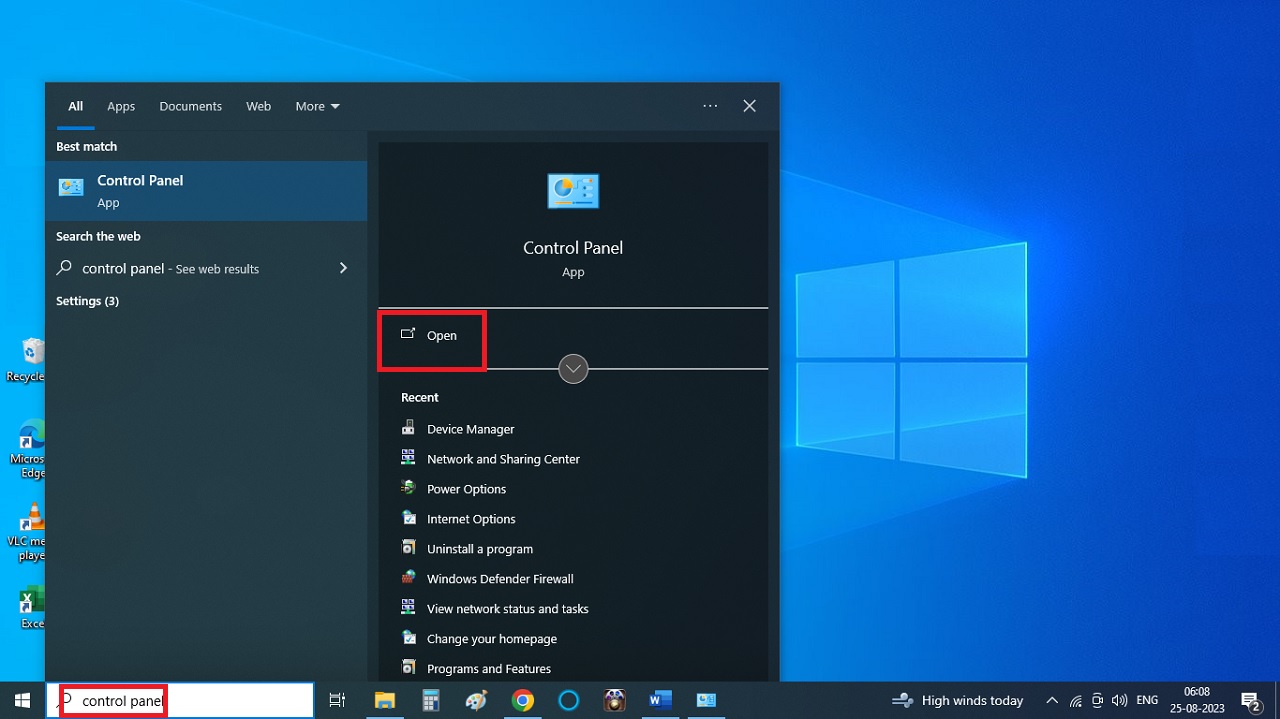
- Set View by to Large icons in the Control Panel window.
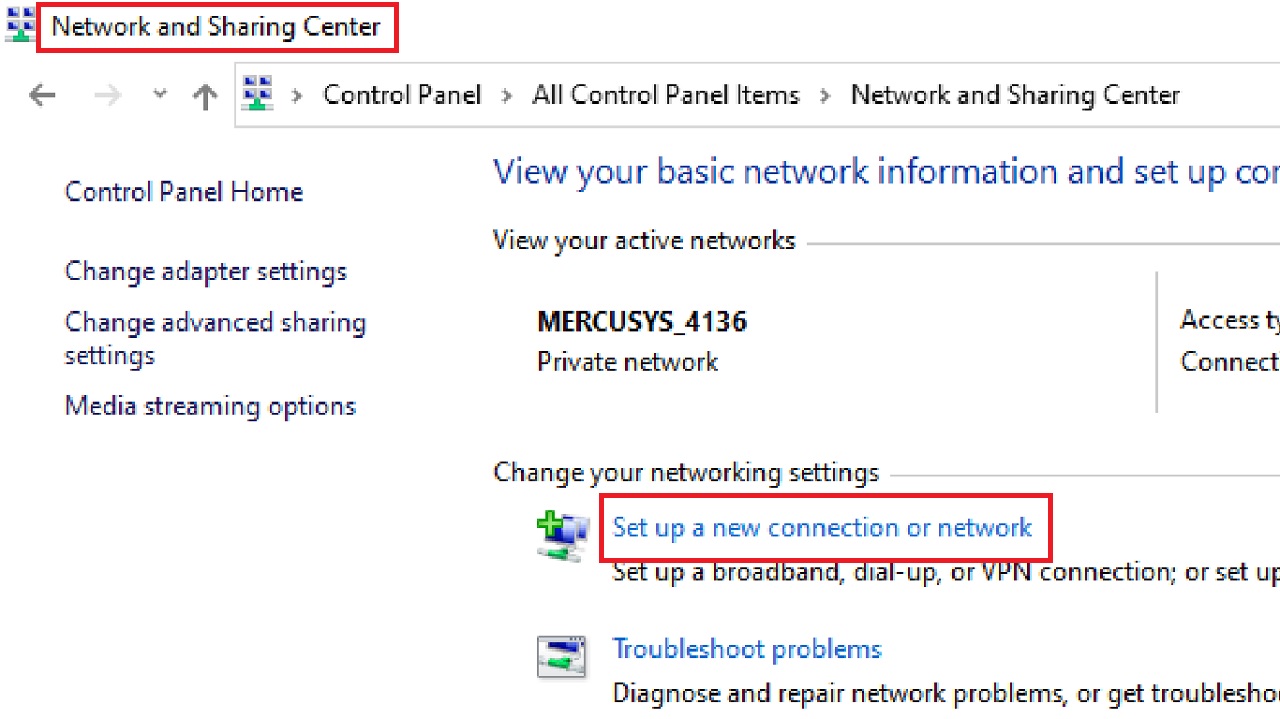
- Click on Network and Sharing Center.
- Now, select Set up a new connection or network in the following Network and Sharing Center window.
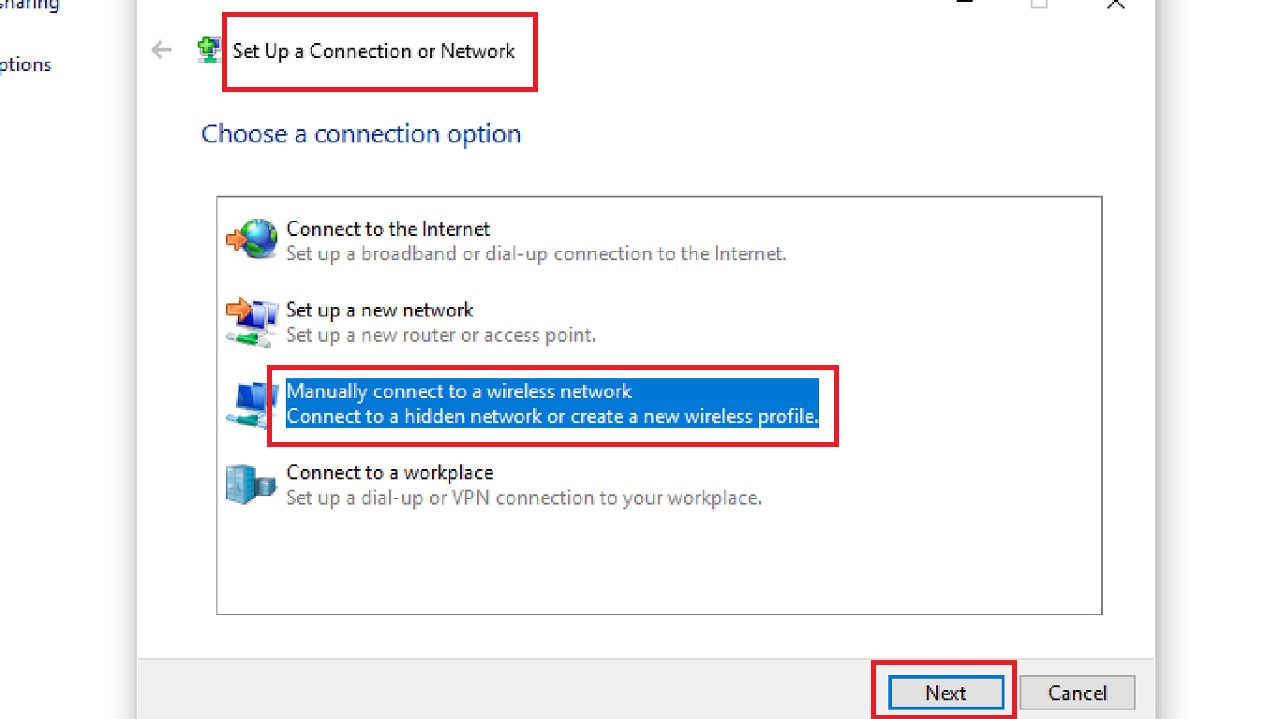
- Next, in the Set Up a Connection or Network window, click on Manually connect to a wireless network.
- Click on the Next button.
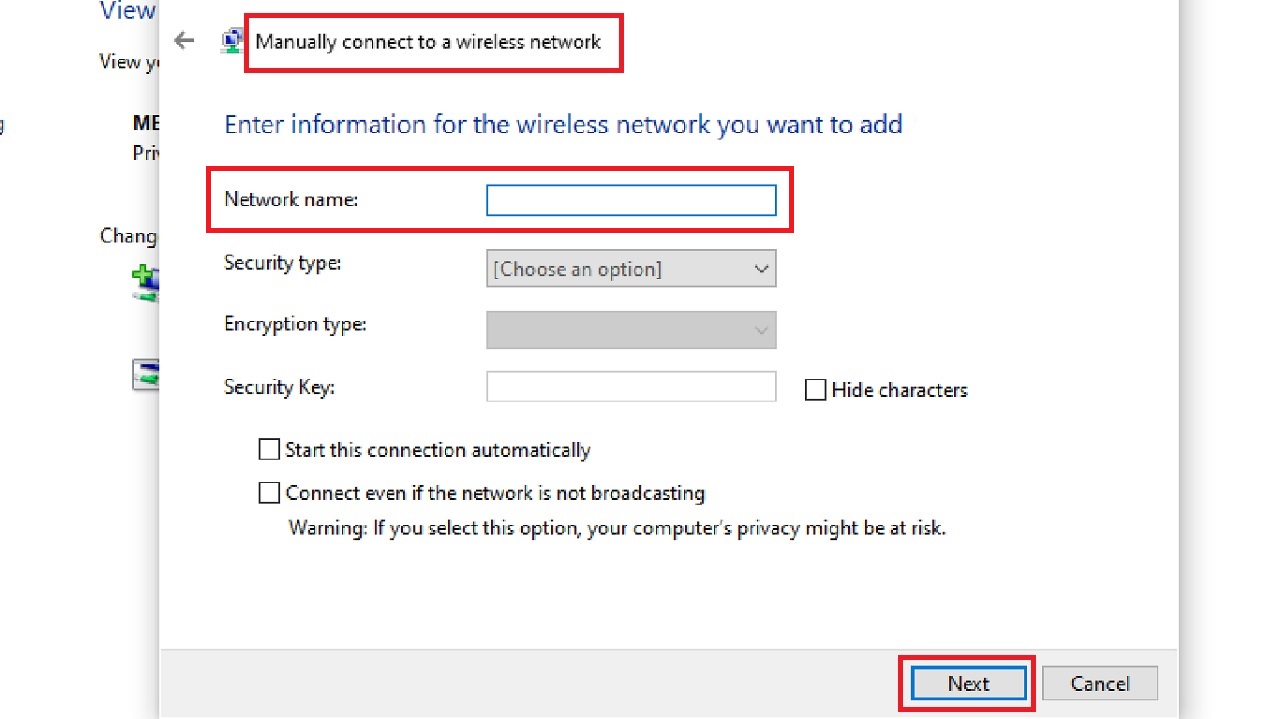
- Now, enter the Network name and other essential details when required.
- Finally, click on the Next button.
This should establish the connection immediately. However, in some cases it might not happen that way. In that case, you will need to restart your device to apply the changes.
Now check whether the problem is fixed or not. If you still encounter it, follow the next method.
Method 6: Update Network Adapter Drivers
The network adapter driver may be outdated to cause the issue. Updating it may bring things back to normal.
STEPS TO FOLLOW:
- Right-click on the Start Menu.
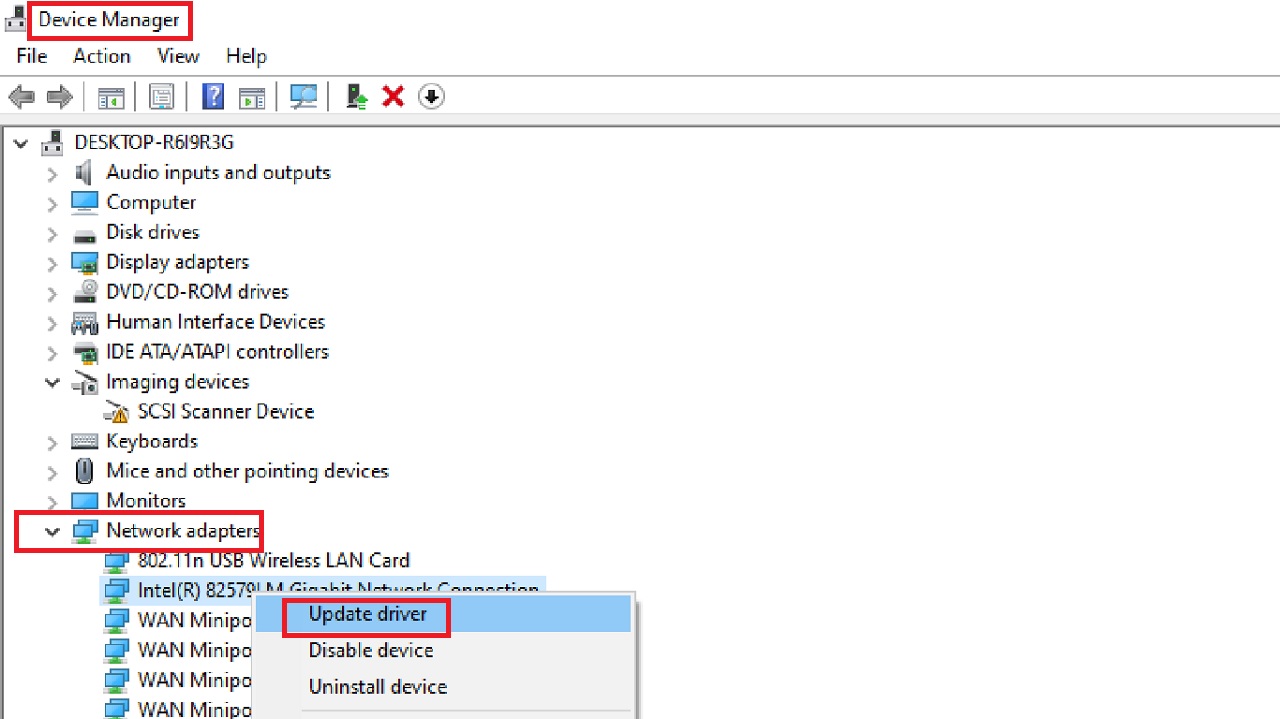
- Select Device Manager from the options and open it.
- In the Device Manager window expand Network adapters by clicking on the arrow next to it.
- Right-click on your network adapter.
- Click on the Update driver option from the drop-down context menu.
- Select the ‘Search automatically for drivers’ option in the following window.
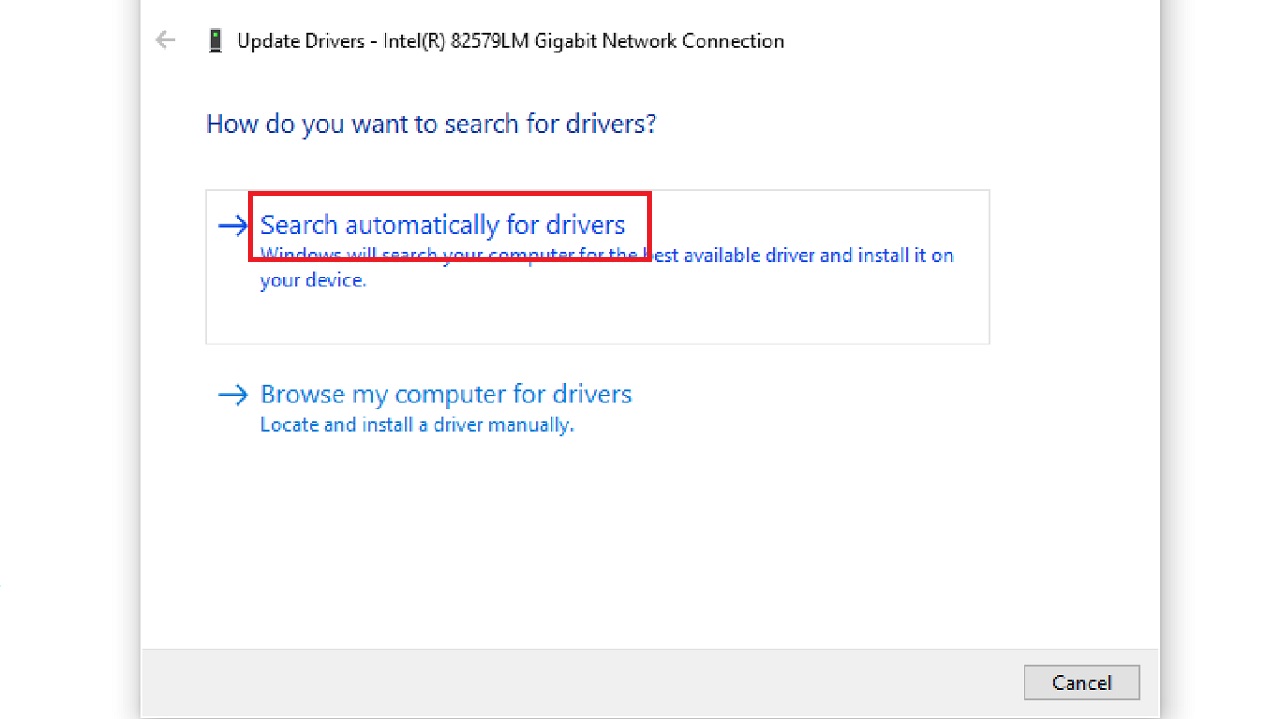
- Follow the on-screen instructions henceforth.
When the process is completed, you can check whether or not the error has been rectified. If the process fails to do so, follow the next process.
Method 7: Check and Set Security Type for Adapter
You must ensure that the security type for the network adapter and Windows in your system is the same. If it is not, change it. This step will enhance Wi-Fi security and performance, potentially resolving the “Let’s Connect You to a Network” error.
In this demonstration, it is assumed that the security type to be set is WPA-2 Personal.
STEPS TO FOLLOW:
- Open the Network and Sharing Center from the Control Panel as before and follow the same process to open the Wi-Fi Status window.
- This time, click on the Wireless Properties window.
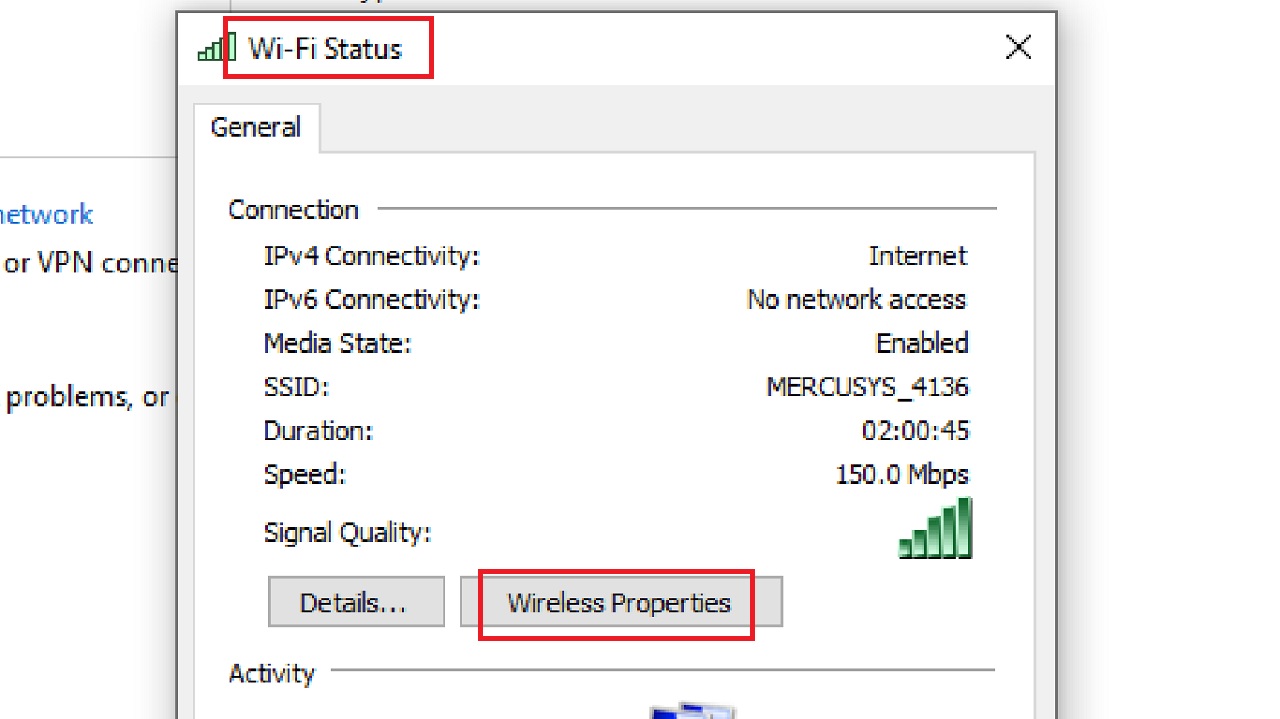
- Go to the Security tab.
- Check the Security type.
- Click on the small arrow in the box next to Security type.
- Select WPA-2 Personal from the drop-down options.
- Click on the OK button to save the change and close the window.
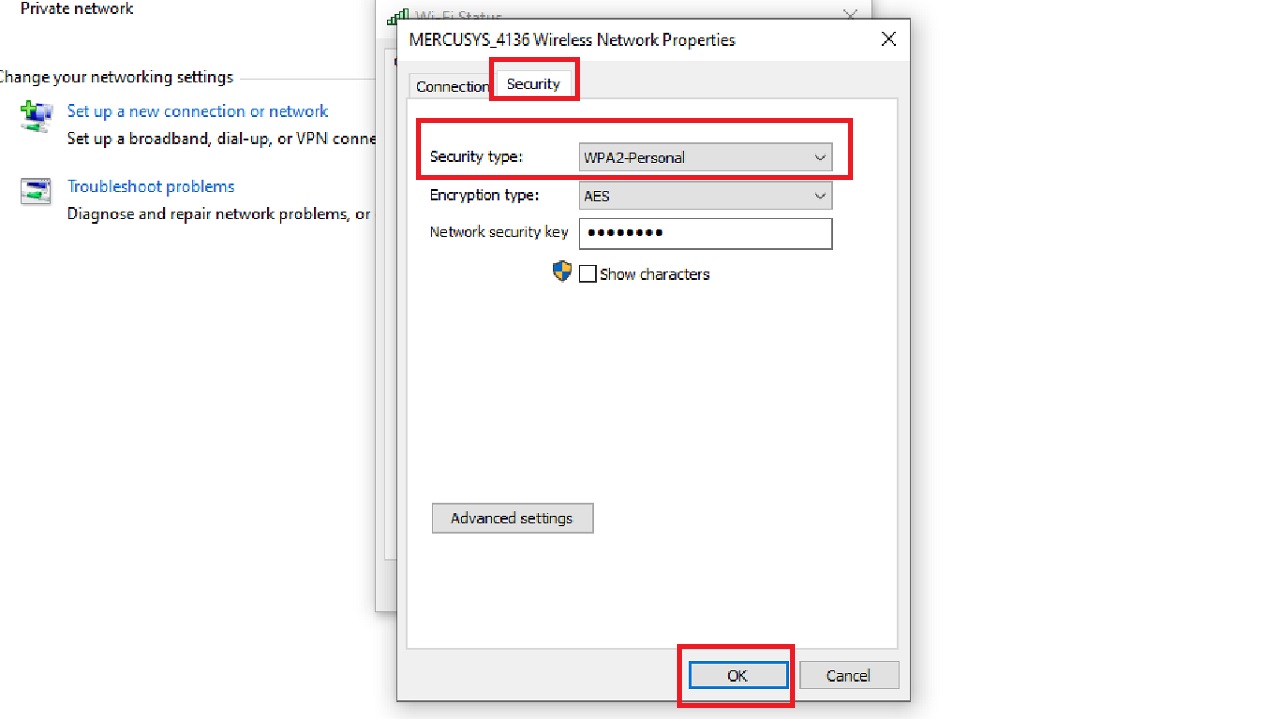
Now, check whether the issue is resolved or not. If it persists, move to the next method.
Method 8: Flush DNS Cache and Reset It
Flushing the DNS Resolver Cache and then resetting it might help you fix this issue.
STEPS TO FOLLOW:
- Right-click on the Start Menu.
- Click on Windows PowerShell (Admin).
- Type in the command ipconfig /flushdns and hit the Enter button on your keyboard.
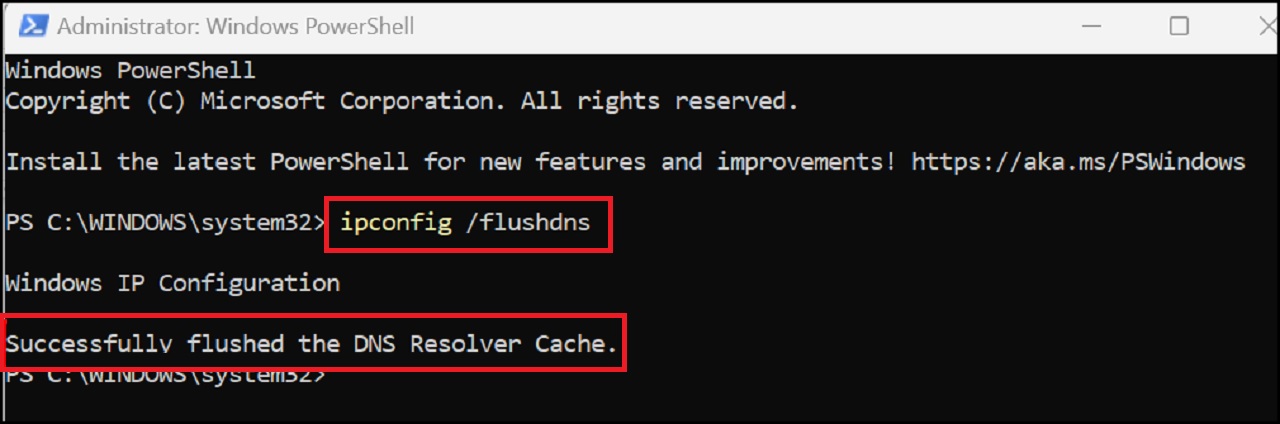
Wait for the process to be completed. When it is done, run the following commands for resetting:
- ipconfig /release
- ipconfig /renew
- netsh winsock reset
- netsh int ip reset
When all these commands are executed successfully, restart your PC and check whether the issue has been rectified or not. If it has not, move on to the next solution.
Method 9: Change Wireless Network Mode
You may resolve the issue of your computer stuck on “Let’s connect you to a network” by changing the network mode. This will help your system to connect to a particular network.
STEPS TO FOLLOW:
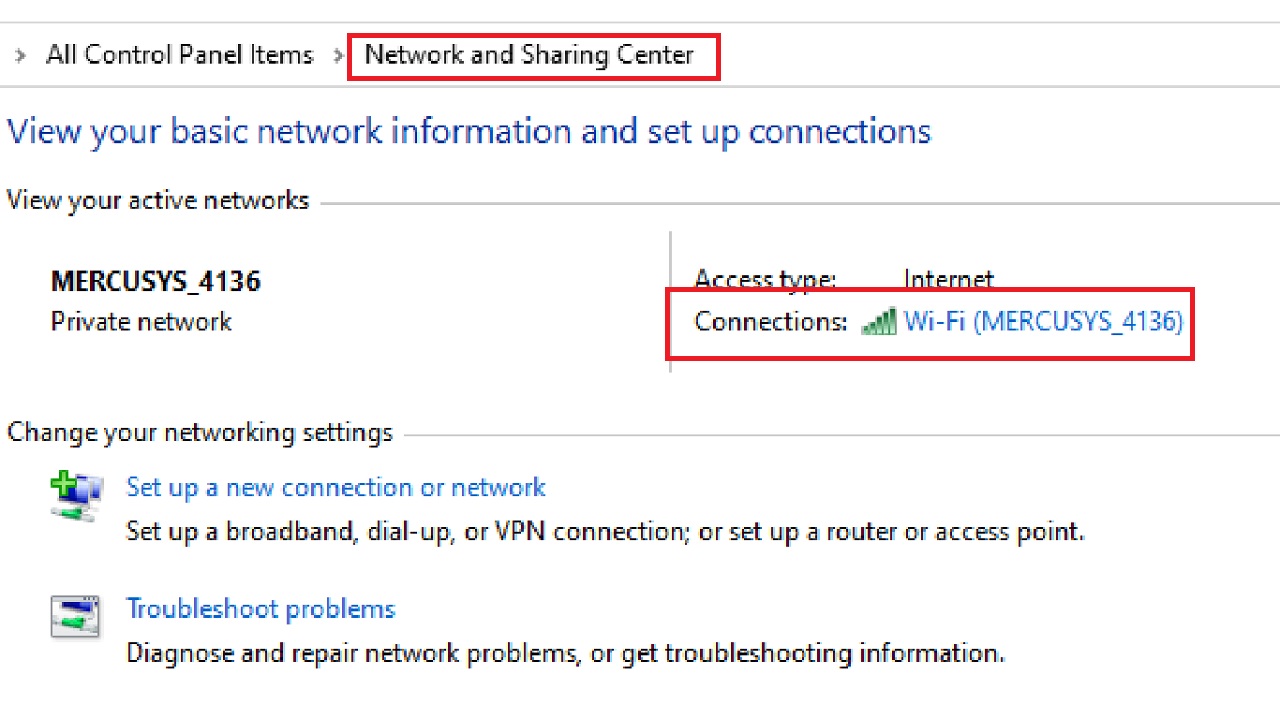
- Open Network and Sharing Center from the Control Panel as before.
- Now, select your active network (Wi-Fi MERCUSYS _4136 in this case) and double-click on it to open the Wi-Fi Status window.
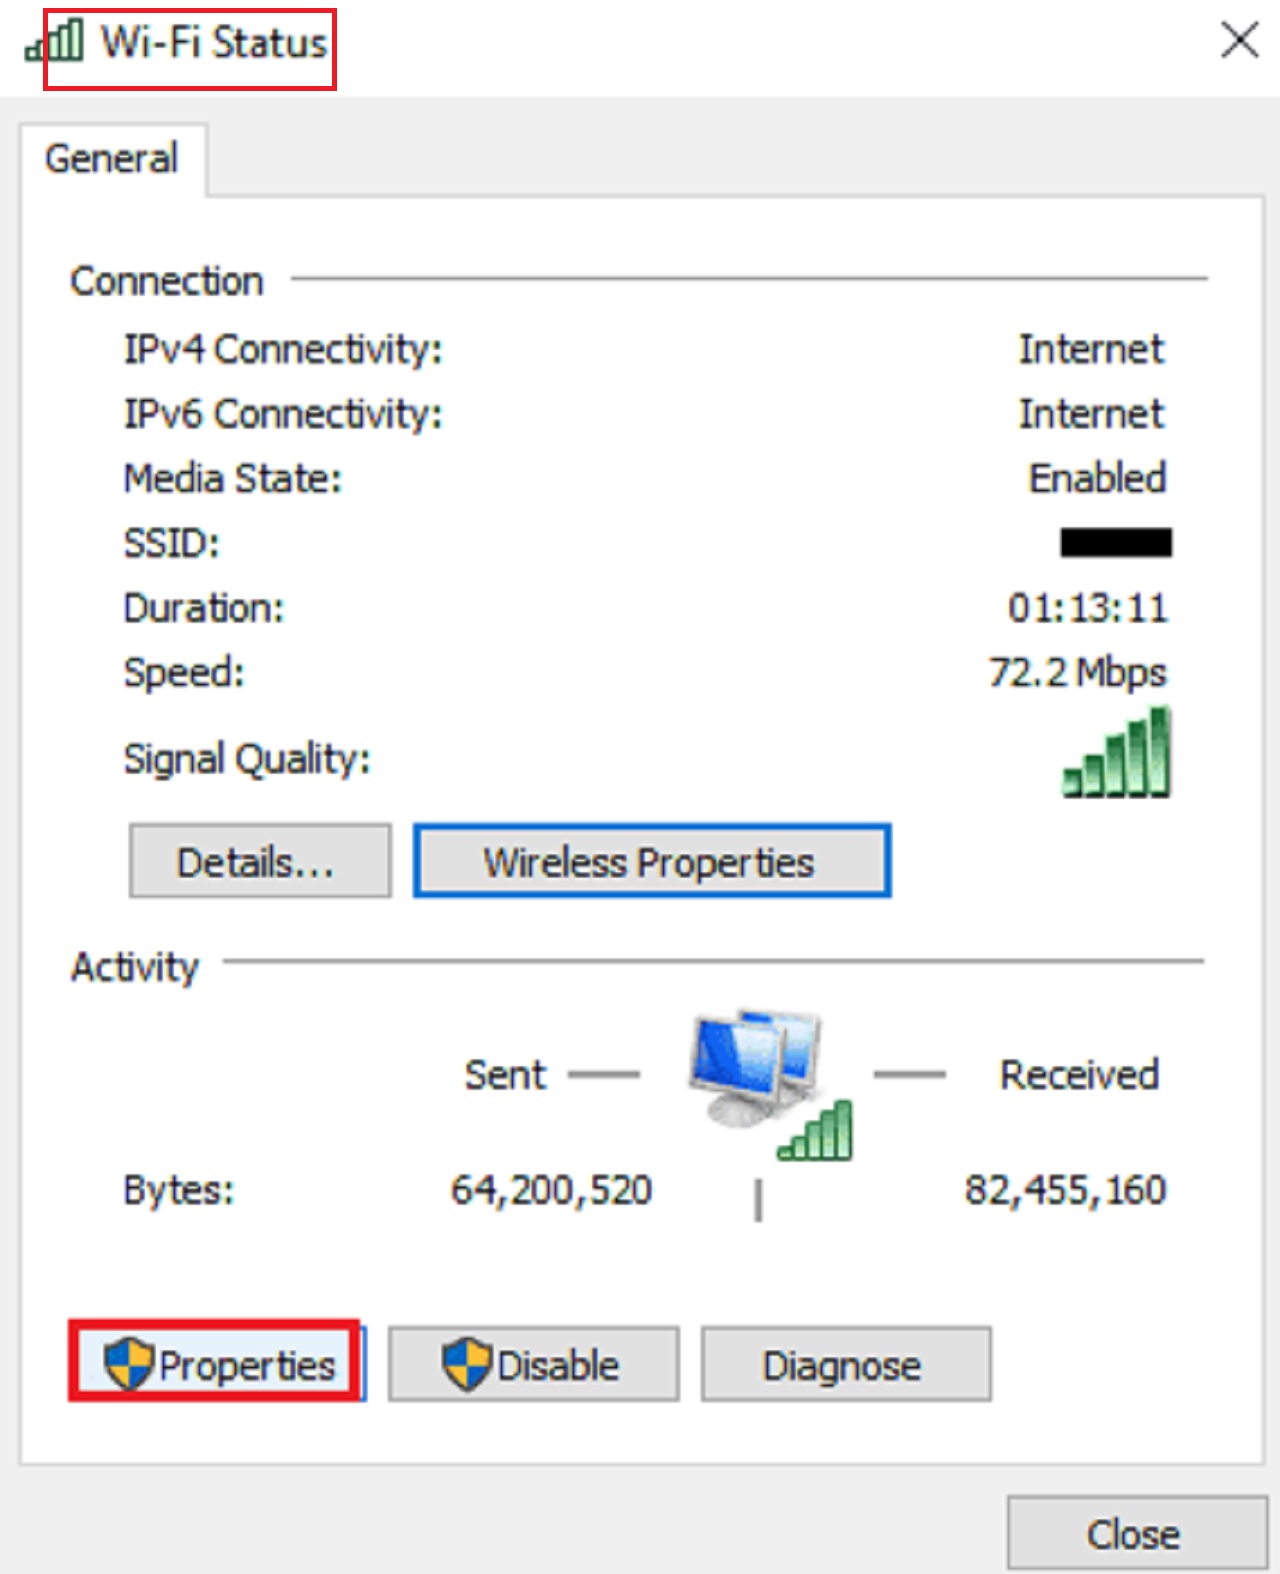
- Click on the Properties button below on the Wi-Fi Status window.
- Next, in the Wi-Fi Properties window in the Networking tab, click on the Configure button.
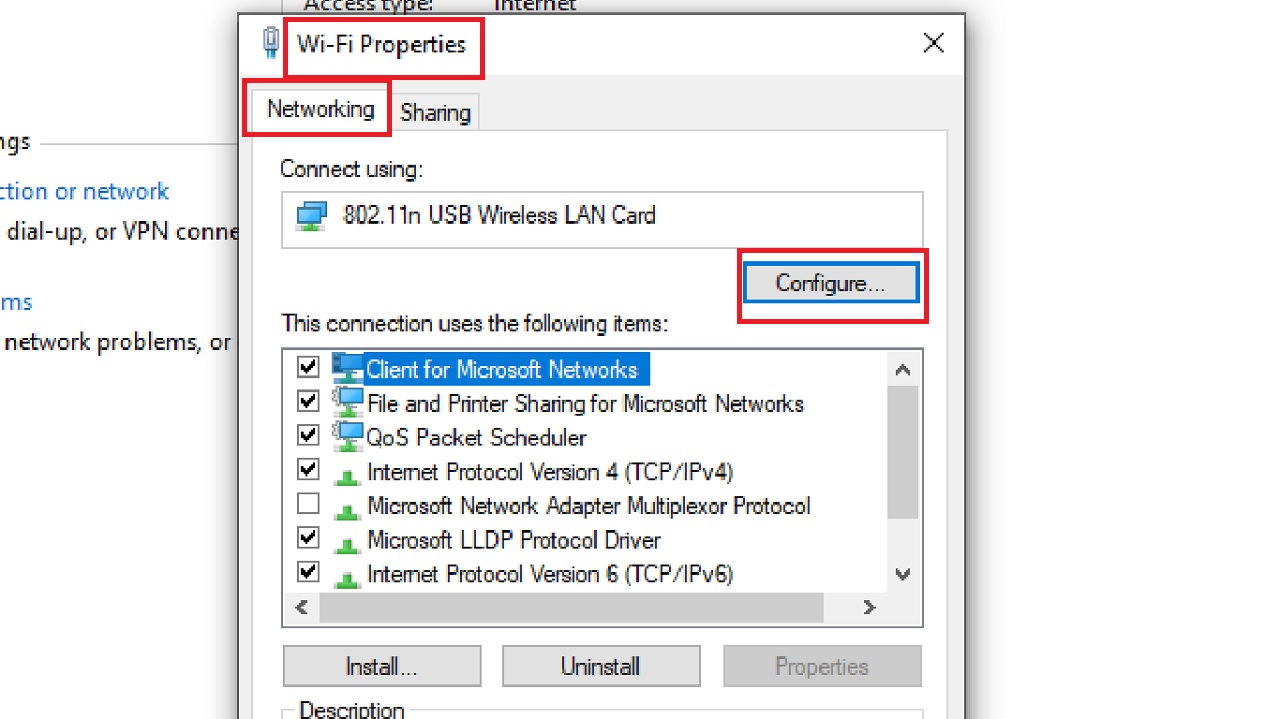
- Then, go to the Advanced tab in the following window.
- Select the Wireless Mode from the list in the box under Property.
- Go to the box under Value and click on the small arrow on the right side.
- Click on any option other than the current one, (802.11b/g option in this case for example) from the drop-down list.
- Finally, click on the OK button.

Now, reboot the system to apply the changes and check whether the issue is resolved or not.
Note: The available options may vary according to the settings. The main idea of this process is to select a different mode from the current one that might work and resolve the issue and save that setting.
Also, note that changing the network mode might have an impact on the overall performance of the Wi-Fi network. Therefore, it is necessary to choose the best mode that is compatible with your system and also functions at a good speed.
After changing the wireless network mode, try to connect your device to the network again and check if the error persists. If it does, there might be other issues causing the problem. In that case, move on to the next method.
Method 10: Change the Channel Width of the Network Adapter
Changing the channel width of the network adapter can sometimes resolve the issue.
STEPS TO FOLLOW:
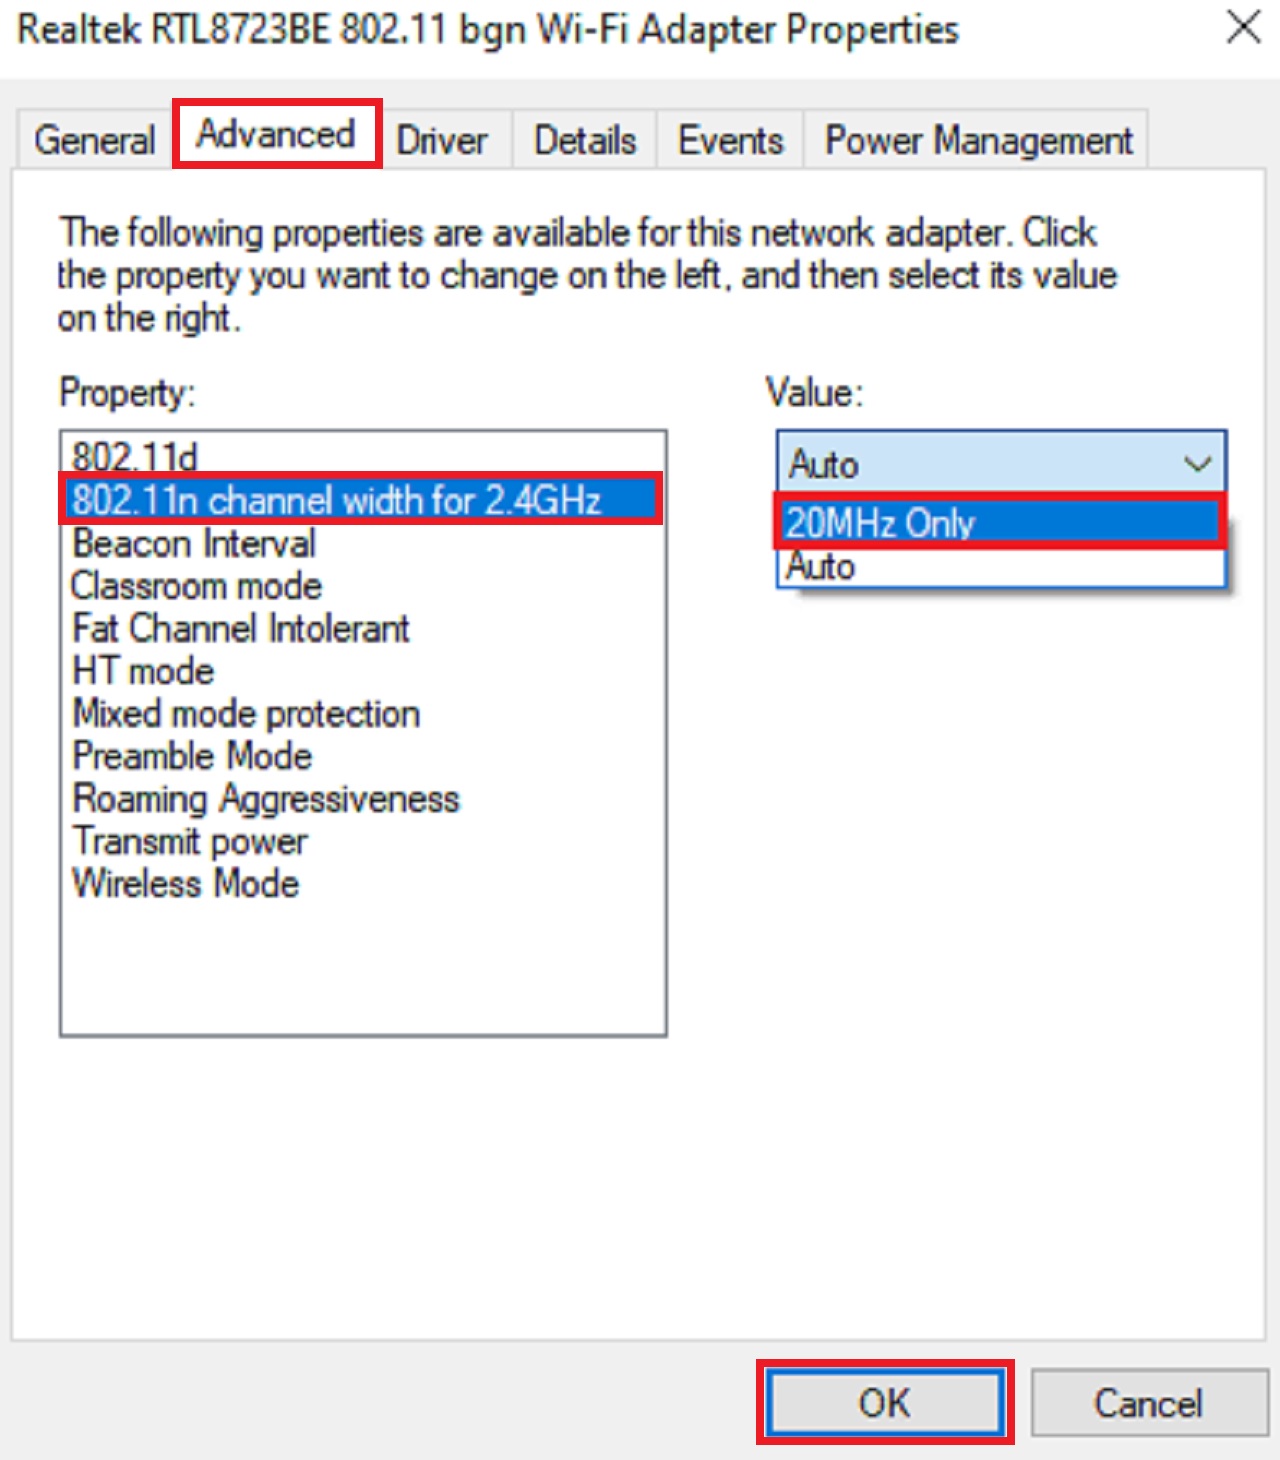
- Follow the same processes of the above solution to go to the Advanced tab.
- This time, in the box under Property, select 802.11n channel width for 2.4GHz.
- Now, go to the box under Value and click on the small arrow on the right side.
- Click on the 20MHz Only option.
- Click on OK to apply the change.
Check if the issue is resolved now or else move to the next solution.
Note: This solution is most relevant to the 2.4 GHz frequency band, which is common for Wi-Fi. And, 20MHz will reduce interference from neighboring networks.
If you are using a dual-band router, you can explore different channel width settings for the 5 GHz frequency band.
Method 11: Change the Power Options to Maximum Performance
You may fix the “Let’s Connect You to a Network” error by making changes in the power options. It helps most of the time.
STEPS TO FOLLOW:
- Type power and sleep setting in the search box and hit the Enter key.
- In the following window, click on the Additional power settings option at the right.
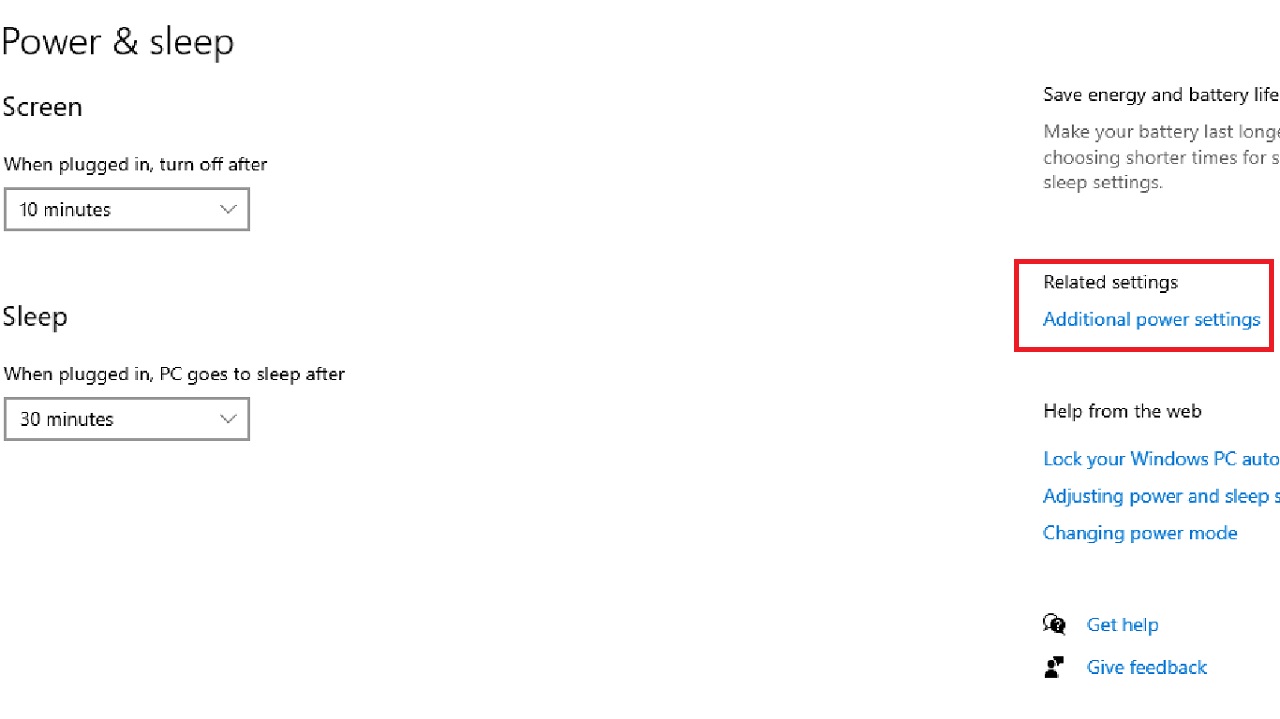
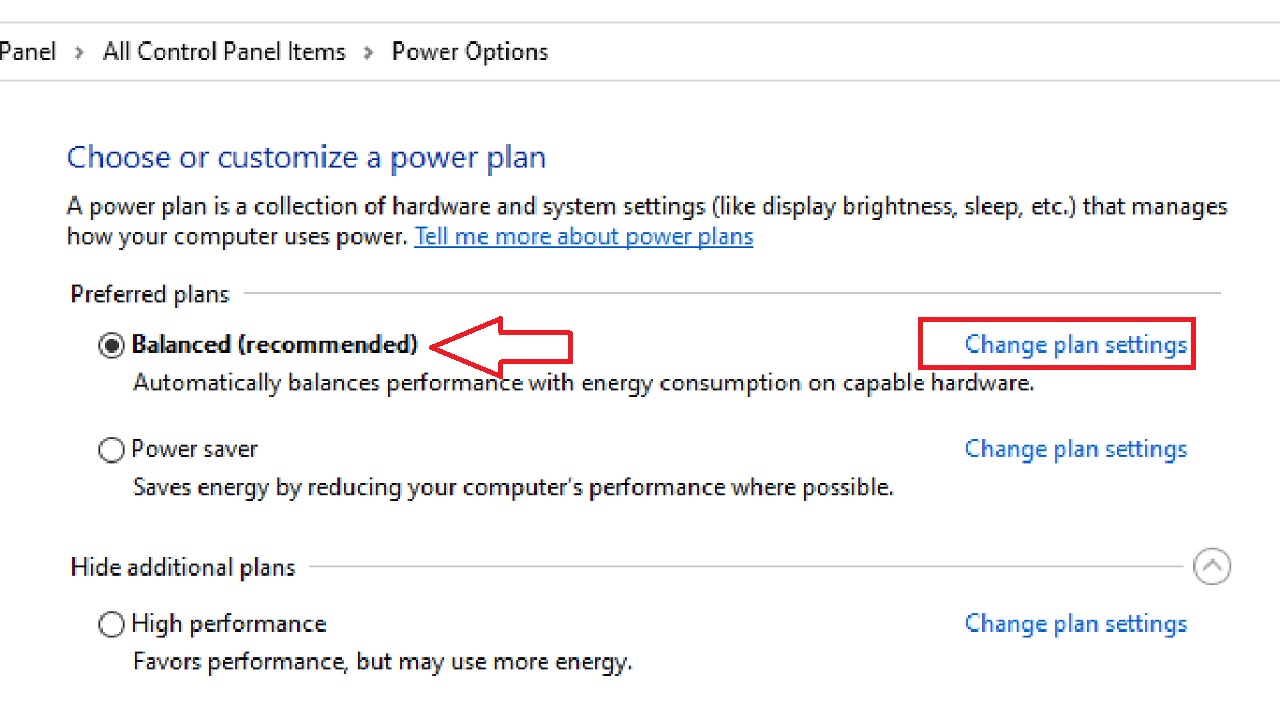
- Select Change plan settings from the next Power Options window beside Balanced (recommended).
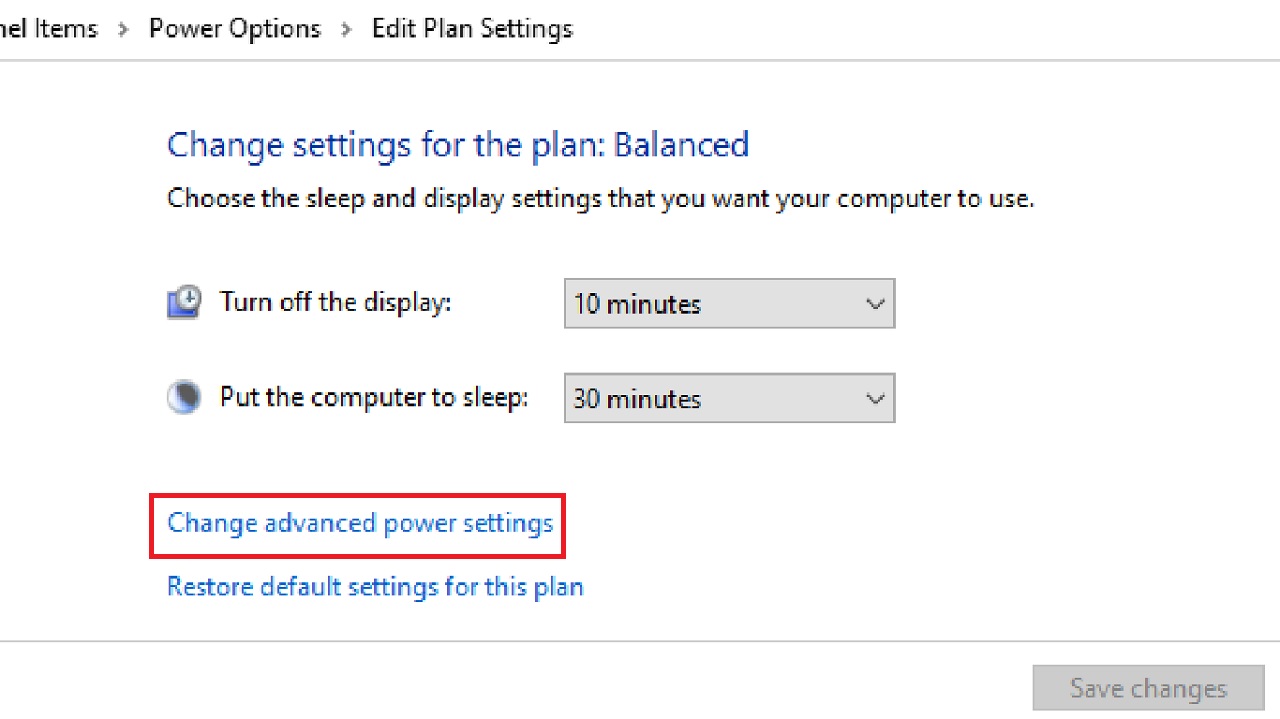
- Click on Change advanced power settings in the following Edit Plan Settings window.
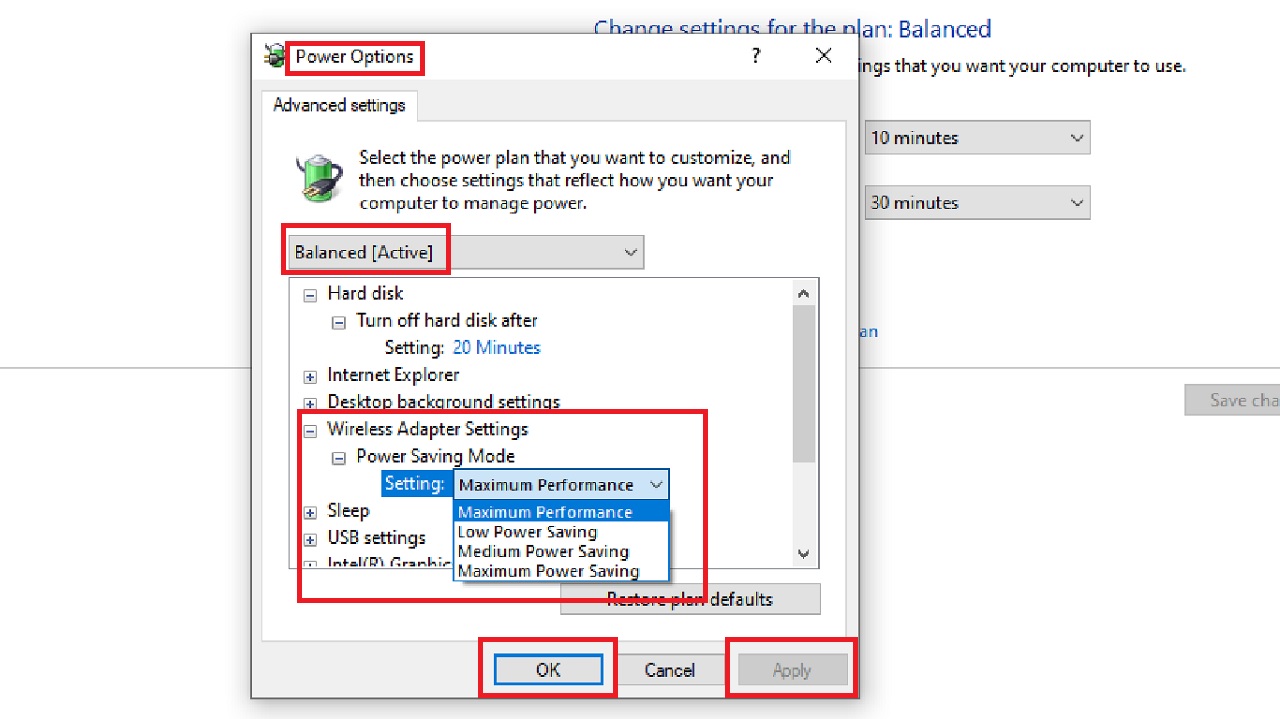
- Click on the plus sign next to Wireless Adapter Settings from the list in the box under Balanced [Active] in the Power Options window that appears next.
- Do the same for the Power Saving Mode under it.
- Click on the small arrow in the box next to Settings.
- Select Maximum Performance from the drop-down options.
- Press on the Apply button and then on the OK button to save the changes and exit.
Now, restart your computer and check whether the issue is resolved.
Method 12: Bypass the Connection Using Command Prompt
Finally, you may use a specific command in the Command Prompt to bypass and resolve the issue as well if you encounter this error during Windows 11 setup.
STEPS TO FOLLOW:
- Open the Command Prompt as administrator.
- In the Command Prompt window type OOBE\BYPASSNRO and press Enter.
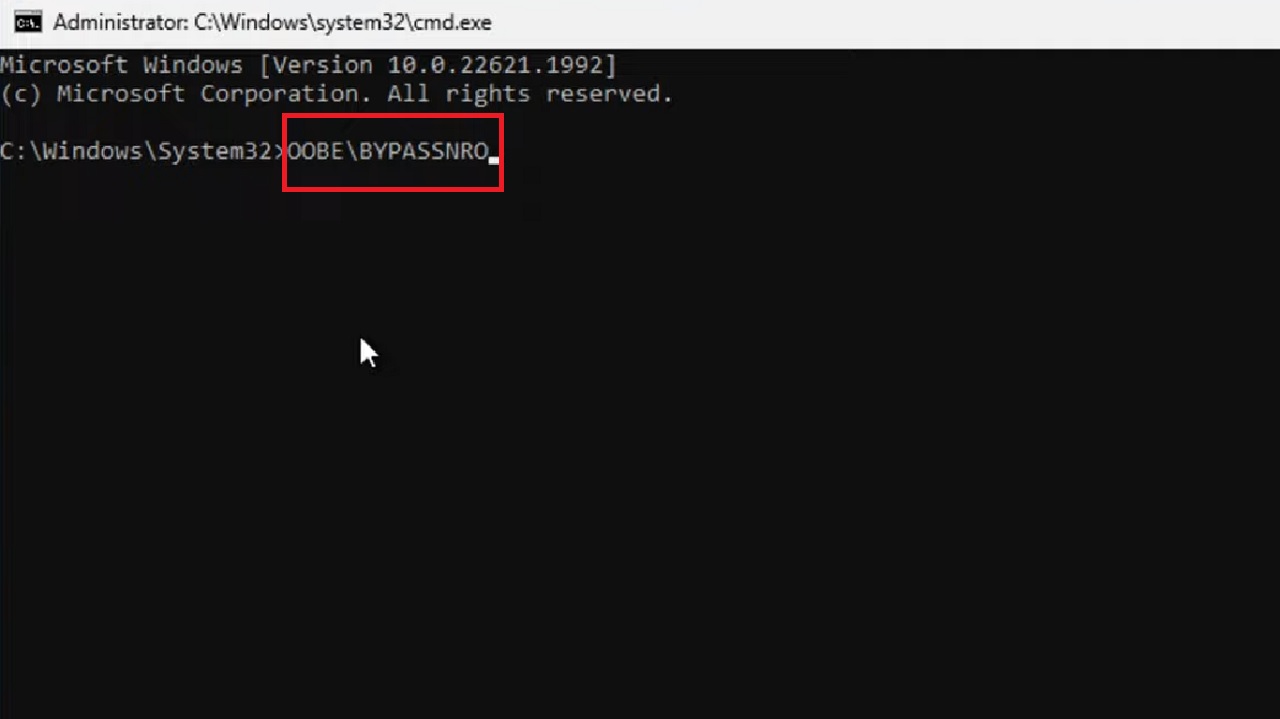
This will restart the computer automatically after successful completion.
- After the system restarts, click on I don’t have internet when you see the following window:
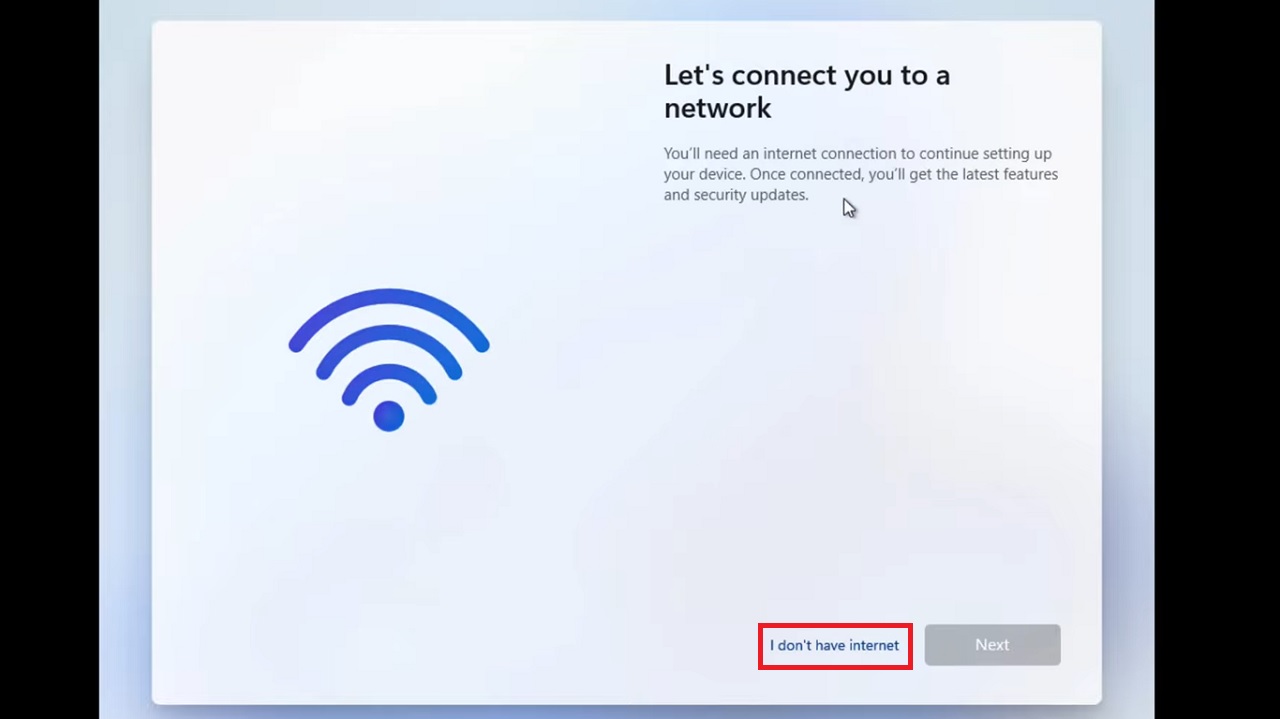
- In the following window, click on Continue with limited setup to continue.
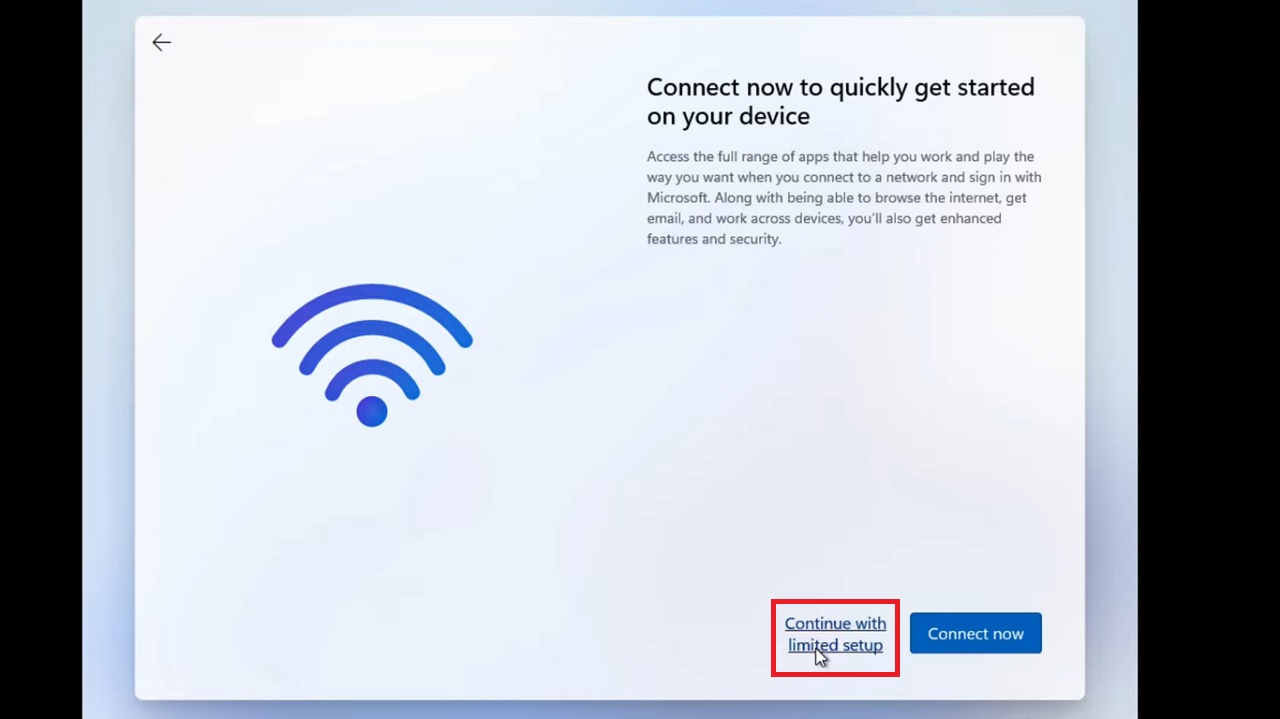
- Now, follow the on-screen instructions to create a local user account.
This might take some time. Once the entire process is complete, it will resolve the issue.
Note: You may even bypass the issue by connecting to a mobile hotspot or by using an Ethernet adapter, though it will not address the issues underlying.
Conclusion
So, from checking the network connections and cables to updating the network drivers, there is a spectrum of solutions to the “Let’s Connect You to a Network” issue.
Try one or a couple of these fixes to overcome this issue and restore seamless network functionality. If nothing works, seek professional assistance.