
While using your computer and connecting to the network or internet, you may occasionally experience a message saying “a network change was detected.” This is typically an error message, which is not fatal.
However, in such a situation, your productivity or user experience may hamper, which can be quite annoying.
Fortunately, there are some easy and quick solutions to this issue, which this article will tell you about.
In This Article
KEY TAKEAWAYS
- As in most issues related to network connectivity, rebooting your PC or restarting the router may solve the “a network change was detected” error.
- Disabling the Internet Protocol Version 6 (TCP/IPv6) may also rectify the error if it is the reason for the issue.
- Making some changes in the web browser itself such as clearing the browsing data or resetting the browser may sometimes rectify the problem.
- Updating the operating system as well as the network drivers to the latest versions may sometimes resolve this issue, as it does for many others.
- Flushing the DNS Resolver Cache and resetting the IP address configuration may often rectify the “a network change was detected” error.
What Causes a Network Change Was Detected Error?
Usually, “A network change was detected” error message occurs when you download a content from the internet or view a webpage and the internet connection changes from one network to the other.
This eventually affects the current data flow and disrupts normal operation.
Sometimes, you may also encounter this error message if you are using a Virtual Private Network (VPN) service and it is conflicting with the network connection.
A few other instances when this error message can appear are:
- Malware or virus infection in your system or device
- Hacking of the network
- Technical or system issues
- Browser issues
- Corrupt extensions
- Too many unnecessary networks in the system
- More than one network trying to connect at once
- Outdated operating system
- Outdated network drivers
- Large amount of browsing data saved in the cache
- Improper loading of the web page
- Improper loading of the browser
- The Internet Protocol Version 6 is enabled
- Improper Wi-Fi router connections
- Improper DNS settings
- Network proxy issues
If you want to fix the issue, read on.
How to Fix a Network Change Was Detected Error?
One of the most obvious and recommended solutions to the “a network change was detected” error is trying a different internet browser altogether, such as Mozilla Firefox, Microsoft Edge, or any other, assuming that you are using Google Chrome browser.
However, depending on the causes and your system configuration, you may also try a few quick and easy methods to fix this issue and then move on to the more complex ones. These are:
- If the VPN is conflicting with the network, you may try to resolve the issue by disabling it temporarily.
- If malware or virus is causing the issue, then performing a system scan for virus infection and rectification may also resolve the issue.
- If you are experiencing the issue on a specific webpage due to its scripts or contents, then closing it and then reopening it may resolve the issue, if reloading it does not.
- Rebooting or restarting your PC may solve a lot of issues, including “a network change was detected” error.
- Restarting your router or modem is also another quick fix to the issue where all you have to do is unplug the device from the wall outlet, wait for about five minutes, plug it back and restart the system.
- If you have a dual-band Wi-Fi router which is switching between 2.4 GHz and 5 GHz automatically, changing the ID names of the network and connecting only to 2.4 GHz may resolve the issue.
- Depending on the browser you are using, turning off the Predict network actions to improve page load performance feature, if available under Privacy & Security settings, may fix this issue.
- If the Internet Protocol Version 6 (TCP/IPv6) is causing the issue, disabling it may resolve the issue sometimes.
Apart from the above solutions, making some changes in the browser settings can help resolve this issue.
Note: For demonstration Google Chrome browser is used in the following solutions. The icons may vary depending on the design of the home page of the web browser you are using. So, make sure you check them before following the steps.
Updating the web browser: Open your browser > Click on the three dots in the upper-right corner of your screen or the More icon > Go to Settings > About Chrome > Click on Update.
(If you cannot find the Update option, it signifies that the browser is already updated to its latest version).
Resetting the browser: Open your browser > Click on the three dots > Go to Settings > Reset and clean up > Restore settings to their original defaults > Reset settings.
Repair browser: Press Windows + R keys together on your keyboard to open the Run dialog box > Type control panel > Press Enter > Go to Programs and Features > Uninstall a Program > Select your browser > Click Repair > Follow on-screen instructions.
If the above solutions fail to resolve the issue, you can try these relatively complex yet quick solutions, before moving on with the more advanced solutions mentioned thereafter:
Perform a Windows update: In Windows, Go to Settings > Update & Security > Check for updates.
In Mac, go to the Apple logo > System Preferences > Software Update > Click on Update Now > Follow the instructions on-screen to install available updates.
Update network driver: Open Run > Type devmgmt.msc > Press Enter> Expand the Network adapters section > Right-click on your network driver > Select Update driver > Click Search automatically for drivers > Follow the on-screen instructions.
Disable the Energy Efficient Ethernet property (If available): Right-click on the Start Menu > Select Device Manager > Select Network adapters > Expand it > Double-click on your network adapter > Go to Advanced > Energy Efficient Ethernet option > Set the Value to Disabled.
Now, if none of the above fixes could resolve the issue, try these following solutions.
Method 1: Disable Unused Network Connection
Having too many network connections in your PC may cause the “a network change was detected” error if you do not use them all. Disabling the unused ones may resolve the issue.
For example, if you are using Wi-Fi network connection, disable Ethernet and/or Bluetooth.
STEPS TO FOLLOW:
- Go to the search box next to the Start Menu.
- Type control panel.
- Hit the Enter button on the keyboard.
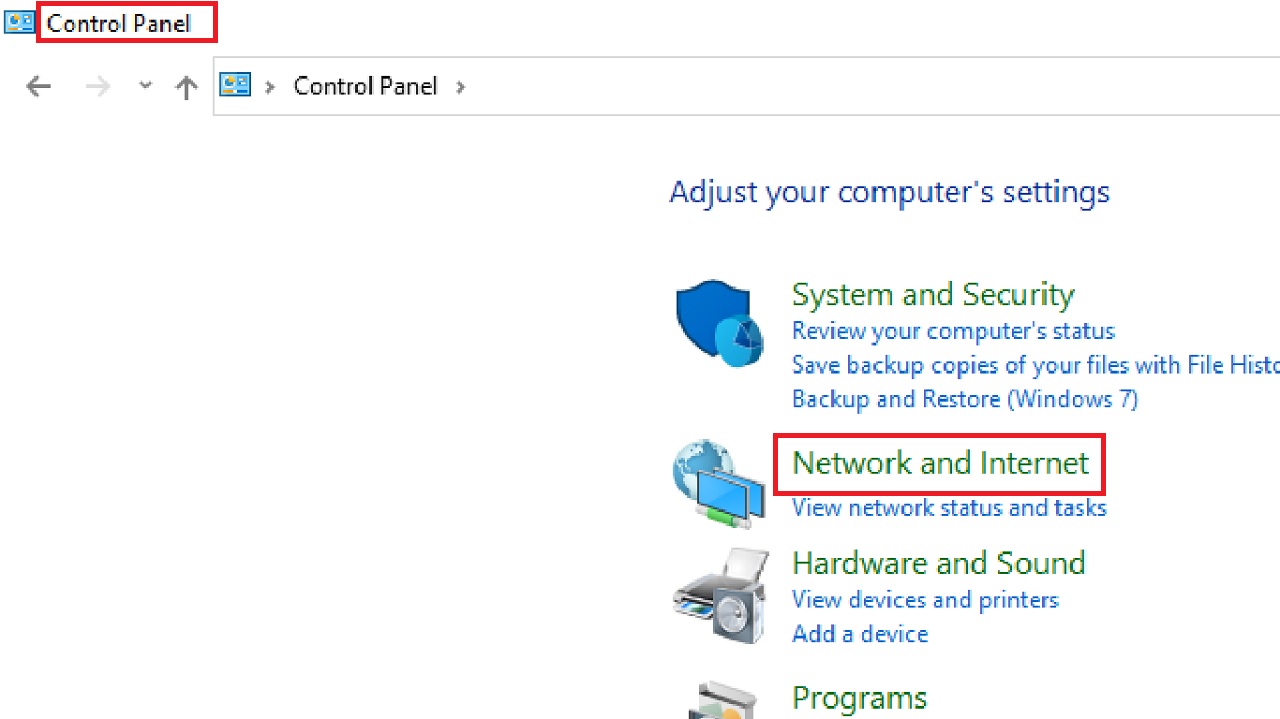
- Click on the Network and Internet option in the Control Panel.
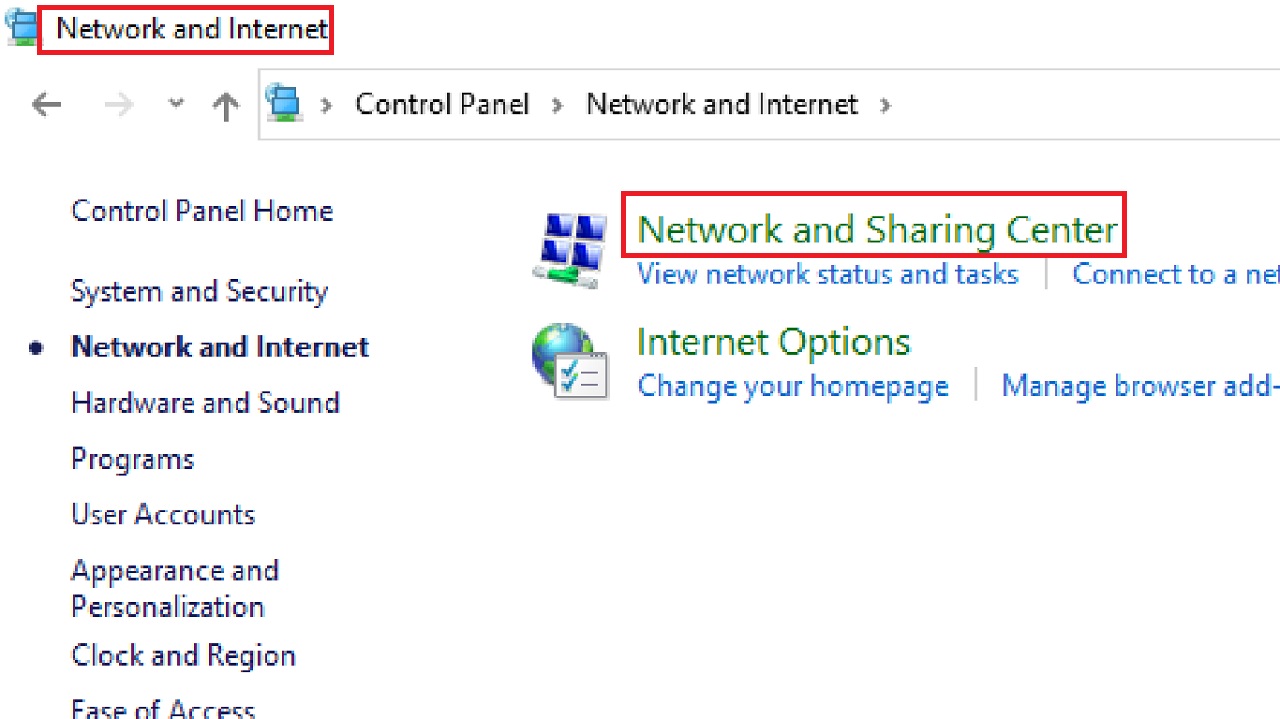
- Select Network and Sharing Center from the following Network and Internet window.
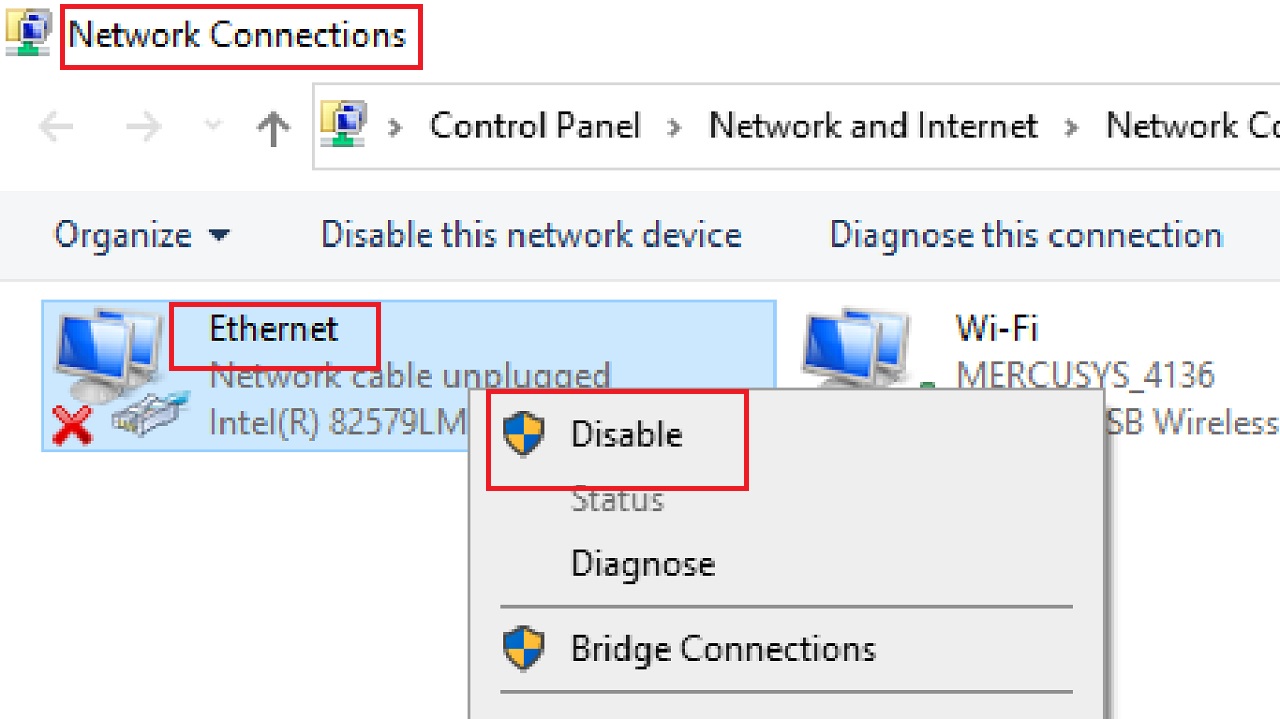
- Select Change adapter settings in the left panel of the Network and Sharing Center window.

- Select Ethernet in the Network Connections window, if you do not use it.
- Right-click on it.
- Select Disable from the drop-down context menu.
Follow the same if you have Bluetooth connection to disable it as well, keeping only the Wi-Fi connection active.
If this does not work, then you should delete or forget unwanted multiple networks on your PC.
In Windows computer, you can do it from Windows Settings app by following these simple steps:
- Go to Settings.
- Select Network & Internet in the following window.

- Select Wi-Fi from the left panel of the following Network & Internet window.
- Click on Manage known networks in the right side of the window.

- Select and click the Network you want to delete, MERCUSYS_4136, for example.
- Click on the Forget button.

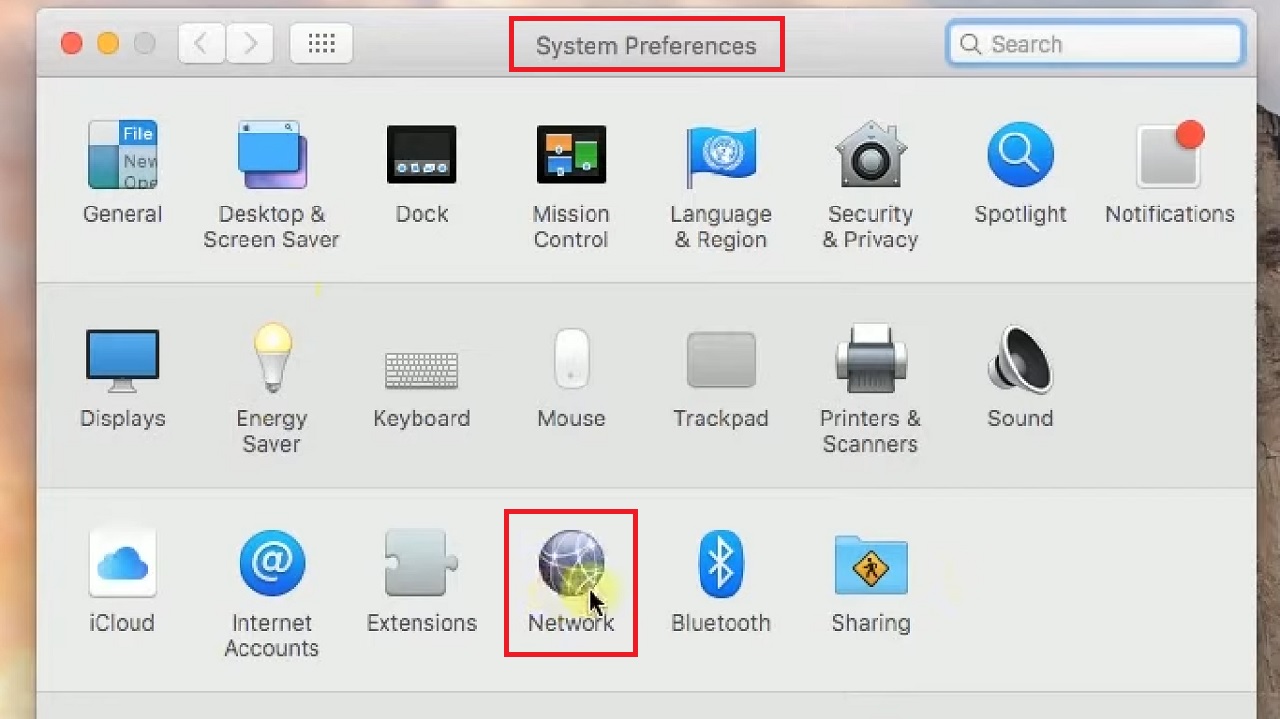
In Mac:
If you are using a Mac computer, follow these steps:
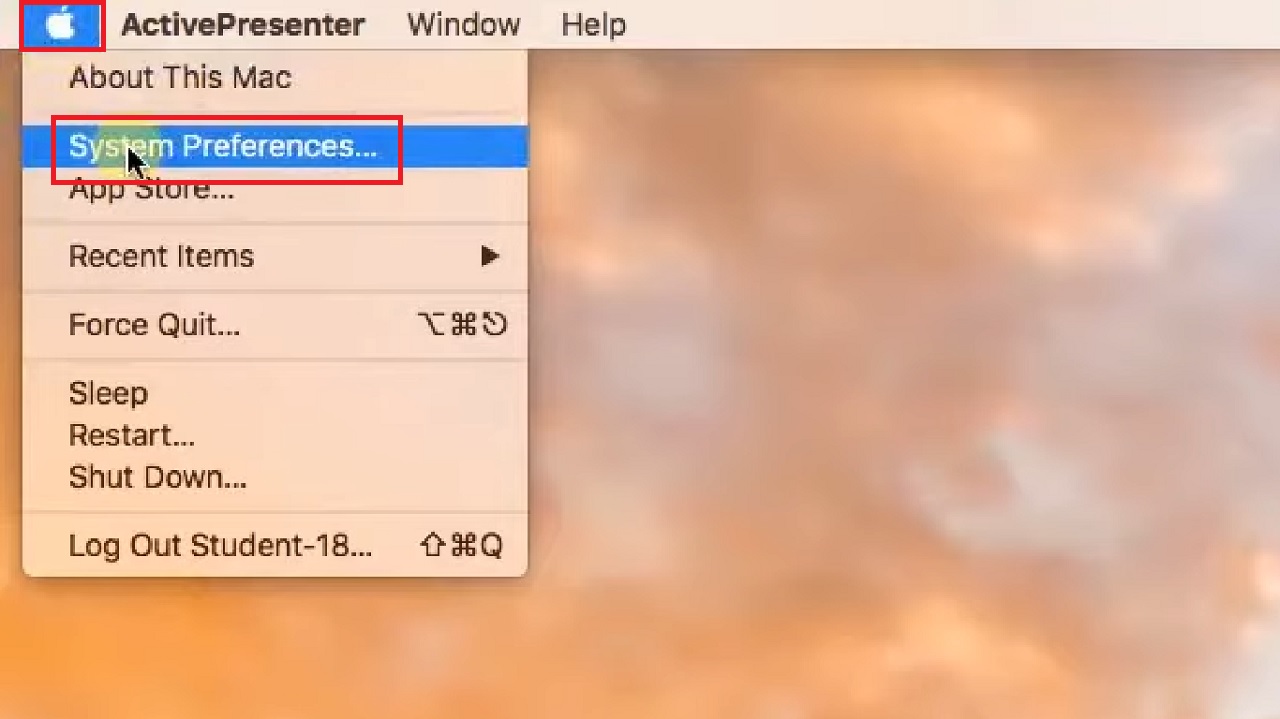
- Go to the Apple Icon.
- Click on System Preferences.
- Select Network from the System Preferences window.
- Select Wi-Fi on the left panel in the following Network window.
- Click on the padlock icon below.
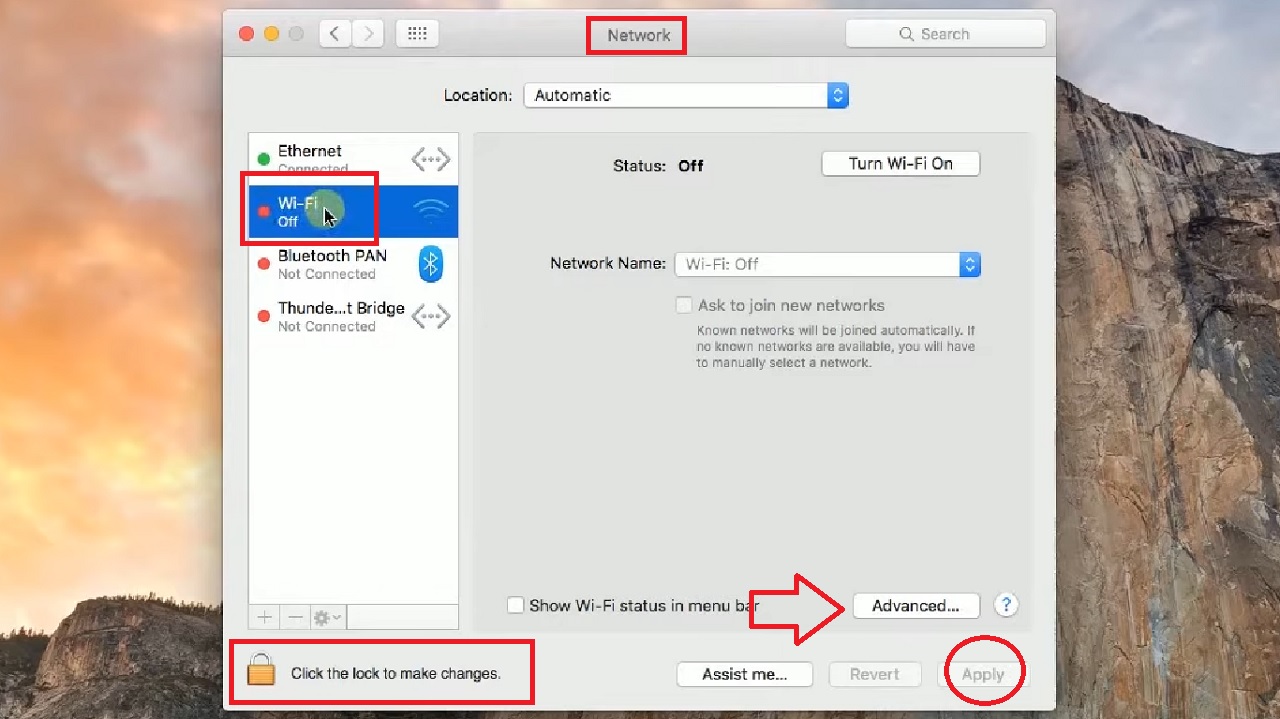
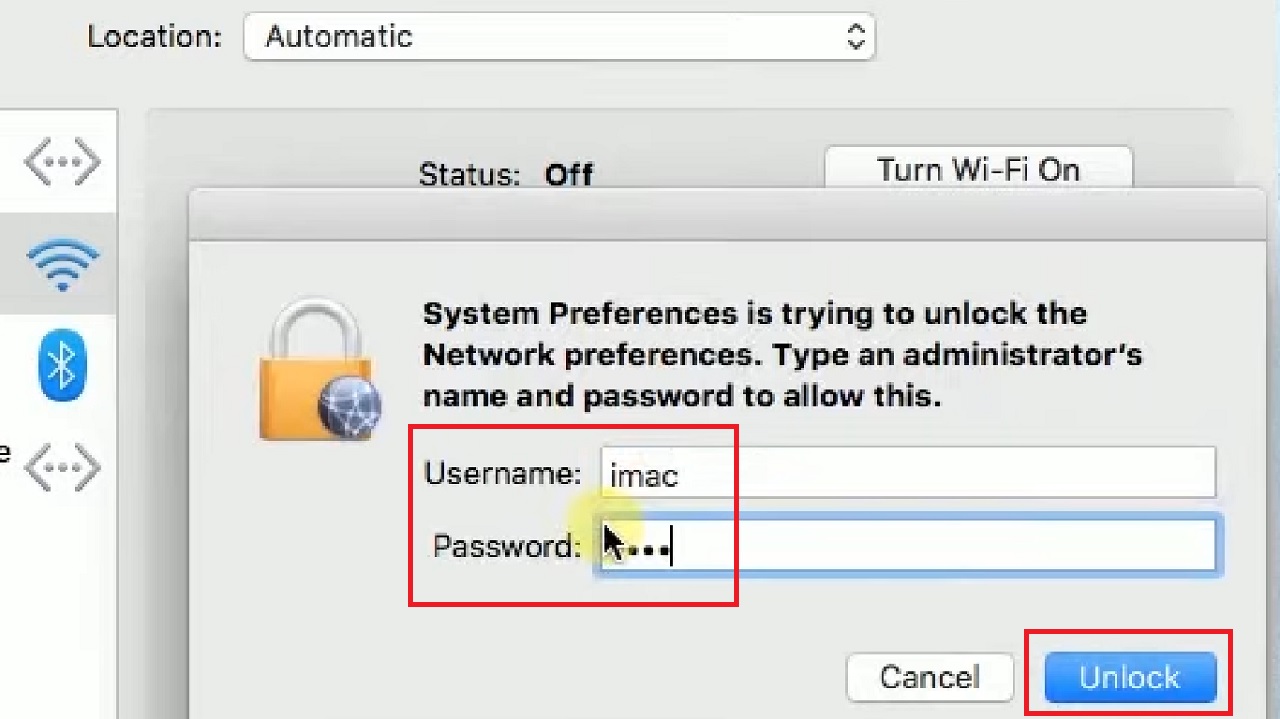
- Enter the admin username and password when prompted.
- Hit Unlock.
- Now, click on the Advanced button in the previous Network window, marked by a red arrow in the image.
- Choose the network to forget in the following window under the Wi-Fi tab.
- Click on the minus button.
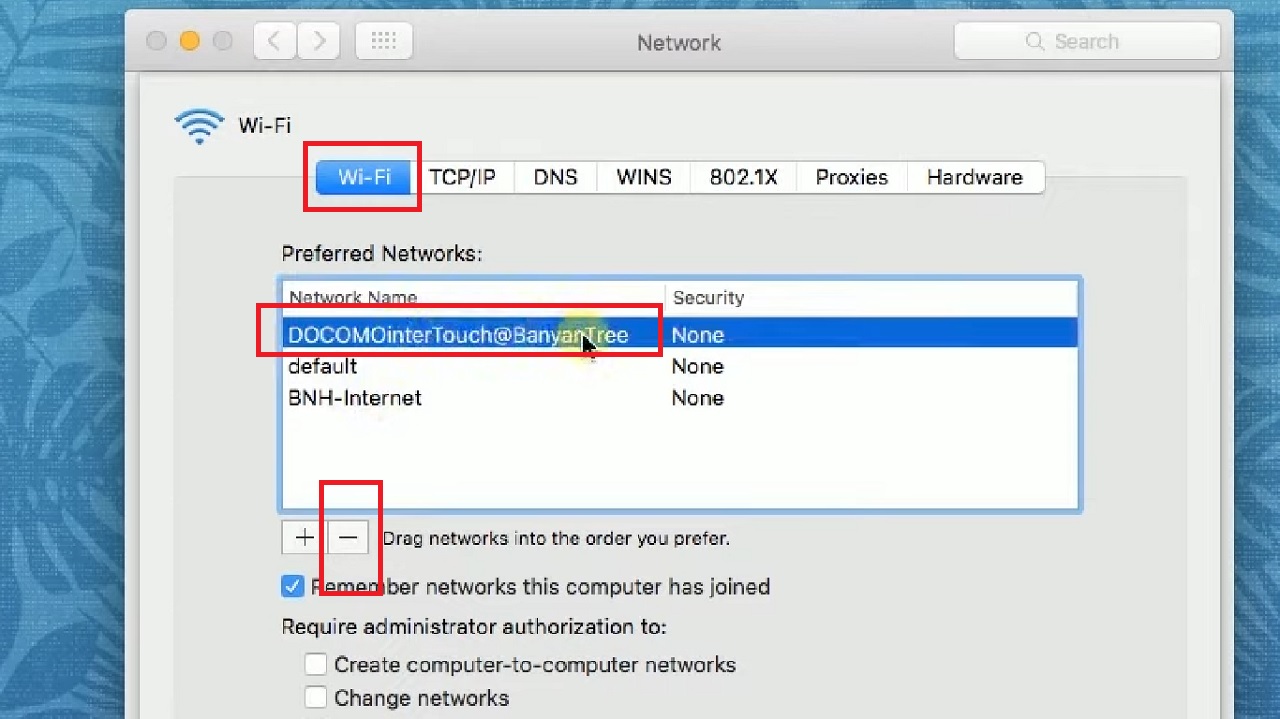
- Repeat the last two steps for other network connections you want your system to forget.
- Click on the OK button below. (Not shown in the image).
- Click on the Apply button in the previous Network window, marked by a red circle.
- Also, remember to lock the padlock.
This might resolve the issue. If it does not, move to the next method.
Method 2: Flush the DNS and Reset the IP Address Configuration
Often, flushing the DNS and subsequently resetting the IP address configuration may rectify the error.
STEPS TO FOLLOW:
In Windows:
- Press the Windows and R button on your keyboard together to open the Run dialog box.
- Type cmd.exe in the box.
- Press CTRL + SHIFT + ENTER keys together to open the elevated Command Prompt window.
- Press the Yes button in the User Account Control window when it appears.
- Type ipconfig /flushdns command in the Command prompt Window.
- Hit the Enter key on the keyboard. Wait for the DNS Resolver Cache to be flushed.
- When it is done, type the command netsh winsock reset in order to reset the IP address configuration.
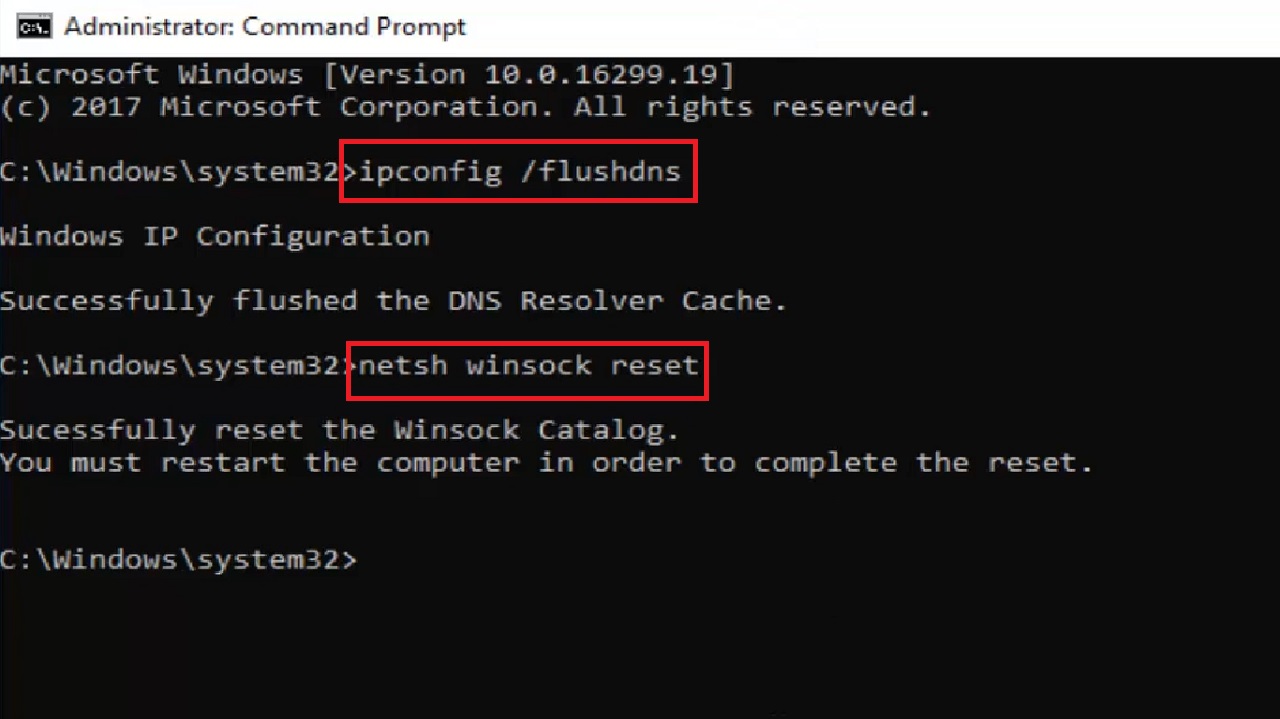
- Type exit when the process is complete and hit Enter to close the Command prompt.
Now, restart your computer and check whether or not the issue is resolved.
In Mac:
- To flush the DNS, press Command and Spacebar to open the Spotlight search box.
- Type Terminal.
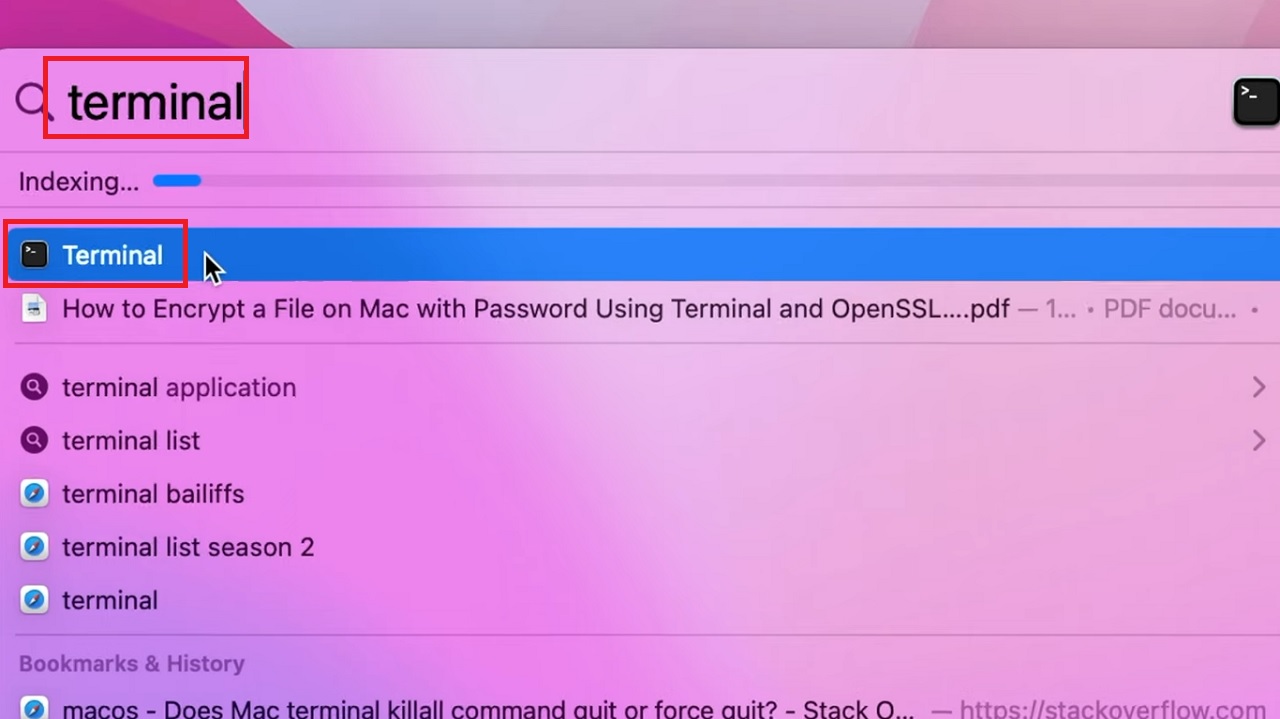
- Press Enter.
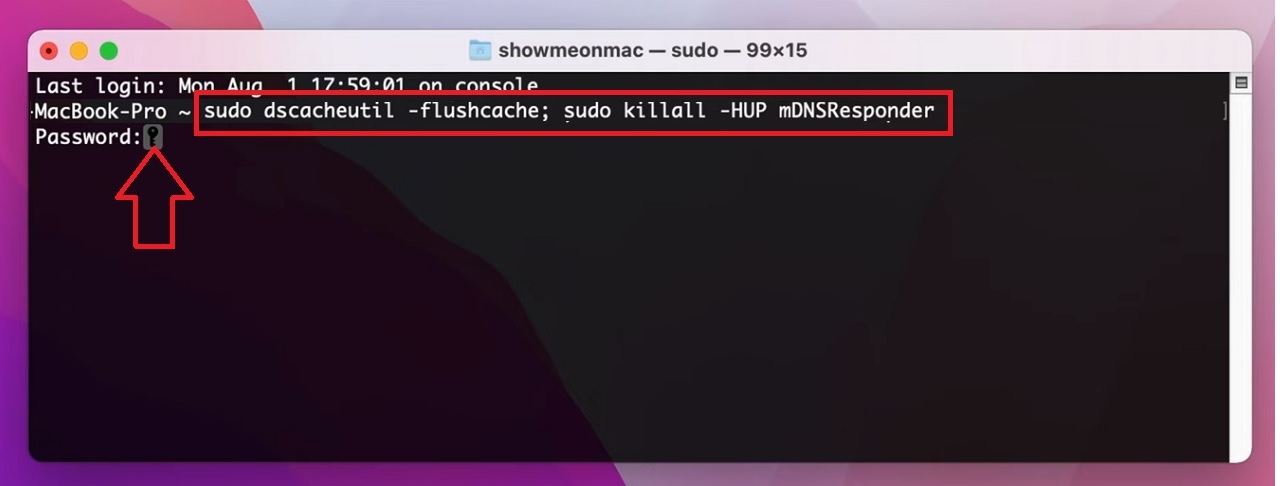
- Type the command sudo dscacheutil -flushcache; sudo killall -HUP mDNSResponder.
- Hit Enter.
- Enter your admin password when prompted. (Note that the terminal will not show the password as you type it, but do not worry, it will work).
- Press Enter again.
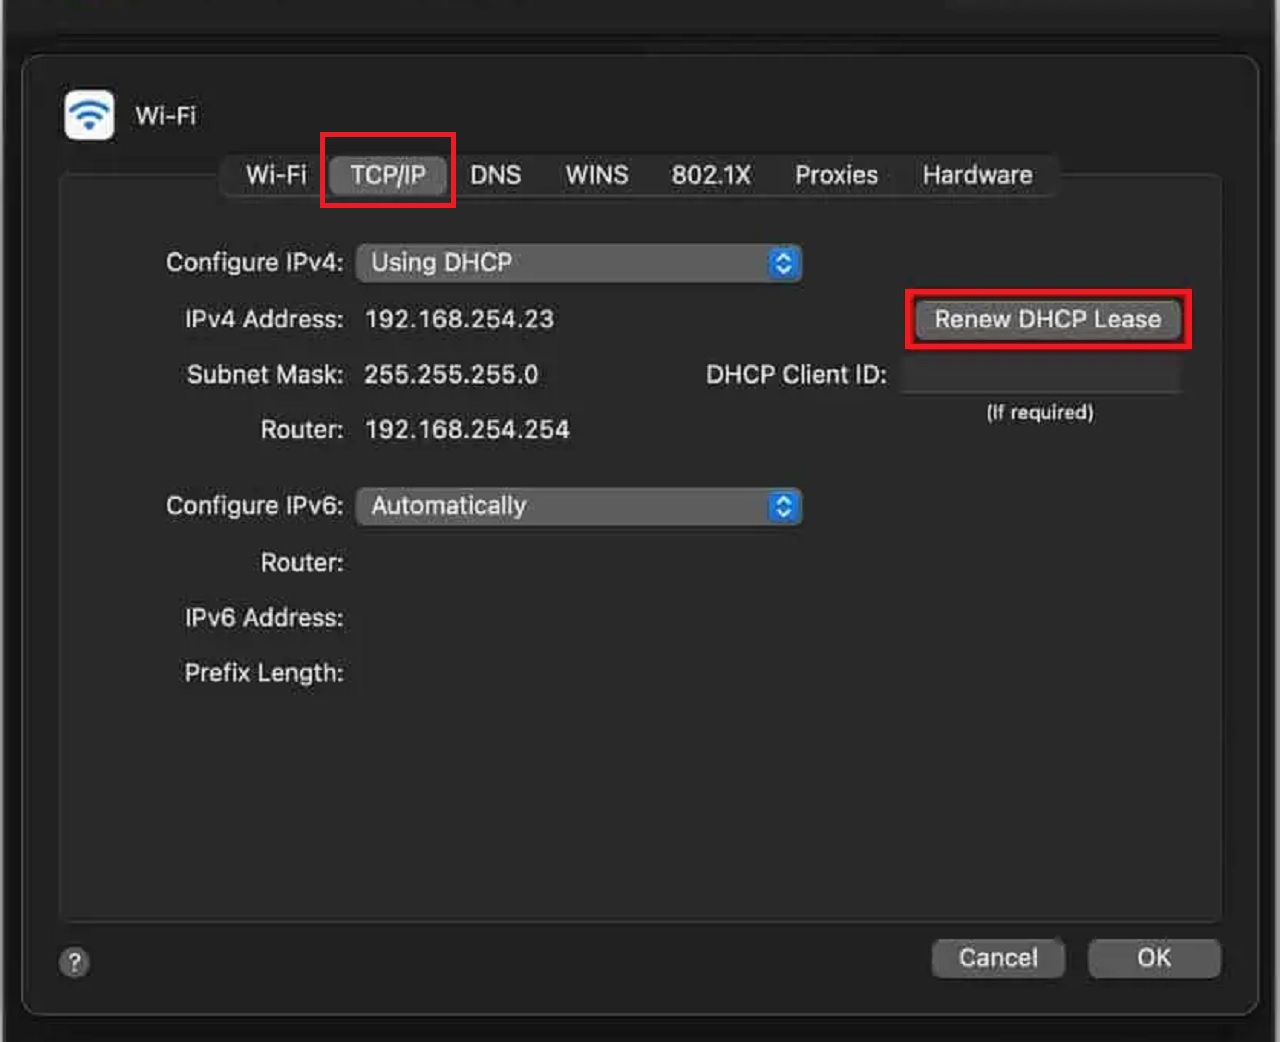
When the process is complete, to reset IP address follow these steps:
- Follow all the steps in Method 1 to reach and click on Advanced.
- Select TCP/IP tab in the Network window.
- Click on Renew DHCP Lease.
Now, restart the computer and check whether the issue is resolved. If it persists, follow the next method.
Method 3: Turn Proxy Server Off
If the proxy server is turned on, you may encounter this error message. So, turn it off.
STEPS TO FOLLOW:
In Windows:
- Go to the Start Menu.
- Type internet options and hit Enter.
- Go to the Connections tab in the Internet Properties window that appears next.
- Click on the LAN settings button below.
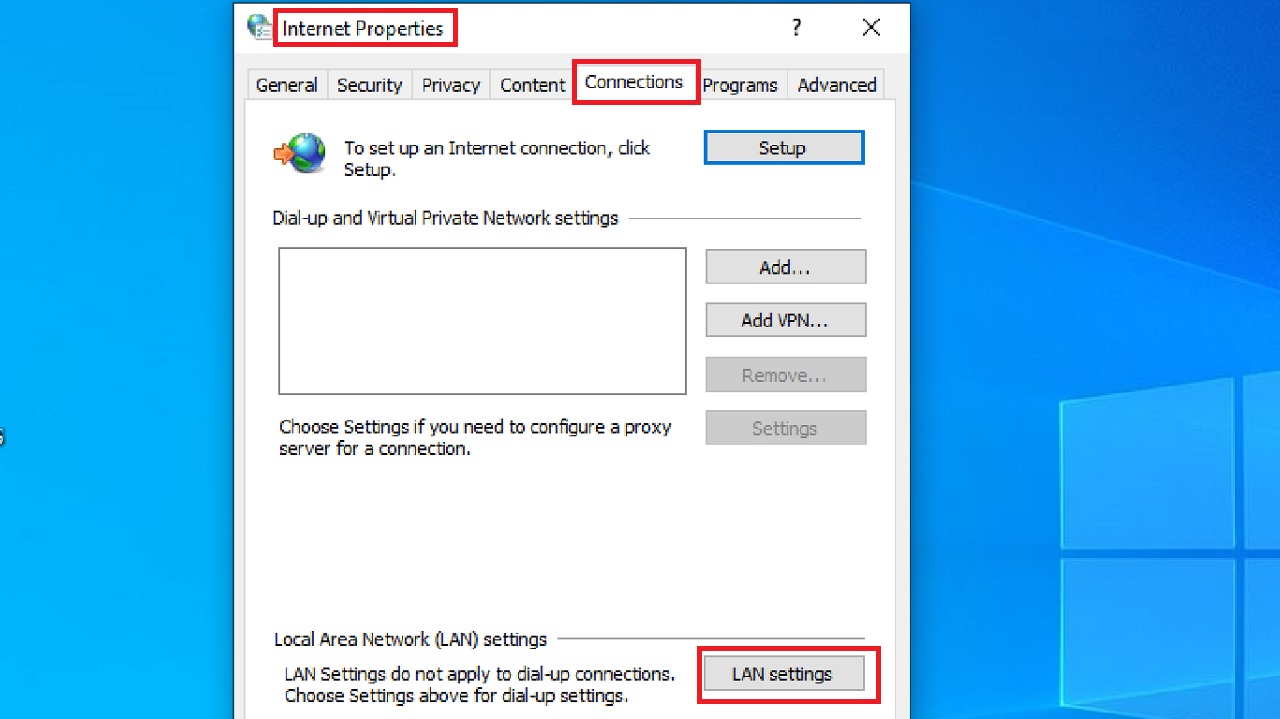
- In the following Local Area Network (LAN) Settings window, uncheck the box under Proxy server next to Use a proxy server for your LAN (These settings will not apply to dial-up or VPN connection).
- Click on the OK button.
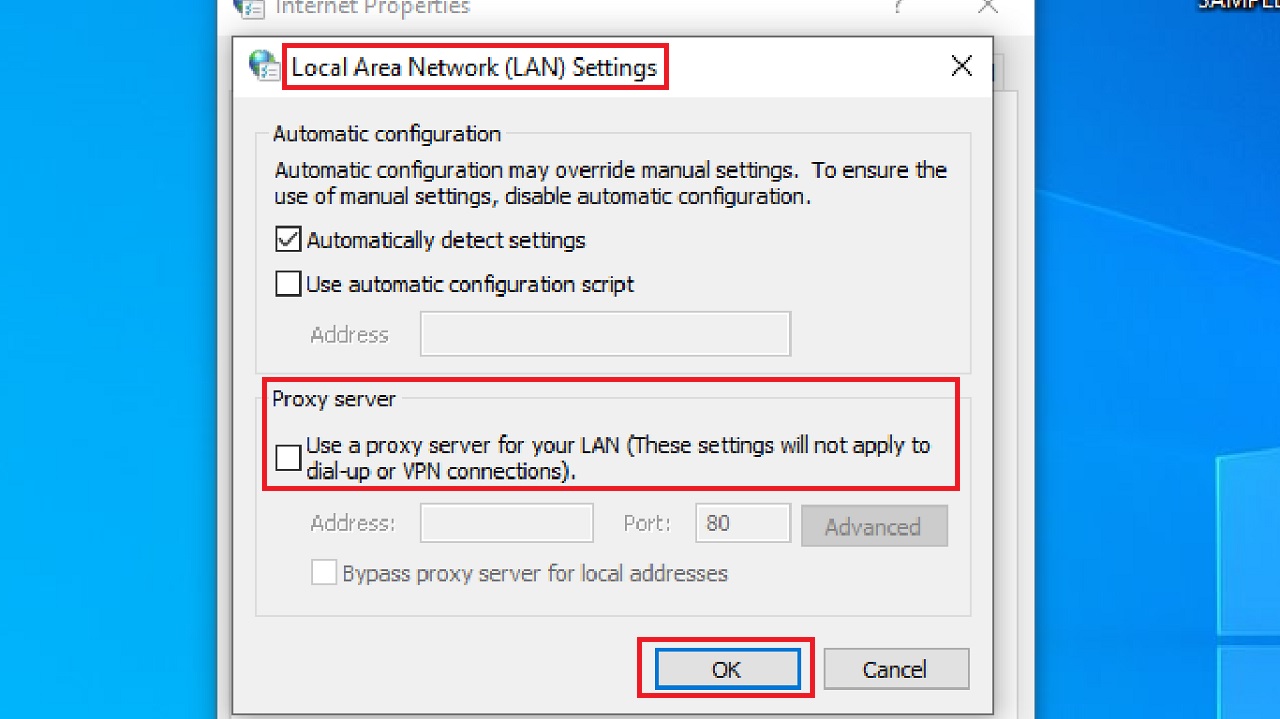
Next, click on the OK button in the other windows and close them. Now, reconnect again and check whether the issue is resolved.
In Mac:
- Reach to and click on Advanced as before.
- Select Open proxy settings under System from the next window.
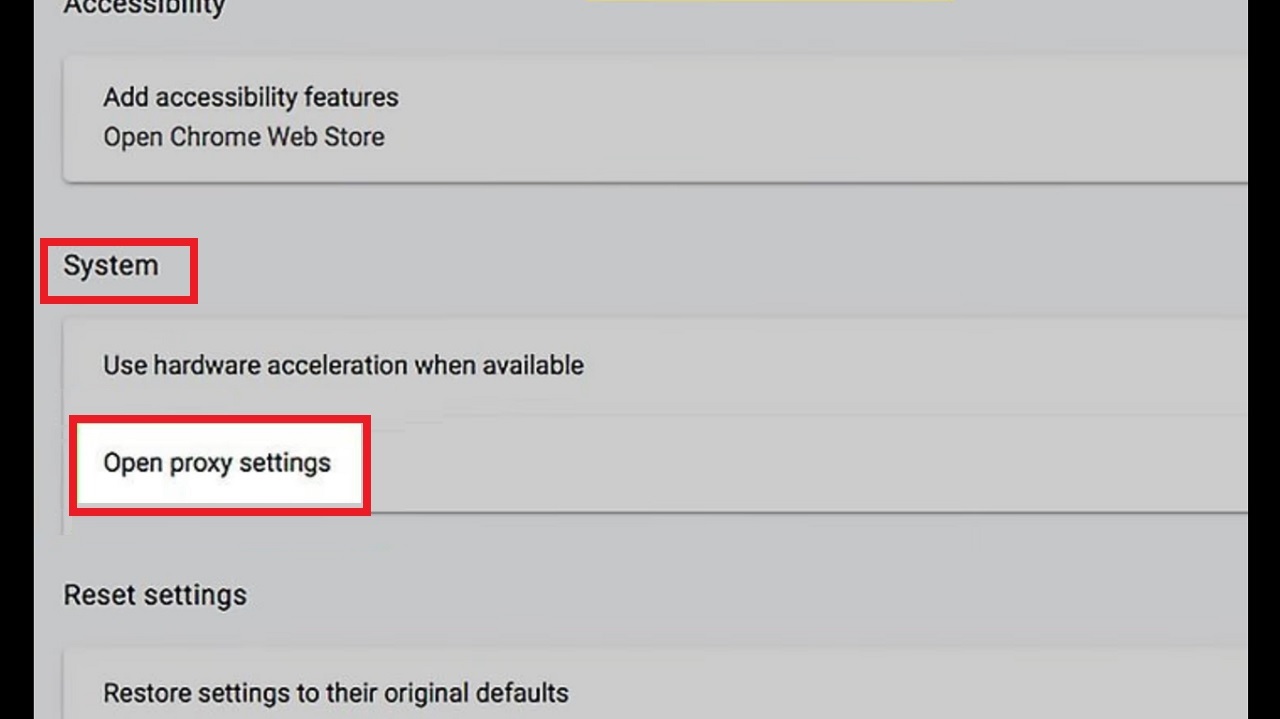
- Select the Proxies tab in the window that follows.
- Disable all proxies by unchecking the small square boxes next to each.
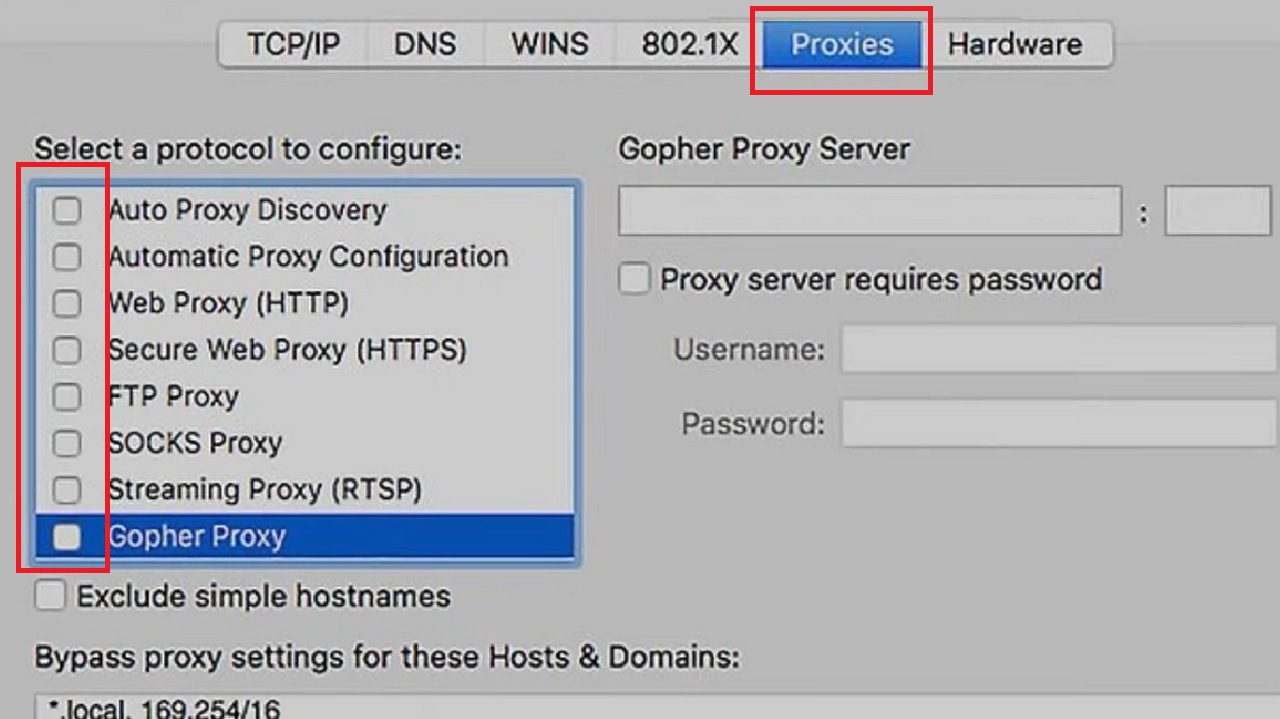
- Press the OK button below.
- Press the Apply button in the previous window.
Check whether the issue is resolved.
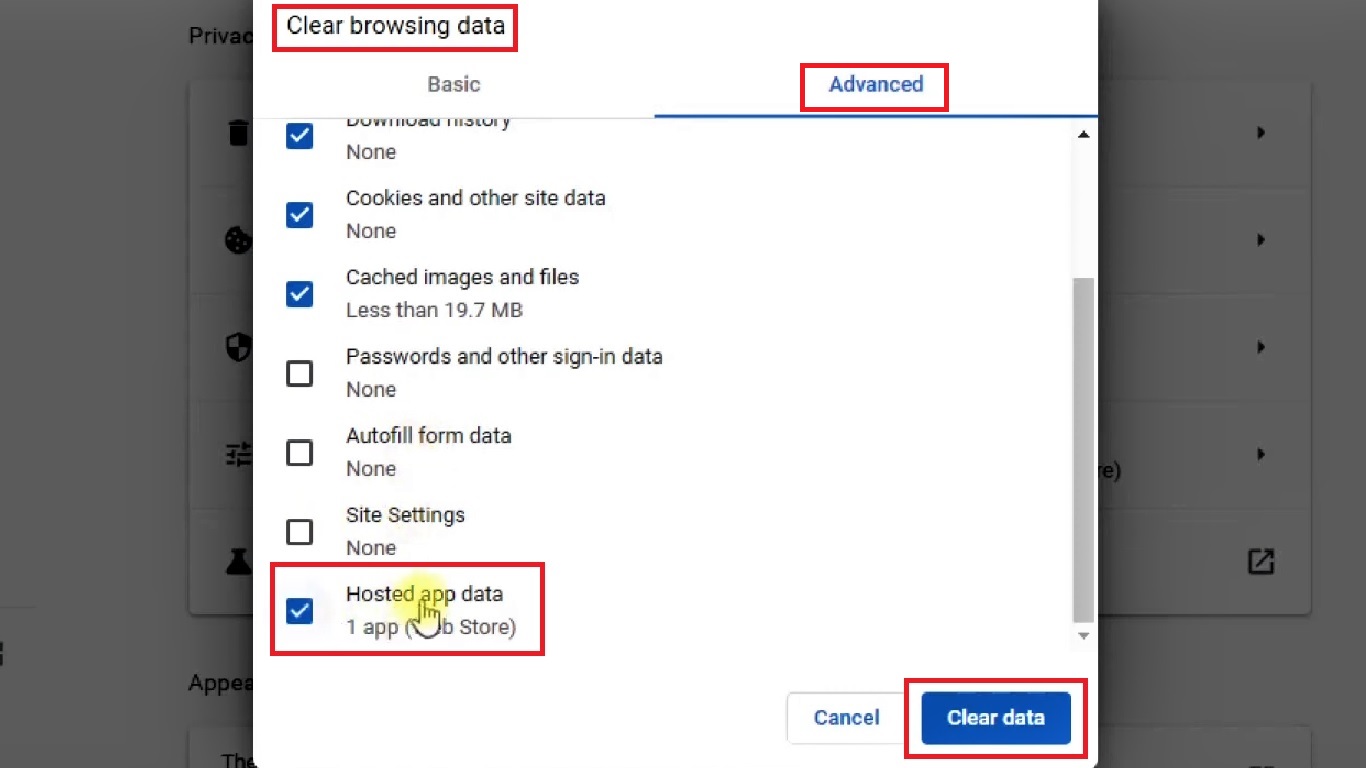
Method 4: Clear the Browsing Data
Too much browsing data saved in the browser cache may also cause this issue. Therefore, clearing it is a feasible solution.
STEPS TO FOLLOW:
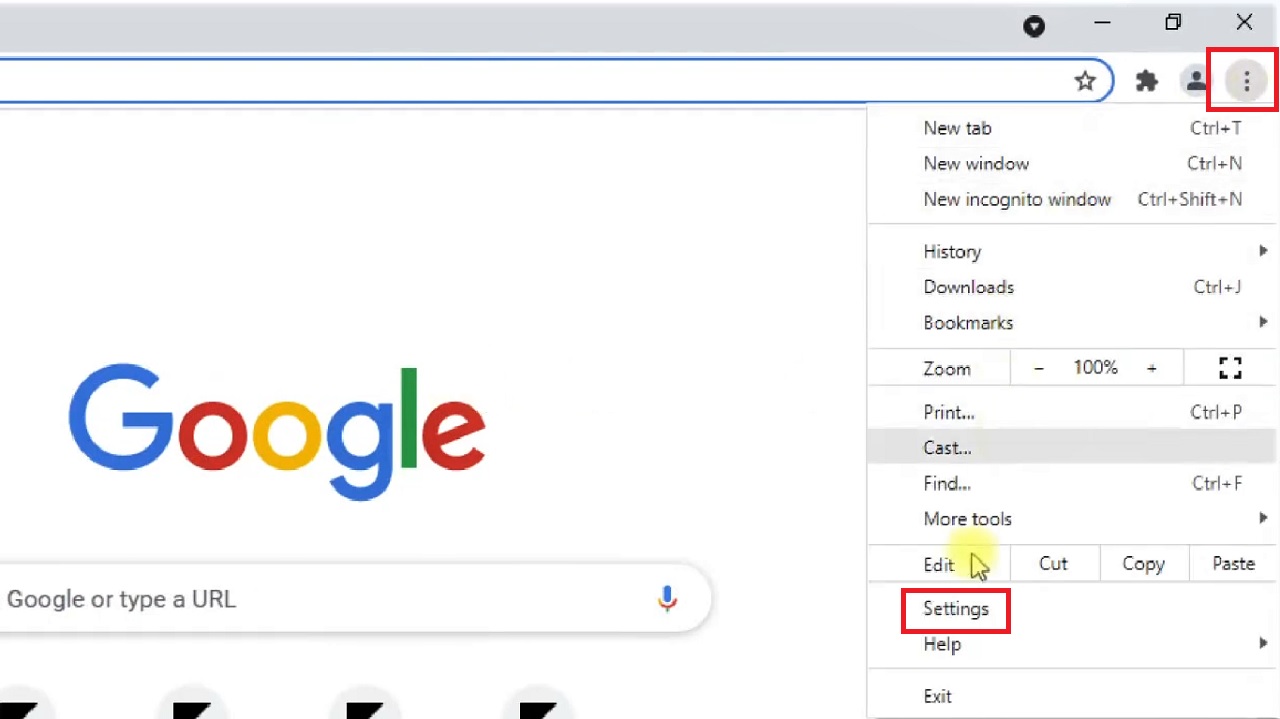
- Go to your Browser. (Google Chrome here, for example).
- Click on the three dots on the top-right corner of the screen.
- Click on Settings.
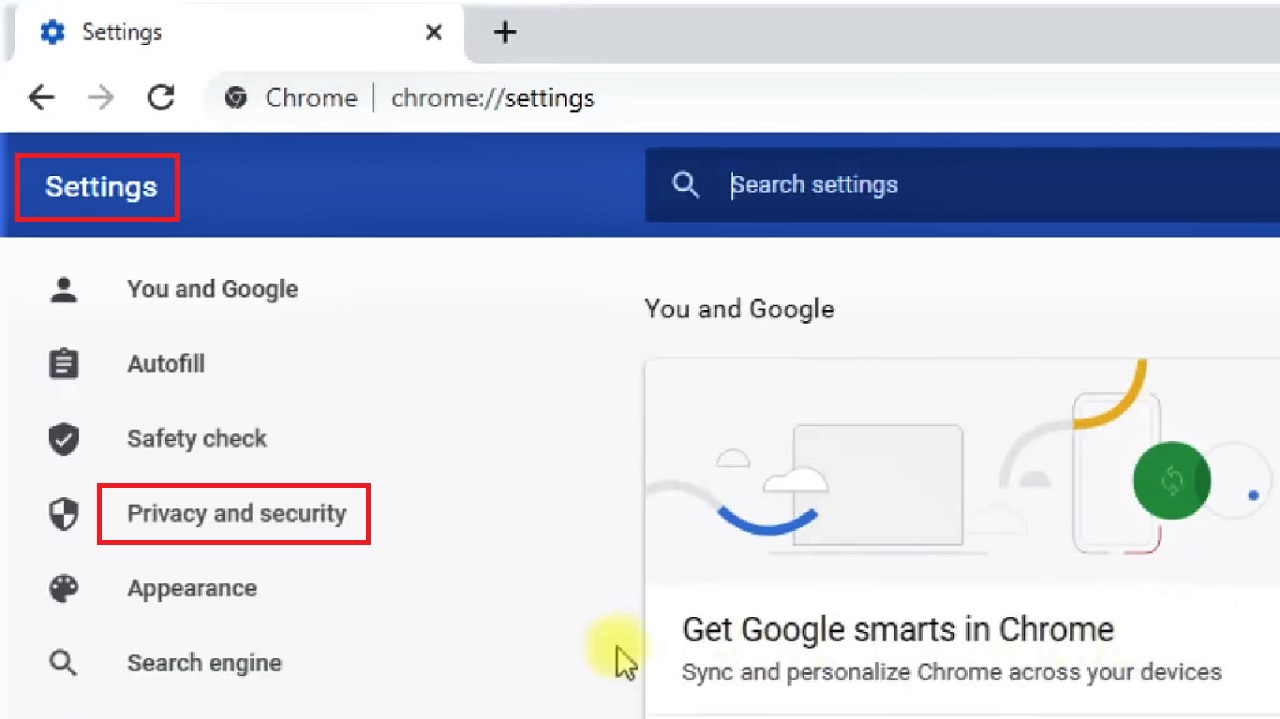
- Select Privacy and security from the left panel of the following Settings window.
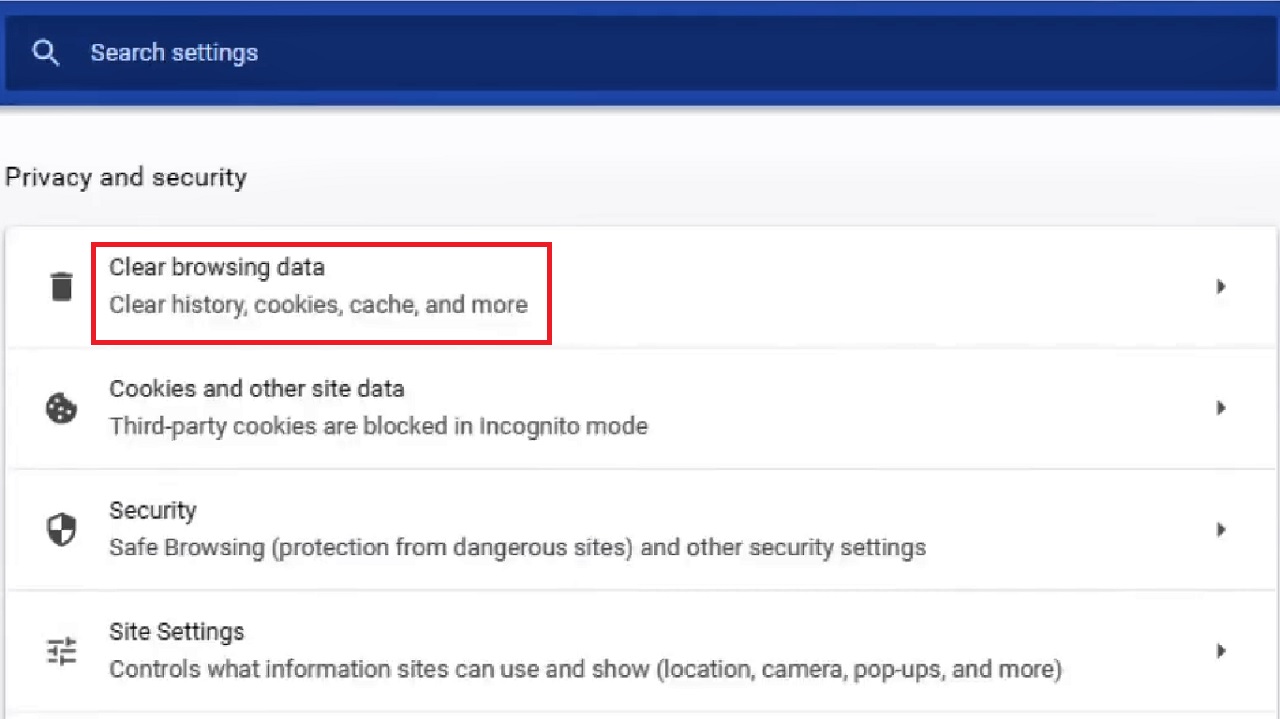
- Click on Clear browsing data from the right side of the windows under Privacy and security.
- Go to the Advanced tab in the Clear browsing data window.
- Check the small box next to Hosted app data.
- Click on the Clear data button.
Close the window and try connecting again to check whether or not the issue has been resolved.
Method 5: Modify DNS Server Configurations
The default server configuration may also cause this specific error which may be resolved by changing it to a different server.
STEPS TO FOLLOW:
- Go to the Network Connections window from the Control Panel as you did in Method 1.
- Right-click on Wi-Fi.
- Select Properties from the drop-down menu.
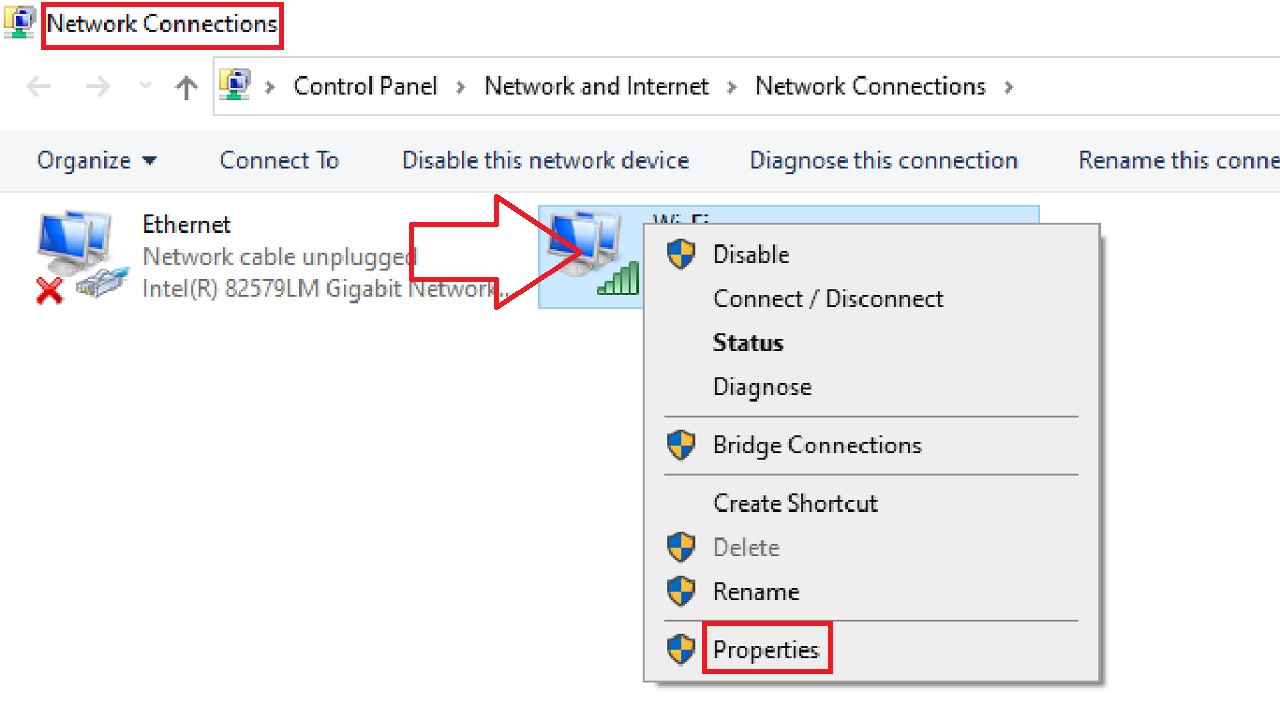
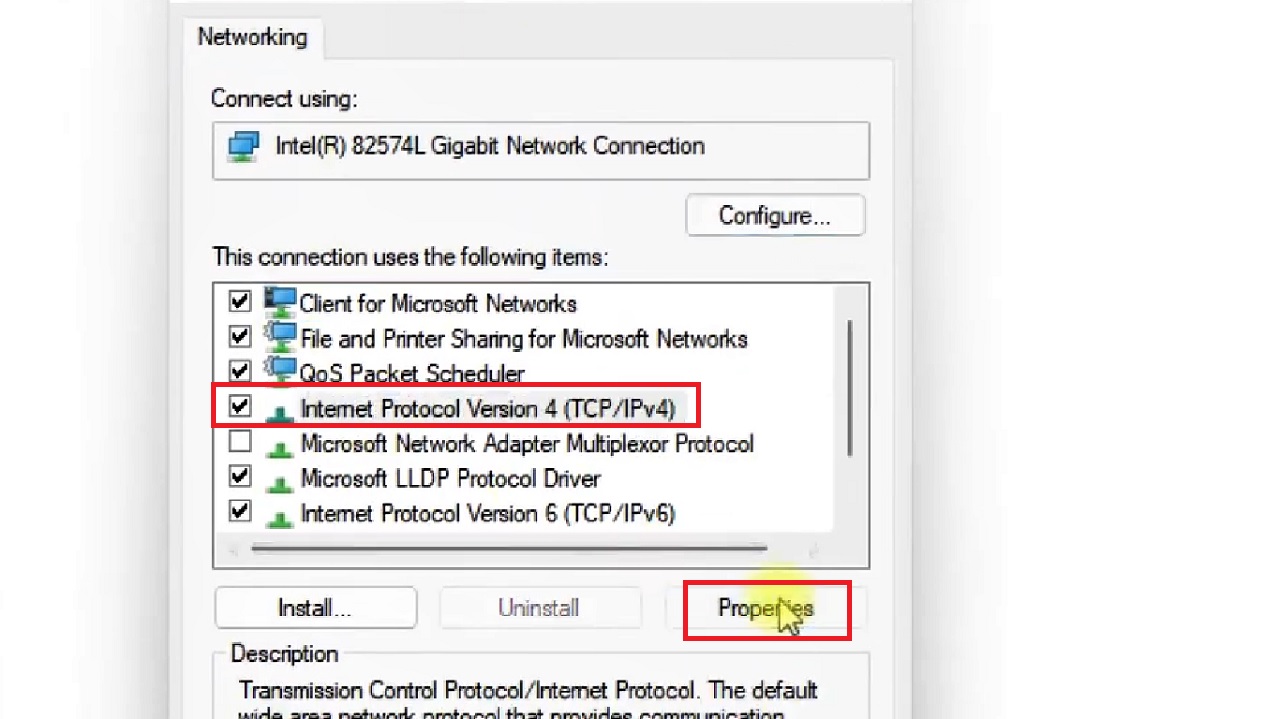
- Select Internet Protocol Version 4 (TCP/IPv4).
- Click on Properties.
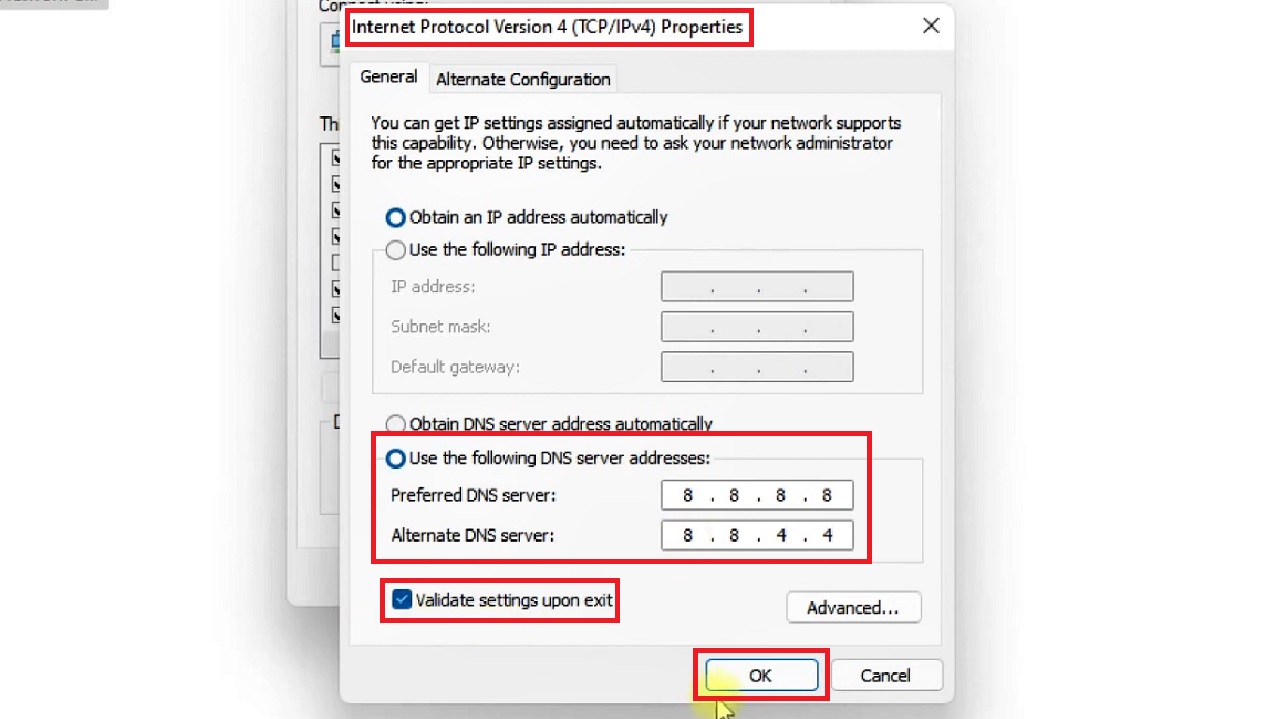
- In the following Internet Protocol Version 4 (TCP/IPv4) Properties window, check the small radio button next to the Use the following DNS server addresses option.
- Type 8.8.8.8 into the Preferred DNS server field.
- Type 8.8.4.4 in the Alternate DNS server field.
- Check the small box next to Validate settings upon exit.
- Click on the OK button to save the changes.
Now, reconnect and check if the issue is resolved.
Method 6: Disable the Browser Extensions
Often disabling the extensions of your browser may resolve the issue.
STEPS TO FOLLOW:
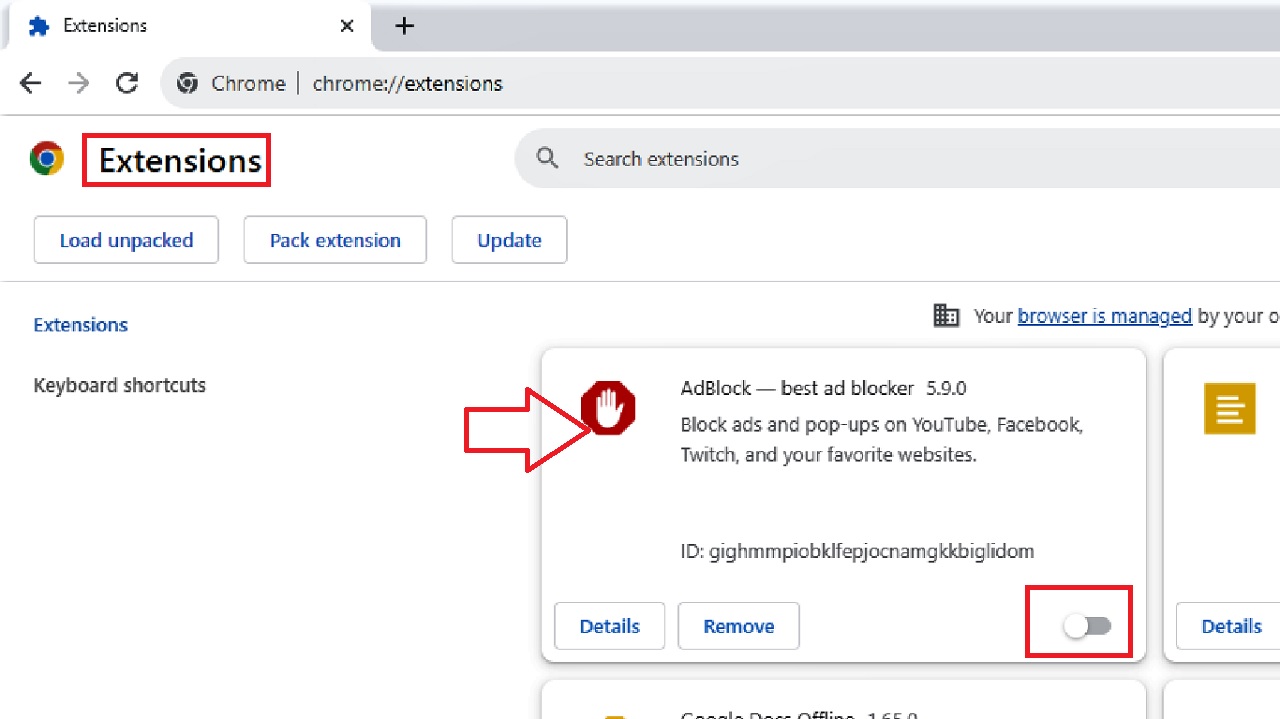
- Open your browser and click on the three dots as before.
- Click on Extensions in the drop-down context menu.
- Click on Manage extensions from the sub-menu.

Sometimes, depending on the settings, you may find the Extensions after clicking on More tools from the option, marked by a red arrow in the above image.
- Select the erroneous extension from the following Extensions window, Adblocker for example.
- Drag the sliding switch under it to the left to disable it.
Close the window and check. The issue may be resolved now.
Method 7: Disable the Internet Protocol Version 6 (TCP/IPv6)
Sometimes, the Internet Protocol Version 6 (TCP/IPv6) may cause this issue and therefore disabling it may solve your problem.
STEPS TO FOLLOW:
- Select Internet Protocol Version 6 (TCP/IPv6) from the Network Connections window, as you did in Method 4, and click on Properties.
- In the Internet Protocol Version 6 (TCP/IPv6) Properties window, select the Obtain DNS server address automatically by clicking on the small radio button next to it.
- Click on the OK button to save the change.
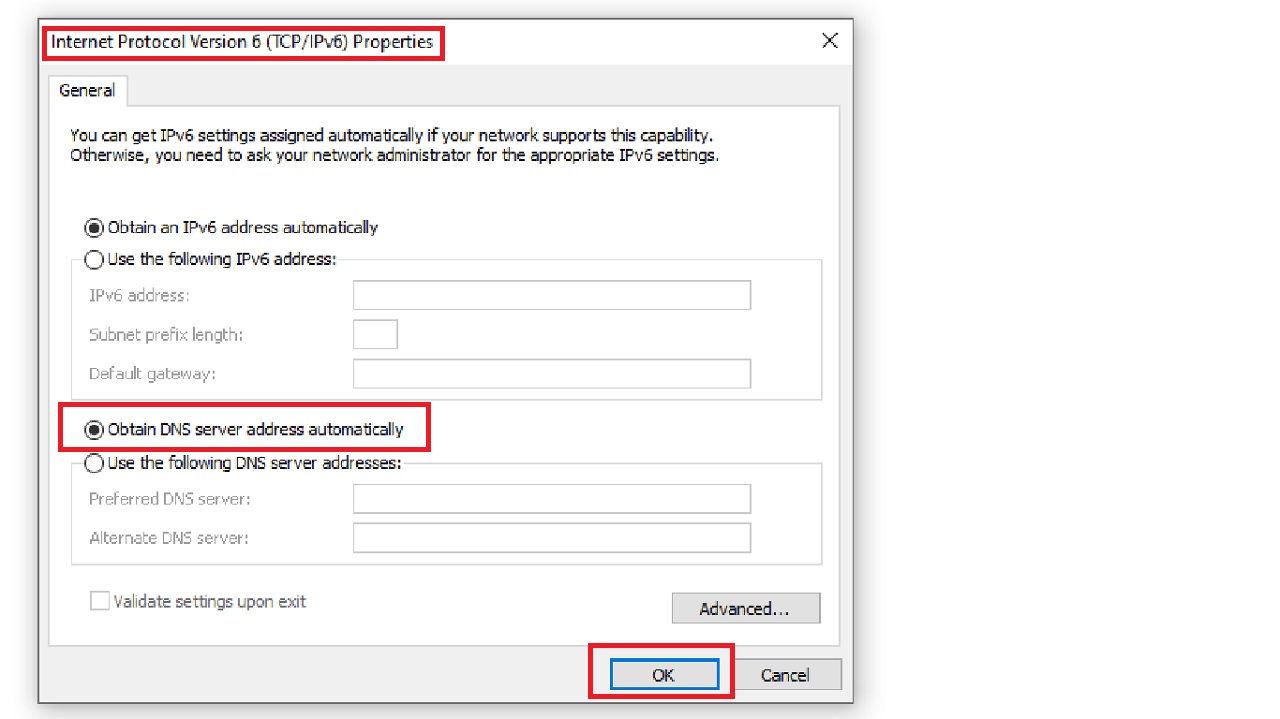
Now, check whether the issue has been resolved or not.
Conclusion
Resolving the “a network change was detected” error can be really quick and easy depending on the reason for this error to occur.
However, with multiple solutions to fix this issue now known to you, you should not be worried or frustrated when you encounter this error message henceforth.