
Like most users, you too use Wi-Fi technology for different purposes. However, just like others, you may also encounter an error message saying “Wi-Fi doesn’t have a valid IP configuration.”
In such a situation, you cannot use your Wi-Fi connection to access the internet. Your internet connection will be limited or entirely cut off unless you have an alternate Ethernet connection available.
However, this is not a critical issue, and you do not need to replace your entire system. There are some useful solutions to rectify the error. Continue reading this article to learn more.
In This Article
KEY TAKEAWAYS
- An easy fix to the “Wi-Fi doesn’t have a valid IP configuration” error is to restart your router and system with a clean boot.
- Apart from checking the connection, you may also try running the network adapter troubleshooter or uninstalling or disabling antivirus protection.
- The issue can also be rectified by resetting the IP configuration of the network adapter or the TCP/IP settings.
- The issue may also be rectified by modifying the SSID and password of the router.
- Performing a network reset, updating firewall and the wireless network adapter, setting the channel bandwidth to automatic may also help.
Causes for Wi-Fi Doesn’t Have a Valid IP Configuration
The “Wi-Fi doesn’t have a valid IP configuration” error can occur when the IP address configuration of the router does not match the one reported by the Wi-Fi network adapter.
Additionally, if the network service is not running, it can also cause this error to occur.
In addition to that, there are also other reasons for this issue to occur.
- It may occur after you have updated the Windows operating system which does not recognize the network adapter.
- It may also occur after making changes in the network but these are not set properly in the network adapter.
- When something goes wrong in network identification while running the built-in troubleshooter it will not allow the system to connect to the network anymore.
- If there is no active connection to the internet, this issue may also occur.
- If your system has outdated, corrupted, damaged, or have missing drivers, it can also cause this error.
- The third-party antivirus program installed in your PC may interfere with the normal operation and cause Wi-Fi configuration error.
Now that you know about the probable causes of the “Wi-Fi doesn’t have a valid IP configuration” error, take a look at the solutions to rectify it and get connected to the internet as fast as possible.
Ways to Fix Wi-Fi Doesn’t Have a Valid IP Configuration Error
Since the “Wi-Fi doesn’t have a valid IP configuration” error is related to IP configuration, resetting the IP Configuration on the network adapter is the most effective solution for it. You may also try resetting the TCP/IP settings.
There are also some simple solutions to try initially before moving on to the more advanced and relatively complex fixes. These are:
- Restarting your router
- Restarting your PC with a clean boot
- Checking the connection whether it is running or not
- Changing the name or Service Set Identifier (SSID) of the router along with its password
- Running the network adapter troubleshooter
- Disabling the antivirus protection temporarily
- Resetting the network settings of the PC or performing a network reset
- Updating and reinstalling the wireless network adapter
- Resetting the firewall protection
- Setting the bandwidth of the channel to automatic to obtain the IP address
- Setting the IP manually
The simple fixes may resolve the issue temporarily but it may resurface again. Therefore, it is best to try the advanced solutions for a permanent fix to this particular error.
Here are the steps to follow while trying each of these solutions to fix “Wi-Fi doesn’t have a valid IP configuration” error.
Method 1: Change the SSID and Password of the Router
If the simple fixes like restarting your PC or router does not resolve the issue, you may try changing the name and password of your router.
You will need the gateway IP, login username and password to gain access to the settings for this method. All these are usually available on the label at the back of the router itself.
STEPS TO FOLLOW:
- Open your browser.
- Type in the gateway IP into the URL bar. It is usually 192.168.0.1 or 192.168.1.1 by default.
- Hit Enter.
- Type in the username and password in the relevant boxes.
- Look for SSID and WPA pre-shared key or password in settings.
- Type the new SSID and password.
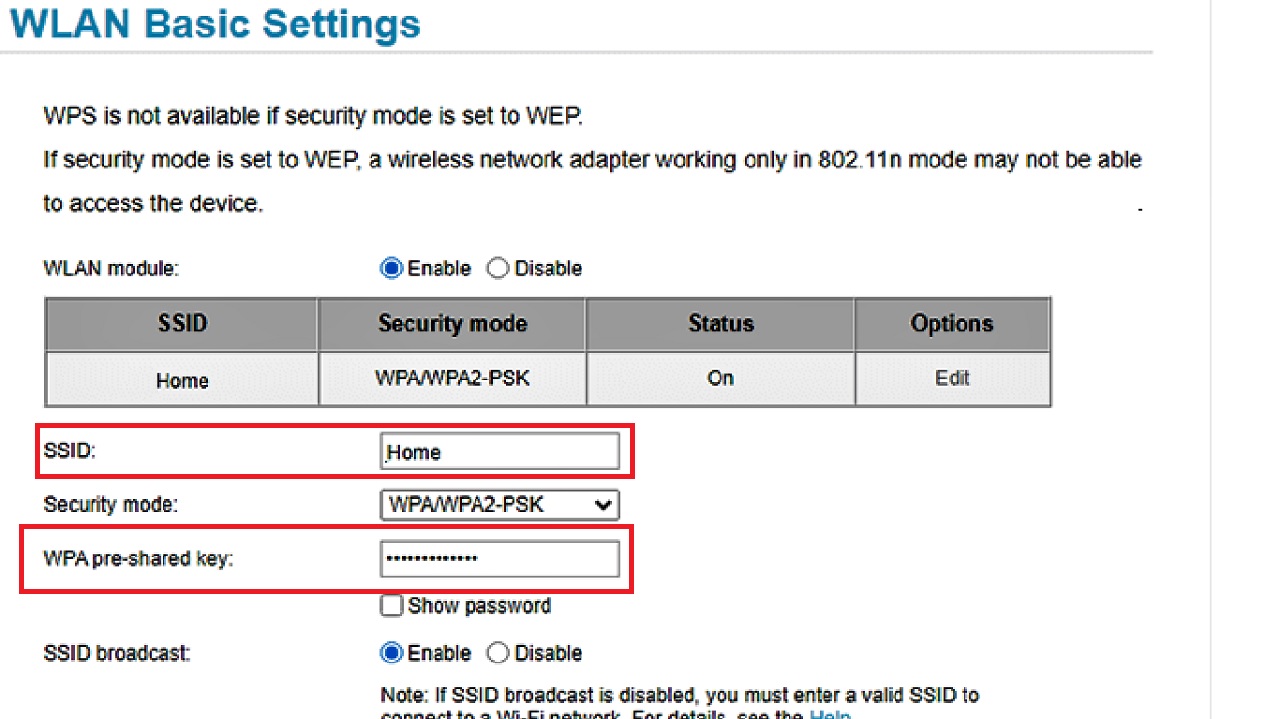
- Save the changes and close the window.
When it is done, update the connection of your PC to the router by using the new SSID and password.
Also make sure that you update the network of other devices, if any, that are linked with the same connection.
Now check whether the issue has been resolved or not.
Method 2: Make Changes in the Network Service
Sometimes the network service may not be running and causing this issue because the software will not be able to identify and manage the changes in network on your system automatically. So, check it and make the necessary changes.
STEPS TO FOLLOW:
- Type in services in the search box next to the Start Menu and hit Enter.
(You may hit the Windows key on your keyboard to open the search box as well).
- In the Services application window that appears, scroll down and look for WLAN AutoConfig Service.
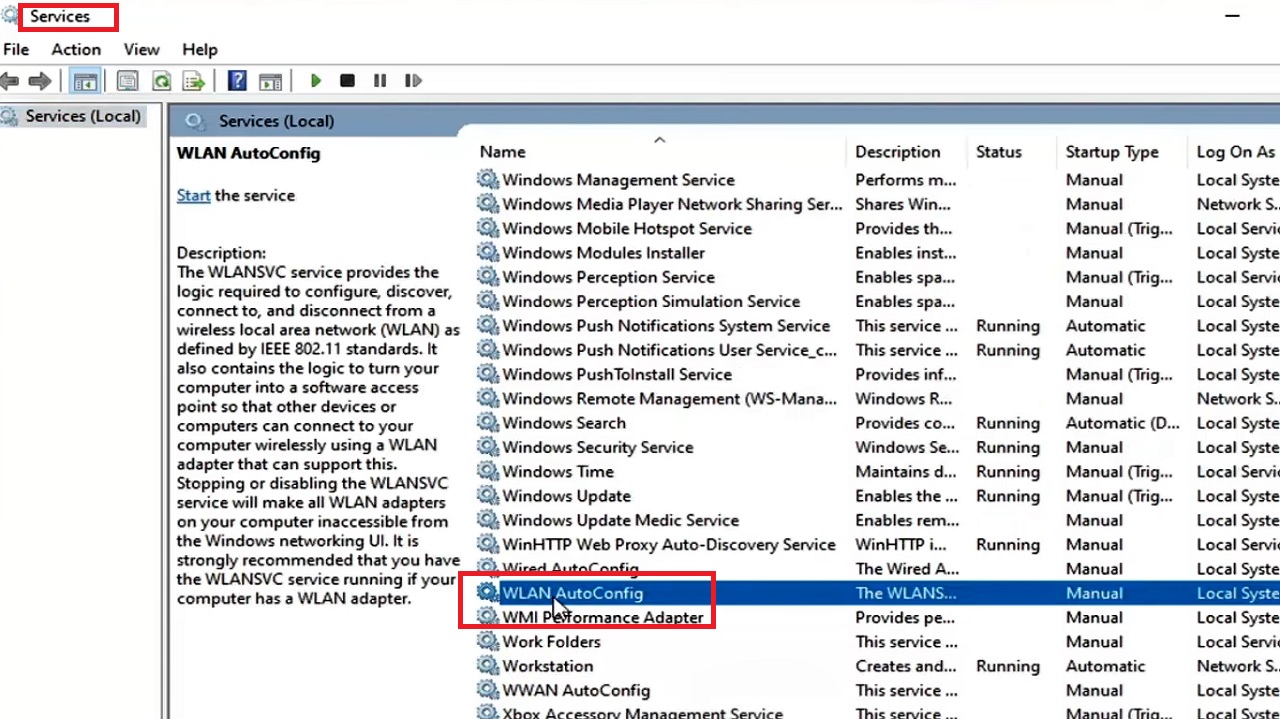
- Right-click on it.
- Select Properties from the drop-down menu.
You may double-click on it to open the following WLAN AutoConfig Properties (Local Computer) window quickly.
- In this window under the General tab, check whether the Status of the service is Running. If it is not, click on the Start button to run it.
- But prior to that, check whether the Startup Type is set to Automatic. If it is not, click on the small arrow on the right side of the box and select Automatic from the drop-down options to set it.
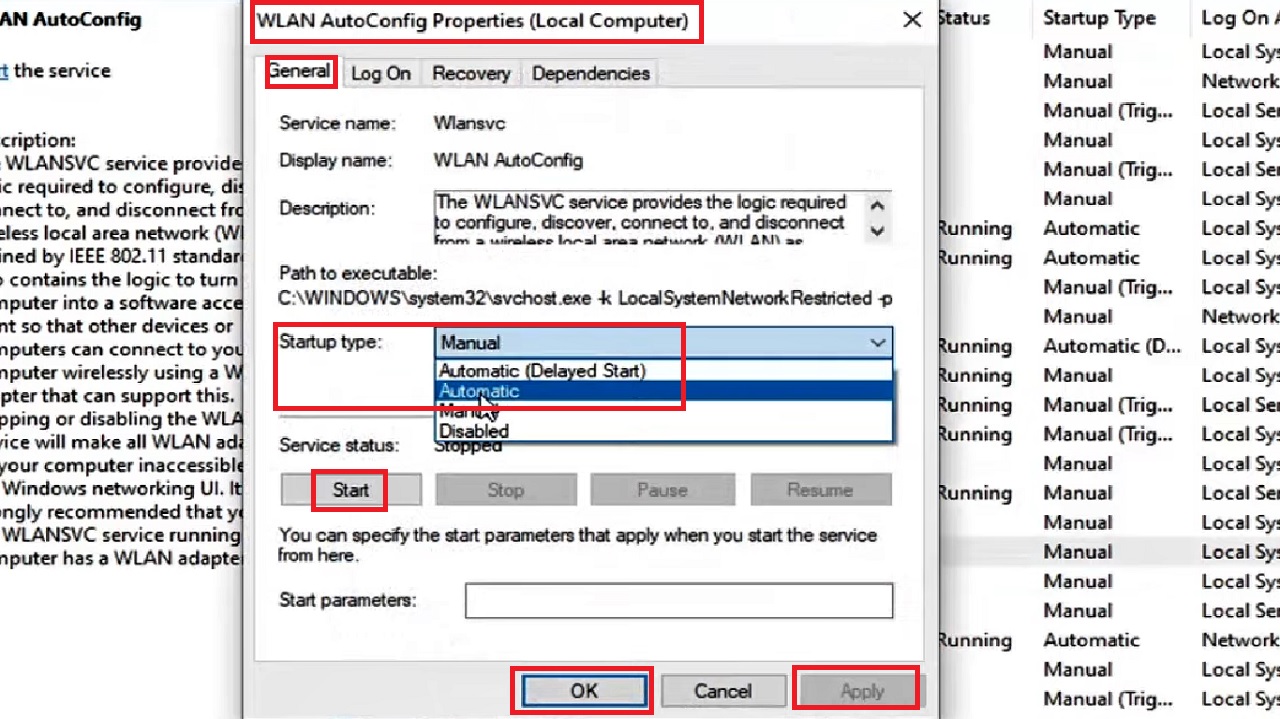
- Click on the Apply button and then on the OK button to save the changes and close the window.
You may also try disabling the DHCP Client service.
- Look for it in the Services window.
- Right-click on it and select Stop from the drop-down option.
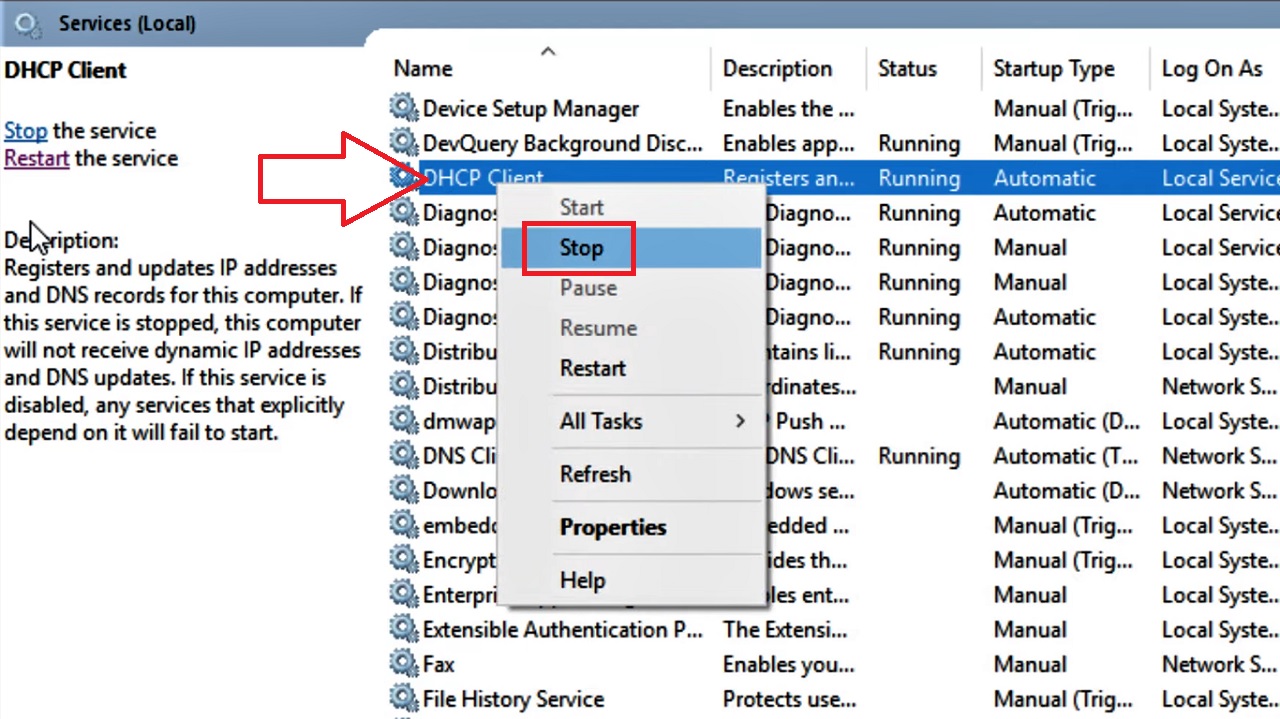
- Click on the Yes button in the confirmation window that appears next.
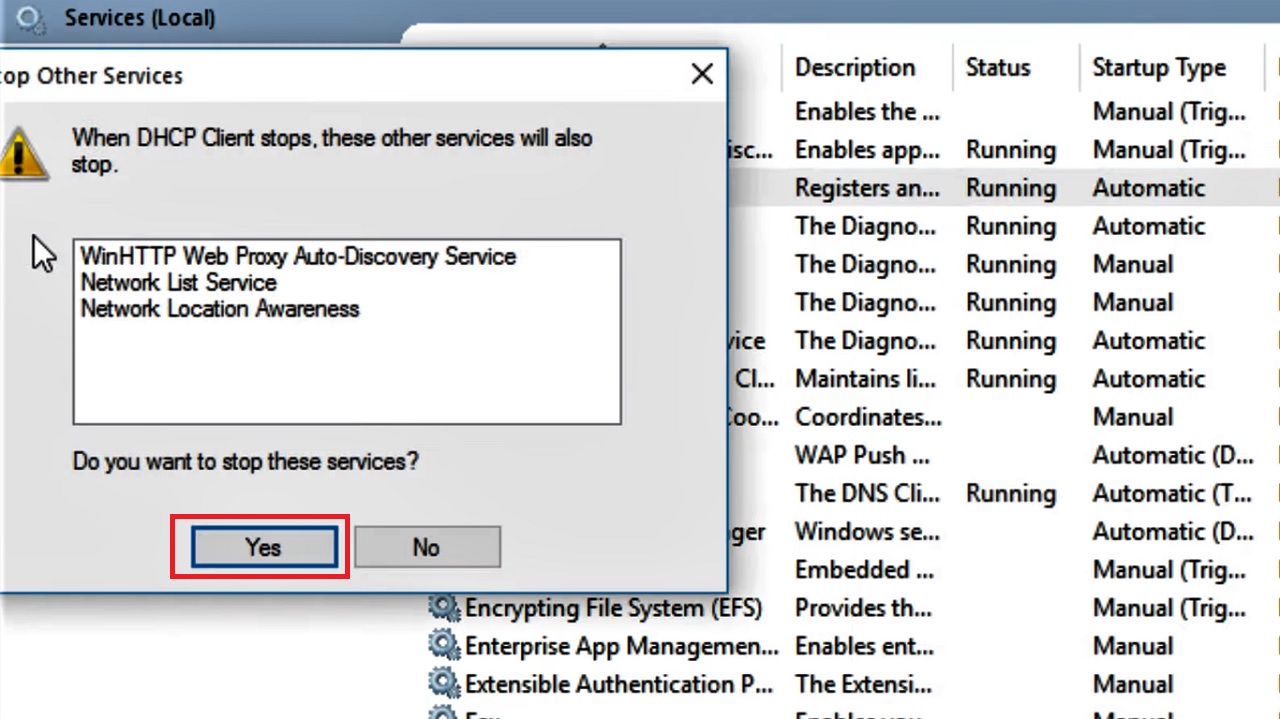
Now, restart your PC. After the system restarts, check whether things are restored. If the network is still not working, try resolving the issue with the next solution.
Method 3: Perform a Clean Boot on Your System
Often, restarting your PC with a clean boot may resolve the issue. This will eliminate the chances of applications conflicting with each other or cause any interference in the operation by the third-party apps installed on your PC. So, disable all non-Microsoft services and applications.
STEPS TO FOLLOW:
- Press the Windows and R keys on your keyboard at the same time to bring up the Run utility.
- Type in msconfig in the box.
- Press the Enter key on your keyboard or the OK button on the box.
- When the System Configuration window launches, go to the Startup tab and click on Open Task Manager.

- In the following window, select each app or program under Name. right-click on them one by one and ‘Disable’ them.
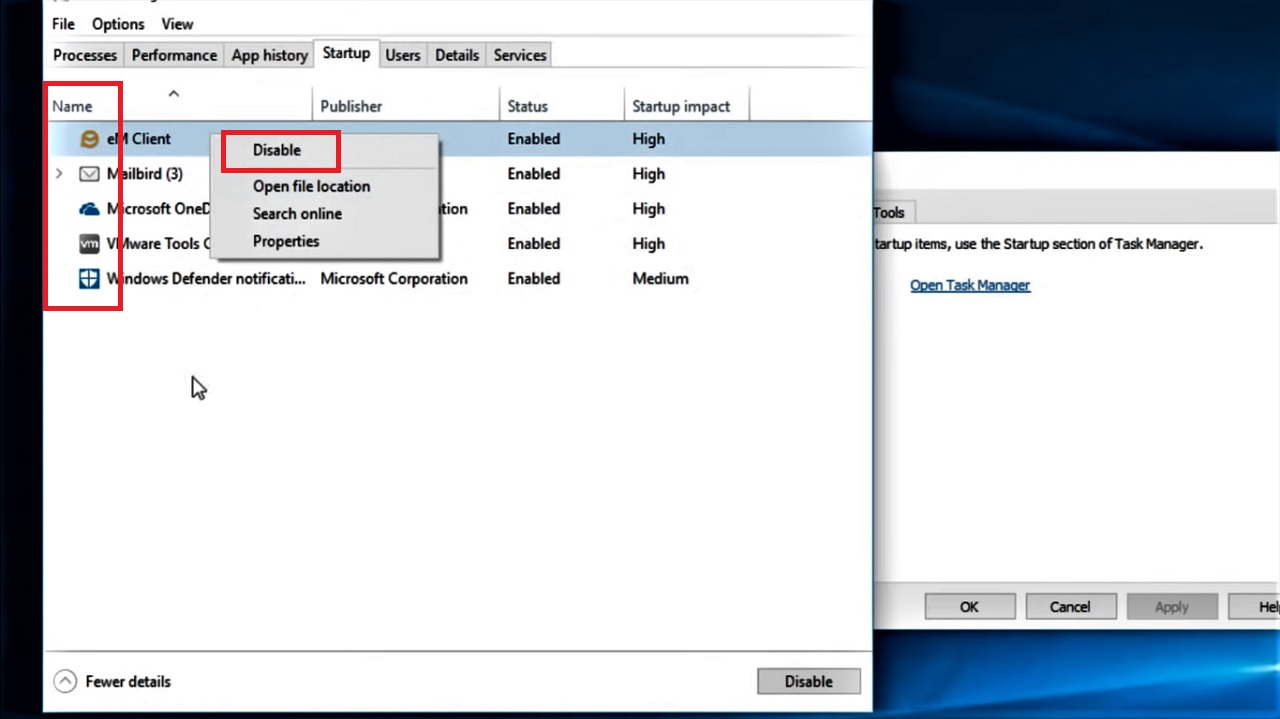
When you are done deleting all of them, close the Task Manager and go to the Services tab.
- Click on the small square box next to Hide all Microsoft services to check it. This way you will see all the third-party services only.
- Now click on the Disable all button on the right.
- Click on the Apply button and then on the OK button to save the changes and close the window.
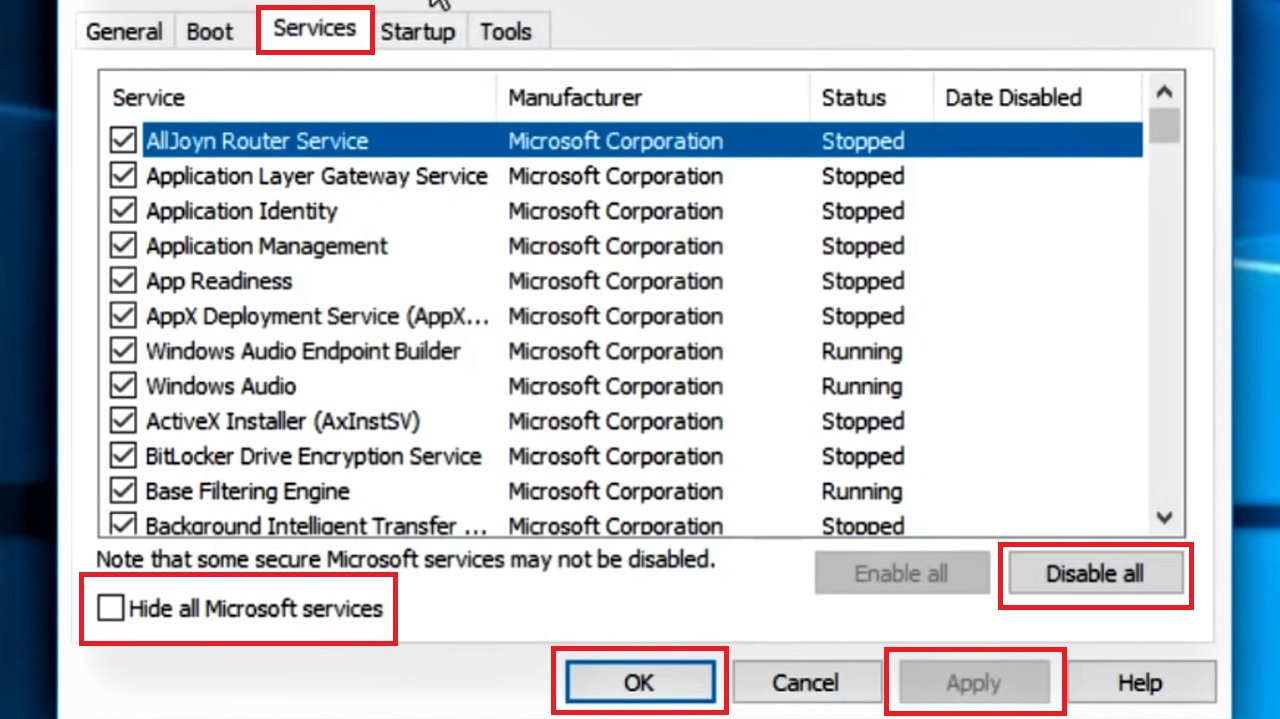
- Then finally, restart your computer.
Now, with only the official Microsoft services running, you should be able to connect to the Wi-Fi network without any issues.
Later on, you should repeat the hiding, disabling, restarting, and checking steps for each third-party service one by one to find out which particular service is interfering with the operation of the network and disable it.
Method 4: Run the Network Troubleshooter
If the above solutions could not rectify the error, then there may be issues in the network that are not allowing it to function properly. Running the network troubleshooter will identify such issues and fix them to restore things back to normal again.
STEPS TO FOLLOW:
- Open Settings by pressing the Windows and I keys on your keyboard simultaneously.
Alternatively, you can click on the Windows icon on the left side of the bottom of your screen to bring up the Start menu and click on the gear icon there above the Power option.
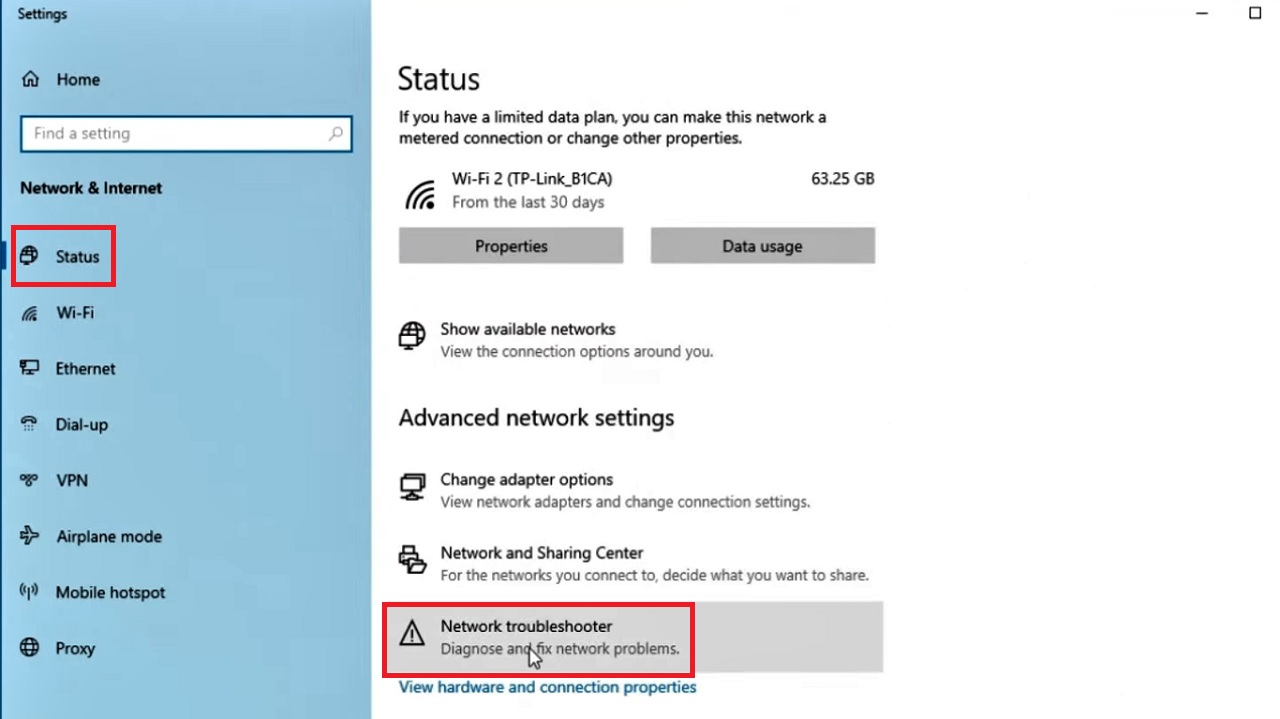
- In the Settings page, click on the Network & Internet tile.
- Go to the Status tab on the left panel, if you are not in it already.
- Scroll down to find Network troubleshooter on the right side of the window and click on it.
- In the next Network Adapter window, select Wi-Fi (Wi-Fi 2 in this case) by clicking on the small circular button next to it.
- Click on the Next button.
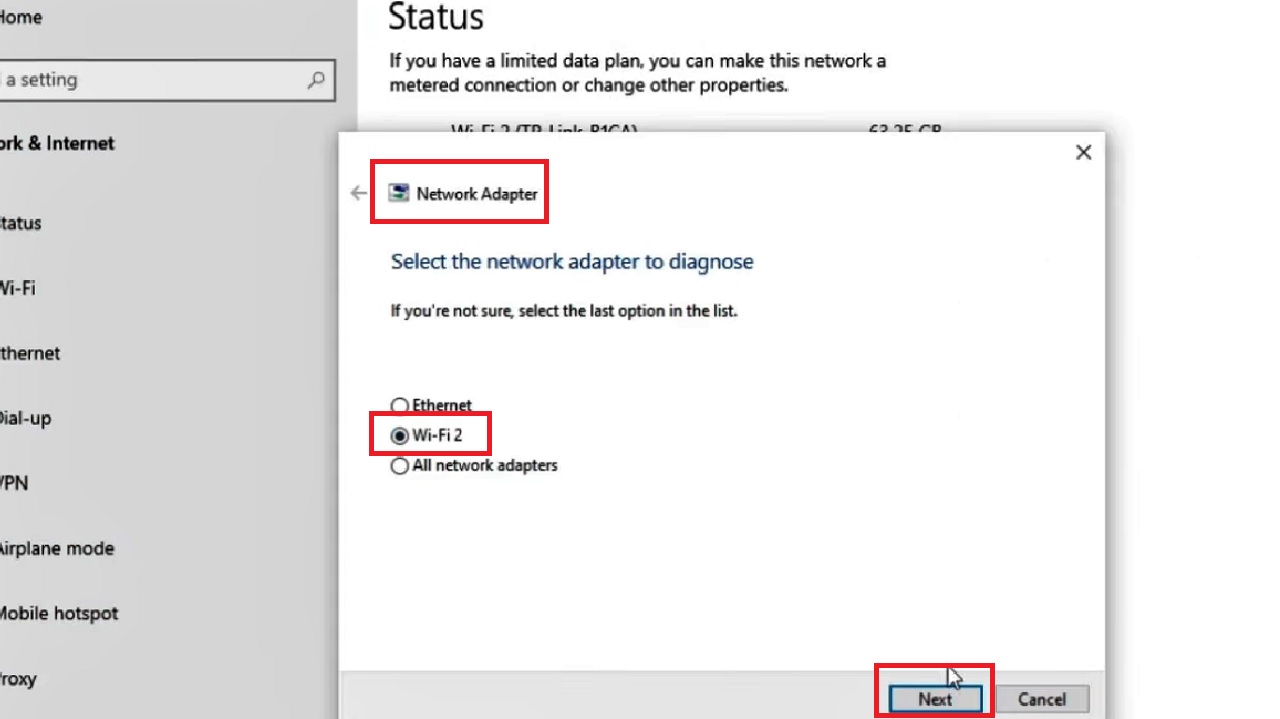
- Wait for the troubleshooter to scan your system and identify the issues, if any.
- Follow the on-screen instructions if it finds any issue so that it can fix it.
- However, if the Troubleshooting couldn’t identify the problem, close the troubleshooter.
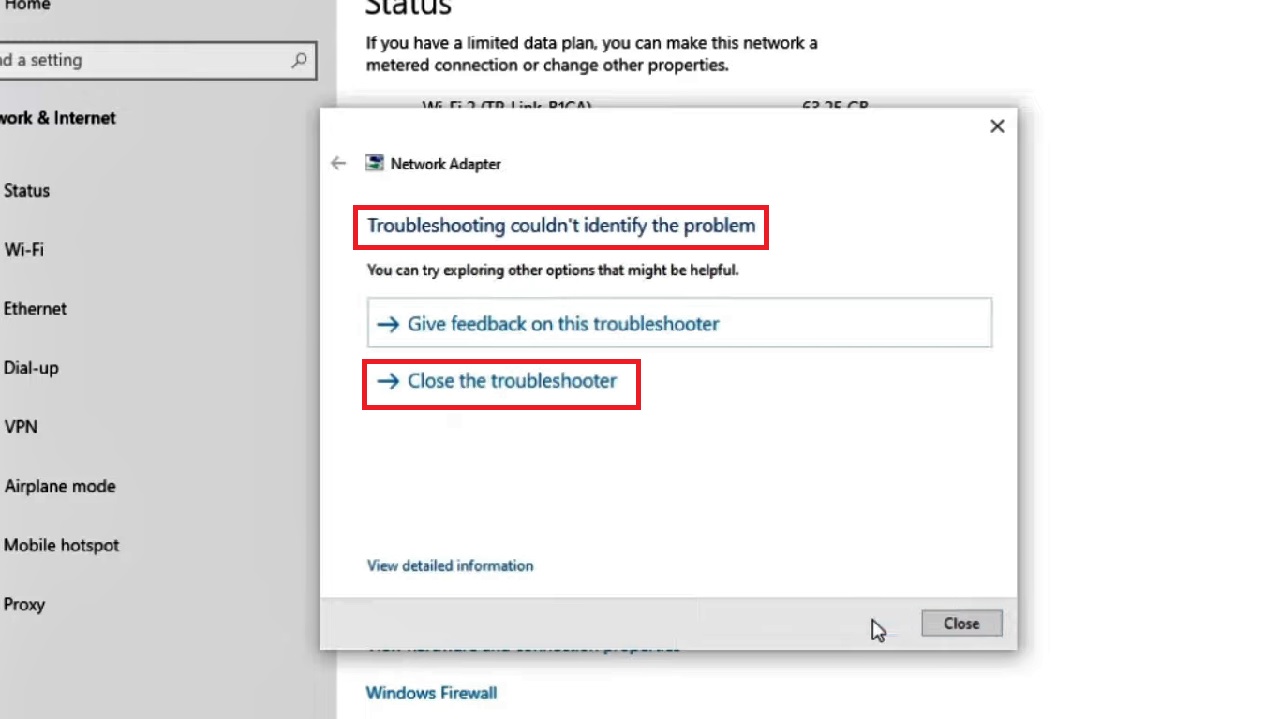
Check whether or not the issue has been resolved. If it still persists, move on with the next method.
Method 5: Reset IP Configuration and TCP/IP Settings
Resetting the IP configuration and the TCP/IP settings completely may resolve issues with a network adapter. You will need to use the Command Prompt in this case to run a few commands.
STEPS TO FOLLOW:
- Open the Run utility as before, type cmd, right-click on it and select Run as administrator, and hit Enter key on your keyboard.
In the Command Prompt, if you have a dynamic IP address, you will need to type in the following set of commands:
- netsh winsock reset
- netsh int ip reset
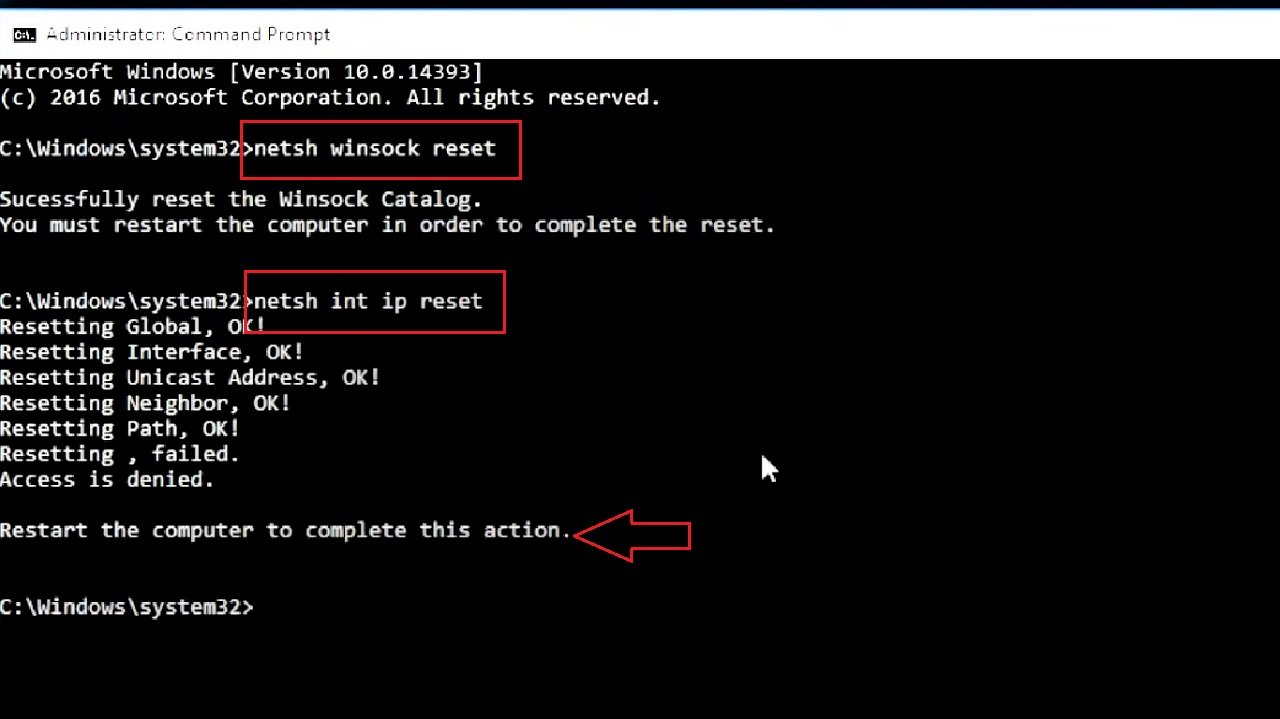
After all the commands are successfully executed, type in exit to close the window.
Now, restart your PC and after it reboots, check if the “Wi-Fi doesn’t have a valid IP configuration” error has been resolved or not.
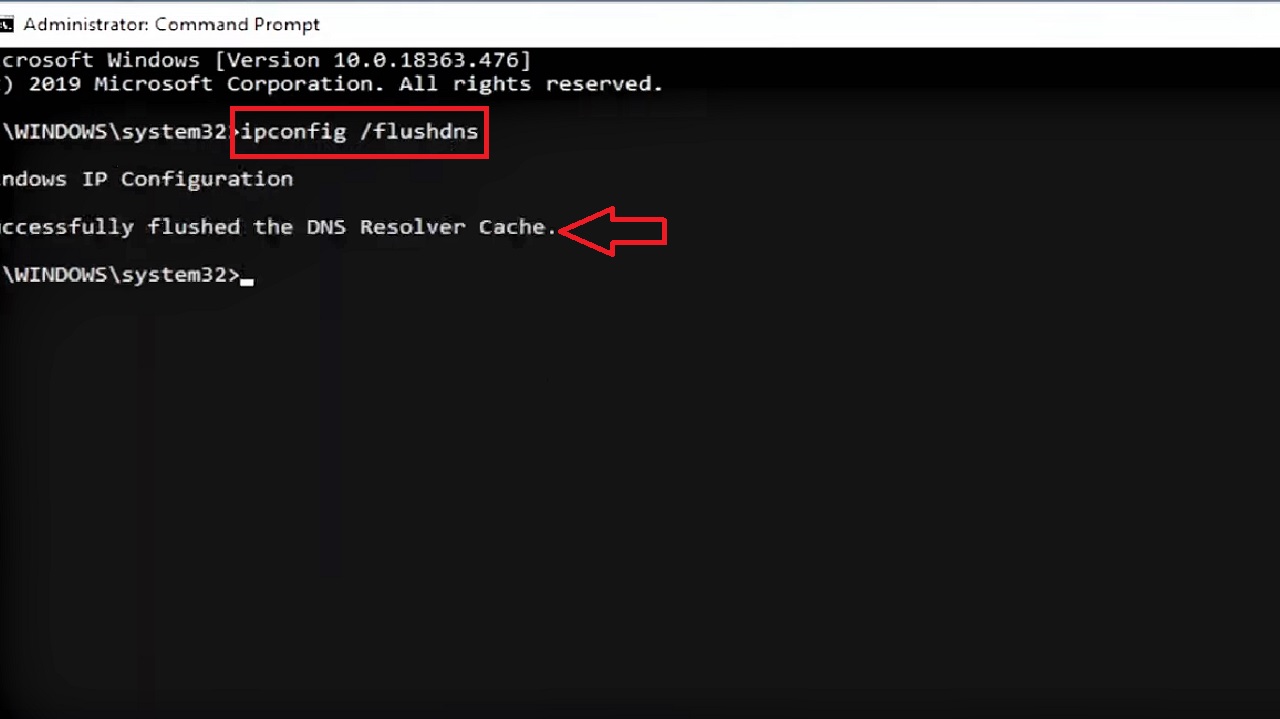
- If it still persists, try the ipconfig /flushdns command in the elevated Command Prompt and hit Enter to flush the DNS Resolver Cache.
However, if you have a static IP address, you will have to type in the following commands and press the Enter key after each command line after it completes execution:
- ipconfig /release
- ipconfig /all
- ipconfig /renew
After all the commands are successfully executed, follow the same process as above to check whether the error has been resolved.
If it still exists, continue trying to fix it with the following solution.
Method 6: Disable Antivirus from the Task Manager
You may disable your antivirus applications temporarily because they often cause different issues by preventing other apps and services from running properly. Therefore, it may also cause the “Wi-Fi doesn’t have a valid IP configuration” error.
Note: Follow this method with awareness of the inherent risks of running a PC without antivirus protection. It is recommended to create a proper backup of your system to revert any potential damage.
STEPS TO FOLLOW:
- Right-click on an empty space in the taskbar.
- Select Task Manager from the pop-up option.
- Click on the More details button below to expand if the Task Manager opens in compact mode (Not shown in the image).
- Go to the Startup tab on the header menu located at the top of the Task Manager window.
- Locate your antivirus application from the list. (K7 User Agent, as for example in this case).
- Select it by clicking on it one time.
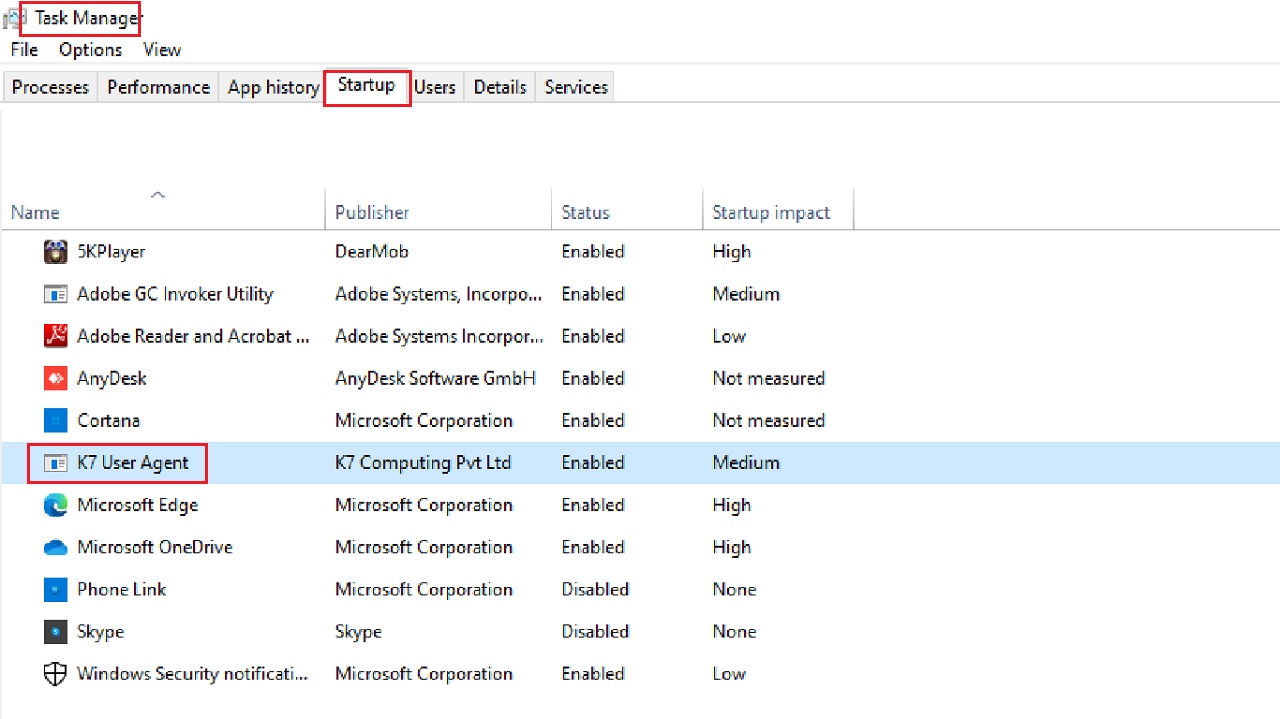
- Click on the Disable button located in the bottom-right of the window. (Not shown in the image).
Now, restart your PC and try connecting to your Wi-Fi to find whether or not the issue has been resolved.
Method 7: Set Obtain the IP Address Automatically in Network Settings
You may try to resolve the issue by changing the width of the channel to automatic. This will allow obtaining the IP address automatically.
STEPS TO FOLLOW:
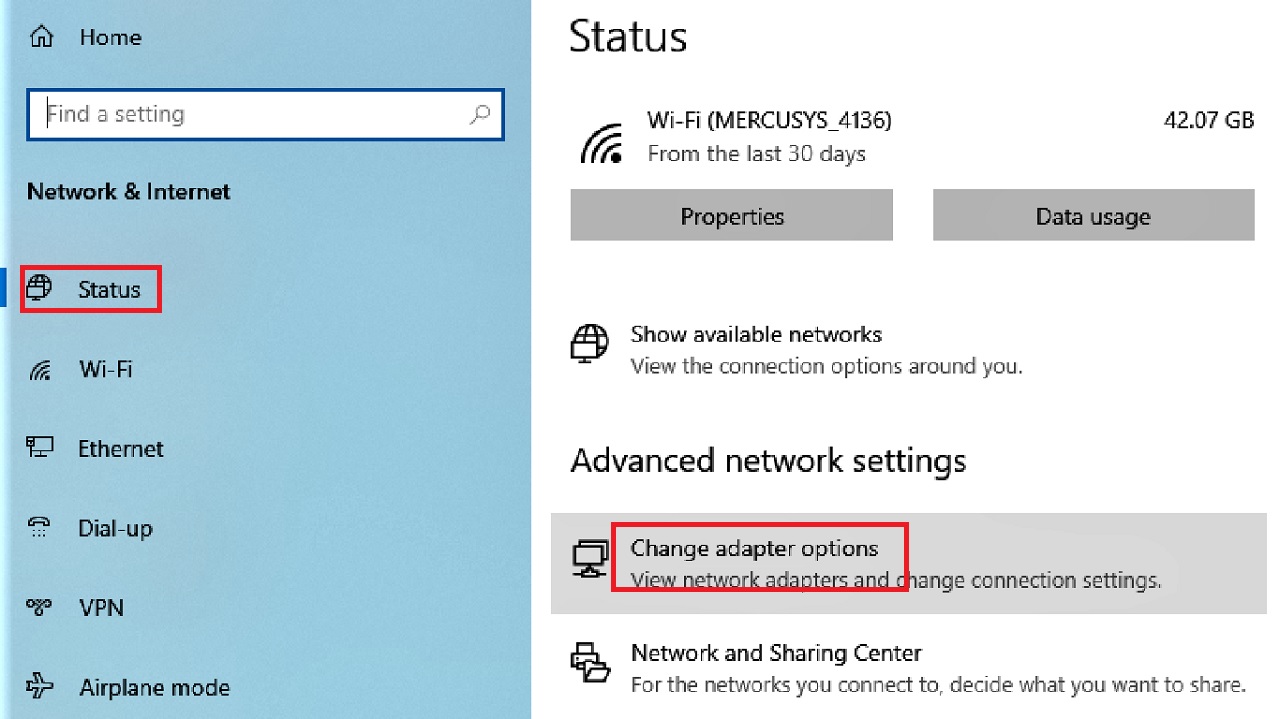
- Press the Windows and X keys on your keyboard together.
- Select Network Connections from the options displayed in the Windows quick menu.
- Select Change adapter options located under the Advanced network settings option.
- Right-click on your Wi-Fi adapter when the pop-up window appears on your screen.
- Select Properties.
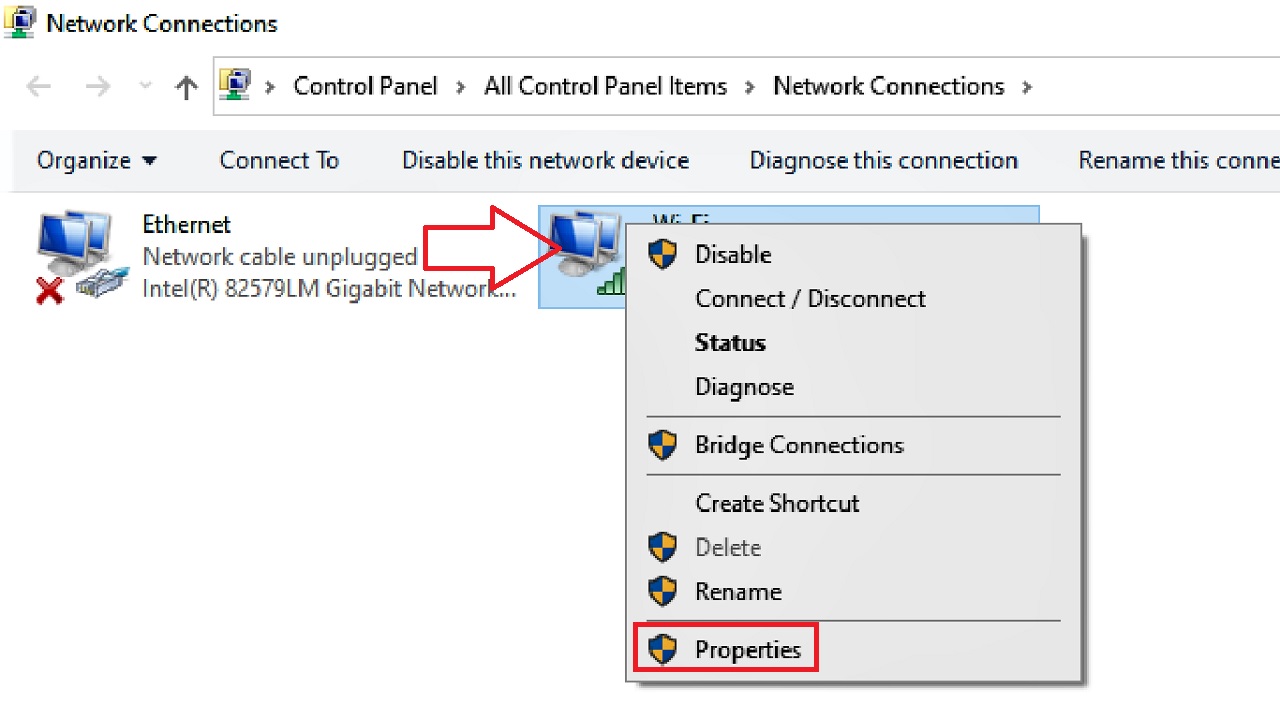
- Click on the Yes button on the User Account Control (UAC) window when and if prompted to get administrative permissions.
- Click on the Configure button under the Networking tab in the Wi-Fi Properties window that appears.
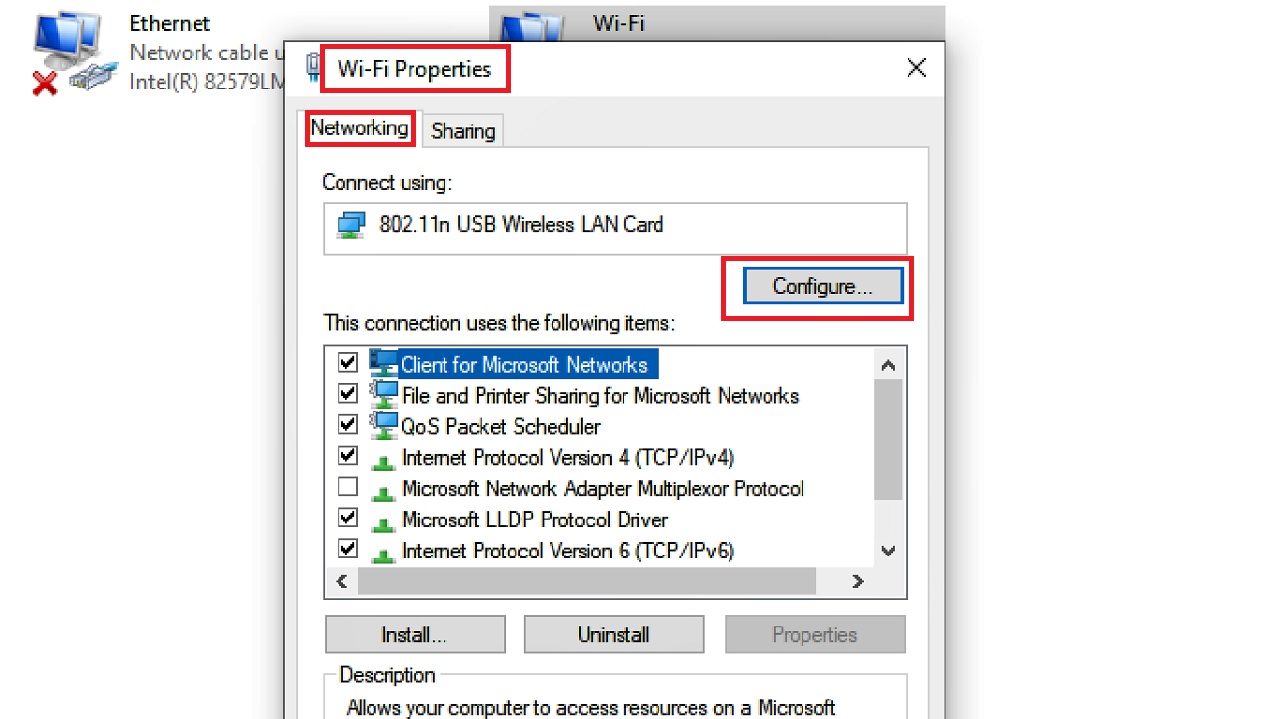
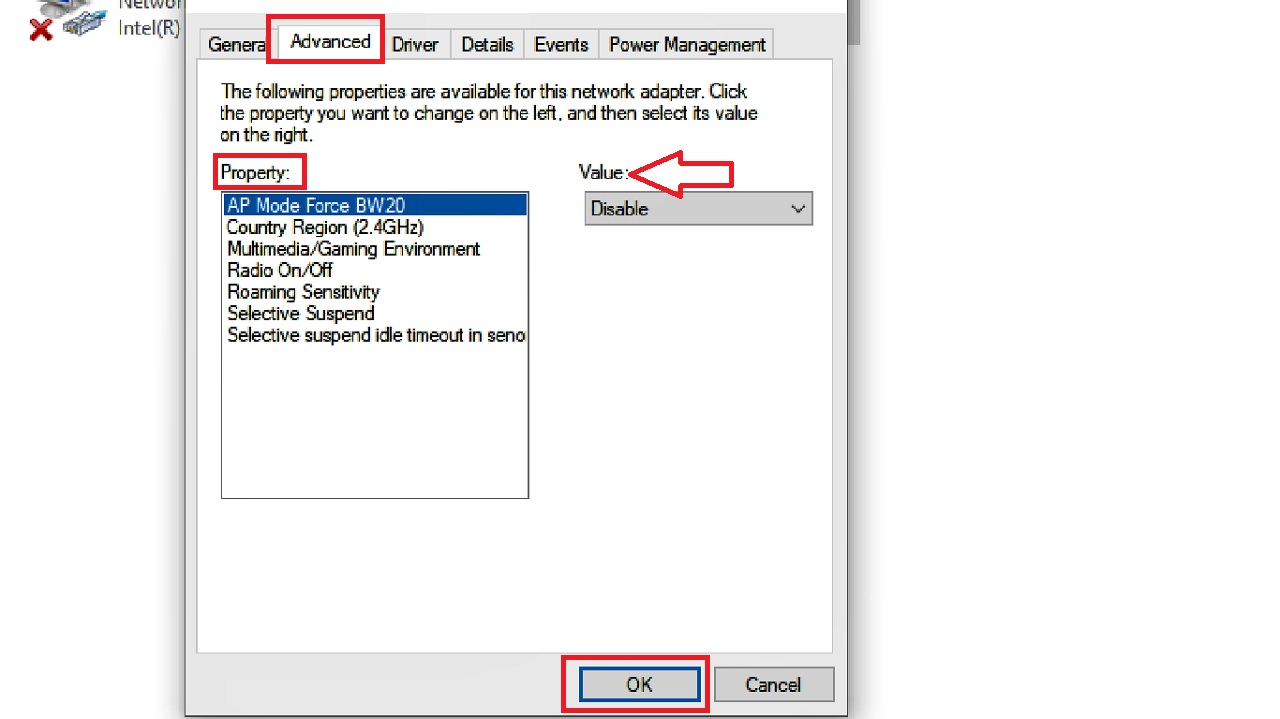
- Go to the Advanced tab.
- If you see 802.11n channel in the box under Property, select it. (Not available in this case).
- Set the Value to Auto. (Marked by a red arrow in the image below).
- Click on the OK button to save the changes.
Now check whether the issue has been resolved.
Method 8: Uninstall the Wireless Network Adapter Drivers from the Device Manager
Uninstalling and reinstalling the drivers of the network adapter may also resolve the issue most of the time.
STEPS TO FOLLOW:
- Press the Windows and X keys as before.
- Select Device Manager from the options.
- Click on the small arrow next to the Network adapters section in the Device Manager window to expand it.
- Select the network adapter you are using and right-click on it.
- Select Uninstall device from the drop-down options.
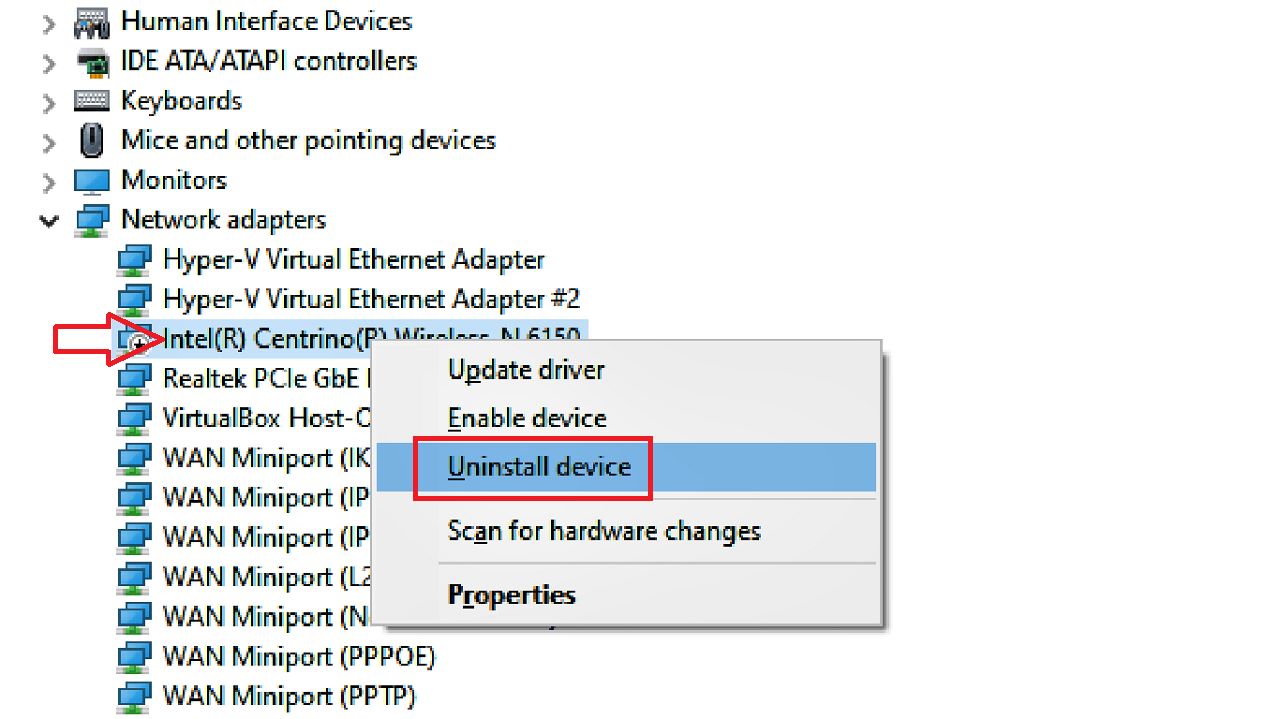
When you restart your PC, the system will automatically update the driver with the latest version.
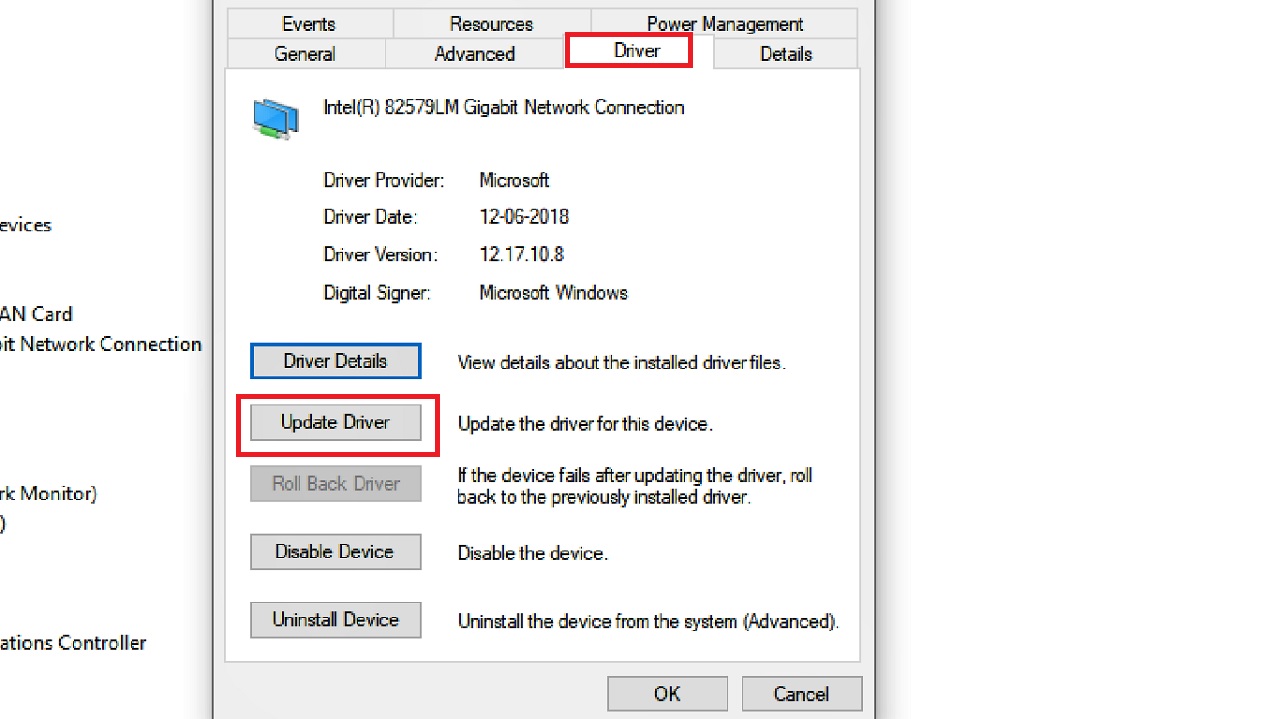
Alternatively, you can select Properties or double-click on the network adapter you are using.
- Then, go to the Driver tab in the following window.
- Click on the Update Driver button.
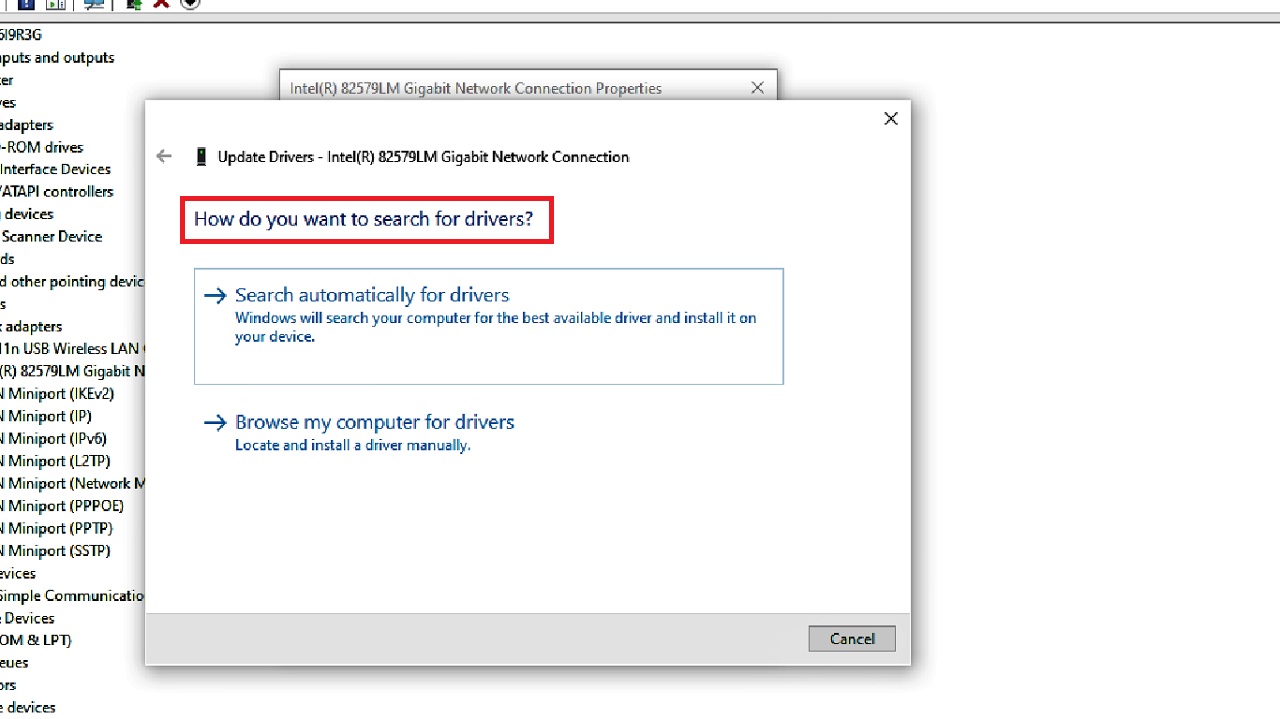
- Choose the preferred method of updating the driver between ‘Search automatically for drivers’ and ‘Browse my computer for drivers’ when you are asked How do you want to search for Drivers?
Wait until the driver installation process is complete. When it is done installing, restart your PC and check whether or not you are able to connect to your Wi-Fi without issues.
Method 9: Reset the Firewall Protection
More often than not, resetting the configuration of your firewall protection in your system may resolve this issue because it may prevent validation of the IP address.
STEPS TO FOLLOW:
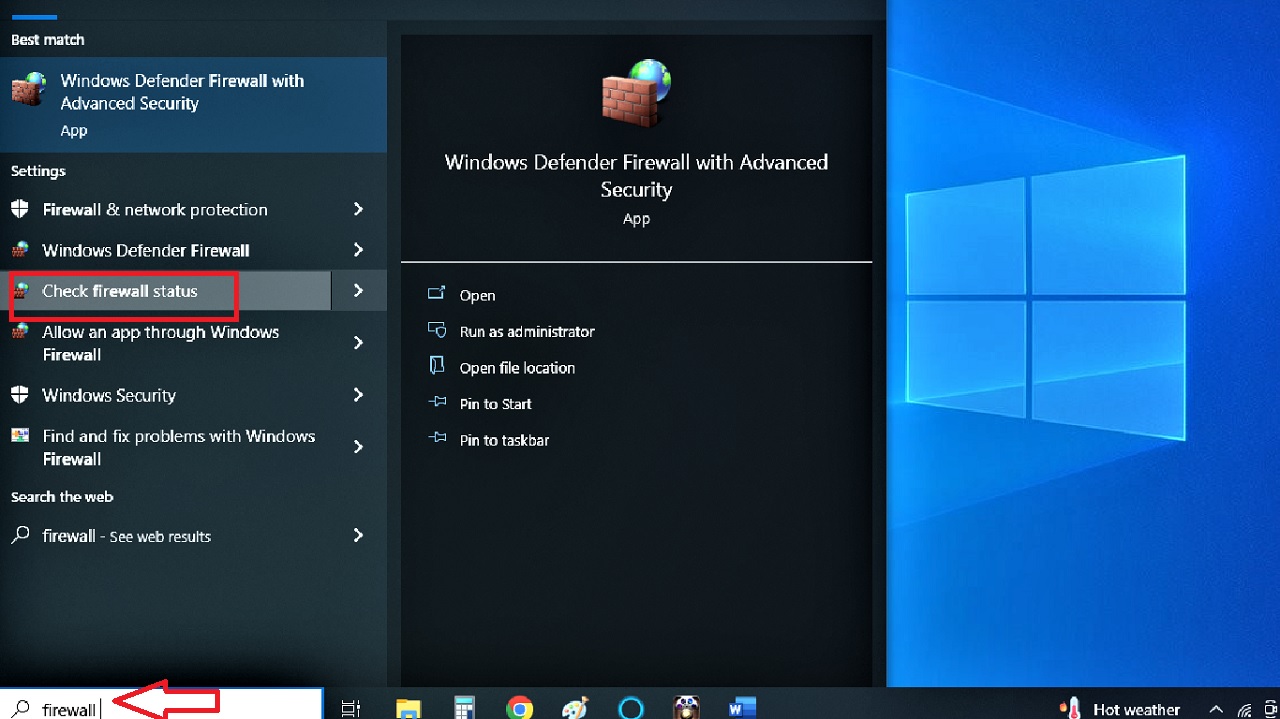
- Press Windows and S keys on your keyboard together to bring up the search bar.
- Type in firewall.
- Click on Check firewall status from the search results.
- Click on the Restore defaults option in the left pane of the Windows Defender Firewall window.
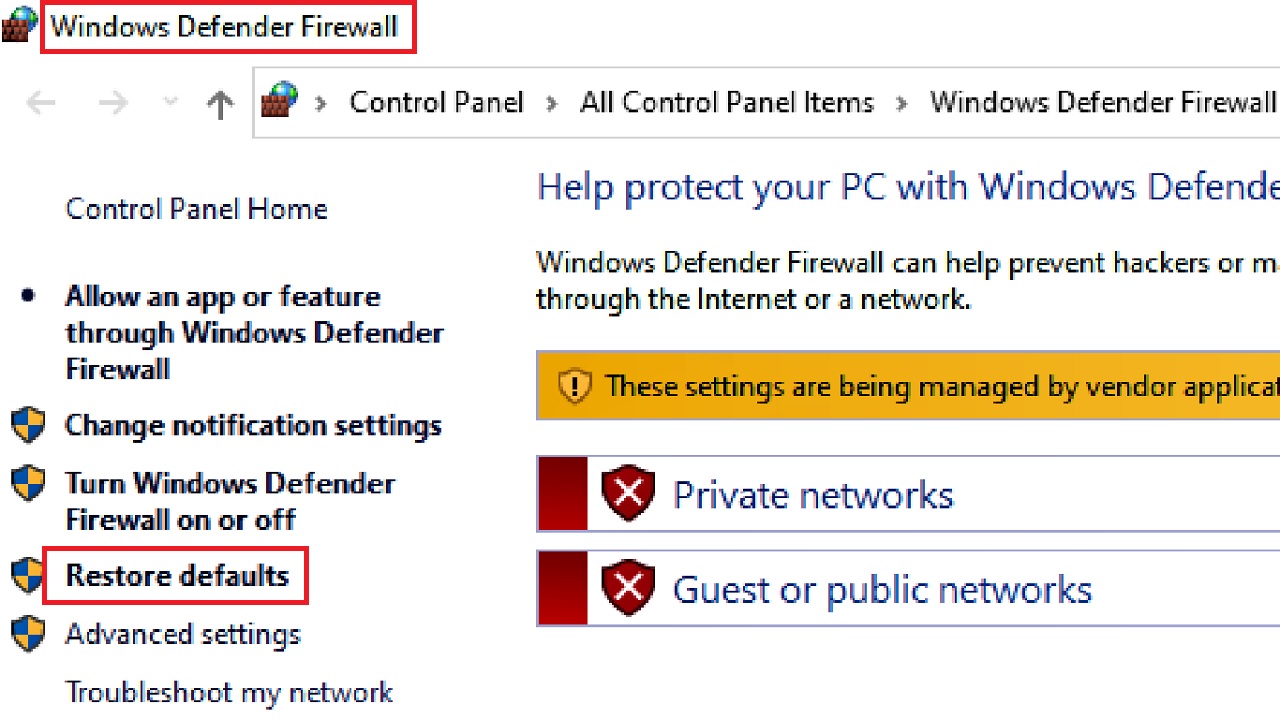
If it is allowed, a new window will open. Read the warnings and click on the Restore defaults button. Click on the Yes button for confirmation.
This will reset the firewall configuration taking it back to its default settings.
After the firewall has been reset, try connecting to your Wi-Fi network again and check whether it is working properly.
Method 10: Setup IP Manually
Sometimes, the automatic settings of the IP may cause issues. Setting it up manually may help the network adapter to perform properly.
STEPS TO FOLLOW:
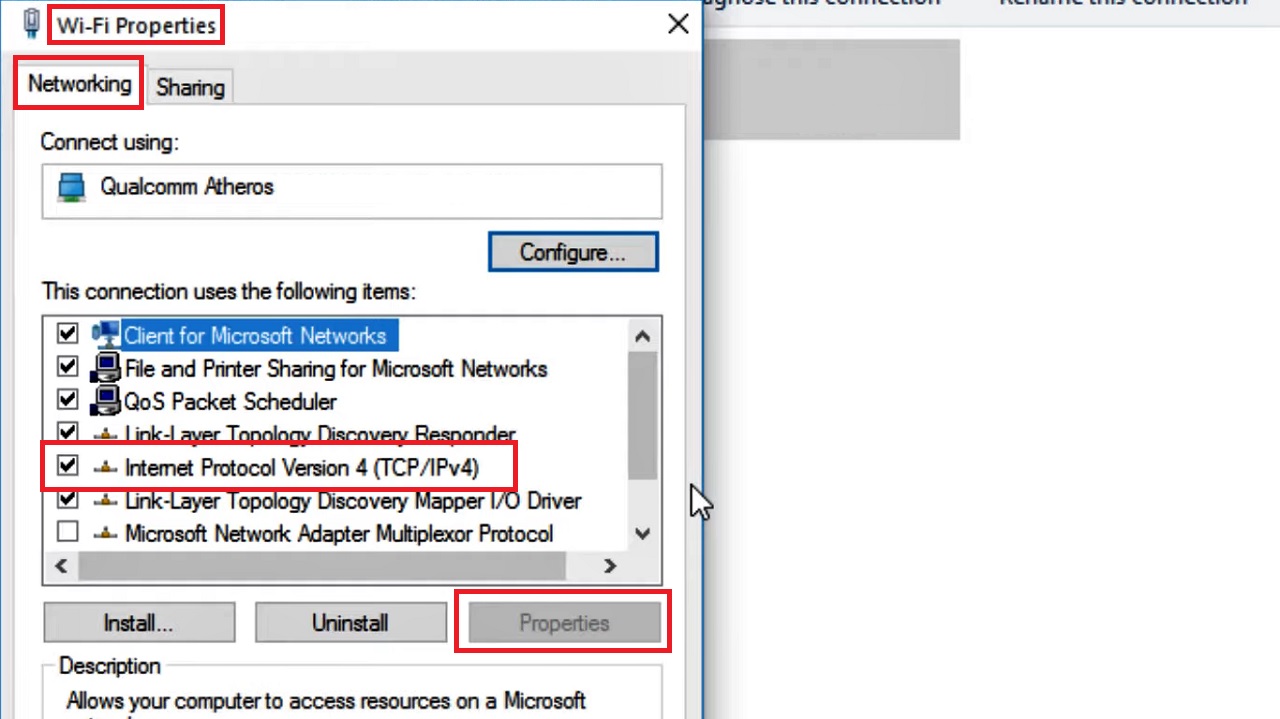
- Open the Wi-Fi Properties window as in Method 7 and select Internet Protocol Version 4 (TCP/IPv4) under the Networking tab.
- Click on the Properties button.
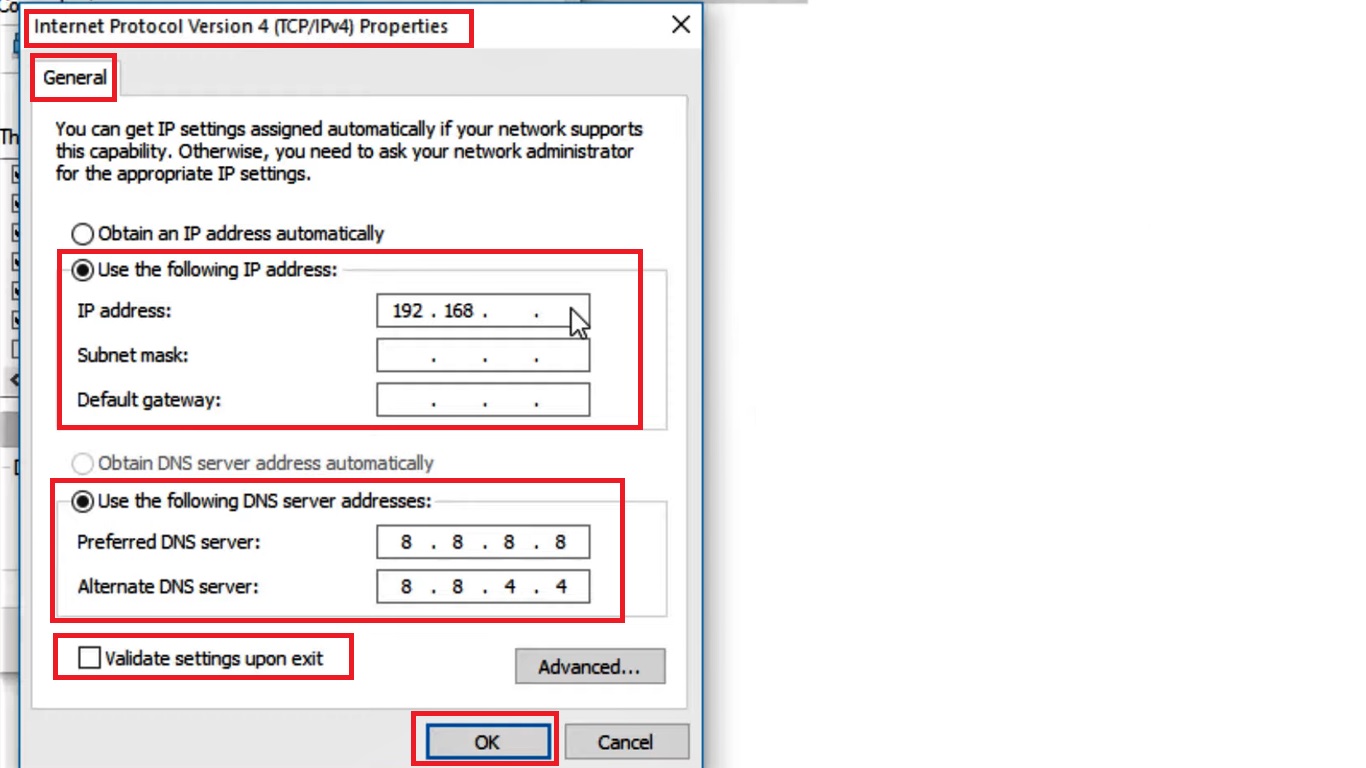
- In the new Internet Protocol Version 4 (TCP/IP) Properties window, click on the small circular button next to “Use the following IP address” option.
- Type in the IP address, Subnet mask, and Default gateway in the relevant boxes.
- Then, click on the radio button next to the “Use the following DNS server addresses” option, and type in the Preferred DNS server: 8.8.8.8, Alternate DNS server: 8.8.4.4.
- Make sure that the box next to Validate settings upon exit option is checked.
- Click on the OK button.
Now, check whether the Wi-Fi issue has been resolved.
Additionally, if the problem still persists, you may try resetting the Internet Protocol Version 4 by running a few specific commands in the Command Prompt as an administrator.
Open the Command Prompt as before and type in the commands one after the other, pressing Enter every time:
- netsh winsock reset catalog
- netsh int ipv4 reset reset.log
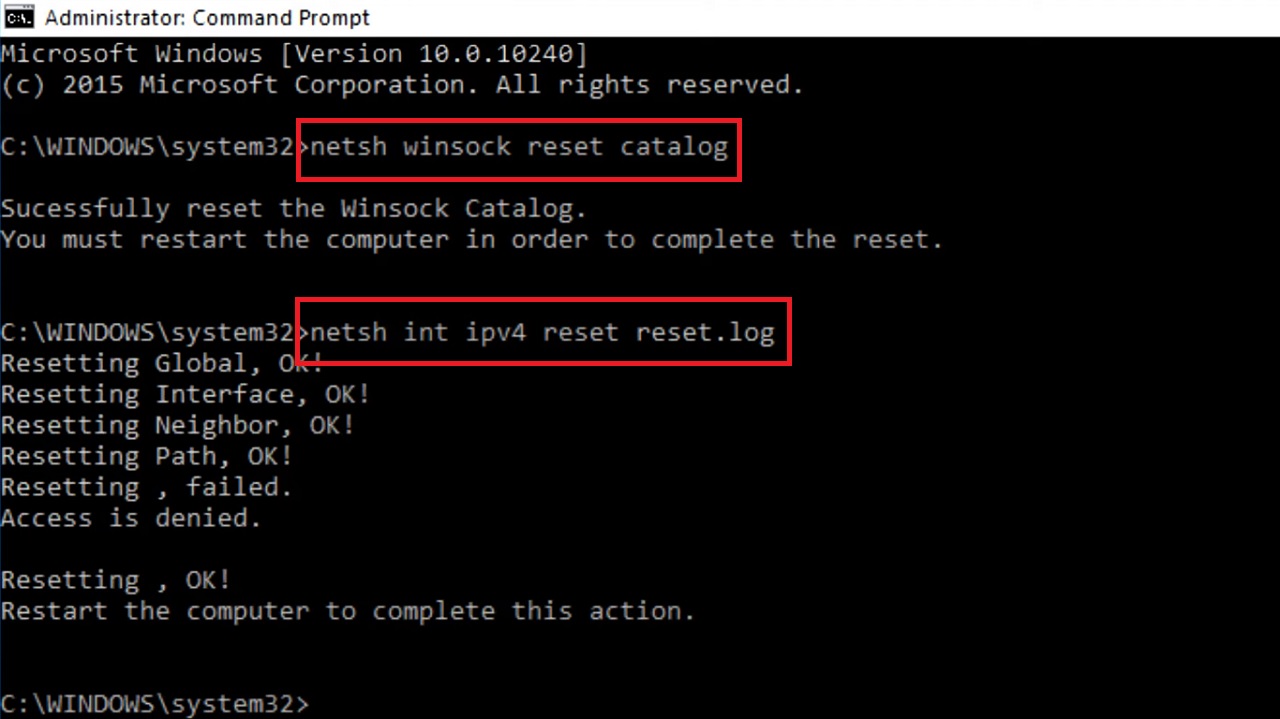
When the process is complete, restart the system and check whether the issue has been resolved.
Method 11: Perform a Network Reset
Just like system reset, performing a network reset may also help in solving the issue with your Wi-Fi validation. This will recreate the profiles of your network by removing the existing ones.
STEPS TO FOLLOW:
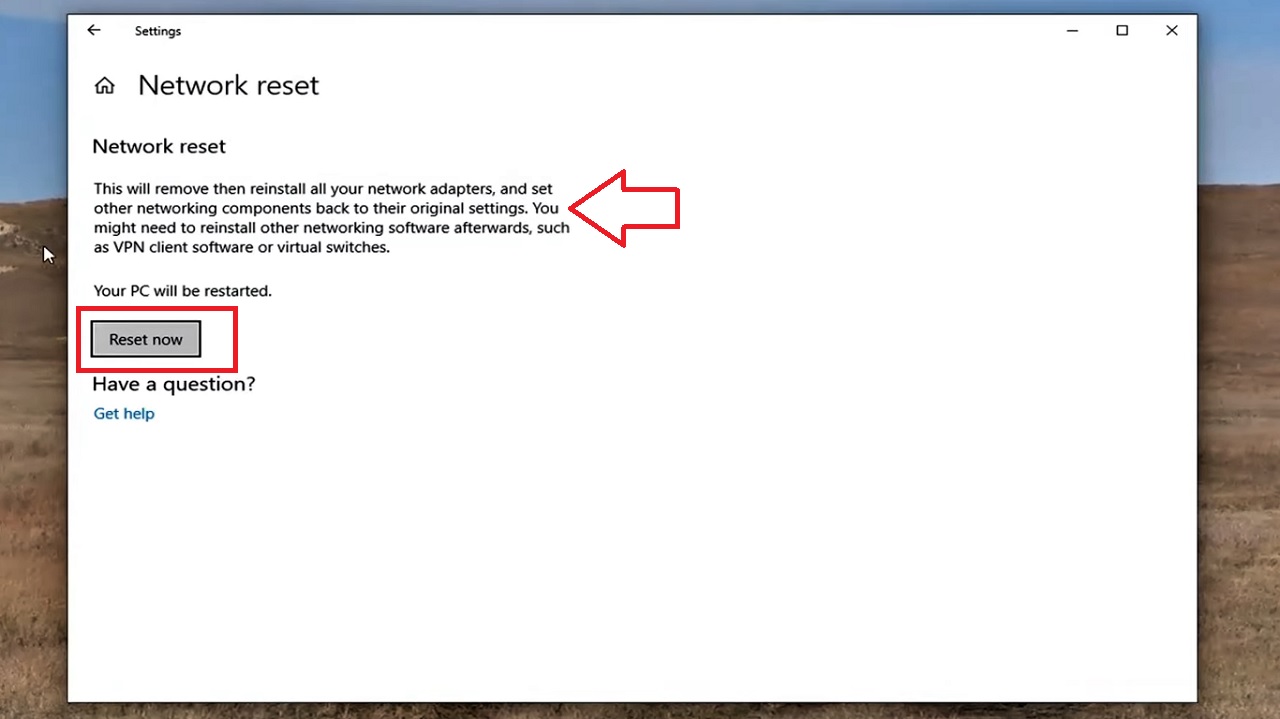
- Open Settings as before > Go to Network & Internet > Status.
- Scroll down on the page to find the Network reset link.
- Click on it.
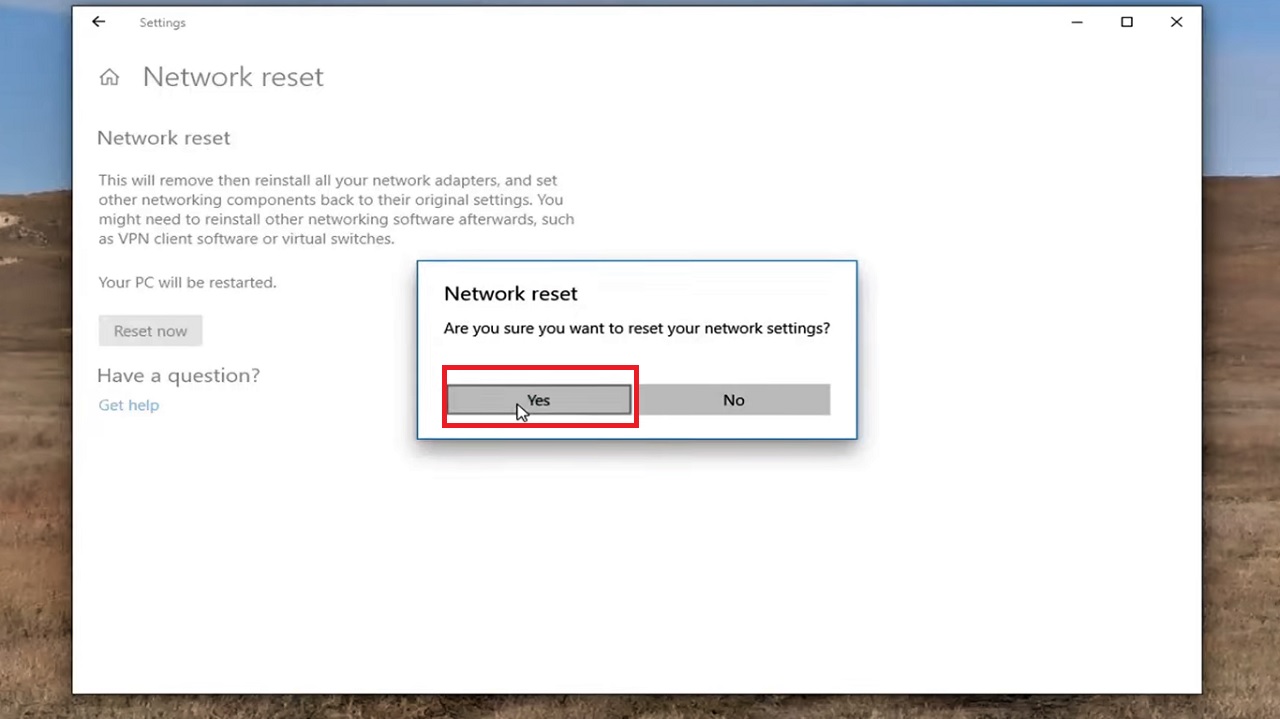
- Read the warnings and click on the Reset now button.
- Click on the Yes button on the next window for confirmation.
Now, when the reset is complete, reconnect to all the networks you used earlier using the correct authorization.
Finally, restart your PC, connect to your Wi-Fi and check whether or not the issue has been resolved.
Method 12: Make Changes in the Proxy Settings
You may also have the issue resolved by making changes in the Proxy settings of your network.
STEPS TO FOLLOW:
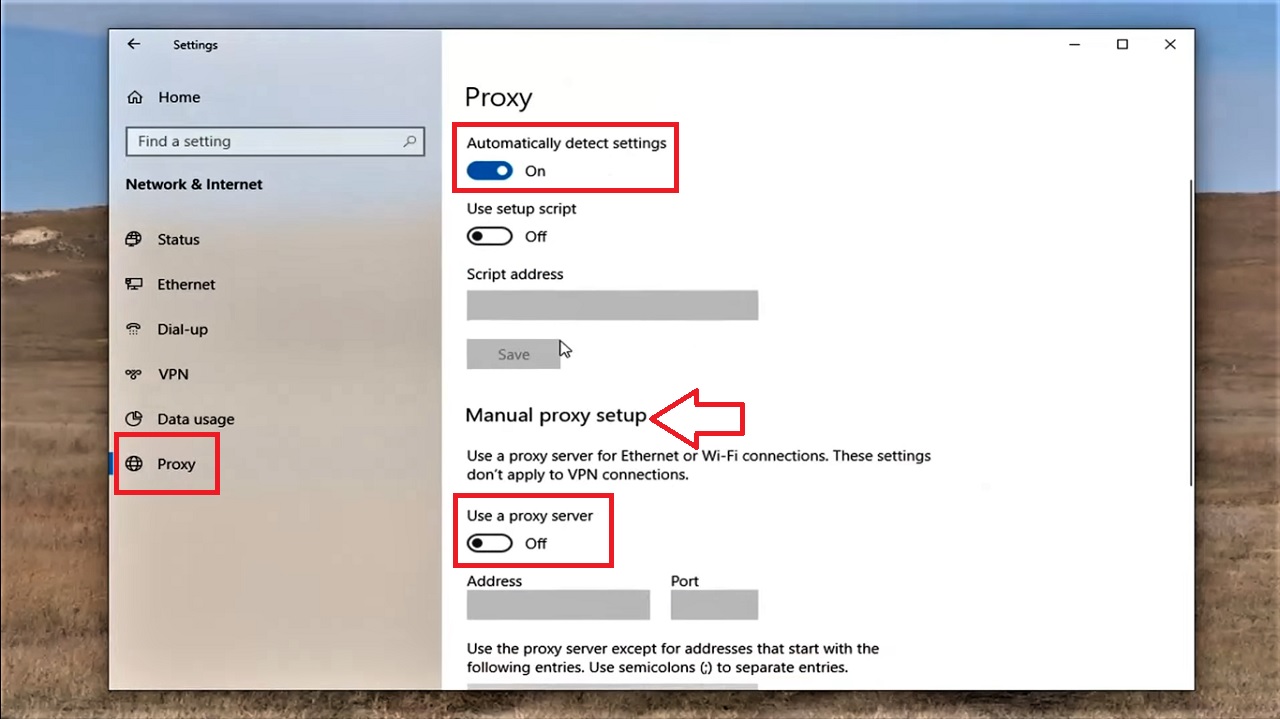
- Go to Settings as before > Select Network and Internet > Select Proxy from the left panel of the Settings window.
- Under Proxy, make sure that the toggle switch under Automatically detect settings is set to On.
- Also, check that the toggle switch under Use a proxy server in the Manual proxy setup section is turned Off.
Restart your PC and then check whether or not the issue has been resolved.
Method 13: Reset Wi-Fi Network Adapter from the Control Panel
You may also try resetting the wireless network adapter to solve the problem.
STEPS TO FOLLOW:
- Open the Run dialog box as before.
- Type ncpa.cpl and then click on the OK button.
- Select the wireless network in the next screen.
- Right-click on it.
- Select Disable from the drop-down options.
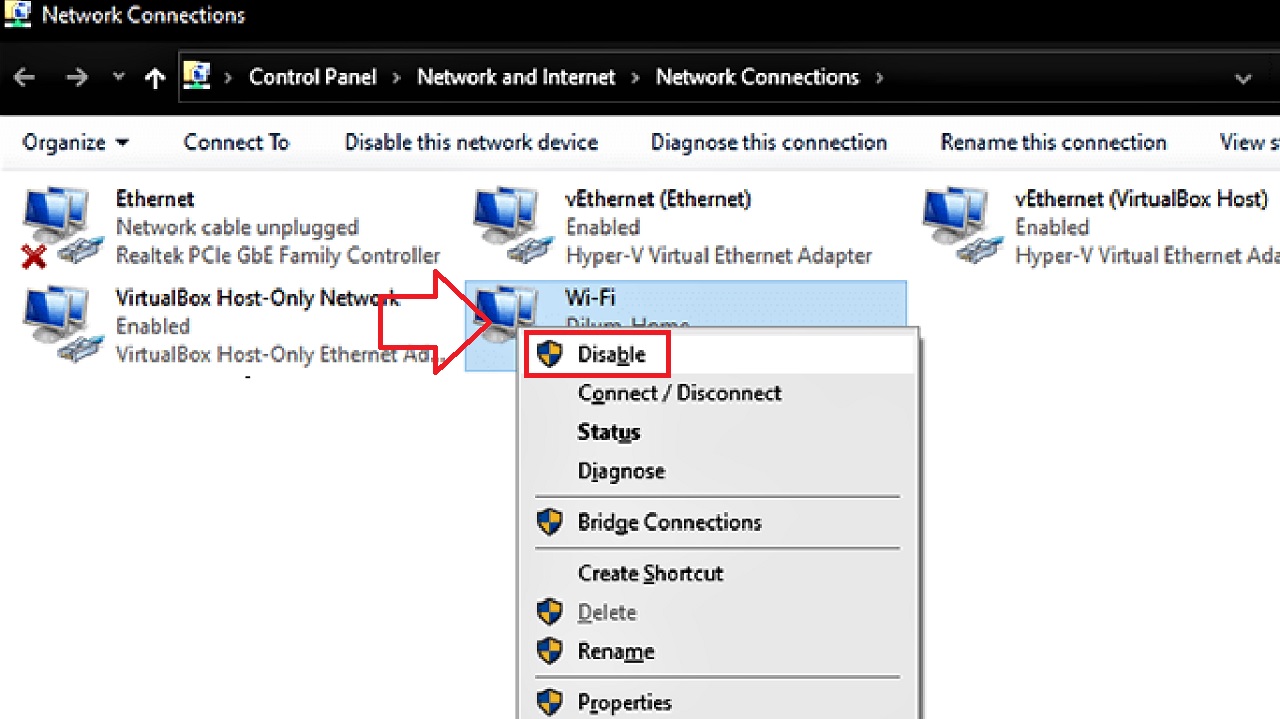
- Wait for 10 seconds.
- Right-click again and select Enable this time.
Close the window and check whether the network is working properly.
Method 14: Reset the Router Back to its Factory Settings
If none of the above methods work, you can try fixing the issue by resetting the router to its factory settings, as your last resort.
Note: Resetting your router will remove all previous configurations from the device. This means you will have to reconfigure all those settings.
STEPS TO FOLLOW:
- Go to the back of your router.
- Locate the small Reset button.
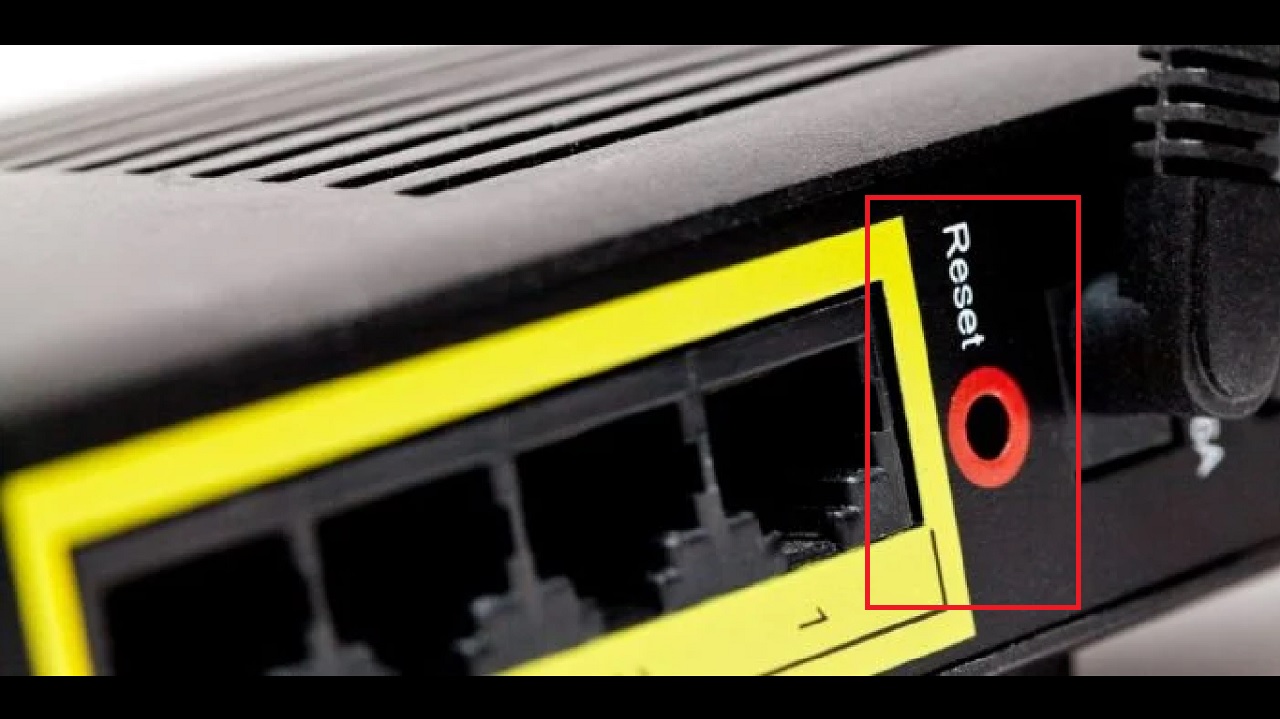
- Use a paperclip to press it.
- Hold it down for about 15 to 30 seconds until the power indicator starts blinking.
Wait till the resetting process is complete. Configure your network settings and connect to your Wi-Fi network to see whether or not the issue has been resolved.
Conclusion
As you can see there are lots of easy and not-so-easy solutions to fix the “Wi-Fi doesn’t have a valid IP configuration” error.
You may try any one or a few in combination depending on whether you want a temporary or a permanent fix.