
Sometimes you may not be able to see the network profile you are connected to even if the computer shows that you are successfully connected.
This is not a serious issue and can be resolved in a few quick steps. If you are not aware of them, this article will be of great help to you.
In This Article
KEY TAKEAWAYS
- A missing network profile on a PC can be restored by changing the profile from public to private or vice versa depending on the default settings from the properties section in the Wi-Fi or the cable connection of the PC.
- Using the consul commands in Windows PowerShell will also reset the network profile to private and make it visible again. Running the winsock reset command in the Command Prompt may also resolve the issue.
- You may also make some changes in the SNMP Trap services by changing the startup type from manual or other to automatic, which will successfully make things work just like usual.
- The issue may also be resolved by running the troubleshooter for the network adapter from Windows Settings if it is caused due to an outdated driver.
- Adding a new protocol in network sharing from the Control panel may sometimes bring back the missing network on your computer.
Why Do the Network Profile Go Missing?
More often than not, the network profile set to public or private may not be recognized by your computer.
This may happen mainly when the antivirus software loaded on your computer has the permission to control it from thee instead of your PC settings.
Some other reasons for a network profile may go missing are:
- An outdated network adapter driver
- Other underlying issues in the computer system
- Improper setting of the value data of the profile name keys in the Windows Registry
- Some errors in the Settings app
- A temporary glitch in the computer
Fortunately, this issue is not a major one and is solvable with the following steps.
How to Fix Network Profile Missing?
One easy way to get back the missing network profile is to restart your computer to start with. If that does not help, you must change the network profile to private from public or vice versa, depending on the default settings.
Sometimes, you may be able to fix the issue in the simplest way by running the troubleshooter for your network adapter. Simply go to Settings > Update & Security > Troubleshoot > Network adapter > Run the troubleshooter.
Updating the network adapter driver may also resolve the issue. You can do this by right-clicking on the Start menu > opening Device Manager > expanding Network adapters > right-clicking on the network driver > selecting Update driver.
You may also run the hardware and devices troubleshooter from the Control Panel to fix any other errors that may be causing the issue.
You can change the network profile in different ways such as directly from the Wi-Fi or cable connection on your computer, or by running a couple of commands on Windows PowerShell.
The steps to follow for it along with some other ways to resolve the issue of a missing network profile are mentioned below along with the steps to follow.
Method 1: Using the Wi-Fi Connection
Changing the network profile from the Wi-Fi connection is one easy way to fix this issue.
STEPS TO FOLLOW:
- Click on the Network icon at the bottom-right corner of your screen.
- Select Properties.
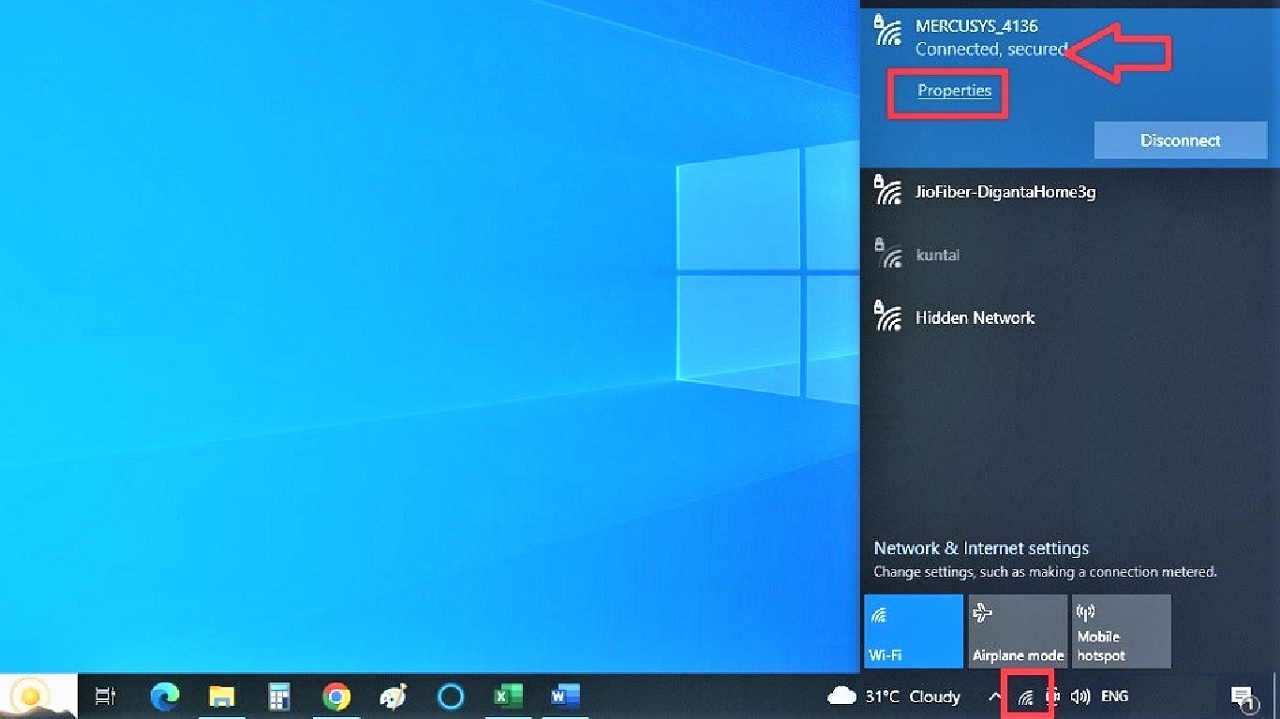
- In the window that pops up, set the Network profile to Private if it is set to Public, or to Public if it is set to Private.
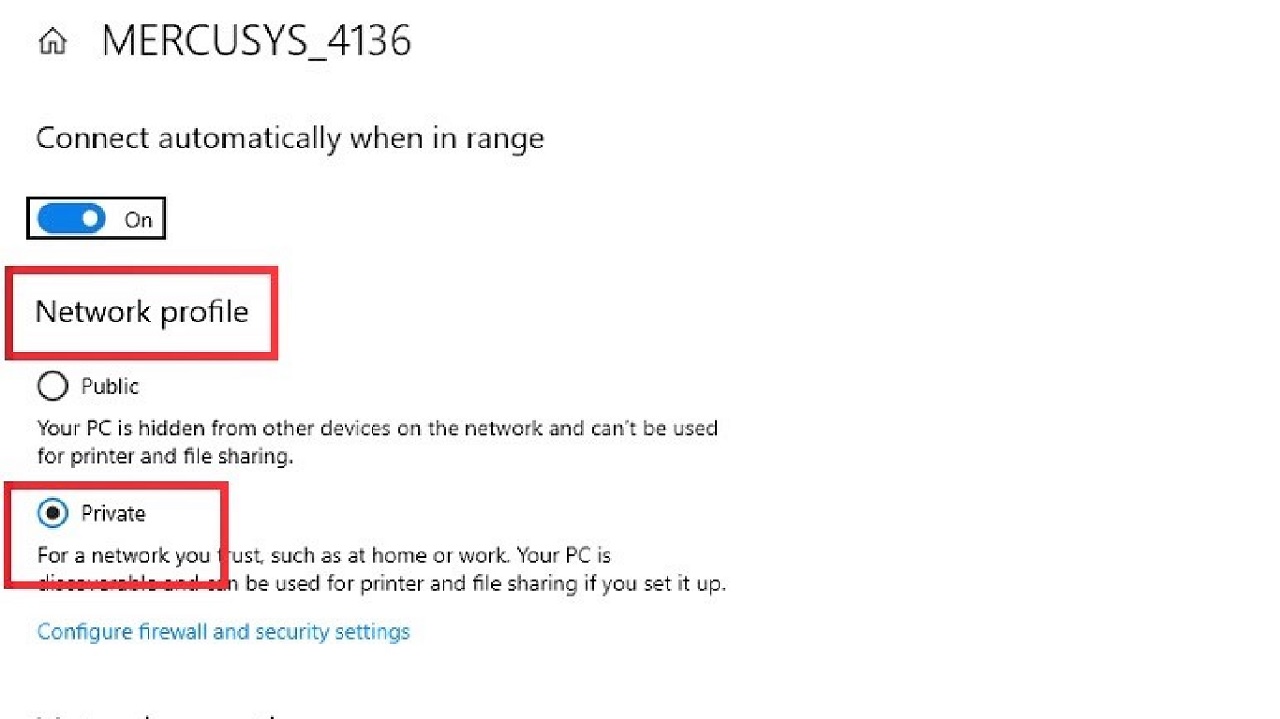
Restart your computer and this might resolve your issue of missing network profile.
Method 2: Using the Ethernet Connection
If you are using an Ethernet connection, the process is pretty much the same. However, there are two ways to set the network profile, depending on the situation.
STEPS TO FOLLOW:
If the network profile is visible, you may follow the same process as you did in Method 1, which is, click on the network icon > select properties under Ethernet > change the network profile from public to private.
However, you may not be able to do so, if the network profile is not visible in the first place, as it is shown in the image below:
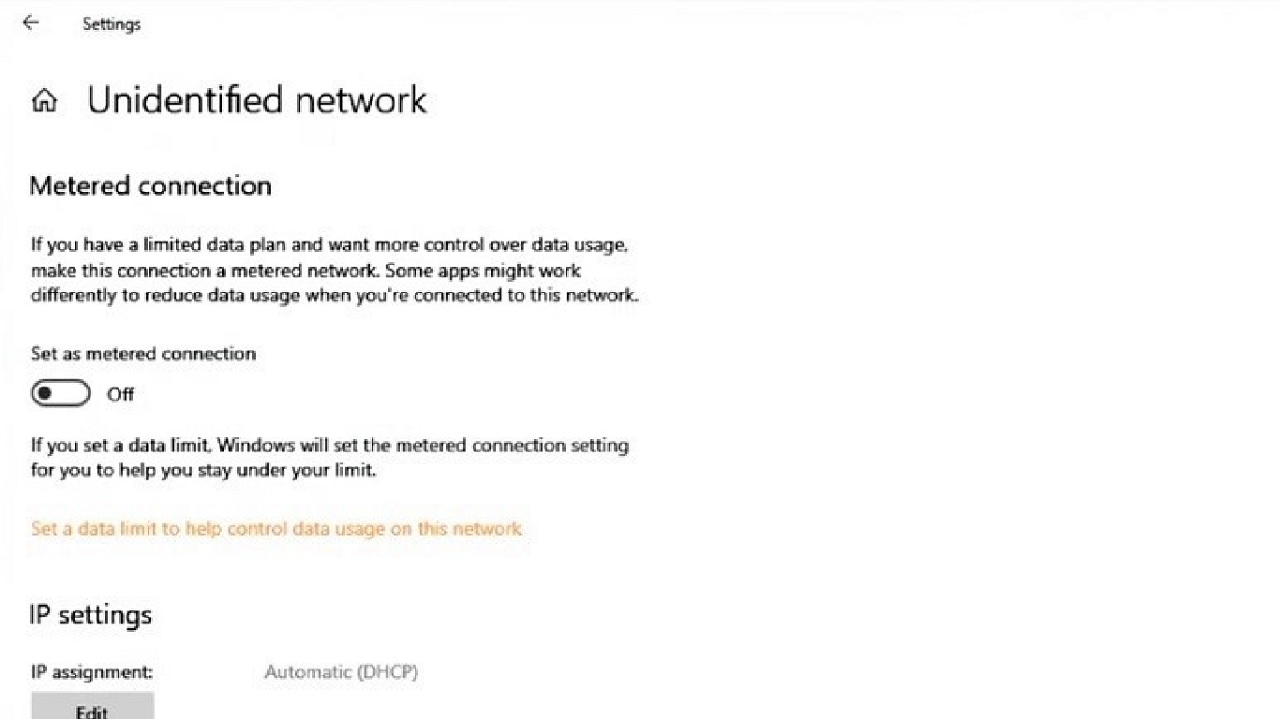
In that case, it is a bit confusing and you will need to use the consul command and follow these particular steps:
- Press the Windows and X keys together and select Windows PowerShell (Admin) from the list of options that pops up.
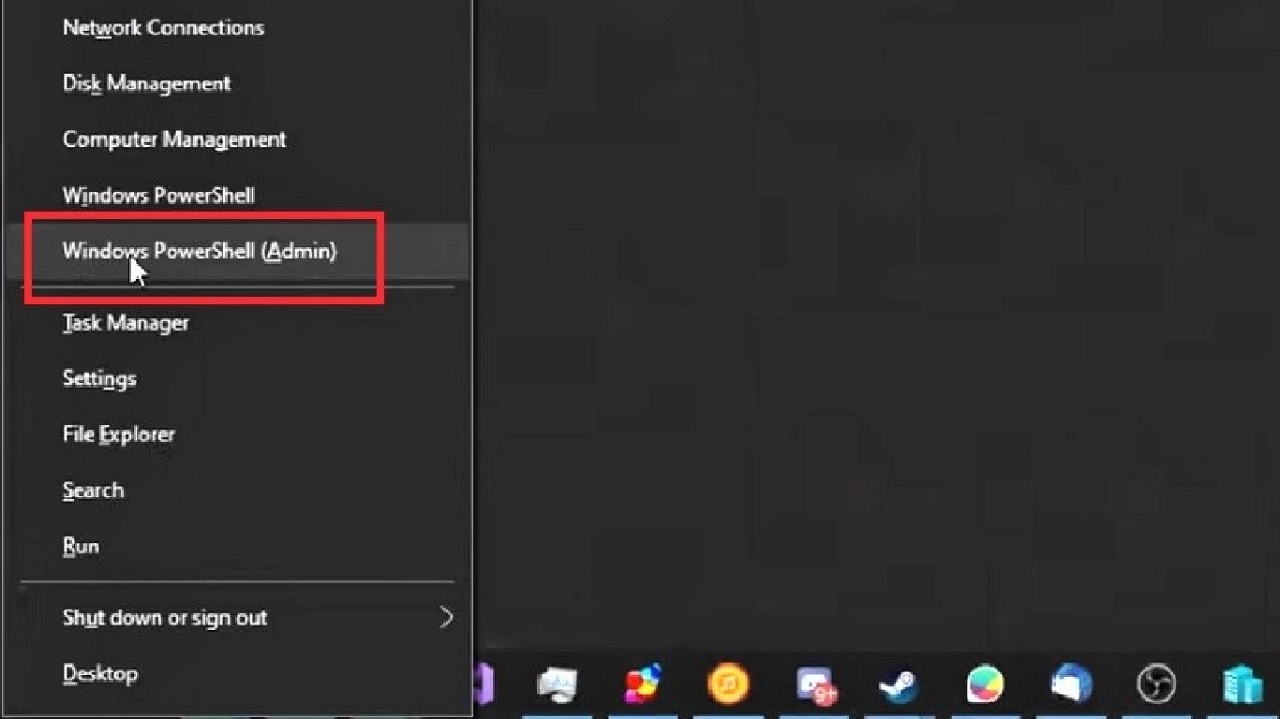
- Now, when the PowerShell command prompt opens, type the command Get-NetConnectionProfile and hit Enter.
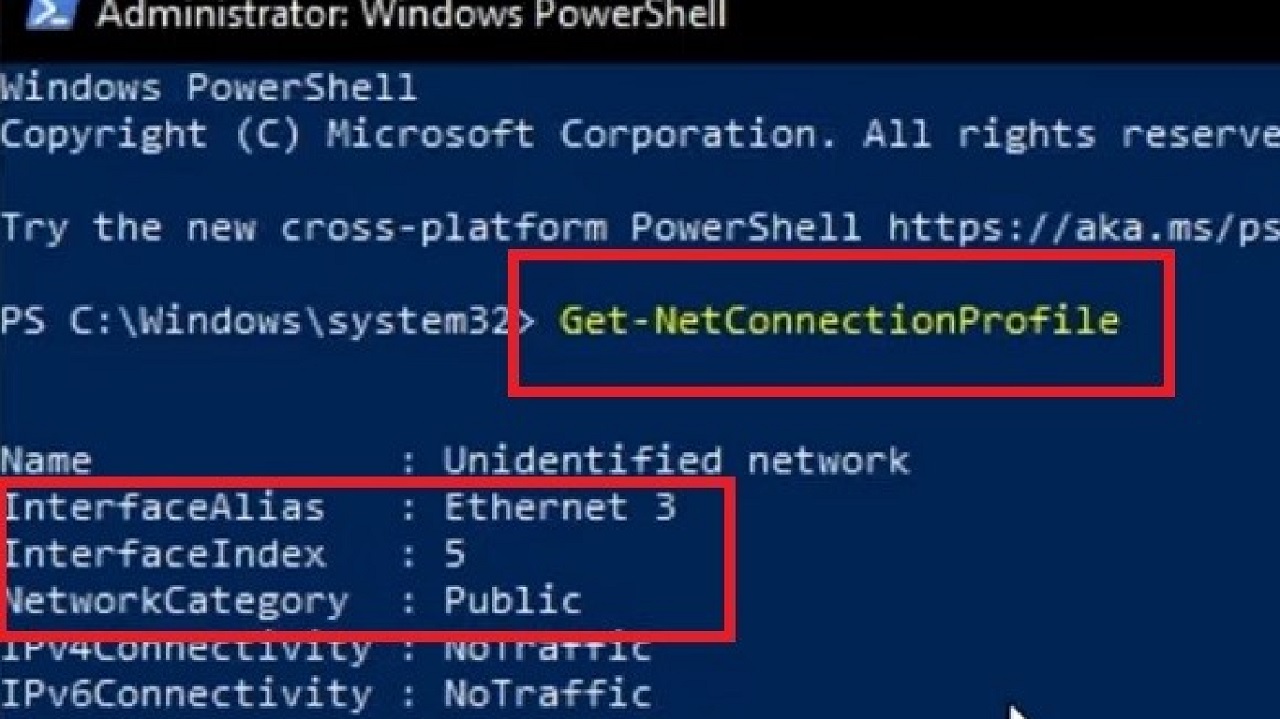
This will show the details of the unidentified network. Take a note of the InterfaceIndex, which is 5, and the NetworkCategory, which is Public in the image above.
You will need them for your next consul command to change the network profile from public to private.
- Type the command Set-NetConnectionProfile -InterfaceIndex 5 -NetworkCategory Private and hit Enter. (If your network is set to private and you want to change it to public, type Public in place of Private in the command.)
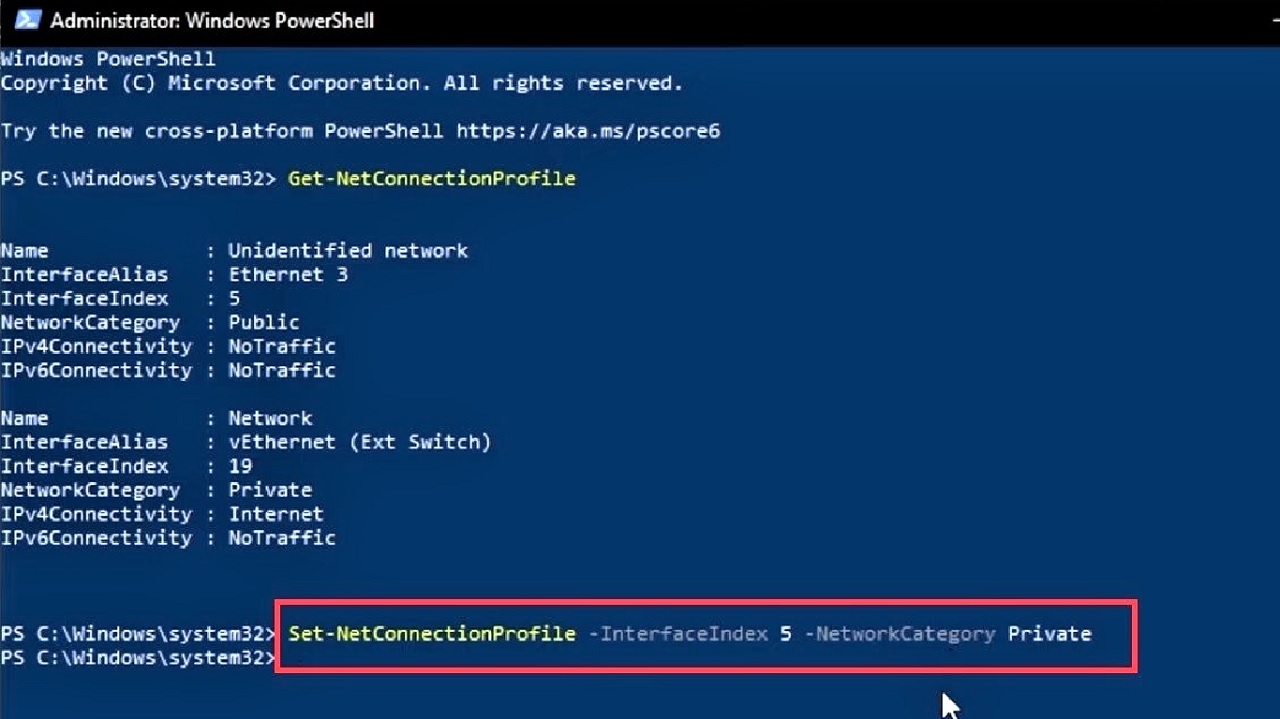
Note that you will not see any result or information when you press Enter.
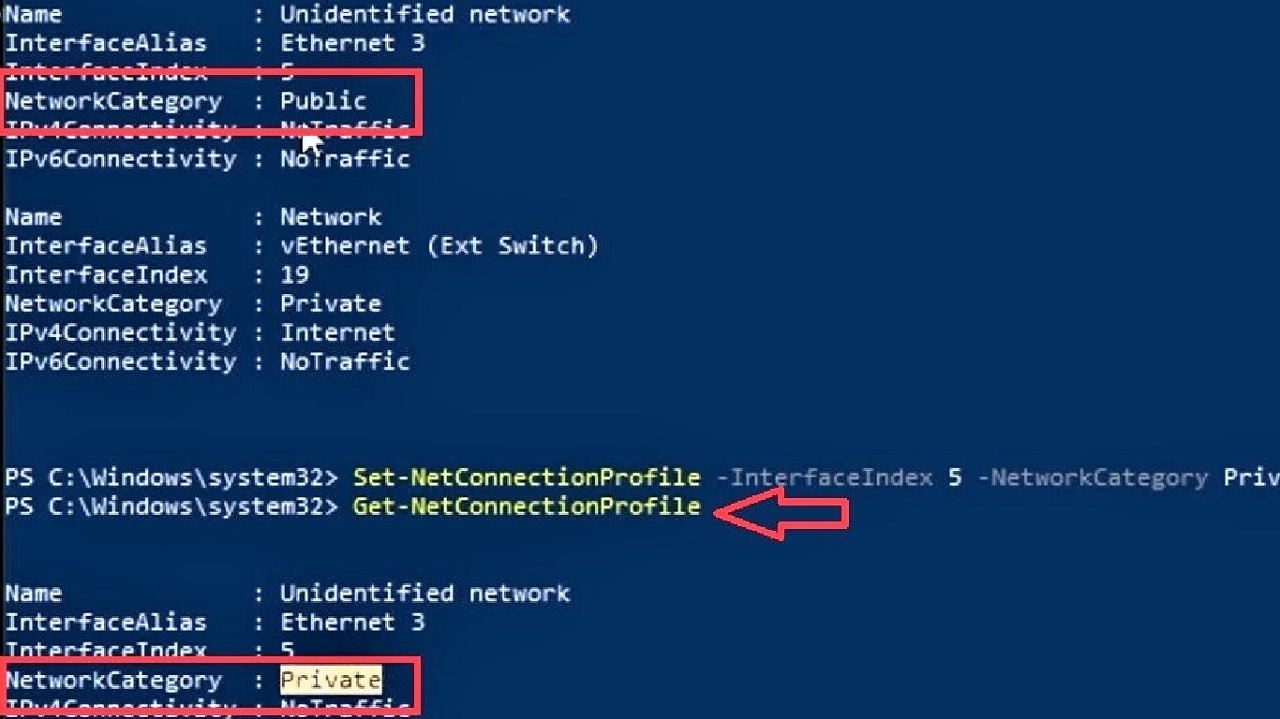
At this point, you will need to press the Up Arrow key on your keyboard twice. This will show Get-NetConnectionProfile. When you see it, press Enter.
Now you will be able to see the details of your same network connection along with the network profile, now changed to Private, as shown in the image below:
Now close all windows and restart your computer. This will fix the issue of your missing network profile.
Method 3: Disabling the Firewall or Antivirus Program
The network profile may not be visible on the network settings because the antivirus or firewall may have the permission to control it. Disabling it will resolve the issue.
For this method, consider the Avast antivirus program for example.
STEPS TO FOLLOW:
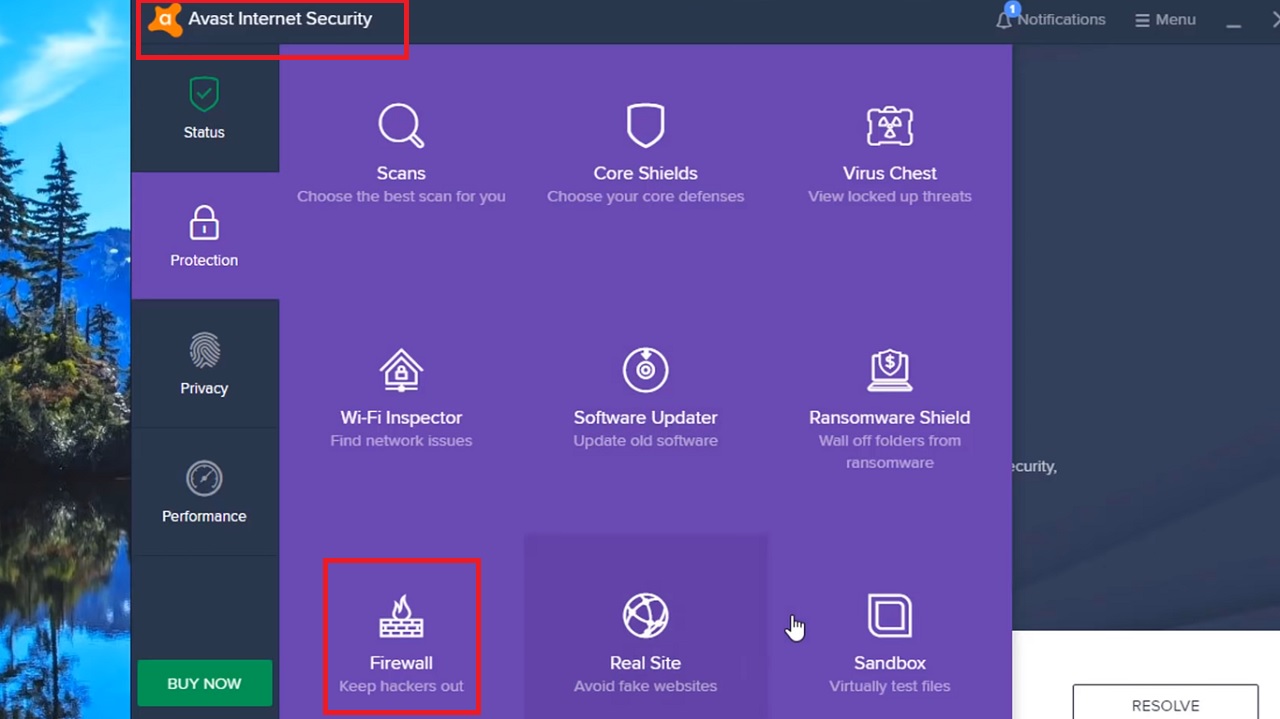
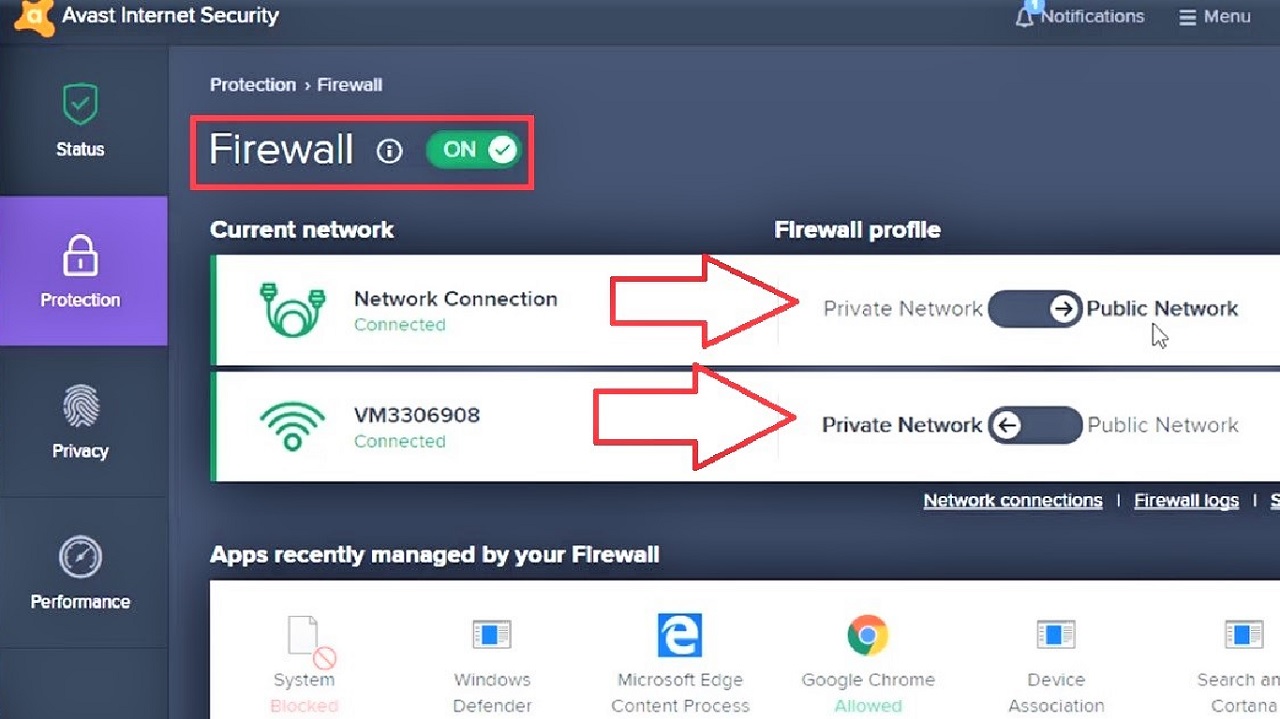
- Click to open the Avast antivirus program from the hidden icons (the upward arrow) at the bottom-right side of the taskbar.
- When the Avast Internet Security window opens, click on the Firewall option.
- You will see that the profiles of your networks are set here, as shown by the red arrows. Click on the sliding switch marked ON next to Firewall.
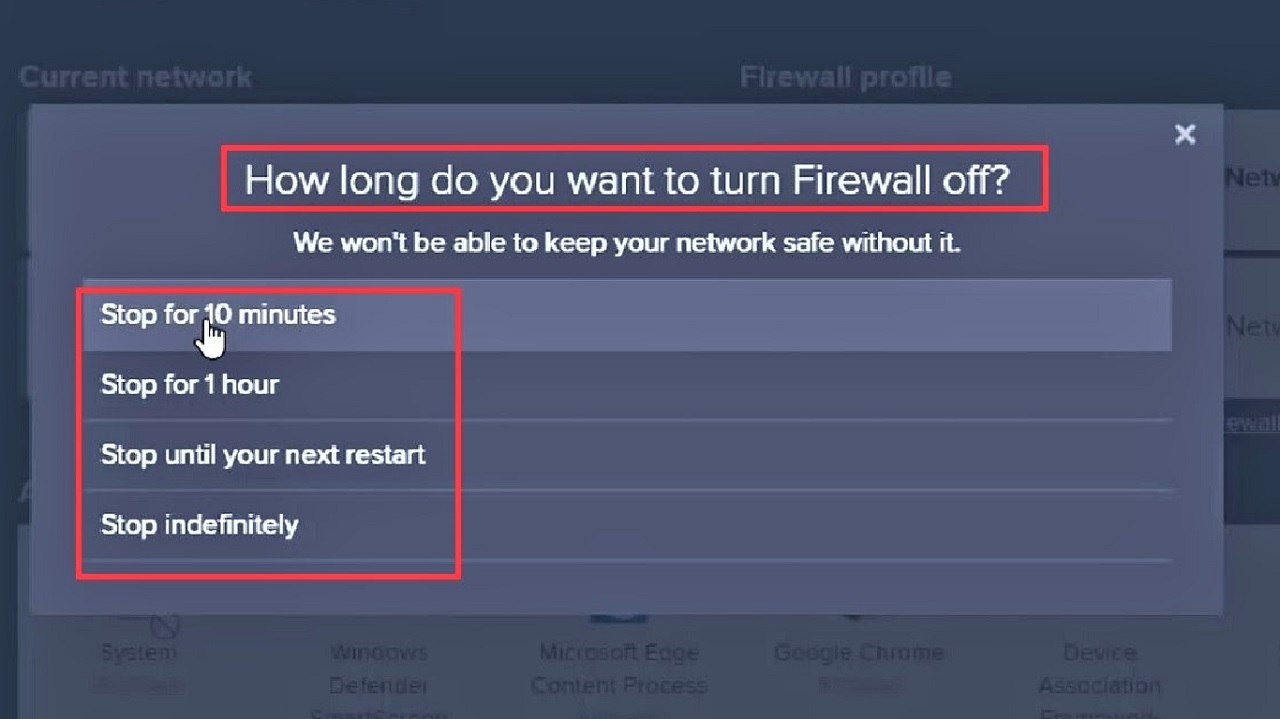
- Select the time you want the firewall to be turned off from the following window which asks you How long do you want to turn Firewall off?
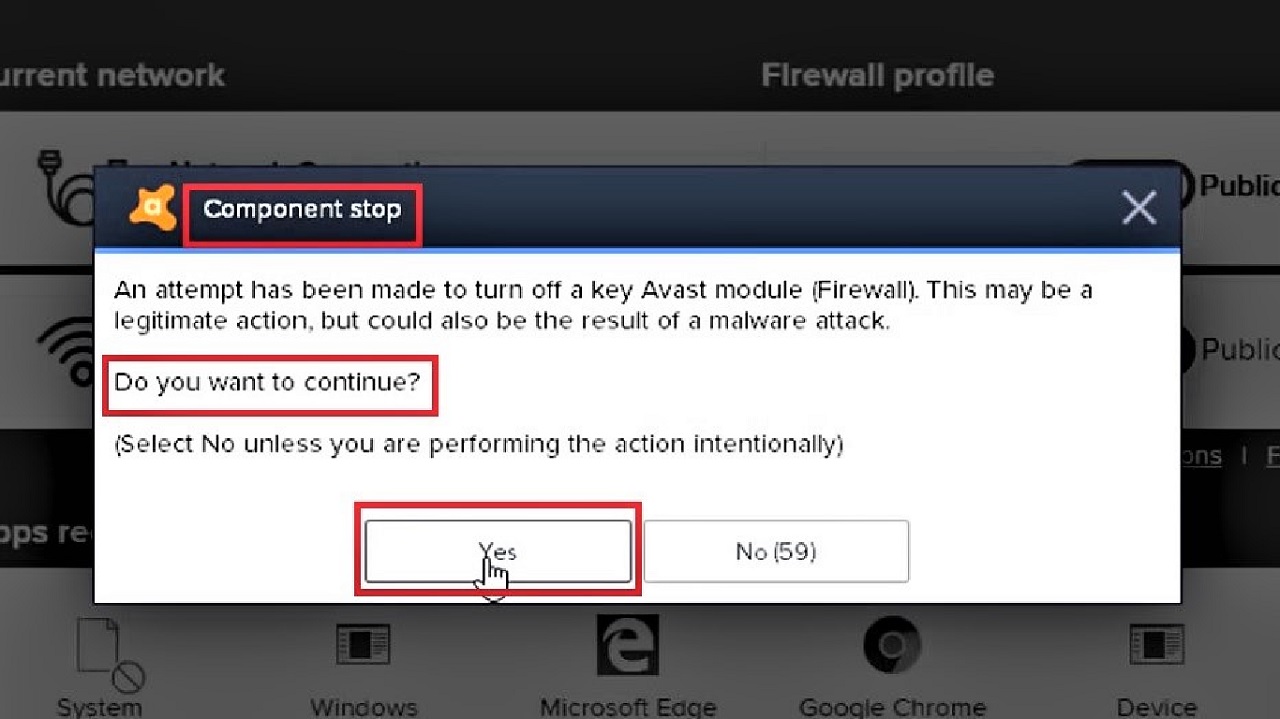
- Click on Yes in the following Component stop window which asks you Do you want to continue?
This will turn the firewall off, as shown in the image below:
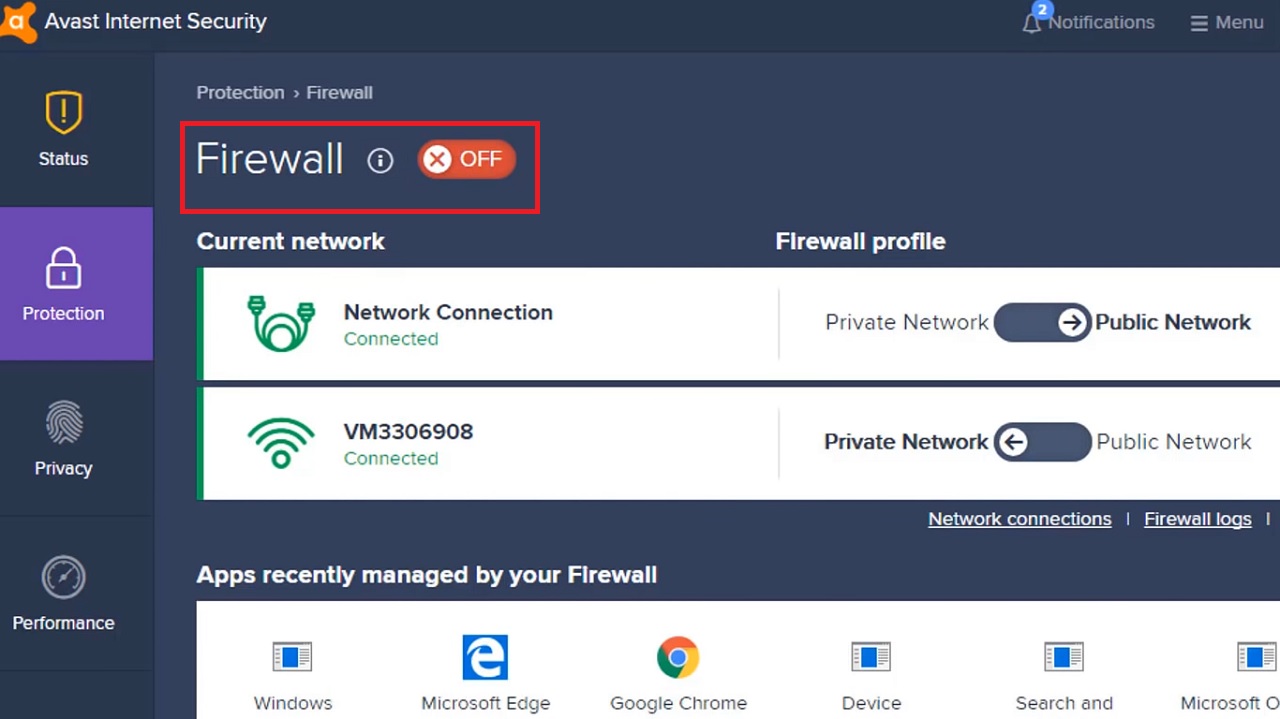
Now, go to Windows Setting by pressing the Windows and I keys together on your keyboard. (You can also right-click on the Start menu and choose it from the options that pop up.)
- Once the Settings window opens, go to Network & Internet.
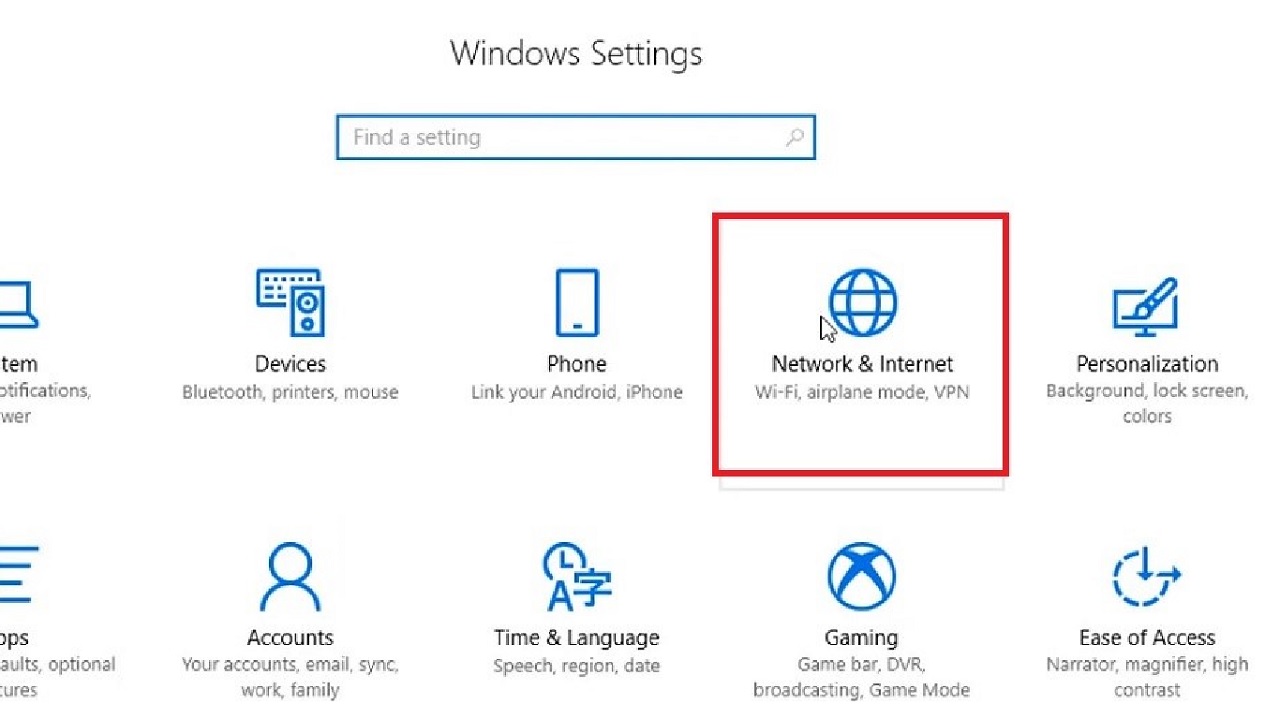
- Click on Change connection properties.
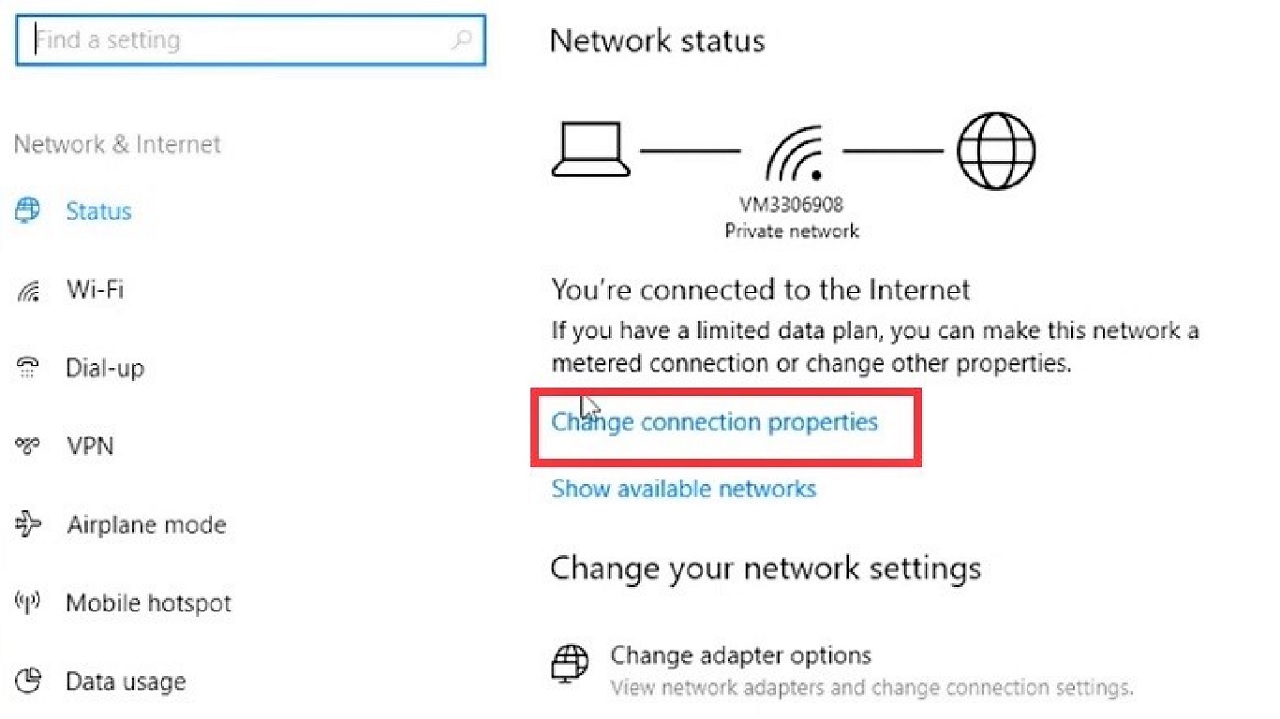
Now change the network profile from public to private or vice versa as you did in Method 1.
Method 4: From the Command Prompt
Resetting the Windows Socket API or winsock command in the Command Prompt may also bring back the missing network profile.
STEPS TO FOLLOW:
- Open Command Prompt from the search box by typing cmd in it and hitting Enter after selecting run as administrator.
- Type the command netsh winsock reset.
- Hit Enter.
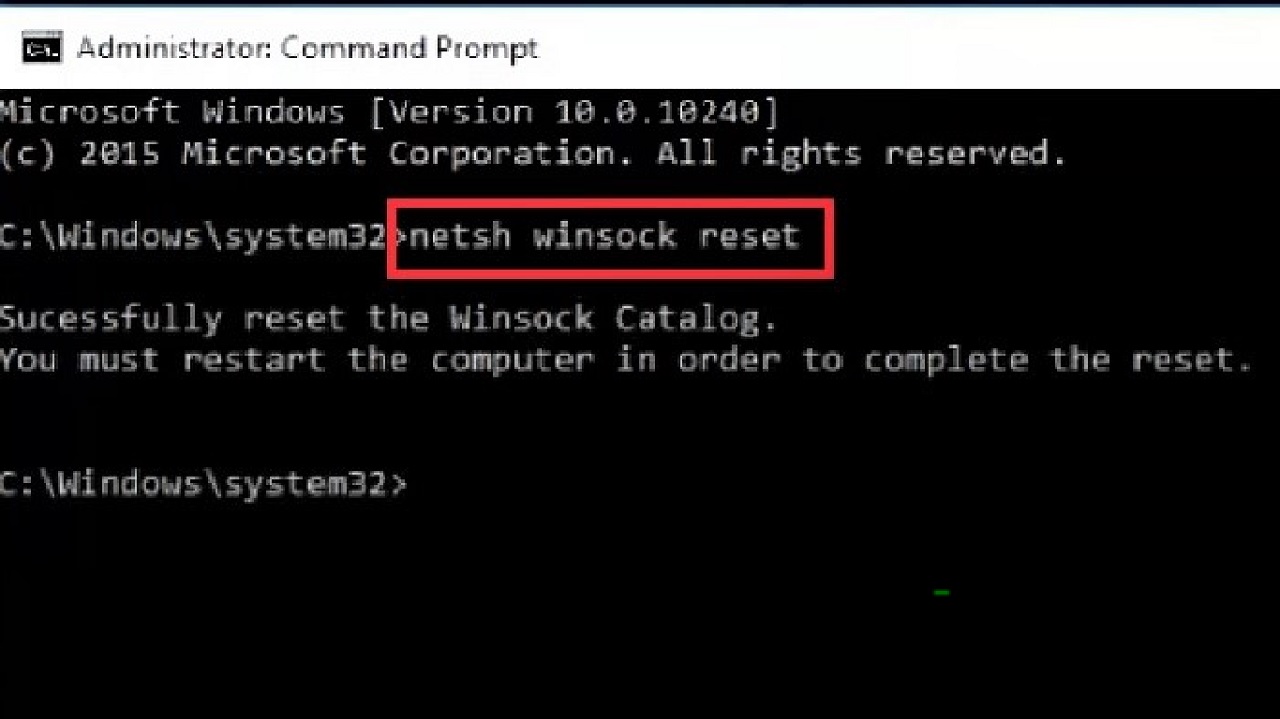
Restart your computer and see whether the issue is resolved.
If it could not resolve the issue, try another command – netsh int ip reset and hit Enter.
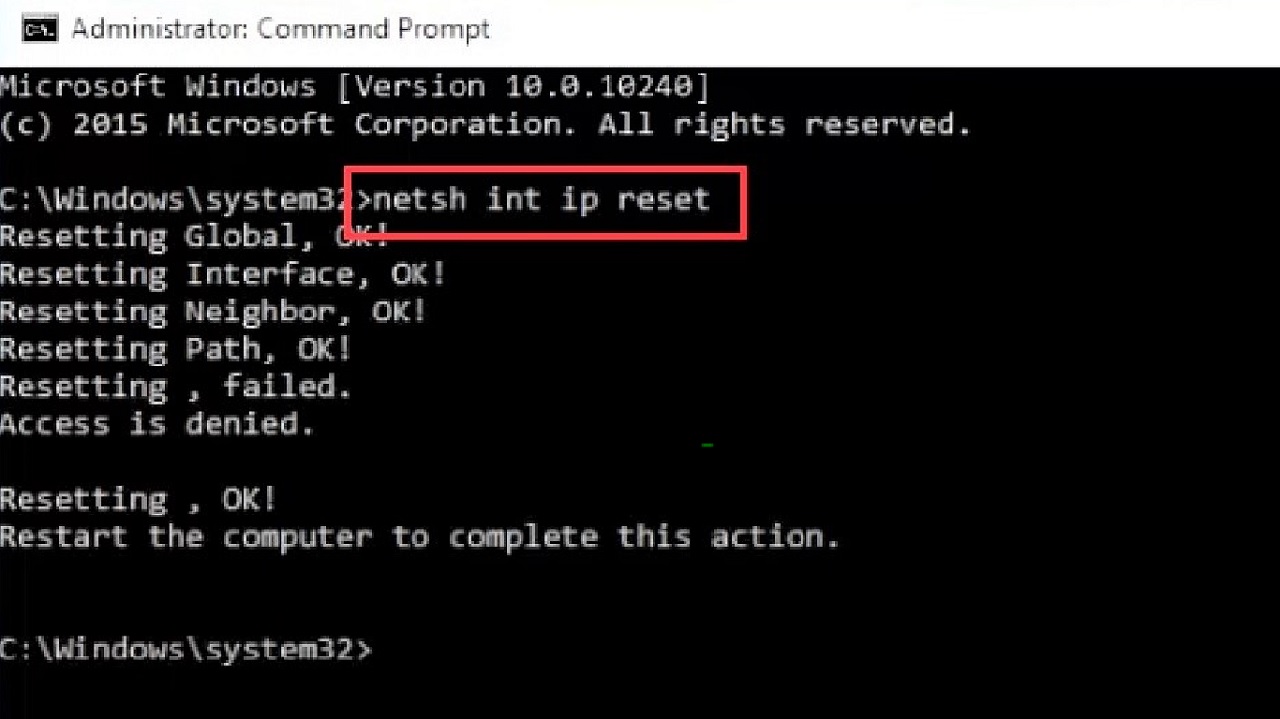
Close the Command Prompt, restart your computer system and this should fix the issue.
Method 5: From the Control Panel
You can resolve the issue of missing network profiles from the network and sharing center of the Control Panel as well by adding a new protocol.
STEPS TO FOLLOW:
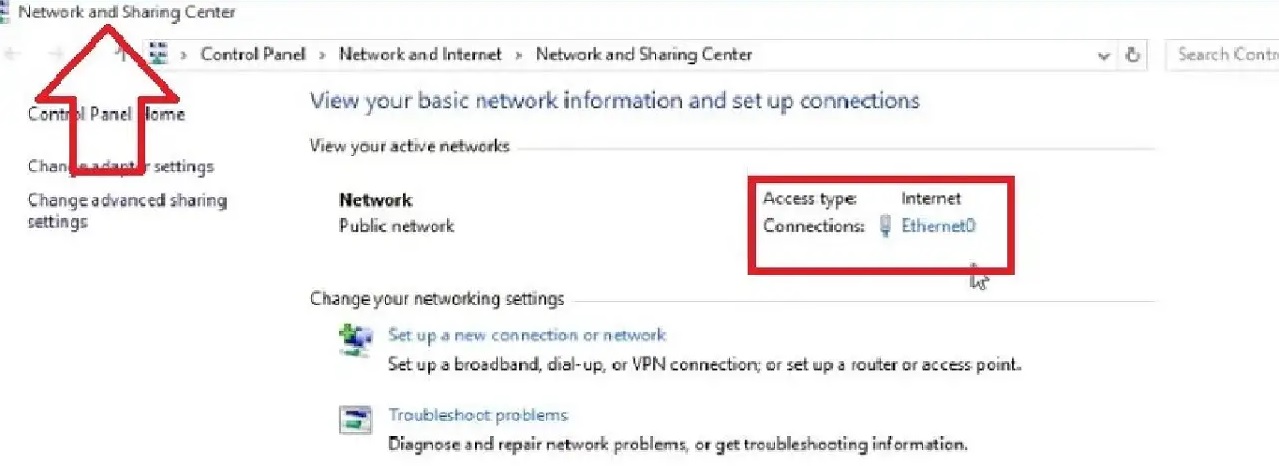
- Open Network and Sharing Center by typing control panel in the search box > hitting Enter > view by large icons Category.
- Select your network connection type, Ethernet or Wi-Fi and left-click on it. (In this case, it is Ethernet.)
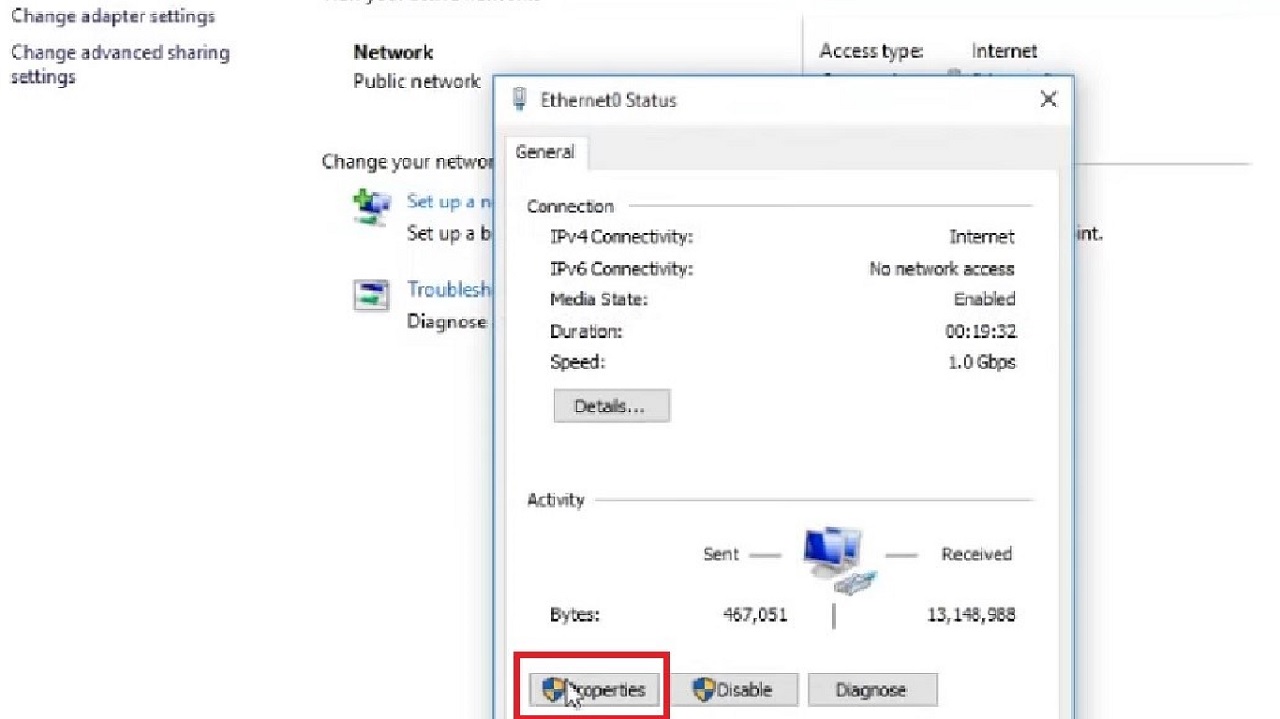
- Select Properties from the following window.
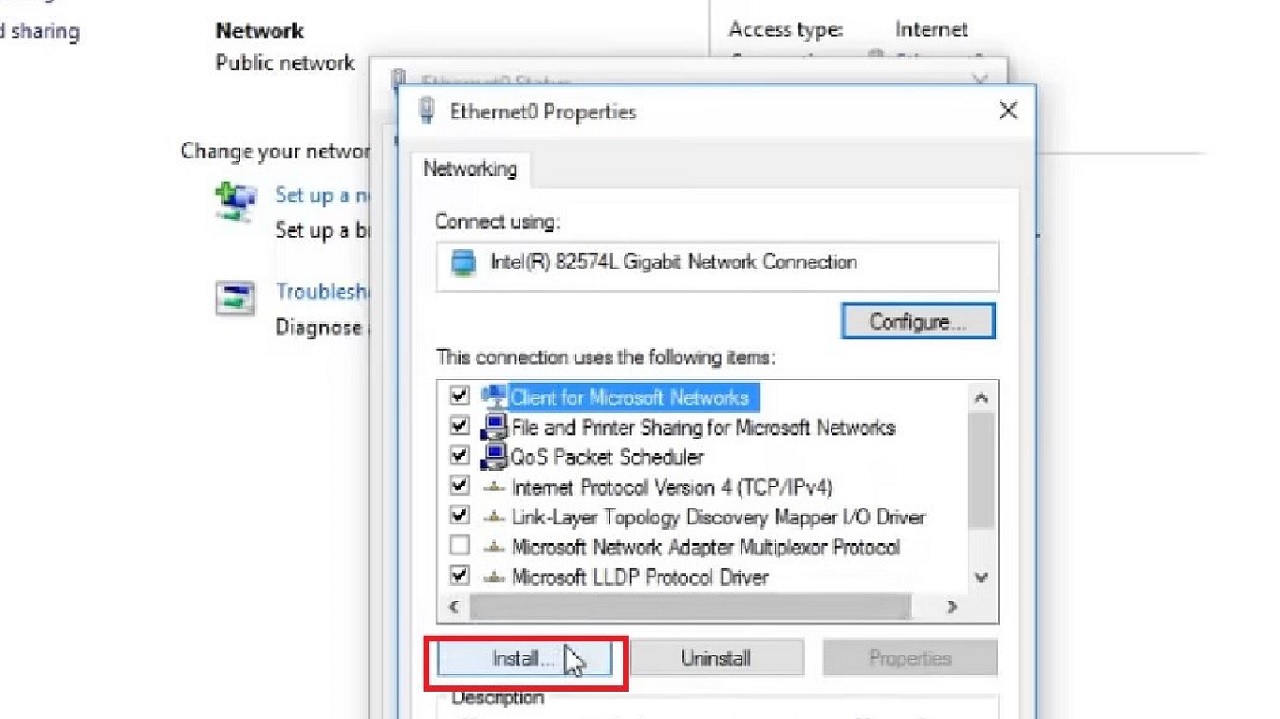
- Click on Install in the next window.
- Select Protocol in the box in the Select Network Feature Type window.
- Click on the Add button below.

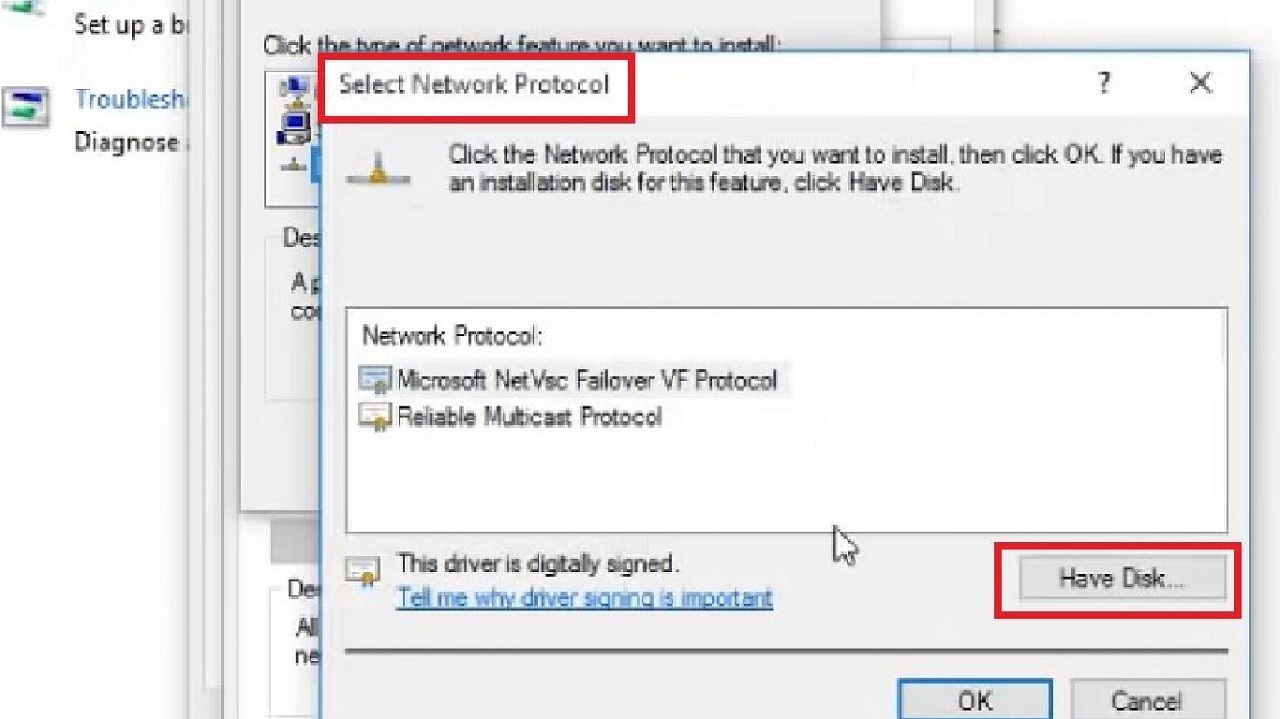
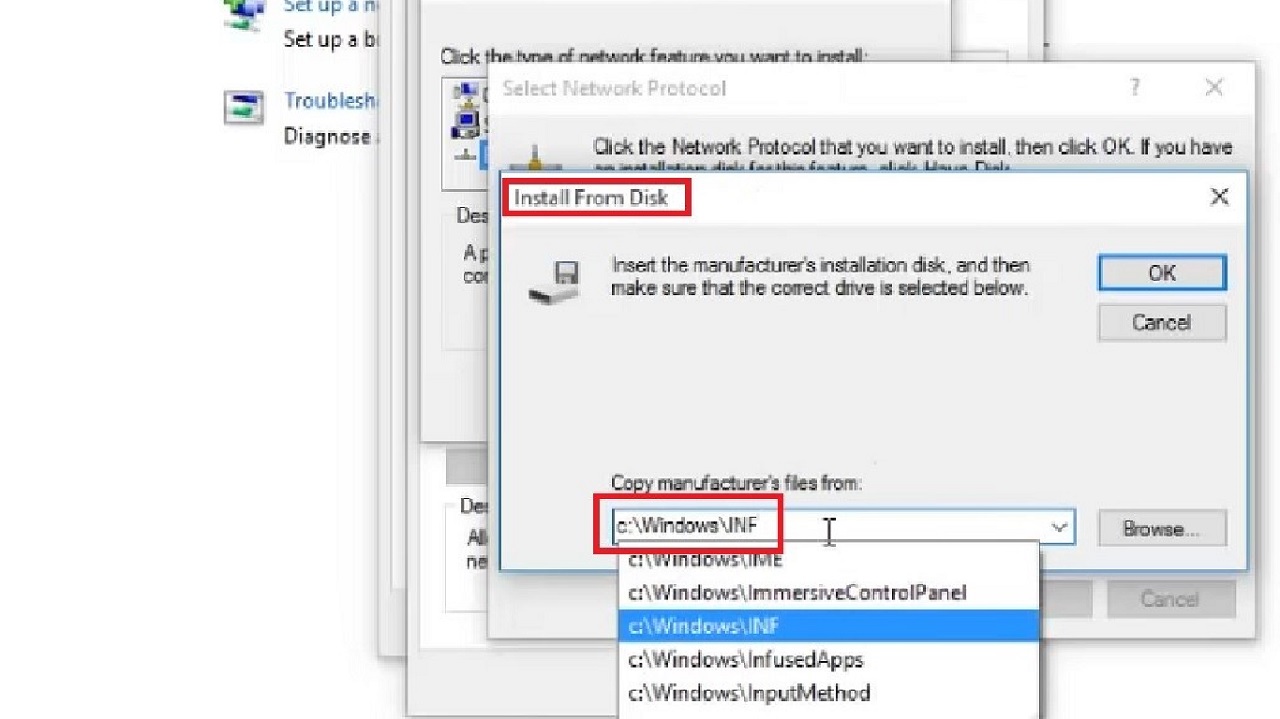
- Click on the Have Disk button in the next Select Network Protocol window.
Type c:\Windows \INF in the box beside Browse under ‘Copy manufacturer’s file from’ in the Install From Disk window.
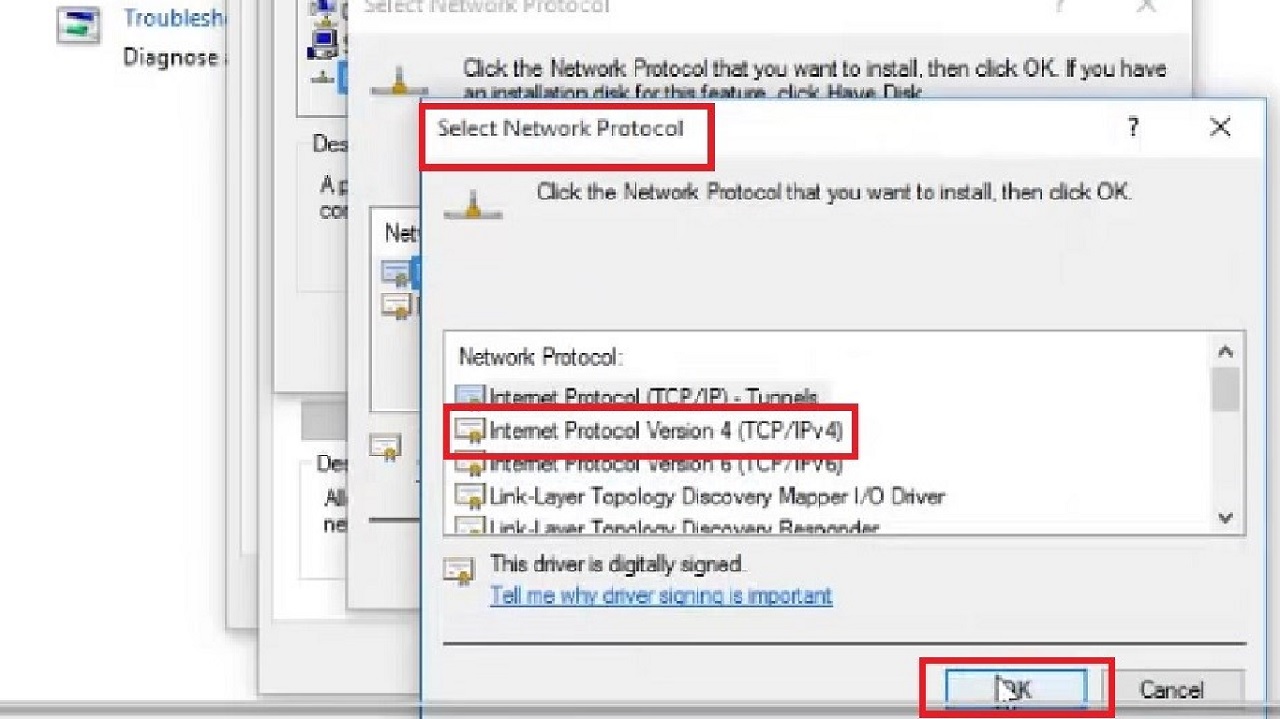
- Now select the Internet Protocol Version 4 (TCP/IPv4) in the next Select Network Protocol window.
- Finally, click on the OK button.
Now, close all other windows that are open before you restart the system and check whether the missing network profile is visible on your computer now.
Method 6: From Services
You may make some changes in the SNMP Trap Services in order to resolve the problem of a missing network profile.
STEPS TO FOLLOW:
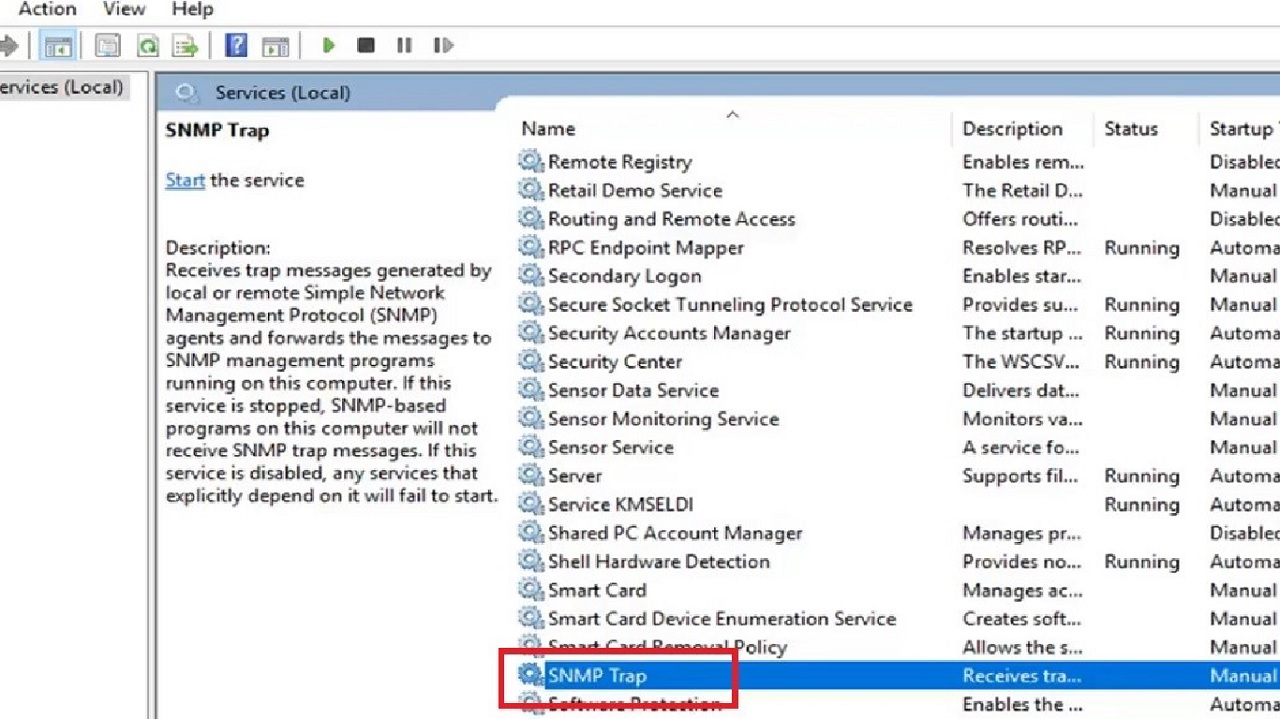
- Type in Services in the search box beside the Start menu.
- When the Services window opens, scroll down to find SNMP Trap service.
- Double-click on it.
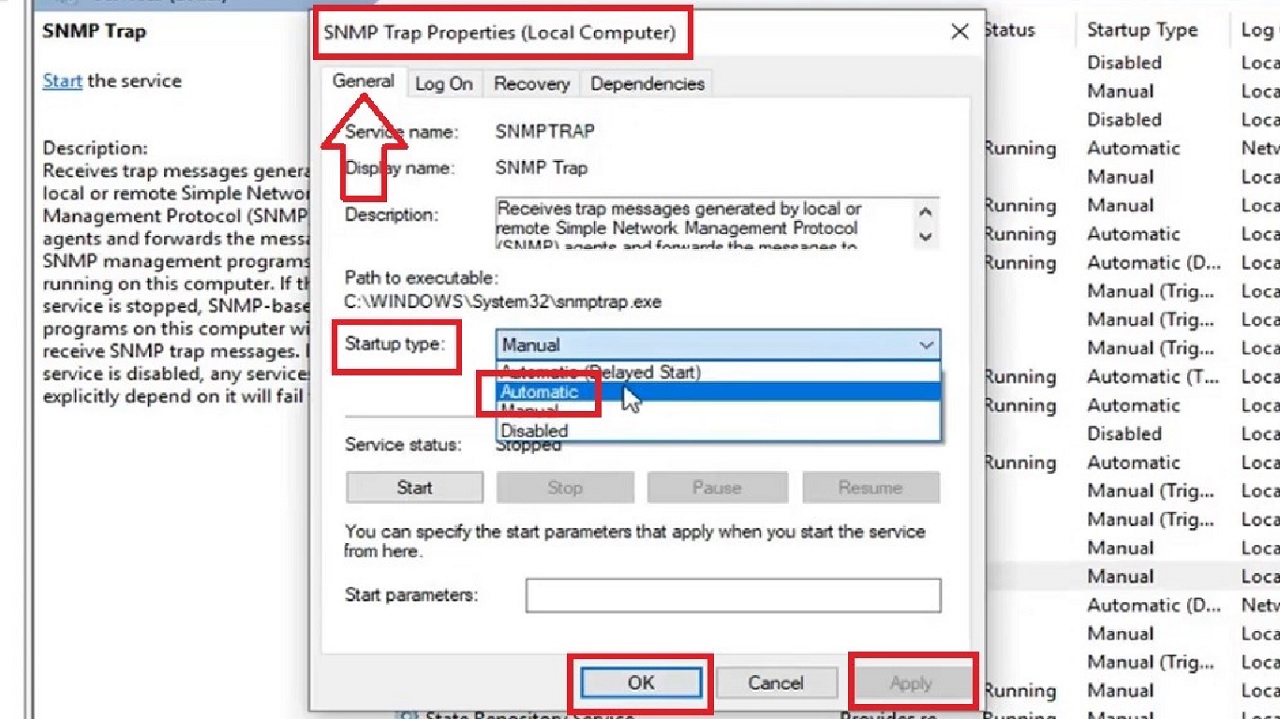
- Set the Startup type to Automatic in the General tab of the SNMP Trap Properties (Local Computer) window.
- Click on the Apply button and then on the OK button.
Now close all the windows and restart the computer to see whether or not the problem has been rectified.
Method 7: From Windows Registry Editor
Changing the value data of the profile name key may also resolve the issue.
STEPS TO FOLLOW:
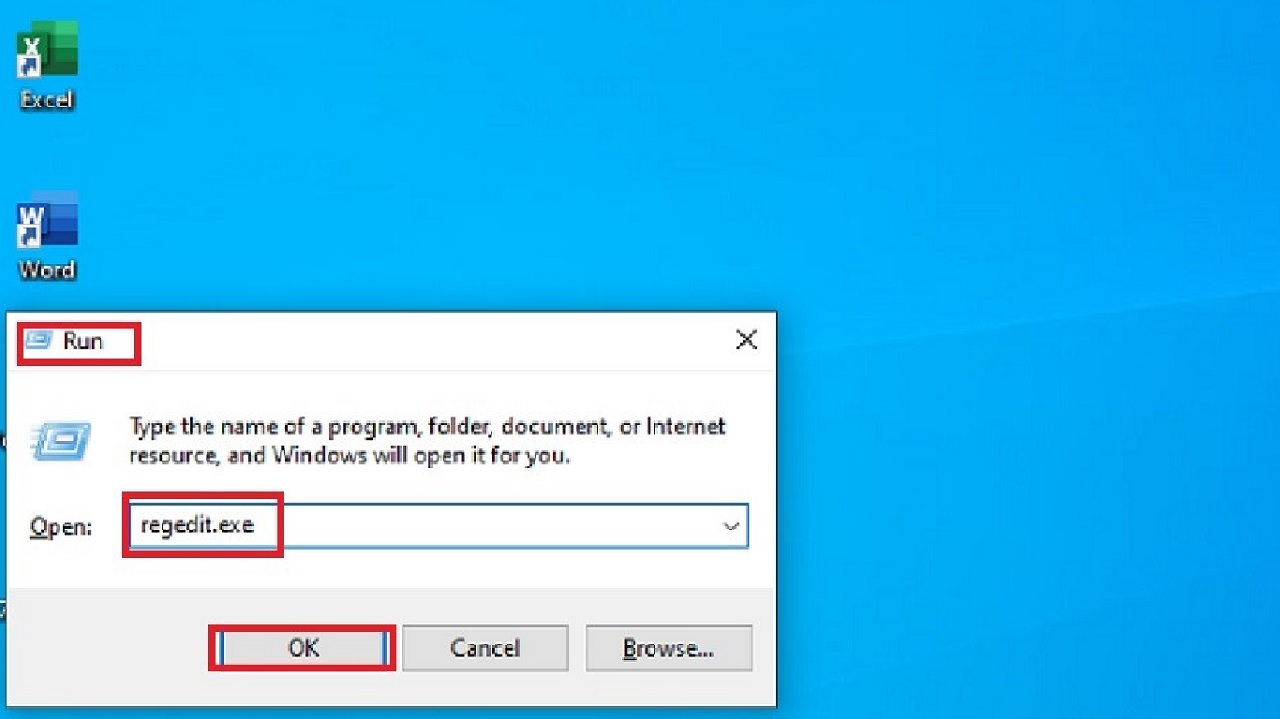
- Press the Windows and R keys together on your keyboard to open the Run dialog box.
- Type regedit.exe in the run prompt.
- Hit enter or click on the OK button.
- Click on the Yes button in the User Account Control window.
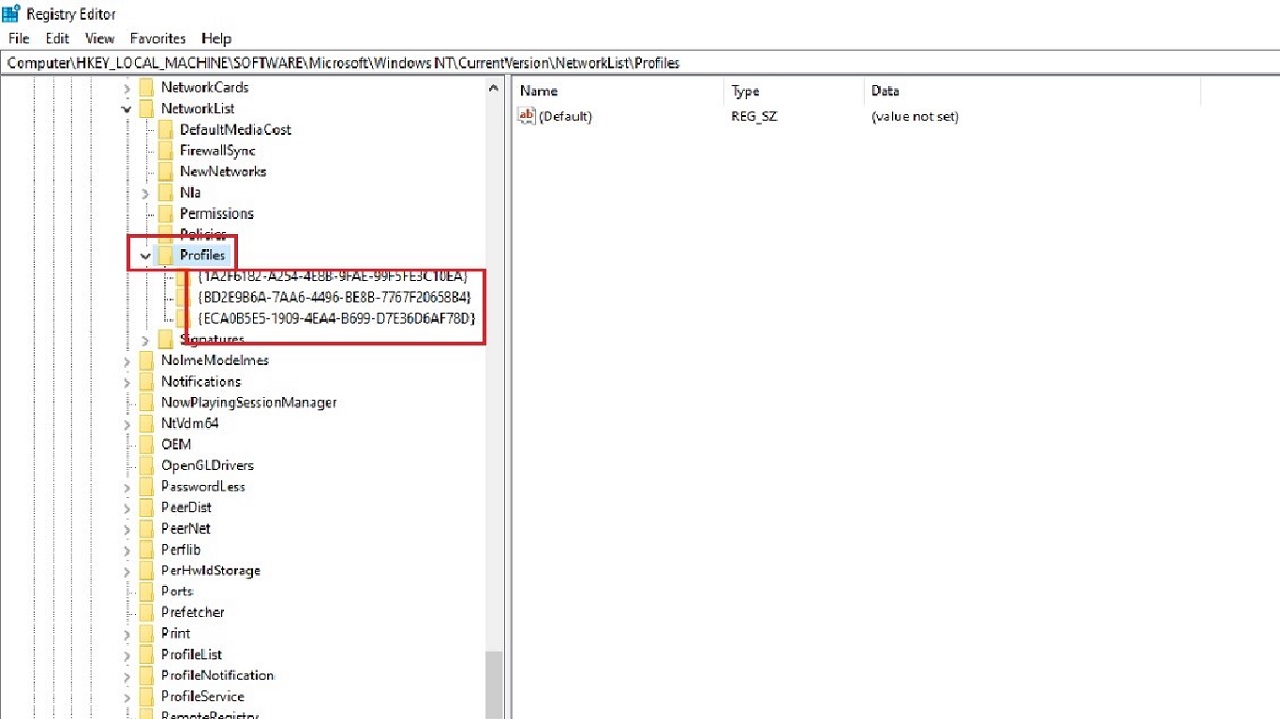
When the Windows Registry window opens, navigate to the following paths in the exact order:
- HKEY_LOCAL_MACHINE
- SOFTWARE
- Microsoft
- Windows NT
- CurrentVersion
- NetworkList
- Profiles
When you reach Profiles, click on the small arrow next to the folder to expand it.
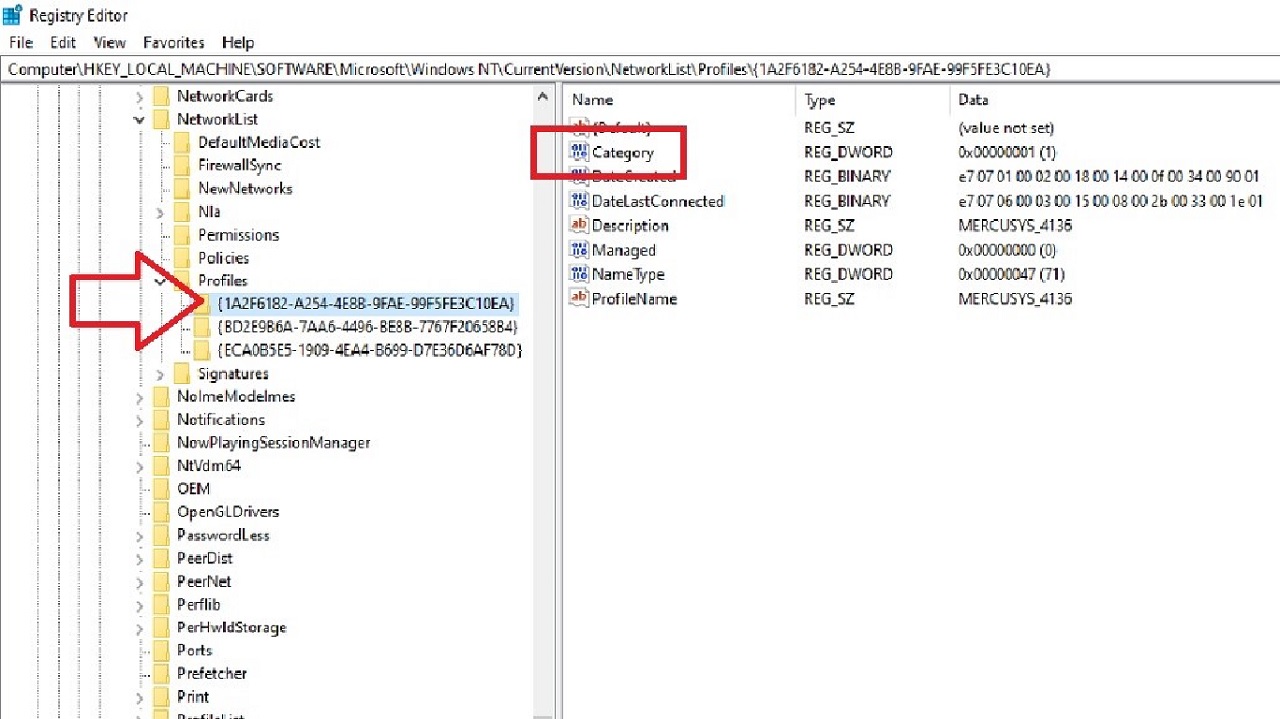
- Click on each of the Profiles to find the profile name key.
- On the right side of the window, double-click on the Category option.
- In the Edit DWORD (32-bit) Value window, change the Value data from 0 to 1.
- Click on the OK button.
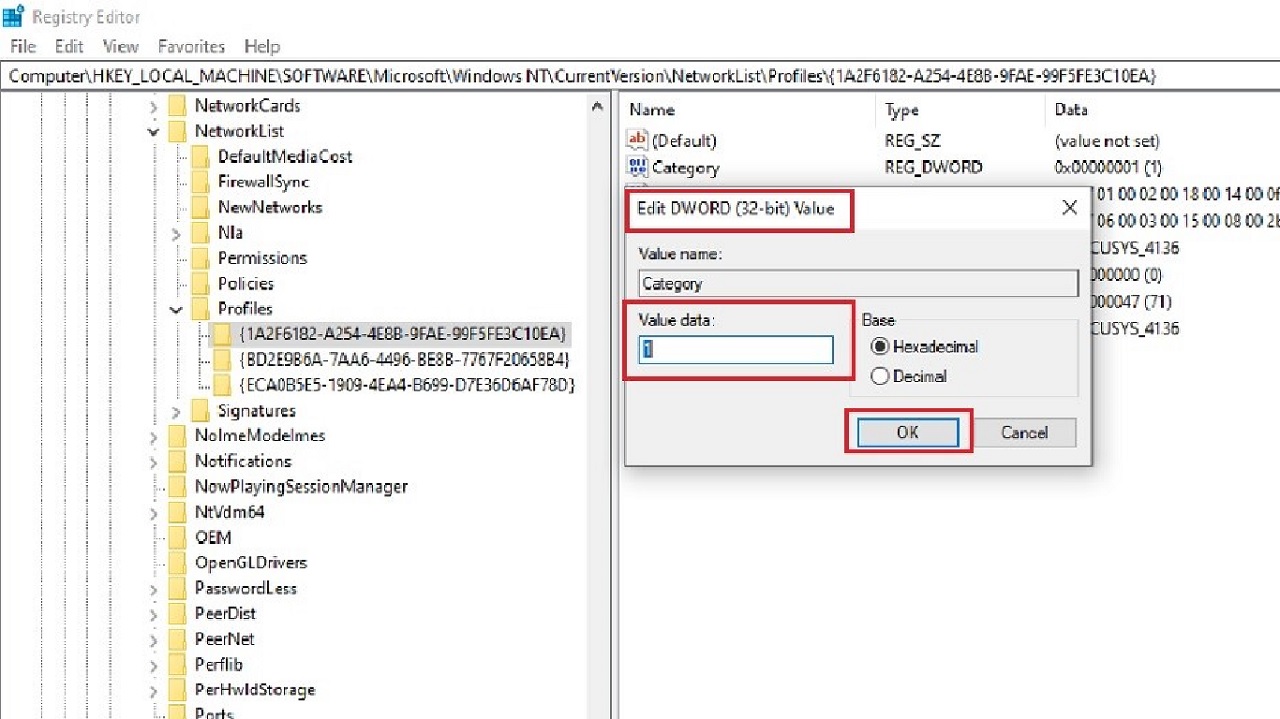
Close all windows and restart your computer. This will change the network profile from Public to Private.
Method 8: From Local Security Policy
Making changes in the local security policy will also rectify the problem.
STEPS TO FOLLOW:
- Open Run as before.
- Type secpol.msc this time and hit enter.
This will open Local security policy window
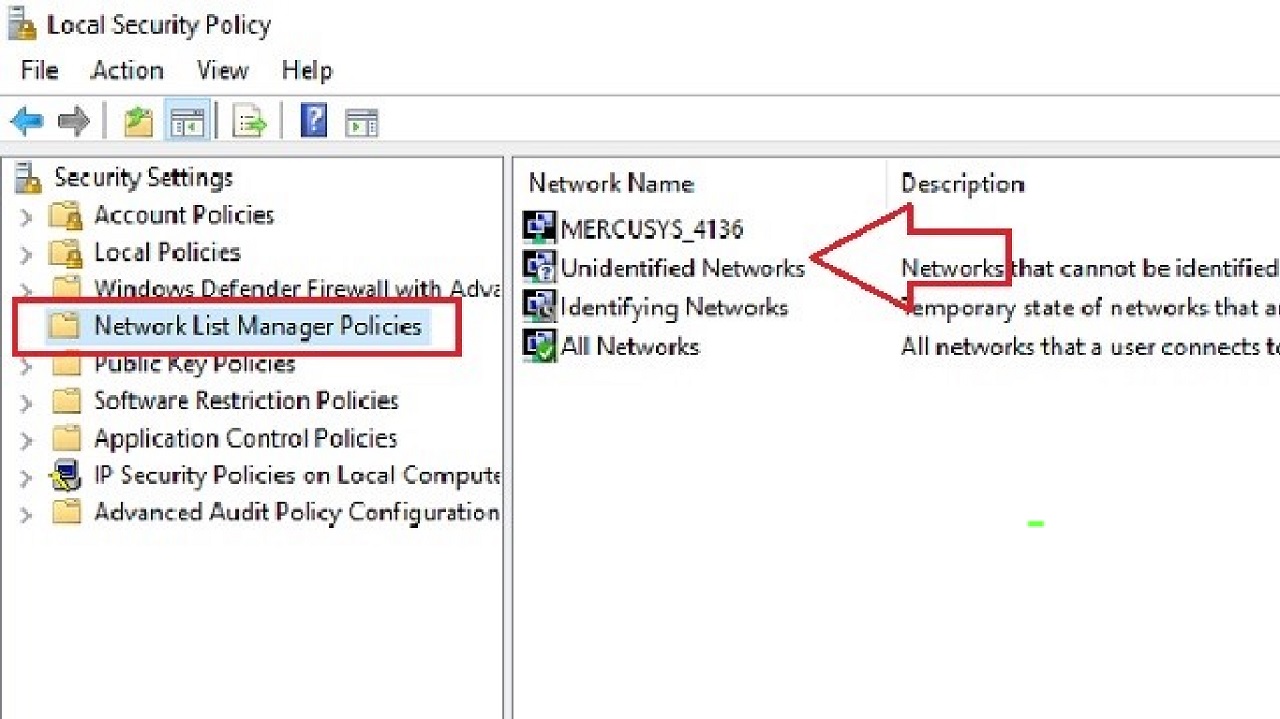
- On the left, you will find Network List Manager Policies.
- Click on it.
- Double-click on your network on the right side as shown by the red arrow in the image below.
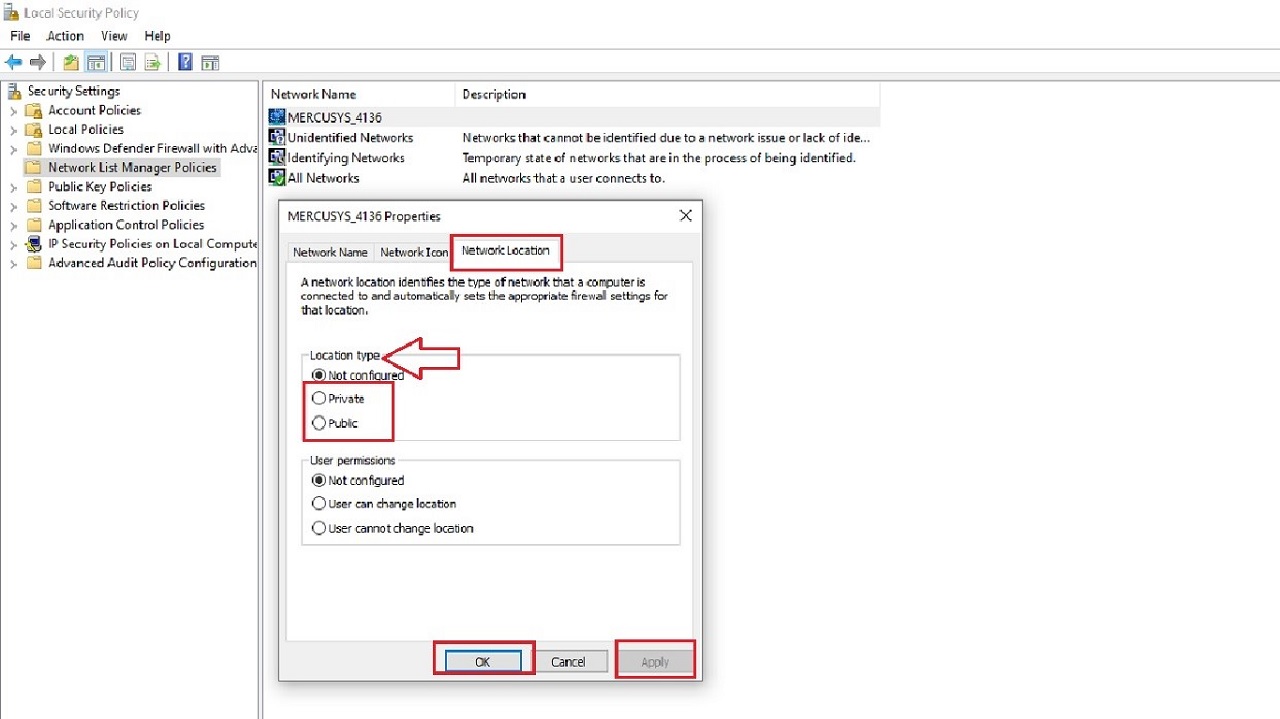
- Go to the Network Location tab in the following window.
- Select Private from the Location type section by checking the small circle next to it.
- Click on the Apply button and then on the OK button to save the changes and exit.
Now, restart your computer and your issue of network profile missing will be fixed.
Method 9: Repair the Settings App
There may be some issues in the Settings app that may also cause the network profile to disappear. Repairing it will help you resolve the problem.
STEPS TO FOLLOW:
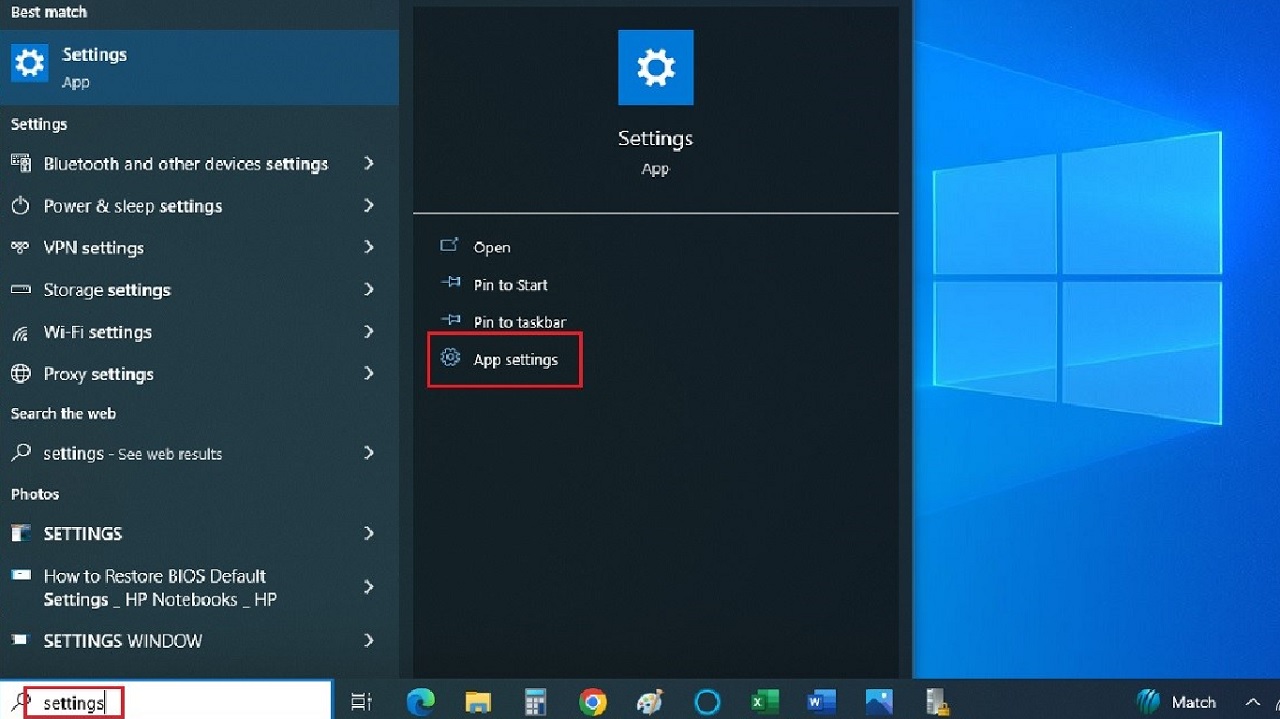
Open the search menu > type in settings > select the App settings option from the right > hit Enter.
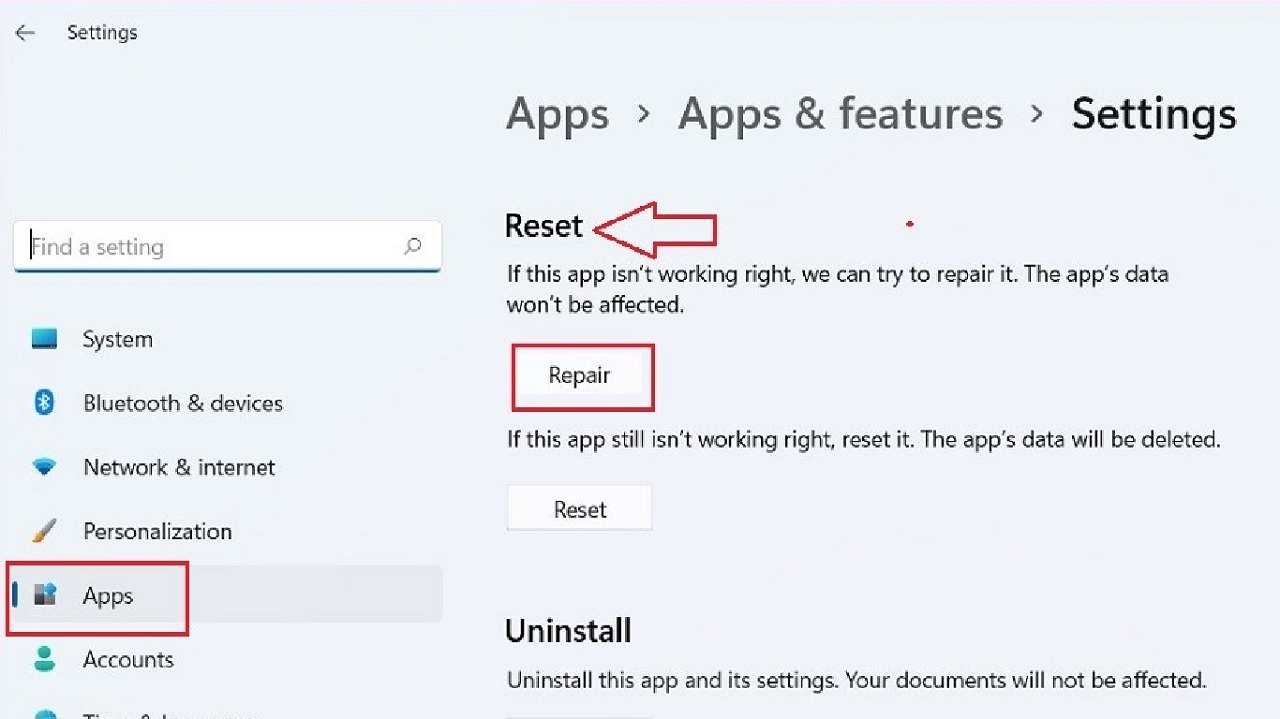
- In the new window to find the Reset section on the right side.
- Click the Repair button.
You should now be able to see the option to change the network profile. Set it to Private and restart your computer and see whether or not the issue has been resolved.
If it still persists, go to the same menu by repeating the steps and try resetting the Settings app. This will show you the option to change the network profile following the same steps.
Conclusion
Missing network profiles on a computer is a common issue and can be resolved with some fixes that are easy to perform, as explained in this article.
So, now when you face this issue, try any one of these fixes and bring things back on track quickly.