
Shortcut virus is just like any other virus program. It acts like a worm, hibernating in the autorun.inf file and it runs in the background.
If your external hard drive has this virus, you will not be able to access the files stored in it. These files will be either hidden or encrypted into shortcuts using the .lnk extension.
There are some quick steps to remove the shortcut virus from your external hard drive, as described in this article. Follow the steps carefully and regain control of your hard drive and access the files stored in it.
In This Article
KEY TAKEAWAYS
- You may run a couple of commands in the Command Prompt to remove the shortcut virus from your external hard drive.
- Restoring the system files and deleting the autorun files is another way to remove shortcut virus from a USB or pen drive.
- Anything suspicious in the Windows Registry must also be deleted to remove the virus.
- Another useful solution to remove shortcuts virus from the external hard drive is by creating a .bat file.
- There are lots of third-party software tools or shortcut virus remover that you can also use to remove the virus from your external hard drive.
What Causes Shortcut Virus and Its Spreading?
There may be a virus or malware on your computer system itself that may cause this issue. A shortcut virus is created by a combination of malware, Trojan horse, and worms.
A shortcut virus can infect your external storage through the following:
- Online malware
- Infected or corrupted storage
- Inactive antivirus
There is a specific pattern or path in which the shortcut virus spreads. It will first infect the computer system and then move on to the external hard drives such as pen drive and USB drive to infect them.
It will then infect the files stored in the external hard drive, encrypting or hiding them, or by creating shortcut files.
Other than that, the shortcut virus can also spread in other ways, such as:
- From email attachments
- From pop-up or banner ads
- From files downloaded from any unreliable or unofficial websites
- Bundled programs
- Illegal peer-to-peer networks
Sometimes, cybercriminals and intruders may take control of your computer system by making use of its vulnerabilities and inject the shortcut virus.
How to Remove Shortcut Virus from External Hard Disk?
You can use the Command Prompt to run a few commands and even delete the values that you cannot identify in the Windows Registry to remove the shortcut virus from your external hard drive.
One easy way to remove the shortcut virus from the external hard drive is to run a system check and clean the virus and malware from the source computer. Then, you must enable the Windows Defender Firewall protection.
Some other ways to remove the shortcut virus from your hard drive are:
- Creating a BAT file
- Deleting the autorun files
- Changing the Windows Script Host Settings
Using any reliable third-party software tool is also another way to remove the shortcut virus from an external hard drive.
Method 1: Using the Command Prompt
Running a couple of specific commands in the Command Prompt will remove the shortcut virus from your external hard disk. Assume that its volume label is H.
STEPS TO FOLLOW:
- Open Command Prompt and administrator by typing cmd in the quick search box next to the start menu, right-clicking on the best match, choosing Run as administrator and hitting Enter on your keyboard.
- In the Command prompt window, type H: and hit Enter.
H is the volume letter of the drive, which can be D or E or any other letter in your case. Replace H with that letter.
- Next, type the command del * .lnk and hit Enter.
- Sometimes it may ask for confirmation from you. If it does Press ‘y’ and hit Enter again.
Wait until the process is complete.
- Now type attrib -s -r -h *.* /s /d /l and hit Enter.
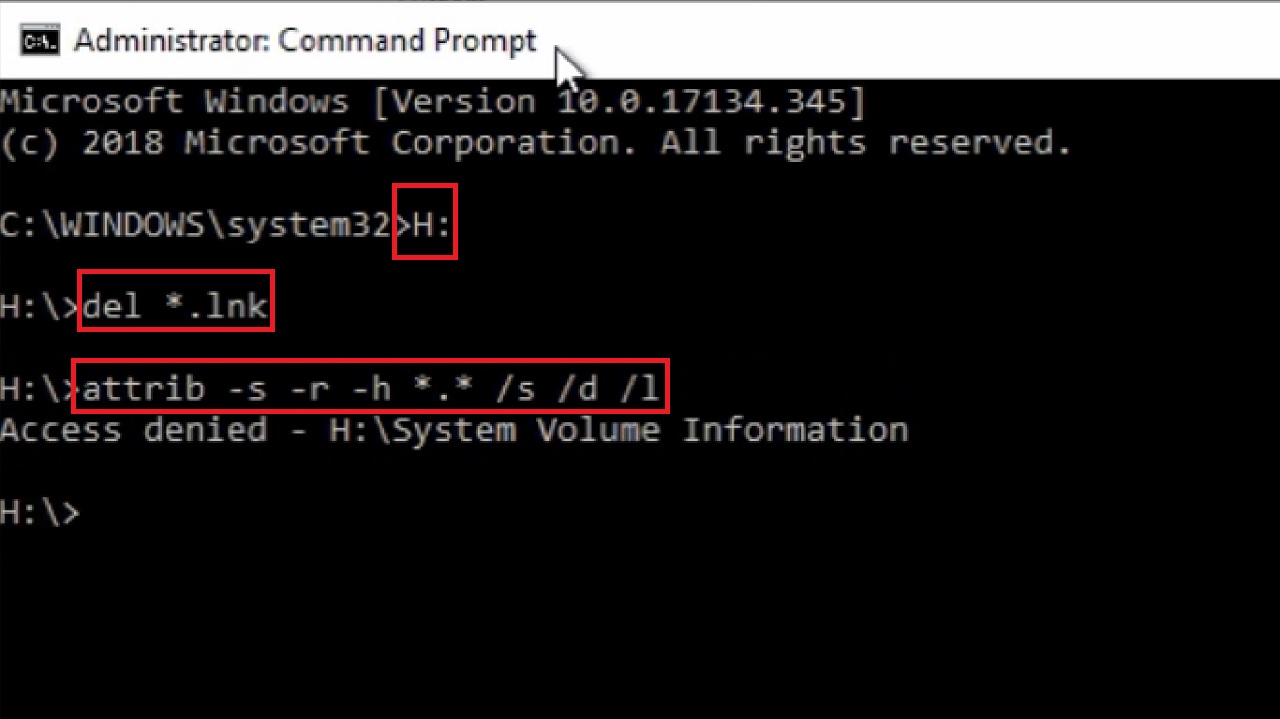
Wait again for the command to be executed successfully.
- Finally, type exit and hit Enter to close the Command Prompt.
Restart your computer and check whether the issue has been fixed or not. If the problem still exists, try the next solution.
Method 2: Use the Registry Editor
In this method you will need to delete anything that looks suspicious in the Registry Editor.
STEPS TO FOLLOW:
- Press the Windows and R keys on your keyboard together to open the Run dialog box.
- Type regedit in the box and hit Enter.
- Click on the ‘Yes’ button on the User Account Control window when it appears.
When the Registry Editor window appears, from the left-hand menu options, click on the small arrow next to each of these following folders in the exact sequence mentioned below to expand them:
- HKEY_CURRENT_USER
- SOFTWARE
- Microsoft
- Windows
- CurrentVersion
Once you reach here, scroll down here to look for the Run folder and click on it.
- On the right-hand side of the window, look for any suspicious entry. (IDMan in this case).
- Right-click on it.
- Choose Delete from the drop-down options.
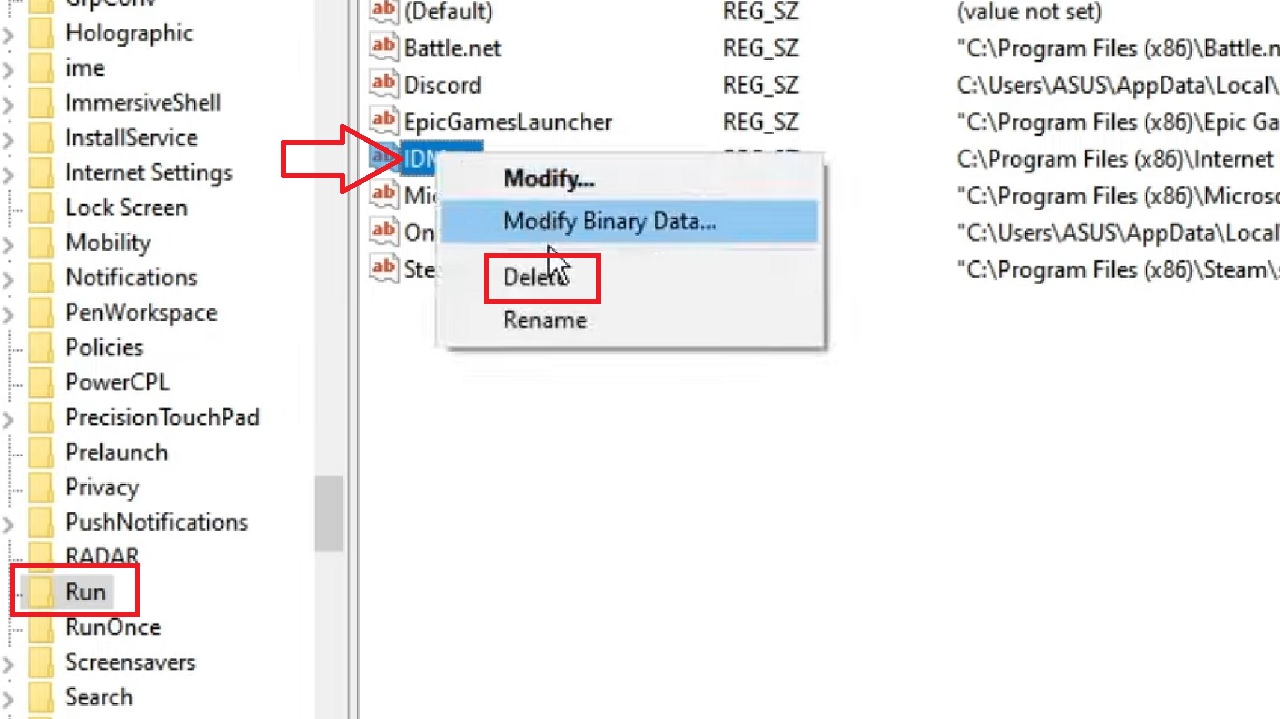
Similarly, delete everything that looks suspicious to you or you cannot identify. If you do not have any clue about any particular value, search it on Google before deleting.
Note: Deleting anything from the Windows Registry that is useful may cause severe damage to the system and affect its performance drastically.
Method 3: Create a BAT File
Creating a BAT file and then running it as an administrator may also remove the shortcut virus from the external hard drive.
STEPS TO FOLLOW:
- Right-click on a blank space on your desktop.
- Click on New from the drop-down menu.
- Click on Text Document from the drop-down submenu.
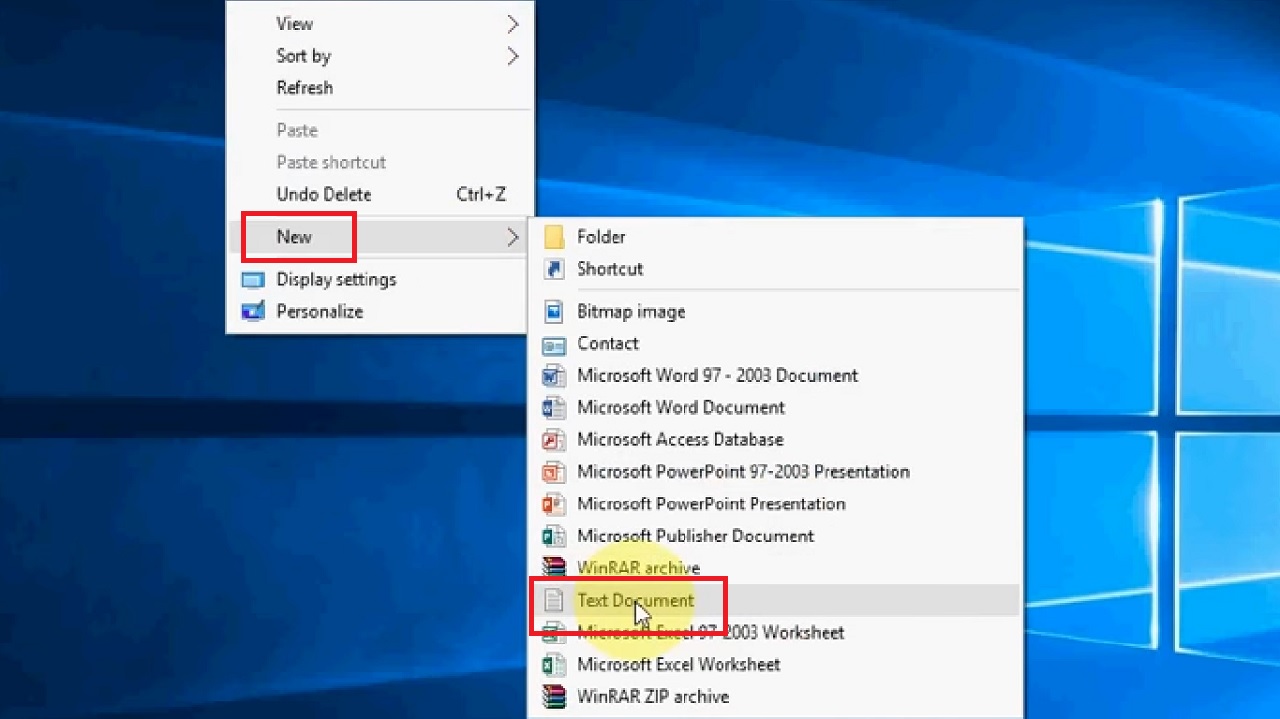
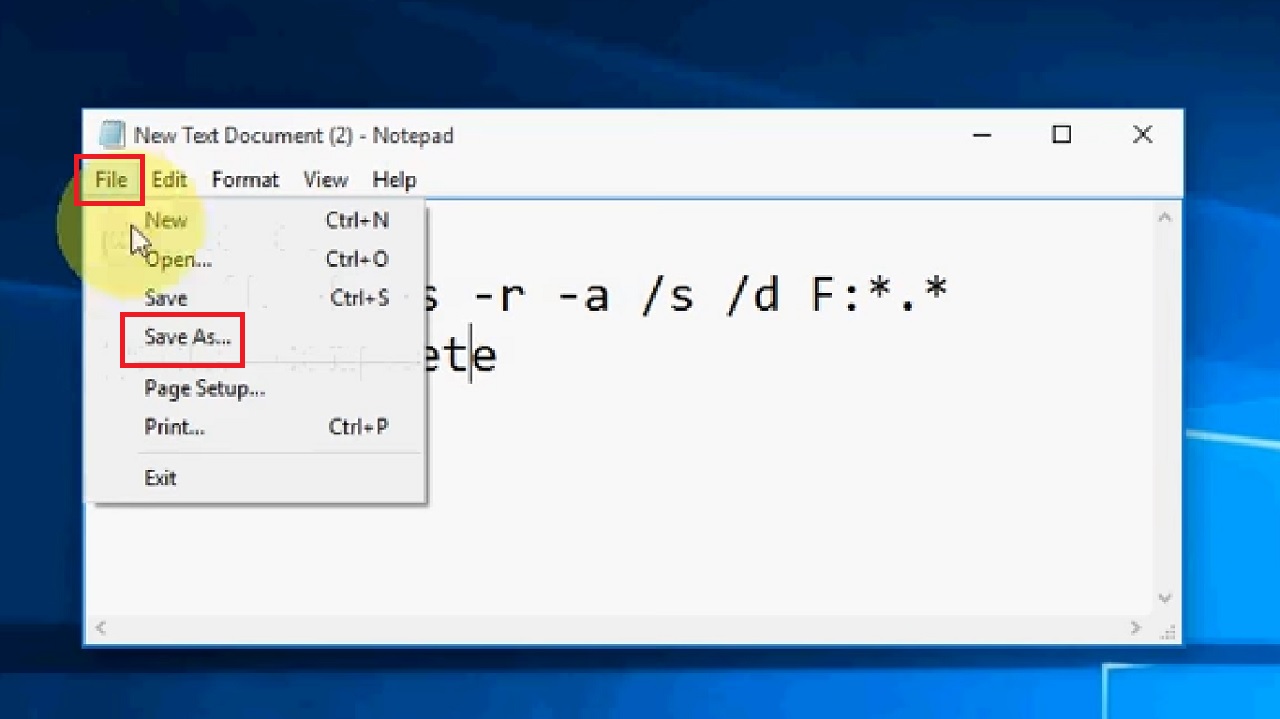
In the Notepad, type the following command:
@echo off
attrib -h -s -r -a /s /d F: *.*
@echo complete
It is shown in the image below for your better understanding:
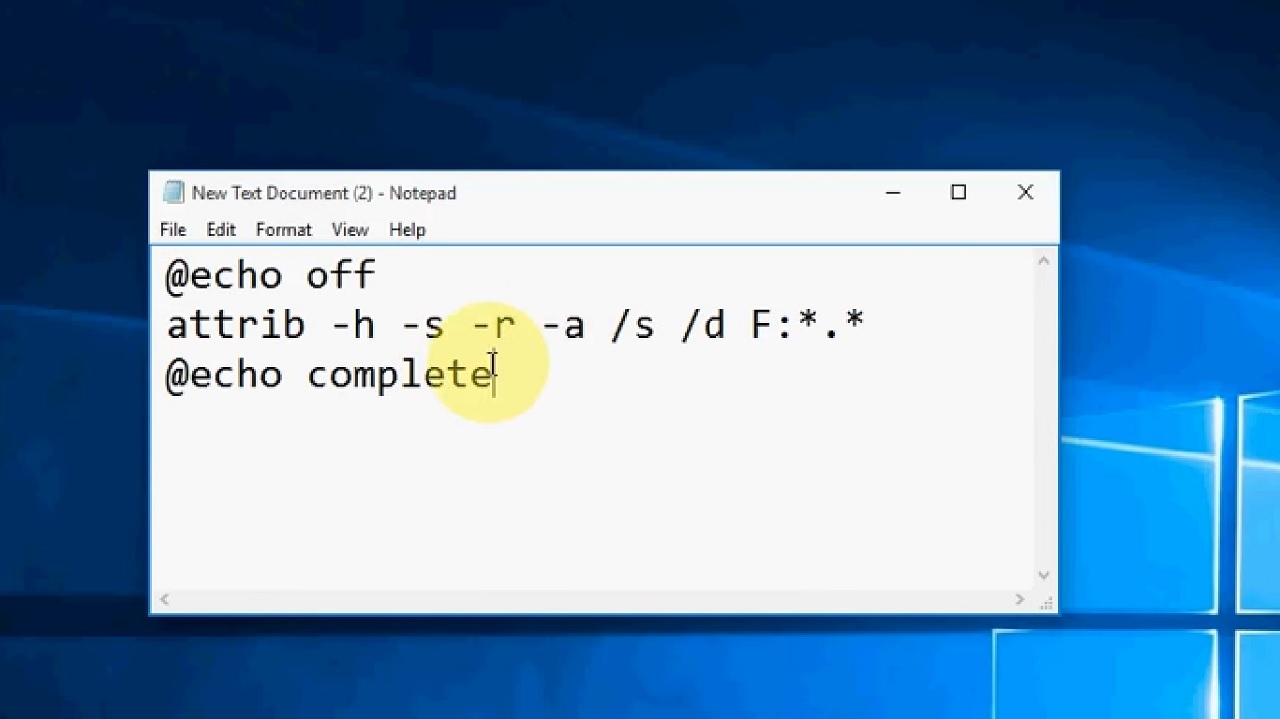
Make sure that you replace the Letter ‘F’ with your drive letter.
- Now, click on the File tab at the top of the Notepad.
- Click on Save As.
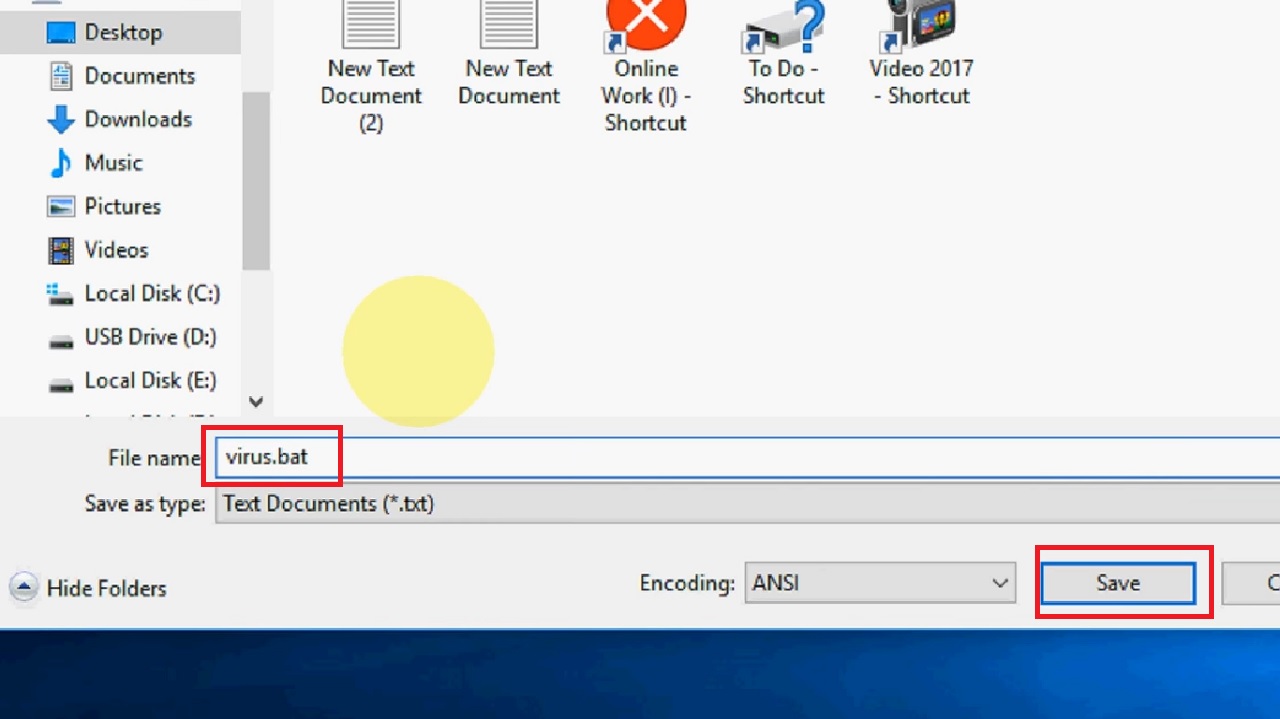
- Give the file a name. You can give any name, ‘virus’ in this case.
- Type .bat after the name.
- Click on the ‘Save’ button.
- Now, right-click on the newly created virus.bat file.
- Click on Run as administrator from the options that pops up.
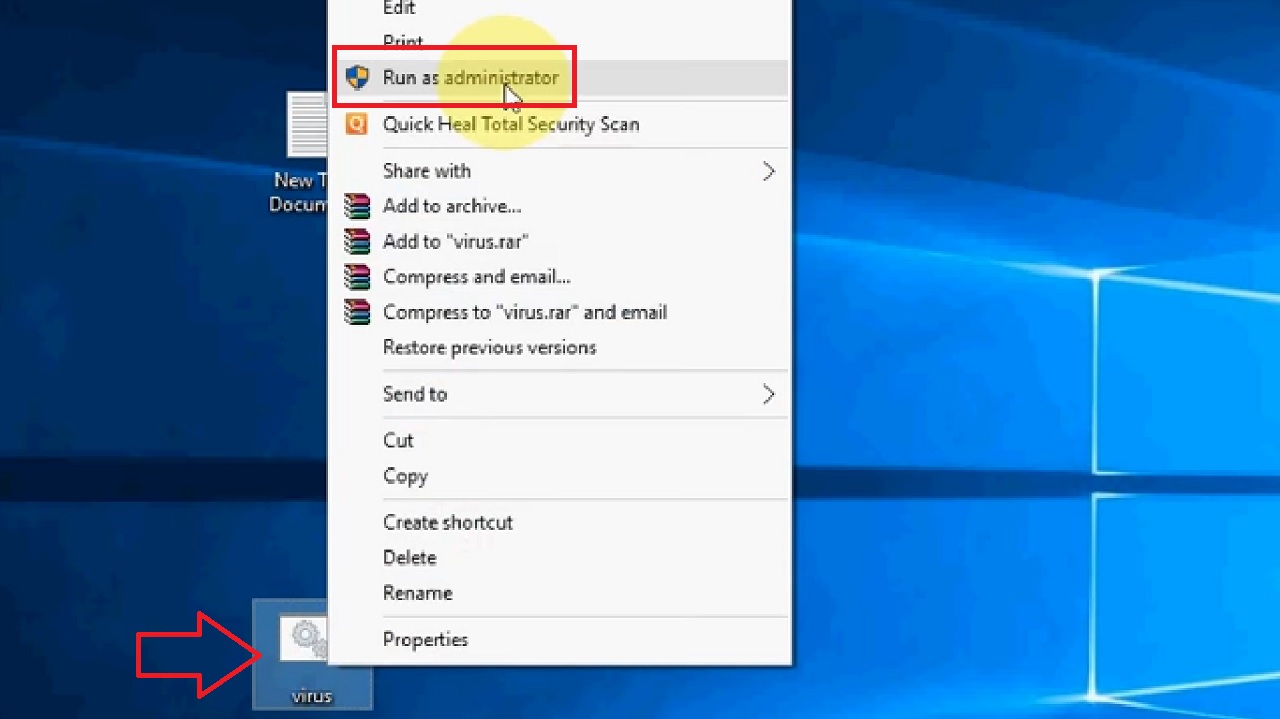
This will remove all shortcut viruses from your external hard drive. You may now copy the files in your external hard drive, save them in another drive on your PC, and format the pen drive.
Method 4: Restore System Files and Delete Autorun Files
When you open your external hard drive from the File Explorer after connecting it, you may get to see only a shortcut with an icon. Do not click on it since it can be a virus and can trigger another virus.
Restore the operating system files and delete the autorun files to remove the shortcut virus.
STEPS TO FOLLOW:
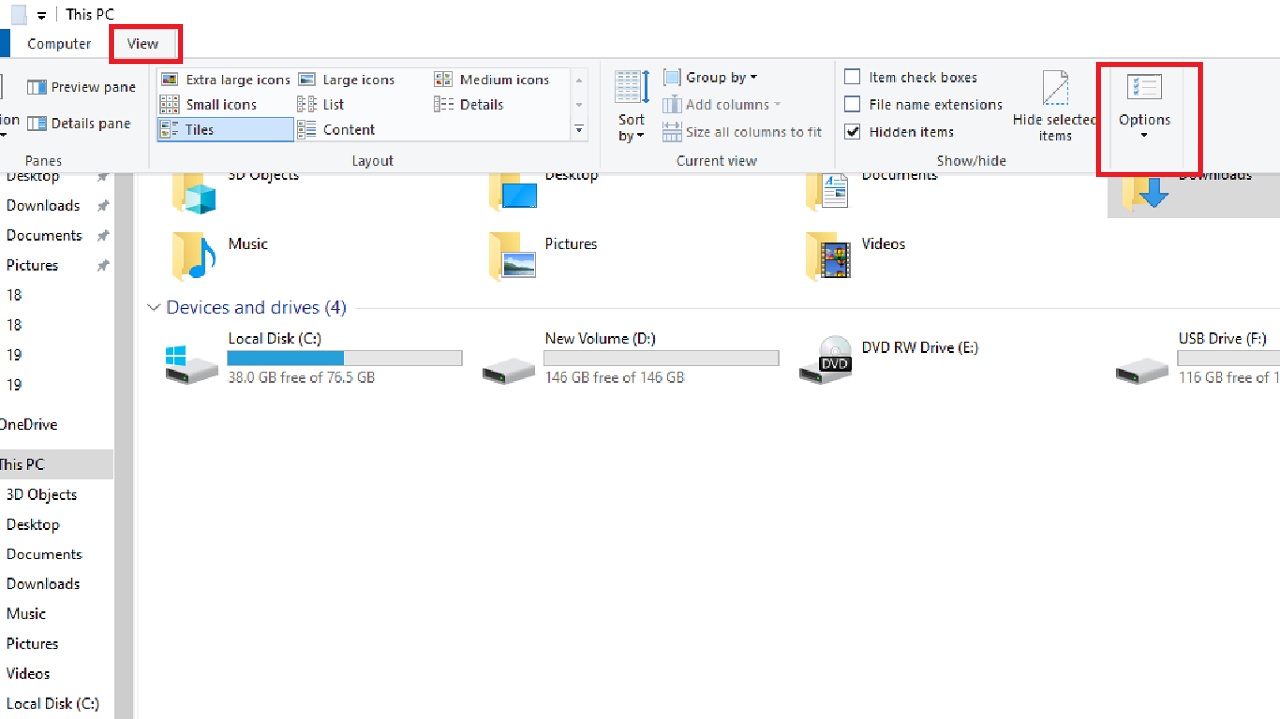
- Open File Explorer and go to This PC.
- Go to the View tab on top.
- Select Options.
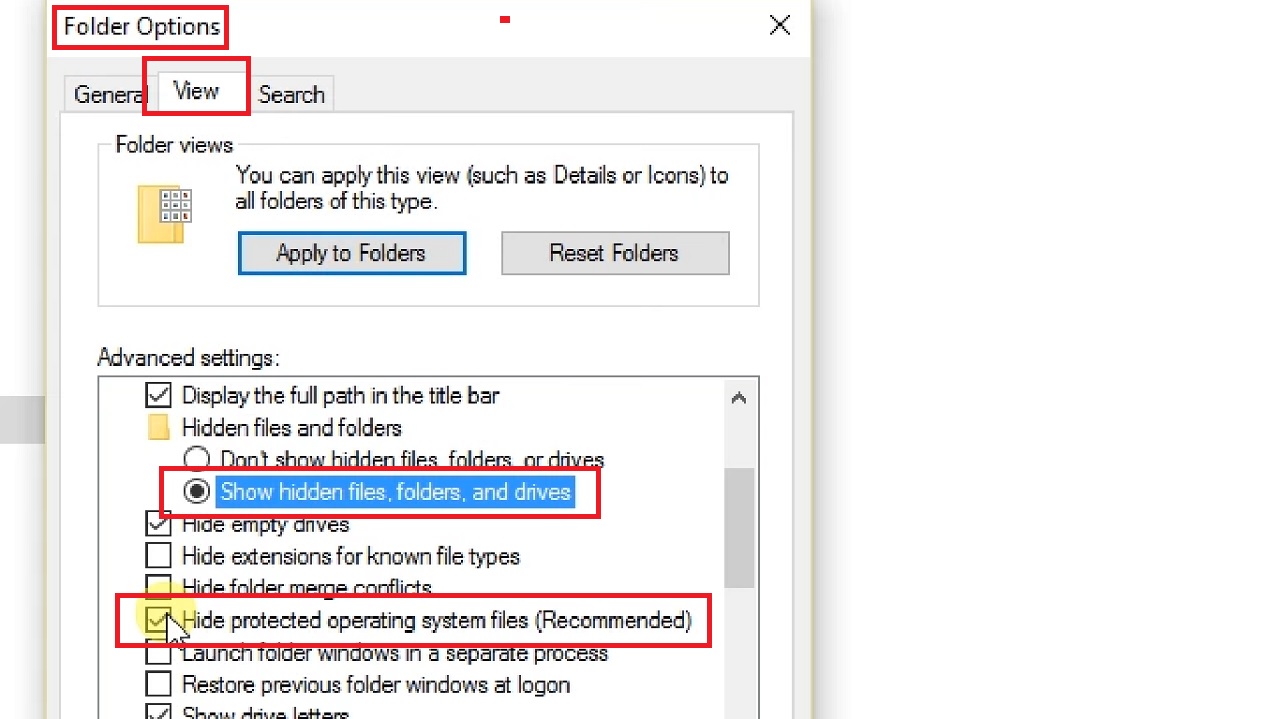
- Click on the View tab on the Folder Options window.
- Check the small circular button next to ‘Show hidden files, folders, and drives.’
- Click to uncheck the small square box next to ‘Hide protected operating system files (Recommended).’
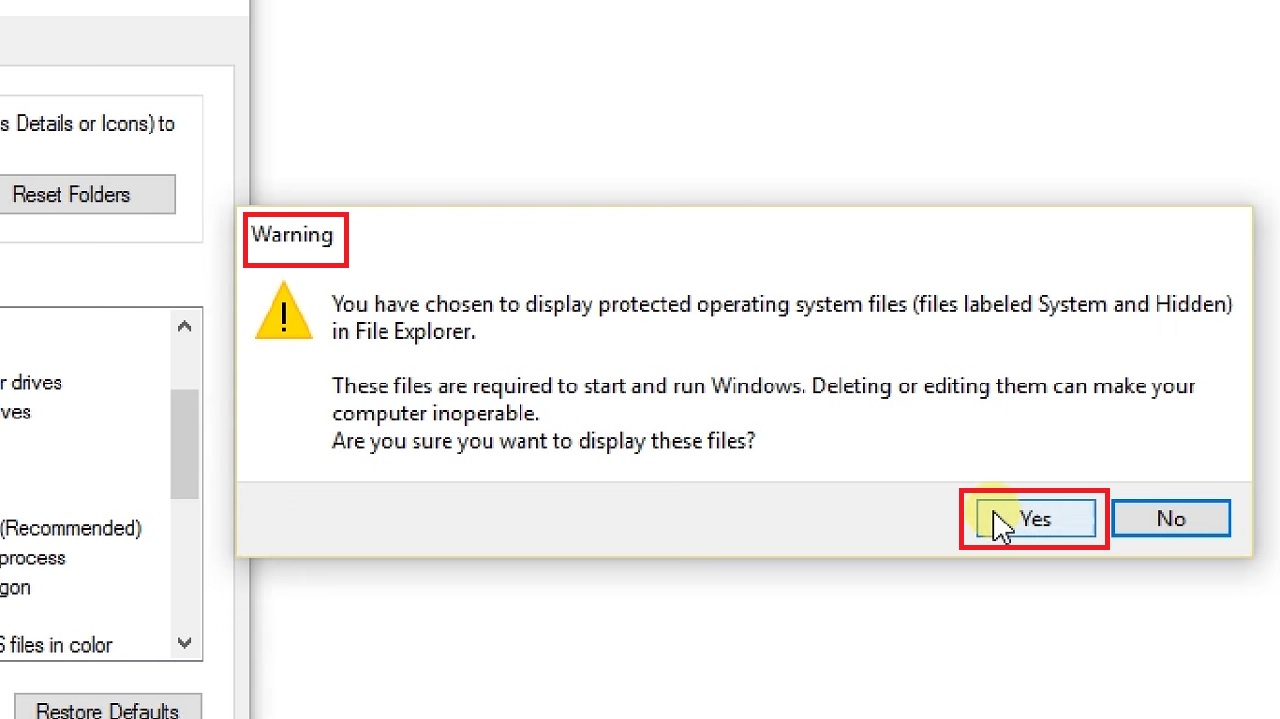
- Click on the Yes button in the Warning window that appears.
- Click on the OK button in the previous Folder Options window to save the changes and close it.
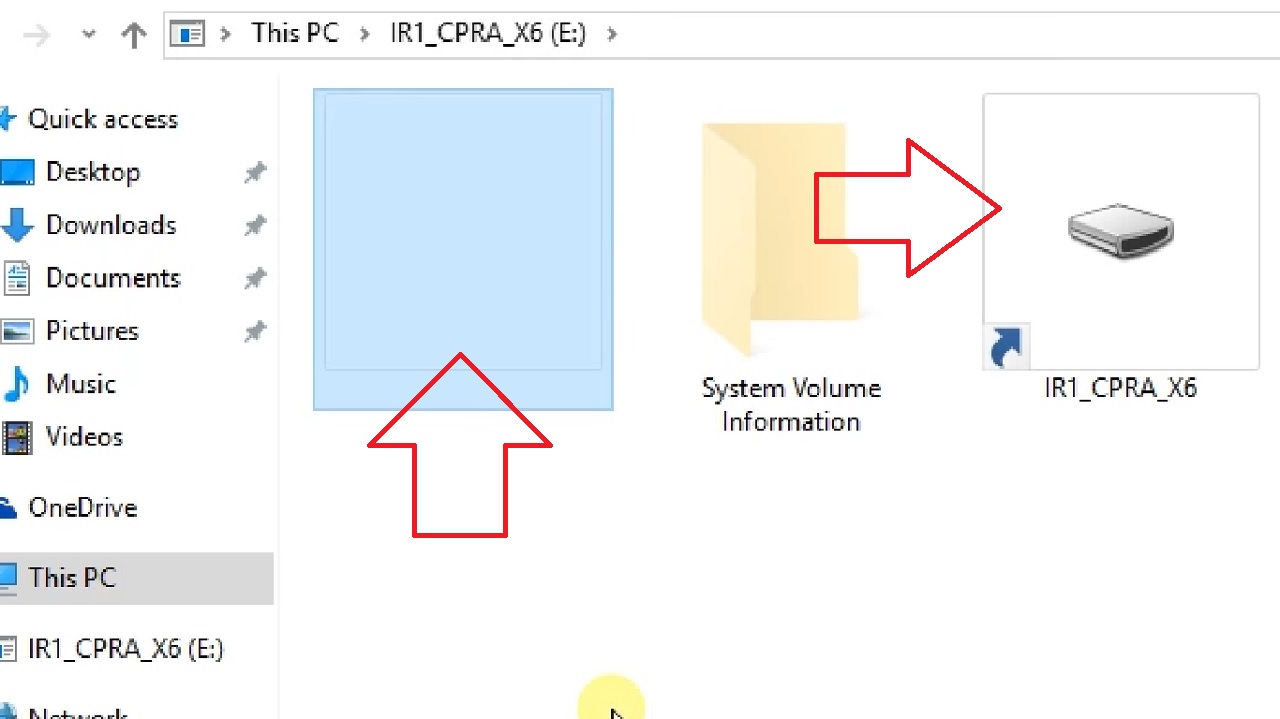
- This will unhide the System Volume Information files and others.
- Delete the shortcut icon.
- Double-click on the blank section with no image, icon or name.
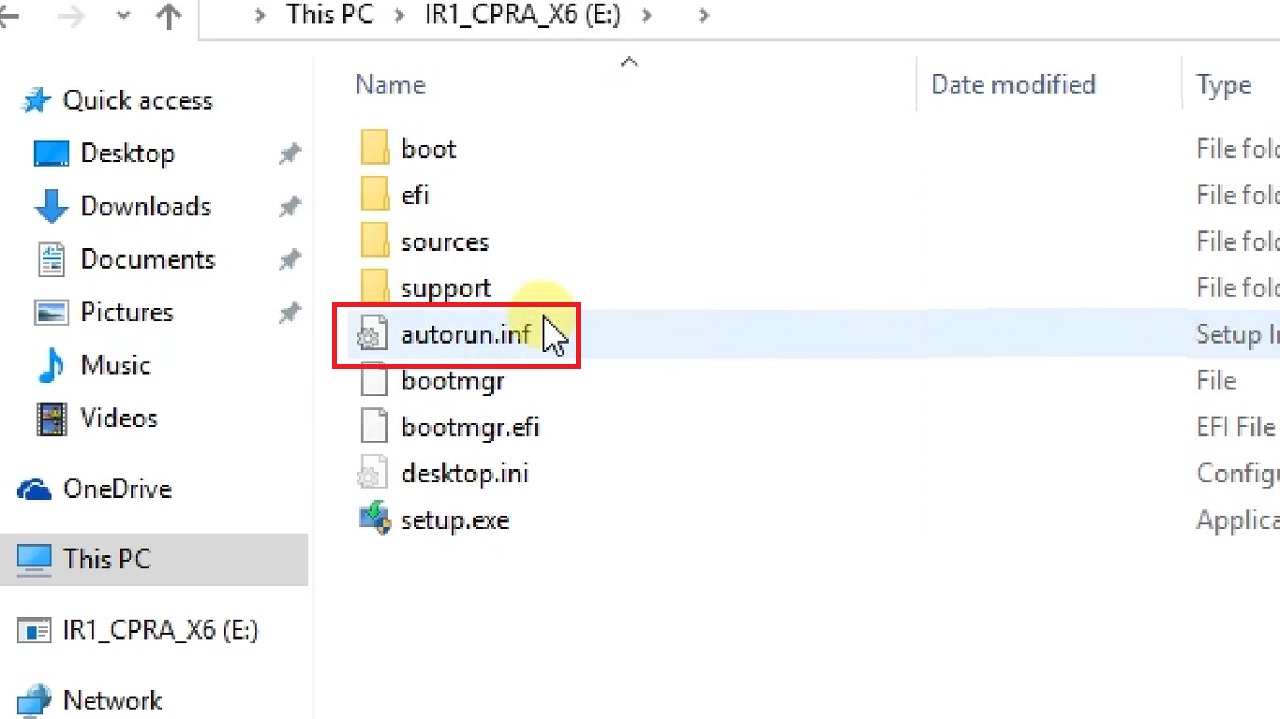
- If you see autorun files in it, delete them.
Now, copy the remaining content and store it in another drive and format the external hard drive.
Method 5: Make Changes in the Windows Script Host Settings
Sometimes the issue with the Windows Script Host Settings may cause this issue. You can make your external hard drive free from the shortcut virus by making changes in these settings.
STEPS TO FOLLOW:
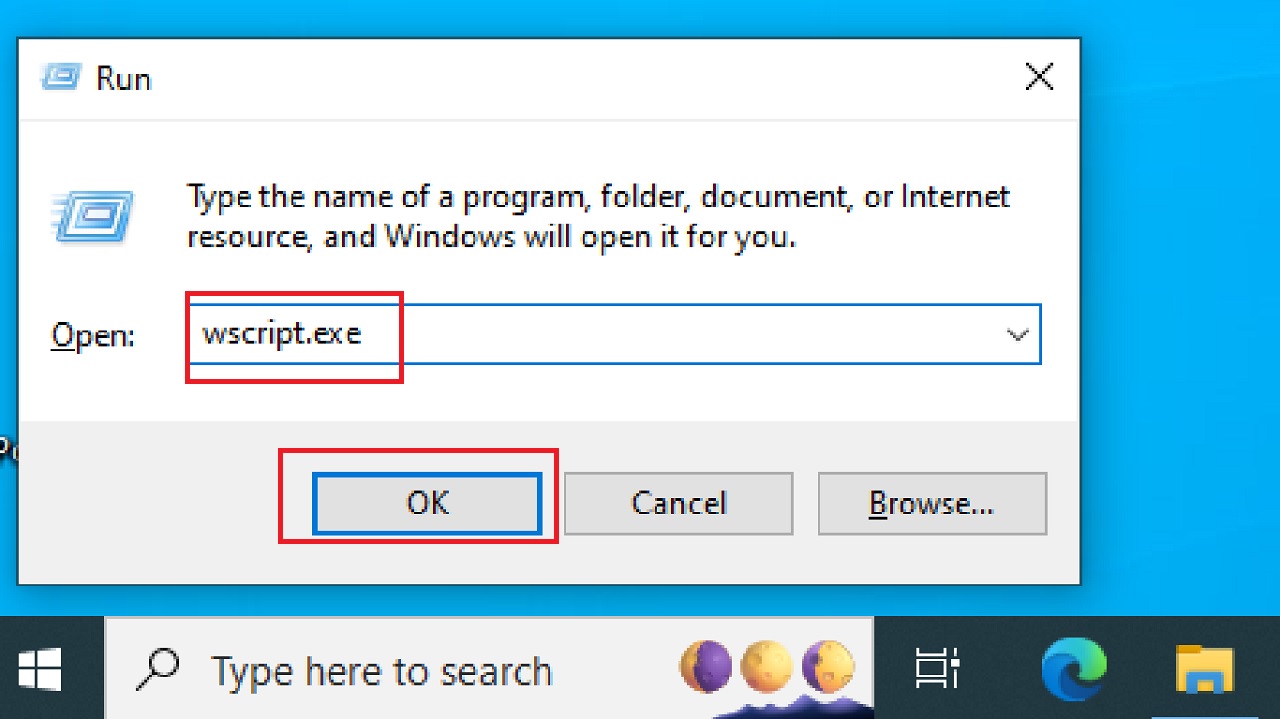
- Open the Run dialog box as before.
- Type wscript.exe and hit Enter.
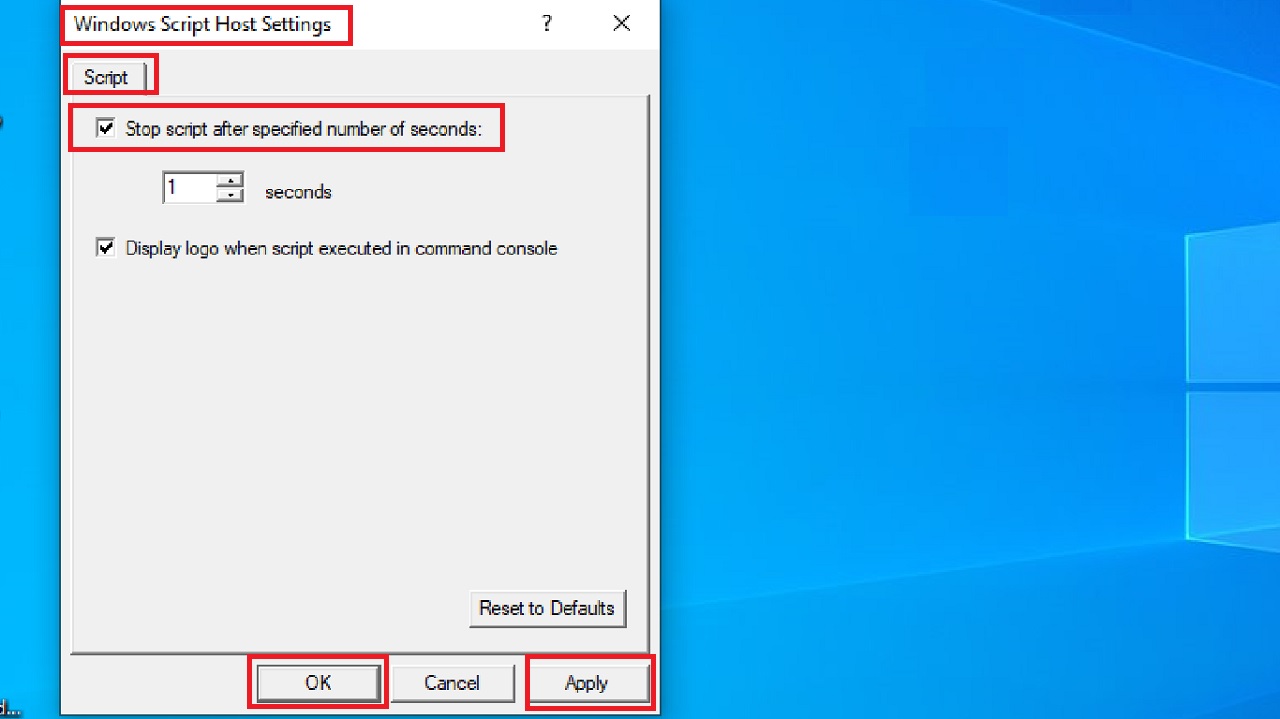
- Under the Script tab in the following Windows Script Host Settings window, click on the small square box next to ‘Stop script after specified number of seconds.’
- Click on the Apply button, and then on the OK button to close the window and save the changes.
- Now, press the CTRL + SHIFT + ESC keys on your keyboard together to open the Task Manager.
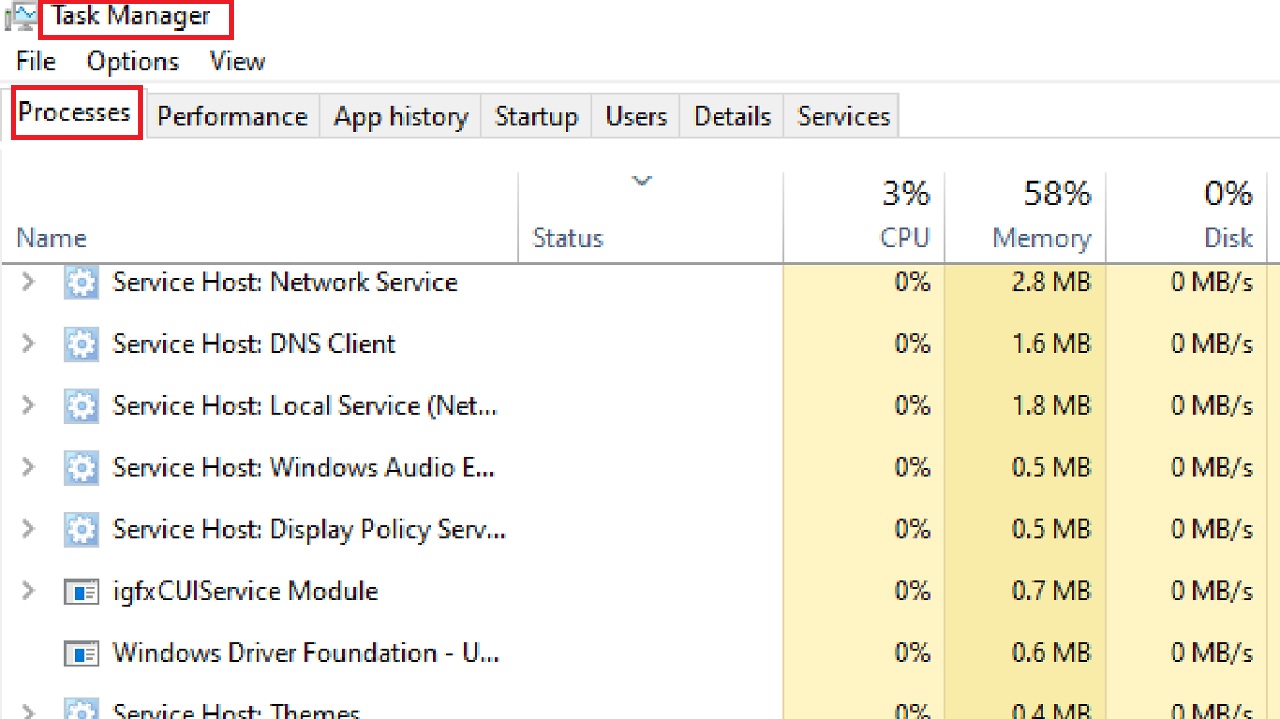
- Scroll down under the processes tab to find wscript.exe or wscript.vbs file.
- Select it.
- Click on the End Task button.
However, you may not always find it. If you do not, close Task Manager and proceed with the next steps.
- Press the Windows and E keys on your keyboard to open another File Explorer window.
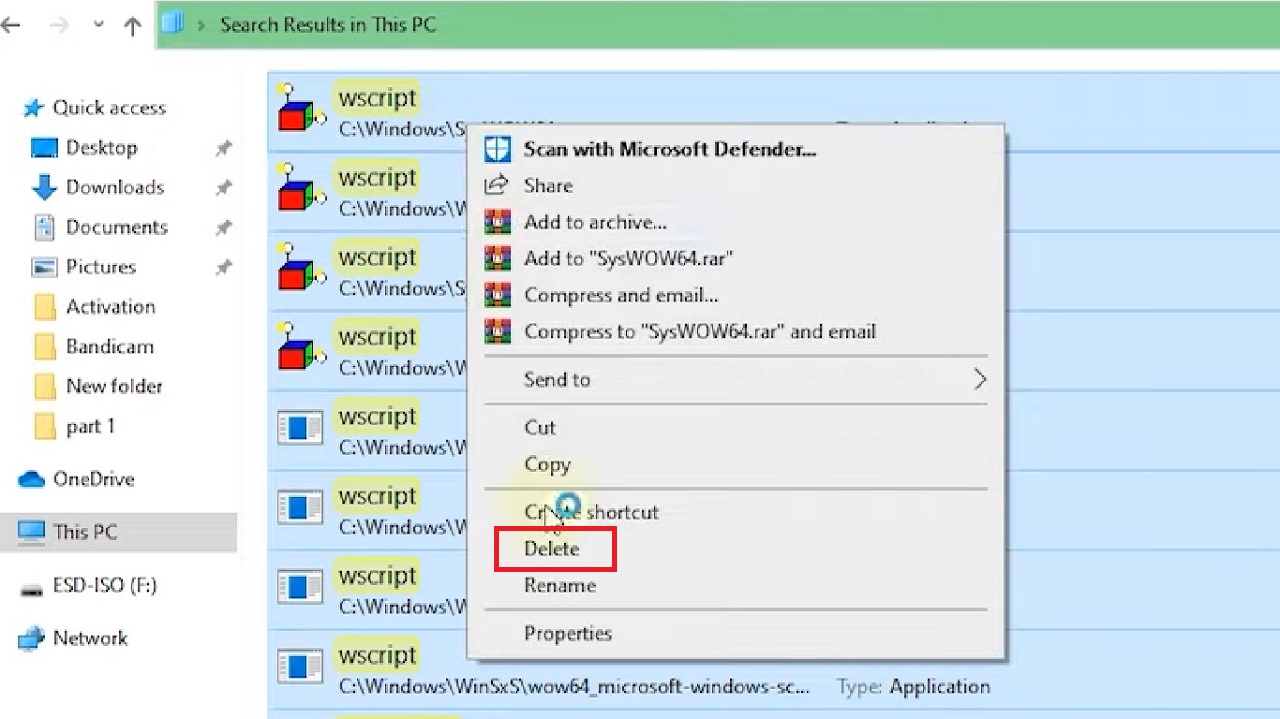
- Go to the search bar at the top and type wscript.exe and hit Enter.
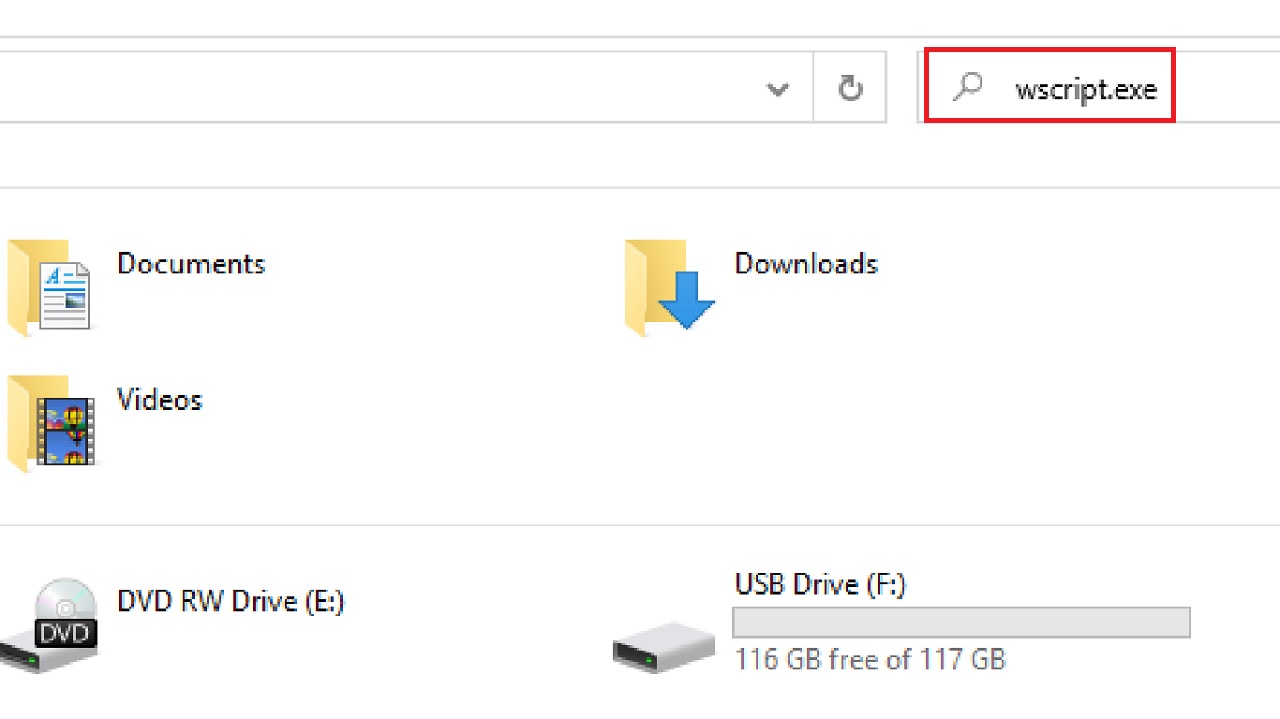
- It will take some time, and you will see a lot of wscript.exe files will open.
- Press CTRL + A to select them all.
- Right-click on the selection.
- Click on Delete from the drop-down option.
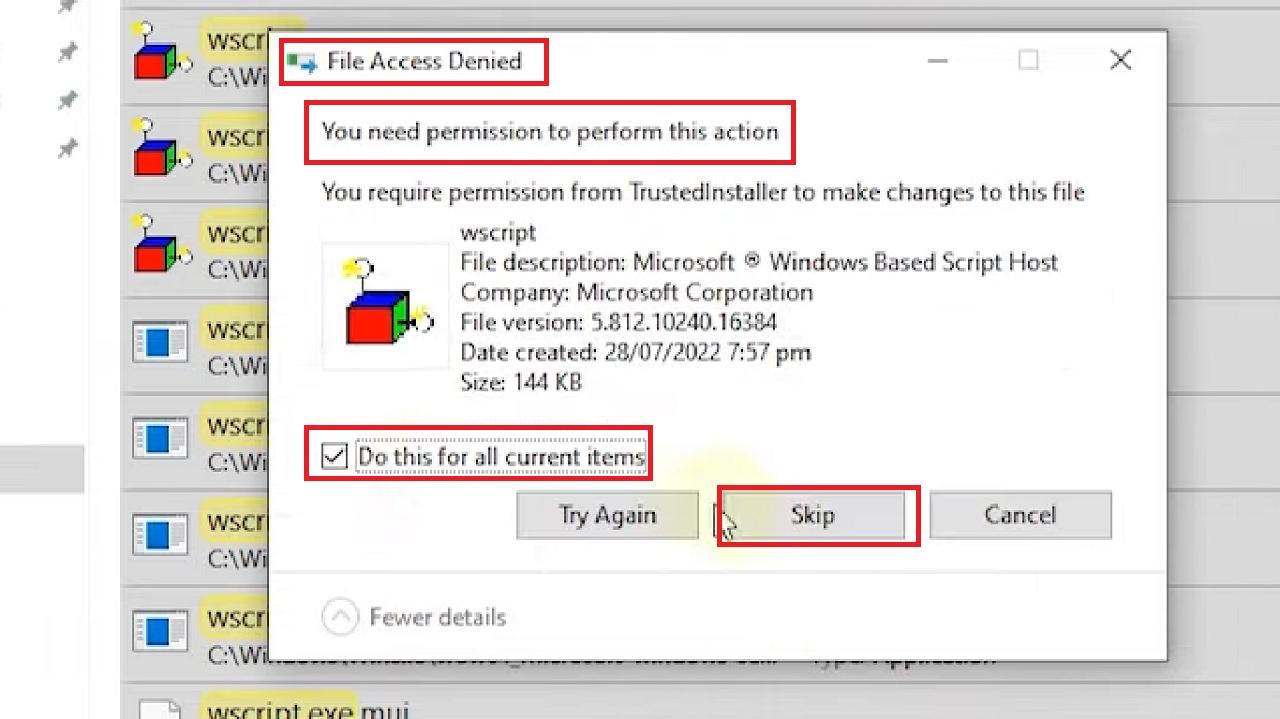
- During the process, if you see the File Access Denied window saying that ‘You need permission to perform this action, check the small square box next to ‘Do this for all current items.’
- Click on the Skip button.
Now close all windows and restart your PC.
You may also try to find wscript.exe files in another way.
- Open the Run dialog box again as before.
- Type msconfig.
- In the System Configuration window, go to the Startup tab.
- Look for Microsoft Windows Script Host.
- If you find it there, click on the small square next to it to uncheck it.
- Click on the Apply button and then on the OK button.
Your system will now be free from shortcut virus. Restart your computer system
After the system reboots, open the Command Prompt as before. Run the command attrib -s -r -h *.* /s /d /l and hit Enter as you did in Method 1.
This will recover the files stored in your external hard drive.
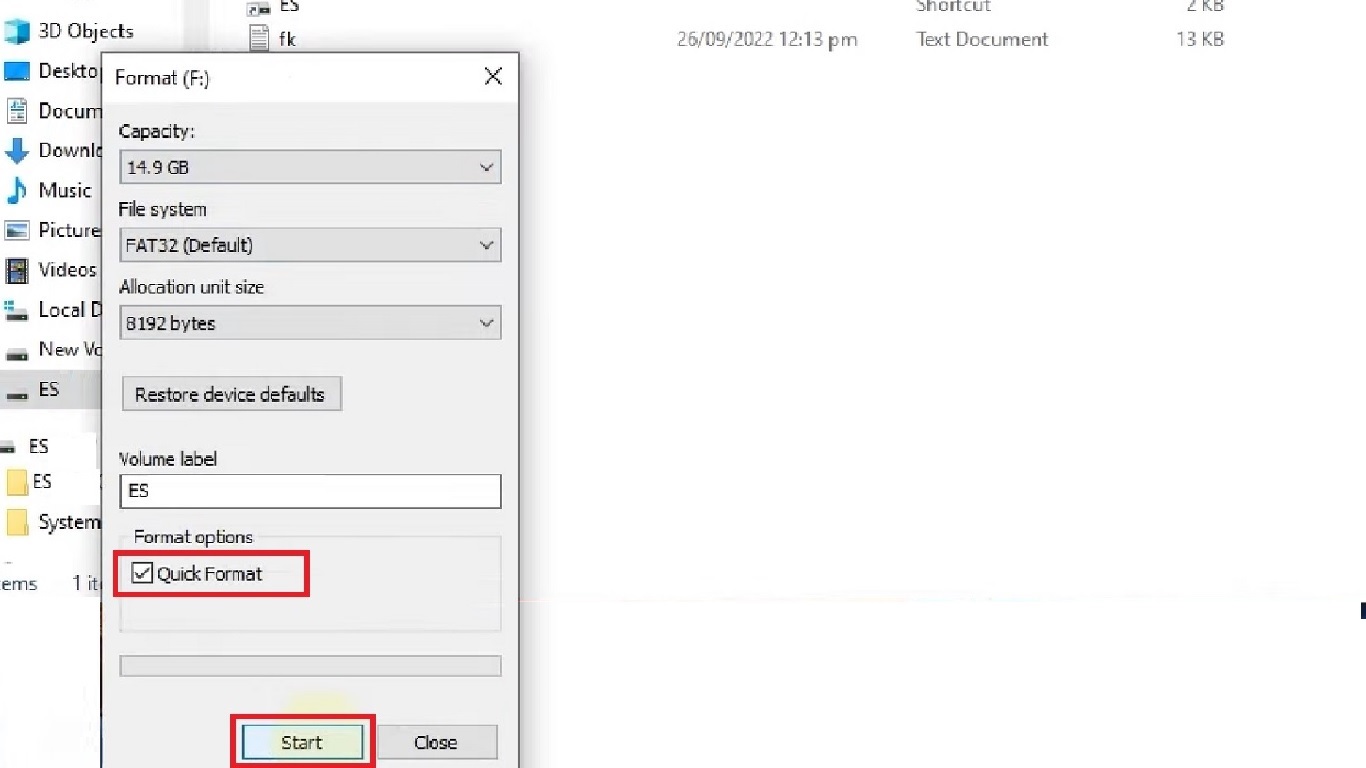
Create a backup of these files in another storage and format the external hard drive in the following way:
- Right-click on the drive > Click on Format from the options.
- Click on the box next to Quick Format under Format options.
- Click on the Start button.
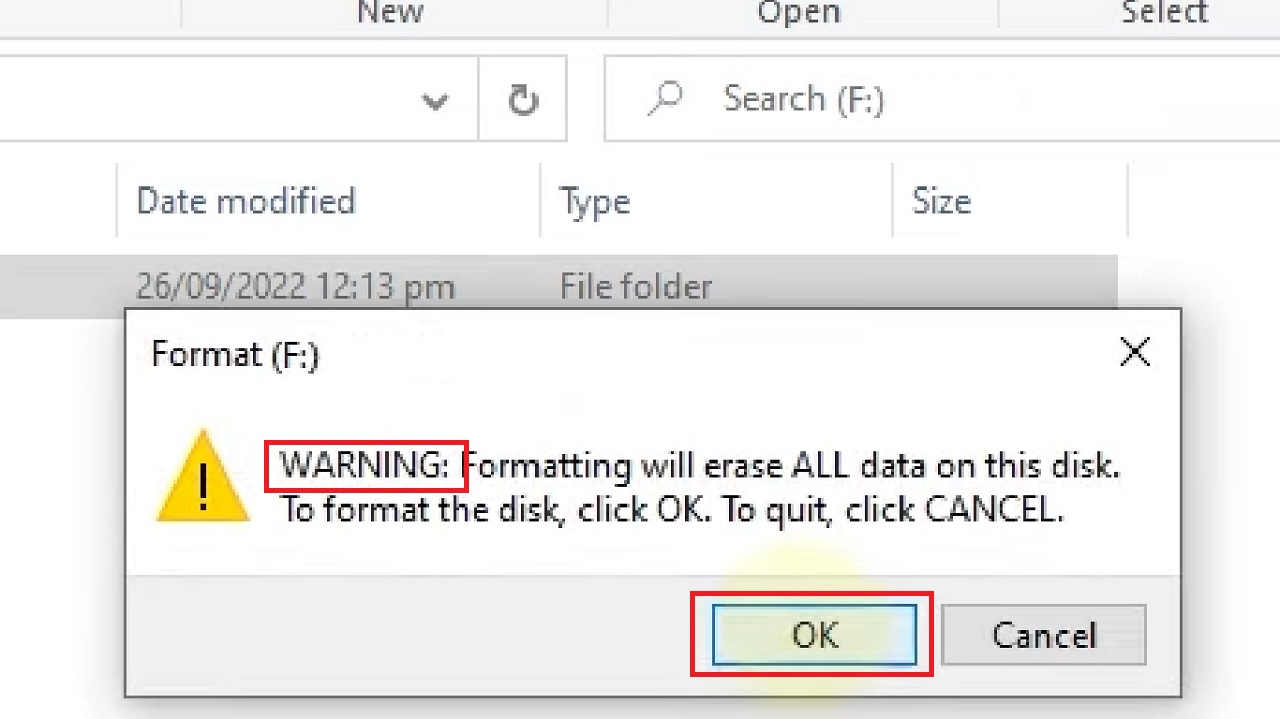
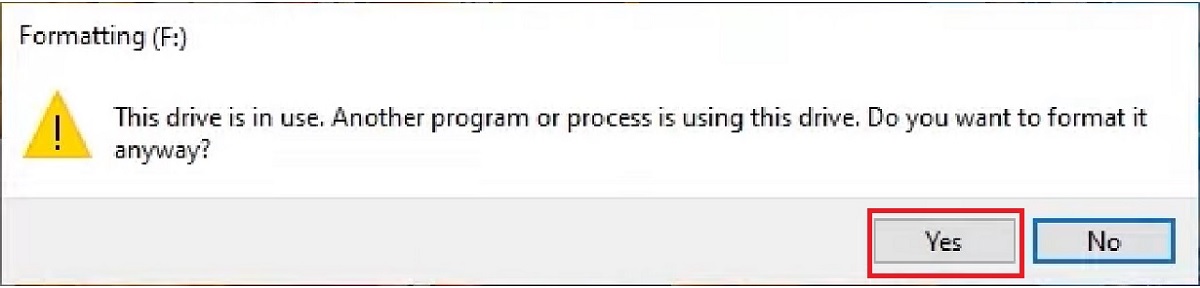
- Click on the OK button in the WARNING window.
- Click on the Yes button in the following window.
- Click on the OK button when a window shows ‘Format Complete’.
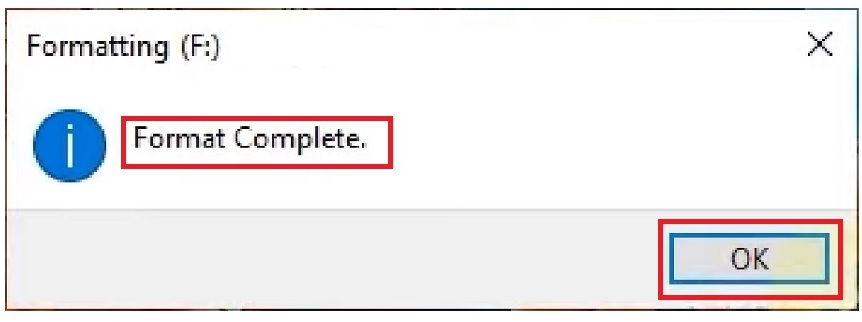
Now restart your computer system. When it reboots, you can save the files on the external hard drive again.
Conclusion
So, these are the steps to remove a shortcut virus from the external hard drive.
Follow any one of them to prevent replacing the files and folders stored in your USB drive with fake shortcuts and prevent lower system performance, data loss or damage to your PC.