
Often, your PC may encounter some technical or logical errors that may prevent Windows from detecting the actual free space available in the hard drive. As a result, it will show wrong hard disk free space.
In such a situation, you will not be able to save any more files to your hard disk since Windows will not let you do so. Annoying and frustrating as it is, there is no reason to think that this is the end of your hard disk.
In this article, you will learn about some effective fixes to this particular issue.
In This Article
KEY TAKEAWAYS
- Check System protection for the affected drive from the Control Panel and delete the restore points that are created to show the accurate free space.
- Creating a proper partition of the unallocated space of the affected hard drive from Disk Management is another easy way to resolve the issue.
- Most deleted files stay in the Recycle Bin. Deleting files completely from the system is another way to resolve the issue.
- Running the Check Disk utility to remove system errors helps Windows to show the right hard disk free space.
- You will also be able to resolve the issues by removing the temporary files with the prefetch command.
Why Does Windows Show Wrong Hard Disk Free Space?
There can be malware or virus attacks where spaces of the hard drive can be occupied without the knowledge of Windows. Therefore, Windows cannot show the right hard drive free space.
In addition to that, there may be several restore points created unnecessarily in the hard drive for which Windows may show wrong hard disk space.
That is not all. There are also a few other common possibilities of this issue, such as:
- The hard drive may be outdated
- Incomplete or incorrect formatting process followed earlier
- Initializing the hard drive to an entirely wrong partition table
- Too many cached or temporary files
- Deleted files still residing in the Recycle Bin
- Corrupted file system and system errors
- Inconsistent codes
- Errors in the disk due to existence of bad sectors
- Corrupted EFI or Master Boot Record information area due to accidental removal or improper insertion in case of an external hard drive
The Version 1803 bug that is typically found in Windows 10 only, can also cause this issue. This is usually an Explorer.exe bug introduced by Microsoft unknowingly with version 1803. This bug causes conflicts with the metadata file types, which results in incorrect measurements of free space in the hard disks.
How to Fix Windows 10 Showing Wrong Hard Disk Free Space?
One effective way to fix the issue of Windows 10 showing wrong hard disk space is to delete all restore points and files created that are unnecessary. You can do this by checking System protection in the Control Panel.
Another easy fix to the issue is checking for malicious software or viruses by running any reliable third-party antivirus program. It will scan everything to find issues and viruses and fix them for you.
Some other ways to resolve the issue are:
- Deleting files from the Recycle bin permanently
- Running the prefetch command in the Run dialog box to delete all temporary and cached files
- Updating the drivers of the drive
- Reformatting the hard drive from MBR to GPT
- Using the Command Prompt to run the check disk command
- Updating Windows to the latest version to remove the Version 1803 bug
- Running System Maintenance Troubleshooter
Here are some useful solutions to the issues described for you along with the specific steps to follow.
Method 1: Check System Protection and Delete Restore Points
One useful way to fix the issue of Windows 10 showing wrong hard disk free space is to check System Protection.
This feature usually tends to hit save restore points on the hard drives. This can take up a huge space unnecessarily and often unknowingly.
So, deleting them is a smart way to resolve the issue.
Assuming that the issue is with the Drive D, this is what you can do.
STEPS TO FOLLOW:
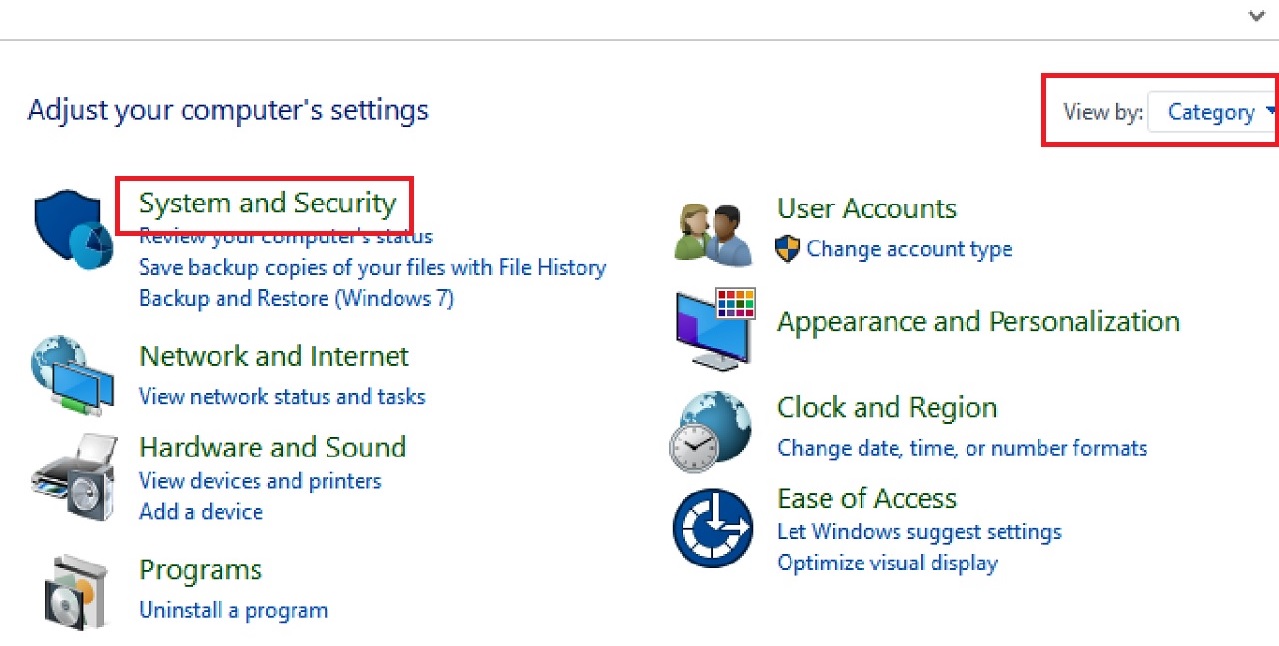
- Open the Control Panel by typing it in the quick search box next to the Start Menu.
- Select Category in the View by box.
- Click on System and Security.
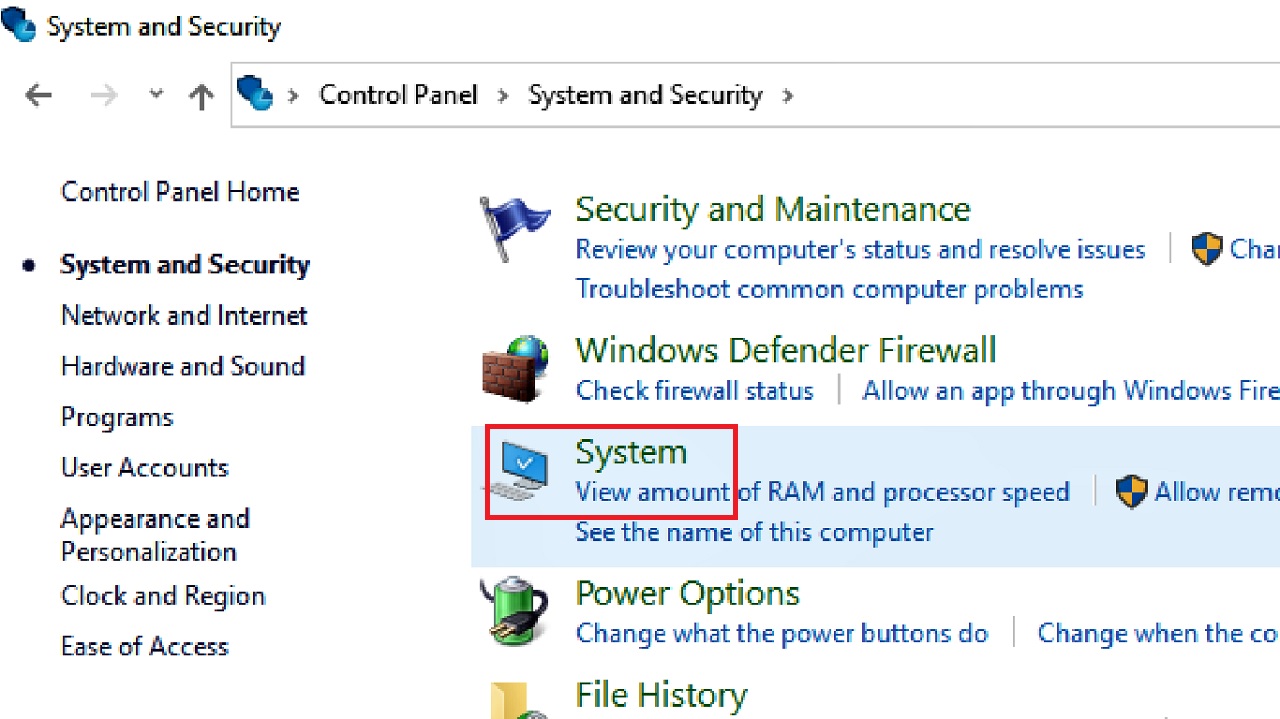
- In the following window, click on System.
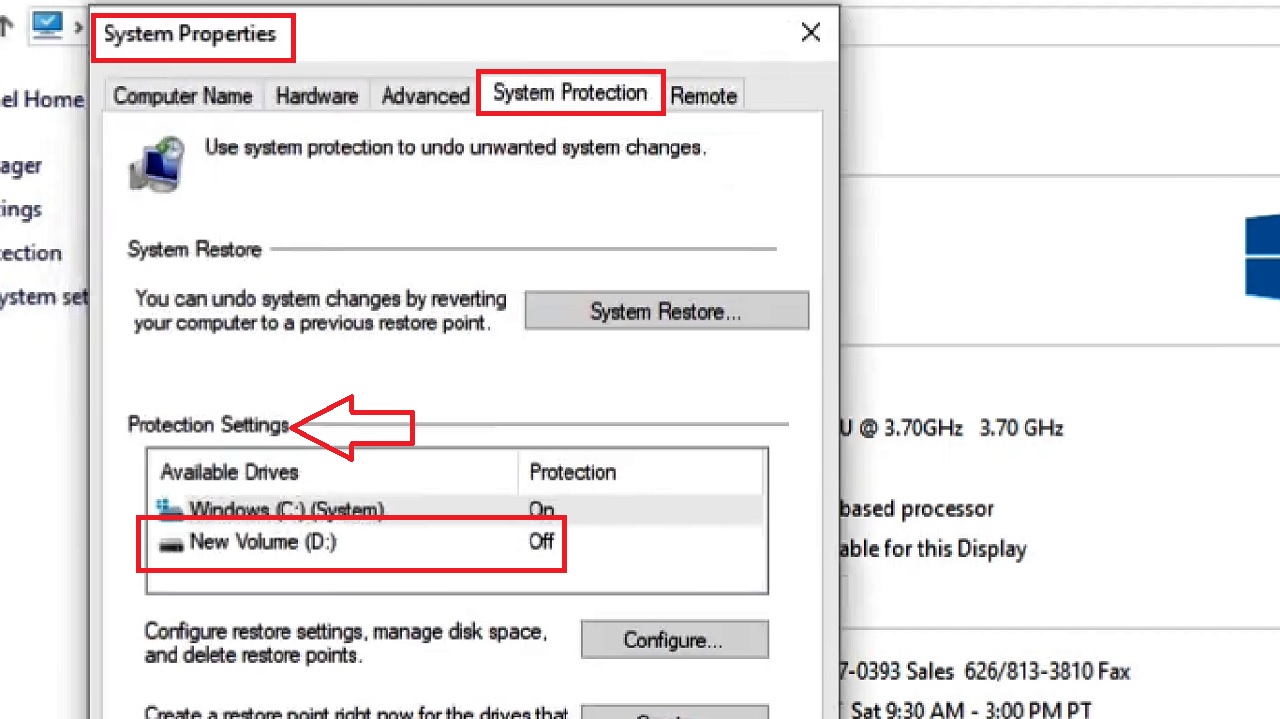
- Select System Protection from the left panel in the following window.
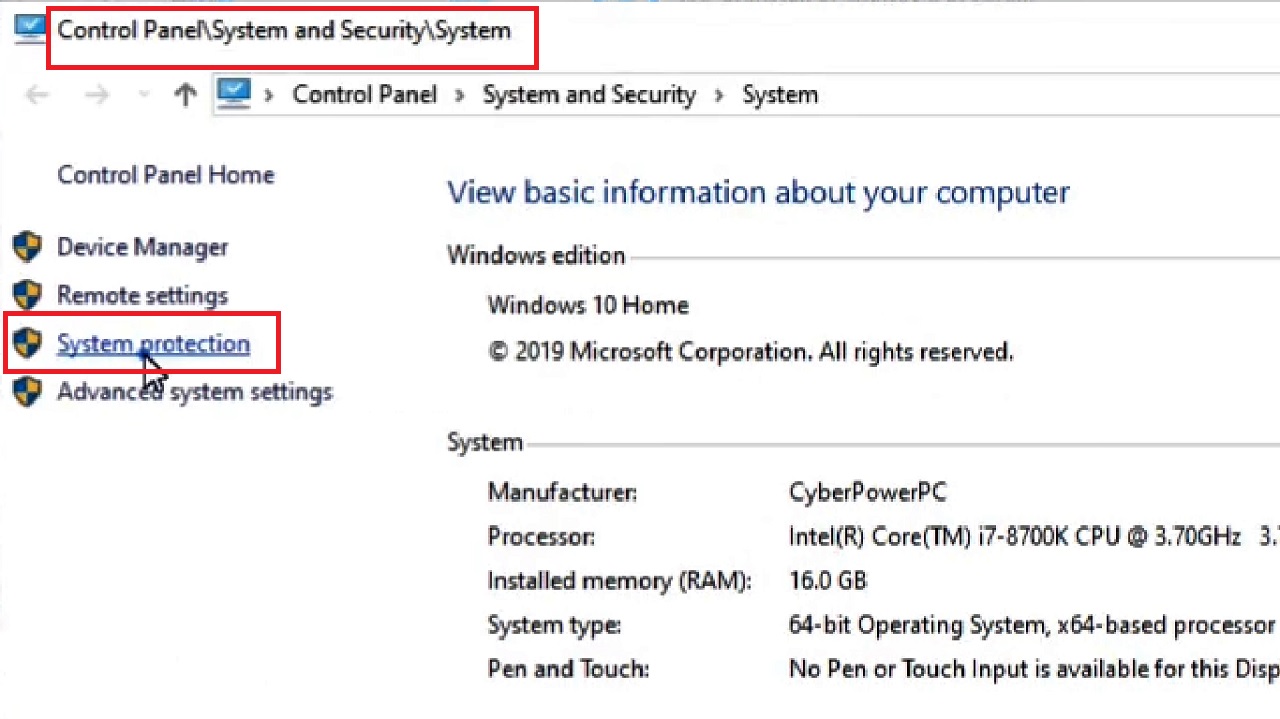
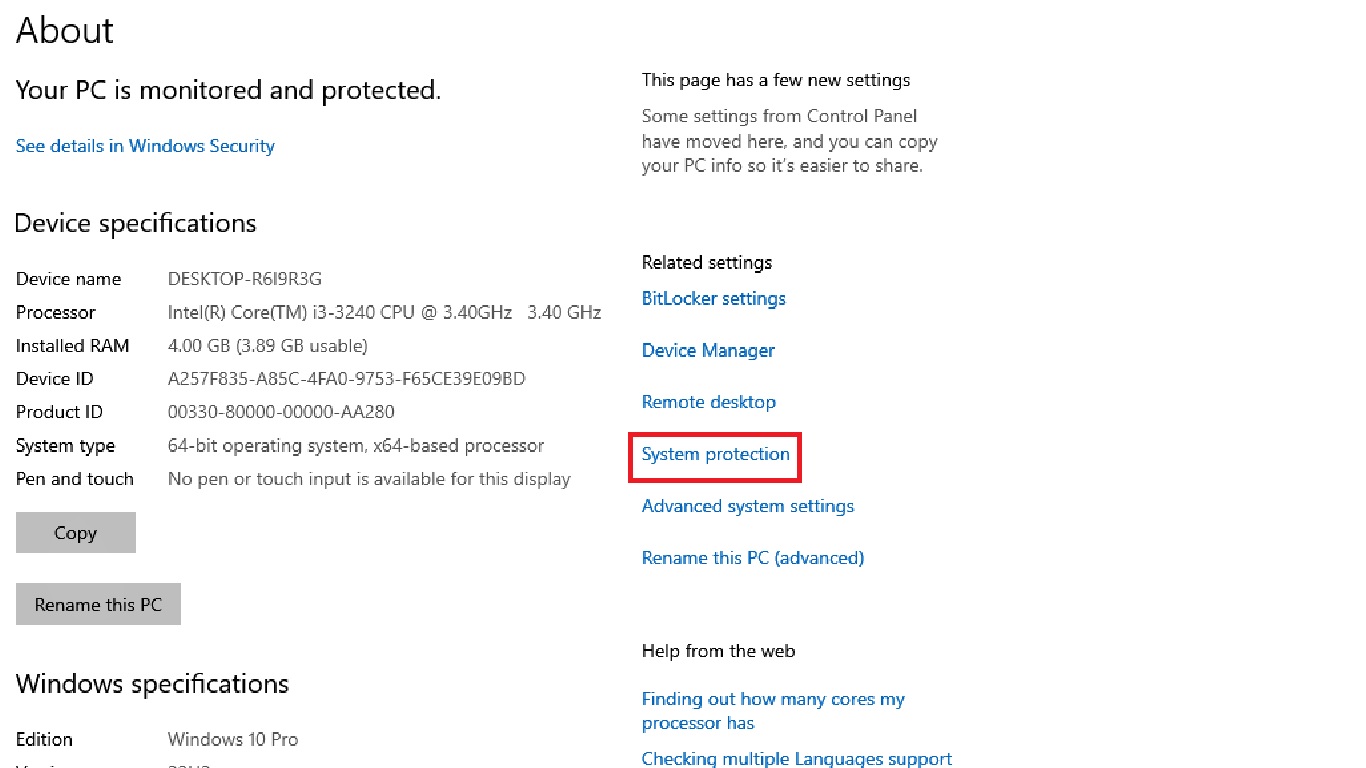
Sometimes, depending on the settings and operating system, System protection option may be on the far-right of the window, as shown in the image below:
As you can see from the image below, in the System Properties window under the System Protection tab, the Protection Settings for New Volume (D:) is off.
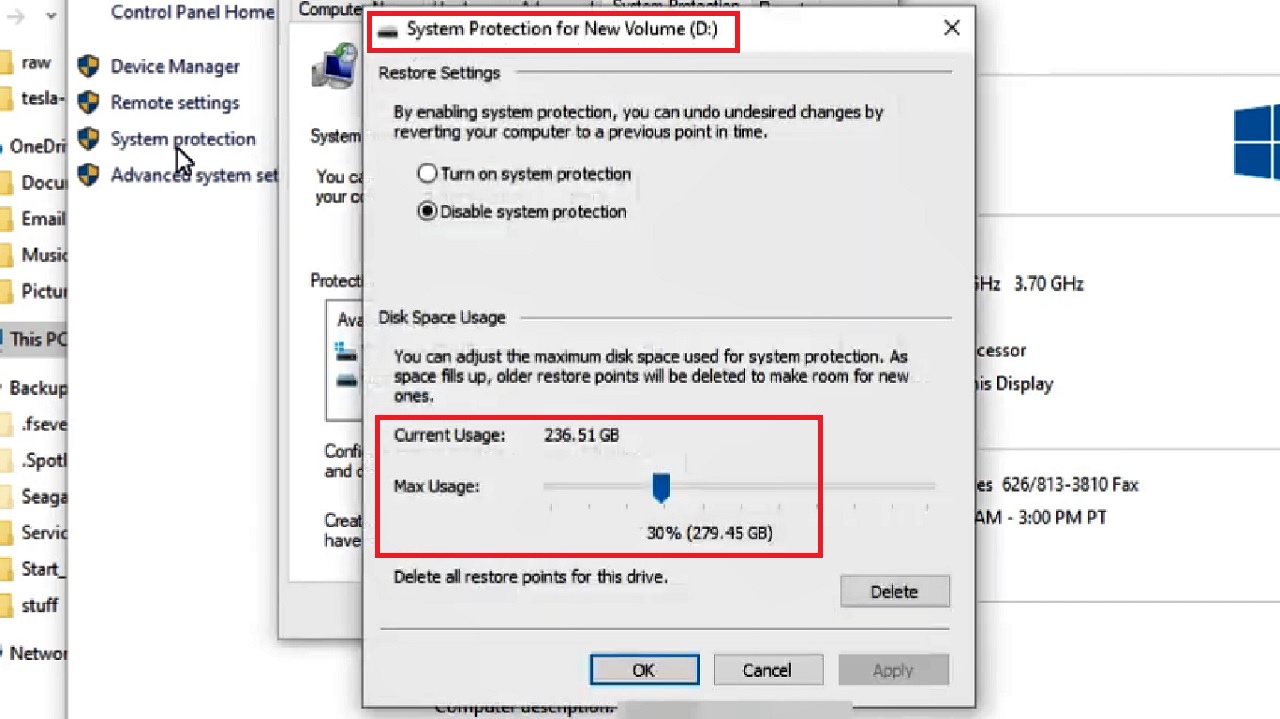
When you click on it, it will open the System Protection for New Volume (D:) window. Much to your surprise, you will see more than 30% of the space is used up, as shown in the image below:
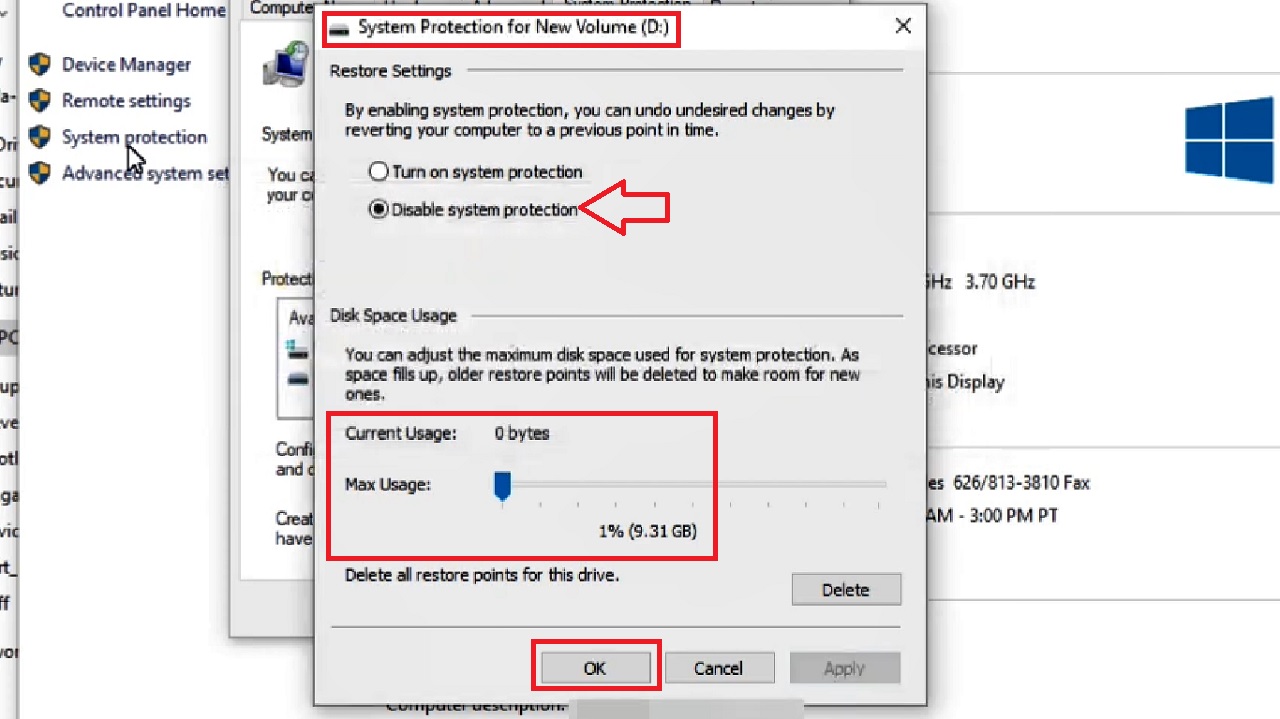
- In this window, drag the sliding switch to the left to set it to 1%.
- Make sure that the small circular button next to Disable system protection is checked.
- Click on the OK button.
- Click on Continue in the following warning window.

This will start deleting the restore points that are created unnecessarily, and free up a lot of space. This will eventually show the right hard disk free space.
Method 2: Creating a Proper Partition
If the hard drive partition is initialized improperly, or if it is incomplete, it may cause this issue. Re-partitioning the hard drive will resolve the issue most of the time.
STEPS TO FOLLOW:
Right-click on This PC > Click n Manage > Select Disk Management from the left side of the Computer Management window.
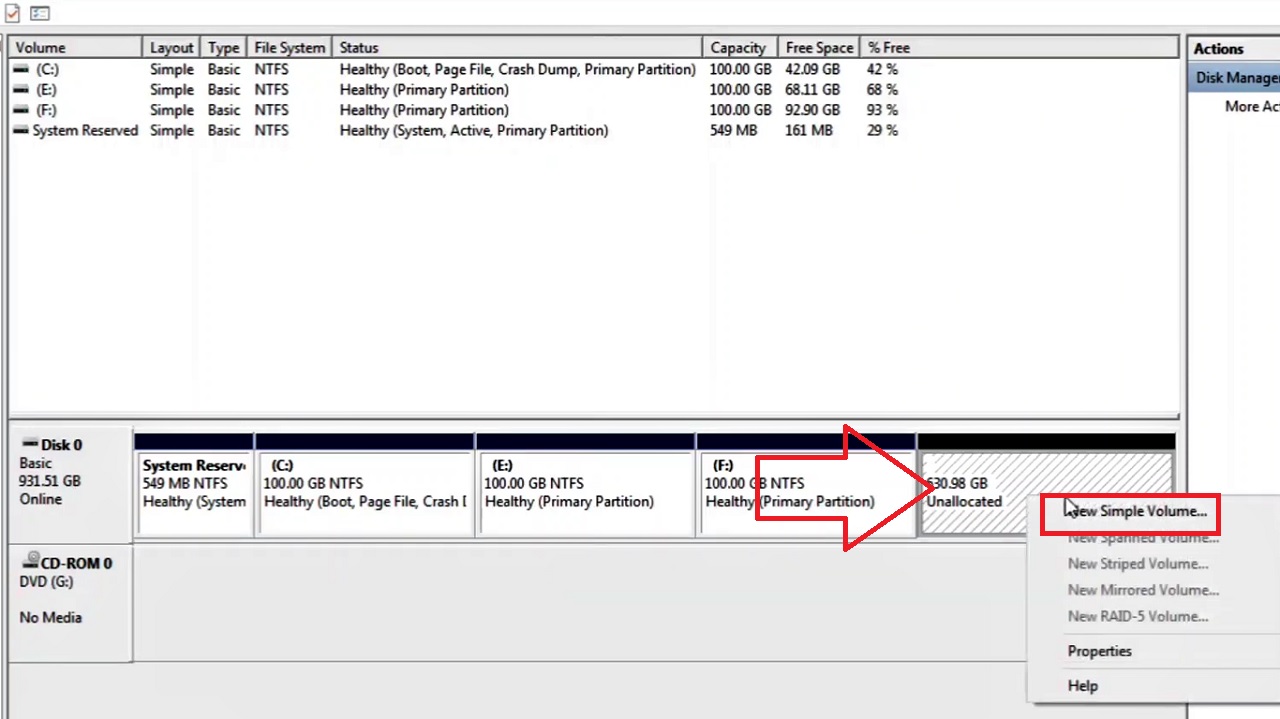
You will see a large space marked Unallocated, as shown in the image below, where no programs can write to this space. Ideally, this space does not exist for the operating system and hence it cannot show it.
Things will be restored if you use this unallocated space to create a new partition with a distinct drive letter or expand an existing one.
- Right-click on it.
- Select New Simple Volume.
- Follow the instructions of the New Simple Volume Wizard window.
Here a new drive will be created and Windows will show it as well, Drive D of about 30 GB in this example. Note that the total amount of allocated space is also reduced by that much from before, as shown by a red arrow in the image below:
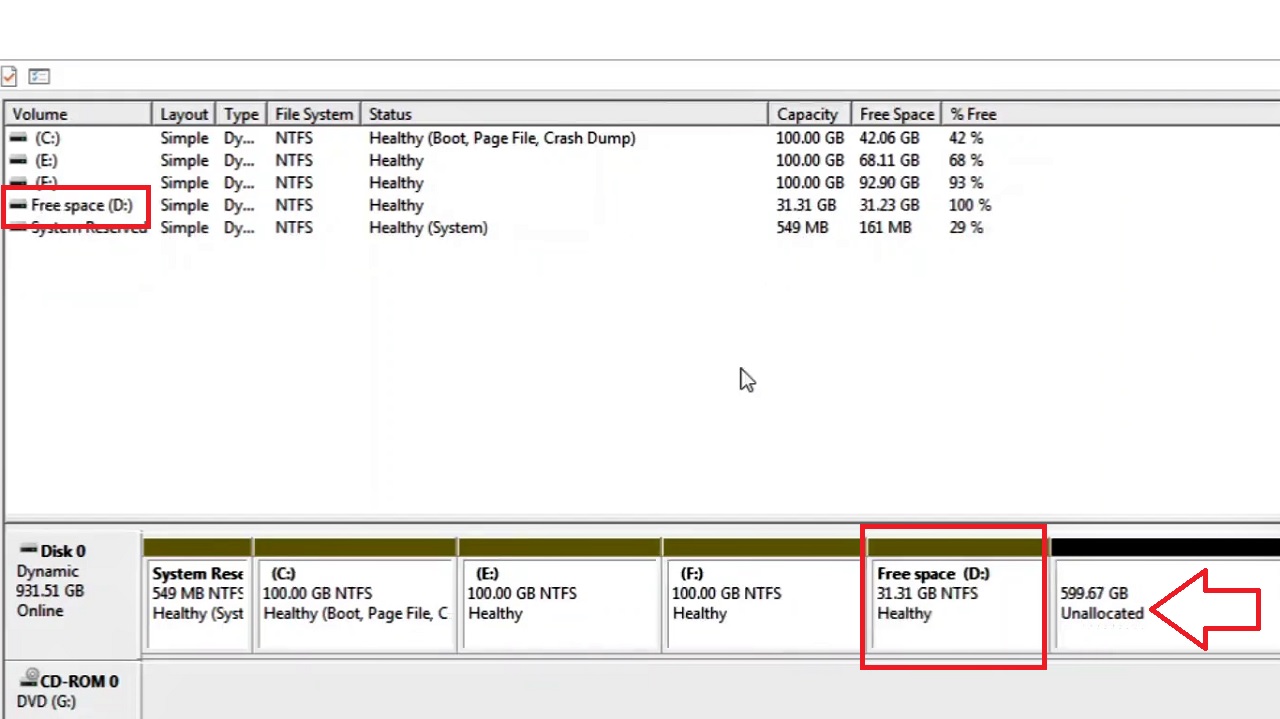
You can create multiple drives by following the same steps to make the best use of the unallocated space that Windows could not recognize and showed wrong hard disk space earlier.
Method 3: Remove Deleted Files Completely from the System
Most users do not know that simply deleting a file does not remove them from the system completely. This shows wrong results and Windows considers them to be useful files stored in the Recycle Bin.
Remove them completely for Windows to display the correct free space of the hard drive.
STEPS TO FOLLOW:
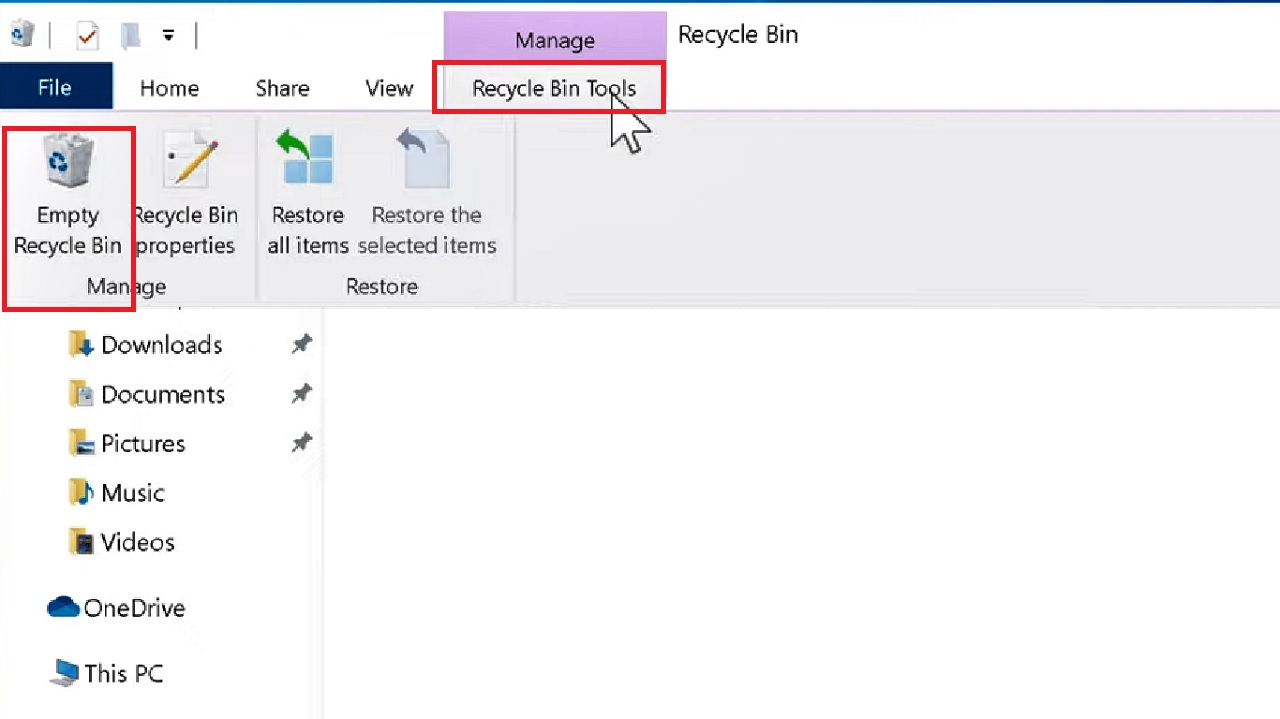
- Go to the Recycle Bin.
- Select Recycle Bin Tools under Manage.
- Click on Empty Recycle Bin.
- Click on the Yes button in the following Delete File window.
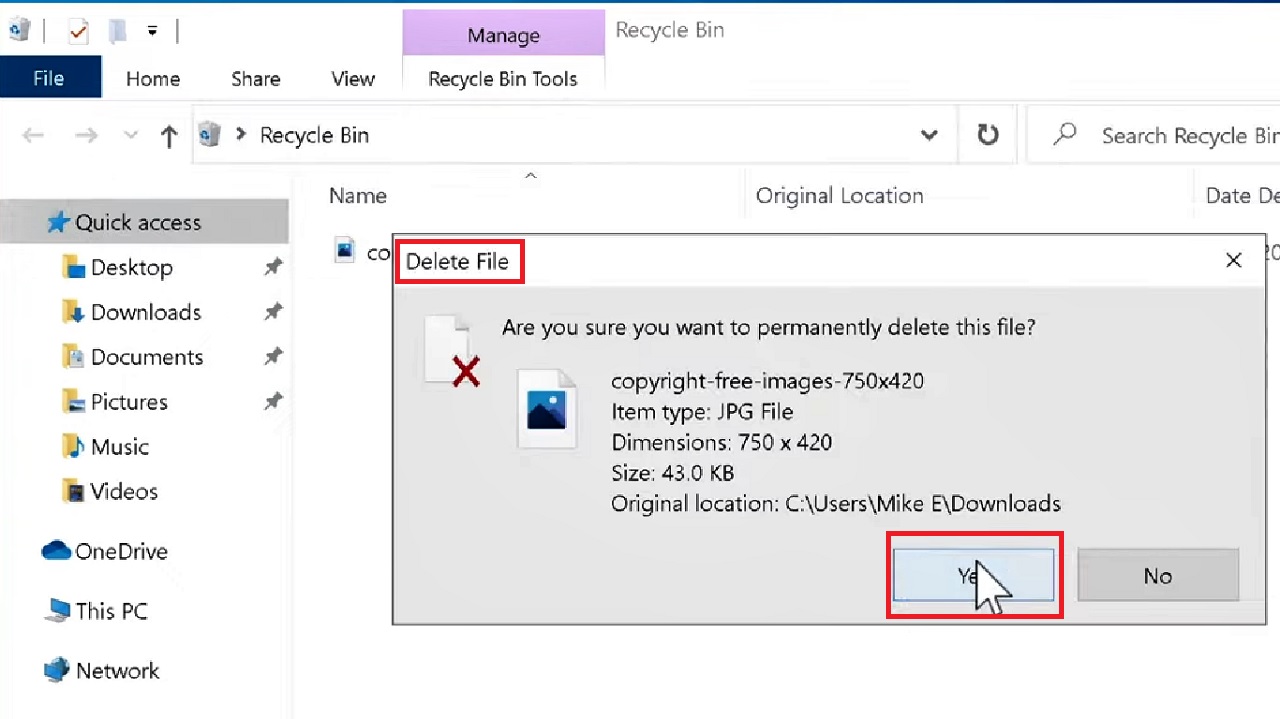
This will delete the files permanently and the Windows will know the actual free space to display.
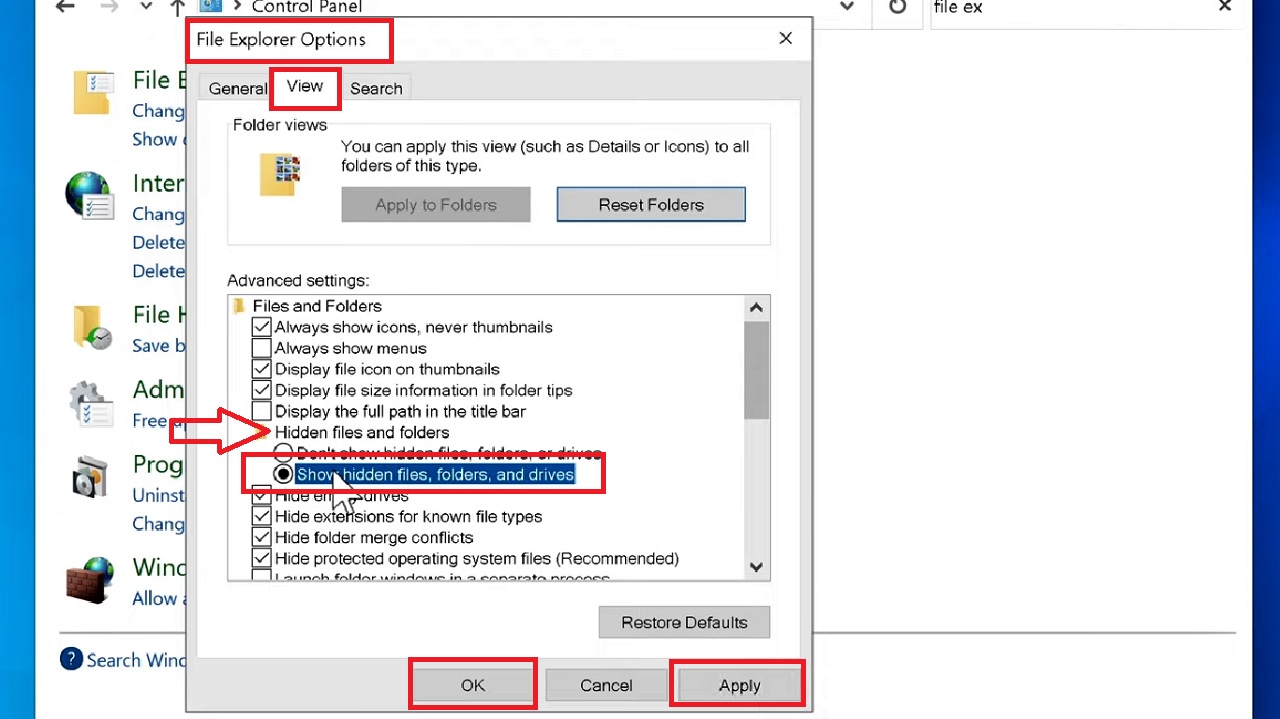
Method 4: Reveal the Hidden Files and Folders
Your system settings may need some changes if it is set not to show the hidden files and folders.
This can also cause the issue, because the disk will have the files but Windows will not be able to show it. It can be resolved by changing the settings.
STEPS TO FOLLOW:
- Open the Control Panel as before.
- Type File Explorer in the search box at the top-right corner.
- Select File Explorer.
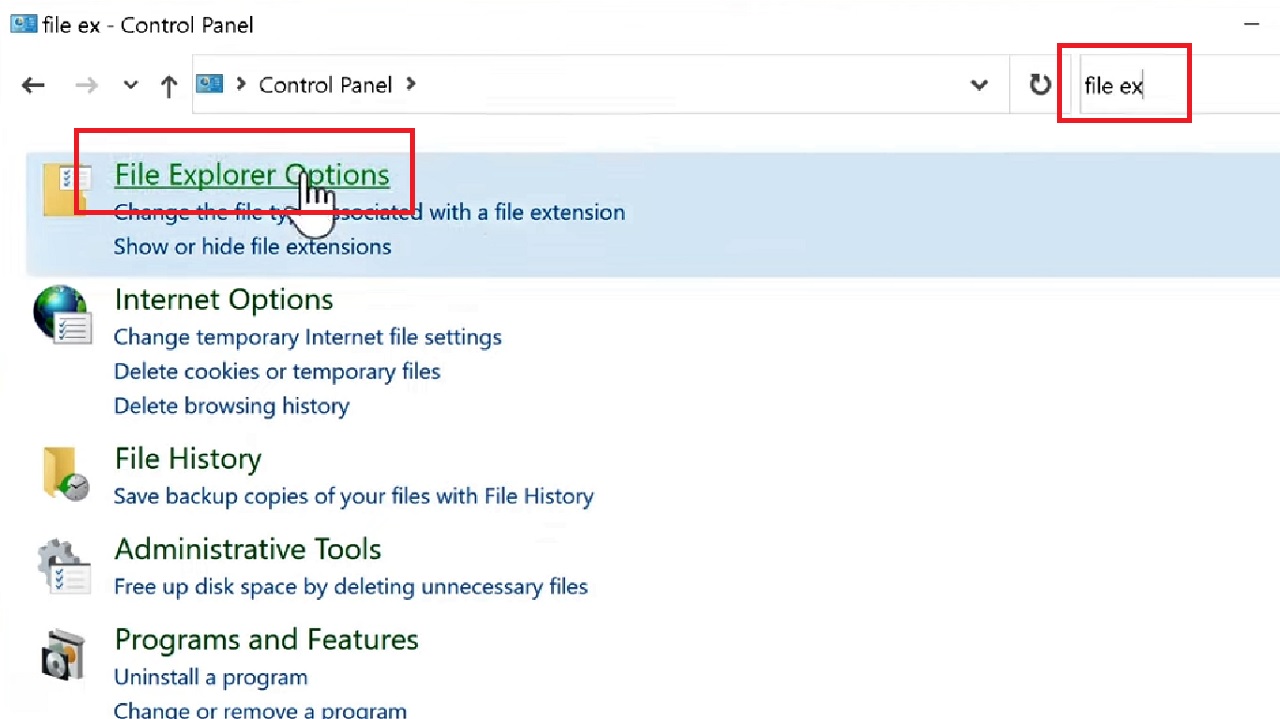
- Go to the View tab in the File Explorer Options window.
- Under the Hidden files and folders section, check the small square box next to Show hidden files, folders, and drives.
- Click on the Apply button and then on the OK button to close the window.
- Now, open the File Explorer.
- Check the folders.
- Delete those that are unnecessary.
- Remove them from the Recycle Bin as well as before.
This will free up a lot of space on your hard drive and it will be recognizable by Windows.
Method 5: Running Check Disk Command
If there are any logical or technical errors that may be preventing Windows from showing the right hard disk free space, running the Check Disk utility is the best solution.
STEPS TO FOLLOW:
- Type cmd in the search box > Choose Run as administrator > Hit Enter.
- In the Command Prompt window, type in the command chkdsk C: /f /r /x and hit Enter.

Here C represents the letter of the drive to be repaired (which you should replace by yours), f represents the scanning process to be followed for the hard drive, r instructs finding the bad sectors and to recover data, and x is for force running on the volume.
This will make the free space recognizable for Windows and it will not show wrong hard disk space.
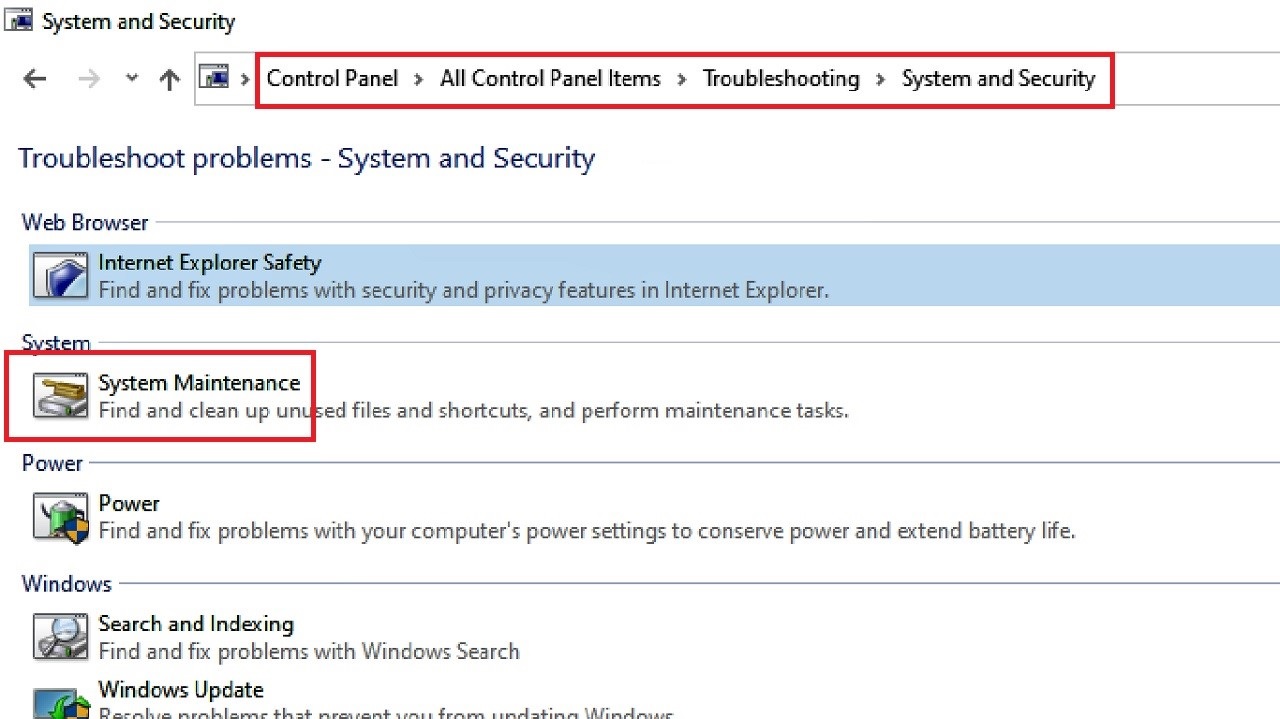
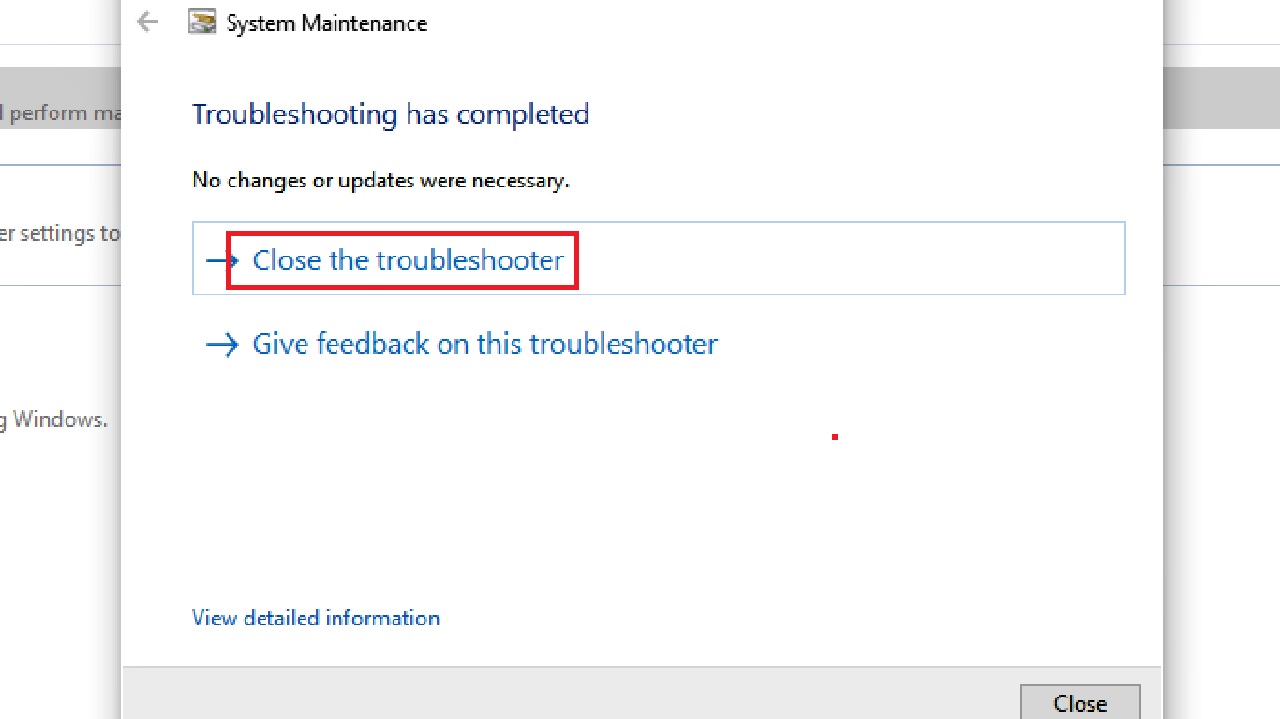
Method 6: Run System Maintenance Troubleshooter
If there is an issue with the Windows operating system itself, it will cause wrong measurement and display of free space in a hard drive. Running the System Maintenance troubleshooter and restarting the system may often resolve this issue with the inconsistencies detected and repaired automatically.
STEPS TO FOLLOW:
- Open the Control Panel > Select Large icons in the View by box > Click on Troubleshooting > Select System and Security > System Maintenance.
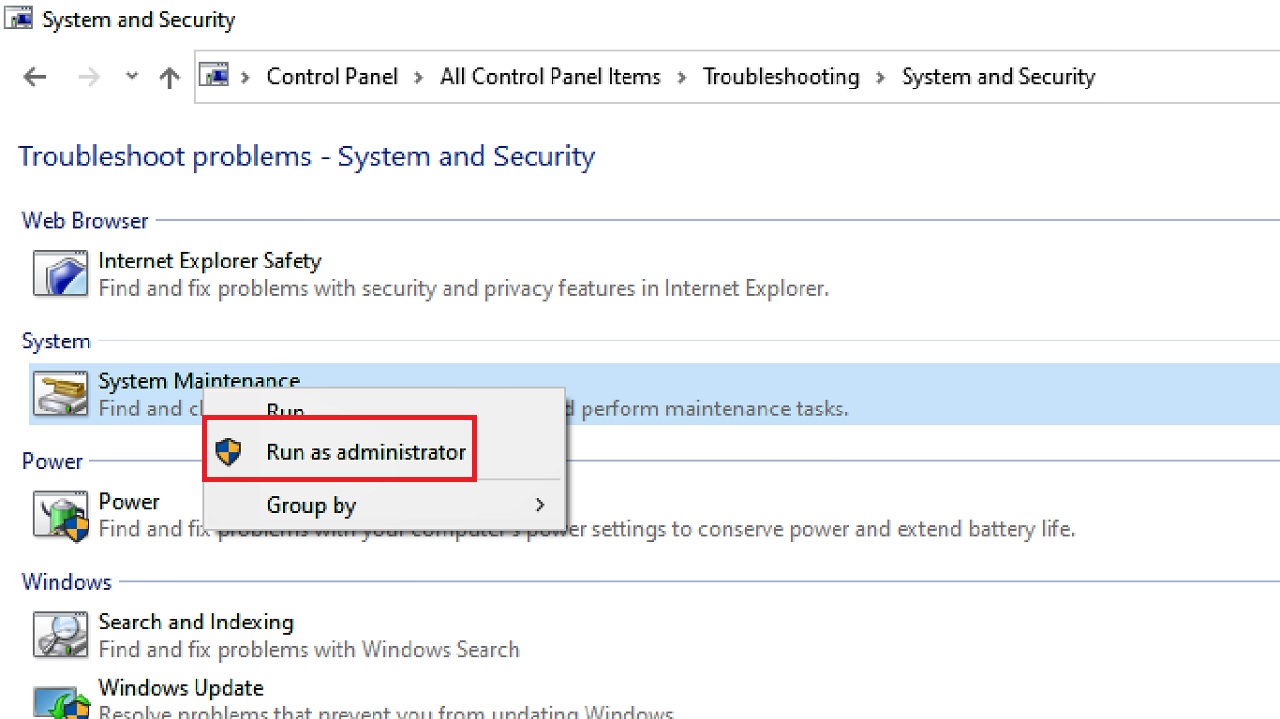
- Right-click on System Maintenance.
- Select Run as Administrator.
- Click on Advanced in the System Maintenance window that appears.
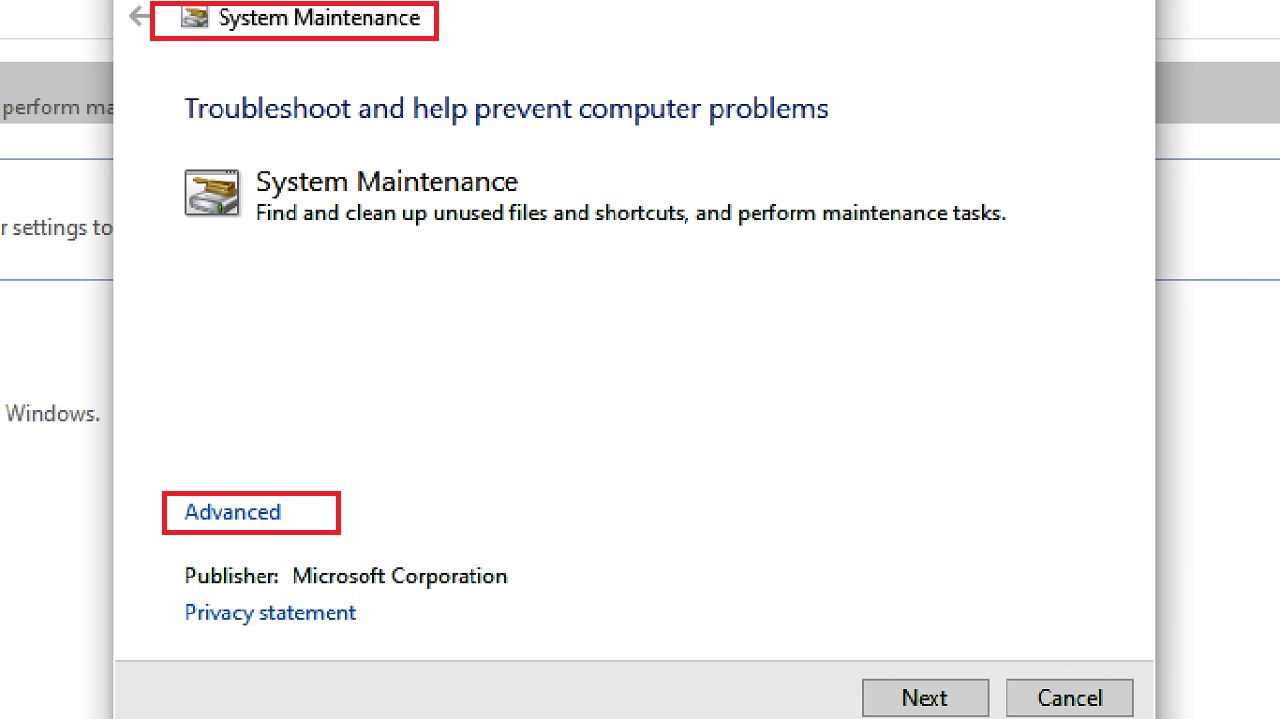
- Check the small box next to Apply repairs automatically.
- Click on Next.

- This will start the detecting process. Wait until it is complete. If there are no issues found on the hard drive, a window will tell that No changes or updates were necessary in the results as follows:
- However, if there are issues, it will fix them and will ask you to ‘Apply this fix.’ Click on this option in the window.
- Again, wait till the process is complete.
Once it is complete, close all windows, restart your PC and check whether the issue is resolved when the system restarts.
Conclusion
All these methods are useful to address the issue of internal or external hard drives showing a wrong capacity.
Though a few of them are very basic troubleshooting in nature, performing them will enable you to restore things back to normal very quickly and easily.