
You may experience a blue screen on your computer system for several reasons, and the Wi-Fi driver may be one of them. Just like any other BSOD situation, this can be equally frustrating for a user.
Fortunately, there is a specific driver update available for the Windows 10 and Windows 11 users to prevent the incompatibility issue of the driver and the operating system and blue screen occurrence.
In addition to that, there are also a few general solutions for Blue Screen of Death that may rectify the problem. In this article you will know more about these fixes.
In This Article
KEY TAKEAWAYS
- The issues in the Wi-Fi adapter can be resolved by updating the driver. This will prevent the Wi-Fi driver from causing a blue screen.
- Performing a network reset is also another way to fix this issue by setting the configuration of the network right.
- In many cases, running the Internet Connections troubleshooter may rectify the issue and prevent the Wi-Fi driver from causing a blue screen.
- The issue may also be resolved by updating Windows or by uninstalling the device from the Device Manager.
- Performing a system restore may also resolve the issue of Wi-Fi drivers causing blue screens by taking the system back to an earlier perfect state.
Why is Wi-Fi Driver Causing Blue Screen?
Typically, if there are issues in the Wi-Fi adapter driver or if it is outdated, it can cause a blue screen sometimes. There may also be some internal issues in the network settings.
Apart from that, if you want to add another Wi-Fi card to your PC and if it is the same as that on the motherboard of the computer, if it has any, then it will cause a blue screen.
There may also be some other reasons for this error to happen, such as:
- Outdated Windows
- Software issues
- Incompatible driver update with the operating system
- Conflict between files or software programs with the Wi-Fi driver
- Hardware issues such as incompatible motherboard of the PC with the wireless adapter
Here are some common BSOD fixes that you can try to prevent your Wi-Fi adapter from causing a blue screen.
How to Fix Wi-Fi Driver Causing Blue Screen?
The Wi-Fi driver causing blue screen can be resolved by updating the driver. If you are using a Windows 10 or Windows 11 system with a modern Intel wireless adapter, there is a new driver available, such as version 22.190.0, for upgrading and fixing the blue screen issue.
Since there are several reasons for this issue to occur, there are also a few other solutions to resolve it.
For example, if the add-in Wi-Fi card is the same as that one on-board the motherboard of your PC and is causing the blue screen error, disabling the Wi-Fi card on the motherboard from the Device Manager will allow adding it and resolve the issue.
Besides that, there are some other easy fixes to the issue, such as:
- Updating Windows
- Uninstalling device
- Performing a network reset
- Running Internet Connections troubleshooter
Here are the specific steps to follow for each of these solutions explained for you in detail.
Method 1: Update the Wi-Fi Driver
The outdated Wi-Fi driver may cause a blue screen and therefore it is recommended that you update it.
STEPS TO FOLLOW:
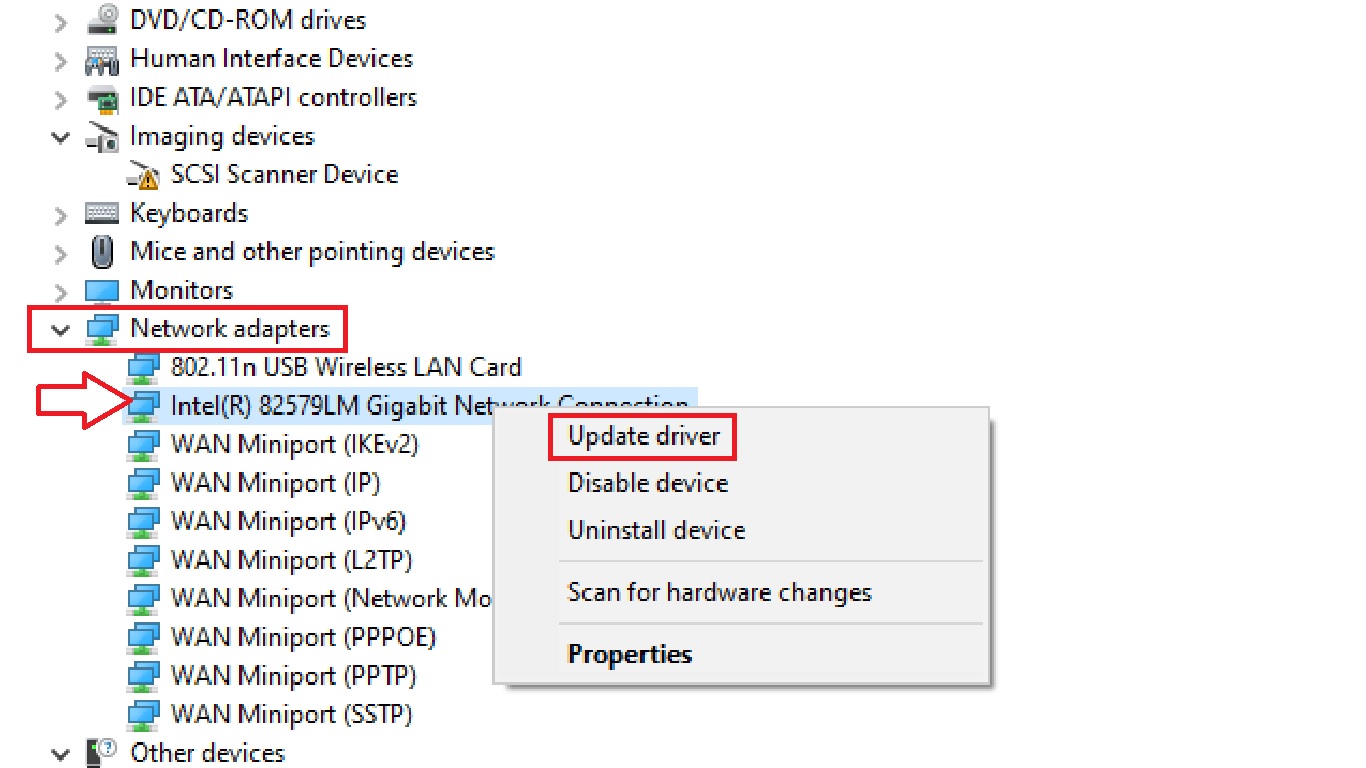
- Right-click on the Start Menu.
- Select Device Manager from the options.
- Go down to the Network adapters.
- Click on the small arrow next to it to expand it.
- Select and right-click on your network adapter.
- Select Update Driver.
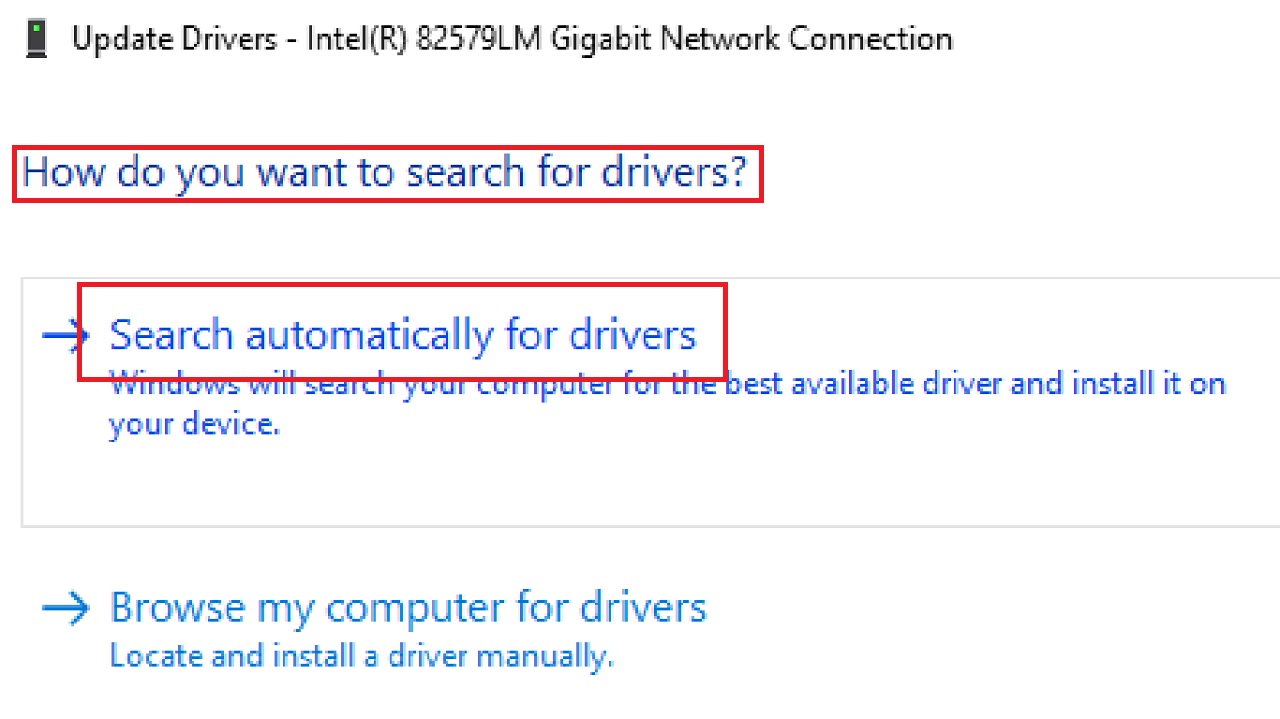
- In the following window asking ‘How do you want to search for drivers?’ select Search automatically for drivers.
- Click on the Close button when the process is complete and you see a window that says, ‘The best drivers for your device are already installed.’
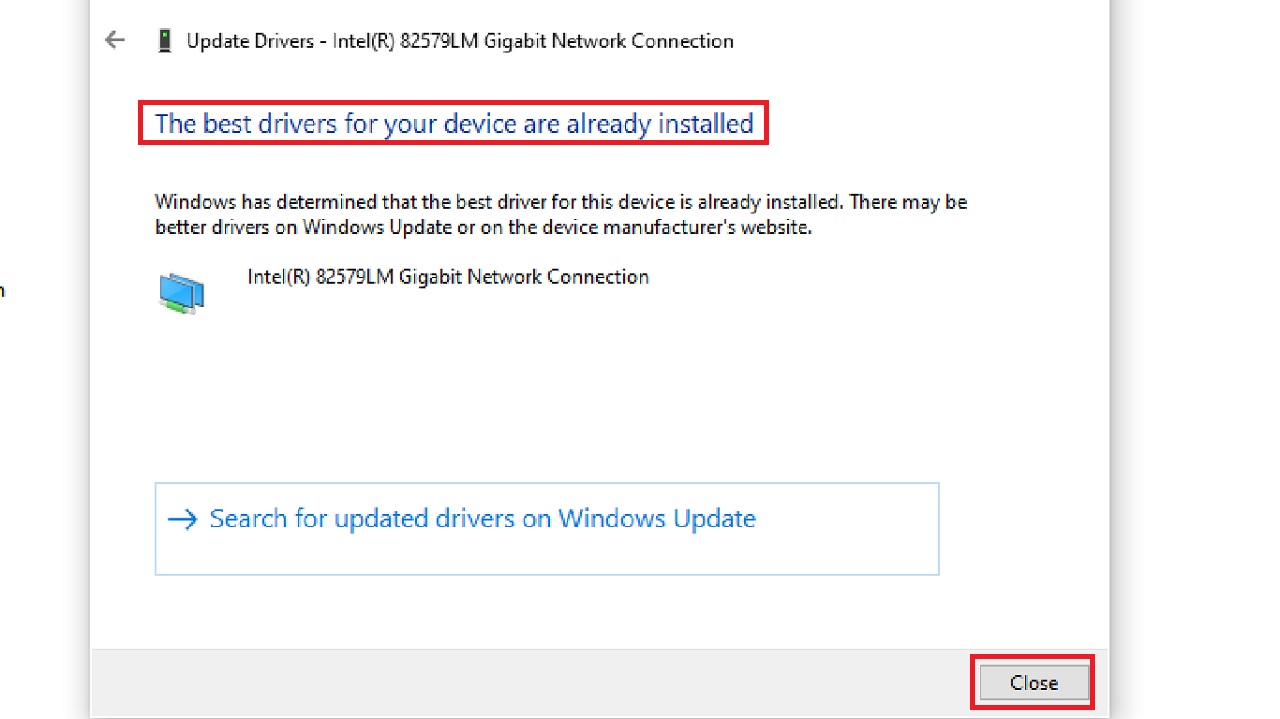
Now, restart your system and check whether or not the issue has been resolved. If the issue still persists, perform the next method.
Method 2: Perform a Network Reset
In most cases and issues related to the network, performing a network reset may resolve the Wi-Fi driver causing a blue screen issue.
STEPS TO FOLLOW:
- Press the Windows and I keys on your keyboard at the same time to open the Windows Settings app.
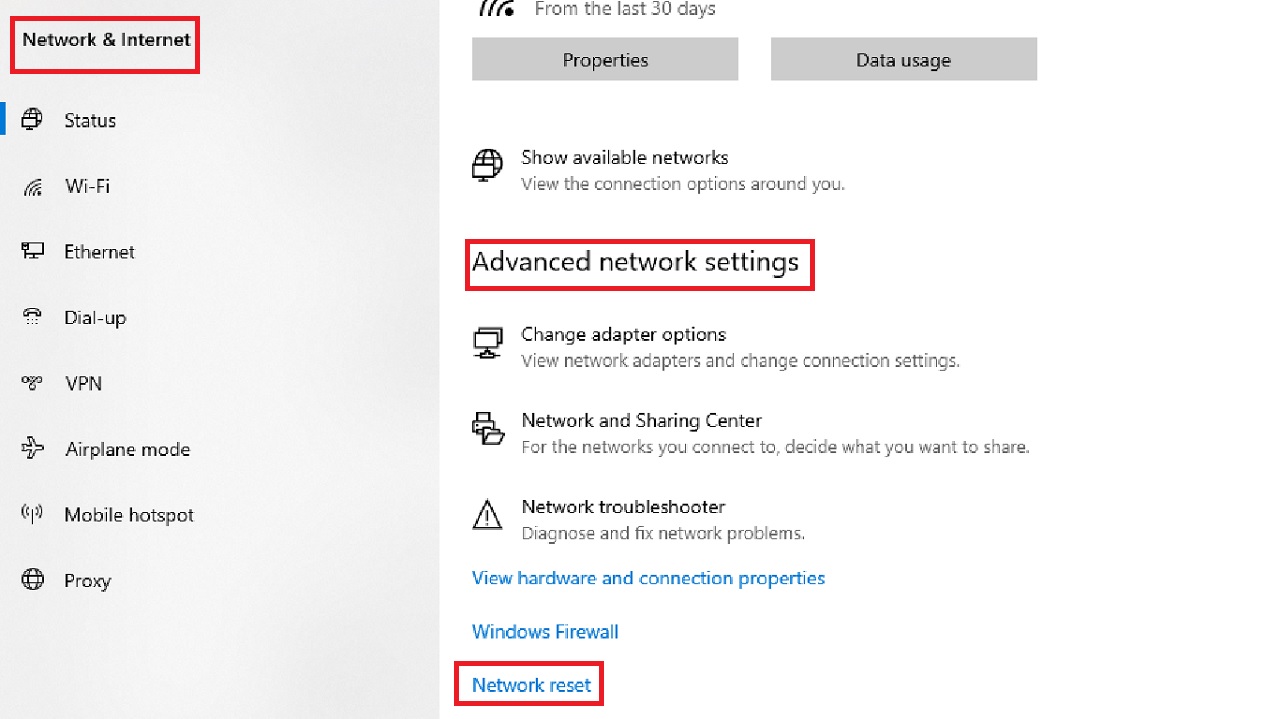
- Select Network & Internet from the Settings window that opens up.
- Click on Network reset in the following Network & Internet window on the lower right side under Advanced network settings.
- Click on Reset now button in the following window and Press Yes on the confirmation window that follows.
- Now, restart your computer.
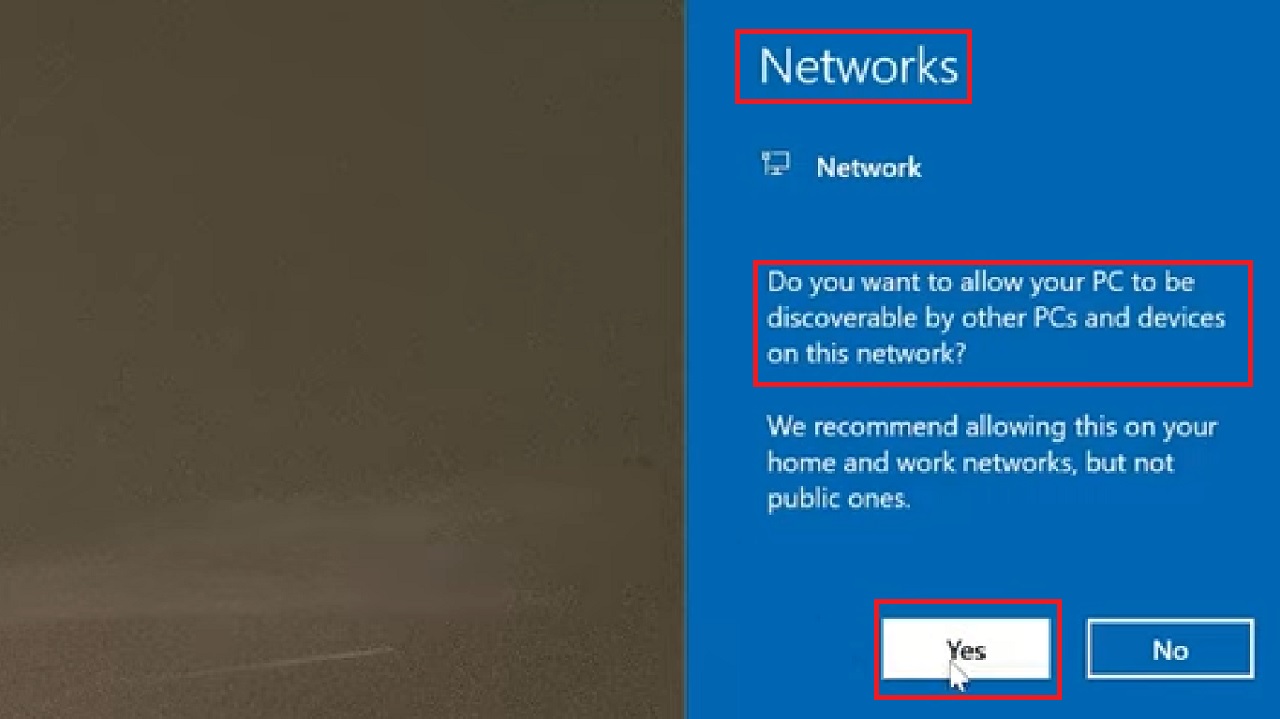
After the system restarts, press the Yes button in the Networks window that appears and asks you ‘Do you want to allow your PC to be discoverable by other PCs and devices on this network?’
Check whether the issue has been resolved or not. However, if that did not work, try the next solution.
Method 3: Perform an Internet Connections Troubleshoot
The internal issues with the network can be identified and rectified by simply running the Internet Connections troubleshooter.
STEPS TO FOLLOW:
- Open the Windows Settings app as before.
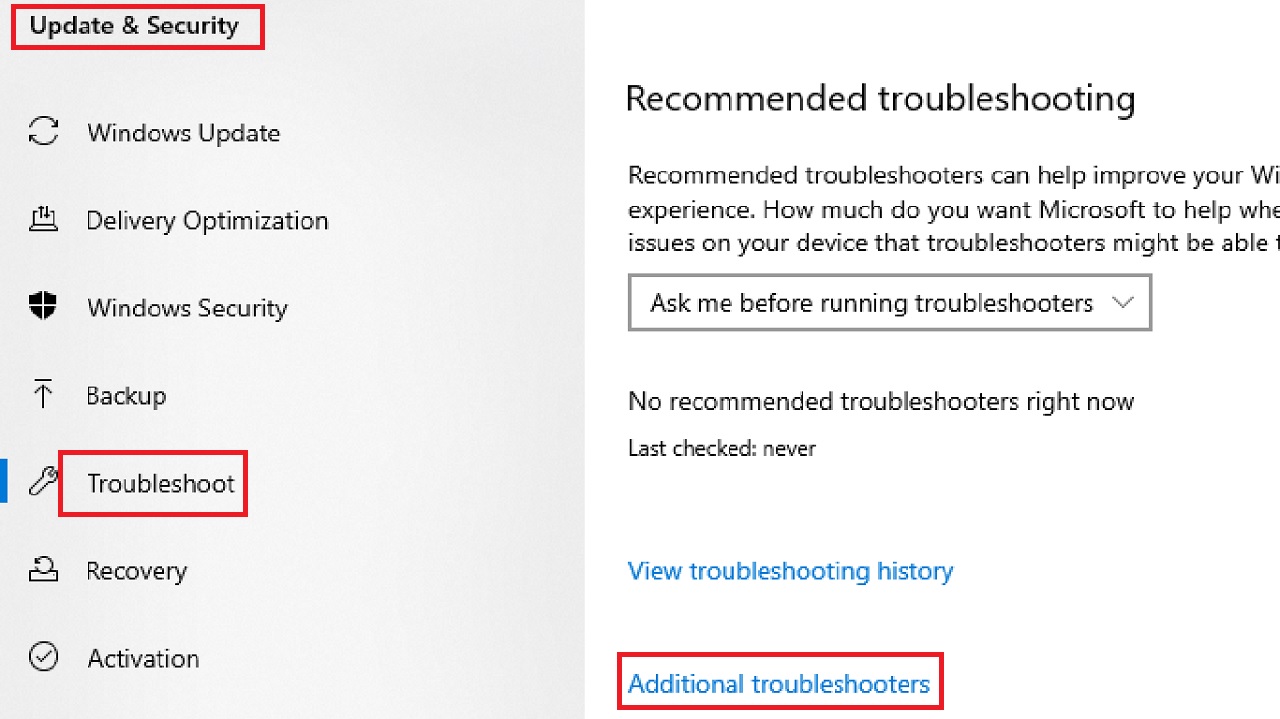
- Go to Update & Security.
- Click on Troubleshoot in the left pane of the following Update & Security window.
- Click on the Additional troubleshooters option on the lower-right side of the window.
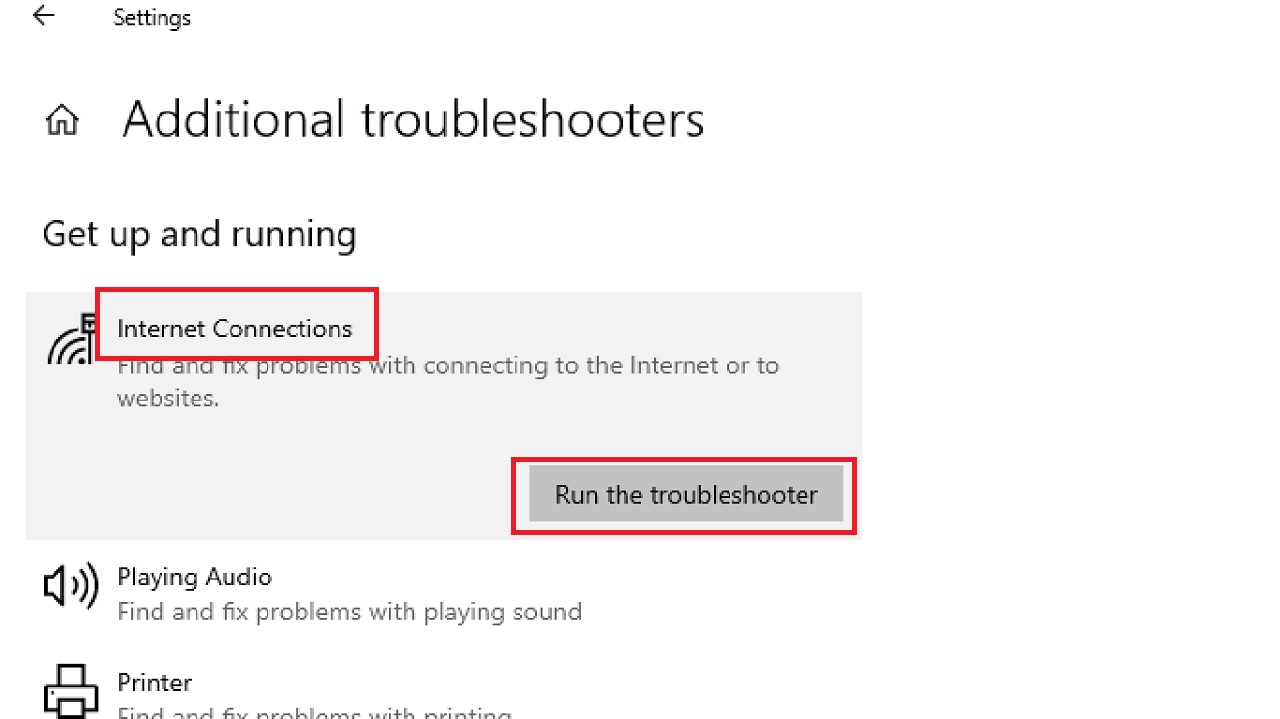
- Click on Internet Connections on the following window.
- Click on Run the troubleshooter button under Internet Connections.
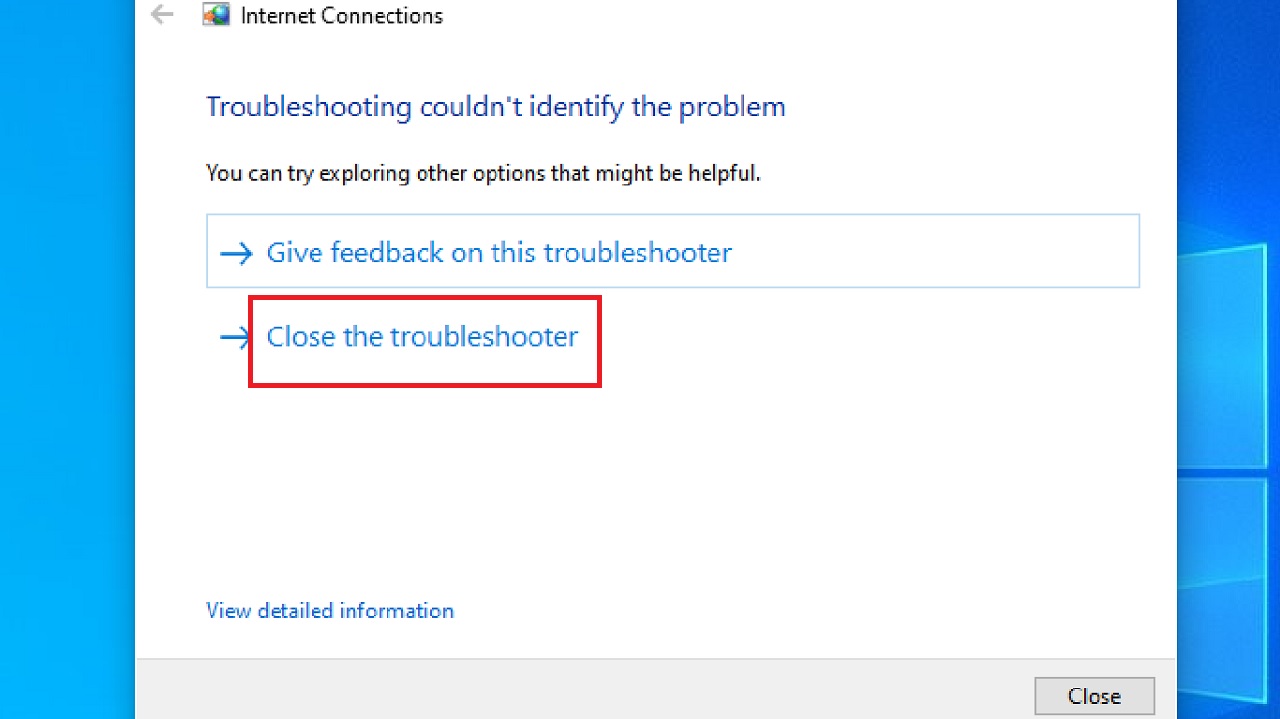
- Click on Troubleshoot my connection to the internet in the following Internet Connections window.
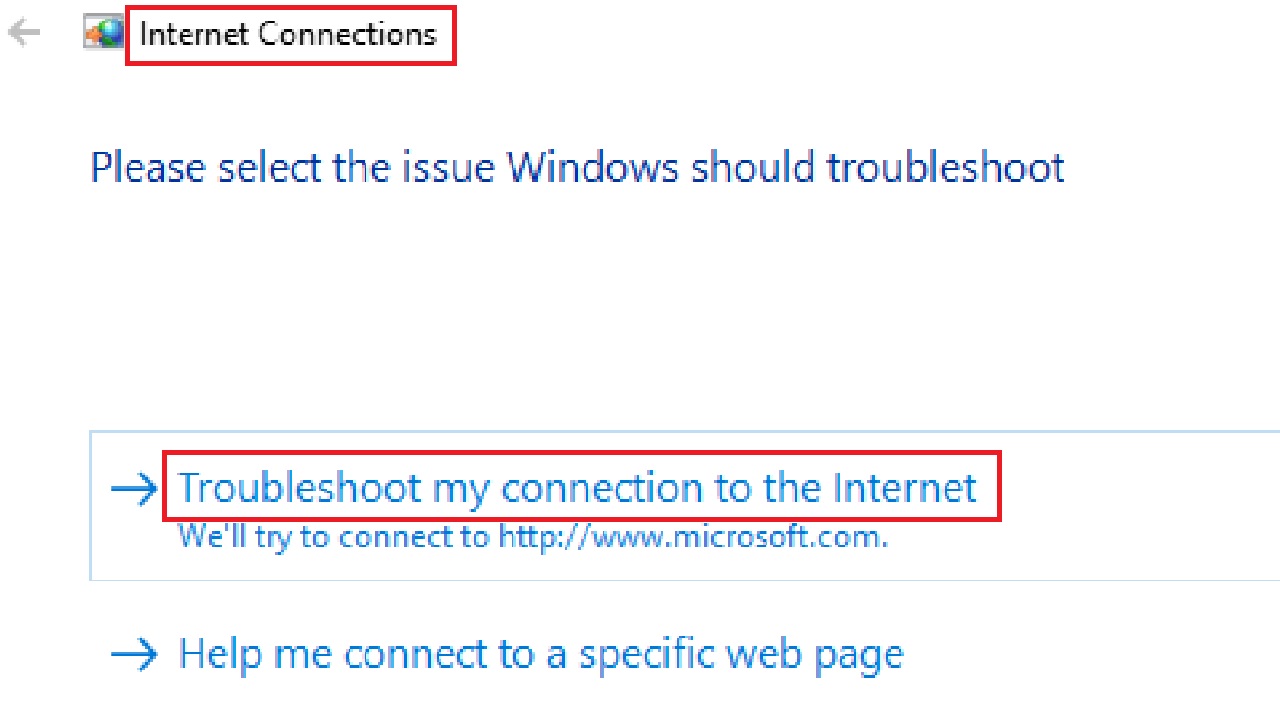
- This will take some time. Wait for the process to be complete and the connection to be repaired and then press ‘Close the troubleshooter.’
Once it is complete, restart your computer and check whether the issue is fixed or not. If that did not resolve the issue, follow the next method.
Method 4: Uninstall Device from the Device Manager
Uninstalling the device from the Device manager may resolve the issue sometimes.
STEPS TO FOLLOW:
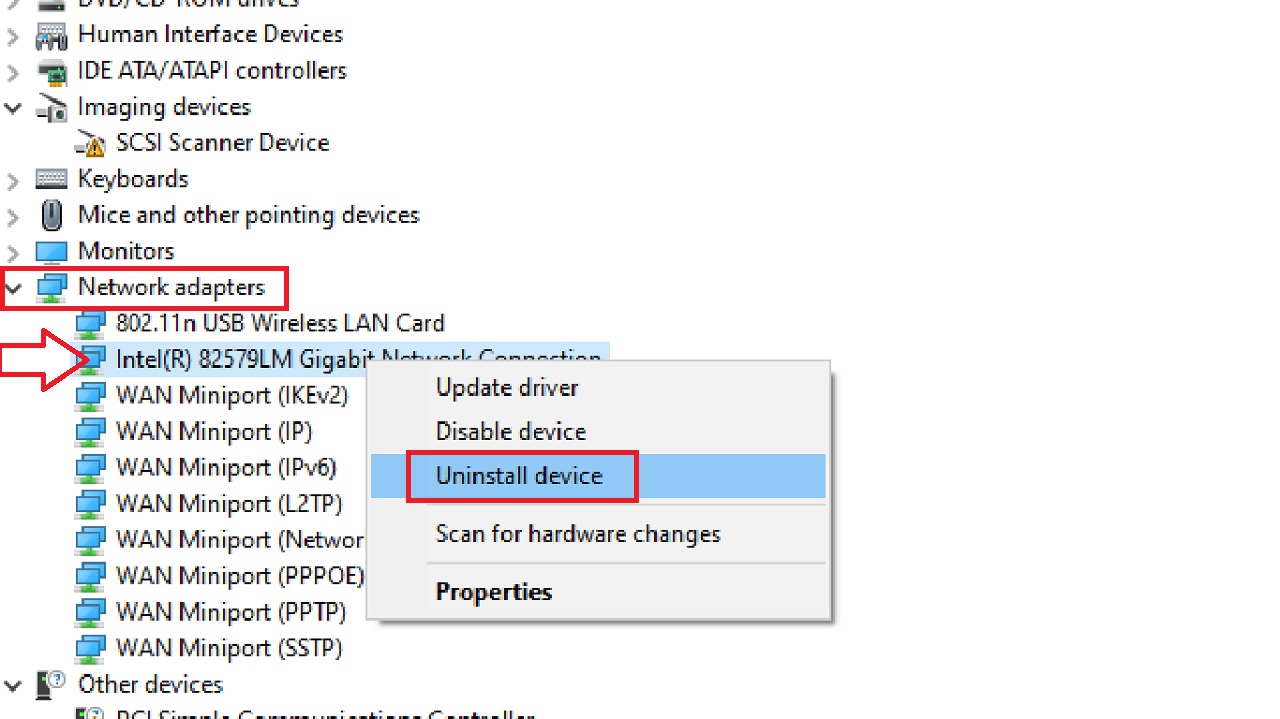
- Open the Device Manager as before, expand Network adapters, and right-click on it.
- This time select Uninstall device from the drop-down context menu.
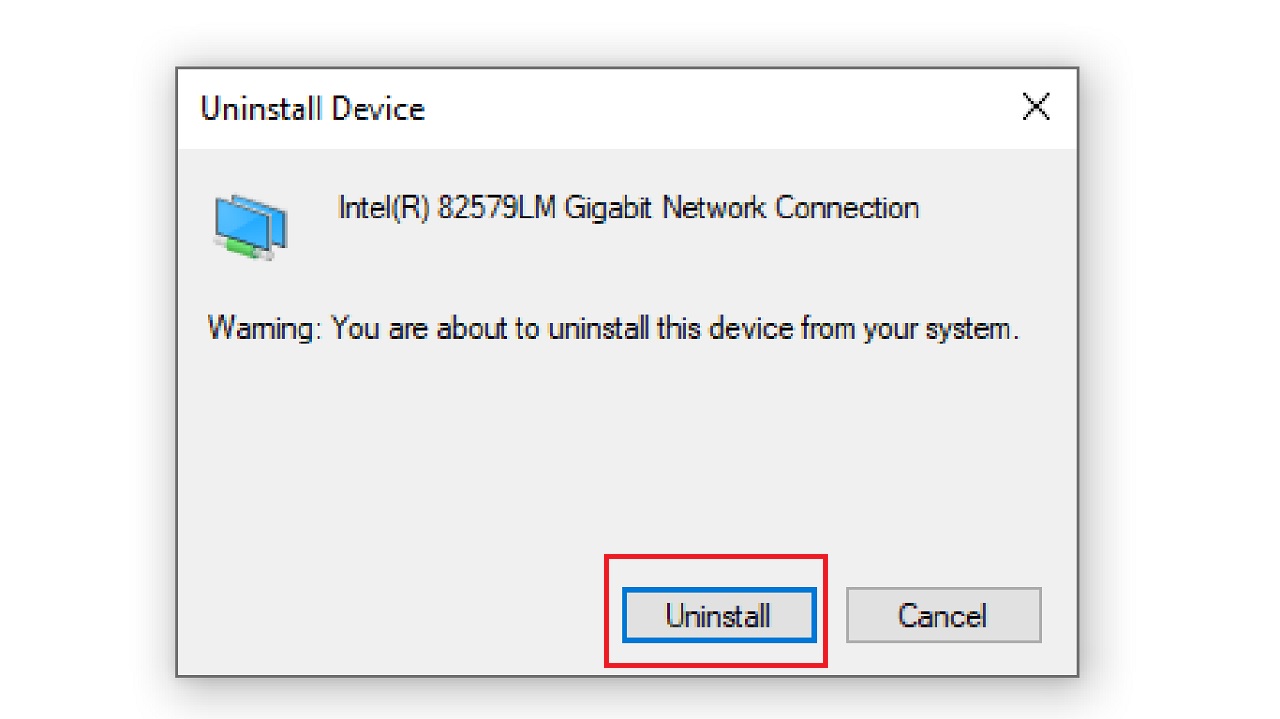
- Press the Uninstall button in the following warning window.
When the uninstallation process is complete, restart your computer system. After it restarts, verify whether the issue has been fixed or not. If it could not solve the issue, you will have to update Windows 10.
Method 5: Update Windows 10
Your operating system may be outdated and therefore incompatible with the updates of Wi-Fi driver. In that case, you will need to update Windows 10 to prevent the Wi-Fi driver from causing a blue screen.
STEPS TO FOLLOW:
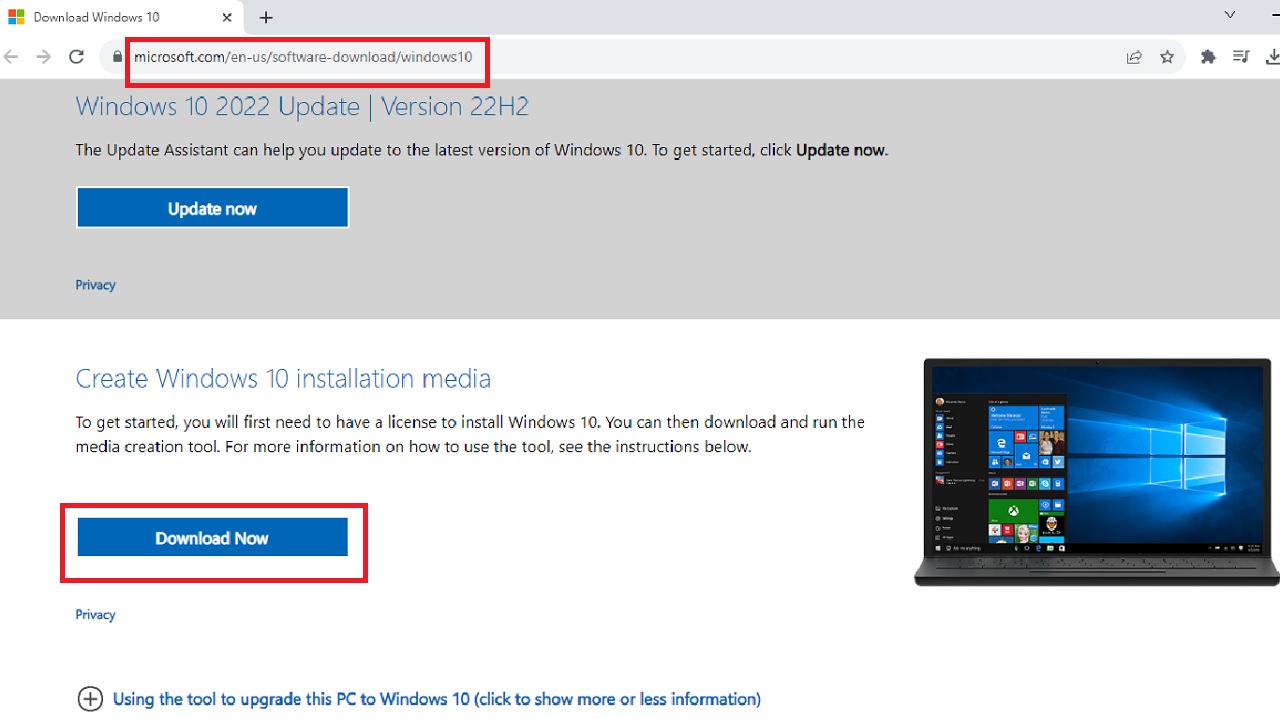
- Open Google Chrome.
- Type the link https://www.microsoft.com/en-us/software-download/windows10 in the search bar.
- Click on the Download Now button.
- When the file is downloaded, run it.
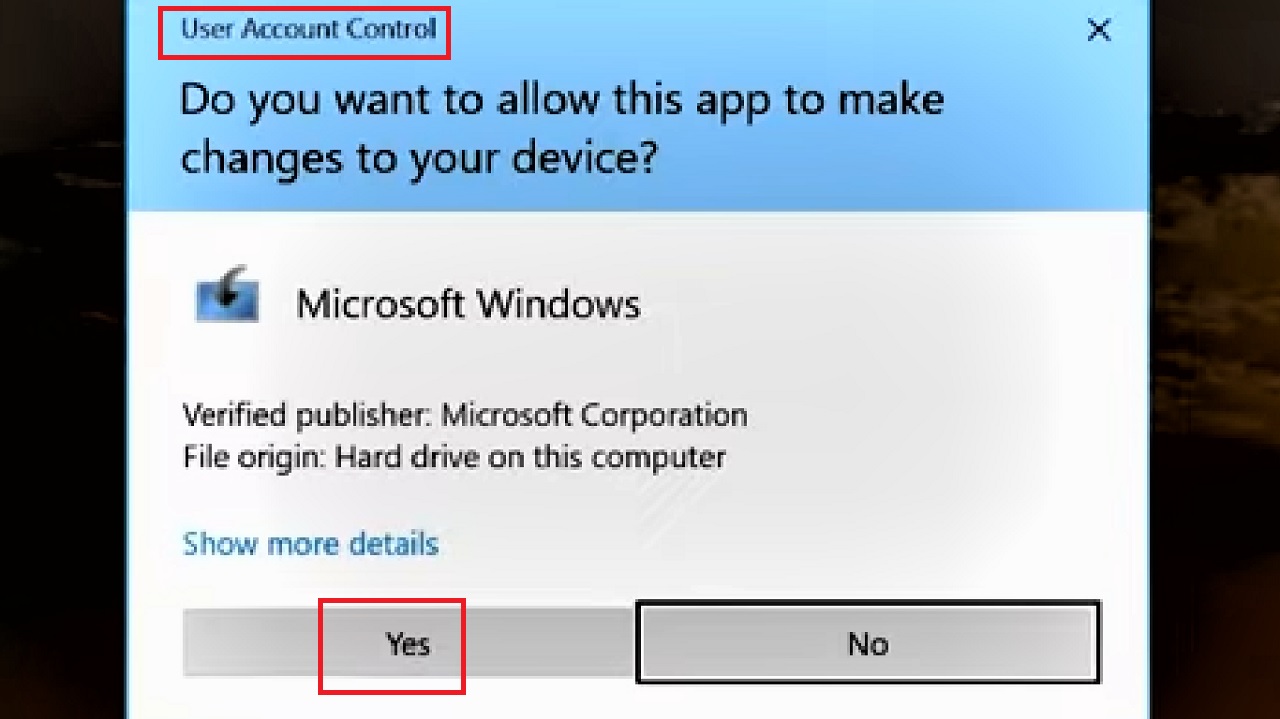
- Press Yes on the User Account Control window that appears next.
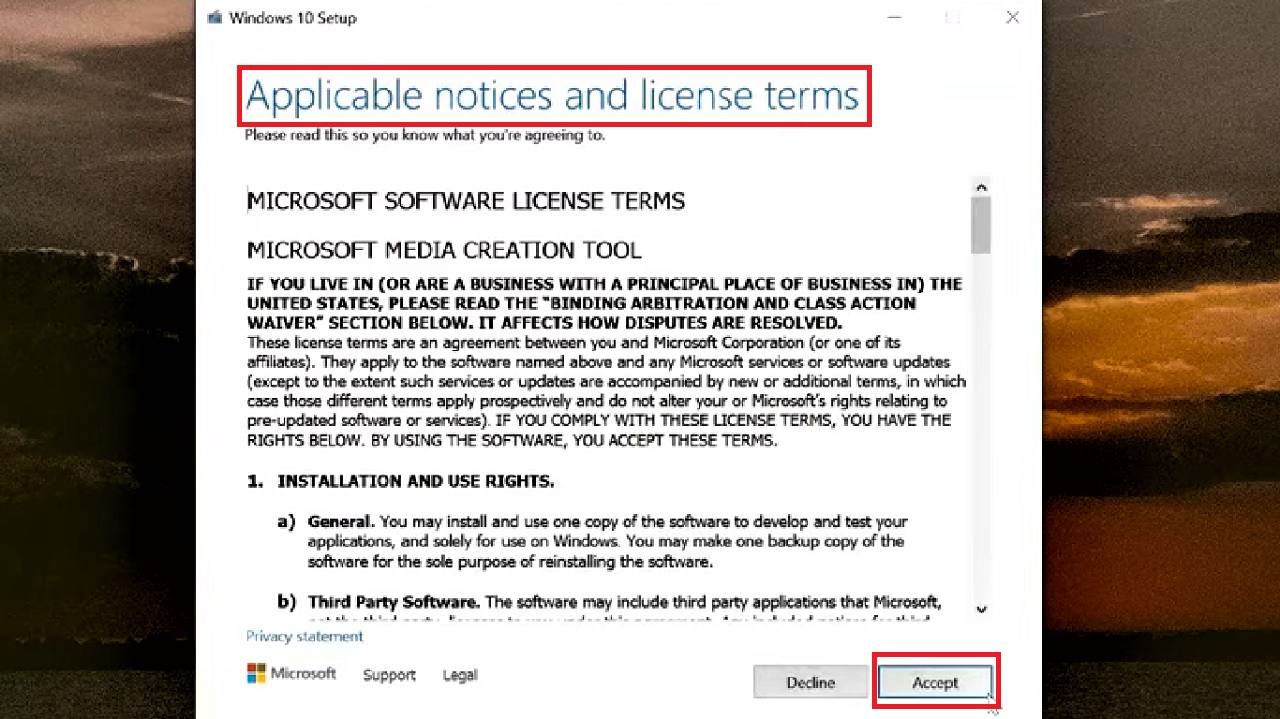
- Click on the Accept button to agree with the Applicable notices and license terms.
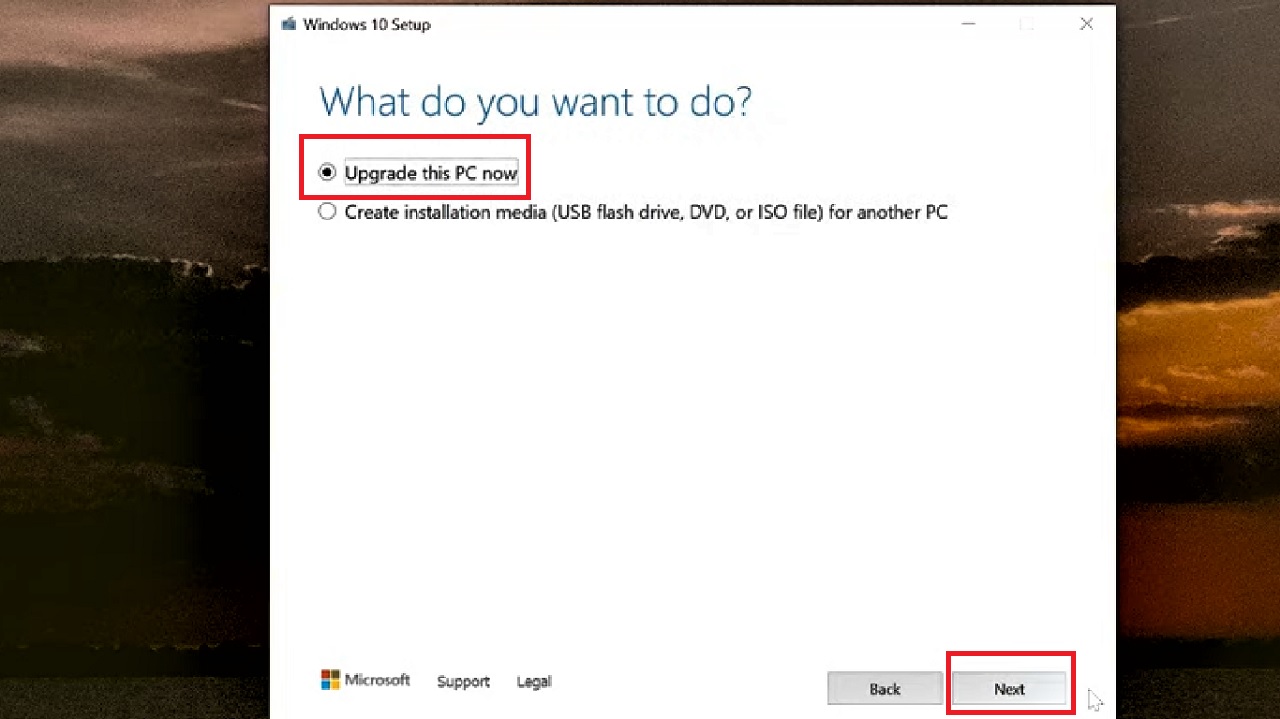
- Click on the small radio button next to ‘Upgrade this PC now’.
- Press on the Next button below.
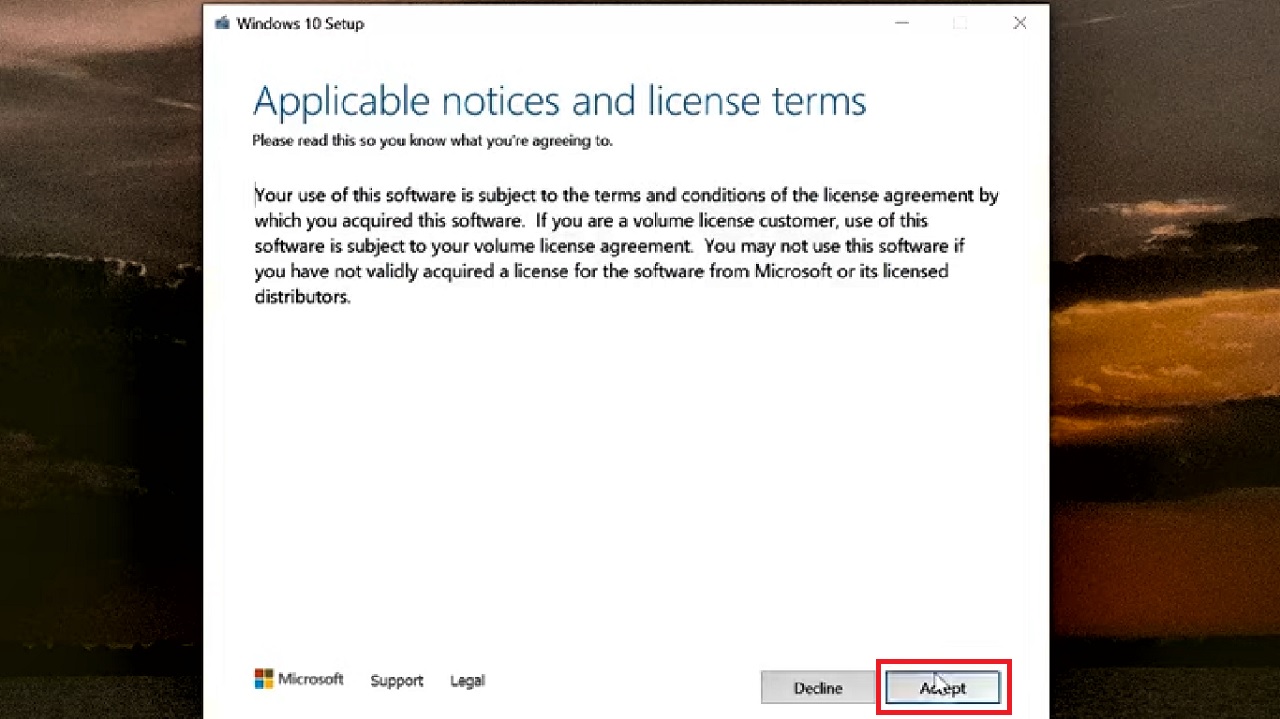
- Press Accept in the next window.
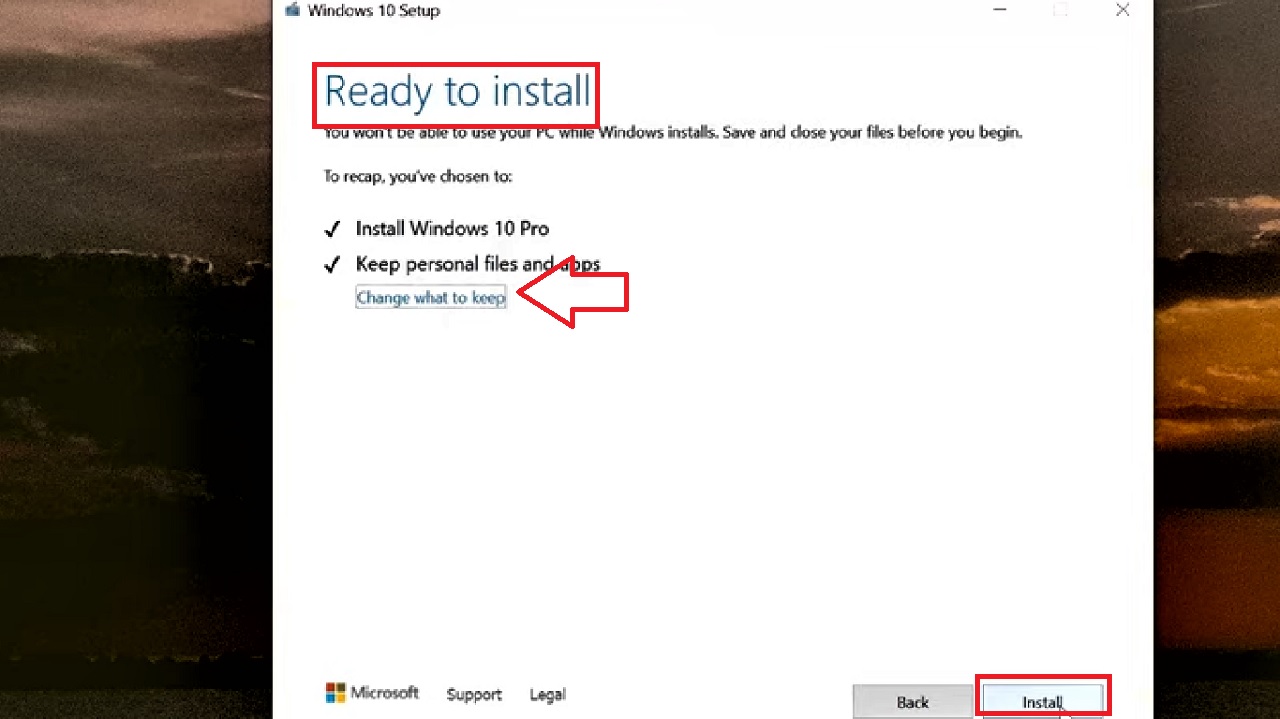
- The next window will show that Windows is Ready to install. Leave everything as it is in this window if you want to keep all your files and programs on your PC or click on Change what to keep.
- Finally, click on the Install button below.
Wait for the updates to be installed. When it is complete, restart your computer and check whether or not the issue is resolved.
If it could not resolve the issue, try the next method.
Method 6: Advanced Startup from Recovery Options for System Restore
Performing a system restore can resolve several issues related to the network and others in a computer system. In the same way, it may also prevent the Wi-Fi driver from causing a blue screen.
Ideally, in this process, the system is taken back to an earlier date when the issue did not occur.
Note: To perform this method, you must have at least one restore point created earlier.
STEPS TO FOLLOW:
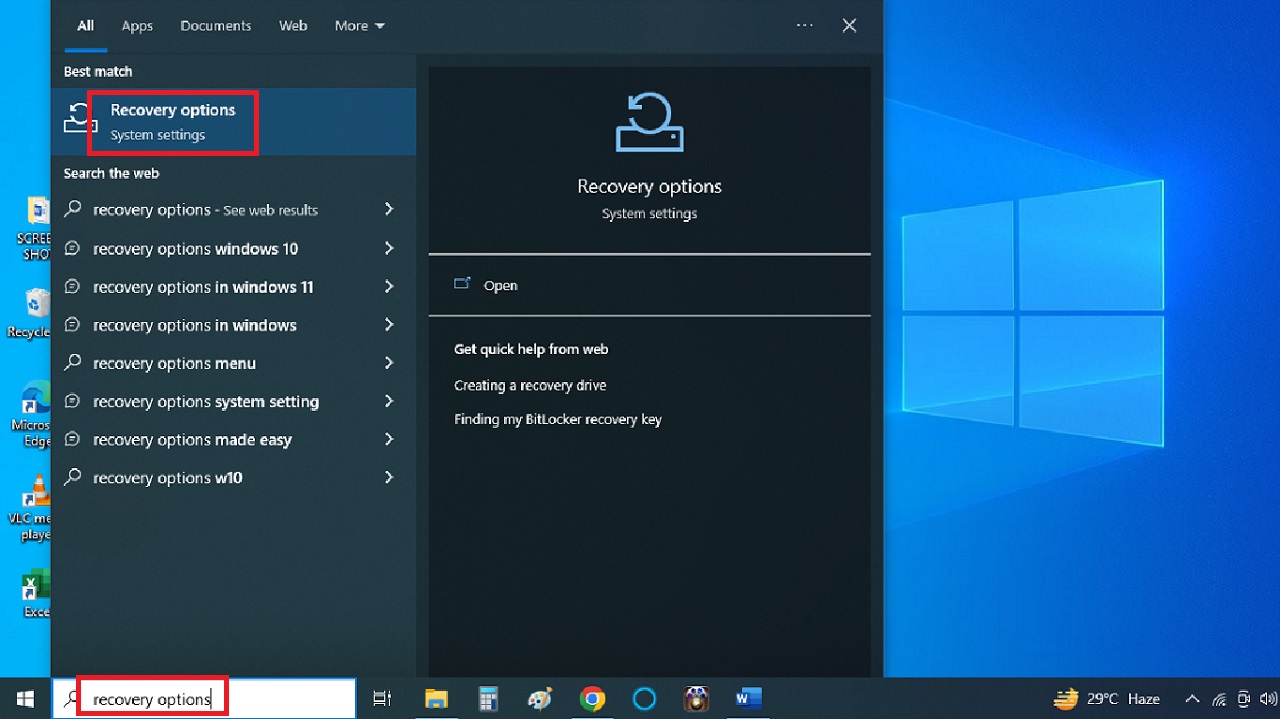
- Go to the Windows quick search box next to the Start Menu and type recovery options and hit Enter.
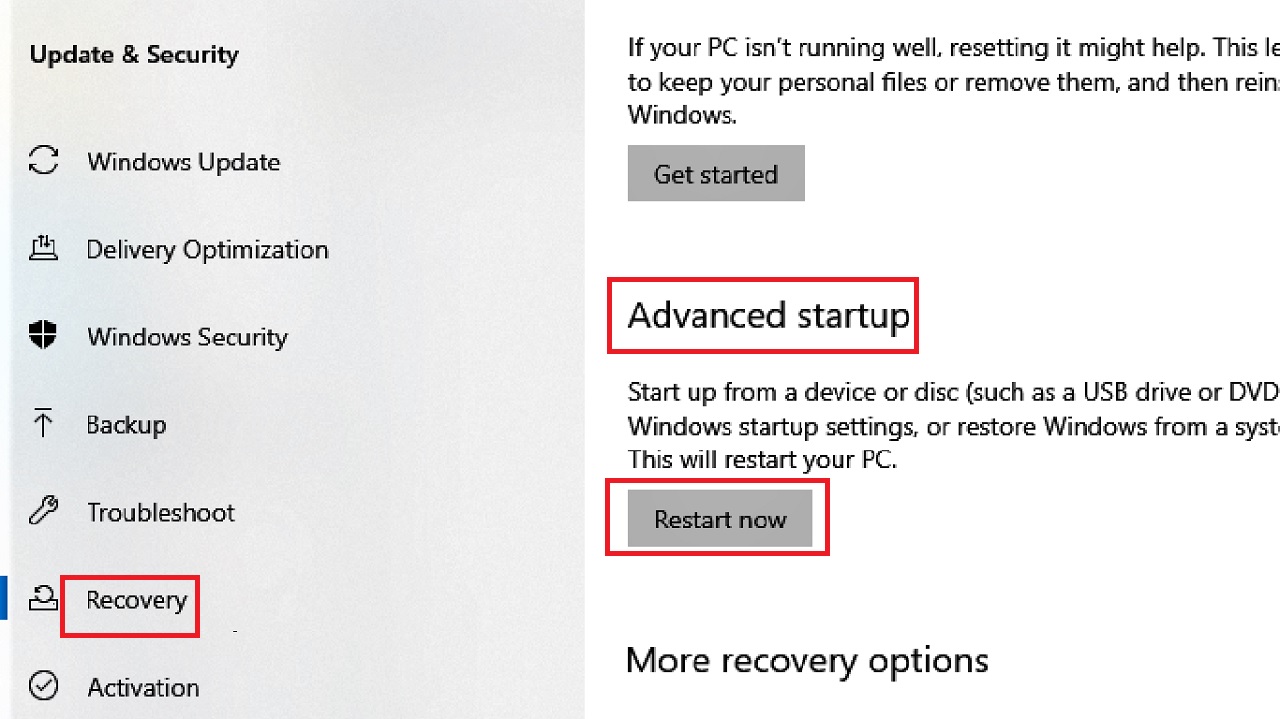
- In the following window, click on Restart now under Advanced startup.
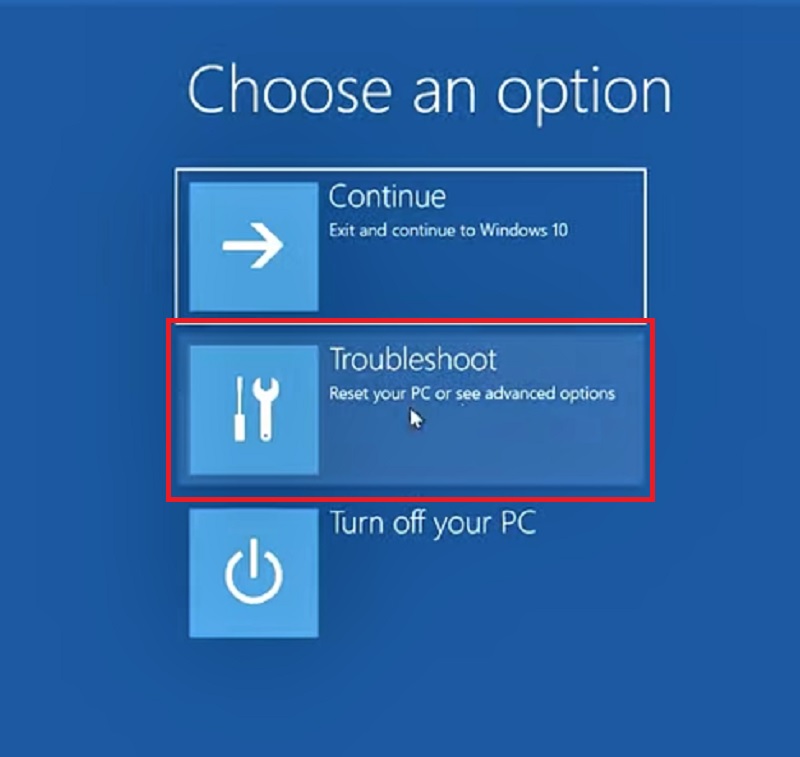
- After the system restarts, click on Troubleshoot in the window that appears.
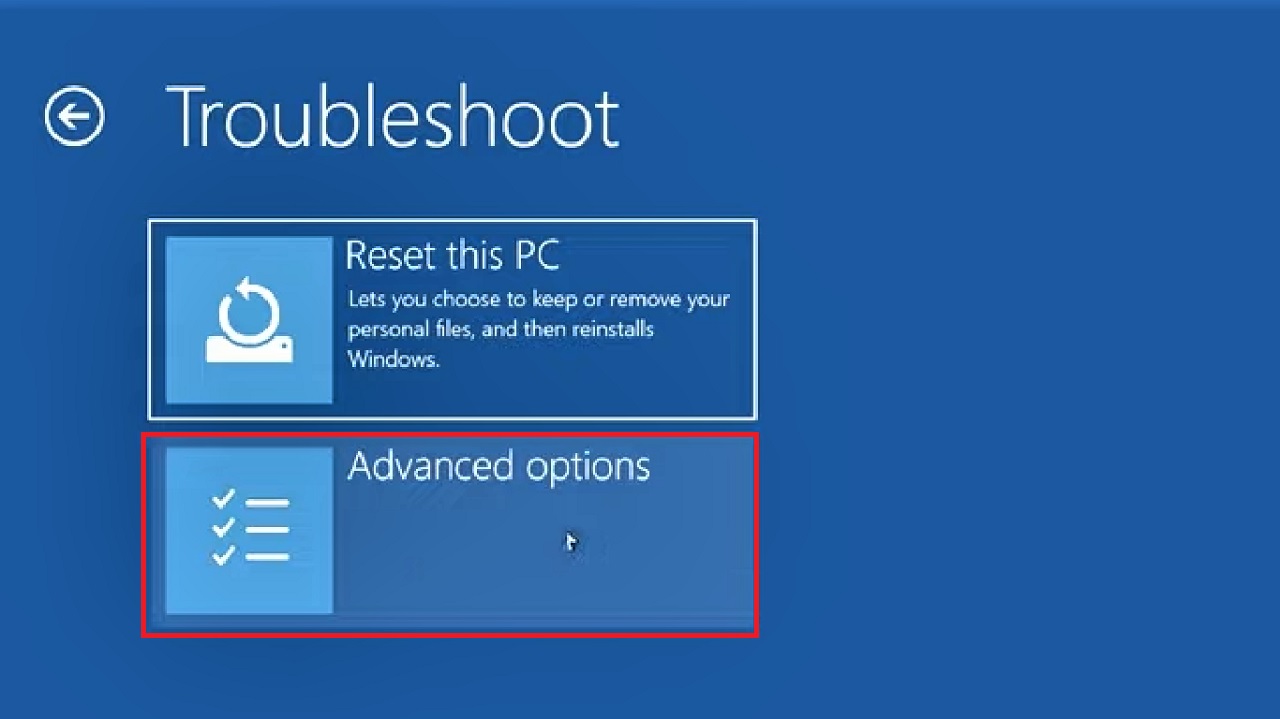
- Then, in the next window, select Advanced options.
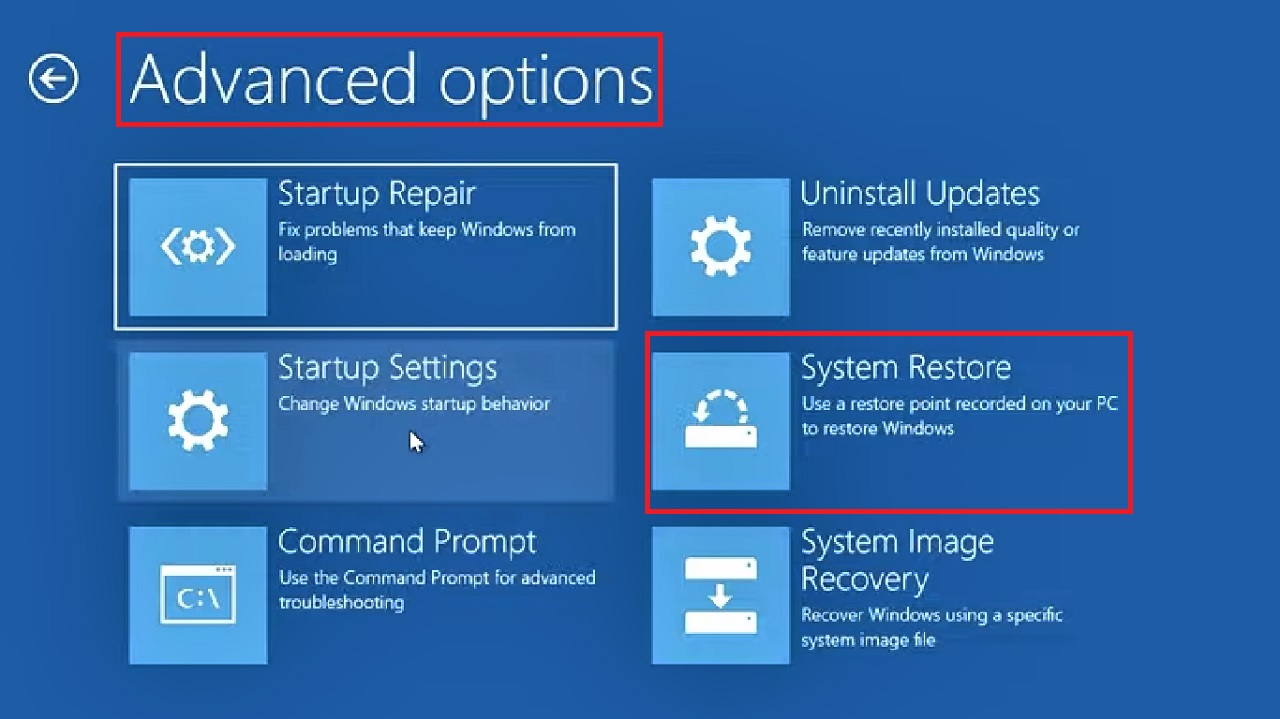
- Click on System Restore in the following Advanced options window.
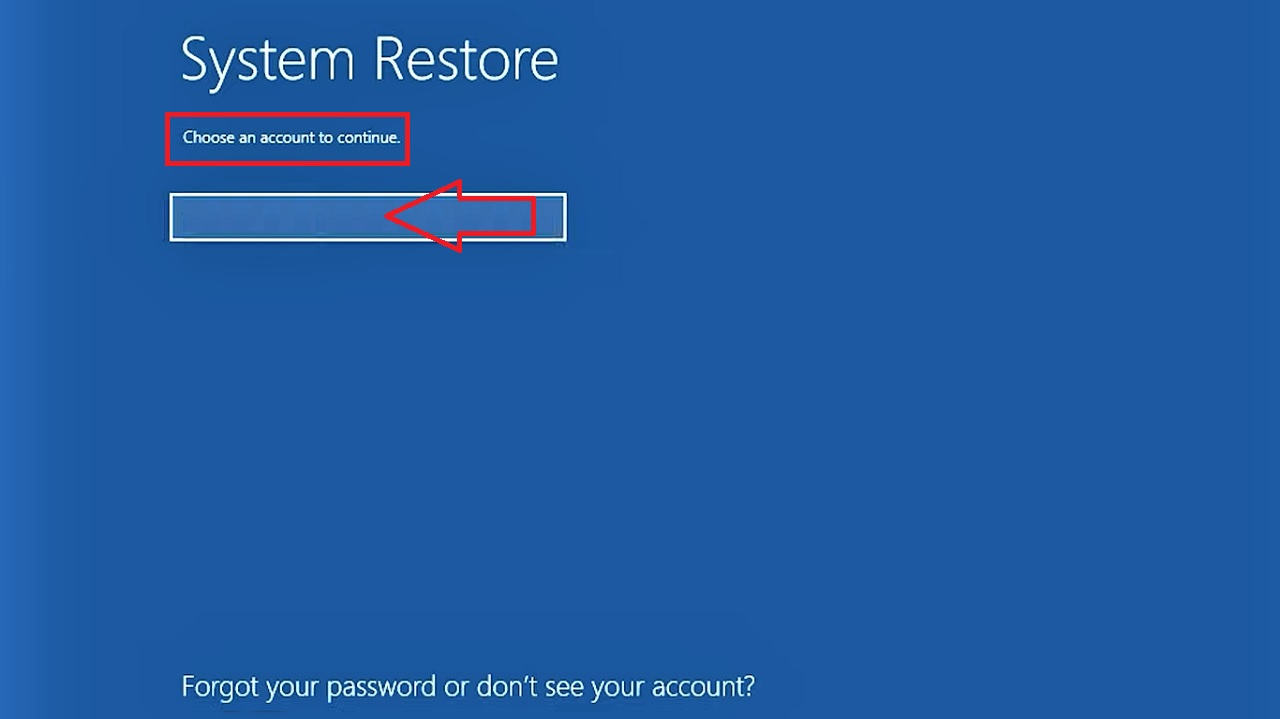
- Choose an account to continue in the next window and type in in the field marked with a red arrow in the image below.
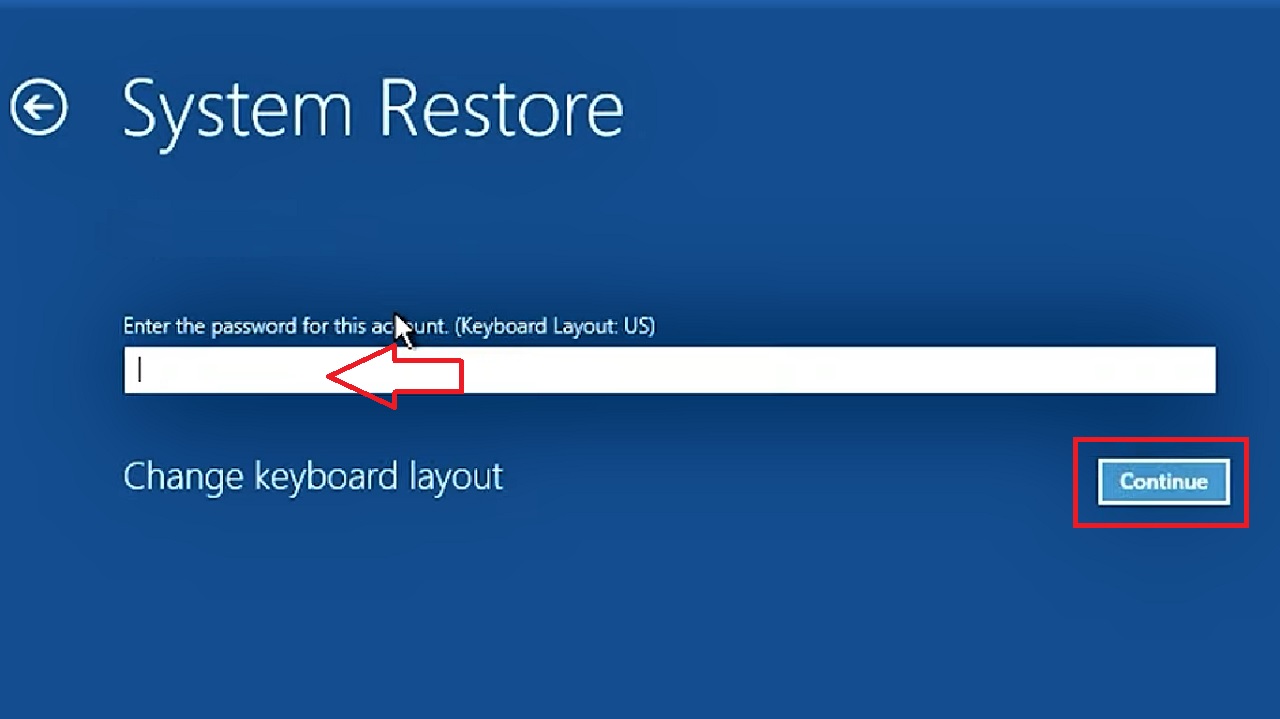
- Click on the Continue button in the following window after typing the password in the relevant box marked with a red arrow.
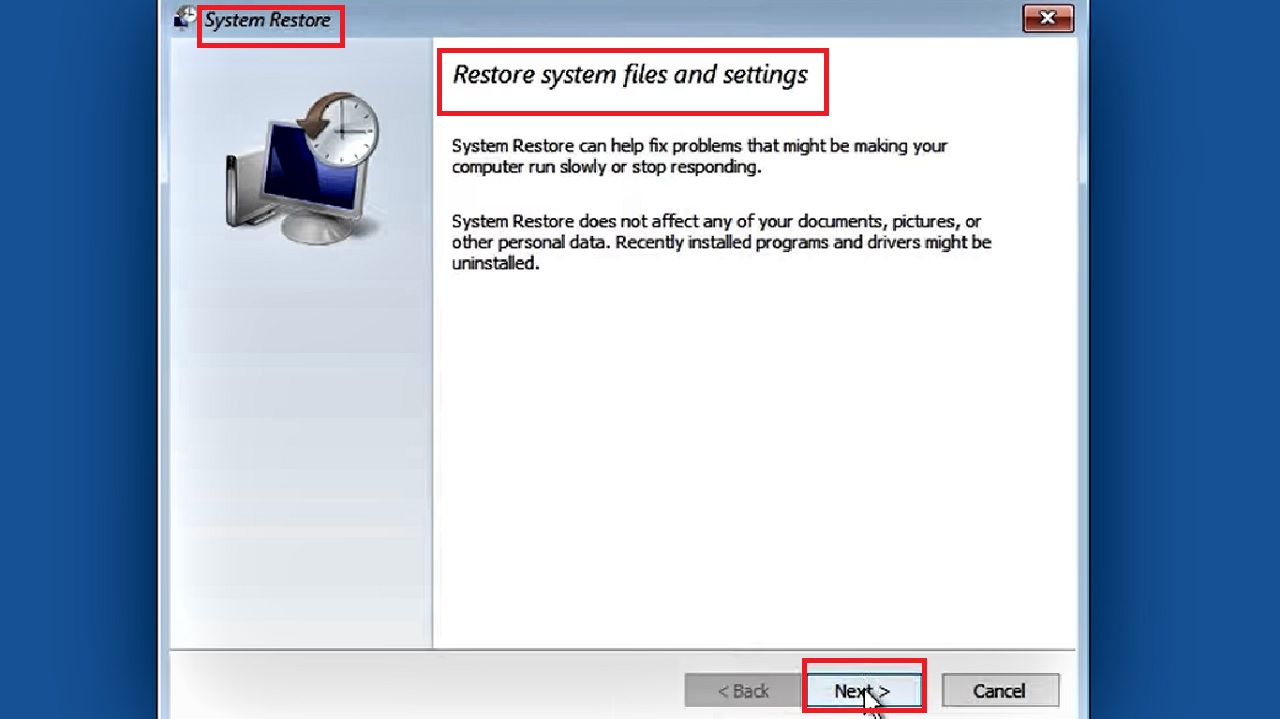
- Click on the Next button at the bottom of the System Restore window that appears next to Restore system files and settings.
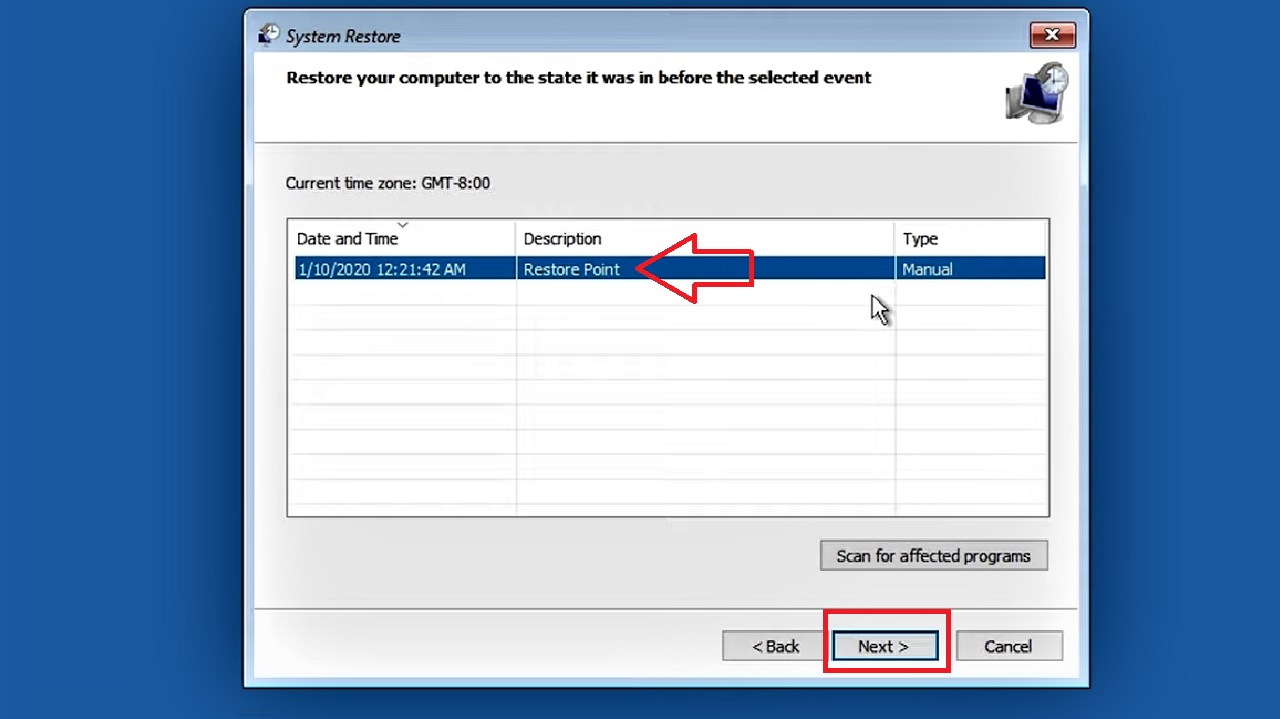
- Select the latest restore point from the list from the box in the next window to Restore your computer to the state it was in before the selected event.
- Click on the Next button below.
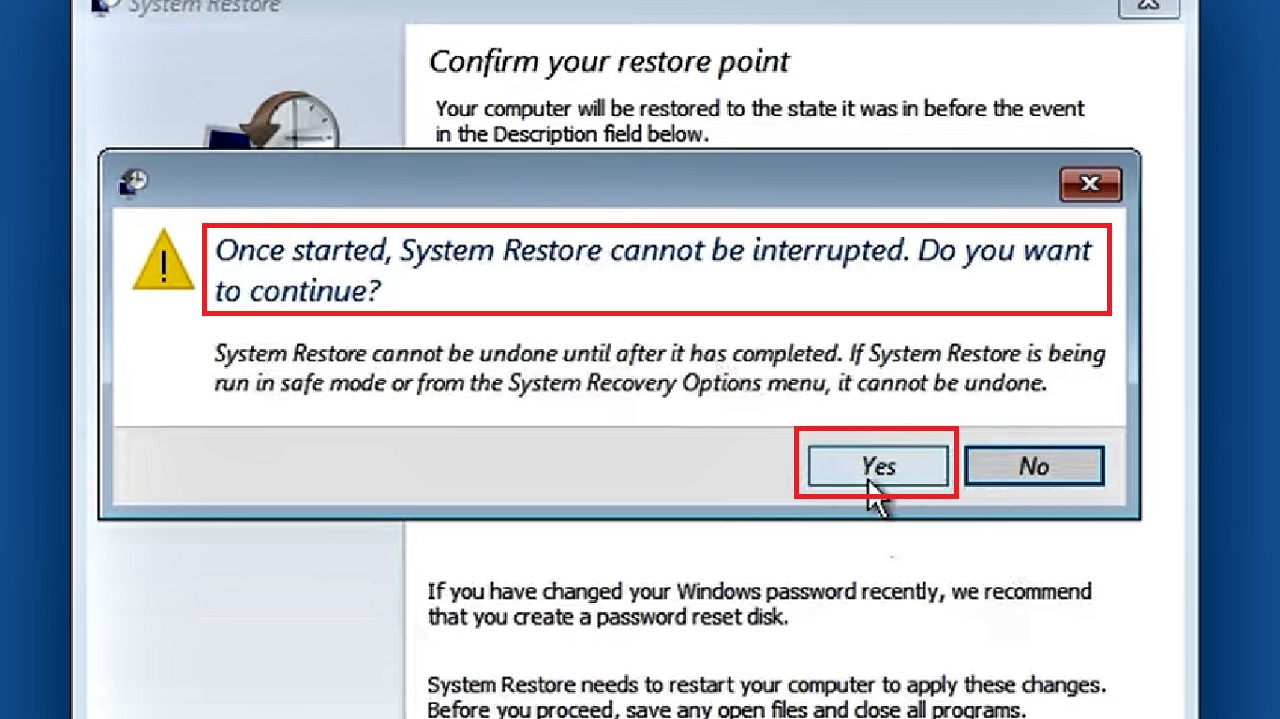
- Press the Finish button in the following window to Confirm your restore point.

- Finally, press Yes in the final window which says ‘Once started, System Restore cannot be interrupted. Do you want to continue?’
This will start the restoration process and might take some time. Wait until the process is complete.
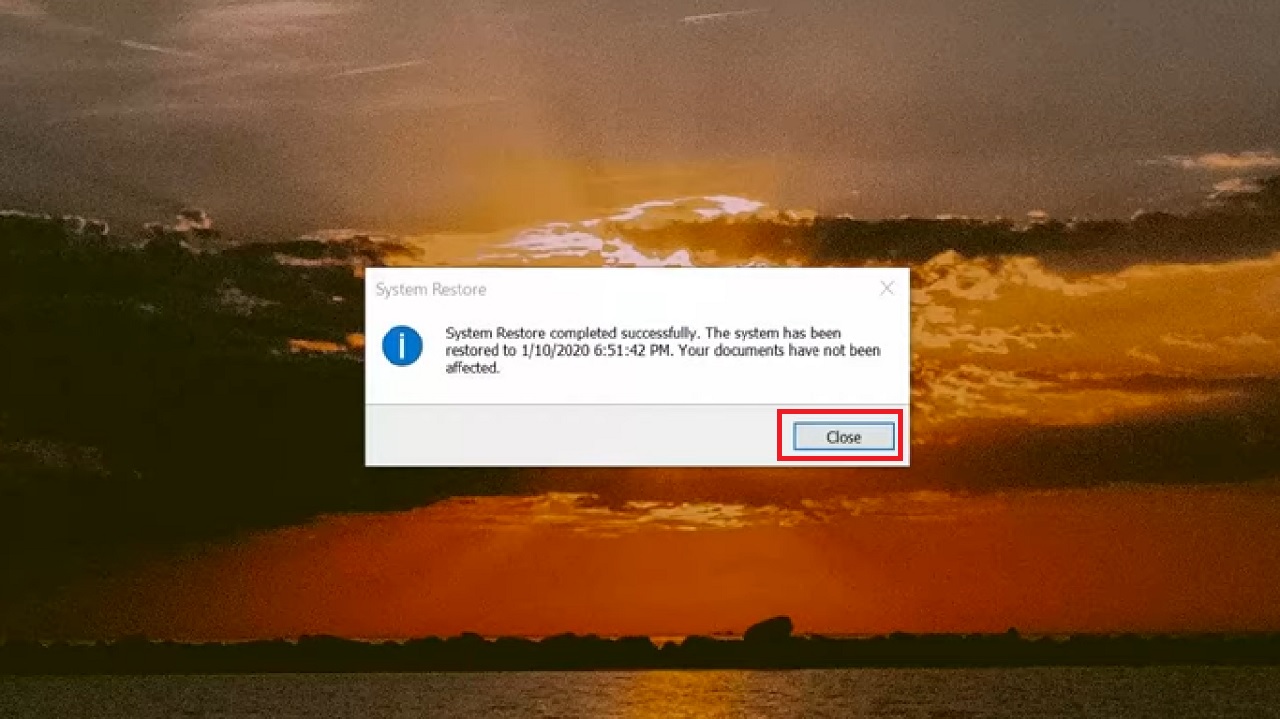
- When you see the window confirming that System Restore completed successfully, click on the Restart button to apply the changes.
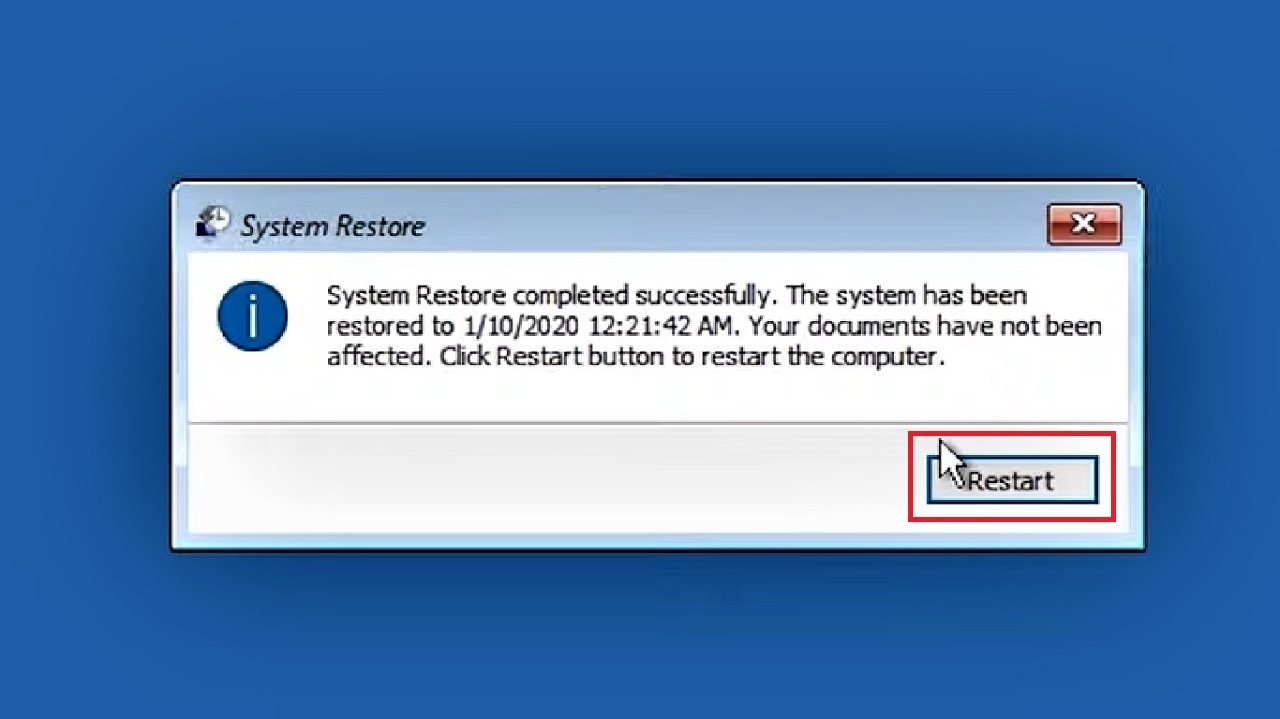
- After the system restarts, to end the process, click on the Close button in the window that appears stating that ‘System Restore completed successfully.’
Now, connect to your network and check whether or not the blue screen issue is resolved or not.
Conclusion
Ideally, the Wi-Fi driver causing a blue screen is a common BSOD issue that can be resolved by common fixes such as driver and Windows update, system restore, uninstalling device and others.
Choose and perform one of the fixes to solve this problem on your PC.