
It is important to keep your router firmware updated for proper functionality. However, at times it may fail even if you follow the correct guidelines.
In this post, you will find some of the most effective tips to troubleshoot the router firmware update failure issue quickly, either directly or indirectly.
In This Article
KEY TAKEAWAYS
- Restart your router to resolve minor glitches that may be causing the issue.
- Run a virus scan to remove bugs or corrupted files from your PC.
- Disconnect unnecessary devices from the router and place them away from interfering devices.
- Turn off Virtual Private Network service if you are using any.
- Make changes in the adapter settings.
Why Does Router Firmware Update Fail?
The most obvious reason for the router firmware failing to update is selecting the wrong file in the first place, which is not compatible with the particular router model.
This error may also occur if:
- You are not using a high-speed internet connection or the connection is weak and unstable
- You are using a cached version of the web browser
- You press any button, play games, or perform any background activities during the updating process
- There is a virus-infected or tainted file existing on the PC
- The router is receiving interrupted signals
- There is some issue with the services of the Internet Service Provider (ISP)
- The distance between the system and the modem or router is too much
- There are technical glitches or faulty hardware in the system
- The firewall security of your system is over-aggressive
In short, there are several reasons for a router firmware update to fail. Fortunately, the solutions to this issue are pretty straightforward.
Ways to Fix Router Firmware Update Failed
The simplest fix to the router firmware update failed issue is to choose to update the compatible and latest version of the file that matches the router.
In addition, also try the following simple fixes before you move on with the other solutions to this issue:
- Check the cables for damages and swap them if needed
- Check for loose connections and secure them
- Connect the router to a different power outlet
- Run a speed test on your computer to check the internet speed
- Delete cache and cookies and use an updated web browser
- Run a virus scan on your PC to remove bugs
- Place your router from interfering appliances and devices
- Place the router in a central location instead of in corners or near concrete walls
- Do not perform any task on your PC during the updating process
- Switch to a wired connection if you are using a wireless connection
- Check and enter the correct login credentials
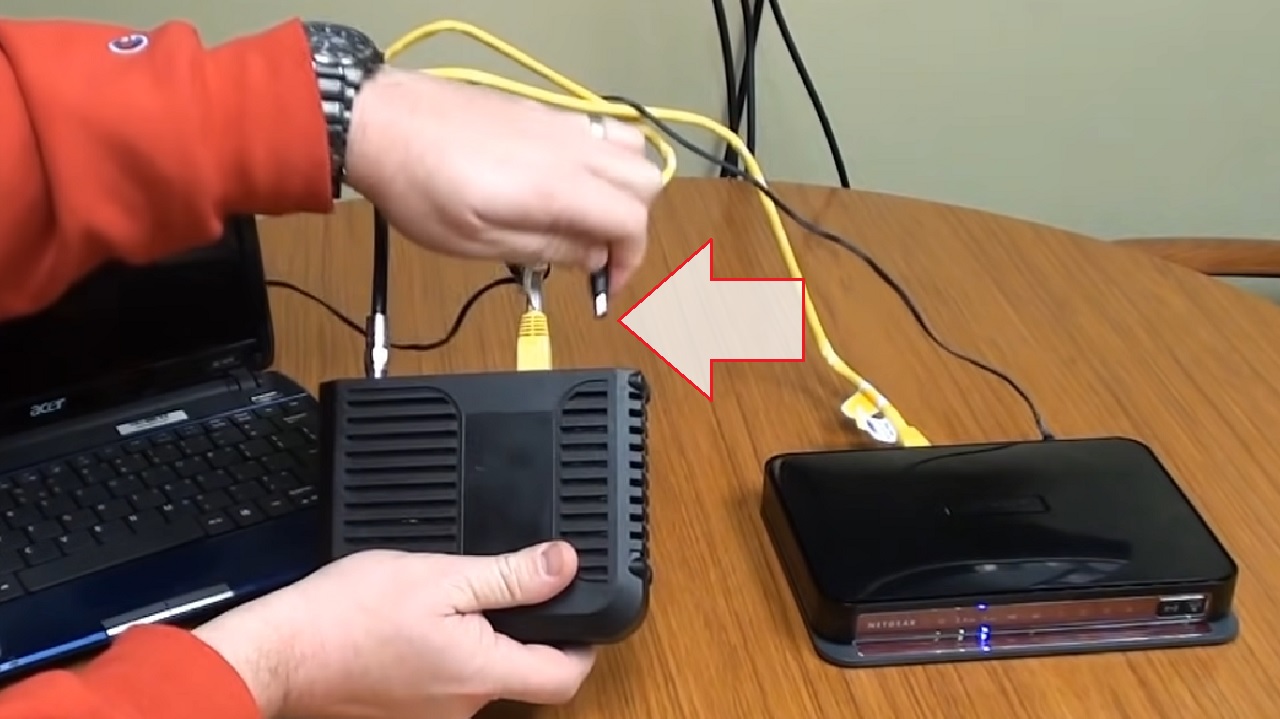
- Disconnect other devices from the router and reconnect them after updating firmware
- Press the Wi-Fi button on the router to disable wireless radios
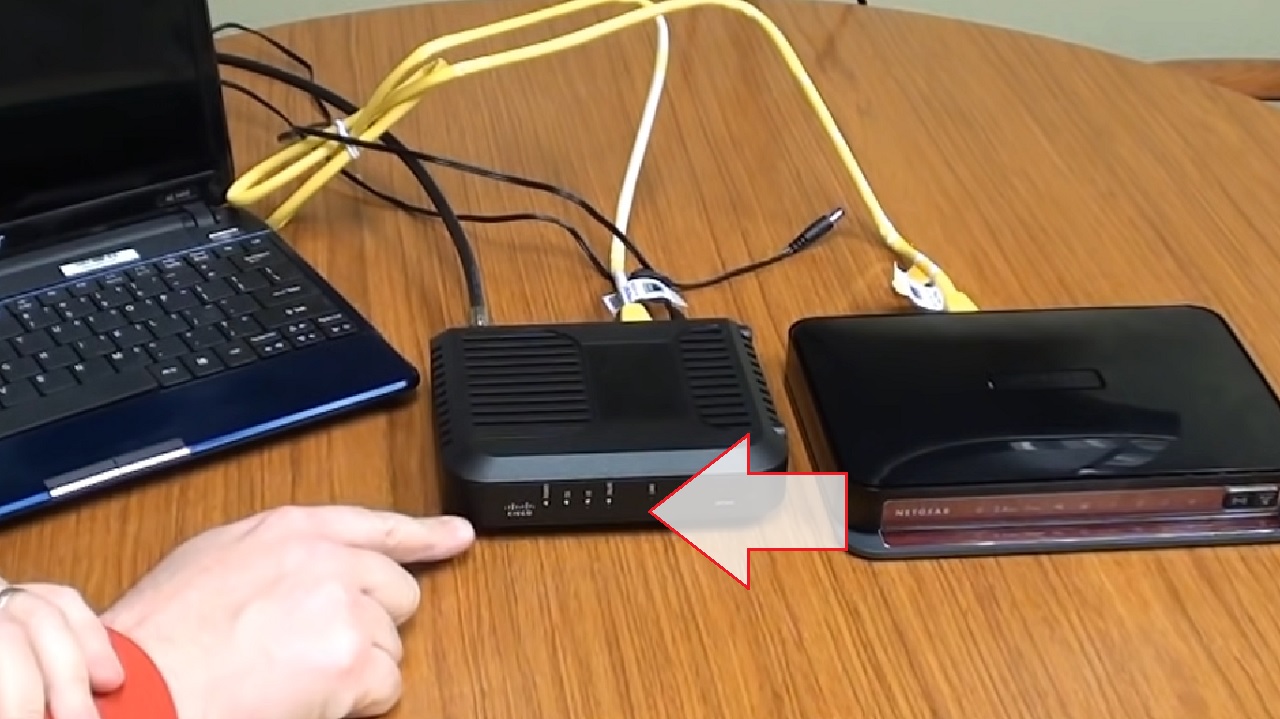
- Ensure that the router and modem are connected via the WAN ports
Here are the steps to follow for a few specific solutions for a router firmware update failed issue.
Method 1: Reboot Your Router
As an initial step to the troubleshooting, reboot your router.
Often, rebooting or restarting your router may resolve the minor issues in it and may in turn fix the problem of router firmware update failure as well, especially if the issue is not related to other specific factors.
STEPS TO FOLLOW:
- Shut down your computer.
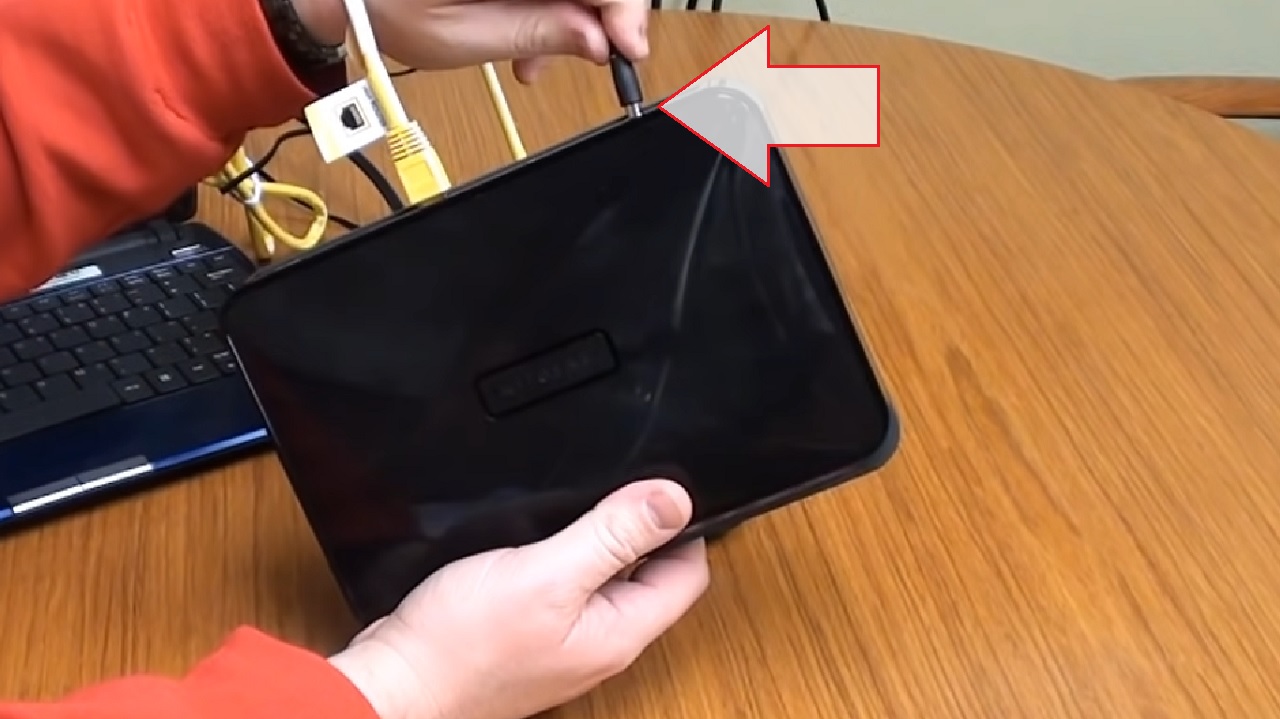
- Disconnect all cables connecting the devices to the router.
- Remove the power adapter from the modem.
- Then, remove the power adapter from the router.
- Unplug them from the power outlet, if you want.
- Wait for about a couple of minutes.
- Then, plug in the power adapter of the modem first.
- Plug the power cord into the power outlet if you have removed it.
- Turn it on.
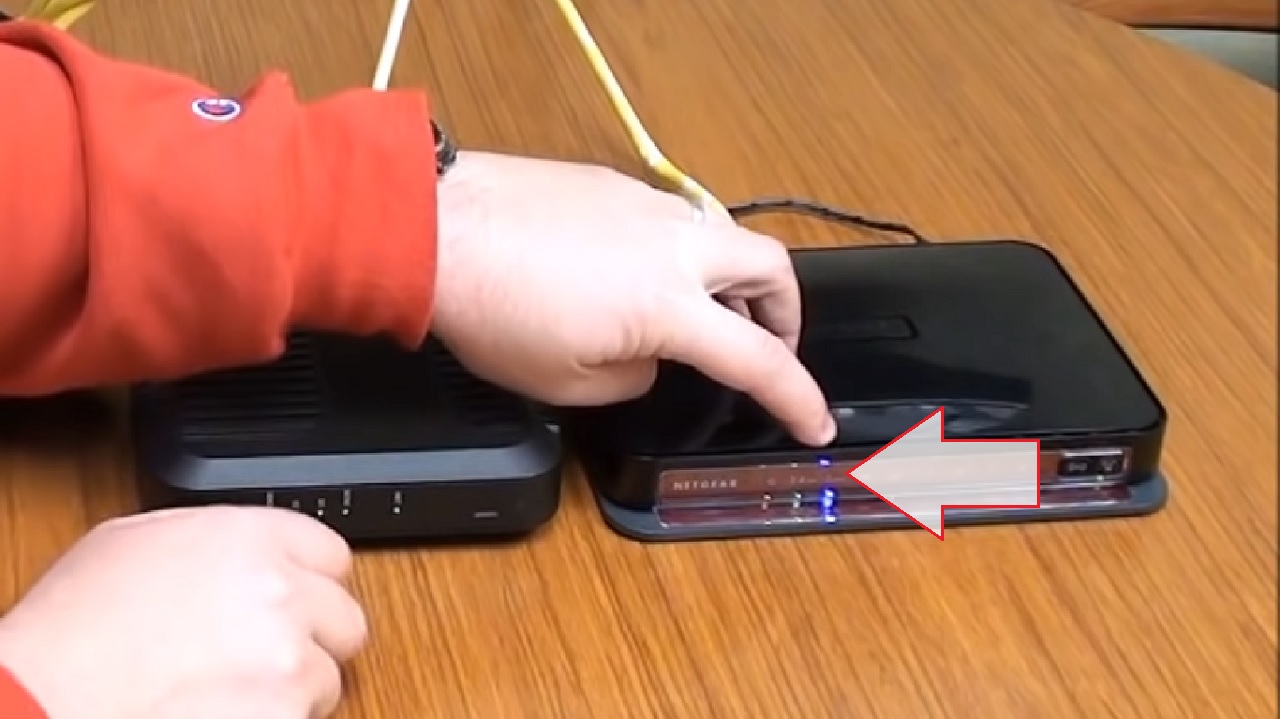
- Wait for the modem to reboot and for the lights to turn on.
- Next, plug the adapter of the router back.
- Turn the power on, if you have removed the power cord, and wait for the LED lights to lighten.
- Connect all devices to the router back.
- Finally, turn on your PC and other devices.
Note: Follow the order of unplugging and plugging the devices as mentioned above. If you follow the wrong order, you might experience slow internet to no internet at all.
Now, wait for all the devices to turn on, and then try updating the failed router firmware again.
If this cannot resolve the issue, follow the next method.
Method 2: Disable Firewall Security
Another indirect way to resolve the issue is to disable the firewall security of your system. This feature at times may disrupt the process of updating your router’s firmware. Disable it temporarily so that the necessary files can be downloaded.
Note: Different router models may have different interfaces and approaches. Refer to your router manual or documentation for the precise process. However, here are the basic steps to follow for the two popular router models.
STEPS TO FOLLOW:
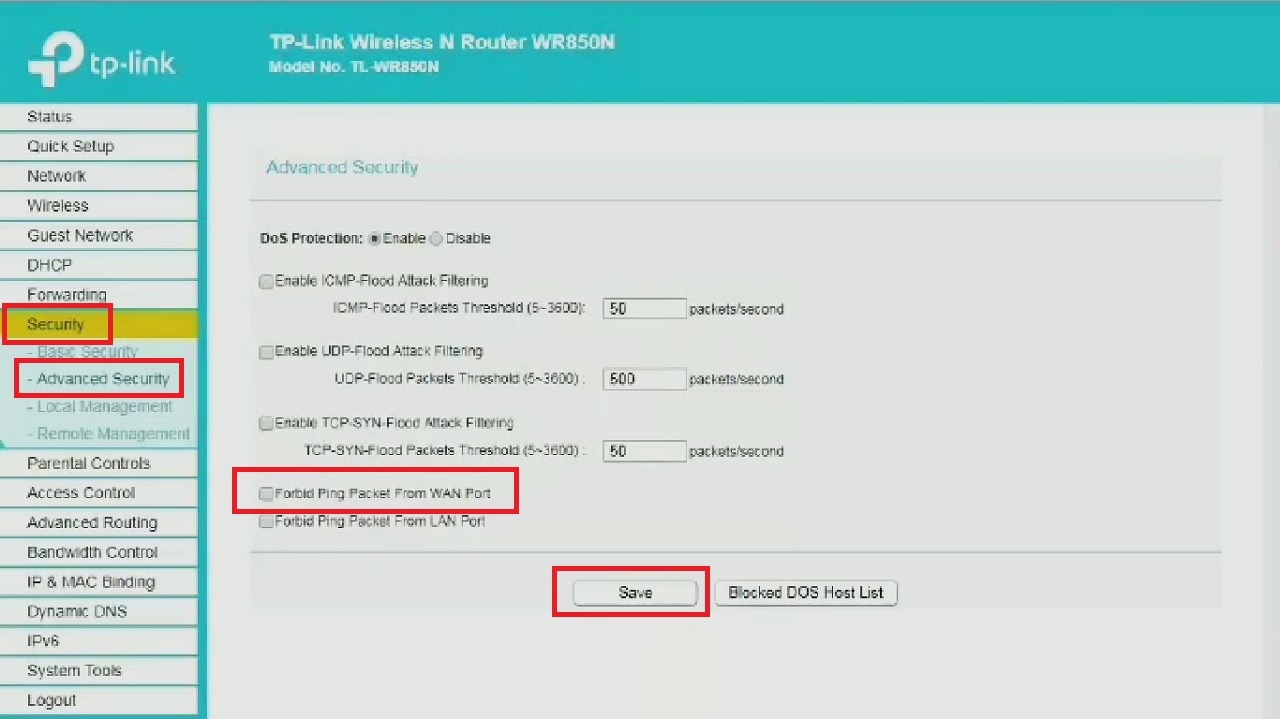
For TP-Link Router:
- Open a web browser.
- Type in the IP address.
- LogIn to the router’s web interface by entering the Username and Password.

- Now, select Security on the left pane.
- Click on Advanced Security under it.
- Click on the small box next to Forbid Ping Packet From WAN Port.
- Click on the Save button.
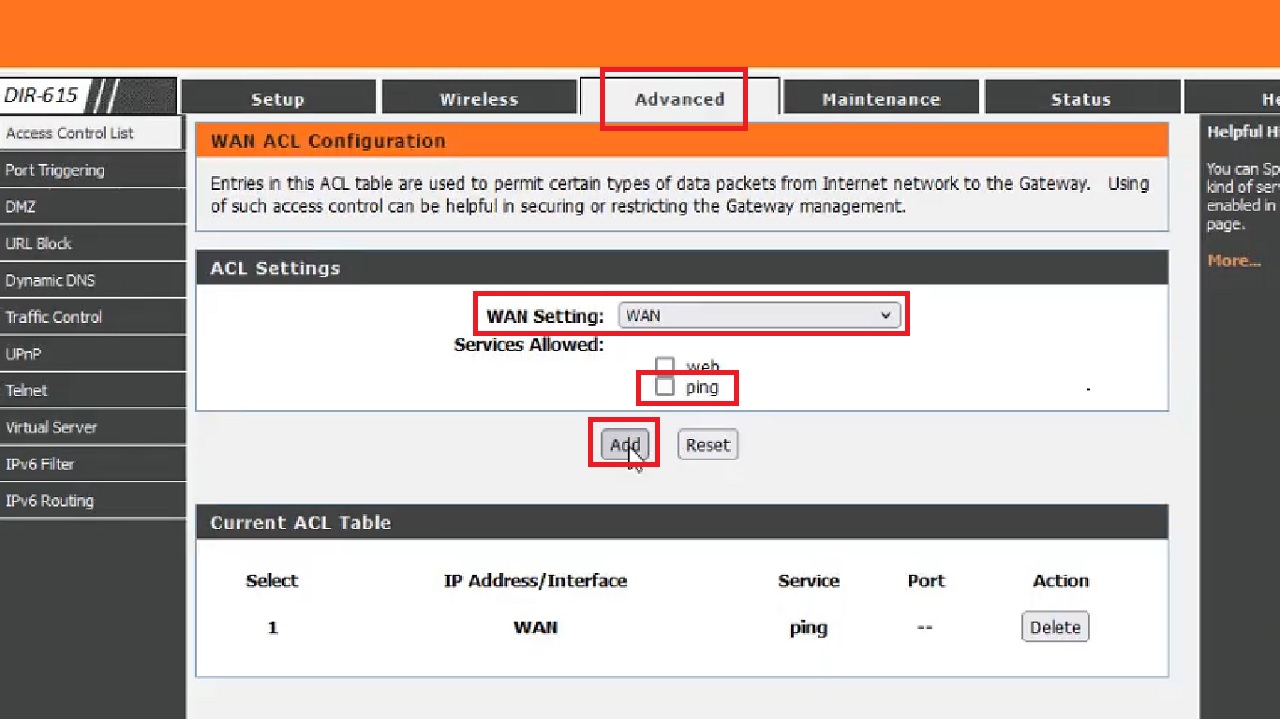
For D-Link Router:
- Open the web interface similarly and Login by typing the Username and Password.

- Go to the Advanced tab.
- Select WAN from the dropdown options you get after clicking on the small arrow in the box next to WAN Setting.
- Check the box next to ping.
- Click on the Add button.
Note: Disabling your router’s firewall for a long time is not recommended. Enable it again as soon as you are done with the updating of the failed router firmware.
However, if that does not work, maybe changing the adapter setting would.
Method 3: Change the Adapter Setting
There may be some internal issues with the adapter that are preventing updating the router. Make the following changes and, in the process, it may resolve the issue.
Note: Before you begin this process, make sure your computer is connected to the router through a wired connection.
STEPS TO FOLLOW:
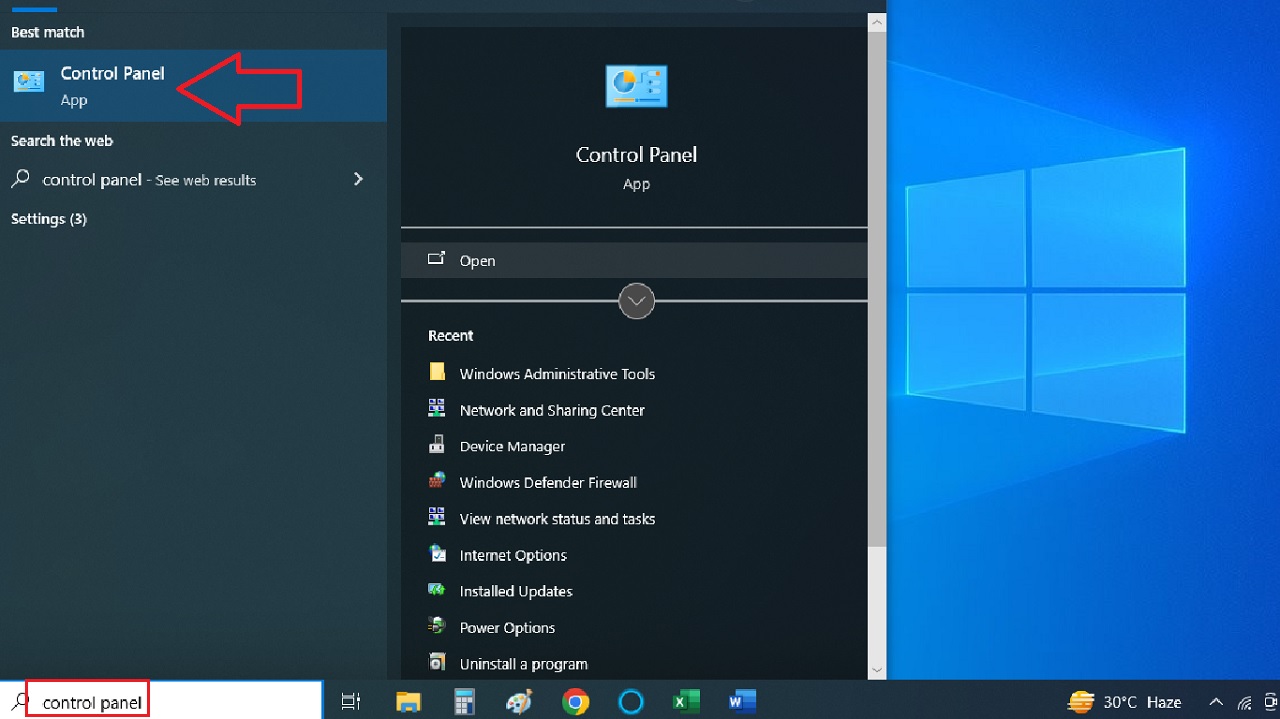
- Go to the search box next to the Start Menu.
- Type control panel in the search box.
- Hit the Enter button on your keyboard.
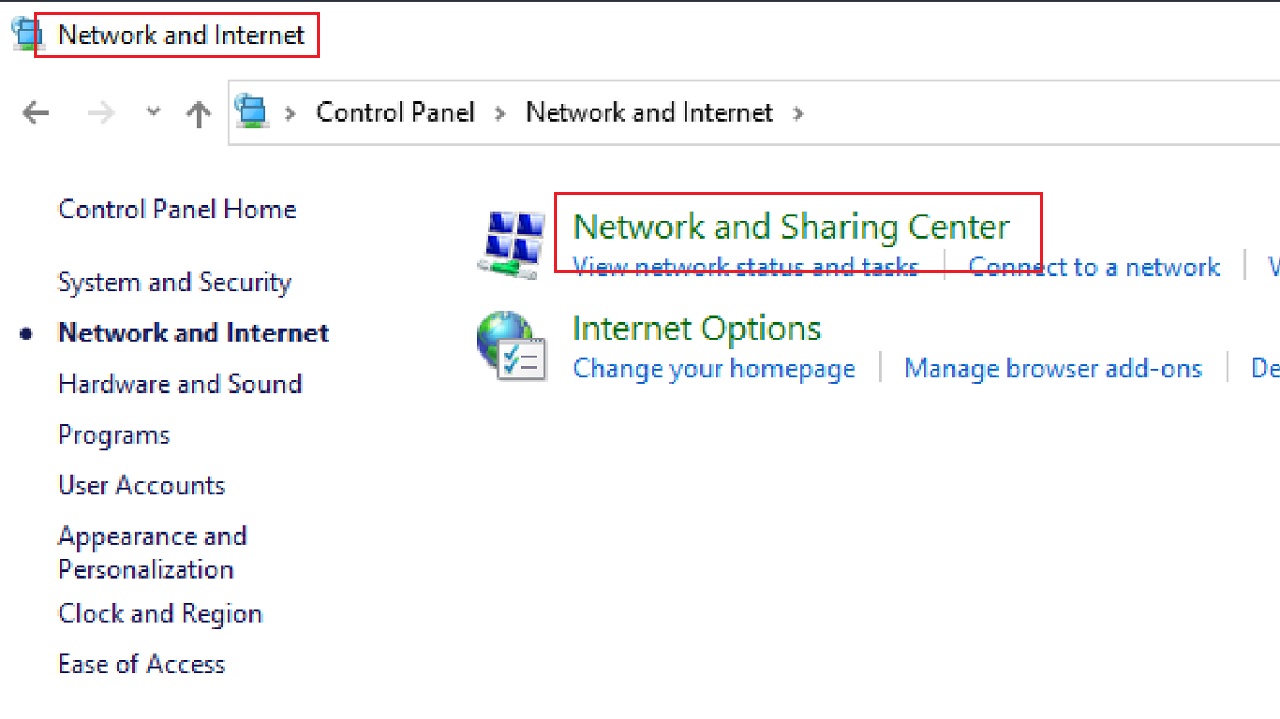
- Go to the Network and Internet option.
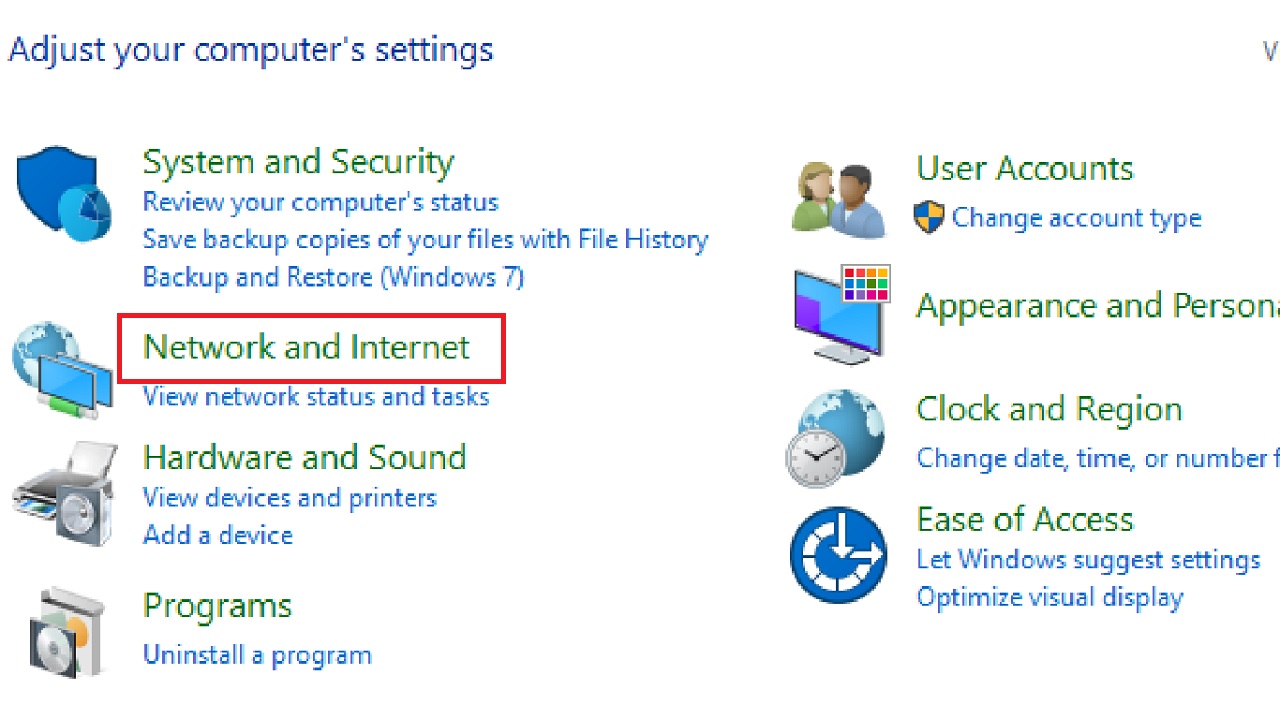
- Select Network and Sharing Center in the following Network and Internet window.
- In the Network and Sharing Center window that follows, click on the Change adapter settings option in the left pane.
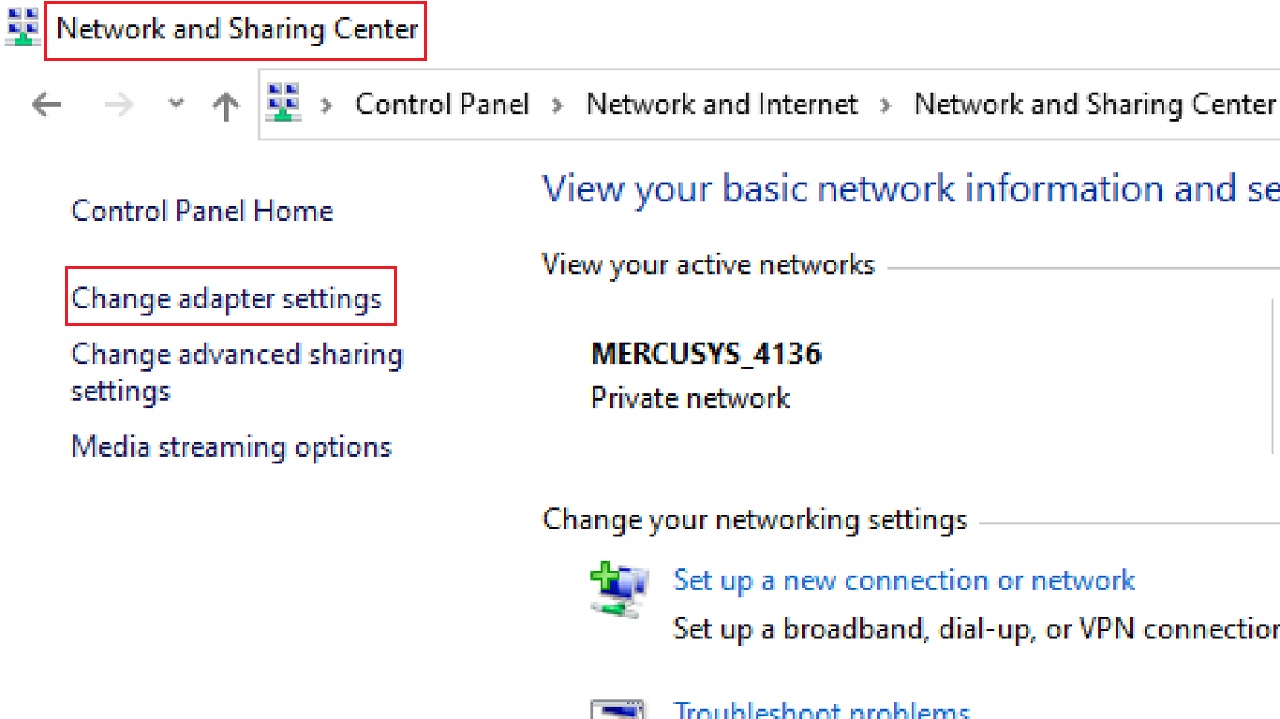
- This will take you to the Network Connections window.
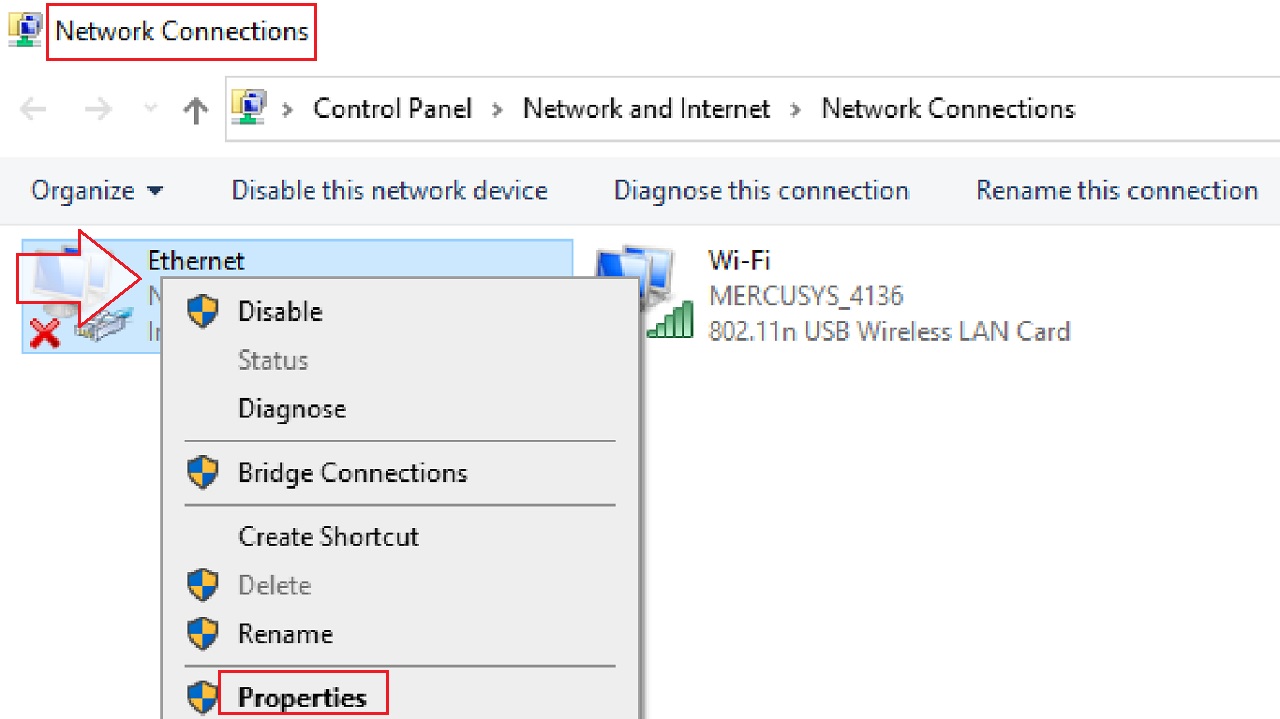
- Select and right-click on Ethernet, or LAN as the case may be.
- Select Properties from the dropdown options.
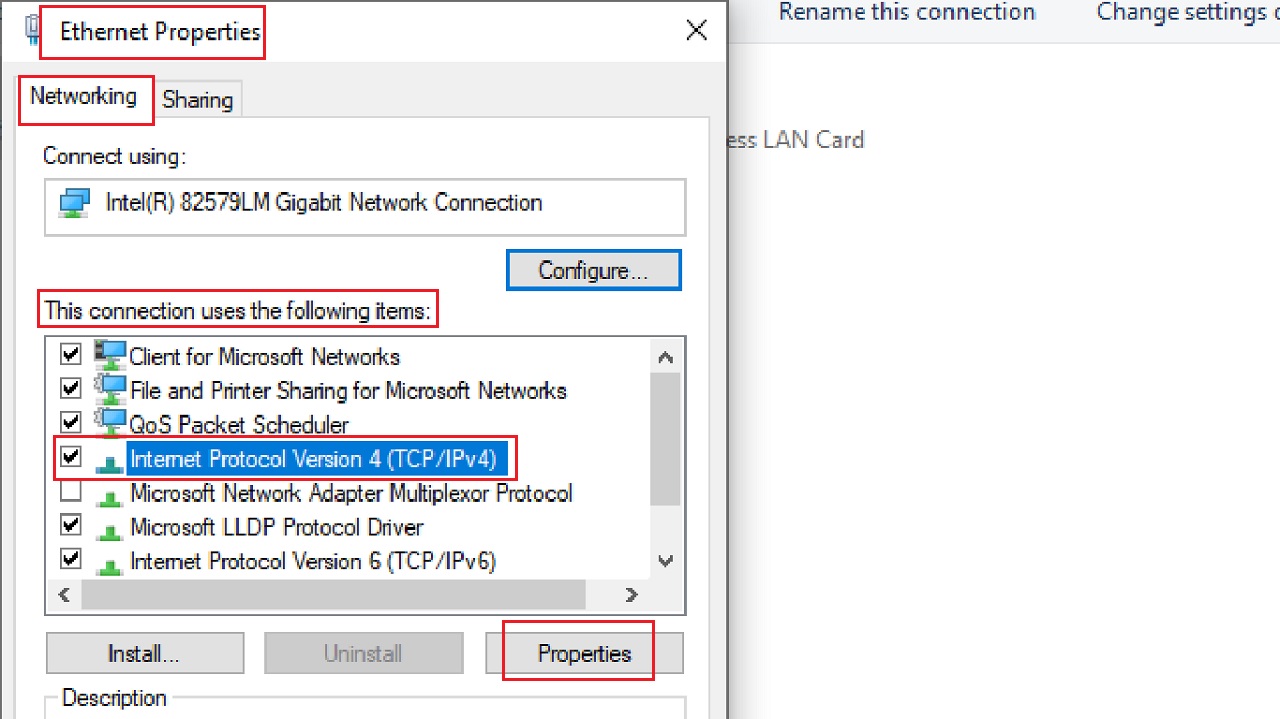
- In the Ethernet Properties window under the Networking tab, click on Internet Protocol Version 4 (TCP/IPv4) from the list in the box under This connection uses the following items.
- Click on the Properties button below.
- In the following window, make sure the small circular button next to Use the following IP address is checked.
- Now, change the IP address to 192.168.1.10, and the Subnet mask to 255.255.255.0, which are typically the common configurations for most local networks.
- Click on the OK button below.
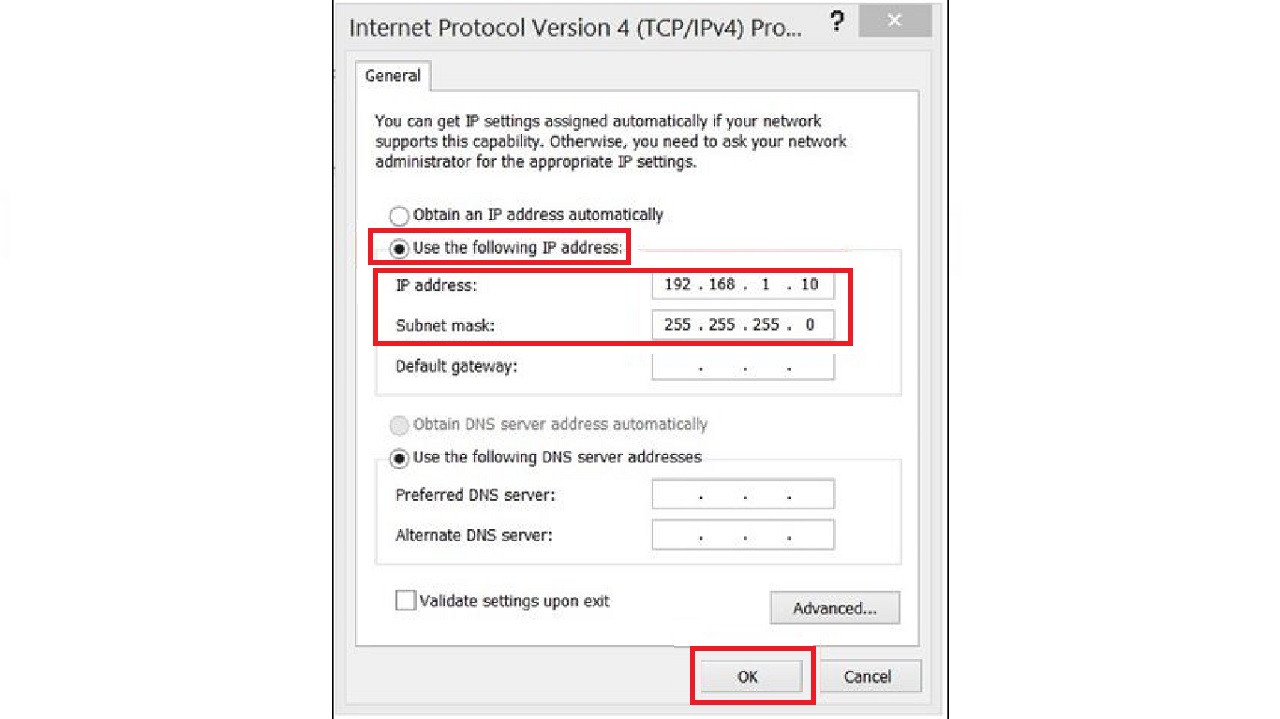
- Click Close on the other windows to finish the settings.
Now try updating your router firmware.
If none of the above indirect solutions could resolve the issue, here are some more effective solutions that you can try.
Method 4: Turn Off Virtual Private Network
If you are using a Virtual Private Network (VPN) service, turning it off temporarily may help in resolving the issue.
STEPS TO FOLLOW:
In Windows Computer:
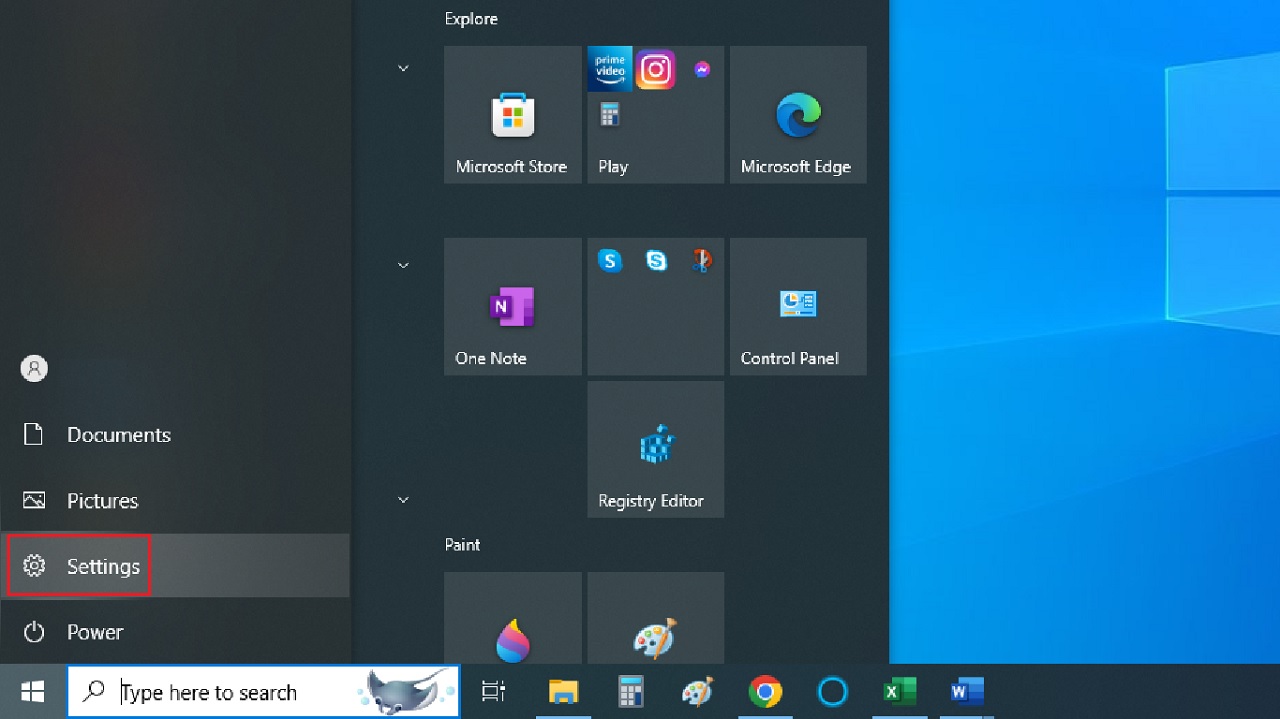
- Click on the Start Menu.
- Select Settings from the pop-up options. (The gear icon).
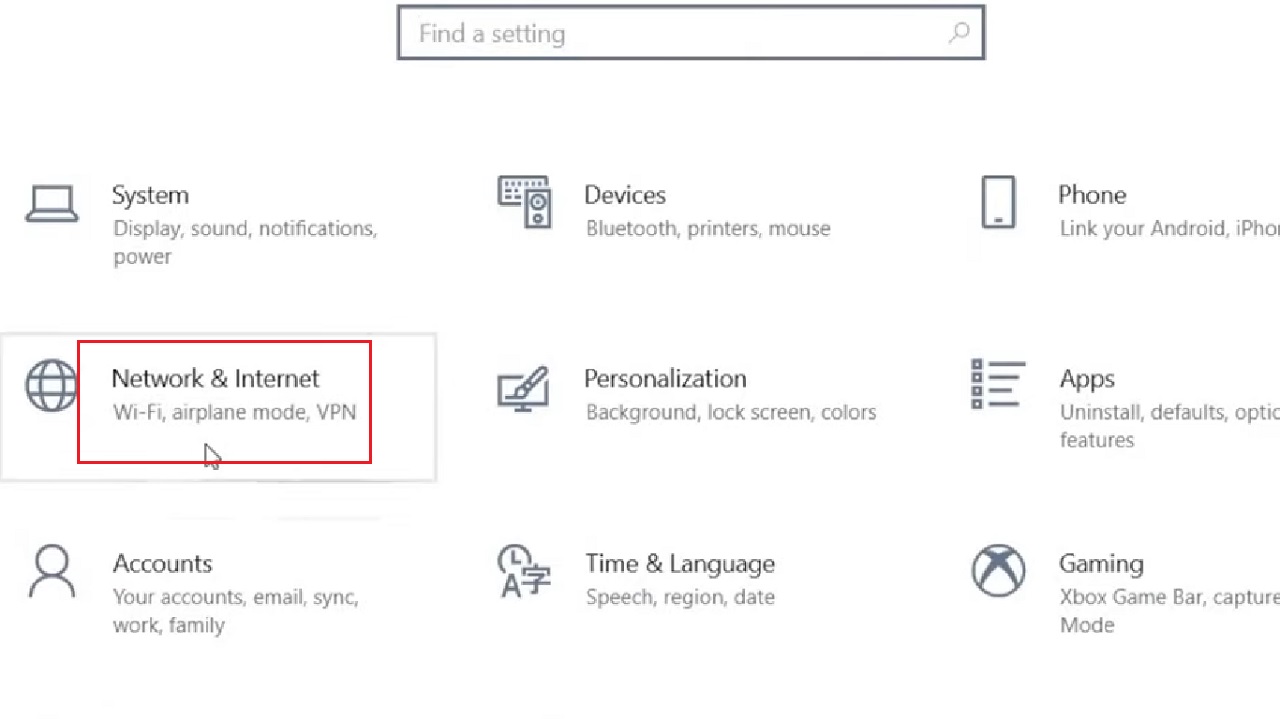
- Click on Network & Internet.
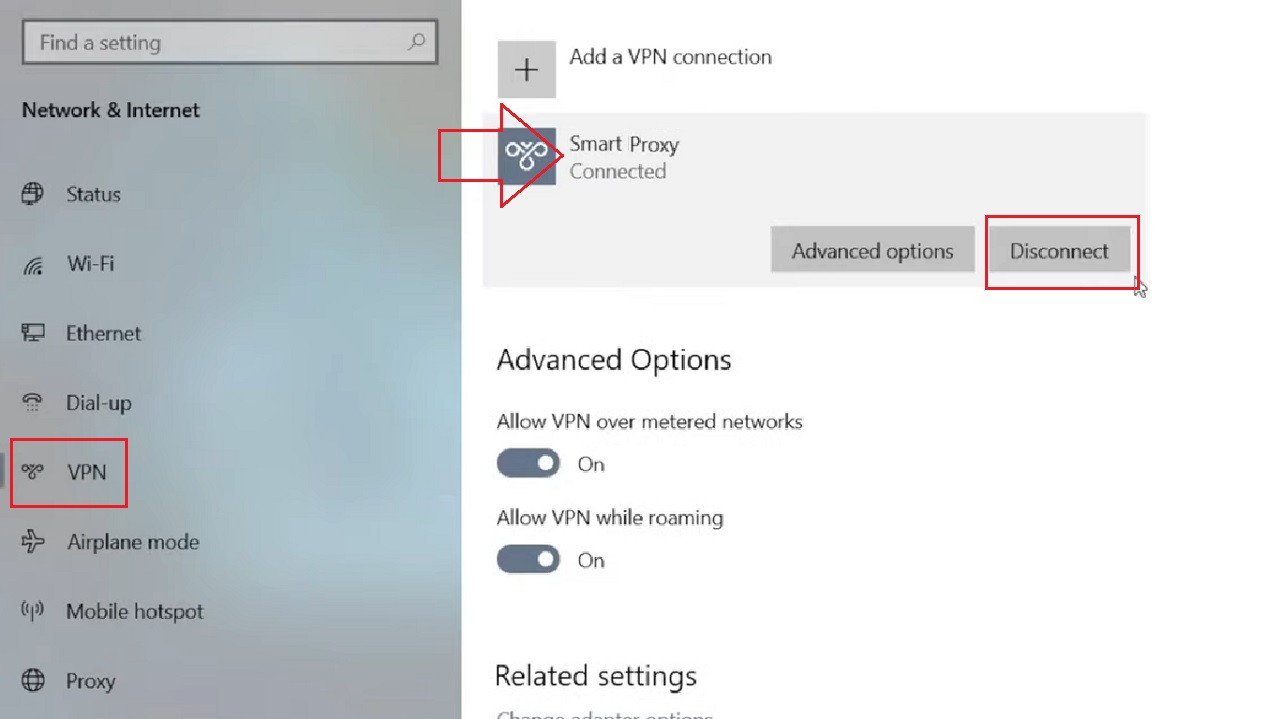
- Select VPN from the left pane.
- Select your VPN connection.
- Click on the Disconnect button.
In a Mac Computer:
- Select System Preferences from the bar below and click on it.

- Click on Network in the System Preferences window.
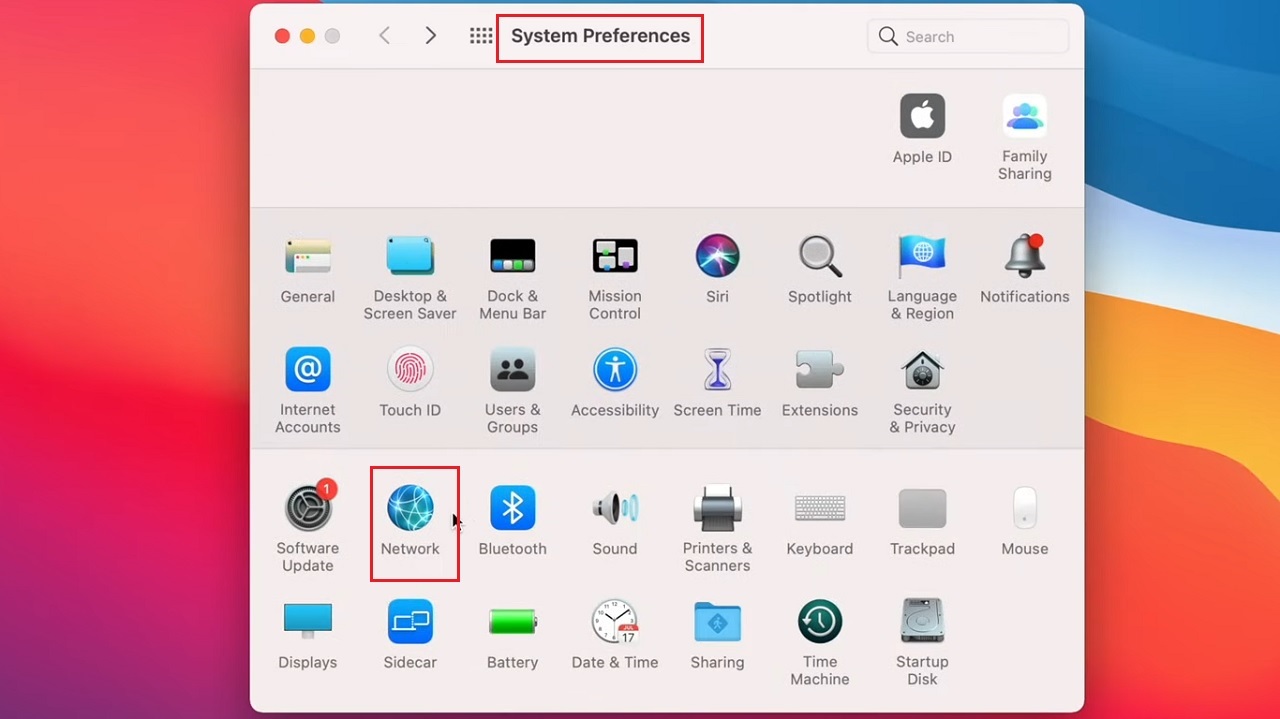
- Select your VPN connection from the left panel in the following Network window.
- Click on the Disconnect button.
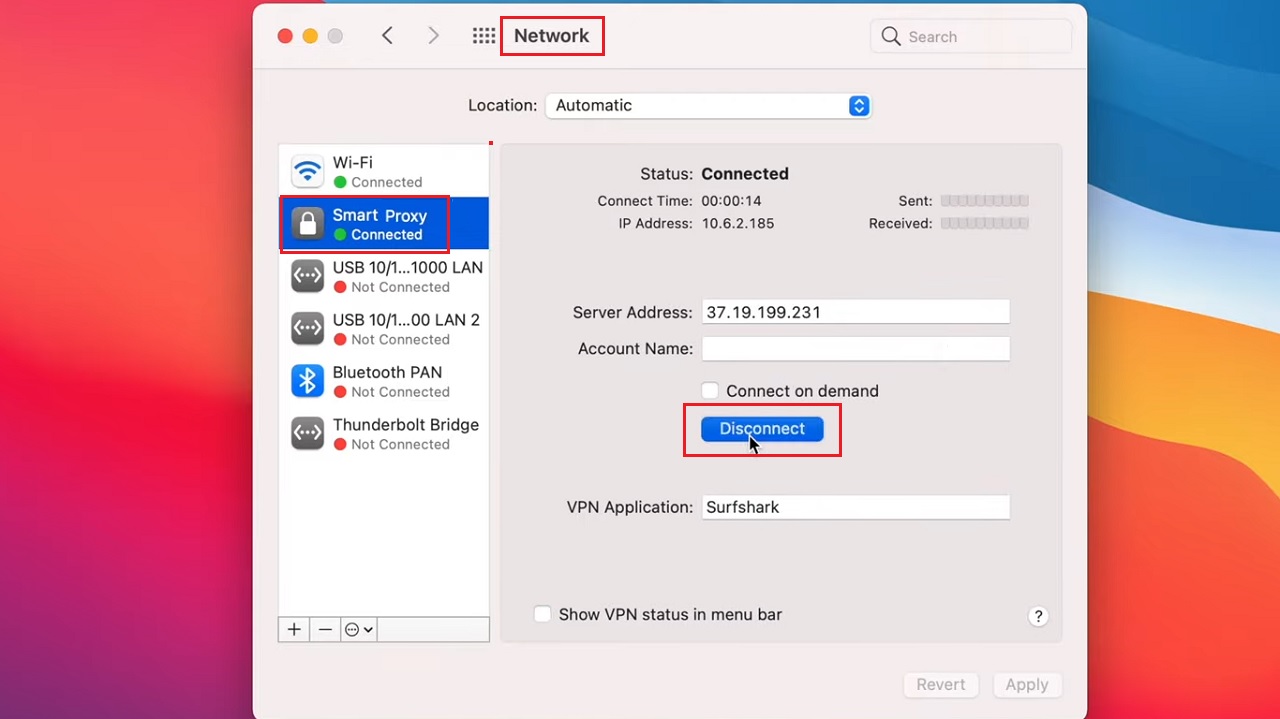
Now, when you are done disconnecting your VPN service, access your router and perform the firmware update.
When the process is complete, reconnect to your VPN server following the same process but clicking on the Connect button this time.
From the Router:
If you have set up your VPN directly on your router, you can turn it off in the following way:
- Access the web interface of your router and log in as you did before.
- Go to VPN, WAN, or Internet, as the case may be depending on your router model and interface, to locate the VPN settings.
- Look for an option Enable PPTP VPN Server, VPN Status, on anything similar or related to VPN.
- Click on it to disable the VPN or turn it OFF.
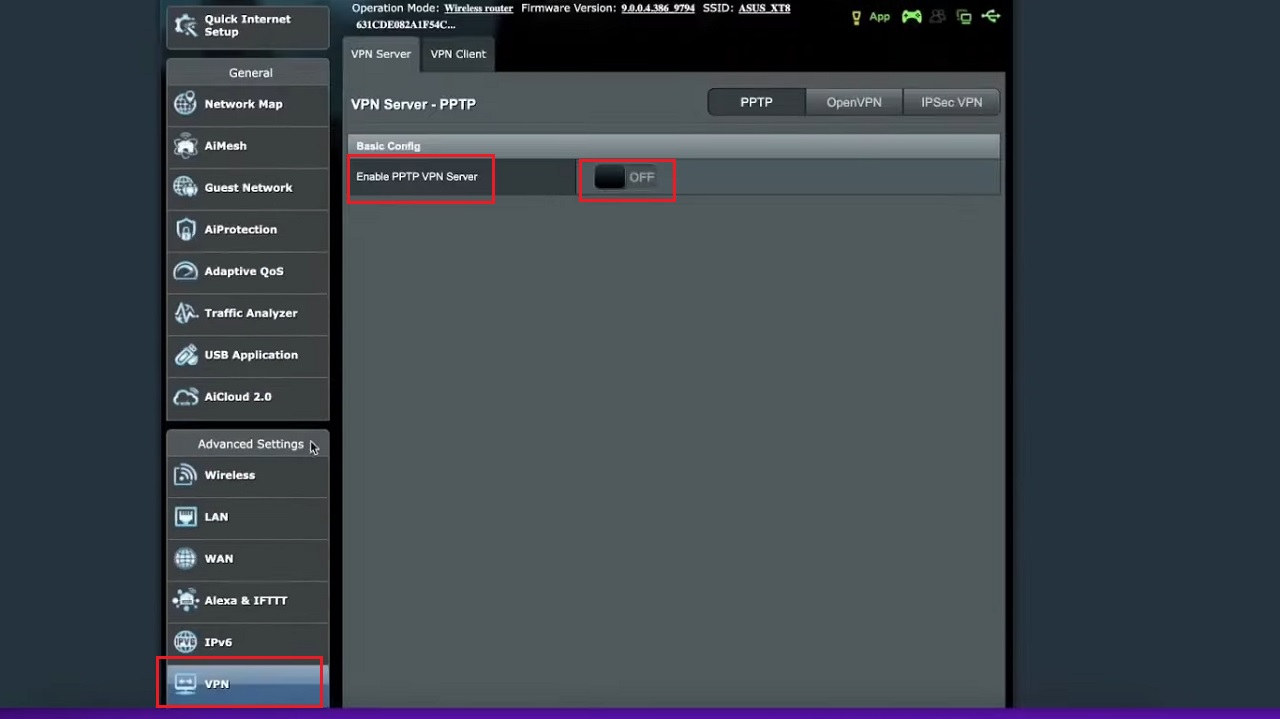
- Click on the Save and Apply button where applicable.
A few particular models of routers may need rebooting after making such changes so that these can take effect. So, reboot your router if needed.
Note: The exact steps and options may vary from one router’s make and model to another. Visit the manufacturer’s website or refer to the user manual of your router if you have difficulty finding and disabling the VPN settings.
However, be very careful while performing the steps because making incorrect changes to the router’s settings can affect the network’s functionality adversely.
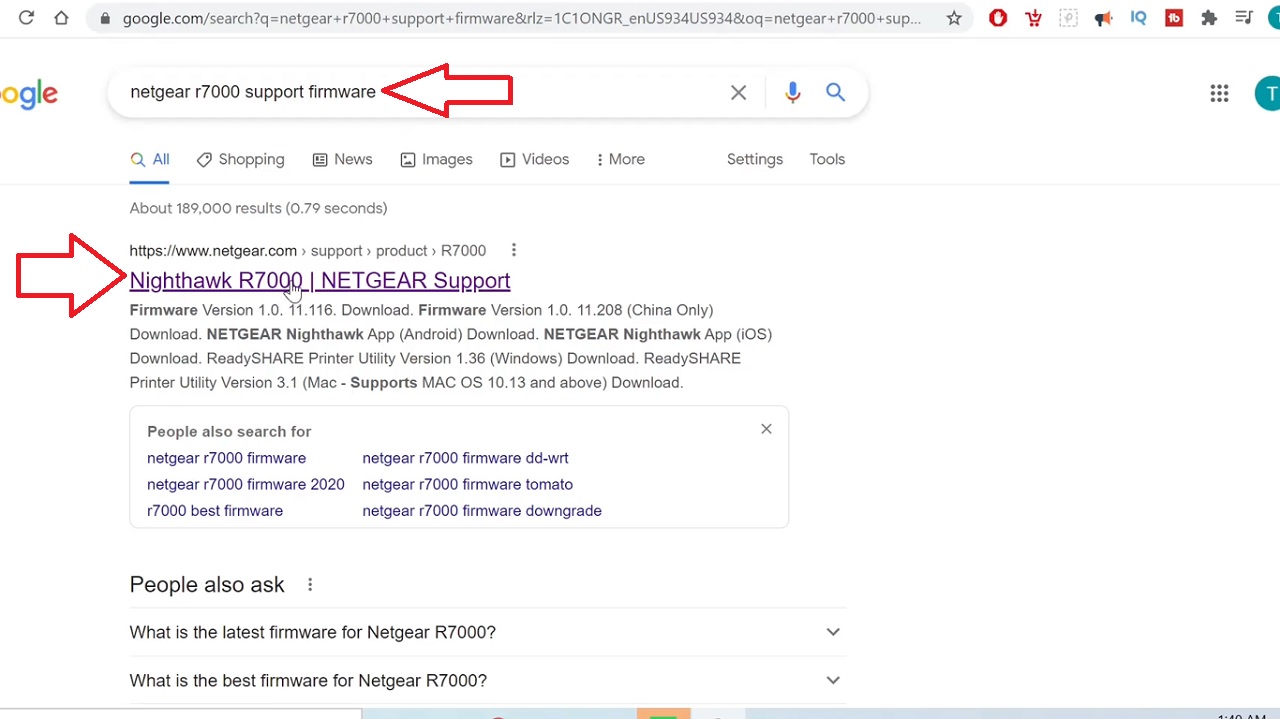
Method 5: Install the Earlier Stable Firmware Version
If you are having issues with installing the latest version, you may resolve the issue by installing the last stable version of the router firmware.
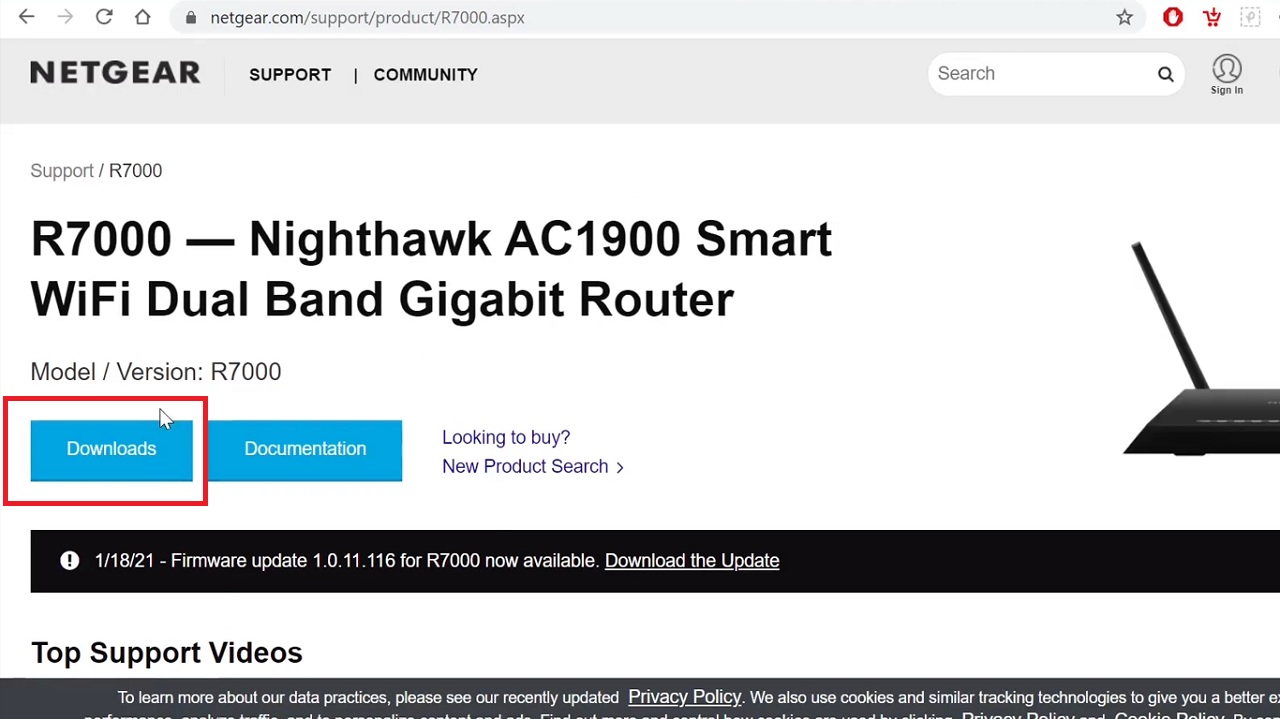
Note: Here a Netgear router model r7000 is used for demonstration purposes. The layout and interface may vary from your router model. So, refer to your router documentation while performing the steps with caution.
STEPS TO FOLLOW:
- Go to your web browser > Type the IP address > Log in using the username and password > Check the Firmware Version of your router.

- Now, in your web browser type netgear r7000 support firmware in the search box and hit the Enter button on your keyboard.
- Click on the first result.
- Click on the Downloads button on the next page.
- Scroll down to the Previous Versions.
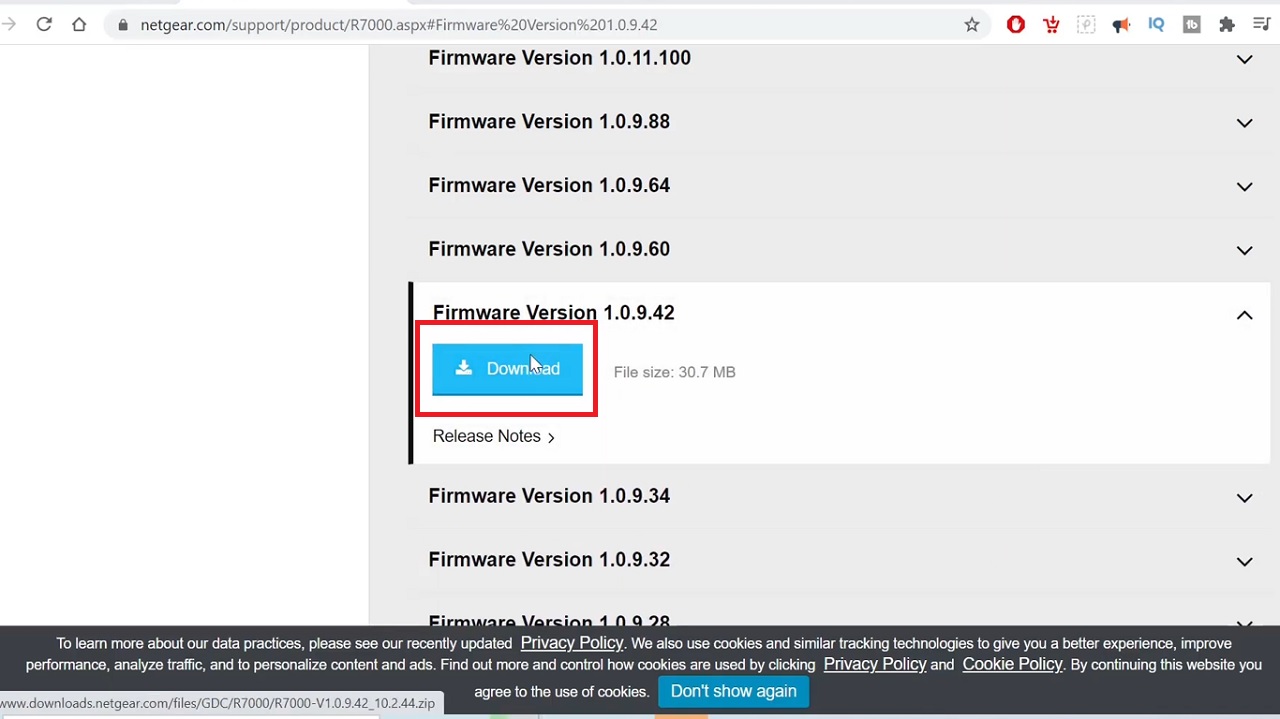
- Select and click on an earlier version.
- Click on the Download button.
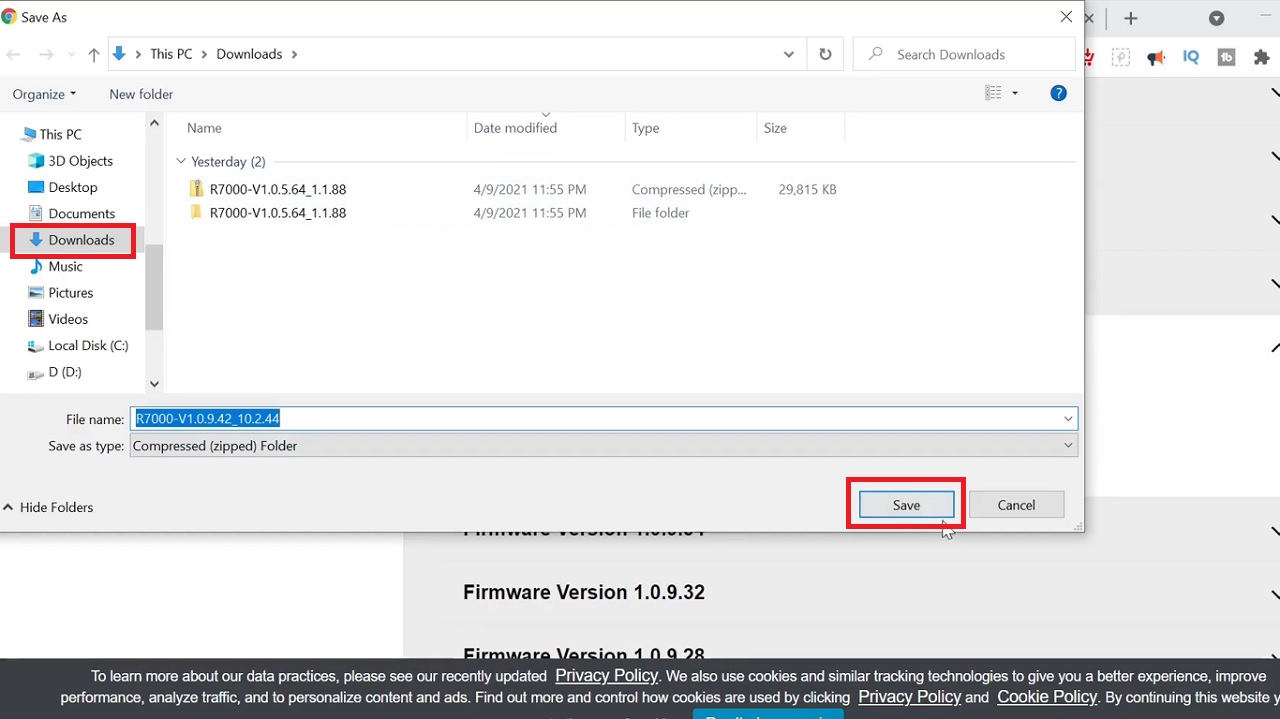
- Click on the Save button and it will be saved in the Downloads folder.
- When it is downloaded, click on it below and click on Show in folder.
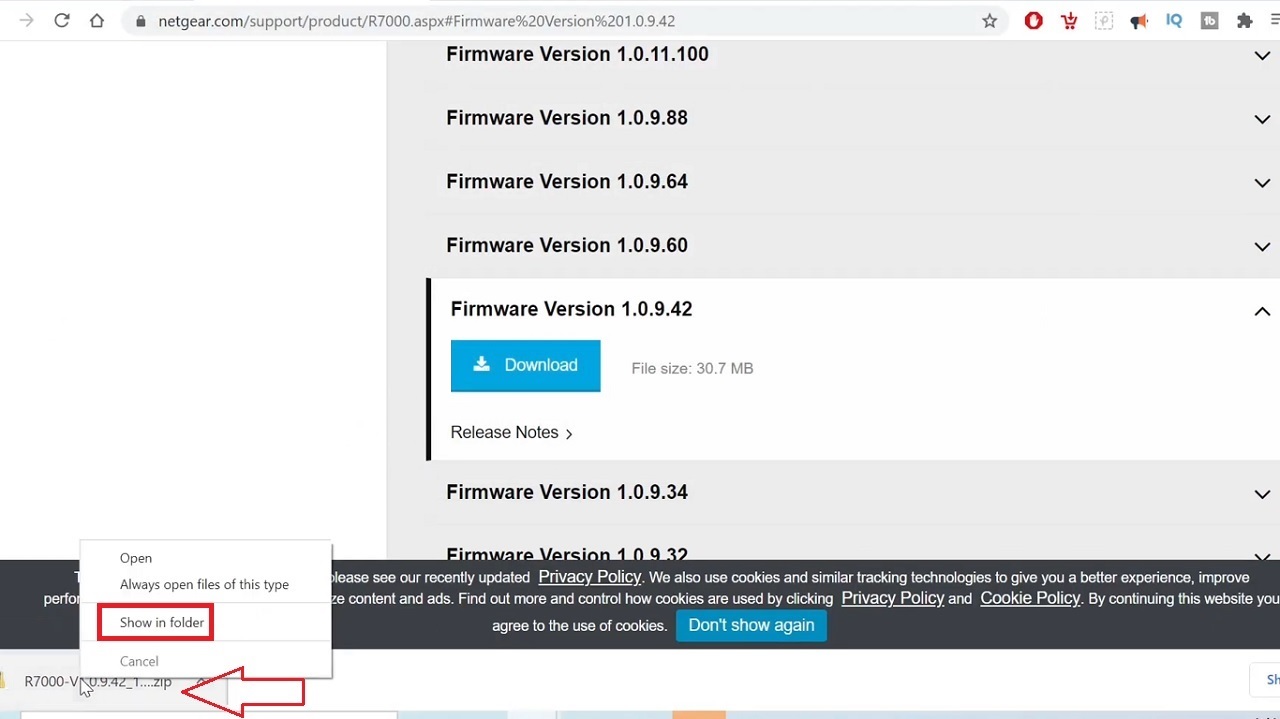
- Right-click on the file.
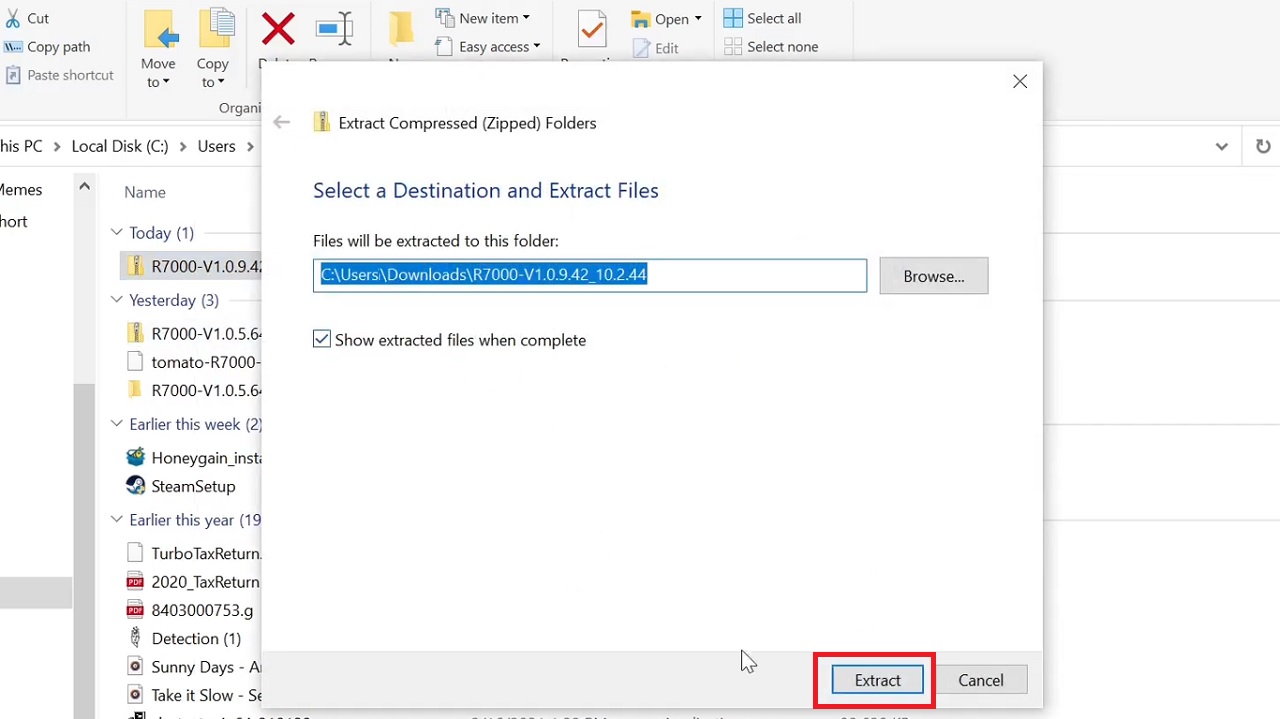
- Click on Extract All.

- Click on the Extract button in the following window.
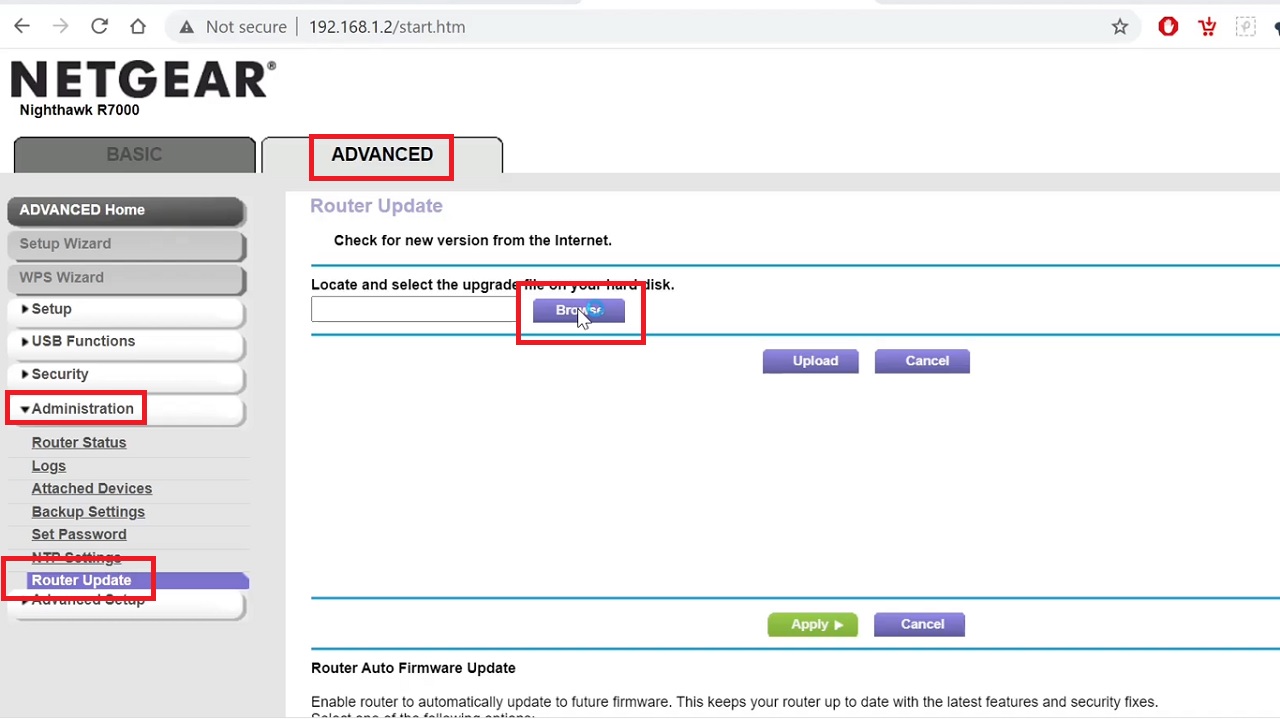
- After it is extracted, go to your router web interface tab which is already open.
- Select the ADVANCED tab.
- Click on Administration in the left pane.
- Select Router Update under it.
- On the right side of the window, click on the Browse button.
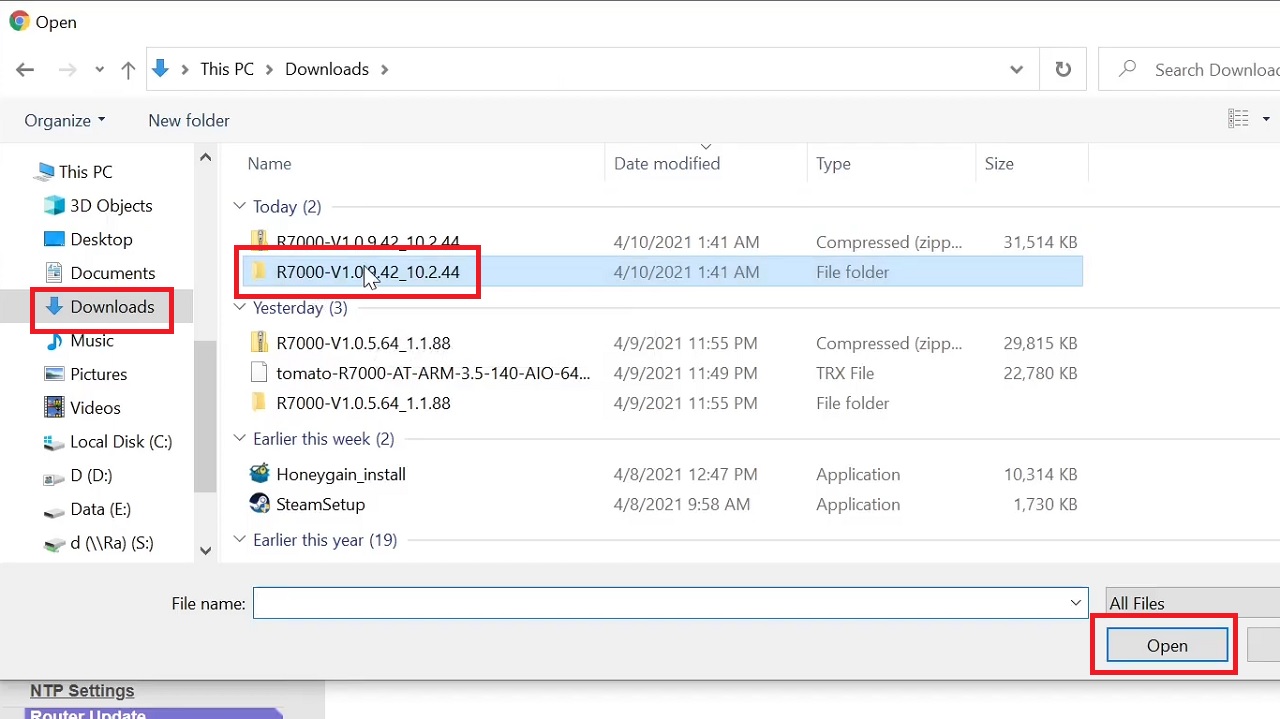
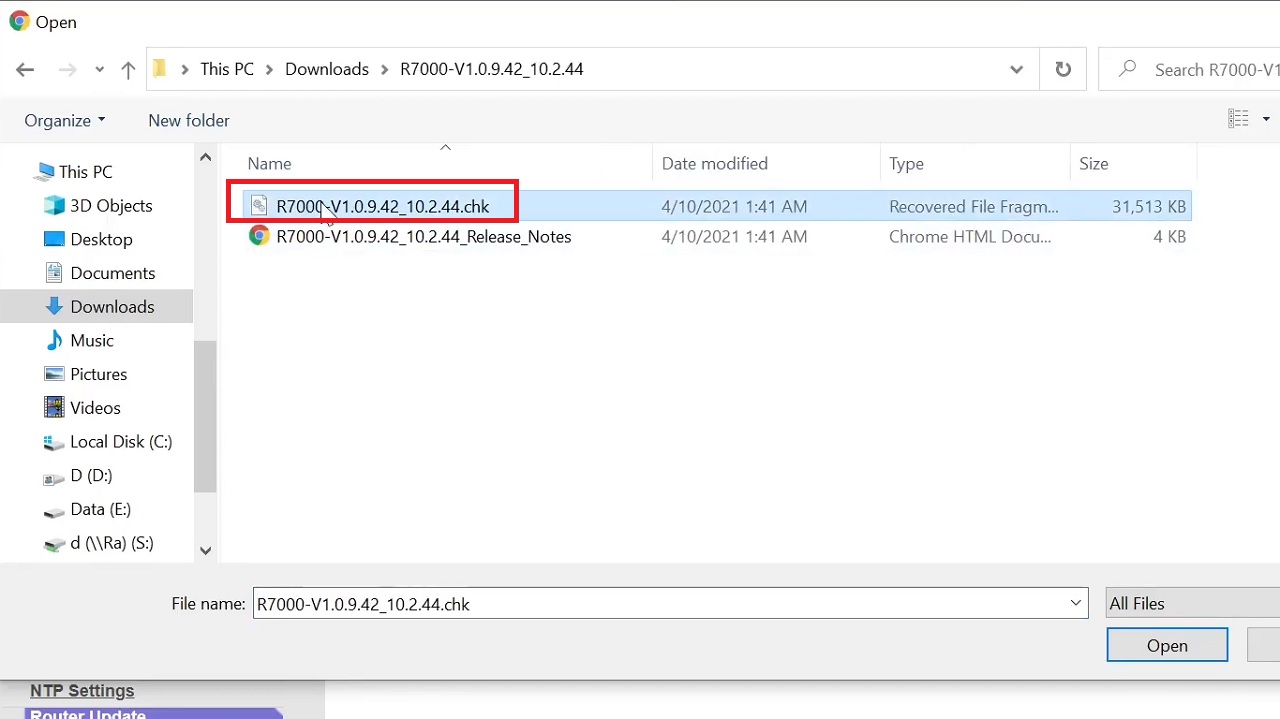
- Go to the Downloads folder.
- Click on the unzipped R7000-V1.09.42_10.2.44 folder you extracted.
- Click on Open.
- Double-click on the R7000-V1.0.9.42_10.2.44.chk file in the next window.
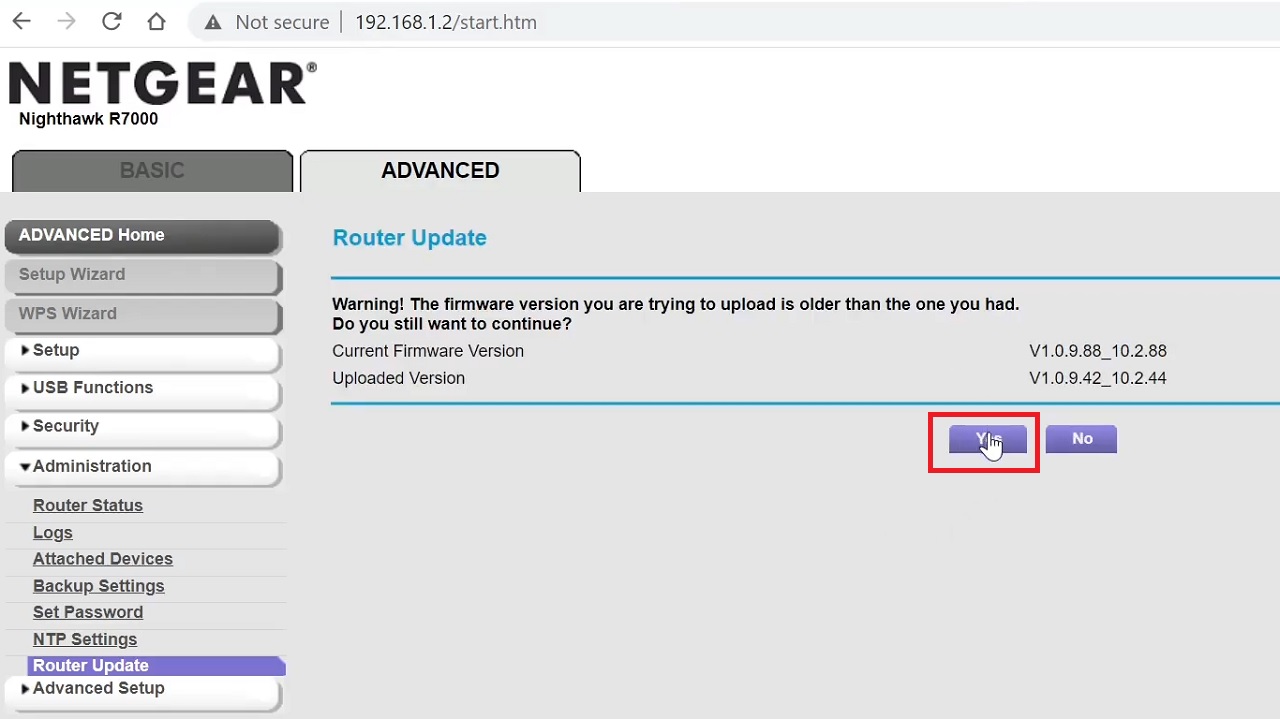
- Click on the Upload button.
- Click on the OK button on the window asking Continue?

- Click on the Yes button in the following window.
- This will initiate the process. Let the process complete and then click on the small circle next to I Disagree and I Agree just as shown in the following window:
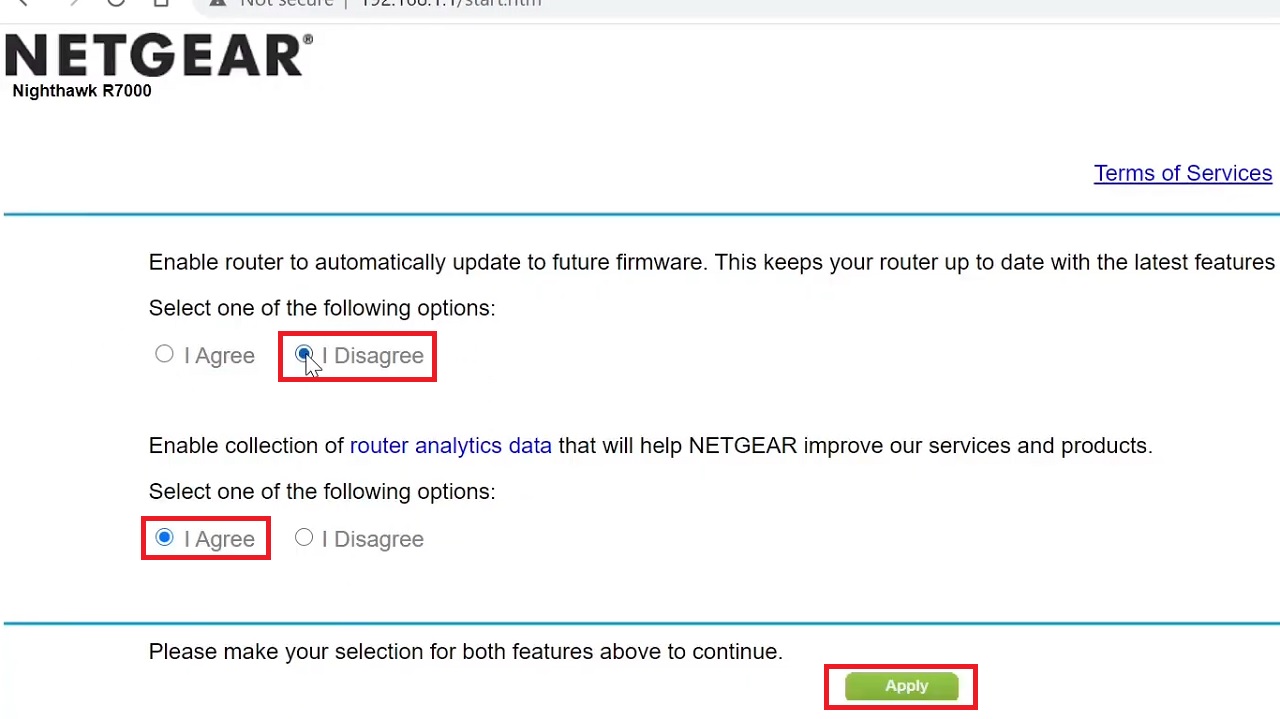
- Click the Apply button below, as shown in the image above.
- Wait for the process to complete.
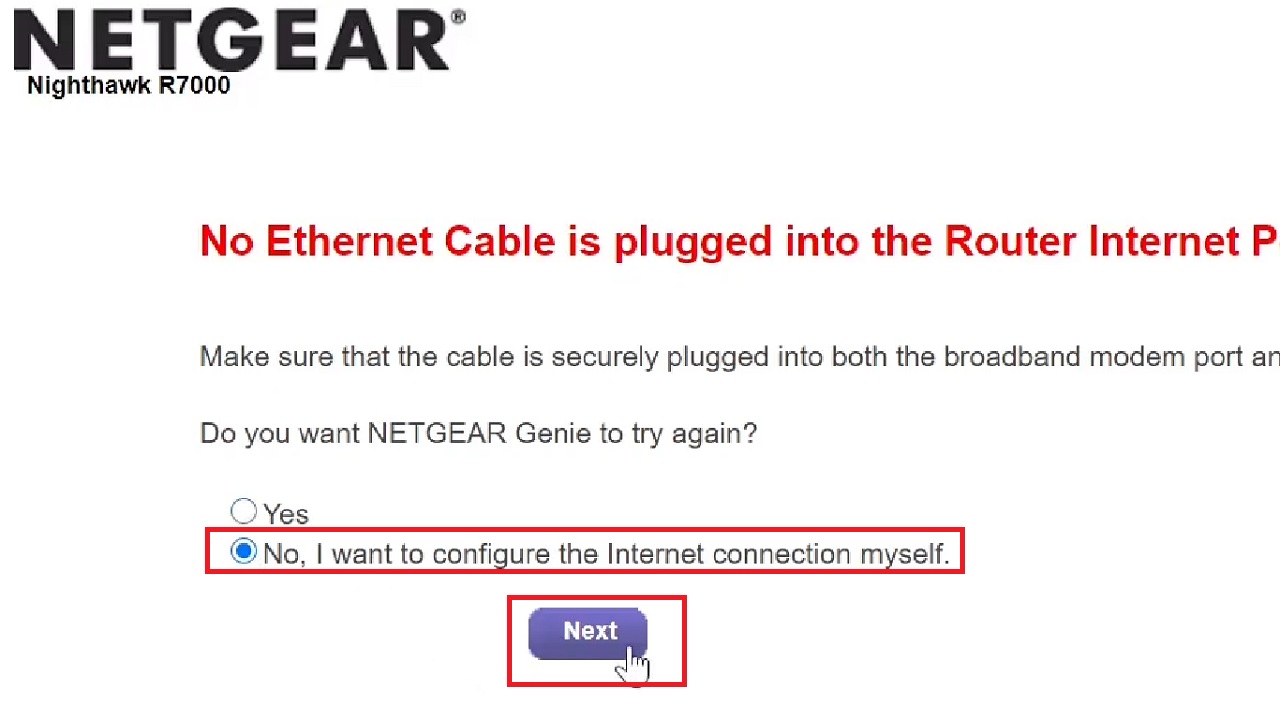
- Now, in the following window, click on the small radio button next to No, I want to configure the Internet connection myself.
- Click on the Next button.
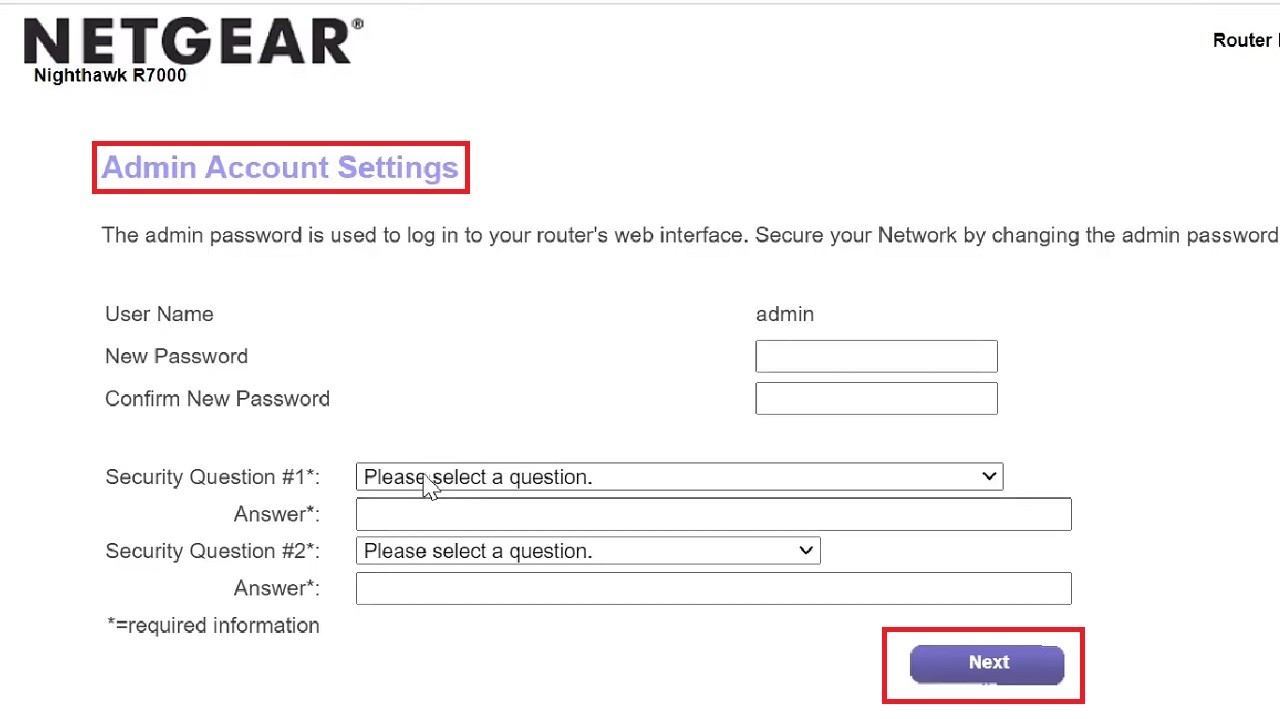
- Go ahead and fill up the necessary details in the following window for Admin Account Settings.
- Click on the Next button.
When everything is complete, you can see the router version is downgraded to an earlier version, as shown in the image below:
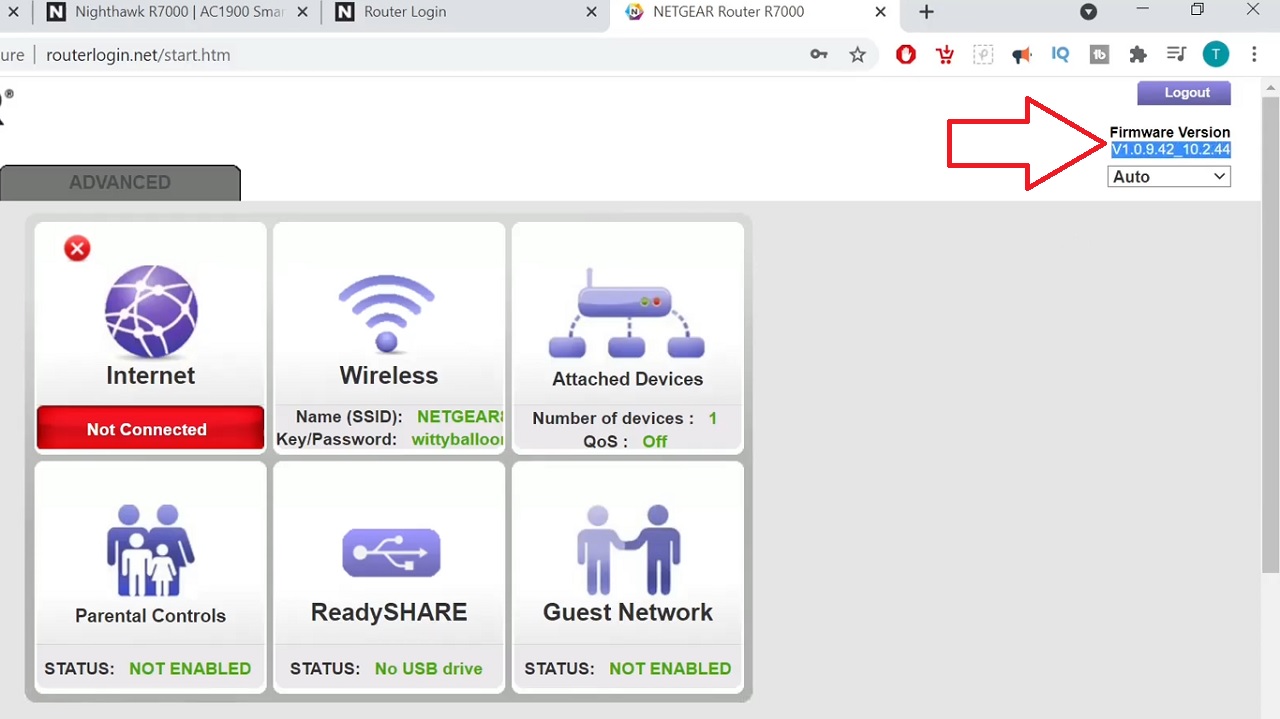
Though this process does not allow upgrading, your network connection will be operational at least.
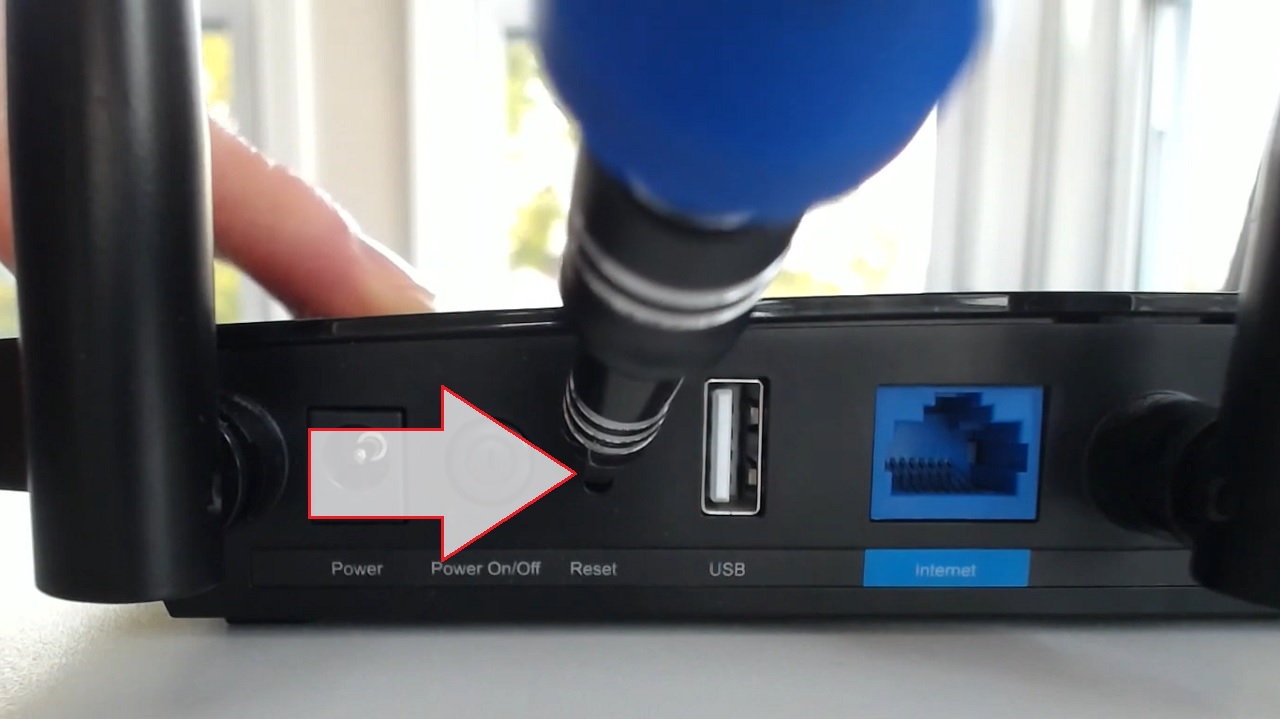
Method 6: Reset the Router to Factory Settings
If you still face the issue after trying all of the above solutions, you may try resolving the issue by performing a factory reset.
STEPS TO FOLLOW:
Press the Reset button with a sharp object for about 7 to 10 seconds until the LED lights on your router flash.
Now, set up your Wi-Fi again because all previous settings will be deleted after a factory reset.
Try updating your router firmware now.
Method 7: Perform Firmware Restoration in Rescue Mode
If the above method fails to resolve the issue, as a last resort and before calling a professional for repair, you may perform firmware restoration to resolve the issue in the rescue mode.
This feature is however available in a few specific router models, such as Asus, Linksys, and others.
Note: For demonstration, an ASUS router is used. Check your router documentation to find out whether or not it supports this feature and then follow the steps accordingly.
First, you will need to download the latest firmware and then make the necessary changes in the rescue mode.
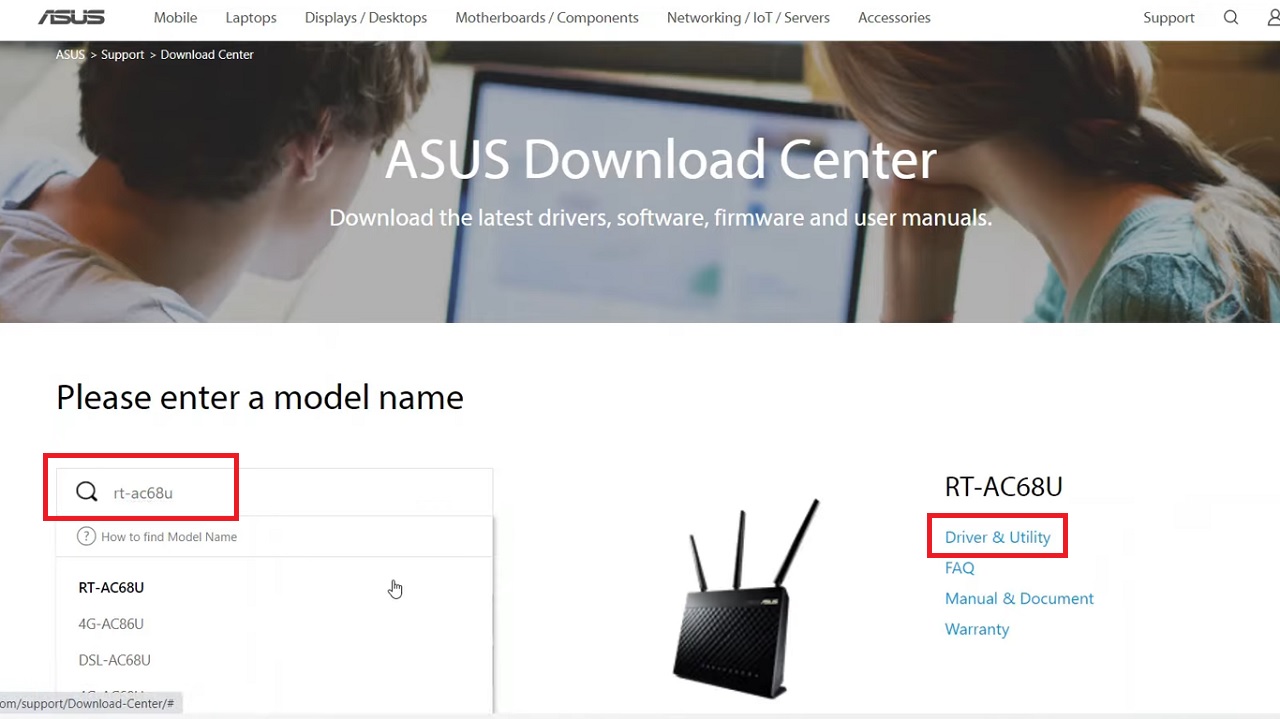
STEPS TO FOLLOW:
- To download and install, go to https://www.asus.com/support/Download-Center/.
- Type in your router model, rt-ac68u, for example.
- Click on Driver & Utility.
- Click on the Download button to download the latest version of router firmware.
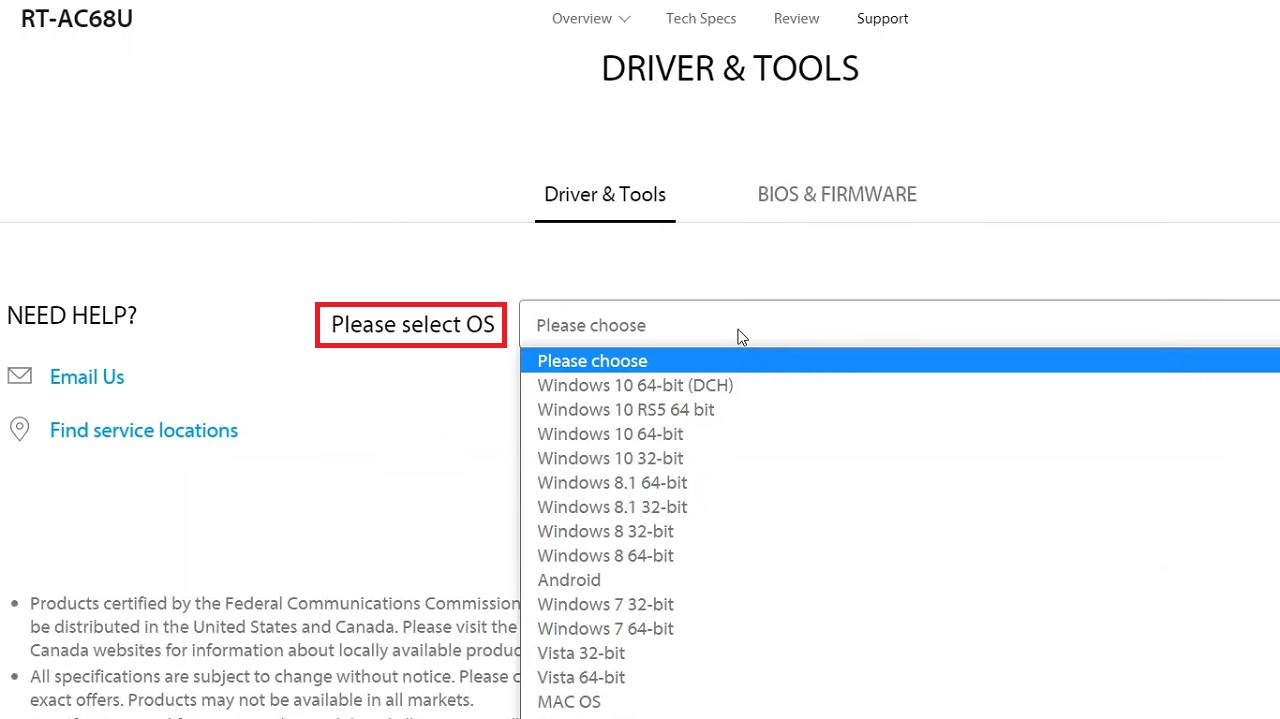
- Now, go to Driver & Tools.
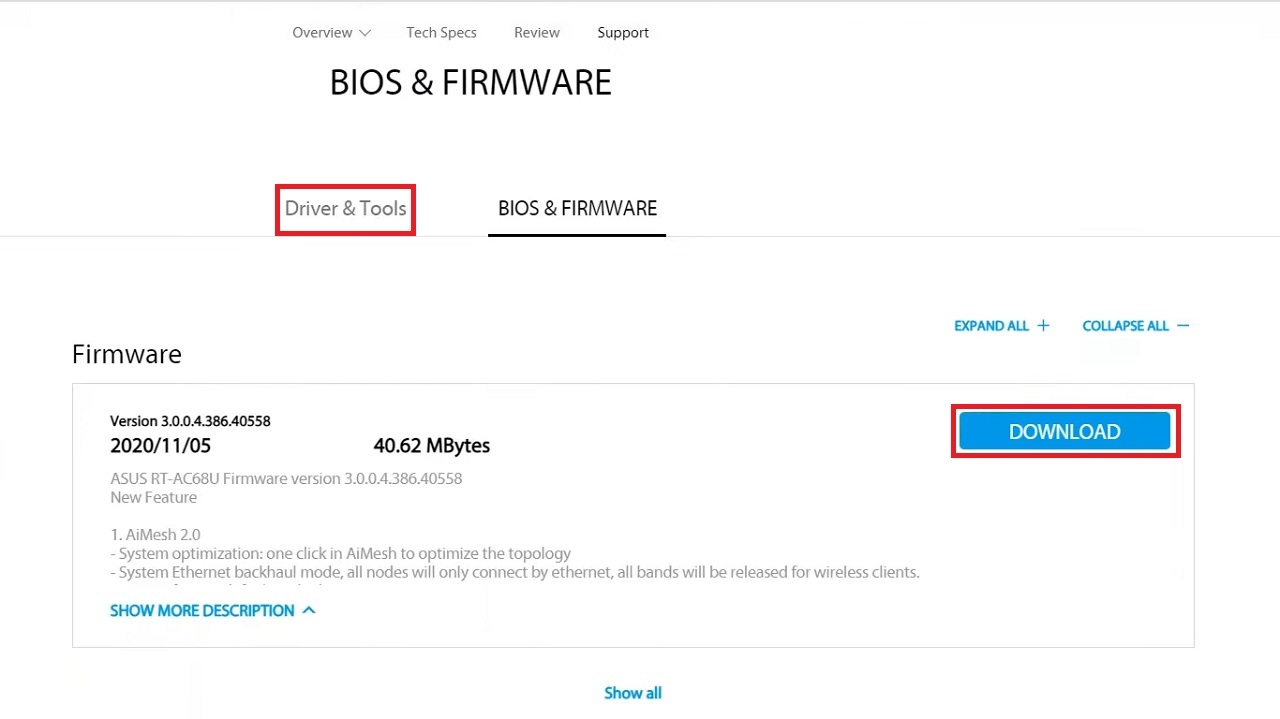
- Next, Please select OS from the dropdown options.
- Click Show all.
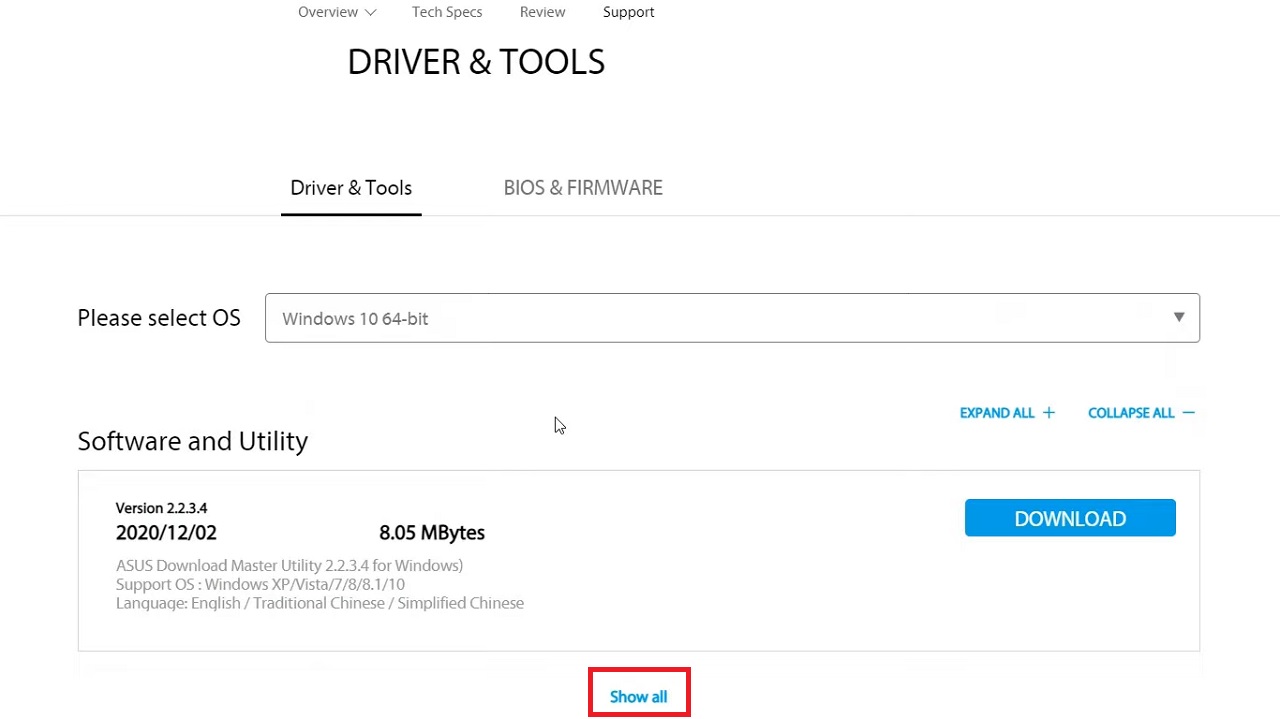
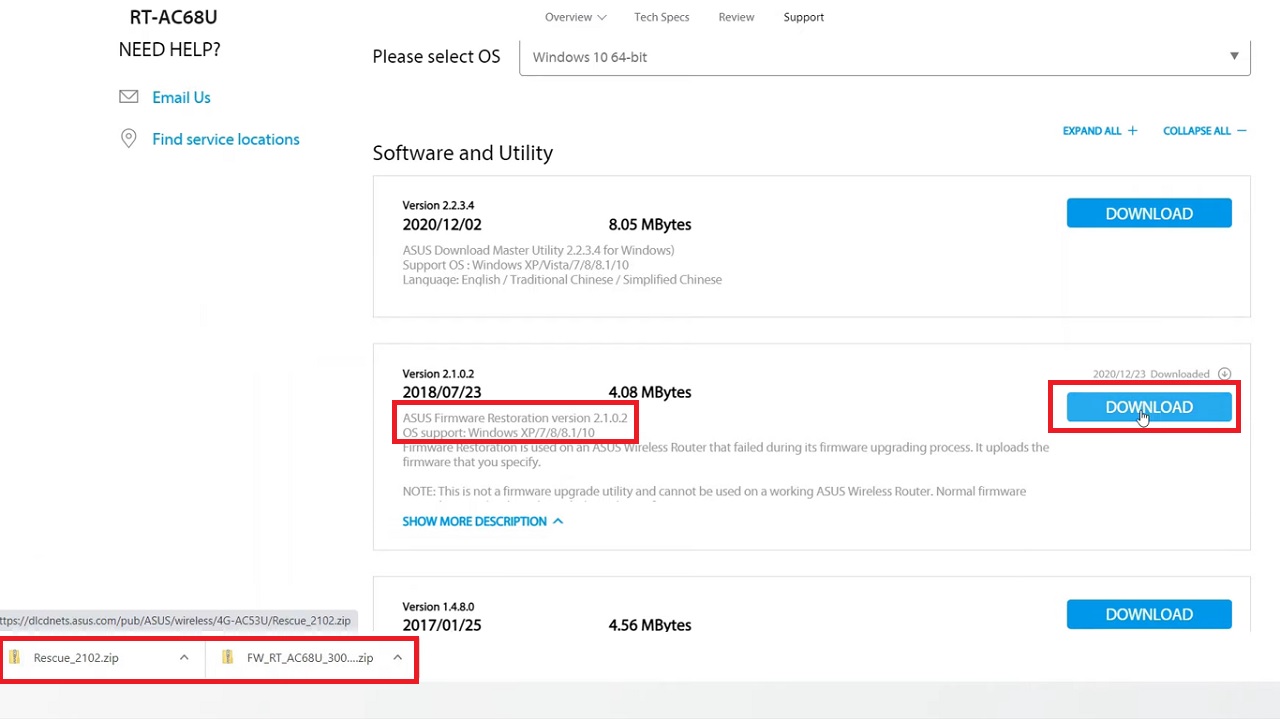
- Download ASUS Firmware Restoration version 2.1.0.2.
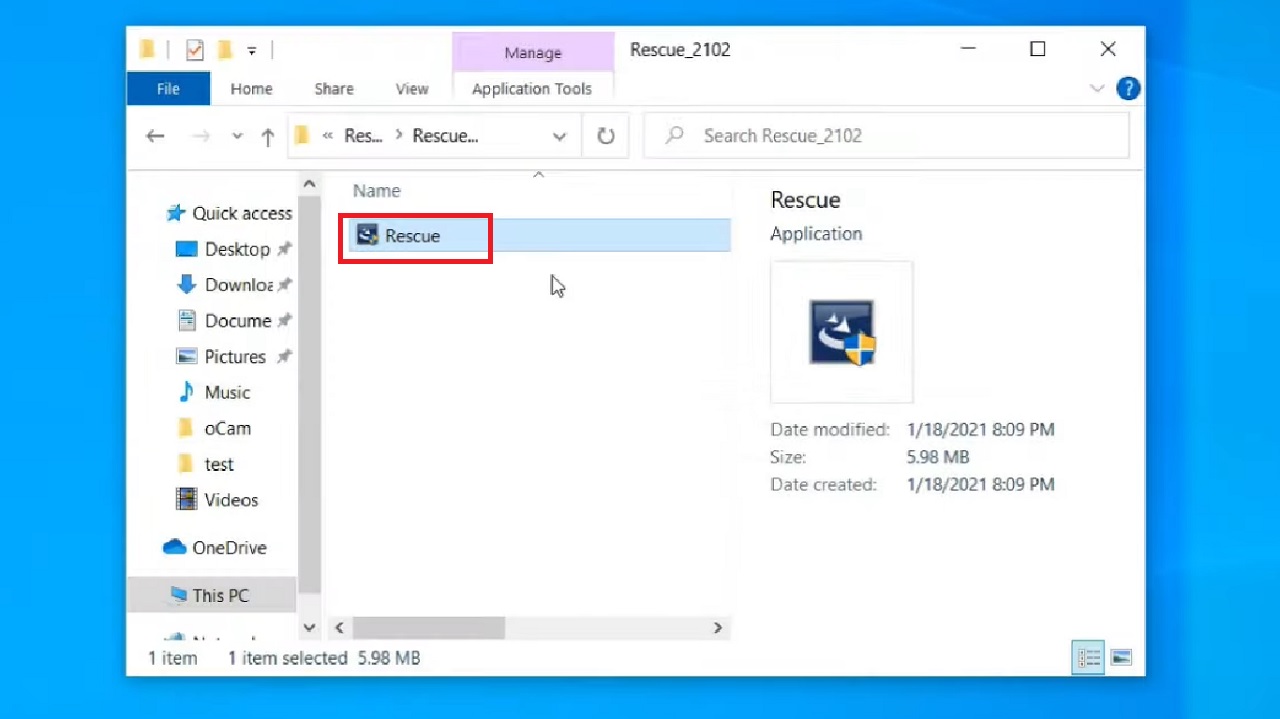
- Then unzip the two files.
- Double-click on the Rescue file to install the firmware restoration.
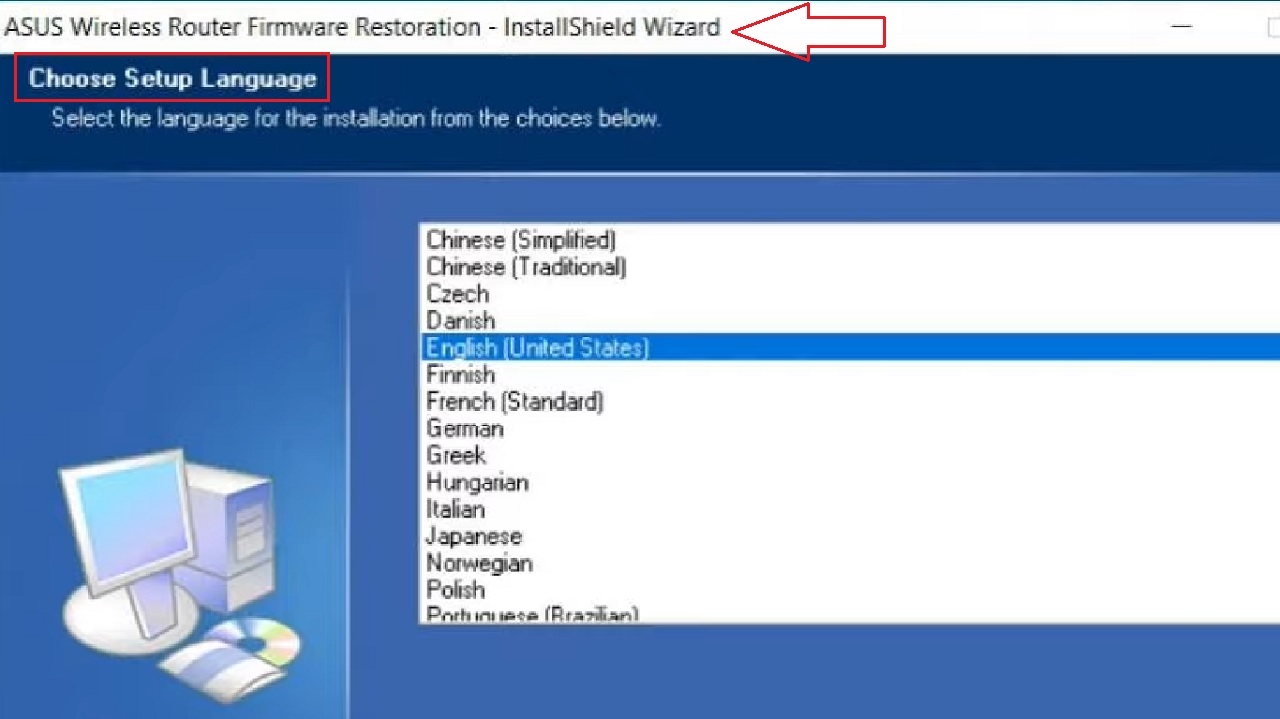
- Choose Setup Language from the ASUS Wireless Router Firmware Restoration – InstallShield Wizard.
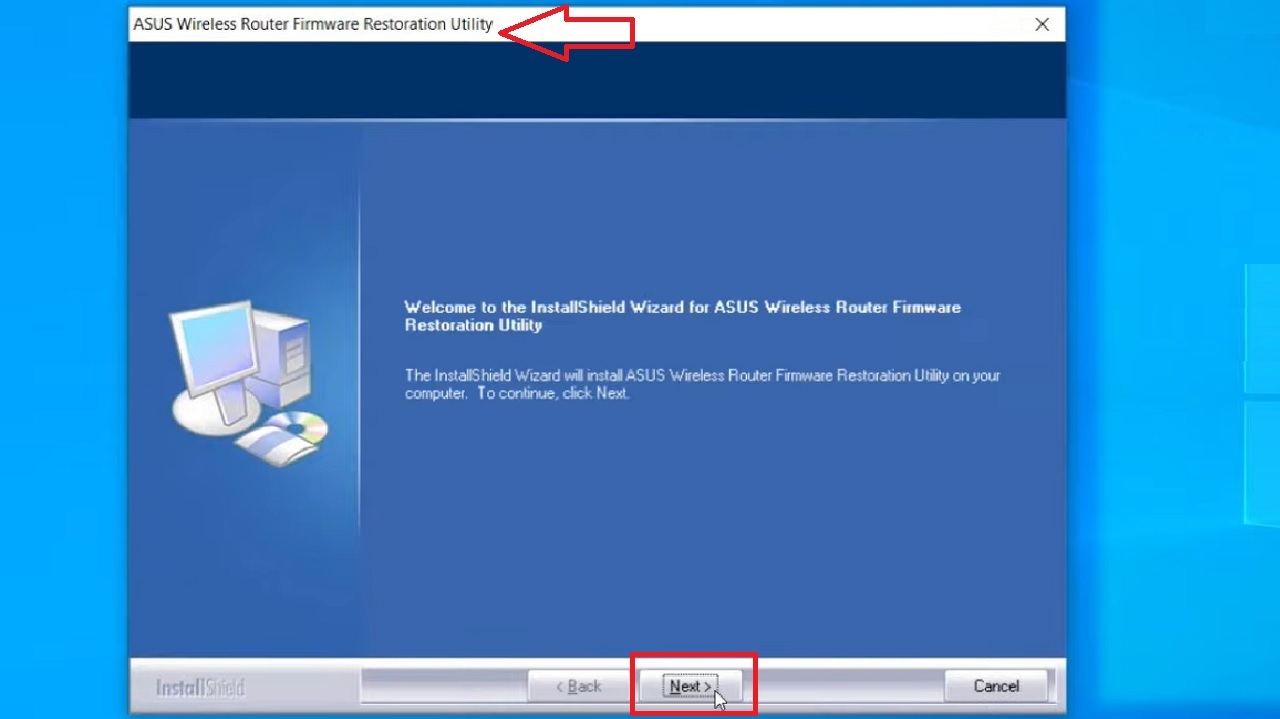
- Click on the Next button below. (Not shown in the image).
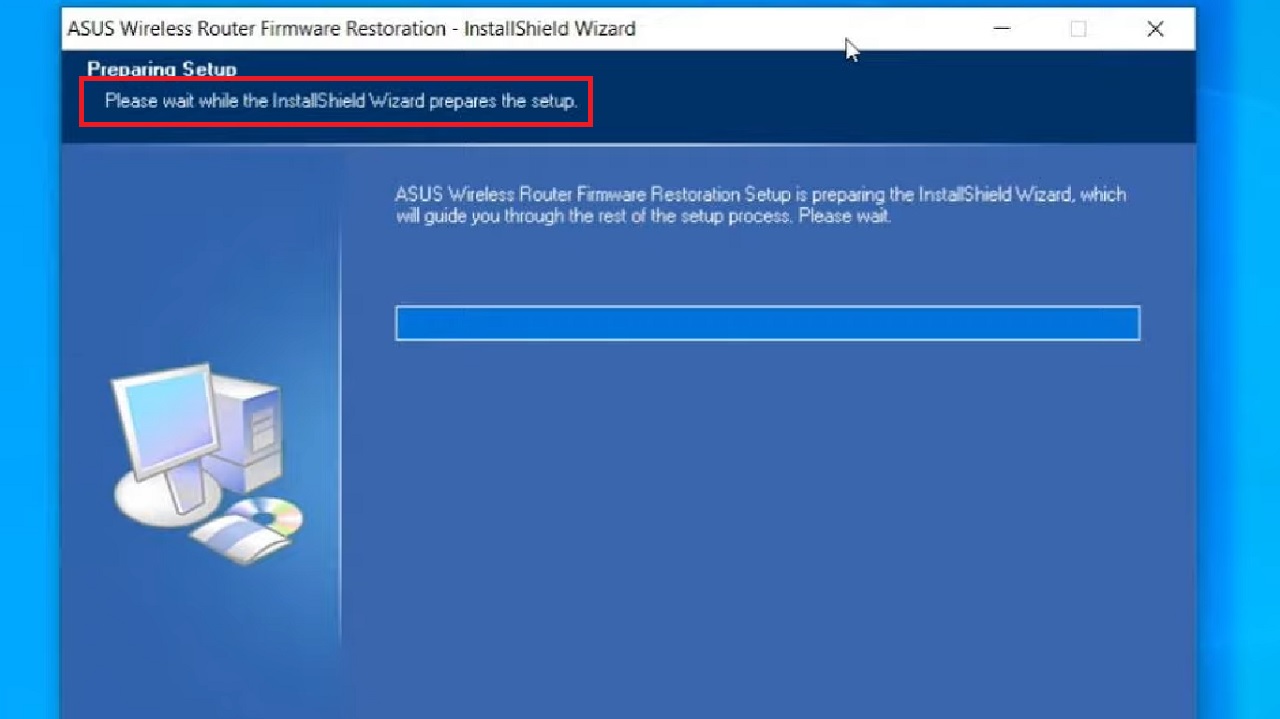
- Please wait while the InstallShield Wizard prepares the setup.
- Then follow the wizard and click on the Next button in the following ASUS Wireless Router Firmware Restoration Utility window.
- Click on the Browse button to Choose Destination Location in the following window or click on the Next button if you are okay with the default location. Usually, you should choose the default location.

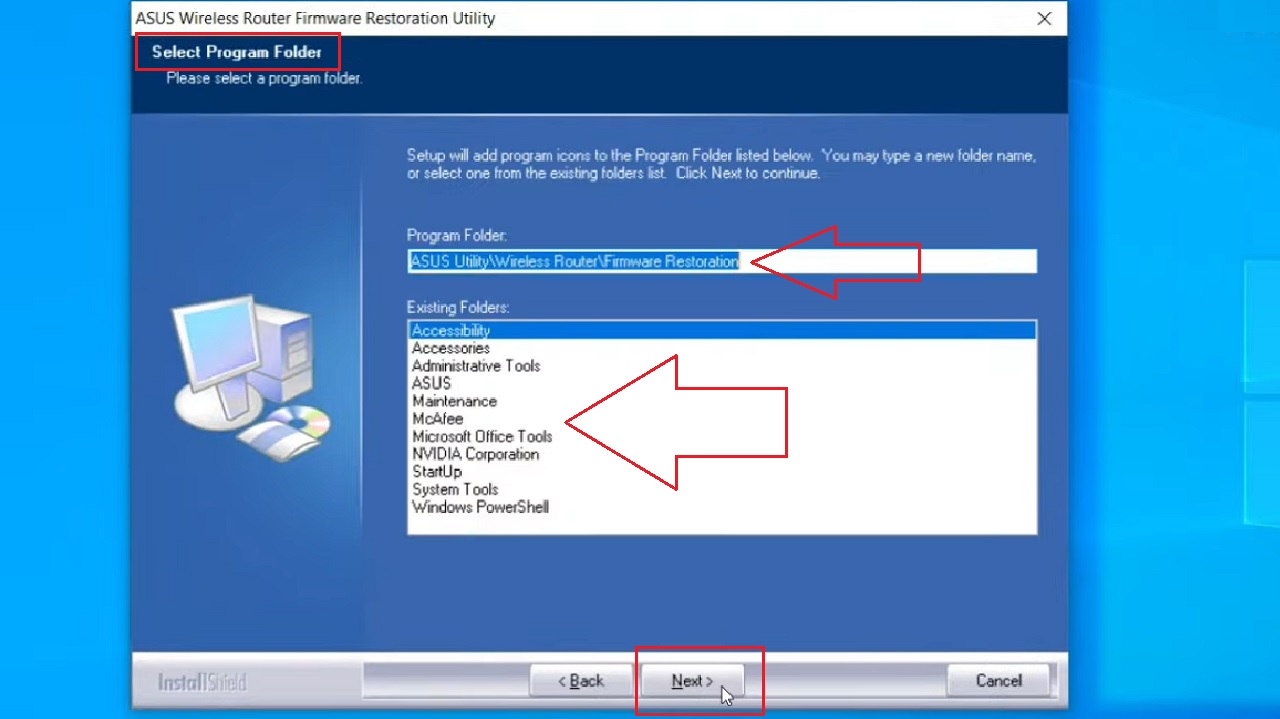
- In the following window, you may Select Program Folder from the existing folders list, type in a new name for it, or simply click on the Next button to continue.
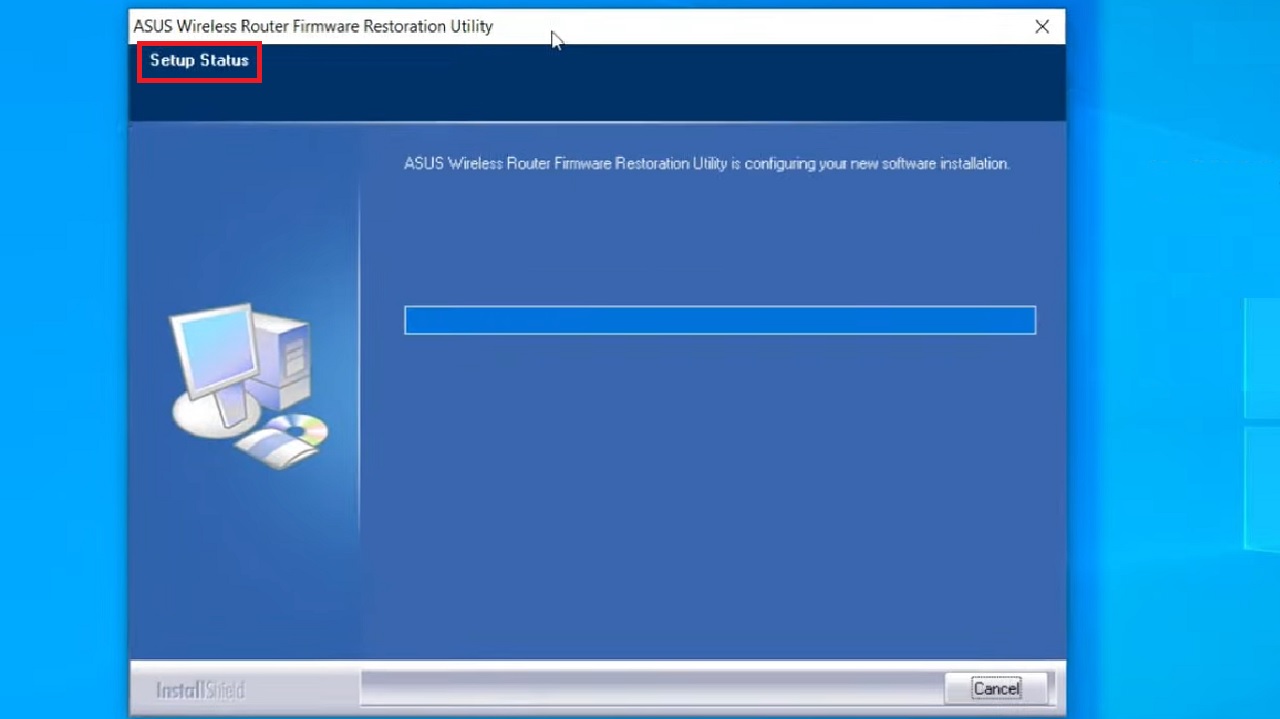
- Follow the Setup Status window while the firmware restoration utility configures the new software installation.
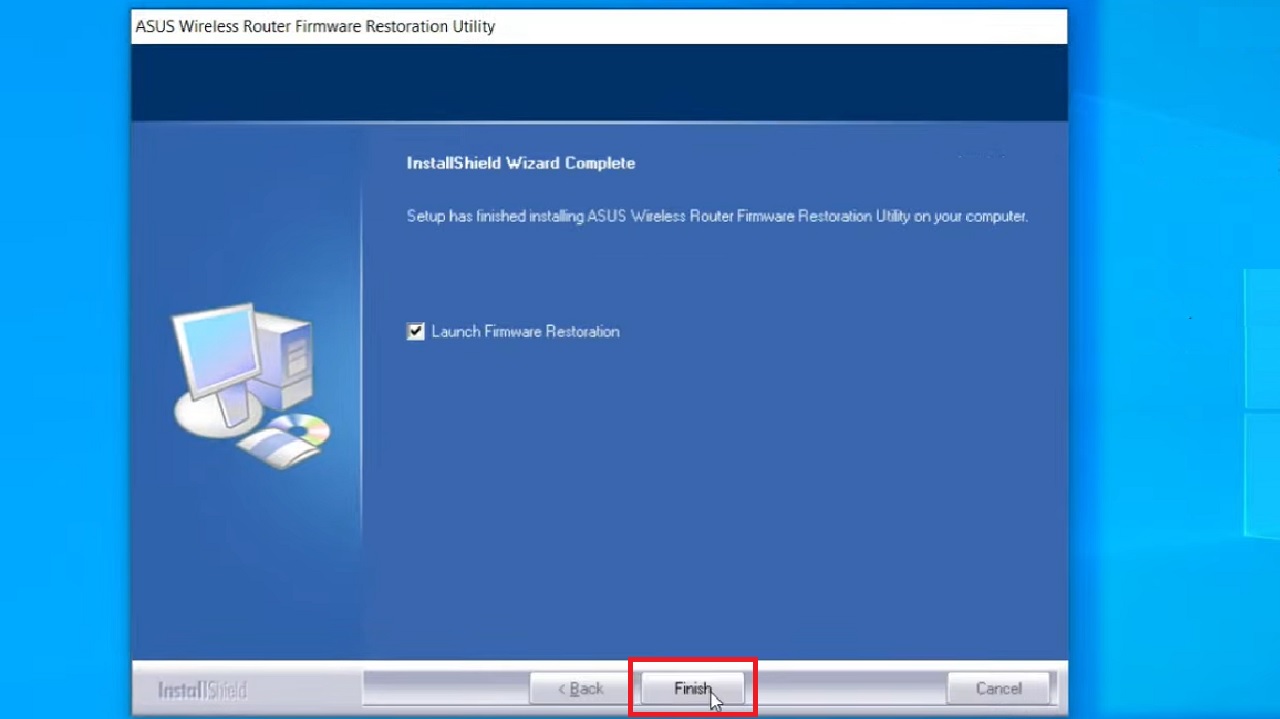
- Finally, click on the Finish button.
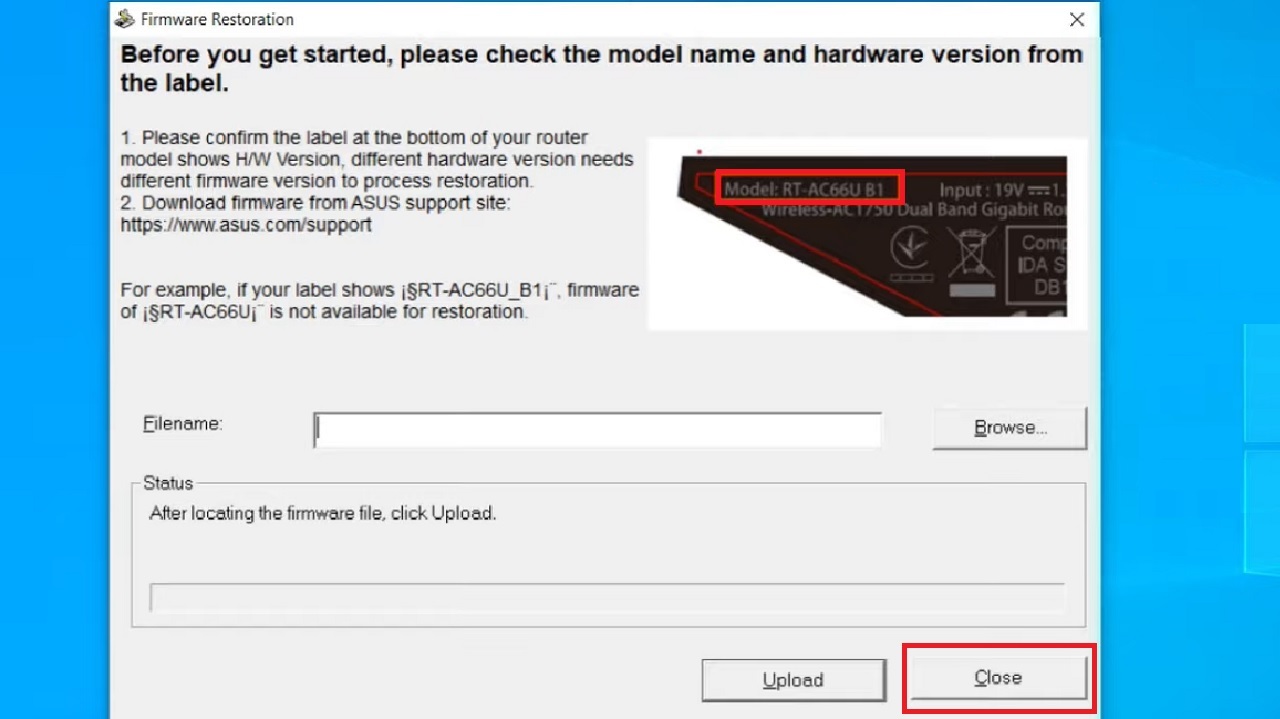
When the installation is complete, click on the Close button in the following window, after confirming the model number and hardware version from the label at the back of the device.
You must now change the network card settings.
- First, make sure to use an RJ45 cable to connect the router to your computer.
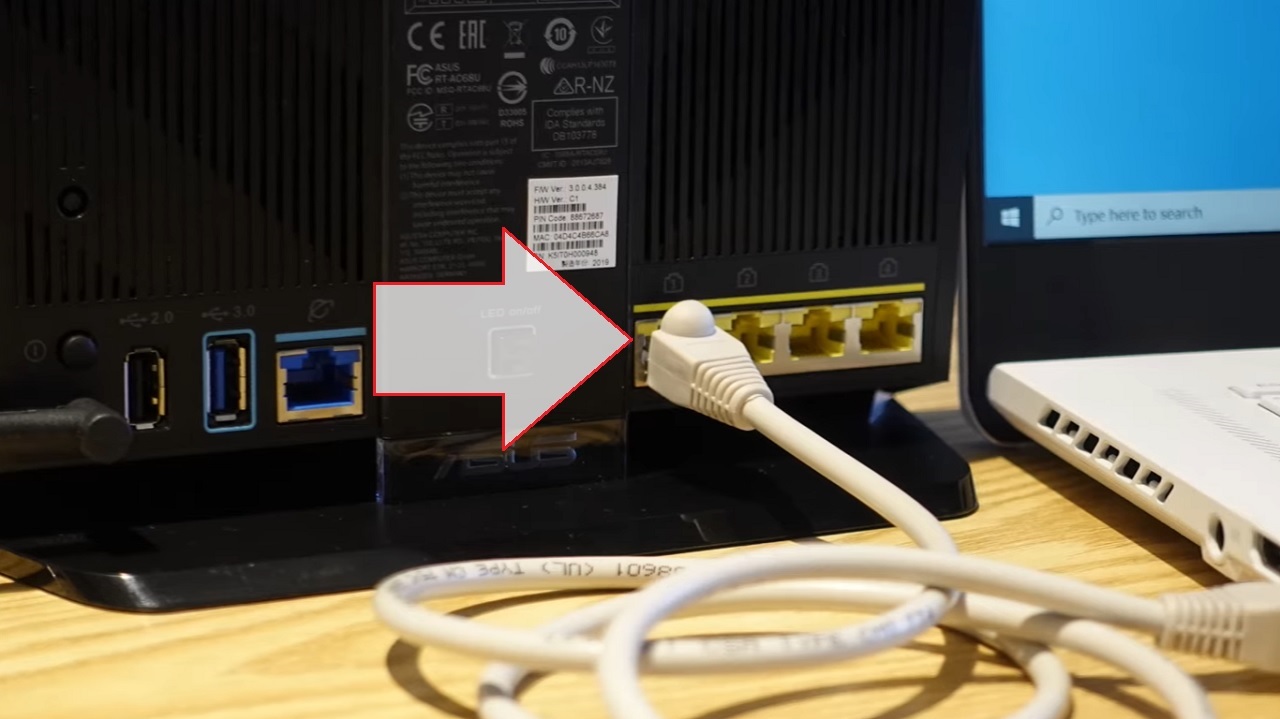
Then follow the steps mentioned in Method 3 to go to the Internet Protocol Version 4 (TCP/IPv4) Properties window and change the IP address and Subnet mask in the same way.
Now, to go to the Router Rescue Mode, press and hold the Reset button at the back of your router as you did in the above method. However, make sure you unplug the router and plug in the power adapter while pressing the button.
Release the Reset button when the power LED light starts flashing slowly.
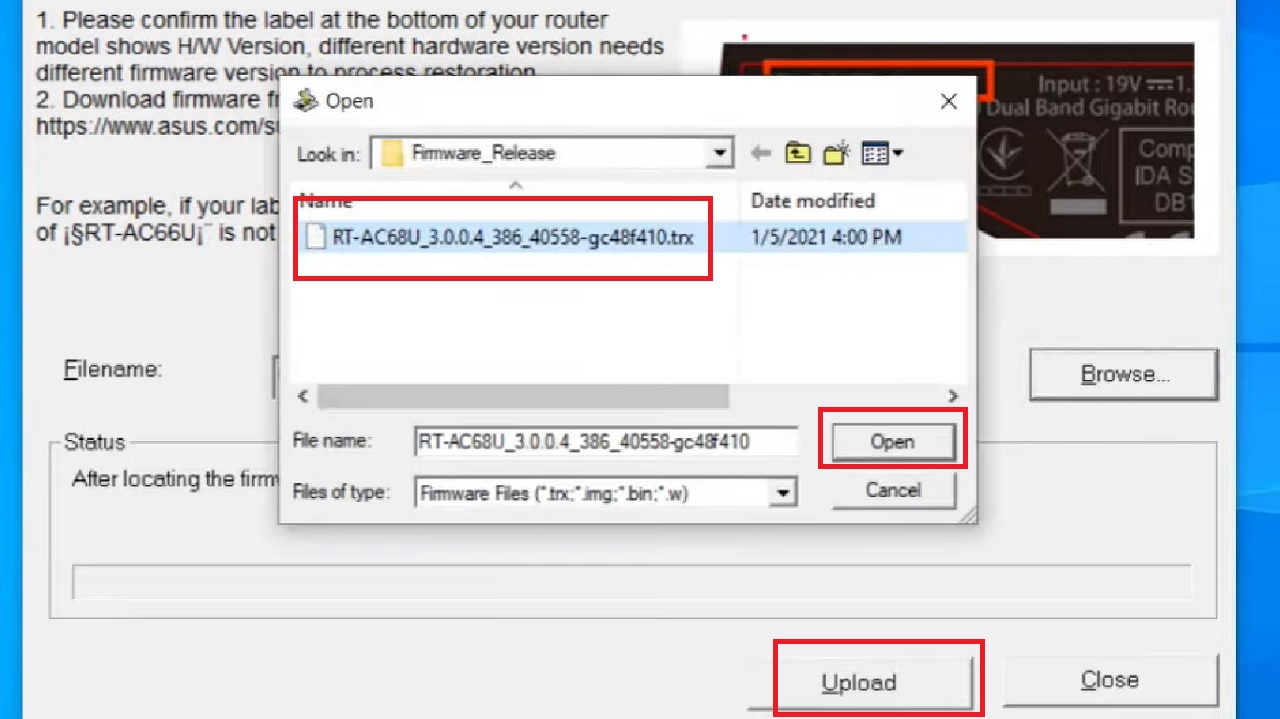
- Now, open Firmware Restoration.
- Click on the Browse button.
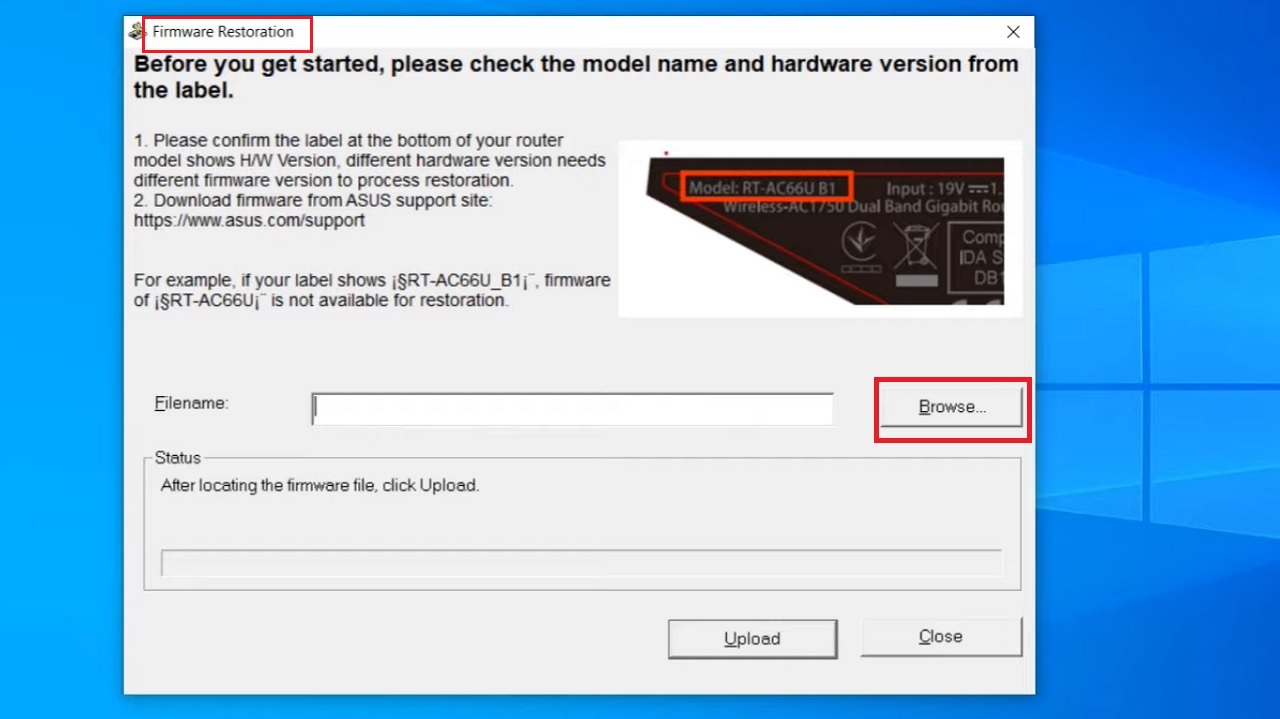
- Select the firmware file.
- Click on the Open button.
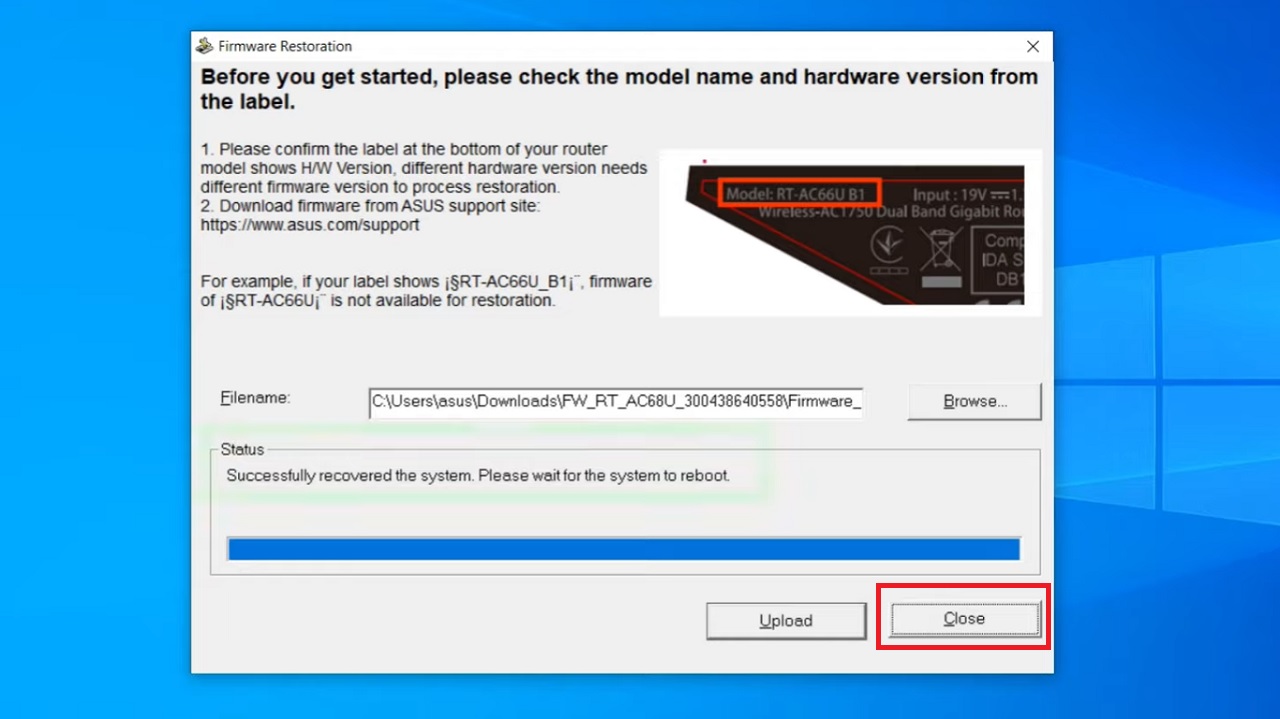
- Click on the Upload button in the previous window.
This will initiate the process, which might take a couple of minutes to complete. Close the window when it is complete.
Now, go back to the Network Connections window and change the TCP/IPv4 to its original settings.
Conclusion
As you can see, right from viruses on your PC to selecting the wrong firmware file, there are a lot of reasons for router firmware updates to fail.
Try the troubleshooting hacks mentioned in this article to resolve it. If you still face the issue, consider seeking technical assistance from an expert.