
You may experience a ‘No Internet, Secured’ message while surfing websites on the internet all of a sudden. This error message clearly indicates that your internet connection isn’t working.
In such a situation, you cannot open any website or download any content from the web. It is really a frustrating and annoying situation but thankfully, there are some easy fixes to this issue.
This article will guide you through the steps to follow for each of the solutions to the ‘No Internet, Secured’ error, if you don’t know them already.
In This Article
KEY TAKEAWAYS
- To start with, you can resolve the ‘No Internet, Secured’ error by rebooting your PC and/or restarting your router or modem.
- Disabling any conflicting third-party app or service, such as VPN, may also rectify the issue sometimes.
- Running the Internet Connections troubleshooter can resolve a lot of issues including ‘No Internet, Secured’ error.
- Another effective way to rectify the error is by resetting network settings from the Windows Settings app.
- You may disable the Internet Protocol Version 6 from Wi-Fi Properties as a temporary solution to this issue.
Why Does No Internet, Secured Error Occur?
The main reason for the ‘No Internet, Secured’ error message to appear is the misconfiguration in the IP address. It may also occur when the internet connection of your ISP is down.
There are a few other reasons as well for this error to occur, such as:
- Issues with the Wi-Fi software or hardware
- The router settings conflicting with the wireless driver
- There may be issues with the power management settings
- Conflicting third-party apps and services
- Outdated operating system
- The PC or device may be infected with malware
- The website you are trying to visit does not have a valid security certificate and is not secure
Here are some simple and relatively complex steps to follow to resolve the issue.
How to Fix No Internet, Secured Error?
Sometimes, some simple actions may rectify the ‘No Internet, Secured’ error, such as moving the system closer to the router.
You may also check for any network outage to see whether or not the internet connection of the ISP is down by connecting to the internet using another device. If it does not, the issue with the Internet Service Provider. If it works fine, the issue is with your PC.
In that case, some of the easiest and proven ways to fix the ‘No Internet, Secured’ error are:
- Resetting the connection of the ISP is one way to resolve this issue if you are using DSL or fiber. You may do it through a phone number, an app, or the support email address, depending on the ISP you are using.
- Verifying the connection status of your computer is an easy and quick fix to this issue. Check that you are connected to the right Wi-Fi network that has an internet connection, before moving on to the other solutions.
- Disabling Virtual Private Network (VPN) or any conflicting third-party app may also resolve the issue if these disrupt the internet connection. If you really have to use them, make sure these have no bugs and are updated.
- Resetting the router may fix this issue sometimes. Switch it off, unplug it and reconnect it after a few minutes and switch it on.
- Restarting the computer often helps resolve issues like this. So, close all apps and programs and reboot your computer to try fixing the issue.
Also, switching network connection from Wi-Fi to Ethernet may sometimes help identifying whether the issue is with the Wi-Fi hardware or software. Accordingly, you can fix the issue by updating network drivers, router firmware, settings or configuration and rectify the ‘No Internet, Secured’ error.
If the above solutions do not work, try the following:
Updating operating system: Go to Settings > Update & Security > Windows Update > Check for updates.
Reset network settings: In Windows 10, go to Start Menu > Settings > Network & Internet > Status > Network reset > Select Reset now.
In Windows 11, go to Settings > Network & Internet > Advanced network settings > Network reset > Select Reset now.
If the issue still persists, try fixing it with the following solutions.
Note: As such, all the methods mentioned above and below may not work on your PC because it will entirely depend on the configuration of your computer and the setup of the network adaptor.
Still, the most probable and general solutions are listed here. Just follow the steps in order while performing them.
Method 1: Run the Internet Connections Troubleshooter
The Windows network troubleshooter can solve a number of issues related to network connection. So, starting your endeavor by running the Internet Connections troubleshooter is a feasible solution.
STEPS TO FOLLOW:
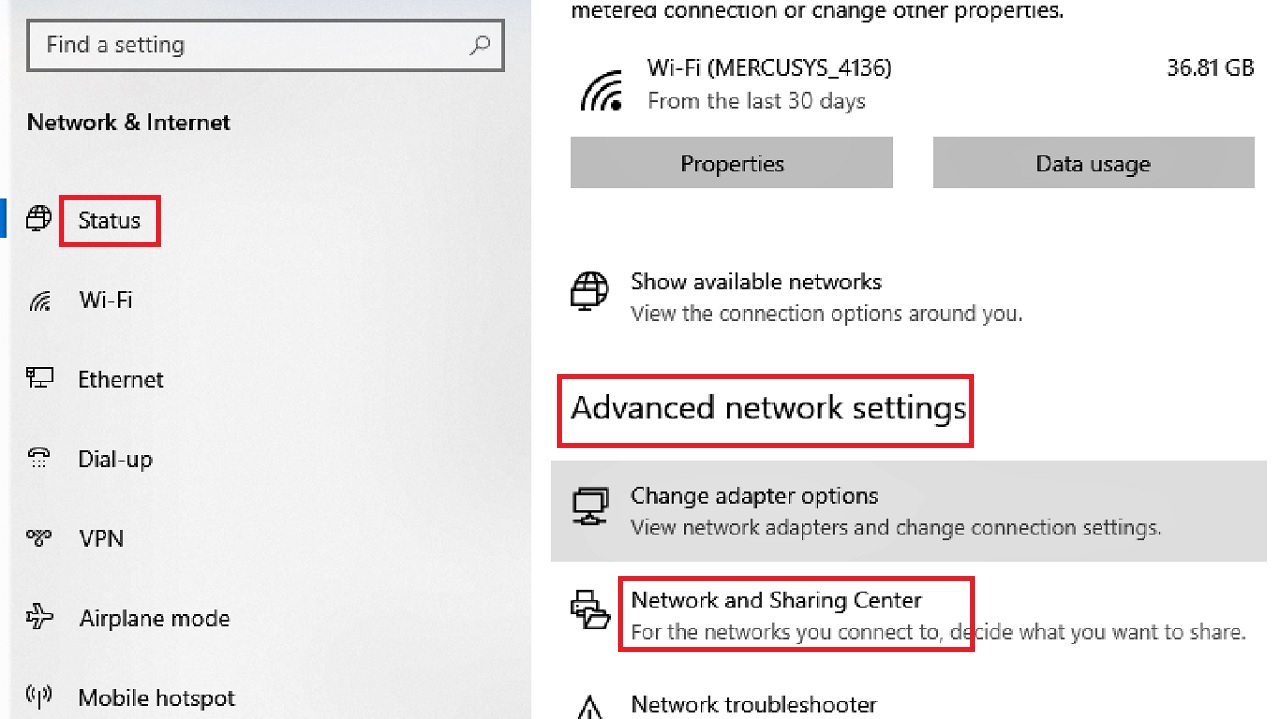
- Go to the Start Menu.
- Select Settings.
- Choose Network & Internet.
- Select Status in the following window.
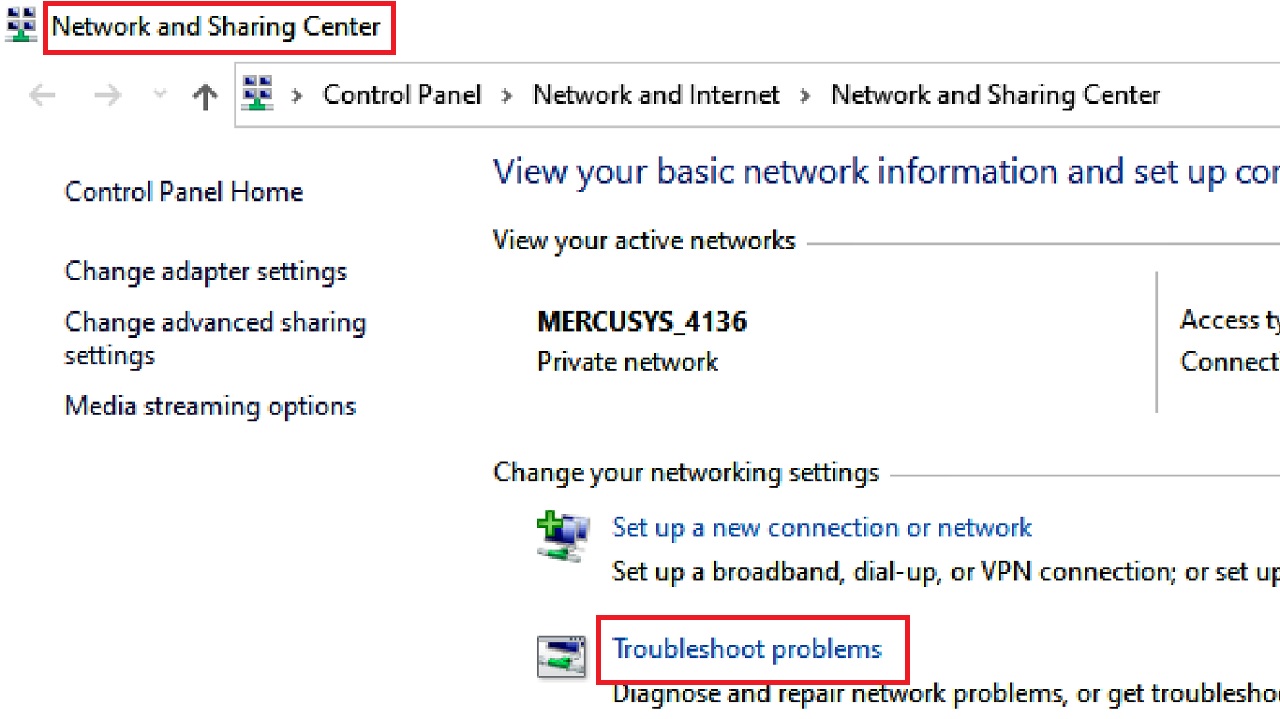
- Click on Network and Sharing Center from the right side of the window under Advanced network settings.
- Select Troubleshoot problems on the right side of the Network and Sharing Center window.
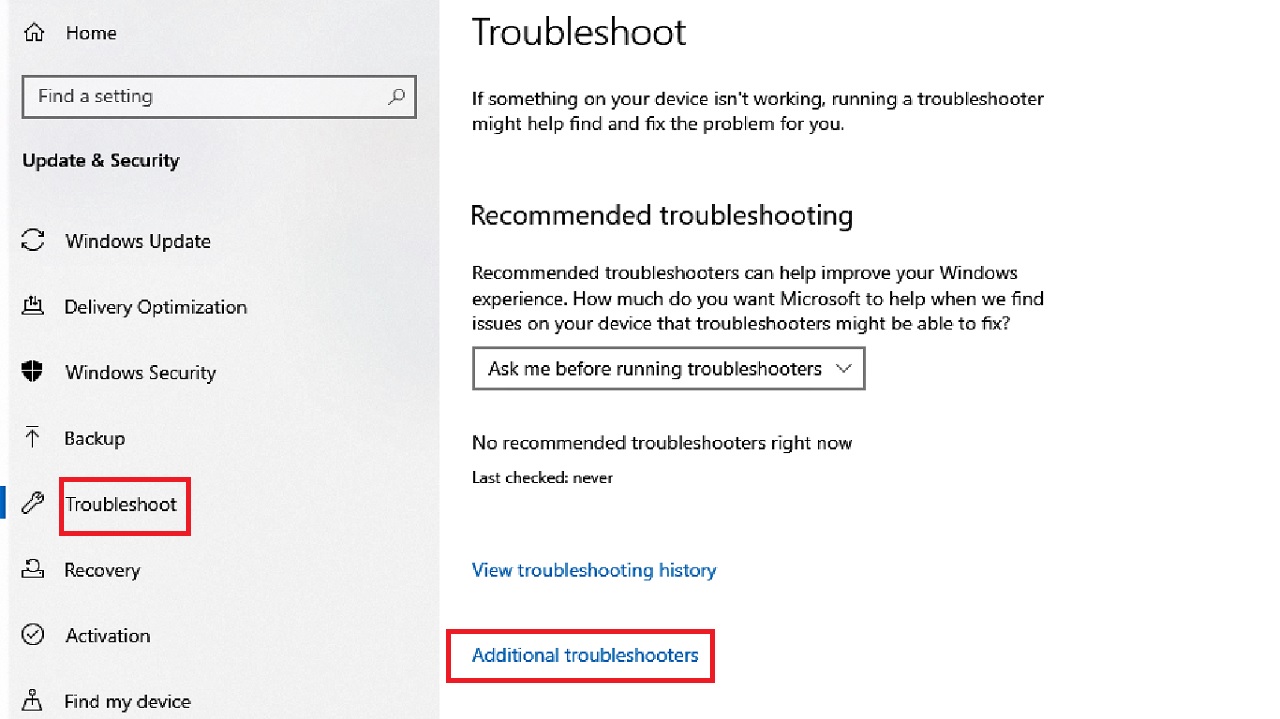
- Click on Additional troubleshooters in the following Troubleshoot page.
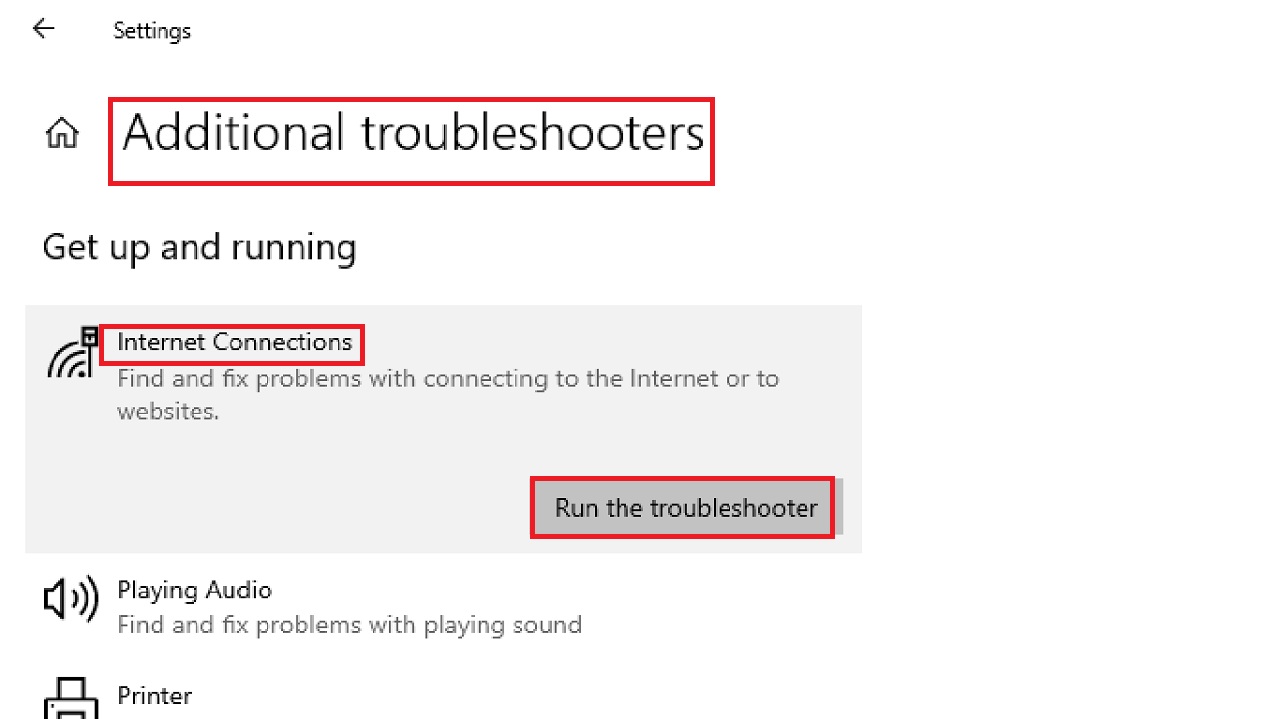
- Click on Internet Connections under Additional troubleshooters.
- Click on Run the troubleshooter button.
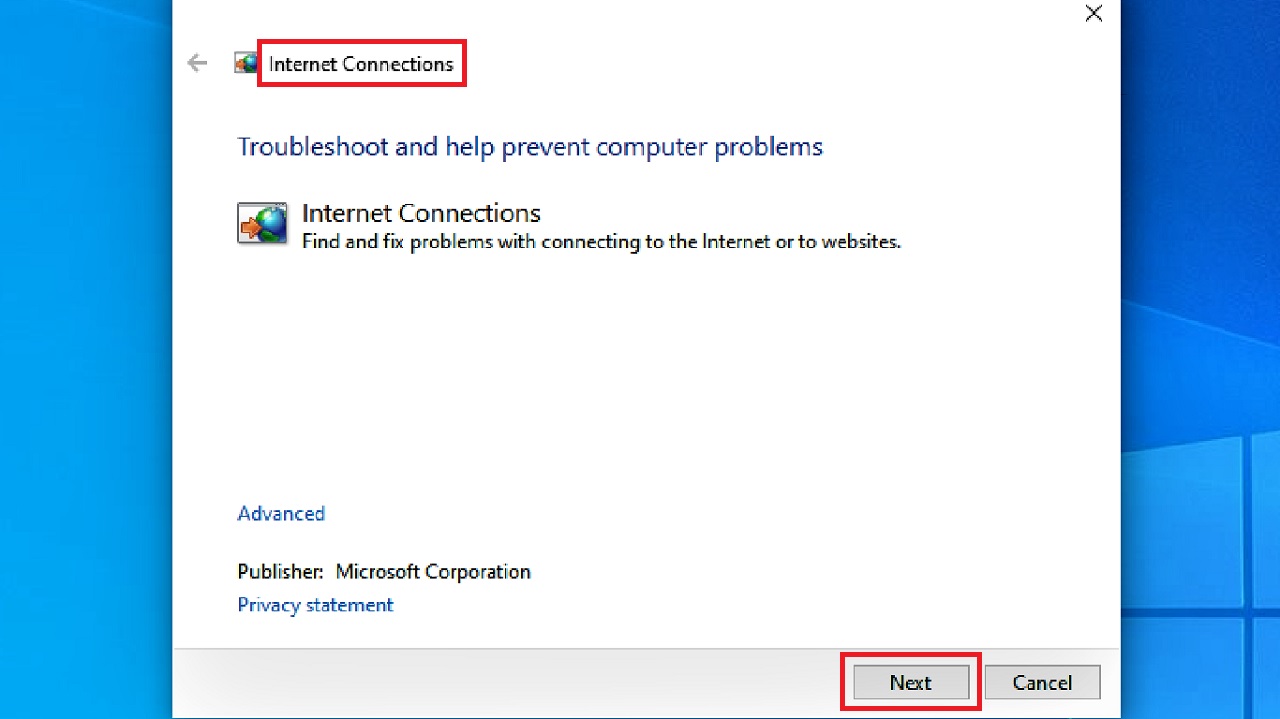
You can also run this troubleshooter from the Control Panel easily.
- Type Find and fix network problems in the search box next to the Start Menu and hit the Enter key on your keyboard.
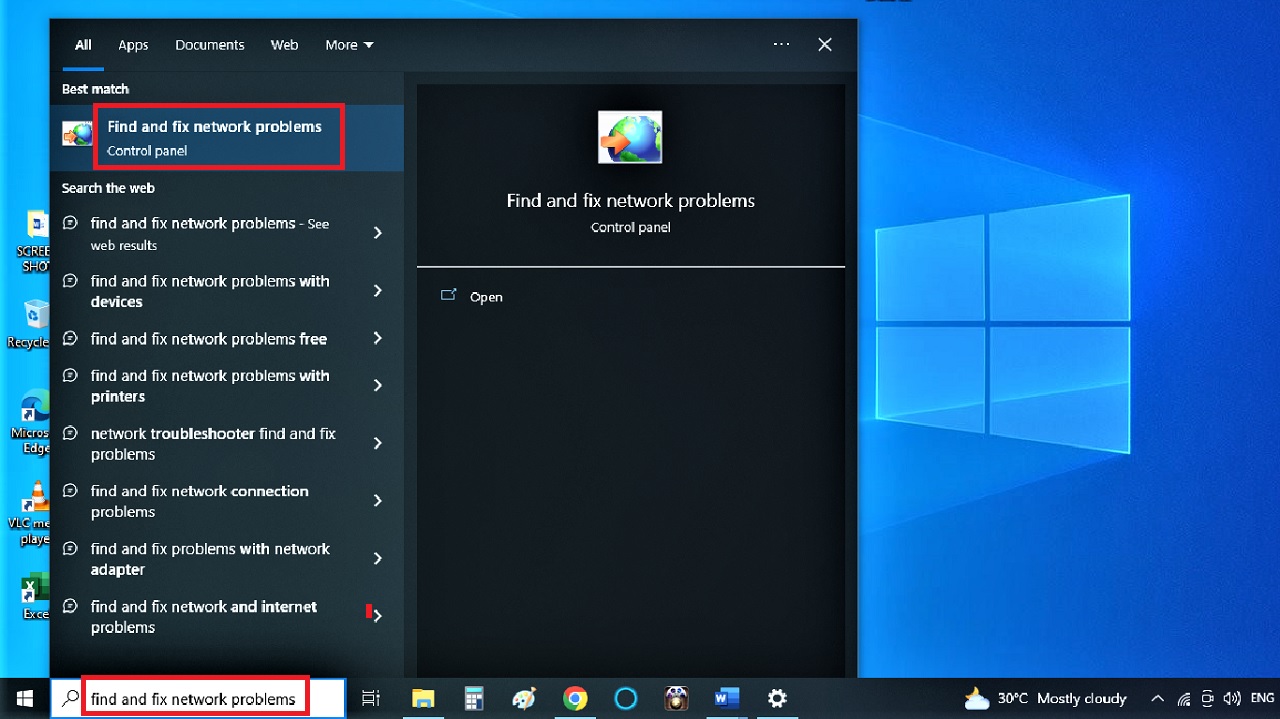
- Click on the Next button in the following Internet Connections window.
- Click on the ‘Troubleshoot my connection to the Internet’ option.
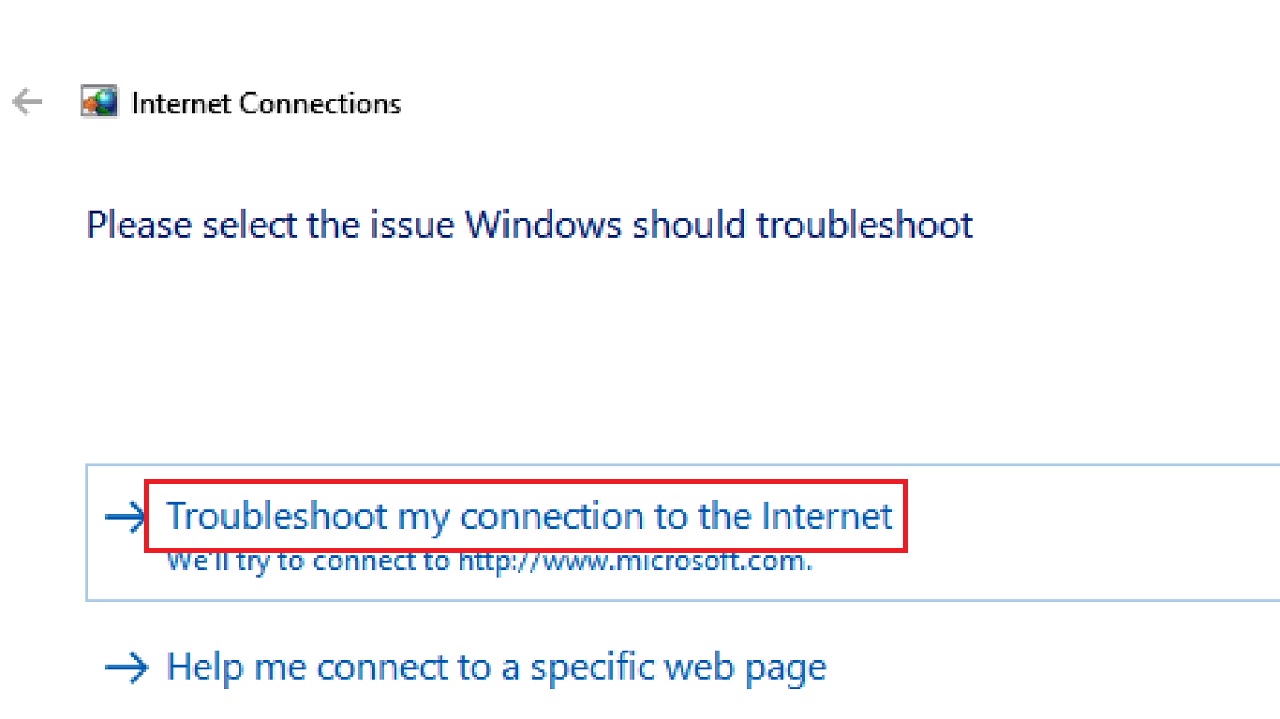
- Follow the on-screen instructions, if any from here.
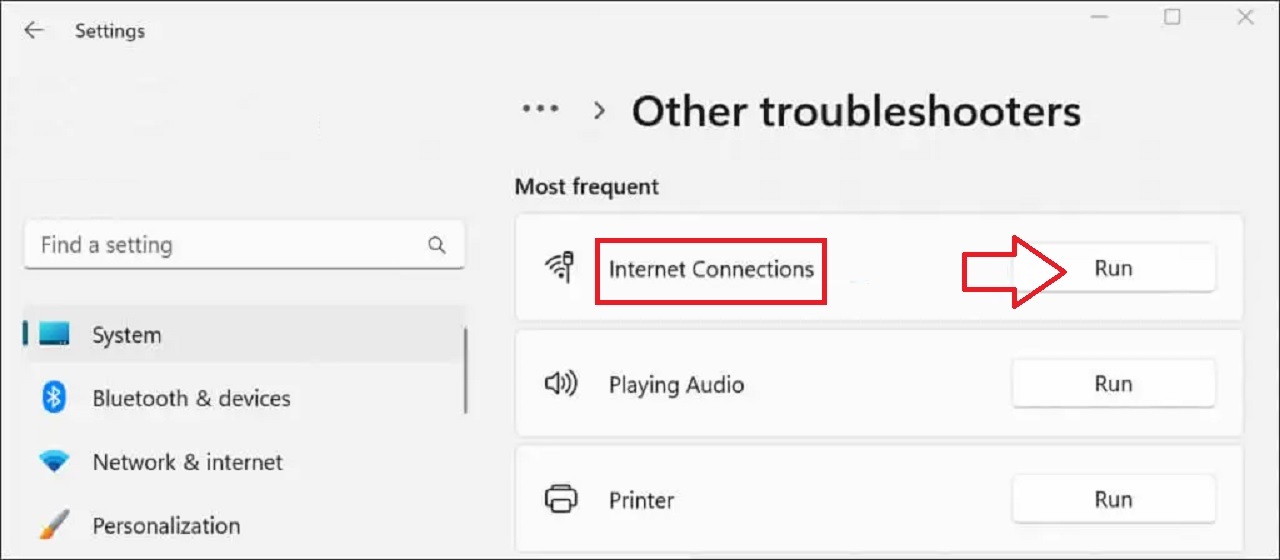
If you are using Windows 11, follow these steps:
- Go to Settings > System > Troubleshoot > Other troubleshooters.
- Click on the Run button next to Internet Connections.
In either case, if the troubleshooter resolves the issue, you will be able to connect to the internet again. If it cannot resolve the issue, it will at least inform you about the issue and you can take necessary actions accordingly to fix the issues within.
Method 2: Check and Change Network Protocol Settings
You can change the default network settings on your PC. This may often resolve the issue.
STEPS TO FOLLOW:
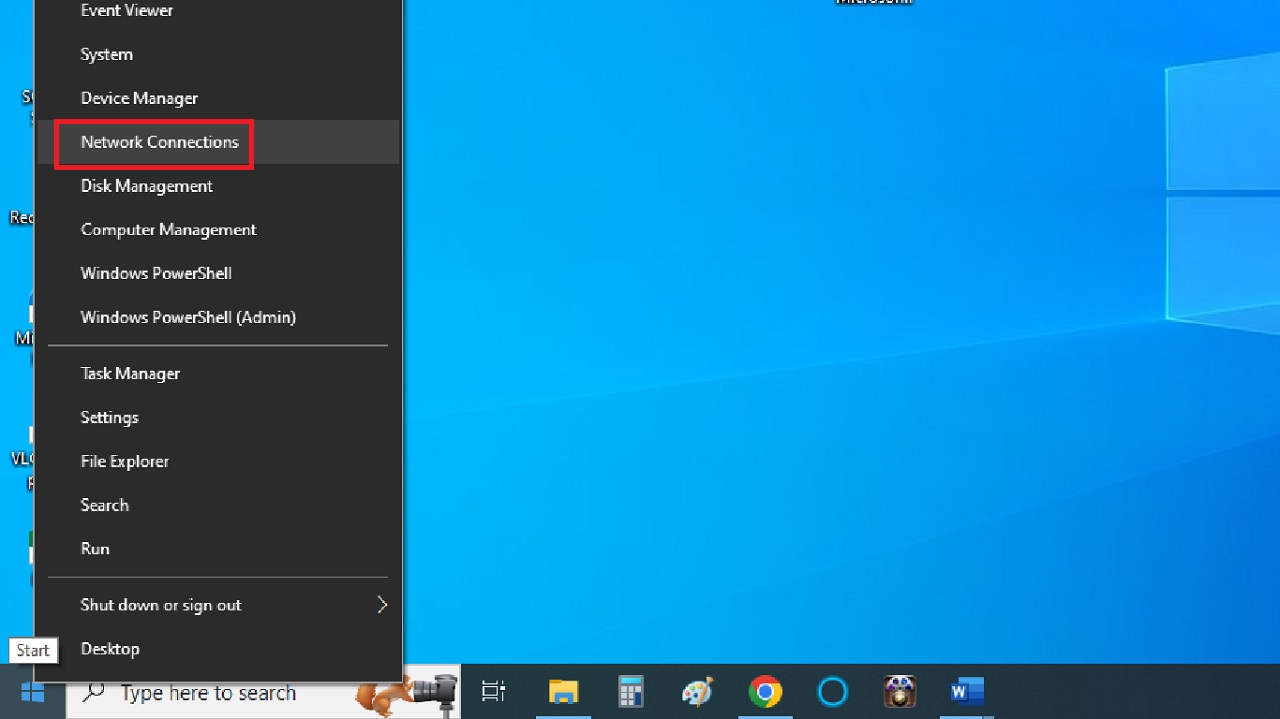
- Right-click on the Start Menu.
- Select Network Connections.
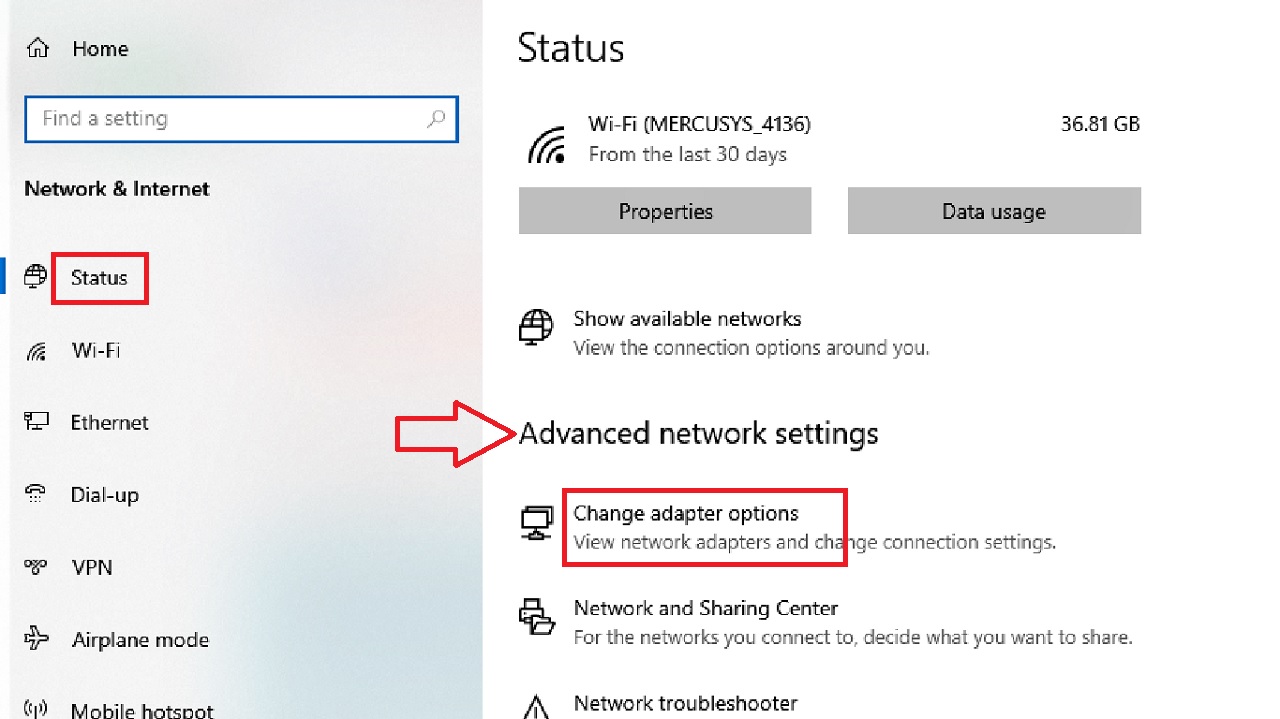
- Look under Advanced network settings in the Status page.
- Select Change adapter options.
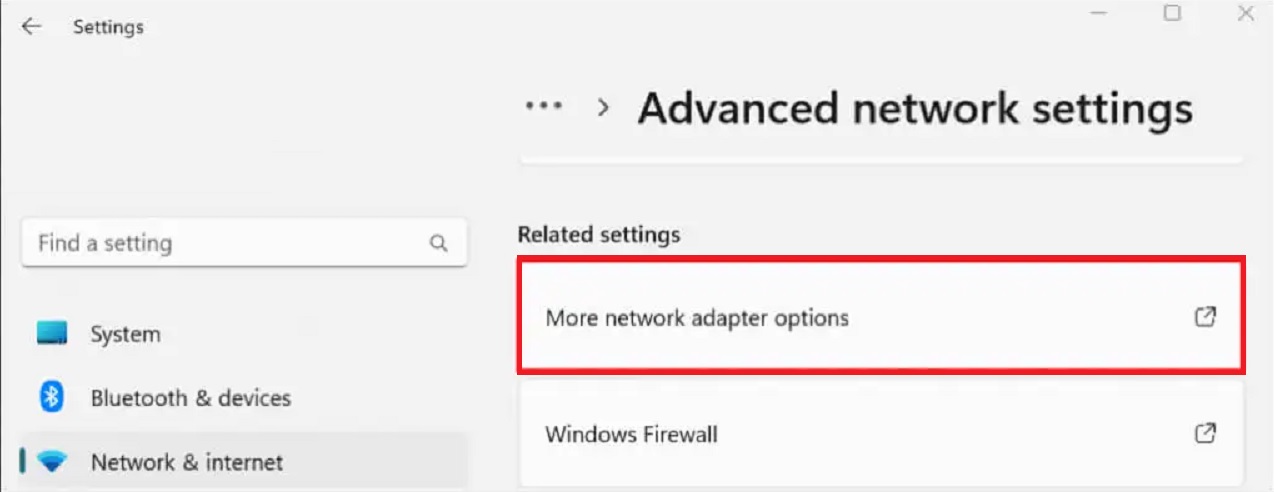
(Scroll down to the Related settings section and select More network adapter options in Windows 11).
- Right-click on the wireless network.
- Select Properties.

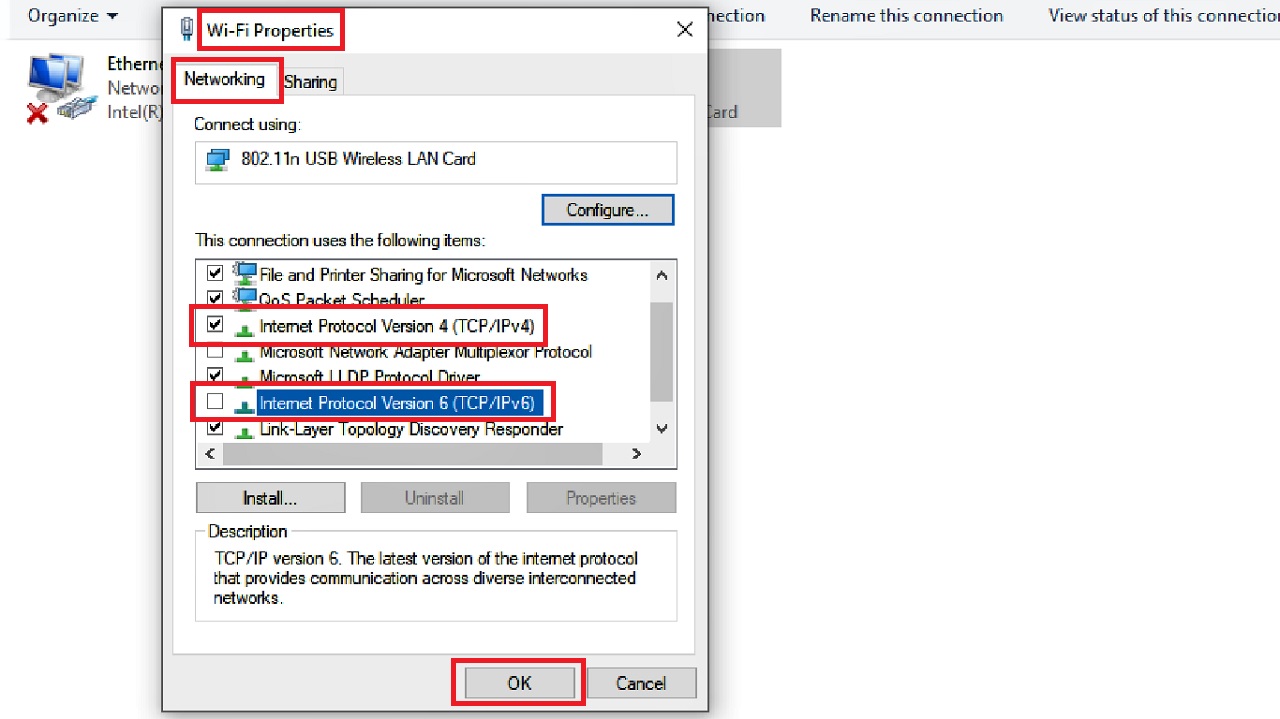
- In the Wi-Fi Properties window, check that the small square box next to Internet Protocol Version 4 (TCP/IPv4) is ticked.
- Uncheck the box next to Internet Protocol Version 6 (TCP/IPv6).
- Click on the OK button.
Now check whether or not the issue is resolved.
Note: Microsoft does not recommend disabling the IPv6. So, if you find that the error still persists after the above changes, re-enable IPv6. It will prevent other Windows components from malfunctioning.
If the issue still persists, then the wireless driver and the router program may be conflicting with each other, especially if your system has had a recent update. Sometimes disabling the Wi-Fi sharing feature in such situations may resolve the ‘No Internet, Secured’ error.
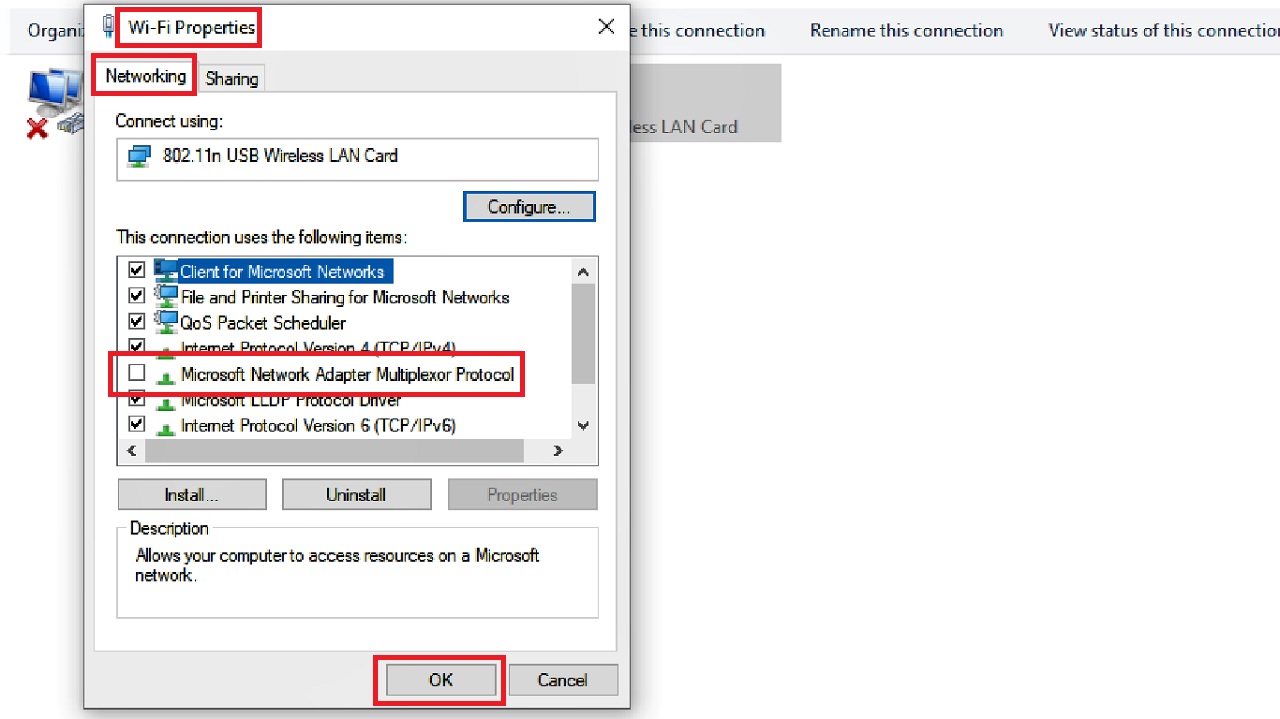
- Go to the Wi-Fi Properties window again.
- Scroll down the list displayed in the box under ‘This connection uses the following items’ in the Wi-Fi Properties window.
- Uncheck the small square box next to ‘Microsoft Network Adapter Multiplexor Protocol.’
- Also, uncheck any other item related to Wi-Fi sharing.
- Click on the OK button.
Now, try to connect to your internet again to see whether or not the issue is resolved. If the problem persists, try the following additionally:
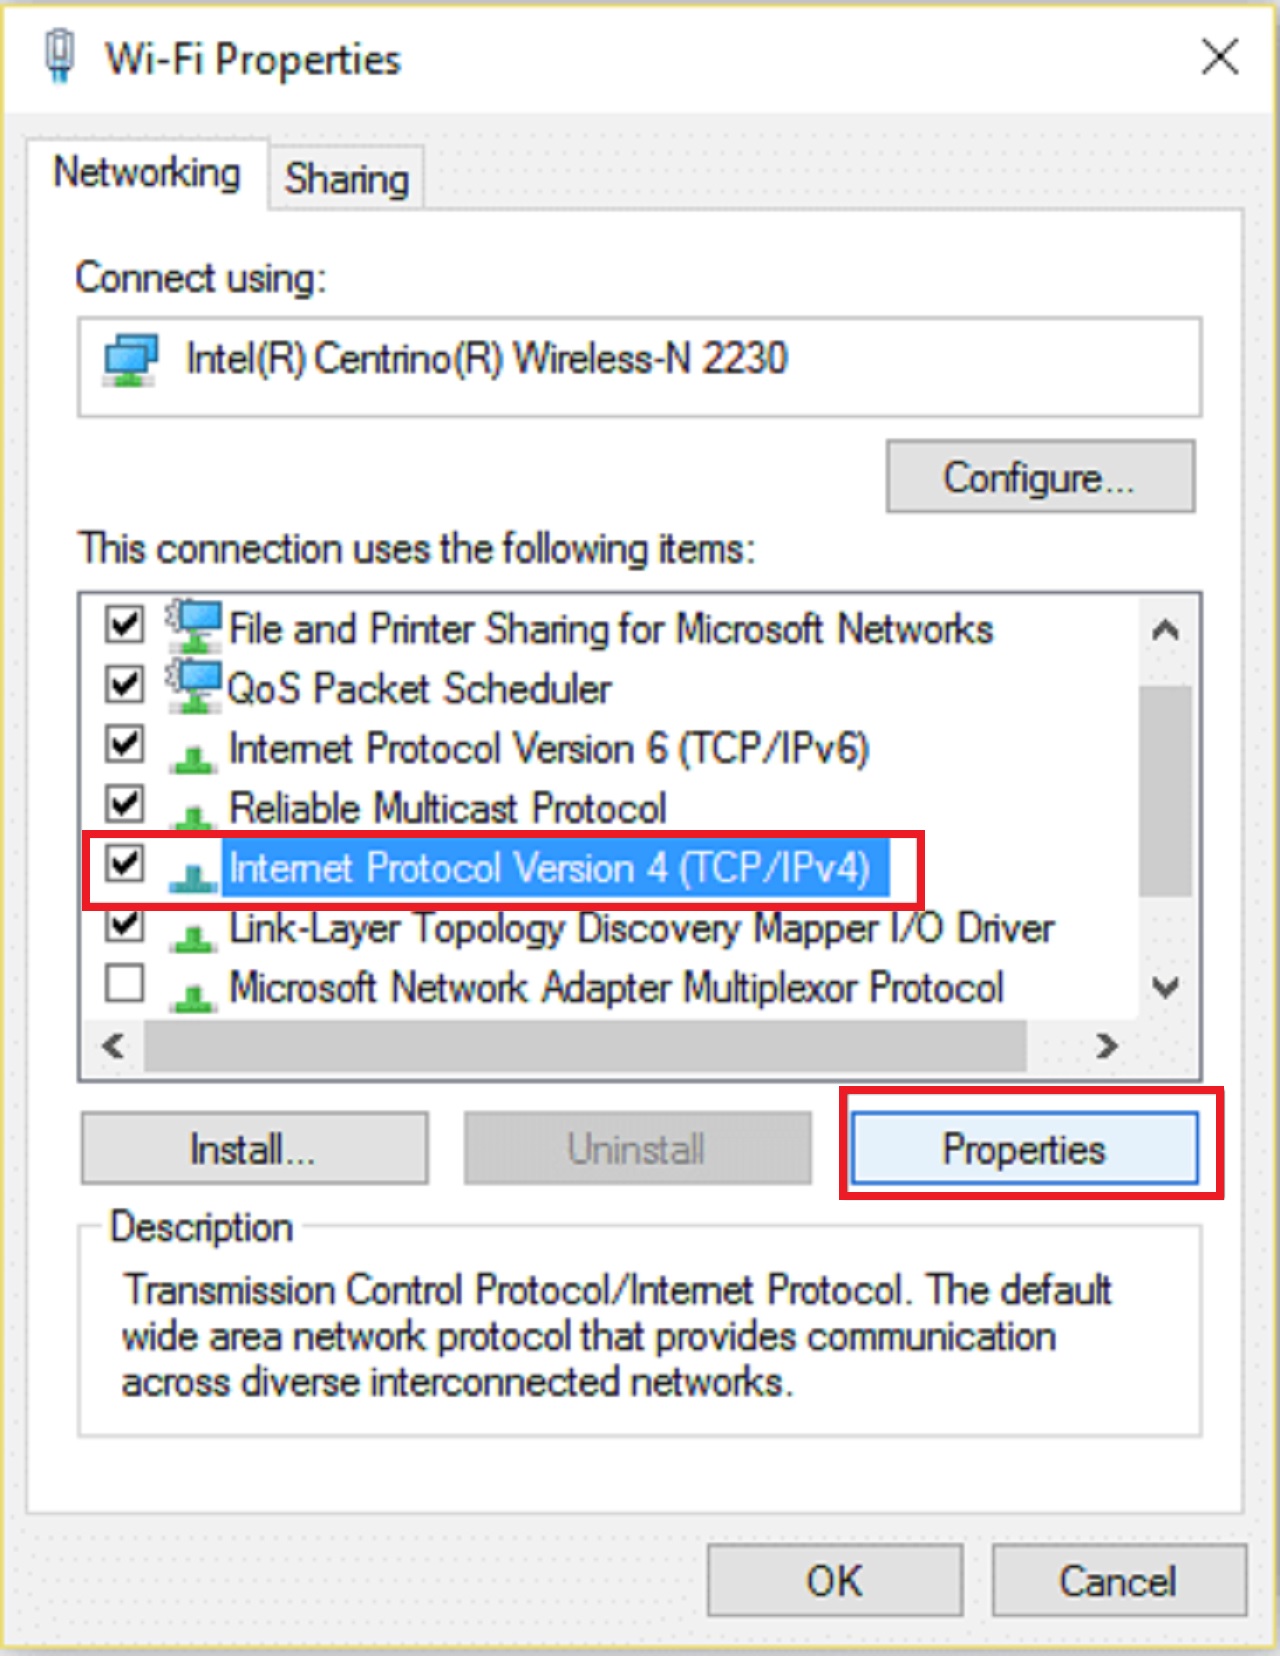
- Select IPv4 from the options.
- Click on Properties button.
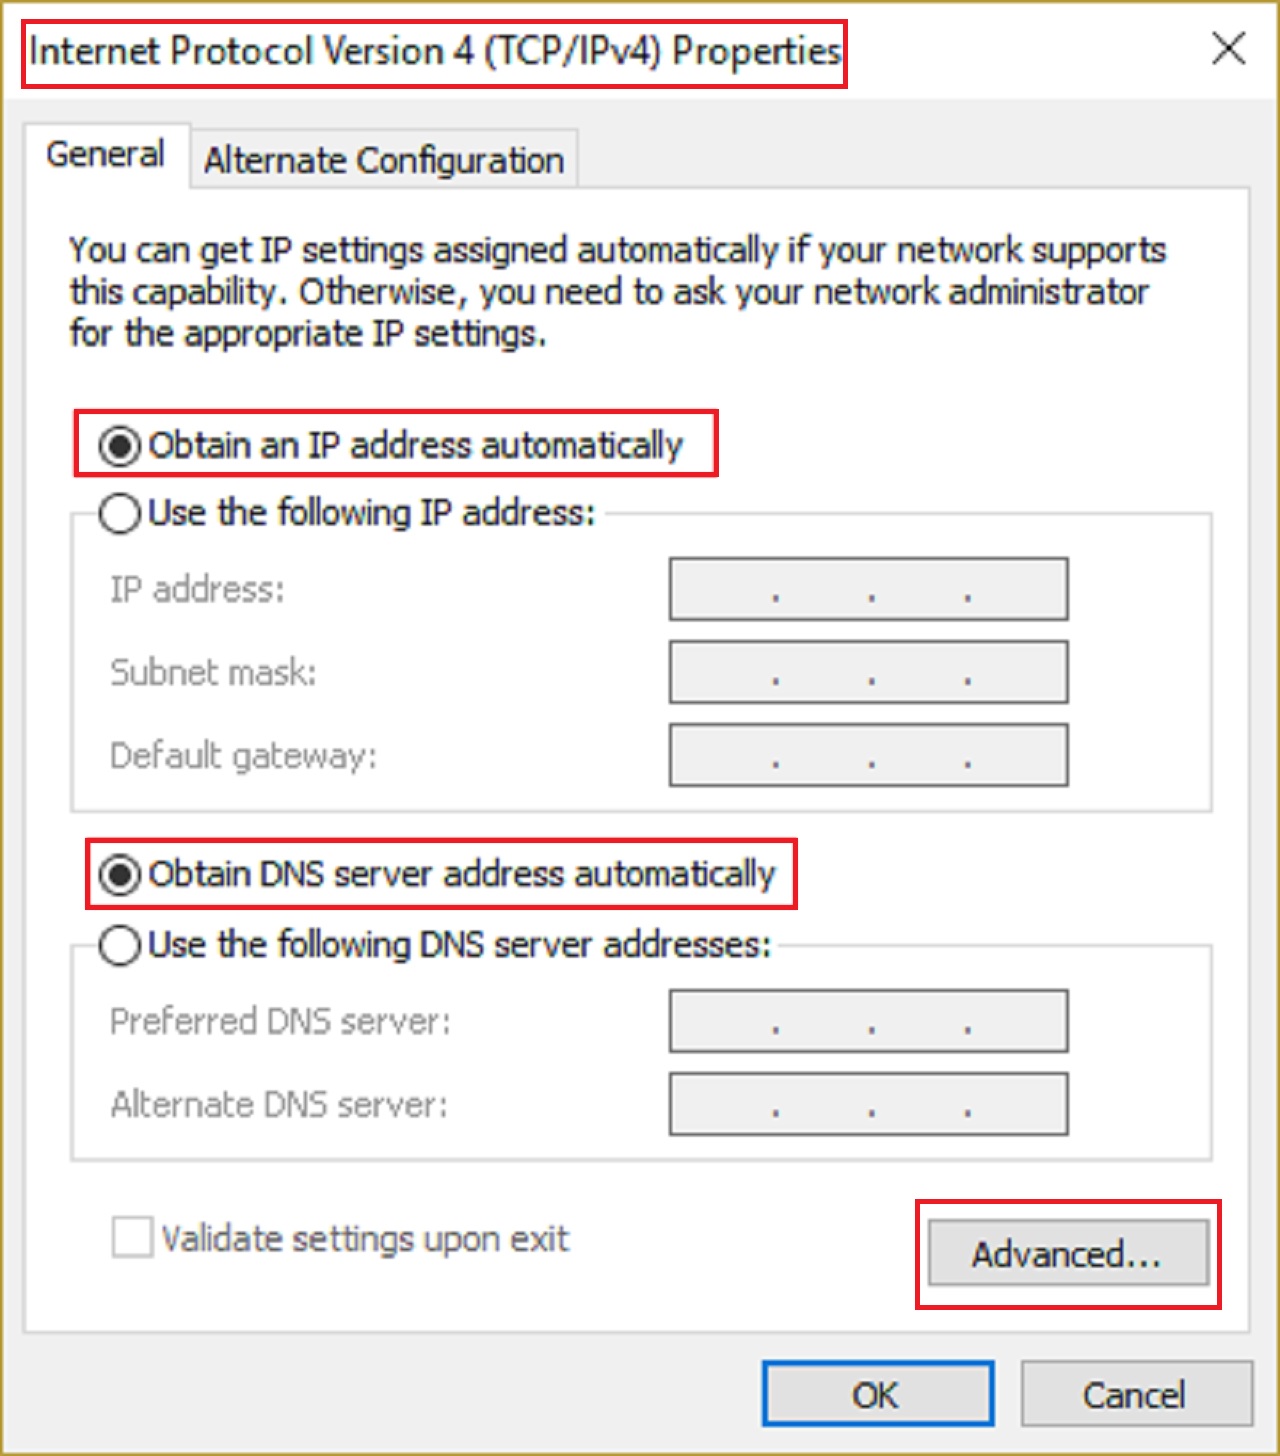
- In the Internet Protocol Version 4 (TCP/IPv4) Properties window, check the small radio buttons next to ‘Obtain an IP address automatically’ and ‘Obtain DNS server address automatically.’
- Now, click the Advanced button.
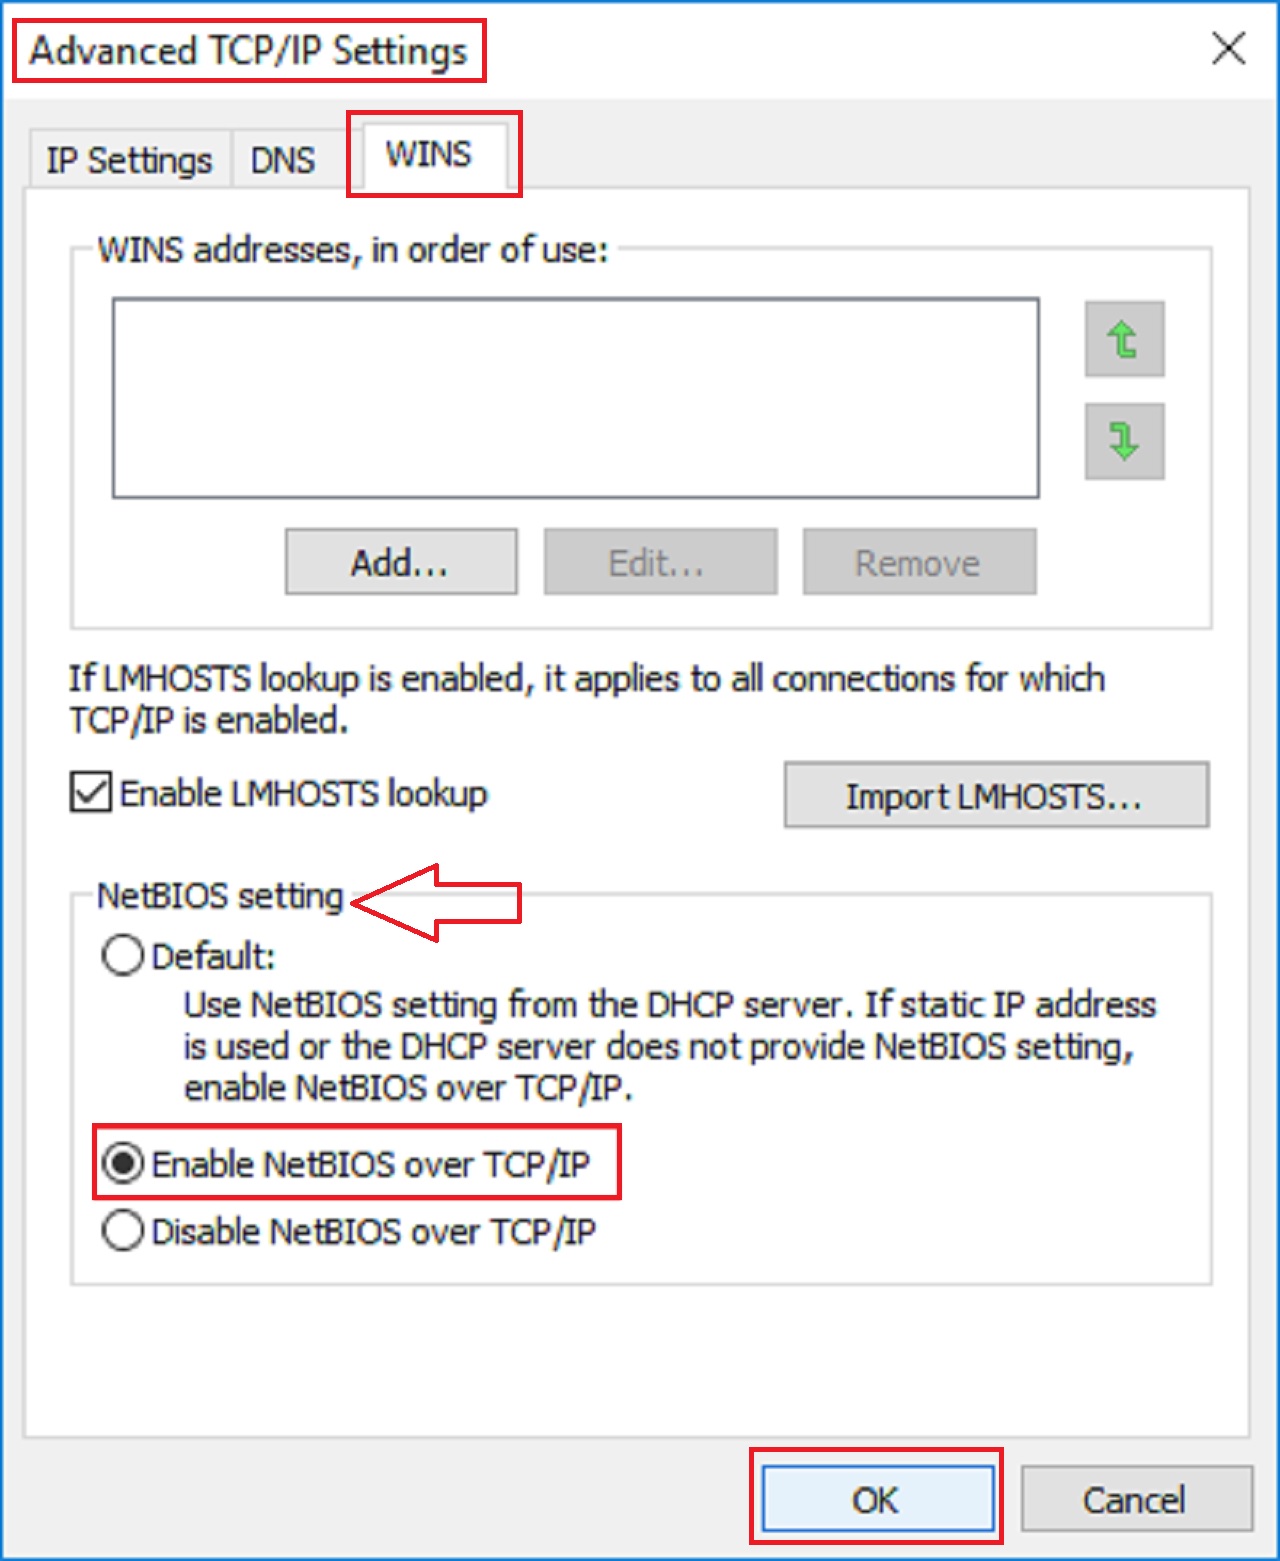
- Go to the WINS tab in the following Advanced TCP/IP Settings window.
- Check the small circular button next to Enable NetBIOS over TCP/IP under the NetBIOS setting.
- Click on the OK button in this window and all others to close them and save the changes.
Now, check whether the issue is resolved by connecting to your internet. If it is still not rectified, follow the next steps to get it solved:
In the Wi-Fi Properties window, make sure that the boxes next to all of the following properties are checked after unchecking TCP/IPv6:
- Internet Protocol Version 4, or TCP/IPv4
- Client for Microsoft networks
- Link-layer Topology Discovery Responder
- Link-layer Topology Discovery Mapper I/O Driver
- File and Printer Sharing for Microsoft Networks
- Microsoft LLDP Protocol Driver
- QoS Packet Scheduler
Now, click on the OK button to save the changes and reboot your system.
Once it restarts, check whether or not the issue is resolved. If it still persists, try the following method.
Method 3: Flush DNS Cache
Flushing the DNS cache of your PC can also resolve this issue many times. You can do it through the Command Prompt or Windows PowerShell.
STEPS TO FOLLOW:
- Right-click on the Start Menu.
- Choose Windows PowerShell (admin).
- Type in the command ipconfig /flushdns and hit the Enter button on your keyboard.
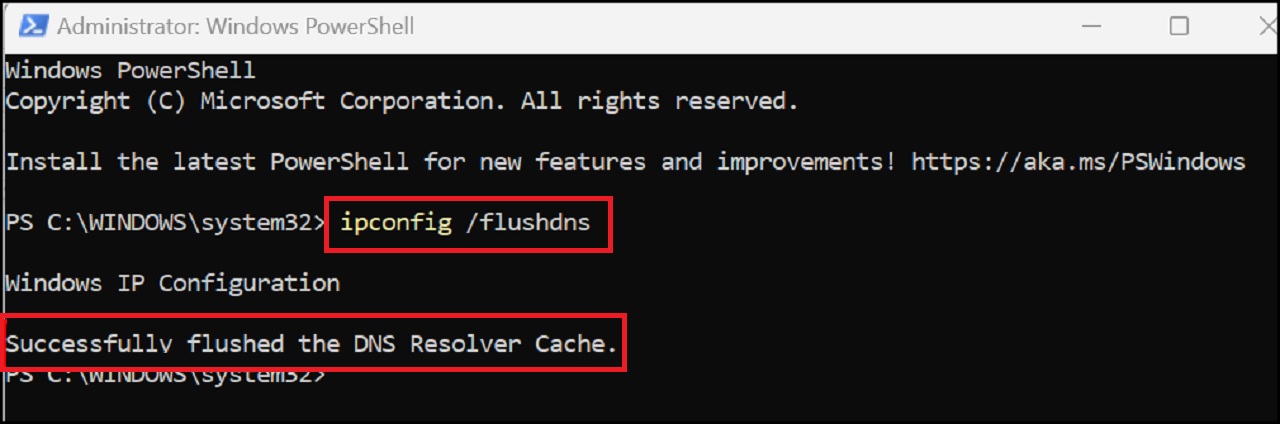
- Close the window when you see the success message saying, “Successfully flushed the DNS Resolver Cache,’ as shown above.
Sometimes, the issues will be resolved at this stage. Check whether or not the issue is resolved. If you see that the problem still persists, then you will have to reset your network configuration in addition to flushing the DNS Resolver Cache.
The commands to run in the Command Prompt or Windows PowerShell for this are:
- ipconfig /release
- ipconfig /renew
- netsh winsock reset
- netsh int ip reset
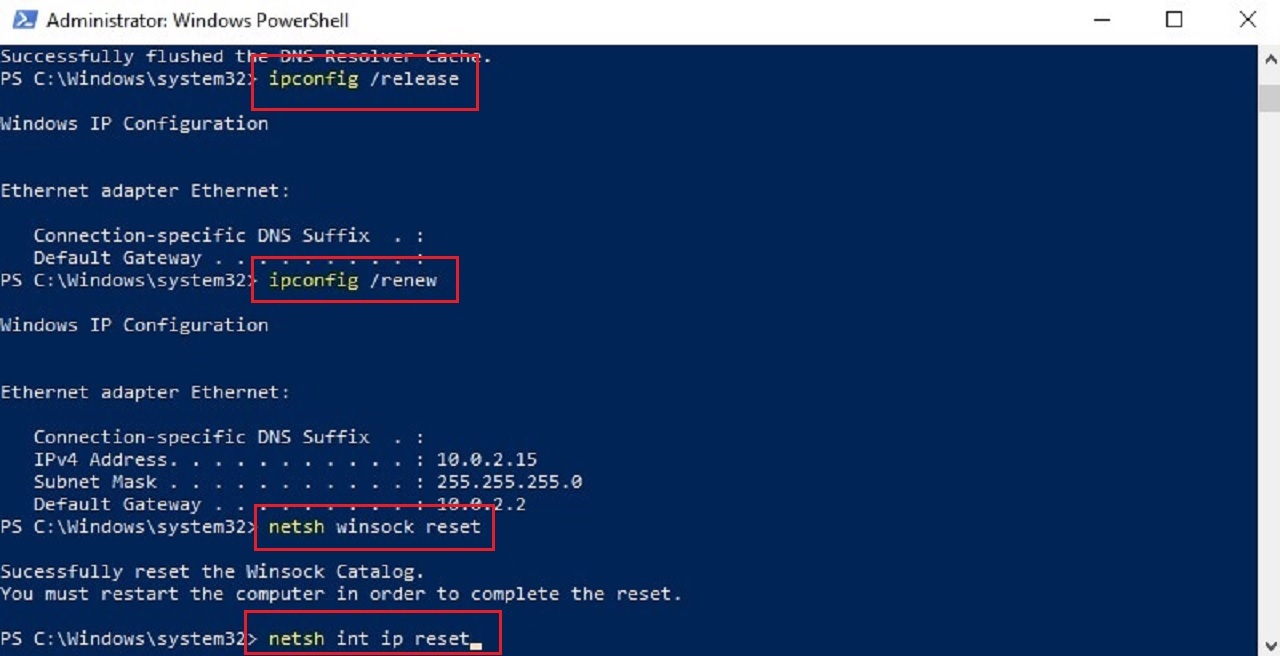
When the entire process is complete, reboot your PC and check whether now the issue has been rectified or not. If it has not, move on to the next solution.
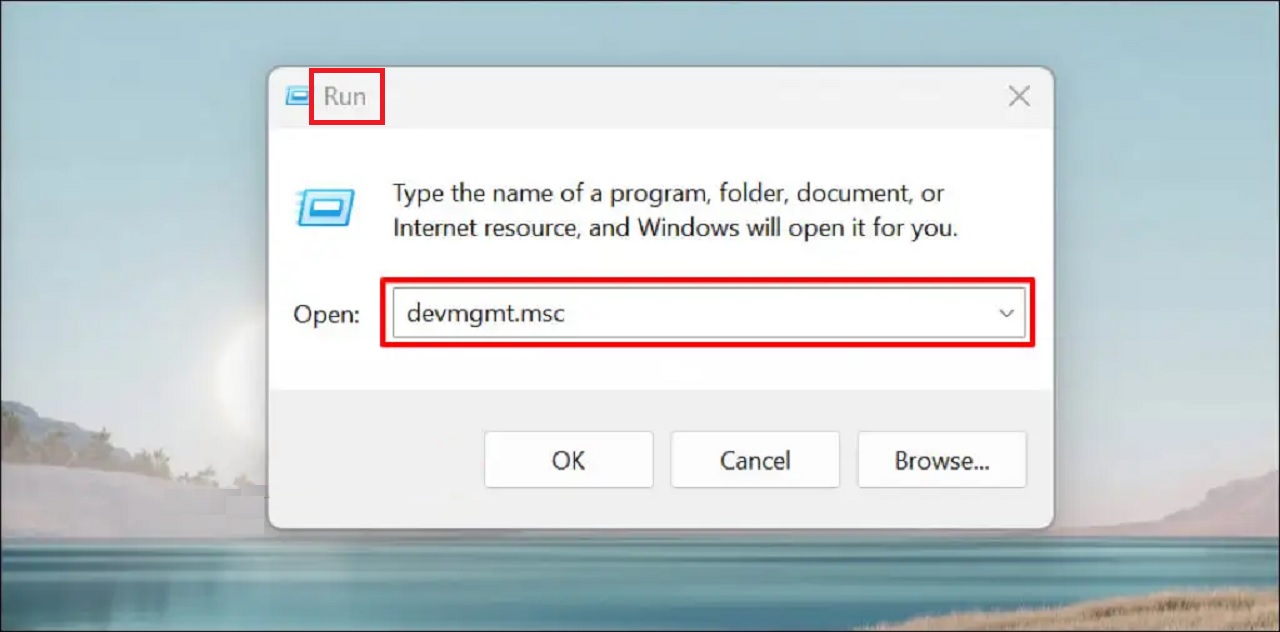
Method 4: Reinstall or Update Network Adapter Driver
If there are any issues or bugs in the network adapter, you may experience this ‘No Internet, Secured’ error. The best thing to do is update or reinstall the driver.
STEPS TO FOLLOW:
- Press the Windows and R keys on your keyboard together to open the Run dialog box.
- Type devmgmt.msc in the box and press OK or hit Enter.
- In the Windows Device Manager, expand the Network adapters category by clicking on the small arrow next to it.
- Right-click your network adapter.
- Select Update driver.
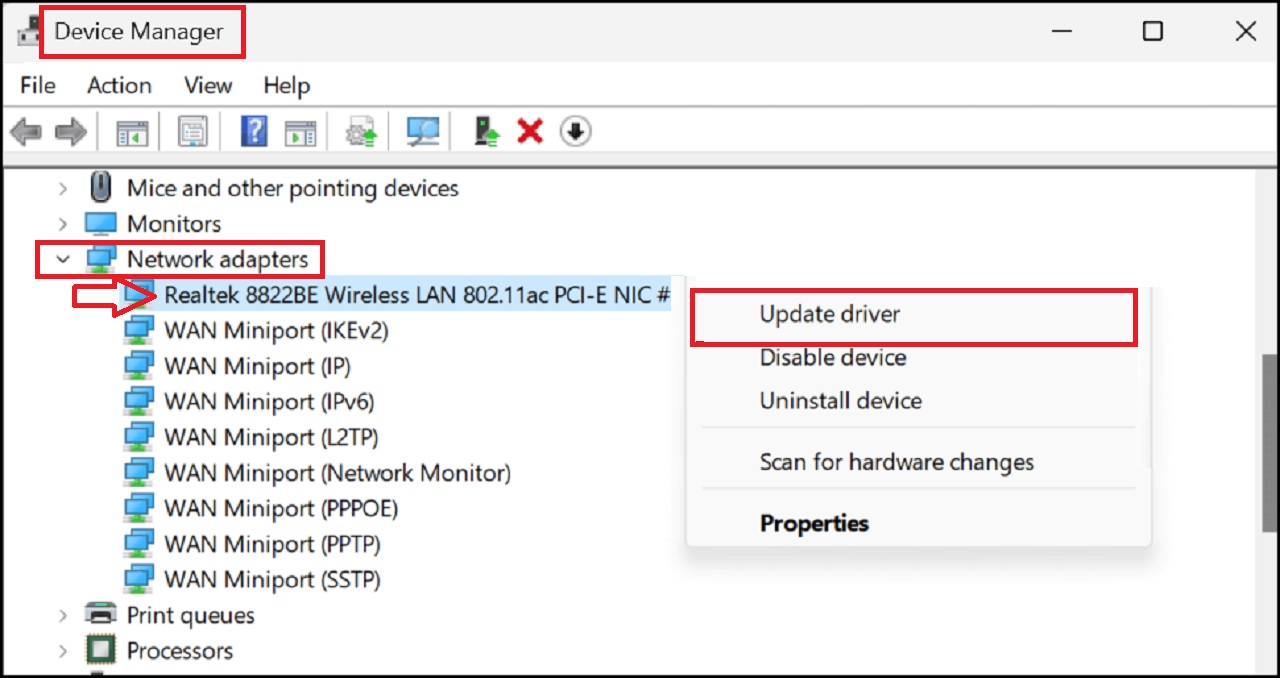
Check whether the issue is resolved.
If it still persists, uninstall the network driver in the following way:
- Go to the network adapter in the same way as before.
- Select the Uninstall device option from the Device Manager window.
- Select Uninstall on the confirmation page.
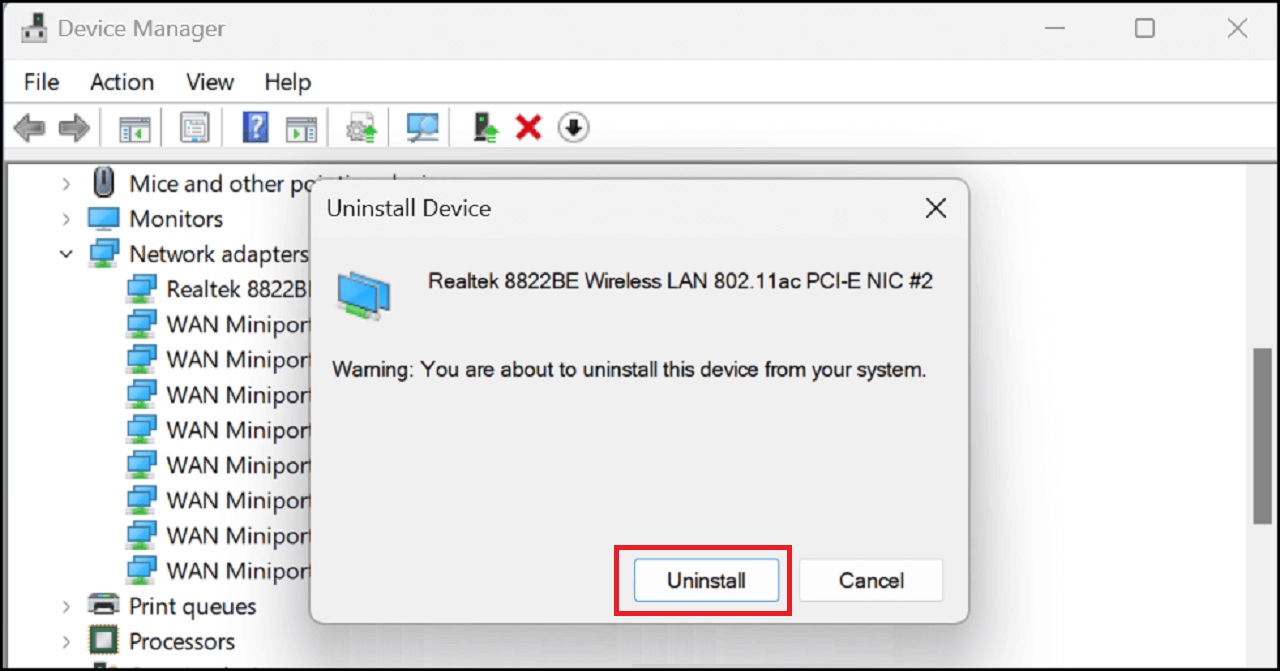
- Restart the system to reinstall a fresh copy of the driver.
Now, connect to your network and check if it has resolved the problem. If it has not, move to the next method.
Method 5: Change the Power Management Properties
Sometimes, modifying the power management properties may help fixing the error.
STEPS TO FOLLOW:
- Open Device Manager > Expand Network adapters > Select and double-click on your network adapter.
- Go to the Power Management tab in the following window.
- Uncheck the box next to ‘Allow the computer to turn off this device to save power.’
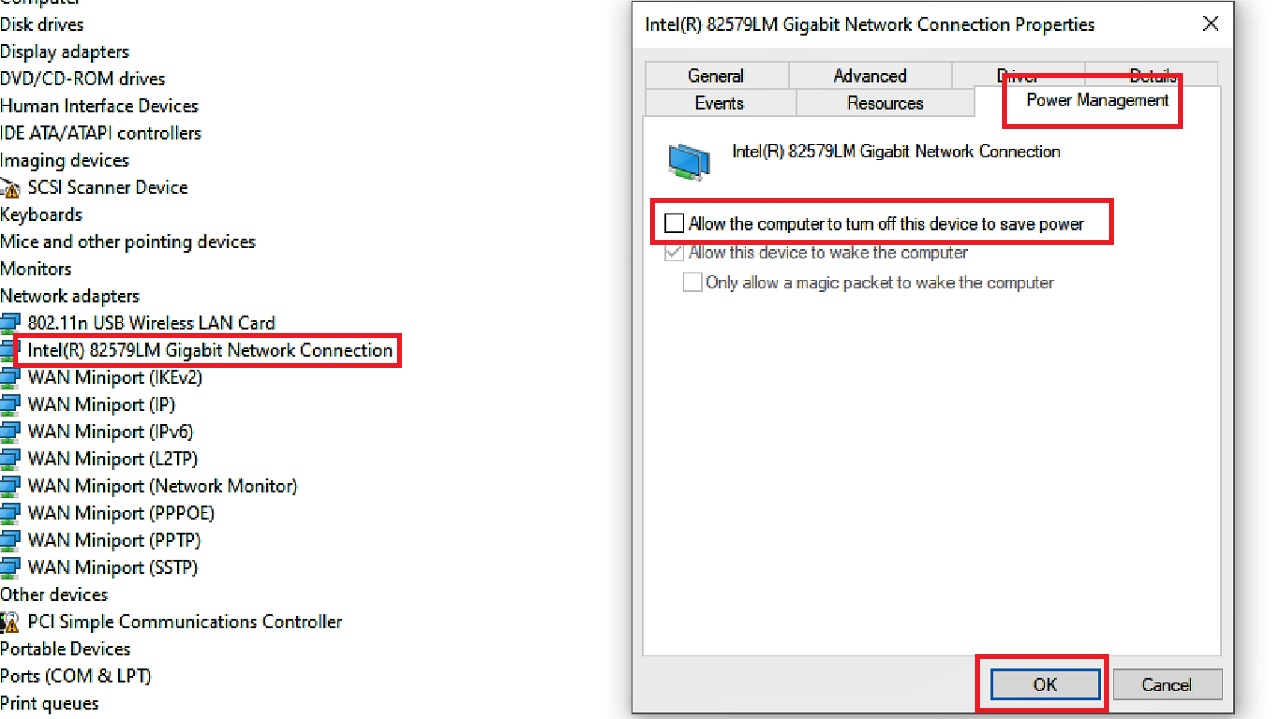
Now check whether or not the issue is resolved. If it has not, move on to the next method.
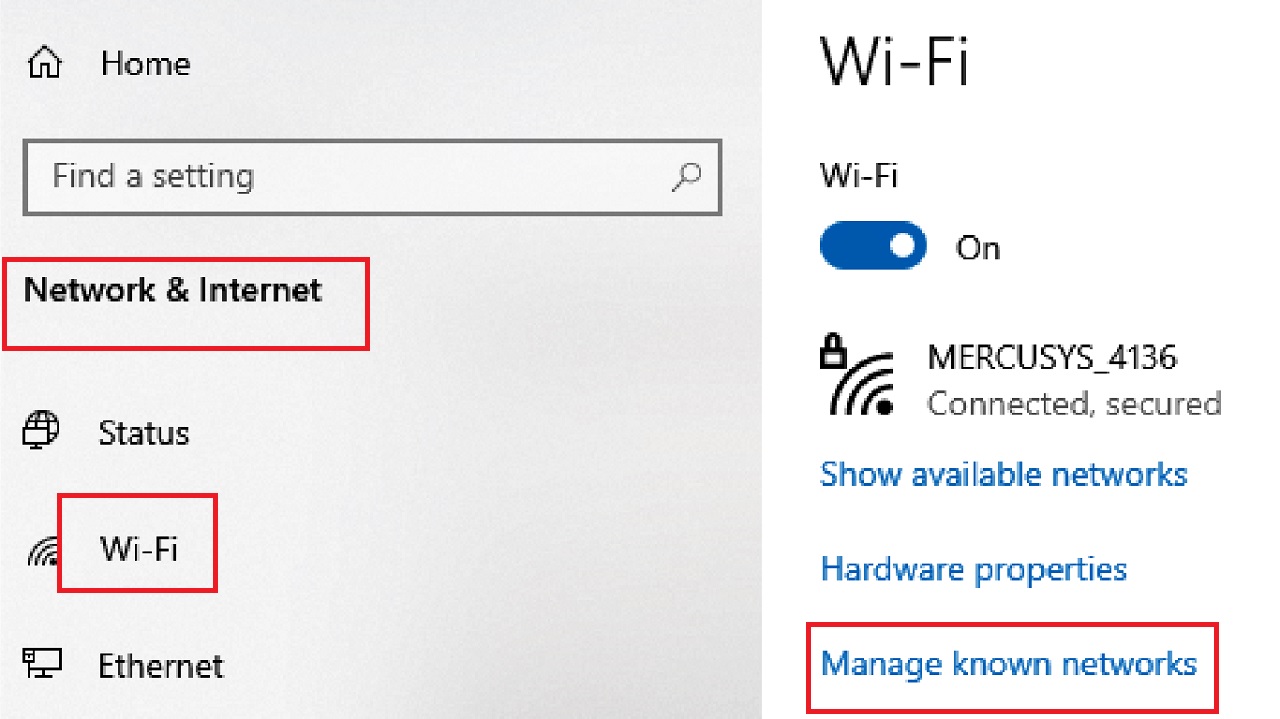
Method 6: Forget Internet Connection and Reconnect
When you make changes to the Wi-Fi connection, such as the signal type or name, Windows might not update it and could use old information, causing this issue. Erasing the information saved earlier and reconnecting might resolve the issue.
STEPS TO FOLLOW:
- Press Windows and I together to open Settings.
- Select Network & Internet.
- Select Wi-Fi in the following Network & Internet window.
- Click on Manage known networks option under your network connection.
- In the following window, click on your Wi-Fi network connection under Manage known networks, MERCUSYS_4136 in this case.
- Click on the Forget button.
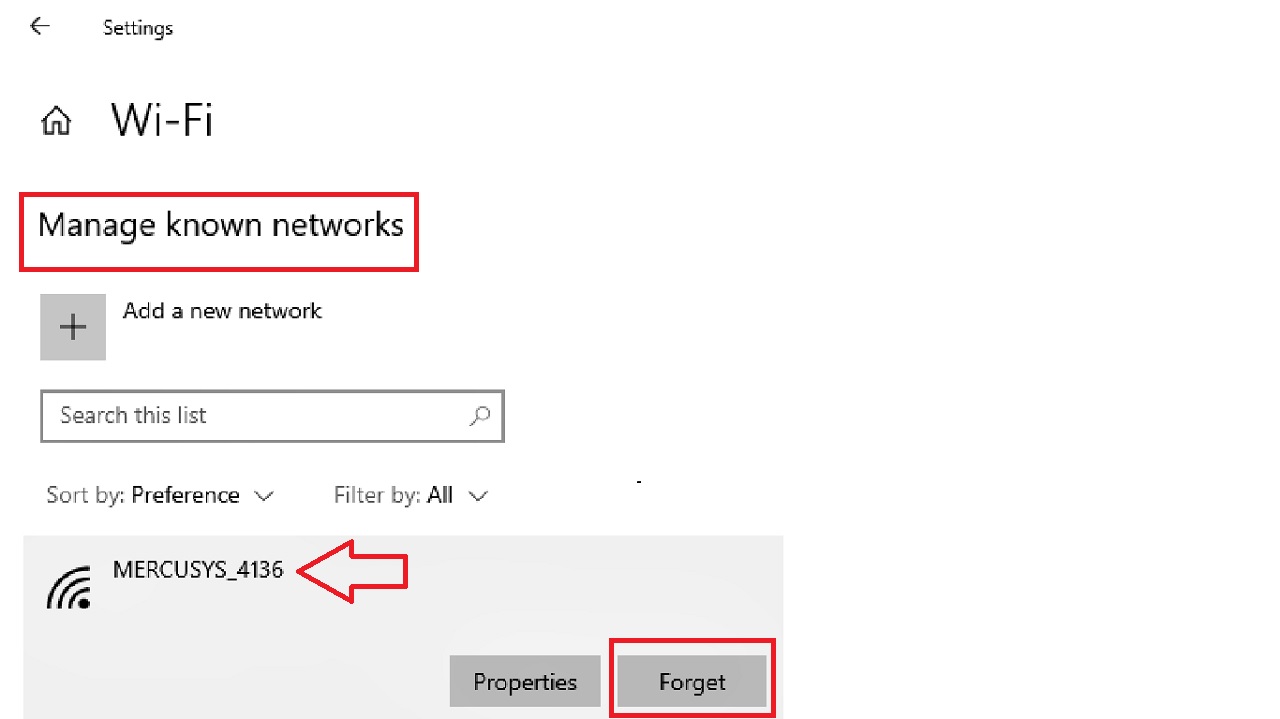
Now, reconnect to the internet and check whether the issue is resolved.
Method 7: Disable Proxy Server Setting
If available, you can disable the settings of the proxy server to resolve the issue of ‘No Internet, Secured’ error.
STEPS TO FOLLOW:
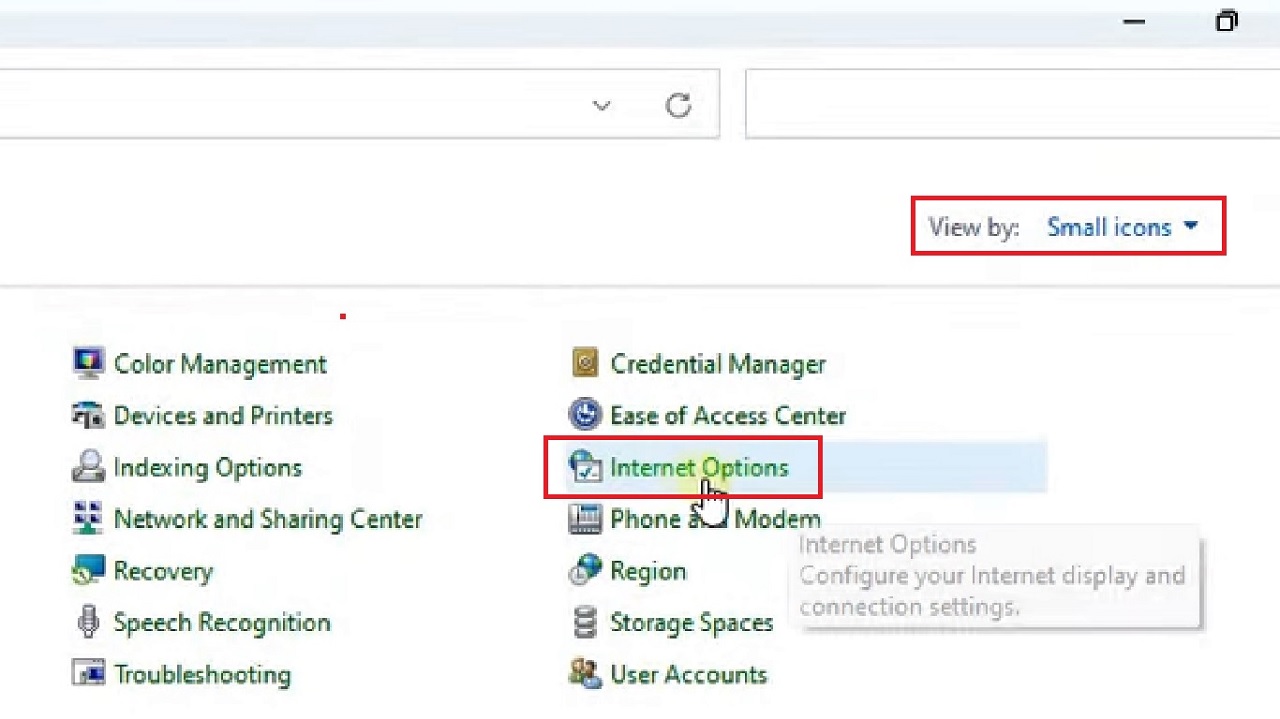
- Type control panel in the search box next to the Start Menu and hit the Enter key on your keyboard.
- Select Small icons in the View by box on the top-right corner of the Control panel window.
- Select Internet Options.
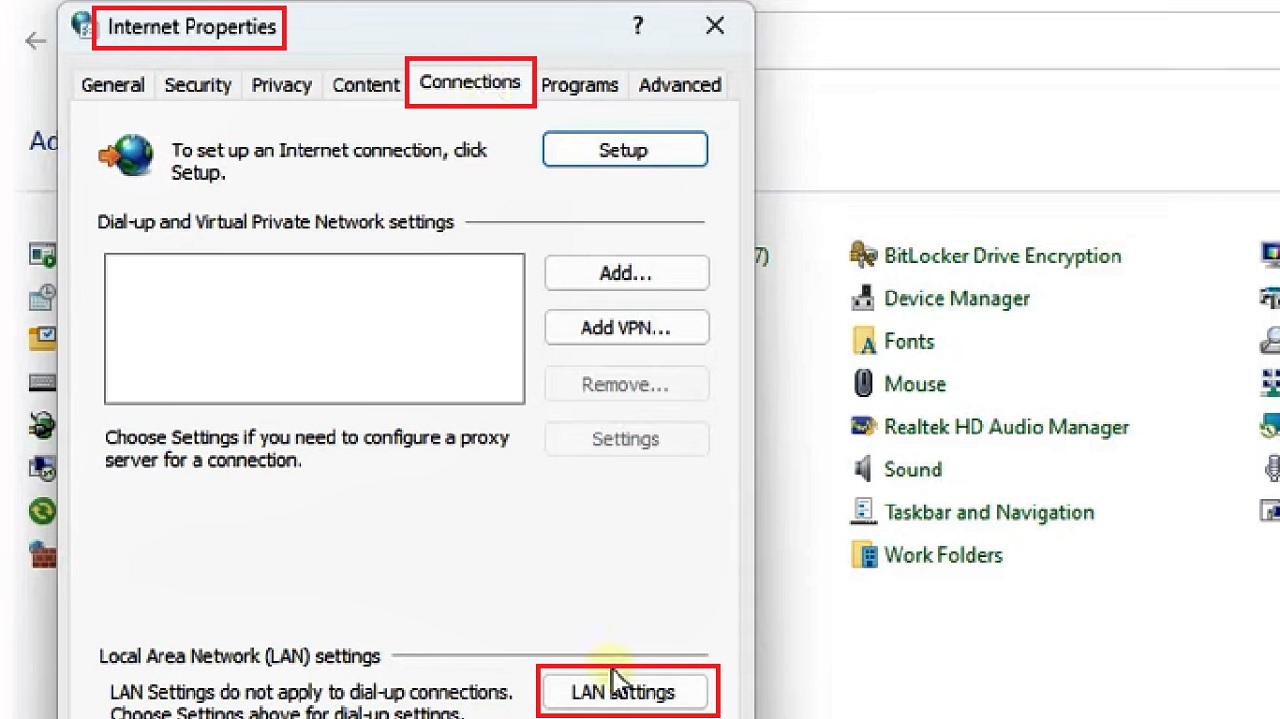
- Go to the Connections tab in the Internet Properties window that appears next.
- Click on the LAN settings button below.
- In the following Local Area Network (LAN) Settings window, uncheck the box under Proxy server next to Use a proxy server for your LAN (These settings will not apply to dial-up or VPN connection).
- Click on the OK button.
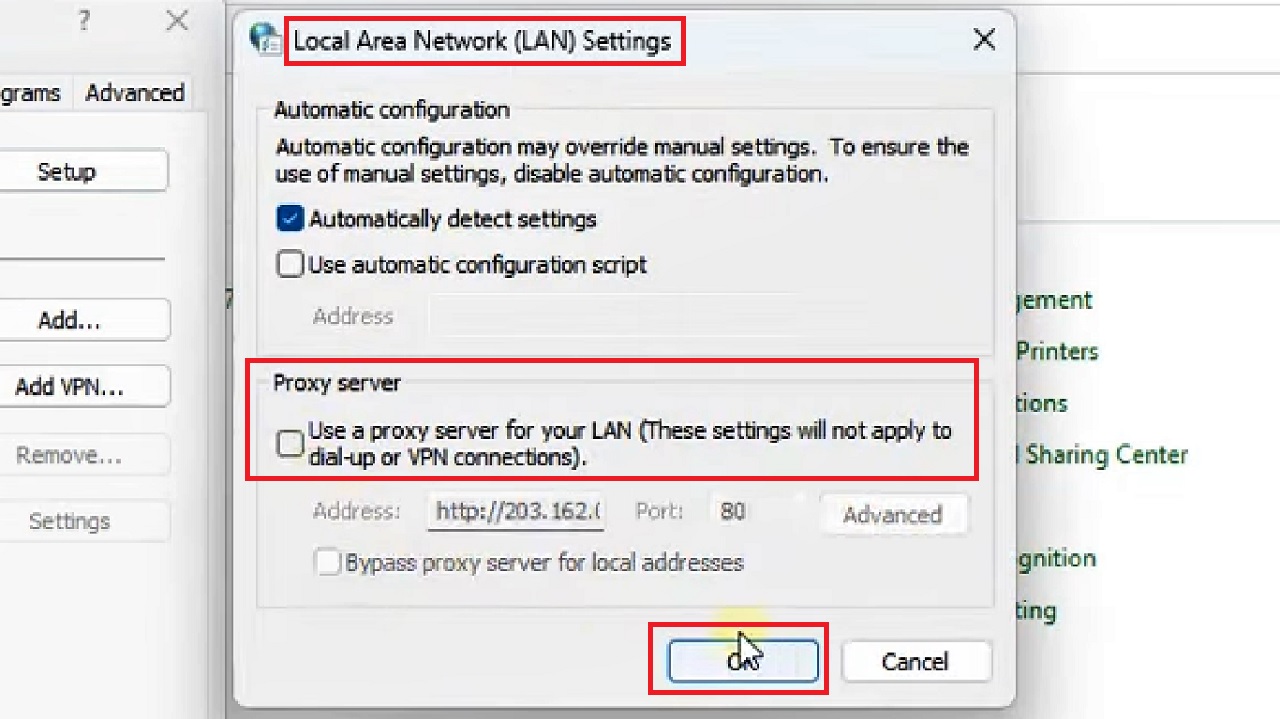
Click on the OK button in the other windows and close them. Now, reconnect again and check whether the issue is resolved.
Method 8: Change the Power Plan Settings
The power plan settings in your PC may cause several network errors, including ‘No Internet, Secured’ error. The issue may be resolved by changing the balanced power plans or energy saving settings.
STEPS TO FOLLOW:
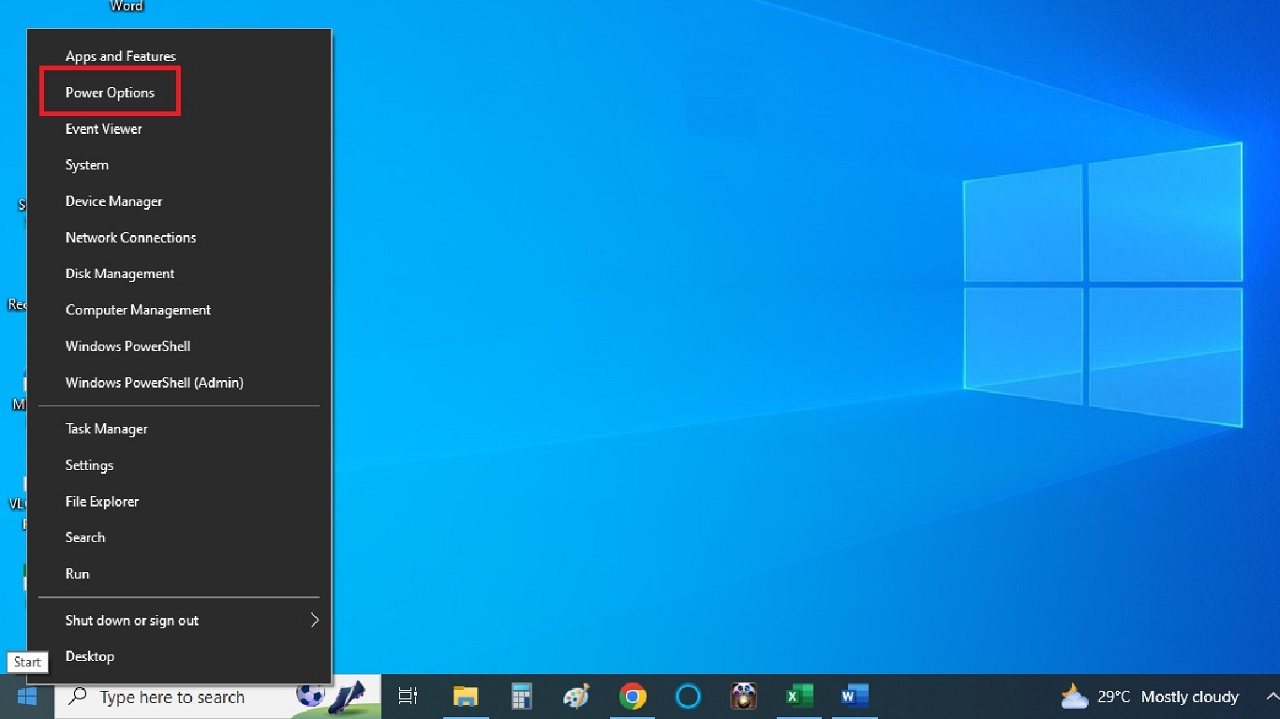
- Press the Windows and X keys on your keyboard together.
- Select Power Options from the pop-up options.
- Click on Additional power settings.
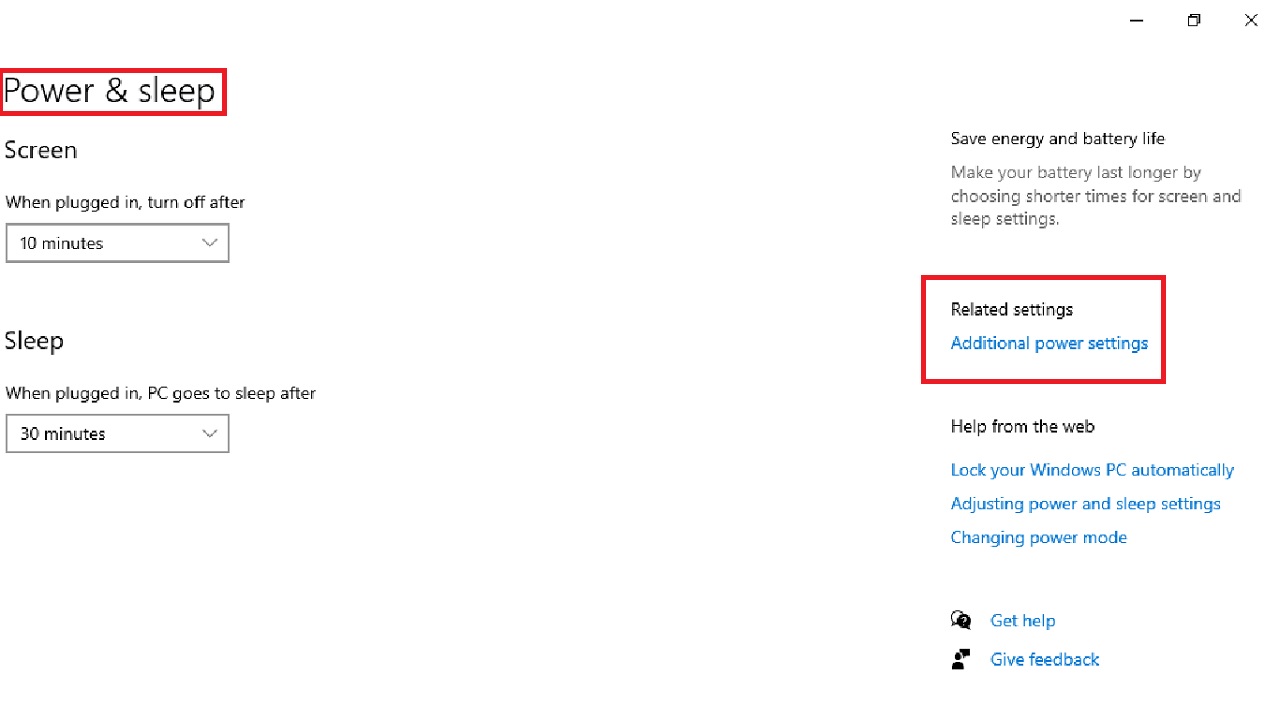
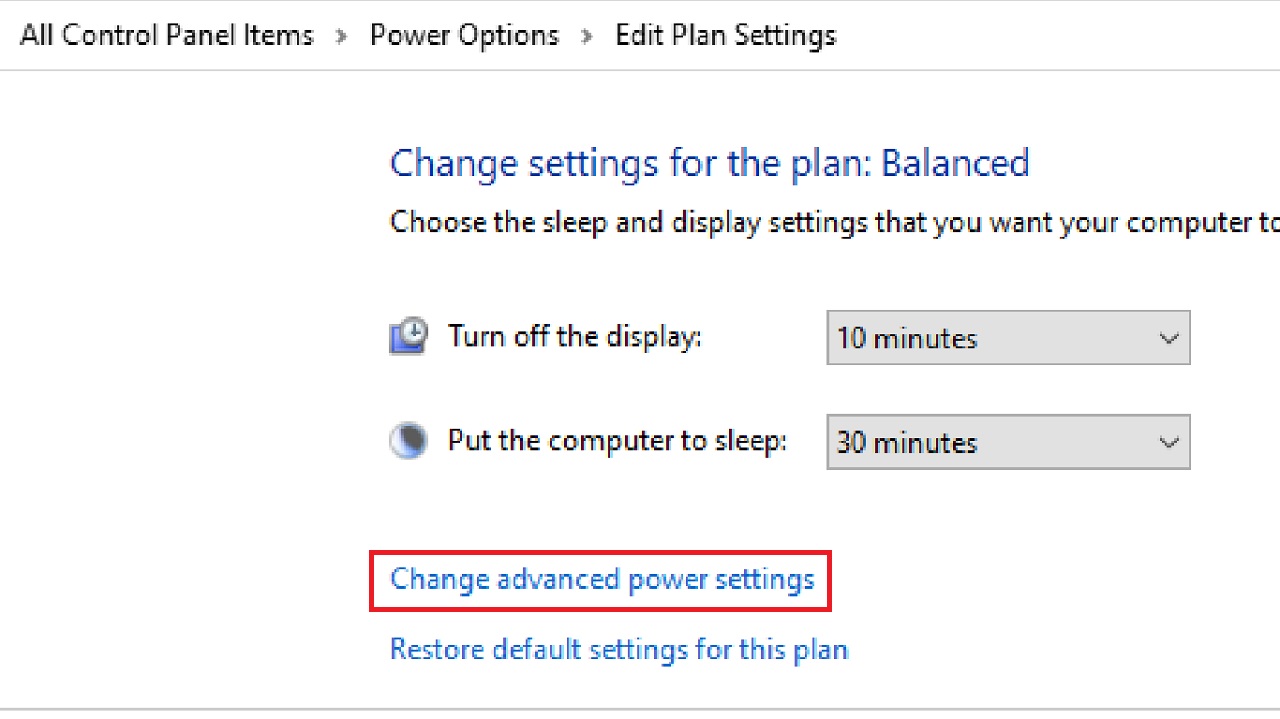
- Click on Change plan settings next to Balanced (recommended).

- Select Change advanced power settings in the following window.
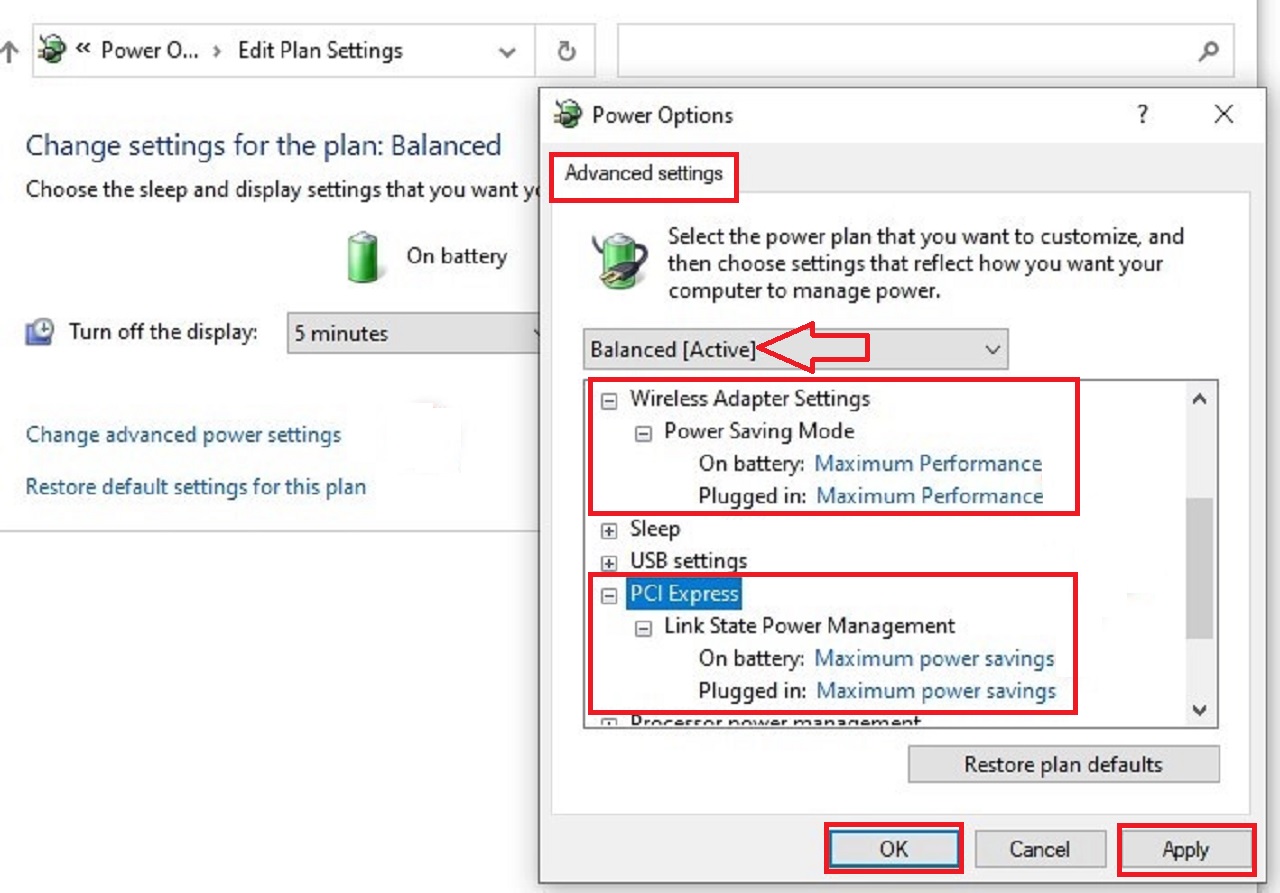
- Click on the Plus button next to Wireless Adapter Settings in the box under Balanced [Active] to expand it.
- Do the same for Power Saving Mode under it.
- Set the power options both for ‘On battery’ and ‘Plugged in’ to Maximum Performance.
- Follow the same process to set the power performance to maximum for the Link State Power Management power plan under PCI Express.
- Click on the Apply button and then on the OK button to save the changes and close the window.
Now, restart your computer and check whether the issue is resolved or not.
Conclusion
There are quite a few solutions to the ‘No Internet, Secured’ error.
Try a few of these solutions for success because not all of them may work on your PC if the configuration does not support performing a particular one.