
The Start button may not work or appear on your Windows PC even if you have tried your best and have pressed the Windows key on your keyboard a number of times.
This indicates that the Start menu is not working error, which is, however, not fatal or uncommon.
There are different fixes for it, both simple and complex in nature, as you will see as you go through this article in its entirety.
KEY TAKEAWAYS
- Some simple fixes to Windows not responding to the Start menu include restarting or resetting the system and updating the drivers installed in it.
- You may even rebuild the index, create a new registry, and even unhide the hidden taskbar to resolve the problem on your PC.
- Creating a new local admin account and signing through it, apart from restarting Windows Explorer, may also fix your problem.
- Changing the settings of the HKEY root classes and local machine may also make the Start menu work as normal as before.
- There are several commands that you can use to make adjustments in and from the Task Manager, which will also rectify the Start menu issue.
In This Article
Why is Your Start Menu Not Opening?
One of the most important and common reasons for the Start menu not working on a Windows PC is the existence of corrupted files in the operating system that are related to the Start menu and its operation.
In addition to this, there are also myriad reasons for such an issue to happen on your PC, such as:
- The temporary files in Cortana may be corrupted.
- There may be a bug or malware in your system that got through when you updated Windows, causing the Start menu to freeze.
- If there is a Windows account under which the Start menu is crashed, you will encounter such an issue as well.
- There may be corrupted files in the Windows Explorer, which itself may have expired as well.
- The corrupted or outdated drivers on your PC may also result in such a malfunction.
Now that you know the most common reasons for the Start menu malfunctioning on Windows, take a look at the solutions that could bring it back on track.
How to Fix Windows 10 Start Menu Not Working?
One of the best ways to resolve the Start menu issue with your Windows 10 PC is to initiate a system restore to a restore point that was last saved.
Apart from that, trying the easier ones, such as updating the drivers and operating system, restarting the system, and creating a new account, may also work.
Depending on the causes of the issue, one or a combination of the following solutions will surely work to rectify the problem you are facing with your PC with the Start Menu.
Method 1: Changing the Start Value in the Registry Editor
There may be a few specific settings in the system that are preventing the Start menu from functioning as it should. These settings, therefore, need to be changed.
For this, you will need to go to the Registry Editor and make the necessary changes.
STEPS TO FIX:
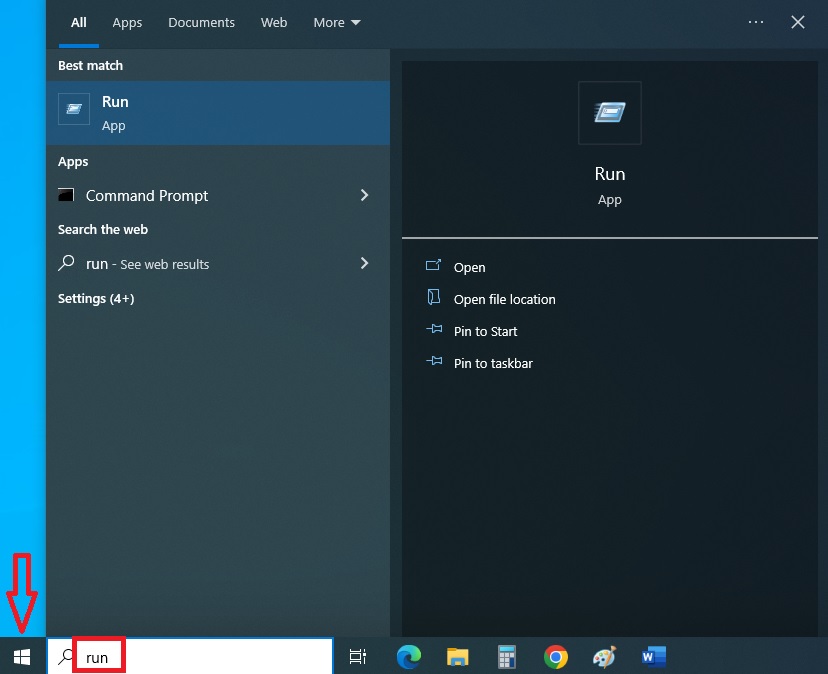
- Go to the Search bar beside the Start icon on the left side of your screen.
- Type in run.
- Press Enter.
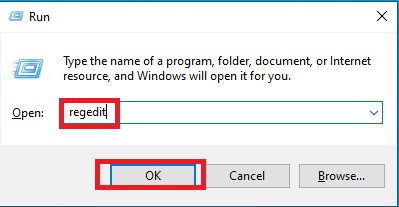
- Type in the command regedit in the run box.
- Press Enter.
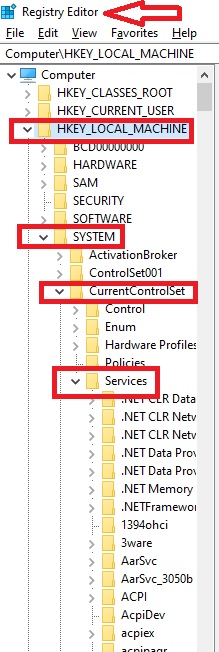
- Click on the arrow beside the HKEY_LOCAL_MACHINE folder to expand it.
- Similarly, click on the arrow beside the SYSTEM folder to expand it.
- Expand the CurrentControlSet folder as well in the same way.
- Click on the arrow key beside the Services folder.
- Under this folder, you will find a lot of folder options to choose from. However, to make the process easier, type wpn on your keyboard.
- Look for WpnService folder.
- Click on the arrow key beside it.
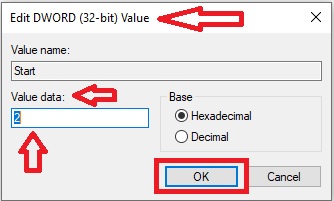
- Select Start from the right-side window.
- Right-click on it.
- Select Modify.
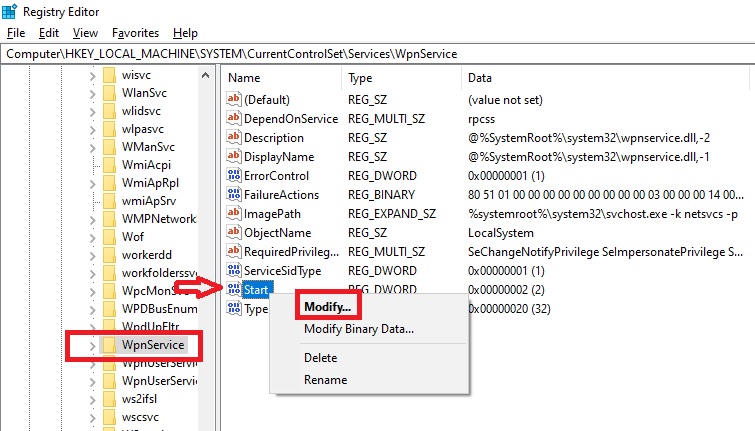
- In the new Edit DWORD (32-bit) Value window, set the value to 0, if it is not already.
- Click on the OK button.
Now, try using the Start menu. It should work.
If this does not work, repeat the steps from going to the WpnService folder and try with different values until 4. One of these values will surely work.
Method 2: Changing Classes Root
If the above method did not work, then making changes in the Classes Root may resolve the issue.
STEPS TO FIX:
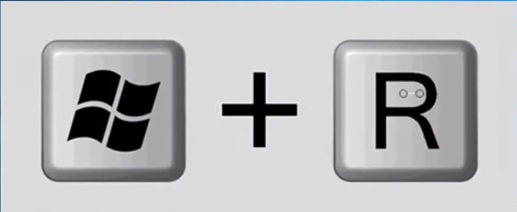
- Press the Windows and R keys on your keyboard to go to the Run box.
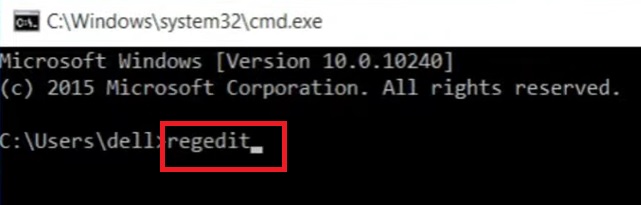
- Type in cmd in the box.
- Press Enter or click on the OK button to go to the Command Prompt directly.

- Now, type regedit in the Command Prompt.
- Press Enter.
This will open the Registry Editor window.
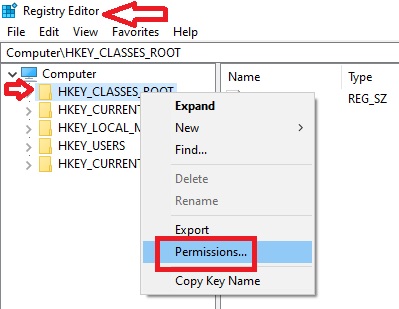
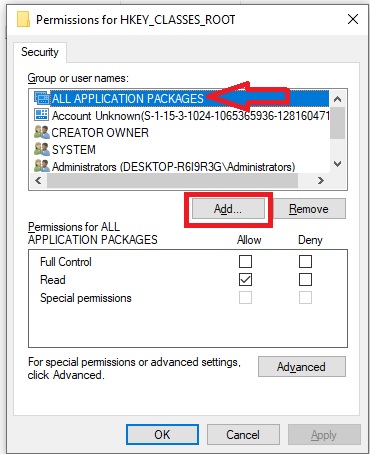
- Select HKEY_CLASSES_ROOT and right-click on it.
- Click on Permissions.
The next window should have the ALL APPLICATION PACKAGES listed on the window under Group or user names. If it does not, it will create the issues with the Start menu. It therefore needs to be added by following the next steps:
- Click on the Add button.
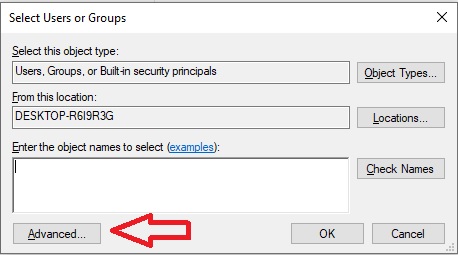
- In the new window, click on the Advanced button.
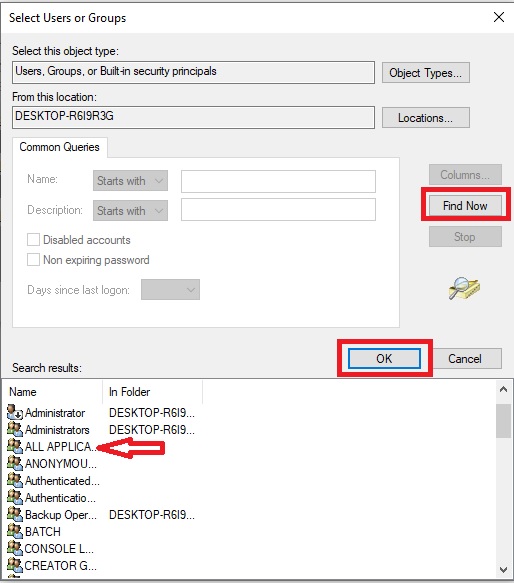
- In the next window, click on the Find Now button.
- Look at the search results below. Here you will find ALL APPLICATION PACKAGES.
- Click on it once to select it.
- Click on the OK button to add it to the box.
- When this package is added to the Group or user names window, select it.
- Check the box under Allow and beside Full control.
- Click on the Apply button.
- Then click on the OK button.
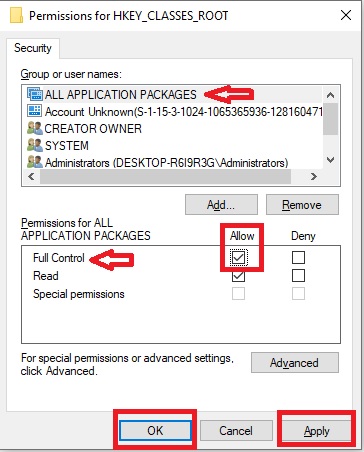
Finally, close all windows, including the Command Prompt. This will bring back the Start menu to normal.
Method 3: Restart Windows Explorer
Sometimes, the Windows Explorer may not be able to detect the Start menu. A simple process to fix this issue is to select Windows Explorer and restart it.
STEPS TO FIX:
- Open Task Manager by right-clicking on a blank space on the Taskbar. (Alternatively, you can press the Ctrl, Alt, and Del keys together on your keyboard).
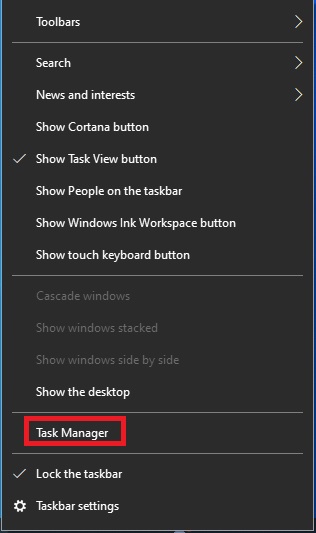
- Select Windows Explorer.
- Click on the Restart button. (You may also right-click on Windows Explorer and then select Restart from the drop-down menu).
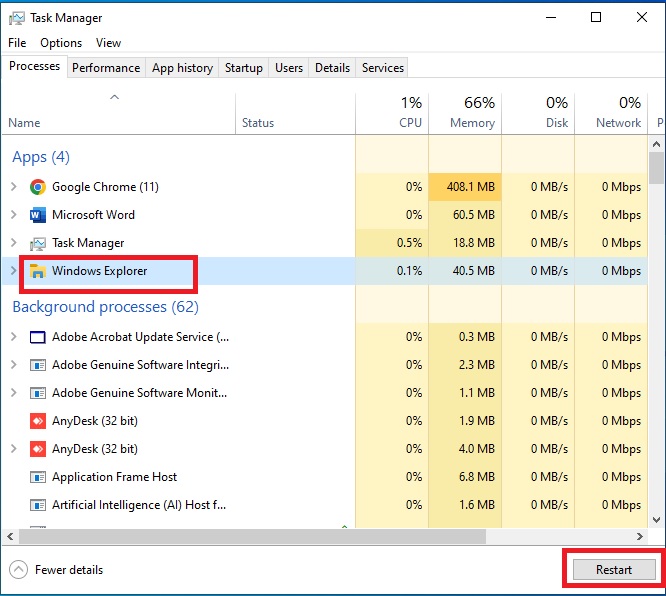
This should fix the issue.
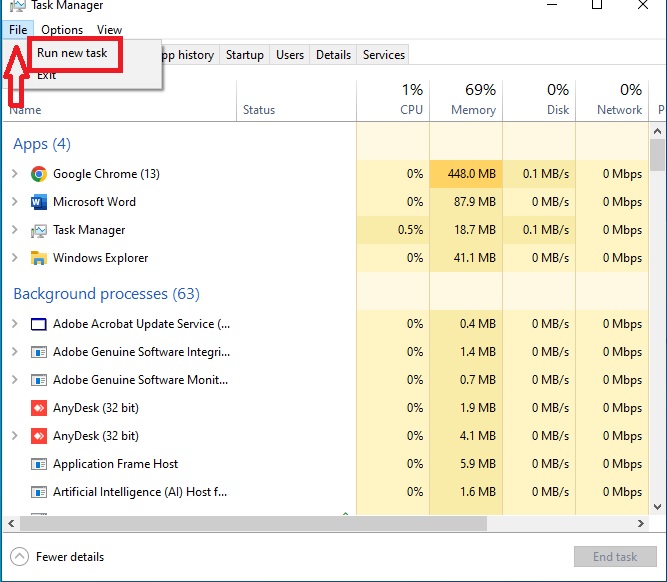
Method 4: Start Your Computer in Safe Mode
There may be issues with your system working normally, and therefore, the Start menu may not work sometimes. In such situations, starting the PC in safe mode may prove to be useful.
STEPS TO FIX:
- Open Task Manager as before.
- Go to the File menu.
- Select Run new task.
- In the new window that appears on top of it, type in msconfig in the box.
- Press Enter or click on the OK button.
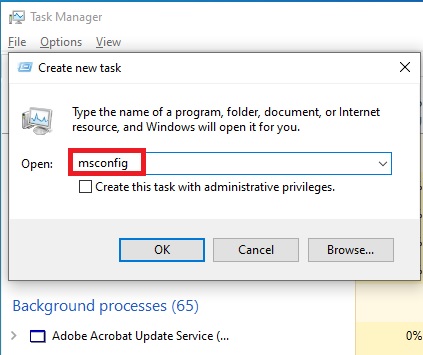
This will take you to the System Configurations window.
- Go to the Boot tab.
- Check the box beside Safe boot.
- Click on Apply.
- Click on OK.

When the new window opens for confirmation, click on the Restart button.

Once the system is open, undo everything that you have done till now, restart the PC once again, and check whether or not the issue has been resolved.
Method 5: Run the SFC Command
If the above simpler methods fail, move on to the next relatively complex process and run the SFC command.
STEPS TO FIX:
- Open Task Manager and Run new task as before, but this time type in powershell in the box.
- Check the box beside Create this task with administrative privileges.
- Click on the OK button.

- Now, in the Administrator Windows PowerShell window, type in the command sfc /scannow.
- Press Enter.
The process may take some time, and, in the end, you may or may not see information regarding some problems.
Whatever it is, type in the next command DISM /Online /Cleanup-Image / RestoreHealth.
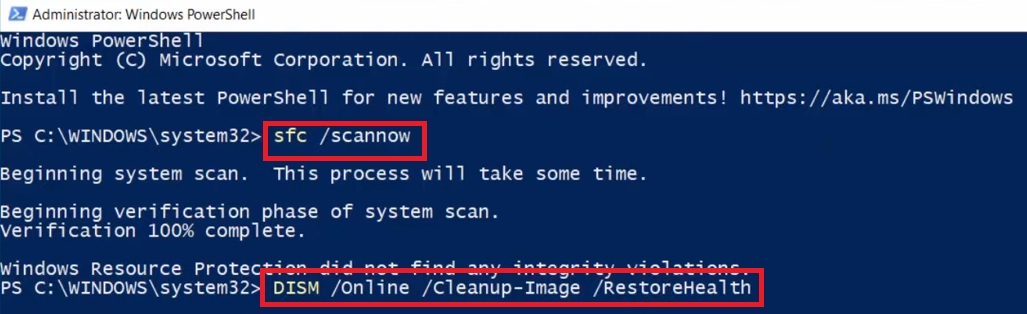
This will again take some time. When the operation is completed successfully, exit from the prompt and check whether or not the Start Menu is working.
Method 6: Reset the Applications
In spite of the above fixes, sometimes the Start menu may still not work due to issues with the applications running. Therefore, resetting all apps would be an effective move. However, please keep in mind before you go ahead with this process that all data stored in those apps will be removed.
STEPS TO FIX:
- Open PowerShell as before and run it as administrator.
- Type in the command Get-AppXPackage -AllUsers | Foreach {Add-AppxPackage -DisableDevelopmentMode -Register “$($_.InstallLocation)\AppXManifest.xml”}
- Press Enter.

This will reset the apps. Do not bother about the errors marked in red. Just check whether your issue is resolved or not after the process is completed.
Method 7: Change the User Account
Issues with the Start menu in your PC may be the result of the user account. Therefore, you may create a new user account to rectify the problem, assuming that none of the above solutions were effective.
STEPS TO FIX:
- Once again, open the PowerShell prompt.
- Type in the command net user abc 1234 /add. (Replace abc with your username and 1234 with your preferred password).
- Press Enter.

Restart the computer and log in with the new user. This should solve the issue.
Method 8: Resetting the Computer System
There may be some internal issues with your PC that are creating this issue. Often, resetting the computer system will rectify the problem.
STEPS TO FIX:
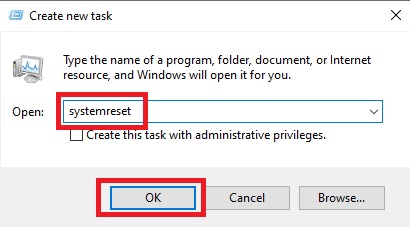
- Run a new task in the Task Manager as before.
- Type in systemreset in the box.
- Press Enter or click OK.
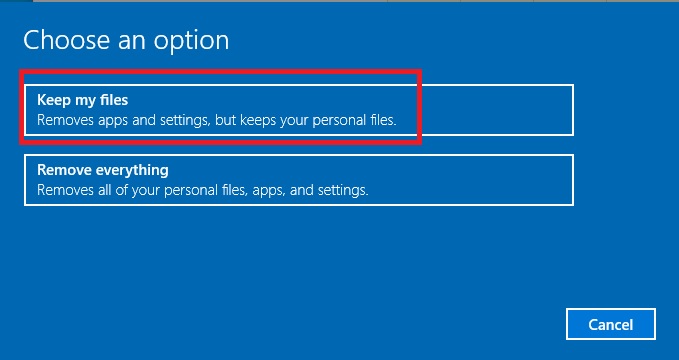
- From the Choose an option window, choose an option according to your liking. (Say, you choose the first option).
It will not take much time before a new window appears that will inform you about the apps that are going to be removed, as follows:
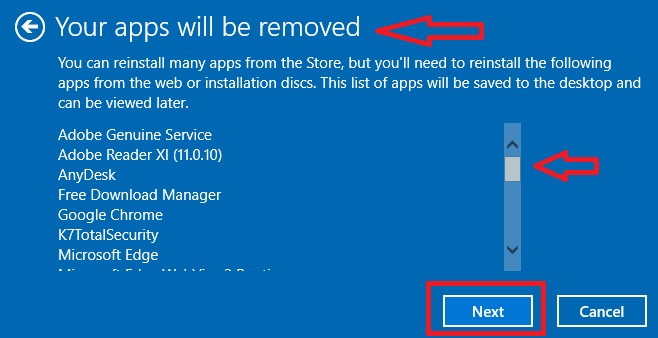
Use the bar on the right to scroll up and down to check all of them. Remember, you will need to reinstall those particular apps after your PC is reset.
If you are okay with it, click on the Next Button, and then follow the instructions for resetting your computer system.
When it is done, your issue will be resolved.
Method 9: Simply Restart Your Computer
Sometimes, even a simple restart of your computer system can resolve the issue with the Start menu. However, if the Start menu itself does not work, you may not be able to do so in the normal process.
STEPS TO FIX:
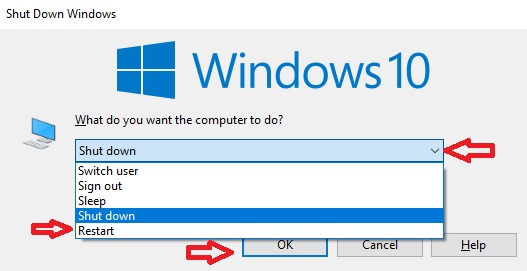
- Press the Alt and F4 keys on your keyboard together to open the Shut Down Windows.
- Click on the small arrow in the new window that pops up to open the drop-down menu.
- Use the arrow keys on your keyboard to select Restart.
- Hit Enter or click on the OK button.
Once the system restarts, check whether the Start menu is working or not.
Method 10: Manually Update Windows
There are instances when the Windows operating system itself may create such an issue. This may be because Windows may not have been updated automatically.
In such a situation, it is better to update Windows manually, and for that, you do not even need to use the Start menu.
STEPS TO FIX:
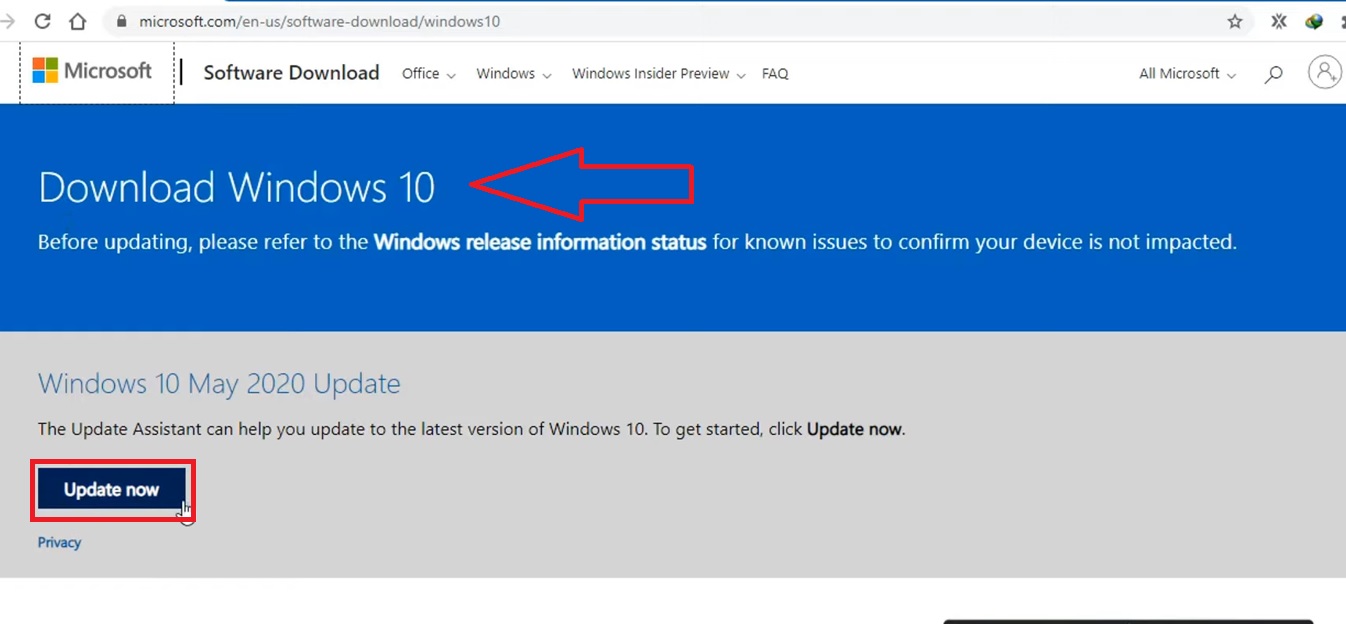
- Go to the Windows Download page.
- Click on the Update Now button.
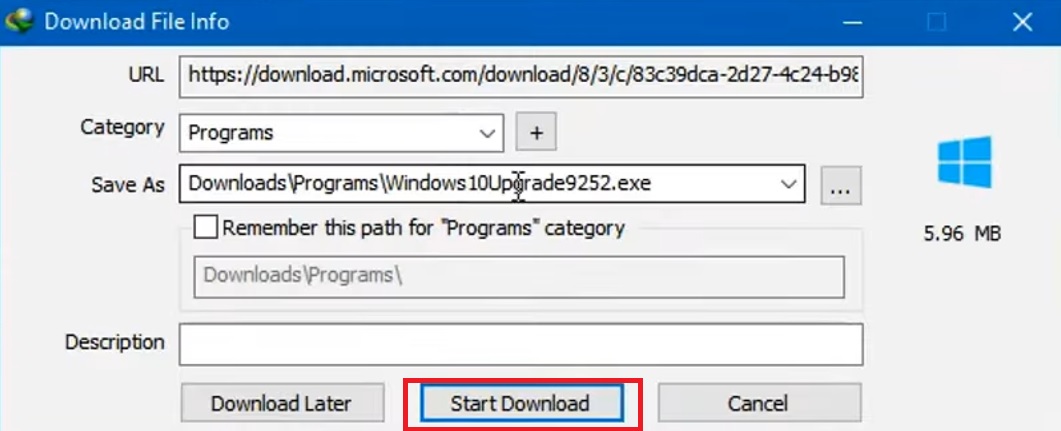
- Click on the Start Download button on the Download File Info window of the update assistant tool.
- Follow the instructions.
The new window will show the updating process in progress.
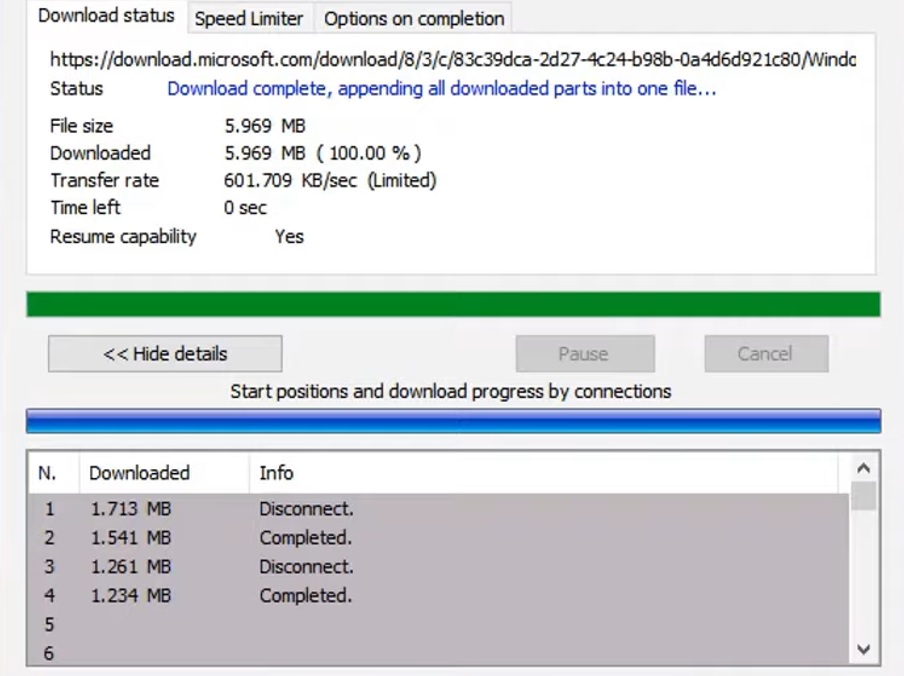
When it is completed, reboot your system and check to see whether or not the issue was resolved this way.
You can also update Windows in an alternative way.
- Open Run by pressing the Windows and R keys on your keyboard as before.
- Type Settings.
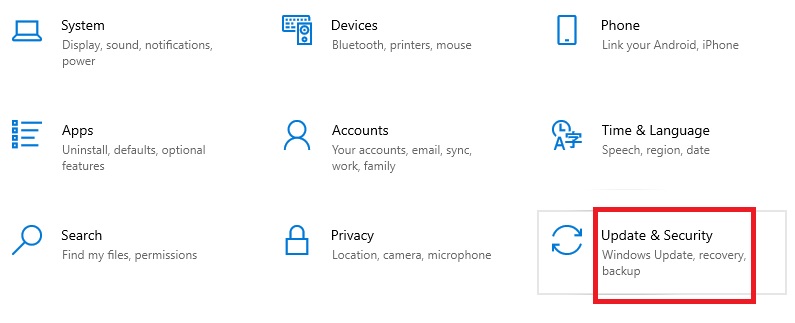
- In the window, go to Update & Security.
- Click on Windows Update.
- Click on the Check for updates button.
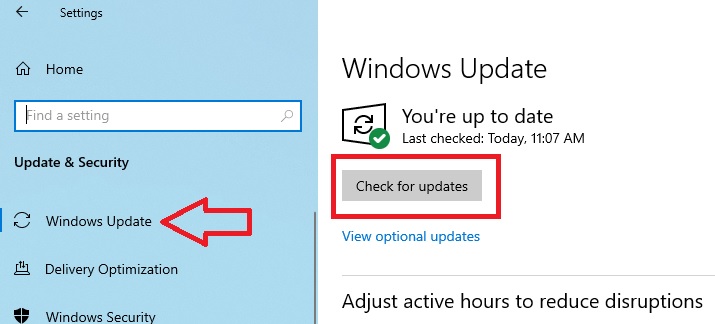
It will inform you whether or not updates are available. Get them.
Method 11: Rebuilding the Index
Rebuilding the index will expedite the process of reviewing or inspecting files and other things in the system and the operating system. This will enhance the search process based on the specific criteria.
Therefore, rebuild the index in the following way.
STEPS TO FIX:
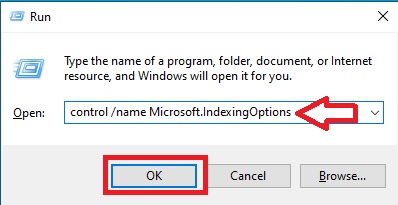
- Go to the Run box.
- Type in the command control /name Microsoft.IndexingOptions.
- Click on OK or press Enter.
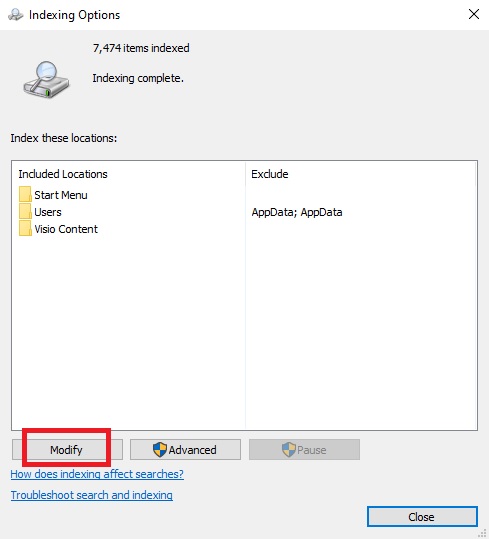
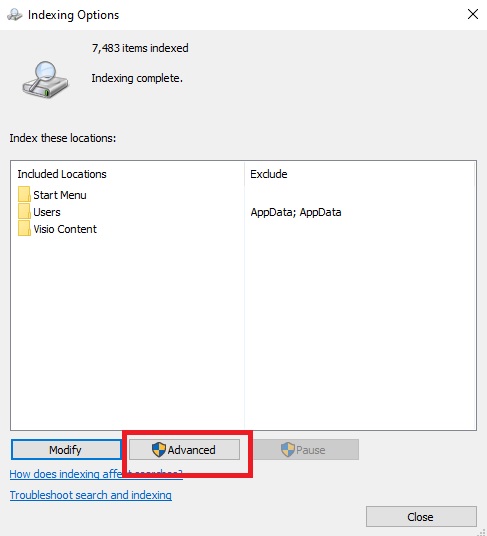
- In the new Indexing Options window, click on Modify located at the bottom left-hand side.
- Click the Show all locations button.
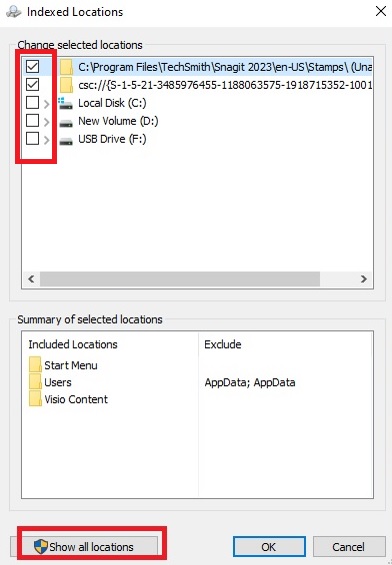
- The uncheck all the boxes shown under Change selected locations in the Indexed Locations window.
- Click the OK button.
- Click on the Advanced button on the Indexing Options window.
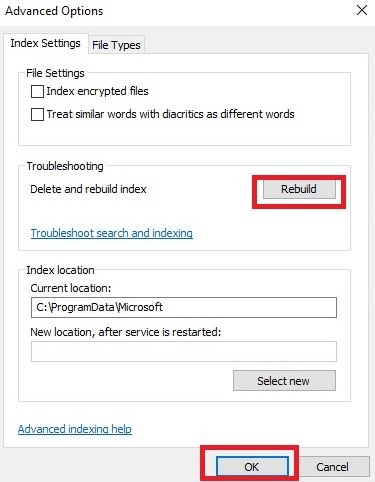
- Click on the Rebuild button on the Advanced options window.
- Click on the OK button.
- When the process is complete, press the Windows and R keys together to open the run box again and type in the command shutdown /r in the box.
- Click on the OK button or hit Enter.
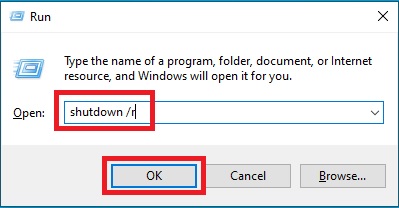
This will restart your machine and fix the issue.
Method 12: Using the Windows 10 Media Creation Tool
If you are facing the freezing Start menu issue, then the Media Creation Tool is a good tool to use to resolve the issue.
STEPS TO FIX:
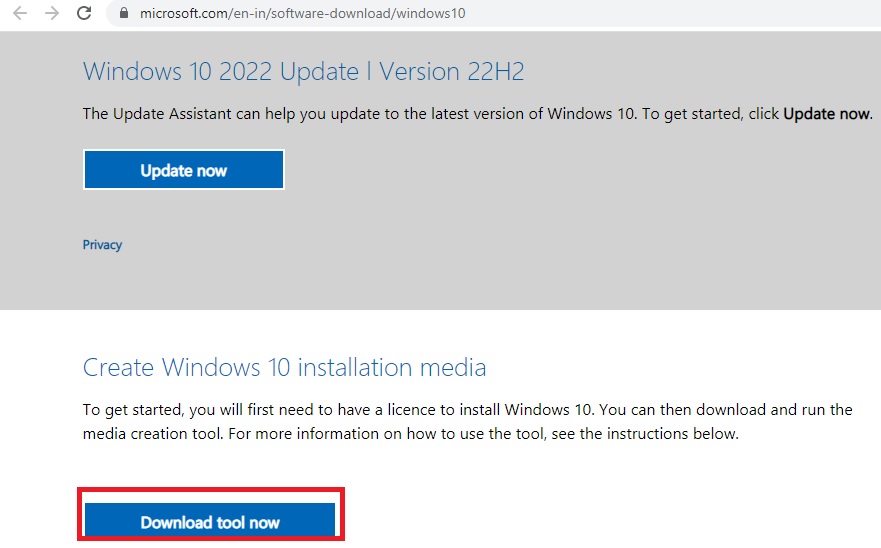
- Go to the Media Creation Tool site of Microsoft.
- Click on the Download tool now button at the bottom section of the web page.
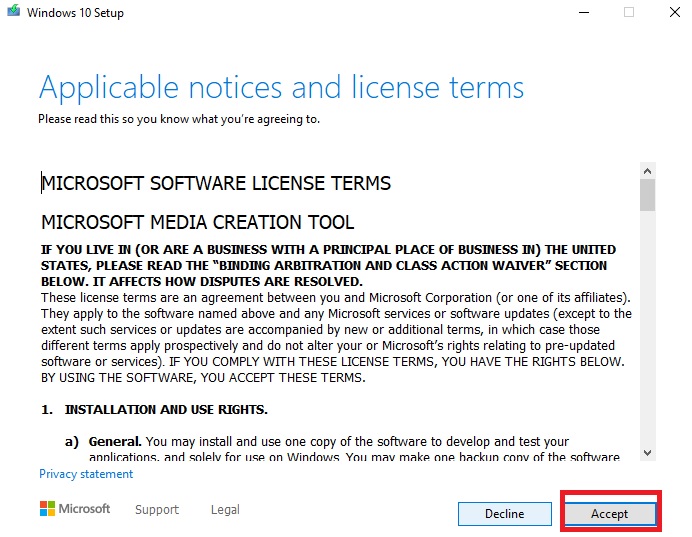
- Accept the Terms and Conditions.
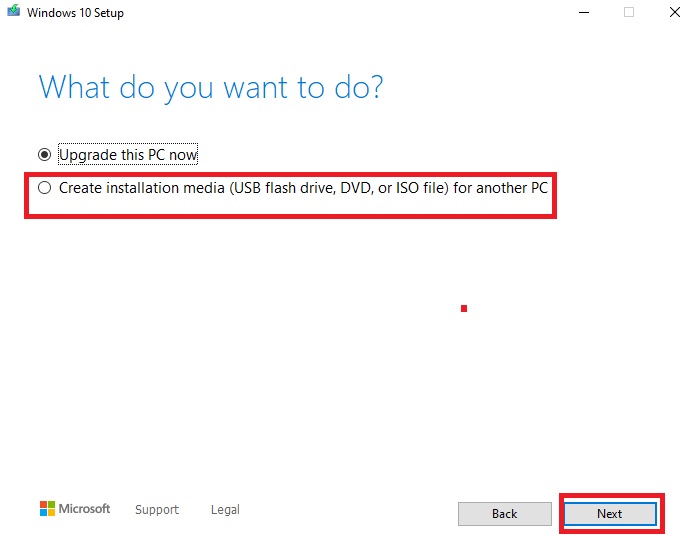
- Click on the circle beside Create installation media (USB flash drive, DVD, or ISO file) for another PC.
- Click on the Next button.
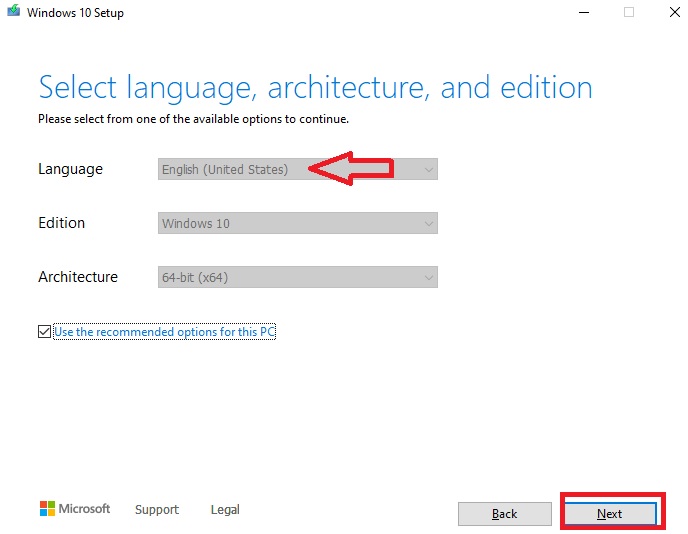
- Select the Language.
- Click on the Next button.
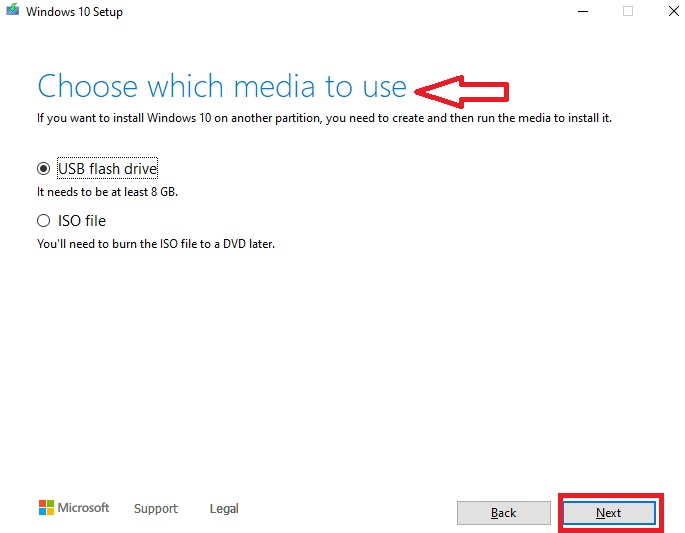
- Choose Which media to use.
- Click on Next.
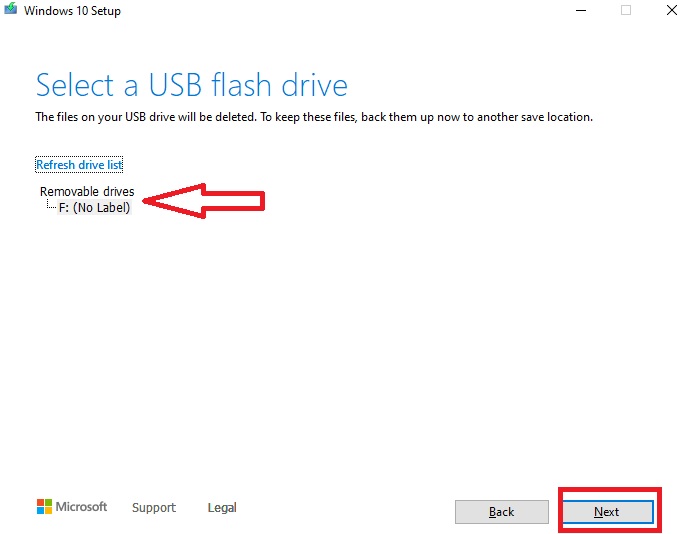
- Select the drive from the Windows 10 Setup window.
- Click on Next.
- Look for setup.exe from the created media and double-click on it to start the installation process.

This will resolve the problem with your Start menu.
Method 13: Unhide the Taskbar
Strange or silly as it may sound, the Taskbar may not be locked in the settings, and therefore it may cause the Windows 10 Start button not working error. Locking it onto the taskbar or unhiding it will fix this issue as well.
STEPS TO FIX:
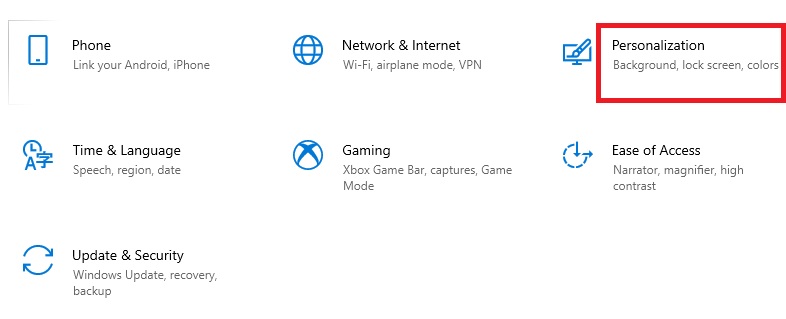
- Press the Windows and I keys on your keyboard together to open Settings.
- Choose Personalization.
- Click on the Taskbar button.
- Toggle the switch under the Lock the taskbar heading.
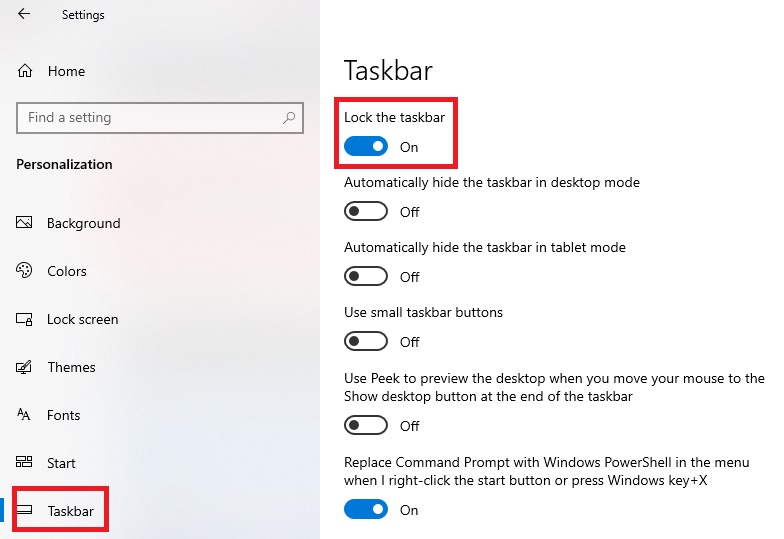
This will fix the Start menu on the Taskbar.
Method 14: Update Drivers
Often, outdated drivers may cause such an issue along with a number of other issues because they may be corrupted. Therefore, updating them is an essential and effective solution.
STEPS TO FIX:
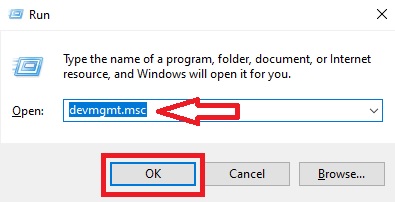
- Press the Windows and R keys together on the keyboard to open the Run box.
- Type in devmgmt.msc in it.
- Click on the OK button.
- In the Device Manager window, right-click on the drivers that are installed on your PC.
- Select each of them and click on the Update driver.
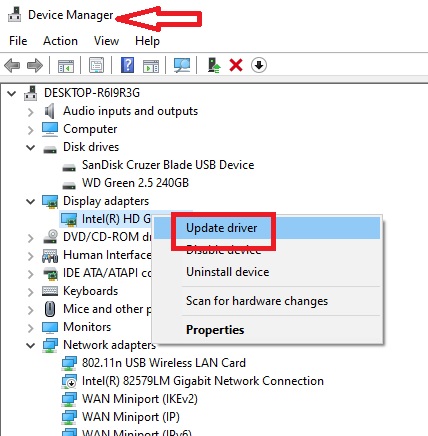
This may often resolve the issue, first-hand.
Method 15: Clear the Temporary Files of Cortana
Cortana was a useful inclusion to Windows, but it failed to achieve its goal and created a lot of problems like Start menu not working errors and others.
Therefore, disabling it or removing and rebuilding the temporary files here will resolve the Explorer issues, which include the Start Menu button not working error.
STEPS TO FIX:
Open Command Prompt and run as administrator. When the prompt opens, type in the following commands in this order and press Enter every time:
- CD/d “%LOCALAPPDATA%PackagesMicrosoft.Windows.Cortana_cw5n1h2txyewy”
- Taskkill /F /IM SearchUI.exe
- RD /S /Q Settings
This will remove the files and resolve the issue.
Conclusion
The Start menu on Windows may not work or open, and it can be very frustrating because you will not be able to access the settings or apps.
Thankfully, after reading this article, now you know about the simple fixes to this issue and can use one or a few of them to make your Start menu work just as it did before.