
Sometimes, the network printing on your computer may not work due to some errors in the settings. In such situations, you can easily fix these issues by running a few basic troubleshooting.
If that does not help, there are other ways to fix this issue such as from the Registry Editor, the Control Panel, and more.
These methods are a bit more detailed, as you will see when you read this article, but are quite doable even by a person with little technical knowhow.
In This Article
KEY TAKEAWAYS
- Updating Windows, the printer drivers as well as the network adapters from the Device Manager may often resolve the issue of network printing not working on a PC.
- Troubleshooting the printer and adapter may also fix the problem pretty easily just as removing a few specific programs or disabling Windows Firewall temporarily may also help.
- The file and printer sharing status in the Control Panel may not be set correctly and prevent the network printer from printing. Changing the private and public network settings accordingly may help.
- Making some changes in the Print key in the Registry Editor and changing the value data is a proven way to resolve this issue and make the printer functional on a computer network again.
- Cancelling all documents for printing, running a few specific commands on the Command Prompt and changing the printer spooler service to automatic from the Services window will make the printer work again.
Why is Network Printing Not Working?
Network printing may not work on a PC due to issues with the printer and its settings primarily. Often the settings of the network or the local port may not be correct.
There may also be issues with the value data of the print key in the Registry Editor.
Some other common reasons for this issue to occur are:
- Outdated network and printer drivers
- Disabled network or printer sharing
- Unavailability of a static IP address for the printer
- Specific services related to network and printer sharing may not be set to automatic
- The printer spooler service may be not set to automatic as well
- Windows Defender Firewall may be preventing such action and may need to be disabled temporarily
The reasons for this issue to occur may be varied but the fixes for it are quite easy and common, as explained hereunder.
Ways to Fix Network Printing Not Working Issue
You can resolve the issue of network printing not working in your computer by making sure that printer sharing is enabled in the first place.
Also, make sure that the network is set to Private while you share the printer and there is a static IP address set up as well.
If these do not help in any way, you may try fixing the issue with some other basic steps as well, such as:
- Running Windows updates and optional updates related to the printer
- Updating your network and printer drivers separately from the Device Manager by right-clicking on the respective options
- Running basic network and printer troubleshooters
- Uninstalling a few unnecessary programs related to printers and networks from the Programs and Features section in the Control Panel
- Removing and adding the printer again on your system
If none of the above basic steps resolve the issue, you should now move on with the more detailed solutions to make your network printer functional once again.
Here are the methods and all the steps to follow.
Method 1: From Services
This is one of the most common and simplest ways to resolve the issue of network printing not working o a computer.
STEPS TO FOLLOW:
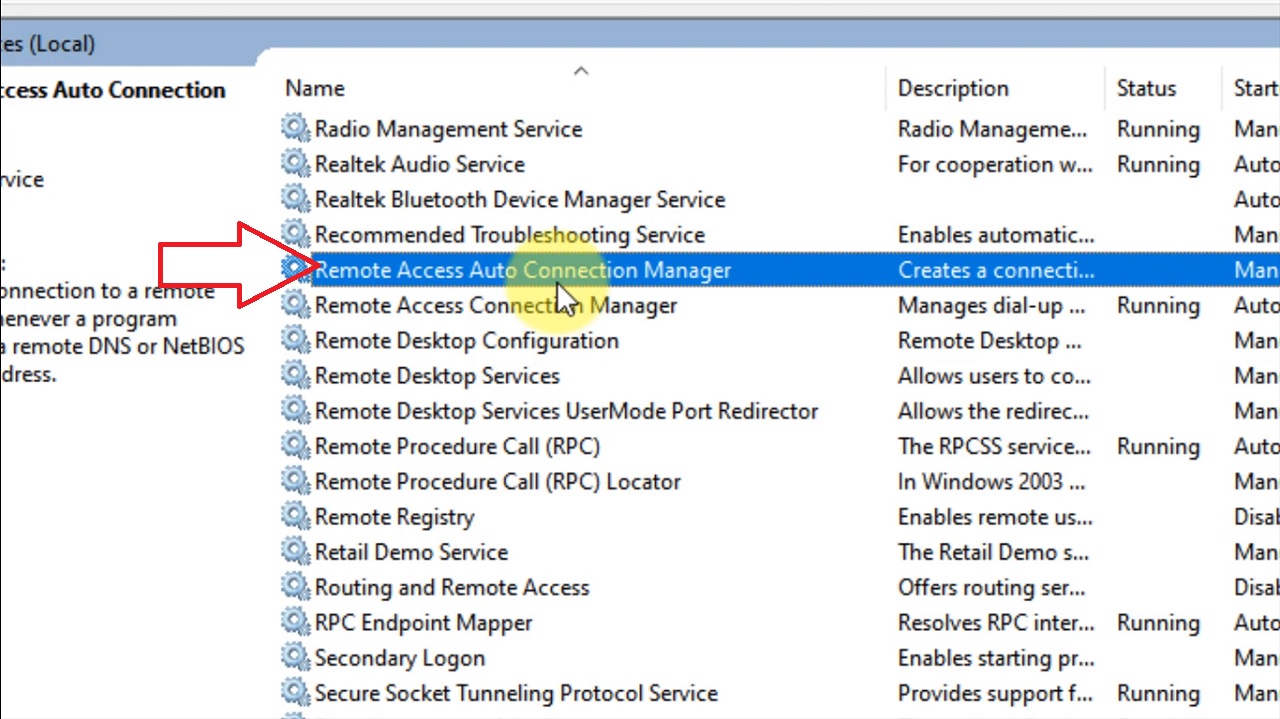
- Type services in the search box next to the Start menu.
- In the window that opens, look for Remote Access Auto Connection Manager.
- Double-click on it.
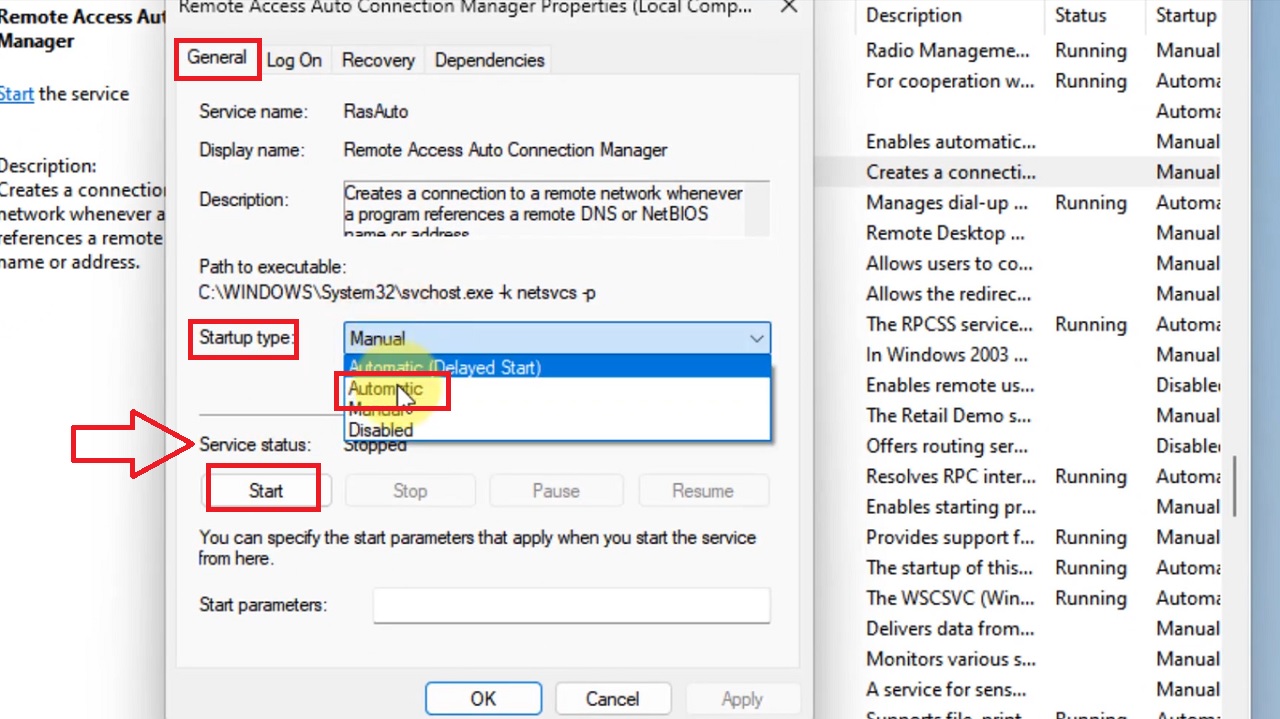
- On the General tab, change the Startup type to automatic if it is not set already.
- Click on the Start button under Service status.
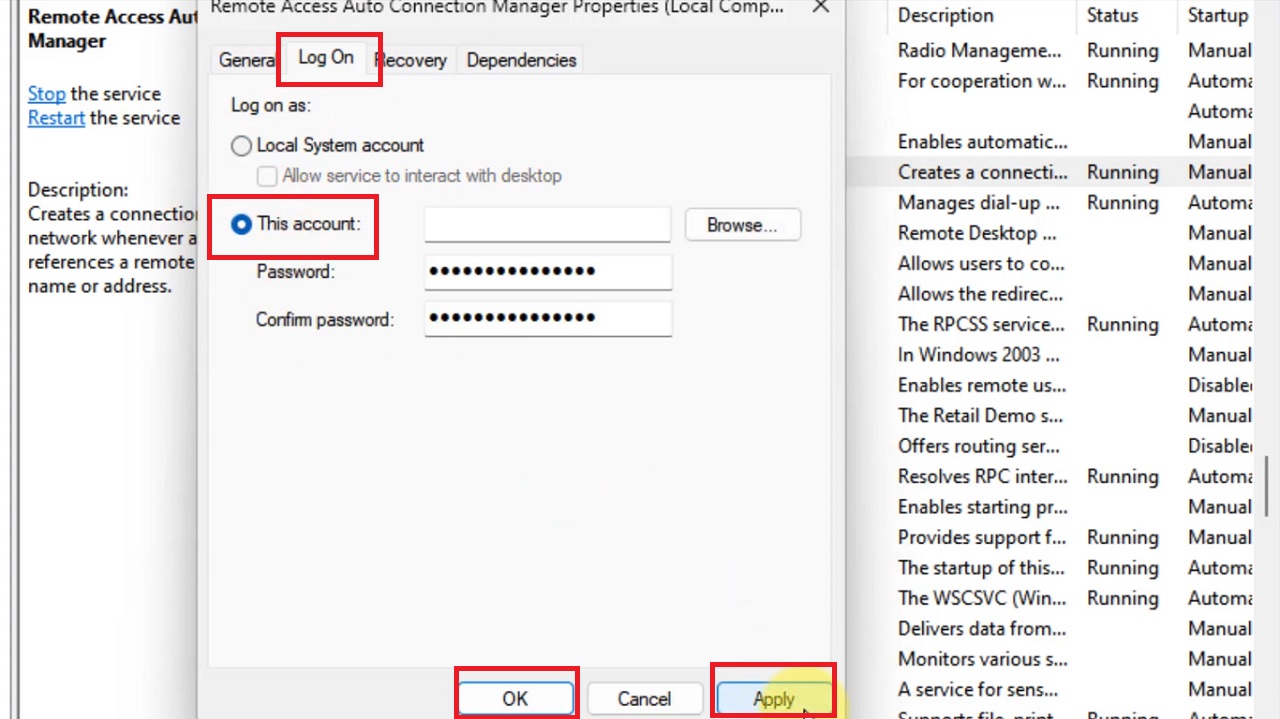
- Now, go to the Log On tab in the same window next to the General tab.
- Click on the small circle next to This account to check it.
- Click on the Apply button.
- Click on the OK button.
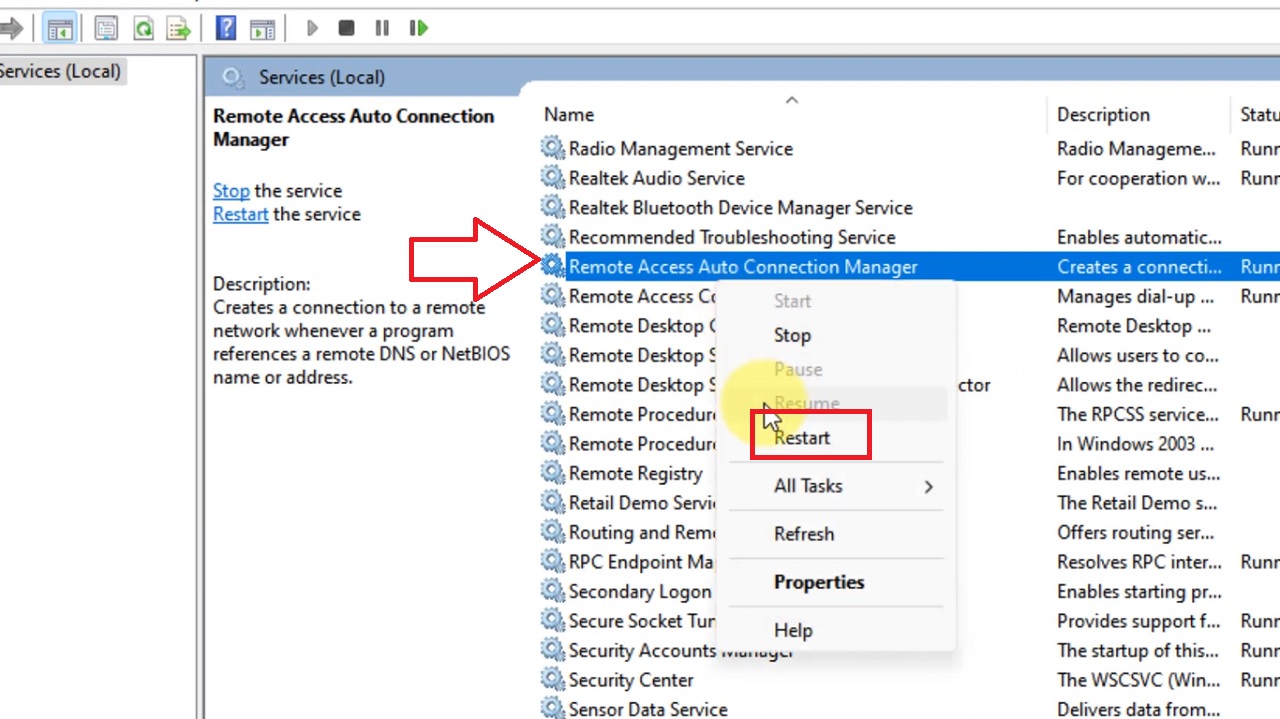
- Finally, right-click on the Remote Access Auto Connection Manager in the first window.
- Click on Restart from the drop-down menu.
When it is done restarting, end the process by restarting your computer and your printer and your issue will be fixed.
Method 2: From the Registry Editor
A few small changes made into the Registry Editor may also fix the issue of network printing.
STEPS TO FOLLOW:
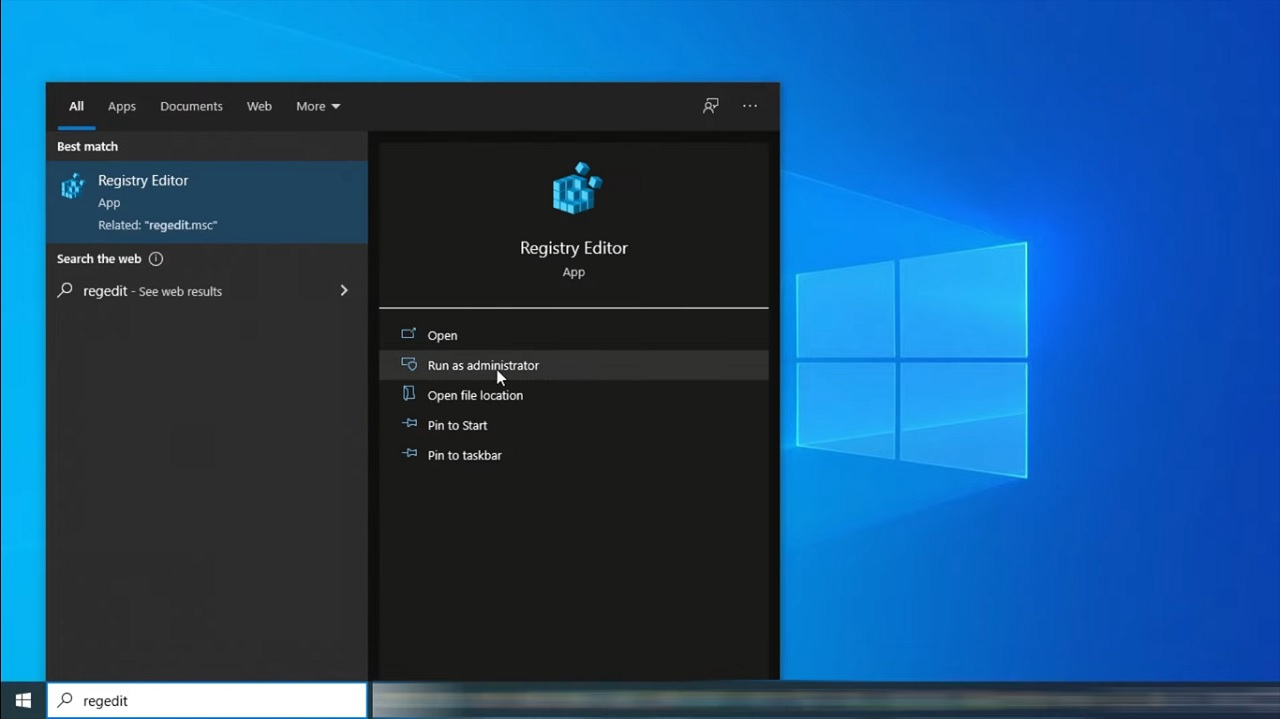
Open and run Registry Editor as administrator by typing it in the search box and hitting Enter.
Expand the following folders in the exact order:
- HKEY_LOCAL_MACHINE
- SYSTEM
- CurrentControlSet
- Control
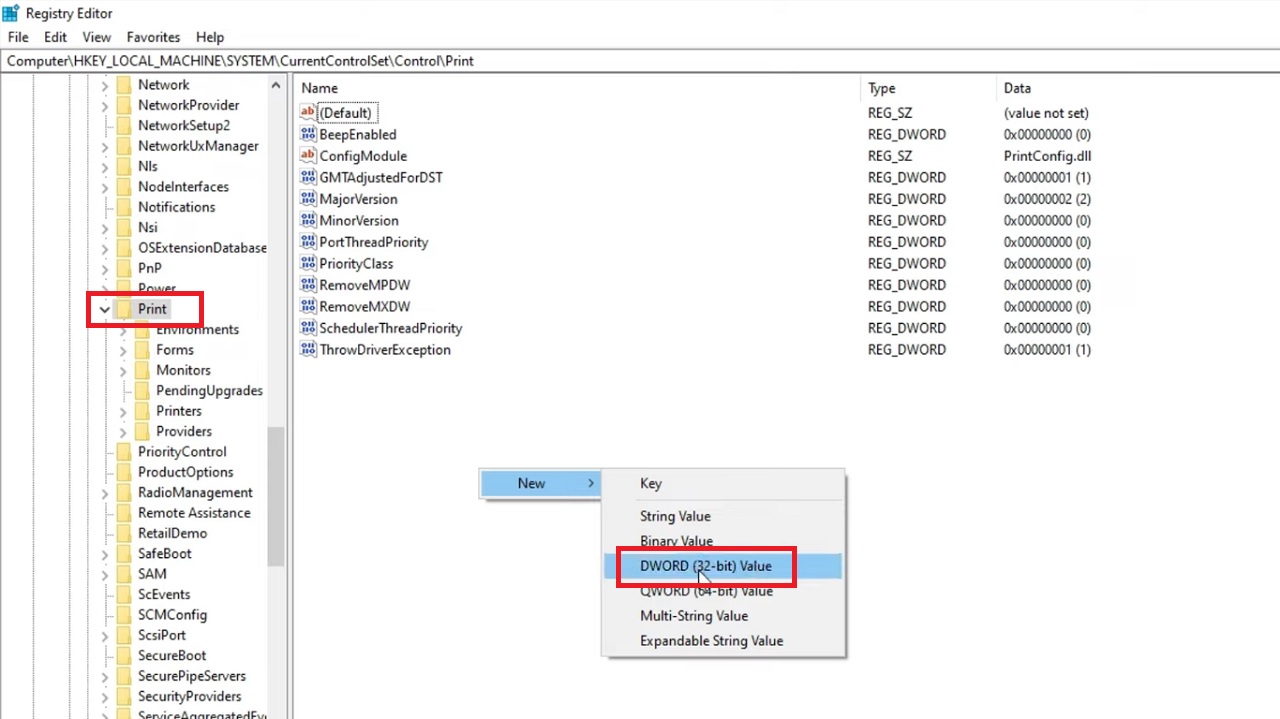
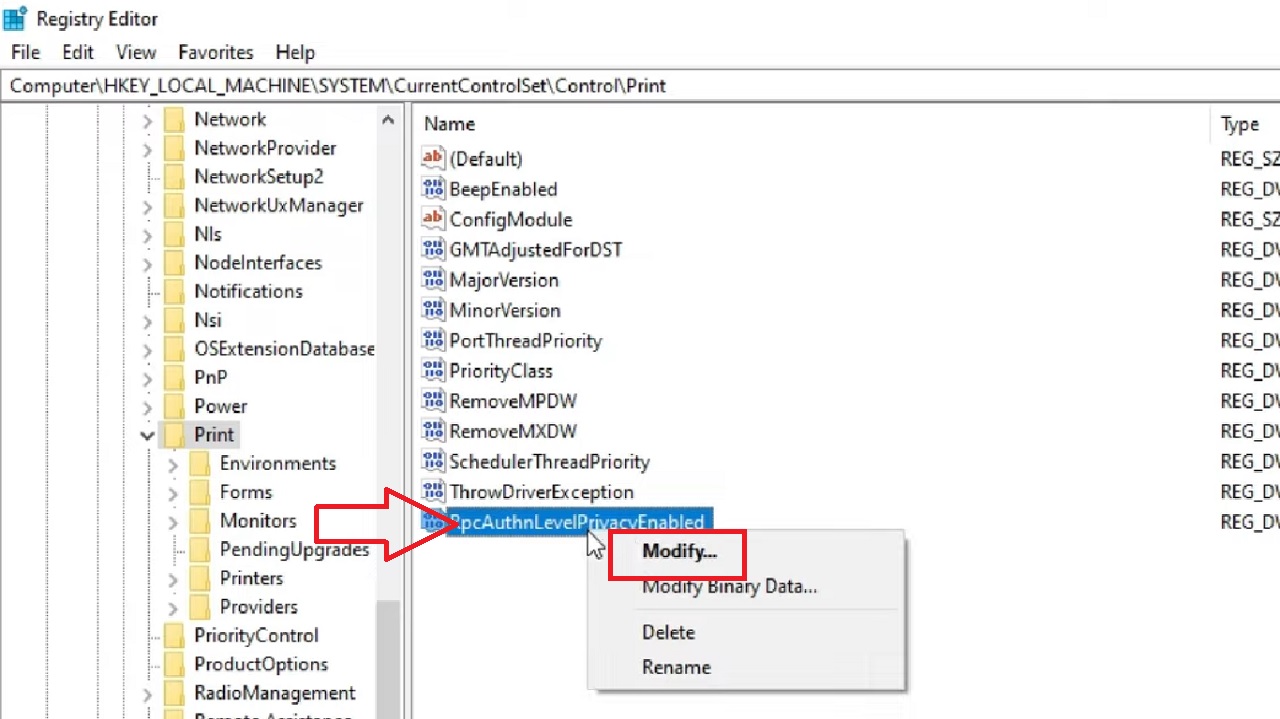
When you reach there, click on the Print folder.
- Go to a blank space on the right side of the window.
- Right-click there.
- Click on New.
- Select DWORD (32-bit) Value from the drop-down options.
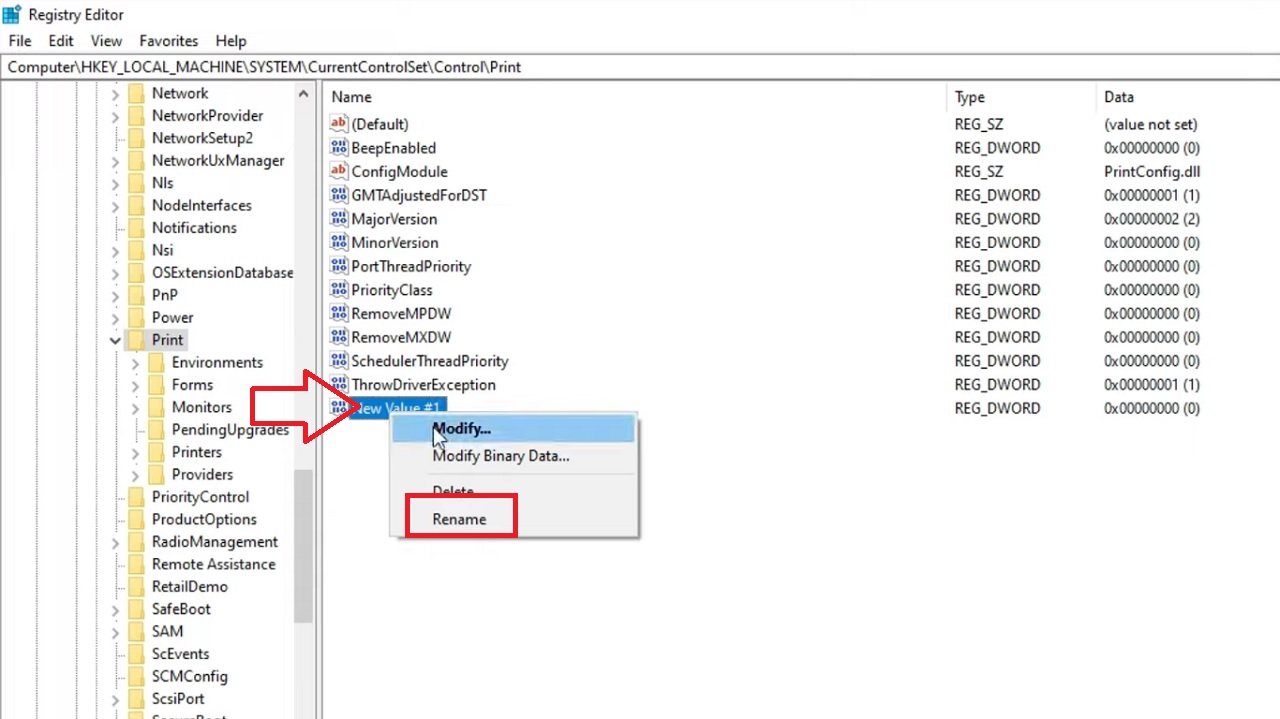
- Right-click on the New Value # 1.
- Select Rename.
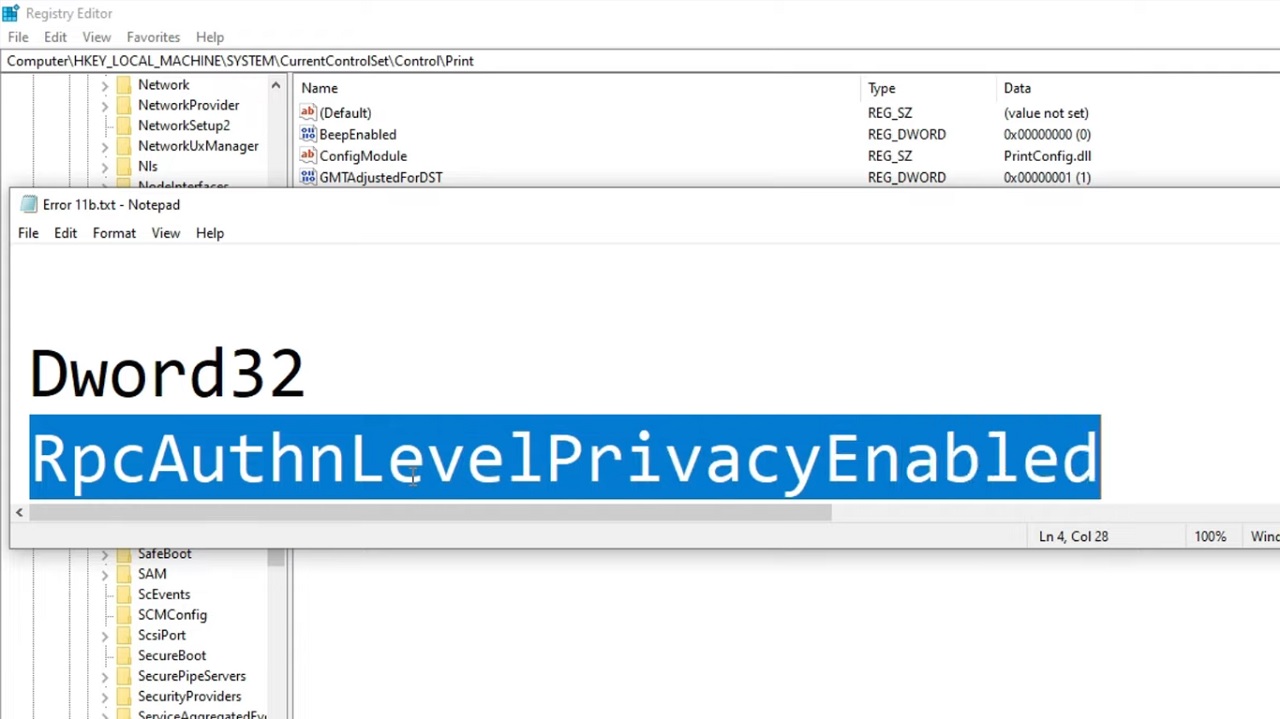
Name the new key as shown in the Notepad image below:
- Now right-click on the new key you have just created and renamed.
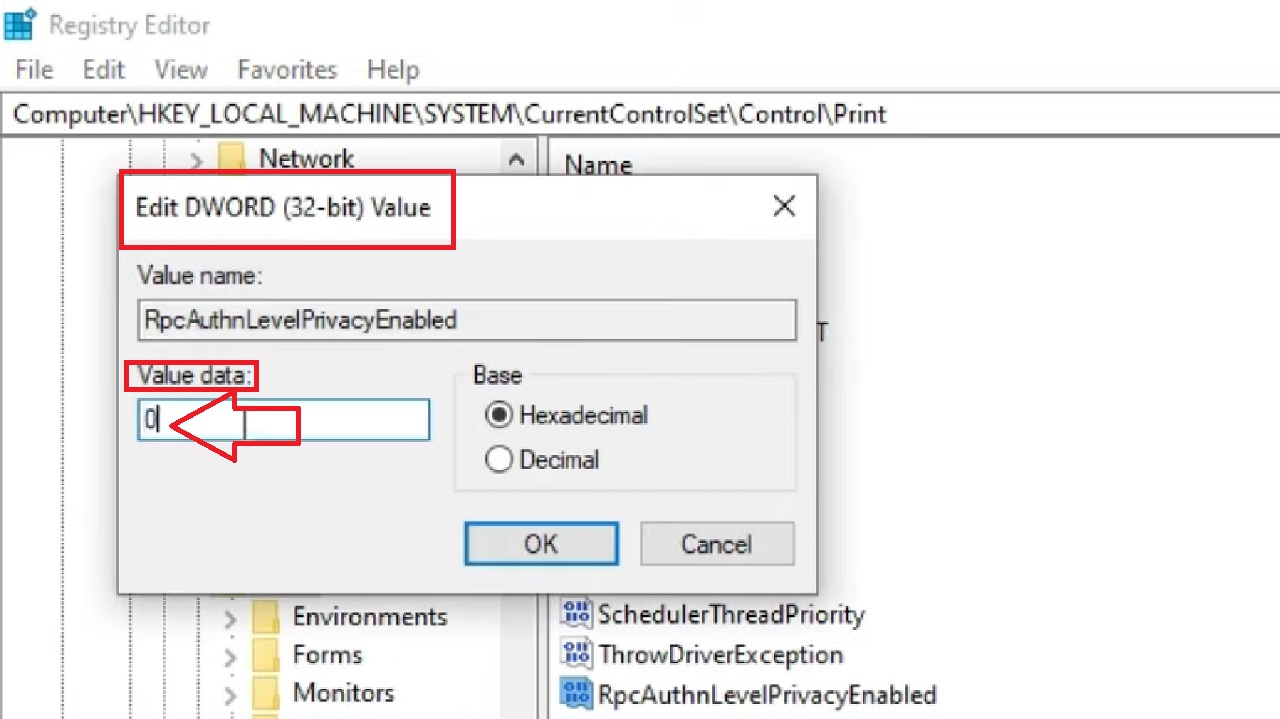
- Select Modify from the drop-down options.
- Change the Value data to 0 in the Edit DWORD (32-bit) Value window.
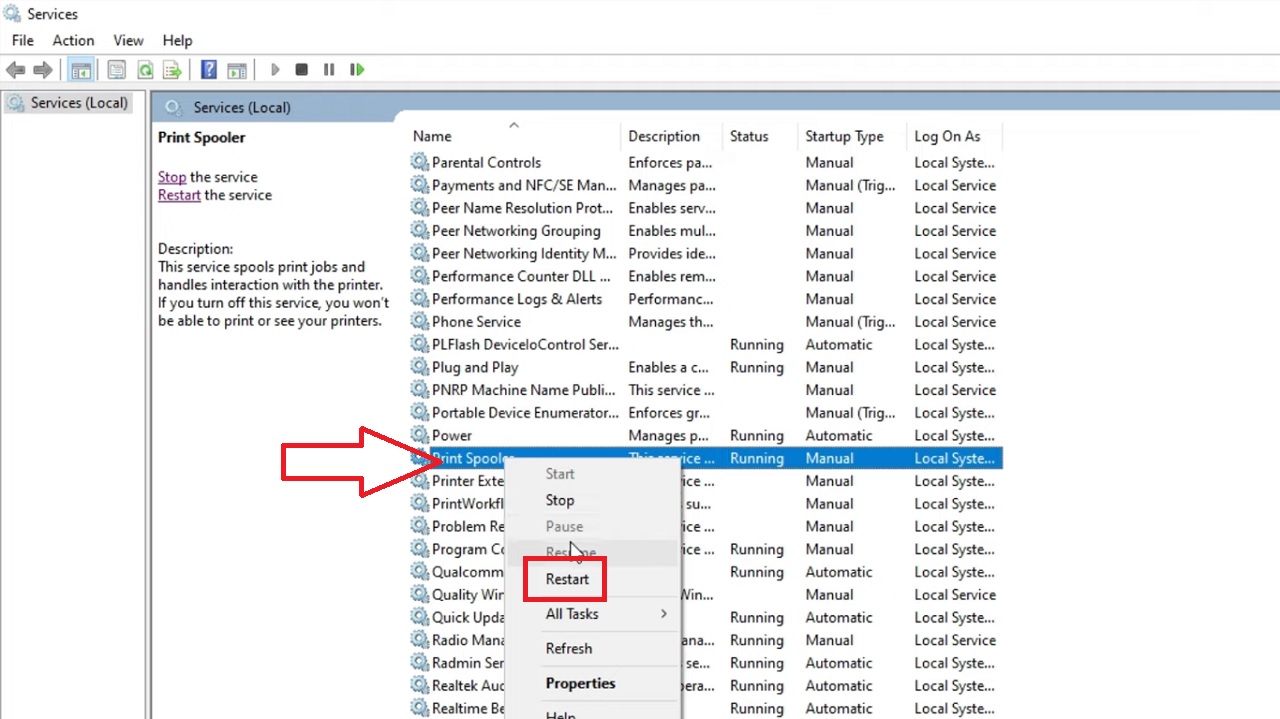
Now, go to the Services window as you did in Method 1 but make sure that you choose Run as administrator this time before hitting the Enter button.
- Look for Print Spooler service in the window.
- Right-click on it.
- Click on Restart from the options in the drop-down window.
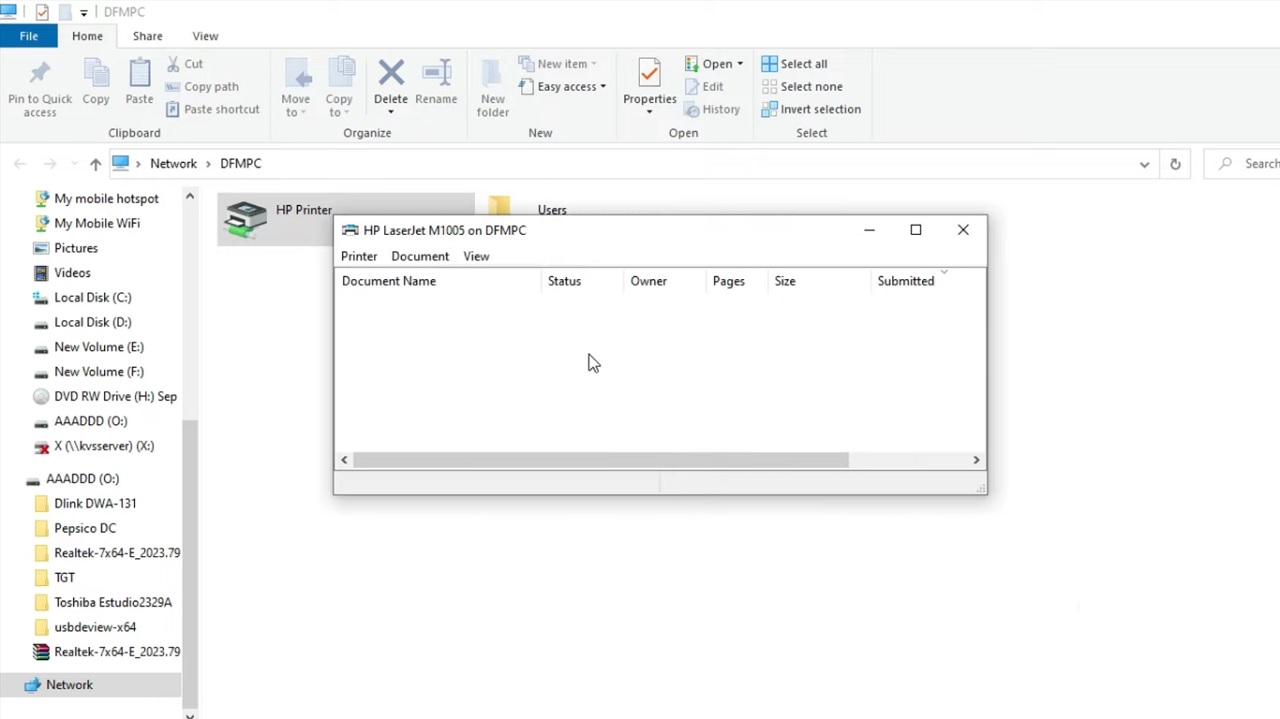
Now, refresh the printer in the Client PC and then double click on the icon to connect it. The printer will now connect as shown in the image below:
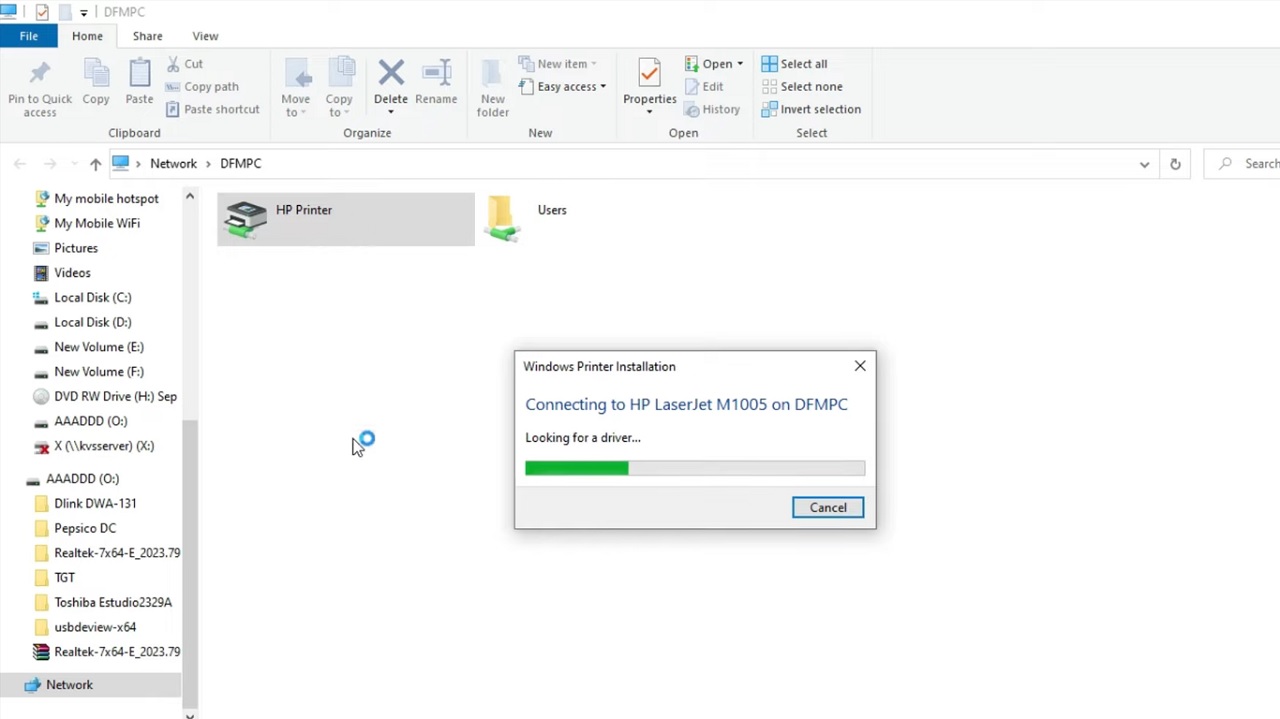
Your issue will be resolved and a window as shown below will finally appear signifying that the printer is now connected, functional, and ready to take print commands.
Method 3: From Printers & Scanners Option in Settings
You may need to make some adjustments to the settings of the Printers & Scanners to resolve this issue, which may be messed up now causing the problem.
STEPS TO FOLLOW:
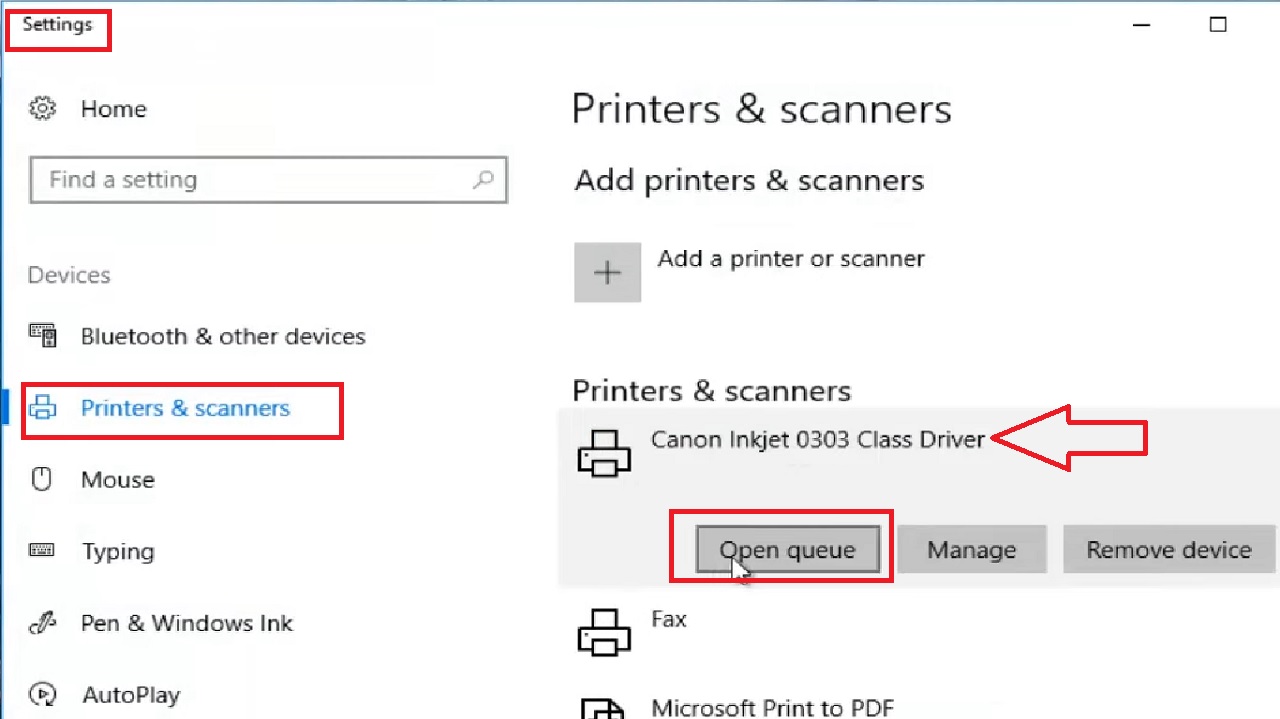
- Go to Settings by left-clicking on the Start menu > Devices > Printer & Scanners on the left panel.
(Alternatively, you can type printers and scanners in the search box next to it.)
- Select your printer from the window.
- Click on Open Queue.
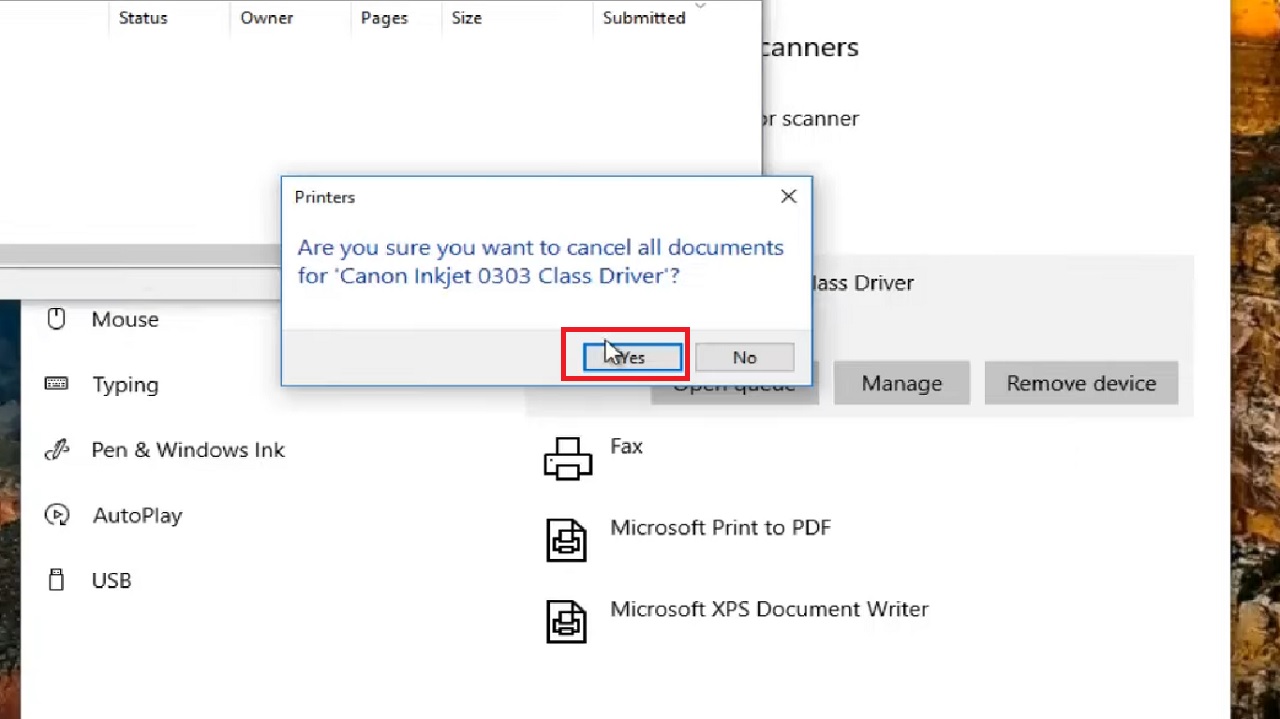
- Left-click on the Printer tab on the top-left corner.
- Select Cancel All Documents from the drop-down options.

- Click on the Yes button in the confirmation window that pops up.
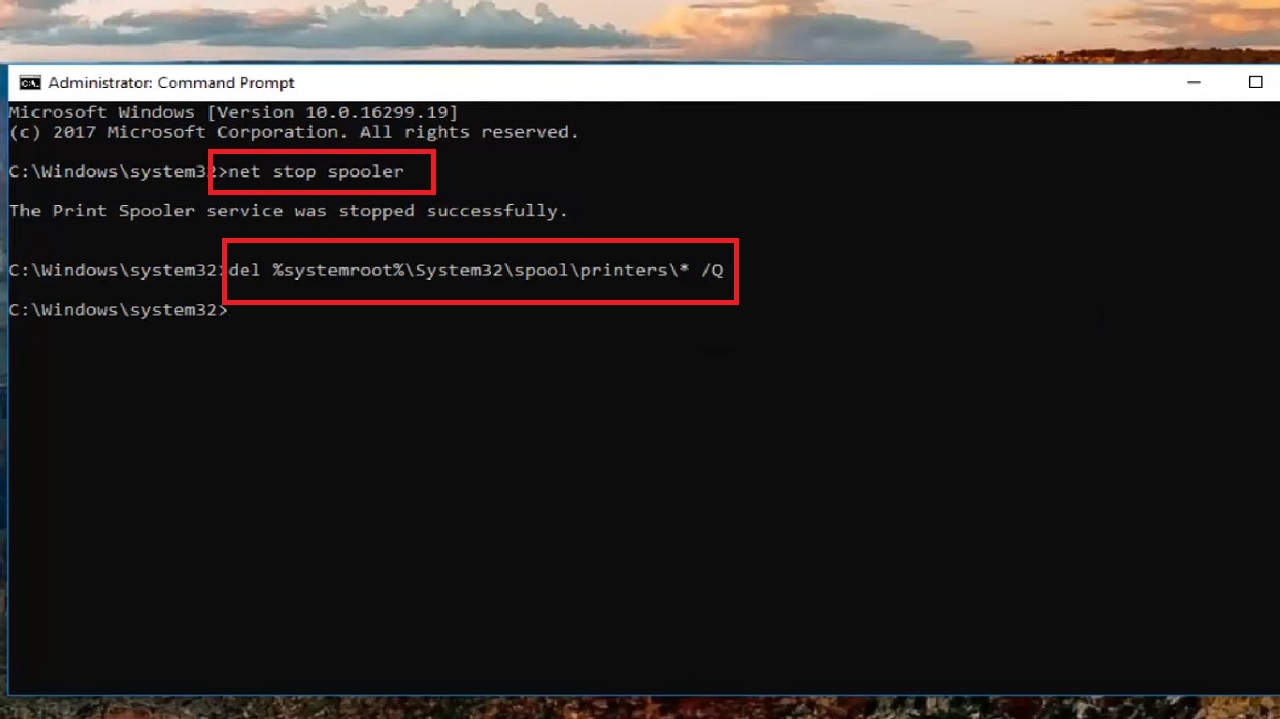
- Close all windows and go to the Start menu again and type in cmd to open the Command Prompt.
- Right-click on that and select Run as administrator and click on the Yes button on the User Account Control (UAC) window.
- When the Command Prompt opens, type in the command net stop spooler and hit the Enter button.
- When the execution is complete, type in the next command del %systemroot%\System32\spool\printers\* /Q and click Enter.
Now, close the Command Prompt window and go to the Start menu again to open Services as you did in Method 1.
- Go to Print Spooler and right-click on it.
- Select Properties from the drop-down options.
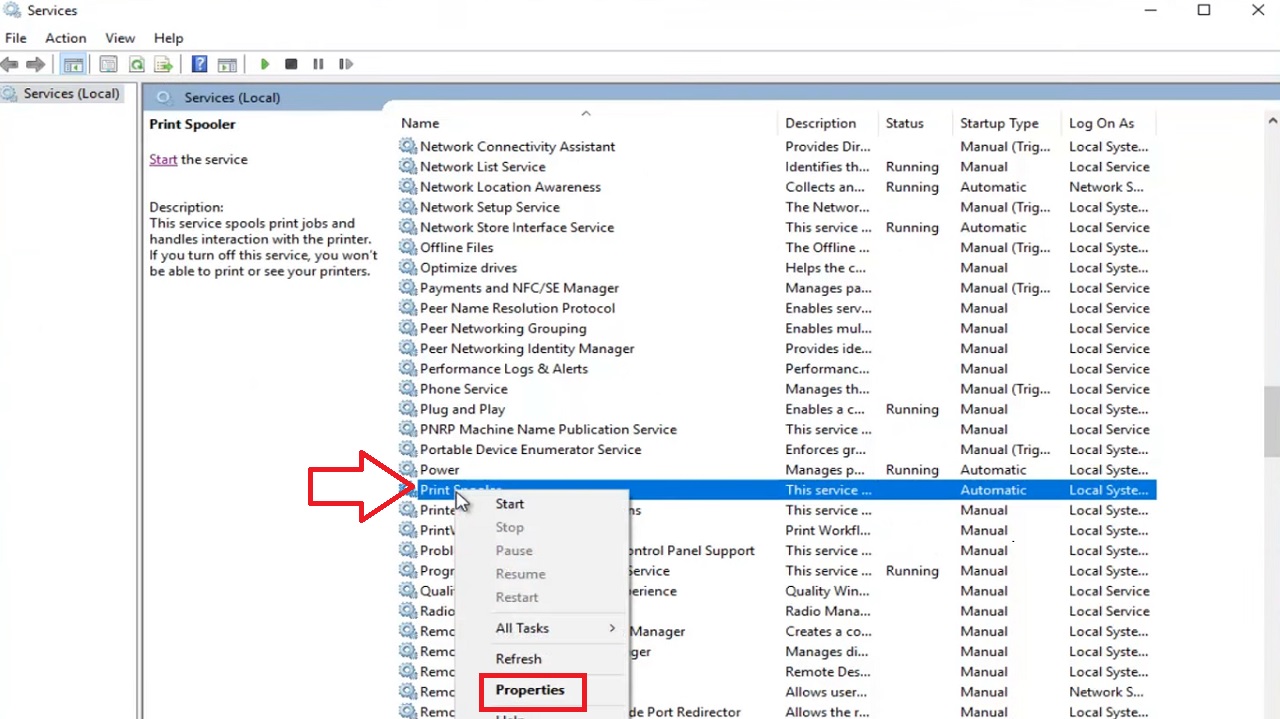
Now set the Startup type to Automatics and click on the Start button under Service status, as you did for the Remote Access Auto Connection Manager in Method 1.
Now close all windows and programs open on your computer, restart your system and the printer and your problem will be solved.
Method 4: Making Changes in Firewall Settings
The firewall set on your computer may also cause this issue. Making some changes in it may resolve the issue.
STEPS TO FOLLOW:
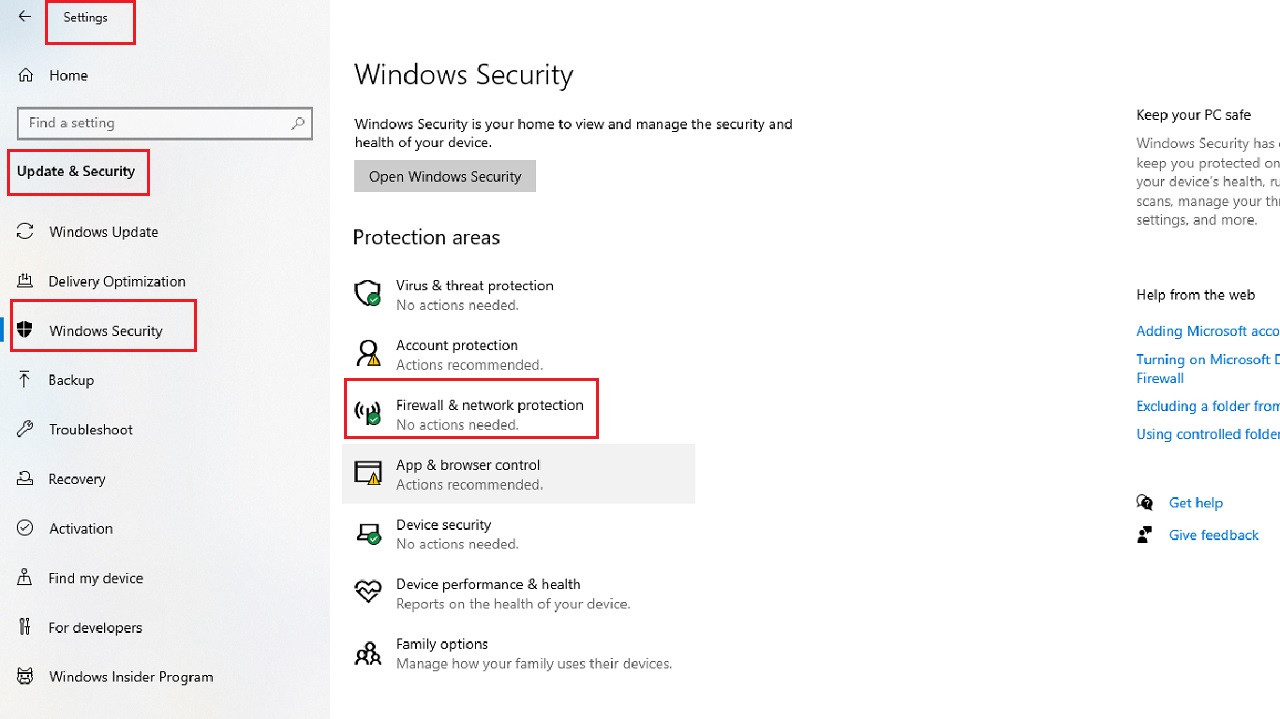
- Open Settings by right-clicking on the Start menu > Go to Update & Security > Windows Security on the left panel > open Firewall & network protection.
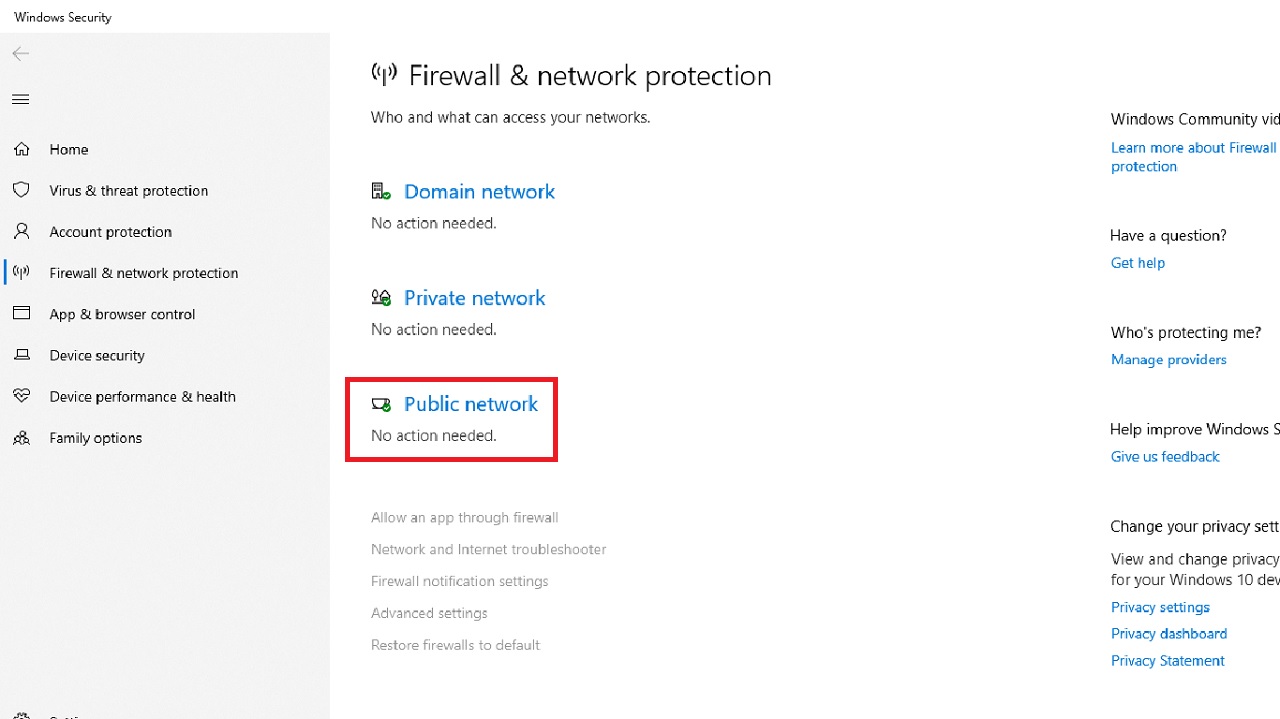
- Click on Public network in the following window.
Make sure that the toggle switch under Microsoft Defender Firewall is turned off.
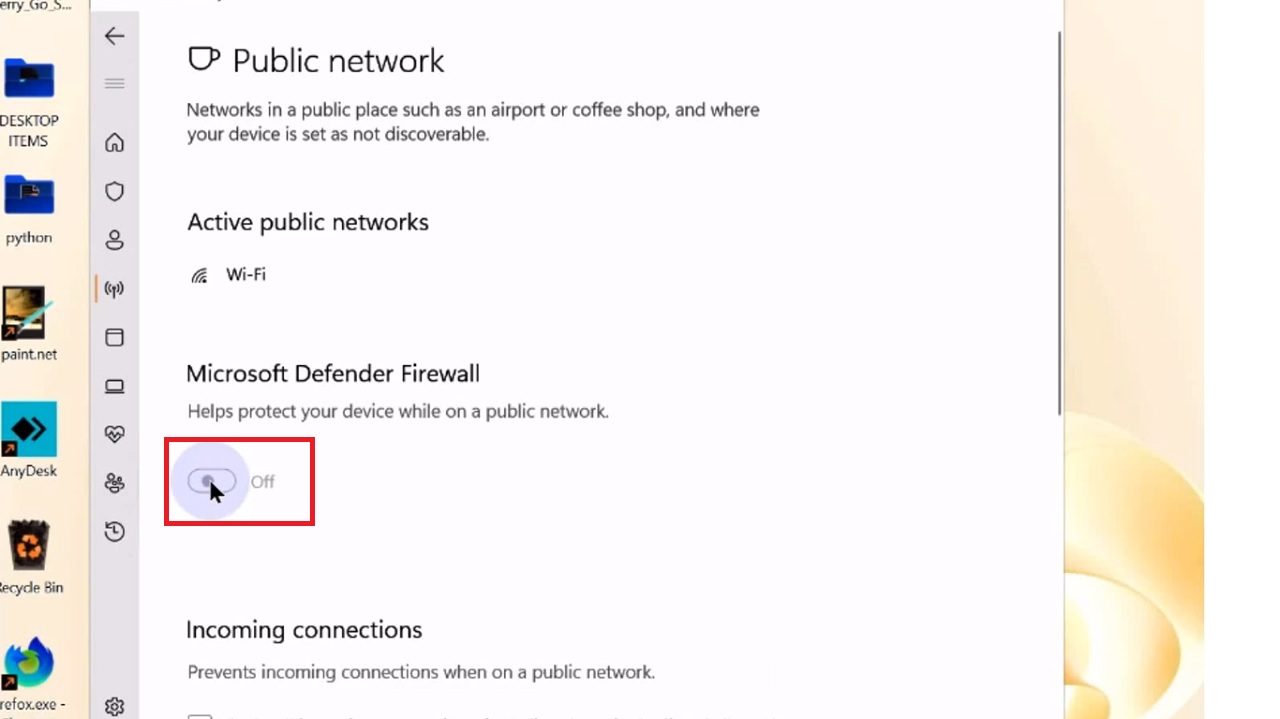
If you are using any other provider, it may say ‘Microsoft Defender Firewall is not active, because you’re using other providers.
Method 5: From Control Panel
Additionally, you may also fix the issue from the Control Panel.
STEPS TO FOLLOW:
- Type firewall.cpl in the search box and hit Enter.
- Select ‘Allow an app or feature through Windows Defender Firewall’ from the left pane of the following window.
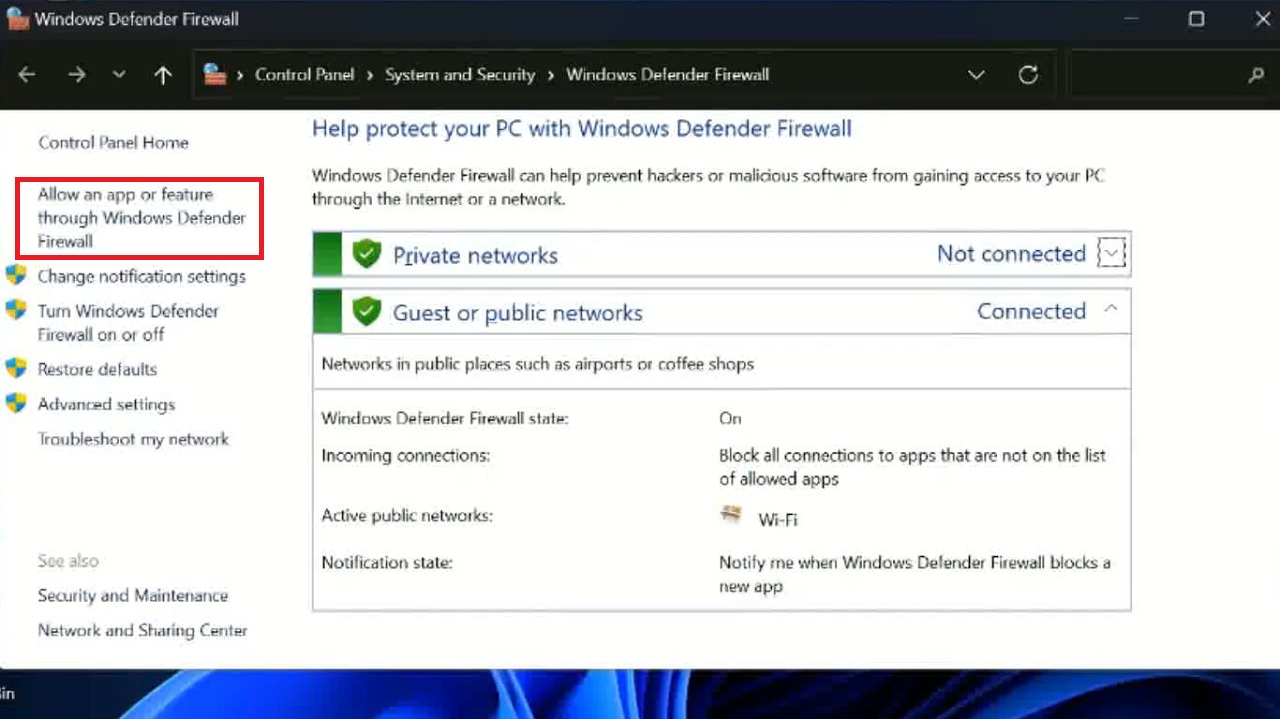
- Click on the Change settings button.
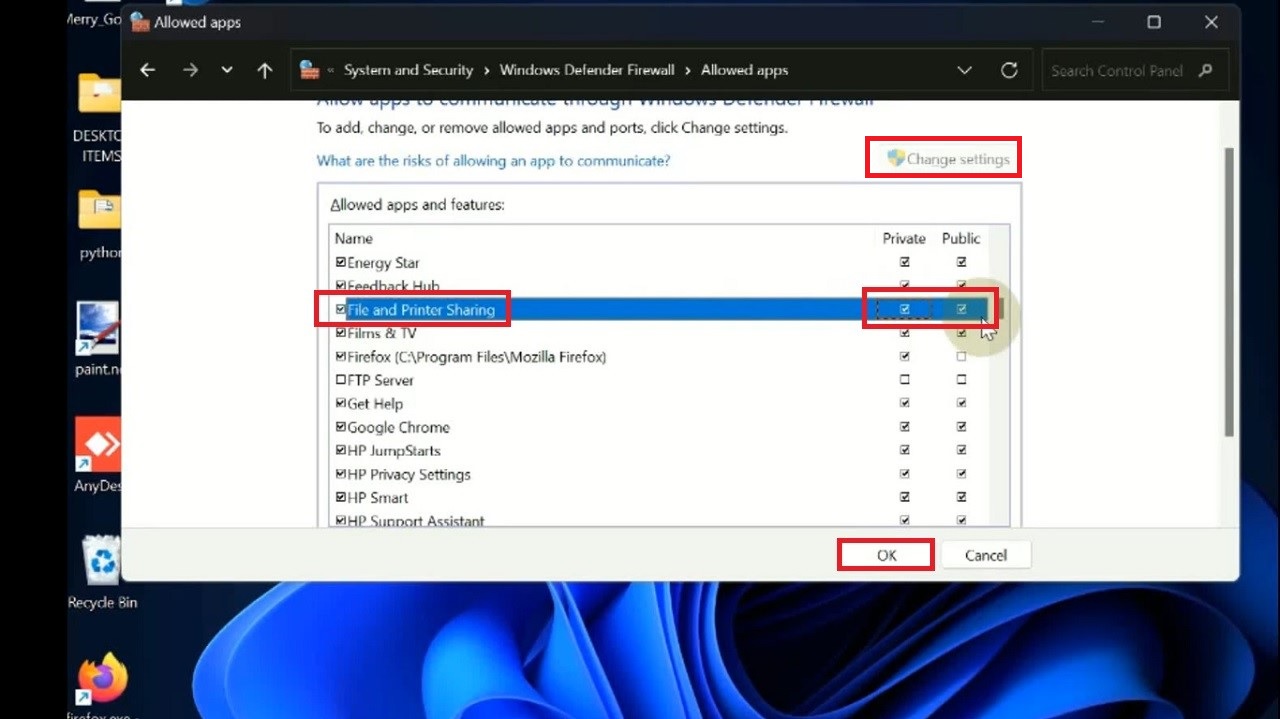
- Scroll down and look for File and Printer Sharing in the window under Allowed apps and features.
- Click on the small square box at its left as well as the other two such boxes under the Private and Public column corresponding to it.
- Click on the OK button.
Check if the issue has been resolved. If it has not, then you may also try the following in the Control Panel itself.
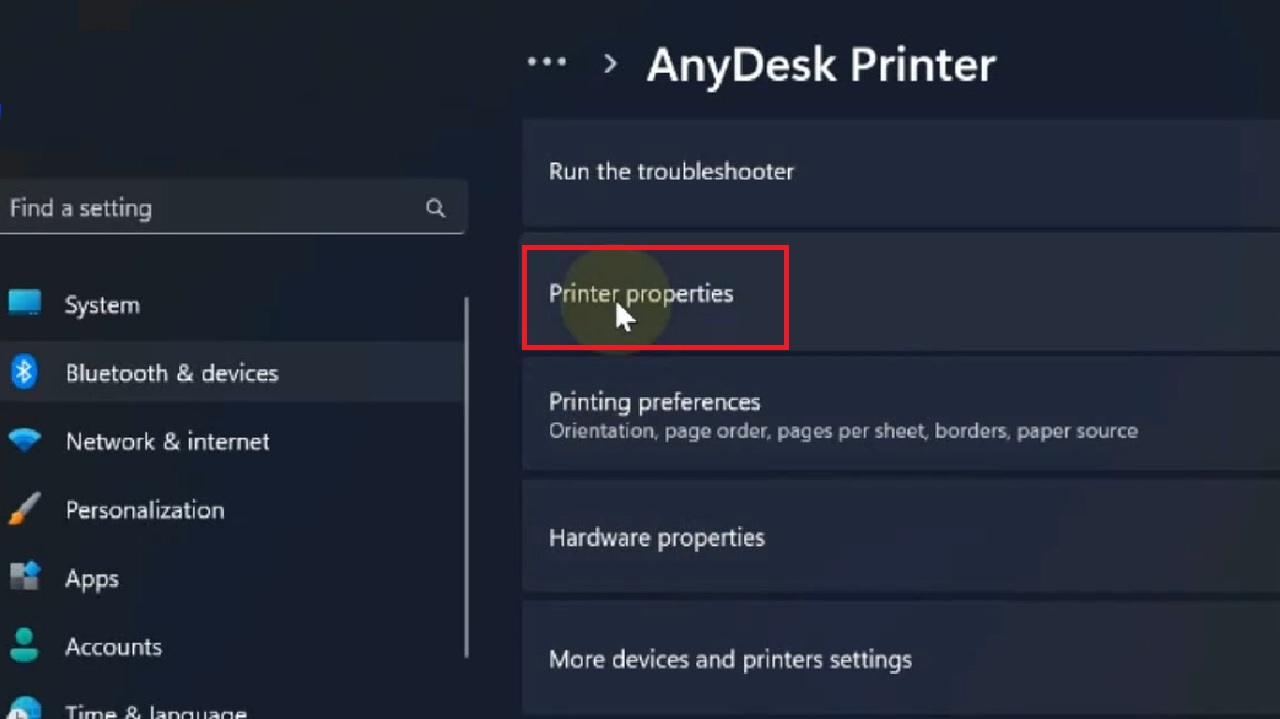
- Click on View devices and printers under Hardware and Sound > Find and select Printers & Scanners > Choose and click on your printer > Select Printer properties.
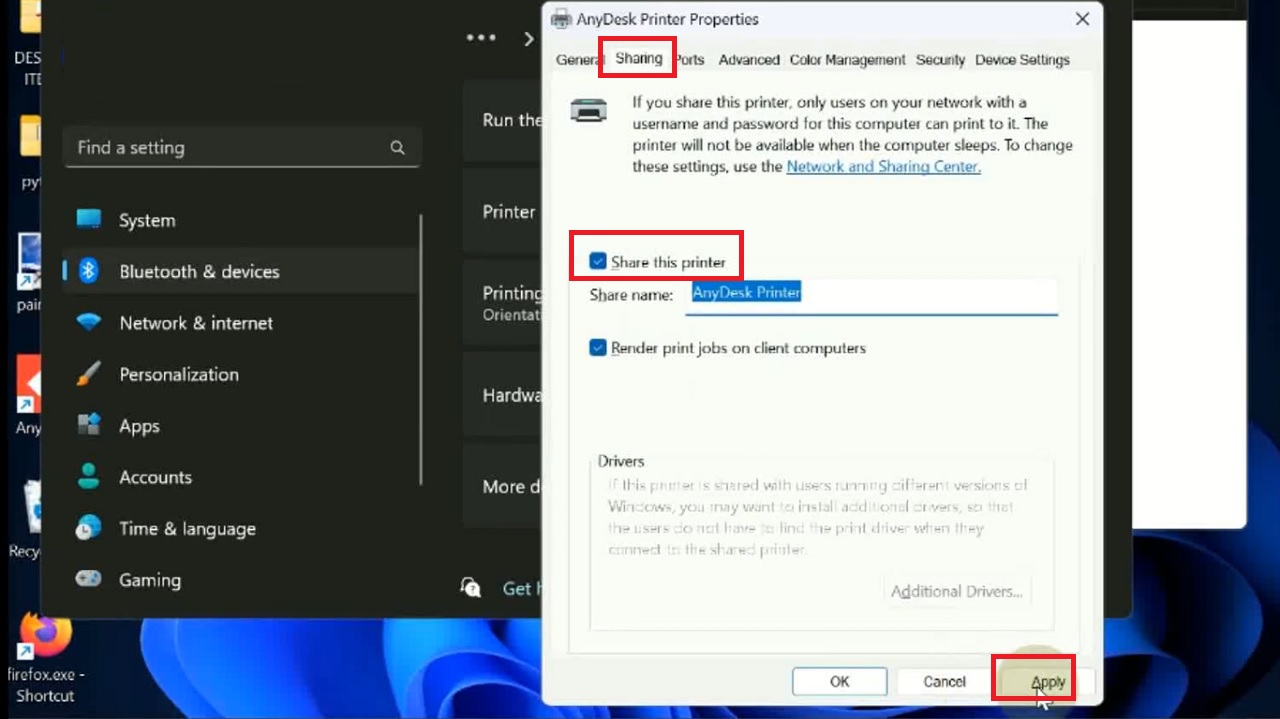
- Go to the Sharing tab.
- Check the small box next to Share this printer.
- Finally, click on the Apply button and then on the OK button on this window to save the changes made.
Now, restart your computer system and check whether or not the network printing issue has been resolved.
Conclusion
So, you do not have to worry much when network printing is not working on your computer.
Try one or a couple of the fixes mentioned above and have this issue resolved easily by yourself without needing any assistance from a professional expert.