
There may be times when Windows may not be able to detect proxy settings on your computer and not allow you to connect to the internet.
Annoying as it is, you need not worry about it because you can rectify this common and non-fatal error with some simple fixes like restarting your PC and router, troubleshooting, and performing a full system scan.
However, it may not always work and for that you will need to follow a few specific methods to rectify this error. This article deals with those particular methods.
In This Article
KEY TAKEAWAYS
- General troubleshooting as well as troubleshooting the network adapter along with updating or rolling the driver back, as the case may be, may resolve the issue of Windows not detecting proxy settings automatically.
- Running a full scan on your PC for malware and virus detection and removal of the conflicting VPN service or any other third-party apps may bring things back to normal most of the time.
- Resetting the Address and Port of the proxy settings and setting IP address and DNS to automatic may allow Windows to detect the proxy setting of the network on your computer automatically.
- You may even go back to an earlier time by choosing a restore point when this issue was not experienced and therefore resolve the issue, provided you already have some restore points created before.
- Like in most cases, running a few specific commands in the Command Prompt and Windows PowerShell may clear the errors and reset everything so that the system can detect the proxy setting of the network.
Why Cannot Windows Detect Network’s Proxy Settings Automatically?
The ‘Windows Could Not Automatically Detect This Network’s Proxy Settings’ error is caused when the network adapter may need updating, the proxy settings may be incorrect, or the IP address may not be set to automatic. This issue is typically caused due to problems in your computer system.
Apart from the above, some other reasons for this error to occurs may also include:
- Third-party apps that may be conflicting
- The VPN service
- Existence of malware and virus
- Issues in network connectivity
- Corrupted System Files
The good news is that there are quite a few fixes to this issue, irrespective of its reasons.
Ways to Fix Windows Could Not Automatically Detect This Network’s Proxy Settings Error
Usually, the ‘Windows Could Not Automatically Detect This Network’s Proxy Settings’ error has nothing to do with the internet connection. Therefore, general troubleshooting and rebooting your PC and router may fix this issue most of the time.
However, there are some other useful ways to fix this issue as well, such as:
- You may update the network adapter from the Device Manager by right-clicking on it, going to the driver tab and selecting Update driver.
- You may also Roll back the driver if you have not installed any new driver recently.
- You can remove the third-party apps or the Virtual Private Network service that may be conflicting and check whether it is resolved.
- Reconfiguring or removing any antivirus software or firewall may also help sometimes.
- Running a malware or virus scan on your computer to detect and remove them may also rectify the error.
If none of the above solutions work, you may even reset your network connection settings by clicking on the ‘Reset now’ button at the bottom of the Network & Internet section in Windows Settings.
Still, if the above solutions were unable to resolve the issue, you should now move on to the more detailed troubleshooting steps.
Method 1: Review and Reset the Proxy Settings
Often the settings itself may be improper and may prevent Windows from detecting the proxy settings automatically. To resolve the issue, you should review and reset the proxy settings, if required.
STEPS TO FOLLOW:
- Open Windows Settings by right-clicking on the Start menu and selecting the option from the pop-up window.
- Go to the Network & Internet section and click on the Proxy tab on the left panel.
- Under Proxy, slide the switch under ‘Use a proxy server’ to off and under ‘Automatically detect settings’ to on.
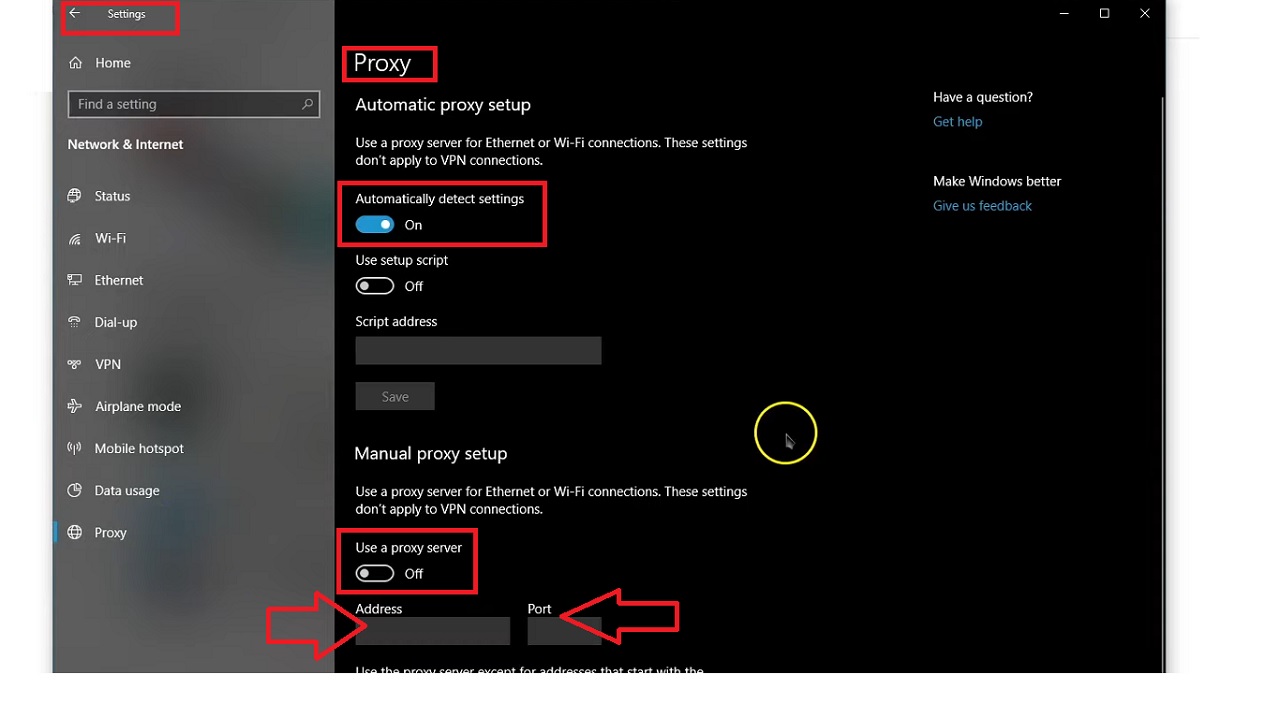
Try connecting to the internet now to see whether the issue is resolved.
If it has not, then turn off the switch under ‘Automatically detect settings’ and give it another try.
Also, find out the network settings from the network administrator and re-enter the Address and Port in the relevant boxes (as shown by the arrows in the image above) to make sure it is not entered incorrectly.
Now, restart your computer and try connecting to the network. If it works, it is resolved. If it does not, move on with the following steps.
Method 2: Use the Network Adapter Troubleshooter
This method needs to be followed over and above general troubleshooting mentioned before because Windows usually have a lot of different troubleshooting features dedicated for each specific type of issue.
STEPS TO FOLLOW:
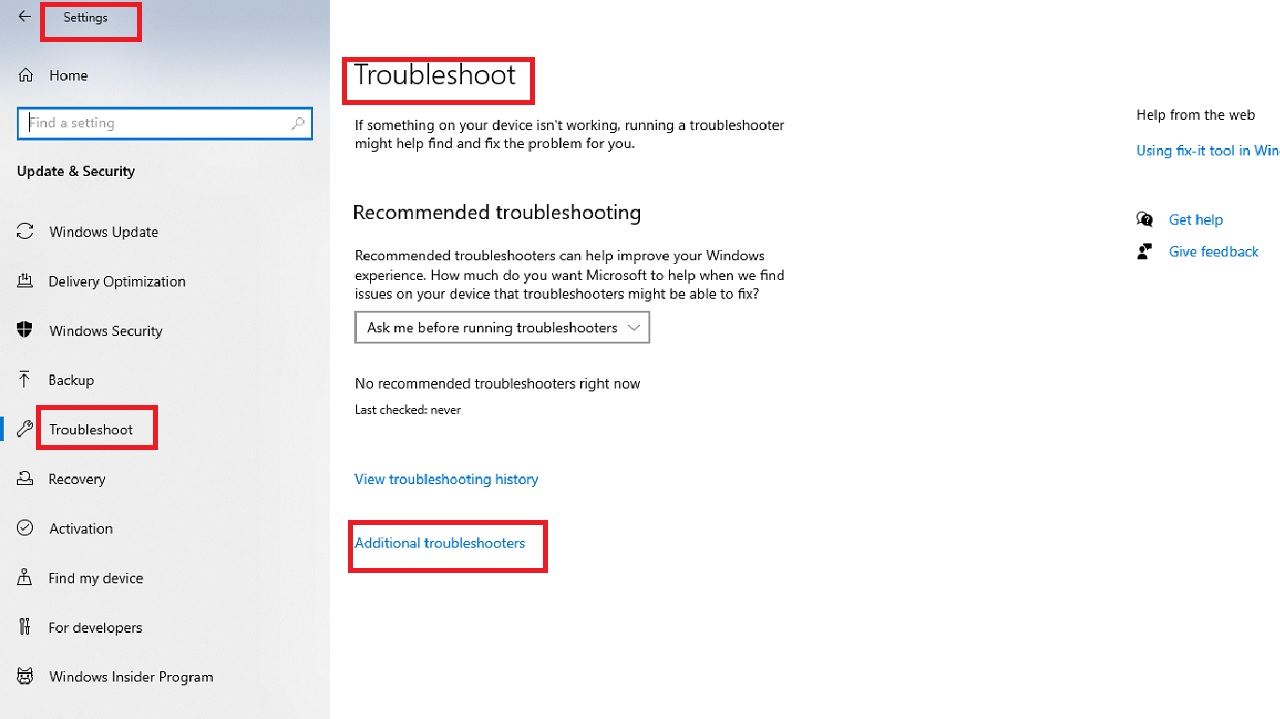
- Go to Settings as before.
- Select Update & Security > Troubleshoot from the left panel.
- On the Troubleshot page, click on Additional Troubleshooters.
- On the next window, scroll down and find Network Adapter.
- Click on Run the troubleshooter.
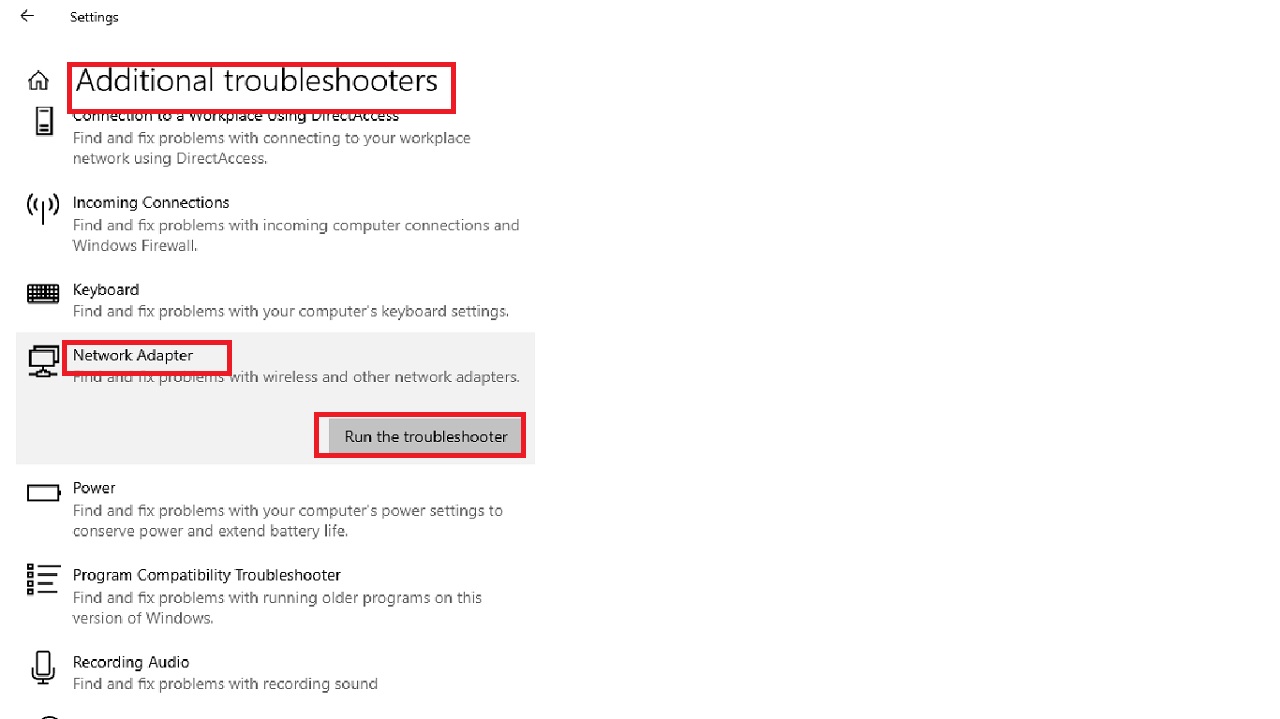
When the process is complete, restart the computer and see whether Windows can detect the proxy settings and you can connect to the internet.
Method 3: Set Obtaining IP address/DNS to Automatic
The IP address or DNS must be obtained automatically by Windows to detect the proxy settings. Check that it is set to automatic, and set it correctly if it is not.
STEPS TO FOLLOW:
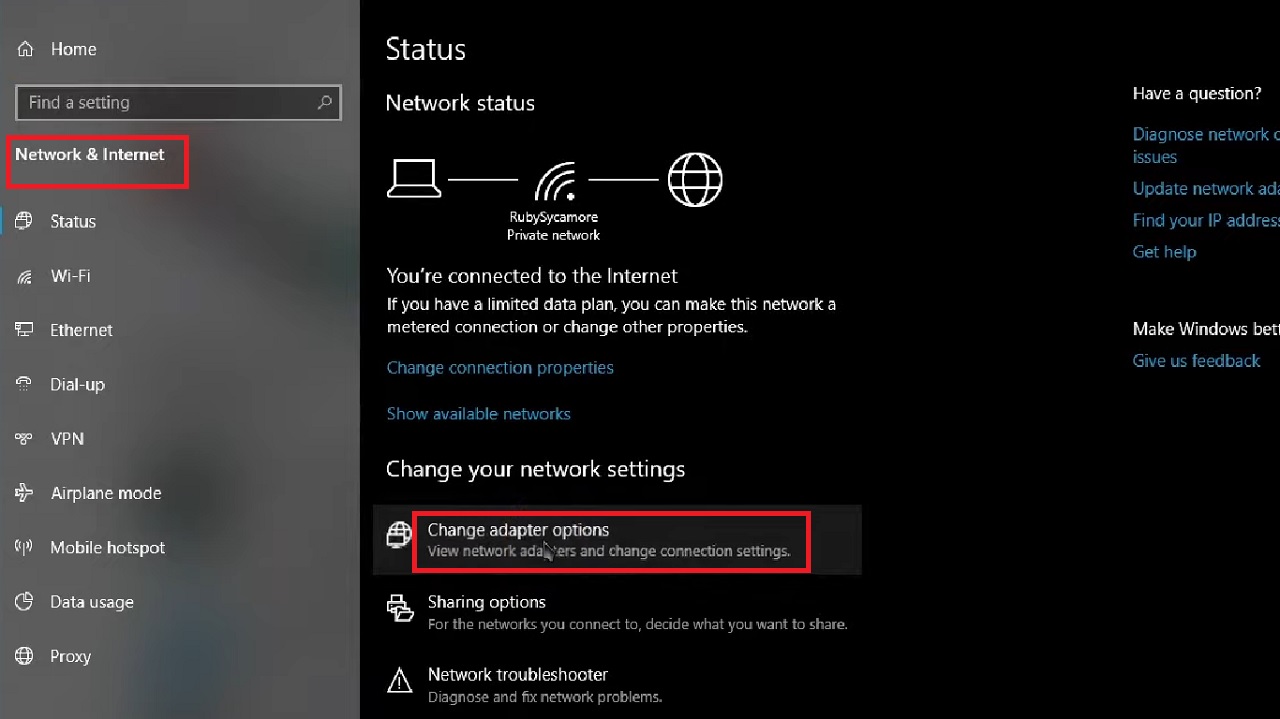
- Go to Settings > Network & Internet.
- Click on Change adapter options.
- Double-click on the connection that you are using currently.
- Click on Properties in the following Wi-Fi Status window.
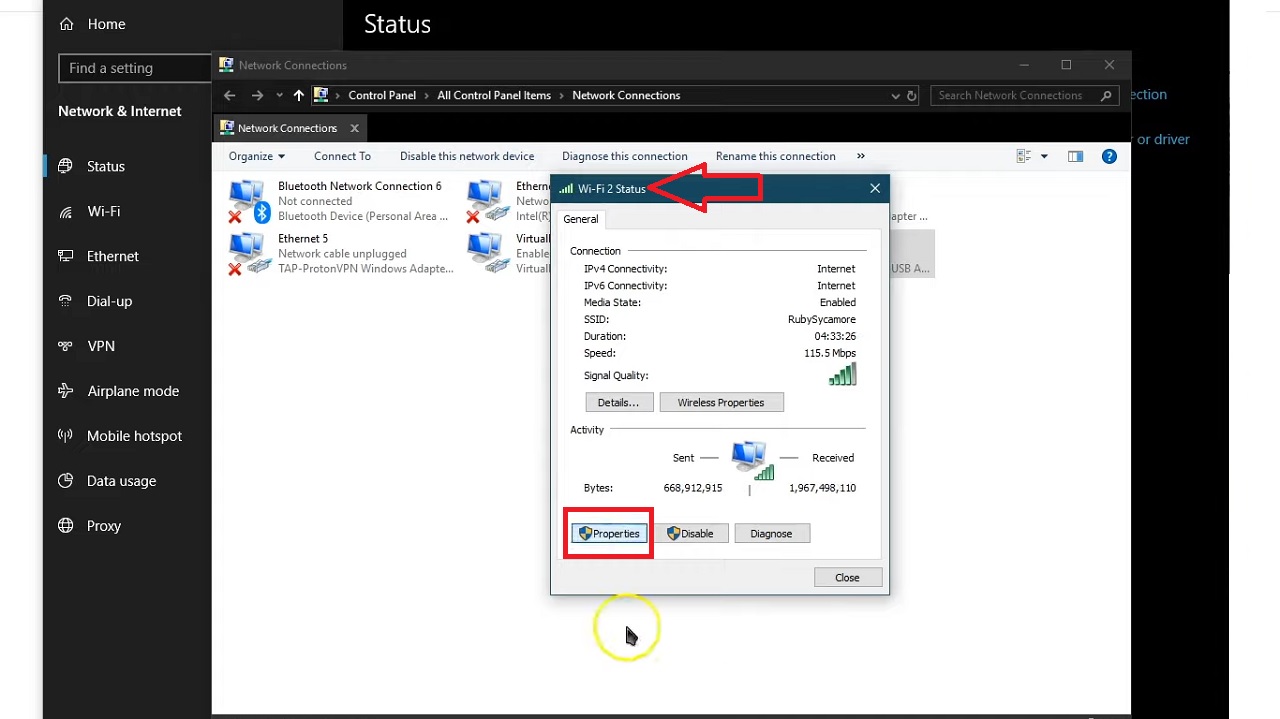
- Choose Internal Protocol Version 4 (TCP/IPv4) from the list of options in the box under ‘This connection uses the following items:’
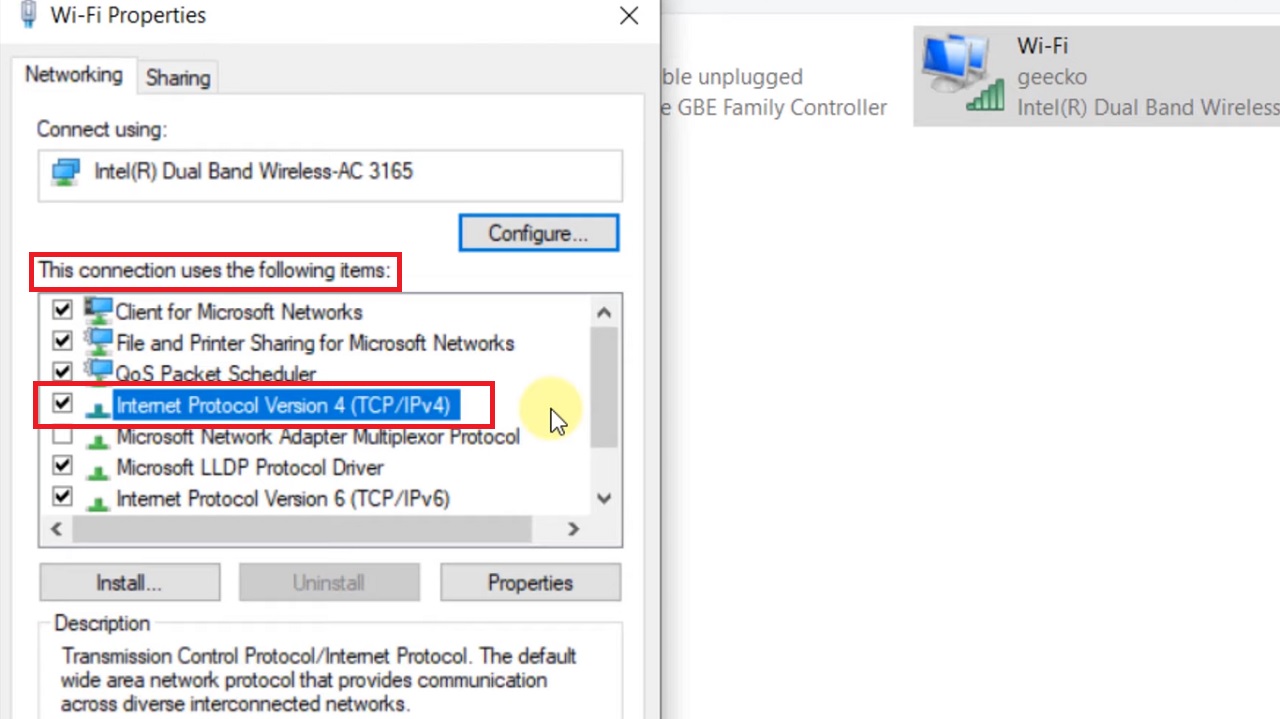
In the following TCP/IPv4 Properties window, check the small circles next to ‘Obtain an IP address automatically’ at the top as well as beside ‘Obtain DNS server address automatically.’
- Click on the OK button.
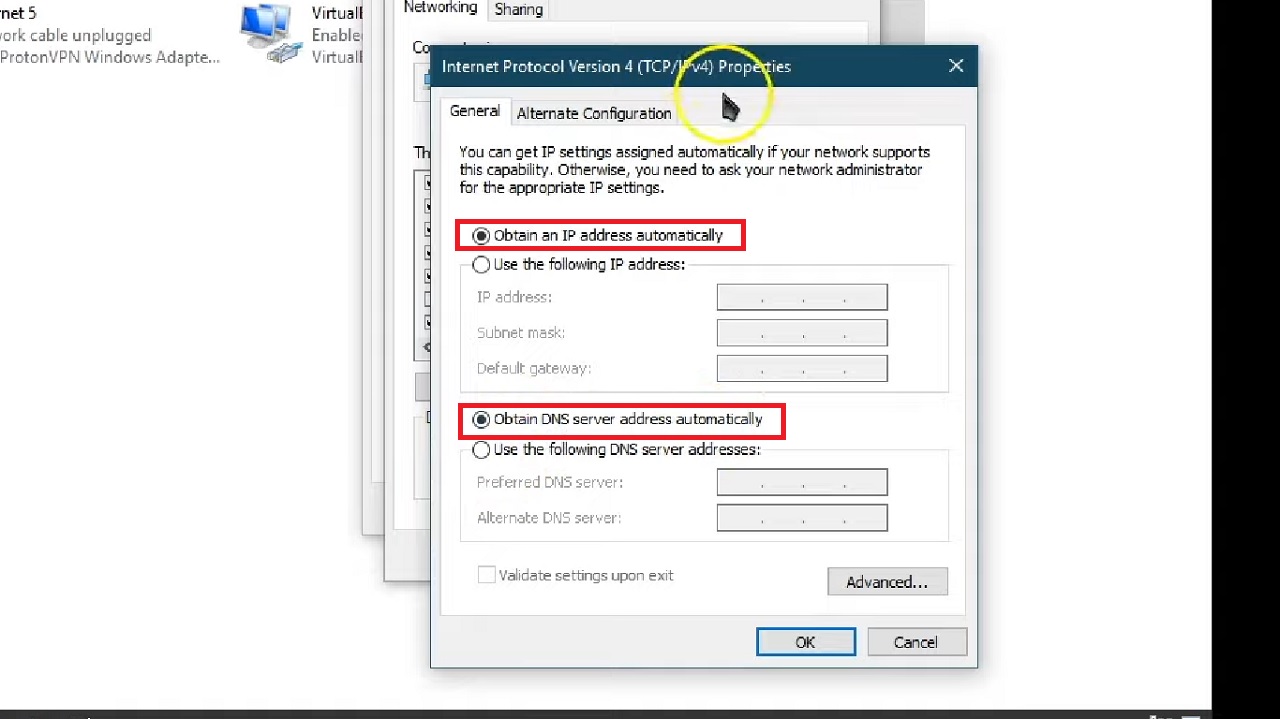
Now, in the previous window, select Internet Protocol Version 6 (TCP/IPv6) as well and ensure that the circles beside the same options as above are checked.
Restart your system and connect to the internet to check if it is working.
Method 4: Run a Few Commands
You may run a few specific commands in the Command Prompt or Windows PowerShell as admin to flush out the errors and reset everything to solve this specific issue.
STEPS TO FOLLOW:
Right-click on the Start menu and choose Command Prompt or Windows PowerShell (Admin).
When the window opens run the following commands one by one, hitting the Enter button after each and waiting for a command to be executed fully:
- netsh winsock reset
- netsh int ip reset
- ipconfig /release
- ipconfig /renew
- ipconfig /flushdns
Close the Command Prompt window and restart your computer to see whether or not the issue has been rectified.
Method 5: Choose a Restore Point
This will take your PC back to a time when the issue did not occur. However, this method will not work if you know that you have not created any restore points earlier.
STEPS TO FOLLOW:
- Open the Control Panel by typing it in the Run box and hitting Enter.
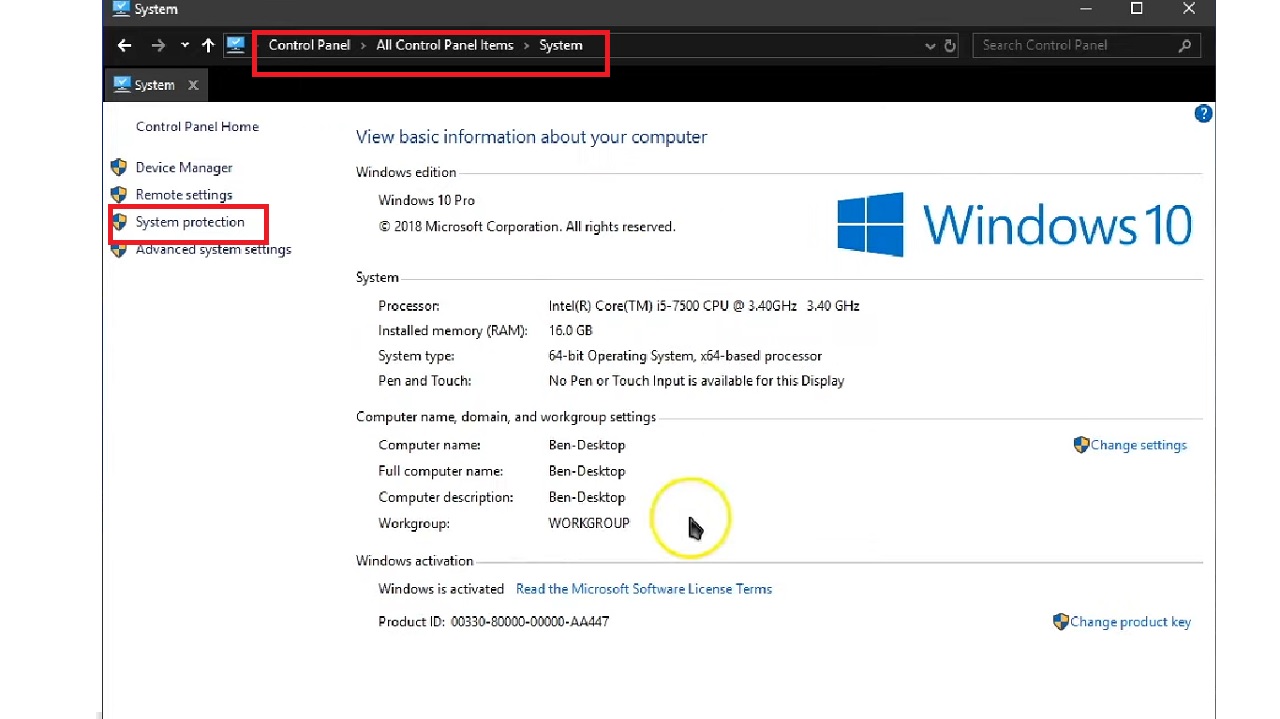
- Click on View by Large icons and click on System.
- In the System Window, click on System protection on the left side.
- Click on System Restore in the following System Properties window.
- Click on the Next button in the System Restore window.
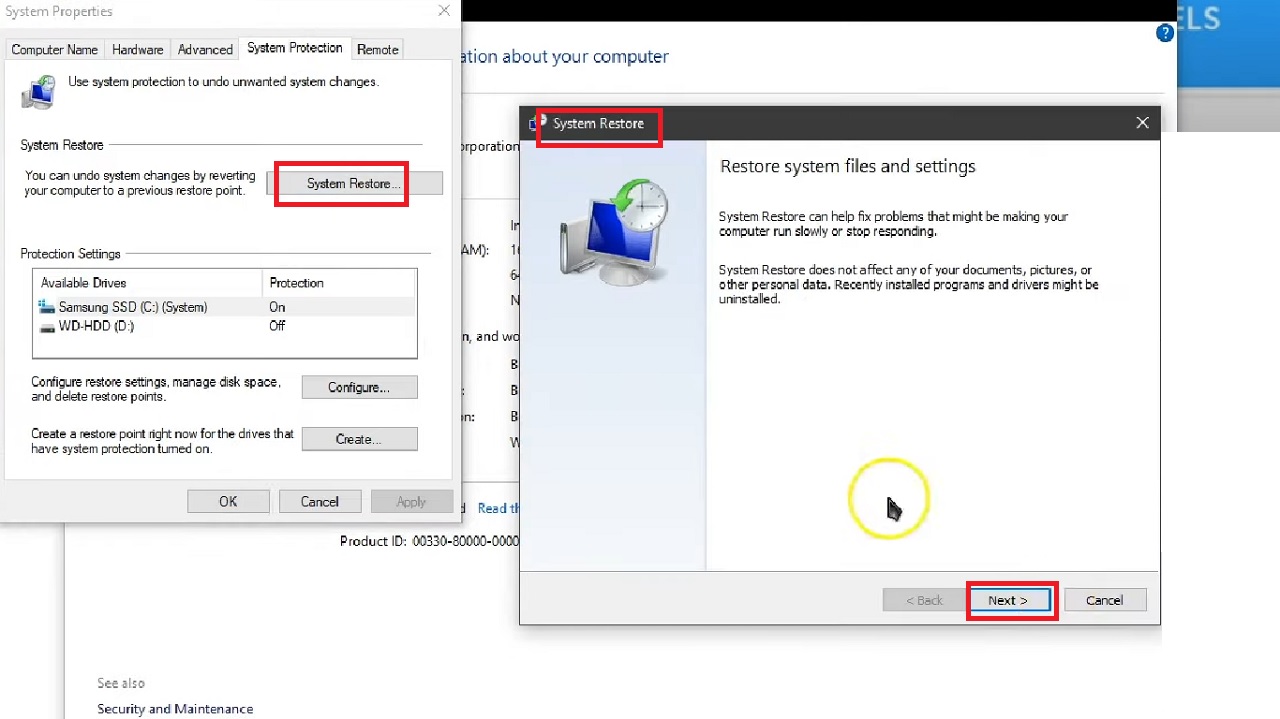
- Choose an earlier restore point from the following window.
- Click on the Next button below.
(At this point you can also click on the ‘Scan for affected programs’ button to make sure that you won’t lose any important data or personal file.)
- Finally, click on the Finish button and confirm your restore point.
Now, restart your PC and connect to the internet. The issue will be resolved.
Method 6: Restore Advanced Setting
Sometimes restoring advanced settings may resolve the issue of proxy settings not being detected by Windows.
STEPS TO FOLLOW:
- Type inetcpl.cpl in the search box and hit Enter.
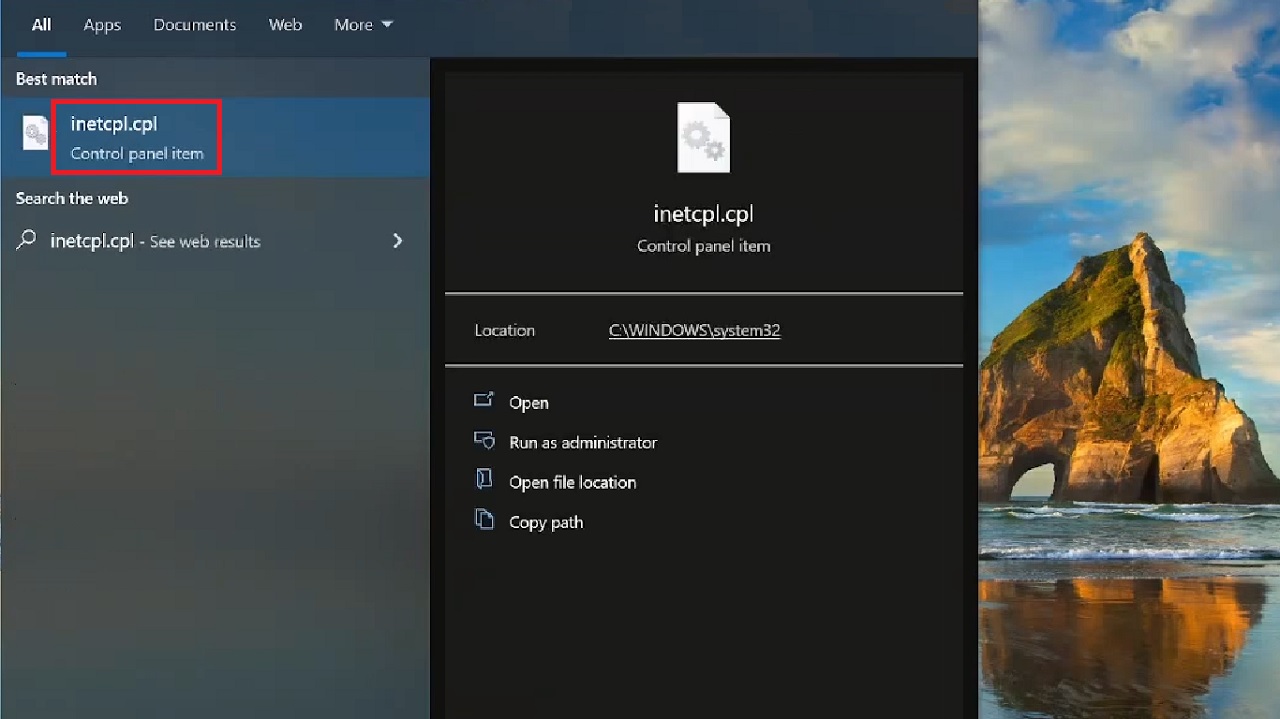
- In the Internet Properties window, go to the Advanced tab.
- Click on the Restore advanced settings button.
- Then click on the Apply button and then on the OK button.
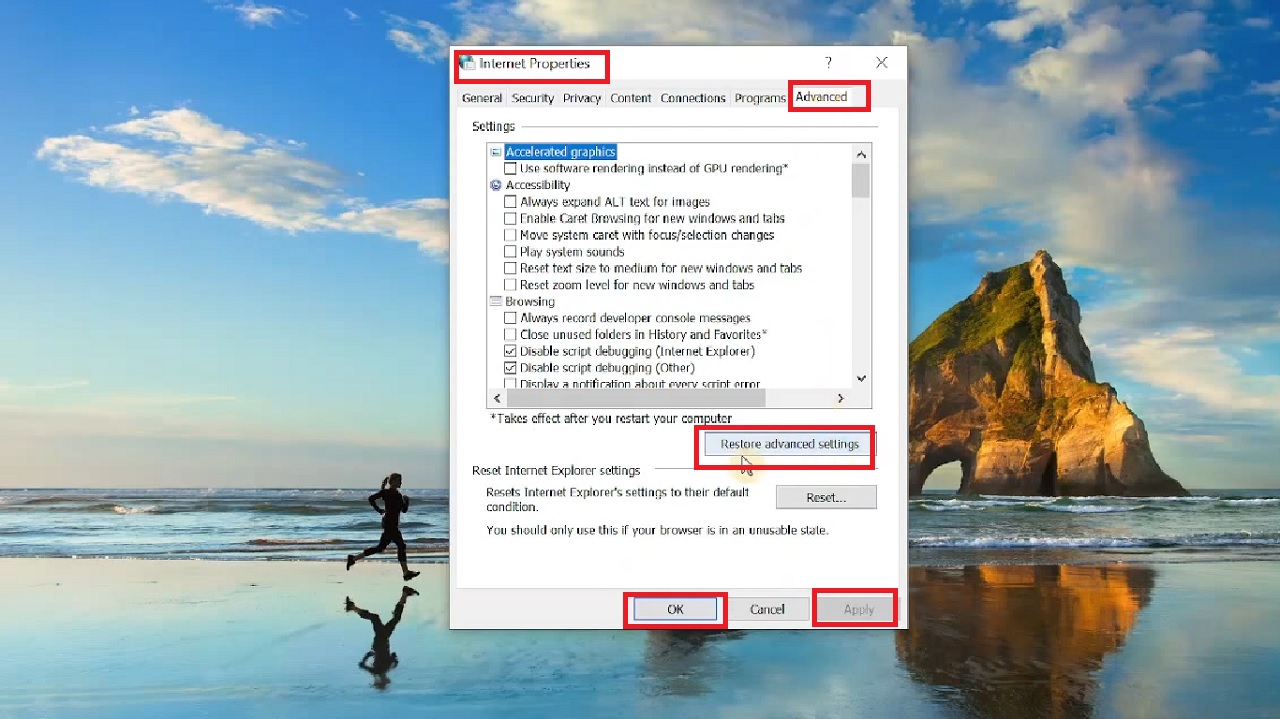
Restart your computer to check whether the issue has been resolved.
Conclusion
All these fixes are tried and tested and will help Windows detect the proxy settings on your PC if it ever fails to do so.
Try them when your computer encounters this specific error.