
If your device connects to a Wi-Fi network constantly and automatically without your consent, it can be really worrying.
Your privacy, security, and control will be compromised over your internet connections.
This article however has got you covered. The simple guide will show you how exactly to stop your device from automatically connecting to Wi-Fi networks in just a few simple steps.
In This Article
KEY TAKEAWAYS
- Remove the credentials of the network from the Wi-Fi settings of your device by forgetting it to stop automatic connections.
- Choose the connection order or network priority according to your preference.
- Disable the auto-join or auto-connect feature in specific networks to prevent automatic reconnection of the device.
- Switch your device to Airplane Mode to disable all wireless connections, including Wi-Fi.
- Use a Virtual Private Network (VPN) to prevent such susceptibility of connecting to a given network automatically and maintain your online privacy with proper encryption.
Why Do You Need to Stop Automatically Connecting to a Wi-Fi Network?
Usually, when your system connects to a Wi-Fi network automatically, you somewhat lose control over the credentials and other files. Stopping it will allow you to regain the lost control.
Stopping automatic connection to a Wi-Fi network will also help in preventing a few unwanted activities, such as:
- Easy access by other users to the same network
- The possibility of accessing the personal information and files of other connected users
- The hackers spreading malware easily through the system
A few other specific reasons to stop automatically connecting to Wi-Fi networks include ensuring the following:
- Privacy and safeguarding online activities from exposure on unsecured networks
- Better security of device and protection from malware attacks and hacking attempts
- No unnecessary usage of data plan resulting in higher unexpected charges
- Longer battery life for battery-powered devices
- Prioritizing faster and trusted networks over less secure and open ones
- Avoiding login to captive portals
- No accidental sharing of network credentials with unfamiliar networks
The ways to achieve it are pretty straightforward, as described below.
Ways to Stop Automatically Connecting to a Wi-Fi Network
The best way to stop automatically connecting to a Wi-Fi network is to forget it from the device settings.
You may also adjust network priority or connection order of the device so that it always connects to the first selected option.
If your device keeps connecting to Wi-Fi networks without your consent, you can regain control over your internet connections with these methods:
- Disable auto-join by turning the auto-connect feature off for specific networks if available
- Switch to airplane mode to disable all wireless connections temporarily
- Use a Virtual Private Network to ensure online privacy
Here are the steps to follow for some of the most effective methods.
Method 1: Make Changes in The Settings
You can disable the option of connecting automatically from the Settings app.
STEPS TO FOLLOW:
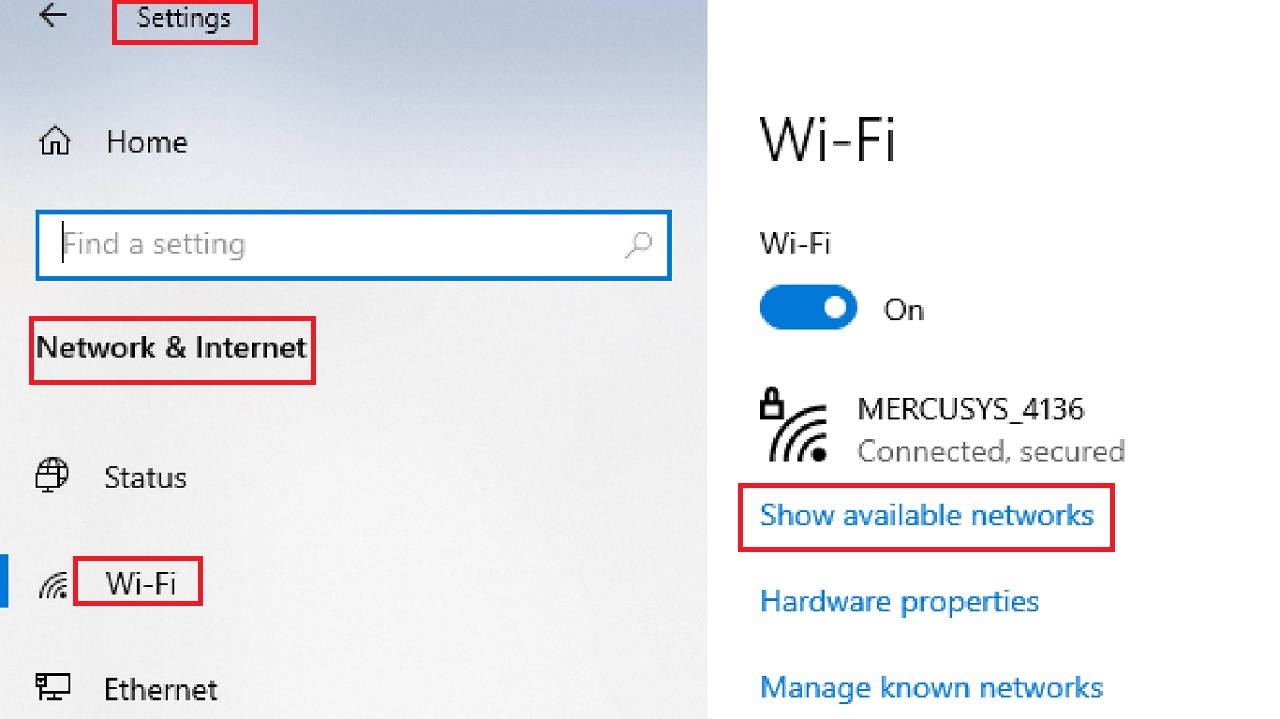
- Right-click on the Start Menu.
- Select Settings > Network & Internet > Wi-Fi.
- Click on Show available networks.
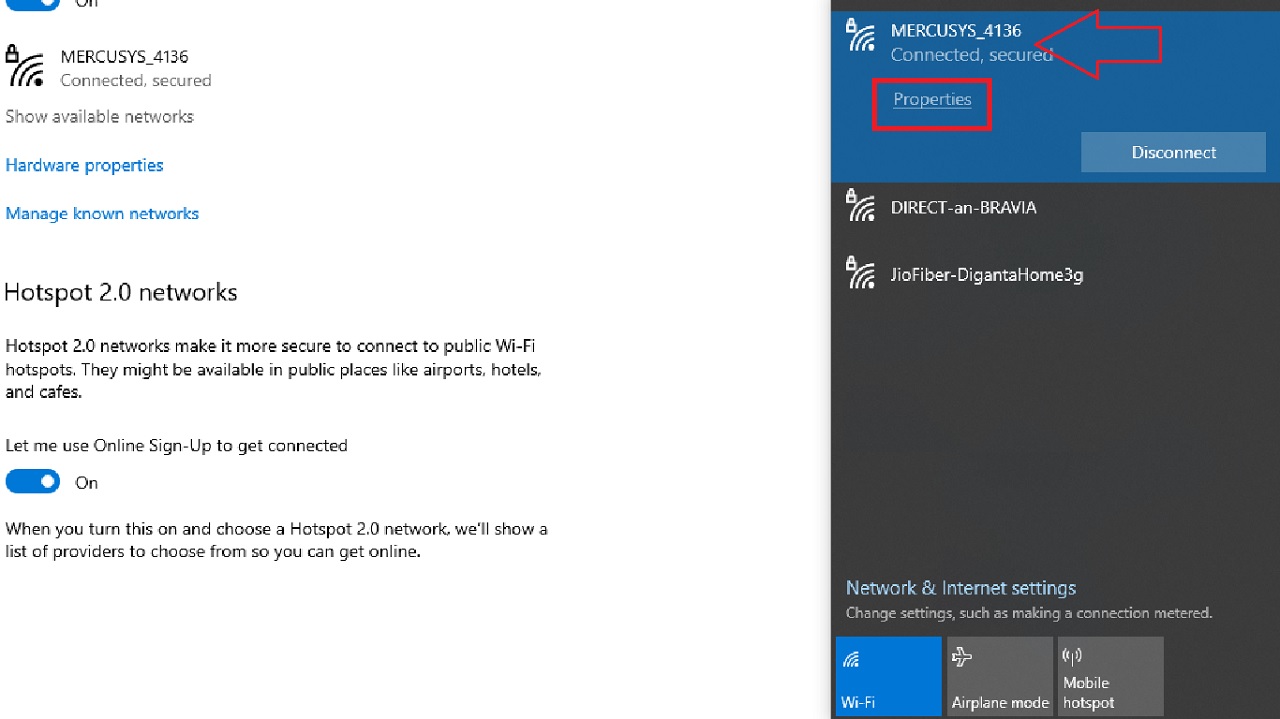
- Click on your internet connection. (MERCUSYS_4136 in this case).
- Click on Properties.
- Look for Connect automatically when in range button.
- Drag it to the left to turn it off, or uncheck the box, as the case may be.
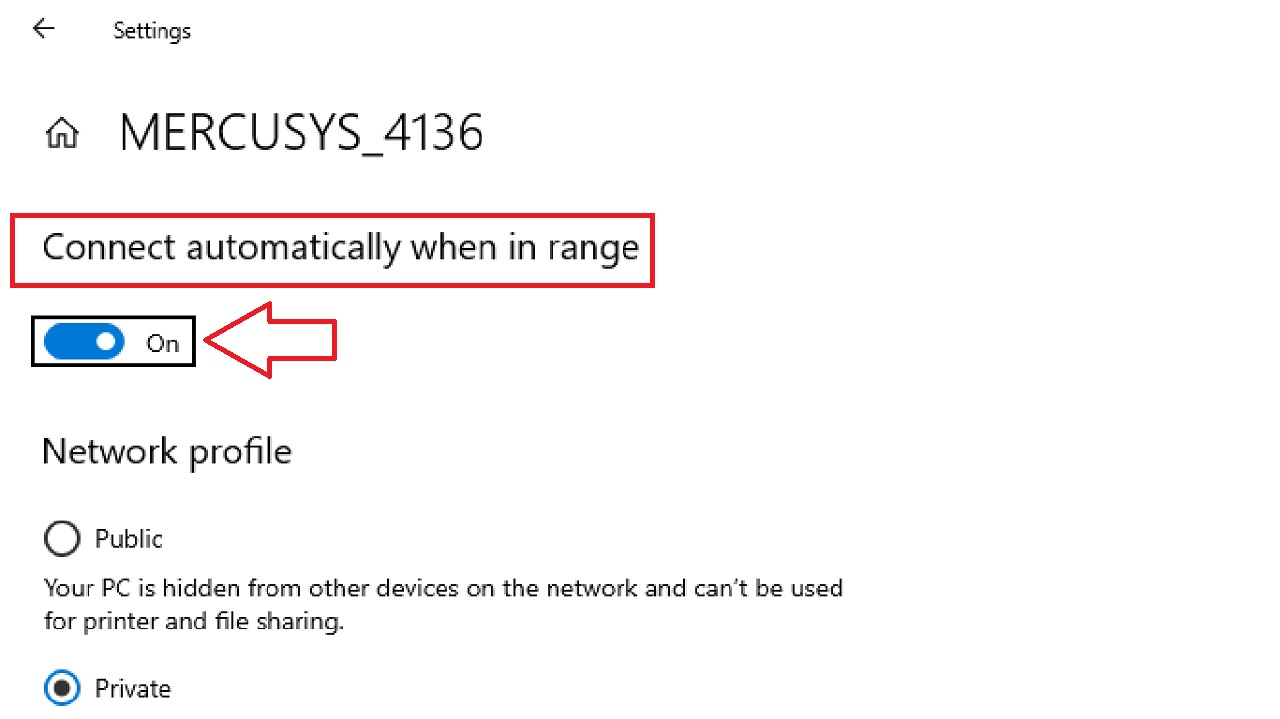
Note: The exact wording and location of this option may differ from the one in this demonstration depending on the operating system and the device you are using. So, check yours before you click on any option or button.
Method 2: Change through the Control Panel
You can also disable the automatically connecting feature from the Control Panel.
STEPS TO FOLLOW:
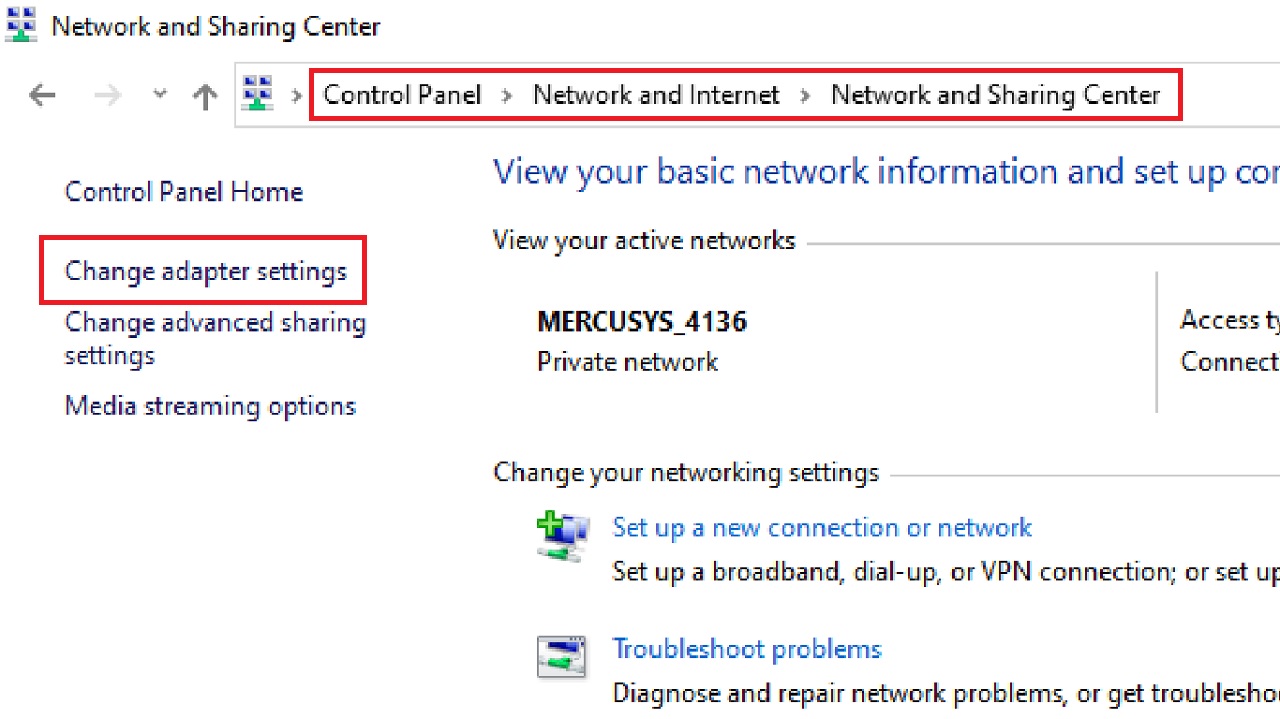
- Go to the search box next to the Start Menu.
- Type control panel and hit Enter.
- Select Network and Internet > Network and Sharing Center.
- Click on Change adapter settings on the left pane.
- Right-click on your Wi-Fi network connection.
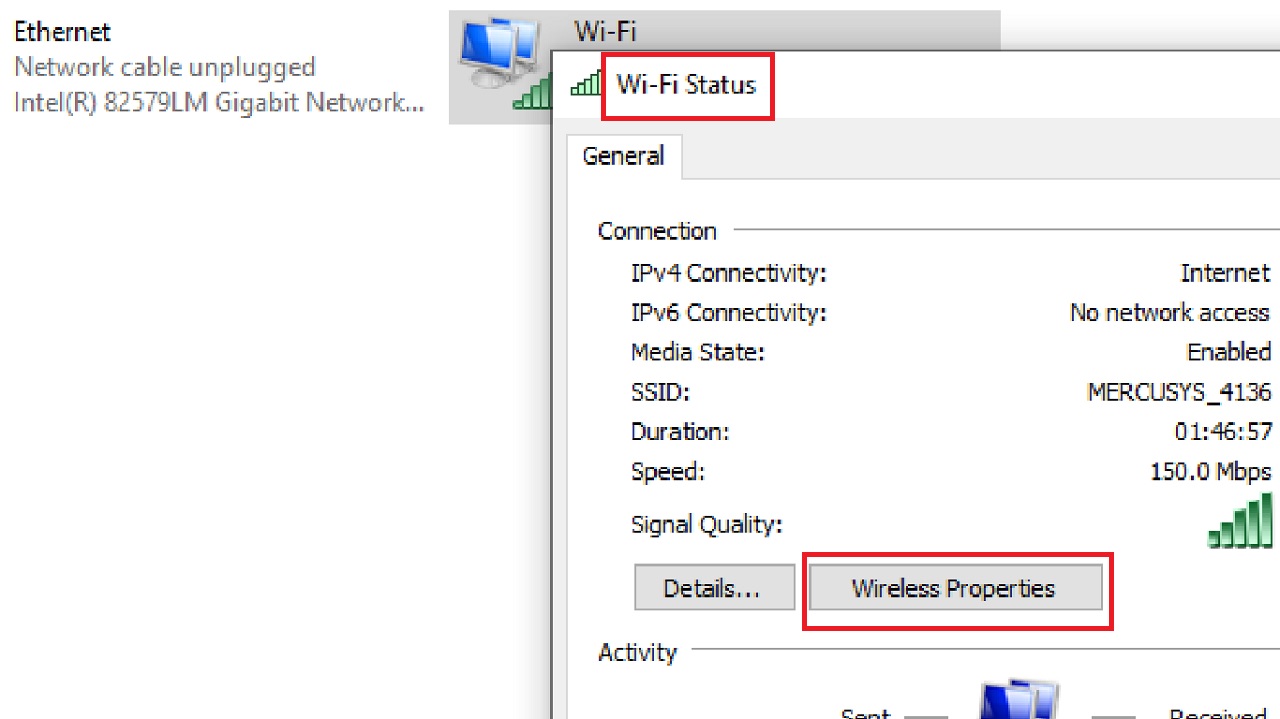
- Select Status from the drop-down option to open the Wi-Fi Status window.
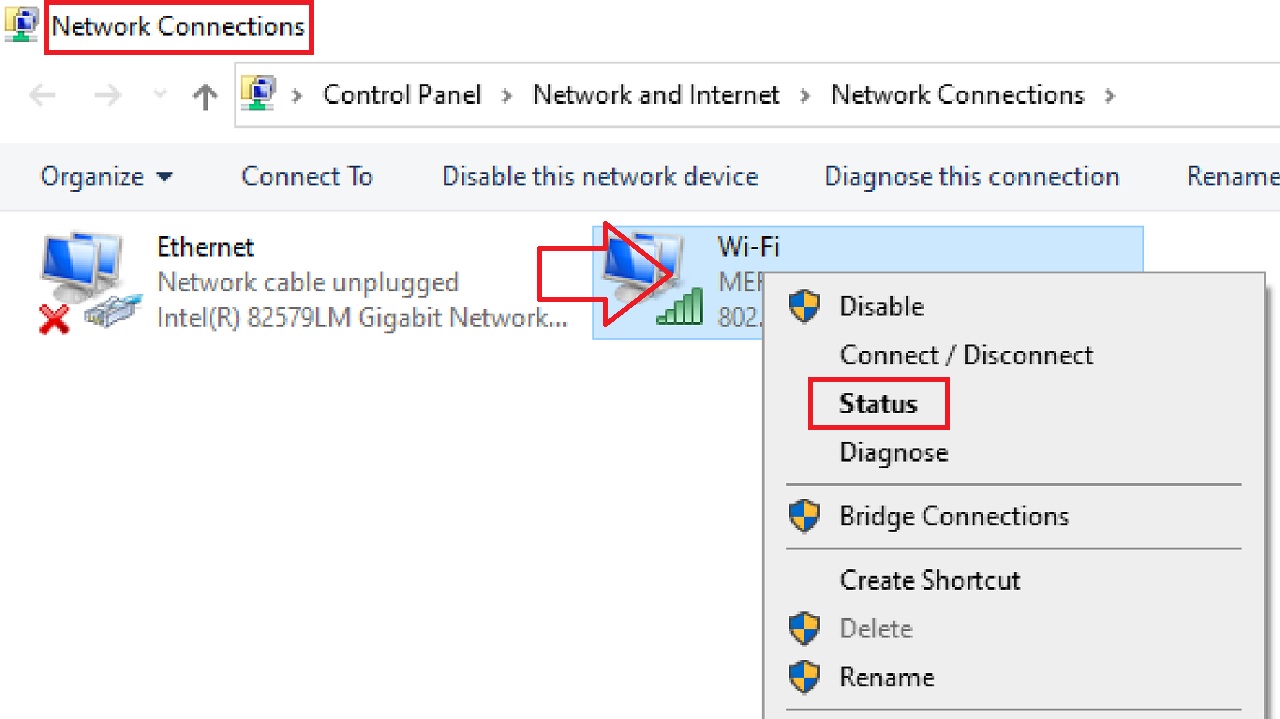
Alternatively, you may also double-click on your Wi-Fi network for quicker access.
- Click on the Wireless Properties button.
- Uncheck the box in the following window next to Connect automatically when this network is in range in the Connection tab.
- Click on the OK button.
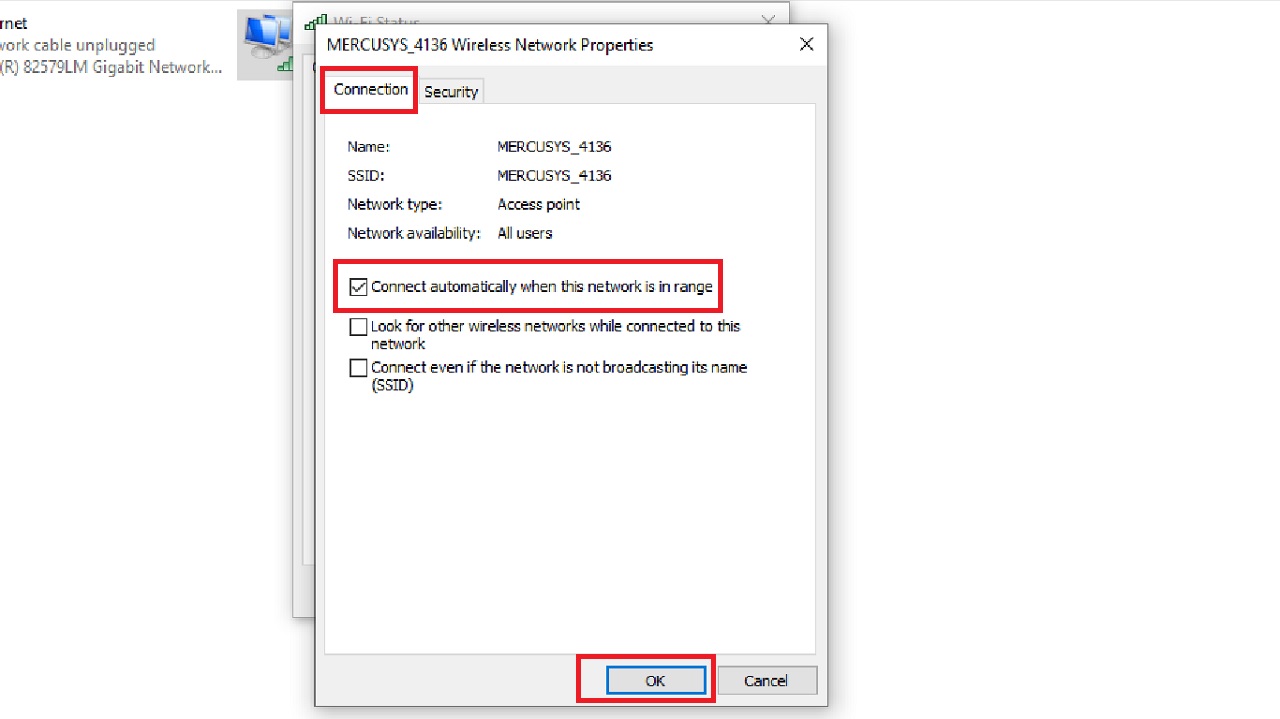
Close all windows.
Method 3: Remove the Unwanted Network Connection
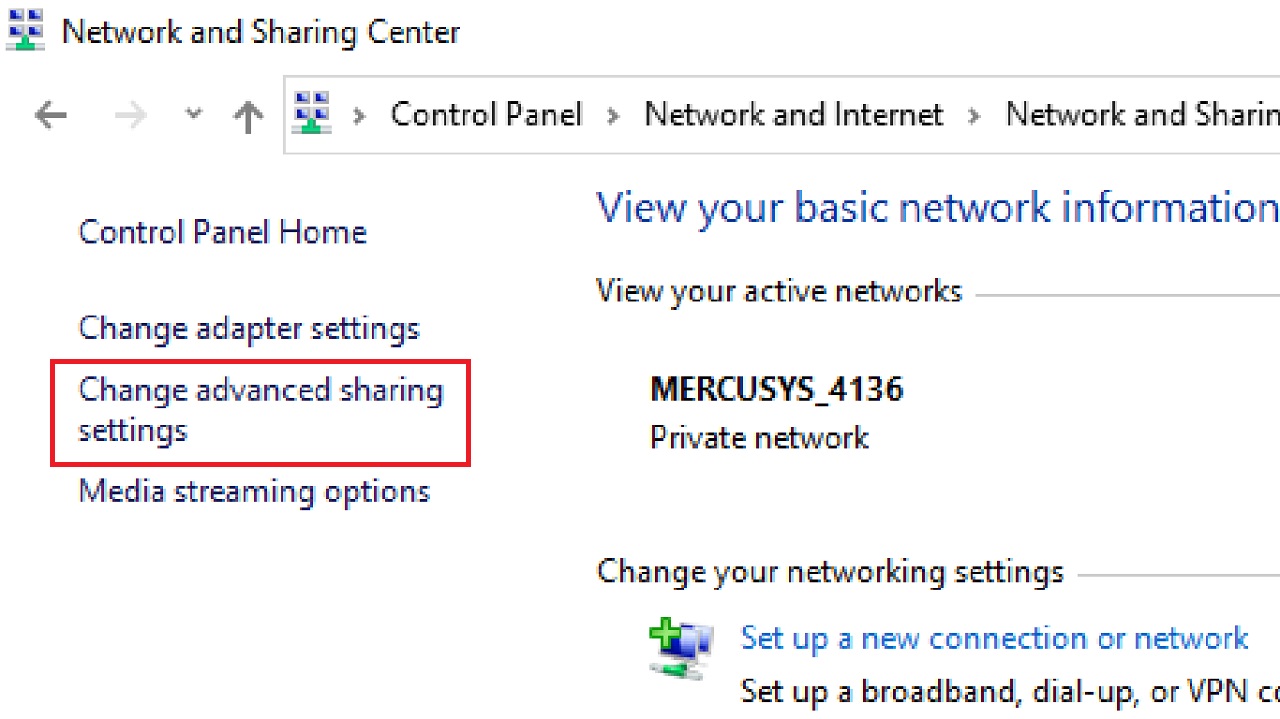
You may also remove the network connection your system is getting connected to automatically if you do now want it. You can do it from the Control Panel.
STEPS TO FOLLOW:
- Open the Network and Sharing Center as before in the Control Panel.
- This time click on the Change advanced sharing settings.
- In the following window expand Private (current profile) by clicking on the arrow on the right.
- Untick the box next to ‘Turn on automatic setup of network connected devices’ under Network discovery.
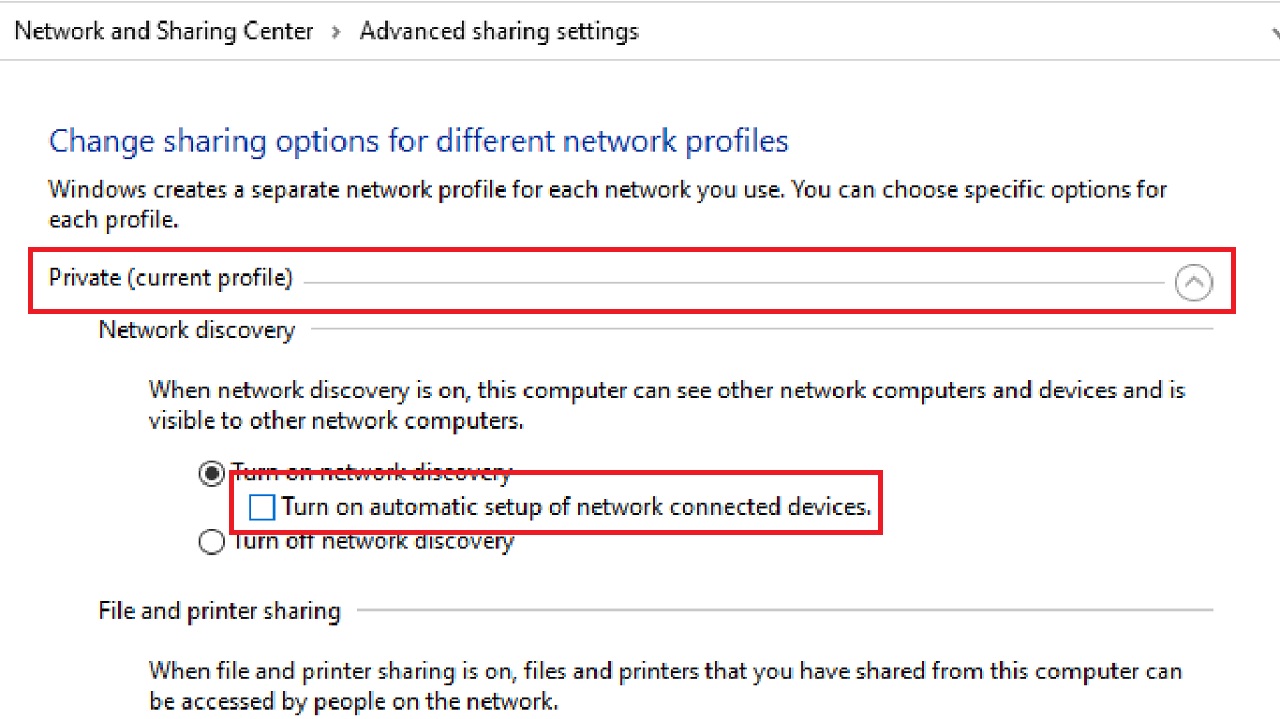
- Click on the Save changes button below (not shown in the picture).
- Close the window.
You can now remove any network connection by forgetting it from the Settings app. For that, go to the Start Menu > Settings > Network & Internet > Wi-Fi > Manage known networks.
Then click on the connection you want the system to remove and press the Forget button.
Method 4: From the Command Prompt
You may run netsh or Network Shell command in the Command Prompt to stop automatic connections of your system to the specific Wi-Fi network that you know.
STEPS TO FOLLOW:
- Type cmd in the search box > Right-click on the best match > Choose Run as administrator.
- Click on the Yes button on the User Account Control (UAC) prompt when it appears.
- Type the command netsh wlan show profiles in the Command Prompt window and press Enter.
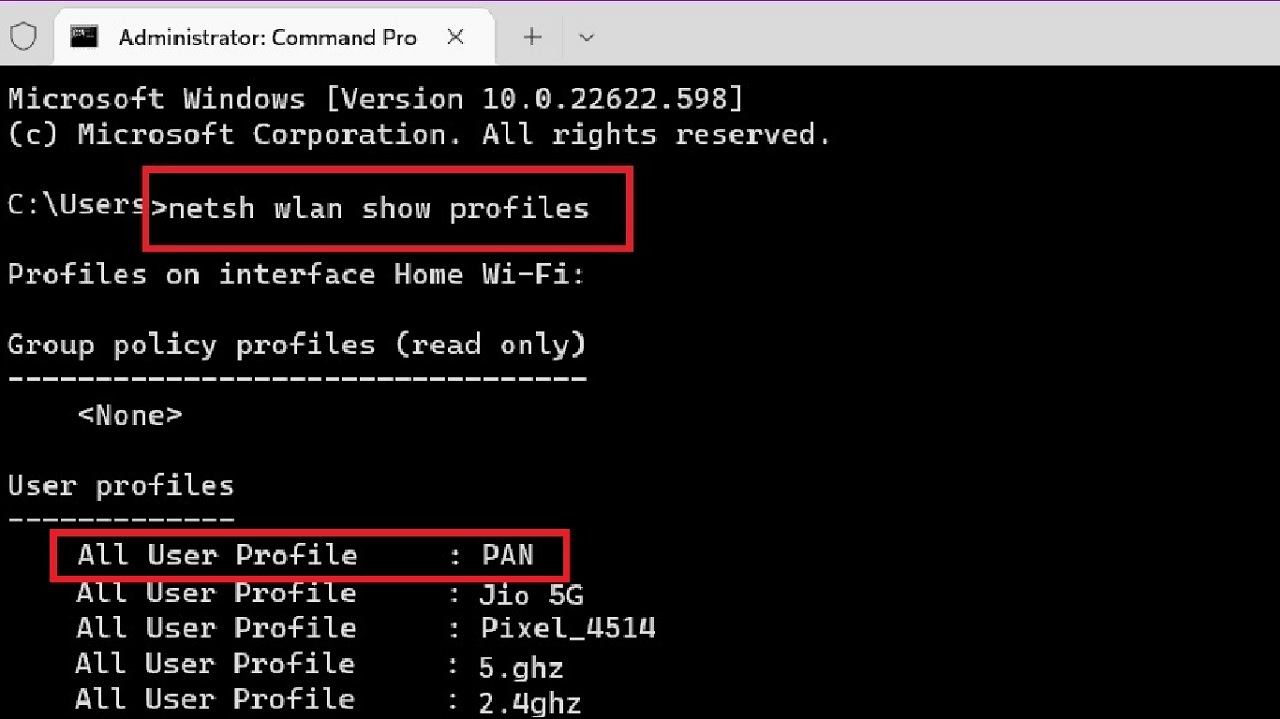
- Check the name of the network (PAN, in this case) for which you want to disable the automatic connection and note it down.
- To stop automatic connection, now type the command netsh wlan set profileparameter name=”PAN” connectionmode=manual and press Enter.
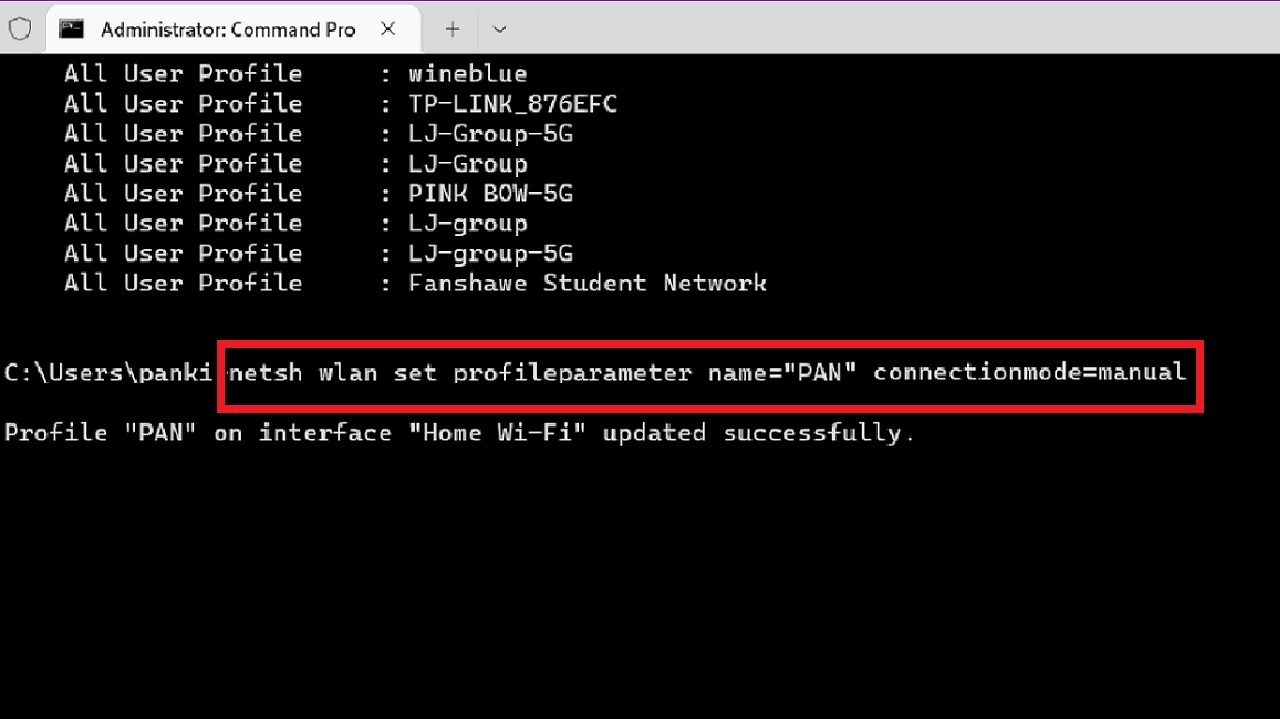
Replace “PAN” part in the given command with the actual name of your wireless network you found and noted in the last step.
To verify the changes from the profile settings, you can type the command netsh wlan show profile name=”ProfileName” and press Enter.
Once again, replace “ProfileName” with the name of your Wi-Fi network that you changed.
Now, your system will not connect to the selected Wi-Fi network automatically anymore.
Conclusion
With all these methods, you will find it easy to regain control of your internet connections and stop your device from connecting to a Wi-Fi network automatically. Happy browsing!