
You may encounter difficulties while connecting to your Windows PC’s 5 GHz Wi-Fi network at times.
You will not be able to utilize the high-speed potential of your network for seamless browsing, streaming, and gaming experiences.
Here are a few effective solutions that you can try below to tackle this common issue and restore your online connectivity.
In This Article
KEY TAKEAWAYS
- One easiest and most effective solution to being unable to connect to the 5 GHz Wi-Fi is updating the driver of the Wi-Fi adapter to avert compatibility issues.
- You may start fixing the issue of unable to connect to 5 GHz Wi-Fi on Windows by checking your router settings for 5 GHz network broadcasting, distinct SSID, and device compatibility.
- Sometimes, disabling the Allow the computer to turn off the device to save energy from Power Management of the network adapter may help.
- Running network troubleshooter on Windows can solve several network issues including this by diagnosing and fixing internal issues automatically.
- Resetting the TCP/IP stack by running a couple of commands in the Command Prompt may also clear and reset network configuration to fix the error.
Why Cannot You Connect to 5 GHz Wi-Fi in Windows?
One most common reason for you being unable to connect to 5 GHz Wi-Fi is that the network card installed in your system may not support this specific bandwidth.
Apart from that there may be several other factors that may contribute to this specific error, such as:
- Hardware issues or limitations
- Signal interference from other networks or devices
- Outdated network adapter driver
- Outdated Windows operating system or glitches in it
- Improper router settings
- Recent software update
- Change of Wi-Fi router
- Prioritization of device for automatic selection of 2.4 GHz network
- Power saving settings
- Improper network stack configuration
- Incorrect subnet or IP address settings
- Exceedingly stringent security software and firewall settings blocking network access
Fortunately, the solutions to this issue are quite simple and actionable, as explained below.
How to Fix Cannot Connect to 5 GHz Wi-Fi in Windows Error?
One easy and potential way to fix the issue of your PC not connecting to the 5 GHz Wi-Fi is to update the driver from the official website of the manufacturer.
Alternatively, you can also do it from the Device Manager by right-clicking on the network adapter and selecting the update driver and following the on-screen instructions after that.
If that does not help, you may try rolling back the driver to an earlier version and try connecting to the 5 GHz network.
However, before you start with the solutions, it is important to check a couple of things to ensure that your PC supports 5 GHz frequency.
Check compatibility:
Open Run by pressing Windows Logo key and R key together > Type cmd > Hit Enter > Type netsh wlan show drivers > Press Enter > Look for Radio types supported section.
Here 802.11n, g, and b indicates 2.4 GHz network capability only and if it shows all these along with 802.11a and ac, it indicates 5 GHz network capability as well.
Check router settings:
Next, check the router settings to ensure it is broadcasting the 5 GHz network and is not set to limited compatibility mode or to a hidden SSID.
Check signal interference:
Then check for signal interference from other electronic devices around the router or from neighboring networks that may impact your 5 GHz Wi-Fi connections. Remove the devices that you suspect.
Now that you have checked the compatibility and support, try some other useful ways that might resolve the error in specific situations. These include:
- Restart devices: Restart your PC or router by switching them off and turning on after some time to refresh network connections.
- Perform a network reset: Go to Settings from the Start Menu > Network & Internet > Status > Network reset under Advanced network settings > Click on the Reset now button.
- Update Windows: Go to Settings > Update & Security > Windows Update > Check for updates > Click Download if available > Click Install > Restart PC.
- Remove 2.4 GHz network connectivity: Go to Settings > Network & Internet > Wi-Fi > Click on Manage known networks > Find the 2.4 GHz network in the list > Click Forget > Connect to the 5 GHz Wi-Fi band.
Now, if the above simple solutions fail, try fixing the issue by following a few relatively complex solutions as mentioned hereunder.
Note: For all fixes, it is necessary that the network card in your PC supports this particular frequency.
Also note that all these fixes may not be effective under all situations and settings. So, success is not guaranteed for each of these solutions. You will be better off if you try a couple of them if one does not resolve the issue.
If nothing helps, seek professional help or contact your network service provider.
Method 1: Change the Preferred Band
You can change the preferred band by accessing the properties of the network adapter from the Device Manager to access 5 GHz Wi-Fi. Along with making a few other changes in the network properties.
STEPS TO FOLLOW:
- Go to the Start Menu.
- Right-click on it.
- Select the Device Manager option from the pop-up list.
(Alternatively, press the Windows and R Keys on your keyboard > Type devmgmt.msc in the Run dialog box > Hit Enter).
- Click on the small arrow next to Network adapters in the Device Manager window to expand it.
- Select your network adapter and double-click on it to open its Properties.
- Go to the Advanced tab in the following window.
- From the list in the box under Property, select Preferred Band.
- Go to the box under Value.
- Click on the small arrow on its right side.
- Select Prefer 5GHz band option from the dropdown context menu. (This option may also be marked as 5G first after a serial number).

Additionally, you will need to find and change the Wireless Mode to Auto in the same process. If you have 5G Wireless Mode specifically, IEEE 802.11a/n/ac/ax option, and for 2.4G Wireless Mode, select IEEE 802.11b/g/n/ax option.
Now finally, click on the OK button (not shown in the picture) to save the changes and close the window.
You are all set now. Restart your PC and check whether you can connect to the 5 GHz Wi-Fi or not. If you cannot connect, then move on to the next step.
Method 2: Disable and Re-enable Network Adapter
In some cases, simply disabling and reenabling the network adapter can resolve this issue.
STEPS TO FOLLOW:
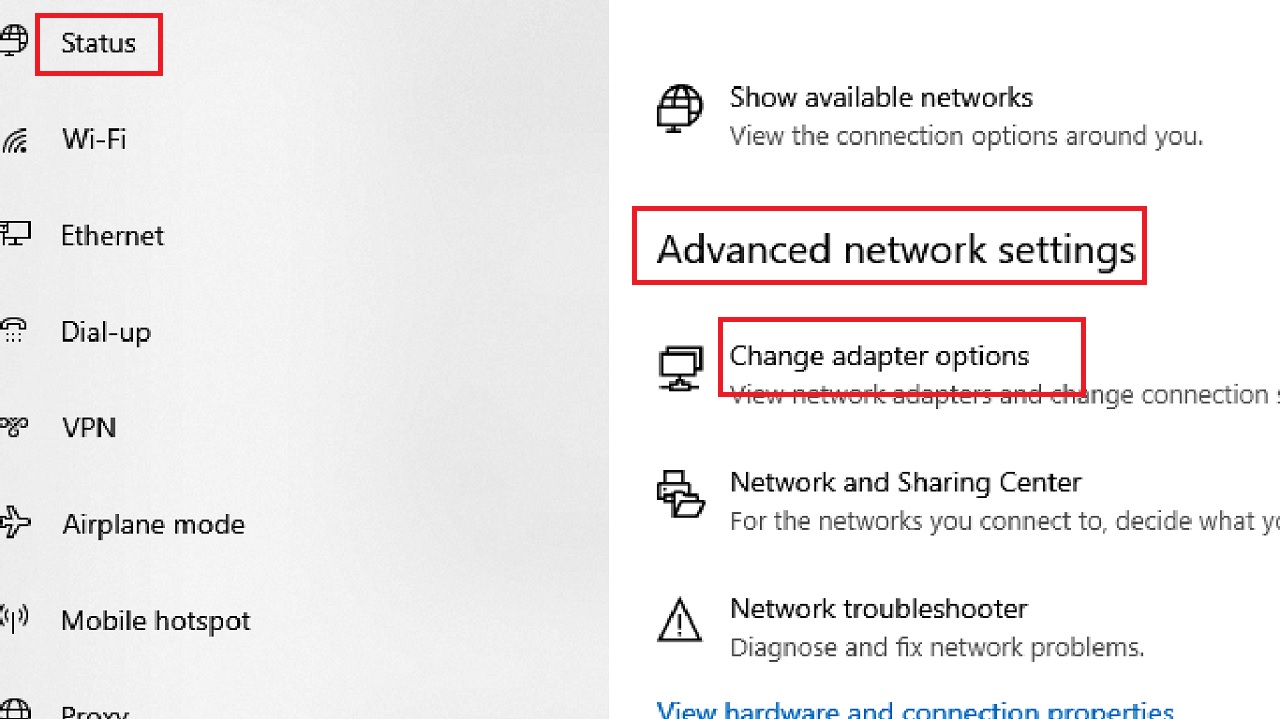
- Go to the Settings app > Select Network & Internet > Status.
- Under Advanced network settings, select Change adapter options.
- Right-click on Wi-Fi in the following Network Connections window.
- Click on the Disable option from the dropdown context menu.
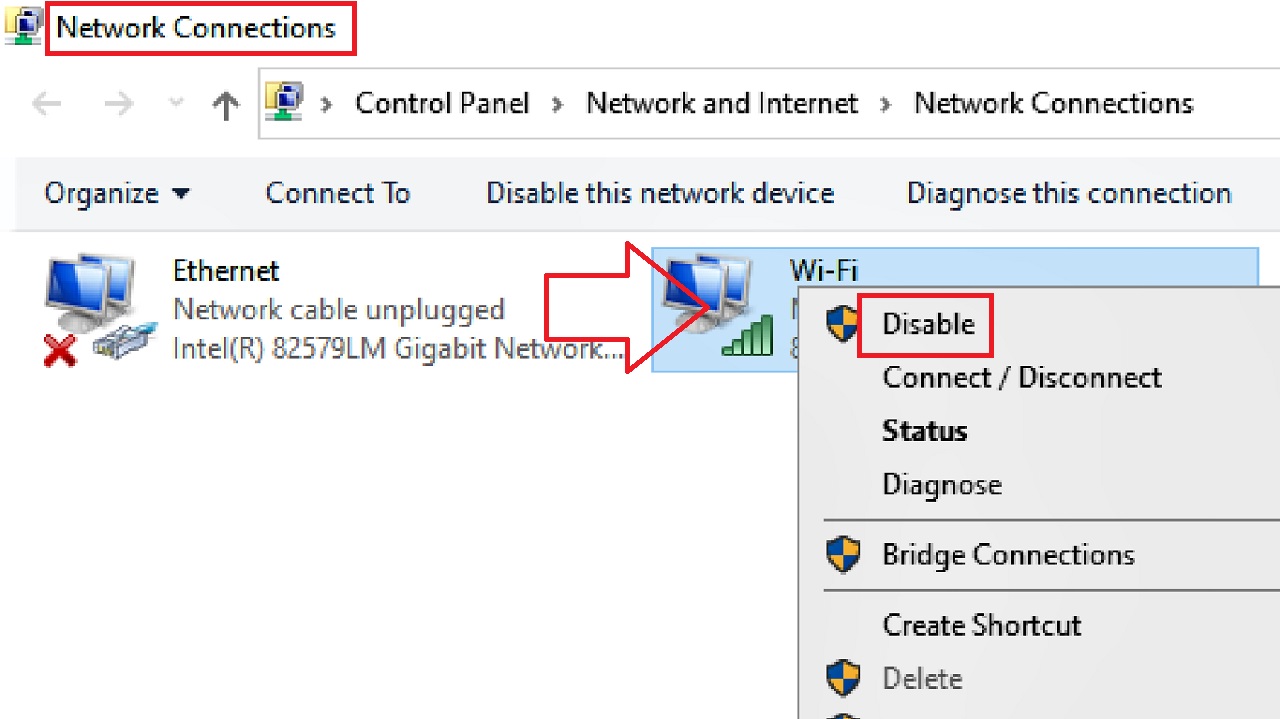
- Wait a few seconds and right-click on Wi-Fi again.
- Click on the Enable option to re-enable the network adapter.
Now, check if the issue is resolved. If it is still there, follow the next solution.
Method 3: Run Network Adapter Troubleshooter
Sometimes, the issue might be resolved by running the network adapter troubleshooter. It will scan the PC for any issues and fix them automatically, if possible, that might be affecting the connection.
STEPS TO FOLLOW:
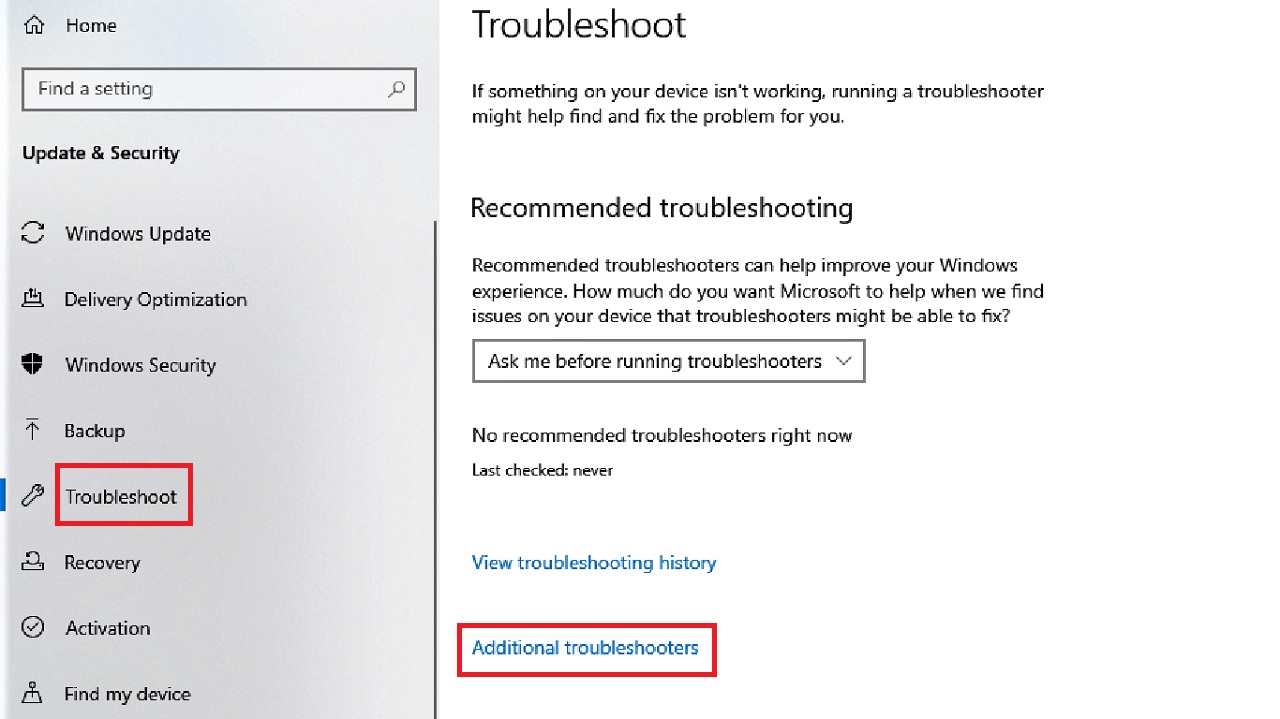
- Go to Settings > Update & Security > Troubleshoot.
- Click on Additional troubleshooters from the right side.
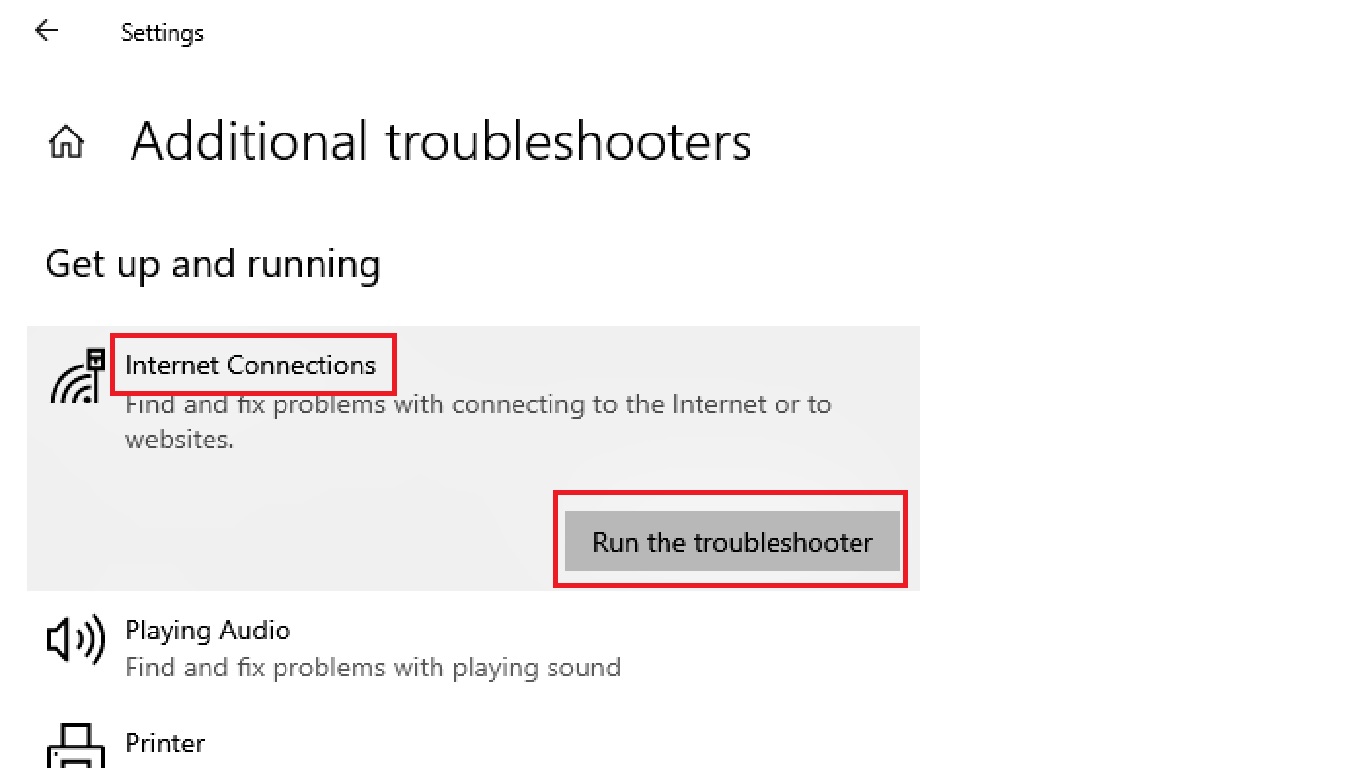
- Locate Internet Connections and click on it.
- Click on Run the troubleshooter.
- Follow the on-screen instructions.
Do the same for running the troubleshooter for the network adapter in the same window.
After that, check whether you can connect to the 5 GHz frequency band of the Wi-Fi network. If you cannot, follow the next step.
Method 4: Reset the Transmission Control Protocol and Internet Protocol
Often resetting the Transmission Control Protocol and Internet Protocol, or TCP/IP, can help in resolving the issue of unable to connect to your 5 GHz Wi-Fi network.
STEPS TO FOLLOW:
- Open the Command Prompt as an administrator.
- Click on the User Account Control Window.
Now, in the Command Prompt window, type the command following commands and press Enter after each is execute completely:
- netsh winsock reset
- netsh int ip reset
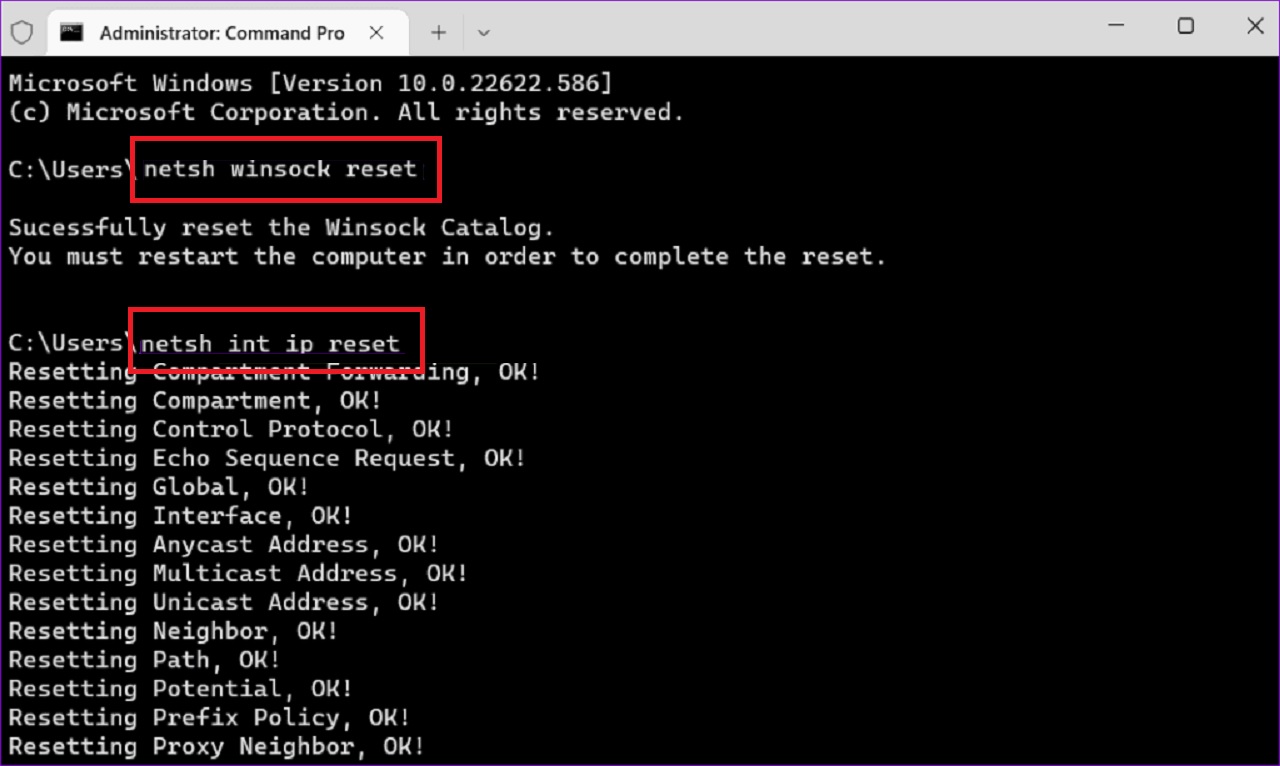
Now, restart your computer and you will now be able to connect to the 5 GHz network once it restarts.
Method 5: Change the Power Management Settings
Sometimes, Windows may turn off the network adapter to save power, which is why you may experience this issue. You can prevent this easily by making changes in the Power Management settings.
STEPS TO FOLLOW:
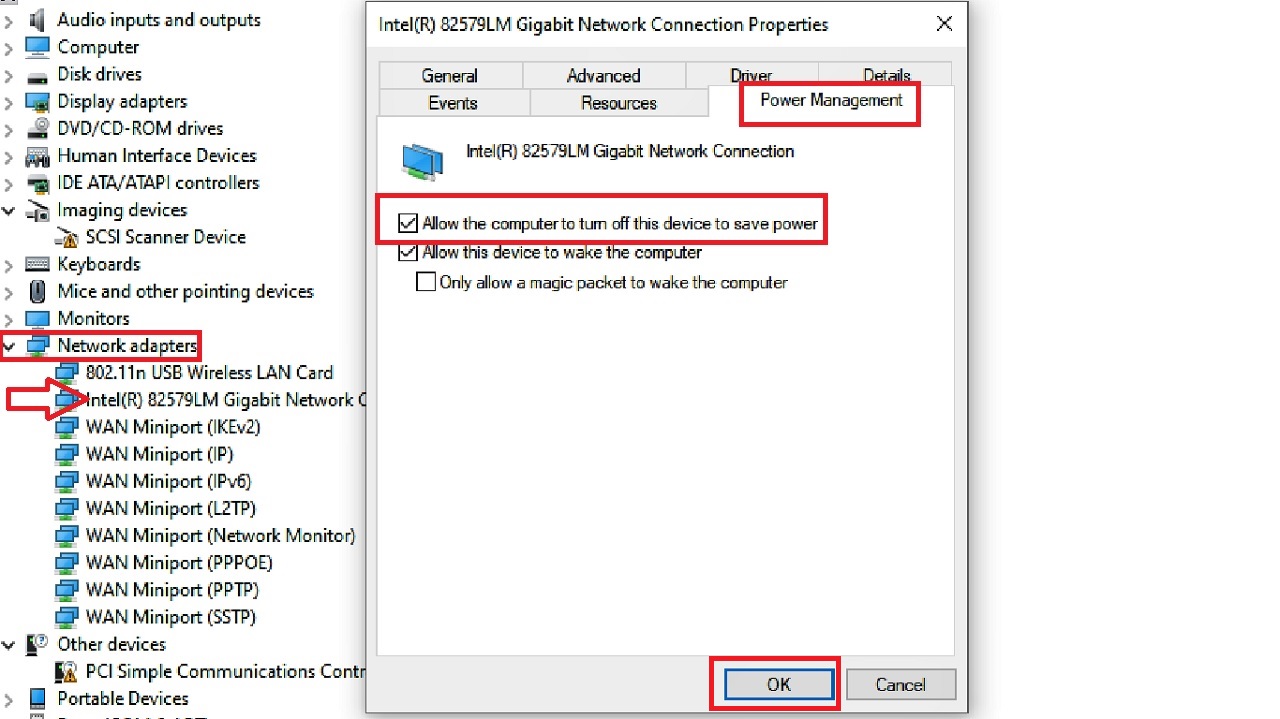
- Go to Device Manager and to your network adapter Properties as you did in Method 1.
- Go to the Power Management tab.
- Uncheck the small box next to Allow the computer to turn off this device to save power.
- Click on the OK button to save the change.
Reconnect and check whether the issue is resolved. If it still persists, move on to the next solution.
Method 6: Perform a System Restore
Sometimes, the settings may be messed up due to recent changes made in the computer. In that case, you may face this issue. Restoring the system to an earlier date might resolve the error by reverting the current settings..
STEPS TO FOLLOW:
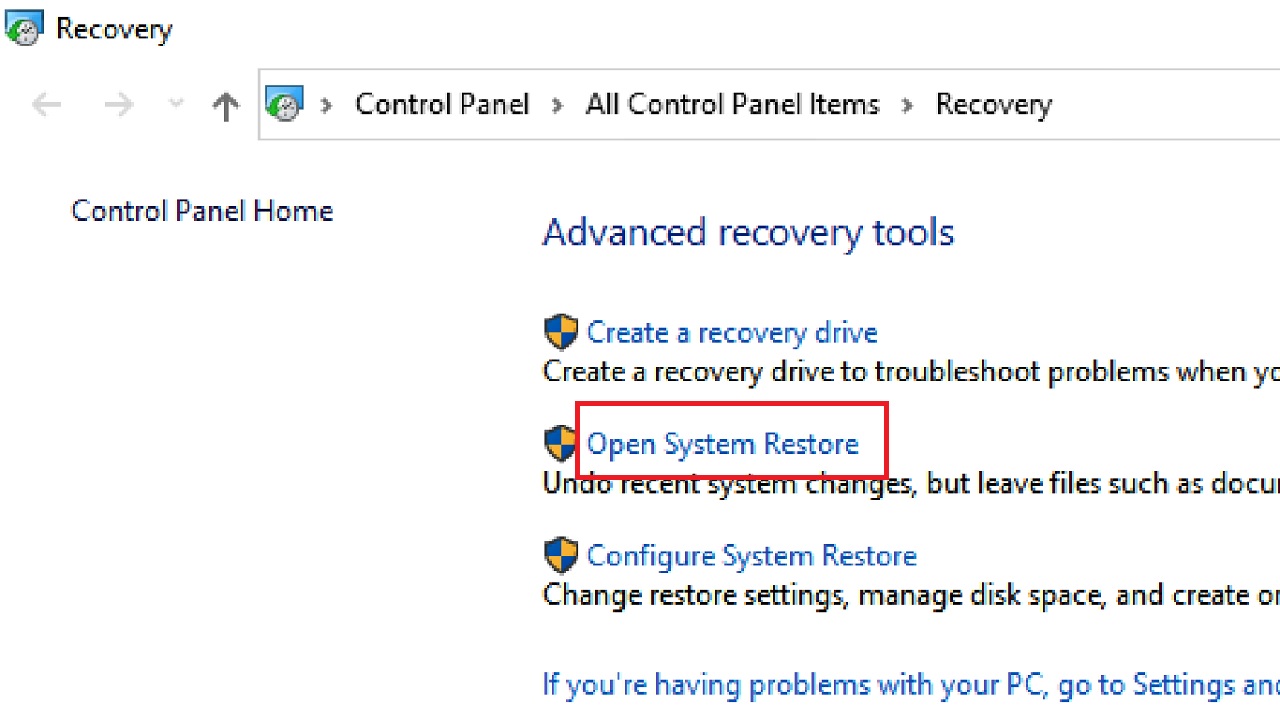
Press the Windows and S keys on your keyboard together to open the search window.
- In the search box, type system restore.
- Hit the Enter button on your keyboard.
- In the following window, click on the Open System Restore option.
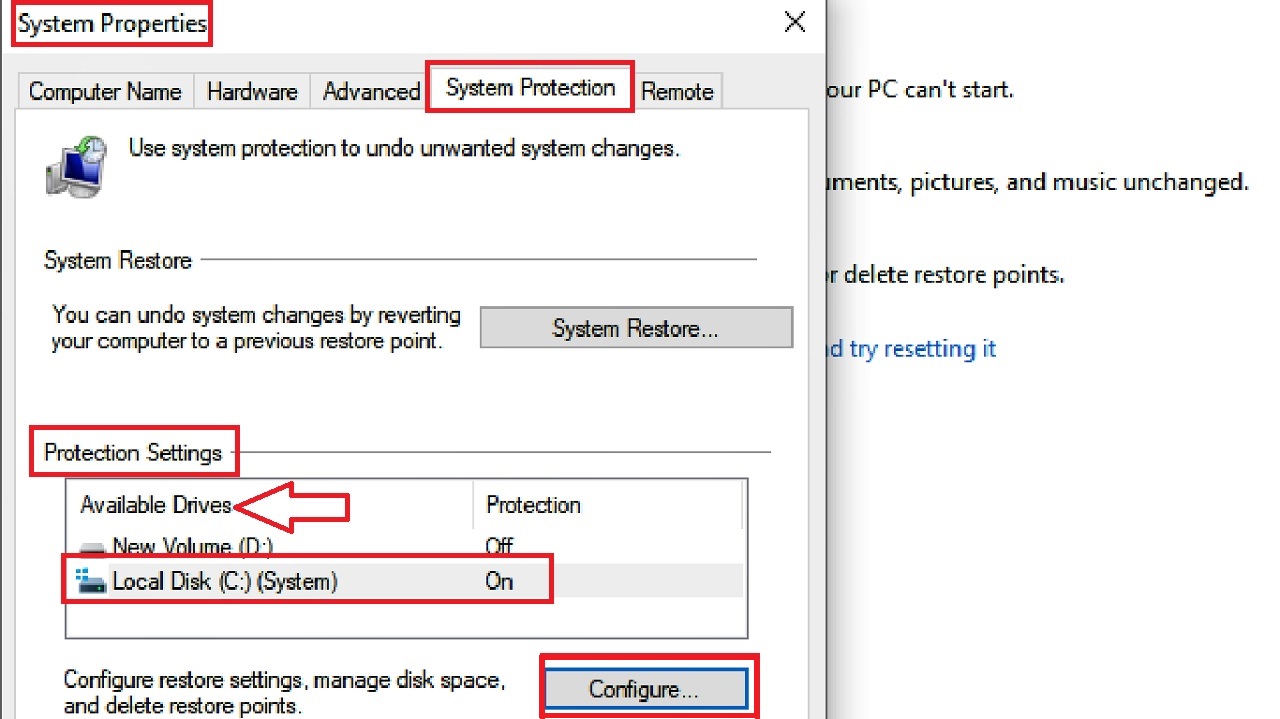
If it does not, you will need to enable the system protection in the following way:
- Click on system protection if you need to create a restore point or turn on system protection.

- Select the drive where the operating system resides from the Available Drives displayed in the box under Protection Settings under the System Protection tab in the System Properties window. It is the Local Disk (C:) (System) in this case.
- Click on the Configure button.
- Click on Apply, and then click the OK button.
- Now, when the System Restore wizard opens, select a restore point you want.
- Click on Next.
- Click on Finish.
The system will restart to begin the restoration process. Once it is done, now check if you can connect to your 5 GHz Wi-Fi band. If it could not resolve the issue, move on to the next step..
Method 7: Remove Recent Windows Update
Any recent Windows updates may cause this issue along with others due to bugs or compatibility issues introduced which are affecting connectivity.
Note: Consider this option as your last resort. Exercise caution during the process and monitor your system after removing the updates. Also, ensure you reinstall them as soon as possible, especially if they are related to system security.
STEPS TO FOLLOW:
- Go to Windows Settings > Update & Security > Windows Update.
- In this page, look for View Update History on the right side.
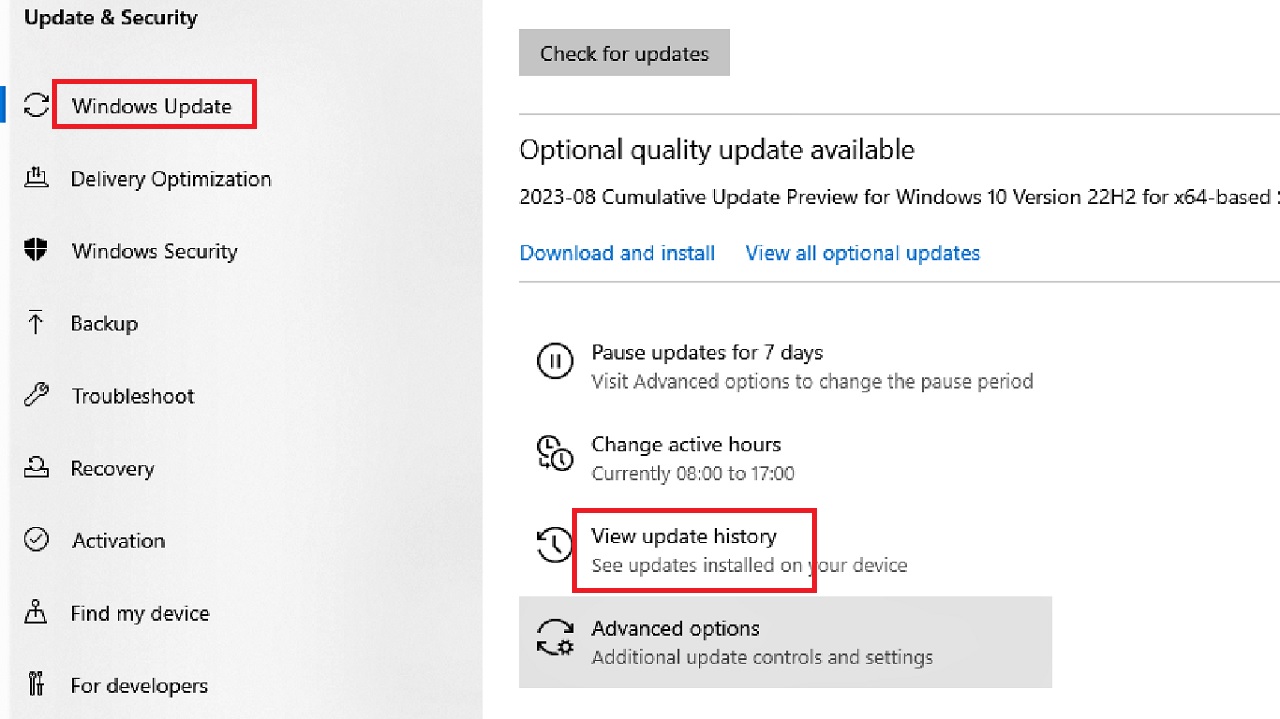
- Select Uninstall updates in the next window under View update history.
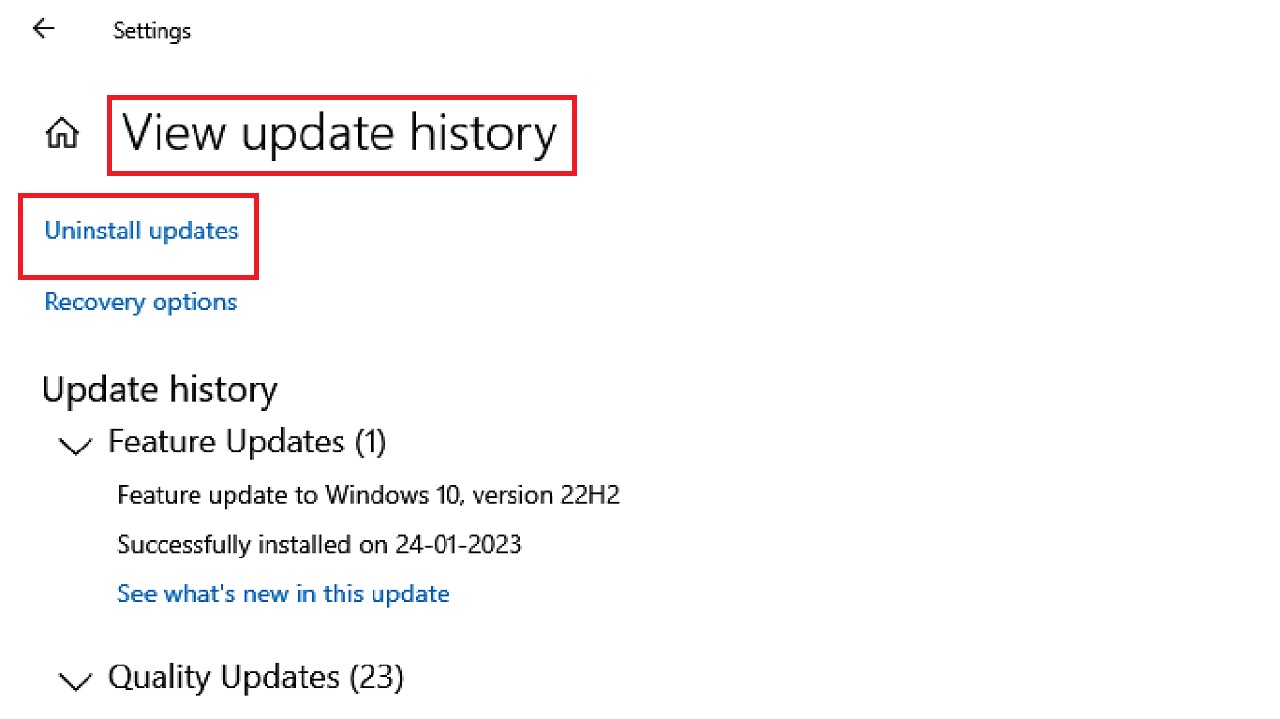
This will open the Installed Updates page. Alternatively, you can also reach this page from the Control Panel > Programs > Programs and Features.
- In the Installed Updates page, locate the recent updates causing the issue.
- Right-click on each.
- Select Uninstall.
- Follow the on-screen instructions.
After uninstalling the updates, restart your PC to see if the error has been resolved or not.
Conclusion
These solutions offer active ways to tackle the Cannot Connect to 5 GHz Wi-Fi in Windows error.
While a few of these solutions may not apply to all scenarios, exploring these steps will allow you to restore seamless connectivity.
Seek professional help if needed for best results.