
Wi-Fi wireless capability being turned off is a common and frustrating issue, but it can be resolved with ease.
In this article, we will provide clear solutions to help you restore your Wi-Fi functionality.
In This Article
KEY TAKEAWAYS
- Check the physical hardware switch to ensure it’s in the ‘On’ position.
- Power cycle or restart your router by unplugging and plugging it back in.
- Enable Wi-Fi using function key shortcuts like F2 or F12.
- Run the network troubleshooter on your operating system.
- Update or reinstall Wi-Fi drivers from the manufacturer’s website or Device Manager.
Why is Wi-Fi Wireless Capability Turned Off?
More often than not, the physical Wi-Fi hardware button on the device is switched off which causes this issue.
There are also a few other specific reasons for the Wi-Fi wireless capability being turned off, such as:
- Accidental pressing of the function key shortcut
- Corrupt, outdated, or missing Wi-Fi drivers
- Improper power-saving settings
- Flight or Airplane mode activation
- Improper software or OS settings
- Conflicting third-party software
- Network adapter issues
- Firewall or security software interference
- Existing malware or viruses
- Hardware malfunctions
Regardless of the cause, simple troubleshooting can help resolve the issue. If not, follow these methods.
Ways to Fix Wi-Fi Wireless Capability Turned Off
Start fixing the issue of the Wi-Fi capability being turned off issue by checking the hardware switch. It might be set to the ‘Off’ position. If it is, then change it to the ‘On’ position.
If that did not work, here are a few other solutions you may try to resolve the issue:
- Use function key shortcuts to enable Wi-Fi
- Run the network troubleshooter
- Update or reinstall Wi-Fi drivers
- Adjust power management settings
- Restart your router by power cycling it
- Disable Airplane or Flight mode
- Check system settings and make adjustments
- Inspect the network adapter
- Resolve system or software errors
- Adjust or temporarily remove firewall or security software
- Scan for and remove malware or viruses
- Check the physical integrity of Wi-Fi hardware
Here are the steps to follow for a few specific solutions to resolve the Wi-Fi wireless capability turned off issue.
Note: Specific steps may vary, so consult your device documentation if needed. So, exercise caution while performing the steps and refer to your device documentation or manual to be safe and sure.
If none of these solutions work, seek professional technical support.
Method 1: Press the Function Key Shortcut
You may have accidentally pressed the function key shortcut if it has one, which might have disabled the Wi-Fi connectivity. Press it again to enable it.
STEPS TO FOLLOW:
- Look for the following function keys, or anything similar to it, on your keyboard:
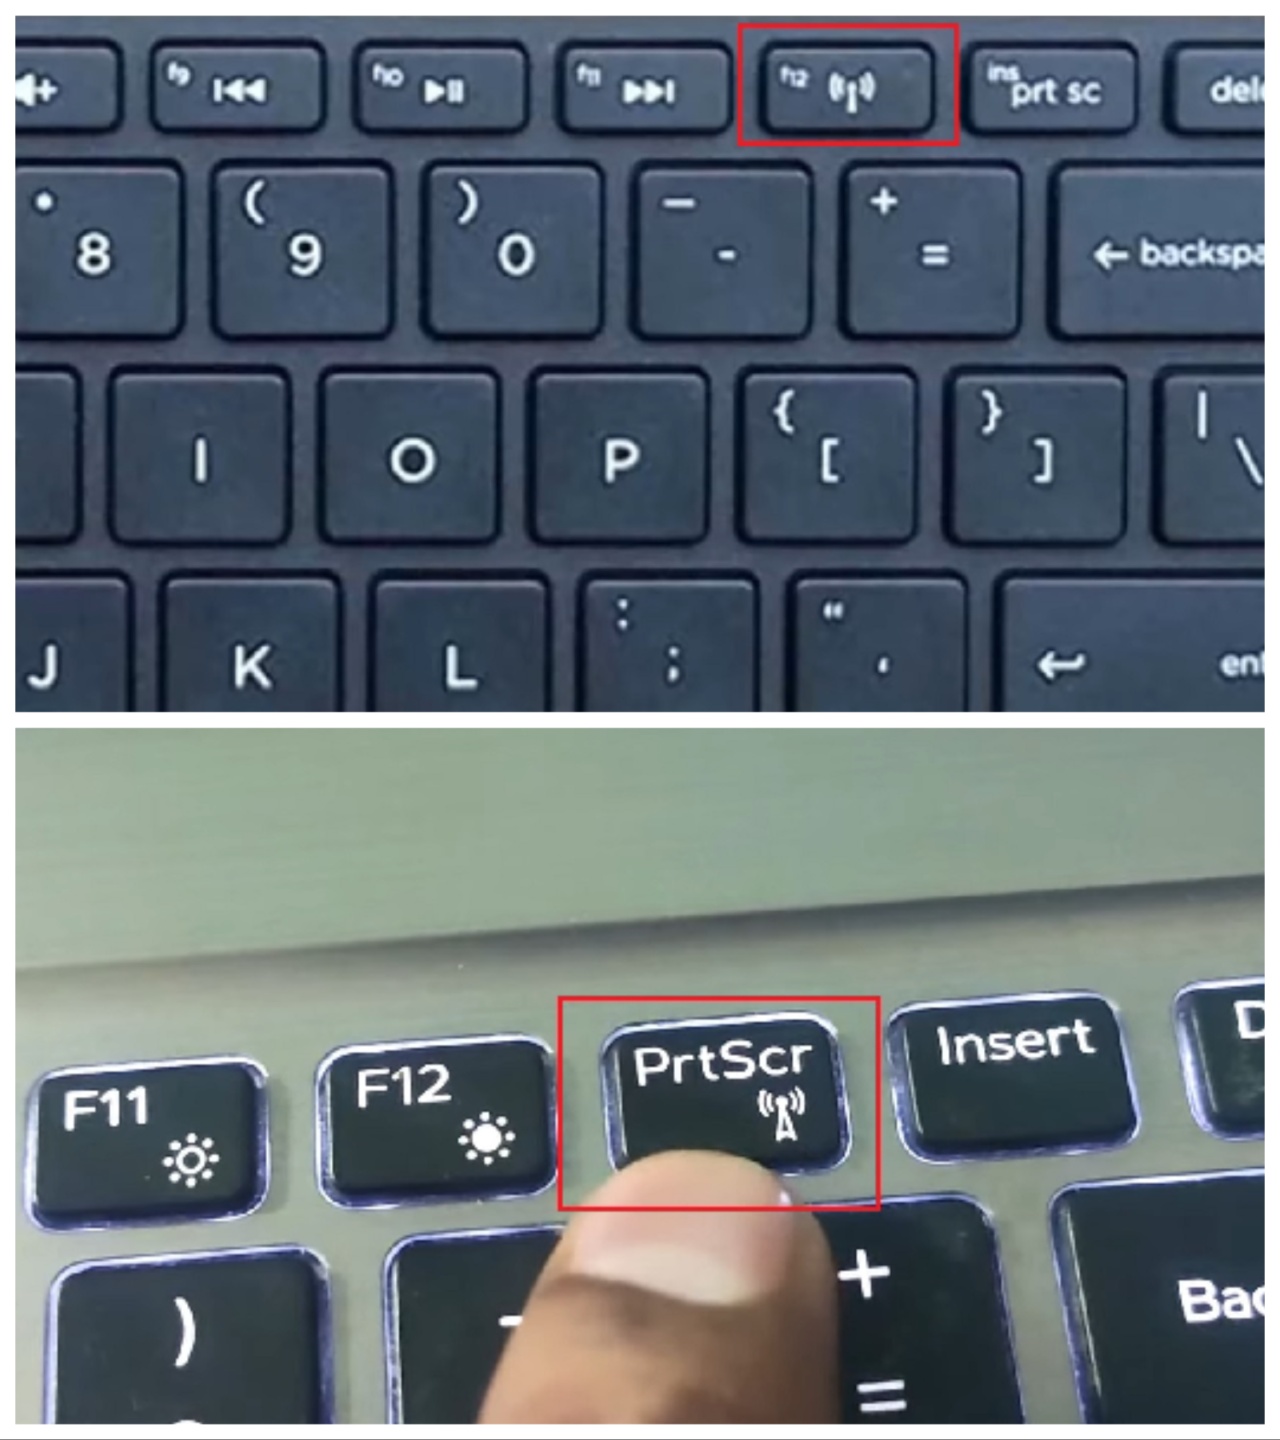
Note: All keyboards may not have this button.
- Press it again and check whether the connection is restored.
If it has not, try the next method.
Method 2: Change the Power Saving Setting Under Power Management
Changing power saving settings can often resolve the Wi-Fi wireless capability turned off issue.
STEPS TO FOLLOW:
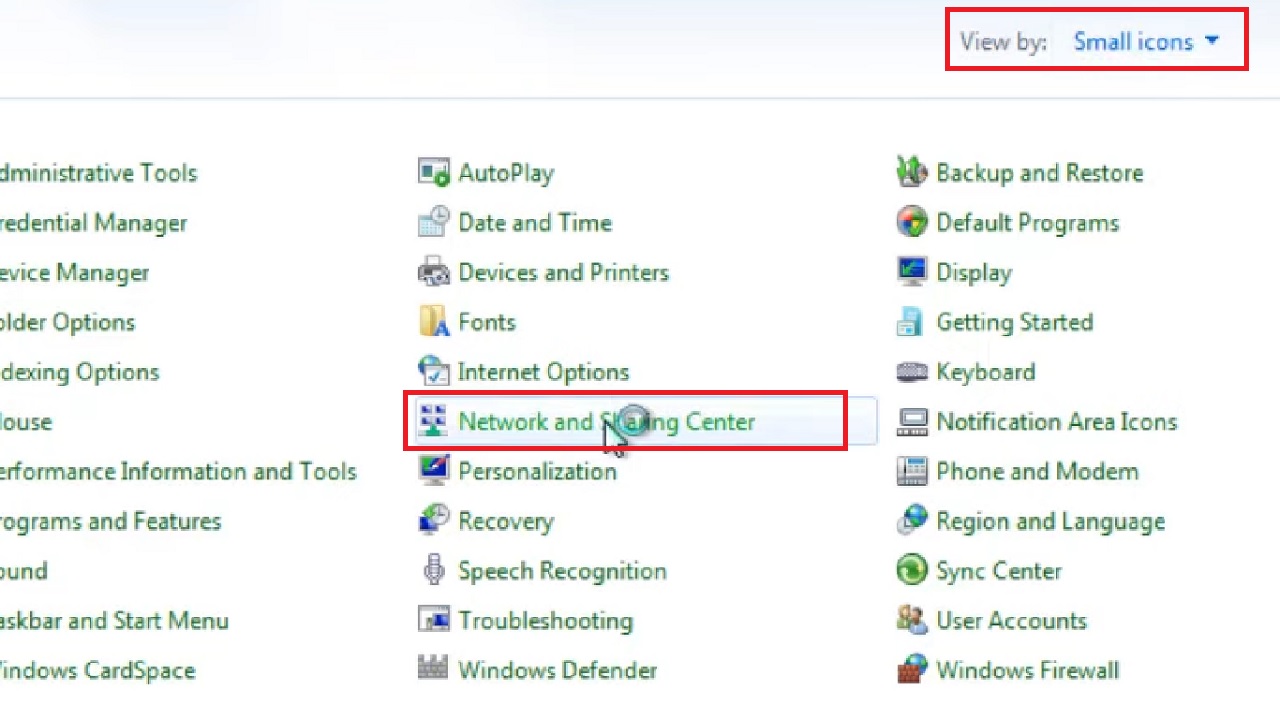
- Go to the search box next to the Start Menu.
- Type control panel and hit Enter.

- Select Large or Small icons in the View by Category.
- Click on Network and Sharing Center.
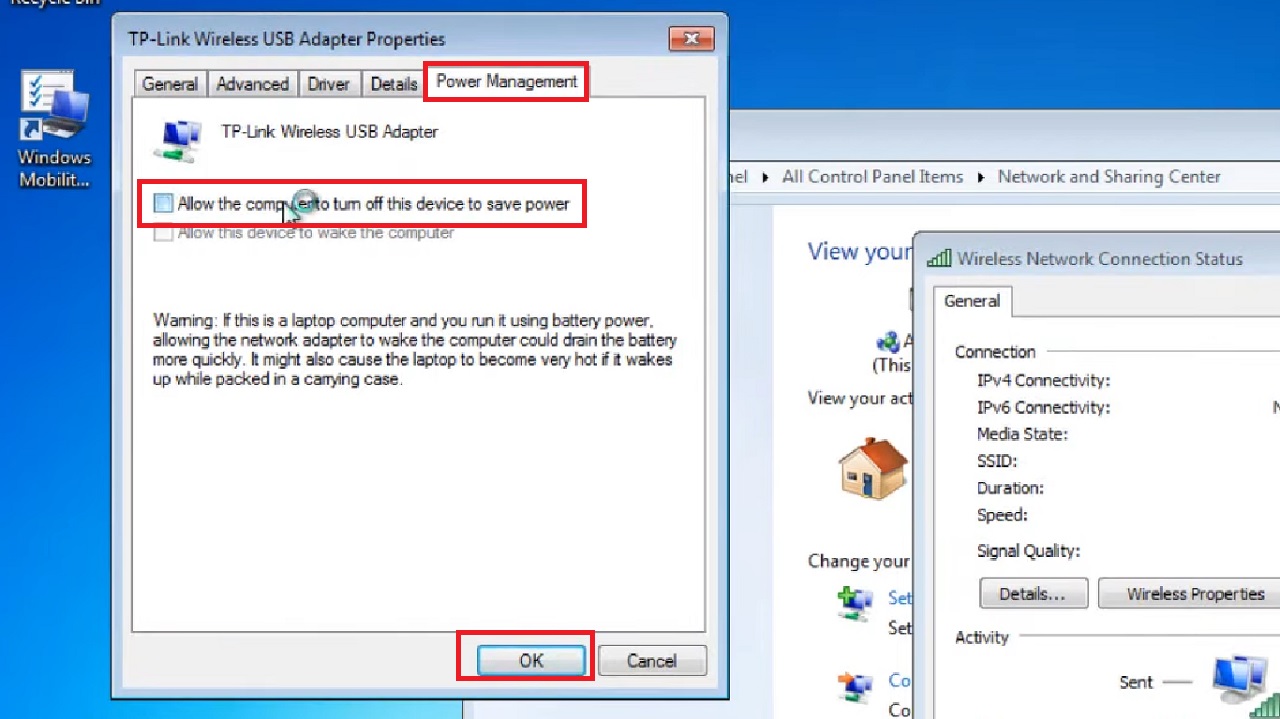
- Click on your active Wireless Network Connection.

- Click on Properties in the following Wireless Network Connection Status window.
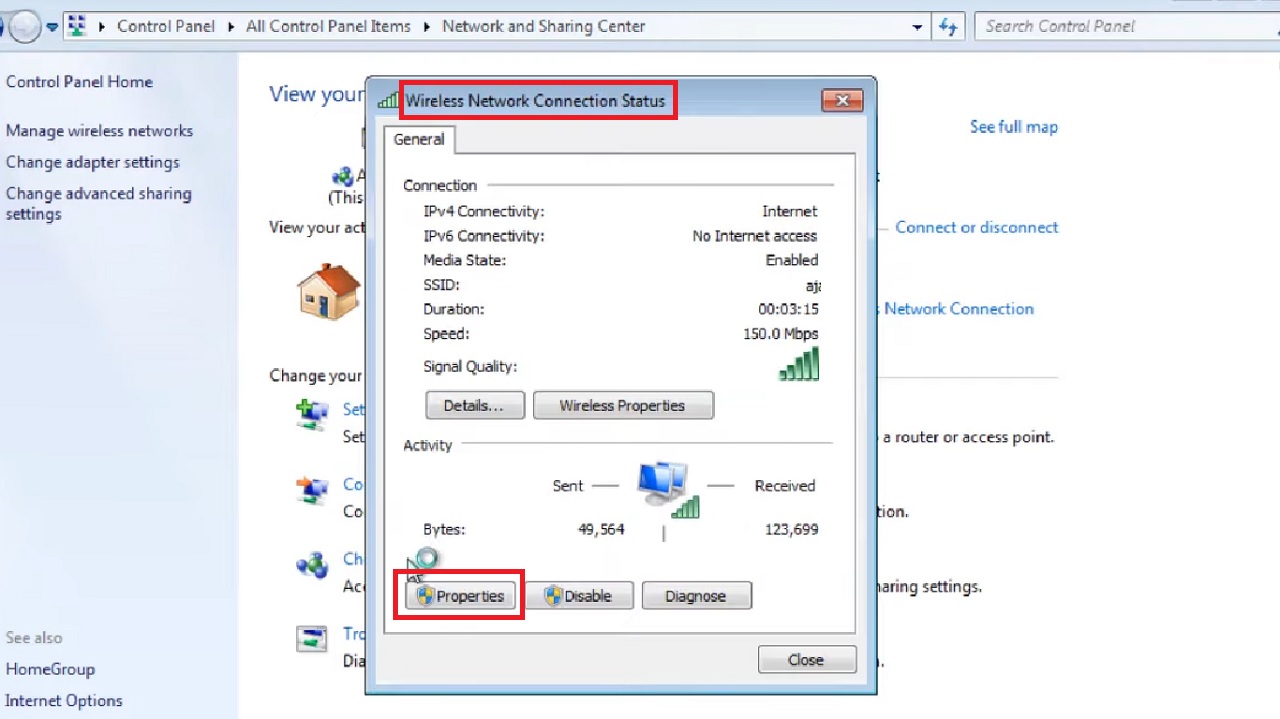
- Click on the Configure button in the Wireless Network Connection Properties window.
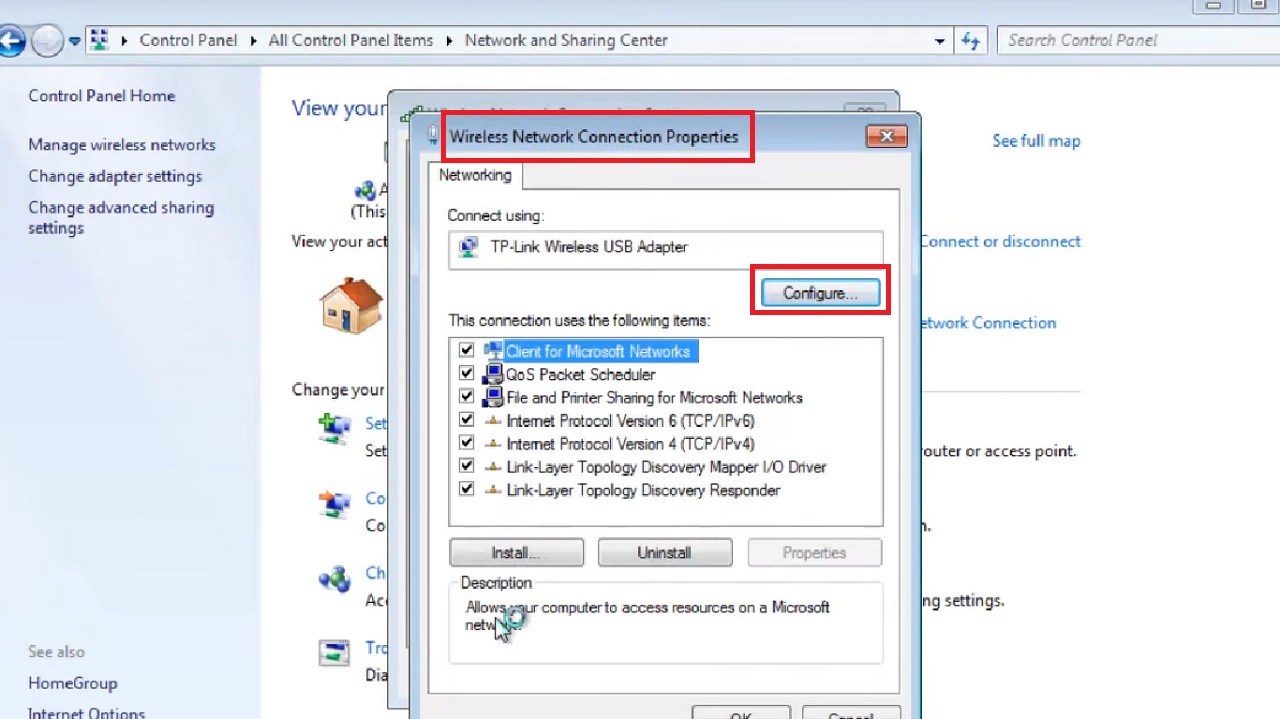
- Go to the Power Management tab in the following window.
- Uncheck the small box next to the ‘Allow the computer to turn off this device to save power’ option.
- Click on the OK button.
Close all windows and check if the issue is resolved. If it persists, move on to the next method.
Method 3: Turn on Wireless in Windows Mobility Center
The next method to try is to enable wireless in the Windows Mobility Center if the feature is available in your system. This will resolve the issue if it is caused due to system settings or software-related issues.
STEPS TO FOLLOW:
- Go to the search box and type windows mobility and hit Enter.
- Go to the Wireless Network section on the following window.
- Make sure the wireless is enabled and connected.

If you do not have this feature in your system, follow these steps:
- Press the Windows and I keys on your keyboard together to open the Windows Settings app.
- Click Network & Internet.
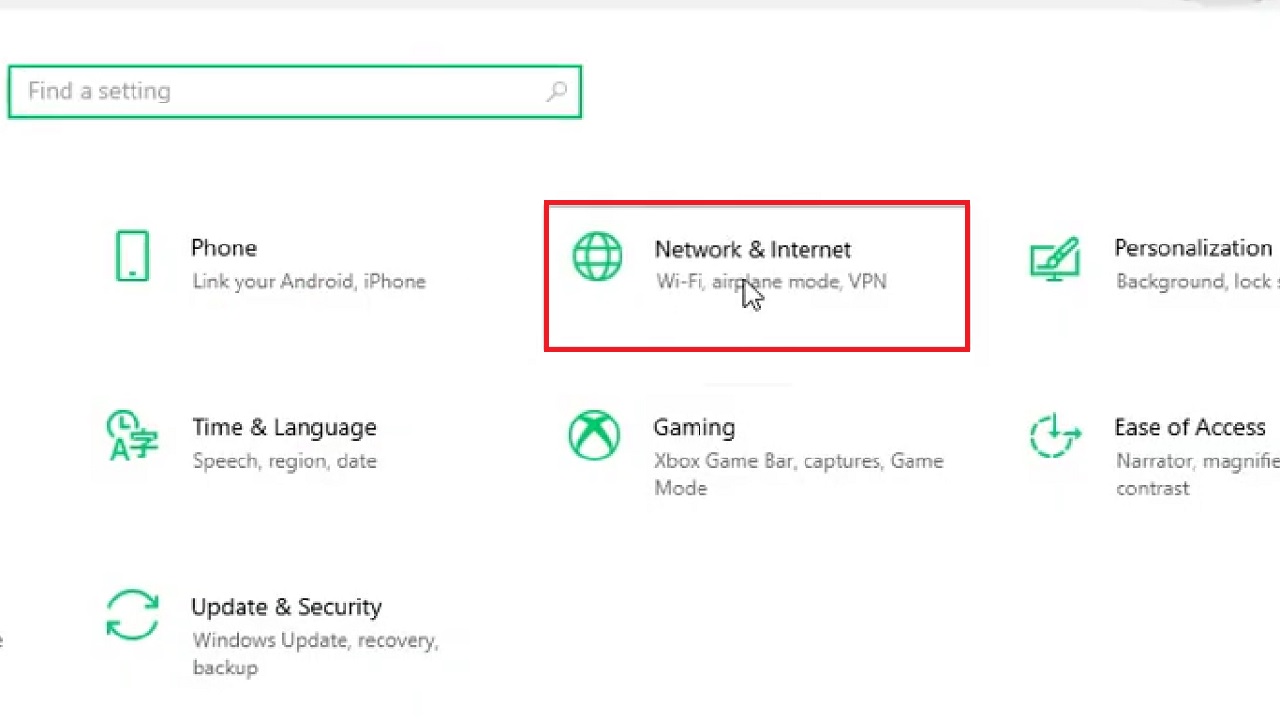
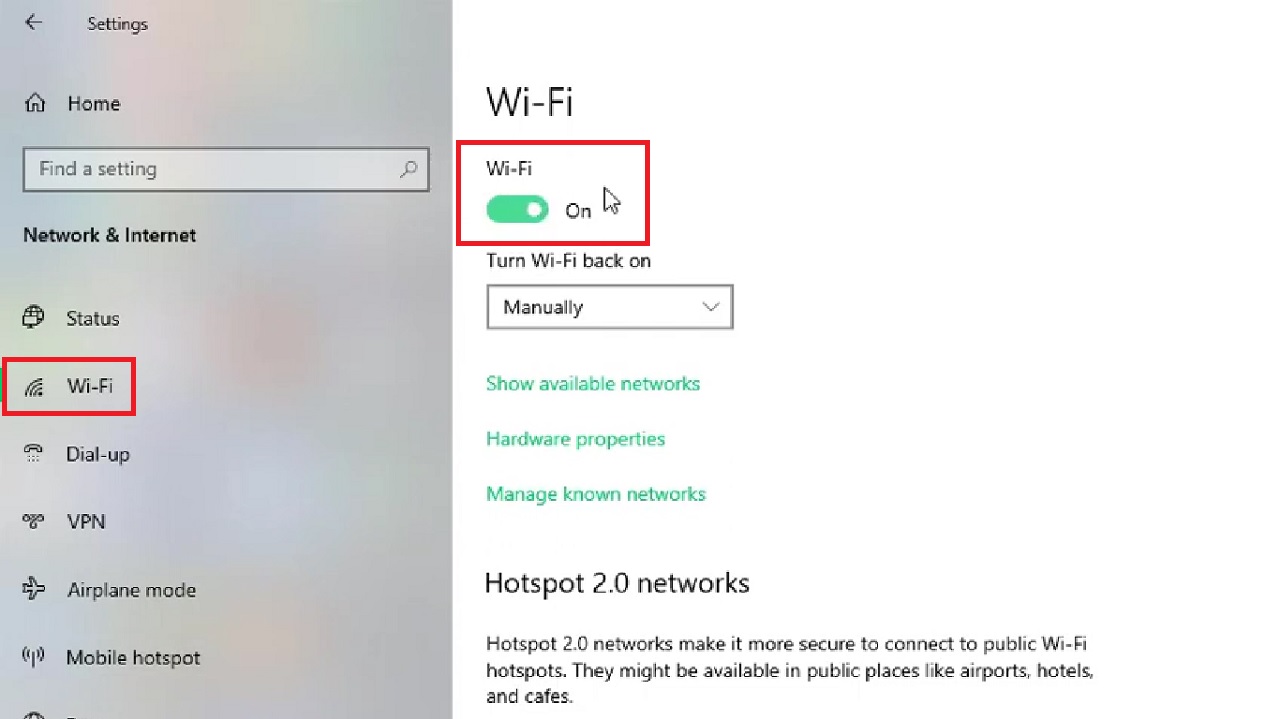
- Click on Wi-Fi on the left pane of the following window.
- Toggle the sliding switch to turn on Wi-Fi, if it is turned off.
Check if the issue is resolved. If you still encounter it, follow the next method.
Method 4: Run Network Troubleshooter
You may try running the built-in network troubleshooter to resolve the issue.
STEPS TO FOLLOW:
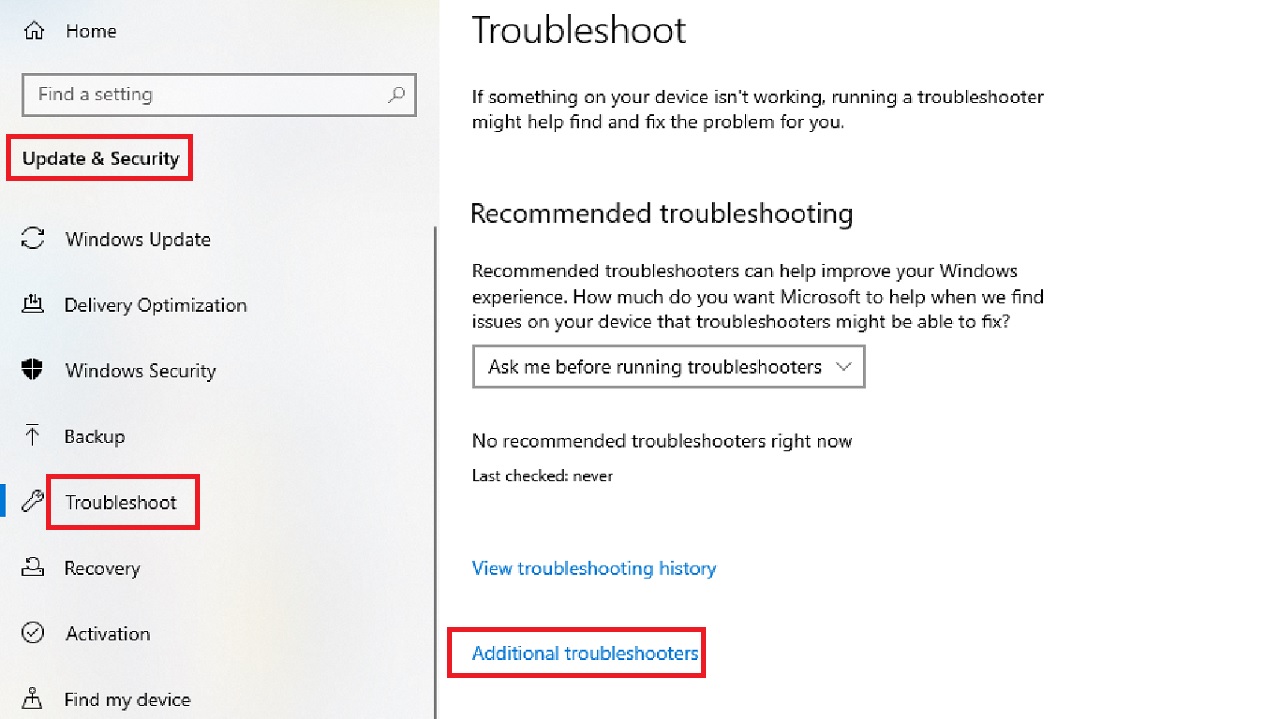
- Open the Settings app.
- Go to Update & Security.
- Click on Troubleshoot in the left pane of the following Update & Security window.
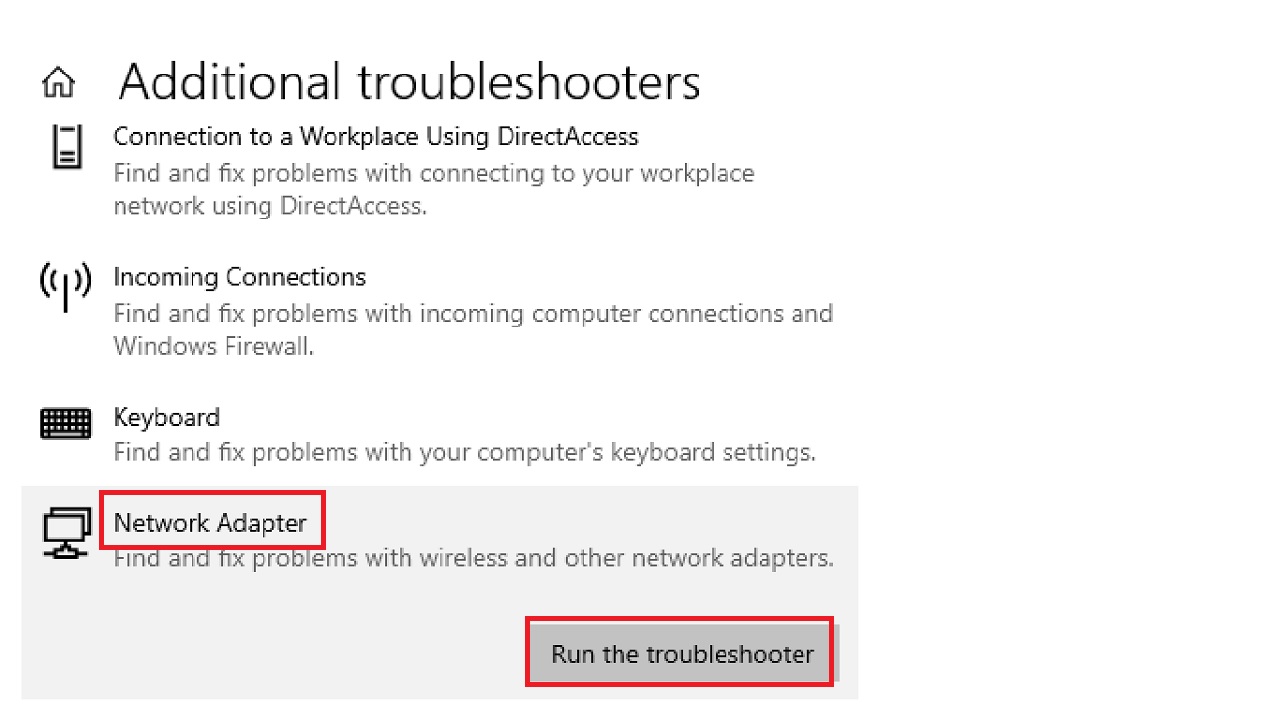
- Click on Additional troubleshooters on the right.
- Scroll down to find and click on Network Adapter.
- Click on Run the troubleshooter button.
- In the following window click on the circular button next to Wi-Fi.
- Click on the Next button.

Close all windows after the process is complete.
Now restart your computer and check whether or not the issue is resolved. If it persists, follow the next method.
Method 5: Make Changes in Network Adapter Settings
You may make a few changes to the adapter settings. This will potentially resolve the issue if it is related to its configurations.
STEPS TO FOLLOW:
- Right-click on the Wi-Fi icon on the taskbar.
- Select Open Network & Internet settings.

- Click on Change adapter options on the right side of the window under Advanced network settings to open the Network Connections page.
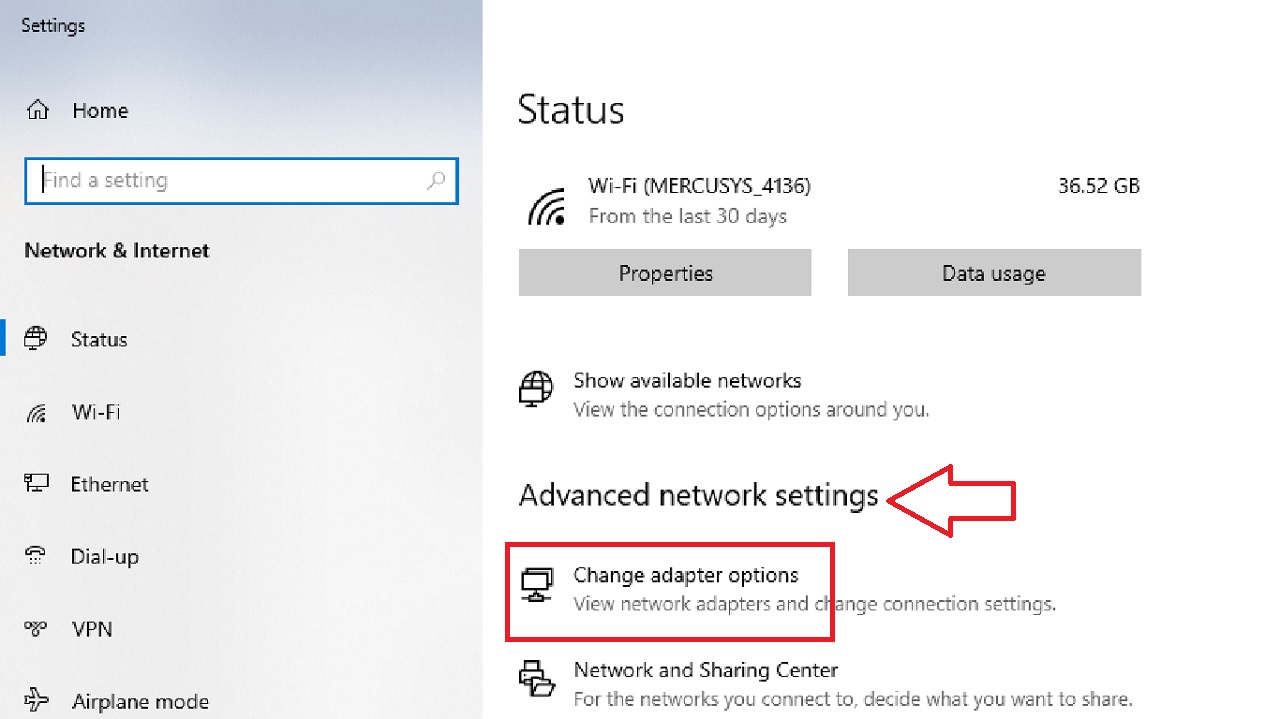
You may also access the page from: Control Panel > Network and Internet > Network and Sharing Center > Change adapter settings.
- Right-click on your Wi-Fi adapter in the Network Connections window.
- Choose Enable from the dropdown options if it is currently disabled.
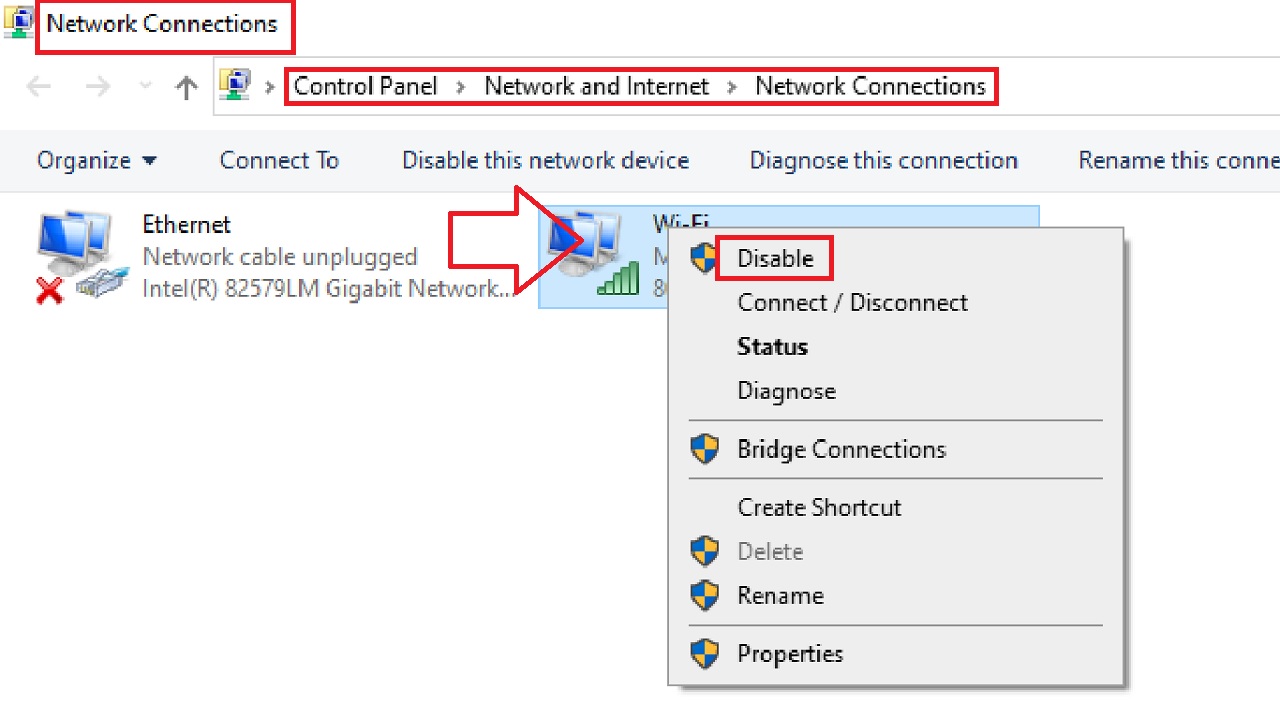
If it is enabled already, you may try disabling it and then re-enabling it. This will refresh the connection.
Try the next method if the problem persists.
Method 6: Check and Change Settings of TCP/IPv4
Allowing the Internet Protocol Version 4 (TCP/IPv4) to obtain an IP address and DNS server address automatically may also resolve the issue.
STEPS TO FOLLOW:
- Type ncpa.cpl in the Windows search box and hit Enter.
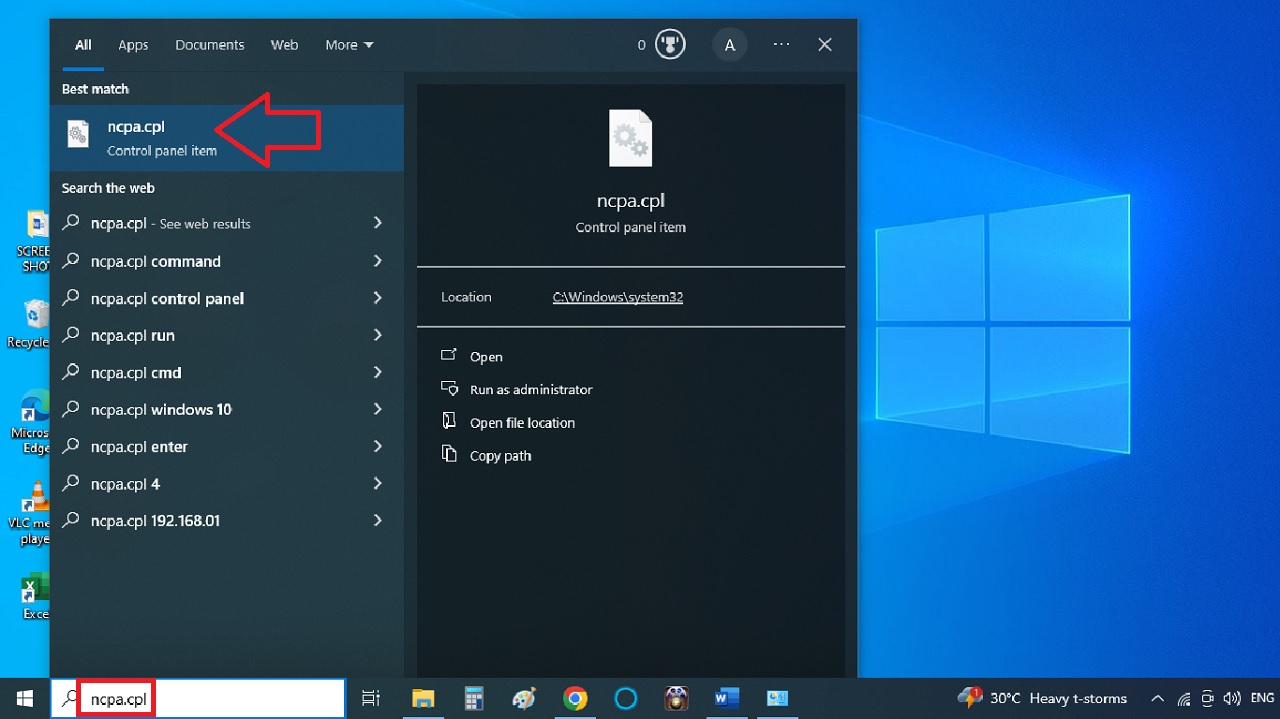
- Right-click on Wi-Fi.
- Select Properties.

- Select Internet Protocol Version 4 (TCP/IPv4) in the Wi-Fi Properties window under the Networking tab.
- Click on the Properties button.
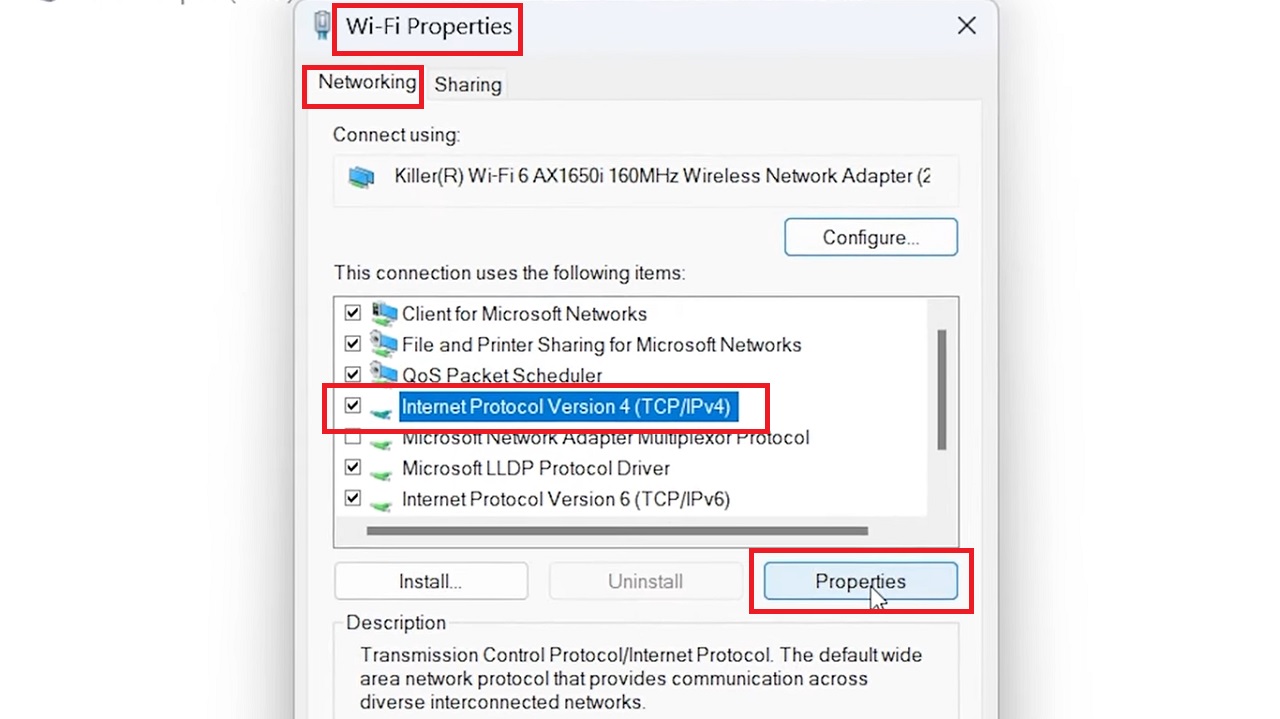
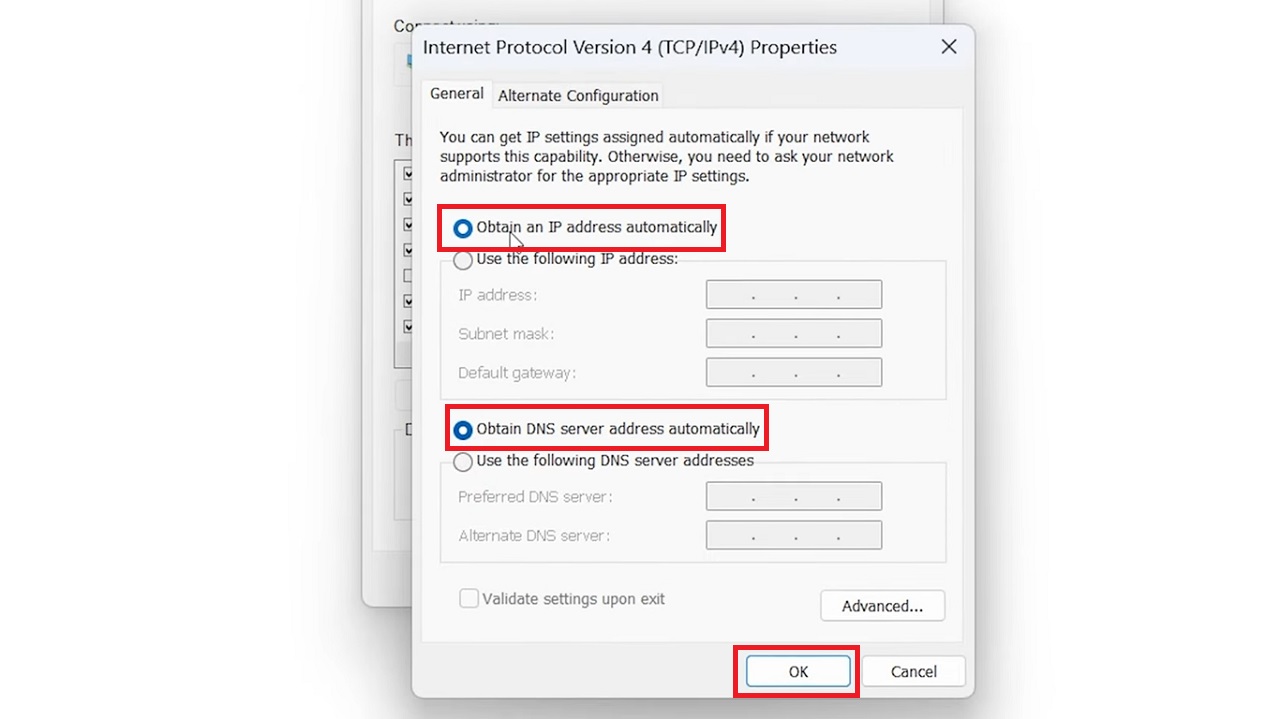
- In the following window under the General tab, make sure the small circular buttons next to Obtain an IP address automatically and Obtain DNS server address automatically are checked.
- Click on the OK button below.
Now close all open windows and restart your computer to apply the new settings.
Follow the next method if this does not resolve the issue.
Method 7: Uninstall and Reinstall or Update Network Driver
Often a lot of network-related problems are resolved by simply uninstalling and reinstalling the network driver.
It may also be resolved by updating the network driver if it is outdated. Perform them one by one.
STEPS TO FOLLOW:
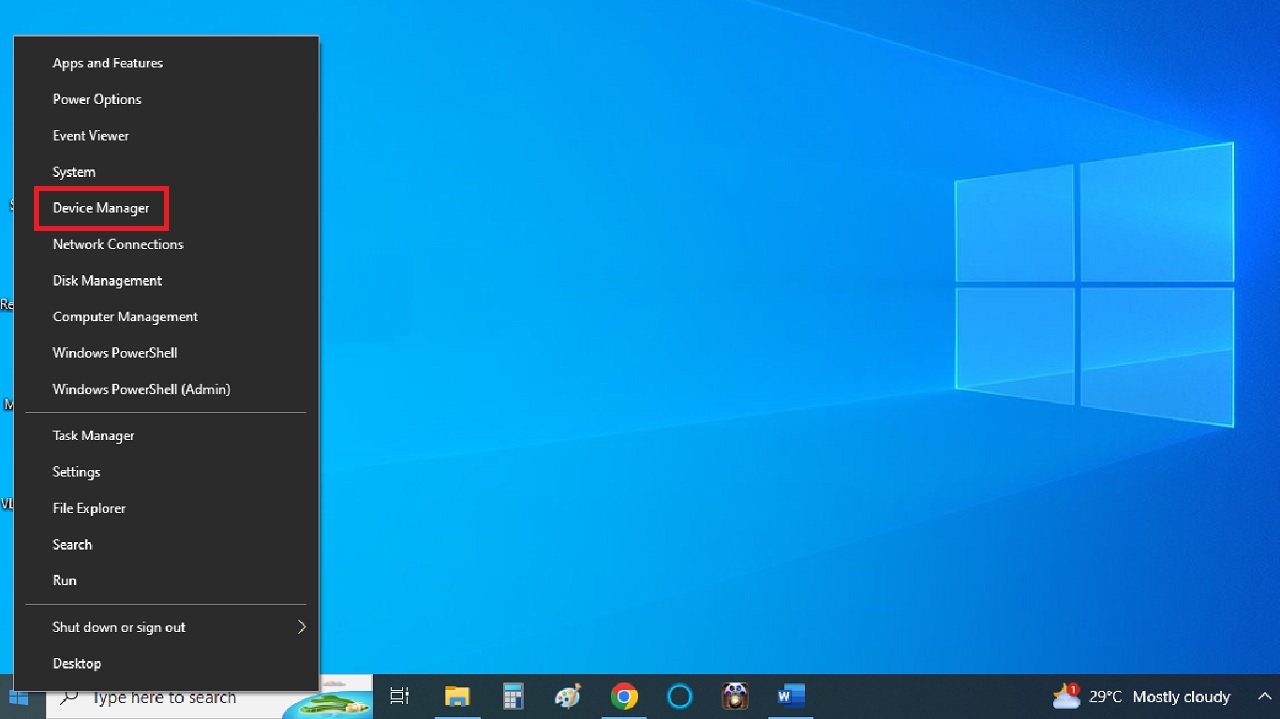
- Right-click on the Start Menu.
- Click on Device Manager from the pop-up options.
- Double-click on Network adapters to expand it.
- Right-click on your network adapters, which may be different from the one in this demonstration.
- Select Uninstall device from the dropdown options.
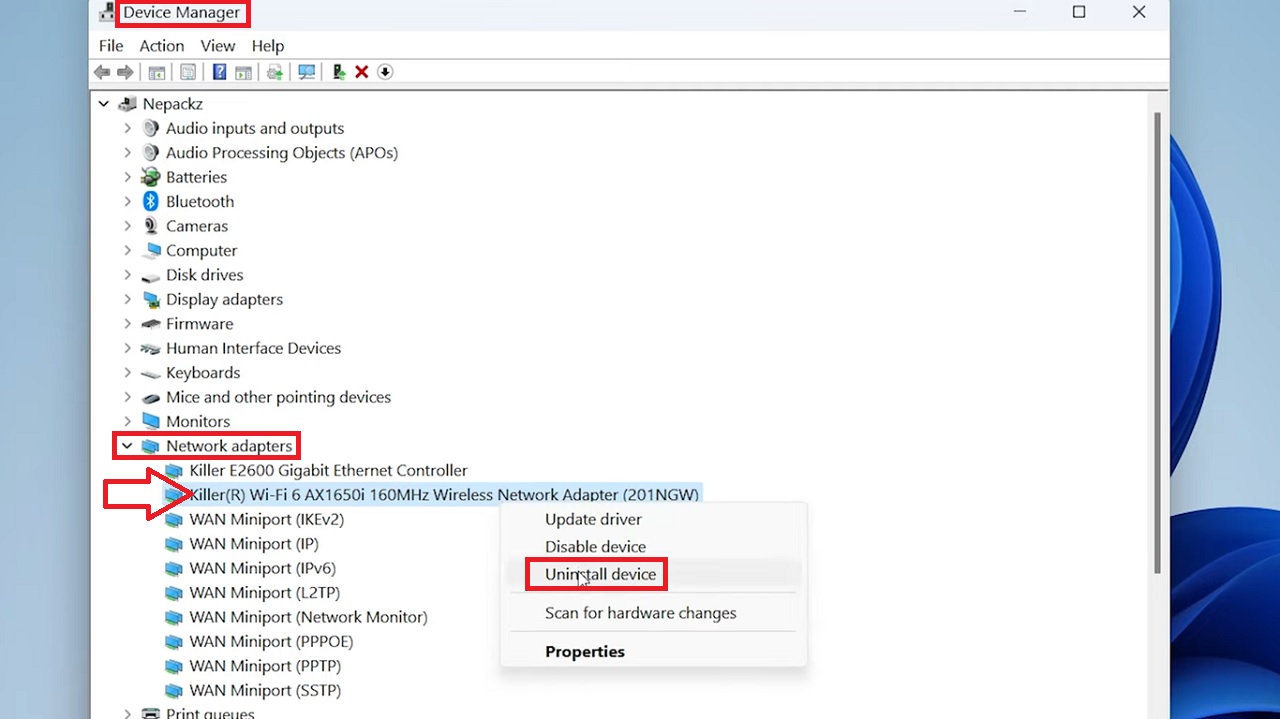
- Uncheck the small box next to Attempt to remove the driver from this device.
- Click on the Uninstall button.

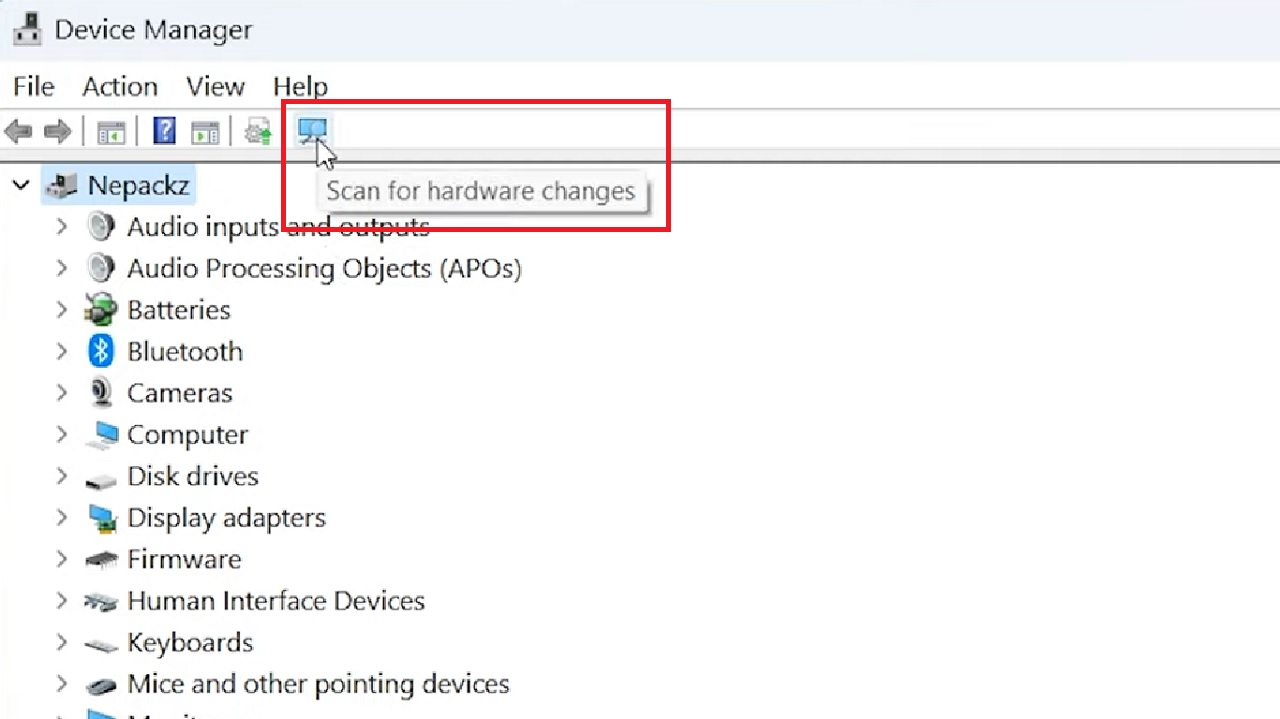
- To reinstall it, click on Scan for hardware changes.
You may also restart your system to reinstall it.
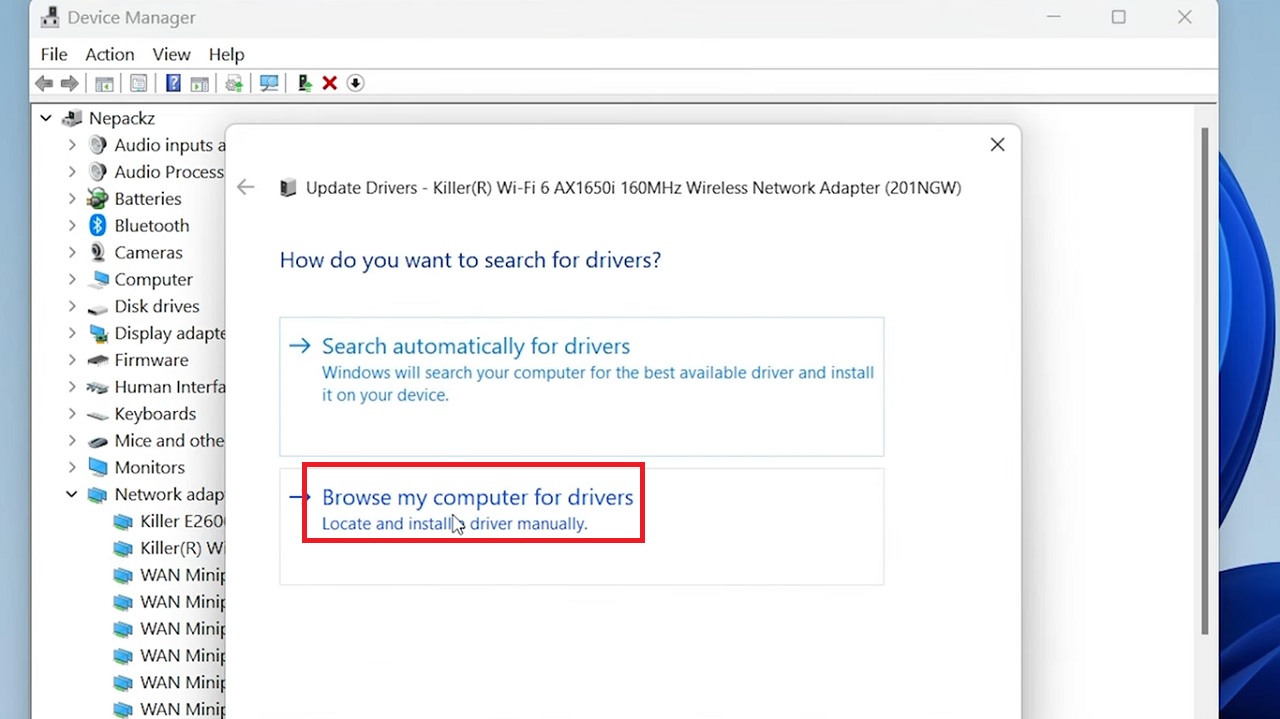
To update the driver, follow the initial steps mentioned above and click on the Update driver option from the dropdown option.
- Then, click on Browse my computer for drivers option in the following window.
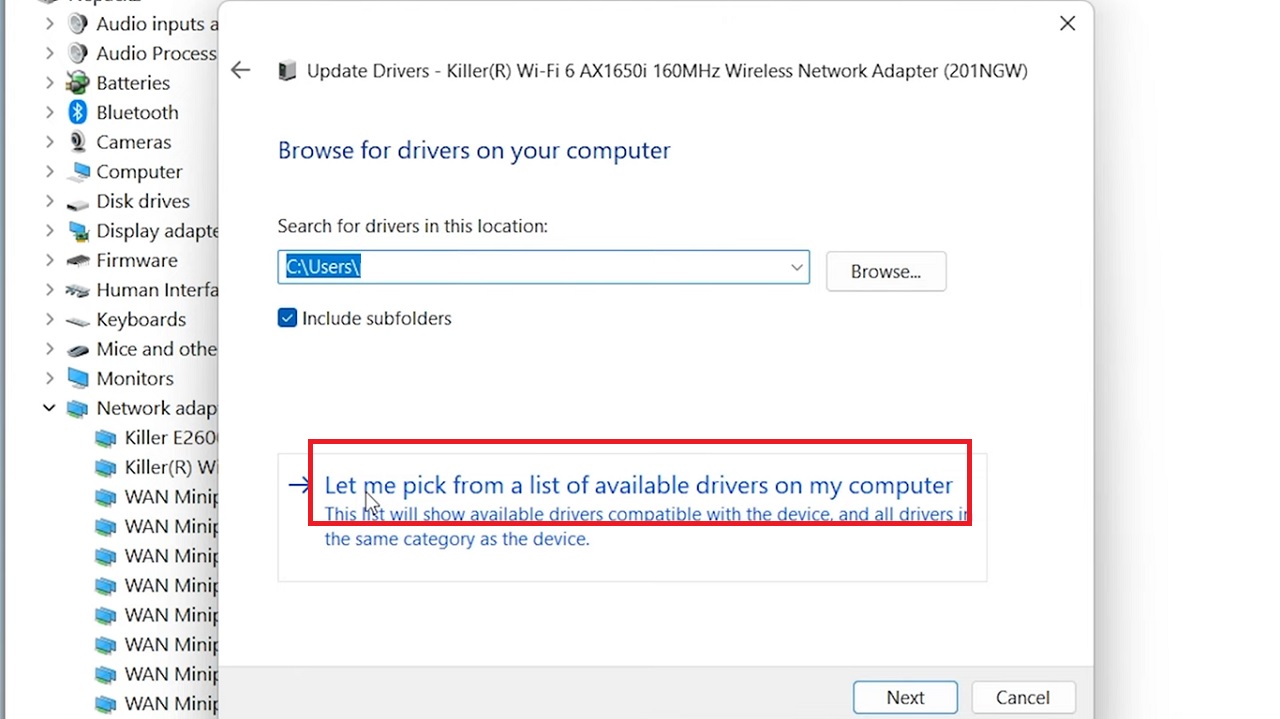
- Click on Let me pick from a list of available drivers on my computer option in the next window.
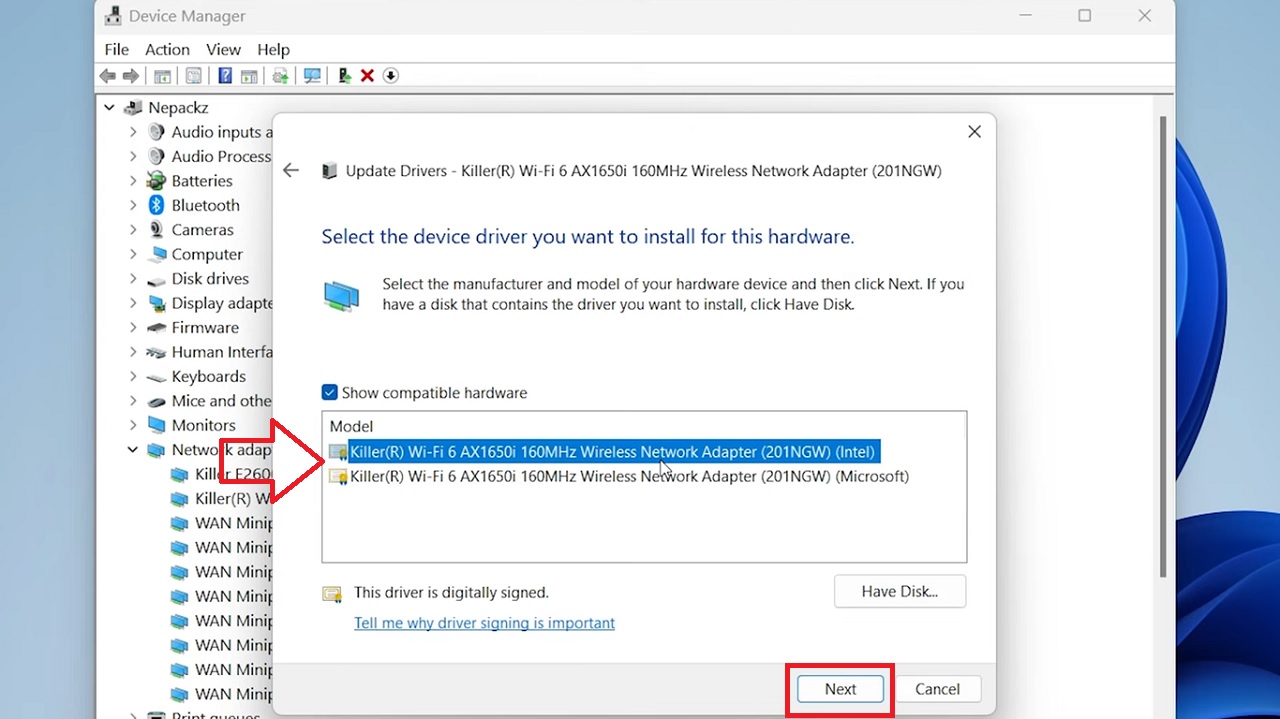
- Choose one of the available drivers.
- Then click on the Next button below.
- Click on the Close button when you see the message Windows has successfully updated your drivers.
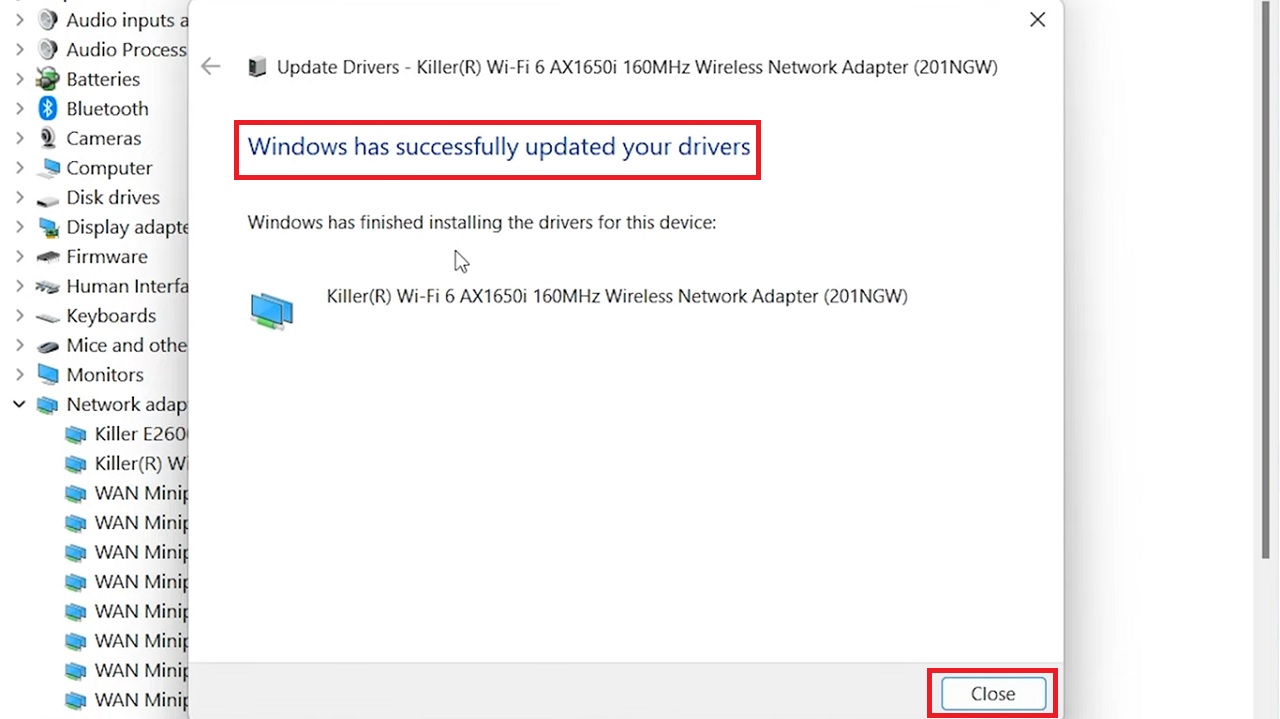
Now, check whether the issue is resolved.
Method 8: Perform a System Restore
STEPS TO FOLLOW:
- Go to the search box and type recovery options.
- Hit Enter.
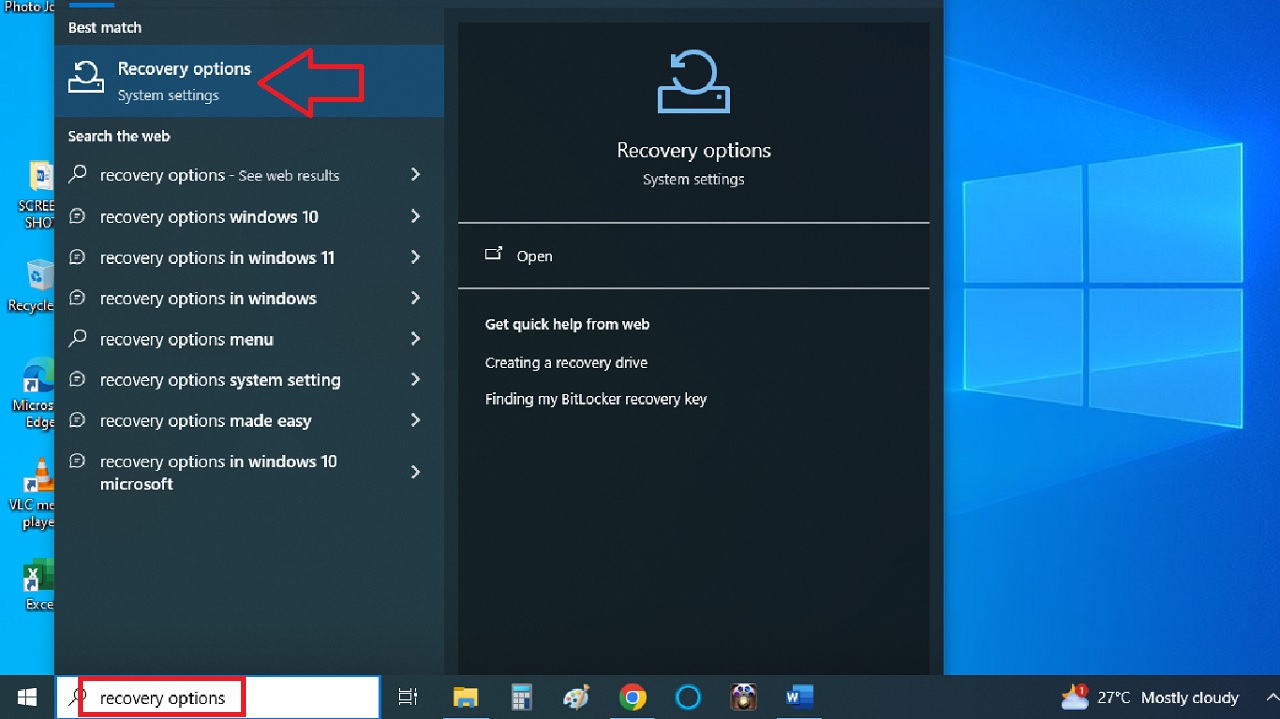
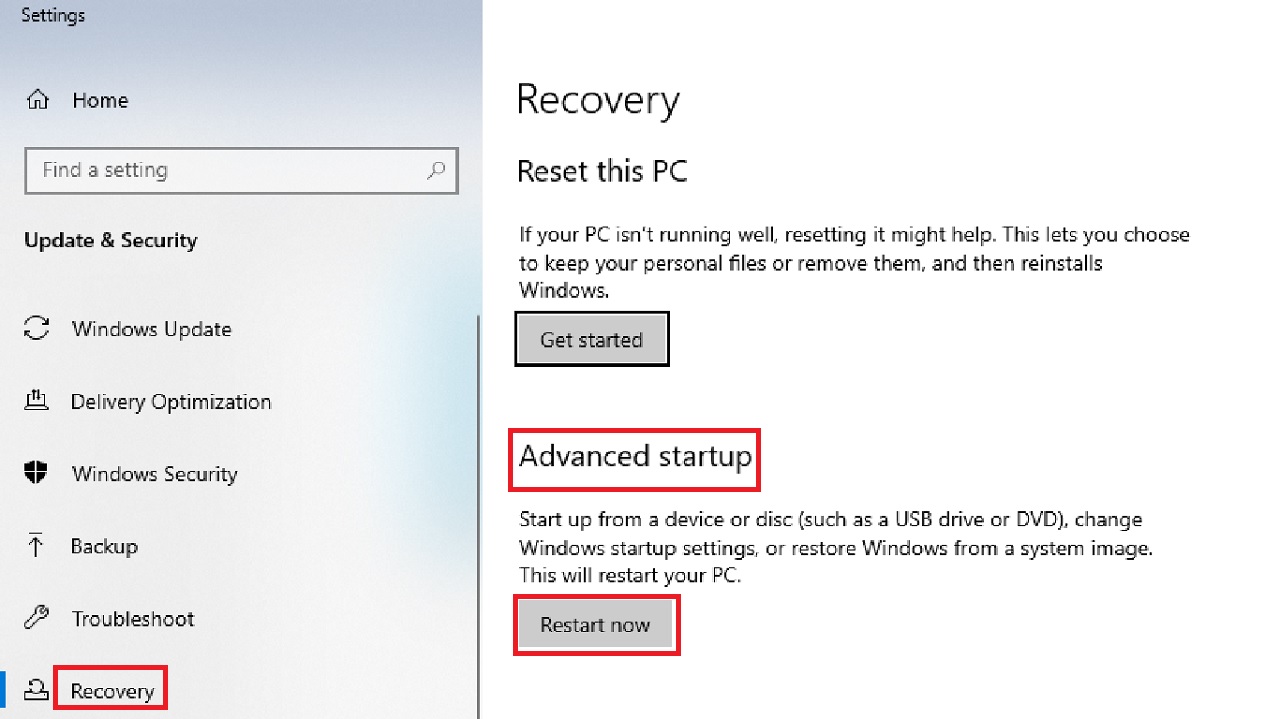
- Go to the Advanced startup section on the right side.
- Click on Restart now.
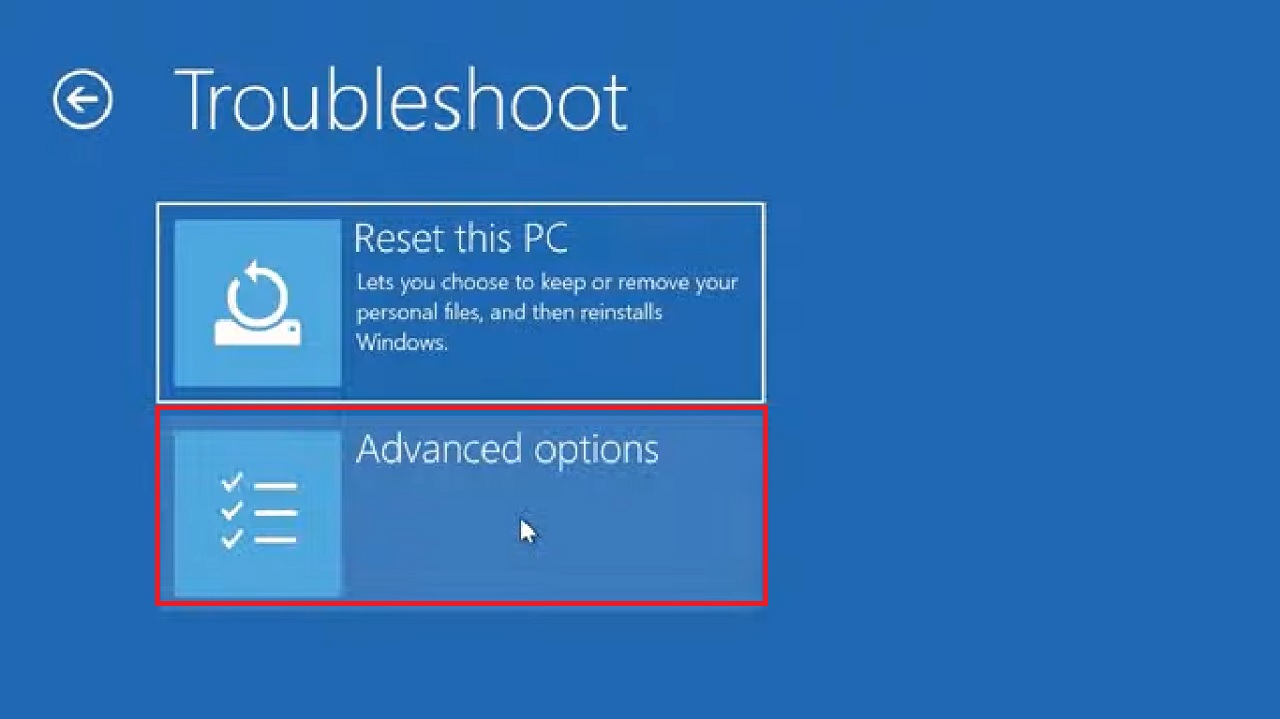
- Click on Troubleshoot in the following Choose an option window.
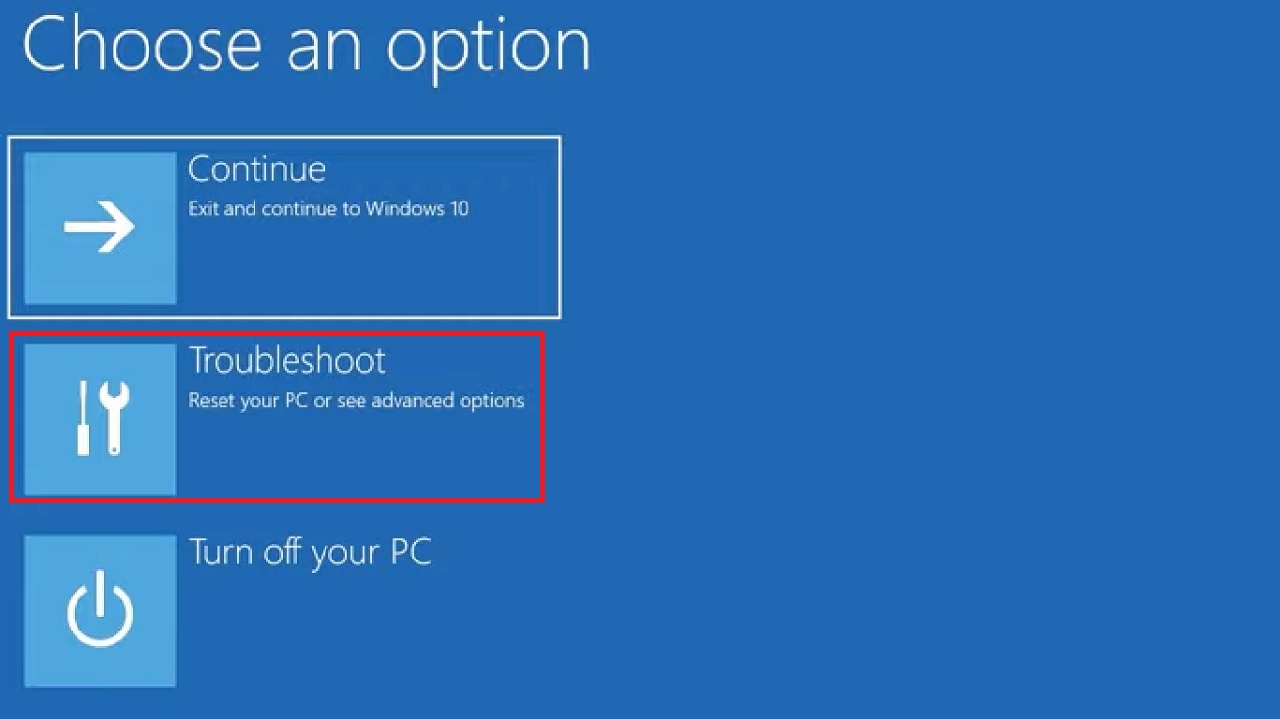
- Click on Advanced options in the next.
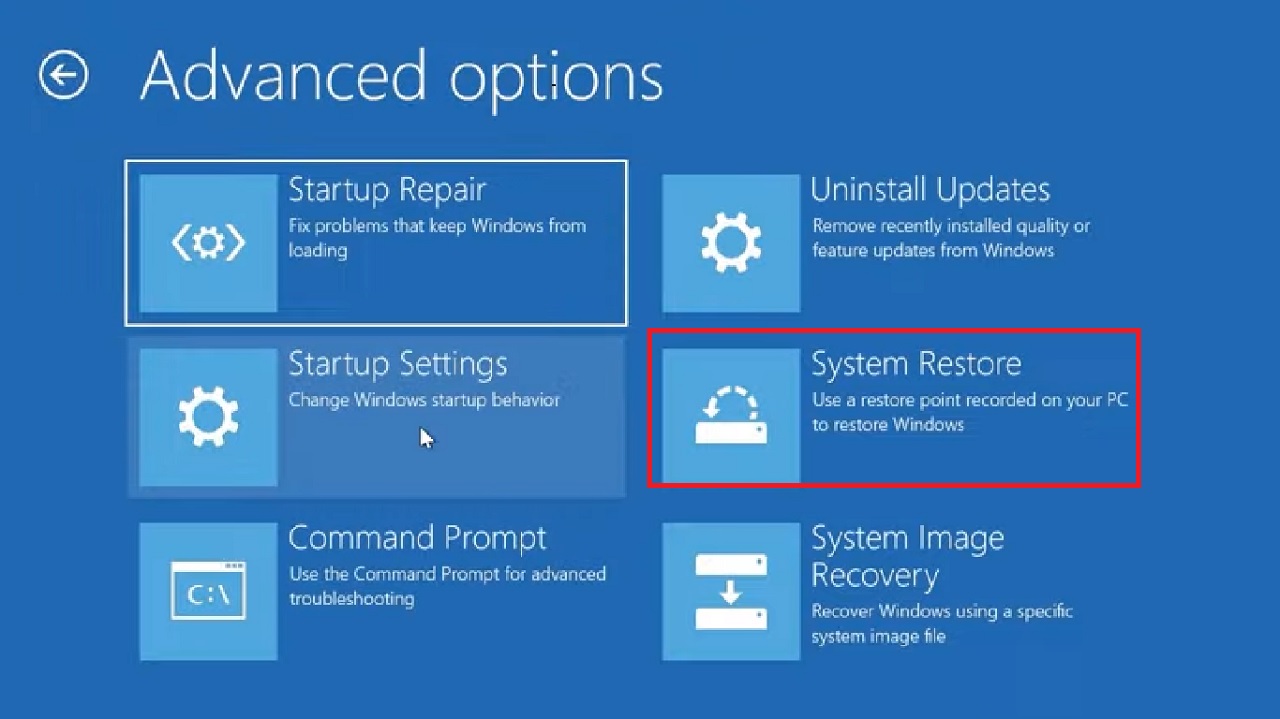
- Press System Restore.
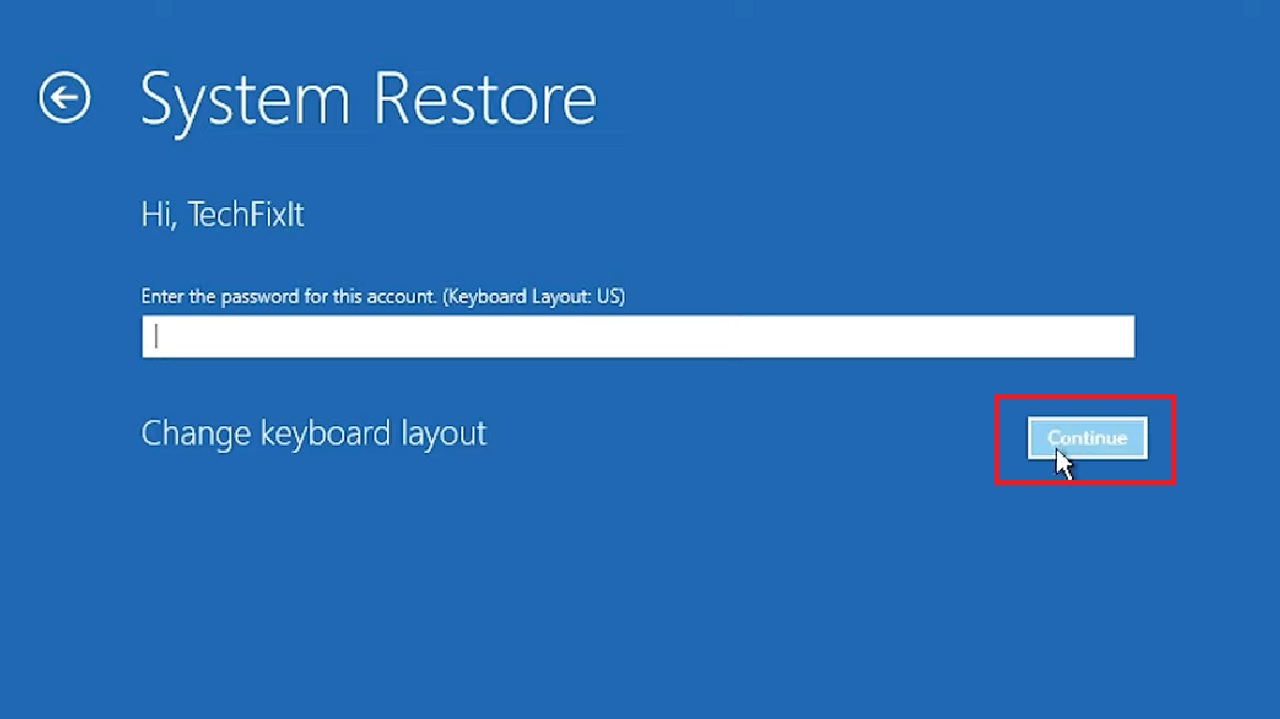
- Click on Continue.
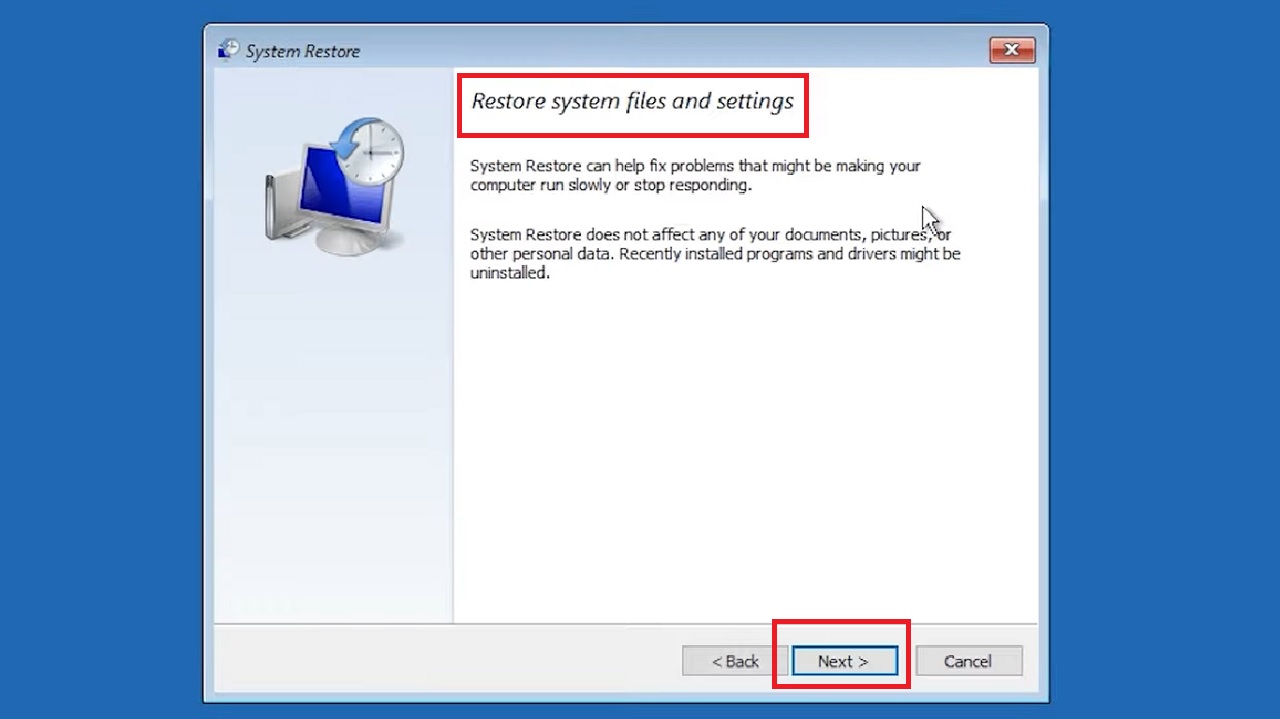
- Click on Next in the following window to Restore system files and settings.
- Select the latest restore points.
- Click on the Next button.
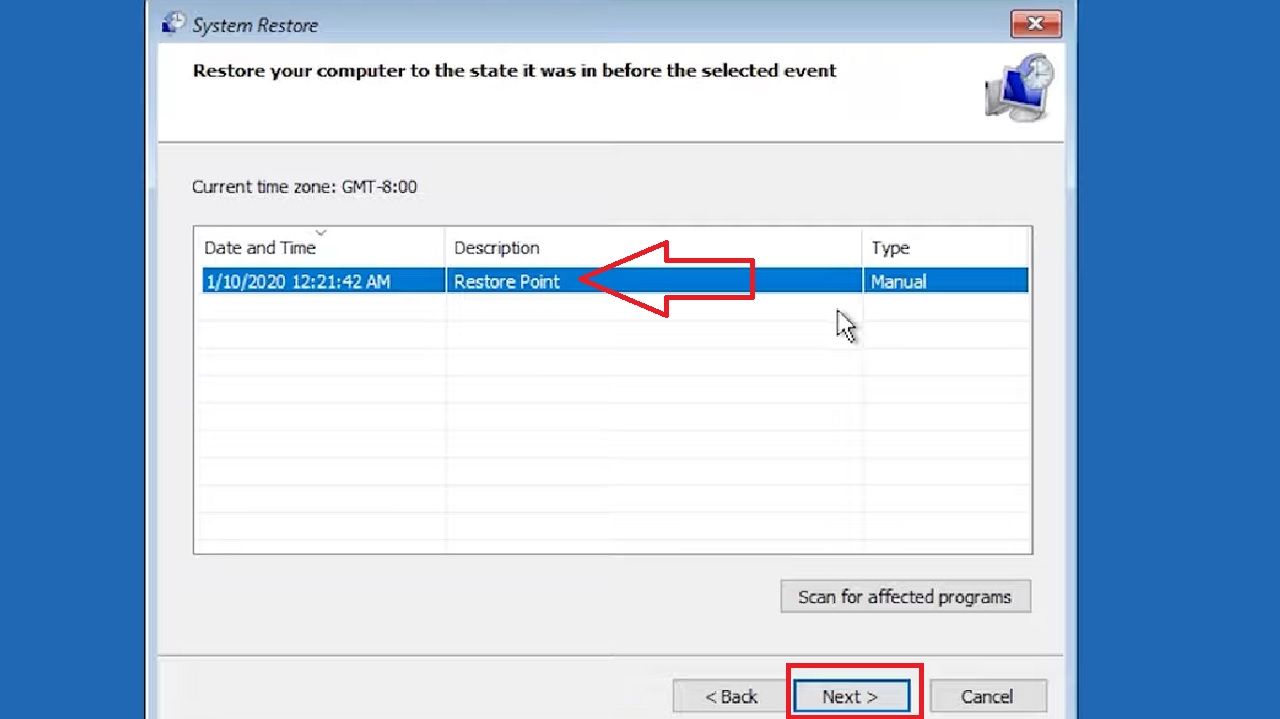
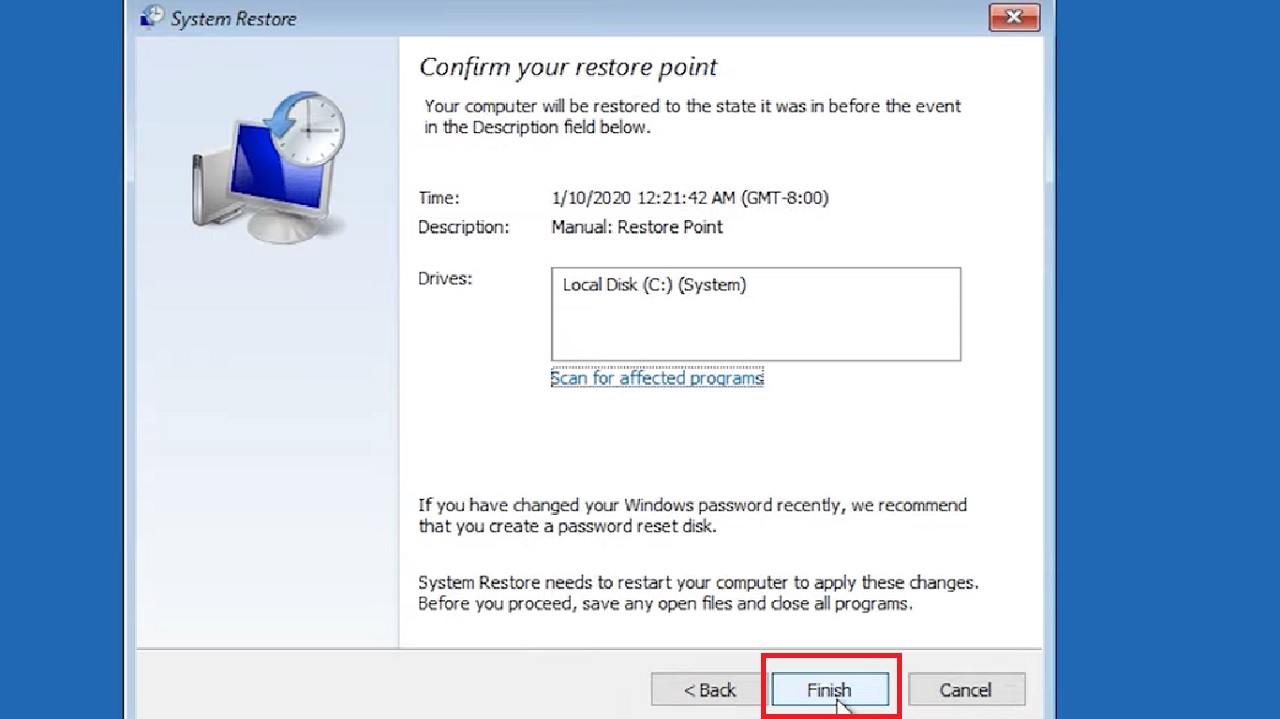
- Click on Finish in the following window.
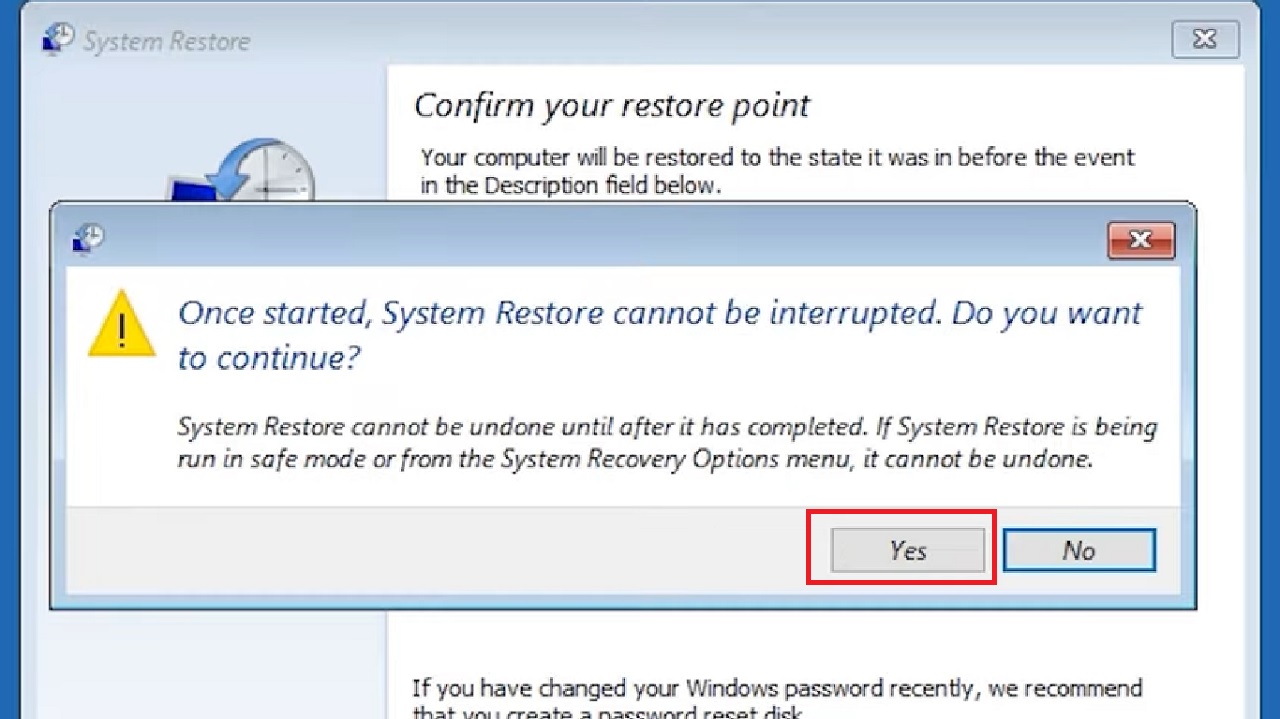
- Click on Yes in the following confirmation window.
Now, wait for your system to be restored, and when it is done, check whether or not the issue is resolved.
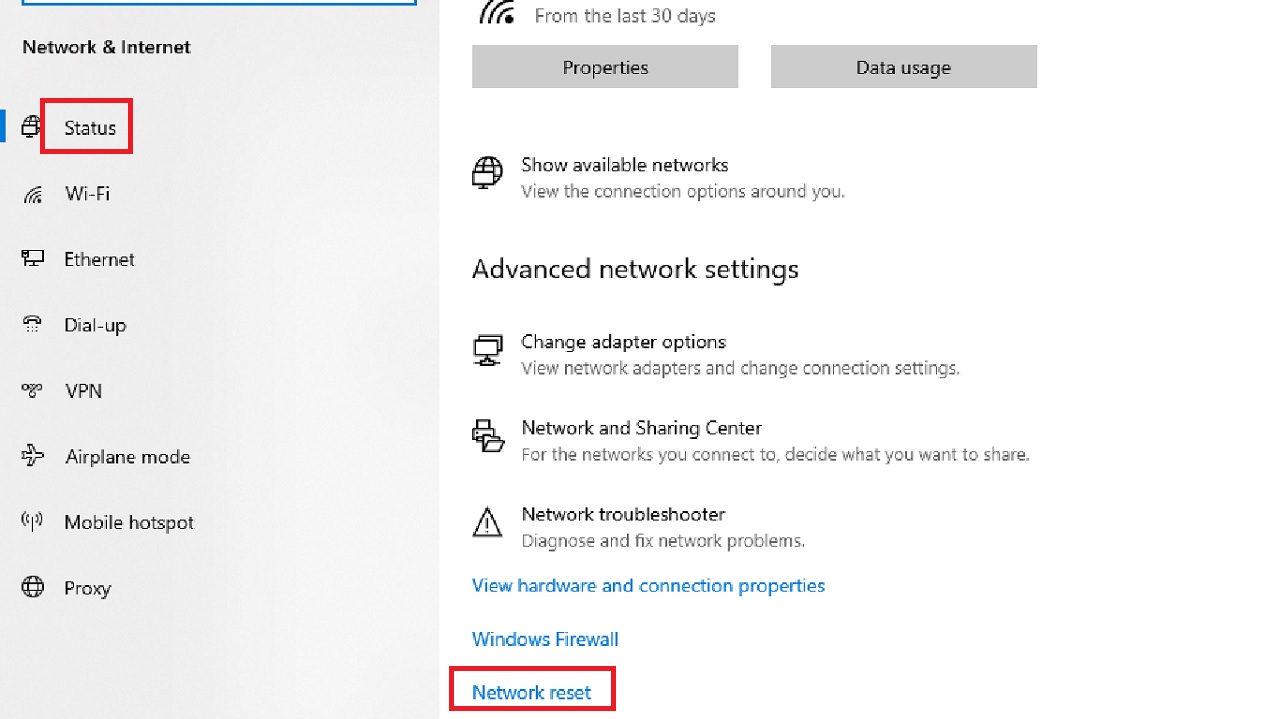
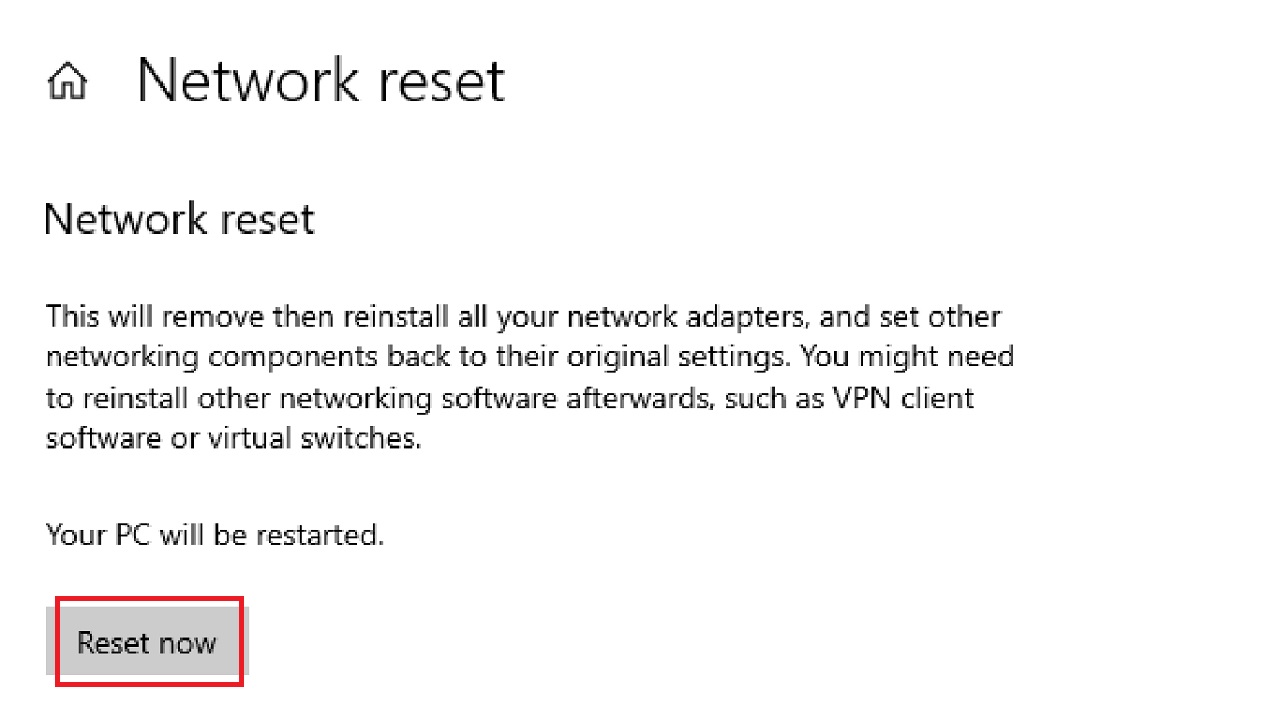
Method 9: Perform a Network Reset
If nothing seems to work for your specific condition, as a last resort, you can try performing a network reset to resolve the issue.
Note: A network reset will clear all settings related to the network including Ethernet, Wi-Fi, and VPN configurations, and set them all to their default values.
STEPS TO FOLLOW:
- Open Settings as before and go to Network & Internet.
- In the Status page, scroll down to find the Network reset option on the right side and click on it.
- Click on the Reset now button.
- Press the Yes button in the confirmation window that appears next.
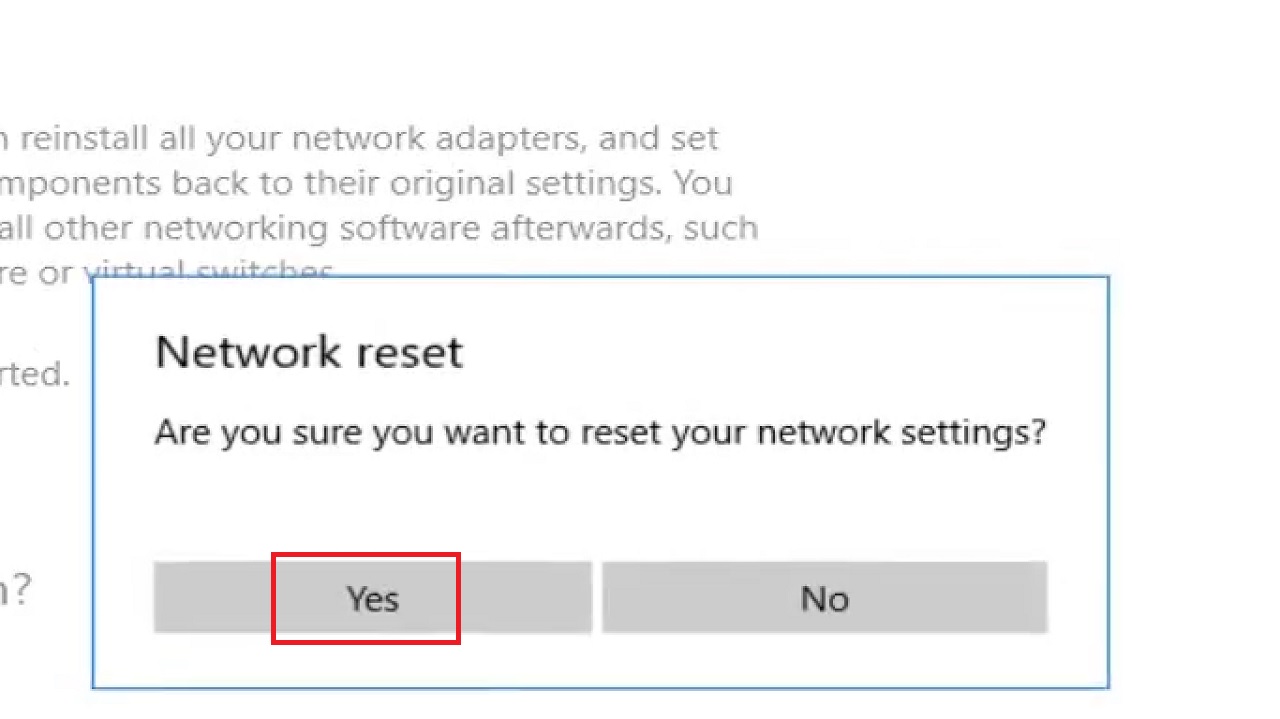
- The computer will restart to complete the process.
Reconnect to your network after the system restarts. Press on the Yes button if and when the following window appears while reconfiguring the connectivity settings:

The problem should be fixed now.
Conclusion
In conclusion, resolving Wi-Fi wireless capability being turned off requires a systematic approach that considers both software and hardware factors.
Choose the most appropriate solution based on your specific situation to ensure seamless connectivity.