
You will not be able to enjoy a seamless connectivity if your Wi-Fi hits a snag and you encounter a DHCP is not enabled for Wi-Fi error.
This can be very irritating especially when you want to access the internet and visit a particular website for some information.
However, it is quite easy to overcome this hurdle and get back to seamless streaming, browsing, downloading, and surfing, if you only know the ways to go ahead.
If you do not know them, fear not, because this article will guide you through the step-by-step solutions to bid adieu to such Wi-Fi woes.
In This Article
KEY TAKEAWAYS
- Most of the time, restarting the router and your PC will resolve the DHCP is not enabled error for Wi-Fi quickly by refreshing the network settings.
- Changing the router configuration through the admin panel in a web browser to ensure DHCP is enabled is another easy and quick fix to the issue.
- If an outdated router firmware is the cause of the issue, updating it and resetting the router may fix the problem as well.
- Releasing and renewing the IP address is known to resolve the DHCP is not enabled for Wi-Fi error in most of the situations.
- Setting the DHCP Client to automatic or restarting it may also resolve the DHCP is not enabled for Wi-Fi issue.
Why is DHCP is Not Enabled for Wi-Fi?
The most significant reason for the DHCP is not enabled for Wi-Fi error to occur is an issue with the network or router settings.
There may also be some hardware issues with the router or its outdated firmware that may disable DHCP.
There are also several other reasons for this error to happen, and some of the most common ones are:
- The DHCP or Dynamic Host Configuration Protocol Server on the network server or on the router may be disabled
- Conflicting IP addresses of two separate devices connected to the same network, if they have the same IP address
- Issues with the network cables
- Loose connections between the router and devices
- A large number of devices requesting IP addresses at the same time causing a network overload
- Overly restrictive anti-virus security software program or firewall blocking the DHCP communication between the router and the devices
- Issues with the network card driver that needs an update
- Incompatible network card drivers
- Faulty router with faulty switches
- Software errors or glitches causing the DHCP service to stop working on the router or server
- Existence of malicious software or viruses in the system that is interfering with the network services
- Sudden power fluctuations or surges causing electrical issues
- Accidental or unauthorized changes to the network configuration or settings
- Issues with the Internet Service Provider (ISP)
So, as you see, there are several reasons for this error to occur, but the good news is that there are quite a few simple and advanced solutions to this error. You can solve the problem in quick time and with little effort and technical knowledge.
How to Fix DHCP is Not Enabled for Wi-Fi?
One proven way to fix the DHCP is not enabled for Wi-Fi error is to change the setting of the Internet Protocol Version 4 (TCP/IPv4) of the active connections in the Network Connections so that it can obtain the IP address and DNS server addresses automatically.
However, this is a relatively complicated solution to the issue and so are the ones that are mentioned step-by-step in the following section of this article.
In between, there are a few easy and quick checks to make. In a lot of instances, these simple checks resolved this issue. It includes:
- Restarting the computer
- Restarting the router by powering it off for about and minute and switching it back on
- Scan your computer to detect and fix malware and virus infection
- Temporarily disable the primary antivirus software or conflicting third-party antivirus products with DHCP to check if it resolves the issue and switch to a different product.
A few more complex solutions may also resolve the issue, such as:
Updating the network driver: Press the Windows and X keys together > Select Device Manager > Expand the Network adapters > Right-click on the Wi-Fi adapter > Select Update driver > Select Search automatically for drivers > Restart your system when the process is complete.
Disable and enable network adapter: Go to the search box next to the Start Menu > Type control panel and hit Enter > Go to Network and Internet > Network and Sharing Center > Change adapter settings > Right-click on Wi-Fi > Select Disable > Right-click on Wi-Fi again > Select Enable.
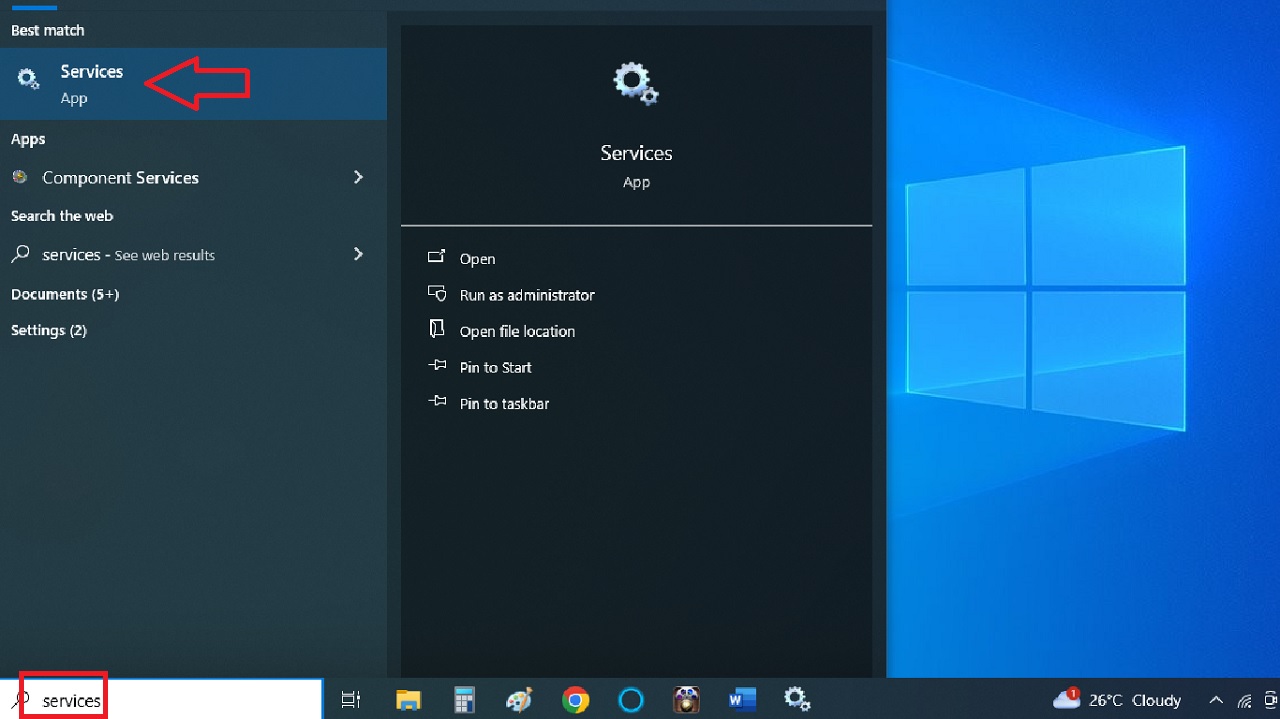
Restart DHCP Client: Type services in search box and hit Enter > Find and right-click on DHCP Client > Click on Restart from the dropdown options.
If none of the above solutions work, you can now move on to the advanced solutions for DHCP is not enabled for Wi-Fi error.
Note: The interface may be different from the demonstration depending on the Windows version, but the basic process is the same. Check yours while following this method.
Also note that all these solutions may not have any direct impact on resolving the issue, and success is not guaranteed for all systems and situations.
It is advised that you seek help from professionals if none of the above or below solutions can restore things back to normal.
With that said, every solution is worth trying before making the call to the professional technician. Let’s dive in.
Method 1: Run the Network Troubleshooter
The easiest and quickest way to fix the DHCP is not enabled for Wi-Fi error is to run the dedicated network and internet troubleshooter.
This built-in Windows tool will not only identify and fix the underlying problems causing the issue but will also recommend changes for the issues that it cannot solve.
STEPS TO FOLLOW:
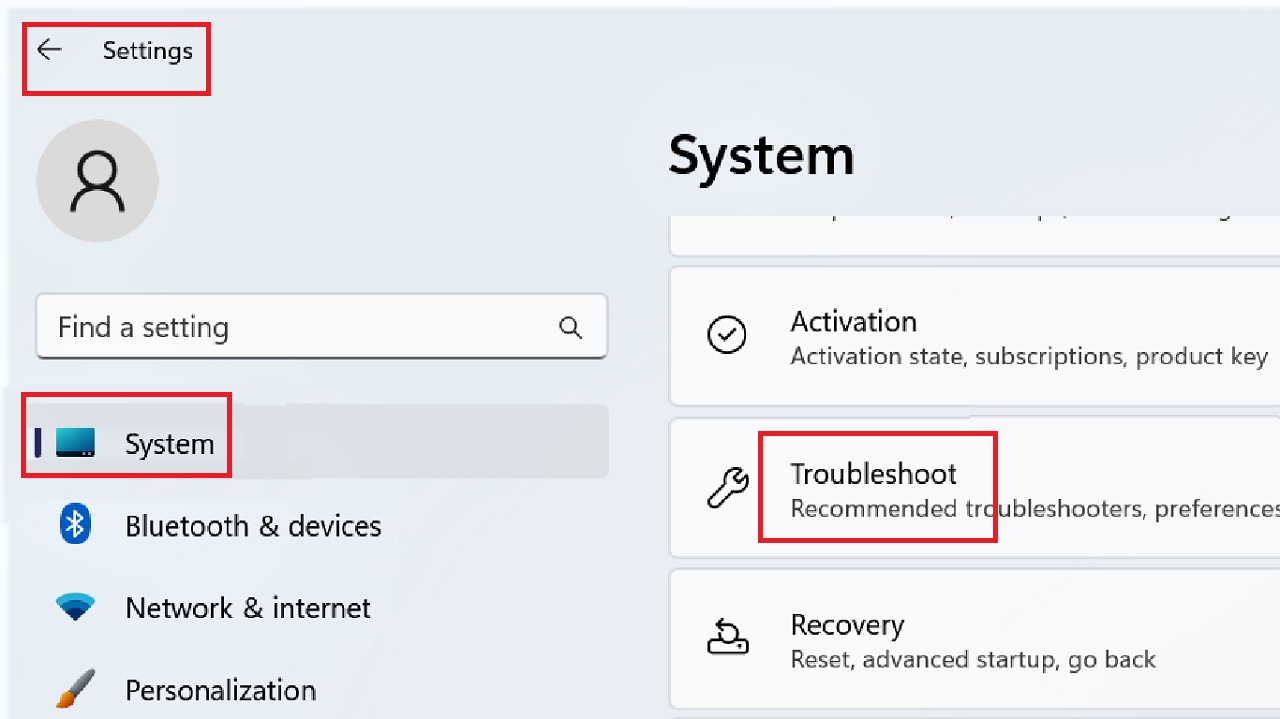
- Press the Windows and I keys together on your keyboard to open Settings.
- Go to System.
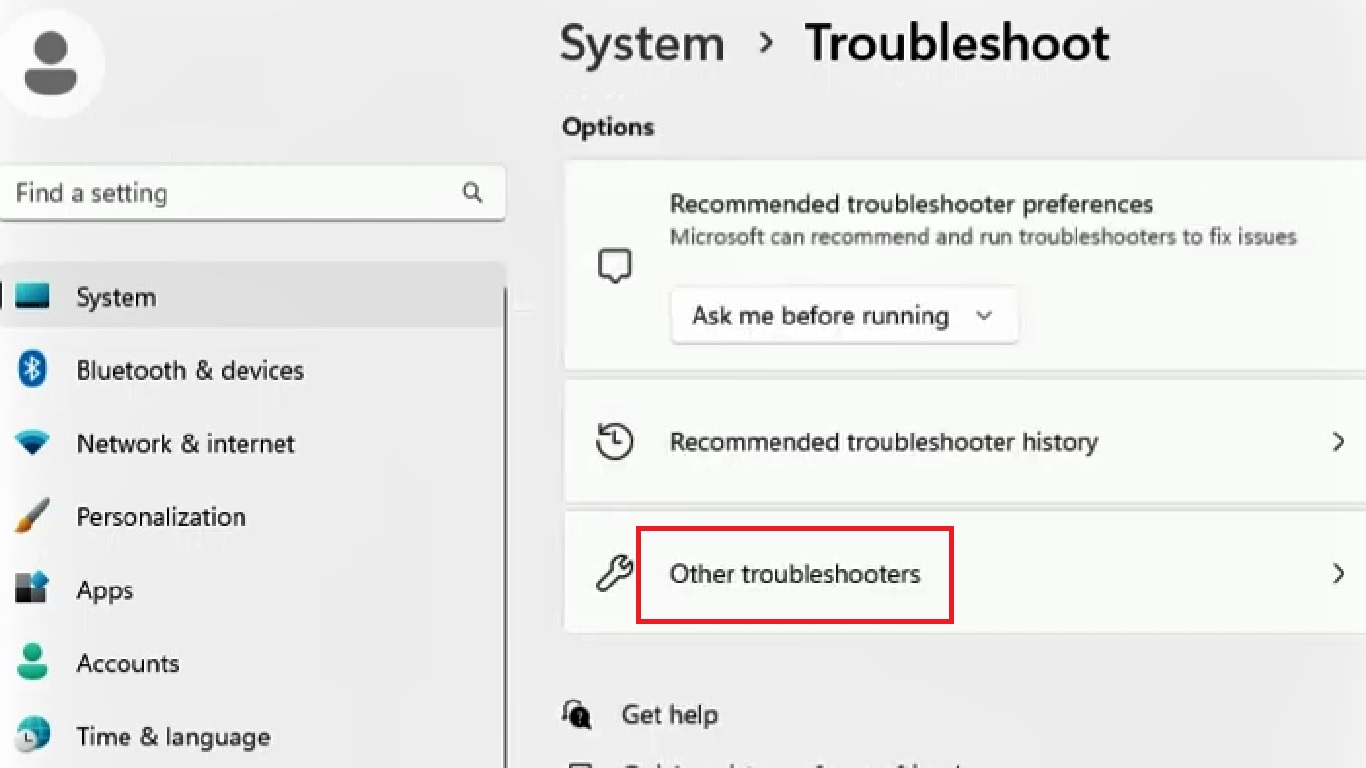
- Select Troubleshoot in the following Systems window.
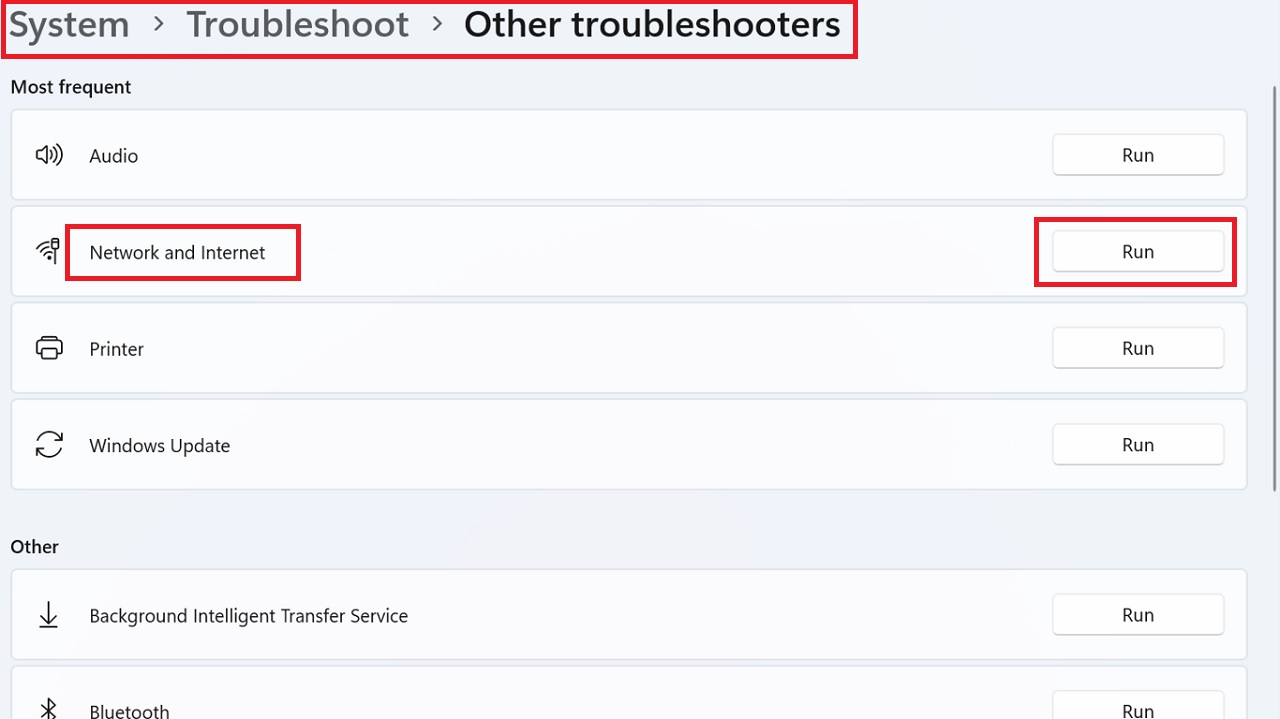
- Click on Other troubleshooters in the following window.
- Click the Run button next to Network and Internet.
Now, follow the on-screen instructions to make the changes recommended and end the process.
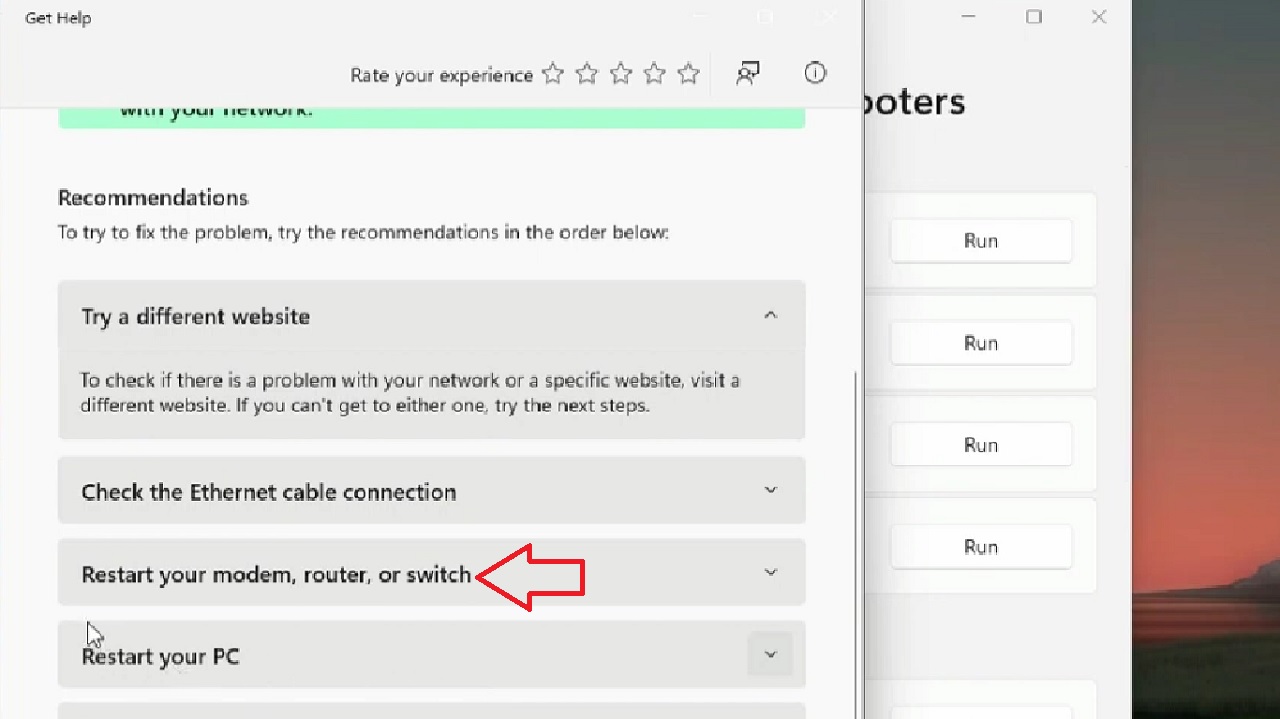
Finally, check whether you are experiencing the error message. If you are, move on to the next solution.
Method 2: Set the DHCP Client Service to Automatic
A network protocol needs the DHCP client service to function properly and get a DHCP address. Setting it to automatic may sometimes help in resolving the said issue.
STEPS TO FOLLOW:
- Press the Windows and S keys on your keyboard together to open the search box.
- Type services in the text field.
- Hit Enter.
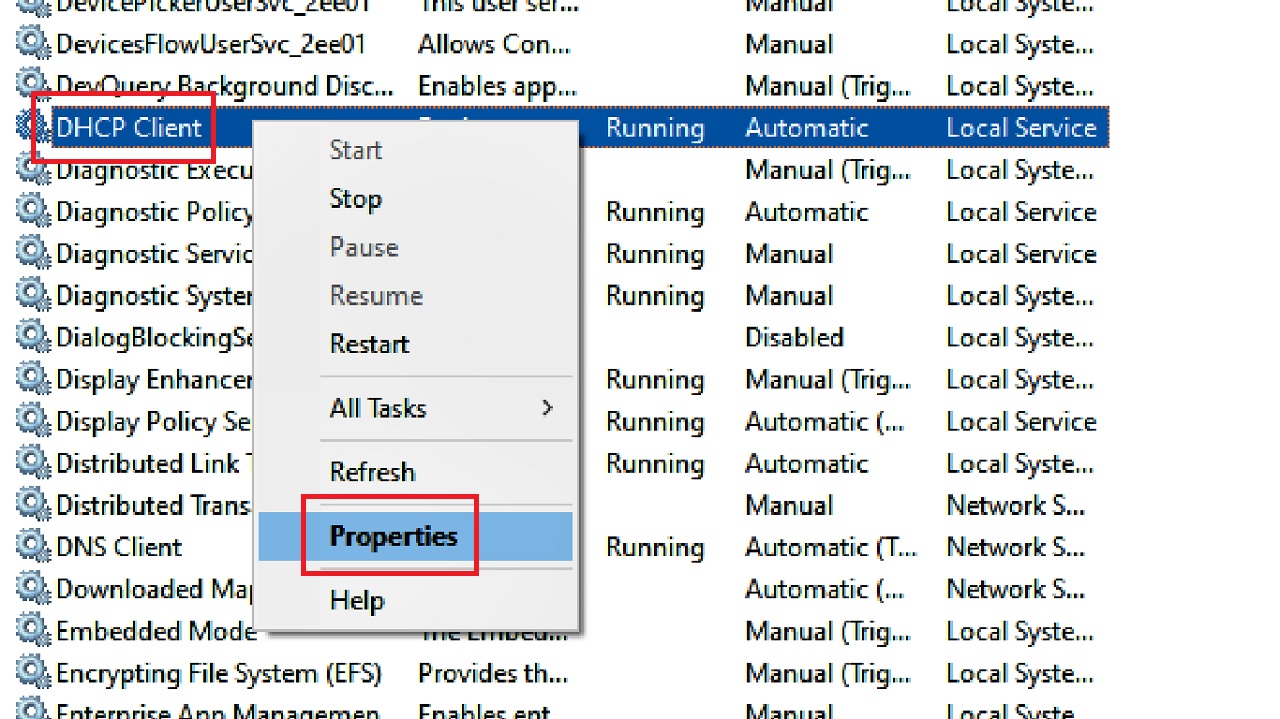
- In the Services window, look for DHCP Client.
- Right-click on it.
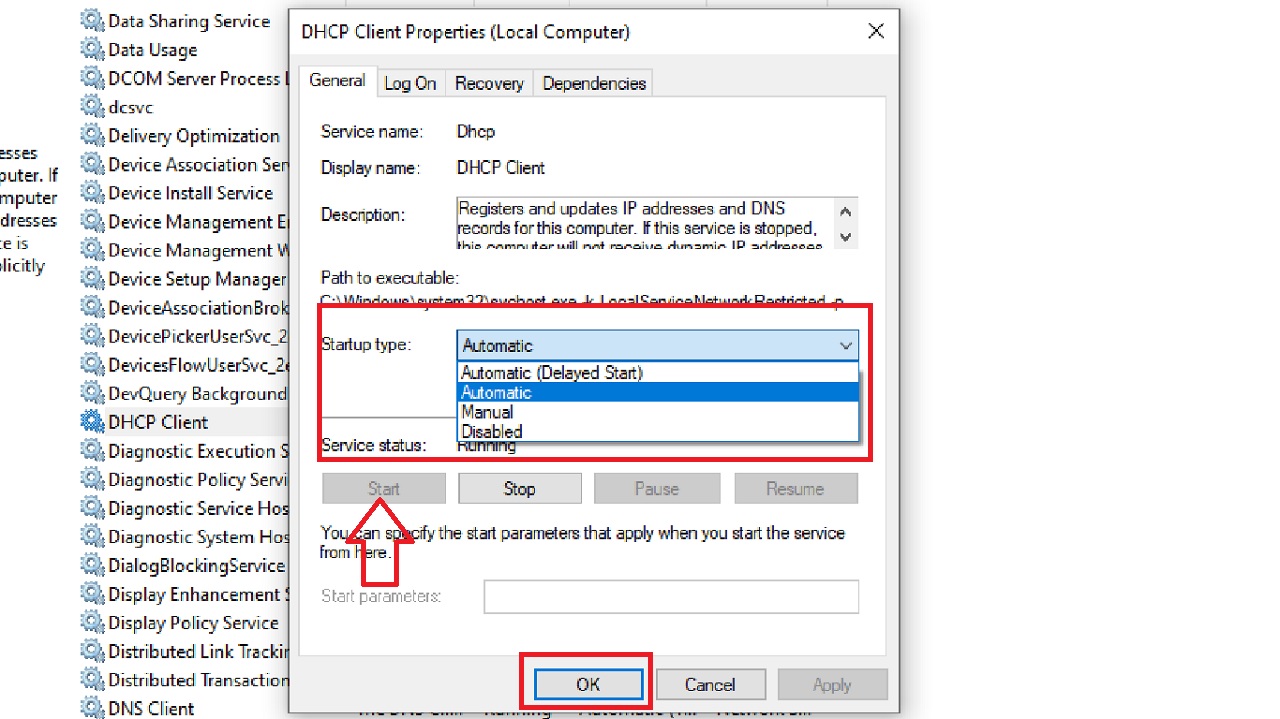
- Select Properties.
- Click on the small arrow in the box next to Startup type.
- Select Automatic from the dropdown menu.
- Click on the Start button to run the service if it is not running.
- Click on the OK button to save the changes.
Note: This is not a guaranteed fix for all situations. So, if it does not work in your case, move on to the next solution.
Method 3: Configure the Network Adapter Settings
Sometimes, the issue may also be resolved when you configure the network adapter settings. Its default setting may require you to manually enter the DNS server and IP address. And, if it is not entered, the issue will occur.
STEPS TO FOLLOW:
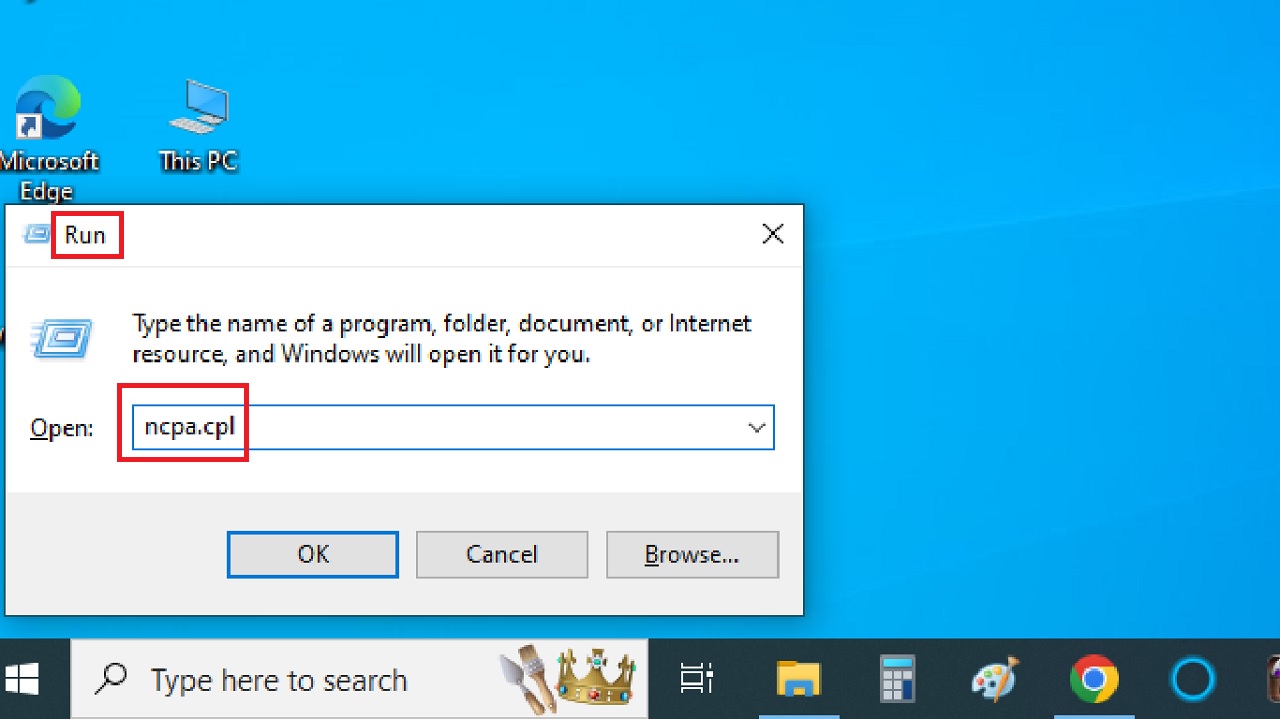
- Press the Windows and R keys together on your keyboard to open the Run dialog box.
- Type ncpa.cpl in the text field.
- Hit Enter.
- Right-click on the active network adapter, Wi-Fi in this case, in the Network Connections window.
- Select Properties from the dropdown context menu.
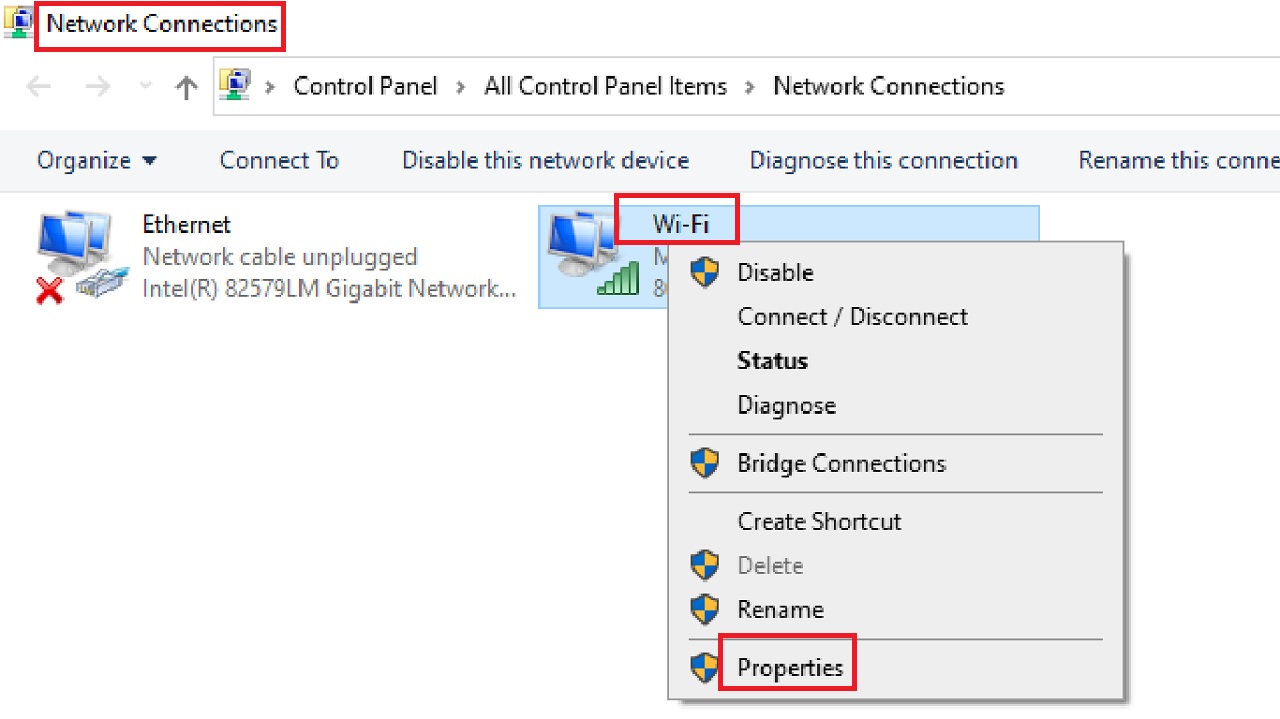
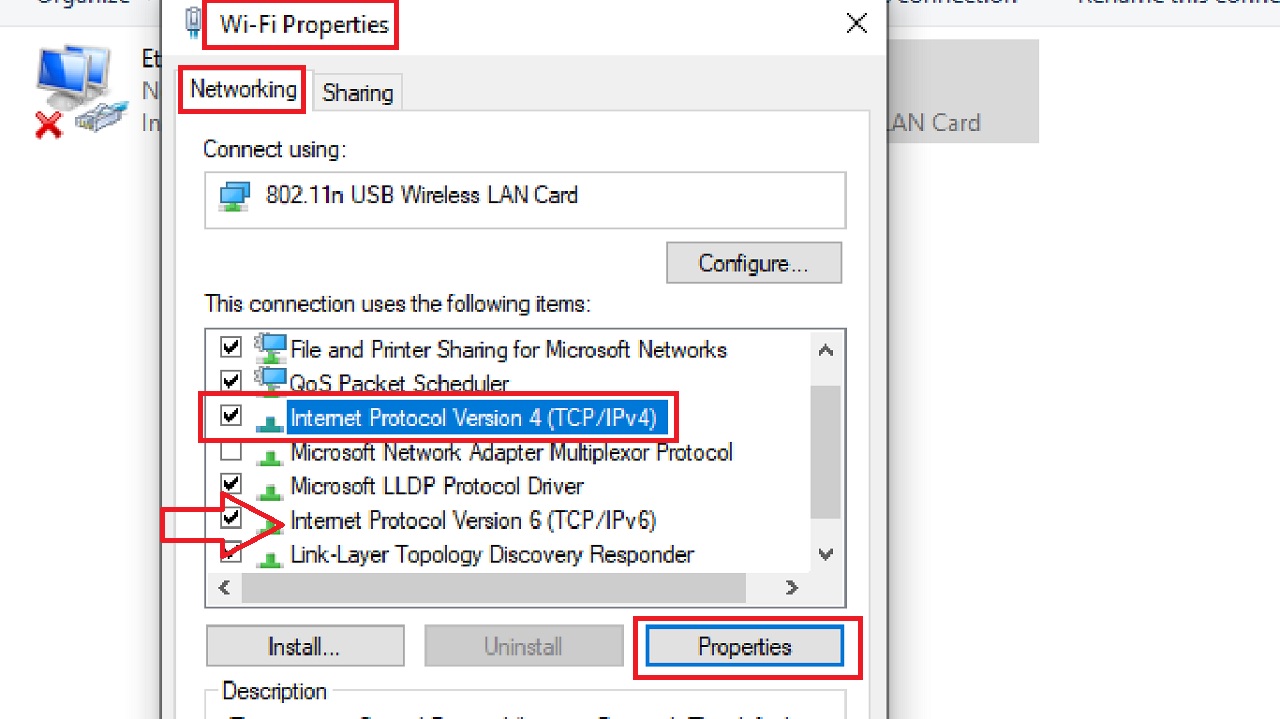
- Select the Internet Protocol Version 4 (TCP/IPv4) from the list of items in the box under This connection uses the following items in the Networking tab in the Wi-Fi Properties window.
- Click on the Properties button.
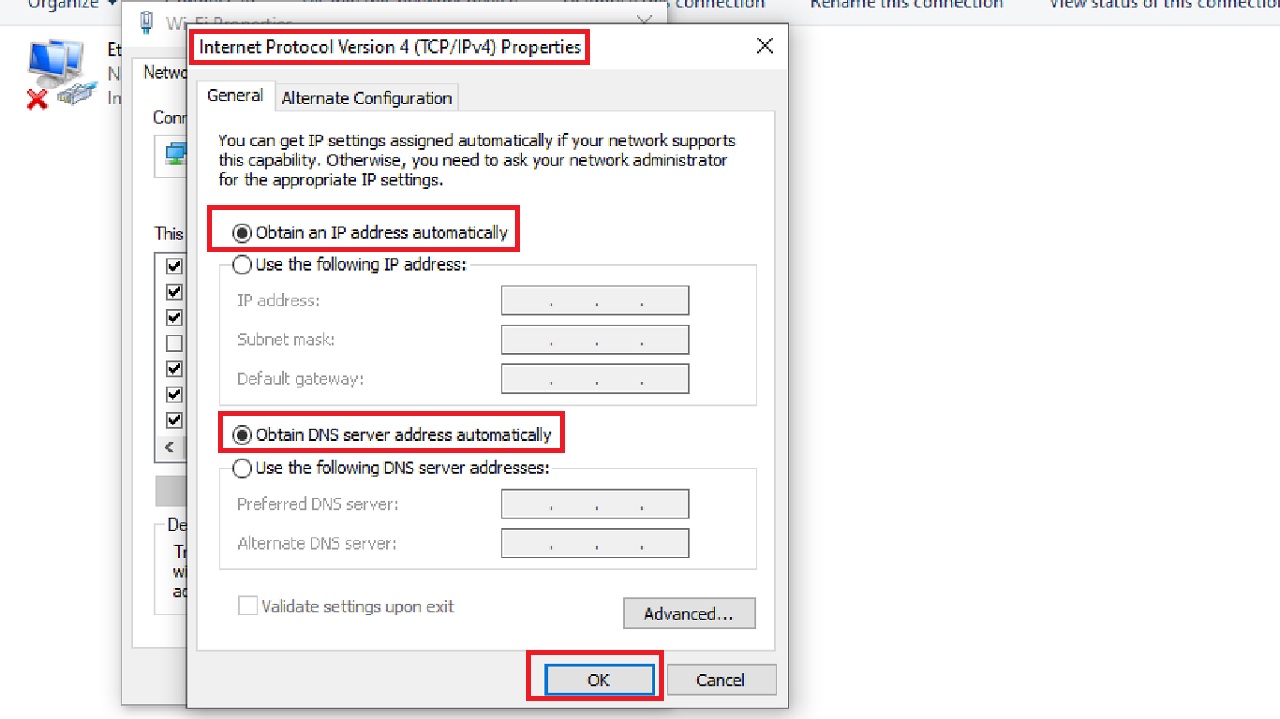
- Click on the radio button next to Obtain an IP address automatically to enable it in the following Internet Protocol Version 4 (TCP/IPv4) Properties window.
- Do the same for Obtain DNS server address automatically.
- Finally, click on the OK button to save the changes.
Do the same for Internet Protocol Version 6 (TCP/IPv6), marked by a red arrow in the image of the Wi-Fi Properties window before the above, if your network connection relies on this particular protocol.
Once you are done making the changes, restart your computer to check whether or not the issue is resolved. If it still persists, move to the next method.
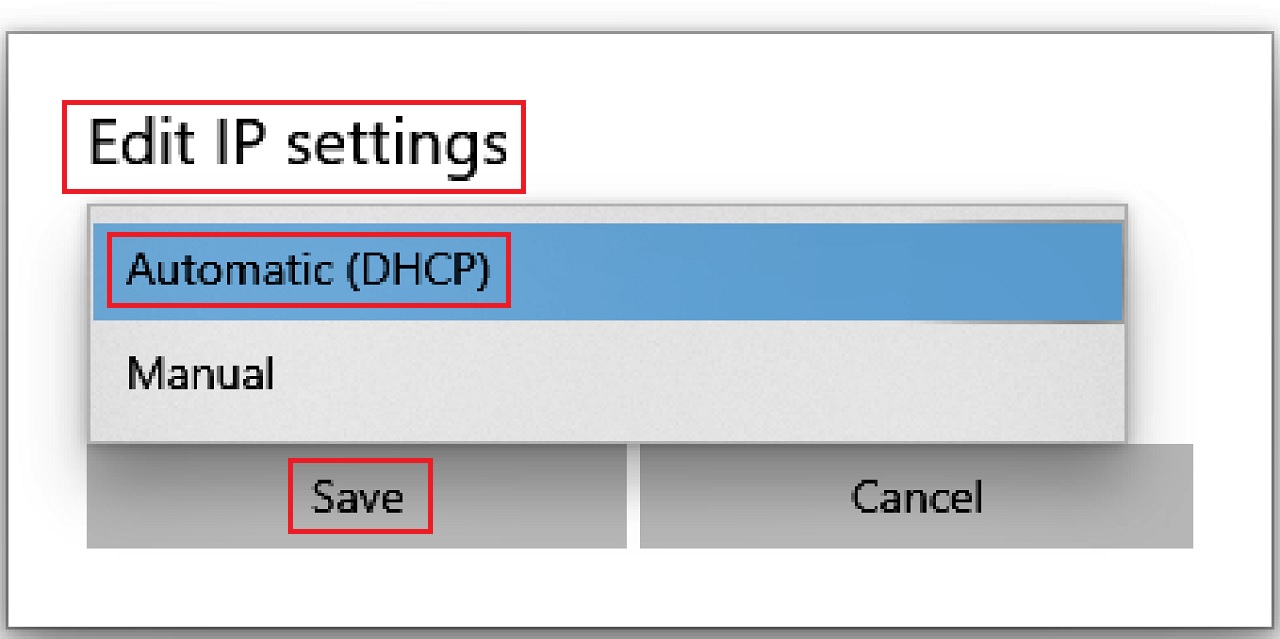
Method 4: Set Network Properties to Automatic
Sometimes the network property may be set to manual and cause this issue. Changing the setting to automatic might fix the problem.
STEPS TO FOLLOW:
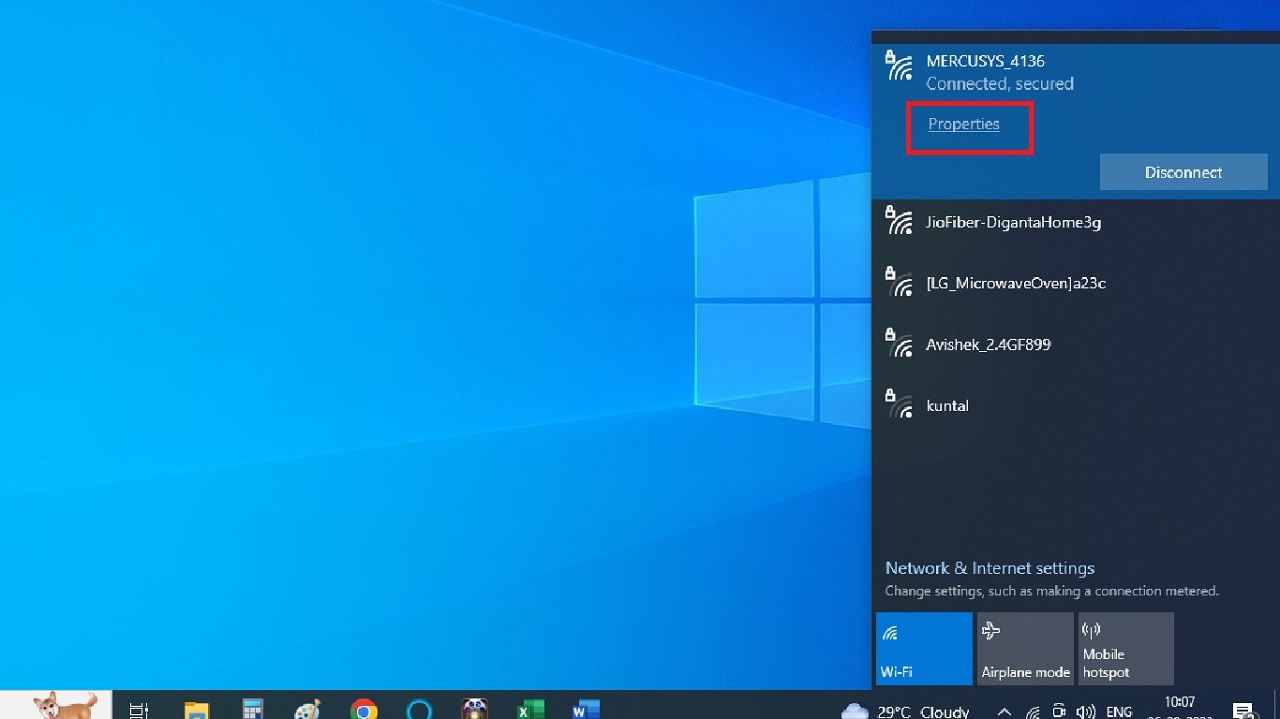
- Click on the network icon on the taskbar on the bottom-right corner of your screen.
- Click on Properties of your network.
- Click on the Edit button in the following window.
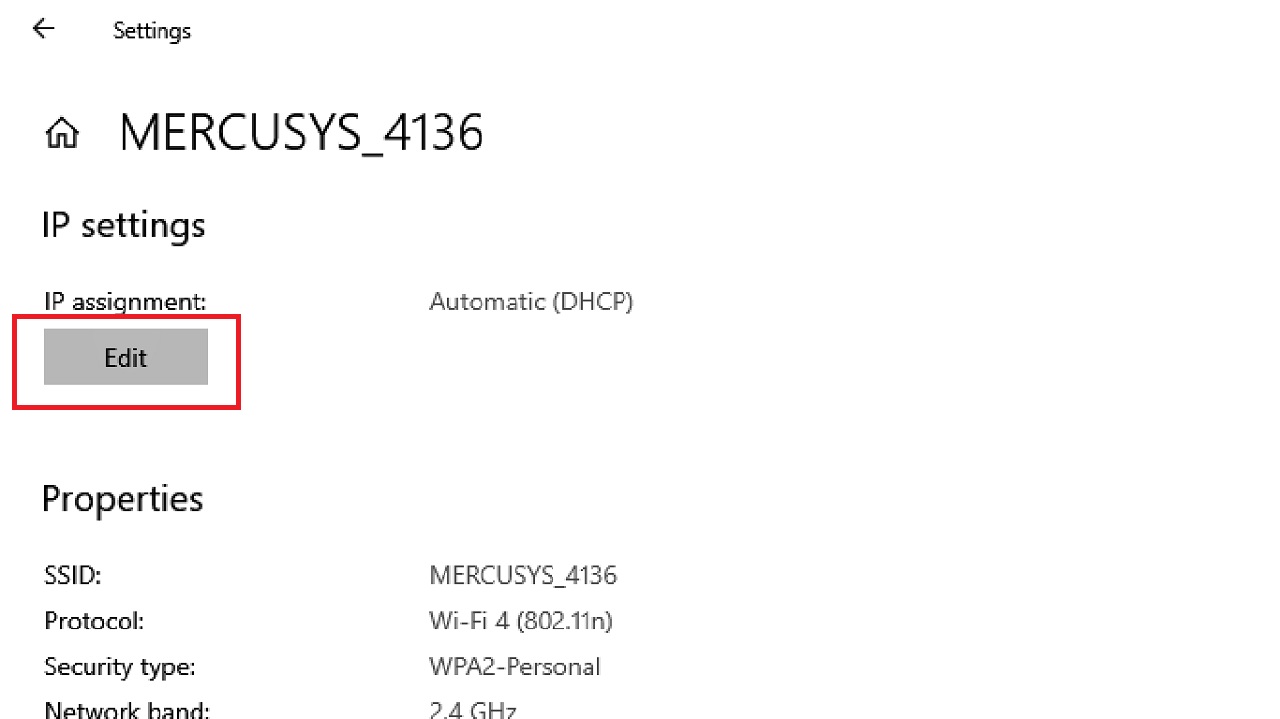
- Click on the small arrow in the box under Edit IP settings in the following window.
- Select Automatic if it is set to Manual by default.
- Click on the Save button.
- Close all windows.
Now, check whether the issue is resolved, or else move to the next solution.
Method 5: Reset the Network Settings
In some specific situations resetting network settings may potentially resolve the issue, especially if there is any misconfiguration or corruption in the settings. So, it is worth trying.
STEPS TO FOLLOW:
- Open Run.
- Type cmd and hit CTRL + SHIFT + ENTER keys together on your keyboard.
- Click on Yes in the User Account Control window.
In the Command Prompt window, type the following commands one by one pressing Enter every time, after a command is successfully executed:
- netsh winsock reset catalog
- netsh int ip reset resetlog.txt
- ipconfig /release
- ipconfig /renew
When it is done, you must close the Command Prompt window and restart the computer.
Method 6: Check Windows Firewall and Create an Exception
In a few specific situations, this specific solution may help. First check whether the Windows Firewall is causing issues with DHCP functioning by blocking the DHCP Client by disabling it. Then, create an exception if it is to resolve the issue.
STEPS TO FOLLOW:
- Open the Control Panel.
- Go to System and Security.
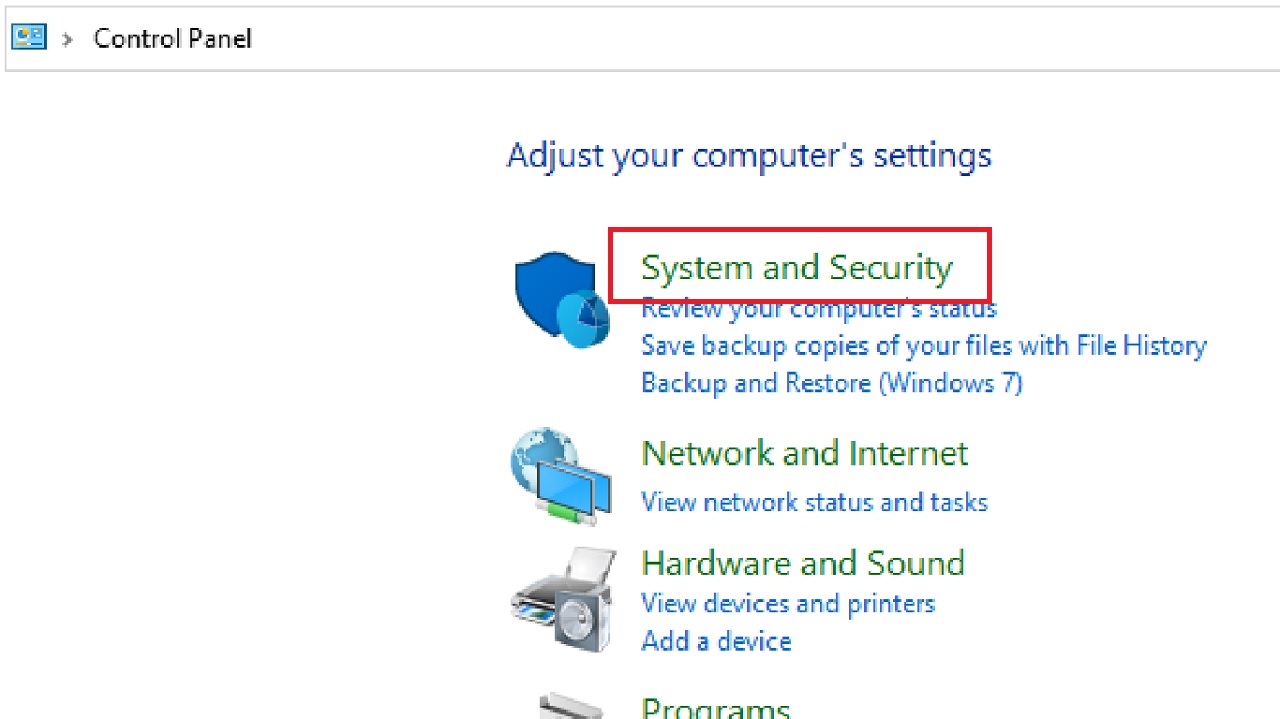
- Select Windows Defender Firewall in the following System and Security window.
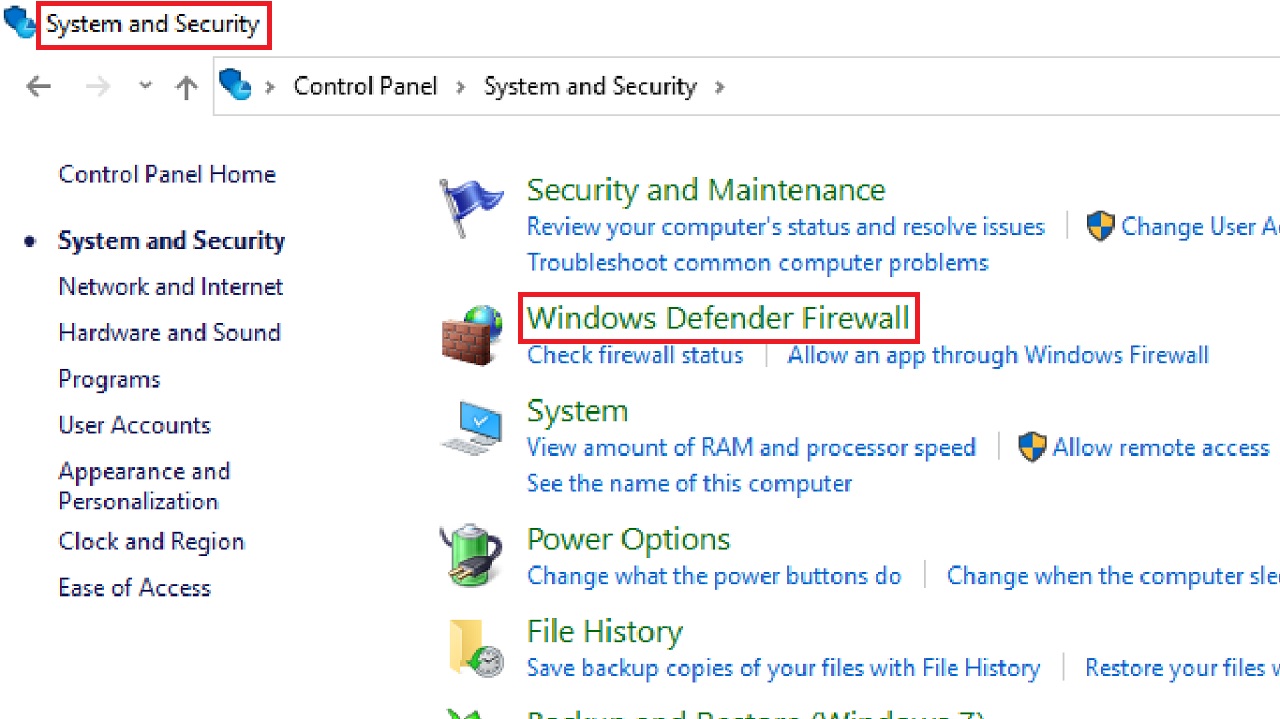
- Go to the left pane in the following Windows Defender Firewall window and click on Turn Windows Defender Firewall on or off.
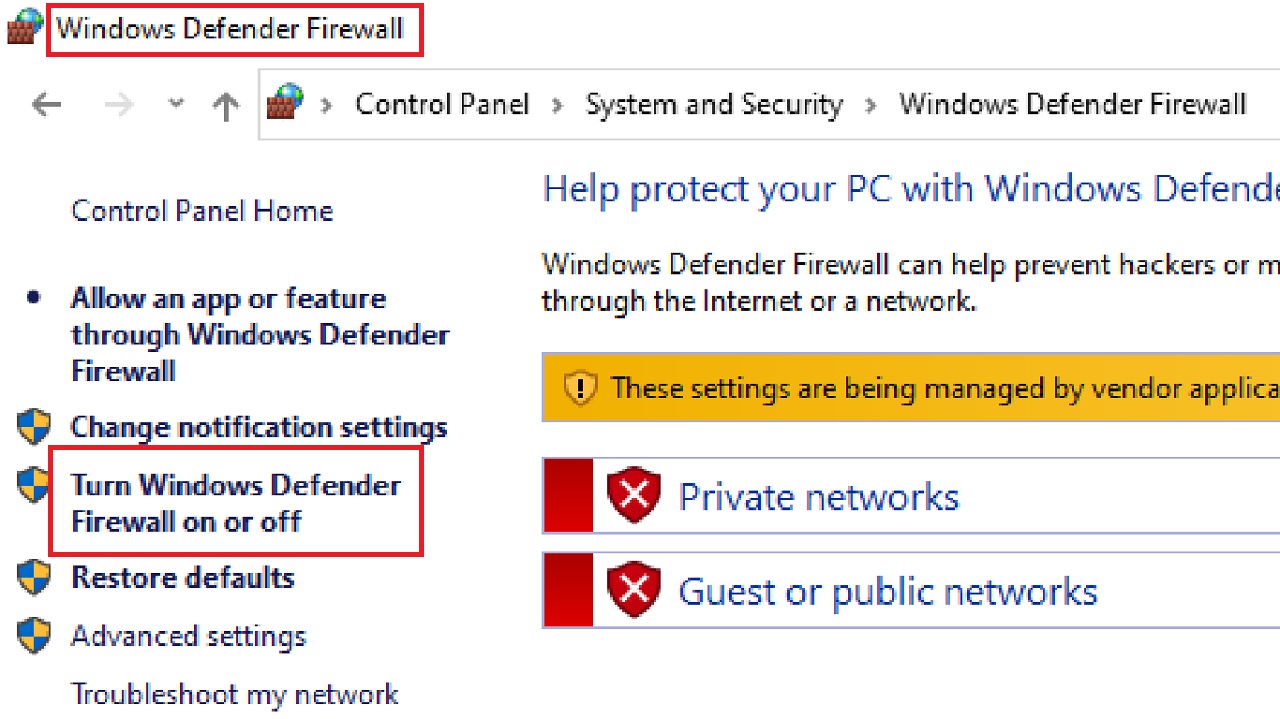
- In the following Customize Settings window, click on the small circular buttons next to Turn off Windows Defender Firewall (not recommended) under both Private network settings and Public network settings to disable them.
- Click on the OK button below (not shown in the picture) to save the changes.

Now restart your system. After it restarts, check whether the issue is resolved or not. If there are no connectivity issues, then the Windows Defender Firewall was the culprit.
So, you will need to configure Firewall so that it allows the DHCP protocol. You can do this by creating an exception for it in the following way:
- Click on the Start menu.
- Click on the Settings option.
- In the Settings menu, go to the Find a setting search area.
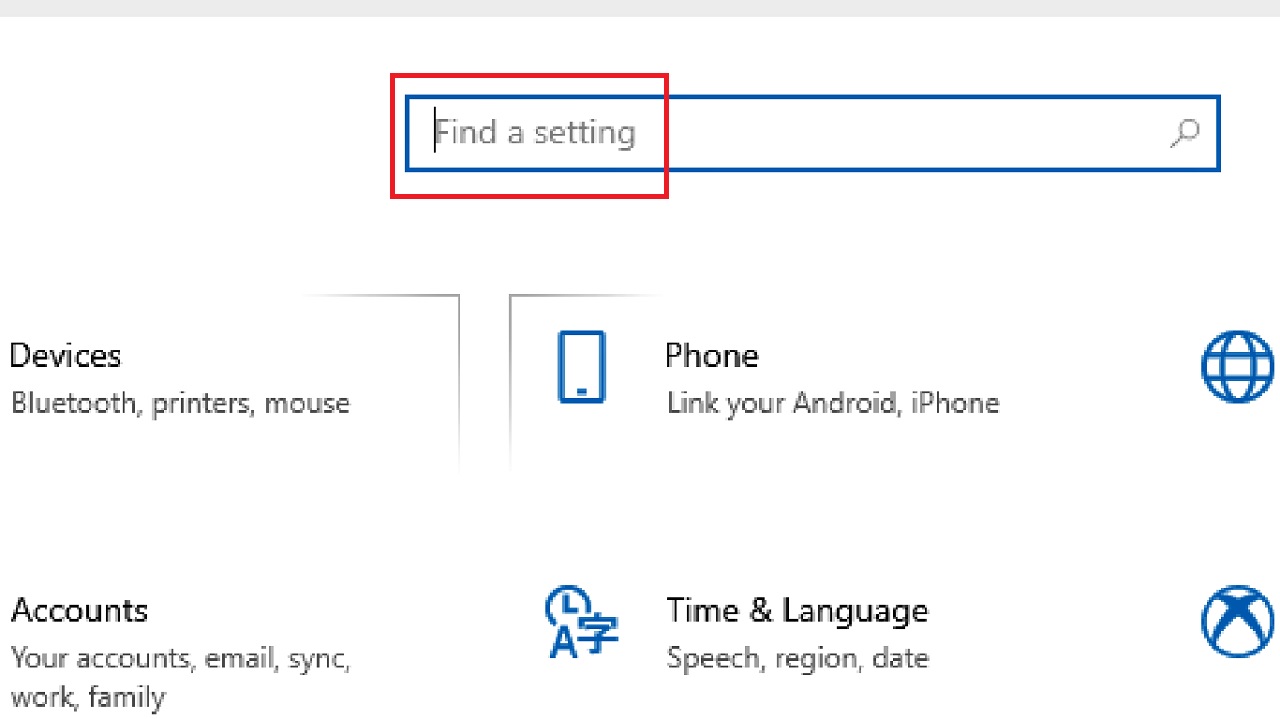
- Type firewall.
- Select the Allow an App through Windows Firewall from the search results displayed in the dropdown options.
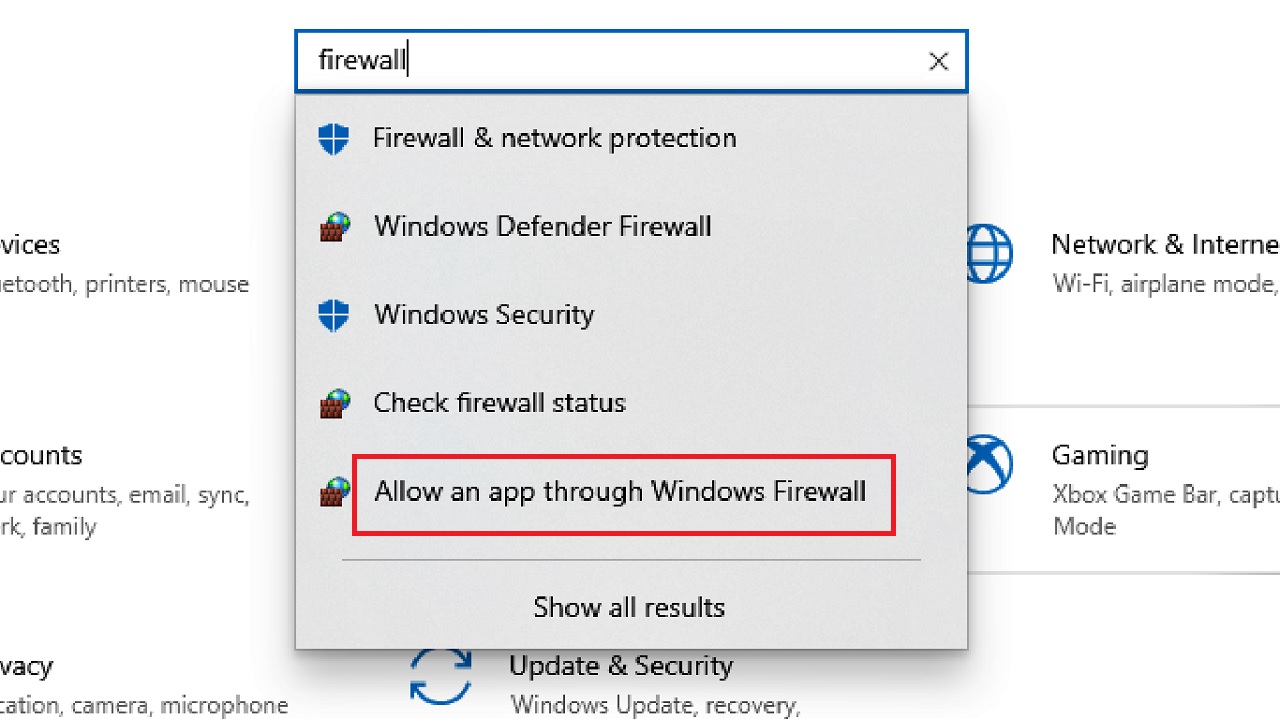
Alternatively, depending on the operating system version, if this option is not available, you may select Windows Defender Firewall from the search results, go to the left pane and click on Allow an App or Feature through Windows Firewall.
- In the following Allowed Apps window that appears, click on Change Settings.
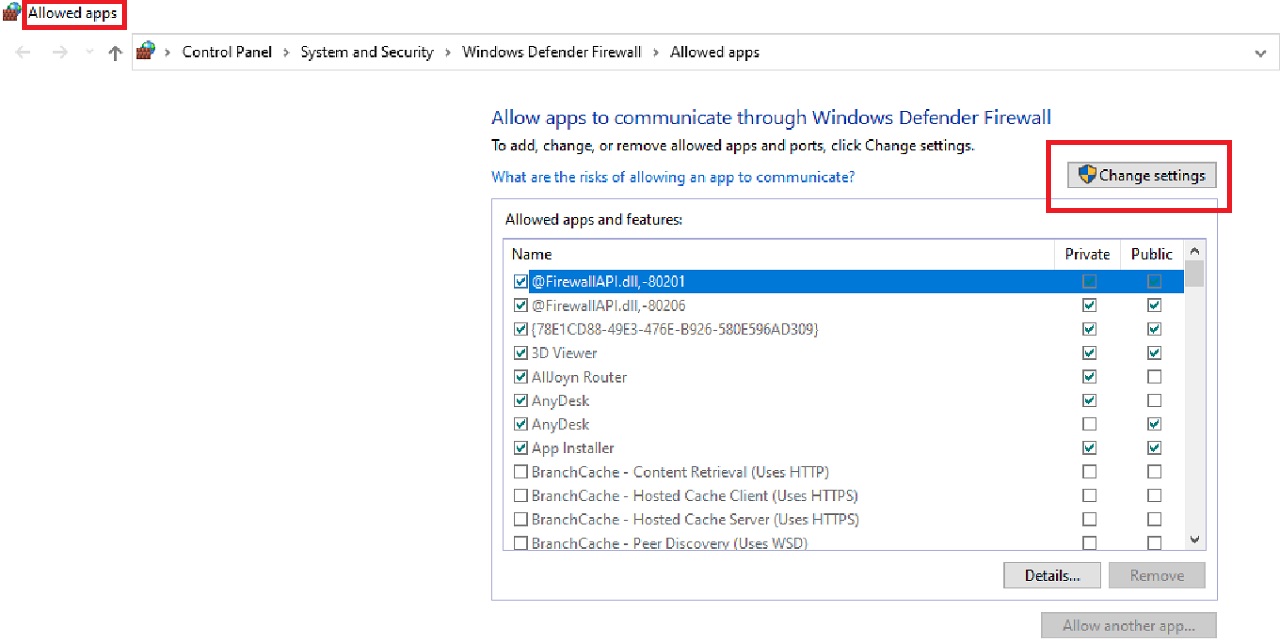
- Find your DHCP service.
- Check the box next to it.
This will allow the DHCP client to communicate through the firewall and your issue will be resolved.
Method 7: Disable Proxy
Disabling proxy is reported to be effective in resolving the issues in some cases. So, you may try it as well.
STEPS TO FOLLOW:
- Open Run and type inetcpl.cpl.
- Press Enter.
- In the following Internet Properties window, go to the Connections tab.
- Click on LAN settings.
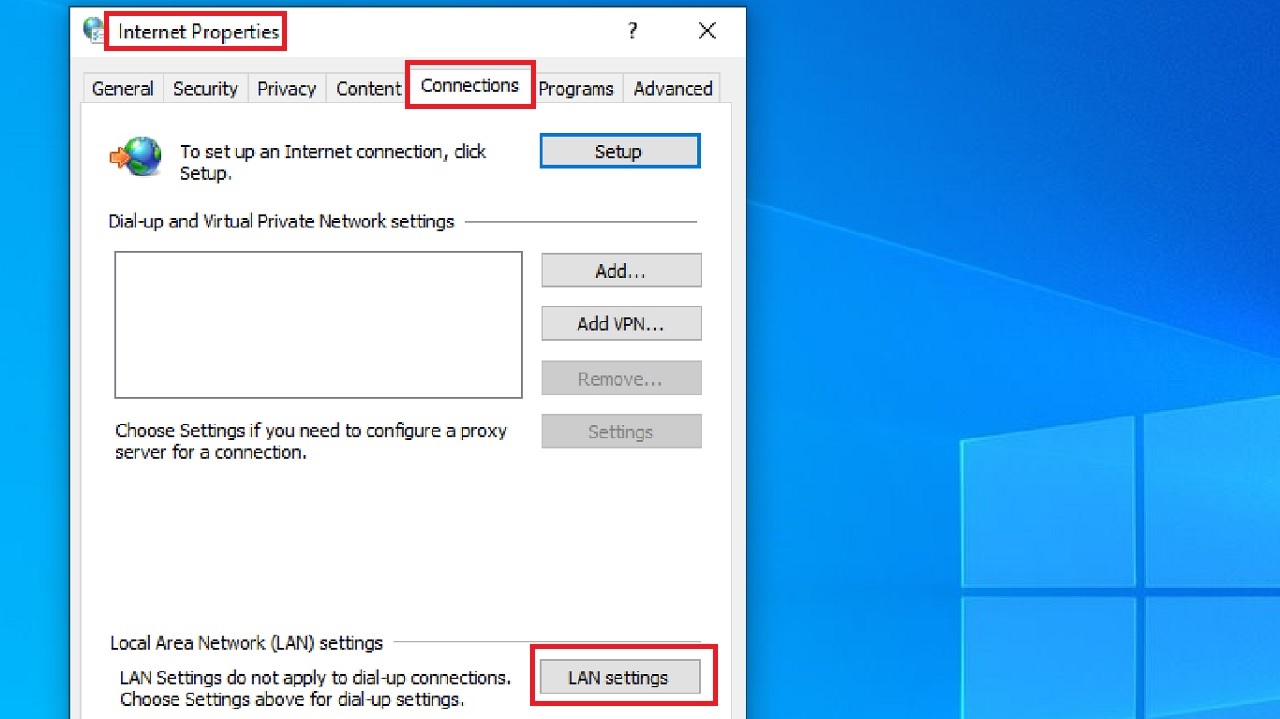
- In the following Local Area Network (LAN) Settings window, check the small square box next to Automatically detect settings if it is not checked already.
- Go to the Use a Proxy Server for your LAN option below.
- Click on the box next to it to uncheck it.
- Click OK to confirm your action.

Now, restart your PC and check whether the issue is resolved.
Conclusion
To wrap up, enjoying uninterrupted data flow and a seamless connectivity is not an issue anymore even if you encounter error messages such as DHCP is not enabled for Wi-Fi.
Now that you know the steps to enable DHCP for your Wi-Fi, it will be just a matter of a few minutes to get things back to normal.