
If you are struggling with your Wi-Fi connection of your device that is not prompting for a password, you are at the right place.
In this article you will learn about the most effective solutions to this issue, “Wi-Fi not asking for password,” addressing it directly.
Follow the instructions for each troubleshooting method to effectively resolve the issue and regain access to the Wi-Fi network.
In This Article
KEY TAKEAWAYS
- Start resolving the issue of “Wi-Fi not asking for password” by checking the network settings to verify you have not disabled the password prompt feature and re-enter it correctly.
- Another useful way to resolve the issue is to forget the connection and reconnect. This will delete the saved network profile on the PC and set a new one.
- Restarting the device and the router may also help you fix the error quickly. If that does not work pressing the reset button at the back of your router may.
- Updating the firmware of the router with the latest version available in the manufacturer’s website is another useful way to resolve the issue.
- You may make changes in the security settings by changing the password and encryption type and then connect to rectify issues in the settings and refresh the authentication process.
Why is Wi-Fi Not Asking for Passwords?
The Wi-Fi in your PC may not prompt for a password if it is set to the “Automatically Connect” option and disabled the password prompt feature.
If your device already has the Wi-Fi password saved, it will not ask for a password and connect to the network automatically.
Apart from that, here are some known reasons for the issue to occur:
- Incorrect or corrupted network profile on your device
- The authentication data may be cached on your system
- The router configuration may be incorrect
- The security configuration may be malfunctioning
- Overly aggressive firewall or antivirus blocking the network communication
- There may be a temporary issue or a software glitch on your device
- The router firmware may be outdated
- The device may be connected to a different preferred network having the same name
- The device may be still within the range of a network to which it was connected previously
- The operating system may be incompatible or there may be a bug existing in it
- The network name and password may be incorrect
- There may be fragments of an old setting still remaining even after a router reset
- There may be credentials stored in the network keychain that are bypassing the request
- There may be a few third-party apps installed on your computer to manage Wi-Fi connections that are conflicting
- Any recent update of the driver or software that is incompatible
Additionally, in some rare cases, any hardware issues in the router may also cause this error.
Now that you know all the reasons for the “Wi-Fi not asking for password” issue to occur, take a look at the solutions to resolve it effectively.
Ways to Fix Wi-Fi Not Asking for Password
One of the easiest ways to fix the “Wi-Fi not asking for password” error is to check the network settings to find if you have disabled the feature accidentally and set it to “Automatically Connect” and enable it.
Also, check for the accuracy of the network name and password. Make sure you are connected to the correct Wi-Fi network and entering the correct Wi-Fi password.
There are a few other simple checks to make before trying the complex solutions, such as:
- Deleting the current network profile saved on your device and then reconnecting to it
- Restarting your device and router by unplugging them and connecting again after some time
- Switching to an Ethernet connection instead of Wi-Fi
- Checking for available Windows updates and, if any is available, installing it
- Updating the outdated router firmware and network adapter driver with the latest version
- Running the network troubleshooter from Settings
- Resetting the router back to factory settings, as the last resort, by pressing the reset button at the back to clear all custom settings and any configuration conflicts
If the basic steps mentioned above cannot resolve the issue, you may follow the steps mentioned below for resolving the “Wi-Fi not asking for password” issue.
Note: All the solutions mentioned above and below depend on specific settings and situations. Therefore, there is no guarantee that every solution will work on every system and condition. Also, one particular solution may not resolve the issue. You may need to combine a few for best results.
Method 1: Change the Security Settings on Your Router and the Password
You may try to resolve the issue by modifying the security settings on the router and also changing the password if required.
STEPS TO FOLLOW:
- Press the Windows and R keys together on your keyboard. This will open the Run dialog box.
- Type ncpa.cpl in the dialog box.
- Hit the Enter key or click on the OK button to open the Network Connections window.

- Select the active network connection on the Network Connections window and right-click on it. (In this case it is the Wi-Fi connection).
- Select Status from the dropdown context menu.
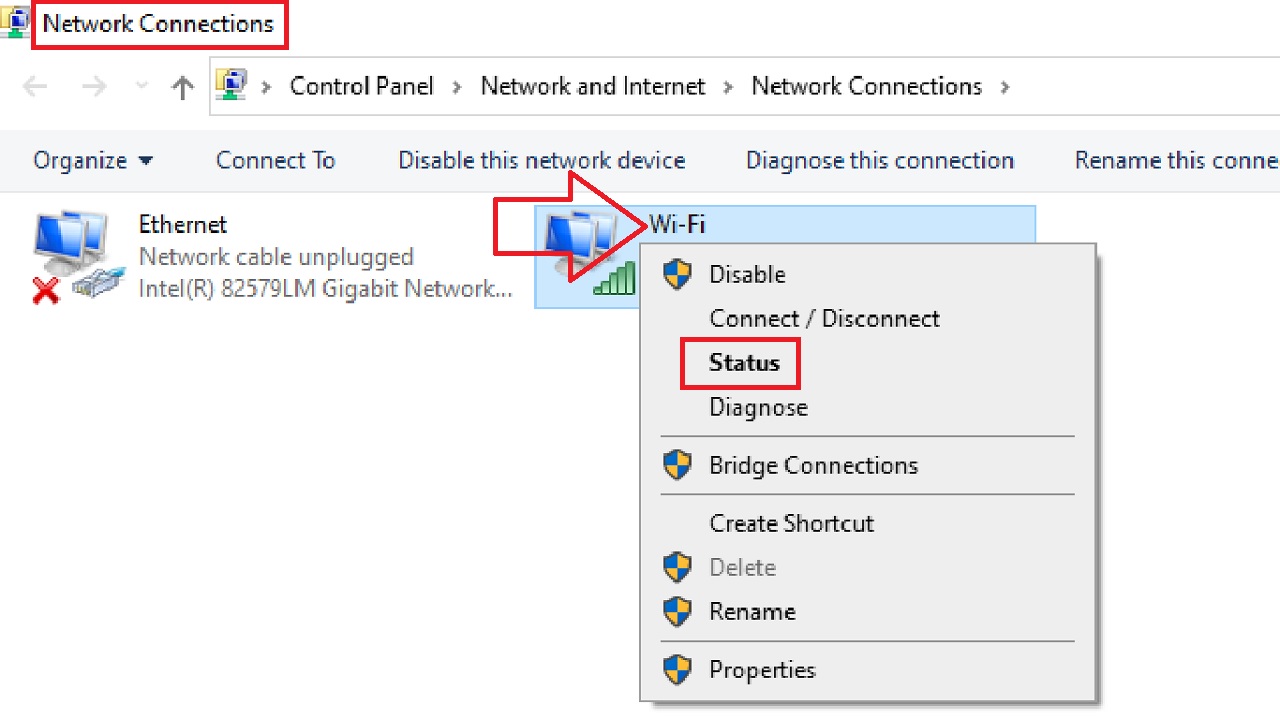
- In the Wi-Fi Status window, click on the Wireless Properties button.

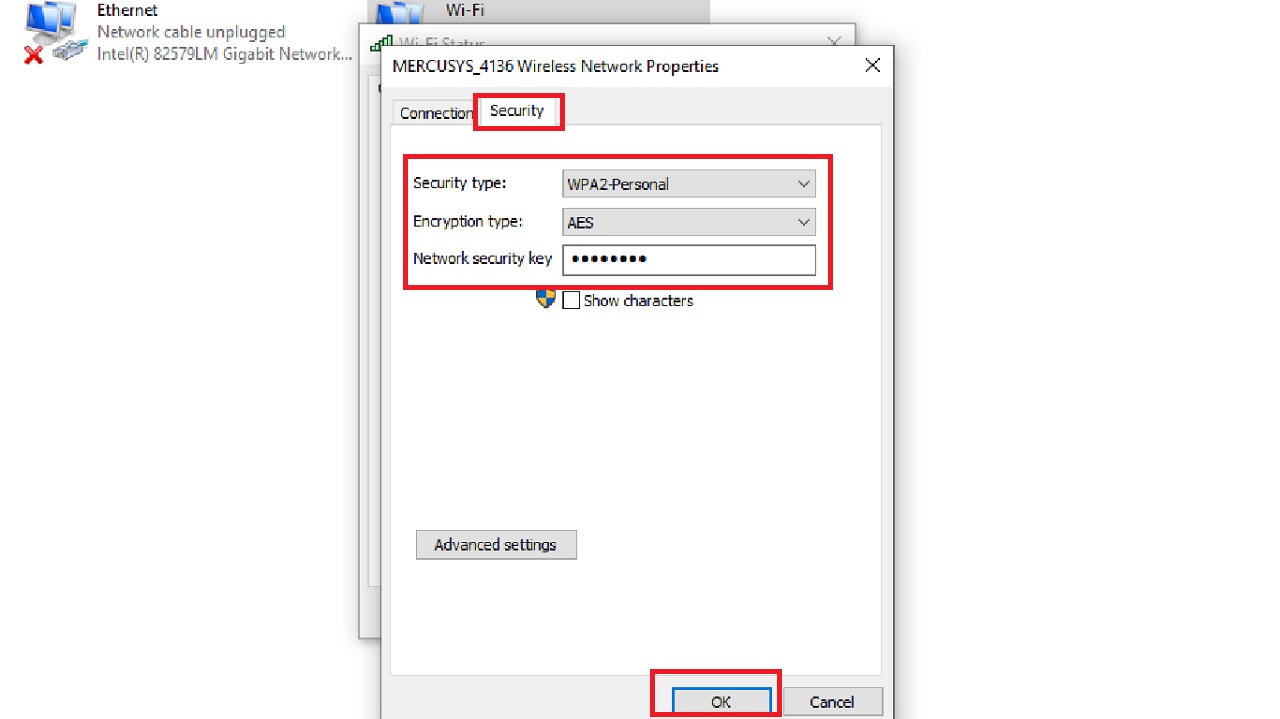
- In the following window, go to the Security tab.
- Click on the small arrow in the boxes next to Security type and Encryption type.
- Choose a different option than what is set from the dropdown options.
- Also change the password or Network security key.
- Finally, click on the OK button.
The issue should be resolved now. If it still persists, try to resolve it in another way as mentioned below.
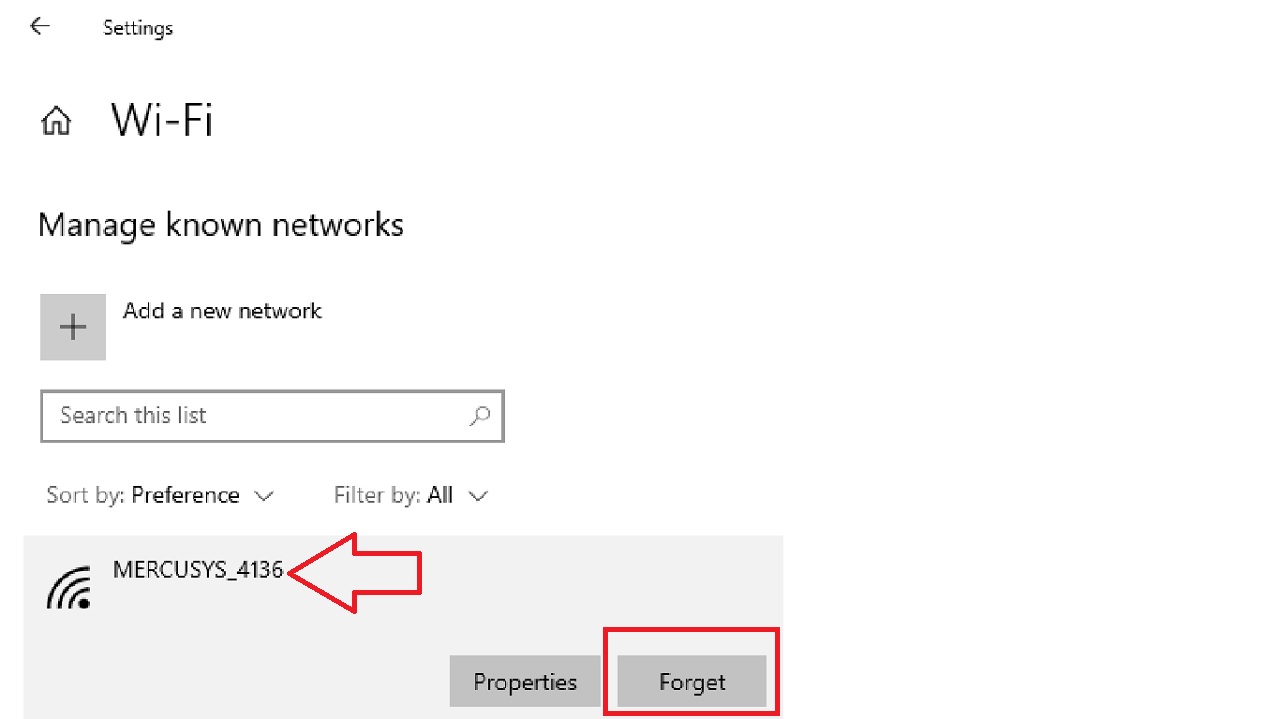
Method 2: Forget the Network and Reconnect
In most cases, the issue may be resolved when you make your system ‘Forget’ the network and then add it again.
STEPS TO FOLLOW:
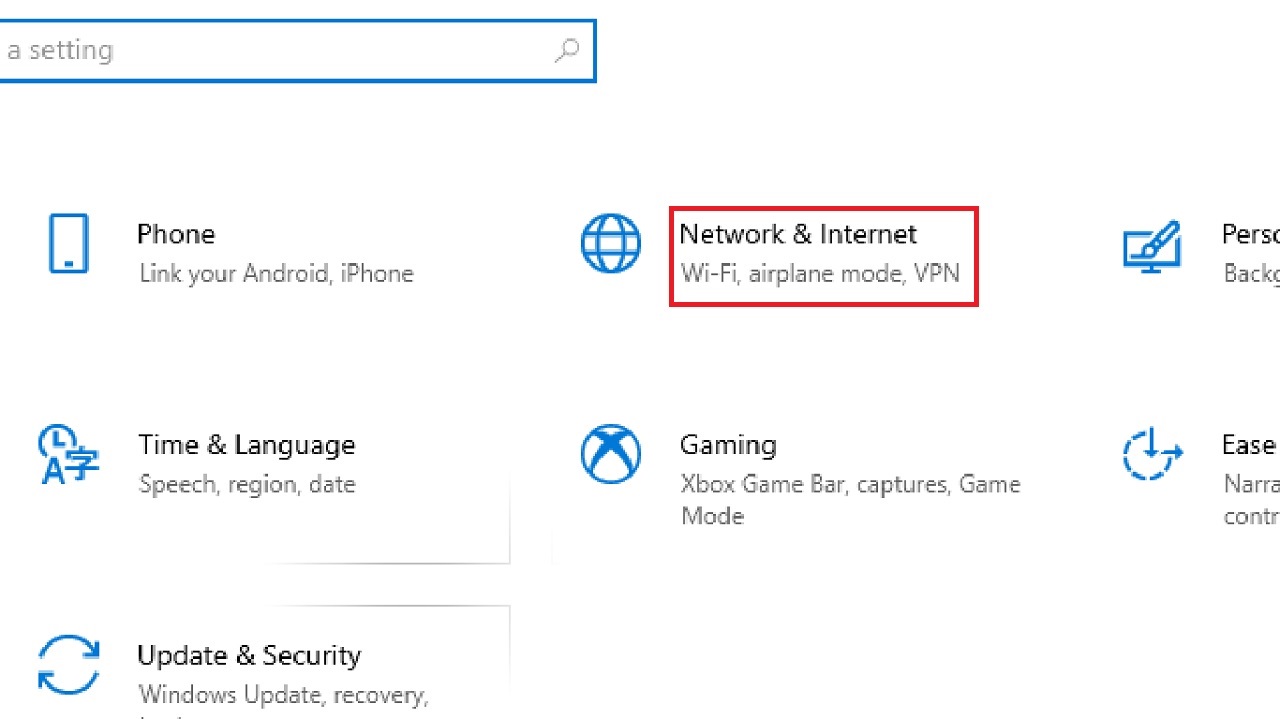
- Click on the Start Menu.
- Select Settings or the Gear icon.
- Click on Network & Internet.
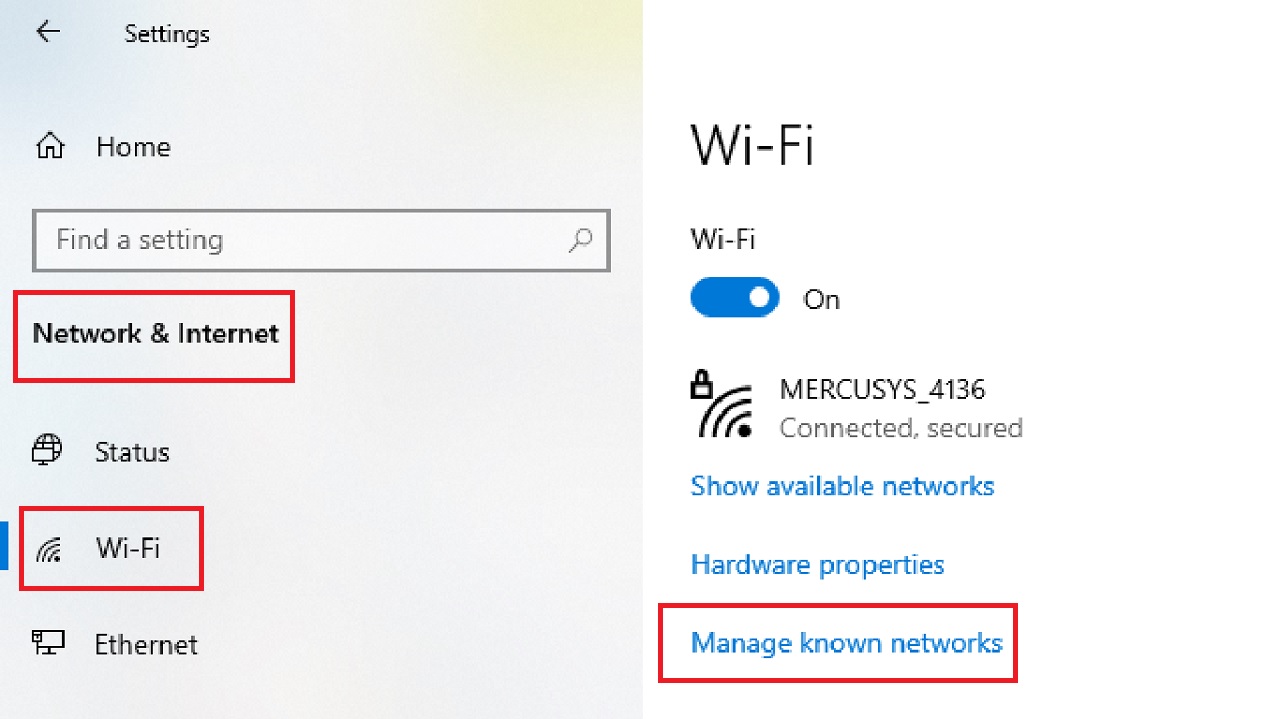
- In the Network & Internet page, select the Wi-Fi option from the left pane.
- Click on Manage known networks option on the right side of the window.
- Select the network connection you want the system to forget and add it again in the following window.
- Click on the Forget button.
- To re-add the network connection, click on the Wi-Fi icon on the right side of the taskbar.
- Select the network the system forgot.
- Click on it.
- Provide the necessary password in the relevant box.
- Click on the Next button.
This should resolve the issue.
Method 3: Disabling Antivirus and Firewall Temporarily
Often the antivirus and firewall are overly aggressive and create issues with network communications. So, disabling them temporarily might potentially resolve this issue as well.
Note: Approach this method with extreme caution because it might leave your system defenseless against security threats.
Also, make sure you re-enable them after troubleshooting to maintain the security of your network and device.
STEPS TO FOLLOW:
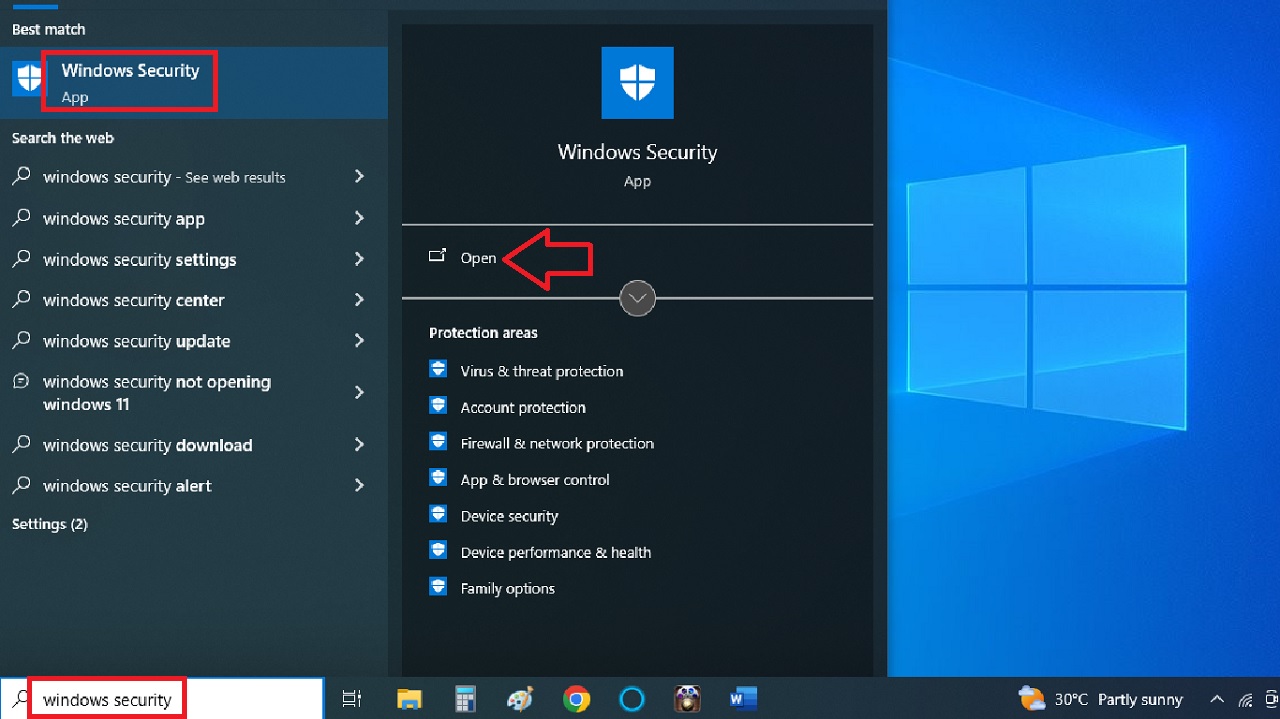
- Go to the search box next to the Start Menu.
- Type windows security and hit the Enter key on your keyboard or click on Open.
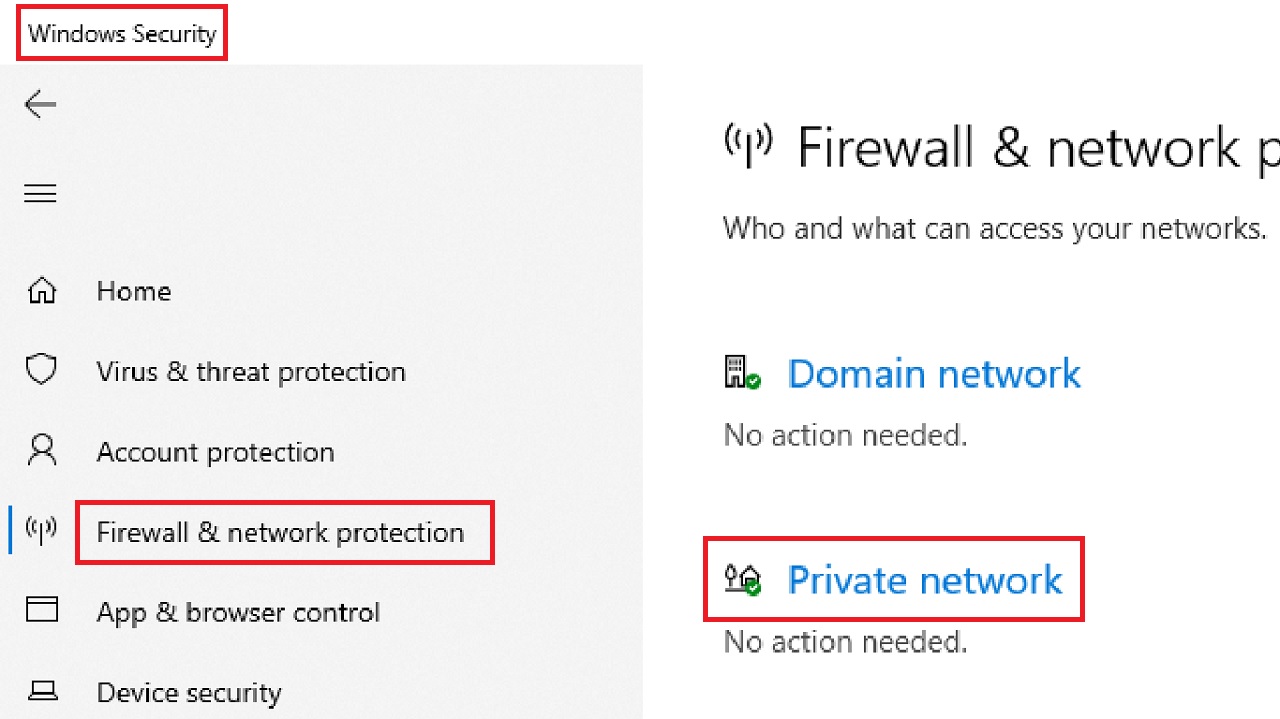
- Select ‘Firewall & network protection’ from the left panel.
- Click on Private network.
- Drag the sliding switch to the left to disable Microsoft Defender Firewall from the following menu.
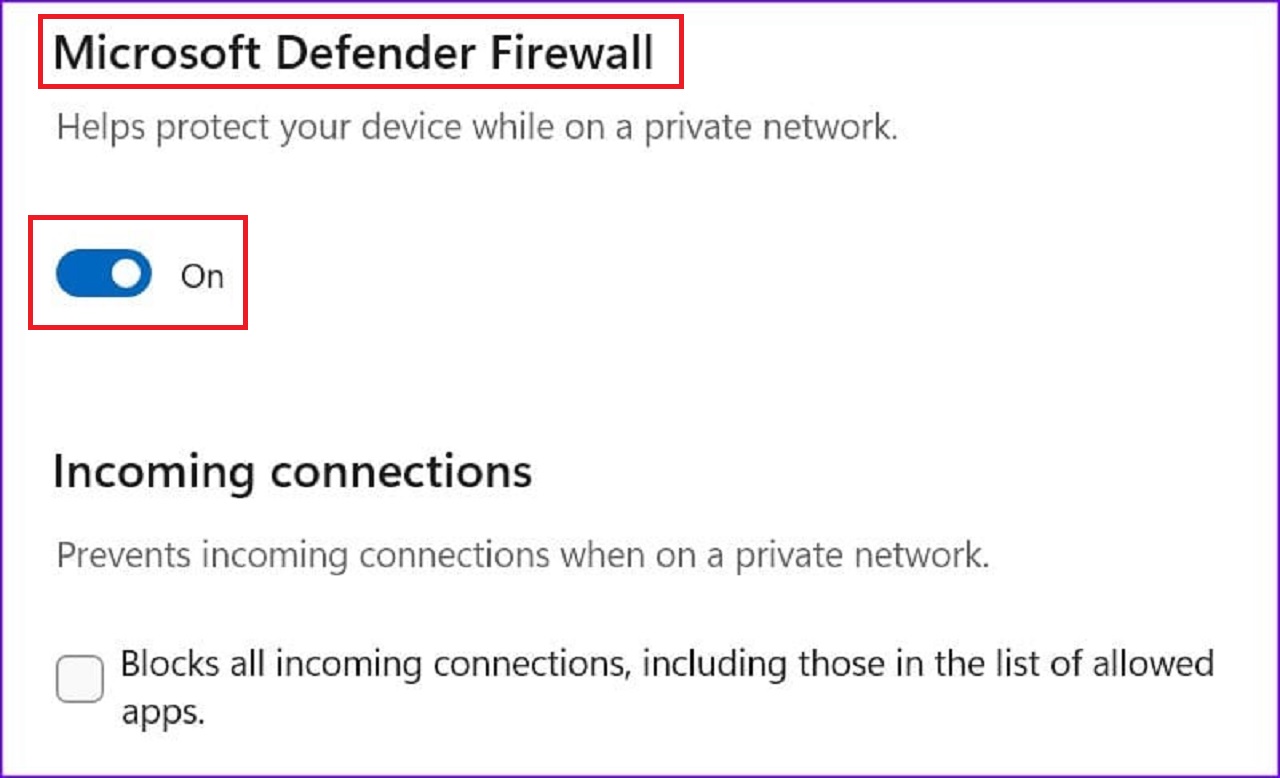
This might resolve the issue. Check by trying to connect to your network.
Method 4: Deleting a WLAN Profile Via the Command Prompt
In some cases, deleting a WLAN profile through the Command Prompt might help resolving this issue, especially if it is incorrect or corrupted.
Note: Perform this step with caution. Make sure that you are deleting the corrupted profile because deleting a profile will remove all its settings, including the passwords saved. If you delete a profile you need, you will be left with no password or saved settings.
STEPS TO FOLLOW:
- Go to search box > Type cmd > Right-click on the best match > Select Run as administrator.
- To view the WLAN profiles saved in your system in the Command Prompt, type in the command netsh wlan show profiles and hit Enter.
- To delete the desired WLAN profile, type in the command netsh wlan delete profile name=”ProfileName” and hit Enter.
(Replace the “ProfileName” part of the command with the actual name of the Wi-Fi network profile you want to delete).
Now, restart your computer and reconnect to your Wi-Fi network by typing the password when prompted.
However, this method may not address any or all given situations. If it does not work in your case and the issue still persists, consider performing the other methods described before or seek professional assistance.
Conclusion
To wrap up, you will need a systematic approach to resolve the “Wi-Fi not asking for password” error.
All the steps mentioned above will help you regain control over the password prompt mechanism.
However, sometimes you may need to perform a combination of these solutions for proper restoration.