
The Wi-Fi disconnection is a common problem faced by Windows 10 users, which causes loss of access to the internet.
Though it is quite frustrating and bothersome, the issue is usually caused by hardware problems and is easily fixable.
In this article, you will learn about some of the quickest and easiest methods to resolve the issue and make your Wi-Fi connection stable and normal again.
In This Article
KEY TAKEAWAYS
- Usually triggered by hardware issues, Wi-Fi disconnection in Windows 10 can often be fixed by restarting the PC, router, or modem.
- If any third-party security software is causing the issue, disabling it temporarily will also restore normal functioning of the Wi-Fi.
- Scanning the computer for any internal issues, checking the cables and connection may also help in resolving the issue.
- Running a few specific commands in the Command Prompt to reset the network settings is a proven way to prevent Wi-Fi getting disconnected.
- Making changes in the value data of a couple of keys in the Windows Registry will also fix the error and make your Wi-Fi function properly.
Why Does Wi-Fi Keep Disconnecting on Windows 10?
The Wi-Fi disconnecting frequently on Windows 10 is usually caused when the Wi-Fi driver software is outdated, which, in turn, causes incompatibility issues.
Some other reasons for this error to occur are:
- An issue in the power management that may be turning the Wi-Fi adapter off
- The Wi-Fi Sense feature connecting to another network nearby
- Improperly configured wireless adapter affecting the range of detection for channel frequency
- Physically damaged, improperly configured or wrong placement of the router
- Service outage
- Large distance between the router and device
The good news is, just as the causes, the solutions to this issue are also many and varied. Read on to learn more about them in the following section of this article.
How to Fix Wi-Fi Keeps Disconnecting on Windows 10?
To fix the Wi-Fi getting disconnected in Windows 10 issue, you can try some easy troubleshooting to start with, such as restarting your PC and router, resetting the router to default settings, and updating your Wi-Fi adapter and firmware drivers to remove temporary and minor technical glitches.
A few other quick and effective way to resolve the Wi-Fi getting disconnected issue are as follows:
Forget and reset password: Click on the network icon on the taskbar > Choose your network > Right-click on it > Select Forget > Click on the network again > click on the Connect button > Provide the password > Click on Next.
Running Internet Connections troubleshooter: Go to Settings > Troubleshoot > Additional troubleshooters > Internet Connections > Run the troubleshooter.
Performing a network reset: Go to Settings > Network & Internet > Network reset > Restart PC > Type in the Wi-Fi credentials again.
Update Windows: Go to Settings > Update & Security > Windows Update > Check for updates.
Refresh the Wi-Fi settings: Go to the Control Panel > Network & Internet > Network and Sharing Center > Change adapter settings > Right-click on the Wi-Fi adapter > Select Disable > Wait for some time > Right-click on it > Select Enable.
Disable Wi-Fi Sense feature: Go to Settings > Network & Internet > Manage Wi-Fi settings > select Wi-Fi Sense > Connect Networks > Toggle the switch to Off > Restart PC.
Apart from these solutions, you can also try some other ways to resolve the issue, such as:
- Limiting the number of connected devices to the Wi-Fi network
- Placing the router close to the device
- Preventing Bluetooth devices, phones and others from causing radio interference
- Disabling any third-party antivirus software temporarily
- Switching off airplane mode
- Checking that the router is plugged in properly
When you have tried these fixes and the issue still persists, here are some more advanced solutions explained for you in detail to fix the issue of your Wi-Fi getting disconnected on Windows 10.
Method 1: Change the Network Profile
An easy fix to the Wi-Fi getting disconnected on Windows 10 is to change the network profile in the first place.
STEPS TO FOLLOW:
- Go to the network icon on the right side of the taskbar.
- Click on it.
- Select Properties.
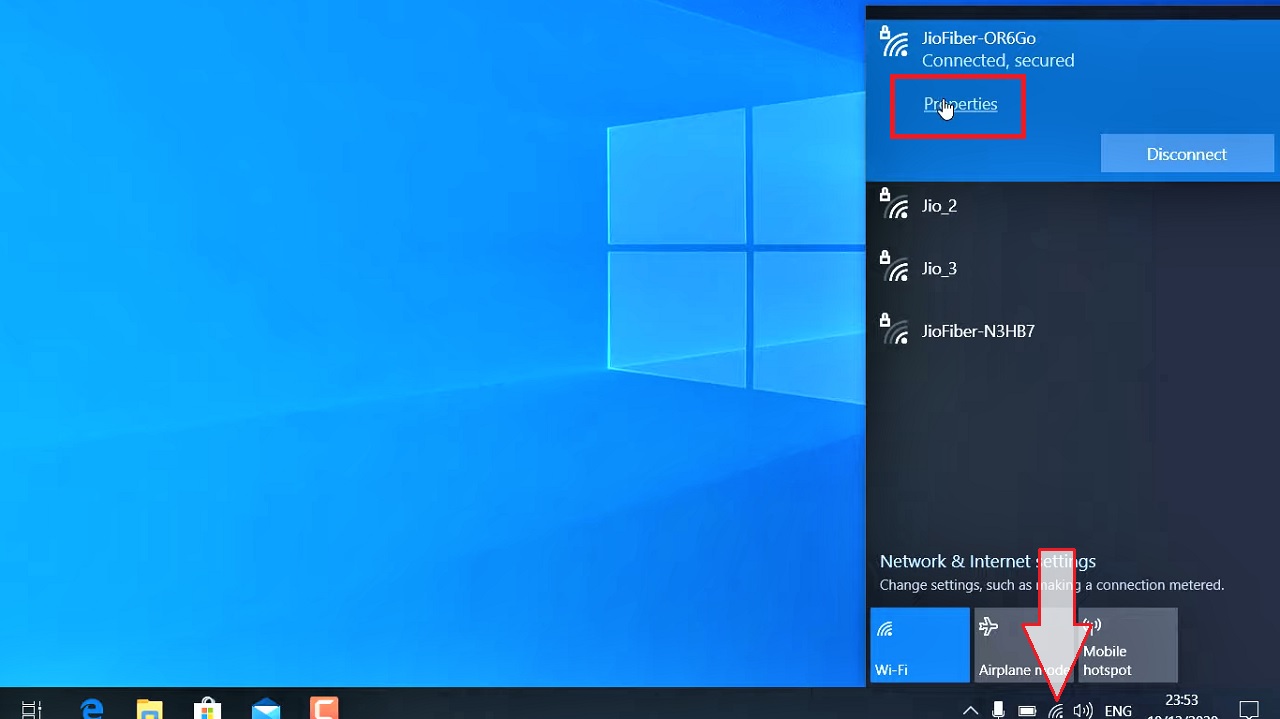
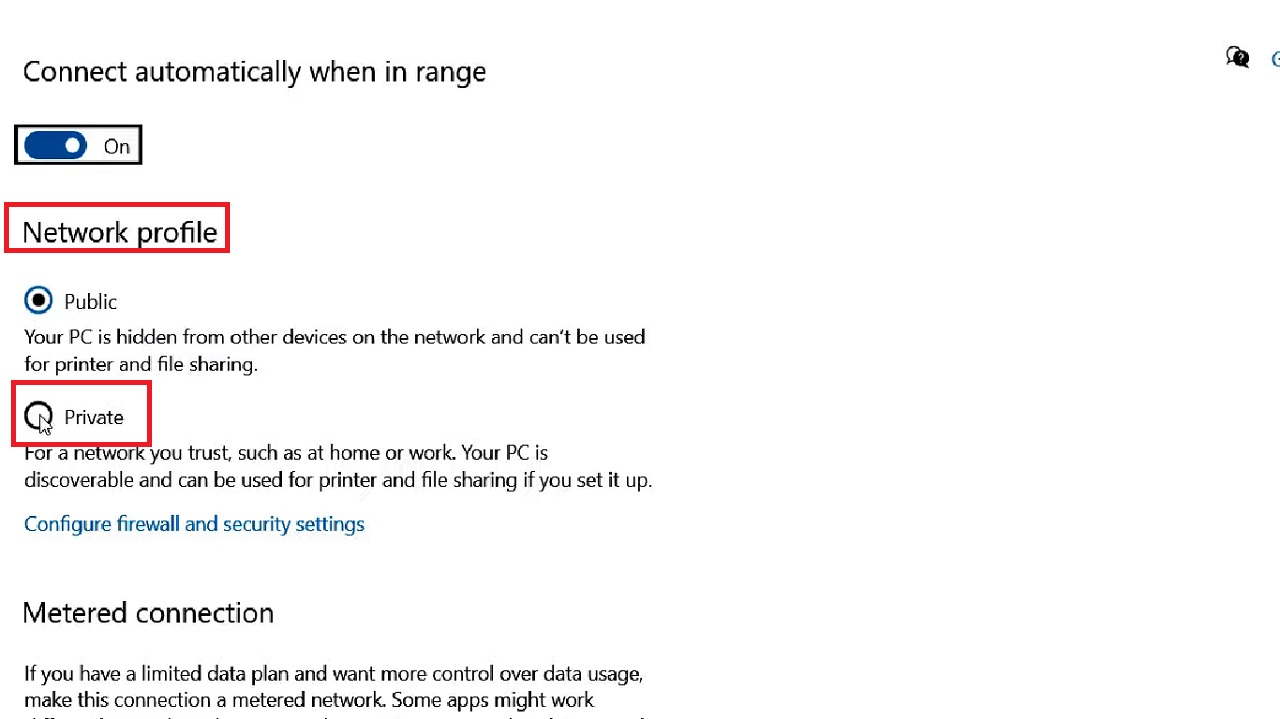
- In the new window, select the Network profile to Private, if it is not, by checking the small radio button next to it.
This might resolve the issue. If the issue is not resolved, try the following solution.
Method 2: Disable Power Saving for Wi-Fi from the Device Manager
Sometimes the power management settings may cause such issues. In such a situation, it is best to disable the power saving feature for Wi-Fi. You will need to go to the Device Manager for it.
STEPS TO FOLLOW:
- Press the Windows and R keys together on your keyboard to open the Run dialog box.
- Type devmgmt.msc in the box and hit the Enter key or click on the OK button on the dialog box.

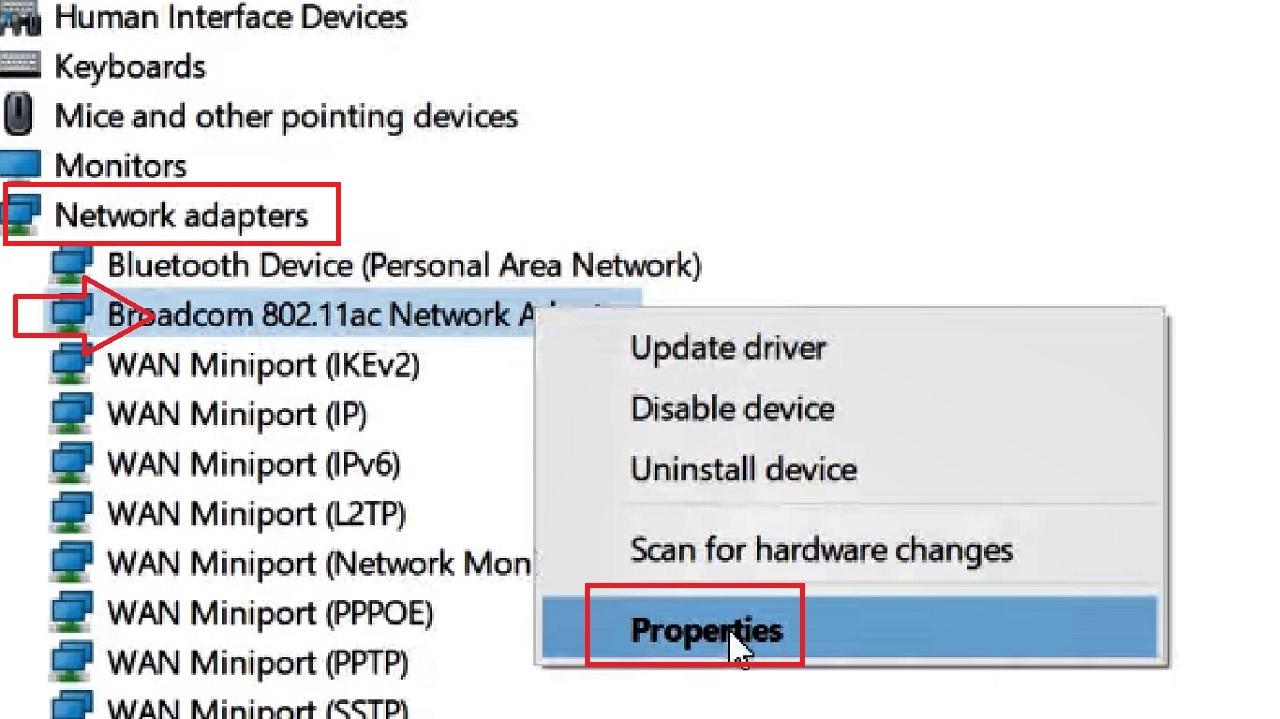
- This will open the Device Manager window, where you will need to look for Network adapters.
- Select it and click on the small arrow next to it to expand the selection.
- Select your network adapter.
- Right-click on it.
- Select Properties from the drop-down context menu.
- Go to the Power Management tab in the following window that appears.
- Click on the small circular button next to ‘Allow the computer to turn off this device to save power’ option to uncheck it, if it is checked.
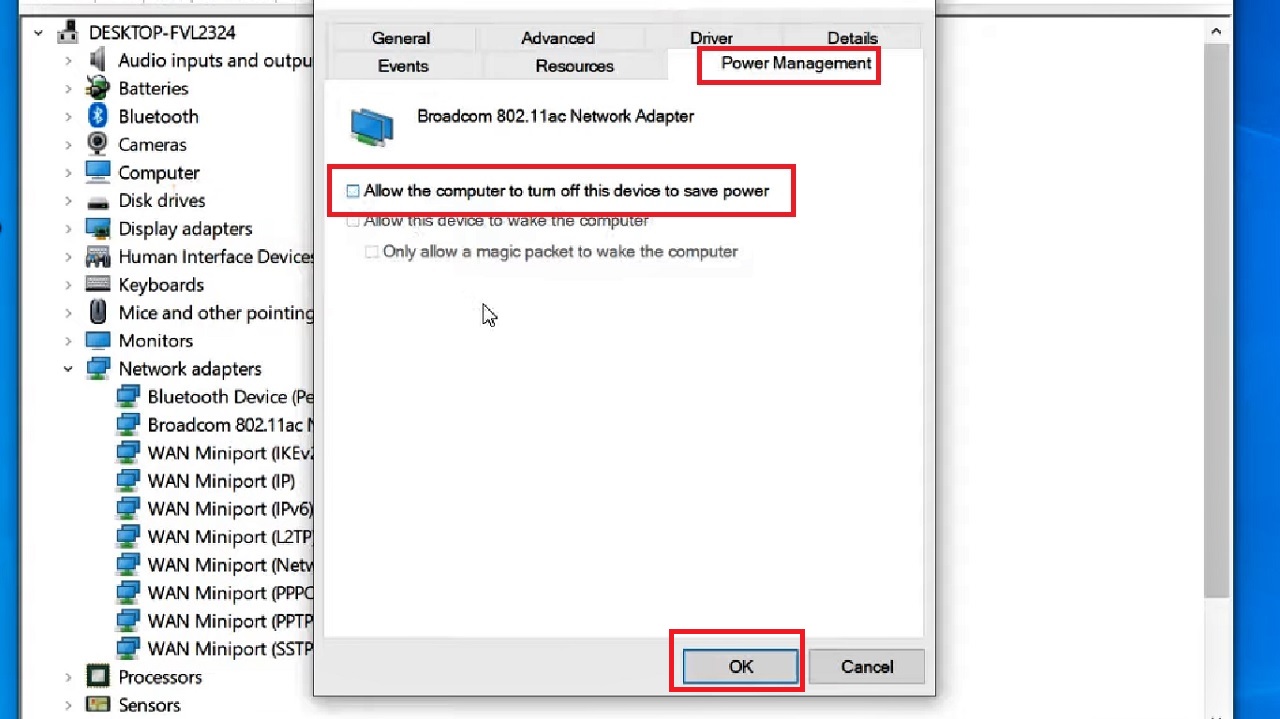
- Click on the OK button below and close the Device Manager window.
Now check whether your Wi-Fi is working as it should or not.
If the issue persists, you may repeat the same process and select Uninstall Device from the options you get after right-clicking on your Wi-Fi adapter.
Restart your computer and it will reinstall the uninstalled driver of the Wi-Fi adapter, thereby resolving the issue in the process.
There is another way to fix the issue, if it still occurs. Update the driver either from the Device Manager by right-clicking on the network adapter or from the official website of the manufacturer from Google.
However, if you still find that your Wi-Fi is getting disconnected, move on to the next method.
Method 3: Change Power Plan Setting
You may have to make some changes in the power plan settings in order to resolve the issue of Wi-Fi getting disconnected in Windows 10.
STEPS TO FOLLOW:
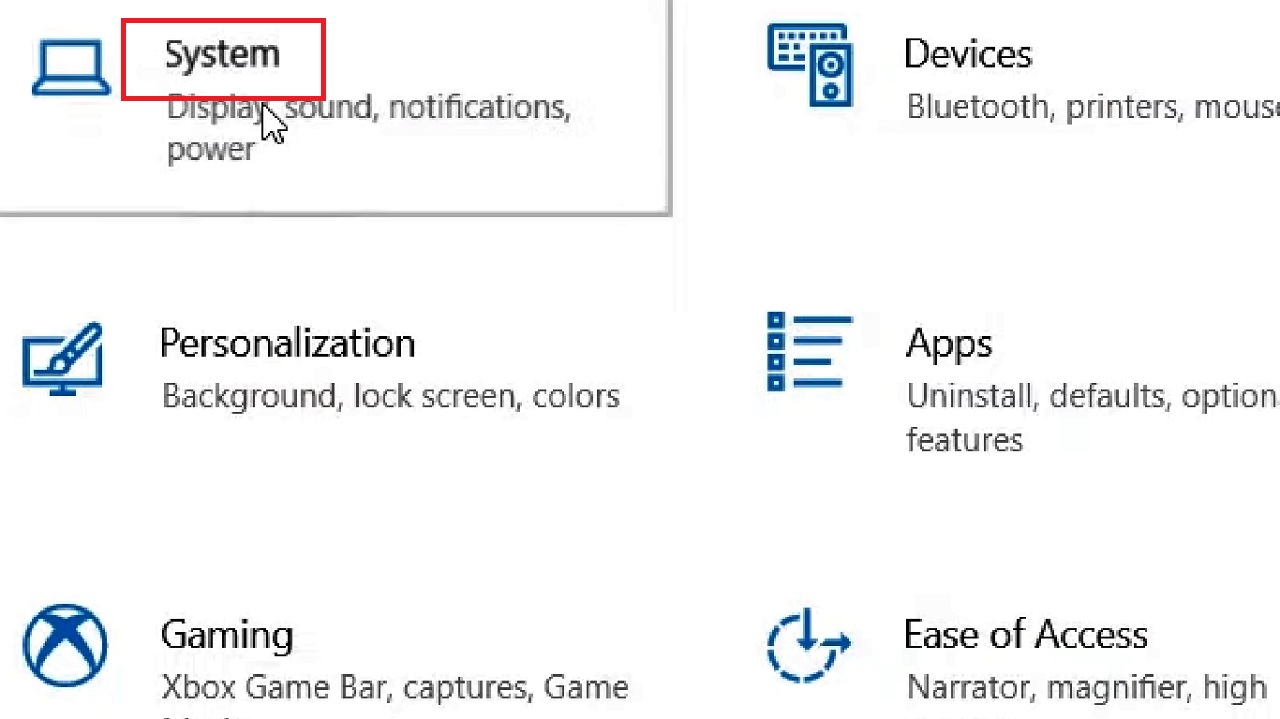
- Press the Windows and I keys together on your keyboard and open the Windows Settings app.
- Go to System and click on it.
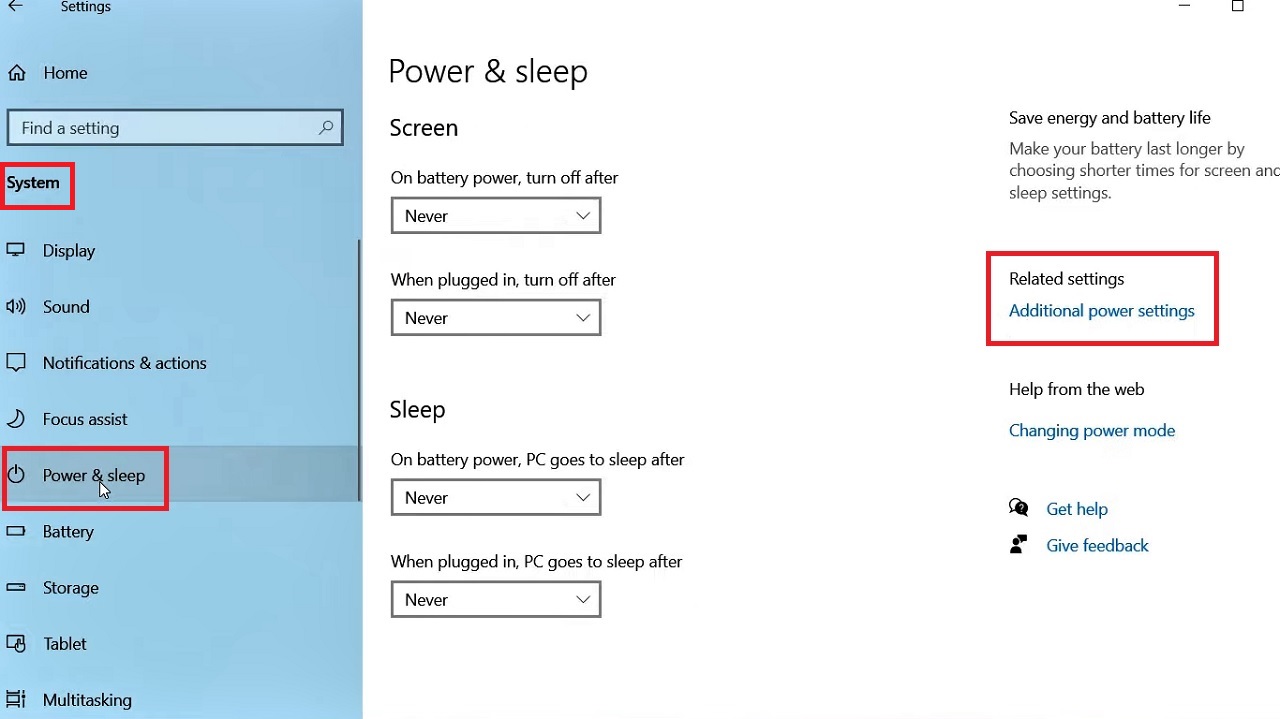
- In the following window, click on Power & sleep on the left pane.
- Go to Additional power settings on the right side of the window under Related settings.
- In the new window, click on Change plan settings next to whatever power plan is selected (Ultimate Performance in this case), under Choose or customize a power plan section.
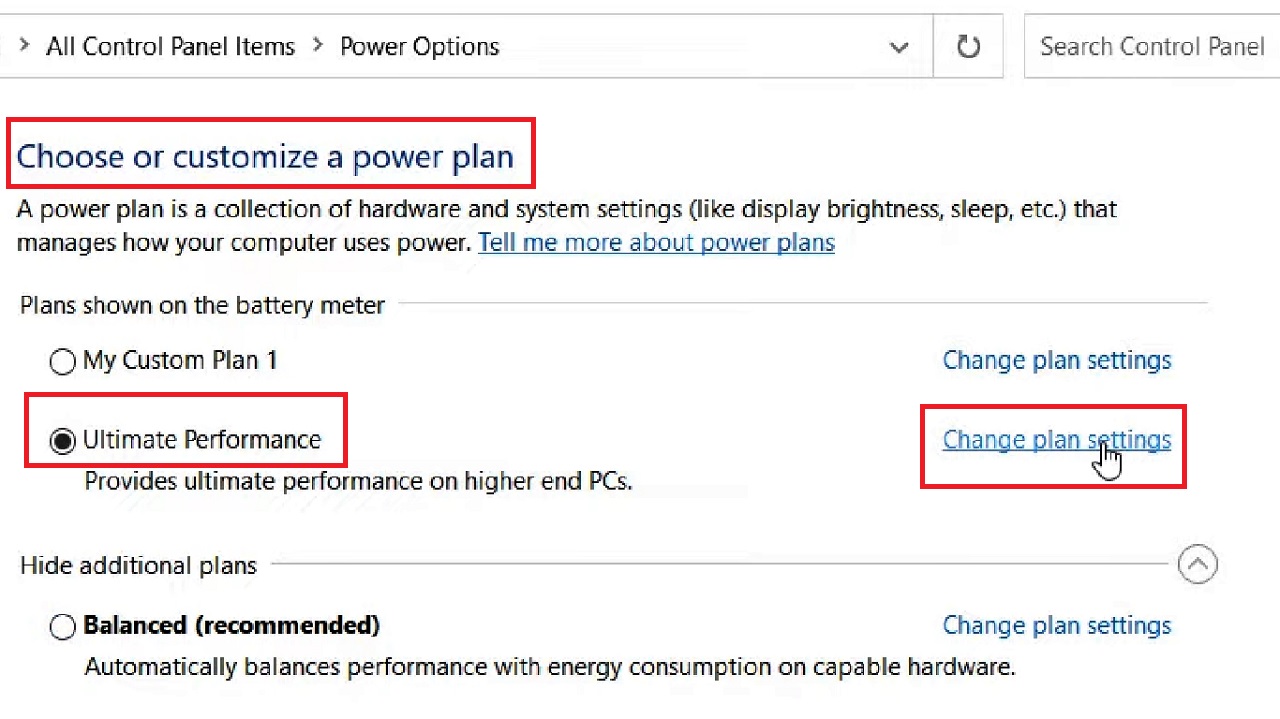
- In the following Edit Plan Settings window, select Change advanced power settings.

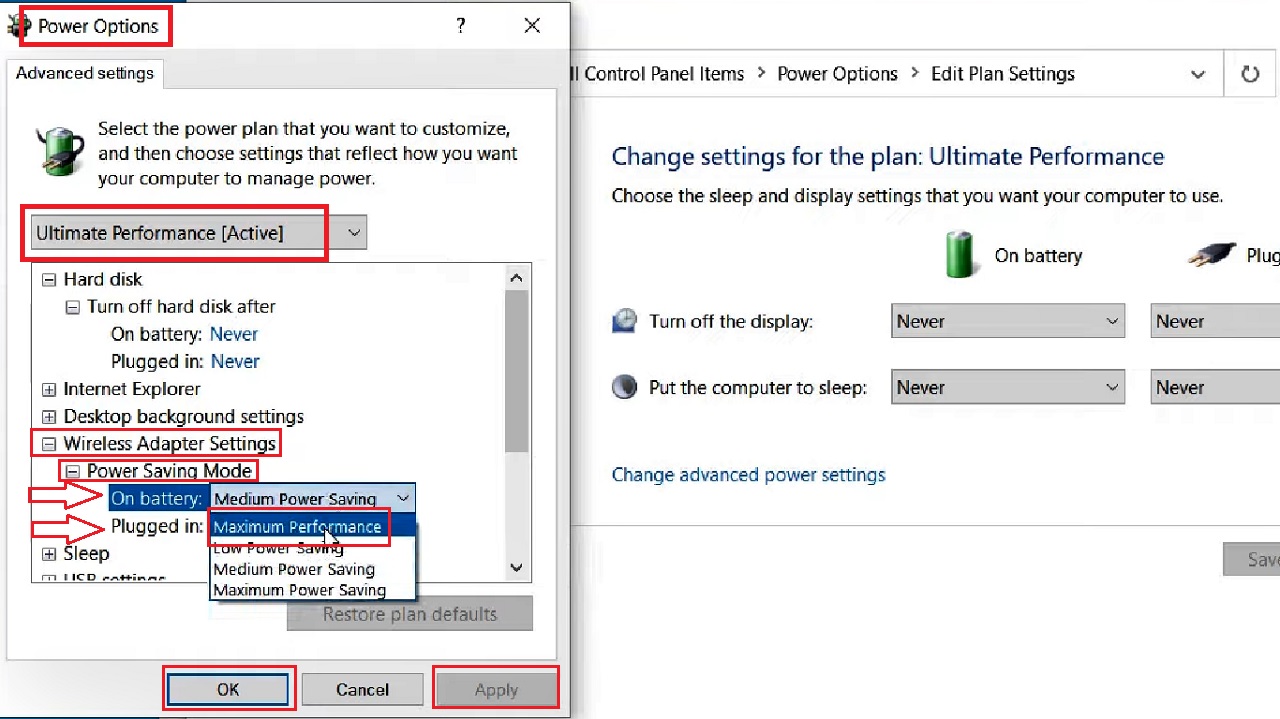
- In the next Power Options window, look for Wireless Adapter Settings in the box under Ultimate Performance [Active].
- Click on the Plus sign next to it to expand it.
- Do the same to expand the Power Saving Mode under it.
- Click on the small arrow on the right side of the box next to On battery.
- Select the Maximum Performance option from the drop-down context menu.
- Repeat the same process in the box next to Plugged in.
- Press the Apply button and then on the OK button to save the changes and exit the windows.
Now, check whether the issue has been resolved or not. If the Wi-Fi is still getting disconnected, go for the next method.
Method 4: Network Socket and IP Reset Using the Command Prompt
Make some changes in the network socket and IP to prevent the Wi-Fi from getting disconnected on Windows 10.
You will need to run a few specific commands in the Command Prompt for this.
STEPS TO FOLLOW:
- Type cmd in the Windows quick search box next to the Start Menu.
- Right-click on the Command prompt icon and choose Run as administrator.
In the Command Prompt, type netsh winsock reset and hit the Enter key on your keyboard.
This will reset the network adapter. When this command is executed successfully and completely, type in the command netsh int ip reset resetlog.txt and again hit the Enter key on your keyboard.
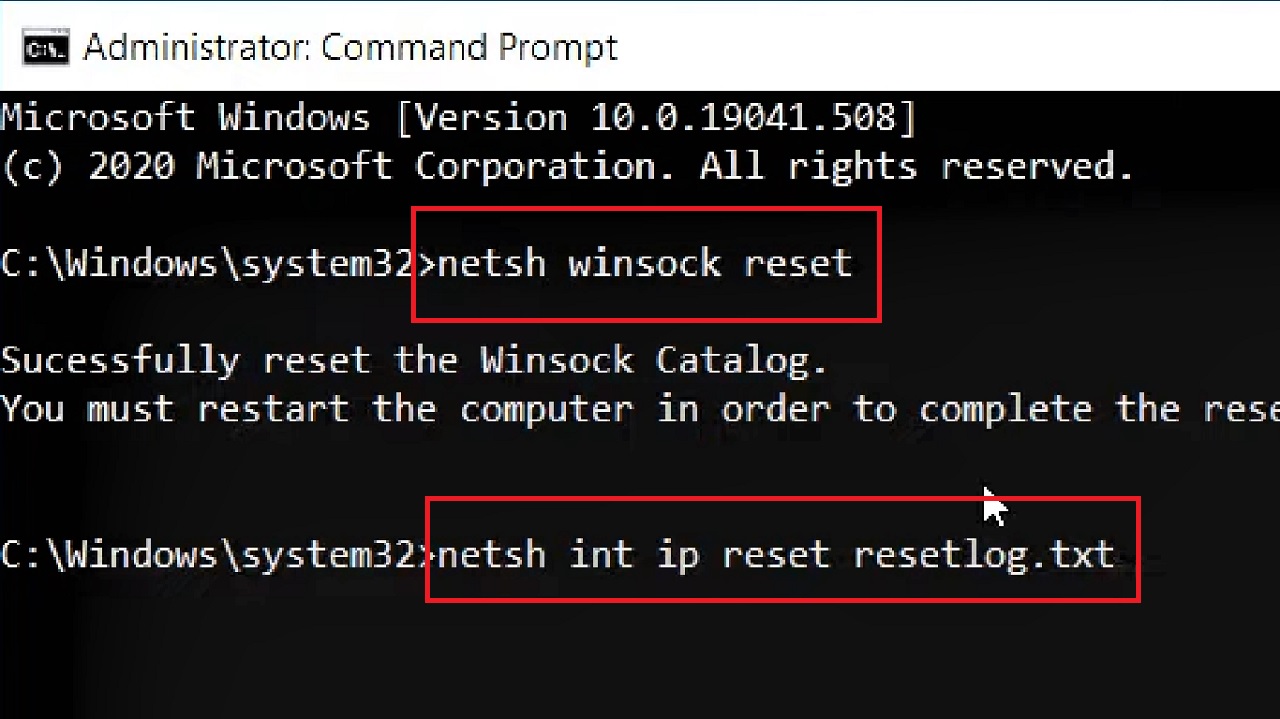
This command will reset all IP logs on your PC.
When the process is complete, type exit and hit Enter.
Now, restart your computer and check whether the issue has been resolved or not.
Method 5: Use Custom Domain Name System
Using a custom Domain Name System (DNS) instead of the default server may sometimes resolve the issue, if the above methods fail.
STEPS TO FOLLOW:
- Open the Windows Settings app as you did in Method 3 before.
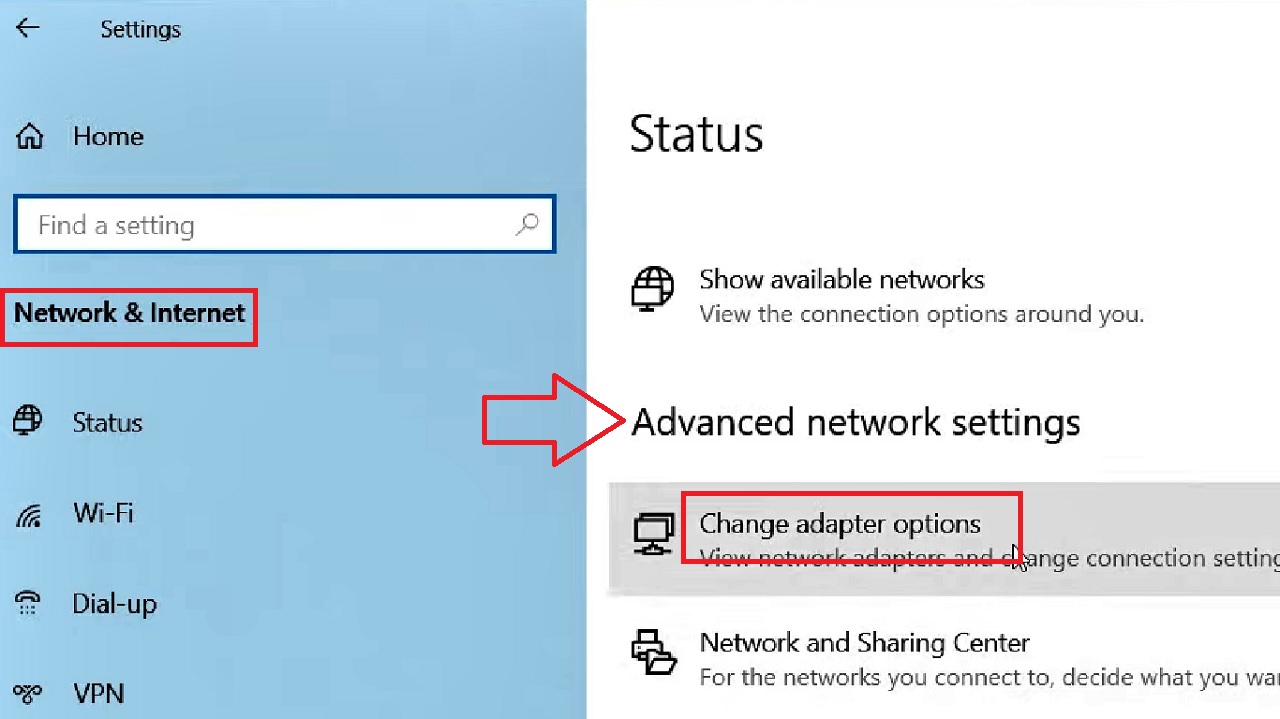
- Select Network & Internet.
- In the following Network & Internet window, scroll down to find Change adapter options under Advanced network settings and click on it.
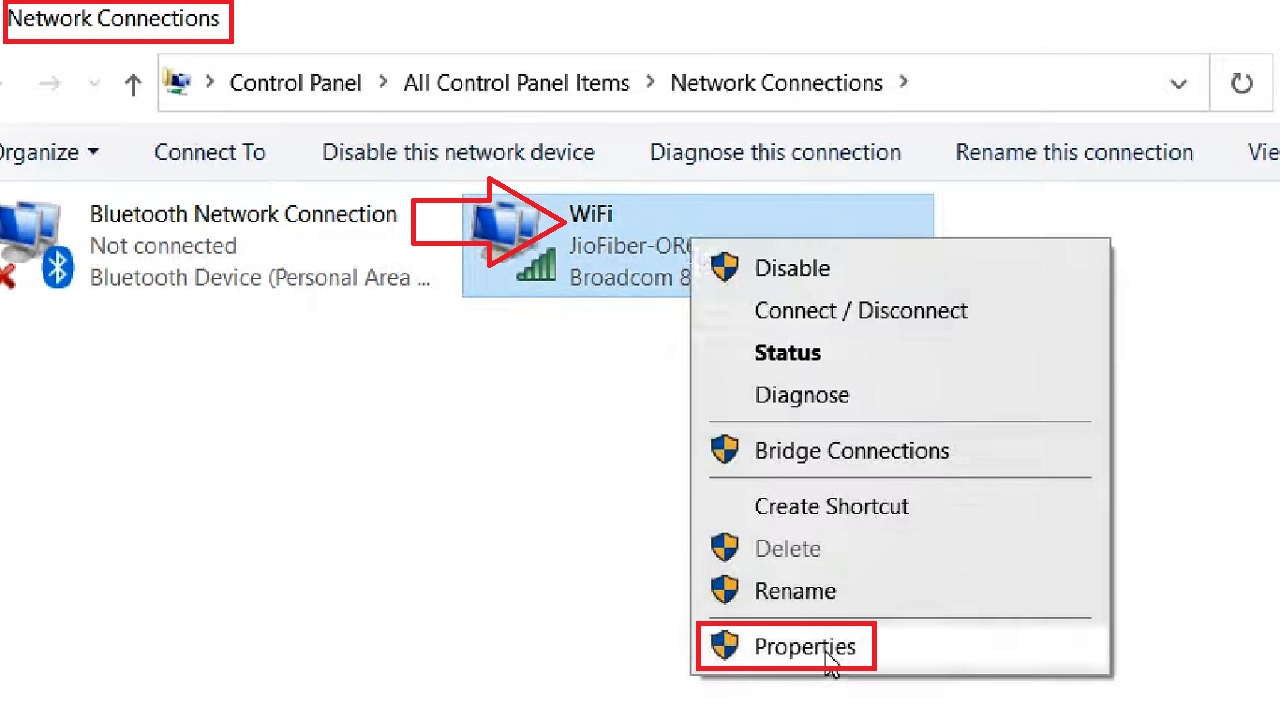
- Right-click on your Wi-Fi in the following Network Connections window.
- Select Properties.
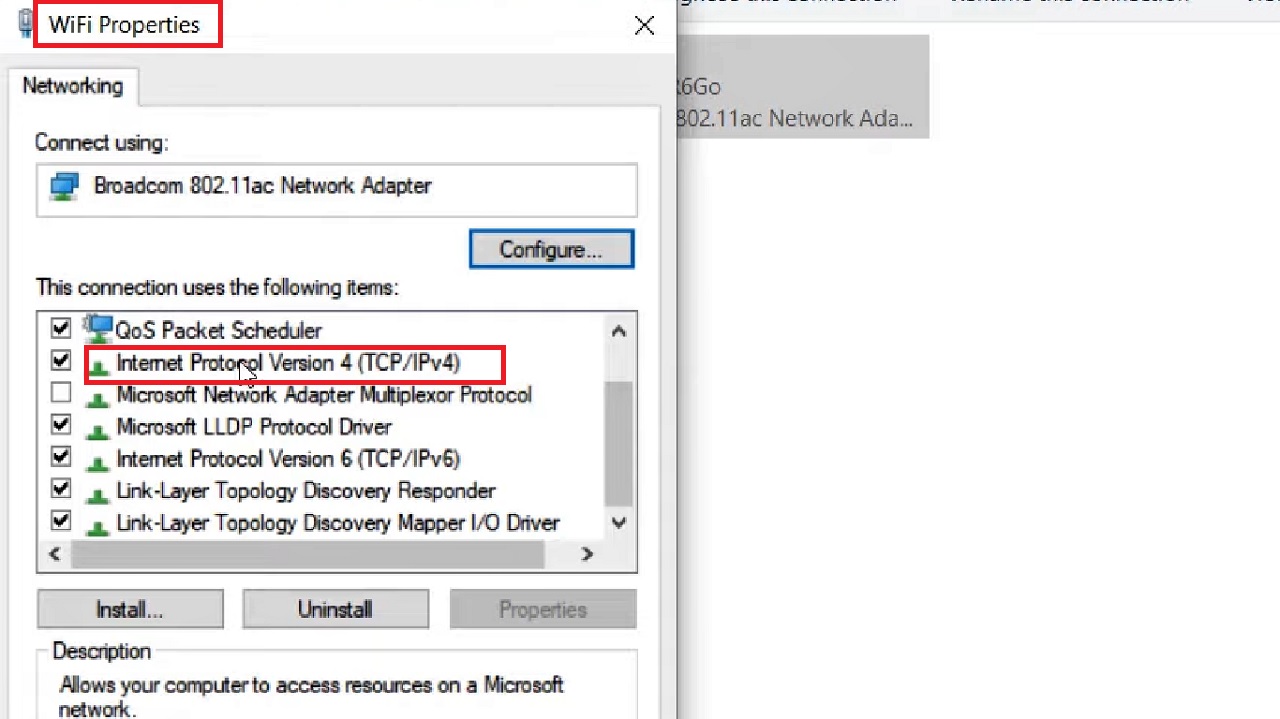
- In the following WiFi Properties window, find Internet Protocol Version 4 (TCP/IPv4) from the list in the box under ‘This connection uses the following items.’
- Double-click on it.
- In the next Internet Protocol Version 4 (TCP/IPv4) Properties window in the General tab, click on the small circular button next to Use the following DNS server addresses.
- Enter 1.1.1.1 in the box next to the Preferred DNS server and 1.0.0.1 in the box next to Alternate DNS server. This will set the Cloudflare DNS.
You may even enter 8.8.8.8 and 8.8.4.4 in the two respective boxes if you want to choose Google’s Public DNS.
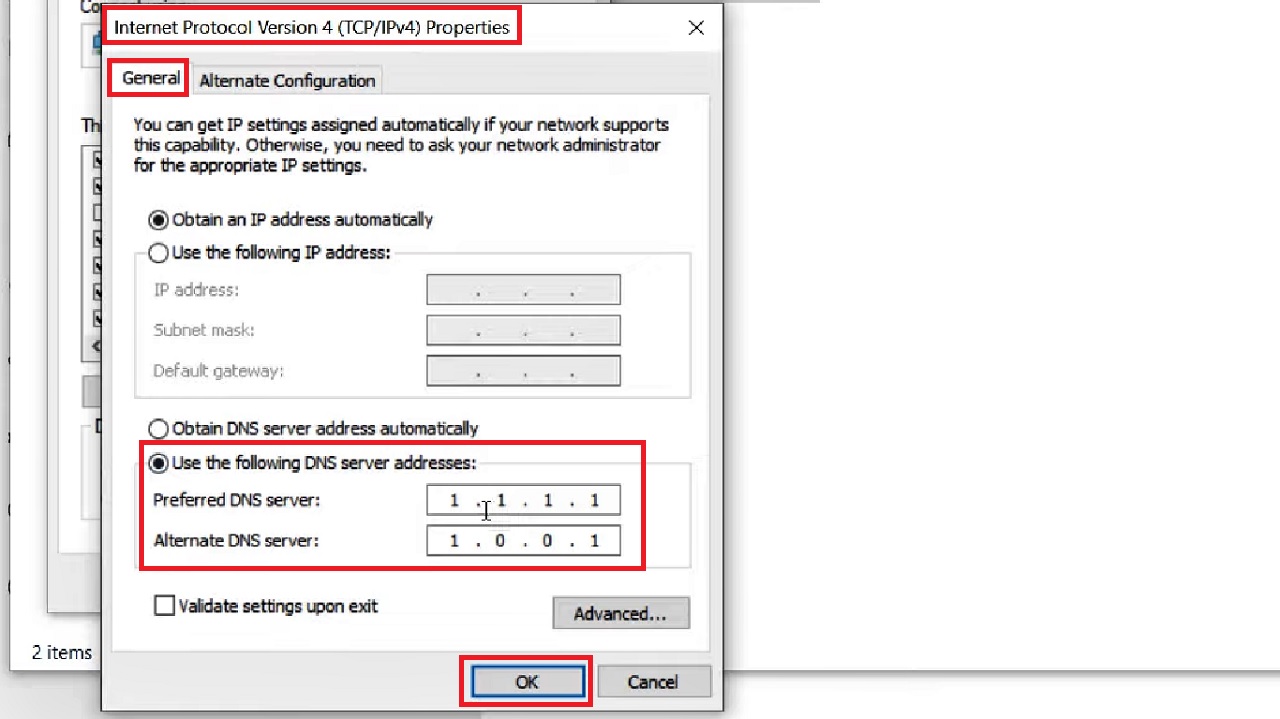
- Click on the OK button and close all windows.
Now check whether your Wi-Fi is still getting disconnected or not.
Method 6: Check the WLAN Service and Make Necessary Changes to Others
There may be some issues with the settings in the WLAN service that may be causing the issue. Check it and make the necessary changes to it and other services as well.
STEPS TO FOLLOW:
- Open the Run dialog box as you did in Method 2 before.
- Type services.msc in the box this time and hit the Enter button on your keyboard.
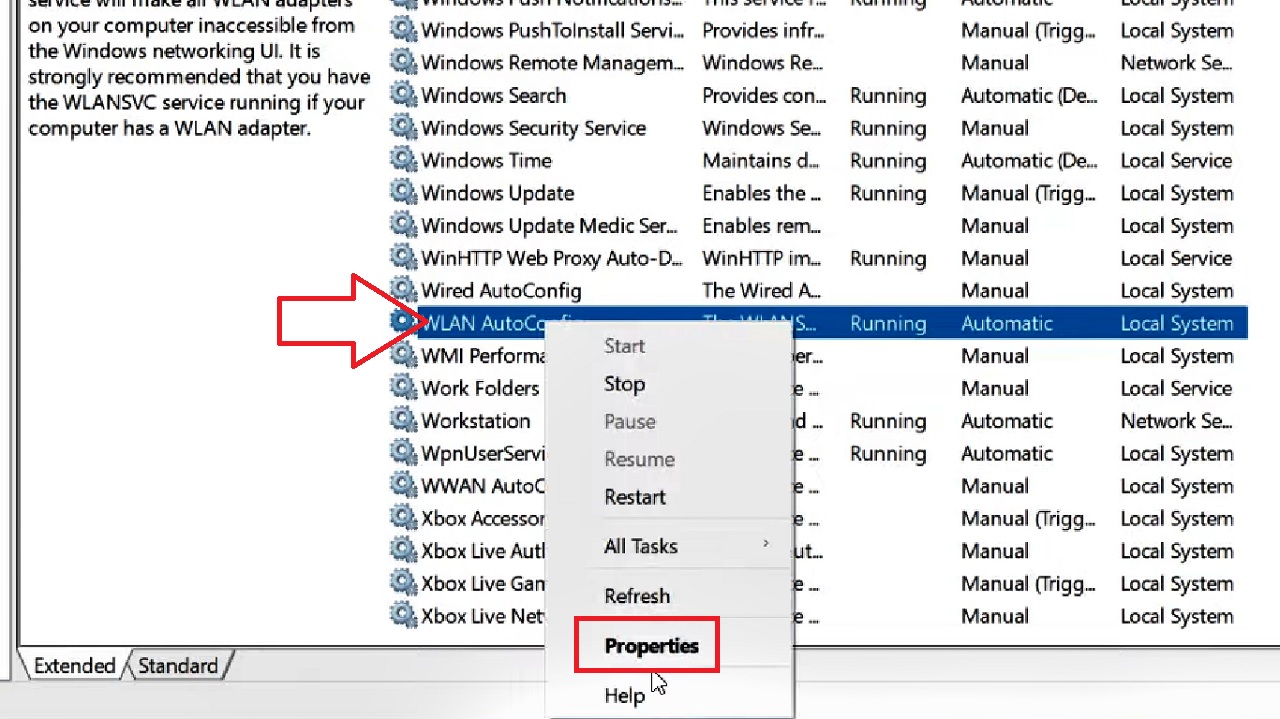
- Scroll down the Service (Local) window to find WLAN AutoConfig service.
- Right-click on it.
- Select Properties.
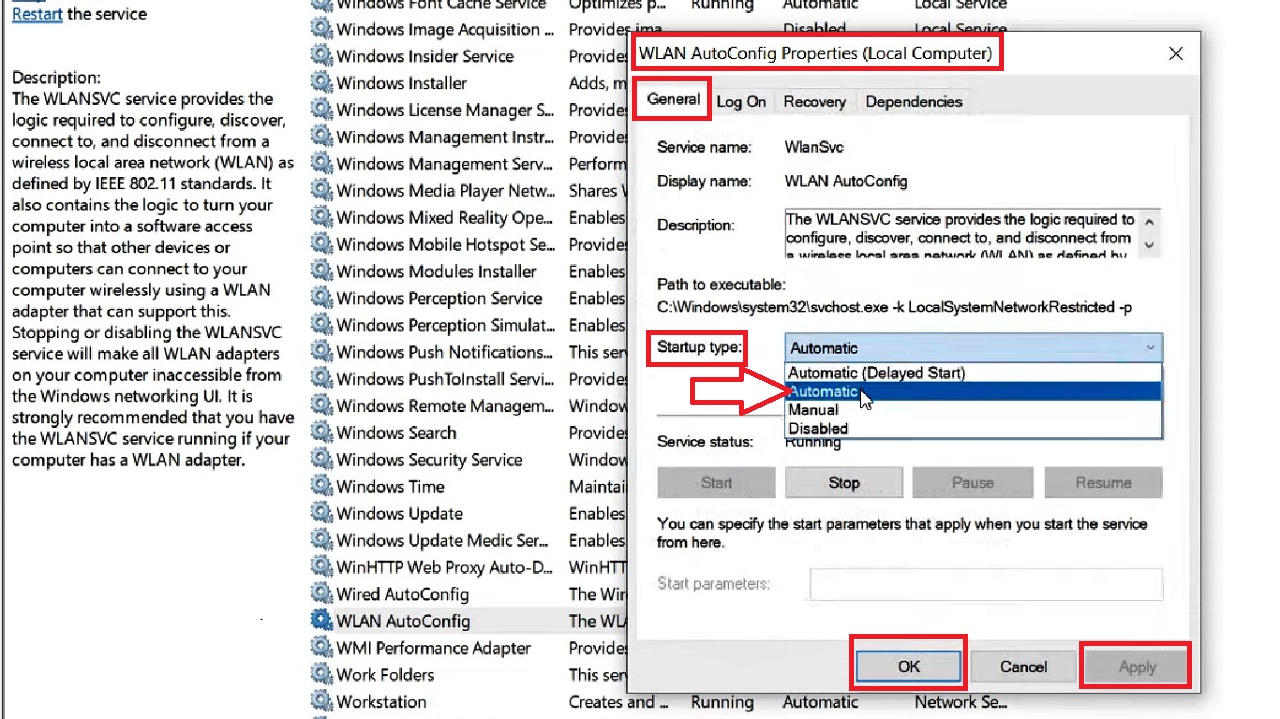
- In the new WLAN AutoConfig Properties (Local Computer) window under the General tab, select the Startup type by clicking on the small arrow in the box on the right and set it to Automatic.
- Click on the Apply button and then on the OK button.
Repeat the steps to do the same to the WWAN AutoConfig service, Network Connected Devices Auto-Setup, and Network Connections.
You will also need to tune the wireless drivers from the Services window in the same way as above. So, repeat the steps for Wi-Fi Direct Services Connection Manager Service and Radio Management Service.
Now, close all windows, restart your computer system and check whether or not the issue has been resolved. If it still persists, try the next solution.
Method 7: Check and Set Roaming Aggressiveness
This issue is also caused when the distance and the Roaming Aggressiveness setting do not match.
Ideally, you must set the Roaming Aggressiveness according to the distance between the PC and the Wi-Fi router or modem.
STEPS TO FOLLOW:
- Go to Windows search > Type ncpa.cpl > Hit the Enter key > Select and right-click on the Wi-Fi adapter > Select properties > Click on Configure button.
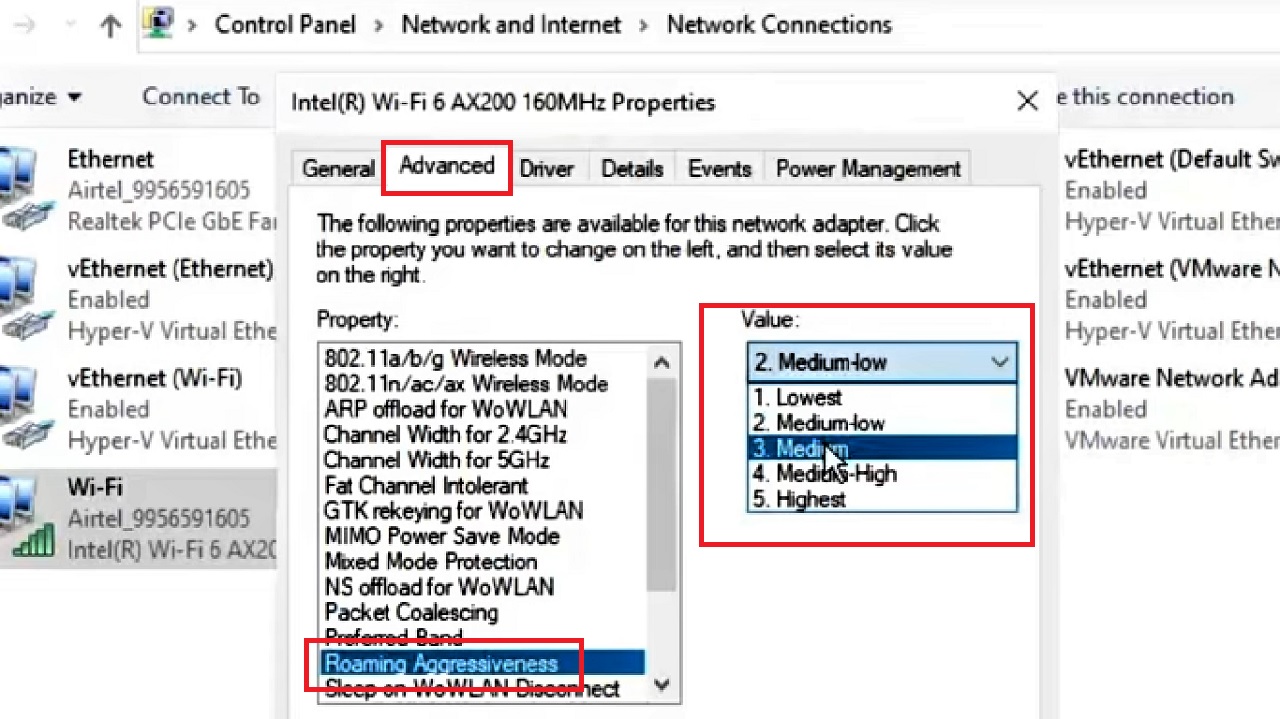
- In the new properties window, go to the Advanced tab.
- Select and click on Roaming Aggressiveness from the list in the box under the Property section.
- Look at the Value section on the right.
- Click on the small arrow in the box under it on the right side.
- Select an option depending on the distance of the router and modem from your device, lowest for closest and highest for farthest.
- After selecting the right option for Roaming Aggressiveness, look for 802.11n Mode in the list.
- Select Disabled in the box under Value.
When you are done making these changes, click on the OK button and restart your computer to check whether or not the issue has been resolved.
Method 8: Making Changes in the Registry Editor
The issue may also occur due to some preset value data of specific keys in the Windows Registry. Checking and changing them may help resolve the issue. You may also need to enable Wi-Fi radio.
STEPS TO FOLLOW:
Go to Windows search > Type regedit > hit Enter key.
When the Registry Editor open, click on the small arrow keys on each of the following folders in the left pane in order as shown to expand them:
- HKEY_LOCAL_MACHINE
- SYSTEM
- CurrentControlSet
- Control
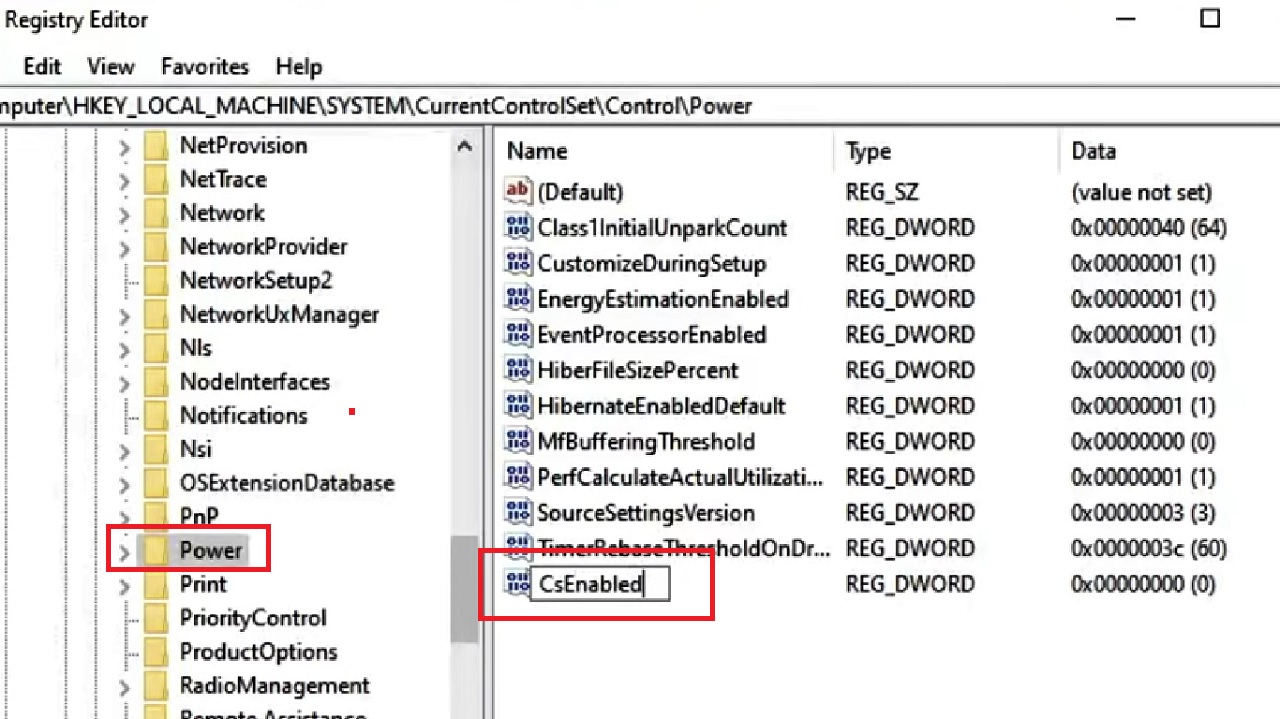
- Power
Double-click on this folder and on the right side of the window look for a key by the name CsEnabled.
- If you don’t find it, right-click on the blank space below.
- Click on New.
- Choose DWORD (32-bit) Value option from the drop-down context menu.
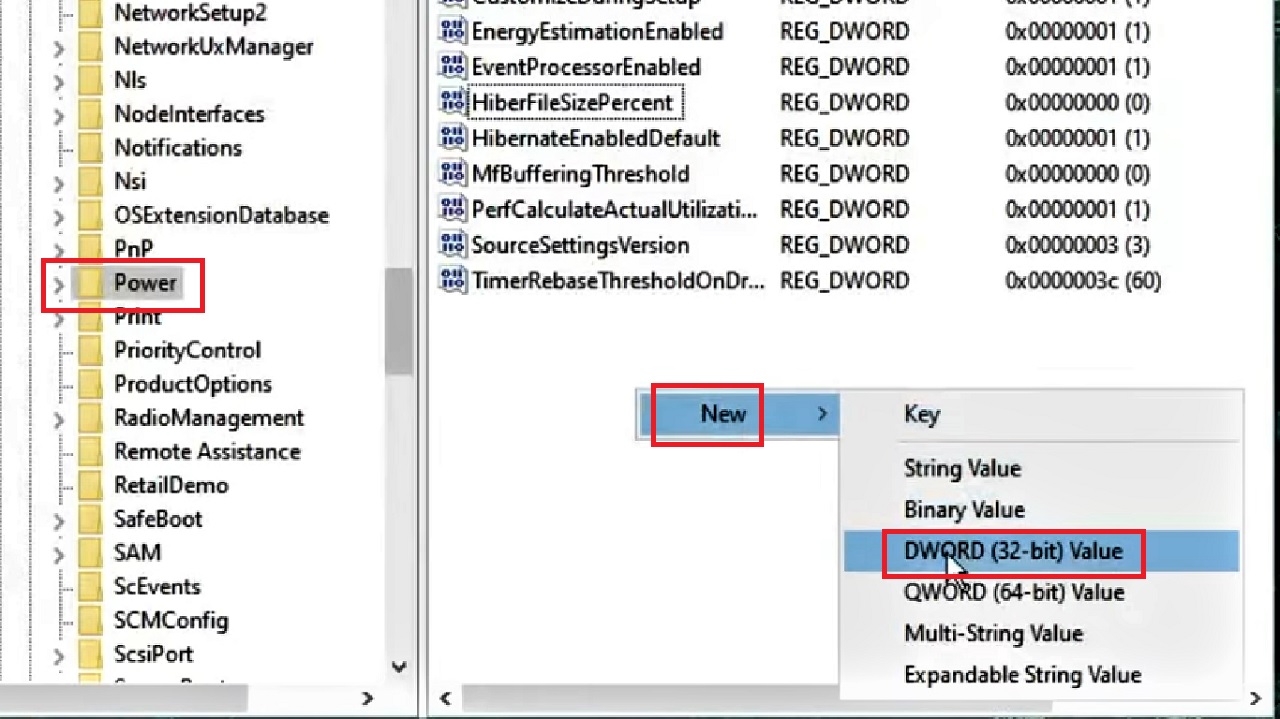
- Name the new key as CsEnabled.
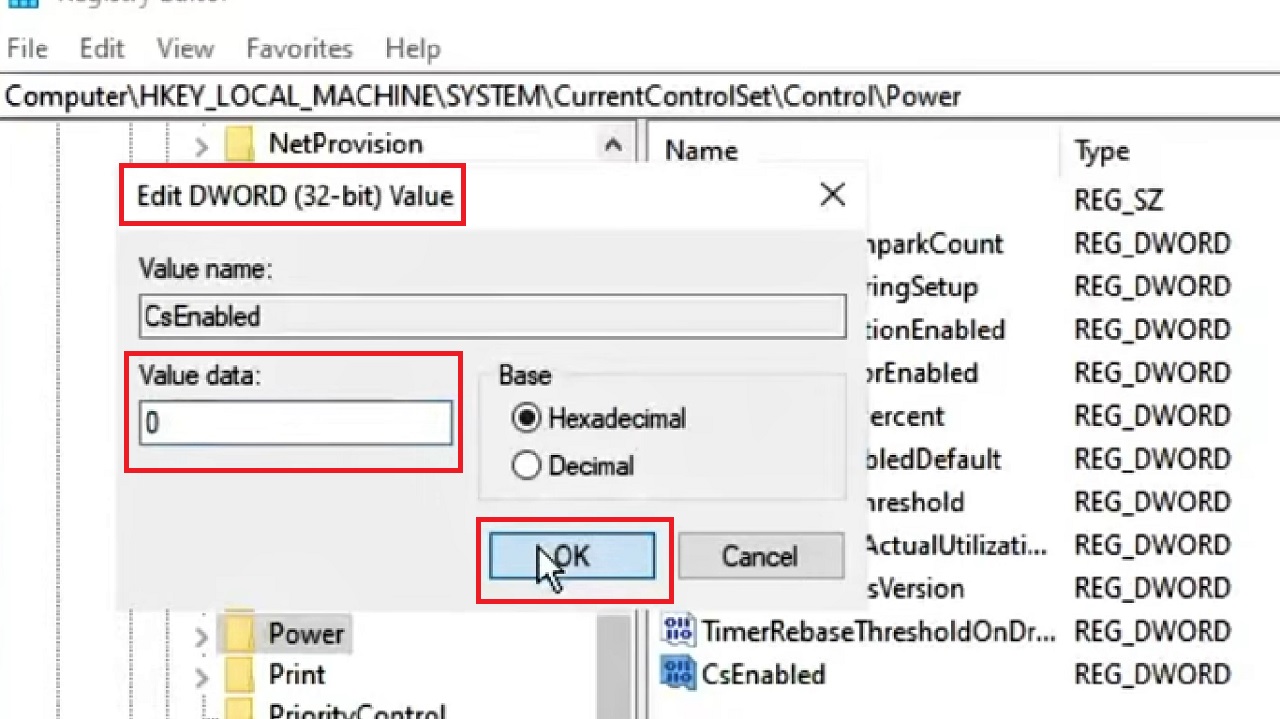
- Then double-click on it.
- Check that the Value data in the Edit DWORD (32-bit) Value window is set to 0.
- Finally, click on the OK button and close the windows.
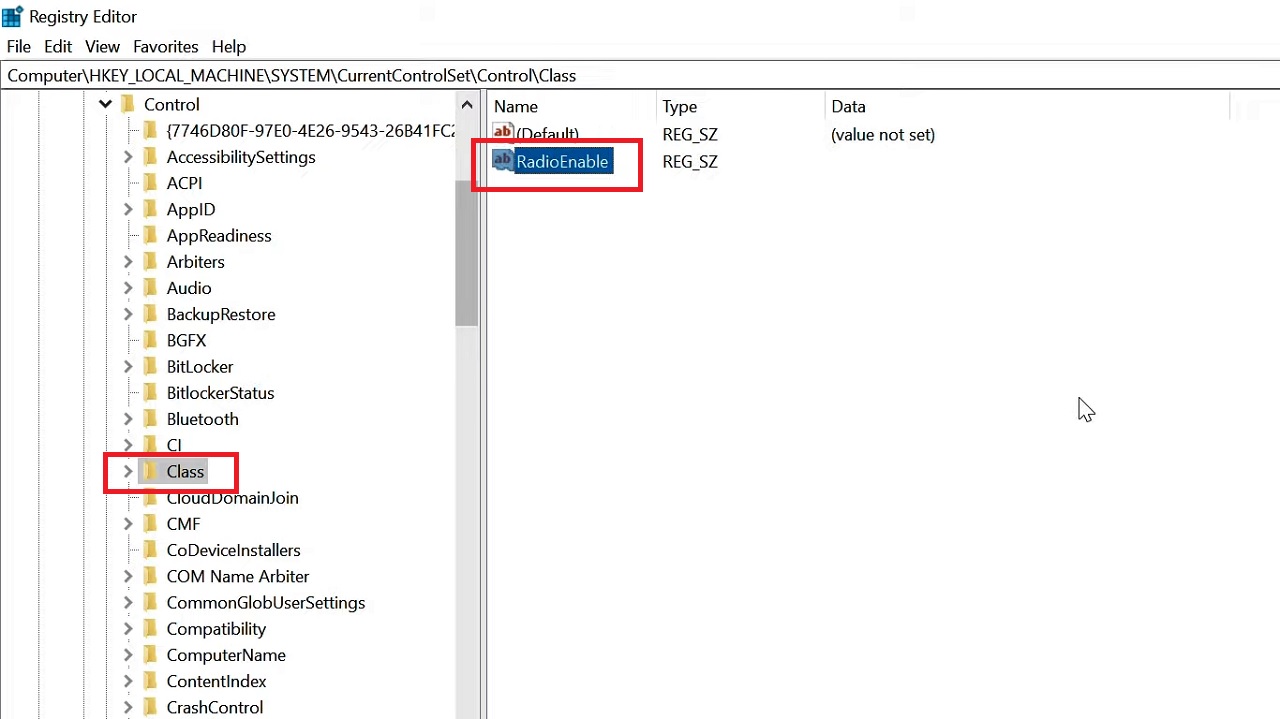
Now, close all the expanded folders in the Registry Editor and then expand the following folders in the same way as before:
- HKEY_LOCAL_MACHINE
- SYSTEM
- CurrentControlSet
- Control
- Class
On the right side of this folder, create a new key called RadioEnable, almost in the same way as above.
- Right-click on the blank space.
- Click on New.
- Click on String Value option from the drop-down context menu.
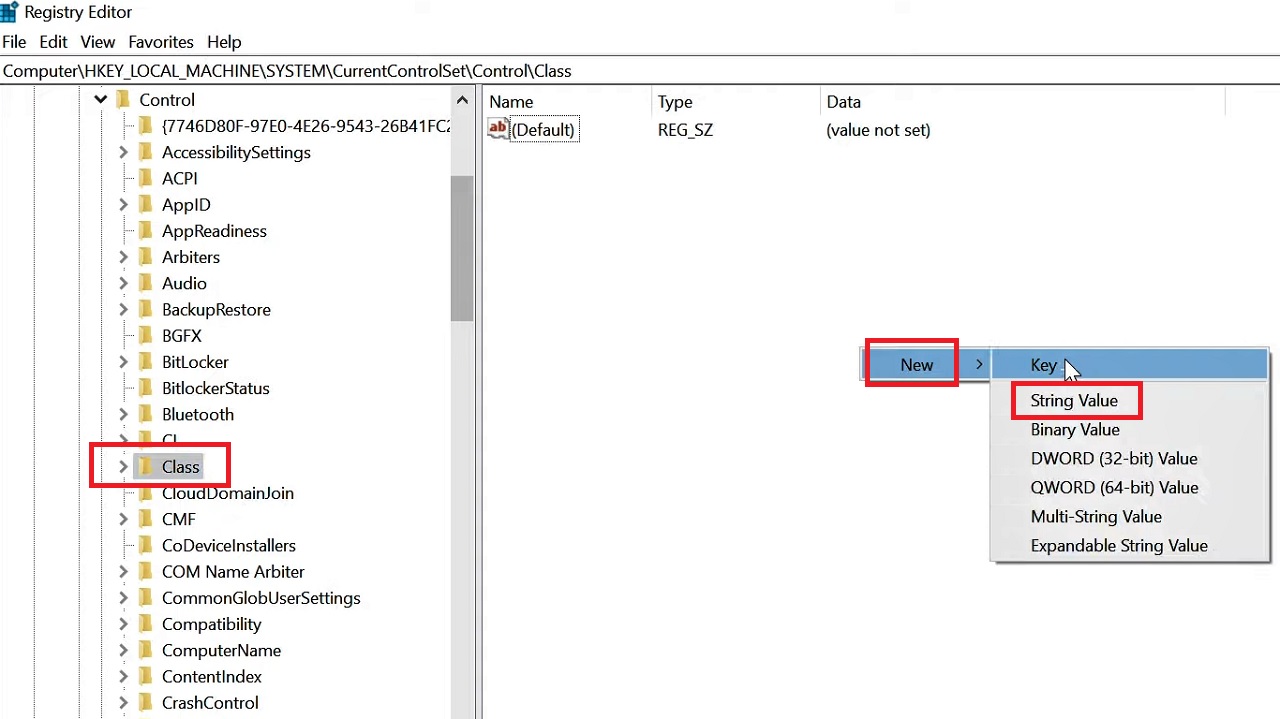
- Rename the key as RadioEnable.
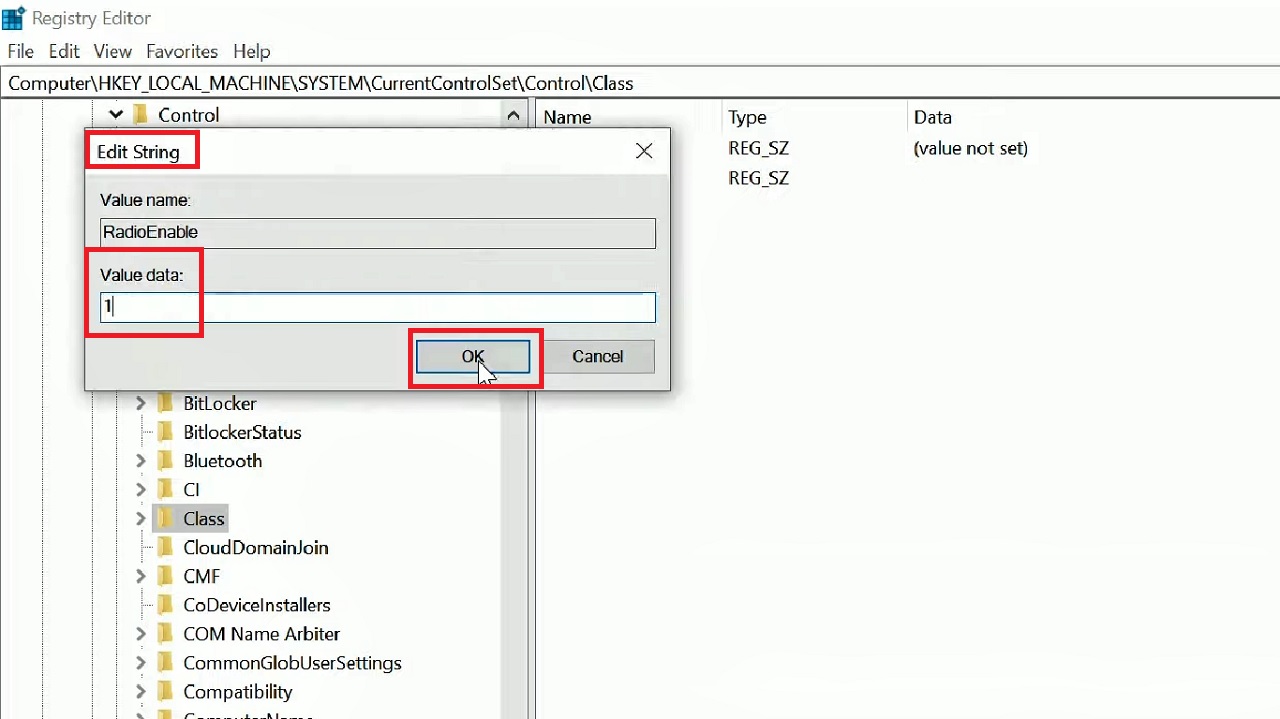
- Double click on it.
- Change the Value data in the Edit String window to 1.
- Click on the OK button.
Now, restart your computer and check whether or not your Wi-Fi is working properly.
Method 9: Refresh Network Options from the Control Panel
Changing the network options may also help in fixing the issue of Wi-Fi getting disconnected in Windows 10.
STEPS TO FOLLOW:
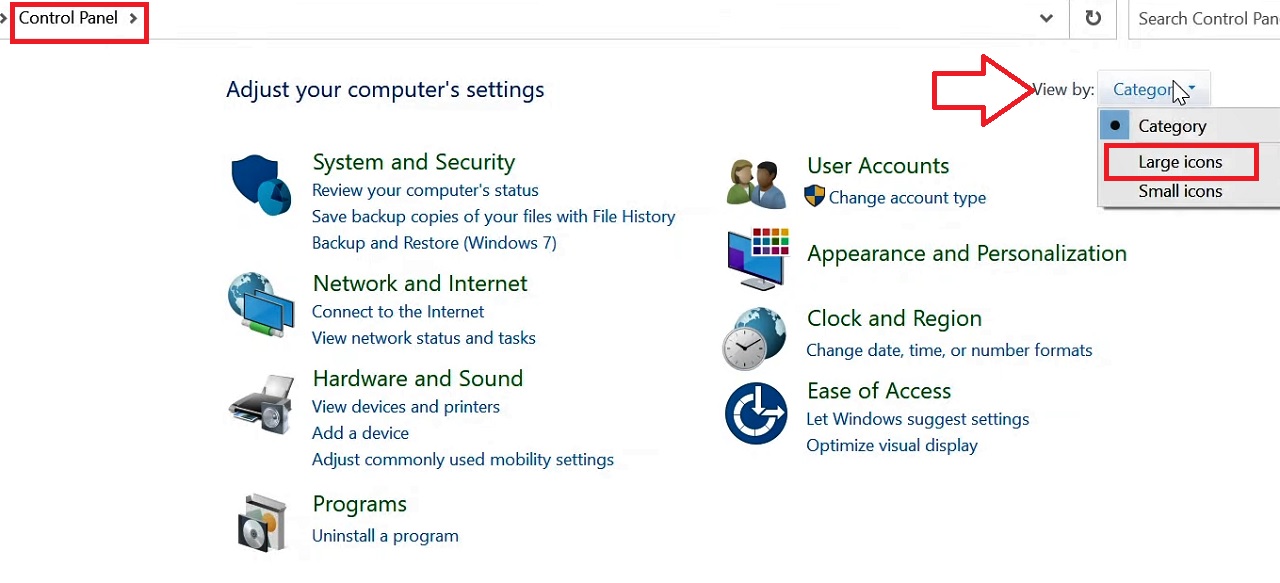
- Go to the Start Menu > Type control panel > Hit Enter Key on your keyboard.
- Go to the View by box on the right.
- Select Large icons.
- Click on Internet Options from the list.
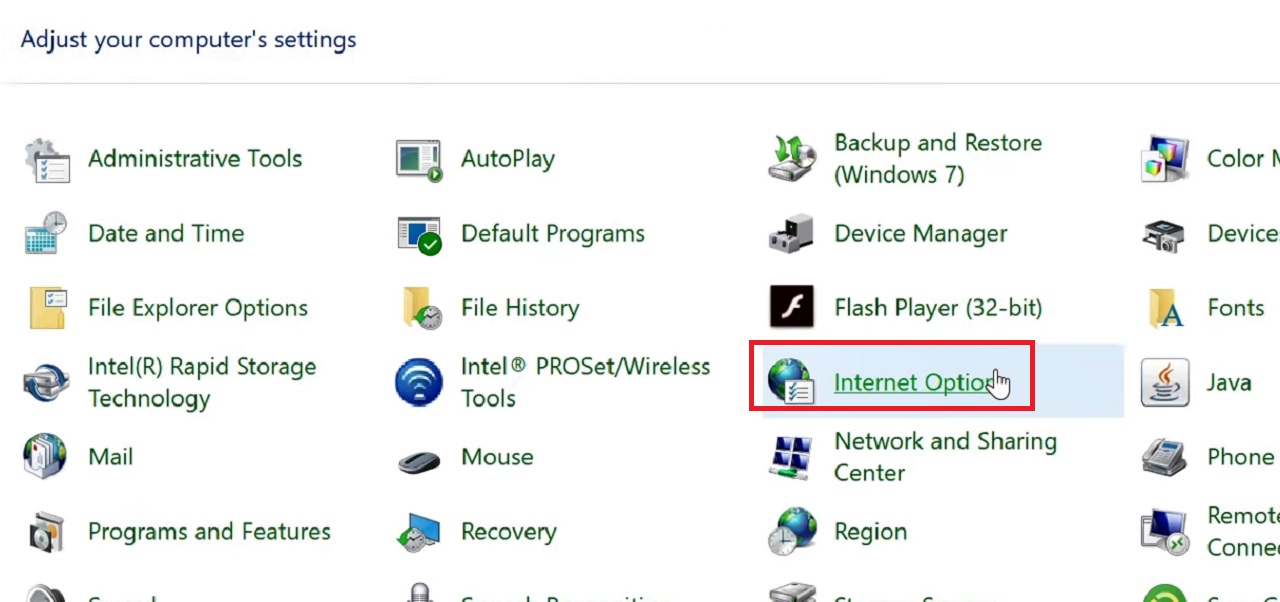
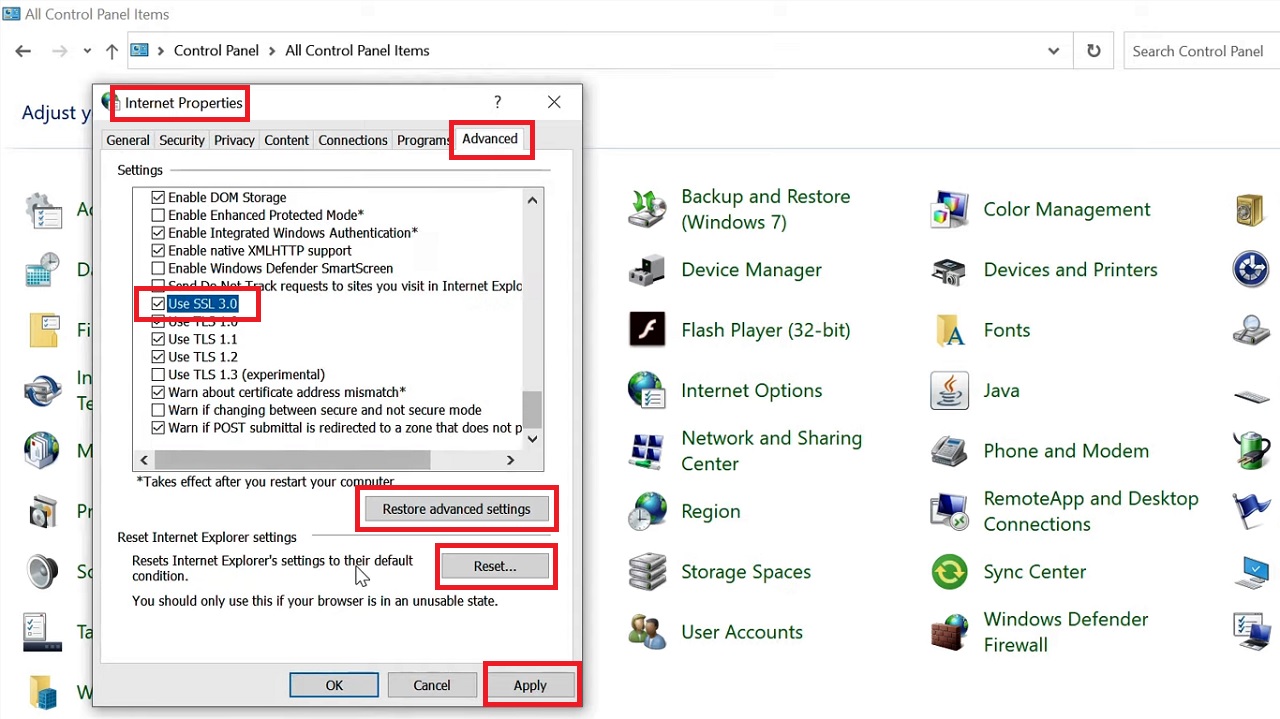
- Go to the Advanced tab in the Internet Properties window.
- Click on the Restore advanced settings button.
- Now check the small square box next to Use SSL 3.0.
- Click on the Apply button.
- Click on the Reset button just above it.
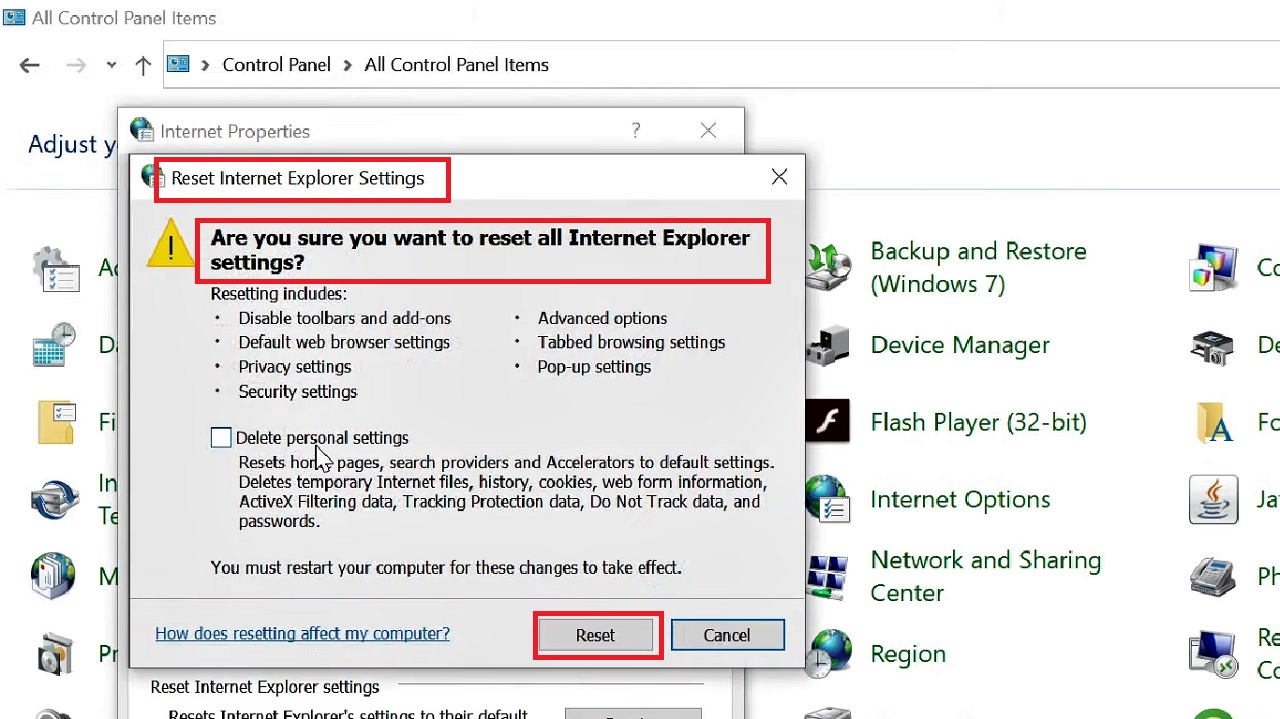
- Click on the Reset button again on the following Reset Internet Explorer Settings window asking you ‘Are you sure you want to reset all Internet Explorer settings?’
- Close the Reset Internet Explorer Settings window when it appears next.
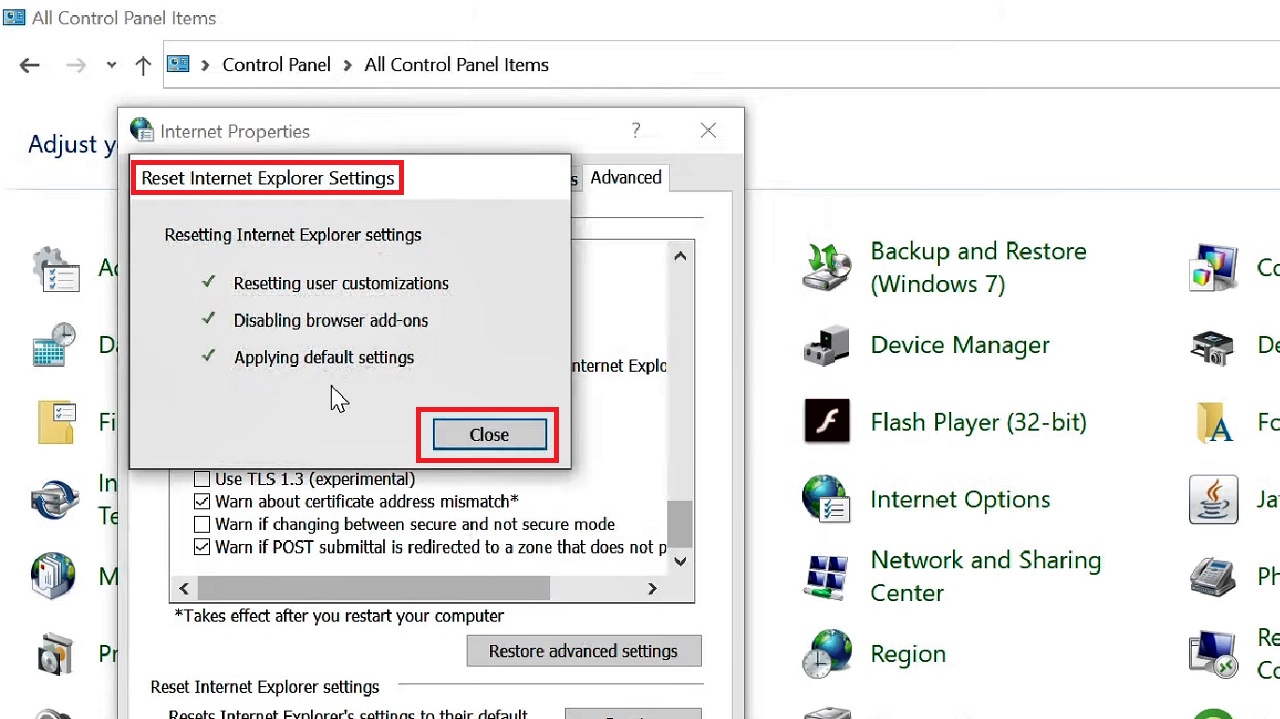
Check whether the issue is resolved or not.
Method 10: Release Faulty Wi-Fi DNS
You will also have to release faulty Wi-Fi DNS which may be causing the issue.
STEPS TO FOLLOW:
Open the Command Prompt as an administrator as in Method 4.
Now, type in these following commands one by one in the said sequence and press the Enter key on your keyboard every time after each of these commands is executed completely:
- netsh winsock reset
- netsh winsock reset catalog
- netsh int ip reset resetlog.txt
- ipconfig /release
- ipconfig /renew
- ipconfig /flushdns
Then finally, when all the commands are executed successfully, just type exit to exit the Command Prompt
Now, restart your computer and check whether or not the Wi-Fi is working properly.
Conclusion
So, there is nothing to worry much about the Wi-Fi getting disconnected on Windows 10 issue, now that you know multiple ways to rectify the error and set things back to normal.
Most of the time the simple fixes will be enough to restore normalcy.